

Page 1
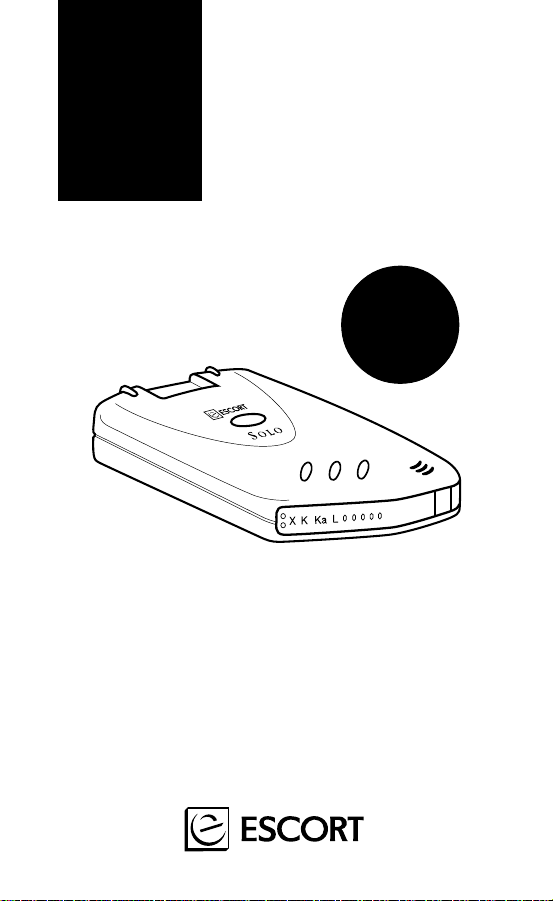
S O L O
CORDLESS RADAR/LASER DETECTOR
Check Quick
Reference Guide
inside cover !
®
mute
dim
city
pwr/vol
O W N E R ' S M A N U A L
M O D E L R D - 5 1 1 0
®
Page 2

CONGRATULATIONS!
SOLO is the result of ESCORT’s commitment to design and manufacture
the best radar and laser detection products available. Created for drivers
who desire the ultimate in mobility, SOLO’s cordless design eliminates
the need for a power cord, recharger, or add-on battery pack. Simply
mount SOLO on your windshield and turn it on.
SOLO uses only a fraction of the power of a conventional detector and
two standard AA alkaline batteries will economically provide months of
high-performance detection. Most drivers will need to replace SOLO’s
batteries only a few times a year at a cost of only two or three cents per
hour of use.
SOLO comes with all of ESCORT’s most sophisticated technologies
including our matchless DPRTM anti-falsing circuitry; true Digital Signal
Processing; SafetyPilotTM road safety system; SmartShieldTM VG2
protection and the incomparable performance you’ve come to expect
from ESCORT. Among SOLO’s features are long-range warning on all
radar and laser bands, Mute, AutoMute, patented SmartMuteTM; highvisibility display, differentiated audible and visual alerts, 4-level Dim, 4level City, Memory retention, battery status indicator, battery-preserving
AutoOff, optional power cord back-up, patented Easy-Mount system—all
in the most compact and portable format available.
SOLO was designed and manufactured in the USA. We are proud
to offer this product and pleased to have you as our customer.
Please drive safely.
AUTOMUTE PROMOTES DRIVING PLEASURE
SOLO is shipped with AutoMute engaged to provide you with the
advantages of audible alerts but with minimal distraction. With AutoMute,
the audio for the first four audible tones or four seconds (whichever is
longer) in an alert situation will be emitted at the volume level you have
set. All subsequent audible tones from the same alert situation will
automatically be emitted at a lower volume level. After the signal has
passed, your SOLO will automatically reset to the volume level you have
set. (If you prefer full audio for the duration of all alert situations,
AutoMute can be easily disengaged: see page 5 for more details.)
Page 3

T A B L E O F C O N T E N T S
Installing SOLO's Batteries..........................................................1
Battery Life Indication..............................................................1,7
Low Battery Warning...............................................................2,7
AutoOff.......................................................................................2
Mounting SOLO..........................................................................3
Controls and Indicators
Power On.............................................................................4
Volume.......................................................................................4
Mute...........................................................................................5
AutoMute....................................................................................5
Highway/City Modes.............................................................5
Dim Modes...........................................................................5
Audible Alerts.......................................................................6
Power On Indicator...............................................................6
City Indicator........................................................................6
Band Indicators.....................................................................6
Signal Meter..........................................................................6
Safety Signals........................................................................6
Mounting Adjustment Button................................................7
Radar Antenna......................................................................7
Laser Lenses..........................................................................7
Power Jack............................................................................7
Programmable Options...............................................................8
Tutorial Mode...........................................................................10
Specifications...............................................................................1 1
Interpreting Alerts......................................................................12
How Radar Works.....................................................................14
How Laser Works......................................................................14
How Safety Signals Work...........................................................15
Troubleshooting..........................................................................16
Service........................................................................................18
Warranty....................................................................................19
Optional Accessories................................................................20
Page 4

I M P O R T A N T B A T T E R Y I N F O R M A T I O N
SOLO is designed to operate on two standard AA alkaline batteries. AA
lithium batteries and AA alkaline rechargeable batteries may also be used,
however the resulting battery life will vary. We do not recommend using
NiCad rechargeable batteries.
Installing SOLO’s Batteries
1 Make sure SOLO is turned off.
2 Turn SOLO upside down. Depress the
battery door and sliding in the direction
of the arrow, remove door from the
battery compartment.
3 Remove any old batteries (both batteries MUST
be replaced at the same time).
4 Observing the polarity indication inside the battery
compartment, insert two fresh AA alkaline batteries.
5 Replace battery door.
6 Turn SOLO on to verify correct battery installation.
NOTE: Please dispose of used batteries properly in accordance with
federal, state and local requirements.
Battery Life
SOLO’s efficient design provides the typical driver with about 50 hours of
battery life from two AA alkaline batteries. Battery life is affected by many
variables, including the brand and age of the batteries, the ambient
temperature, how many and what type of alerts SOLO receives (weak
signals use less battery power than full alerts). In addition, the way you
use SOLO’s alert system will affect the battery life (low audio volume uses
less power than full volume, and Dim mode uses less power than normal
mode). The approximate battery life figures we quote are based on
laboratory testing, using fresh batteries. Your specific conditions and
usage may result in longer or shorter battery life.
Battery Life Indication
As discussed in the Signal Meter section on page 7, remaining battery life
is displayed on SOLO's Signal Meter both at power up and power down.
NOTE: Extreme temperature conditions can cause SOLO's Battery Life
Indication to be inaccurate until SOLO's temperature returns to normal.
REGARDLESS OF YOUR ACTUAL BATTERY LIFE, SOLO’S PERFORMANCE WILL NOT DEGRADE AS BATTERY VOLTAGE BEGINS TO
DROP. SOLO IS DESIGNED TO SHUT DOWN BEFORE PERFORMANCE
IS IMPAIRED BY WEAK BATTERIES.
For best battery performance:
• Purchase fresh, name brand batteries.
• Store batteries in their original packaging before use to prevent the
I
MPORTANT BATTERY INFORMATION
1
Page 5

I M P O R T A N T B A T T E R Y I N F O R M A T I O N
battery contacts from shorting against metal objects.
• Never mix old and new batteries in SOLO or any device.
• Since batteries last longest if used at room temperature, use SOLO at
room temperature whenever possible.
• Turn off SOLO when not in use.
AutoOff
SOLO has a special automatic shut-off feature to conserve battery life in
case you forget to turn SOLO off. (Please refer to page 4 for an explanation of the AutoOff circuit.)
NOTE: The presence of even a weak signal can cause SOLO to remain
on. Turn SOLO off whenever you leave your car as the AutoOff circuit
turns SOLO off after 45 minutes ONLY if no signals are detected. A
passing police car or a nearby motion sensor could be enough to keep
SOLO on, thereby draining your batteries.
NOTE: We recommend using only standard AA alkaline batteries for the
most consistent battery life. While AA lithium batteries and AA alkaline
rechargeable batteries may also be used, the resulting battery life will
vary. We do NOT recommend NiCad rechargeable batteries.
WARNING
Do not leave SOLO in direct sunlight in a parked vehicle, as it may
exceed the battery’s temperature limit and damage the batteries and the
detector. This damage is not covered by SOLO’s warranty.
Low Battery Warning
When SOLO's batteries have only approximately six hours of battery life
remaining, SOLO will sound two “bleeps” and flash the entire Signal
Strength Meter every five minutes. SOLO’s batteries should be replaced at
this time since performance begins to decline once the batteries are
within the warning range. The amount of battery life remaining depends,
to a large extent, on how many alerts you receive and how your SOLO is
being used. If you are unable to replace SOLO’s batteries at the start of
the Low Battery warning, consider lowering your SOLO’s audio volume
and utilizing the AutoMute, Mute and Dim features to prolong battery life.
Optional Power Cord
SOLO’s power jack allows you to power SOLO using an optional Power
Cord. SOLO is designed for 3V operation and its unique circuitry will not
accommodate a standard 12V power cord. Using any cord other than the
Power Cord/Converter Set designed specifically for SOLO may cause
damage not covered by warranty. To order a SOLO Power Cord/Converter,
call 1-800-433-3487 toll-free.
WARNING
SOLO should never be directly wired to any power source, particularly a
12V automotive source. Use ONLY with SOLO's 3V power converter.
2
I
MPORTANT BATTERY INFORMATION
Page 6
M O U N T I N G S O L O
WARNING
ESCORT CANNOT ANTICIPATE THE MANY WAYS SOLO CAN BE
MOUNTED. IT IS IMPORTANT THAT YOU MOUNT SOLO WHERE IT
WILL NOT IMPAIR YOUR VIEW NOR PRESENT A HAZARD IN CASE OF
AN ACCIDENT.
For optimum detection performance, we recommend the following:
Using the Windshield Mount, mount SOLO relatively level and high
•
enough on your front windshield to provide a clear view of the road
from the front and rear.
Mount SOLO away from windshield wipers, other solid objects and
•
heavily tinted areas that might obstruct the radar antenna or laser lens.
Keep the laser lens at the rear of SOLO clean. To clean, apply a small
•
amount of eyeglass cleaning solution with a soft cloth.
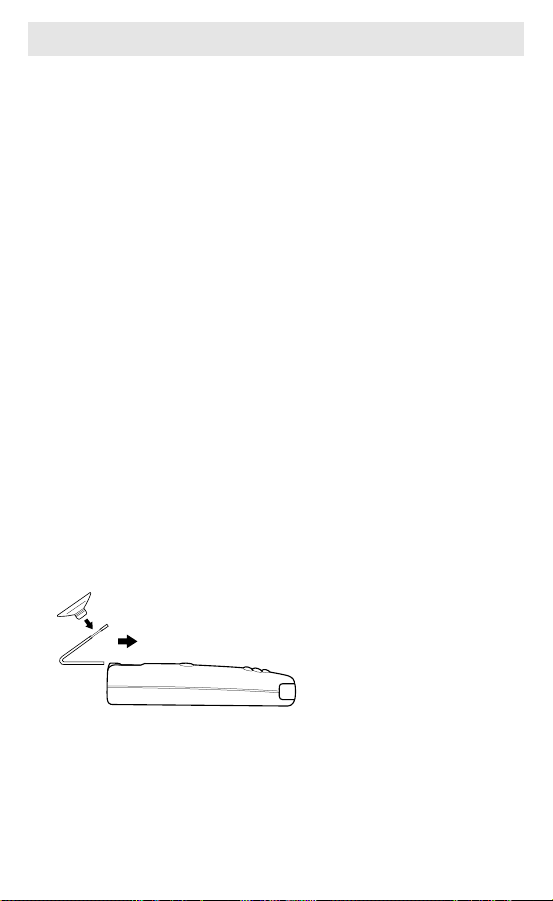
Mounting SOLO to Your Windshield:
SOLO’s patented EasyMount windshield bracket is designed for
unobtrusive and hassle-free mounting.
1 Insert each suction cup into large end of bracket hole and rotate cup
outward, locking into place.
2 Depress the adjustment button on the top of SOLO and slide
EasyMount bracket into the slot until mount is locked into the position
which best fits the angle of your windshield. (For extremely horizontal
or extremely sloped windshields, the EasyMount bracket can be bent.)
3 Mount SOLO on your windshield. Use the adjustment button to slide
SOLO forward or backward to a horizontal position. WHEN
ADJUSTED PROPERLY AND TO MINIMIZE BOUNCING, THE BACK
TOP EDGE OF SOLO SHOULD REST SOLIDLY AGAINST YOUR
WINDSHIELD.
To ensure that the suction
cups adhere to the windshield
firmly, be sure to keep both
your windshield and the
suction cups clean.
CAUTION!
Some windshields have an “anti-lacerative” coating. Use of suction cups
could permanently mar the coating. Consult your dealership or the
vehicle’s owner’s manual to determine if your windshield has this coating.
M
OUNTING
SOLO
3
Page 7
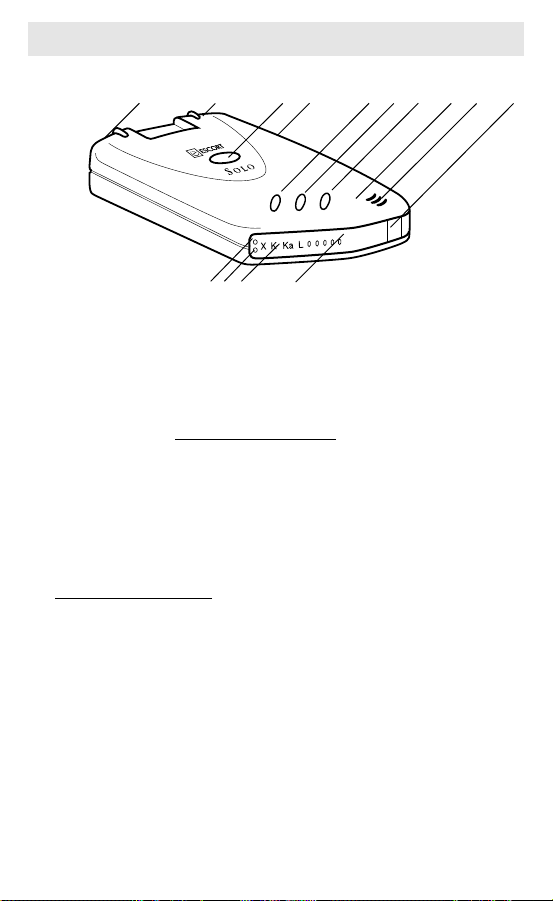
C O N T R O L S A N D I N D I C A T O R S
10 2 3 412 13 5 111 11
®
pwr/vol
dim
city
mute
876
9
MEMORY RETENTION FOR PREFERRED SETTINGS
Keep the factory preset settings for Volume, Dim, AutoMute, City and
other programmable features or select your own with SOLO's on-board
computer. Your selected settings stay in SOLO's Memory even when it's
turned off or the batteries are changed. For more information on SOLO's
programmable options, the first in the industry, see page 8.
1 POWER AND VOLUME
Volume Button. The Power-On indicator blinks to show SOLO is on
and there will be a five-second test alert followed by a two-second
display of remaining battery life on the Signal Meter. Battery life is also
displayed each time you turn SOLO off. (Battery status indication is
more thoroughly discussed in the Signal Meter section on page 7.) The
five-second test alert can be bypassed and blinking Power-On indicator
can be made continuous
more information).
To adjust audio volume:
SOLO will cycle through the 10 volume levels and show the relative
audio level on the Signal Meter. To reverse the direction of the audio
level, briefly release and press again. Once the volume level has been
changed, a two second hold time will be engaged to allow you to
further modify volume without turning SOLO off. Once selected, the
volume setting will be retained in SOLO’s memory.
AUTOOFF SOLO has an automatic shut-off feature to conserve battery
life in case you forget to turn SOLO off. If SOLO does not detect any
signals for 45 minutes, it assumes that it is not in use and you have
forgotten to turn it off. SOLO will sound a declining “power-down”
alert and then turn itself off in five seconds. To keep SOLO from
turning off (such as when you are driving through a very remote area
where alerts are infrequent), press any of SOLO’s buttons. SOLO will
To turn SOLO on and off
: briefly press the Power/
(see Programmable Options on page 8 for
Press and hold the Power/Volume Button.
4
C
ONTROLS AND INDICATORS
Page 8

C O N T R O L S A N D I N D I C A T O R S
sound a “double-bing” confirming that it will remain on.
be “permanently” deselected. See Programmable Options on page 8
for more information).
NOTE: Since the presence of even an extremely weak signal will keep
SOLO on, turn SOLO off whenever you leave your car to prevent the
batteries from being drained.
2 MUTE
To mute the audio for a single specific signal:
Mute Button. After the signal has passed, SOLO will automatically reset
for the next alert. If a new signal is encountered during the signal you
have just muted, SOLO’s patented SmartMuteTM reverts to full audio to
ensure that you do not miss this new signal.
AUTOMUTE SOLO is shipped with AutoMute engaged. In AutoMute
mode, the audio for the first four audible tones or four seconds
(whichever is longer) in an alert situation will be emitted at your
selected volume level and all subsequent audible tones during the
same alert will be emitted at a lower volume level. After the signal has
passed, SOLO automatically resets to the volume level you have set.
(AutoMute can be deselected. See Programmable Options on page 8
for more information).
(AutoOff can
Briefly press the
3 HIGHWAY/CITY MODE Each time you turn SOLO on, the last Highway/
City mode selected is the one which is automatically engaged. We
recommend driving in Highway mode most of the time for maximum
sensitivity. When driving in urban areas where annoying X-band
intrusion alarms and door openers are common, City Mode can be
engaged to lower X-band sensitivity and reduce X-band alerts. Full
sensitivity is maintained on all other bands.
Briefly press the City Button. The City Indicator will blink and SOLO’s
X-band sensitivity level will be lowered to a level to suit most urban
driving environments. Three other City Mode levels are available for
more problematic urban environments
page 8 for more information)
programmed to not blink and light solid
on page 8 for more information). To return to Highway Sensitivity:
Briefly press the City Button again.
4 DIM MODES
With each press, SOLO will cycle through the four display settings as
follows: 1st press = Full Dark, 2nd press = Low, 3rd press = Medium,
4th press = High. SOLO is preset at our factory on High (Full Bright).
Your most recent selection is retained in SOLO’s memory until you
select a different brightness level as the default.
Options on page 8 for more information on how to store a display
default.)
To adjust SOLO’s display:
. Also, the City Indicator can be
To select City Mode:
(see Programmable Options on
(see Programmable Options
Briefly press the Dim Button.
(See Programmable
C
ONTROLS AND INDICATORS
5
Page 9

C O N T R O L S A N D I N D I C A T O R S
5 AUDIBLE ALERTS
For Radar and Laser signals:
SOLO uses a geigercounter-like sound to indicate the signal strength and type of radar or
laser signal being encountered. When you encounter radar or laser, a
distinct Audible Alert will sound and occur faster as the signal gets
stronger. When the signal is very strong, the Audible Alerts will blend
into a solid tone. This allows you to judge the distance from the signal
source without taking your eyes from the road. Each band has a
distinct tone for easy identification. X-band = beep tone, K-band =
raspy brap tone, Ka-band = double-bleep tone, Laser = chirp tone.
Please see page 12 for details on the typical behavior of various radar
and laser signals.
For Safety signals:
Each type of safety signal has its own distinctive
brap tone. Emergency Vehicle = rapid braps, Railroad Crossing =
repetitive brap, Road Hazard = repetitive double brap. THE PRESENCE
OF ONE OF THESE SIGNALS INDICATES A DANGEROUS DRIVING
CONDITION. Be particularly alert and aware of what’s going on
around you.
(For more information on SOLO’s SafetyPilotTM and the
use of Safety transmitters, please see page 15.)
6 POWER-ON INDICATOR When your SOLO is turned on, the Power-On
Indicator will illuminate.
7 CITY INDICATOR The City Indicator will light whenever City mode is
selected.
8 BAND INDICATORS When a radar or laser signal is detected, the
appropriate Band Indicator will light to show which type of signal is
being detected; “X” for X-band, “K” for K-band, “Ka” for Ka-band or
“L” for laser.
9 SIGNAL METER The Signal Meter consists of 5 red LEDs and provides the
following information.
Signal Strength:
encounter, the stronger and closer the signal.
Type of Safety Signal:
E
MERGENCY VEHICLE
▲
Signal Meter scans quickly from right to left.
OAD HAZARD
R
The more meter lights lit during a radar or laser
Safety Signals are displayed as shown below.
All Signal Meter lights double-flash simultaneously.
AILROAD
R
▲
▲
First two Signal Meter Lights alternate flashing with last two Signal Meter Lights.
6
C
ONTROLS AND INDICATORS
Page 10

C O N T R O L S A N D I N D I C A T O R S
Battery Life Indication:
Meter for 2 seconds both at power-up (after the five-second test alert)
and at power-down. NOTE: Extreme temperature conditions can cause
SOLO's Battery Life Indication to be inaccurate until SOLO's
temperature returns to normal.
5 LEDs lit = 80% of battery life remains
4 LEDs lit = 60% to 80% of battery remains
3 LEDs lit = 40% to 60% of battery life remains
2 LEDs lit = 20% to 40% of battery life remains
1 LED lit = less than 20% of battery life remains
Low Battery Warning:
remains, SOLO will sound two short “bleeps” and flash the entire
Signal Meter every five minutes to indicate the batteries need
replacing. The amount of battery life remaining depends, to a large
extent, on how many alerts you receive and how SOLO is being used.
If you are unable to replace SOLO’s batteries at the start of the Low
Battery warning and do not have a SOLO Power Cord, lower SOLO’s
audio volume and utilize AutoMute or Mute and Dim to prolong
battery life.
Remaining battery life is displayed on the Signal
When approximately six hours of battery life
10 RADAR ANTENNA The antenna detects incoming radar signals.
11 LASER LENSES Dual lenses provide 360 degree protection.
12 MOUNTING ADJUSTMENT BUTTON This button allows you to adjust the
mounting bracket to suit your driving environment. Please refer to
page 3 for a complete explanation on mounting.
13 POWER JACK Allows you the option of using a power cord in place of
the battery power source in order to provide back-up or alternative
power for your SOLO through your vehicle’s cigarette lighter.
(SOLO’s unique circuitry will not accommodate a standard 12V
power cord. Using any cord other than the Power Cord designed
specifically for SOLO may cause damage not covered by warranty. To
order a SOLO Power Cord, call 1-800-433-3487 toll-free.)
C
ONTROLS AND INDICATORS
7
Page 11

P R O G R A M M A B L E O P T I O N S
SOLO’s features are preset for optimum performance and battery life but
you may change some settings to better suit your specific needs. Once a
setting is stored into memory, it remains until you decide to reprogram it.
OPTION WHEN TO USE HOW TO SELECT
Disengage
AutoMute
Bypass five-second
test alert
Non-blinking
Power-On
Indicator and
City Indicator
Disengage
AutoOff
Select a default
brightness setting
for SOLO’s display
8
P
ROGRAMMABLE OPTIONS
If you prefer full audio
volume for the duration
of alerts. NOTE: Any
single alert may still be
muted by briefly pressing
the Mute button during
that alert.
If you find the power-on
test alert bothersome. If
you wish to preserve a bit
more battery life.
If you find the blinking
Power-On and City Indicators too bothersome.
WARNING: Selecting this
option will reduce your
battery life.
If you drive in an remote
area where alerts are very
infrequent, this option
keeps SOLO from trying
to turn itself off due to
lack of signals.
Assures SOLO returns to
your favorite brightness
setting each time you turn
it on. (If no brightness level
is selected, SOLO will use
the last one selected.)
Press and HOLD the Mute
button. A “bing” tone will
confirm your selection. To
re-engage AutoMute, press
and hold the Mute button
again. A “double-bing”
tone will confirm your
return to AutoMute.
Press and HOLD the Mute
button at the same time you
turn SOLO on to replace the
five-second sequence with
a one-second alert. Repeat
operation to re-engage the
full test alert.
Press and HOLD the Dim
button
at the same time you
turn SOLO on
On Indicator will light continuously while SOLO is
on. The City Indicator will
light continuously while
SOLO is in City mode.
Press and HOLD the Mute
and Dim buttons at the
same time when SOLO is
on. A “bing” tone confirms
your selection. Repeat to
re-engage AutoOff. A
“double-bing” tone will
confirm your selection.
Press and HOLD the Dim
Button at the selected
brightness level. A “doublebing” tone will confirm
your selected default.
. The Power-
Page 12

P R O G R A M M A B L E O P T I O N S
OPTION WHEN TO USE HOW TO SELECT
Select an alternative
X-band sensitivity
level for City Mode
Signal Meter LEDS LIGHT UP IN THE PATTERNS INDICATED AS YOU ADJUST CITY LEVELS
▲
If you drive in an urban
area where non-police Xband alerts from motion
sensors and intrusion
alarms are prevalent, this
option allows you to select
an X-band sensitivity level
below the standard City
Mode setting.
Moderately reduced X-band sensitivity. Best suited to
Level 4
Press and HOLD the City
button. SOLO will cycle
through the 4 available
City sensitivity levels and
display relative X-band
sensitivity on the Signal
Meter (as shown below).
Release button at your
preferred setting.
suburban environments where intruding signals are
occasional.
Significantly reduced X-band sensitivity. SOLO's default
Level 3
setting and best suited to typical driving environments.
Drastically reduced X-band sensitivity. For use in
Level 2
downtown areas which are aggressively populated
with intruding signals.
Zero X-band sensitivity. To be used ONLY in those
Level 1
rare locations where X-band radar is not used.
Select alternate
audio tones
Returning To SOLO's Factory Preset Settings
You may re-engage SOLO's factory preset settings at any time. To do so,
press and HOLD the Mute, City and Dim buttons at the same time as you
turn SOLO on.
Allows you to select alternative audio tones
(owners of earlier ESCORT detectors will recognize these tones as the
more "classic" style used
in the past).
Press and HOLD the Dim
and City buttons at the same
time you turn SOLO on.
Repeat operation to reselect the factory default
audio tones.
P
ROGRAMMABLE OPTIONS
9
Page 13

T U T O R I A L M O D E
SOLO is equipped with a Tutorial mode to demonstrate all of the alerts and
settings below in order to better familiarize you with them. To access the
tutorial mode, simultaneously press and hold the Mute and City buttons as
you turn SOLO on. SOLO will then demonstrate each of the following:
FEATURE
Laser Alert
Ka-band Alert
K-band Alert K indicator lights as signal meter ramps
X-band Alert X indicator lights as signal meter ramps
AutoMute
Emergency Vehicle Alert Signal Meter scans swiftly right to left.
Railroad Alert Two end Signal Meter positions alternate
Road Hazard Alert Entire Signal Meter double-flashes. Road
Cycling of four City settings Shows how four available City settings
Cycling of four Dim settings Shows how four available Dim/Dark set-
Cycling of ten Volume settings Shows how ten available Volume set-
Low Battery Warning
AutoOff Warning
DEMONSTRATION
Laser indicator lights as signal meter ramps
down. Laser audio sounds.
Ka indicator lights as signal meter ramps
down. Ka audio sounds.
down. K audio sounds.
down. X audio sounds.
As SOLO simulates an X-band encounter,
AutoMute is demonstrated when audio
automatically reduces after first several
tones.
Emergency Vehicle audio sounds.
flashing (like a railroad crossing sign).
Hazard audio sounds.
are indicated on the Signal Meter as city
level is selected.
tings are indicated on the Signal Meter
as the display brightness level is selected.
tings are indicated on the Signal Meter
as volume level is selected.
Signal Meter flashes as two short "bleep"
tones sound.
SOLO sounds a declining "power down"
alert and SOLO turns off.
10
T
UTORIAL MODE
Page 14

S P E C I F I C A T I O N S
RECEIVER TYPE
RADAR: Double Conversion Superheterodyne Voltage
LASER: Quantum Limited Video Receiver
ANTENNA TYPE
RADAR & SAFETY: Self-Contained, Die-Cast Horn, Linear Polarization
LASER: Infrared Photodiode with Fresnel Lens and
DETECTOR TYPE
RADAR & SAFETY: Scanning Frequency Discriminator
LASER: Video Envelope
OPERATING FREQUENCIES & WAVELENGTHS
X-band: 10.525 GHz (center)
K-band and Safety: 24.150 GHz (center)
Ka-band: 34.7 GHz (center)
Laser: 900 NanoMeters (center)
BANDWIDTHS
Radar and Safety:
Laser: 33MHz
ALERT HOLD TIME 4 Seconds
DIMENSIONS 1.2 inches x 2.85 inches x 5.06 inches
OPERATING TEMPERATURE RANGE
With Alkaline Batteries:
With Power Cord Only:
STORAGE TEMPERATURE RANGE
With Alkaline Batteries:
With Power Cord Only:
POWER REQUIREMENT
Two Standard AA Batteries or Power Cord which converts 12V to 3V
SIGNAL PROCESSING
Digital Signal Processing (DSP)
Controlled Oscillator (VCO)
(compatible with circular polarization)
Refractive/Prismatic Element
X-band: 50 MHz
K-band and Safety: 200 MHz
Ka-band: 2.60 GHz
-18C to 55C (0F to 131F)
-18C to 70C (0F to 158F)
-40C to 55C (-40F to 131F)
-40C to 85C (-40F to 185F)
Specifications are subject to change without notice.
S
PECIFICATIONS
11
Page 15

I N T E R P R E T I N G A L E R T S
Although SOLO has a comprehensive warning system and this handbook
is as complete as we can make it, only experience will teach you what to
expect from your SOLO and how to interpret what it “tells” you. The radar
alerts you receive are affected by the type of radar being used, the type of
transmission (continuous or instant-on) and the location of the radar
source. The following examples will give you an introduction to
understanding SOLO’s warning system for radar, laser and safety alerts.
ALERT EXPLANATION
SOLO begins to sound slowly, then
the rate of alerts increase until a solid
tone is achieved. The Signal Meter
ramps accordingly.
SOLO emits short alerts for a few
seconds and then falls silent only to
briefly alert and fall silent again.
SOLO suddenly sounds a continuous
tone for the appropriate band
received. All LEDs in the Signal Meter
are lit.
A brief laser alert. Laser is being used in the area. Because
SOLO receives weak signals. These
signals may be a little stronger as you
pass large, roadside objects. The
signals increase in frequency.
SOLO alerts slowly for awhile and
then abruptly jumps to a strong alert.
You are approaching a continuous
radar source aimed in your direction.
An instant-on radar source is being
used ahead of you and out of your
view.
An instant-on radar source or laser
source is being used nearby. This
kind of alert requires immediate
attention!
laser is inherently difficult to detect,
even a weak laser alert may indicate
a source very close by. Any laser alert
requires immediate attention!
A moving patrol car with continuous
radar is overtaking you from behind.
Because these signals are reflected
(reflections are increased by large
objects), they may or may not
eventually melt into a solid point even
when the patrol car is directly behind
you.
You are approaching a radar unit
concealed by a hill or an obstructed
curve.
12
I
NTERPRETING ALERTS
Page 16

I N T E R P R E T I N G A L E R T S
ALERT EXPLANATION
SOLO alerts intermittently. Rate and
strength of alerts may be consistent or
vary wildly.
SOLO alerts intermittently. Rate and
strength of signal increases with each
alert.
SOLO gives an X-band alert
intermittently.
SOLO braps rapidly and the Signal
Meter scans from right to left.
SOLO sounds a repetitive “doublebrap” and the entire Signal Meter
flashes.
SOLO sounds a repetitive “brap” and
the two LEDs on each end of the
Signal Meter alternate flashing.
A patrol car is travelling in front of you
with a radar source aimed forward.
Because signals are sometimes
reflected off of large objects and
sometimes not, the alerts may seem
inconsistent.
A patrol car is approaching from the
other direction, “sampling” traffic with
instant-on radar. Such alerts should
be taken seriously.
You are driving through an area
populated with radar motion sensors
(door openers, burglar alarms, etc.)
Since these transmitters are usually
contained inside buildings or aimed
toward OR away from you, they are
typically not as strong or lasting as a
real radar encounter.
CAUTION: Since the characteristics
of these alerts may be similar to some
of the preceding examples, overconfidence in an unfamiliar area can be
dangerous. Likewise, if an alert in a
commonly travelled area is suddenly
stronger or on a different band than
usual, speed radar may be set up
nearby.
A fast-travelling emergency vehicle is
in the vicinity.
You are approaching a hazardous
road condition such as an accident
site or construction.
You are approaching a dangerous
railroad crossing.
I
NTERPRETING ALERTS
13
Page 17

H O W R A D A R & L A S E R W O R K
HOW RADAR WORKS
Traffic radar, which consists of microwaves, travels in straight lines and is
easily reflected by objects such as cars, trucks, even guardrails and
overpasses. Radar works by directing its microwave beam down the road.
As your vehicle travels into range, the microwave beam bounces off your
car, and the radar antenna looks for the reflections. Using the Doppler
Principle, the radar equipment then calculates your speed by comparing
the frequency of the reflection of your car to the original frequency of the
beam sent out.
Traffic radar has limitations, the most significant of these being that it
typically can monitor only one target at a time. If there is more than one
vehicle within range, it is up to the radar operator to decide which target
is producing the strongest reflection. Since the strength of the reflection is
affected by both the size of the vehicle and its proximity to the antenna, it
is difficult for the radar operator to determine if the signal is from a sports
car nearby or a semi-truck several hundred feet behind.
Radar range also depends on the power of the radar equipment itself. The
strength of the radar unit’s beam diminishes with distance. The farther the
radar has to travel, the less energy it has for speed detection.
Because intrusion alarms and motion sensors often operate on the same
frequency as X-Band radar, your SOLO will occasionally receive nonpolice radar signals. Since these X-Band transmitters are usually contained
inside of buildings or aimed toward the ground, they will generally
produce much weaker readings than will a true radar encounter. As you
become familiar with the sources of these pseudo alarms in your daily
driving, they will serve as confirmation that your SOLO’s radar detection
abilities are fully operational.
HOW LASER (LIDAR) WORKS
Laser speed detection is actually LIDAR (Light Detection And Ranging).
LIDAR guns project a beam of invisible infrared light. The signal is a series
of very short infrared light energy pulses which move in a straight line,
reflecting off your car and returning to the gun. LIDAR uses these light
pulses to measure the distance to a vehicle. Speed is then calculated by
measuring how quickly these pulses are reflected given the known speed
of light.
LIDAR (or laser) is a newer technology and is not as widespread as
conventional radar, therefore, you may not encounter laser on a daily
basis. And unlike radar detection, laser detection is not prone to “false”
14
HOW R
ADAR
& L
ASER WORKS
Page 18

H O W S A F E T Y S I G N A L S W O R K
alarms. Because LIDAR transmits a much narrower beam than does radar,
it is much more accurate in its ability to distinguish between targets and is
also more difficult to detect. AS A RESULT, EVEN THE BRIEFEST AND
WEAKEST LASER ALERT SHOULD BE TAKEN SERIOUSLY.
There are limitations to LIDAR equipment. LIDAR is much more sensitive
to weather conditions than RADAR, and a LIDAR gun’s range will be
decreased by anything affecting visibility such as rain, fog, or smoke. A
LIDAR gun cannot operate through glass and it must be stationary in order
to get an accurate reading. Because LIDAR must have a clear line of sight
and is subject to cosine error (an inaccuracy which increases as the angle
between the gun and the vehicle increases) police typically use LIDAR
equipment parallel to the road or from an overpass. LIDAR can be used
day or night.
HOW SAFETY SIGNALS WORKS
FCC-approved Safety signal transmitters emit microwave radar signals to
indicate the presence of a safety-related concern. Depending on the
frequency location of these signals as set on the transmitter, the outgoing
signal can indicate whether the transmitter is located in a speeding
emergency vehicle, at a road hazard location or at a railroad crossing.
These dual-frequency microwave signals are located in the K-bandwidth
and, as a result, any radar detector which detects K-Band radar will detect
these Safety signals as standard K-Band radar alerts. However, unlike
standard radar detectors, your SOLO is designed to distinguish between a
standard K-Band alert and a Safety signal alert. It will also demonstrate
which type of Safety signal is being received: Emergency Vehicle, Road
Hazard or Railroad.
Since Safety technology is relatively new and the number of transmitters
in operation is not yet widespread, you may not receive Safety signals on
a daily basis and should not be surprised to encounter some emergency
vehicles, road hazards and railroad crossings that are unequipped with
these transmitters and, therefore, fail to provide a signal. As Safety
transmitters become more prevalent (the number of operating transmitters
is growing every day), these Safety signals will become more common.
IF YOU EVER HAVE QUESTIONS ABOUT THE PERFORMANCE OR OPERATION OF YOUR SOLO, PLEASE
TOLL-FREE 1-800-543-1608.
CALL
HOW S
AFETY SIGNALS WORK
15
Page 19

T R O U B L E S H O O T I N G
SOLO will not turn on when Power
Button is pressed.
SOLO beeps briefly at the same
location every day, but no radar
source is in sight.
SOLO does not seem sensitive to
radar or laser.
SOLO did not alert when a police
car was in view.
SOLO did not provide a Safety
signal at a hazardous road
condition, railroad crossing or
while within range of an emergency
vehicle.
SOLO alerts for Ka radar when no
radar source is in sight.
SOLUTIONPROBLEM
Check to make sure batteries are
•
not missing.
Batteries may need replacing.
•
Batteries may be installed
•
improperly.
SOLO is functioning properly.
•
An X-band motion sensor or
intrusion alarm is located within
range of your route. With time,
you will learn predictable
patterns of these signals.
Make sure that SOLO’s radar
•
antenna is not blocked by
windshield wipers or solid
objects or that the laser lens is
not behind tinted areas.
Determine if your vehicle has an
•
InstaclearTM, ElectriClear® or
solar energy reflective
windshield which may deflect
radar or laser signals.
SOLO may be in City Mode.
•
VASCAR, a stopwatch method of
•
speed detection, may be in use.
Officer may not have radar or
•
laser unit turned on.
Safety transmitters may not be
•
commonly used in your area.
Falsing on this band is virtually
•
non-existant. Take all Ka alerts
seriously. There may be an instanton radar source out of sight. Only
a small number of products operate
in the Ka band which may cause
an occasional false alert.
16
T
ROUBLESHOOTING
Page 20

Signal Meter registers but no
audible alert sounds.
SOLO’s display is not working.
SOLO’s audible alerts are less loud
after the first few alerts.
All Signal Meter lights flash
occasionally and SOLO "bleeps"
twice each time.
SOLO bounces or sags on
windshield.
SOLO no longer provides the full
test alert when turned on.
T R O U B L E S H O O T I N G
SOLUTIONPROBLEM
SOLO is probably in City mode
•
where X-band alerts are
purposefully reduced.
Briefly press the Dim button to
•
deactivate Dark Mode.
SOLO is in AutoMute Mode. See
•
page 5 for details.
SOLO’s batteries are low.
•
Replace batteries as described on
page 1.
SOLO is not making contact with
•
the windshield to provide stability.
While holding down SOLO’s
EasyMount button, slide SOLO
further back toward the windshield so that the back top edge
makes firm contact. See page 3
for details.
Suction cups may be worn and
•
need replacing. To order
replacement suction cups, call
1-800-433-3487.
You have inadvertently bypassed
•
the test alert. To re-engage full
test alert, press and hold the Mute
button at the same time you are
turning SOLO on.
T
ROUBLESHOOTING
17
Page 21

S E R V I C E
IF YOUR SOLO EVER NEEDS SERVICE, PLEASE FOLLOW THESE SIMPLE STEPS:
Check the troubleshooting section of this manual. It may have a
1
solution to your problem.
2 Call us at 1-800-543-1608. We may be able to solve your problem
over the phone. If the problem requires that you send your SOLO to the
factory for repair, we will provide you with a SERVICE ORDER NUMBER,
which must be included on the outside of your shipping box.
ENCLOSE THE FOLLOWING INFORMATION WITH YOUR SOLO:
• Your Service Order Number
• Your name and return address
• Your daytime telephone number
• A description of the problem you are experiencing.
OUT OF WARRANTY REPAIRS
For out of warranty repairs, include prepayment in the amount you were
quoted by the Escort Customer Service Representative. If the detector has
been damaged, abused or modified, the repair cost will be calculated on a
parts and labor basis. If it exceeds the basic repair charge, you will be
contacted with a quotation. If the additional payment is not received
within 30 days (or if you notify us that you choose not to have your SOLO
repaired at the price quoted), your SOLO will be returned, without repair.
Payment can be made by check, money order or credit card.
MAIL YOUR SOLO TO:
ESCORT
Customer Service Department
Service Order Number ______________
5440 West Chester Road
West Chester, Ohio 45069
For your own protection, we recommend that you ship your SOLO
postpaid and insured. Insist on a proof of delivery and keep the receipt
until the return of your SOLO.
18
S
ERVICE
Page 22

W A R R A N T Y
ESCORT ONE YEAR LIMITED WARRANTY
ESCORT warrants your SOLO against all defects in materials and
workmanship for a period of one (1) year from the date of the original
purchase, subject to the following terms and conditions:
• The sole responsibility of ESCORT under this Warranty is limited to
either repair or, at the option of ESCORT, replacement of the SOLO
detector. There are no expressed or implied warranties, including those
of fitness for a particular purpose or merchantability, which extend
beyond the face hereof. Some states do not allow limitations on how
long an implied warranty lasts, so the above limitations may not apply
to you.
• ESCORT is not liable for any incidental or consequential damages
arising from the use, misuse, or mounting of the SOLO. Some states
do not allow the exclusion or limitation of incidental or consequential
damages, so the above limitation or exclusion may not apply to you.
• This Warranty gives you specific rights. You may have other legal rights
which vary from state to state. This Warranty does not apply if the
serial number on the housing of the SOLO has been removed, or if
your SOLO has been subjected to physical abuse, improper
installation, or modification.
TO OBTAIN WARRANTY SERVICE, PLEASE FOLLOW THE SERVICE PROCEDURE OUTLINED
ON PAGE 18.
W
ARRANTY
19
Page 23

A C C E S S O R I E S A N D O P T I O N S
To order additional or replacement accessories, call ESCORT toll-free at
1-800-433-3487. The following optional accessories are also available for
SOLO:
SOLO POWER CORD
Provides back-up or alternative power for your SOLO through your
vehicle’s cigarette lighter.
its unique circuitry will not accommodate a standard 12V power cord.
Using any cord other than the Power Cord/Converter Set designed
specifically for SOLO may cause damage not covered by warranty.)
VISOR CLIP
Allows you to mount SOLO on your vehicle’s sun visor.
NOTE: Due to obstruction by tinting and vehicle headliner, visor
mounting can substantially reduce laser detection range.
HOOK AND LOOP FASTENER
Allows you to mount SOLO to your vehicle’s dashboard.
NOTE: The adhesive backing used on the Hook and Loop Fastener can
permanently mar your vehicle’s dashboard.
CARRYING CASE
Soft case keeps SOLO protected when not in use.
NOTE: SOLO is designed for 3V operation and
EscortPlus Club benefits are subject to change without notice.
20
A
CCESSORIES AND OPTIONS
Page 24

SOLO is designed and manufactured in the USA.
ESCORT
5440 West Chester Road
West Chester, Ohio 45069
CUSTOMER SERVICE: (800) 543-1608
SALES: (800) 433-3487
Manufactured under one or more of the following U.S. Patents:
4,313,216 4,581,769 4,583,057 4,604,529 4,613,989 4,631,542
4,686,499 4,750,215 4,862,175 4,887,753 4,896,855 4,952,937
4,954,828 5,049,884 5,049,885.
Other Patents Pending.
Product, accessory and features, specifications and pricing are subject to change without
notice.
© 1999 ESCORT Inc.
®
Recyclable
60-000096-22
Page 25

QUICK REFERENCE GUIDE
To begin using your SOLO, just follow these three simple steps:
Insert two standard AA alkaline batteries into the battery compartment.
a
b
Mount your SOLO on the windshield using the windshield mount.
c
Press the Power-On button to turn SOLO on.
1 EasyMount Slot
Windshield mount is inserted here.
2 Power Jack
Use optional Power Cord for back-up power source. To purchase, call toll-free
1-800-433-3487.
3 EasyMount Button
Press and slide the windshield mount to adjust mount angle.
4 Battery Compartment
Uses 2 AA alkaline batteries.
5 Mute Button
Briefly press to mute the audio for a specific alert. Press and hold to disengage or
re-engage AutoMute.
6 City Button
Briefly press to engage to reduce alerts from X-band intrusion alarms and door
openers common in urban areas. Press and hold to adjust X-band sensitivity
through four possible city sensitivity options to your preferred City setting.
7 Dim Button
Briefly press to adjust display brightness.
8 Power/Volume
Briefly press to turn SOLO on. Press and hold to adjust SOLO’s audio volume.
Once on, briefly press to turn SOLO off.
9 Power-On Light
Blinks when SOLO is on.
10 City Indicator
Blinks when City mode is selected.
11 Band Indicators
Lights to indicate type of signal detected: X, K, Ka or L.
12 Signal Meter
LEDs indicate incoming signal strength or the type of safety signal. Displays
remaining battery life at both power-up and power-down.
(page 3)
(page 7)
(page 5)
(page 6)
(page 5)
(page 4)
(page 4)
(page 5)
(page 6)
(page 6)
1
(page 7)
(page 1)
®
2
(bottom)
4
3
567
8
mute
manual to fully
Please read the entire
pwr/vol
dim
city
understand SOLO’s
operation and features.
12
39 10
 Loading...