

Escalade Sports G05201 User Manual

We strive to ensure that our products are of the highest quality
and free of manufacturing defects or missing parts. However, if
you have any problems with your new product,
DO NOT RETURN IT TO THE STORE,
please contact us toll free @:
1-866-556-2759
FAX: 1-866-873-3531
foosball@escaladesports.com
Or write to:
Escalade Sports
Customer Service Department
P.O. Box 889
Evansville IN 47706
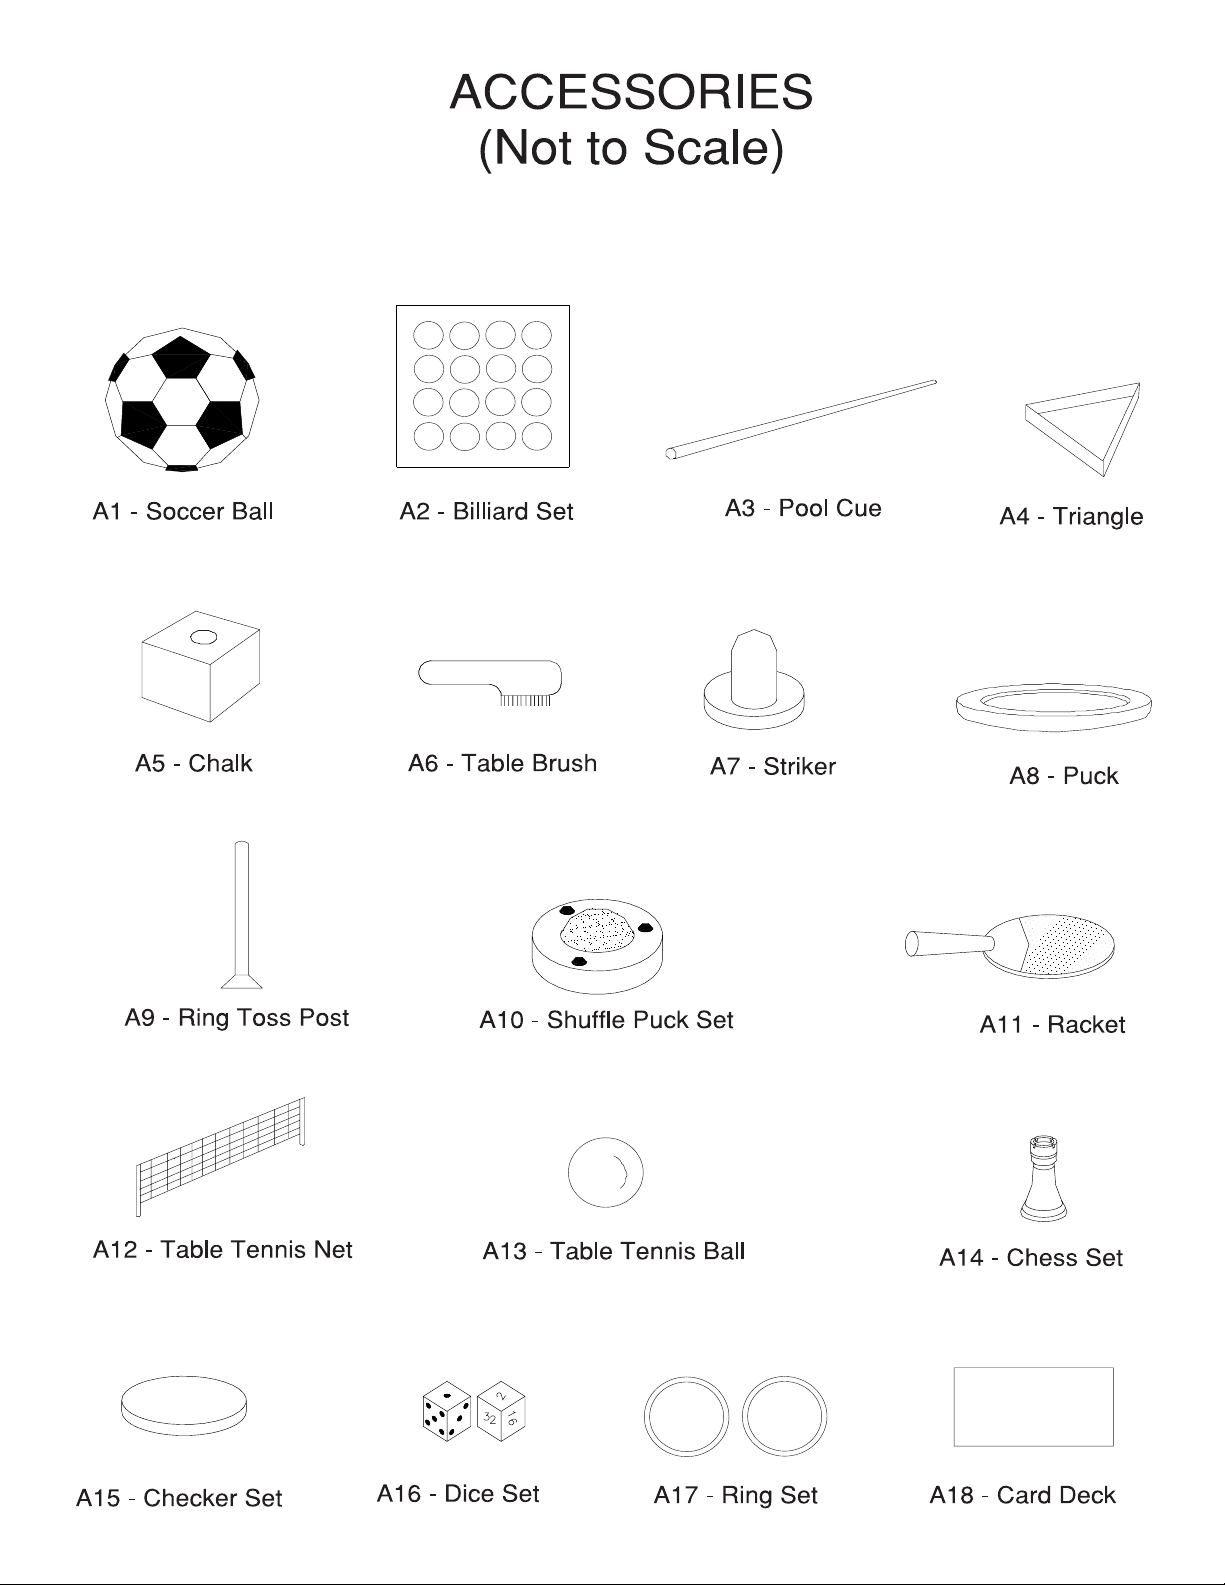
Please have your model number when inquiring about parts.
When contacting Escalade S port s please provide your model number, serial number (if
applicable), and part number if requesting a replacement part. These numbers are
located on the product, packaging, and in this owners manual.
Y our Model Number _______________________
© 2004 Escalade Sports
G05201
1
For Customer Service Call 1-866-556-2759

IMPORTANT! READ THIS MANUAL ALL THE
WAY THROUGH BEFORE BEGINNING TO
PUT YOUR GAME TABLE TOGETHER! THEN
READ EACH STEP BEFORE STARTING
THAT STEP.
TWO ADULTS ARE REQUIRED TO ASSEMBLE
THIS GAME TABLE
Tools Required:
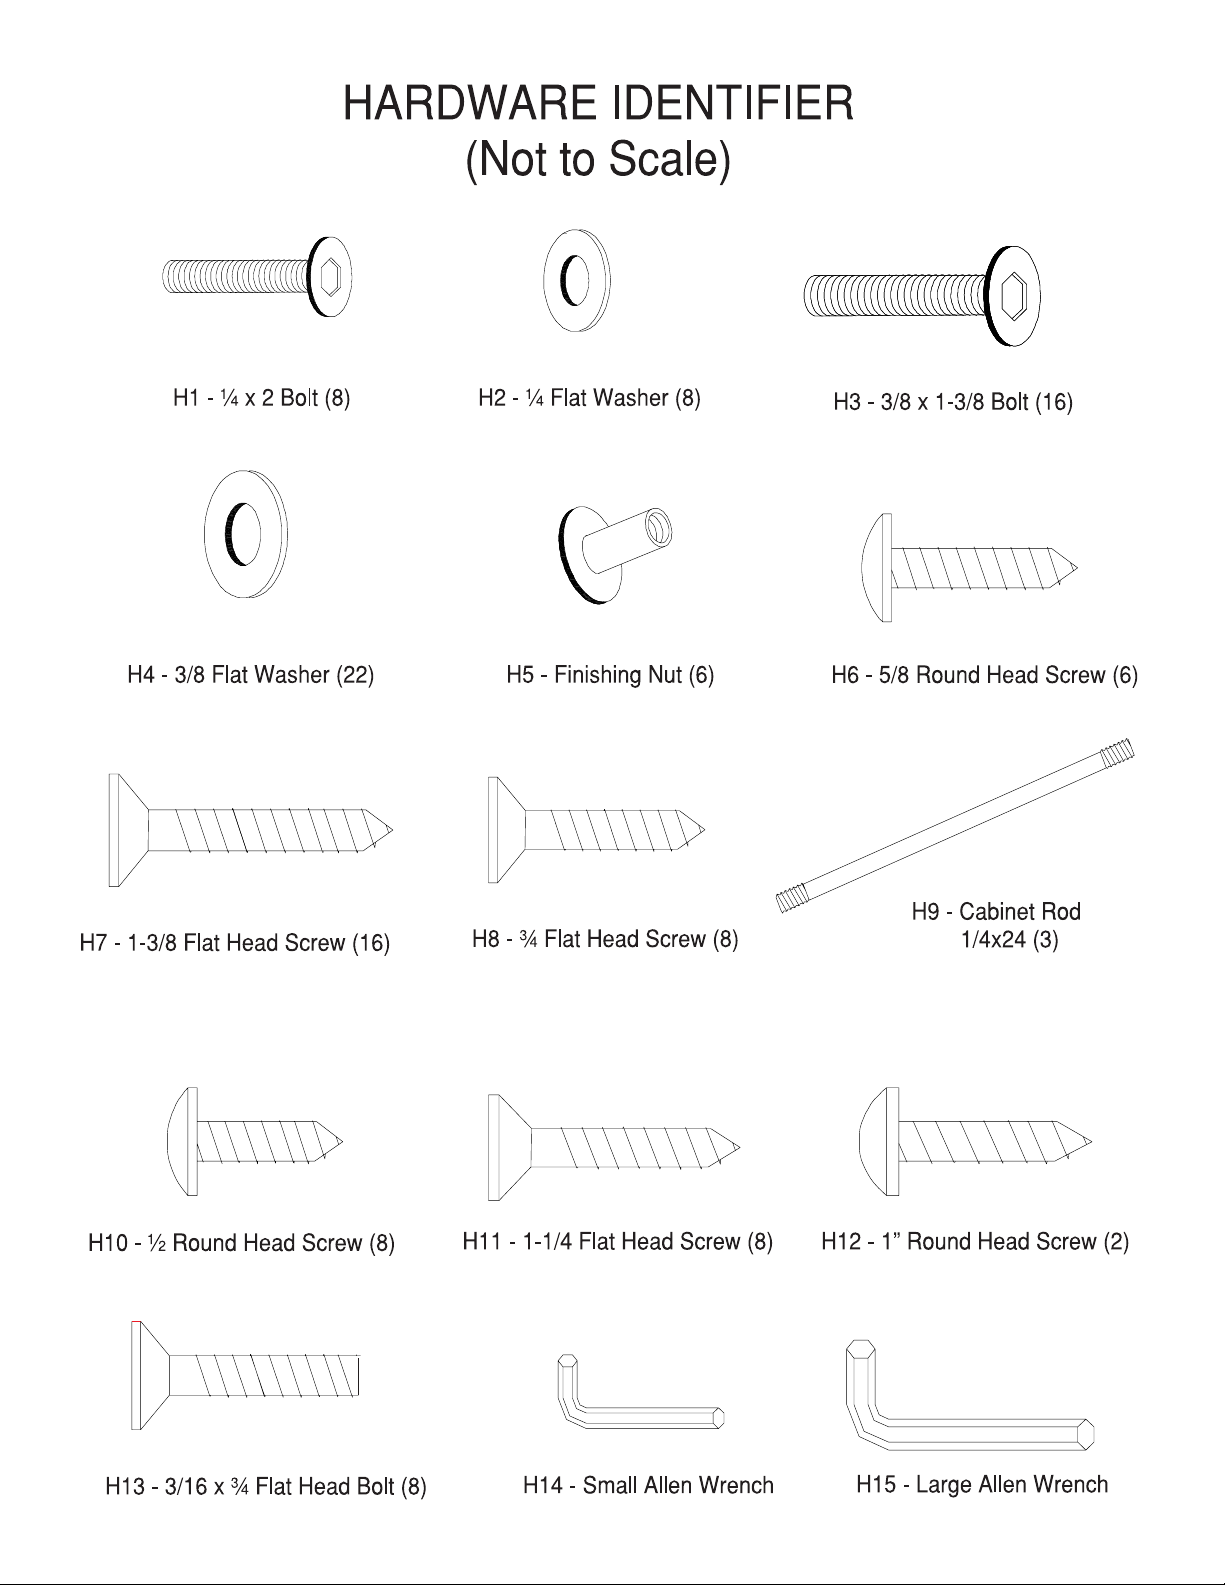
Allen Wrenches H14 and H15 Included with the Hardware Kit
Phillips Screwdriver
Furniture Polish and Cloth
An electric screwdriver is helpful in assembly. However, please set at low torque and use
extreme caution with an electric screwdriver because you could overtighten the hardware
and strip the screws.
Assembly Tips
Make sure you understand the following tips before you begin to assemble your soccer table.
1. When installing parts that have more than one bolt, start ALL the bolts in that part by
hand before tightening anything.
2. Some drawings or images in this manual may not look exactly like your product. Please
read and understand the text before starting each assembly step.
READ AND FOLLOW ALL ASSEMBLY , OPERA TION, AND
SAFETY INSTRUCTIONS CAREFULLY. AT LEAST TWO
ADULTS ARE NEEDED TO PUT THIS GAME TABLE
TOGETHER.
© 2004 Escalade Sports
2
For Customer Service Call 1-866-556-2759
© 2004 Escalade Sports
3
For Customer Service Call 1-866-556-2759
© 2004 Escalade Sports
4
For Customer Service Call 1-866-556-2759
© 2004 Escalade Sports
5
For Customer Service Call 1-866-556-2759
© 2004 Escalade Sports
6
For Customer Service Call 1-866-556-2759
© 2004 Escalade Sports
7
For Customer Service Call 1-866-556-2759

1. Find a clean, level place to begin the assembly of your game table.
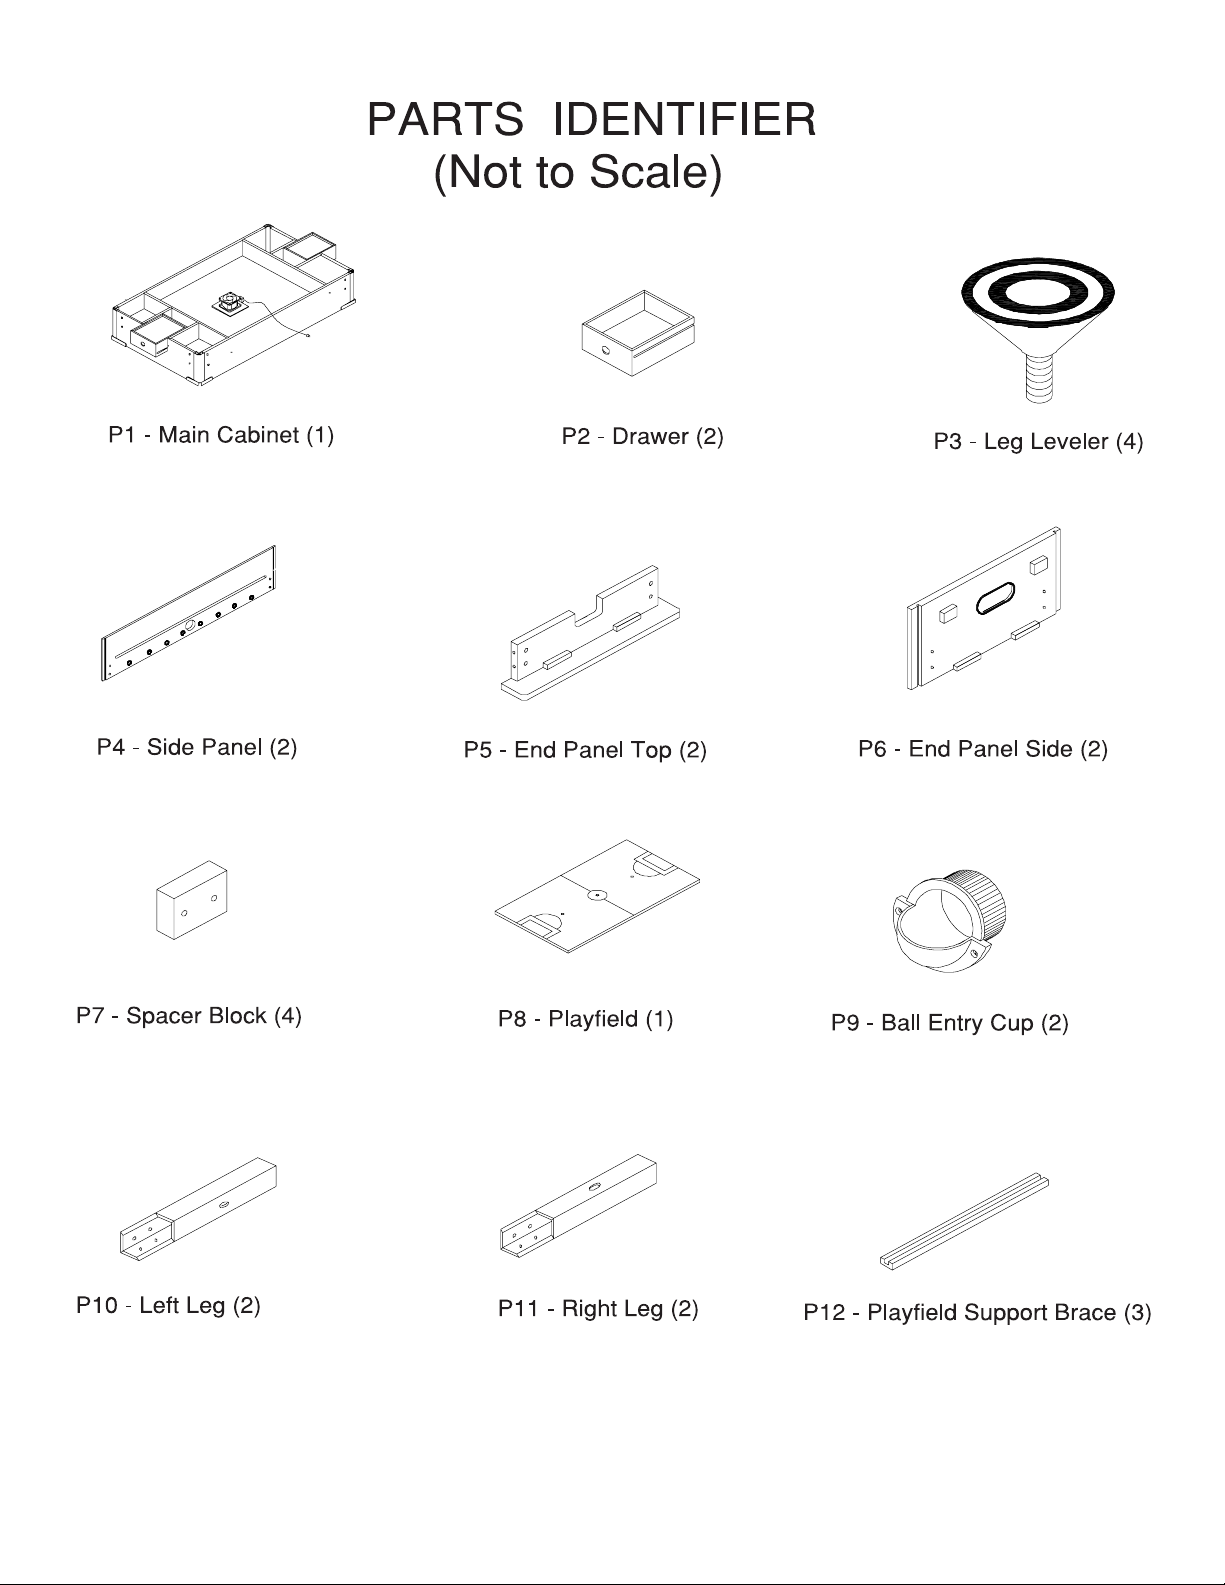
2. Place the main cabinet P1 UPSIDE DOWN as shown in FIGURE 1.
3. Using the Allen wrench provided, attach the legs P10 and P1 1 using bolts
H3 and washers H4 as shown in FIGURE 1. With the help of another
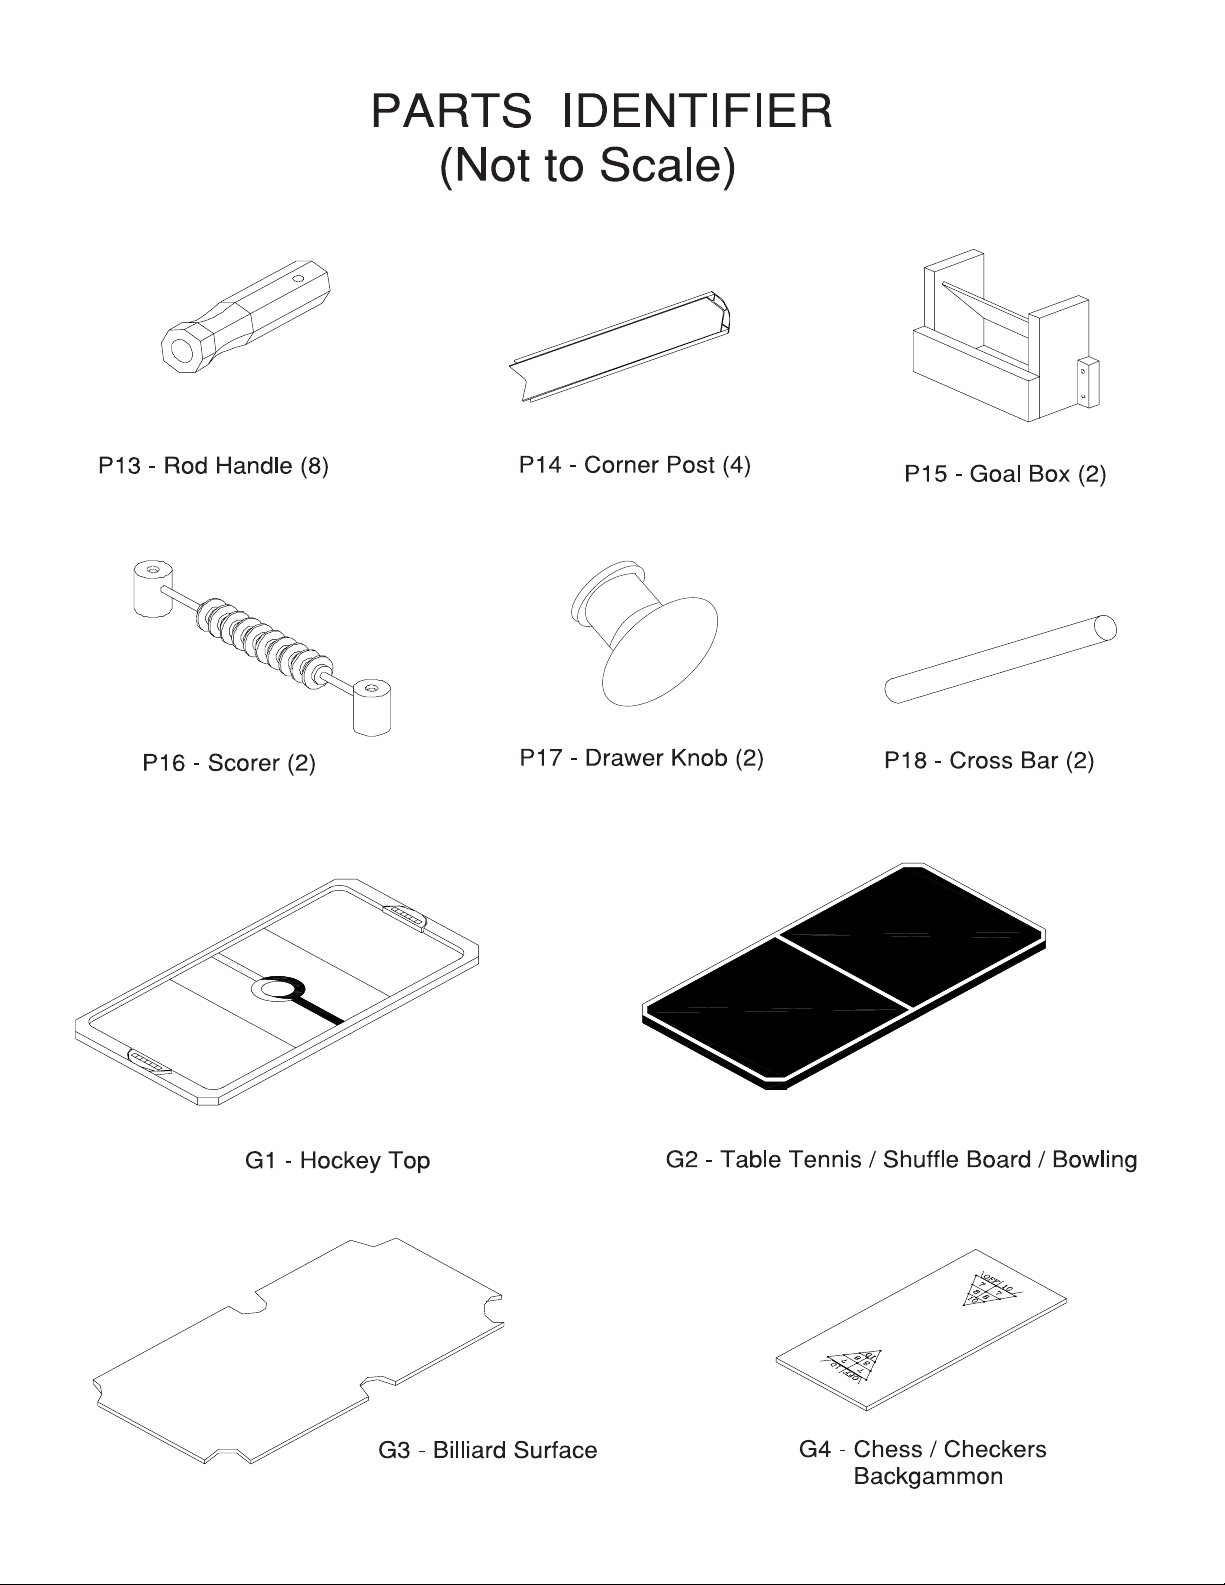
adult have them hold the cross bar P18 between the legs as you attach
them to the table. Remember to start all hardware by hand before you
tighten anything.
4. Screw one leg leveler P3 into the bottom of each leg as shown in
FIGURE 1.
5. Tighten all hardware at this time.
CAUTION:
Start all hardware by hand before
you tighten anything.
© 2004 Escalade Sports
Figure 1
8
For Customer Service Call 1-866-556-2759
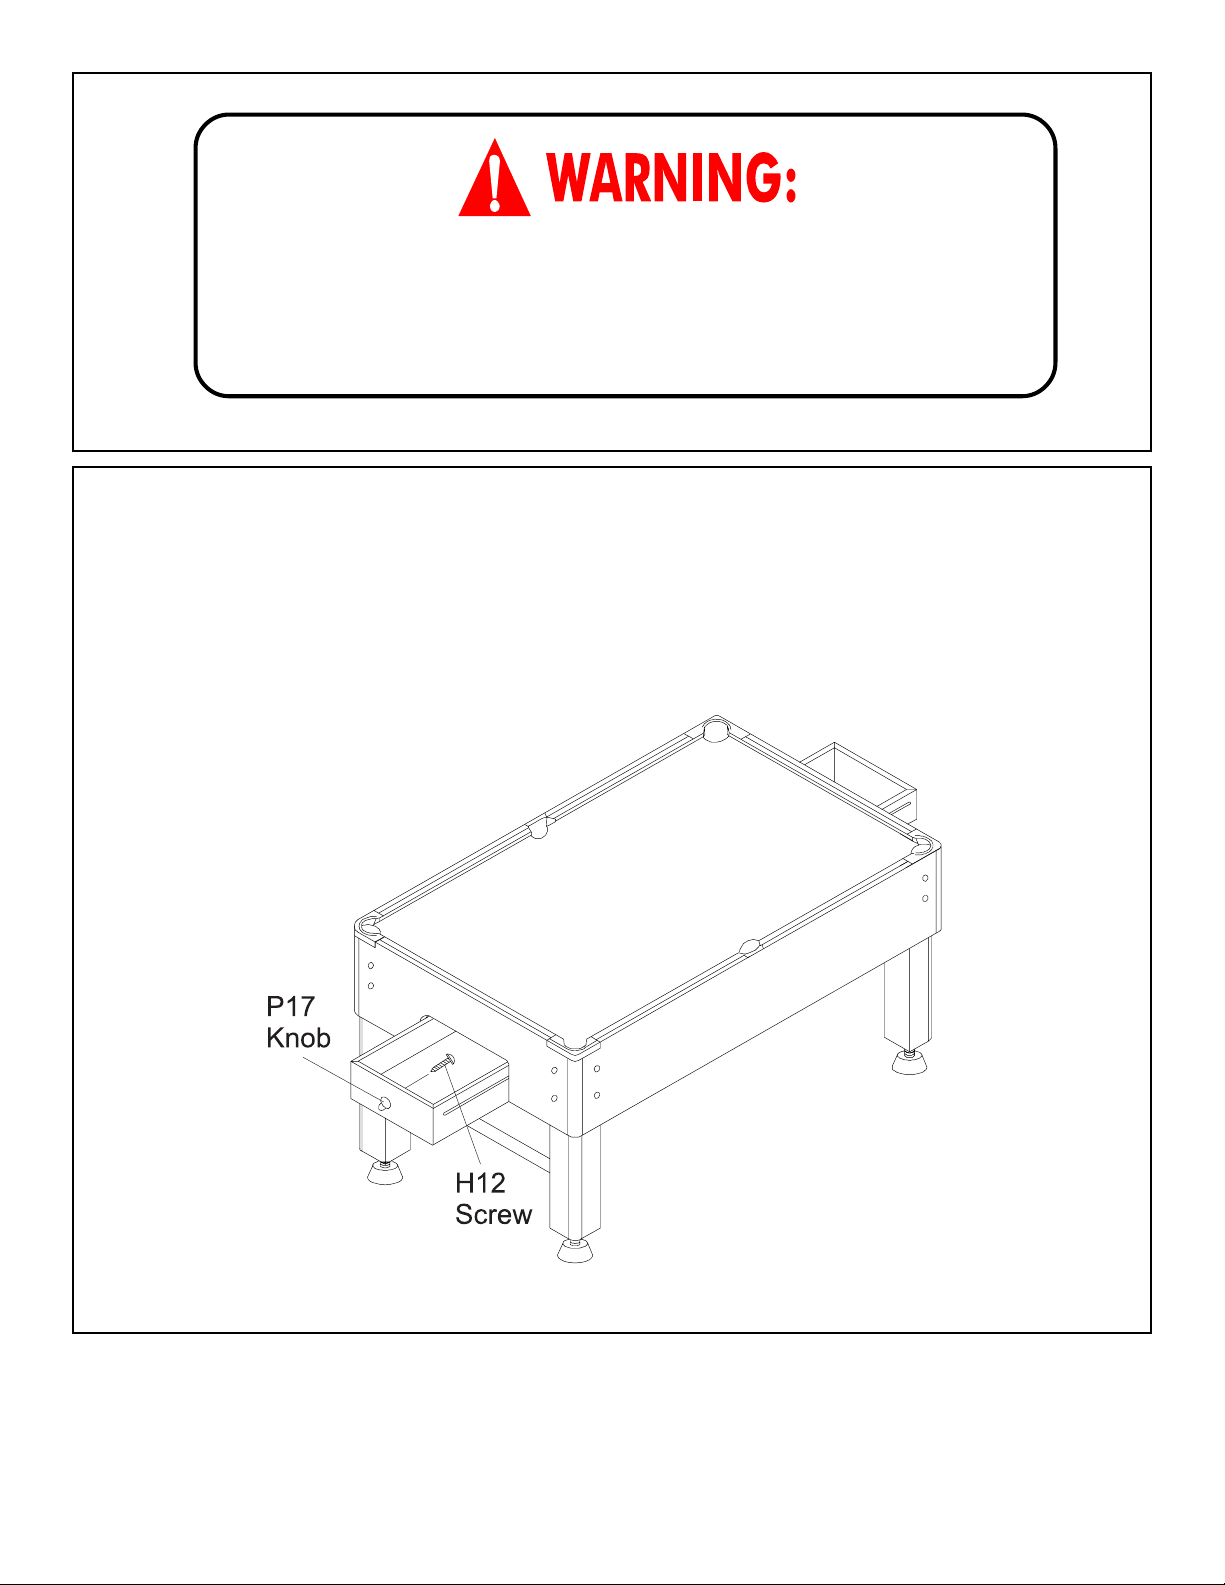
THIS STEP REQUIRES TWO OR MORE ADULTS.
VERY CAREFULLY TURN THE TABLE OVER AND SET IT ON
ITS LEGS. BE CAREFUL, THE TABLE IS VERY HEAVY.
6. After you have turned the main cabinet over slide in the drawers P2 and
attach the knob P17 with screw H12 as shown below.
7. Set the table aside and complete the following steps for the soccer table
assembly.
© 2004 Escalade Sports
9
For Customer Service Call 1-866-556-2759
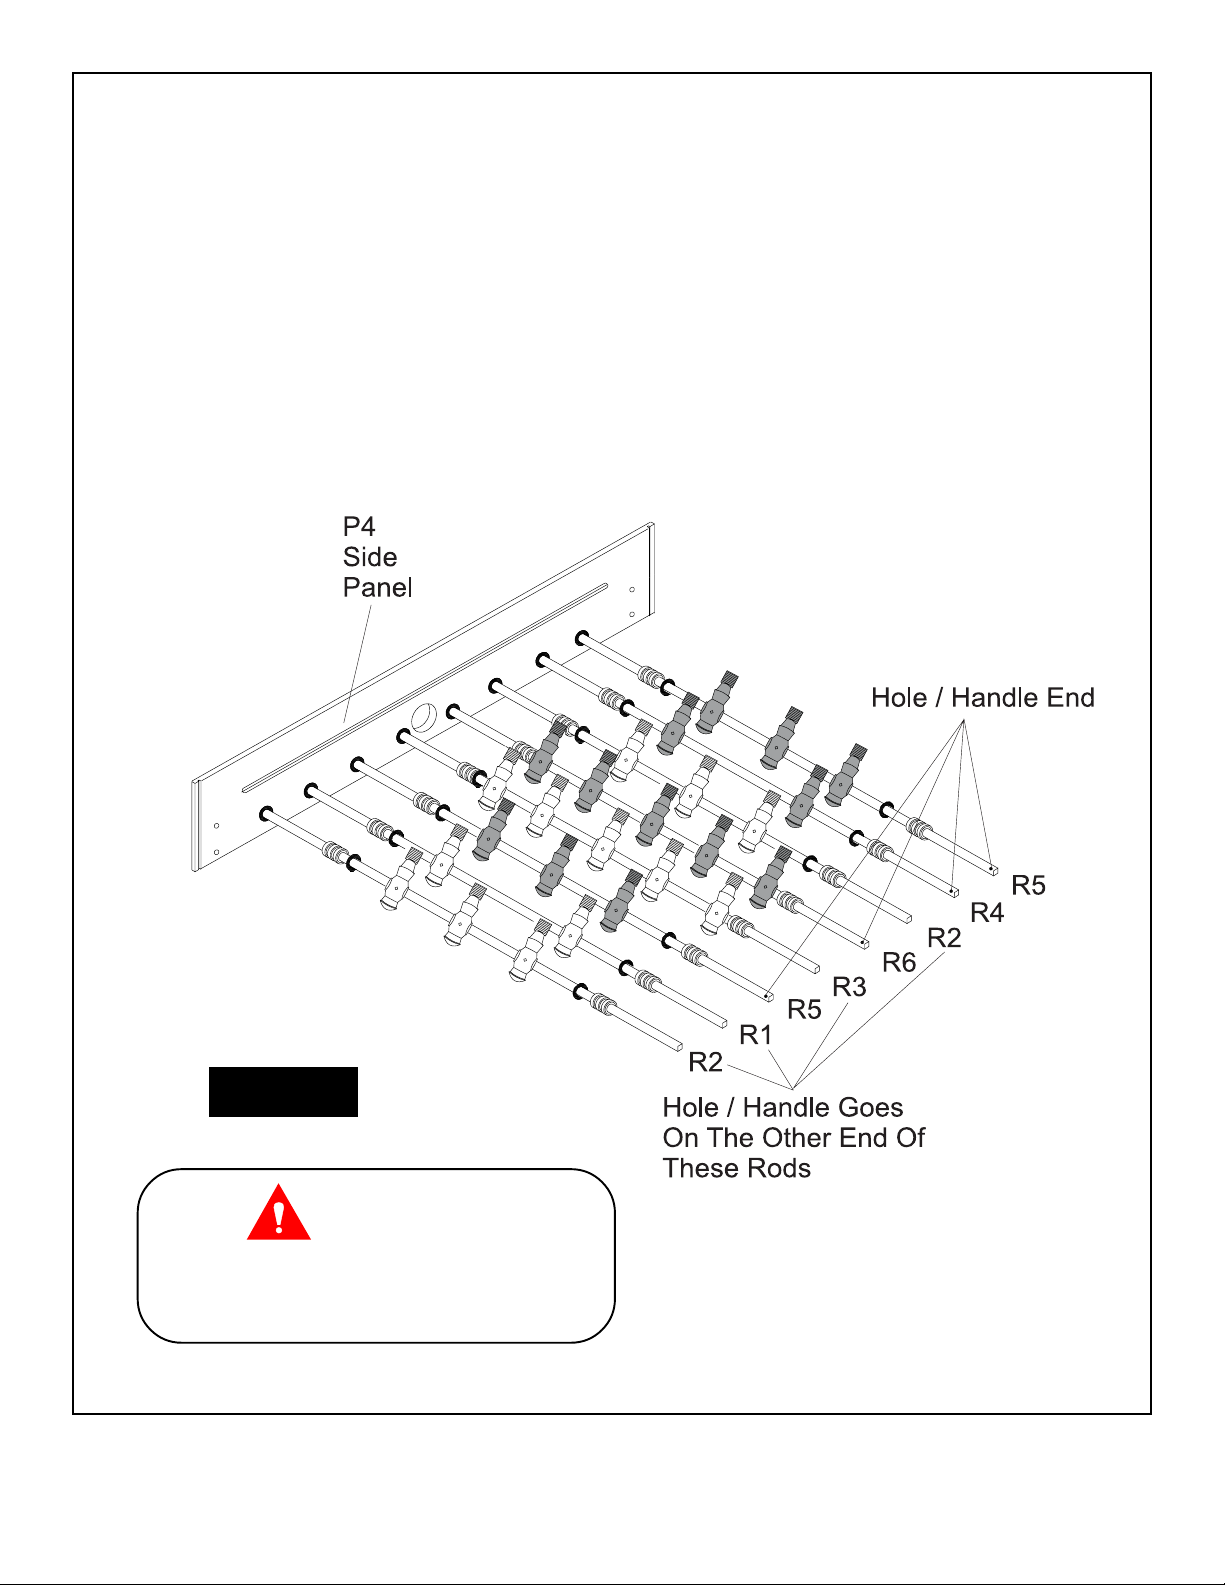
8. Find a clean, level place to begin the assembly of your soccer table.
9. Place one side panel P4 UPSIDE DOWN with the finished side facing out
as shown in FIGURE 2. The ball entry hole will be closest to the floor .
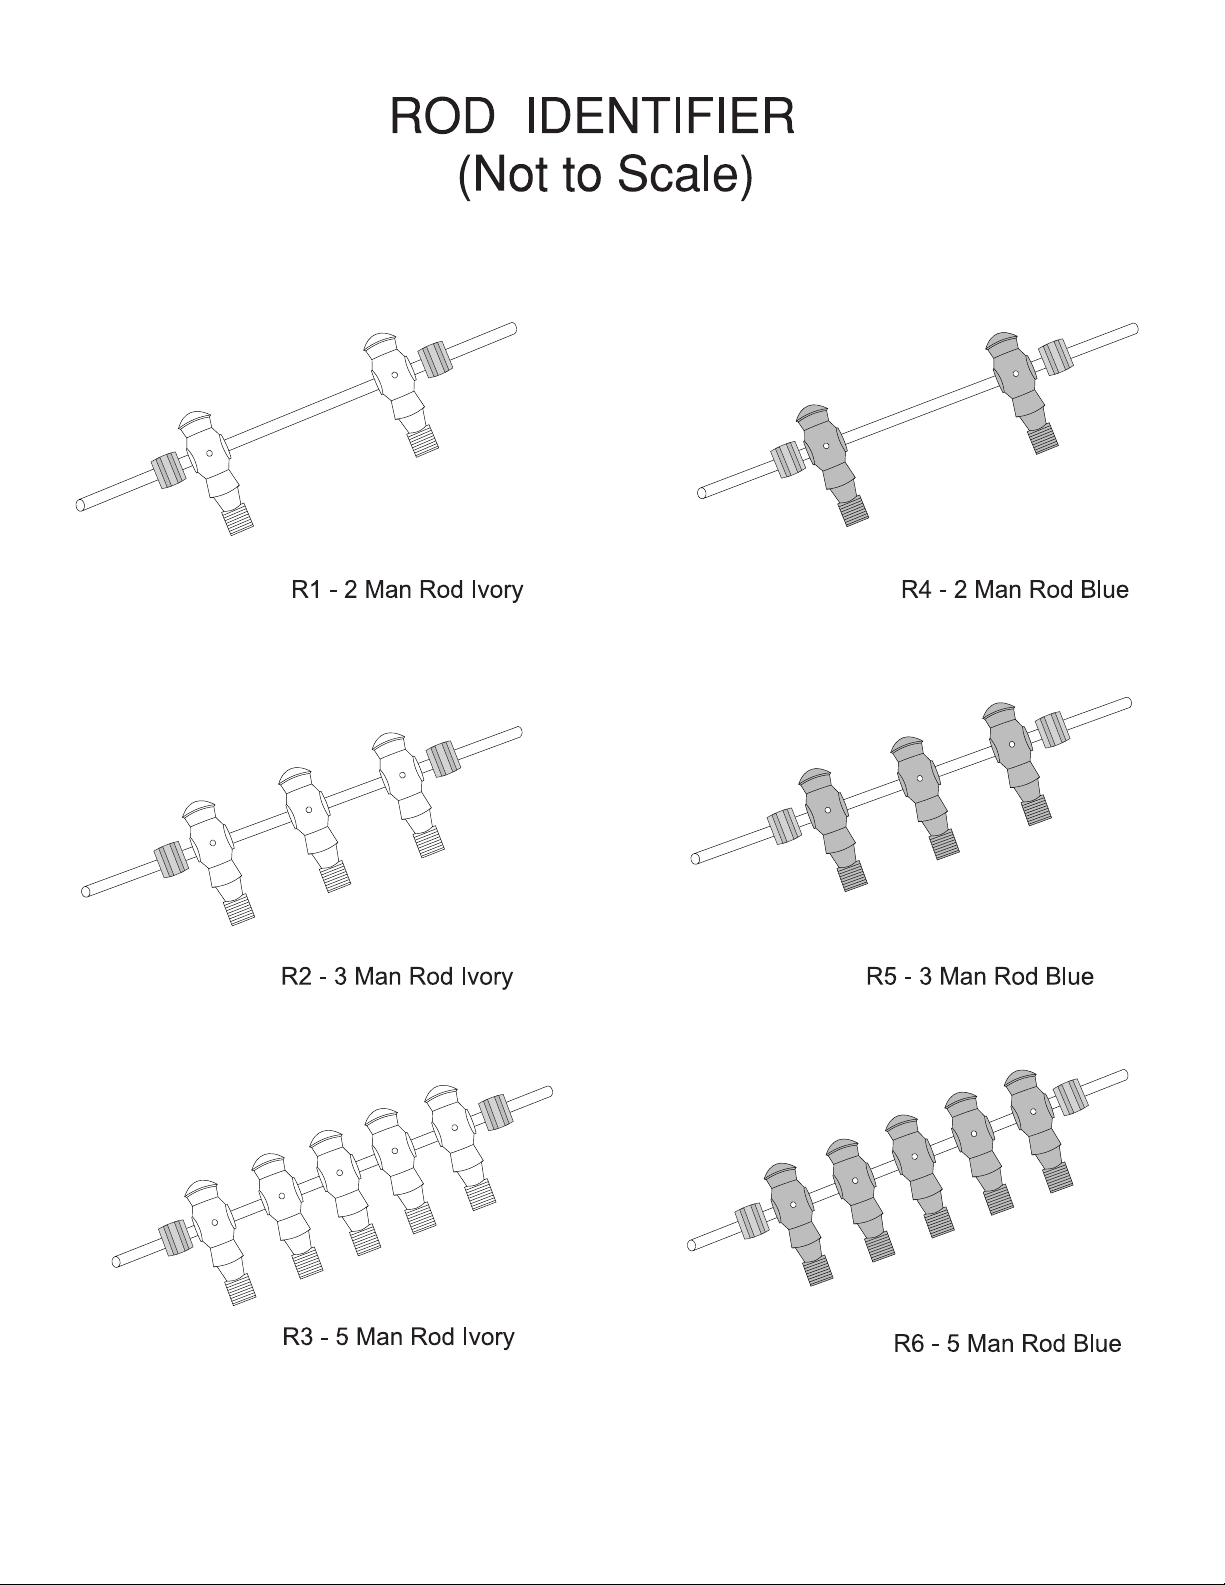
10. Align the rods as shown in FIGURE 2. Please note the location of the hole
that is near one end of each rod. This is the handle end of the rod. There
will be four handles on each side of the table. It is critical that you set the
rods as shown below so the table will be correct when flipped over.
Figure 2
Set the rods as shown noting the
location of the hole / handle end.
© 2004 Escalade Sports
CAUTION:
10
For Customer Service Call 1-866-556-2759
 Loading...