

User Manual:Model Code/s:
Product:
Page:
Document:
ETM292X
Top Mount
Refrigerator
292L
1
User Manual
Dear Customer, Congratulations on purchasing your new
refrigerator. The Esatto brand is proudly distributed
within Australia by Residentia Group Pty Ltd.
Please refer to the warranty card at the rear of this
manual for information regarding your product’s
parts and labour warranty, or visit us online at
www.residentiagroup.com.au.
At Residentia Group, we are customer obsessed
and our Support Team are there to ensure you get
the most out of your appliance. Should you want
to learn more about your refrigerator such as
temperature settings and importantly taking care
of it when cleaning, our Support Team are here
to help. You can use our online Support Centre at
anytime by visiting http://support.residentiagroup.
com.au, or you can contact us via phone by dialling:
1300 11 HELP (4357).
It is important that you read through the following
use and care manual thoroughly to familiarise
yourself with the installation and operation
requirements of your appliance to ensure optimum
performance.
Again, thank you for choosing an Esatto appliance
and we look forward to being of service to you.
Kind Regards,
The Residentia Team
T 1300 11 4357
E info@residentiagroup.com.au
W residentiagroup.com.au
ACN 600 546 656
Residentia Group
PO Box 581
Stanhope Gardens
NSW Australia 2768
2
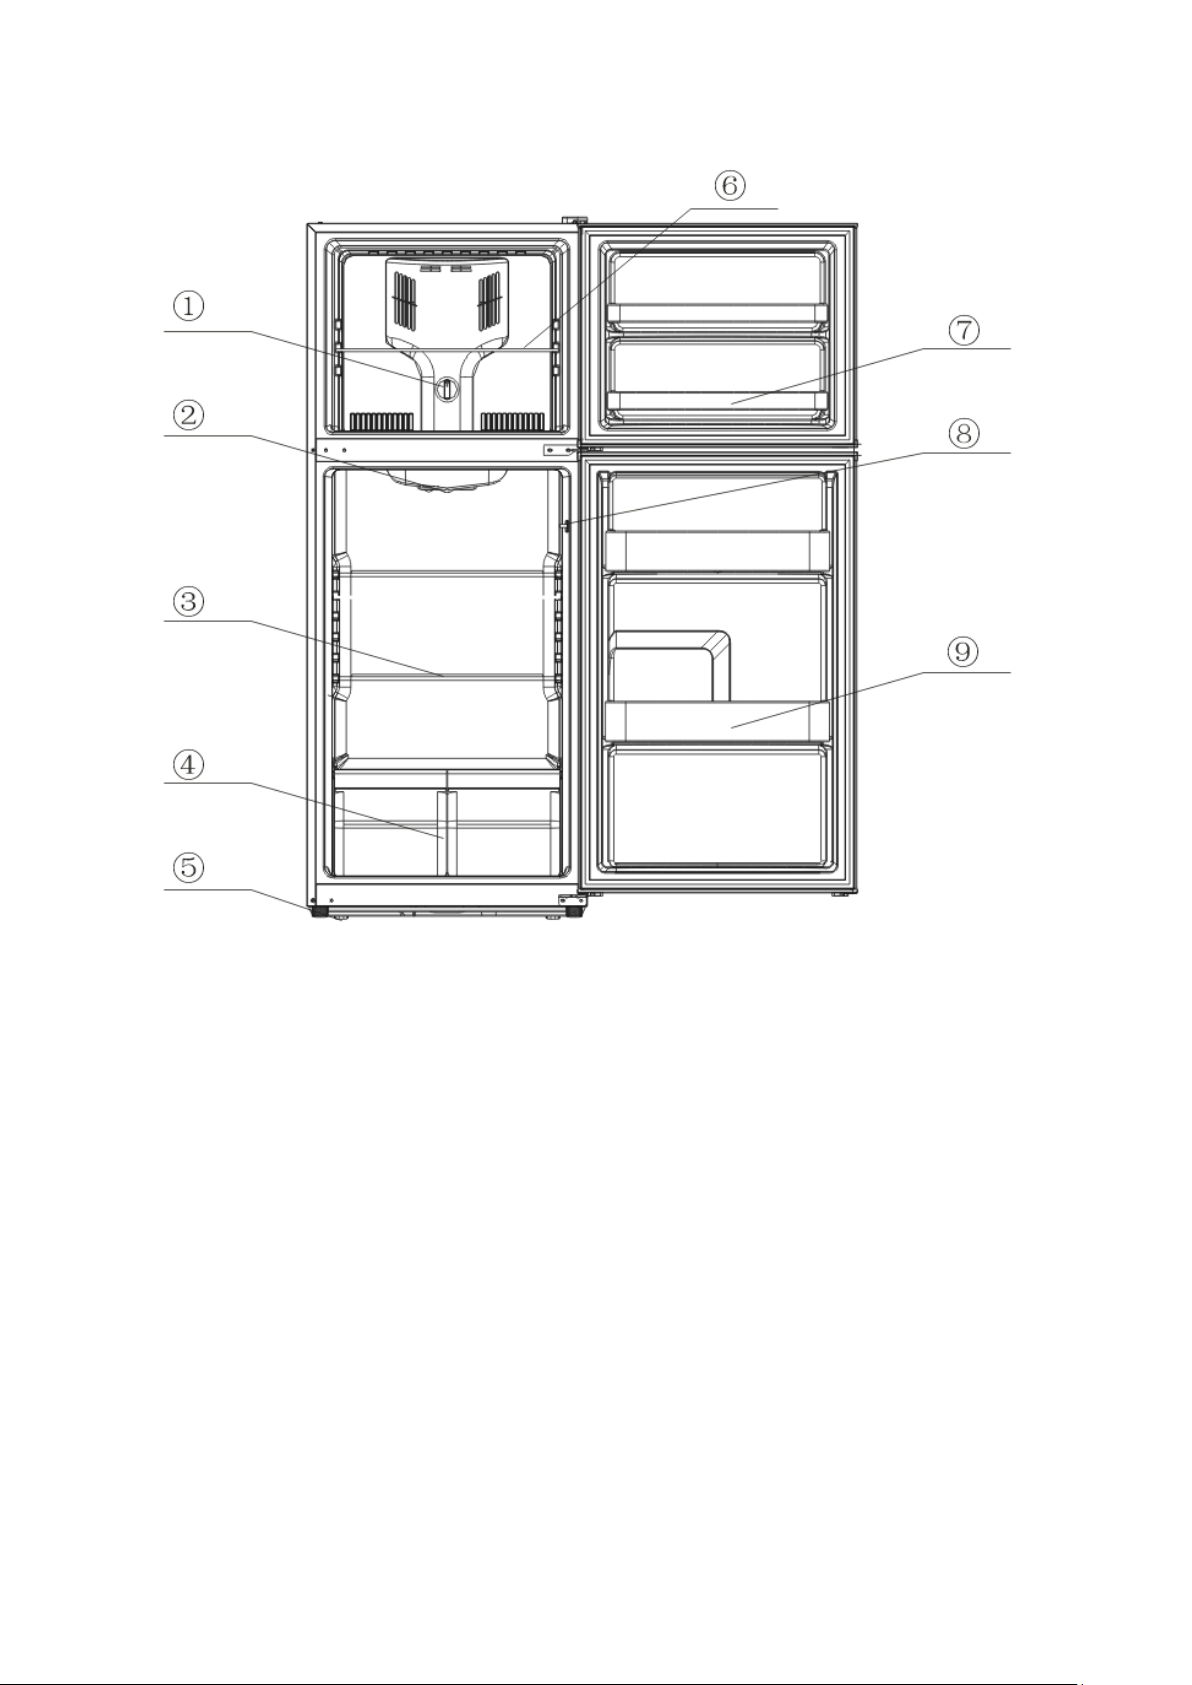
Main configuration:
1、Thermostat
2、Refrigerator lamp
3、Refrigerator shelf
4、Crisper(The crisper contains ice tray and manual)
5、Adjustable foot
6、Freezer shelf
7、Freezer tray
8、lamp switch
9、Refrigerator tray

3
UNPACKING YOUR REFRIGERATOR-FREEZER
WARNING: Use two or more people to move refrigerator-freezer.Failure to
do so can result in back or other injury.
Remove tape and any labels from your refrigerator-freezer before using(except
the rating label).
To remove any remaining tape or glue, rub the area briskly with your thumb.
Tape or glue residue can also be easily removed by rubbing a small amount of
liquid dish soap over the adhesive with your fingers. Wipe with warm water and
dry.
Do not use sharp instruments, rubbing alcohol, flammable fluids, or abrasive
cleaners to remove tape or glue. These products can damage the surface of your
refrigerator-freezer.
When moving the refrigerator-freezer, do not tilt the refrigerator-freezer beyond
45°from upright position.
CLEANING BEFORE USE:
After you remove all of the packaging materials, (especially the foam between
outside condenser and cabinet should be removed)clean the inside of your
refrigerator-freezer before using it.
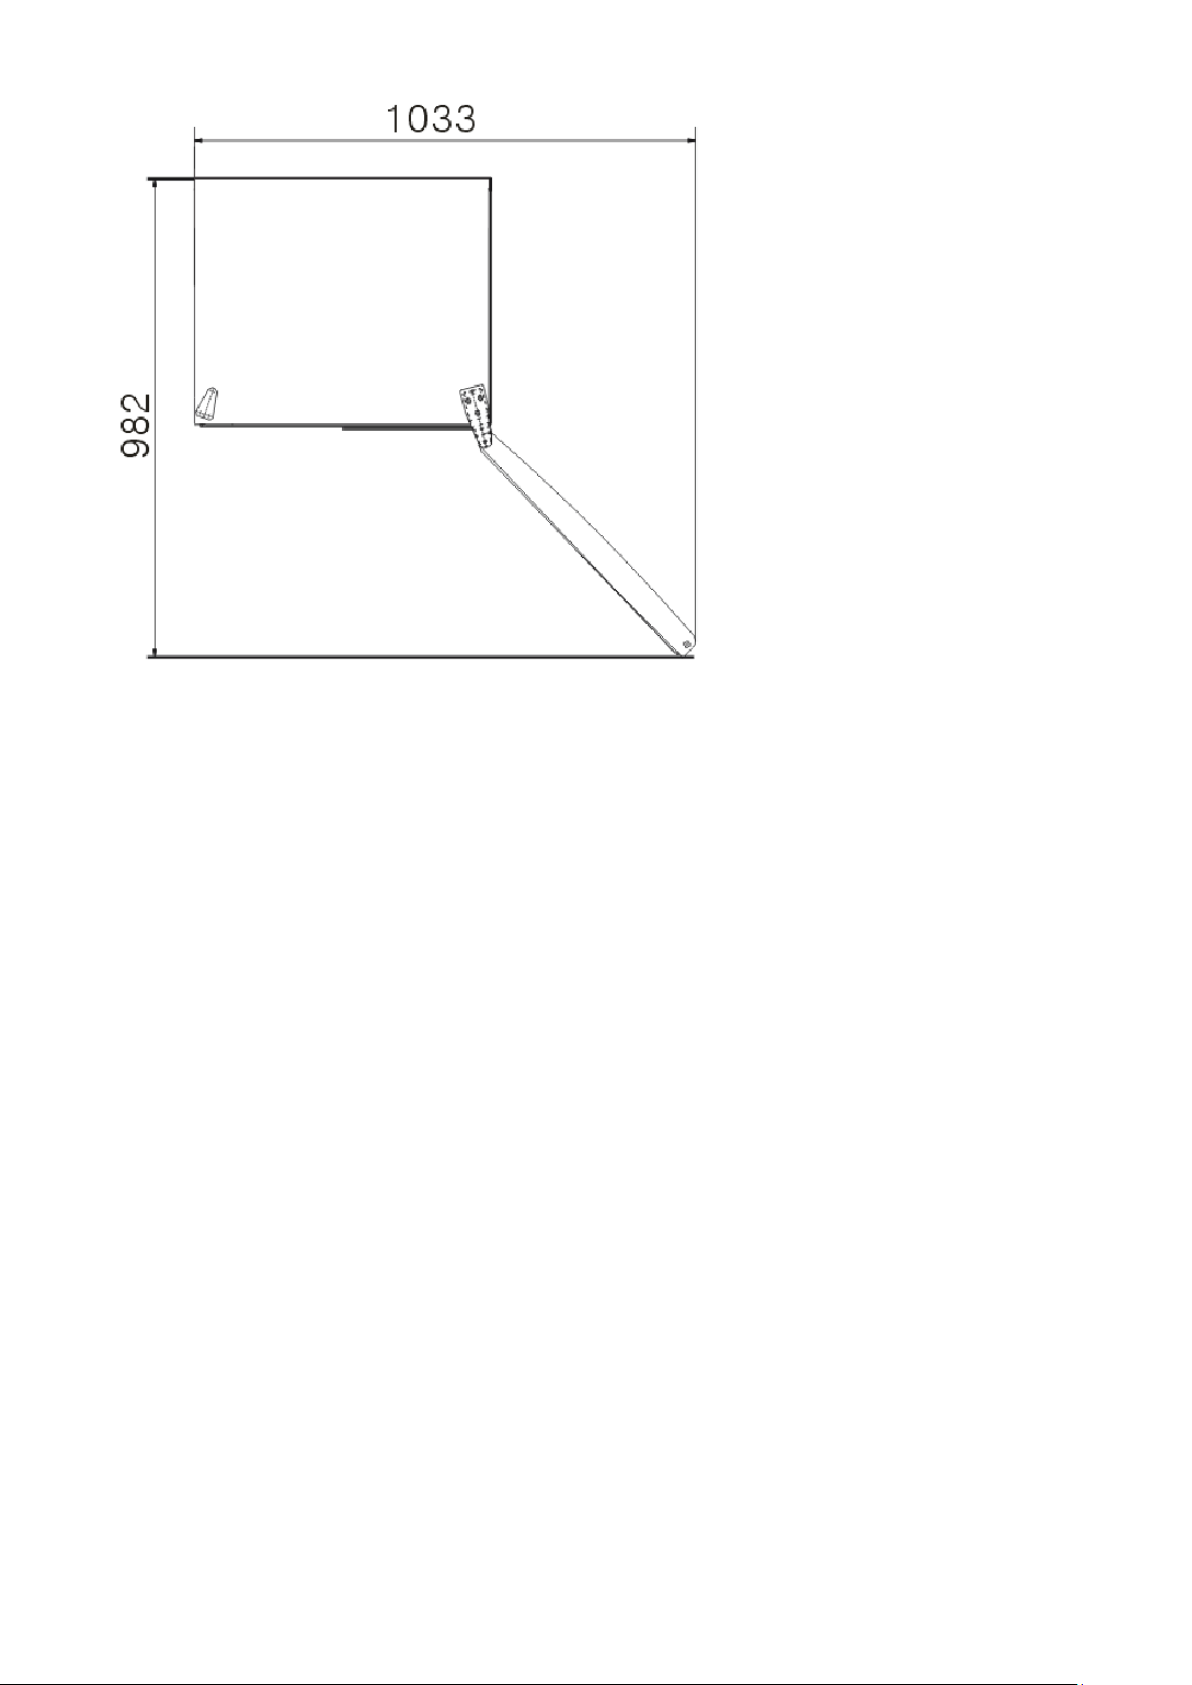
SPACE REQUIREMENTS
WARNING: Keep flammable materials and vapors, such as gasoline, away form
refrigerator-freezer.
Failure to do so can result in death, explosion, fine or burns.
To ensure proper ventilation for your refrigerator-freezer, allow for 200mm space
on each side between walls, 200mm space between back of your
refrigerator-freezer and the wall, and 300mm space between counter top and the
roof or ceiling.
If you are installing your refrigerator-freezer next to a fixed wall, leave sufficient
space on the hinge side to allow for the door to swing open.
Never install your refrigerator-freezer near heat source and direct sun shins.
4
ELECTRICAL REQUIREMENT
WARNING: DO NOT REMOVE GROUND PRONG.
DO NOT USE AN ADAPTOR.
DO NOT USE EXTENSION CORD.
Failure to follow these instructions can result in death, fire or electrical shock.
Before you move your refrigerator-freezer into its final location, it is important to
make sure you have the proper electrical connection.
Recommended Earthing Method
AC220Volt /50Hz, AC only 10 ampere fused and properly earthed electrical
supply is required. It is recommended that a separate circuit serving only this
appliance be provided. Use a receptacle which cannot be turned off with a switch
or pull chain. Do not use an extension cord.
NOTE: Before performing any type of installation, disconnect the
refrigerator-freezer from the electrical source. When you are finished, connect the
refrigerator-freezer to the electrical source and reset the control to the desired
setting.
LEVELING
If the refrigerator-freezer is not leveled during installation. The doors may not

5
close or seal properly, causing cooling, frost, or moisture problems. It is very
important of the refrigerator-freezer to be level in order to function properly.
To level your refrigerator-freezer you may either turn the adjustable foot clockwise
to raise that side to the refrigerator-freezer or turn counter – clockwise to lower
that side.
NOTE: Having someone push against the top of the refrigerator-freezer, take
some weight off. This makes it easier to adjust the adjustable foot.
USE OF THE APPLIANCE
To obtain the best possible results form your refrigerator-freezer, it is important
that you operate it properly.
Temperature Control
The temperature in the refrigerator-freezer
is controlled by the thermostat control knob.
The thermostat control box is loaded in
refrigerator compartment.
Turn the thermostat control knob up or down to regulate the temperature inside
the refrigerator-freezer. The markings on control knob indicated the “1~7” for the
different temperature grades. The temperature decreases with position “1” being
the warmest and position “7” being the coldest.
Set the control to position between “1” and “7” for normal use, the exact postion is
beyond the temperature in the refrigerator-freezer, generally , choose the
number”3”.
Fresh Food Storage
Wrap or store food in the refrigerator in airtight and moisture – proof material.
This prevents food odor and taste transfer throughout refrigerator.
·Fruit – wash, let dry and store in refrigerator in plastic bags or crisper.
·Leafy vegetables- Remove wrapping and trim or tear off bruised and discolored
areas, wash in cold water and drain. Place in plastic bag or plastic container and
store in crisper.

6
·Fish –Use fresh fish the same day as purchased.
·Meat – Store most meat in original wrapping as long as it is airtight and
moisture – proof.
Re – wrap if necessary.
·Leftovers – Cover leftovers with plastic wrap or aluminum foil.Plastic containers
with tight lied can also be used.
Frozen Food Storage
Temperature Control
When using the refrigerator-freezer for the
first time or after defrosting, turn the
temperature control to set “MAX” for at least
two hours before introducing the food to be
stored.
All frozen food products you purchase
should be placed in the freezer compartment as
soon as possible to avoid the frozen food from
defrosting.
Storage recommendation printed on the packaging of frozen food by the
manufacturers should be always be followed.
Be careful that the drawer mustn’t mangle the refrigeration pipeline.
Freezing Fresh Food
Ensure that your freezing operations are carried out under the most hygienic
conditions as freezing alone does not sterilize the food. It is advisable to freeze
the food by packing it into separate meal portions and not in bulk form. Never put
hot or even warm foodstuffs into the freezer compartment. Prior to storing the
frozen food, pack it in plastic bags, aluminum sheets or freezing containers and
place into the freezer compartment. See the data plate on the back of the
refrigerator-freezer for the maximum permissible amount in kilograms of fresh
food that can be frozen in any 24 hour period with a room temperature of 25℃.

7
Never freeze more than the maximum permissible.
Note: Never put bottled food or drinks in the freezer compartment.
For best performance, leave enough space in the Freezer compartment for air to
circulate around the packages.
Cleaning your refrigerator-freezer
Before you start to clean your refrigerator-freezer remove the mains plug from the
power supply.
Use a clean sponge or soft and a mild detergent in warm water. Do not use
abrasive or harsh cleaners.
Hand wash, rinse and dry all surfaces thoroughly.
Do not use cleaning waxes, concentrated detergents, bleaches or cleaners
containing petroleum on plastics and rubber parts.
Never use paper towels, window sprays, scouring cleansers or flammable fluids
on plastic parts as these can scratch or damage material.
Clean with a cloth soaked in this solution and then dry with a soft cloth.
PROLONGED OFF PERIODS
If the refrigerator-freezer is not in use for a long period of time, proceed as
follows:
Disconnect the refrigerator-freezer from the main supply by removing the plug
from the wall socket.
Clean and dry the inside as instructed under the heading of cleaning the
refrigerator-freezer.
Leave the door open to prevent any unpleasant smells from building up while the
refrigerator-freezer is not in use.
TROUBLE SHOOTING
In case of malfunction, you can solve many common problems easily.

8
Your refrigerator-freezer will not operate…Check if
-- The power supply cord is unplugged.
The doors will not close completely…Check if
-- The drawers are out of position.
-- The gaskets are dirty.
-- The refrigerator-freezer is not level.
The refrigerator-freezer is noisy when running…Check if
-- Check the refrigerator-freezer is level and it is not in contact with another
appliance or kitchen furniture.
The refrigerator-freezer does not cool sufficiently…Check if
-- If the door has been opened too often, or it has been left open for a while it
will take time for the refrigerator-freezer to reach its set temperature.
-- Check the airflow the rear of the refrigerator-freezer has not been reduced
due to insufficient clearance.
The following characteristics should not be looked upon as a problem.
-- A gentle tricking sound caused by coolant flowing the pipe.
Compressor operating at high temperature.
Repalcing Your Light Bulb
Note:
All parts removed must be saved to do the replacement of the light bulb.
Before removing the light bulb, either turn off the appliance or disconnect the
electricity leading into the appliance at the main power supply. Failure to do
so could result in electrical shock or personal injury.
Unplug the AC power cord from the wall.
Pull down to remove the lamp cover.
Unscrew the bulb.
Repace with a 15-watt bulb that is the same shape and size.

9
REQUESTING ASSISTANCE OR SERVICE
If the problem is not due to one of the items listed in Troubleshooting, Contact the
dealer or authorized Service Company.
Changing the Reversible Door
Before reversing the door swing, ensure the appliance is unplugged and empty. Provide
additional support for the doors while hinges are being removed. Do not depend on the door
magnets to hold the door in place. It is recommended that two people perform this task. DO
NOT lay the appliance completely flat as this may damage the coolant system.

10
Remove the screws from the
middle
hinge. Lift the refrigerator door
up
and away from the appliance.
Remove right bottom hinge and reserve the
screws. Remove screw covers at left corner
and put them into the screw holes at right
corner. Install left hinge by using those
reserved screws.
Remove right pin assemblies from the bottom
of the freezer and refrigerator doors. On the
opposite side, attach the replacement pin
assemblies (located in the plastic bag with the
Use and Care Manual) with a screwdriver.
Note: You must re-use the screws from the pin
assemblies that are removed in this step when
attaching the new assemblies.
Place the refrigerator door on the bottom hinge.
Ensure the door is aligned horizontally and
vertically. Attach middle hinge to refrigerator door
and attach bolt washer to the back of the hinge,
then fix them to middle beam and get them
fastened with a screwdriver.

11
Place the freezer door on the middle
hinge. Ensure that the door is aligned
horizontally and vertically, and that the
gasket seals on all sides before attaching
the top hinge. Attach the top hinge and
replace the hinge cover.
WARNNING
RECOMMENDATIONS:
1) WARNING – Keep ventilation openings, in the appliance enclosure or in the
built-in structure, clear of obstruction.
2) WARNING – Do not use mechanical devices or other means to accelerate
the defrosting process, other than those recommended by the manufacturer.
3) WARNING – Do not damage the refrigerant circuit.
4) WARNING – Do not use electrical appliances inside the food storage
compartments of the appliance, unless they are of the type recommended by the
manufacturer.
5) The appliance has to be unplugged after use and before carrying out user
maintenance on the appliance.

12
6) This appliance is not intended for use by persons (including children) with
reduced physical, sensory or mental capabilities, or lack of experience and
knowledge, unless they have been given supervision or instruction concerning
use of the appliance by a person responsible for their safety.
7) Children should be supervised to ensure that they do not play with the
appliance.
8) If the supply cord is damaged, it must be replaced by the manufacturer, its
service agent or similarly qualified persons in order to avoid a hazard.
9) Please abandon the refrigerator-freezer according to local regulators for it use
flammable blowing gas and refrigerant.
10)Please according to local regulations regarding disposal of the appliance for
its flammable refrigerant and blowing gas. Before you scrap the appliance, please
take off the doors to prevent children trapped.
Correct Disposal of this product:
This marking indicates that this product should not be disposed with other
household wastes throughout the EU. To prevent possible harm to the
environment or human health from uncontrolled waste disposal, recycle it
responsibly to promote the sustainable reuse of material resources. To return
your used device, please use the return and collection systems or contact the
retailer where the product was purchased. They can take this product for
environmental safe recycling.

User Manual:
Page:
12
Warranty
WARRANTY TERMS AND CONDITIONS
REFRIGERATION APPLIANCES
→ This document sets out the terms and conditions of the product warranties for Residentia
Group Appliances. It is an important document. Please keep it with your proof of
purchase documents in a safe place for future reference should you require service for
your Appliance.
1. In this warranty (a) ‘acceptable quality’ as referred to in clause 10 of this warranty has the
same meaning referred to in the ACL;
(b) ‘ACL’ means Trade Practices Amendment (Australian Consumer Law) Act
(No.2) 2010;
(c) ‘Appliance’ means any Residentia Group product purchased by you
accompanied by this document;
(d) ‘ASR’ means Residentia Group authorised service representative;
(e) ‘Residentia Group’ means Residentia Group Pty Ltd of 20 Yaltara Avenue,
Bundoora Victoria 3083, ACN 600 546 656 in respect of Appliances
purchased in Australia;
(f) ‘major failure’ as referred to in clause 10 of this warranty has the same
meaning referred to in the ACL and includes a situation when an
Appliance cannot be repaired or it is uneconomic for Residentia Group, at
its discretion, to repair an Appliance during the Warranty Period;
(g) ‘Warranty Period’ means:
(i) where the Appliance is used for personal, domestic or household use
(i.e. normal single family use) as set out in the instruction manual, the
Appliance is warranted against manufacturing defects in Australia for 12
months following the date of original purchase of the Appliance;
(h) ‘you’ means the purchaser of the Appliance not having purchased the
Appliance for re-sale, and ‘your’ has a corresponding meaning.
2. This warranty only applies to Appliances purchased and used in Australia and is in addition to (and does
not exclude, restrict, or modify in any way) any non-excludable statutory warranties in Australia.
3. During the Warranty Period Residentia Group or its ASR will, at no extra charge if your Appliance is
readily accessible for service, without special equipment and subject to these terms and conditions,
repair or replace any parts which it considers to be defective. Residentia Group or its ASR may use
remanufactured parts to repair your Appliance. You agree that any replaced Appliances or parts become
the property of Residentia Group. This warranty does not apply to light globes, batteries, lters or similar
perishable parts.
4. Parts and Appliances not supplied by Residentia Group are not covered by this warranty.
5. You will bear the cost of transportation, travel and delivery of the Appliance to and from Residentia Group
or its ASR. If you reside outside of the service area, you will bear the cost of:
(a) travel of an authorised representative;
(b) transportation and delivery of the Appliance to and from Residentia Group or its
ASR, in all instances, unless the Appliance is transported by Residentia Group or its
ASR, the Appliance is transported at the owner’s cost and risk while in transit to and
from Residentia Group or its ASR.
6. Proof of purchase is required before you can make a claim under this warranty.
Continued over page →

User Manual:
Page:
13
Warranty continued
7. You may not make a claim under this warranty unless the defect claimed is due to faulty or defective parts
or workmanship. Residentia Group is not liable in the following situations (which are not exhaustive):
(a) the Appliance is damaged by:
(i) accident
(ii) misuse or abuse, including failure to properly maintain or service
(iii) normal wear and tear
(iv) power surges, electrical storm damage or incorrect power supply
(v) incomplete or improper installation
(vi) incorrect, improper or inappropriate operation
(vii) insect or vermin infestation
(viii) failure to comply with any additional instructions supplied with the
Appliance;
(b) the Appliance is modied without authority from Residentia Group in writing;
(c) the Appliance’s serial number or warranty seal has been removed or defaced;
(d) the Appliance was serviced or repaired by anyone other than Residentia Group, an
authorised repairer or ASR.
8. This warranty, the contract to which it relates and the relationship between you and Residentia Group are
governed by the law applicable where the Appliance was purchased.
9. To the extent permitted by law, Residentia Group excludes all warranties and liabilities (other than as
contained in this document) including liability for any loss or damage whether direct or indirect arising
from your purchase, use or non use of the Appliance.
10. For Appliances and services provided by Residentia Group in Australia, the Appliances come with a
guarantee by Residentia Group that cannot be excluded under the Australian Consumer Law. You are
entitled to a replacement or refund for a major failure and for compensation for any other reasonably
foreseeable loss or damage. You are also entitled to have the Appliance repaired or replaced if the
Appliance fails to be of acceptable quality and the failure does not amount to a major failure. The benets
to you given by this warranty are in addition to your other rights and remedies under a law in relation to
the Appliances or services to which the warranty relates.
11. At all times during the Warranty Period, Residentia Group shall, at its discretion, determine whether
repair, replacement or refund will apply if an Appliance has a valid warranty claim applicable to it.
12. To enquire about claiming under this warranty, please follow these steps:
(a) carefully check the operating instructions, user manual and the terms of this
warranty;
(b) have the model and serial number of the Appliance available;
(c) have the proof of purchase (e.g. an invoice) available;
(d) telephone the numbers shown below.
13. You accept that if you make a warranty claim, Residentia Group and its ASR may
exchange information in relation to you to enable Residentia Group to meet its
obligations under this warranty.
IMPORTANT Before calling for service, please ensure that the steps in point 12 have been followed.
Service: Please call 1300 11 HELP (4357)
Spare Parts: Please call 1300 11 SPARE (7727)
The Australian Consumer
Law requires the inclusion
of the following statement
with this warranty:
Our goods come with guarantees that cannot be excluded under the Australian Consumer Law. You are entitled
to a replacement or refund for a major failure and for compensation for any other reasonably foreseeable loss or
damage. You are also entitled to have the goods repaired or replaced if the goods fail to be of acceptable quality
and the failure does not amount to a major failure.

User Manual:Model Code/s:
Page:
ETM292X
16
 Loading...