

Page 1

Product:
Model Code/s:
Air Conditioner
Remote Control
User Manual
Exactly what
you need
RG57
Online:
esatto.house
Page 2
User Manual
Welcome
2
Residentia Group
—
Head Office
165 Barkly Avenue
Burnley Victoria
Australia 3121
—
ACN
600 546 656
—
Online
residentia.group
—
Postage
PO Box 6077
Collingwood North
VIC Australia 3066
—
Telephone
1300 11 4357
—
Email
Congratulations on purchasing your air conditioner. The Esatto brand is proudly
distributed within Australia by Residentia Group Pty Ltd.
Please refer to the warranty card at the rear of this manual for information regarding your
product’s parts and labour warranty, or visit us online at: www.residentiagroup.com.au
At Residentia Group, we are customer obsessed and our Support Team are there to
ensure you get the most out of your appliance. Should you want to learn more about your
unit such as the various temperature guides or importantly taking care of the appliance,
our Support Team are here to help.
You can use our online Support Centre at anytime by visiting:
→ http://support.residentiagroup.com.au
Or you can contact us via phone by dialling: 1300 11 HELP (4357).
It is important that you read through the following use and care manual thoroughly to
familiarise yourself with the installation and operation requirements of your appliance
to ensure optimum performance.
Again, thank you for choosing an Esatto appliance and we look forward to being of
service to you.
Kind Regards,
The Residentia Team
Page 3
esatto.house
3
Contents
Page 5
Specications
Page 8
LED Display
Page 6
Your Remote
Control
Page 9
Remote Operation
Page 4
User Manual
This page
is intentionally
left blank
4
Page 5
esatto.house
5
2
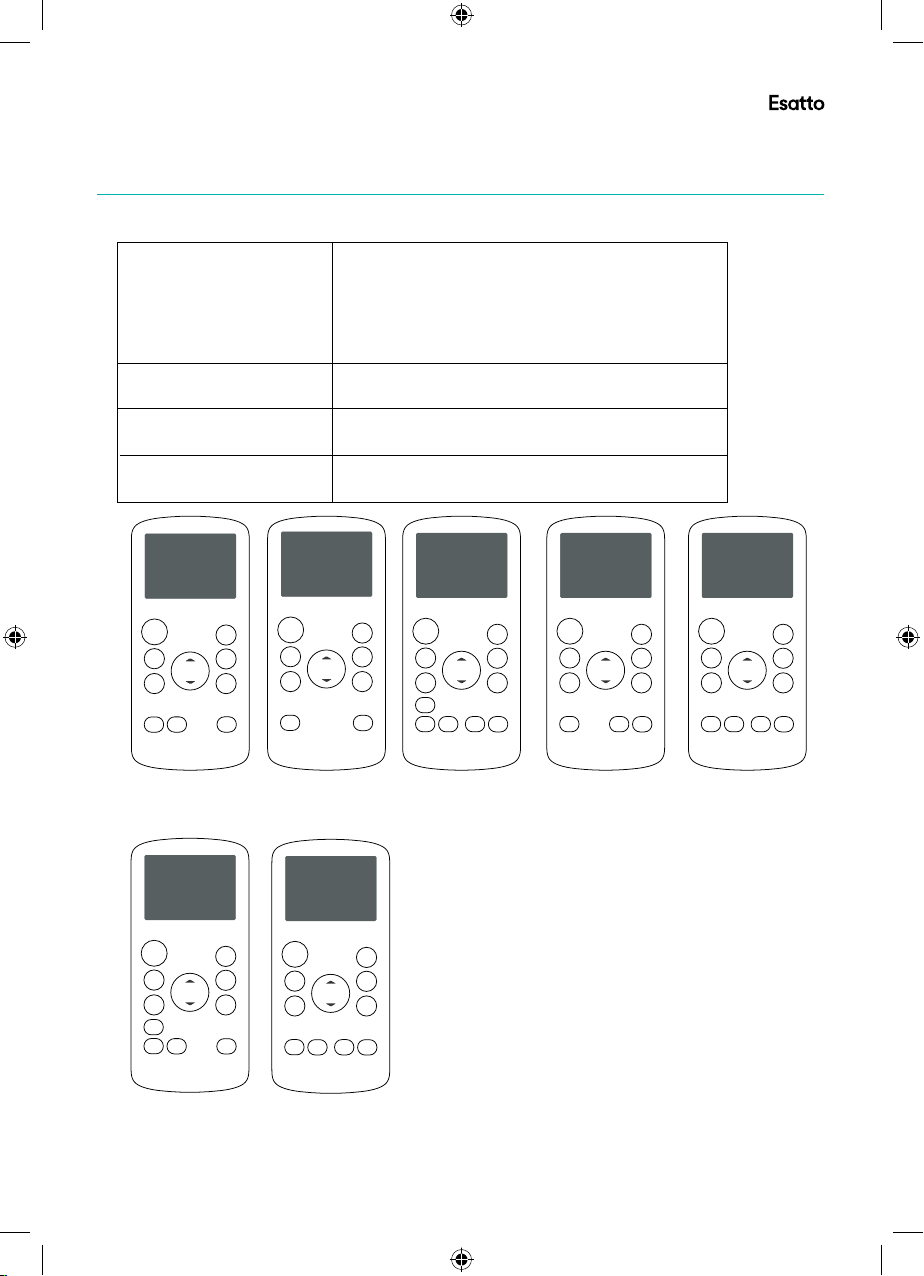
Remote Control Specifications
Specications
Model
Rated Voltage
Signal Receiving Range
Environment
LED
ON/OF F
MODE
TEMP
FAN
SLEEP
RG57H1(B)/BG(C)E;
RG57H1(B)/BG(C)E-M
RG57H1(B)/BG(C)EU1-M
RG57H1(B)/BG(C)EU1
ON/OF F
MODE
FAN
SLEEP
RG57H(B)/BG(C)E
RG57H(B)/BG(C)EU1
RG57H(B)/BG(C)EU1-M
RG57H(B)/BG(C)E-M
SWING
SHORT
CUT
TIMER
ON
TEMP
TIMER
OFF
RG57H(B)/BG(C)E; RG57H1(B)/BG(C)E; RG57H2(B)/BG(C)EF;RG57H3(B)/BG(C)EFU1;
RG57H3(B)/BG(C)EF;RG57H1(B)/BG(C)E-M;RG57H(B)/BG(C)EU1;RG57H4(B)/BG(C)EFU1;
RG57H(B)/BG(C)E-M;RG57H(B)/BG(C)EU1-M;RG57H3(B)/BG(C)EFU1-M;
RG57H1(B)/BG(C)EU1-M;RG57H5(B)/BG(C)CEU1;RG57H5(B)/BG(C)CE;RG57H1(B)/BG(C)EU1;
RG57H2(B)/BG(C)EFU1;RG57H3(B)/BG(C)EF;RG57H4(B)/BG(C)EF;RG57H2(B)/BG(C)EF-M;
RG57H2(B)/BG(C)EFU1-M;RG57H4(B)/BG(C)EFU
1-B;RG57H4(B)/BGCEF-B;RG57J2(B)/BGCE(U1)
3.0V(Dry batteries R03/LR03×2)
8m
O O O O
-5 C~60 C(23 F~140 F)
SHORT
CUT
TIMER
ON
TIMER
OFF
ON/OF F
MODE
FAN
LED
ION
SLEEP
SWING
SHORT
CUT
TIMER
ON
TEMP
TIMER
OFF
FOLLOW
LED
ME
RG57H2(B)/BG(C)EF
RG57H2(B)/BG(C)EF-M
RG57H2(B)/BG(C)EFU1
ON/OF F
MODE
FAN
SLEEP
SHORT
CUT
TIMER
ON
TEMP
TIMER
OFF
FOLLOW
LED
ME
RG57H3(B)/BG(C)EF
RG57H3(B)/BG(C)EFU1
RG57H3(B)/BG(C)EFU1-M
RG57H3(B)/BG(C)EF-M
RG57H2(B)/BG(C)EFU1-M
ON/OF F
MODE
FAN
SLEEP
SWING
SHORT
CUT
TIMER
ON
TEMP
TIMER
FF
O
FOLLOW
LED
ME
RG57H4(B)/BG(C)EFU1
RG57H4(B)/BG(C)EF
RG57H4(B)/BG(C)EFU1-B
RG57H4(B)/BG(C)EF-B
ON/OF F
MODE
FAN
ION
SLEEP
RG57H5(B)/BG(C)E
RG57H5(B)/BG(C)EU1
SWING
SHORT
CUT
TIMER
ON
TEMP
TIMER
OFF
ON/OF F
MODE
FAN
LED
SLEEP
SWING
SHORT
CUT
TIMER
ON
TEMP
TIMER
OFF
LED
ECO
RG57J2(B)/BGCEU1
RG57J2(B)/BGCE
Page 6
User Manual
NOT SURE WHAT A FUNCTION DOES?
Refer to the How to Use Basic Functions and
How to Use Advanced Functions sections
of this manual for a detailed description of
how to use your air conditioner.
SPECIAL NOTE
Button designs on your unit may differ
slightly from the example shown.
If the unit does not have a particular
function, pressing that function s button
on the remote control will have no effect.
When there are wide differences between
Remote control Illustration and
USER'S MANUAL on function description,
the description of USER'S MANUAL
shall prevail.
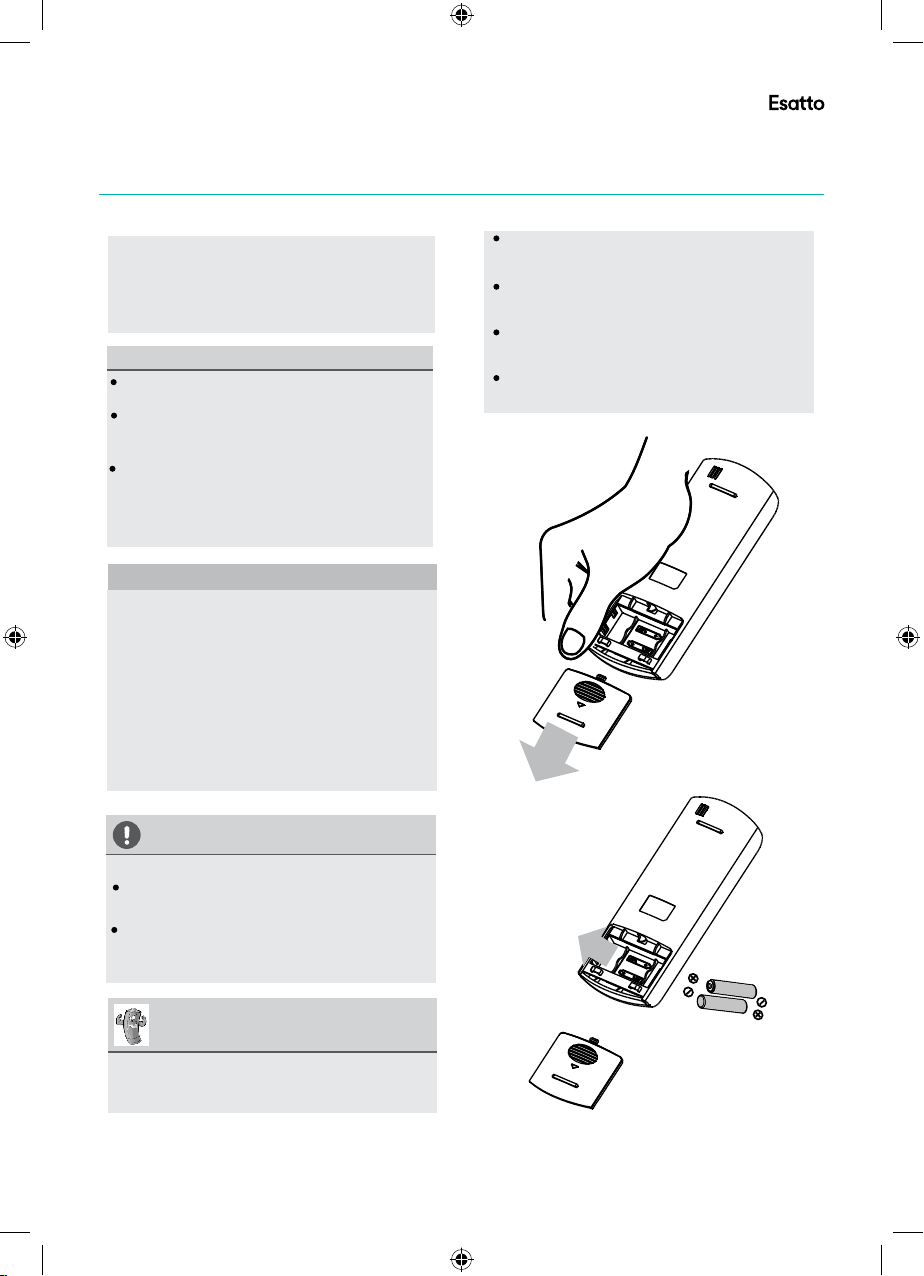
Inserting and Replacing Batteries
Your air conditioning unit comes with two AAA
batteries. Put the batteries in the remote control
before use.
1. Slide the back cover from the remote
Control downward, exposing the battery
compartment.
2. Insert the batteries, paying attention to match
up the (+) and (-) ends of the batteries with
the symbols inside the battery compartment.
3. Slide the battery cover back into place.
BATTERY NOTES
For optimum product performance:
Do not mix old and new batteries, or
batteries of different types.
Do not leave batteries in the remote control
if you don t plan on using the device for
more than 2 months.
BATTERY DISPOSAL
Do not dispose of batteries as unsorted
municipal waste. Refer to local laws for
proper disposal of batteries.
Function Buttons
Handling The Remote Control
,
,
,
,
speed features are optional.
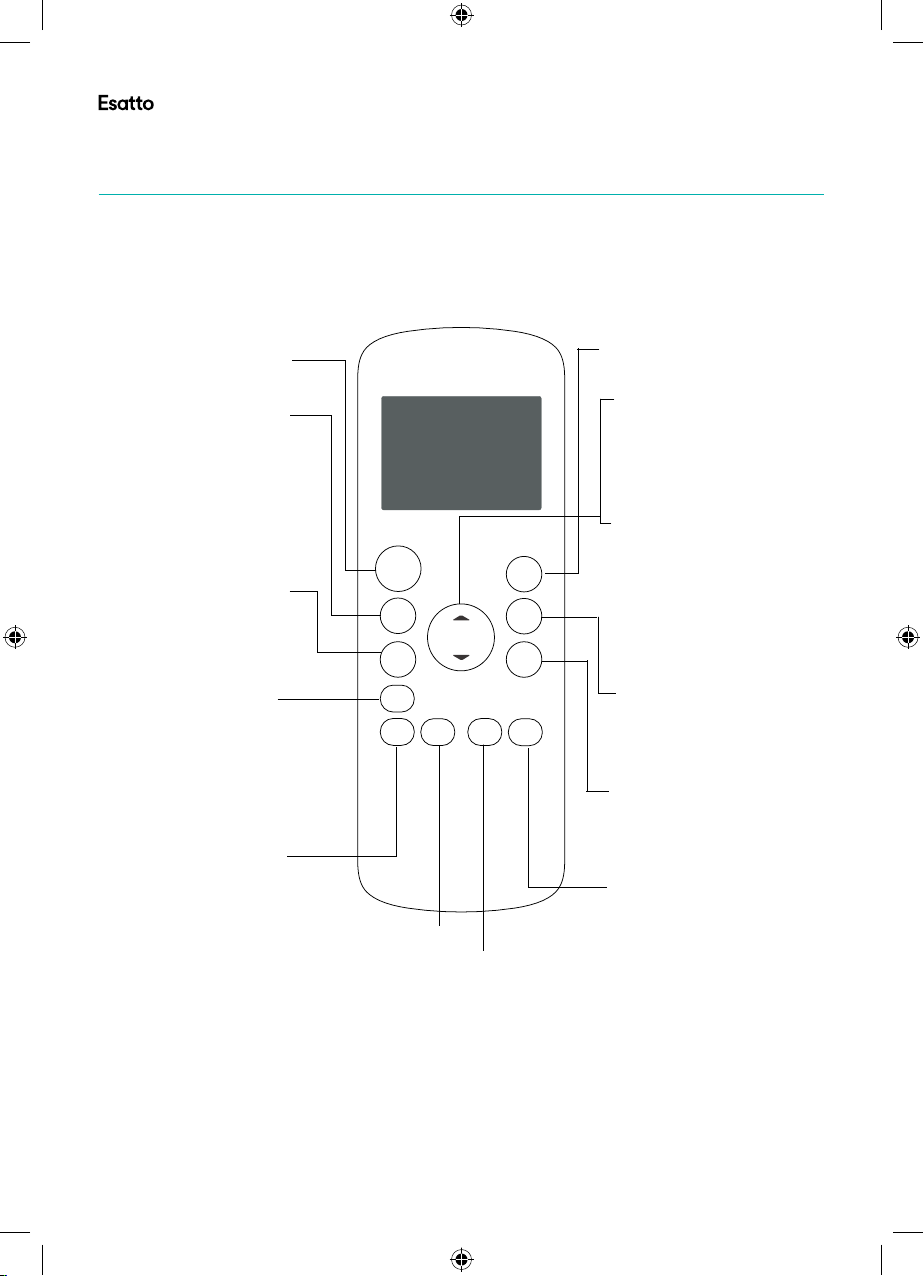
Your Remote Control
Before you begin using your new air conditioner, make sure to familiarize yourself with its remote
control. The following is a brief introduction to the remote control itself. For instructions on how to
operate your air conditioner, refer to the How to Use Basic Functions section of this manual.
6
Turns the unit on or off.
Scrolls through operation
modes as follows:
AUTO
g
COOL g
HEAT g
NO TE:Pl eas e do no t sel ect
HEAT mode if the mac hin e you
purch ase d is co oli ng only type.
Heat mo de is n ot su ppo rted by
the coo lin g onl y app liance.
RG57J2(B)/BGCE(U1) has only cool and fan mdoes.
FAN SPEED
Selects fan speeds in
the following order:
AUTO g LOW g
MED g HIGH
NOTE: MED is optional.
Press this button, the
Ionizer is energized and
will help to remove pollen
and impurities from the
air.
Saves energy during
sleeping hours.
NOTE:
Swing, Ion, Follow me, ECO and Med fan
ON/OFF
MODE
DRY g
FAN
ION
SLEEP
ON/ OFF
MOD E
FAN
ION
SLE EP
SWI NG
Starts and stops louver
movement.
SWING
SHO RT
CUT
TIM ER
TEM P
ON
TIM ER
OFF
LED
A
A
A: FOLLOW ME
Temperature sensing
and room temperature
display button.
A: ECO
Used to enter the
energy efficient mode.
This feature is availabe
under cool mode only.
SHORT CUT
Sets and activates your
favorite pre-settings.
p
TEMP
Increases temperate in
O O
1 C(1 F) increments.
Max. temperature is
O O
30 C(86 F) .
TEMPq
Decreases temperate in
O O
1 C(1 F) increments.
Min. temperature is
O O
17 C(62 F) .
NOTE: Press and hold
and buttons together for
q
p
3 seconds will alternate the
temperature display
between the C & F scale.
O O
TIMER ON
Sets timer to turn unit
on (see How to Use
Basic Functions for
instructions)
TIMER OFF
Sets timer to turn unit
off (see How to Use
Basic Functions for
instructions)
LED
Turns indoor unit s LED
,
display on and off.
If you are sensitive to
light when you go to
sleep, you can press the
LED button to turn off
the LED display on the
unit. Press the button
again to turn it back on.
Page 7
esatto.house
7
NOT SURE WHAT A FUNCTION DOES?
Refer to the How to Use Basic Functions and
How to Use Advanced Functions sections
of this manual for a detailed description of
how to use your air conditioner.
SPECIAL NOTE
Button designs on your unit may differ
slightly from the example shown.
If the unit does not have a particular
function, pressing that function s button
on the remote control will have no effect.
When there are wide differences between
Remote control Illustration and
USER'S MANUAL on function description,
the description of USER'S MANUAL
shall prevail.
TIPS FOR USING REMOTE CONTROL
The remote control must be used within 8
meters of the unit.
The unit will beep when remote signal is
received.
Curtains, other materials and direct sunlight
can interfere with the infrared signal receiver.
Remove batteries if the remote will not be
used more than 2 months.
Inserting and Replacing Batteries
Your air conditioning unit comes with two AAA
batteries. Put the batteries in the remote control
before use.
1. Slide the back cover from the remote
Control downward, exposing the battery
compartment.
2. Insert the batteries, paying attention to match
up the (+) and (-) ends of the batteries with
the symbols inside the battery compartment.
3. Slide the battery cover back into place.
BATTERY NOTES
For optimum product performance:
Do not mix old and new batteries, or
batteries of different types.
Do not leave batteries in the remote control
if you don t plan on using the device for
more than 2 months.
BATTERY DISPOSAL
Do not dispose of batteries as unsorted
municipal waste. Refer to local laws for
proper disposal of batteries.
,
,
Handling The Remote Control
,
,
,
,
,
,
,
,
,
,
,
,
TIPS FOR USING REMOTE CONTROL
The remote control must be used within 8
Handling The Remote Control
NOT SURE WHAT A FUNCTION DOES?
Refer to the How to Use Basic Functions and
How to Use Advanced Functions sections
of this manual for a detailed description of
how to use your air conditioner.
SPECIAL NOTE
Button designs on your unit may differ
slightly from the example shown.
If the unit does not have a particular
function, pressing that function s button
on the remote control will have no effect.
When there are wide differences between
,
,
Remote control Illustration and
,
,
USER'S MANUAL on function description,
the description of USER'S MANUAL
shall prevail.
Inserting and Replacing Batteries
Your air conditioning unit comes with two AAA
batteries. Put the batteries in the remote control
before use.
1. Slide the back cover from the remote
Control downward, exposing the battery
compartment.
2. Insert the batteries, paying attention to match
up the (+) and (-) ends of the batteries with
the symbols inside the battery compartment.
3. Slide the battery cover back into place.
BATTERY NOTES
For optimum product performance:
Do not mix old and new batteries, or
batteries of different types.
Do not leave batteries in the remote control
if you don t plan on using the device for
more than 2 months.
,
,
,
,
,
meters of the unit.
The unit will beep when remote signal is
received.
Curtains, other materials and direct sunlight
,
,
,
,
,
can interfere with the infrared signal receiver.
Remove batteries if the remote will not be
used more than 2 months.
BATTERY DISPOSAL
Do not dispose of batteries as unsorted
municipal waste. Refer to local laws for
proper disposal of batteries.
Page 8
User Manual
1. Press th e MODE bu tton to s elect
COOL mode.
2. Set your d esire d tempe rature us ing
the Temp o r Temp b utton.
3. Press th e FAN butt on to sel ect the
fan speed : AUTO , LOW, MED ,or
HIGH.
4. Press th e ON/OF F butto n to start the
unit.
COOL operation
1
3
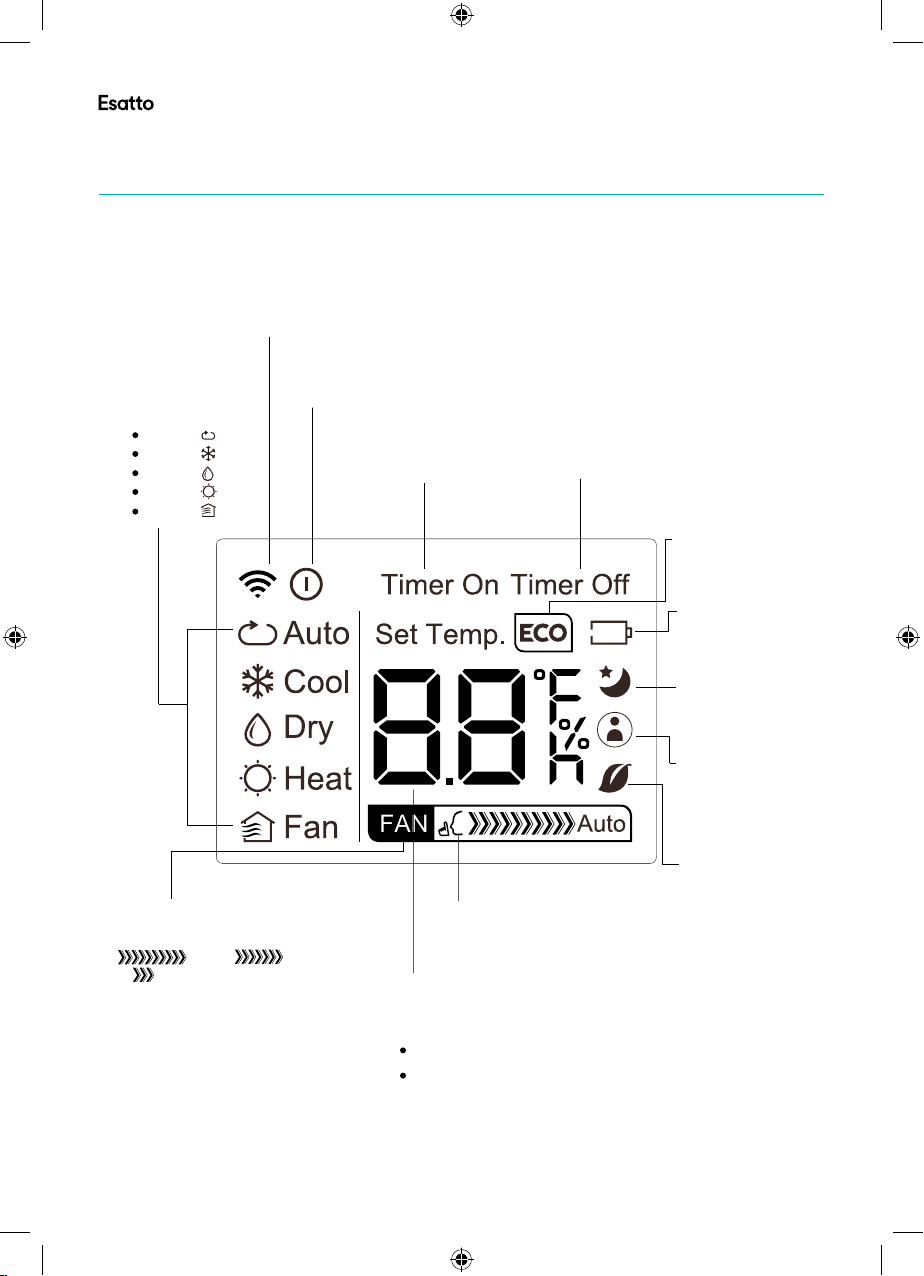
Remote LED Screen Indicators
How To Use The Basic Functions
LED Display
Transmission Indicator
Lights up when remote sends
signal to unit
MODE display
Displays the current
mode, including:
AUTO
COOL
DRY
HEAT
FAN
ON/OFF display
Appears when the unit is turned on,
and disappears when it is turned off
TIMER ON display
Displays when TIMER
ON is set
TIMER OFF display
Displays when TIMER
OFF is set
8
ECO display
Not available for
this unit
FAN SPEED display
Displays selected FAN SPEED:
or LOW
This display is blank when
set to AUTO speed.
NOTE: MED is optional.
HIGH, MED,
Battery display
Low battery
detection
SLEEP display
Displays when
SLEEP function
is activated
FOLLOW ME
display
Indicates that
the FOLLOW ME
function is on
Not available for
this unit
SILENT display
Not available for this unit
Temperature/Timer display
Displays the set temperature by default, or timer setting
when using TIMER ON/OFF functions
Temperature range: 17-30 C(62 F-86 F)
Timer setting range: 0-24 hours
This display is blank when operating in FAN mode.
o O O
Page 9
esatto.house
9
How To Use The Basic Functions
1. Press th e MODE bu tton to s elect
COOL mode.
2. Set your d esire d tempe rature us ing
the Temp o r Temp b utton.
3. Press th e FAN butt on to sel ect the
fan speed : AUTO , LOW, MED,or
HIGH.
4. Press th e ON/OF F butto n to start the
unit.
In AUTO m ode, th e unit will automa tical ly
select th e COOL, FA N, HEAT or DRY mode
based on th e set tem perature.
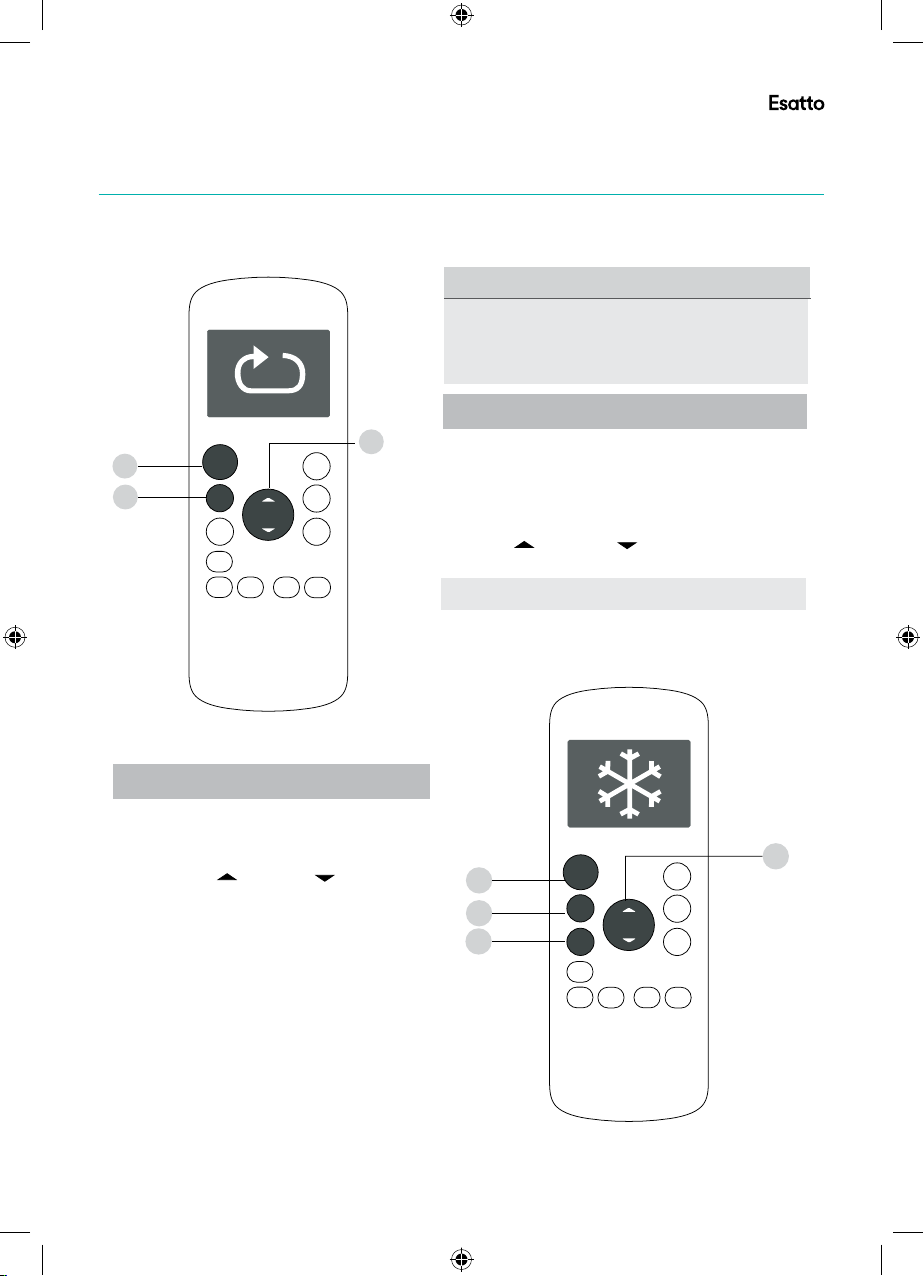
1. Press th e MODE bu tton to s elect Auto mode .
2. Set your d esire d tempe rature us ing the
Temp or Temp but ton.
3. Press th e ON/OF F butto n to start the unit.
,
NOTE: FAN SP EED can t b e set in Aut o mode.
SETTING TEMPERATURE
AUTO operation
The opera ting te mpera ture rang e for uni ts is
O O O
17-30 C (62 F-86 F). You c an increase or
O O
decreas e the set t meperature in 1 C(1 F)
increme nts.
COOL operation
1
3
2
1
3
2
4
How To Use The Basic Functions
ON/O FF
ON/O FF
TEMP
TEMP
SHOR T
CUT
SHOR T
CUT
TIME R
ON
TIME R
ON
TIME R
OFF
TIME R
OFF
MODE
MODE
FAN
FAN
SLEE P
SLEE P
LED
LED
FOLL OW
ION
SWIN G
ME
FOLL OW
ION
SWIN G
ME
Remote Operation
ON/O FF
MODE
FAN
ION
SLEE P
SWIN G
3
1
TEMP
SHOR T
CUT
TIME R
ON
TIME R
OFF
FOLL OW
LED
ME
SETTING TEMPERATURE
The opera ting te mpera ture rang e for uni ts is
O O O
17-30 C (62 F-86 F). You c an increase or
decreas e the set t meperature in 1 C(1 F)
increme nts.
AUTO operation
2
In AUTO m ode, th e unit will automa tical ly
select th e COOL, FA N, HEAT or DRY mode
based on th e set tem perature.
1. Press th e MODE bu tton to s elect Auto mode .
2. Set your d esire d tempe rature us ing the
Temp or Temp but ton.
3. Press th e ON/OF F butto n to start the unit.
NOTE: FAN SP EED can t b e set in Aut o mode.
,
O O
COOL operation
1. Press th e MODE bu tton to s elect
COOL mode.
2. Set your d esire d tempe rature us ing
the Temp o r Temp b utton.
3. Press th e FAN butt on to sel ect the
fan speed : AUTO , LOW, MED,or
HIGH.
4. Press th e ON/OF F butto n to start the
unit.
2
ON/O FF
MODE
FAN
ION
SLEE P
SWIN G
4
1
3
TEMP
SHOR T
CUT
TIME R
ON
TIME R
OFF
FOLL OW
LED
ME
Page 10
User Manual
1
3
4
How To Use The Basic Functions
How To Use The Basic Functions
ON/O FF
SLEE P
Remote Operation (Continued)
3
1
ON/O FF
MODE
FAN
ION
SLEE P
SWIN G
TEMP
FOLL OW
ME
SHOR T
CUT
TIME R
ON
TIME R
OFF
LED
10
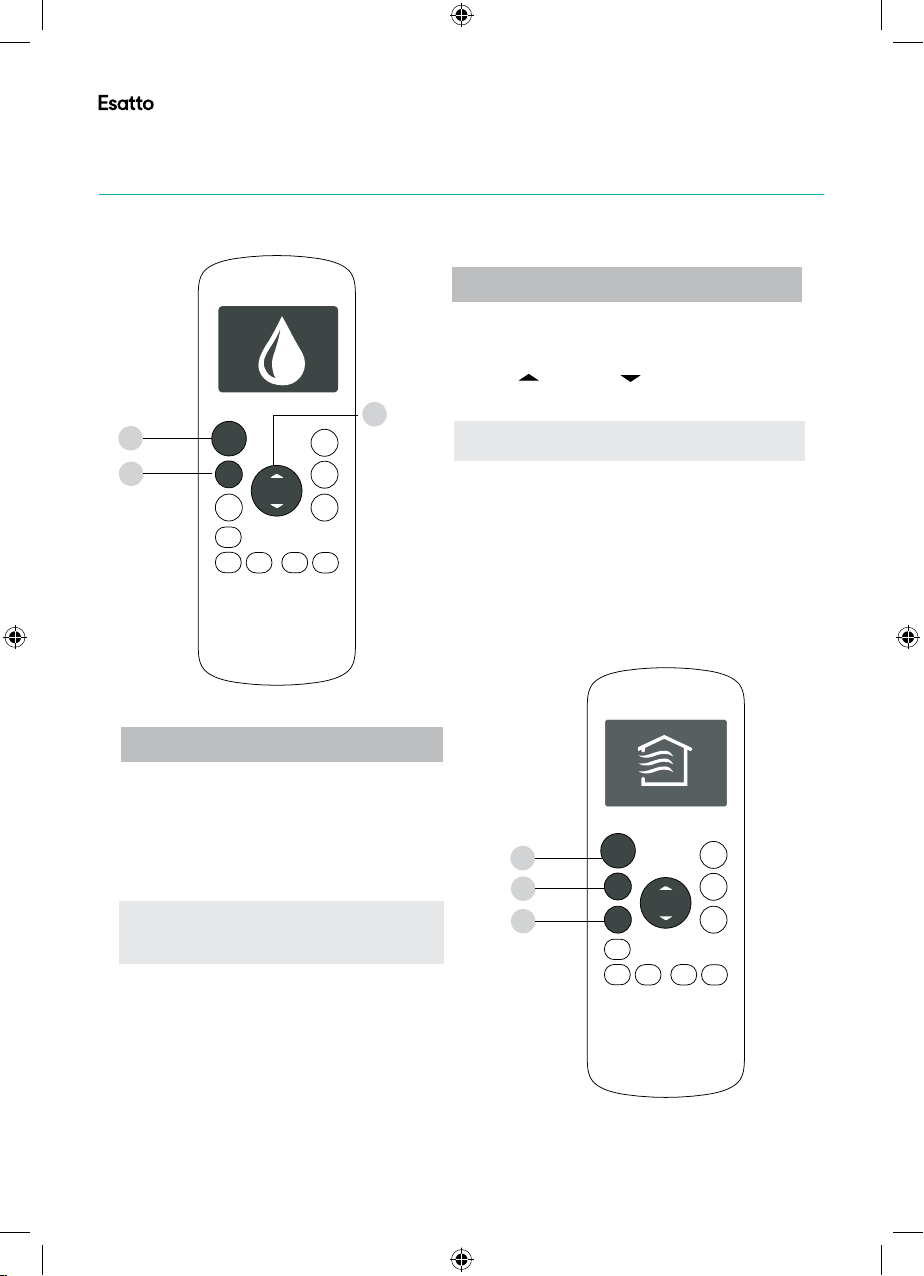
DRY operation(dehumidifying)
1. Press the MODE bu tton to s elect D RY
mode.
2. Set your desire d tempe ratur e using the
Temp or Temp but ton.
2
3. Press the ON/OF Fbutt on to sta rt the un it.
NOTE: FAN SPEED can t be chang ed in
,
DRY mode.
FAN operation
1. Press the MODE bu tton to s elect FA N
mode.
2. Press FAN b utton t o selec t the fan
speed: AUTO, LO W, MED or HI GH.
3. Press the ON/OF Fbutt on to sta rt the
unit.
NOTE: You c an t set tempera ture in FA N
mode. As a r esult , your re mote co ntrol s
,
,
LCD scree n will no t displ ay temp erature.
3
1
2
ON/O FF
MODE
FAN
ION
SLEE P
SWIN G
TEMP
FOLL OW
ME
SHOR T
CUT
TIME R
ON
TIME R
OFF
LED
Page 11
esatto.house
11
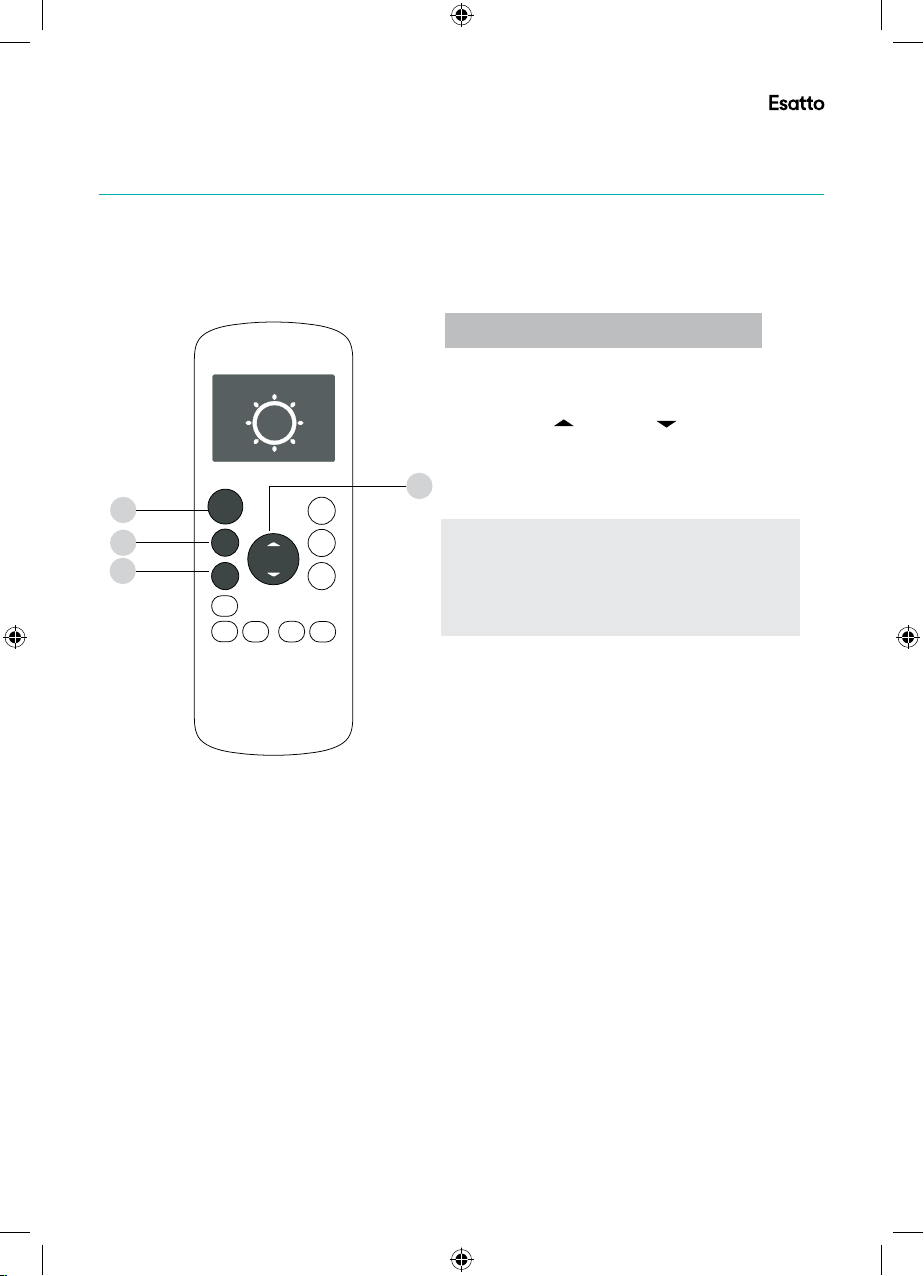
1. Press th e MODE bu tton to s elect
HEAT mod e.
2. Set your d esire d tempe rature u
sing
the Temp o r Temp b utton.
3. Press th e FAN butt on to sel ect the
fan speed : AUTO , LOW, MED,or HIGH.
4. Press th e ON/OF F butto n to star t the
unit.
HEAT operation
NOTE: As o utdoo r tempe rature dr ops,t he
perform ance of y our uni t s HEAT functi on
may be affecte d. In such instanc es, we
recomme nd usin g this ai r conditi oner in
conjunc tion wi th othe r heating a pplia nce.
,
1
3
2
4
How To Use The Basic Functions
ON/O FF
TEMP
SHOR T
CUT
TIME R
ON
TIME R
OFF
MODE
FAN
SLEE P
LED
FOLL OW
ION
SWIN G
ME
How To Use The Basic Functions
ON/O FF
MODE
FAN
ION
SLEE P
SWIN G
4
1
3
TEMP
FOLL OW
ME
SHOR T
CUT
TIME R
ON
TIME R
OFF
LED
HEAT operation
1. Press th e MODE bu tton to s elect
HEAT mod e.
2. Set your d esire d tempe rature us ing
the Temp o r Temp b utton.
3. Press th e FAN butt on to sel ect the
fan speed : AUTO , LOW, MED,or HIGH.
4. Press th e ON/OF F butto n to star t the
2
unit.
NOTE: As o utdoo r tempe rature dr ops,t he
perform ance of y our uni t s HEAT functi on
may be affecte d. In such instanc es, we
recomme nd usin g this ai r conditi oner in
conjunc tion wi th othe r heating a pplia nce.
,
Page 12
User Manual
2. Press th e TIMER O FF button r epeatedly
to set the ti me when you want the u nit to
turn off.
3. Wa it 2 second s, then t he TIME R OFF
functio n will be activate d. The di gital
display o n your remote cont rol will th en
return to t he temp erature d isplay.
Example
hours.
: Setting unit to turn off after 5
1
2
TIMER OFF f uncti on
The TIMER O FF func tion allo ws you to
set a perio d of time after whic h the unit
will auto matically turn off, such as w hen
you wake up .
1.
This numb er indicates the
amount of t ime aft er the current tim e
that you wa nt the unit t o turn off.
For examp le, if you set TIMER OFF fo r
2 hours, will appe ar on the
scree n, and the unit will tur n off after
2 hours.
Press the T IMER OF F button. B y
default , the las t time peri od that you
set and an "h " (indicating ho urs)wil l
appear on t he display.
Note:
" 2.0h "
ON/OFF
MODE
FAN
SHORT
CUT
TIMER ON
TIMER OF
F
TEMP
S
L
EEP
1
3
TIMER OF F
Setting the TIMER function
Remote Operation (Continued)
12
Your a ir cond itionin g unit ha s two
timer-r elate d funct ions:
TIMER ON- sets the a mount o f timer a fter
which the unit wil l autom atica lly turn on.
TIMER OFF- sets the amoun t of time a fter
which the unit wil l autom atica lly turn off.
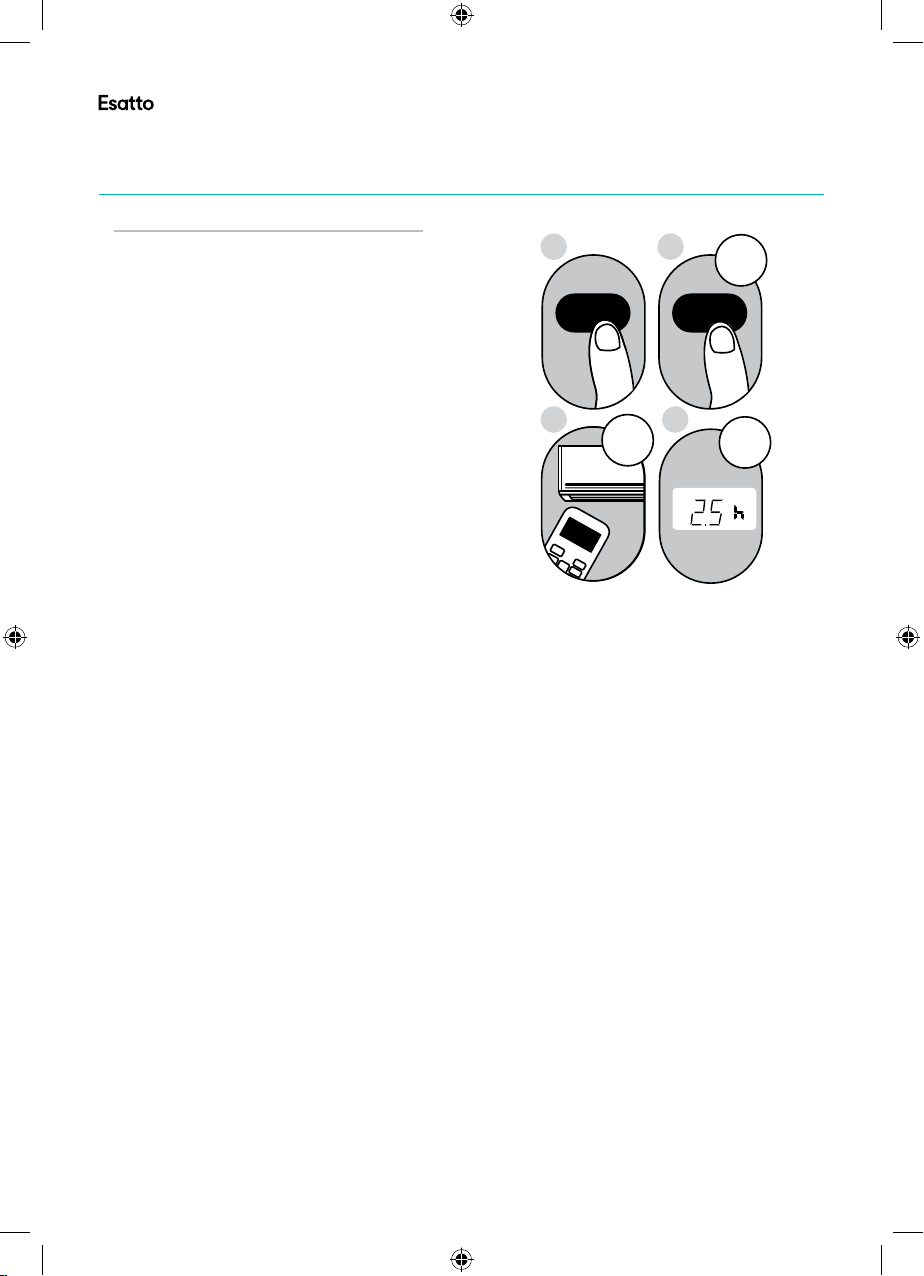
TIMER ON functio n
The TIMER ON funct ion all ows you t o set
a period of t ime aft er whic h the uni t will
automaticall y turn on, su ch as whe n you
come home f rom w ork.
Press the TIMER ON b utton . By
1.
default, the las t time pe riod th at you
set and an "h" (indi catin g hours )will
appear on the disp lay.
Note:
amount of time aft er the cu rre nt time
that you want the unit to turn on.
For examp le, if you set TIMER ON f or
2 hours, will appe ar on the
scree n, and th e unit will t ur n on afte r
2 hours.
2. Press the TIMER O N butto n repea tedly
to set the time when y ou want t he unit t o
turn on.
3. Wa it 2 seco nds, then the TI MER ON
function will be a ctiva ted. The digit al
display o n your re mote co ntrol w ill then
return to the temp eratu re disp lay.
This numb er indi cates t he
" 2.0h "
3
MODE
FAN
S
L
E
EP
Example
hours.
x5
TIMER ON TIMER ON
4
1sec
ON/OFF
SHORT
CUT
TEMP
TIMER ON
TIMER OF
F
: Setting unit to turn on after 2.5
2sec
Page 13
esatto.house
13
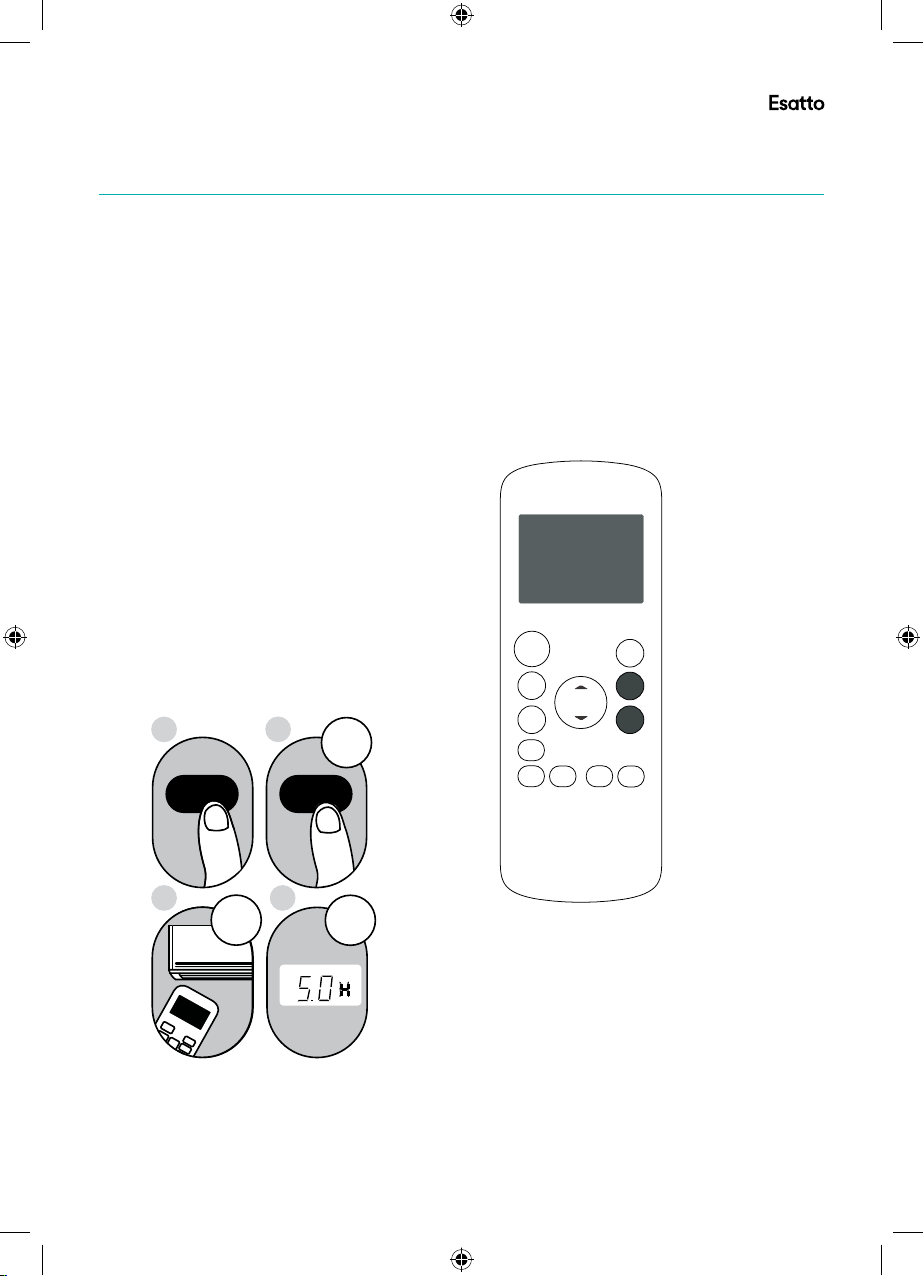
NOTE:
" 0.0h "
When sett ing the TIMER ON o r
TIMER OFF f uncti ons, up to 10 h ours,
the time wi ll increase in 3 0 minute
incre ments with each pres s. After 10
hours and u p to 24, it will incre ase in 1
hour increment s. Th e timer wil l re vert to
zero af ter 24 hours.
You ca n turn off ei ther fu nction by
setting i ts time r to .
2. Press th e TIMER O FF button r epeatedly
to set the ti me when you want the u nit to
turn off.
3. Wa it 2 second s, then t he TIME R OFF
functio n will be activate d. The di gital
display o n your remote cont rol will th en
return to t he temp erature d isplay.
Example
hours.
: Setting unit to turn off after 5
TIMER OFF f uncti on
The TIMER O FF func tion allo ws you to
set a perio d of time after whic h the unit
will auto matically turn off, such as w hen
you wake up .
1.
This numb er indicates the
amount of t ime aft er the current tim e
that you wa nt t
he u nit to turn off.
For examp le, if you set TIMER OFF fo r
2 hours, will appe ar on the
scree n, and the unit will tur n off after
2 hours.
Press the T IMER OF F button. B y
default , the las t time peri od that you
set and an "h " (indicating ho urs)wil l
appear on t he display.
Note:
" 2.0h "
2sec
x10
ON/OFF
MODE
FAN
SHORT
CUT
TIMER ON
TIMER OF
F
TEMP
S
L
EEP
1sec
1
3
2
4
TIMER OF F
TIMER OF F
Continue to press
TIMER ON
or
TIMER OFF until
desired time is
reached.
ON/O FF
TEMP
SHOR T
CUT
TIME R
ON
TIME R
OFF
MODE
FAN
SLEE P
LED
Timer on
FOLLO W
SWIN G
ION
ME
TIMER OFF f uncti on
The TIMER O FF func tion allo ws you to
set a perio d of time after whic h the unit
will auto matically turn off, such as w hen
you wake up .
Press the T IMER OF F button. B y
1.
default , the las t time peri od that you
set and an "h " (indicating ho urs)wil l
appear on t he display.
Note:
amount of t ime aft er the current tim e
that you wa nt the unit t o turn off.
For examp le, if you set TIMER OFF fo r
2 hours, will appe ar on the
scree n, and the unit will tur n off after
2 hours.
2. Press th e TIMER O FF button r epeatedly
to set the ti me when you want the u nit to
turn off.
3. Wa it 2 second s, then t he TIME R OFF
functio n will be activate d. The di gital
display o n your remote cont rol will th en
return to t he temp erature d isplay.
This numb er indicates the
" 2.0h "
1
2
TIMER OF F
3
1sec
TIMER OF F
4
x10
2sec
NOTE:
When sett ing the TIMER ON o r
TIMER OFF f uncti ons, up to 10 h ours,
the time wi ll increase in 3 0 minute
incre ments with each pres s. After 10
hours and u p to 24, it will incre ase in 1
hour increment s. Th e timer wil l re vert to
zero af ter 24 hours.
You ca n turn off ei ther fu nction by
setting i ts time r to .
" 0.0h "
Timer on
ON/O FF
MODE
FAN
ION
SLEE P
SWIN G
TEMP
FOLLO W
SHOR T
CUT
TIME R
ON
TIME R
OFF
ME
Continue to press
TIMER ON
TIMER OFF until
desired time is
reached.
LED
or
Example
hours.
ON/OFF
MODE
FAN
S
L
EEP
SHORT
CUT
TEMP
TIMER ON
TIMER OF
F
: Setting unit to turn off after 5
Page 14
User Manual
Example : Setti ng the un it to turn on a fter 6 ho urs, op erate for 2 h ours, t hen tur n off
(see the fi gure be low)
Your rem ote dis play
Current
time 1PM
Timer starts
Setting b oth TIMER O N and TIMER OFF at the s ame time
Remote Operation (Continued)
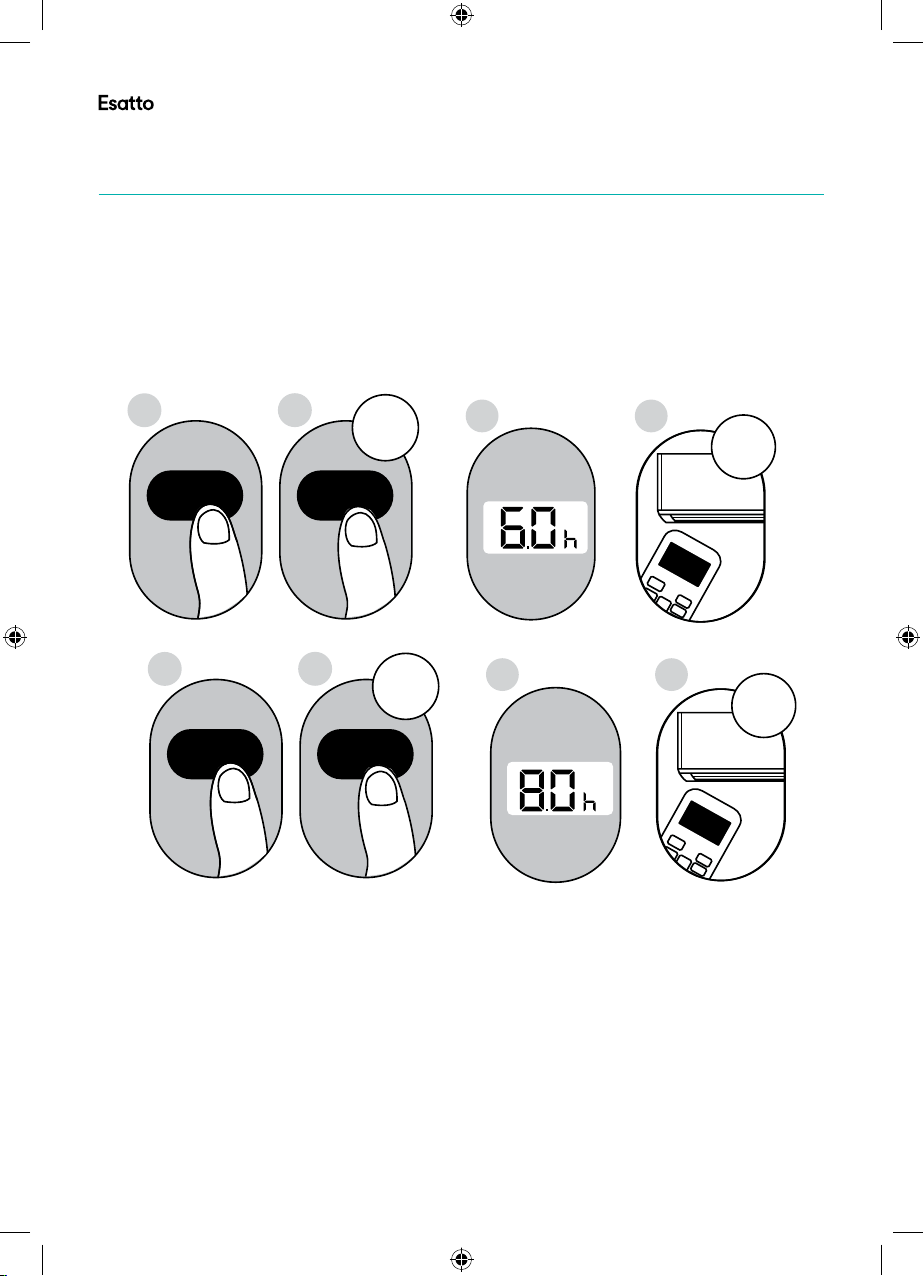
Keep in min d that the ti me period s you set for b oth functions re fer to hour s after the
current t ime. For ex ample, sa y that the cu rrent time is 1:00 PM, and yo u want the un it
to turn on auto matical ly at 7:00 PM . You want it to op erate for 2 hours, then autom a-
tically t ur n off at 9: 00 PM.
14
Do the following:
1
TIMER O N
5
2
TIMER O N
6
X12
3
X16
TIMER O FF
TIMER O FF
4
sec
3
ON/OFF
MODE
SHORT
CUT
TEMP
TIMER ON
7
8
sec
3
ON/OFF
MODE
SHORT
CUT
TEMP
TIMER ON
Page 15
esatto.house
15
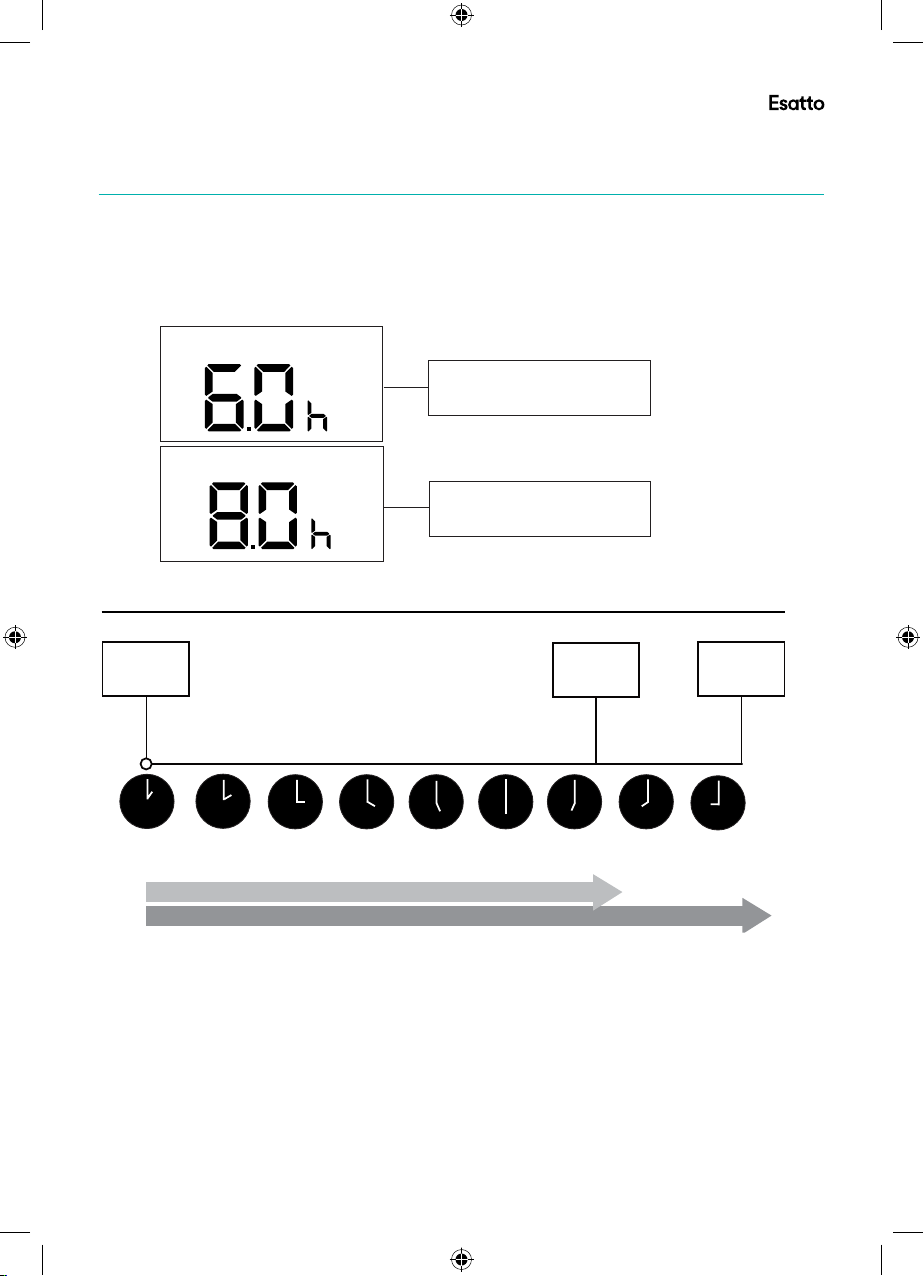
Example : Setti ng the un it to turn on a fter 6 ho urs, op erate for 2 h ours, t hen tur n off
(see the fi gure be low)
Your rem ote dis play
Timer is set To turn ON
6 hours from current time
Timer is set to turn OFF
8 hours from current time
Current
time 1PM
2PM 3PM
4PM 5PM
6PM 7PM 8PM 9PM
Timer starts
Unit turns Unit turns
ON
OFF
6 hours later
8 hours later
Timer on
Timer off
Example : Setti ng the un it to turn on a fter 6 ho urs, op erate for 2 h ours, t hen tur n off
(see the fi gure be low)
Your rem ote dis play
Timer on
Timer is set To turn ON
6 hours from current time
Timer off
Timer is set to turn OFF
8 hours from current time
Timer starts
Current
time 1PM
2PM 3PM
6 hours later
8 hours later
4PM 5PM
6PM 7PM 8PM 9PM
Unit turns Unit turns
ON
OFF
Page 16
User Manual
How To Use The Advanced Functions
NOTE:
-Button s design is b ased on typ ical model an d might be sl ightly di ffere nt
from the ac tual one yo u purchas ed, the actual shape sha ll prevai l.
-All the fu nctions d escribe d are accompl ished by th e unit, if th e unit has
no this fea ture, the re is no corr esponding operatio n happene d when
press the r elative b utton on th e remote co ntrolle r.
-When the re are wide d iffer ences between Remote controll er Illust ration
and USERS M ANUAL on funct ion description, the descript ion on USER S
MANUAL shall p revail.
-The devi ce could co mply with t he local national regu lati
it should c omply wit h CAN ICES- 3(B)/NMB-3(B). In US A, this dev ice
complie s with part 1 5 of the FCC Ru les. Oper ation is su bject to the
followi ng two cond itions: ( 1) This device may not c ause harm ful inter fe-
rence, an d (2) this de vice must a ccept any interference receiv ed,
includi ng interf erence th at may caus e undesired o peratio n.
-This equ ipment ha s been test ed and foun d to comply with the limits for
a Class B dig ital devi ce, pursu ant to part 15 of the FCC Ru les. These
limits ar e designe d to provid e reasonabl e protect ion again st harmfu l
interfe ren
and can rad iate radi o frequen cy energy and , if not installed and u sed in
accorda nce with th e instruc tions, ma y cause harmful interference to r adio
communi cations . However, t here is no guar antee tha t interfe rence wil l
not occur i n a particu lar insta llation. If this equipment does c ause harm ful
interfe rence to ra dio or tele vision reception, which can be de termine d by
turning t he equipm ent off a nd on, the us er is encoura ged to try to correct
the inter ference b y one or more o f the follo wing measur es:
R
eorient o r relocat e the recei ving antenn a.
Increas e the separ ation bet ween the equipment and r eceiver.
Connect t he equipm ent into an o utlet on a ci rcuit different from that to
which the r eceiver i s connect ed.
Consult t he dealer o r an experienced radio /TV techn ician for h elp.
Changes o r modific ations no t approved by the party responsib le for
complia nce could v oid suers authority to o perate th e equipme nt.
Remote Operation (Continued)
SLEEP Function
16
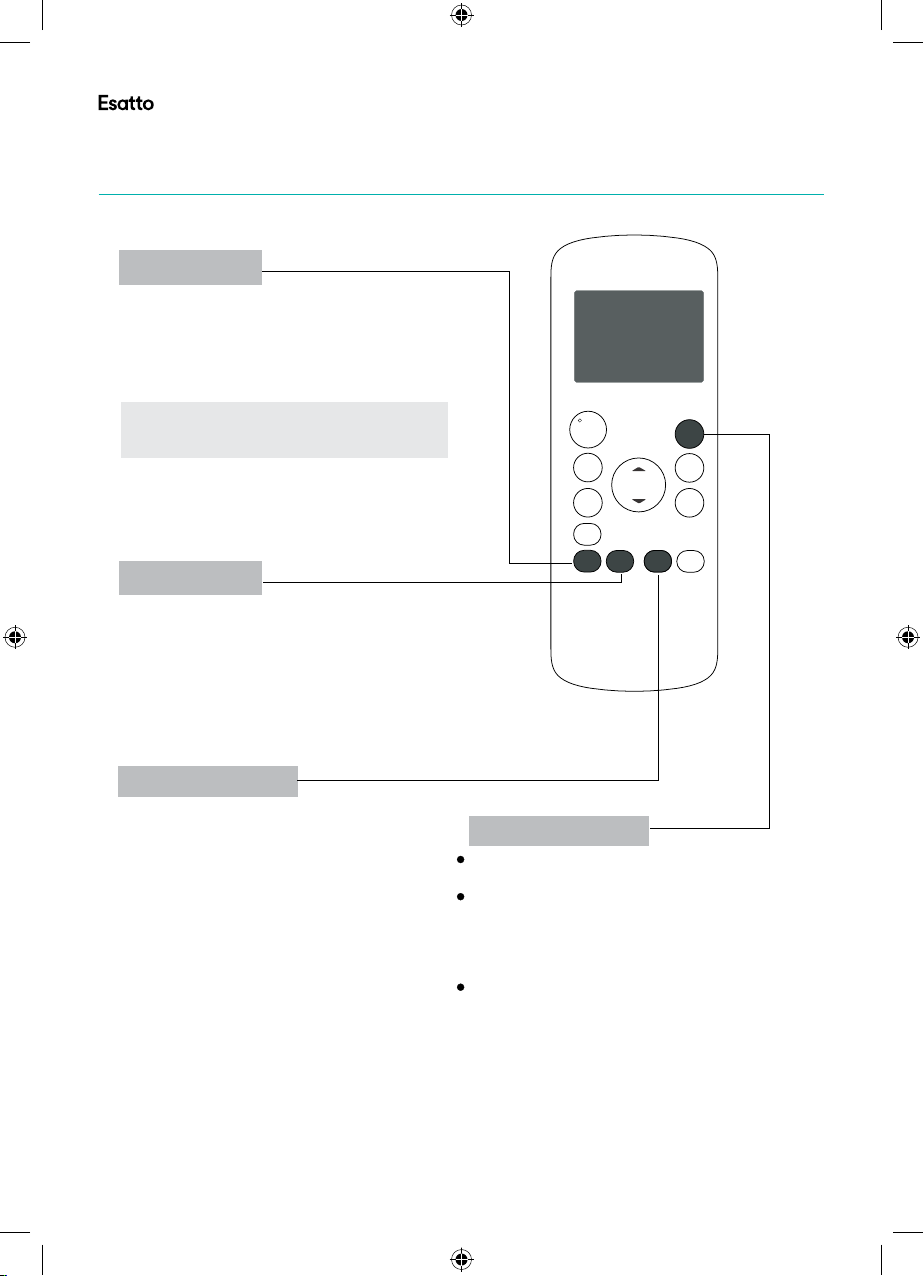
The SLEEP function is used to decrease
energy use while you sleep (and don t need
,
the same temperature settings to stay
comfortable).
Note: The SLEEP function is not available
in FAN or DRY mode.
SWING Function
Used to stop or start louver movement and set
the desired up/down air flow direction. The louver
changes 6 degrees in angle for each press(some
models without). If keep pushing more than 2
seconds, the louver auto swing feature is activated.
FOLLOW ME function
The FOLLOW ME function enables the
remote control to measure the temperature at its current location. When using
AUTO, COOL, or HEAT functions,
measuring ambient temperature from
the remote control (instead of from the
indoor unit itself) will enable the air
conditioner to optimize the temperature
around you and ensure maximum comfort.
1. Press FOLLOW ME button to activate
function. The remote control will send
temperature signal to the unit every
three minutes.
2. Press FOLLOW ME button again to
turn off this function.
ON/ OFF
MOD E
FAN
ION
SLEE P
SWIN G
TEM P
FOLL OW
ME
SHO RT
CUT
TIM ER
ON
TIM ER
OFF
LED
SHORTCUT function
Used to restore the current settings or resume
previous settings.
Push this button when remote controller is on,
the system will automatically revert back to
the previous settings including operating mode,
setting temperature, fan speed level and sleep
feature (if activated).
If pushing more than 2 seconds, the system
will automatically restore the current operation
settings including operating mode, setting
temperature, fan speed level and sleep
feature(if activated ).
Page 17
esatto.house
17
NOTE:
-Button s design is b ased on typ ical model an d might be sl ightly di ffere nt
from the ac tual one yo u purchas ed, the actual shape sha ll prevai l.
-All the fu nctions d escribe d are accompl ished by th e unit, if th e unit has
no this fea ture, the re is no corr esponding operatio n happene d when
press the r elative b utton on th e remote co ntrolle r.
-When the re are wide d iffer ences between Remote controll er Illust ration
and USERS M ANUAL on funct ion description, the descript ion on USER S
MANUAL shall p revail.
-The devi ce could co mply with t he local national regu la
tions. In C anada,
it should c omply wit h CAN ICES- 3(B)/NMB-3(B). In US A, this dev ice
complie s with part 1 5 of the FCC Ru les. Oper ation is su bject to the
followi ng two cond itions: ( 1) This device may not c ause harm ful inter fe-
rence, an d (2) this de vice must a ccept any interference receiv ed,
includi ng interf erence th at may caus e undesired o peratio n.
-This equ ipment ha s been test ed and foun d to comply with the limits for
a Class B dig ital devi ce, pursu ant to part 15 of the FCC Ru les. These
limits ar e designe d to provid e reasonabl e protect ion again st harmfu l
interfe r
ence in a res idential installation. Th is equipm ent gener ates, use s
and can rad iate radi o frequen cy energy and , if not installed and u sed in
accorda nce with th e instruc tions, ma y cause harmful interference to r adio
communi cations . However, t here is no guar antee tha t interfe rence wil l
not occur i n a particu lar insta llation. If this equipment does c ause harm ful
interfe rence to ra dio or tele vision reception, which can be de termine d by
turning t he equipm ent off a nd on, the us er is encoura ged to try to correct
the inter ference b y one or more o f the follo wing measur es
:
Reorien t or reloca te the rece iving antenna.
Increas e the separ ation bet ween the equipment and r eceiver.
Connect t he equipm ent into an o utlet on a ci rcuit different from that to
which the r eceiver i s connect ed.
Consult t he dealer o r an experienced radio /TV techn ician for h elp.
Changes o r modific ations no t approved by the party responsib le for
complia nce could v oid suers authority to o perate th e equipme nt.
NOTE:
-Button s design is b ased on typ ical model an d might be sl ightly di ffere nt
from the ac tual one yo u purchas ed, the actual shape sha ll prevai l.
-All the fu nctions d escribe d are accompl ished by th e unit, if th e unit has
no this fea ture, the re is no corr esponding operatio n happene d when
press the r elative b utton on th e remote co ntrolle r.
-When the re are wide d iffer ences between Remote controll er Illust ration
and USERS M ANUAL on funct ion description, the descript ion on USER S
MANUAL shall p revail.
-The devi ce could co mply with t he local national regu lations . In Ca
it should c omply wit h CAN ICES- 3(B)/NMB-3(B). In US A, this dev ice
complie s with part 1 5 of the FCC Ru les. Oper ation is su bject to the
followi ng two cond itions: ( 1) This device may not c ause harm ful inter fe rence, an d (2) this de vice must a ccept any interference receiv ed,
includi ng interf erence th at may caus e undesired o peratio n.
-This equ ipment ha s been test ed and foun d to comply with the limits for
a Class B dig ital devi ce, pursu ant to part 15 of the FCC Ru les. These
limits ar e designe d to provid e reasonabl e protect ion again st harmfu l
interfe rence in a re si
and can rad iate radi o frequen cy energy and , if not installed and u sed in
accorda nce with th e instruc tions, ma y cause harmful interference to r adio
communi cations . However, t here is no guar antee tha t interfe rence wil l
not occur i n a particu lar insta llation. If this equipment does c ause harm ful
interfe rence to ra dio or tele vision reception, which can be de termine d by
turning t he equipm ent off a nd on, the us er is encoura ged to try to correct
the inter ference b y one or more o f the follo wing measur es:
Reorien
Increas e the separ ation bet ween the equipment and r eceiver.
Connect t he equipm ent into an o utlet on a ci rcuit different from that to
which the r eceiver i s connect ed.
Consult t he dealer o r an experienced radio /TV techn ician for h elp.
Changes o r modific ations no t approved by the party responsib le for
complia nce could v oid suers authority to o perate th e equipme nt.
t or reloca te the rece iving ant enna.
dential i nstalla tion. This equipme nt genera tes, uses
nada,
Page 18
User Manual
This page
is intentionally
left blank
18
Page 19
esatto.house
19
This page
is intentionally
left blank
Page 20
User Manual
This page
is intentionally
left blank
Appliances
20
Exactly what
you need
A RESIDENTIA
GROUP INITIATIVE
 Loading...