

Page 1

LBI-39076B
System Manual
EDACS
Enhanced Local Interconnect (ELI)
ericssonzericssonz
Page 2

LBI-39076B NOTICES
REVISION HISTORY
Revision Date Reason for Change
- Sep 1994 Original Release (ELI Software Release 1.0)
A Jan 1995 Revision D Main Board and Corrections
B Feb 1996 Revision E Main Board, ELI Software Release 1.1, and Corrections
NOTICE!
This Manual covers Ericsson and General Electric products manufactured and sold by Ericsson Inc.
NOTICE!
Repairs to this equipment should be made only by an authorized service technician or facility designated by the supplier. Any
repairs, alterations or substitution of recommended parts made by the user to this equipment not approved by the
manufacturer could void the user’s authority to operate the equipment in addition to the manufacturer’s warranty.
NOTICE!
The software contained in this device is copyrighted by Ericsson Inc. Unpublished rights are reserved under the copyright
laws of the United States.
This manual is published by
inaccuracies of current information, or improvements to programs and/or equipment, may be made by
changes will be incorporated into new editions of this manual. No part of this manual may be reproduced or transmitted in any form or by any means,
electronic or mechanical, including photocopying and recording, for any purpose, without the express written permission of
Copyright September 1994, Ericsson GE Mobile Communications Inc.
Ericsson Inc.
2
, without any warranty. Improvements and changes to this manual necessitated by typographical errors,
Ericsson Inc.
, at any time and without notice. Such
Ericsson Inc.
Page 3

TABLE OF CONTENTS LBI-39076
B
TABLE OF CONTENTS
PAGE
REGULATORY COMPLIANCE............................................................................................................... 7
SPECIFICATIONS..................................................................................................................................... 9
INTRODUCTION....................................................................................................................................... 10
DESCRIPTION........................................................................................................................................... 10
OVERVIEW ........................................................................................................................................ 10
GTI UNITS.......................................................................................................................................... 11
GTI INTERFACE BOARD ................................................................................................................. 12
GTI CONFIGURATOR SOFTWARE................................................................................................. 12
IAM...................................................................................................................................................... 12
INSTALLATION........................................................................................................................................ 12
OVERVIEW ........................................................................................................................................ 12
1. RADIO SOFTWARE....................................................................................................................... 14
2. SITE CONTROLLER HARDWARE.............................................................................................. 14
3. SITE CONTROLLER SOFTWARE................................................................................................ 14
Application Software PROMs....................................................................................................... 15
Personality PROMs....................................................................................................................... 15
4. RADIO CHANNEL ASSIGNMENTS............................................................................................. 15
5. GTI SOFTWARE............................................................................................................................. 16
Main Board ................................................................................................................................... 16
Processor Board............................................................................................................................ 17
Interface Board.............................................................................................................................. 17
6. GTI TELEPHONE INTERFACE.................................................................................................... 18
Revision-A Main Board................................................................................................................ 18
Revision-D or E Main Board ........................................................................................................ 22
7. GTI DIP SWITCH SETTINGS ....................................................................................................... 22
8. GTI INTERFACE BOARD MOUNTING....................................................................................... 23
9. GTI & IAM MOUNTING................................................................................................................ 24
10. GTI CONNECTIONS.................................................................................................................... 24
Telephone Line ............................................................................................................................. 24
MASTR III Power Supply/Audio.................................................................................................. 25
MASTR II or IIe Power Supply/Audio......................................................................................... 25
PCM/Data Bus .............................................................................................................................. 25
Site Controller Computer.............................................................................................................. 26
11. IAM SOFTWARE.......................................................................................................................... 26
12. IAM CONNECTIONS................................................................................................................... 27
Power Supply................................................................................................................................ 27
PCM/Data Bus .............................................................................................................................. 27
Alarm Outputs............................................................................................................................... 27
Printer RS-232 Port....................................................................................................................... 27
13. IAM DIP SWITCH SETTINGS .................................................................................................... 28
14. GETC MODIFICATION............................................................................................................... 28
(Continued)
3
Page 4

LBI-39076B TABLE OF CONTENTS
TABLE OF CONTENTS (Cont.)
CONFIGURATION .................................................................................................................................... 29
OVERVIEW......................................................................................................................................... 29
SITE CONTROLLER DATABASE.................................................................................................... 29
Operation without System Manager .............................................................................................. 29
Interconnect Timing Parameters.................................................................................................... 29
Operation with System Manager ................................................................................................... 30
GTI DATABASE................................................................................................................................. 33
Local Data Link............................................................................................................................. 33
Remote Data Link.......................................................................................................................... 34
OPERATION .............................................................................................................................................. 35
GTI UNITS .......................................................................................................................................... 35
Indicators ....................................................................................................................................... 35
Resets ............................................................................................................................................ 35
Alarms........................................................................................................................................... 35
IAM...................................................................................................................................................... 35
Indicators ....................................................................................................................................... 35
Front Panel Connector................................................................................................................... 36
Printer............................................................................................................................................ 36
Resets ............................................................................................................................................ 36
Backup........................................................................................................................................... 37
Status............................................................................................................................................. 37
Alarms........................................................................................................................................... 37
INTERCONNECT CALLS.................................................................................................................. 37
Overview....................................................................................................................................... 37
Telephone-Originated Call............................................................................................................ 38
Radio-Originated Call ................................................................................................................... 40
MAINTENANCE........................................................................................................................................ 43
GTI REMOVAL................................................................................................................................... 43
MASTR II or IIe Repeaters........................................................................................................... 43
MASTR III Repeaters ................................................................................................................... 43
ELI SOFTWARE UPGRADES ........................................................................................................... 44
Plan A - All at One Time............................................................................................................... 45
Plan B - Half at a Time.................................................................................................................. 46
Plan C - One at a Time.................................................................................................................. 48
IAM Unit....................................................................................................................................... 50
TROUBLESHOOTING .............................................................................................................................. 51
GLOSSARY................................................................................................................................................ 55
PARTS LIST............................................................................................................................................... 57
INTERCONNECTION DIAGRAM............................................................................................................ 58
SCHEMATIC DIAGRAM .......................................................................................................................... 59
INSTALLATION CHECKLIST ................................................................................................................. 60
PAGE
4
Page 5

FIGURES LBI-39076
B
LIST OF FIGURES AND TABLES
PAGE
Figure 1 - Location of ELI Components in a Typical EDACS Installation................................................. 10
Figure 2 - GTI Audio Paths......................................................................................................................... 11
Figure 3 - Card Layout for PDP Upgraded to VAX.................................................................................... 14
Figure 4 - Location of Fastener Screws on Computer ................................................................................. 14
Figure 5 - Location of PROM Card in Computer........................................................................................ 14
Figure 6 - Location of PROM Card in Older Computer.............................................................................. 14
Figure 7 - Location of PROMs on PROM Card.......................................................................................... 15
Figure 8 - Application Software PROM Label............................................................................................ 15
Figure 9 - Personality PROM Label............................................................................................................ 15
Figure 10 - GTI Software Locations............................................................................................................ 16
Figure 11 - GTI 552 Software (Rev A Main Board) ................................................................................... 16
Figure 12 - GTI DSP Software (Rev A Main Board).................................................................................. 16
Figure 13 - GTI 552 Software (Rev D or E Main Boards).......................................................................... 17
Figure 14 - GTI DSP Software (Rev D or E Main Board).......................................................................... 17
Figure 15 - GTI Main Software Label......................................................................................................... 17
Figure 16 - GTI Interface Board Software Locations.................................................................................. 17
Figure 17 - GTI Master Software Label...................................................................................................... 17
Figure 18 - Jumper Locations (Rev A Main Board).................................................................................... 18
Figure 19 - End-to-End Loop Start (Rev A Main Board)............................................................................ 19
Figure 20 - 4-Wire E&M Microwave (Rev A Main Board)........................................................................ 19
Figure 21 - End-to-End Ground Start (Rev A Main Board)........................................................................ 19
Figure 22 - 4-Wire E&M Type 1 (Rev A Main Board)............................................................................... 19
Figure 23 - Telephone Interface Circuit (Rev A Main Board) .................................................................... 21
Figure 24 - Jumper Locations (Rev D or E Main Board)............................................................................ 22
Figure 25 - 4-Wire E&M Card (Rev D or E Main Board) .......................................................................... 22
Figure 26 - GTI Unit DIP Switch Orientation............................................................................................. 22
Figure 27 - GTI Circuit Board Layout......................................................................................................... 23
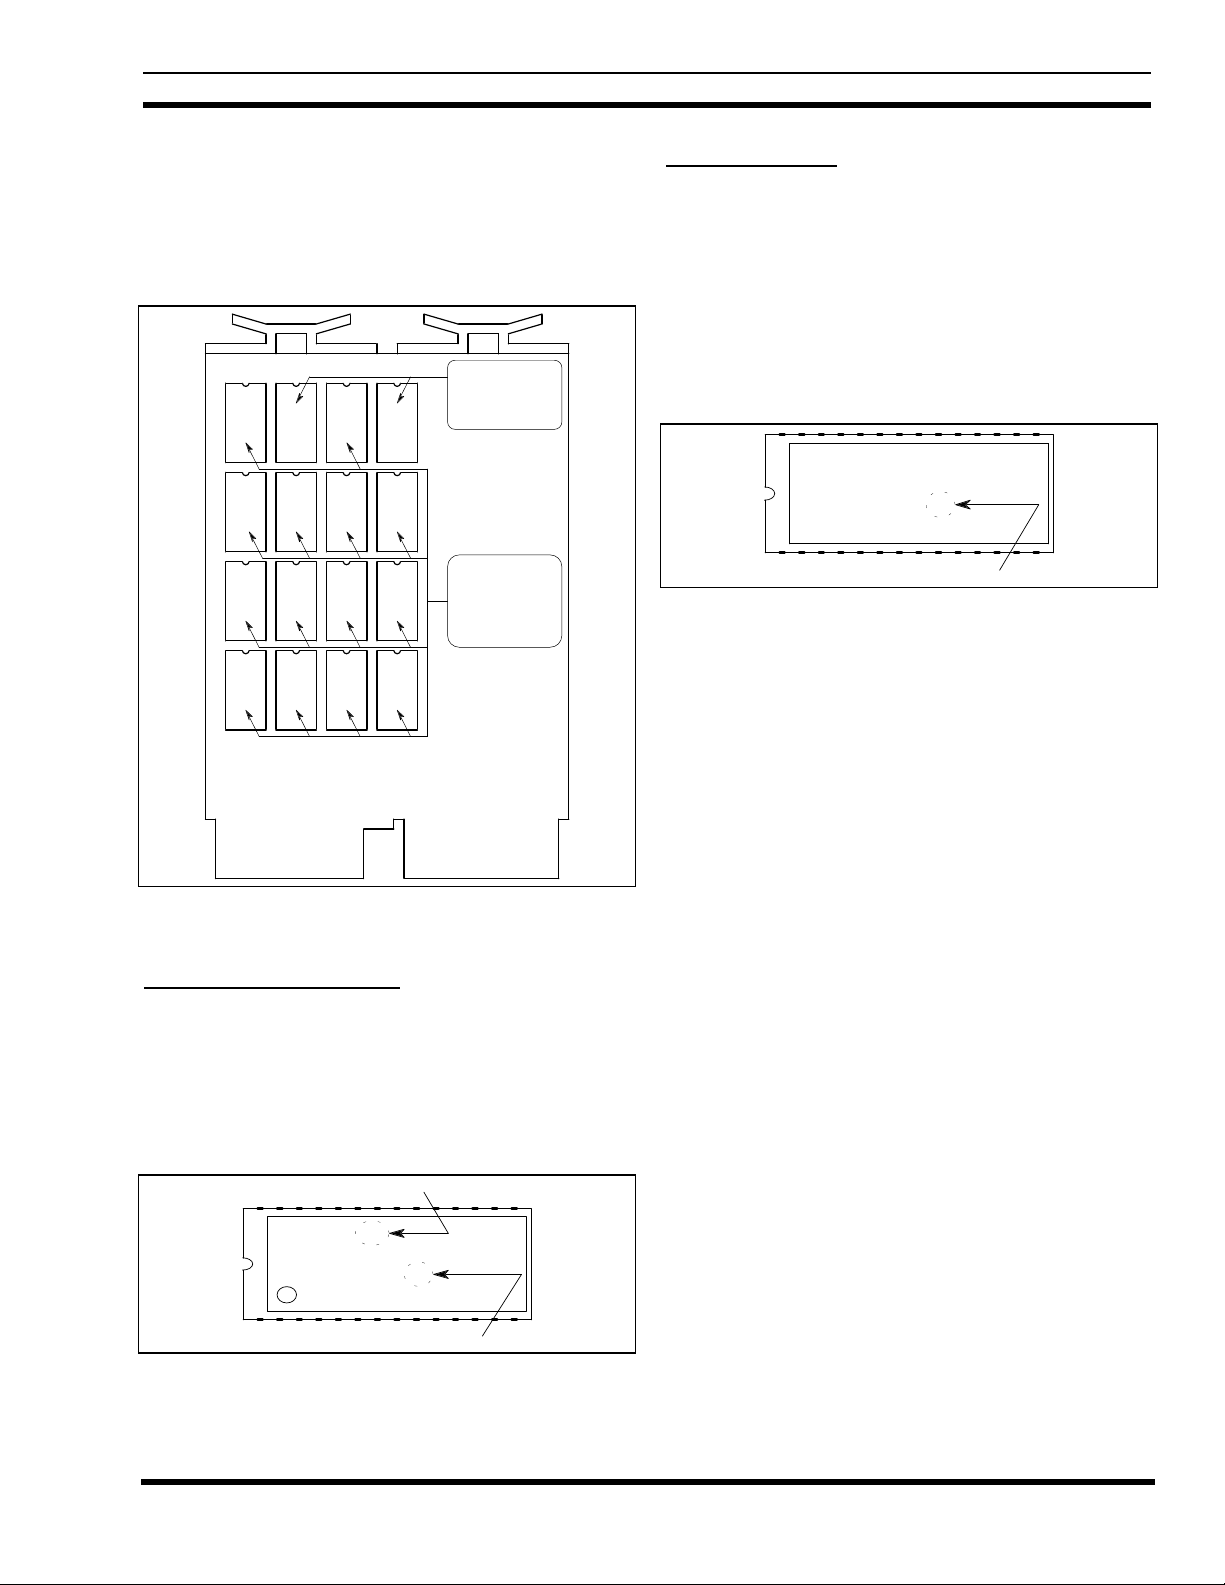
Figure 28 - Connections to GTI................................................................................................................... 24
Figure 29 - Connections to ELI TELCO Interface Module......................................................................... 24
Figure 30 - MASTR III Connections........................................................................................................... 25
(Continued)
5
Page 6

LBI-39076B FIGURES AND TABLES
LIST OF FIGURES AND TABLES (Cont.)
Figure 31 - MASTR II & IIe Connections................................................................................................... 25
Figure 32 - PCM / Data Bus Cable.............................................................................................................. 26
Figure 33 - Site Controller Computer Connections ..................................................................................... 26
Figure 34 - IAM Software Locations........................................................................................................... 26
Figure 35 - IAM Software Label.................................................................................................................. 27
Figure 36 - IAM Rear Panel Connections.................................................................................................... 27
Figure 37 - IAM Power Supply Connections............................................................................................... 27
Figure 38 - IAM Alarm Outputs.................................................................................................................. 27
Figure 39 - IAM Printer RS-232 Port.......................................................................................................... 28
Figure 40 - IAM DIP Switch Settings.......................................................................................................... 28
Figure 41 - Local GTI Connection for 9-Pin COM Port.............................................................................. 34
Figure 42 - Local GTI Connection for 25-Pin COM Port............................................................................ 34
Figure 43 - Front Panel of GTI Unit............................................................................................................ 35
Figure 44 - Front Panel of IAM................................................................................................................... 35
Figure 45 - Position of Temporary Jumper.................................................................................................. 43
PAGE
Table 1 - Sequence of Installation Activities (with Step # References)....................................................... 13
Table 2 - Configurations by Line Type (Rev A Main Board)...................................................................... 18
Table 3 - Configurations by Interface Characteristic (Rev A Main Board)................................................. 19
Table 4 - Configurations (Rev D or E Main Board).................................................................................... 22
Table 5 - Defined DIP Switch Settings for GTI Units................................................................................. 23
Table 6 - Local Interconnect Timing Parameter Adjustments For Release 7............................................... 30
Table 7 - Software Compatibility by Release Number ................................................................................ 44
Table 8 - Software Compatibility by Main Board Revision Number........................................................... 45
Table 9 - Troubleshooting Symptoms.......................................................................................................... 51
6
Page 7

REGULATORY COMPLIANCE LBI-39076
B
REGULATORY COMPLIANCE
FEDERAL COMMUNICATIONS COMMISSION (FCC) REGULATIONS
1. This Telephone Interconnect, before its connection to a
"CENTRALIZED OPERATIONS GROUP" of the local area Telephone Company (not the business office) by the
user, installer, or Installation Supervisor to ensure a smooth installation. T he following three Central Office telephone
connection configurations are possible:
a.
End-to-End configuration:
equivalence number (0.4B), and connection jack (RJ-11) must be reported.
b.
Four-Wire E&M configuration:
equivalence number (0.0B), service order code (9.0Y & AS.3), facility interface code (TL11M telco end, TL11E
Ericsson GE end), and connection jack (RJ2GX) must be reported.
c.
DID configuration:
number (0.0B), service order code (9.0Y & AS.3), facility interface code (02RV2-T), and connection jack (RJ11)
must be reported.
2. This Telephone Interconnect, before its connection to a
reported to the "MAINTENANCE GROUP" of the local area Telephone Supplier b y the user, installer, or Installatio n
Supervisor to ensure a smooth installation. The following four Private Branch Exchange telephone connection
configurations are possible:
a.
End-to-End Loop Start configuration:
ringer equivalence number (0.4B), service order code (9.0Y), facility interface code (02LS2), and connection jack
(RJ-11) must be reported.
b.
End-to-End Ground Start configuration:
service order code (9.0Y), facility interface code (02GS2), ringer equivalence number (0.0B), and connection jack
(RJ-11) must be reported.
The FCC registration number of this system (AXAUSA-21009-OT-E), ringer equivalence
The FCC registration number of this device (AXAUSA-21009-OT-E), ringer
The FCC registration number of this device (AXAUSA-21009-OT-E), ringer
The FCC registration number of this device (AXAUSA-21009-OT-E),
The FCC registration number of this device (AXAUSA-21009-OT-E),
Telephone Central Office,
Telephone Private Branch Exchange
must be reported to the
(PBX), must be
c.
Four-wire E & M trunk configuration:
ringer equivalence number (0.0B), service order code (9.0Y & AS.3), facility interface code (TL11M telco end and
TL11E Ericsson GE end), and connection jack (RJ2GX) must be reported.
d.
DID (tie-trunk) configuration:
equivalence number (0.0B), service order code (9.0Y & AS.3), facility interface code (02RV2-T), and connection
jack (RJ11) must be reported.
3. The total of all ringer equivalence numbers on any one line should not exceed 5.0 for best performance.
4. This device complies with Part 15 of FCC Rules. Operation of this device is subject to the following two conditions:
a. Device must not cause harmful interference.
b. Device must accept any interference, including interference that may cause undesired operation.
5. This device must not be installed on coin-operated or multi-party telephone lines.
6.
DID answer supervision:
answer supervision on DID calls is a violation of Part 68 of FCC rules.
7.
E&M answer supervision:
answer supervision on E&M calls is a violation of Part 68 of FCC rules.
8. Answer supervision will be returned within 500 ms after any of the following three conditions:
a. Incoming call is answered by the called station.
Allowing this equipment to be operated in such a manner as to not provide for proper
The FCC registration number of this system (AXAUSA-21009-OT-E), ringer
Allowing this equipment to be operated in such a manner as to not pr ovide for proper
The FCC registration number of this device (AXAUSA-21009-OT-E),
7
Page 8

LBI-39076B REGULATORY COMPLIANCE
REGULATORY COMPLIANCE (Cont.)
FEDERAL COMMUNICATIONS COMMISSION (FCC) REGULATIONS
b. Incoming call is routed to a dial prompt.
c. Incoming call is routed to a recorded announcement that can be administered by the CPE (Customer Premise
Equipment) user.
9. If this unit malfunctions, the telephone company may disconnect service temporarily. If disconnection is necessary, the
telephone company must attempt to notify the user in advance, if possible. If not, they must notify the user as soon as
they are able.
10. Repair work on this device must be done by Ericsson GE, or an authorized repair station.
DOC REGISTRATION
The Canadian Department of Communications label identifies certified equipment. The certificate means that the equipment
meets certain telecommunications network protective, operational, and safety requirements. The Department does not
guarantee the equipment will operate to a user's satisfaction.
Before installing this equipment, make sure you are permitted to connect it to the facilities of the local telecommunications
company. You must also install the equipment using an acceptable method of connection. In some cases, you many also
extend the company's inside wiring for single line individual service by means of a certified connector assembly (telephone
extension cord). You should be aware, however, that compliance with the above conditions may not prevent degradation of
service in some situations.
Repairs to certified equipment should be made by an authorized Canadian maintenance facility designated by the supplier.
Any repairs or alterations made by a user to this equipment, or equipment malfunctions, may give the telephone
communications company cause to request the user to disconnect the equipment.
For your own protection, make sure that the electrical ground connections of the power utility, telephone lines, and internal
metallic water pipe system, if present, are connected together. This precaution may be particularly important in rural areas.
CAUTION
Do not attempt to make electrical ground connections yourself; contact the appropriate electric inspection authority or
electr ici an .
GTI Load Number: 10
The load number (LN) assigned to each terminal device denotes the percentage of the maximum allowable load to prevent
overloading, to be connected to the telephone loop used by the device. The termination on a loop may consist of any
combination of devices, subject to the requirement that the total of the load numbers of all the devices not exceed 100.
DOC COMPLIANCE NOTICE
This digital apparatus does not exceed the Class A limits for radio noise emissions for digital apparatus as set out in the
Radio Interference Regulations of the Canadian Department of Communications.
DOC AVIS DE CONFORMATION
Le present appareil numerique n'emet pas de bruits radioelectriques depassant les limites applicables aux appareils
numeriques de la classe A prescrites dans le Reglement sur le brouillage radioelectrique edicte par le ministere des
Communications du Canada.
8
Page 9

SPECIFICATIONS LBI-39076
B
SPECIFICATIONS
Dimensions:
Master GTI...........................................................1.75" H x 19.00" W x 12.00" D
GTI ...............................................................1.75" H x 19.00" W x 12.00" D
IAM ...............................................................1.75" H x 19.00" W x 7.00" D
Environmental:
Temperature Range..............................................0° to 70° C (32° to 158° F)
Relative Humidity ................................................95% (max.)
Power:
Input Voltage........................................................12 Volts dc (nominal)
Input Power
Master GTI.................................................... 12 Watts (max.) / 8 Watts (avg.)
GTI ...............................................................12 Watts (max.) / 8 Watts (avg.)
IAM............................................................... 6 Watts (avg.)
EDACS Repeater Types:
...............................................................MASTR II
...............................................................MASTR IIe
...............................................................MASTR III
PSTN Line Types:
...............................................................End-to-End, Loop Start
...............................................................End-to-End, Ground Start
...............................................................2/4-Wire E&M, Microwave
...............................................................2/4-Wire E&M, Type I
...............................................................Direct Inward Dial (DID)
PSTN Dialing Types:
Encoded by GTI:
...............................................................Rotary Dial (Dial Pulse)
...............................................................Push-Button Dial (DTMF)
...............................................................Multifrequency R1/R2
Decoded by GTI (Overdialed):
...............................................................Rotary Dial (Dial Click)
...............................................................Push-Button Dial (DTMF)
...............................................................Multifrequency R1/R2
9
Page 10
LBI-39076B INTRODUCTION / DESCRIPTION
INTRODUCTION
This manual describes the installation, configuration,
and operation of the Enhanced Local Interconnect (ELI)
option. A companion manual, the Global Telephone
Interconnect (GTI) Configurator user's guide (LBI-39077),
describes how to use the GTI Configurator software to
configure the GTI units.
Although the objective of this manual is to provide
information in the order it should be needed, completely
read the applicable section before starting the installation or
configuration.
GETC
Power Monitor Unit
MASTR II/III Repeater
Channel #3
DESCRIPTION
OVERVIEW
The ELI option is a telephone switching system that
allows authorized radio users to make and receive telephone
interconnect calls on their EDACS radios without dispatcher
assistance. Under the direction of the Site Controller
computer, it can connect any one of up to 20 available
EDACS repeater channels to any one of up to 32 available
telephone lines, and maintain up to 20 interconnect calls at
any one time.
SS PCM
Master GTI
GETC
MASTR II/III Repeater
Channel #6
A/P PCM
Downlink GETC
Redundant Downlink GETC
Site Controller Computer
Alarm and Control Unit
Test Unit
Modem / Guardog Chassis
Power Supply
Uninterruptible Power Supply
Site Controller Cabinet First Repeater Cabinet Second Repeater Cabinet Third Repeater Cabinet
Power Supply
GETC
MASTR II/III Repeater
Channel #2
Power Supply
GETC
MASTR II/III Repeater
Channel #1
Power Supply
Power Supply
IAM (Optional)
GETC
MASTR II/III Repeater
Channel #5
P
Power Supply
GETC
MASTR II/III Repeater
Channel #4
Power Supply
GTI
GETC
MASTR II/III Repeater
A/P PCM
A/P
Channel #8
Power Supply
GTI
GETC
MASTR II/III Repeater
Channel #7
Power Supply
T
10
Figure 1 - Location of ELI Components in a Typical EDACS Installation
Page 11
DESCRIPTION LBI-39076
B
The Site Controller computer directs up to 16 levels of
toll call restrictions, up to 15 rotary hunt sequences, 8 dequeuing priority levels, and inbound interconnect
enable/disable assignments, for each ID number. It also
accumulates interconnect call activity data for the System
Manager.
The standard ELI option consists of one or more GTI
units, one GTI Interface card, one set of two GTI
Configurator software diskettes, one set of two Site
Controller computer Personality PROMs, and the necessary
cables and hardware. The ELI option may also consist of an
optional Interconnect Ac counting Manage r (IAM) unit. The
GTI interface card is to be installed into one of the GTI units
making it the Master GTI.
The ELI option utilizes a distributed switching system
architecture that distributes the switching function between
the separate GTI units rather than concentrating it at a
centrally located telephone switch. Additionally, each GTI
unit receives its power from a separate repeater power
supply.
A typical ELI installation containing two GTI units, a
Master GTI, and an optional IAM is shown in
Figure 1. The function of each cable and bus
termination shown, is as follows (see parts list for part
numbers):
S - The serial data cables connect the Master GTI to the
Site Controller computer. (Two are used.)
GTI UNITS
Each GTI (Global Telephone Interconnect) unit
contains both a radio channel interface and a telephone line
interface. For each interface, the GTI contains both analogto-digital and digital-to-analog converters, and a digital
signal processor. The relation of these circuits to the audio
paths is shown in
Figure 2.
The radio channel interface provides the following
functions:
• Decodes DTMF from radio for radio-originated
call.
• Sends ringback or busy tone to radio for radio-
originated call.
• Sends ringing signal to radio for telephone-
originated call.
Repeater
Interface
Telephone
Interface
CODEC Digital
Digital/Analog
Converter
CODEC
Digital/Analog
Converter
Signal
Processor
Digital
Signal
Processor
Bus
Driver
and
Receiver
P - The power cable connects the optional IAM to the
power supply of the associated repeater. (One is
used if an IAM is supplied.)
A/P - The audio/power cable connects a GTI or Master
GTI to a MASTR II/III repeater and its power
supply. (One is used for each GTI or Master GTI
assigned to a MASTR II/III repeater.)
PCM - The PCM/Data bus sections connect each GTI,
the Master GTI, and the optional IAM in a daisychain. (Section lengths depend upon the position
of the units. The total number of bus sections is
one less than total number of units used.)
T - The termination for the PCM/Data bus terminates
the high channel end of the bus. (One is used.)
PCM / Data Bus
Figure 2 - GTI Audio Paths
The telephone line interface provides the following
functions for telephone-originated calls:
• Detects signaling from telephone line.
• Applies signaling to seize telephone line.
• Detects and decodes overdialed telephone number
digits from telephone line.
• Sends voice prompts to telephone line.
• Detects end-of-call signaling from telephone line.
• Removes signaling to drop telephone line.
11
Page 12

LBI-39076B DESCRIPTION / INSTALLATION
The telephone line interface provides the following
functions for radio-originated calls:
• Applies signaling to seize telephone line.
• Detects signaling from telephone line.
• Generates and applies telephone number digits to
telephone line.
• Sends voice prompts to telephone line.
• Detects end-of-call signaling from telephone line.
• Removes signaling to drop telephone line.
One GTI converts the analog audio signal (from the
radio channel connected to it) into a digital signal for
placement onto the PCM/Data bus. Another GTI (or the
same GTI) converts the digital signal from the PCM/Data
bus back to an audio signal (for the telephone line connected
to it). A similar route is taken by the signal from the
telephone line to the radio channel. Each radio channel has
its own time slot on PCM/Data bus so as not to interfere
with any other radio channel.
print real-time records of calls being placed on the system.
Records can also be retrieved from the IAM at any time
using the PC-based GTI Configurator software. Call detail
records contain the following information:
• Record Type
• Start Time
• Elapsed Time
• Call Type
• Radio User ID
• Line Number
• Channel Number
• Phone Number Dialed (up to 20 digits)
• System Number
• Node Number
GTI INTERFACE BOARD
The GTI Interface board serves as the information and
command interface between the Site Controller computer
and all the GTI units in the system. It is installed in only
one GTI unit, which then becomes the Master GTI.
GTI CONFIGURATOR SOFTWARE
The GTI Configurator software is a PC-based, menudriven program (supplied in both 3.5-inch and 5.25-inch
floppy formats) that allows the system operator to change
parameters in the GTI database, retrieve GTI call records,
and monitor the system activity.
IAM
The optional IAM (Interconnect Accounting Manager)
is a microprocessor-based call-detail buffer, containing two
megabytes of battery-backed RAM to provide storage for up
to 60,000 call detail records, compatible with the EDACS
Billing Correlation Unit. At the completion of each call, a
call detail record of that call is sent to the IAM. The IAM
provides a serial data port for a printer to be connected, to
INSTALLATION
OVERVIEW
The installation of the ELI option has been divid ed into
14 steps, which are described in this section. Not all steps
will apply to all installations. Some steps involve more than
one activity.
Table 1 shows a flow chart of the installation activities
for various pieces of equipment. The activities to the right
of a heavy vertical line should not be started until all those
activities to the left of the line have been completed for that
piece of equipment. The number in a circle to the left of
each activity indicates the installation step in the text where
the activity is described.
These 14 installation steps plus the configuration of the
Site Controller database (contained in the Configuration
section of this manual) and the configuration of the GTI
database (contained in the GTI Configurator software user’s
guide) are summarized in the Installation Checklist at the
end of this manual. Make a copy of this checklist, and
check off items as they are completed.
12
Page 13
INSTALLATION LBI-39076
B
Table 1 - Sequence of Installation Activities (with Step # References)
EQUIP INSTALLATION ACTIVITIES
MDR
Radios
Site
Controller
Computer
Standard
GTI
Units
Master
GTI
STEP #
1
Check Software Group #
2
Verify VAX Configuration
3
Check Application Software Group #
Replace Personality PROMs
3
Assign
4
Radio Chan
Record Software
5
Version #s
Set Up
Phone Interface
Set DIP Switches
Record Software
Version #s
Set Up
Phone Interface
4
Radio Chan
6
7
Assign
5
6
Mount with
9
Radio Chan Equip
Connections
10
GTI
Interface
Board
IAM
4
Radio Chan
GETC Modification14GETC
Assign
Set DIP Switches
7
Record Software
5
11
13
Version #
Record Software
Version #
Set DIP Switches
Install GTI
8
Interface Board
Mount with
9
Radio Chan Equip
Mount with
9
Radio Chan Equip
Connections
10
Connections
12
13
Page 14
LBI-39076B INSTALLATION
1. RADIO SOFTWARE
The
1st step
MDR full-duplex radios. If you plan to use this type of
radio with your ELI system, make sure each radio contains
344A4271Gx software (where x = 2 or higher). See the
manual for the radio to get instructions on where to find the
software and how to determine its version.
to install the ELI option applies only to
2. SITE CONTROLLER HARDWARE
The
2nd step
the Site Controller computer is a VAX model. PDP models
will not support the ELI option. Since some PDP models
have been upgraded to a VAX model, you cannot tell if it is
a PDP or VAX from the outside. To know for sure, you
must look inside the PDP system chassis and check what
cards are installed. PDP models that have been upgraded to
a VAX model will have their cards arranged in the card cage
as shown in Figure 3.
MRV11-D H3656-00
Figure 3 - Card Layout for PDP Upgraded to VAX
to install the ELI option is to verify that
KA620-BA
MS630-BB
CQ1610#1
CQ1610#2
EMPTY
EMPTY
EMPTY
4. Loosen the two fastener screws holding the back
panel to the chassis (see Figure 4).
28293031
15
Fastener
Screws
27 26 25 24
20212223
19 18 17 16
14 13 12 11 10 9
2345678
1
0 SM
Figure 4 - Location of Fastener Screws on Computer
3. Rotate the back panel down and out of the way (be
careful not to damage the ribbon cables).
4. Remove the PROM Card (see Figure 5) by pulling
on the two tabs fastened to the front edge of the
card. (Observe standard handling practices for
static sensitive components.)
PROM Card
Figure 5 - Location of PROM Card in Computer
Access to the PROM card in previous VAX versions
and older PDP versions that were upgraded to a VAX
version is through the top. Use the following procedure:
If you find that the Site Controller computer is a PDP
model, upgrade kits are available through Eric sson Service
Parts. Alternatively, the PDP model may be replaced with
the current 19A149302P9 VAX model.
3. SITE CONTROLLER SOFTWARE
The
3rd step
following two parts:
1. Check the revision of the Application Software
PROMs (replacement might be necessary).
2. Replace the Personality PROMs.
Both sets of PROMs are located on the PROM card in
the Site Controller computer. Access to the PROM card in
the latest VAX version of the Site Controller computer is
through the back. Use the following procedure:
3. Turn off the Site Controller computer.
14
to install the ELI option consists of the
1. Turn off the Site Controller computer.
2. Pull the Site Controller computer chassis all the
way forward on its slide-out track.
3. Pull up the top cover and the attached card cage.
4. Remove the PROM Card (see Figure 6) by pulling
on the two tabs fastened to the front edge of the
card. (This is a three-handed operation - observe
standard handling practices for static sensitive
components.)
PROM Card
Figure 6 - Location of PROM Card in Older Computer
Page 15
INSTALLATION LBI-39076
B
The location of the Application Software and
Personality PROMs on the PROM card is shown in Figure
7. When replacing PROMs, be sure to get each new PROM
in the correct location and the notched end facing the right
direction. Be especially careful of location numbers 01 and
02 since these numbers are used for both types of PROMs.
Personality
PROMs
13 14
01-02
01 02
09 10
11 12
Application
0605
0807
Software
PROMs
01-14
0201
03 04
Personality PROMs
Each of the two Personality PROMs must be replaced
when you install the ELI option, regardless of the version of
the Application Software PROMs. The new Personality
PROMs must have ELI selected as the interconnect mode.
In addition, the new Personality PROMs should have other
ELI parameters programmed correctly (see the
Configuration section). Figure 9 shows where to find the
PROM location number on a typical Personality PROM
label.
SER#: 12345678
SITE CONTROLLER
EDACS
PERSONALITY
PROM Location
01
Figure 9 - Personality PROM Label
4. RADIO CHANNEL ASSIGNMENTS
Figure 7 - Location of PROMs on PROM Card
Application Software PROMs
Each of the 14 Application Software PROMs must be
marked 344A3265Gx, where x = 5 or higher. (x = 4 or
lower does not support the ELI option.) Figure 8 shows
where to find the software revision number and the PROM
location number on a typical Application Software PROM
label.
Software Revision
344A3265G5
VAX SITE CTRLR
EDACS
1994 BY ERICSSON GE
C
01
PROM Location
Figure 8 - Application Software PROM Label
The 4th step to install the ELI option, is to assign each
GTI unit (including the Master GTI) and the optional IAM
to a radio channel. Once this relationship is established, the
telephone interface inside the GTI units and the DIP
switches on the side of the GTI units can be set up. T hen
the GTI units can be mounted.
Although the optional IAM is not functionally
associated with any specific radio channel, it is mounted
with a specific radio channel as if it was. This forces it to be
in a predictable location relative to the GTI units so that
cables of the correct length can be provided for its
connection.
Until they are mounted there is an opportunity to get
them mixed up and mounted with the wrong radio channel.
To assure that this doesn’t happen, the radio channel
assignments can be temporarily marked on the GTI units, or
the GTI units can be set up and mounted one at a time.
The method used to assign GTI units to radio channels
is to assign all of the standard GTI units first, follo wed by
the Master GTI, and finally the optional IAM. Start by
assigning the first standard GTI to the highest numbered
radio channel, the next GTI to the next highest numbered
radio channel, and so on until all standard GTI units, then
the Master GTI, and finally the optional IAM (if supp lied)
are assigned.
15
Page 16
LBI-39076B INSTALLATION
You may use some other method. However, using the
method described here assures that the supplied cables will
be the correct length and the PCM/Data Bus will be as short
as possible. (The PCM/Data Bus must not exceed 120 feet
in length).
5. GTI SOFTWARE
The
5th step
that the insulating paper tab on the battery (RAM backup)
has been removed, and record the version number of all
software on each board in each GTI unit. Each regular GTI
unit has a Main board and a Processor board. One regular
GTI unit is made into a Master GTI unit by adding a third
board, the Interface board. Keep this information with this
manual for future reference. If a problem is later
encountered with the equipment, this information may be
essential to help with the diagnosis.
Main Board
to install the ELI option is to make sure
NOTE
Revision-A Main boards do not support
narrowband systems. If you have a narrowband
system, you must use revision-D or later Main
boards.
Revision-A Main boards
CAUTION
Revision-A Main boards require version 1.x
GTI 552 and GTI DSP software. Do not use
version 2.x or higher GTI 552 or GTI DSP
software with revision-A Main boards.
For a revision-A Main board, the GTI 552 software is
stored in U63 and requires version 1.x software (where x =
any number). A sample label for U63 is shown in Figure 11.
(The actual version number o f the software supplied may be
different than that shown.)
Software Version #
(C) ZETRON INC.
GTI 552 V1.3
2#56022
U63
Circuit Symbol
Figure 11 - GTI 552 Software (Rev A Main Board)
601-0607
The Main board contains the GTI 552 and GTI DSP
software at the locations shown in Figure 10. The first Main
boards, identified by the manufacturer’s number 702-9588A,
require different software than later Main boards, identified
by the manufacturer’s number 702-9588D or E. The boards
are referred to as revision-A Main boards and revision-D or
E Main boards respectively.
PROCESSOR
BOARD
MAIN
BOARD
U21
U23
GTI 552
FRONT
BOARD
REVISION
M446 MAIN BOARD
702-9588D
GTI DSP
Figure 10 - GTI Software Locations
For a revision-A Main board, the DSP software is
stored in U72 and requires version 1.x software (where x =
any number). A sample label for U72 is shown in Figure 12.
(The actual version number o f the software supplied may be
different than that shown.)
Software Version #
(C) ZETRON INC.
GTI DSP V1.00
2#56022
U72
Circuit Symbol
641-0017
Figure 12 - GTI DSP Software (Rev A Main Board)
16
Page 17

INSTALLATION LBI-39076
B
Revision-D or E Main boards
NOTE
Revision- D or E M ain boards require ve rsi on 2.x
or higher GTI 552 and GTI DSP software. Do
not use version 1.x GTI 552 or GTI DSP
software with revision-D or E Main boa rds.
For revision-D or E Main boards, the GTI 552 software
is stored in U50 and requires version 2.x software (where x
= any number) or higher. A sample label for U50 is shown
in Figure 13. (The actual version number of the software
supplied may be different than that shown.)
Software Version #
(C) ZETRON INC.
GTI 552 V2.1
2#56022
U50
Circuit Symbol
Figure 13 - GTI 552 Software (Rev D or E Main Boards)
601-0607
Software Version #
(C) ZETRON INC.
GTI MAIN V1.03
2#56022
U21
Circuit Symbol
601-0605
Figure 15 - GTI Main Software Label
CAUTION
When using both r evision -A and revisi on-D or
E Main boards in the same ELI system, the GTI
MAIN software installed in U21 and U23 on the
Proc essor boar d must be ver sion 2. x or h igher .
This applies to all Processor boards in the ELI
system.
Interface Board
The Interface board contains the GTI Master software
at the locations shown in Figure 16.
For revision-D or E Main boards, the DSP software is
stored in U57 and requires version 2.x software (where x =
any number) or higher. A sample label for U57 is shown in
Figure 14. (The actual version number of the software
supplied may be different than that shown.)
Software Version #
(C) ZETRON INC.
GTI DSP V2.01
2#56022
U57
Circuit Symbol
641-0017
Figure 14 - GTI DSP Software (Rev D or E Main Board)
Processor Board
The Processor board contains the GTI Main software in
U21 and U23. A sample label for U21 is shown in Figure
15. The label for U23 is identical except for the circuit
symbol. (The actual version number of the software
supplied may be different than that shown.)
U23
U21
Figure 16 - GTI Interface Board Software Locations
The GTI Master software is stored in U21 and U23. A
sample label for U21 is shown in Figure 17. The label for
U23 is identical except for the circuit symbol. (The actual
revision of the software supplied may be different than that
shown.)
Software Version #
(C) ZETRON INC.
GTI MASTER V1.1
2#56022
U21
Circuit Location
601-0606
Figure 17 - GTI Master Software Label
17
Page 18
LBI-39076B INSTALLATION
6. GTI TELEPHONE INTERFACE
The
6th step
each GTI telephone interface to match the type of telephone
circuit to be connected to it. The first Main boards,
identified by the manufacturer’s number 702-9588A, are
configured differently than the later Main boards, identified
by the manufacturer’s number 702-9588D or E. The boards
are referred to as revision-A Main boards and revision-D or
E Main boards respectively.
to install the ELI option is to configure
NOTE
Revision A Main boards do not support Direct
Inward Dial (DID) telephone lines. If you need
to have a DID telephone line connected to a GTI
unit, that GTI unit must contain a revision-D or
later Main board.
Revision-A Main Board
The revision-A Main board uses 15 jumpers (JP1
through JP15) and two fuses (F2 and F3) to configure the
telephone interface. Set the jumpers and fuses to match the
type of circuit to be connected to it. Figure 18 shows the
locations of these jumpers and fuses on the revision-A Main
board, and Table 2 lists the jumper and fuse configurations
for four common types of telephone circuits. Figure 19
through Figure 22 show simplified schematics of these four
configurations.
Many other configurations of the GTI telephone
interface are possible. Table 3 shows which jumpers and
fuses to use to obtain each specific interface characteristic.
Figure 23 shows a simplified schematic of the interface,
including key components and the location of each jumper
and fuse. If a jumper or fuse is not specifically required for
a characteristic, remove it. Not all characteristics are
compatible with each other. For example, the interface
cannot be configured for a -48 V reference for the E-Lead
and at the same time be configured for an external reference
for the M-Lead.
Table 2 - Configurations by Line Type (Rev A Main Board)
Be careful of terms when talking or reading about the
telephone circuit that the GTI unit is to interface. Terms
such as send, receive, in, out, E-Lead, and M-Lead are
sometimes defined differently by different people and from
different points of reference. T he terms used in this manual
are defined as follows:
• 4-Wire Send - audio voice signals fr om GTI unit to
telephone circuit.
• 4-Wire Rec - audio voice signals from telephone
circuit to GTI unit.
• M-Lead - telephone circuit supervision signal from
GTI unit to telephone circuit.
• E-Lead - telephone circuit supervision signal from
telephone circuit to GTI unit.
RJ-45
JP1
B
C
A
JP9
B
A
JP10
JP12 JP13
JP14 JP15
B
B
A
A
Telephone Line
Connector
D
M
F
C
B
JP8
JP11
B
A
BBDD
E
A
A
JP2 JP3
JP7
CCC
M
A
JP4
JP5
B
D
JP6
A
F3F2
Figure 18 - Jumper Locations (Rev A Main Board)
TELEPHONE JUMPER POSITIONS FOR JP1 THROUGH JP15 FUSES
LINE TYPE 1 2 3 4 5 6 7 8 9 10 11 12 13 14 15 F2&F3
End-to-End Loop Start - B B - - - - A B - - - A A A OUT
End-to-End Ground Start D+M B B - - - - B A - - B A A A IN
4-Wire E&M, Microwave E A+C A+C IN IN C+M - - - IN IN A - B B OUT
4-Wire E&M, Type I E A+C A+C - - C+M - - - IN IN B - B B IN
18
Page 19
INSTALLATION LBI-39076
B
End-to-End, Loop Start
Ring
Tip
1
JP3-B
2
3
JP2-B
Ring
Det.
4
5
6
7
8
JP8-A
JP13-A
Loop
Current
Det.
JP9-B
K3
Transformer
K2
Hybrid
JP15-A
JP14-A
Rec
Audio
Send
Audio
Figure 19 - End-to-End Loop Start (Rev A Main Board)
Figure 19 shows the GTI telephone interface configured
per Table 2 for End-to-End, Loop Start. Two wires are
needed to connect to the telephone company side. Battery
for the loop current is provided by the telephone office.
4-Wire E&M, Microwave
MB
MA
4-W Send
JP4
1
JP6-M
2
JP3-C
3
Res
IDLE
BUSY
K2
JP1-M
JP1-B
JP1-E
-48 V
JP1-A
End-to-End, Ground Start
JP1-D JP1-M
JP13-A
Ring
Det.
Loop
Current
Det.
JP9-A JP8-B JP12-B
K3
Transformer
K2
GND
Hybrid
Current Det.
JP15-A
JP14-A
Rec
Audio
Send
Audio
-48V
Ring
Tip
1
JP3-B
2
3
4
5
JP2-B
6
7
8
Figure 21 - End-to-End Ground Start (Rev A Main Board)
Figure 21 shows the GTI telephone interface configured
per Table 2 for End-to-End, Ground Start. Two wires are
needed to connect to the telephone company side. Battery
for the loop current is provided by the telephone office.
4-Wire E&M, Type I
MB
MA
4-W Send
JP4
1
JP6-M
2
JP3-C
3
K2
FUSE F2
Res
IDLE
BUSY
JP1-M
JP1-B
JP1-E
-48 V
JP1-A
JP12-B
JP15-B
JP14-B
Transformer
Rec Audio
Send Audio.
GND
4-W Rec
4-W Rec
4-W Send
EA
EB
1000 Ohms
JP3-A
4
JP2-A
5
JP2-C
6
JP6-C
7
JP5
8
Transformer
JP11
JP10
E-Lead Det.
JP12-A
Res
Figure 20 - 4-Wire E&M Microwave (Rev A Main Board)
Figure 20 shows the GTI telephone interface configured
per Table 2 for 4-Wire E&M, Microwave. Eight wires are
needed to connect to the telephone company side, and 1000
ohms must be installed in series with the E-Lead. The
interface interprets the absence of E-Lead current as an idle
condition. The interface provides an opened-loop M-Lead
for an idle condition and a closed-loop for a busy condition.
JP12-B
JP15-B
JP14-B
Transformer
Rec Audio
Send Audio.
GND
4-W Rec
4-W Rec
4-W Send
EA
EB
1000 Ohms
JP3-A
4
JP2-A
5
JP2-C
6
JP6-C
7
JP5
8
Transformer
JP11
JP10
E-Lead Det.
JP12-A
Res
FUSE F3
Figure 22 - 4-Wire E&M Type 1 (Rev A Main Board)
Figure 22 shows the GTI telephone interface configured
per Table 2 for 4-Wire E&M, Type I. Six wires are needed
to connect to the telephone company side, and 1000 ohms
must be installed in series with the E-Lead. The interface
interprets the absence of E-Lead current as an idle condition.
The interface provides an open M-Lead for an idle condition
and applies -48 V for a busy condition.
19
Page 20

LBI-39076B INSTALLATION
Table 3 - Configurations by Interface Characteristic (Rev A Main Board)
INTERFACE JUMPER POSITIONS FOR JP1 THROUGH JP15 FUSES
CHARACTERISTIC 1 2 3 4 5 6 7 8 9 10 11 12 13 14 15 F2 F3
Audio Circuit
2-Wire B B A A
4-Wire A+C A+C B B
Signaling
Loop Start A B A
Ground Start B A B A
E&M C+M IN IN
E-Lead Reference
External Reference IN A OUT
Internal Ground OUT A IN
Internal -48 V OUT OUT B IN
Idle M-Lead Reference
External Reference A IN not B OUT
Internal Ground B OUT IN
Internal -48 V A OUT IN
Busy M-Lead Reference
External Reference E IN not B OUT
Internal Ground M OUT IN
Internal -48 V E OUT IN
20
Page 21

INSTALLATION LBI-39076
B
EXTERNAL
M-LEAD
REFERENCE
M-LEAD
4-WIRE
SEND
2-WIRE
SEND/REC.
4-WIRE
OR
REC.
J1
JP4
JP3
D
JP2
D
FUSE F2 -48 V1
JP15
REC.
AUDIO
BAL.
CKT.
SEND
AUDIO
JP10
JP11
K3
T1
JP13
AB
LOOP
CURRENT
DET.
B
JP9
A
JP14
AB
AB
10
T2
AUDIO
HYBRID
DS1
620 OHMS
2
4.7 OHMS
3
4.7 OHMS
4
4.7 OHMS
5
ABC
.47
RING
DET.
ABC
E-LEAD
EXTERNAL
E-LEAD
REFERENCE
6
7
8
RJ-45
A
4.7 OHMS
JP6
A
M
B
D
C
JP5
100 OHMS
DS2
620 OHMS
FUSE F3 GND
JP8
C
B
DE-ENERGIZED for IDLE (shown)
ENERGIZED for BUSY
Figure 23 - Telephone Interface Circuit (Rev A Main Board)
E
F
K2
M-LEAD RELAY
A
M
D
JP1
B
C
E-LEAD
DET.
JP7
B
JP12
A
21
Page 22

LBI-39076B INSTALLATION
Revision-D or E Main Board
The revision-D or E Main boards contain two jumpers
(JP3 and JP4) and a matrix card connector (J5) to configure
the telephone interface. Set the jumpers and insert the
Matrix card to match the type of telephone line to be
connected to it. Figure 24 shows the locations of the
jumpers and the Matrix card connector. Table 4 lists which
jumpers and Matrix card are used for each supported type of
telephone line.
Three matrix cards are supplied with each GTI unit.
They are labeled E-E (for End-to-End), DID (for direct
inward dial), and 4-W (for 4-Wire E&M). The matrix card
will fit into J5 two ways, but only one way is correct. Be
sure that the A1 end of the matrix card goes into the A1 end
of J5.
A1
J5
Matrix Board
JP3
JP4
A
B
A
B
chassis. The orientation of the DIP switches is shown in
Figure 26.
JP2
-48
GND
EXREF
K2
Rec Audio
Send Audio.
EXREF
GND
-48
M-Lead External Reference
1
M-Lead
2
4-W Send
3
4-W Rec
4
4-W Rec
5
4-W Send
6
E-Lead
7
E-Lead External Reference
8
-48 Vdc Reference
Ground Reference
NC
JP1
NO
Transformer
Transformer
E-Lead Det.
Ground Reference
-48 Vdc Reference
JP3
Figure 25 - 4-Wire E&M Card (Rev D or E Main Board)
FRONT
Figure 24 - Jumper Locations (Rev D or E Main Board)
Table 4 - Configurations (Rev D or E Main Board)
TELEPHONE
LINE TYPE
JP3 JP4 MATRIX
CARD
End-to-End, Loop Start B A* E-E
End-to-End, Ground Start B A* E-E
4-Wire E&M, Microwave A A* 4-W
4-Wire E&M, Type I A A* 4-W
DID B A* DID
*Use the B position when the distance to the PBX is short
(gives better hybrid balance).
The End-to-End and DID Matrix cards contain no
jumpers to configure. However, the 4-Wire E&M matrix
card has three jumpers (JP1 thr ough JP3) to configure. T he
function of each jumper is shown in Figure 25.
7. GTI DIP SWITCH SETTINGS
The 7th step to install the ELI option, is to set the two
DIP switches through openings in the right side of the GTI
FRONT
1
00
18
SW2 SW1
1
18
Figure 26 - GTI Unit DIP Switch Orientation
In the left-hand DIP switch (SW2), switch sections 1
through 4 are set to identify the type of telephone line to be
connected to the GTI unit, switch section 5 is not used, and
switch sections 6 through 8 are used to set the baud rate for
the serial data port to the GTI Configurator terminal.
In the right-hand DIP switch (SW1), switch sections 1
through 6 are set to match the radio channel number
connected to the GTI unit (this will also be the line number
of the telephone line connected to that GTI unit), and switch
sections 7 and 8 are not used.
Table 5 summarizes the defined switch settings for both
DIP switches. Switch combinations not shown are not
supported by the ELI option.
22
Page 23
INSTALLATION LBI-39076
B
Table 5 - Defined DIP Switch Settings for GTI Units
BANK SW2
DIP SWITCH #
0 0 0 X X X X X No Telephone Line Connected
1 0 0 X X X X X 2-Wire End-to-End loop start
0 1 0 X X X X X 2-Wire End-to-End ground start
1 1 0 0 X X X X
0 0 1 1 X X X X 4-Wire E&M Overdial-PBX
1 0 1 0 X X X X 4-Wire E&M Type 1 Immediate Start
1 0 1 1 X X X X 4-Wire E&M Type 1 Wink Start
1 1 0 0 X X X X
1 1 0 1 X X X X DID Wink Start
X X X X X 0 0 0 300 Baud
X X X X X 1 0 0 1200 Baud
X X X X X 0 1 0 2400 Baud
X X X X X 1 1 0 4800 Baud
X X X X X 0 0 1 9600 Baud
X X X X X 1 0 1 19200 Baud
4-Wire E&M Overdial-Microwave
DID Immediate Start
Configurator Terminal
Serial Data Rate:
0 = DIP Switch Lever Down
1 = DIP Switch Lever Up
X = DIP Switch Lever Down or Up
SEE
PARAMETER
BELOW
Telephone
Line Type:
BANK SW1
DIP SWITCH #
1 2 3 4 5 6 7 8
1 0 0 0 0 0 X X
0 1 0 0 0 0 X X
1 1 0 0 0 0 X X
0 0 1 0 0 0 X X
1 0 1 0 0 0 X X
0 1 1 0 0 0 X X
1 1 1 0 0 0 X X
0 0 0 1 0 0 X X
1 0 0 1 0 0 X X
0 1 0 1 0 0 X X
1 1 0 1 0 0 X X
0 0 1 1 0 0 X X
1 0 1 1 0 0 X X
0 1 1 1 0 0 X X
1 1 1 1 0 0 X X
0 0 0 0 1 0 X X
1 0 0 0 1 0 X X
0 1 0 0 1 0 X X
1 1 0 0 1 0 X X
0 0 1 0 1 0 X X
1 0 1 0 1 0 X X
0 1 1 0 1 0 X X
1 1 1 0 1 0 X X
0 0 0 1 1 0 X X
1 0 0 1 1 0 X X
0 1 0 1 1 0 X X
1 1 0 1 1 0 X X
0 0 1 1 1 0 X X
1 0 1 1 1 0 X X
0 1 1 1 1 0 X X
1 1 1 1 1 0 X X
0 0 0 0 0 1 X X
GTI
UNIT
#1 2 3 4 5 6 7 8
1
2
3
4
5
6
7
8
9
10
11
12
13
14
15
16
17
18
19
20
21
22
23
24
25
26
27
28
29
30
31
32
8. GTI INTERFACE BOARD MOUNTING
The
8th step
Master GTI from a standard GTI by adding the GTI
Interface board. Each standard GTI contains two printed
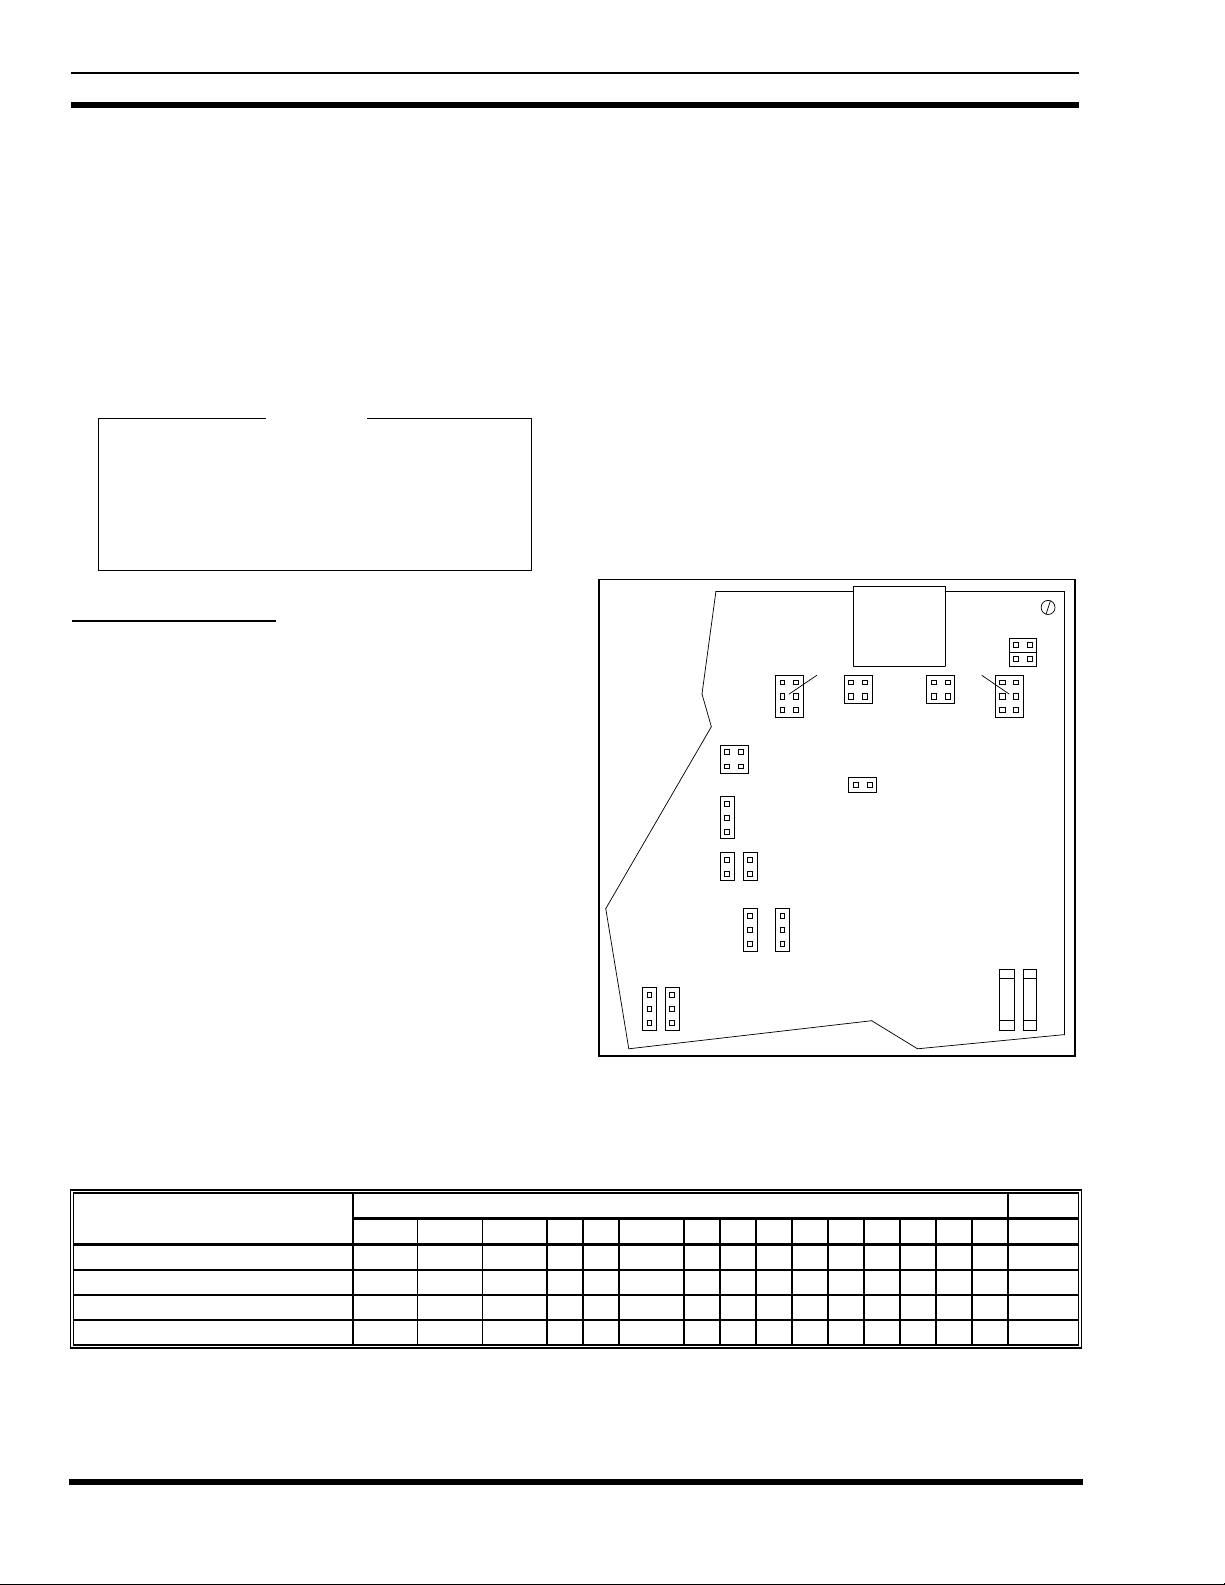
circuit boards, mounted as shown in Figure 27. A third
board, the GTI Interface board, is added to one GTI unit at a
site, making it the Master GTI.
PROCESSOR
BOARD
to install the ELI option, is to make a
P1
MAIN
BOARD
Figure 27 - GTI Circuit Board Layout
After the cover has been removed, add the GTI
Interface board as follows:
1. Remove the five screws (don't throw them away)
holding the GTI Processor board, and replace them
with five screw-in standoffs supplied with the GTI
Interface board.
2. Carefully position the GTI Interface board above
the GTI Processor board, so that the 14 pins of P1
on the GTI Processor board line up with the 14-pin
socket on the under side of the GTI Interface board,
and push the GTI Interface board down to the
standoffs.
3. Fasten the GTI Interface board to the standoffs
using the five screws removed in step 1.
23
Page 24

LBI-39076B INSTALLATION
9. GTI & IAM MOUNTING
The
9th step
standard GTI units, the Master GTI, and optional IAM (if
supplied). Be sure that the following items have been
completed before mounting:
• Recorded all software version numbers
• Installed GTI interface card in Master GTI
• Set up telephone interface
• Set DIP switches (GTI units and Master GTI)
The method used to mount GTI units in repeater
cabinets is to mount all of the standard GTI units first,
followed by the Master GTI. Start by mounting the first
standard GTI just above the GETC for the highest numbered
radio channel, the next GTI just above the GETC for the
next highest numbered radio channel, and so on until all
standard GTI units, and then the Master GTI are mounted.
You may use some other method. However, using the
method described here assures that the supplied cables will
be the correct length and the PCM/Data Bus will be as short
as possible. (The PCM/Data Bus must not exceed 120 feet
in length).
to install the ELI option, is to mount the
Telephone Line
The ELI TELCO Interface module, in the EDACS
Interface panel at the top of each repeater cabinet, is used to
consolidate the telephone connections for 6 telephone lines
from up to 6 GTI units into a single 25-pair IDC telco
connector for connection to a Type 66 (or equivalent)
punchblock and the telephone company. A second 25-pair
IDC telco connector is provided on each module to allow a
25-pair cable to connect this module in tandem with a
similar module in an adjacent repeater cabinet.
CAUTION
All telephone lines must come through
protected punchblocks (or equivalent
protection) before being connected to this
equipment.
For each GTI unit that will be connected to a telephone
line, connect a cable from the female 8-pin modular RJ-45
connector on the back of the GTI unit to one of the female
8-pin modular RJ-45 co nnecto rs (J 1 through J 6) on the fro nt
of the ELI TELCO interface module in the EDACS Interface
Panel at the top of the cabinet (see Figure 29). Use a cable
that matches the location of the GTI unit:
The 350A1154G1 GTI hardware kit, supplied with each
GTI unit, provides a pair of offset brackets to brace the rear
of the GTI unit to the back rails of the cabinet.
10. GTI CONNECTIONS
The
10th step
connections to the GTI units (including the Master GTI).
All of the connections can be made to the connectors on the
rear panel as shown in Figure 28.
Telephone GTI Configurator
Repeater Audio
Line
Master GTI Connections to Site Controller Computer
to install the ELI option, is to make the
Power Supply/
POWER/AUDIOPHONE PCM/DATA BUS
PCM/Data
Bus
PROGRAM
To Port 30
To Port 31
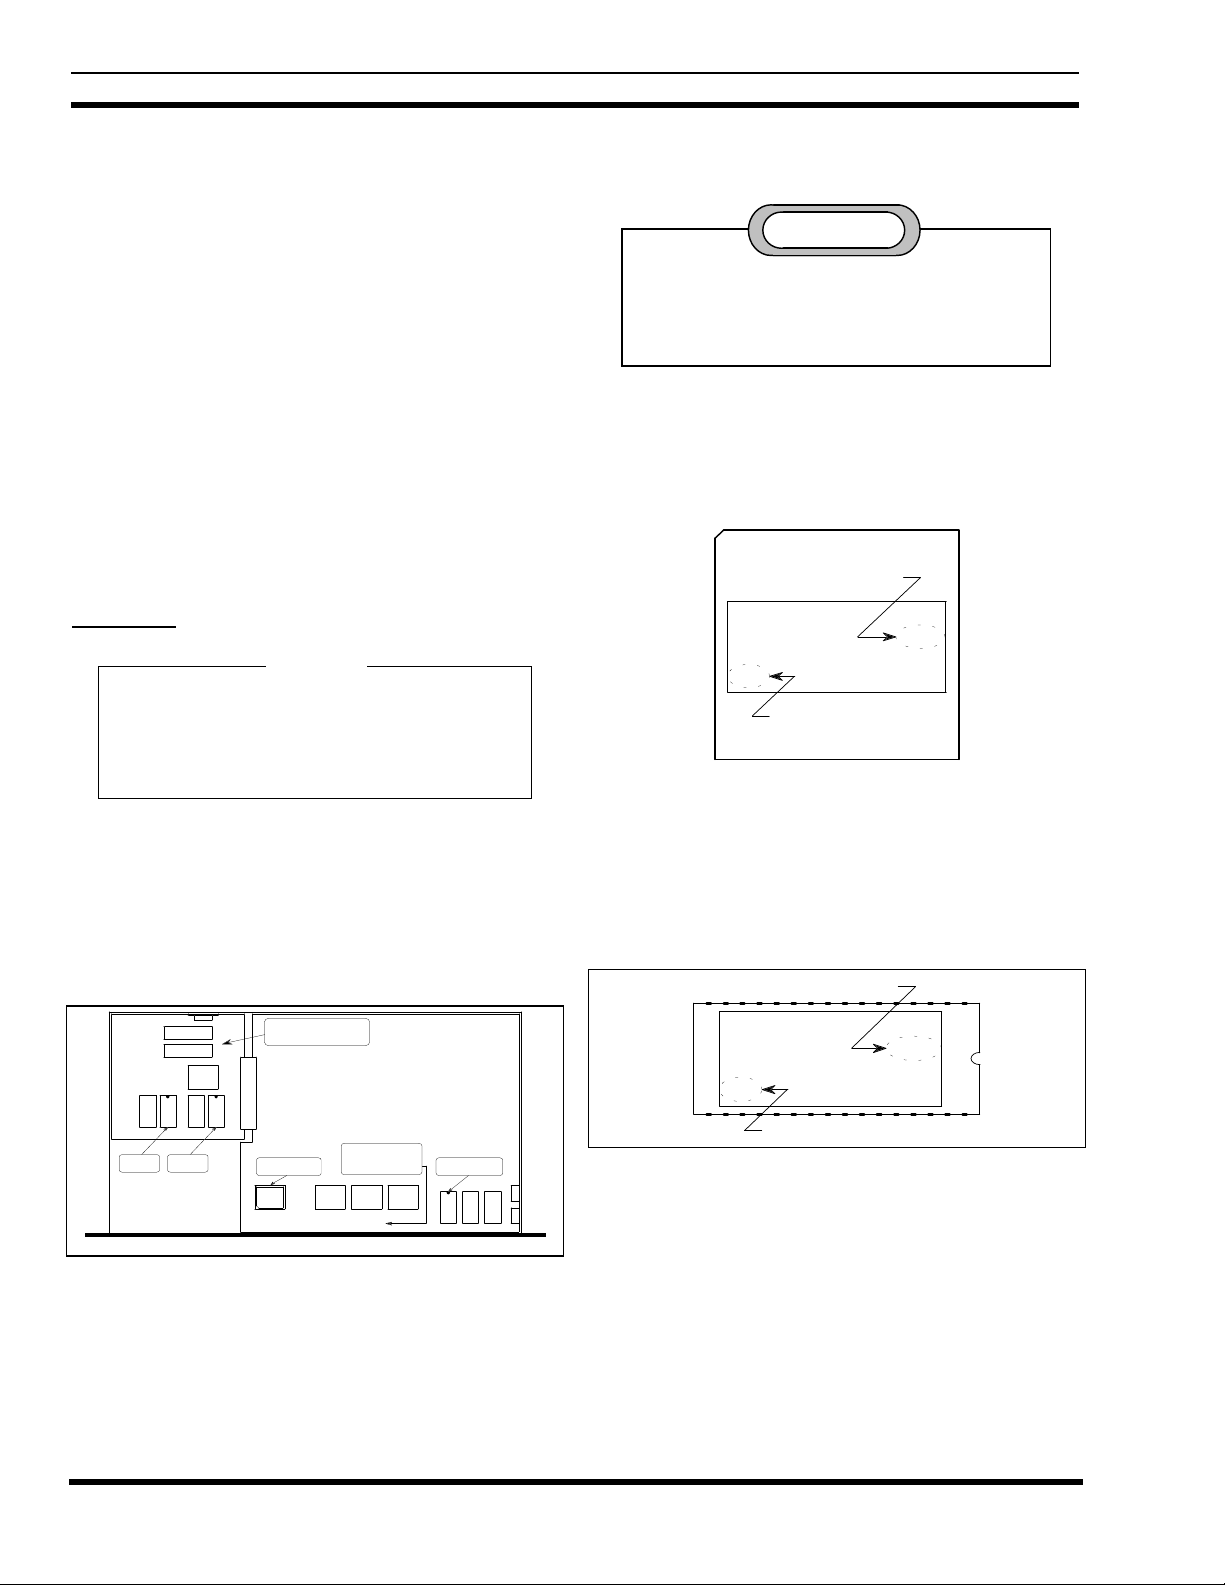
Figure 28 - Connections to GTI
J3
RS-232 Port
(J3)(J2)(P1)(J1)
J4 J5
• Use a 44" 19B803829P1 cable when the GTI is
located with the top repeater.
• Use a 60" 19B803829P2 cable when the GTI is
located with the middle repeater.
• Use a 76" 19B803829P3 cable when the GTI is
located with the bottom repeater.
J14 J15
J1
Telephone
Company
Connections
ELI TELCO
J2
J3
J4
J5
J6
GTI
Connections
Figure 29 - Connections to ELI TELCO Interface Module
24
Page 25

INSTALLATION LBI-39076
B
MASTR III Power Supply/Audio
If the GTI unit is to be connected to a MASTR III
repeater channel, connect a 19B803830P1 cable from the
male 1x6-pin Molex connector on the back of the GTI
(marked "POWER/AUDIO") to P4 on the MASTR III
repeater T/R Shelf backplane, and to P801 on the repeater
power supply, as shown in Figure 30. Note that the power
supply end of the cable comes with pins attached to wires,
but no connector shell. These pins are to be inserted into the
existing connector shell already connected to P801 on the
power supply. Insert the pin on the red wire into pin
position 3 and the pin on the black wire into pin position 6.
GTI T/R Shelf Backplane
POWER/AUDIO
Tx Audio
Rx Audio
PTT
Gnd
+12 Vdc
19B803830P1 Cable
1
2
4
5
6
#24 BRN
#24 BLU
#24 YEL
#24 BLK
#22 BLK
#22 RED
P4
1
MIC_HI
6
INTRCM_AUDIO
5
LOCAL_PTT
2
AGND
Existing Connector
Power Supply
P801
Neg
6
Pos
3
Figure 30 - MASTR III Connections
MASTR II or IIe Power Supply/Audio
If the GTI unit is to be connected to a MASTR II or IIe
repeater channel, the existing 19C320811G15 or G16
harness for the MASTR II or IIe repeater channel must be
modified. The modification involves two existing
connectors on the harness: P40 - a 1x6-pin Molex connector,
and P41 - a 1x2-pin Molex connector. These connectors
will be found secured to the harness as it goes to J1201,
J1202, J1203, and J1204 on the backplane of the repeater.
Use the following procedure to rearrange the wires from
these two connectors into the single connector, P40, and
then connect it to the GTI unit:
1. Remove pin 1 from the shorter connector, P41, using a
small screwdriver or scribe to depress the to ngue of the
pin in the open slot in the side of the connector while
you pull gently on the wires going to the pin. Insert the
pin into the longer connector, P40, as pin 6.
2. Remove pin 2 from the shorter connector, P41, and
insert the pin back into the longer connector, P40, as
pin 5.
3. Remove pin 3 (attached to the two W/Y/BN colored
wires) from the longer connector, P40, and insert the
pin back into the same connector, but now as pin 4.
4. Cut the short loop of white wire between pins 1 and 2 in
the longer connector, P40.
5. Remove pin 1 from the longer connector, P40, and
insert the pin back into the same connector, but now as
pin 3.
NOTE
Once the MASTR II or IIe r epeater h arn ess has
been modified per steps 4 and 5, a GTI un i t must
be connected to the repeater harness at all times
to complete the audio loop of the repeater. If the
GTI unit ever needs to be removed, you must
reconnect the jumper cut in step 4. Because of
the pin change in step 5, the jumper will be
needed bet ween pin s 2 and 3.
Plug this rearranged P40 into the male 1x6-pin Molex
connector (marked "POWER/AUDIO") on the back of the
GTI. See Figure 31.
GTI T/R Shelf Backplane
Gnd
P40
2
3
4PTT
5
6
W-BK
W-BK-R
W-Y-BR
W-Y-BR
#22 BLK
#22 RED
J1203P3
7
11
Rec/Exc Door
J933P8
6
5
Power Supply
P801
P9
5
3
TRANS AUDIO HI
TRANS AUDIO LO
TRANS AUDIO HI
TRANS AUDIO LO
Neg
Pos
POWER/AUDIO
Rx Audio
Tx Audio
+12 Vdc
Modified Part of
19C320811G15 or G16 Harness
6
5
4
P40
3
2
1
Figure 31 - MASTR II & IIe Connections
PCM/Data Bus
The PCM/Data bus is made up of a PCM/Data bus
termination plug and one or more 12-pair shielded cables
daisy-chained between each GTI, the Master GTI, and the
optional IAM (if present). These cables have a stackable
25
Page 26

LBI-39076B INSTALLATION
24-pin connector on one end, and a standard 24-pin
connector on the other.
To install the data bus cables, connect the IAM unit (if
present) first, then the Master GTI unit, and finally the
standard GTI units (from the lowest channel to the highest
channel). Plug the standard connector of the first cable
directly into the first unit, and the stackable connector of the
first cable directly into the second unit. Then plug the
standard connector of the second cable into the stackable
connector of the first cable (which is plugged into the
second unit), and the stackable connector of the second
cable directly into the third unit. Continue connecting the
cables in this way until all units are connected together.
Then, plug the PCM/Data bus termination plug into the
stackable connector of the last cable (which is plugged into
the last unit).
Figure 1 shows the standard routing for a typical ELI
system. Figure 32 shows the pin-out information for
PCM/Data bus cables.
Female Part of Connector Mates with Next Cable
11
13 13
2
14214
33
15 15
4
16416
55
17 17
6
18618
77
19 19
8
20820
99
21 21
102210
11 11
23 23
122412
Male Part of Connector Mates with GTI / IAM
PCM Data Bus - Bit 0
PCM Data Bus - Bit 1
PCM Data Bus - Bit 2
PCM Data Bus - Bit 3
PCM Data Bus - Bit 4
PCM Data Bus - Bit 5
PCM Data Bus - Bit 6
PCM Data Bus - Bit 7
PCM Data Bus - Frame Sync
Console Data Bus
22
Subscriber Data Bus
24
Repeater Data Bus
1
13
2
14
3
15
4
16
5
17
6
18
7
19
8
20
9
21
10
22
11
23
12
24
Figure 32 - PCM / Data Bus Cable
Site Controller Computer
Two data cables must connect the Master GTI to the
Site Controller computer. Connect a 19B803826P1 cable
from the left female RJ-11-6 connector on the back of the
Master GTI, to Port 30 on the back of the Site Controller
computer. Connect a 19B803826P2 cable from the right
female RJ-11-6 connector on the back of the Master GTI, to
Port 31 on the back of the Site Controller computer. The
locations of Ports 30 and 31 on the back of the Site
Controller computer are shown in Figure 33.
Port 31 (LIC) Port 30 (RIC)
Figure 33 - Site Controller Computer Connections
11. IAM SOFTWARE
The 11th step to install the ELI option app lies only if
an IAM was supplied. Record the software version number
marked on the software PROM in the IAM unit. If a
problem is later encountered with the equipment, the
software version number may be essential to help with the
diagnosis.
The location of the software PROM in the IAM unit is
shown in Figure 34.
U23
FRONT
Figure 34 - IAM Software Locations
The IAM software is stored in U23 in the IAM. A
sample label for U23 is shown in Figure 35. The actual
version number of the software supplied may be different
than that shown.
26
Page 27

INSTALLATION LBI-39076
B
Software Version #
(C) ZETRON INC.
IAM V1.2
2#56022
U23
Circuit Symbol
601-0537
Figure 35 - IAM Software Label
12. IAM CONNECTIONS
The
12th step
only if an IAM was supplied. All connections to the IAM
are made to connectors on the rear panel, as shown in Figure
36.
Power Supply
POWER
Figure 36 - IAM Rear Panel Connections
needed to install the ELI option applies
PCM / Data
(P1) (J2) (P2) (J3)
Bus
P2
Alarm
Outputs
ALARM
Printer
RS-232 Port
PRINTER
For a power supply connected to a MASTR II or IIe
repeater, remove the existing pins in pin positions 3 and 5,
and tie back. Then insert the pin on the red wire into pin
position 3 and the pin on the black wire into pin position 5.
PCM/Data Bus
Connect the PCM/Data bus cables as instructed in the
previous section for the GTI units.
Alarm Outputs
The IAM provides three open-drain alarm outputs for
the user to connect to an alarm system, if desired. These
alarm outputs will go through indeterminate states during
IAM power-up or reset. If the Active High output
configuration is selected by setting DIP switch section 7 to
the up position, all alarms will be active if the IAM loses
power. Conversely, if the Active Low output configuration
is selected by setting DIP switch section 7 to the down
position, no alarms will be active if the IAM loses power.
The standard ELI option does not provide a cable for this
connection, but pin-out information is shown in Figure 38.
Pins 7 through 10 are not used.
Power Supply
Connect a 19B803968P1 cable from the male 1x6-pin
Molex connector on the back of the IAM (marked
"POWER") to P801 on the repeater power supply, as shown
in Figure 37. Note that the power supply end of the cable
comes with pins attached to the wires, but no connector
shell. These pins are to be inserted into the existing
connector shell already connected to P801 on the power
supply.
Existing Connector
IAM Power Supply
POWER
Gnd
5
+12 Vdc
19B803968P1 Cable
6
Black
Red
P801
Neg
*
Pos
3
* 5 for MASTR II and IIe
6 for MASTR III
Figure 37 - IAM Power Supply Connections
For a power supply connected to a MASTR III repeater,
insert the pin on the red wire into pin position 3 and the pin
on the black wire into pin position 6.
ALARM OUTPUTS CONNECTOR
12345678910
Pin Alarm Function
Ground
10
1
2
Alarm 1
Ground
3
4
Alarm 2
5
Ground
6
Alarm 3
Ground
7
8
Alarm 4
9
Ground
Alarm 5
SMDR Full or Memory Error
Bus Failure
Low Battery
Not Used
Not Used
Figure 38 - IAM Alarm Outputs
Printer RS-232 Port
A female 9-pin RS-232 serial printer port, labeled
“PRINTER”, is provided in the rear panel of the IAM
allowing you to connect a printer to keep real-time records
of calls being placed on your system (a record is printed
after each call ends). The proper baud rate for the port can
27
Page 28

LBI-39076B INSTALLATION
be selected using DIP switch sections 2 through 4. The
serial printer port can be turned off and on using DIP switch
section 5. The proper handshaking protocol for your printer
can be selected using DIP switch section 6. The IAM can
use both hardware and software handshaking, or just
software handshaking. The standard ELI option does not
provide a cable for this connection, but pin-out information
is shown in Figure 39.
PRINTER RS-232 CONNECTOR
12345
9876
Pin Function
1
2
3
4
5
6
7
8
9
DTR (Output)
NC
Tx Data (Output)
Rx Data (Input)
Ground
NC
CTS (Input)
NC
Ground
Figure 39 - IAM Printer RS-232 Port
Connecting a serial printer can sometimes entail some
trial and error to get things set up properly. If you need to
change any of the DIP switch settings, be sure to do a soft
reset on the IAM (the IAM will only look at the DIP switch
settings as part of the reset sequence).
A soft reset is accomplished by pushing the RESET
button on the front panel two times. If the time between the
two pushes is too short or too long, the reset will be abor ted.
The two pushes should be about 1/2 second apart. When the
two pushes of the Reset button are spaced correctly, the
front panel LEDs will all flash simultaneously as the IAM
resets.
13. IAM DIP SWITCH SETTINGS
The
13th step
an IAM was supplied. Set the sections of the DIP switch on
the front of the IAM unit as needed. Figure 40 shows the
layout of the DIP switch sections and the function of each.
to install the ELI option applies only if
Switch section 8 is not used. Set switch section 1 to the
operate (down) position.
DIP Switch Section Layout
Up
12345678
Setting of DIP Switch Section #
12345678
Up
Dn
Dn Dn
Up
Dn
UpDn Dn
UpDn Dn
UpDnDnUp
DnDn
Up
Up
Dn
Up
Dn
Down (Dn)
Function
Mode of Operation
Test
Operate
Baud Rate to Printer
300
1200
2400
4800
9600
Data to Printer
On
Off
Printer Handshake
Use Xon/Xoff
Use both Xon/Xoff & DTR
Alarm Output
Active High
Active Low
Figure 40 - IAM DIP Switch Settings
The position of each DIP switch section (except switch
section 5 which controls data to the printer) is read only
when the unit is reset. This means that changing the position
of any of the other DIP switch sections will have no effect
until the unit is reset or power-cycled.
14. GETC MODIFICATION
The
14th step
only to MASTR III repeaters. If a MASTR III repeater will
be connected to a GTI unit or the Master GTI, the associated
GETC must be modified. (This does not apply to MASTR
II or IIe EDACS repeaters.)
Remove power from the GETC shelf and pull out the
tray containing the circuit boards until you can reach the
connectors along the rear edge of the main circuit board.
Disconnect the connector going to J7 (third connector from
the right). Carefully extract pin 8, using a small screwdriver
or scribe to depress the to ngue of the pin in the ope n slot in
the side of the connector while you pull gently on the wire
going to the pin. Tape the pin to the cable and reconnect the
connector to J7.
needed to install the ELI option applies
28
Page 29

CONFIGURATION LBI-39076
B
CONFIGURATION
OVERVIEW
The user configurable parameters for the ELI option
reside in two locations: the Site Controller computer’s
database and the GTI units’ database. T he configuration of
these two databases is covered in this section.
SITE CONTROLLER DATABASE
The overall operation of the ELI option is controlled by
the software in the Site Controller computer and the active
configuration of the Site Controller computer’s database.
This active configuration must reflect the installed telephone
interconnect hardware and the desired operational
characteristics. The Site Controller must use Release 5
(group 5, version 6.xx) or higher software to support ELI.
However, it is highly recommended that the Site Controller
use Release 7 (group 7, ve rsion 7.xx) or higher so ftware to
ensure the proper and efficient operation of the ELI system.
Operation without System Manager
If the Site Controller computer is not connected to a
System Manager, the active configuration of its database
will always be the default configuration contained in its
Personality PROMs. Therefore, this default configuration
must reflect the installed telephone interconnect hardware
and the desired operational characteristics.
If the telephone interconnect hardware or the desired
operational characteristics change, it will be necessary to
order a new set of Site Controller computer Personality
PROMs. To assure that the new PROMs will accurately
reflect these changes, it is important to pay particular
attention to the following two data fields used by the Site
Controller personality programmer to make the new
Personality PROMs. (This is because telephone lines are
typically numbered differently in the ELI option than they
were in the previous telephone interconnect option.)
Max Line
used. For the ELI option, the standard procedure is to
assign telephone line numbers to the highest equipped radio
channel numbers, with the telephone line numbers
corresponding to the channel numbers. Therefore, a sevenchannel ELI site with three telephone lines would have
telephone line numbers five through seven, and you would
enter 7 in the Max Line field.
- Defines the highest telephone line number
Rotary Defaults
considered when hunting for an available line. This field
should only list existing line numbers. Listing non-existent
line numbers may delay the line assignments for radioinitiated interconnect calls. In the previous example, line
numbers one through four would not exist and should not be
entered in the Rotary Defaults field.
Interconnect Timing Parameters
- Defines which line numbers are to be
NOTE
If upgrading to Release 7 Site Controller
Application Software, check these interconnect
timing settings.
If the Site Controller has Release 7 or later site
controller software, the interconnect timing parameters in
the Site Controller personality may need to be altered.
These timing parameters are designed to guide system
response time to certain interconnect sequences, such as dial
tone detection and DTMF digit detection. The Site
Controller pre-Release 7 software added significant time to
these timing parameters. As an example, the dial tone
detection duration defaults to one second. Prior to this
release, the site controller would in fact wait 1.6 seconds for
dial tone. Another example is the DTMF digit detect
duration, which defaults to 20 seconds for ELI. Prior to this
release, the 20 second time-out was in reality 32 seconds.
These examples indicate that ro tary hunts would take lo nger
and interconnect resource recovery would be further delayed
beyond what a customer called out in the Site Controller
personality. At best this causes confusion, making it more
difficult to tailor an EDACS system per customer needs.
With Release 7 and later software, the interconnect
timings are accurate. The accurate timings provide the
benefit of reliable customization of system operation per
customer needs (e.g., dial tone detection) and increased
interconnect call throughput by more quickly recovering
interconnect resources for use by future calls. This carries
certain implications, most notable of which is dial tone
detection. If a customer application reports dial tone within
1 to 1.5 seconds, for example, previous software releases
would reliably process dial tone detection with a personality
value of 1 second. Release 7 (or later ), however, would not,
resulting in either a rotary hunt or, worse, misdialing on o ne
or more lines (see open DSR #4324). To remedy this
problem, the site controller personality should be updated
concurrent with the Release 7 (or later) upgrade to provide
the same relative time margin for dial tone detection, namely
increase the duration from 1 second to 1.6 seconds.
29
Page 30

LBI-39076B CONFIGURATION
Similarly, other interconnect timing parameters may
need upward adjustment. In addition to the dial tone detect
duration, the following parameters may require changes:
pulse digit delay base, pulse digit delay increment, DTMF
digit delay, DTMF digit detect duration, and line dropping
duration. The adjustment needed can be calculated as
follows (defaults are included in Table 6).
Operation with System Manager
If the Site Controller computer is connected to a System
Manager, the default configuration contained in its
Personality PROMs is not as critical, since it can be reconfigured with the System Manager. However, it must still
specify the ELI option, and should reflect the installed
telephone interconnect hardware and the desired operational
characteristics well enough to run the interconnect system in
an emergency. (Whenever the Site Controller computer
loses power or is reset, the active configuration of the Site
Controller computer’s database is (and will operate by) the
default configuration until an update of the latest database
can be obtained from the System Manager.)
Table 6 - Local Interconnect Timing Parameter Adjustments For Release 7
The following user-configurable database parameters
apply to local telephone interconnect systems in general.
They have been grouped by function, rather than System
Manager menu selection. The System Manager menu
selection and panel references are given, following each
parameter and its description, to help you locate the data
field for the parameter. Not all parameters are used for the
ELI system. Notes specifically for the ELI system are
shown where they apply.
General Limits for Site
• Interconnect - This 24-channel row of parameters
defines (for the site) if a channel is equipped for
telephone interconnect calls. Default is no (N) for all
channels. Enter Y for yes, or leave N for no. Note that
GTI units are usually placed on the highest available
channel numbers.
Site/Device Definition (menu selection 10)
Channel Configuration (panel 1)
LOCAL TELEPHONE
INTERCONNECT TIMING
PARAMETER
DEFAULT
VALUE
1
ADJUSTED DEFAULT
VALUE
2
(needed with Release 7 to
maintain the same timing
RECOMMENDED
VALUE
3
(assumes the Current Value4 provides
the desired level of operation)
margin as pre-Release 7)
Dial Tone Detect Duration 1,000 ms
(1 sec)
1,600 ms
(1.6 sec)
Use the 1,000 ms if the dial tone is
present within 1/2 sec; otherwise use
Adjusted Default Value.
Line Dropping Duration 4,000 ms
(4 sec)
6,400 ms
(6.4 sec)
Use Adjusted Default Value, or optimize
by trying other values between Current
Value and Adjusted Default Value.
1
Default Value: The Default Value is the value used in the Personality if no specific value is specified.
2
Adjusted Default Value: The Adjusted Default Value equals 1.6 times the Default Value. (Example: for a Default Value of
1000 ms, the Adjusted Default Value equals 1.6 times the Default Value of 1000 ms, or 1600 ms.)
3
Recommended Value: The Recommended Value is the value of the parameter that should be used with release 7 and later
Application Software. The recommendations are conservative and are intended to minimize any customer impact by
providing timing margins equivalent with past releases. You can try existing personalities with the Release 7 upgrade; there
may be sufficient timing margin to accommodate the more accurate Release 7 timings. However, be aware of the timing
sequences and be prepared to update the personality if performance problems are encountered.
4
Current Value: The Current Value is the value of the parameter currently being used satisfactorily with pre-release 7
Application Software.
30
Page 31

CONFIGURATION LBI-39076
B
• Line Active - This column of parameters defines (for
the site) if a line is available for interconnect calls.
Default is no (N) for all lines. Enter Y for yes, or leave
N for no. Note that a line number gets its number from
the radio channel number that shares the same GTI
Unit. Also note that GTI Units are placed on the
highest available channel numbers first.
Line Definition (menu selection 14)
Line Parameters (pages 1 & 2)
• Pulse Dial - This column of parameters defines (for the
site) if a line uses pulse dialing. Default is no (N) for
all lines. Note that the ELI system will ignore this
parameter, so there is no point in changing it from its
default value. However, the equivalent of this
parameter must be set in the GTI user database. (See
the GTI Configurator Software user’s guide, LBI-
39077.)
Line Definition (menu selection 14)
Line Parameters (pages 1 & 2)
• Message Conv Limit - This 4-digit field defines (for
the site) the conversation time limit(in seconds) for
interconnect calls (and message trunking). Default is
300 seconds. Enter a number from 10 to 2550.
NOTE
The voice prompt played to the caller (as the
result of an unanswered telephone-originated
call) will depend upon whether the IHT or the
60-second GTI interval expires first. If the IHT
is set to less than 60 seconds, it will expire first
and the GTI unit will play voice prompt #6.
(Default = Call is disconnecting) If the IHT is
set to more than 60 seconds, the 60-second GTI
interval will expire first and the GTI unit will
play voice prompt #5. (Default = Radio didn’t
answer) If the IHT is set exactly to 60 seconds,
either voice prompt #5 or #6 may be played, due
to slight timing variances.
• Max # Concurrent Intercon - This 2-digit field
defines (for the site) the maximum number of
simultaneous telephone interconnect calls permitted.
Default is 2.
Site/Device Definition (menu selection 10)
Site Parameters (panel 2)
Channel Assignment Parameters
Who Can Receive Calls
Site/Device Definition (menu selection 10)
Site Parameters (panel 2)
Channel Assignment Parameters
• Interconnect Hang Time - This 2-digit field defines
(for the site) the time (in seconds) between an unkey
command and channel drop. Default is 30 seconds. Do
not enter a number larger than 60 (see note).
Site/Device Definition (menu selection 10)
Site Parameters (panel 2)
Channel Assignment Parameters
NOTE
Although the Interconnect Hang Time (IHT) can
be set higher than 60 seconds, the GTI unit will
wait no more than 60 seconds for a telephoneoriginated call to be answered. Therefore, setting
the IHT to more than 60 seconds will not allow
more than 60 seconds for the call to be
answered.
• Inb Interconnect - This 1-digit field defines (for each
logical unit ID) if inbound interconnect calls are
allowed for this specific logical unit ID. Default is no
(N). Enter Y for yes, or leave N for no.
Logical Unit Definition (menu selection 11)
Radio Parameters (panel 2)
Radio Features
• Inb Interconnect - This 1-digit field defines (for each
group ID) if inbound interconnect calls are allowed for
this specific group ID. Default is no (N). Enter Y for
yes, or leave N for no.
Group Definition (menu selection 12)
Group Parameters (panel 2)
Features
31
Page 32

LBI-39076B CONFIGURATION
Who Has What Priority
• Interconnect - This 1-digit field defines (for each
logical unit ID) which of eight queuing priority levels
(from 0 to 7) is to be applied to this sp ecific logical unit
ID for interconnect calls. Default is the lowest priority
(0).
Logical Unit Definition (menu selection 11)
Radio Parameters (panel 2)
Call Priority
• Interconnect - This 1-digit field defines (for each
group ID) which of eight queuing priority levels (from 0
to 7) is to be applied to this specific group ID for
interconnect calls. Default is the lowest priority (0).
Group Definition (menu selection 12)
Group Parameters (panel 2)
Call Priority
Who Has What Toll Call Restrictions
• Digit Patterns - This column of parameters defines (for
the site) up to 16 digit patterns for the first four digits of
an outgoing interconnect call. An X used as a digit in a
pattern allows that digit to be any number from 0 to 9.
A string of 4 periods is used to represent an unused
pattern. Default is unused (....) for all patterns.
Who Has What Rotary Hunt Sequence
• Interconnect Rotary Definition - These 15 rows of
parameters define a 16-line rotary hunt sequence for
each of the 15 non-zero Rotary Numbers. Default is
zero (0) for each line. Starting from the left, assign the
valid line numbers in any order. Leave the unassigned
line numbers set to zero (0). Note that a line number
gets its number from the radio channel number that
shares the same GTI Unit. Also note that GTI Units are
placed on the highest available channel numbers first.
Assigning non-existent line numbers will delay the
rotary hunt sequence.
Rotary Definition (menu selection 13)
Interconnect Rotary Definition (panels 1 & 2)
• Rotary Number - This 2-digit field defines (for each
logical unit ID) which rotary number (from 0 to 15) is
to be applied to this specific logical unit ID. Default is
none (0). This number (other than 0 for none) is
meaningless by itself. The actual rotary hunt sequence
telling which line numbers are searched and in what
order (while searching for an available line) is defined
by the Interconnect Rotary Definition.
Logical Unit Definition (menu selection 11)
Radio Parameters (panel 2)
Interconnect
Toll Call Restrictions (menu selection 15)
Toll Call Parameters (panel 1)
• Restriction Levels - These 16 columns of parameters
define (for the site) which of 16 digit patterns will be
permitted for each of the 16 toll call restriction levels.
Default is no (N) for each of the 16 digit patterns for
each of the 16 toll call restriction levels. Enter Y for
yes, or leave N for no.
Toll Call Restrictions (menu selection 15)
Toll Call Parameters (panel 1)
• Toll Call Restrictions - This 2-digit field defines (for
each logical unit ID) which of 16 toll call restriction
levels (from 0 to 15) is to be applied to this specific
logical unit ID for interconnect calls. Default is
restriction level zero (0).
Logical Unit Definition (menu selection 11)
Radio Parameters (panel 2)
Interconnect
NOTE
For someone to be able to make a radio-initiated
interconnect call, a
Number
must be defined for that logical unit ID.
Dedicated Line
The default values for these parameters define
line 1 as the
Number
Dedicated Line
and no
to each logica l u ni t I D. T her efore each
logical unit ID has access to line 1.
In an ELI system, line number 1 will typically
not exist. In that case the default values for
Dedicate d Line
Rotary Number
and
all outgoing interconnect calls from each
unit ID.
Therefore, you must assign a
Rotary Number
each logical unit ID and one or more valid line
numbers to each of these assigned rotary
numbers in the
Interconnect Rotary Definition
or assign a valid line number as the
Line
for each logical unit ID. We recommend
using the
Rotary Definition
Rotary Number
.
and
Rotary
or
Rotary
will block
logical
to
Dedicated
Interconnect
,
32
Page 33

CONFIGURATION LBI-39076
B
Who Has What Dedicated Line
• Dedicated Line - This 3-digit field defines (for each
logical unit ID) the line number to be dedicated to
outgoing interconnect calls. Default is line 1. Enter a
line number, or 0 for denial. It is recommended that
you enter 0 for denial, and use unique rotary hunt
sequences to define dedicated lines.
Logical Unit Definition (menu selection 11)
Radio Parameters (panel 2)
Interconnect
• Dedicated To Unit - This column of parameters defines
(for the site) the logical unit ID to which each line is
dedicated. Default is no logical unit ID (0) for all lines.
Enter a logical unit ID, or leave 0 for no logical unit ID.
It is recommended that you leave 0 for no logical unit
ID, and use unique rotary hunt sequences to define
dedicated lines.
Line Definition (menu selection 14)
Line Parameters (pages 1 & 2)
RECOMMENDATION
It is recommended that all dedicated line
assignments be set up by using the
Number
parameters, not the
Set the
and assign a unique
single unique line number in the corresponding
Interconnect Rotary Definition
unit ID requir i ng a dedicated line.
Existing telephone interconnect systems that currently
have dedicated lines defined by using non-zero values for
the Dedicated Line and Dedicated To Unit parameters, can
continue to use this method with the ELI system. However,
because the lines are typically numbered differently for the
ELI system, some reconfiguring of the line numbers will
probably be necessary. If you find this to be the case, you
may want to change to the recommended method at this
time, as described above.
Dedicated Line
nterconnect Rotary Definition
and I
Dedicated Line
parameter to none (0),
Rotary Number
for each logi ca l
Rotary
parameter.
and a
GTI DATABASE
GTI Configurator software, using an office PC connected
through a data link to one GT I unit. The re-configured GTI
database will be cloned to each other GTI unit that is
connected to this one GTI unit.
Local Data Link
Using a local data link between an office PC and one
GTI unit, requires less equipment and is less complicated to
set up than a remote data link. A local data link should not
exceed 50 feet in length and requires the following four
items:
1. PC-Based Terminal (Not Supplied) - The customer
must supply a PC-based terminal with the following
features:
• IBM-compatible 386 or better
• MS-DOS version 3.2 minimum operating system
• 10 MB available hard drive
• 640 KB minimum RAM (recommend 2 MB)
• 1.2 MB 5.25-inch or 1.44 MB 3.5-inch floppy
drive
• Monochrome or color monitor
• Available male 9-pin RS-232 port (If a male 9-pin
serial port is not available, an adapter will be
required.)
2. RS-232 Data Cable (Supplied) - A 10-foot
19D903985P72 cable is supplied with male and female
9-pin connectors.
3. GTI Configurator Software (Supplied) - The GTI
Configurator software is supplied in both 3.5 and 5.25-
inch floppy formats.
4. GTI Configurator User’s Guide (Supplied)
Figure 41 shows how an office PC with a 9-pin COM
port is connected to a GTI unit. Figure 42 shows how an
office PC with a 25-pin COM port is connected to a GTI
unit.
Some user-configurable parameters for the ELI system
reside in the active configuration of the GTI database, in
each GTI unit. The GTI database is configured with the
33
Page 34

LBI-39076B CONFIGURATION
GTI UnitOffice PC
COM Port
DB-9 (M)
Rx Data
Tx Data
DTR
Signal Ground
RTS
CTS
DB-9 (F) DB-9 (M)
3 3
4
5
6
7
8
9
19D903985P72
Cable
Figure 41 - Local GTI Connection for 9-Pin COM Port
Adapter
COM Port J3
1
Rx Data
Tx Data
Signal Ground
DTR
RTS
CTS
3
2
20
7
4
5
2
3
4
5
6
7
8
9
19D903985P72
Cable
J3
DB-9 (F)
11
22
4
5
6
7
8
9
DB-9 (F)DB-25 (M) DB-9 (M) DB-9 (M)DB-25 (F) DB-9 (F)
1
2
3
4
5
6
7
8
9
Tx Data
Rx Data
DTR
Gnd
CTS
RTS
GTI UnitOffice PC
Tx Data
Rx Data
DTR
Gnd
CTS
RTS
Figure 42 - Local GTI Connection for 25-Pin COM Port
Remote Data Link
A remote data link using data modems will be required
if the GTI database must be configured from a location over
50 feet from the GTI units. The amount of additional
equipment required will depend upon which one of the
following two methods is used:
Internal GTI Modem
1.
- Use the internal 1200-baud
modem built into each GTI unit and the telephone line
connected to a GTI unit. This method requires the
following additional equipment:
•
1200-baud modem at GTI Configurator location
(internal or external - cable required if external)
•
Available telephone line at GTI Configurator
location and a cable to connect from the telephone
line to the modem
34
External Modem
2.
- Use an external modem at the GTI
unit location connected to the RS-232 port on the back
of a GTI unit. This method requires the following
additional equipment:
•
External modem at the GTI unit location and a
cable to connect it to the RS-232 port on the back
of a GTI unit
•
Matching modem at the GTI Configurator location
(internal or external - cable required if external)
•
Available telephone line or other communication
circuit and a cable to connect from it to the modem
(at both locations)
For additional information about using a remote data
link, see the Data Link To GTI Units section in the GTI
Configurator software user’s guide.
Page 35

OPERATION LBI-39076
B
OPERATION
GTI UNITS
The location of the indicators and reset button on the
front panel of each GTI unit (including the Master GTI) is
shown in Figure 43.
REPEATER TELEPHONE
STATUS
RADIO CONNECTED
DTMF DETECTED
Figure 43 - Front Panel of GTI Unit
Indicators
Status Indicator
The red LED, labeled “STATUS”, should be lit
whenever the unit is synchronized with the Master GTI (the
LED should flicker approximately twice a second). The unit
should automatically synchronize, but in the event that it
doesn’t, momentarily press the button labeled “RESET”.
Repeater Indicators
Of the two red LEDs for the “REPEATER” interface,
one is lit when the “RADIO (is) CONNECTED” and the
other is lit when “DTMF (is) DETECTED” from the radio.
GLOBAL TELEPHONE INTERCONNECT
LINE CONNECTED
DTMF DETECTED
MODEM IN USE
RESETPOWER
initiates a soft reset for that GTI unit only. Pushing the
RESET button on the Master GTI initiates a simultaneous
soft reset for all the GTI units. A simultaneous soft reset of
all GTI units can also be made through the GTI
Configurator software.
Hard Reset
A hard reset returns each user-configurable parameter in
each GTI unit’s user database back to the factory default
value, but does not alter any voice prompts that have been
recorded. A simultaneous hard reset of all GTI units can
only be made through the GTI Configurator software.
Power-cycling the GTI units does not perform a hard reset.
Alarms
The Site Controller computer can receive two types of
alarm messages from the Master GTI. One, called the LIC
alarm (after an earlier interconnect system), indicates a
connection problem between the Site Controller computer
and the Master GTI, or a problem in the Master GTI itself.
The other type of alarm message, called the RIC alarm
(after a second part of the same earlier interconnect system),
indicates a connection problem between the Site Controller
computer and a specific GTI unit, or a problem in the
specific GTI unit itself. A RIC alarm can be received for
each specific GTI unit.
IAM
Telephone Indicators
Of the three red LEDs for the “TELEPHONE”
interface, one is lit when the “MODEM (is) IN USE”, one is
lit when “DTMF (is) DETECTED” from the telephone line,
and one is lit when the telephone “LINE (is)
CONNECTED”.
Power Indicator
Whenever power is applied, the green LED, labeled
“POWER”, should be lit (there is no off/on switch).
Resets
Soft Reset
A soft reset does not alter any user-configurable
parameters in a GTI unit’s user database. Pushing the
RESET button on the front panel of a standard GTI unit
Skip this section if your ELI system is not equipped
with an IAM. The locations of the DIP switches, indicators,
and reset button on the front panel of the IAM are shown in
Figure 44.
INTERCONNECT ACCOUNTING MANAGER
RESET
POWERSTATUS
SETUP DIP SWITCHES
CDR RECEIVED
ALARM
LO-BAT
PRINTER
RESERVED FOR
FUTURE USE
Figure 44 - Front Panel of IAM
Indicators
Status Indicator
The red LED, labeled “STATUS”, should be lit
whenever the unit is synchronized with the Master GTI (the
LED should flicker periodically at a rate of approximately
twice a second). The unit should automatically synchronize
35
Page 36

LBI-39076B OPERATION
with the Master GTI within a couple of minutes of being
powered-up, but in the event that it doesn’t, momentarily
press the button labeled “RESET”.
CDR Received Indicator
The red LED labeled “CDR RECEIVED” should be lit
momentarily each time a Call Detail Record is received by
the IAM.
Alarm Indicator
The red LED labeled “ALARM” should be lit whenever
a fault (such as the call record buffer is full or the data bus
has failed) is detected.
Low-Battery Indicator
The red LED labeled “LO-BAT” should be lit when a
run-down battery backup for RAM is detected. This
condition can only be detected during power-up after an
extended power outage.
Printer Indicator
The red LED labeled “PRINTER” should not be lit
when DIP switch section #5 (for the output to the printer) is
off (down position).
The red LED labeled “PRINTER” should be lit when
DIP switch section #5 (for the output to the printer) is on (up
position). It should go off and on with the receipt of XOFF
and XON signals respectively from a connected printer. It
should flicker at a fast rate if no printer is connected.
Power Indicator
Whenever power is applied, the green LED, labeled
“POWER”, should be lit (there is no off/on switch).
Resets
Soft Reset
A soft reset is accomplished by pushing the RESET
button on the front panel for about 2 seconds, or until all the
front panel LED indicators that were off, flash on
simultaneously and then back off.
Clearing RAM
There may be occasions when the RAM needs to be
cleared (such as after replacing a RAM chip). The RAM is
cleared by using the Clear Call Detail Buffers operation in
the GTI Configurator software, or by using the hardwarebased procedure described here.
CAUTION
Retrieve all call detail records that you want to
keep, using the Retrieve Call Detail Data
operation in the GTI Configurator software,
before clearing the RAM. When the RAM is
cleared, all call detail records stored in RAM
will be lost.
To clear the RAM using the RESET button on the front
of the IAM, use the following procedure:
1. Write down the present positions of the DIP switches
located on the back panel.
2. Set DIP switch 1 to the up (test) position and DIP
switches 2 through 8 to the down position.
3. Push the RESET button on the front panel for about 2
seconds, or until all the front panel LED indicators that
were off, flash on simultaneously and then back off.
Front Panel Connector
The connector on the front panel of the IAM is reserved
for future use.
Printer
The printer can be used for a hard copy backup of the
raw Call Detail Records. The data to the printer can be
turned on and off with DIP switch section 5. Up is on and
down is off. Do not reset the IAM for this section of the
DIP switch.
36
4. Set DIP switch 1 to the down (operate) position and
DIP switches 2 through 8 to the positions noted in the
first step.
5. Push the RESET button on the front panel for about 2
seconds, or until all the front panel LED indicators that
were off, flash on simultaneously and then back off.
To verify that the RAM has been cleared, use the Status
info operation in the GTI Configurator software to look at
the number of records for each telco line. For more
information, see the GTI Configurator software user’s guide.
Page 37

OPERATION LBI-39076
B
Backup
The IAM has the capacity to hold 60,000 records in
battery backed RAM. Every effort has been made to ensure
that this memory won’t be corrupted in normal operation.
However, one must not forget about the possibly of
component failure in the IAM, or more likely an external
influence (such as a lightning strike, technical error, etc.)
that could cause the loss of records stored in the IAM.
Therefore, you should download the billing data often and
backup the data then stored in the office PC to ensure that, if
an accident occurs, the loss of data (potential revenue) will
be minimized.
As the operation of the IAM is autonomous, the ELI
system will continue to process telephone calls, even if the
IAM has failed, the IAM memory is full, or the IAM is
disconnected from the PCM/Data bus. There is an option in
the GTI Configurator that will halt the call processing if
there is a bus failure (between units). Because the standard
placement of the IAM is at one end of the bus, it is possible
that there won’t be any indication to users of the system if
the IAM is not able to store Call Detail Records.
However, the IAM has alarm outputs that can be used to
notify the user of a memory or bus problem that may result
in the loss of billing data (see the subsequent section on
alarm outputs). Also, the printer can be used for a hard copy
backup of the raw Call Detail Records. The data to the
printer can be turned on and off with DIP switch section 5.
Up is on and down is off. Do not reset the IAM for this
section of the DIP switch.
Status
The status of the IAM can be read by using the GTI
Configurator software. The GT I Configurator software will
show if an IAM is present, the number of call records
presently stored, the amount of memory free and memory
used, any alarm conditions, etc. See the GTI Configurator
software user’s guide for more information about accessing
the IAM for status messages.
Alarms
As described in the installation section, three open drain
alarm outputs are provided to alert external equipment in
case of problems. Because the IAM does not immediately
affect other devices, its operation (or lack of operation) is
not immediately obvious, unless someone at the site
observes the front panel LEDs, the status of the IAM is read
via the GTI Configurator software, or these alarm outputs
are monitored.
Alarm 1 - CDR Full or Memory Error - indicates that
the CDR buffer is full or a memory error has occurred. In
either case, one should access the site (using the GTI
Configurator), read the status of the IAM, and download the
Call Detail Records (if possible).
Alarm 2 - Bus Failure - is sent if there is a PCM/DATA
bus failure and the IAM can’t communicate with the GTI
units to receive billing data.
Alarm 3 - Low Battery - is active if the battery backup
for RAM is low and should be replaced. (This condition
will only be detected during power-up after an extended
outage.)
It should be noted that these alarm outputs will go
through indeterminate states during IAM power-up or re set.
It is recommended that the normally-closed output option be
selected (see DIP Switch Settings), so that the presence of
individual alarms will indicate the intended alarms, and the
presence of all alarms will indicate that the IAM has lost
power.
INTERCONNECT CALLS
Overview
The operation of the Enhanced Local Interconnect
(ELI) system is controlled by the Site Controller computer.
The Site Controller computer makes radio channel and
telephone line assignments, based on availability, and the
constraints of its active database configuration. For a site
that is not connected to a System Manager, the active
database configuration is nothing more than what has been
programmed into the Site Controller computer's Personality
PROMs. For a site that is connected to a System Manager,
the active database configuration is the latest site database
received from the System Manager.
The Site Controller computer supervises the GTI units
by sending and receiving messages over two 19.2 Kbaud
serial data links to the Master GTI. (All messages between
the Site Controller computer and individual GTI units must
first go through the Master GTI.) Message bytes are made
up of 8 data bits, 1 stop bit, and no parity bit.
The following terms are used to simplify the
descriptions in this section:
• Telephone-originated call - a call from a telephone,
through a telephone line connected to an EDACS
repeater site, to one or more radios using that
EDACS repeater site.
37
Page 38

LBI-39076B OPERATION
• Radio-originated call - a call from a radio using an
EDACS repeater site, through a telephone line
connected to that EDACS repeater site, to a
telephone.
• Line-connected GTI - the GTI unit connected to the
telephone line for the interconnect call being
described.
• Channel-connected GTI - the GTI unit connected to
the radio channel for the interconnect call being
described.
Note that a line-connected GTI and a channelconnected GTI may be the same physical GTI unit or
different physical GTI units. Although each GTI unit is
capable of being connected to one line and to one channel,
the Site Controller computer makes each radio channel and
telephone line assignment, based on availability and the
constraints of its active database configuration, not on
whether they share the same GTI unit.
Detection of telephone hang-up depends on signaling
provided to the line-connected GTI. To determine if a line
provides the necessary signaling, connect a scope across the
line to monitor the DC voltage. At the end of the call, there
must be a loss of voltage for 100 milliseconds or more.
Telephone hang-up typically can be detected on End-to-End
with battery removal (many COs now provide this type of
line, but it cannot always be ordered), E&M Type 1, and
DID lines. Telephone hang-up typically cannot be detected
on PBX lines and microwave links (which emulate end-toend lines).
Telephone-Originated Call
The sequence of steps for a telephone-originated local
interconnect call is as follows:
DETECTING THE CALL
1. Somewhere in the telephone system, a user dials the
telephone number of a subscriber line connected to a
GTI unit.
2. The line-connected GTI detects the call by sensing the
presence of a ringing voltage (or an E-lead signal), and
sends a message to the Site Controller indicating that a
call has been detected by this GTI unit.
3. The Site Controller checks to see if it is permitted to
add another telephone interconnect call. (There may be
a limit on the number of telephone interconnect calls
allowed at any one time.)
If the Site Controller is not permitted to add another
telephone interconnect call, it lets the call go
unanswered. This ends the sequence here.
4. If the Site Controller is permitted to add another
telephone interconnect call, it checks to see if that line
number is dedicated to a specific LID. (See Dedicated
to Unit field in System Manager screen 14.)
If the line number is dedicated to a specific LID, go to
step 19.
5. If the line number is not dedicated to a specific LID, the
Site Controller checks to see if a channel-terminating
GTI is available to collect overdial digits. (The Site
Controller will check the GTI on the Control Channel
first and if available, use it for this operation.)
If no channel-terminating GTI is available, the Site
Controller lets the call go unanswered. The caller
should hang up and try again after 3 ringbacks. This
ends the sequence here.
ANSWERING THE CALL
6. If a channel-terminating GTI is available, the Site
Controller allocates it for digit collection.
7. The Site Controller sends a message to the lineterminating GTI, directing it to answer the call.
8. The line-terminating GTI answers the call and lights the
“LINE CONNECTED” indicator on its front panel.
9. The Site Controller directs the line-terminating (now
line-connected) GTI to apply dial tone to the line.
10. The Site Controller directs the line-connected GTI to
look for DTMF or dial click (pulse) signals.
11. The Site Controller starts a rapid polling mode of
operation to poll the Master GTI more frequently than
usual. The fast polling is used during the anticipated
dialing process to speed the processing of the dialed
digits. The Site Controller will fast poll for the DTMF
Digit Detection Duration (forced to 20 seconds when
ELI is selected) to collect the digits. The call will be
disconnected if the DTMF digits are not collected
within this time.
12. The caller hears the dial tone from the line-connected
GTI, and starts sending DTMF digits indicating whether
the call is analog or digital, if it’s to a group or
individual, and what the ID of the individual or group
is.
38
Page 39

OPERATION LBI-39076
B
IDENTIFYING CALLED ID
13. The channel-terminating GTI detects the first DTMF
digit, momentarily lights the “DTMF DETECTED” red
LED on the front panel, and reports the digit to the Site
Controller.
14. The Site Controller directs the line-connected GTI to
stop sending a dial tone to the calling line, and starts a
counter to count the received DTMF digits.
15. The Site Controller checks the first DTMF digit to see if
it is a #, *, or number from 0 to 9.
If the first DTMF digit is a #, the call is identified as a
digital call, but the counter is not advanced. (The call
will be assigned but audio will be incorrect. This is
because ELI does not support digital mode.)
If the first DTMF digit is a * (or a 9 when using pulse
dialing), the call is identified as a group call, and the
counter is advanced by one.
If the first DTMF digit is a number from 0 to 8, the digit
is stored in the ID buffer and the counter is advanced by
one.
16. The channel-terminating GTI detects the next DTMF
digit, momentarily lights the “DTMF DETECTED” red
LED on the front panel, and reports the digit to the Site
Controller.
17. The Site Controller receives the report from the
channel-terminating GTI, stores the digit in its ID
buffer, advances the counter by 1, and checks to see if
the counter has reached 5. If the Site Controller is still
within the DTMF Digit Detect Duration and the counter
has not reached 5, return to step 16.
If the counter has not reached 5 within the 20 second
DTMF Digit Detect Duration, the Site Controller will
send a message to the channel-terminating GTI
instructing it to send the call denied tone or voice
prompt, and hang up. This ends the sequence here.
18. If the counter has reached 5, the Site Controller has now
received all digits of the called ID, and directs the
channel-terminating GTI to stop looking for DTMF
digits and disconnect the audio connection from the
line-connected GTI.
19. The Site Controller checks to see if the called ID is
valid, and if the ID is allowed to receive interconnect
calls. (See Inb Interconnect field in System Manager
screen 11, panel 2.)
If the called ID is not valid, or is not
interconnect calls, the Site Controller sends a message
to the line-connected GTI instructing it to send the call
denied tone (or voic e prompt) and hang up. This ends
the sequence here.
OBTAINING WORKING CHANNEL
20. If the called ID is valid and is
interconnect calls, the Site Controller checks to see if a
working channel with a channel-terminating GTI is
available.
If a working channel with a channel-terminating GTI is
not currently available, the Site Controller queues the
call and instructs the GTI to apply a queue tone (or
voice prompt) to the line. When the call comes out of
the queue, continue to next step.
21. If a Working Channel with a channel-terminating GTI is
available, the Site Controller sends a message to the
Control Channel GETC to send the Working Channel
assignment to the radio(s) with the called LID or GID.
22. The radio(s) with the called LID or GID receive(s) the
Working Channel assignment and tune(s) to the
assigned Working Channel.
23. The Site Controller sends a message directing the
channel-terminating GTI to insert itself into the audio
loop of the assigned Working Channel in preparation
for a telephone interconnect call.
24. The Site Controller sends a message directing the
channel-connected GTI to apply a ringing tone to the
called radio(s) and the line-connected GTI unit to apply
a ringback tone to the calling telephone.
25. A radio user hears the ringing tone and pushes the PTT
switch.
26. The assigned W orking Channel GET C detects the ra dio
transmission on the assigned Working Channel and
sends a radio keyed message to the Site Controller. If
the Site Controller does not receive this message within
the Interconnect Hang Time (see System Manager
screen 10, panel 2.) , it sends a hang up message to the
line-connected GTI and a disconnect message to the
Working Channel GETC.
27. If the Site Controller receives the radio keyed message
within Interconnect Hang Time, it sends a connect
audio message to the Master GTI. The Master GTI
directs the line-connected GTI and channel-connected
GTI to send the digitized audio to each other over the
allowed to receive
allowed to receive
39
Page 40

LBI-39076B OPERATION
PCM Data Bus (completing the audio path between the
calling telephone and the called radio(s)).
28. The Site Controller directs the line-connected GTI to
look for DTMF digits.
ENDING THE CALL
29. To end the telephone interconnect call, the caller
presses the # key on the DTM F keypad and hangs up.
(If the telephone does not have a # key, the caller can
just hang up.)
30. When the line-connected GTI detects the DTMF # digit
(or end of call signaling, if the line provides it), it gets a
message to the Site Controller indicating that the
telephone has been hung up.
The called radio user can also terminate the call by
pushing the EXIT, SPC, or designated button on the
radio (see the operator's manual for the radio). This
causes the radio to transmit a disconnect signal to the
assigned working channel GETC, and the GETC to
send a message to the Site Controller.
31. When the Site Controller receives a hang up message
from the line-connected GTI, a disconnect message
from the Working Channel GETC, or the Transmission
Conv Limit is exceeded (see System Manager screen
10, panel 2.), the Site Controller first directs the
channel-connected GTI to extract itself from the audio
loop of the assigned Working Channel, then directs the
line-connected GTI to hang-up the line, and finally
directs the assigned Working Channel GETC to
terminate the call.
Radio-Originated Call
A request for a telephone interconnect call can be made
from any radio that is equipped with the controls to place a
telephone interconnect call. However, a telephone line will
not be connected and the trapped telephone interconnect
digits will not be re-dialed to the telephone line until the Site
Controller computer has verified the following:
• The trapped telephone interconnect digits meet the
toll call restrictions for that radio ID.
• The Site Controller computer receives the digital
stream terminator digit.
• All other system parameter and protocol
requirements are met along the way (i.e., calling
radio is valid for the site).
A telephone interconnect number is a string of decimal
numbers (digits). The string can be anywhere from 0 to 32
digits long. It can be pre-programmed (pre-stored), or
manually keyed just prior to pressing the PTT switch
(temporarily-stored). The radio automatically adds a
terminator digit to the end of a pre-stored telephone
interconnect number. However, you may have to manually
add the terminator digit (press the * Key) at the end of a
temporarily-stored telephone interconnect number (see
operator’s manual for the radio). When a working channel
is assigned, all digits including the terminator digit are sent
digitally to the assigned working channel GETC. The
channel-connected GTI takes the digitally-transmitted digits
and decodes them for the Site Controller.
A telephone interconnect number may be a complete or
partial telephone number. (An example of a partial
telephone number is an access code plus an area code.)
When the telephone interconnect number is only a partial
telephone number, the caller must supply the remaining
digits of the telephone number as overdialed digits, after the
telephone line has been connected and the trapped
interconnect digits have been re-dialed on the telephone line.
Overdialed digits are logged by the Site Controller and then
passed directly to the telephone line, through the channelconnected GTI and line-connected GTI, without interception
and regeneration.
The toll call restrictions test is performed on the first 4
interconnect digits, or as many of the first 4 interconnect
digits as it has received before receiving the terminator digit.
The lack of the terminator digit will not hold up the toll call
restrictions test once 4 interconnect digits are received, but
the terminator digit must be received before the telephone
line is connected and the trapped interconnect digits are redialed to the telephone line. If less than 4 interconnect
digits have been received by the time the terminator digit is
received, the Site Controller adds wild-card digits to the end
of the string of received interconnect digits, until it has 4
digits for the toll call restrictions test. Each wild-card digit
is tested for all possible values from 0 to 9.
The following sequence of steps describes the main
events involved in a radio-initiated local telephone
interconnect call:
OBTAINING A WORKING CHANNEL
1. The radio user sets the radio to the mode of operation
that allows an interconnect call, selects a pre-stored
telephone number or types in a temporarily-stored
telephone number, and pushes the PTT switch.
40
Page 41

OPERATION LBI-39076
B
2. The radio sends an interconnect call request on the
Control Channel.
3. The Control Channel GETC receives the request for an
interconnect call, and sends the request to the Site
Controller.
4. The Site Controller receives the request for an
interconnect call, and checks to see if it is permitted to
add another interconnect call. (There may be a limit on
the number of telephone interconnect calls allowed at
any one time.)
If the Site Controller is not permitted to add another
interconnect call, it directs the Control Channel GETC
to send a busy signal to the calling radio. This ends the
sequence here.
5. If the Site Controller is permitted to add another
interconnect call, it checks to see if the calling LID has
a dedicated line. (See Dedicated Line field in System
Manager screen 11, panel 2.)
If the calling LID has no dedicated line, or if the
dedicated line is not currently available, the Site
Controller will search for an available line using the
Rotary Number for the calling LID (see Rotary Number
field in System Manager screen 11, panel 2.), and the
Rotary Definition for that Rotary Number (see Rotary
Definitions in System Manager screen 13).
If no line is available, the Site Controller directs the
Control Channel GETC to send a busy signal to the
calling radio. This ends the sequence here.
6. If the dedicated line is available, or if an available line
is found through the Rotary Number and Rotary
Definition, the Site Controller allocates that line for the
interconnect call and checks to see if a Working
Channel with a GTI is available.
If a working channel with a GTI is not available, the
Site Controller will queue the call request and send a
queued tone to the radio. Continue to the next step
when the call comes out of the queue.
7. If a working channel with a channel-connected GTI is
available, the Site Controller directs the Control
Channel GETC to send the Working Channel
assignment to the calling radio, and directs the assigned
Working Channel GETC to look for the DTMF digits
from the calling radio.
INTERCONNECT DIGITS
8. The calling radio receives the Working Channel
assignment, tunes to the assigned Working Channel, and
sends the pre-stored or temporarily-stored interconnect
digits (with the terminator digit) to the assigned
Working Channel GETC.
9. The assigned Working Channel GETC receives the
interconnect digits (and terminator digit), and sends
them to the Site Controller.
10. As the Site Controller receives the digits, it counts and
stores each interconnect digit, and looks for the
terminator digit. As soon as it counts 4 interconnect
digits received or sees the terminator digit, it performs
the toll call restrictions test for that radio ID, using
wild-card digits if necessary.
If the received interconnect digits fail the toll call
restrictions test, the Site Controller directs the assigned
working channel GETC to terminate the call and deallocate the telephone line. This ends the sequence
here.
If the received interconnect digits pass the toll call
restrictions test and the Site Controller has received the
terminator digit, skip step 12.
11. If the received interconnect digits pass the toll call
restrictions test, but the Site Controller has not received
the terminator digit, the Site Controller will continue to
receive, count, and store each interconnect digit until it
either sees the terminator digit, the received
interconnect digits exceed the maximum storage
capacity of 32, or the allowed hang time expires.
If the Site Controller receives too many interconnect
digits or does not receive the terminator digit within the
allowed hang time, it directs the assigned working
channel GETC to terminate the call and de-allocate the
telephone line. This ends the sequence here.
12. The Site Controller directs the assigned Working
Channel GTI to insert itself into the audio loop of the
assigned Working Channel in preparation for a
telephone interconnect call.
RE-DIALED DIGITS
13. The Site Controller then directs the GT I for the allotted
line to take the line off-hook and check if dial tone is
present.
41
Page 42

LBI-39076B OPERATION
If the Dial Tone Required field is set to Y in the System
Configuration of the GTI Configurator, then the
absence of dial tone, for whatever line type (E&M or
End-to-End), will cause the Site Controller to initiate a
rotary hunt to get an available telephone line. The Site
Controller will apply a rotary hunt tone to the calling
radio. If all of the lines are exhausted by the rotary
hunt, the call is dropped (for more information, see the
rotary hunt parameters in the Configuration section of
this manual).
14. When the line-connected GTI detects dial tone (or Elead signal) (or if Dial Tone Required is N and the Dial
Tone Seek Time is up), it sends a dial tone detected
message to the Site Controller. The caller should hear a
dial tone (but will hear nothing for an E-lead signal).
If the Site Controller does not receive the dial tone
detected message within the Dial Tone Detect Duration
in the Site Controller Personality, the Site Controller
will initiate a rotary hunt for an available telephone line.
The Site Controller will apply a rotary hunt tone to the
calling radio. If all of the lines are exhausted by the
rotary hunt, the call is dropped (for more information,
see the rotary hunt parameters in the Configuration
section of this manual).
15. The Site Controller sends the interconnect digits (that
have been trapped and stored) to the line-connected
GTI for re-dialing (DTMF or pulse dial) to the
connected line. The caller should hear these DTMF
tones or dial clicks (pulse dial) as the digits are dialed.
16. The Site Controller directs the line-connected GTI to
look for DTMF digits (to detect the pressing of the #
key by the telephone user to end the call).
OVERDIALED DIGITS
17. If the telephone interconnect number was only a partial
telephone number, the caller must now supply the
remaining digits of the telephone number as overdialed
digits. These overdialed digits are sent as DTMF tones
directly through the channel-connected GTI and lineconnected GTI to the telephone line, without trapping
and re-dialing. All overdialed digits are logged into the
call record.
ENDING THE CALL
18. The normal method to end a radio-originated telephone
interconnect call is for the caller to press the EXIT,
SPC, or a designated button on the radio (see the
operator's manual for the radio). This causes the radio
to transmit a digital end-of-call signal to the assigned
working channel GETC. (The telephone end can also
terminate the call, by pressing the # key for one second
or by hanging up.)
19. The assigned Working Channel GETC receives the endof-call signal from the calling radio, and sends end-ofcall information to the Site Controller.
20. When the Site Controller receives the end-of-call
information from the Working Channel GETC, or the
Transmission Conv Limit is exceeded (see System
Manager screen 10, panel 2.), the Site Controller first
directs the channel-connected GTI to extract itself from
the audio loop of the assigned Working Channel, then
directs the line-connected GTI to hang-up the line, and
finally directs the assigned Working Channel GETC to
terminate the call.
42
Page 43

MAINTENANCE LBI-39076
B
MAINTENANCE
GTI REMOVAL
When you are about to remove a GTI from an EDACS
Repeater cabinet in a working system, you must take special
care to avoid disrupting the system. There are two
recommended procedures: one procedure for when the GTI
is connected to a MASTR II or IIe EDACS Repeater, and
the other procedure for when the GTI is connected to a
MASTR III EDACS Repeater.
If you are upgrading the software in the GTIs, see the
Software Replacement heading in the Maintenance section
of this manual.
MASTR II or IIe Repeaters
Use the following procedure to disconnect a GTI from a
MASTR II or IIe EDACS Repeater. (An alternative to using
the jumper in step 3, is to disable the radio channel through
the System Manager (RF parameter in screen 20, panel 1:5).
However, this reduces the number of available radio
channels by one and therefore should only be used for a very
short period of time, if at all.)
4. Disconnect the Power/Audio plug from the back
panel of the GTI (you will need a pair of pliers to
pull the plug out of the recessed connector).
5. Disconnect the Phone plug from the back panel of
the GTI.
6. (Master GTI only) Disconnect the two Site
Controller data link plugs from the back panel of
the Master GTI.
7. Disconnect the PCM Data Bus from the back panel
of the GTI. If there are two cables (or one cable
and a termination) quickly reconnect the two cables
(or the cable and the termination) back together
without the GTI and let hang).
NOTE
It is necessary to temporarily separate the two
PCM Data Bus cables when disconnecting them
from a GTI. While separated, all GTIs
connected to higher numbered radio channels
will not be connected to the Master GTI and may
cause interconnect abnormalities such as dropped
calls and/or alarms.
1. Disable the Interconnect parameter through the
System Manager (screen 10, panel 1) for the
specific channel number associated with the GTI
being removed.
2. Disable the Line Active parameter through the
System Manager (screen 14) for the specific
channel number associated with the GTI being
removed.
3. Add a jumper between pins 2 and 3 of the
Power/Audio plug on the back panel of the GTI
(see Figure 45).
Back Panel of GTI
Temporary Jumper
123456
Power/Audio
Plug
Figure 45 - Position of Temporary Jumper
Use the preceding procedure in reverse to reconnect the
GTI to the MASTR II or IIe EDACS Repeater. Don’t forget
to remove the jumper between pins 2 and 3 on the
Power/Audio plug after plugging it into the GTI.
MASTR III Repeaters
Use the following procedure to disconnect a GTI from a
MASTR III EDACS Repeater. (No jumper is needed.)
1. Disable the Interconnect parameter through the
System Manager (screen 10, panel 1) for the
specific channel number associated with the GTI
being removed.
2. Disable the Line Active parameter through the
System Manager (screen 14) for the specific
channel number associated with the GTI being
removed.
3. Disconnect the Power/Audio plug from the back
panel of the GTI (you will need a pair of pliers to
pull the plug out of the recessed connector).
4. Disconnect the Phone plug from the back of the
GTI.
43
Page 44

LBI-39076B MAINTENANCE
5. (Master GTI only) Disconnect the two Site
Controller data link plugs from the back of the
Master GTI.
6. Disconnect the PCM Data Bus from the back panel
of the GTI. If there are two cables (or one cable
and a termination) quickly reconnect the two cables
(or the cable and the termination) back together
without the GTI and let hang).
NOTE
It is necessary to temporarily separate the two
PCM Data Bus cables when disconnecting them
from a GTI. While separated, all GTIs
connected to higher numbered radio channels
will not be connected to the Master GTI and may
cause interconnect abnormalities such as dropped
calls and/or alarms.
Use the preceding procedure in reverse to reconnect the
GTI to the MASTR III EDACS Repeater.
ELI SOFTWARE UPGRADES
CAUTION
Using non-compatible versions of ELI software
may lock-up (disable) each radio channel that is
assigned to a local telephone interconnect call.
When upgrading to a new ELI software relea se number
or adding new GTIs to an existing ELI system, you must
make sure that all software versions and all GTI Main Board
revision numbers used in that ELI system (each GTI and
IAM) are compatible for that ELI software release number.
Using non-compatible versions of software or hardware may
lock-up (disable) each radio channel that is assigned to a
local telephone interconnect call. Table 7 lists which
software versions are required for each ELI software release
number. Table 8 lists which software versions are required
for each Main Board revision number.
Three plans for upgrading an existing ELI system from
release 1.0 to release 1.1 software are given here. Each of
the plans require that the ELI system be completely taken
out of service while changes are made to the Master GTI
unit. The differences are in how many (if any) GTI units
you put in use before you have finished making changes to
all of the GTI units.
Table 7 - Software Compatibility by Release Number
ELI
EQUIP-
MENT
All GTIs GTI DSP V1.00 or
Master GTI
Only
IAM GTI IAM V1.2 V1.30
GTI
Configurator
Plan A is to take the ELI system completely out of
service while changes are made to the Master GTI unit and
all regular GTI units. This plan is easiest for those making
the changes to the GTI units, but hardest for those wanting
to use the ELI system while the changes are being made.
Plan B is to briefly take the ELI system completely out
of service while the first half of the regular GTI units are
disconnected, then run the ELI system at half capacity while
changes are made to the first half of the regular GTI units,
then take the ELI system completely out of service while
changes are made to the Master GTI unit, and then run the
ELI system at half capacity while changes are made to the
second half of the regular GTI units. This plan is harder for
those making the changes to the GTI units, but is easier for
those wanting to use a heavily-loaded ELI system while the
changes are being made.
Plan C is to take the ELI system completely out of
service while changes are made to the Master GTI unit, and
then run the ELI system with only the Master GTI unit while
changes are made to the first regular GTI unit. As the
changes for each regular GTI unit or group of regular GTI
units are completed, they can be reconnected and brought
back into service. This plan is harder for those making the
changes to the GTI units, but is easier for those wanting to
use a lightly-loaded ELI system while the changes are being
made.
SOFT-
WARE
PACKAGE
GTI 552 V1.3 or
GTI Main V1.03 or
GTI Master V1.02 V1.04
GTI
Configurator
SOFTWARE VERSION
REQUIRED FOR
ELI RELEASE NUMBER
Release 1.0 Release 1.1
V2.03
V2.01
V2.3
V2.1
V2.14
V2.01
V1.3 V2.10
44
Page 45

MAINTENANCE LBI-39076
B
Table 8 - Software Compatibility by Main Board Revision Number
ELI
EQUIPM-
ENT
GTI
Unit
Master GTI
Unit Only
IAM GTI IAM V1.2 V1.2 or
GTI
Configurator
Read over the details of each plan before deciding
which will work best for your ELI system. If you have a
new version of GTI IAM software to install, wait until all
GTI units have been completed.
When a GTI unit is disconnected from a MASTR II or
IIe EDACS Repeater, a jumper is required to maintain the
audio loop for the repeater. Failure to use a jumper will
result in no audio for any call assigned to that repeater’s
channel. An alternative to using the jumper is to disable the
radio channel through the System Manager (RF pa rameter in
screen 20, panel 1:5). However, this reduces the number of
available radio channels by one and therefore should only be
used for a very short period of time, if at all.
CIRCUIT
BOARD
Main
Board
Main
Board
Processor
Board
Interface
Board
SOFTWARE
PACKAGE
GTI DSP V1.00 V2.01 or
GTI 552 V1.3 V2.1 or
GTI Main V1.03 V2.01 or
GTI Master V1.02 V1.02 or
GTI
Configurator
SOFTWARE VERSION
REQUIRED FOR
MAIN BOARD REVISION NUMBER
Revision A Revision D Revision E
V2.01 or
V2.03
V2.3
V2.14
V1.04
V1.30
V1.3 V1.3 or
V2.10
2. Master GTI (Modify Master GTI):
• (MASTR II & IIe applications only) - Add a
jumper between pins 2 and 3 of the Power/Audio
plug on the back panel of the GTI (see Figure 45).
• Disconnect the Power/Audio plug (you will need a
pair of pliers to pull the plug out of the recessed
connector), Phone plug, PCM Data Bus plugs, and
two Site Controller data link plugs from the back
panel of the Master GTI unit.
• Remove the Master GTI unit from the cabinet, and
remove the top cover.
V2.03
V2.1 or
V2.3
V2.01 or
V2.14
V1.02 or
V1.04
V1.2 or
V1.30
V1.3 or
V2.10
Plan A - All at One Time
Plan A is to take the ELI system completely out of
service while changes are made to the Master GTI unit and
all regular GTI units. This plan is easiest for those making
the changes to the GTI units, but hardest for those wanting
to use the ELI system while the changes are being made.
1. System Manager (Disable All):
• Using System Manager screen 10, panel 1:4,
reconfigure the Interconnect field to N for each
radio channel.
• If the Main Board is Revision A, replace with a
Revision D or E Main Board.
• Replace the GTI DSP software on the Main Board
with V2.03 GTI DSP software.
• Replace the GTI 552 software on the Main Board
with V2.3 GTI 552 software.
• Temporarily remove the GTI Interface Board from
over the Processor Board.
• Replace the GTI Main software on the Processor
Board with V2.14 GTI Main software.
• Re-install the GTI Interface Board over the
Processor Board.
45
Page 46

LBI-39076B MAINTENANCE
• Replace the GTI Master software on the GTI
Interface Board with V1.04 GTI Master software.
• Re-attach the top cover, and re-install in cabinet
(don’t forget to fasten rear supports).
• Re-connect the Power/Audio plug, Phone plug,
PCM Data Bus plugs, and two Site Controller data
link plugs to the back panel of the Master GTI unit.
• (MASTR II & IIe applications only) - Remove the
jumper between pins 2 and 3 of the Power/Audio
plug on the back panel of the GTI (see Figure 45).
3. Each Regular GTI (Modify Each Regular GTI):
• (MASTR II & IIe applications only) - Add a
jumper between pins 2 and 3 of the Power/Audio
plug on the back panel of the GTI (see Figure 45).
• Disconnect the Power/Audio plug (you will need a
pair of pliers to pull the plug out of the recessed
connector), Phone plug, and PCM Data Bus plugs
from the back panel of the GTI unit.
• Remove the GTI unit from the cabinet, and remove
the top cover.
• If the Main Board is Revision A, replace with a
Revision D or E Main Board.
• Replace the GTI DSP software on the Main Board
with V2.03 GTI DSP software.
• Replace the GTI 552 software on the Main Board
with V2.3 GTI 552 software.
• Replace the GTI Main software on the Processor
Board with V2.14 GTI Main software.
4. System Manager (Enable All):
• Using System Manager screen 10, panel 1:4,
reconfigure the Interconnect field to Y for each
equipped radio channel.
Plan B - Half at a Time
Plan B is to briefly take the ELI system completely out
of service while the first half of the regular GTI units are
disconnected, then run the ELI system at half capacity while
changes are made to the first half of the regular GTI units,
then take the ELI system completely out of service while
changes are made to the Master GTI unit, and then run the
ELI system at half capacity while changes are made to the
second half of the regular GTI units. This plan is harder for
those making the changes to the GTI units, but is easier for
those wanting to use a heavily-loaded ELI system while the
changes are being made.
The first group of GTI units is the group of GTI units
closest to the Master GTI unit (along the PCM Data Bus),
and consists of approximately half of the GTI units.
1. System Manager (Disable All):
• Using System Manager screen 10, panel 1:4,
reconfigure the “Interconnect” field to “N” for each
radio channel.
• Using System Manager screen 14, reco nfigure the
“Line Active” field to “N” for each line number.
2. Each GTI in 1st Group (Disconnect 1st Group):
• Disconnect the PCM Data Bus plugs from the back
panel of each GTI unit in the first group, but reconnect the segments to maintain bus continuity
end-to-end.
• Re-attach the top cover, and re-install in cabinet
(don’t forget to fasten rear supports).
• Re-connect the Power/Audio plug, Phone plug, and
PCM Data Bus plugs to the back panel of the
Master GTI unit.
• (MASTR II & IIe applications only) - Remove the
jumper between pins 2 and 3 of the Power/Audio
plug on the back panel of the GTI (see Figure 45).
• Repeat for each GTI unit.
46
3. System Manager (Enable all but 1st Group):
• Using System Manager screen 10, panel 1:4,
reconfigure the “Interconnect” field to “Y” for the
radio channels connected to the Master GTI unit
and each GTI unit in the second group.
• Using System Manager screen 14, reco nfigure the
“Line Active” field to “Y” for the line numbers
connected to the Master GTI unit and each GTI
unit in the second group.
Page 47

MAINTENANCE LBI-39076
B
4. Each GTI in 1st Group (Modify 1st Group):
• (MASTR II & IIe applications only) - Add a
jumper between pins 2 and 3 of the Power/Audio
plug on the back panel of the GTI (see Figure 45).
• Disconnect the Power/Audio plug (you will need a
pair of pliers to pull the plug out of the recessed
connector) and Phone plug from the back panel of
the GTI unit.
• Remove the GTI unit from the cabinet, and remove
the top cover.
• If the Main Board is Revision A, replace with a
Revision D or E Main Board.
• Replace the GTI DSP software on the Main Board
with V2.03 GTI DSP software.
• Replace the GTI 552 software on the Main Board
with V2.3 GTI 552 software.
• Replace the GTI Main software on the Processor
Board with V2.14 GTI Main software.
• Re-attach the top cover, and re-install in cabinet
(don’t forget to fasten rear supports).
• Re-connect the Power/Audio plug and Phone plug
to the back panel of the GTI unit (absolutely DO
NOT reconnect the PCM Data Bus at this time).
• (MASTR II & IIe applications only) - Remove the
jumper between pins 2 and 3 of the Power/Audio
plug on the back panel of the GTI (see Figure 45).
• Repeat for each GTI unit in the first group.
connector), Phone plug, PCM Data Bus plugs, and
two Site Controller data link plugs from the back
panel of the Master GTI unit.
• Remove the Master GTI unit from the cabinet, and
remove the top cover.
• If the Main Board is Revision A, replace with a
Revision D or E Main Board.
• Replace the GTI DSP software on the Main Board
with V2.03 GTI DSP software.
• Replace the GTI 552 software on the Main Board
with V2.3 GTI 552 software.
• Temporarily remove the GTI Interface Board from
over the Processor Board.
• Replace the GTI Main software on the Processor
Board with V2.14 GTI Main software.
• Re-install the GTI Interface Board over the
Processor Board.
• Replace the GTI Master software on the GTI
Interface Board with V1.04 GTI Master software.
• Re-attach the top cover, and re-install in cabinet
(don’t forget to fasten rear supports).
• Re-connect the Power/Audio plug, Phone plug,
PCM Data Bus plugs, and two Site Controller data
link plugs to the back panel of the Master GTI unit.
• (MASTR II & IIe applications only) - Remove the
jumper between pins 2 and 3 of the Power/Audio
plug on the back panel of the GTI (see Figure 45).
5. System Manager (Disable All):
• Using System Manager screen 10, panel 1:4,
reconfigure the “Interconnect” field to “N” for each
radio channel.
• Using System Manager screen 14, reco nfigure the
“Line Active” field to “N” for each line number.
6. Master GTI (Modify Master GTI):
• (MASTR II & IIe applications only) - Add a
jumper between pins 2 and 3 of the Power/Audio
plug on the back panel of the GTI (see Figure 45).
• Disconnect the Power/Audio plug (you will need a
pair of pliers to pull the plug out of the recessed
7. Each GTI in 1st Group (Re-connect 1st Group):
• Re-connect the PCM Data Bus plugs to the back
panel of each GTI unit in the first group (must
temporarily disconnect the segments of the bus).
8. Each GTI in 2nd Group (Disconnect 2nd Group):
• Disconnect the PCM Data Bus plugs from the back
panel of each GTI unit in the second group, but reconnect the segments to maintain bus continuity
end-to-end.
47
Page 48

LBI-39076B MAINTENANCE
9. System Manager (Enable all but 2nd Group):
• Using System Manager screen 10, panel 1:4,
reconfigure the “Interconnect” field to “Y” for the
radio channels connected to the Master GTI unit
and each GTI unit in the first group.
• Using System Manager screen 14, reco nfigure the
“Line Active” field to “Y” for the line numbers
connected to the Master GTI unit and each GTI
unit in the first group.
10. Each GTI in 2nd Group (Modify 2nd Group):
Complete the regular GTI units in the order you get to
them, as you follow the PCM Data Bus.
• (MASTR II & IIe applications only) - Add a
jumper between pins 2 and 3 of the Power/Audio
plug on the back panel of the GTI (see Figure 45).
• Disconnect the Power/Audio plug (you will need a
pair of pliers to pull the plug out of the recessed
connector) and Phone plug from the back panel of
the GTI unit.
• Remove the GTI unit from the cabinet, and remove
the top cover.
• If the Main Board is Revision A, replace with a
Revision D or E Main Board.
• Replace the GTI DSP software on the Main Board
with V2.03 GTI DSP software.
• Replace the GTI 552 software on the Main Board
with V2.3 GTI 552 software.
• Replace the GTI Main software on the Processor
Board with V2.14 GTI Main software.
• Re-attach the top cover, and re-install in cabinet
(don’t forget to fasten rear supports).
• Re-connect the Power/Audio plug and Phone plug
to the back panel of the GTI unit.
• Re-connect the PCM Data Bus plugs to the back
panel of the GTI unit (you must temporarily
disconnect the segments of the bus, but all GTI
units affected should not be in service yet).
• (MASTR II & IIe applications only) - Remove the
jumper between pins 2 and 3 of the Power/Audio
plug on the back panel of the GTI (see Figure 45).
• Go on to next step if you want to put GTI units
back into service one at a time, or repeat this step
until several or all GTI units have been completed
before going on to the next step.
11. System Manager (Enable Each Completed GTI):
• Using System Manager screen 10, panel 1:4,
reconfigure the “Interconnect” field to “Y” for each
radio channel connected to each newly completed
GTI unit.
• Using System Manager screen 14, reco nfigure the
“Line Active” field to “Y” for each line number
connected to each newly completed GTI unit.
• Keep returning to the previous step until all GTI
units have been completed and brought back into
service.
Plan C - One at a Time
Plan C is to take the ELI system completely out of
service while changes are made to the Master GTI unit, and
then run the ELI system with only the Master GTI unit while
changes are made to the first regular GTI unit. As the
changes for each regular GTI unit or group of regular GTI
units are completed, they can be reconnected and brought
back into service. This plan is harder for those making the
changes to the GTI units, but is easier for those wanting to
use a lightly-loaded ELI system while the changes are being
made.
The order in which the regular GTI units are co mpleted
and reconnected is important to avoid periodic disruptions
when each GTI unit is reconnected to the PCM Data Bus.
Follow the PCM Data Bus from the Master GTI unit to the
regular GTI units. Complete the regular GTI units in the
order you get to them, as you follow the PCM Data Bus.
If the Master GTI unit does not have a telephone line
connected to it, temporarily patch a telephone line to it until
one or more regular GTI units with a telephone line have
been completed and brought back into service.
If the ELI system experiences problems due to the
temporary disconnections, you will have to disable
the ELI system through the System Manager for
each temporary disconnection.
48
Page 49

MAINTENANCE LBI-39076
B
1. System Manager (Disable All):
• Using System Manager screen 10, panel 1:4,
reconfigure the Interconnect field to N for each
radio channel.
• Using System Manager screen 14, reco nfigure the
“Line Active” field to “N” for each line number.
2. Master GTI (Modify Master GTI):
• (MASTR II & IIe applications only) - Add a
jumper between pins 2 and 3 of the Power/Audio
plug on the back panel of the GTI (see Figure 45).
• Disconnect the Power/Audio plug (you will need a
pair of pliers to pull the plug out of the recessed
connector), Phone plug, PCM Data Bus plugs, and
two Site Controller data link plugs from the back
panel of the Master GTI unit.
• Remove the Master GTI unit from the cabinet, and
remove the top cover.
• If the Main Board is Revision A, replace with a
Revision D or E Main Board.
• Replace the GTI DSP software on the Main Board
with V2.03 GTI DSP software.
• Replace the GTI 552 software on the Main Board
with V2.3 GTI 552 software.
• Temporarily remove the GTI Interface Board from
over the Processor Board.
• Replace the GTI Main software on the Processor
Board with V2.14 GTI Main software.
• Re-install the GTI Interface Board over the
Processor Board.
• Replace the GTI Master software on the GTI
Interface Board with V1.04 GTI Master software.
• Re-attach the top cover, and re-install in cabinet
(don’t forget to fasten rear supports).
• Re-connect the Power/Audio plug, Phone plug,
PCM Data Bus plugs, and two Site Controller data
link plugs to the back panel of the Master GTI unit.
• (MASTR II & IIe applications only) - Remove the
jumper between pins 2 and 3 of the Power/Audio
plug on the back panel of the GTI (see Figure 45).
3. Each Regular GTI (Disconnect Regular GTIs):
• Disconnect the PCM Data Bus plugs from the back
panel of each regular GTI unit, but re-connect the
segments to maintain bus continuity end-to-end.
4. System Manager (Enable Master GTI Only):
• Using System Manager screen 10, panel 1:4,
reconfigure the “Interconnect” field to “Y” for the
radio channel connected to the Master GTI unit.
• Using System Manager screen 14, reco nfigure the
“Line Active” field to “Y” for the line number
connected to the Master GTI unit.
5. Each Regular GTI (Modify Each Regular GTI):
Complete the regular GTI units in the order you get to
them, as you follow the PCM Data Bus.
• (MASTR II & IIe applications only) - Add a
jumper between pins 2 and 3 of the Power/Audio
plug on the back panel of the GTI (see Figure 45).
• Disconnect the Power/Audio plug (you will need a
pair of pliers to pull the plug out of the recessed
connector) and Phone plug from the back panel of
the GTI unit.
• Remove the GTI unit from the cabinet, and remove
the top cover.
• If the Main Board is Revision A, replace with a
Revision D or E Main Board.
• Replace the GTI DSP software on the Main Board
with V2.03 GTI DSP software.
• Replace the GTI 552 software on the Main Board
with V2.3 GTI 552 software.
• Replace the GTI Main software on the Processor
Board with V2.14 GTI Main software.
• Re-attach the top cover, and re-install in cabinet
(don’t forget to fasten rear supports).
• Re-connect the Power/Audio plug and Phone plug
to the back panel of the GTI unit.
• Re-connect the PCM Data Bus plugs to the back
panel of the GTI unit (you must temporarily
disconnect the segments of the bus, but all GTI
units affected should not be in service yet).
49
Page 50

LBI-39076B MAINTENANCE
If the ELI system experiences problems due to the
temporary disconnections, you will have to disable
the ELI system through the System Manager for
each temporary disconnection.
• (MASTR II & IIe applications only) - Remove the
jumper between pins 2 and 3 of the Power/Audio
plug on the back panel of the GTI (see Figure 45).
• Go on to next step if you want to put GTI units
back into service one at a time (suggested for first
GTI units completed), or repeat this step until
several GTI units have been completed before
going on to the next step (suggested for last GTI
units completed).
6. System Manager (Enable Each Completed GTI):
• Using System Manager screen 10, panel 1:4,
reconfigure the “Interconnect” field to “Y” for each
radio channel connected to each newly completed
GTI unit.
• Using System Manager screen 14, reco nfigure the
“Line Active” field to “Y” for each line number
connected to each newly completed GTI unit.
• Keep returning to the previous step until all GTI
units have been completed and brought back into
service.
IAM Unit
If you have a new version of GTI IAM software to
install, wait until all GTI units have been completed.
• Disconnect the Power plug (you will need a pair of
pliers to pull the plug out of the recessed
connector) and PCM Data Bus plug from the back
panel of the IAM unit.
• Remove the IAM unit from the cabinet, and remove
the top cover.
• Replace the older GTI IAM software with the new
GTI IAM software.
• Re-attach the top cover, and re-install in cabinet
(don’t forget to fasten rear supports).
• Re-connect the Power plug and PCM Data Bus to
the back panel of the IAM unit.
50
Page 51

MAINTENANCE LBI-39076
B
TROUBLESHOOTING
The hardware used in the ELI system is extremely
reliable, making component failure the unlikely cause of
most problems. The most common causes of problems are
as follows:
1. Site Controller Computer - The Site Controller may
have a version of the Application Software that does no t
support the ELI option, a personality that does not
specify the ELI option, telephone interconnect
parameters that are not adequately defined in the
database, or a PROM leg bent under a PROM during
installation of new Application Software or Personality.
Table 9 - Troubleshooting Symptoms
SYMPTOM POSSIBLE CAUSE(S) CORRECTIVE ACTION
No
interconnect
or from a MASTR II or IIe Repeater
channel, and the GTI unit connected to
this channel won’t stay synchronized.
No
interconnect or radio-to-radio
calls can be placed to or from a
MASTR III Repeater channel, and the
transmitter stays keyed all the time
(“TRANSMIT” LED on System
Module stays lit).
calls can be placed to
or
The GTI unit (that is connected to the
repeater) is connected to an open or
unterminated PCM/Data bus. An
unterminated section of PCM/Data bus
can act as an antenna to pick up stray
signals that could interfere with the
synchronization of the GTI unit,
causing it to continually reset in an
attempt to regain synchronization.
2. GTI Unit - A GTI Unit may have jumper positions that
are incorrect for type of telephone line connected, DIP
switch settings that are incorrect for the radio channel /
line number, user-configurable parameters that are not
correctly defined in the database, or no telephone line
connected.
3. Interconnect Cable - An interconnect cable may be
missing, be connected to the wrong connector, or have a
pin pushed back in a connector.
Table 9 lists some of the possible causes and the
corresponding corrective action for various symptoms that
might be observed. It is assumed that non-interco nnect calls
(such as group calls) are operating normally for the LIDs
and GIDs to be used for interconnect calls.
Make sure that the PCM Bus
Termination is connected to the
PCM/Data bus at the highest channel
end.
Make sure that the PCM/Data bus is
connected between all GTI units.
Check for defective PCM/Data bus
cable.
All
radio-originated
get stuck DTMF tone and tone
continues to non-interconnect calls.
All radio-originated interconnect calls
from all LIDs get rotary hunt tone.
interconnect calls
Improper software upgrade. Check the software of the GTIs and
upgrade all GTI old software to the new
release.
The Dial Tone Required parameter is
incorrectly set to Y for E&M lines
(E&M lines have no dial tone).
All telephone lines are not connected or
failed.
Two or more GTIs have different
software versions belonging to different
software releases. (All GTIs in a system
must use software versions belonging to
the same software release.)
(Continued)
Set the Dial Tone Required parameter
to N in the System Configuration area
of the GTI Configurator.
Check connections and operation of the
telephone lines.
Check the version of the software in
each GTI. If all versions do not belong
to the same software release, upgrade
all older software to the newer. Do not
mix software from different releases.
51
Page 52

LBI-39076B TROUBLESHOOTING
Table 9 (Cont.) - Troubleshooting Symptoms
SYMPTOM POSSIBLE CAUSE(S) CORRECTIVE ACTION
All radio-originated interconnect calls
from all LIDs get rotary hunt tone after
the dial tone is heard.
All radio-originated interconnect calls
have no audio in both directions.
All radio-originated interconnect calls
from all LIDs get call denied tone.
The Site Controller’s personality does
not contain the correct value for the
Dial Tone Detect Duration parameter.
You attempted a digital interconnnect
call (from a prestored interconnect
number or via the radio keypad), and
digital interconnect calls are not
currently supported.
Personality in Site Controller computer
does not specify ELI option.
Database in Site Controller computer
has no radio channel defined for
interconnect calls.
Database in Site Controller computer
has no dedicated line number or rotary
hunt sequence defined for any LID.
If the Site Controller software is V5.60
or higher, the Dial Tone Detect
Duration should be at least 1600
milliseconds. If not, replace with a new
personality with correct value.
Reprogram the radio for analog (only)
interconnect calls (for all prestored
interconnect numbers and via the radio
keypad).
Replace present Personality PROMs
with PROMs that specify ELI option.
Set the Interconnect parameter (in the
Site Controller computer database) to Y
for one or more interconnect channel
numbers.
Set the Dedicated Line parameter (in
the Site Controller computer database)
to 0 for each LID.
Specify a rotary hunt sequence for each
LID (in the Site Controller computer
database) by assigning a non-zero
Rotary Number to each LID, and
defining a line number* sequence in the
Interconnect Rotary Definition for
each assigned rotary number.
All radio-originated interconnect calls
from all LIDs get busy tone.
All telephone-originated interconnect
calls have no audio from telephone to
radio (audio from radio to telephone is
OK).
52
Database in Site Controller computer
has zero defined for the number of
concurrent interconnect calls.
Database in Site Controller computer
has no (or the wrong) line number
defined for interconnect calls.
Application Software in Site Controller
computer does not support the ELI
option.
Personality in the Site Controller
computer does not specify the ELI
option.
(Continued)
*These line numbers must match GTIequipped radio channel numbers.
Set the Max # Concurrent Intercon
parameter (in the Site Controller
computer database) to 1 or more.
Set the Line Active parameter (in the
Site Controller computer database) to Y
for one or more line numbers.
Replace the present Application
Software PROMs with PROMs marked
344A3265Gx, where x=5 or higher.
Replace the present Personality PROMs
with PROMs that specify the ELI
option.
Page 53

TROUBLESHOOTING LBI-39076
B
Table 9 (Cont.) - Troubleshooting Symptoms
SYMPTOM POSSIBLE CAUSE(S) CORRECTIVE ACTION
All telephone-originated interconnect
calls are unanswered on all lines.
All telephone-originated interconnect
calls are unanswered on one or more
(but not all) lines.
Site Controller computer not connected
to the Master GTI.
Jumpers and/or DIP switches in each
GTI set incorrectly for line type.
GTI line type database configured
incorrectly for each line.
DIP switches in each GTI set for
incorrect GTI unit number.
Database in Site Controller computer
has zero defined for the number of
concurrent interconnect calls.
Bus connection problem between
Master GTI and affected GTI(s).
Jumpers and/or DIP switches in GTI(s)
connected to affected line(s) set
incorrectly for line type.
Line type of affected line(s) incorrectly
configured in GTI database.
DIP switches in GTI(s) connected to
affected line(s) set for incorrect GTI
unit number(s).
Check 19B803826P1 and P2 data cable
connections.
Check GTI jumper locations and DIP
switch positions.
Check GTI database configuration.
Check GTI DIP switch positions.
Set the Max # Concurrent Intercon
parameter (in the Site Controller
computer database) to 1 or more.
Check 19B803828P1 and P2 bus cable
connections between Master GTI and
affected GTI(s).
Check jumper locations and DIP switch
positions in GTI(s) connected to
affected line(s).
Check GTI database configuration.
Check DIP switch positions in GTI(s)
connected to affected line(s).
All telephone-originated interconnect
calls are denied on all lines.
Radio-originated interconnect calls
cannot be made from any LID (radio is
assigned a Working Channel and the
interconnect call is displayed on the
Site Monitor screen of the System
Manager, but call is quickly dropped).
All GIDs and LIDs are denied inbound
calls in the Site Controller computer
database.
LID 16383 is wide area enabled and no
interconnect channels are wide area
enabled.
The toll call restriction parameters may
not have been configured in the System
Manager (default values do not permit
radio-originated interconnect calls).
(Continued)
Set the Inb Interconnect parameter (in
the Site Controller computer database)
to Y, for each GID or LID that is to
receive inbound interconnect calls.
Set the Wide Area Enable parameter
(in the Site Controller computer
database) to N, for LID 16383.
or
Set the Wide Area parameter (in the
Site Controller computer database) to
Y, for each radio channel that is to be
used for interconnect calls.
Configure and enable the digit patterns
in the Toll Call Parameters screen
(menu selection 15), and configure the
Toll Call Rest parameter for each LID
(menu selection 11, panel 2)
53
Page 54

LBI-39076B TROUBLESHOOTING
Table 9 (Cont.) - Troubleshooting Symptoms
SYMPTOM POSSIBLE CAUSE(S) CORRECTIVE ACTION
Billing data does not contain the co rrect
ID and channel information.
LIC Alarm with all RIC Alarms Crossed 19B803826P1 and P2 data
LIC Alarm with no RIC Alarms Bad 19B803826P2 data cable between
All RIC Alarms Bad 19B803826P1 data cable between
Adjacent RIC Alarms on highest
equipped channel numbers
Single RIC Alarm Bad 19B803828P1 or P2 bus cable
Application Software in Site Controller
computer does not support the ELI
option.
Personality in the Site Controller
computer does not specify the ELI
option.
cables between Master GTI and Site
Controller computer.
Bad GTI Interface card. Replace GTI Interface card.
Bad Master GTI unit. Replace Master GTI unit.
the Master GTI and Port 31 on the Site
Controller computer.
Bad connection to 19B803826P2 data
cable between the Master GTI and Port
31 on the Site Controller computer.
the Master GTI and Port 30 on the Site
Controller computer.
Bad connection to 19B803826P1 data
cable between the Master GTI and Port
30 on the Site Controller computer.
Bad connection to 19B803828P1 or P2
bus cable between the group of adjacent
GTI units and the GTI unit for the next
lower channel.
Bad 19B803828P1 or P2 bus cable
between the group of adjacent GTI
units and the GTI unit for the next
lower channel.
Bad stackable connector on the
19B803828P1 or P2 bus cable between
the GTI unit for the next lower channel
and the GTI unit for the 2nd lower
channel.
connection to a single GTI unit.
Bad 19B803828P1 or P2 bus cable
connector attached to a single GTI unit.
Bad single GTI unit. Replace the single GTI unit.
Replace the present Application
Software PROMs with PROMs marked
344A3265Gx, where x=5 or higher.
Replace the present Personality PROMs
with PROMs that specify the ELI
option.
Swap connections at either the Master
GTI end or the Site Controller co mputer
end.
Replace 19B803826P2 data cable.
Re-seat cable connector on equipment
connector.
Replace 19B803826P1 data cable.
Re-seat cable connector on equipment
connector.
Re-seat the connectors at both ends of
the bus cable between the group of
adjacent GTI units and the GTI unit for
the next lower channel.
Replace the bus cable between the
group of adjacent GTI units and the
GTI unit for the next lower channel.
Replace the bus cable between the GTI
unit for the next lower channel and the
GTI unit for the 2nd lower channel.
Re-seat the connector on the bus cable
that connects directly to the single GTI
unit.
Replace the bus cable that connects
directly to the single GTI unit.
54
Page 55

GLOSSARY LBI-39076
B
GLOSSARY
2-Wire Audio Line.......................................................A 2-Wire audio line uses a single audio pair for passing audio signals in
both directions.
4-Wire Audio Line....................................................... A 4-Wire audio line uses separate audio pairs for passing audio signals
in both directions; one audio pair for each direction.
CDR.............................................................................Call Detail Record [ELI]
Channel-Connected GTI .............................................. The Channel-connected GTI is the specific GTI unit connected to the
EDACS repeater channel involved in the interconnect call being
described.
DID .............................................................................. Direct Inward Dialing - A feature which allows callers to dial from the
public network straight to a wanted extension on a PABX without
intervention by an operator.
DIP Switches...............................................................Dual In-Line Package Switches - DIP switches are commonly packaged
in banks of eight, but can be more or less.
DSP..............................................................................Digital Signal Processor
DTMF ..........................................................................Dual-Tone Multi-Frequency - DTMF is a signaling method using set
combinations of two specific voice-band frequencies to represent
characters on a keypad (typically includes the numbers 0 through 9).
One frequency represents the row number on keypad; the second
frequency represents the column number.
E-Lead .........................................................................The E-Lead is a separate signaling wire associated with some 2-Wire or
4-Wire audio lines, and is used to signal an incoming call from the
public telephone network. Signaling is usually detected by the presence
or absence of ground or -48 Vdc.
E&M Signaling............................................................E&M signaling uses separate leads (separate from the 2-Wire or 4-Wire
audio lines) for detecting incoming calls (E-Lead), and sending off-
hook and on-hook signals (M-Lead).
EDACS........................................................................Enhanced Digital Access Communications System
EDACS Interface panel ...............................................The panel at the top rear of most EDACS equipment cabinets
containing modules that allow quick and easy interconnection of all
audio and control functions in an EDACS installation.
ELI...............................................................................Enhanced Local Interconnect - a telephone interface system for use with
EDACS repeater channels, under the direction of the Site Controller
computer.
ELI Interface Module .................................................. The ELI Interface module (used in the EDACS Interface panel at the
top of each cabinet containing GTI units) is used to consolidate the
telephone line connections for 6 GTI units into a single 25-pair IDC
telco connector.
GETC...........................................................................A GETC is a trunking card that can be configured for many
applications. The GETC mentioned in this manual is the Station GET C.
One Station GETC must be connected to each repeater used in an
EDACS installation to permit trunking of that radio channel.
GID ..............................................................................Group ID - a unique number used by a group of radios to work with an
EDACS system.
55
Page 56

LBI-39076B GLOSSARY
GLOSSARY (CONT.)
Ground-Start Signaling ................................................Ground-Start signaling is used to send the local off-hook and on-hoo k
signals to the public telephone network. Off-hook is detected by the
presence of a DC loop current between one of the two wires of the 2Wire audio line and ground.
GTI Unit.......................................................................Global Telephone Interconnect Unit - the interface for one EDACS
repeater channel, and one telephone line, in a single unit.
GTI Configurator.........................................................The GTI Configurator is the office PC used to run the GTI Configurator
software.
GTI Configurator Software ..........................................The GTI Configurator software is a PC-based, menu-driven program
that allows the system operator to set up the GTI(s) and optio nal IAM,
retrieve GTI call records, and monitor the system activity via a monitor
screen.
GTI Interface Board.....................................................The GTI Interface board is the interface between the Site Controller
computer and the Enhanced Local Interconnect (ELI) system. The GTI
Interface board is added to one GTI, making it the Master GTI.
IAM..............................................................................Interconnect Accounting Manager - The IAM is a microprocessor-
based, call-detail buffer containing two megabytes of battery-backed
RAM to provide storage for up to 60,000 interconnect calls.
Inbound Call ................................................................An inbound call is a call from a telephone to a radio. This is also
referred to as a telephone-originated call.
LED..............................................................................Light-Emitting Diode
LID...............................................................................Logical ID - a unique number used by a radio to work with an EDACS
system.
Line-Connected GTI....................................................The line-connected GTI is the specific GTI unit connected to the
telephone line involved in the interconnect call being described.
Loop-Start Signaling....................................................Loop-Start signaling is used to send the local off-hook and on-hook
signals to the public telephone network. Off-hook is detected by the
presence of a DC loop current between the two wires of the 2-Wire
audio line.
M-Lead.........................................................................The M-Lead is a separate signaling wire associated with some 2-Wire
or 4-Wire aud io lines, and is used to send the lo cal off-hook and on-
hook signals to the public telephone network. Signaling is usually by
application or removal of ground or -48 Vdc.
Master GTI...................................................................The Master GTI is the specific GTI that has had the GTI Interface card
added.
PABX...........................................................................Private Automatic Branch Exchange
PCM.............................................................................Pulse Coded Modulation
PCM / Data Bus...........................................................T he PCM / Data Bus is used to connect the optional IAM (if present),
Master GTI, and all the standard GTI units together. It is actually made
up of an 8-bit parallel PCM Data bus, a serial Console Data bus, a serial
Subscriber Data bus, and a serial Repeater Data bus.
PSTN ...........................................................................Public Service Telephone Network
56
Page 57

GLOSSARY / PARTS LIST LBI-39076
B
GLOSSARY (CONT.)
Radio-Originated Call..................................................A telephone interconnect call from a radio to a telephone.
Site Controller Database .............................................. The Site Controller Database is the specific information about the site,
such as equipment available at the site, validation tables by feature and
priority for each Logical (individual) ID and Group ID, etc., maintained
by the System Manager. If the site has no System Manager, the Site
Controller Database uses the default values contained in the Site
Controller computer's two Personality PROMs.
Telephone-Originated Call ..........................................A telephone interconnect call from a telephone to a radio.
PARTS LIST
SYMBOL PART NO. DESCRIPTION
Master GTI Parts
19B803752P1 GTI Interface board, including installed software
19B803826P1 Cable, telephone, 44”, top GTI to interface panel
19B803826P2 Cable, telephone, 60”, middle GTI to interface panel
GTI Configurator Parts
19D903985P72 Cable, Serial Data, between any GTI and configurator
IAM Unit Parts
19B803753P1 IAM Unit, including installed software
19B803968P1 Cable, power, IAM to power supply
SYMBOL PART NO. DESCRIPTION
GTI Unit Parts
19B803751P1 GTI Unit, including installed software
350A1154G1 Kit, hardware, GTI mounting
19B803830P1 Cable, audio/power, GTI to repeater/power supply
19B803829P1 Cable, telephone, 44”, top GTI to interface panel
19B803829P2 Cable, telephone, 60”, middle GTI to interface panel
19B803829P3 Cable, telephone, 76”, bottom GTI to interface panel
19B803828P1 Cable, PCM bus, 36”, between GTIs, same cabinet
19B803828P2 Cable, PCM bus, 200”, between GTIs, diff. cabinets
19C852592P1 Termination, PCM bus
57
Page 58

LBI-39076B INTERCONNECTION DIAGRAM
Bus Cable
Stackable 2x12 Molex
Bus Termination
2x12 Molex
100 Ohms
100 Ohms
100 Ohms
100 Ohms
100 Ohms
100 Ohms
100 Ohms
100 Ohms
100 Ohms
100 Ohms
100 Ohms
100 Ohms
RJ-45 RJ-45 RJ-45RJ-45
1
2
3
5
6
7
8
RJ-45
RJ-45
1
2
3
4
5
6
7
8
PCM/Data Bus (J2)
2x12 Molex
1
13
2
14
3
15
4
16
5
17
6
18
7
19
8
20
9
21
10
22
11
23
12
24
Power/Audio (P1)
1x6 Molex
2
3
4
5
6
19C852327G1
ELI TELCO
Module
(EDACS
Interface Panel)
See Schematic
Diagram
for Details
Standard GTIPhone (J1)
E/M Ref
E/M Lead
2/4-W Audio
2-W Audio
2-W Audio
2/4-W Audio
E/M Lead
E/M Ref
19B803828P1 (36")
19B803828P2 (200")
Bus Cable
Bit 0
Bit 1
Bit 2
Bit 3
Bit 4
PCM Data
Bus
Bit 5
Bit 6
Bit 7
Frame Sync
Console Data bus
Subscriber Data Bus
Repeater Data Bus
Rx Audio
Tx Audio (MASTR II & IIe)
Gnd
+12 Vdc
1
2
3
44
5
6
7
8
Standard 2x12 Molex
19B803829P1 (44")
19B803829P2 (60")
19B803829P3 (76")
RJ-45
Bus Cable
Stackable 2x12 Molex
Bus Cable
BN
BL
Y
BK
R
Phone Cable
P4
Left (J4)
RJ-11-6
Shield
Master GTI
Phone (J1)
RJ-45
E/M Ref
1
E/M Lead
2
2/4-W Audio
3
2-W Audio
4
2-W Audio
5
2/4-W Audio
6
E/M Lead
7
E/M Ref
8
PCM/Data Bus (J2)
2x12 Molex 2x12 Molex
1
Bit 0
13
2
Bit 1
14
3
Bit 2
15
4
Bit 3
16
5
Bit 4
17
6
Bit 5
18
7
Bit 6
19
8
Bit 7
20
9
Frame Sync
21
10
Console Data bus
22
11
Subscriber Data Bus
23
12
Repeater Data Bus
24
Power/Audio (P1)
1x6 Molex
1
Tx Audio (MASTR III)
2
Rx Audio
4
PTT (MASTR III)
5
Gnd
6
+12 Vdc
Tx Data
Rx Data
Ground
Right (J5)
RJ-11-6
Shield
Tx Data
Rx Data
Ground
19B803828P1 (36")
19B803828P2 (200")
Bus Cable
PCM/Data
Bus
19B803826P1
Data Cable
1
2
3
4
55
6
P5 P31
19B803826P2
Data Cable
1
2
3
4
6
Standard 2x12 Molex
P30
Port 30
RJ-45
1 Shield
2
3
4
7
Port 31
RJ-45
1
2
3
4
55
7
PCM/Data Bus (J2)
Bus Cable
1
13
2
14
3
15
4
16
5
17
6
18
7
19
8
20
9
21
10
22
11
23
12
24
Power (P1)
1x6 Molex
56Gnd
Tx Data
Rx Data
Signal Ground
Shield
Tx Data
Rx Data
Signal Ground
Bit 0
Bit 1
Bit 2
Bit 3
Bit 4
Bit 5
Bit 6
Bit 7
Frame Sync
Console Data bus
Subscriber Data Bus
Repeater Data Bus
+12 Vdc
Site Controller
Computer
IAM
(Optional)
PCM/Data
Bus
J933P8 MASTR II & IIe
19C303426G1
5
TRANS AUDIO LO
6
TRANS AUDIO HI
J1203P3
1x12 Molex
7
TRANS AUDIO HI
11
TRANS AUDIO LO
P801P9
3x3 Molex Power Supply
3
Pos
5
Neg
Rec/Exc Door
MASTR II & IIe
T/R Shelf Backplane
Station
ELI Interconnection Diagram
58
MASTR III
T/R Shelf Backplane
P4
1x6 Molex
1
2
5
6
MIC_HI
AGND
LOCAL_PTT
INTRCM_AUDIO
19B803968P1 PS Cable
19B803830P1 Audio/PS Cable
Existing Connector Existing Connector
P801
3x3 Molex
36Pos
Neg
Station Station
Power Supply
P801
3x3 Molex
3 Pos
*
Neg
Power Supply
* 5 for MASTR II & IIe
6 for MASTR III
Page 59

B
Pair
TO
PUNCH-
BLOCK
OR
DAISYCHAIN
Pair
#25
SCHEMATIC DIAGRAM LBI-39076
TO GTI UNITTO GTI UNIT TO GTI UNIT
1262273284295
J14
25-Pair
1
#1
2
3
4
5
30
6
31
7
32
8
33
9
34
10
35
11
36
12
37
13
38
14
39
15
40
16
41
17
42
18
43
19
44
20
45
21
46
22
47
23
48
24
49
25
50
J1
RJ-45
J4
RJ-45
12345678
TO GTI UNIT
678
J2
RJ-45
J5 J6
12
Use 19B803829P1, P2, or P3 CableUse 19D903880P120 Cable Use 19D903880P120 Cable
67812345
345678 12345678
J3
RJ-45
RJ-45RJ-45
TO GTI UNITTO GTI UNIT
67812345
J15
25-Pair
1
26
2
27
3
28
4
29
5
30
6
31
7
32
8
33
9
34
10
35
11
36
12
37
13
38
14
39
15
40
16
41
17
42
18
43
19
44
20
45
21
46
22
47
23
48
24
49
25
50
Pair
#1
TO
PUNCH-
BLOCK
OR
DAISYCHAIN
Pair
#25
ELI TELCO Module
19C852327G1
(Similar to 19D904451, Sh. 1, Rev. 0)
59
Page 60

LBI-39076B INSTALLATION CHECKLIST
INSTALLATION CHECKLIST
Steps 1 through 14 parallel the main headings in the Installation sectio n of this manual. For more details, see the head ing that
applies. Step 15 is covered in the Configuration section of this manual. Step 16 is covered in the User’s Guid e for the GTI
Configurator Software, LBI-39077.
1.
RADIO SOFTWARE
2.
SITE CONTROLLER HARDWARE
- If MDR full-duplex radios are to be used, check to make sure their software is G2 or higher.
- Verify that the Site Controller computer is a VAX model (19A149302P5 or
higher), not a PDP model.
3.
SITE CONTROLLER SOFTWARE
•
Check to be sure that the revision of the Application Software PROMs is G5 or higher (replacement might be
necessary).
•
Insure that the Personality PROMs have ELI selected as the interconnect mode.
4.
CHANNEL ASSIGNMENTS
5.
GTI SOFTWARE
- Record the GTI 552, GTI DSP, and GTI Main software version numbers for each GTI unit
- Assign each GTI unit, the Master GTI, and the optional IAM to a specific radio channel.
(including the Master GTI) and the GTI Master software version number for the Master GTI.
6.
GTI TELEPHONE INTERFACE
- Configure the telephone interface in each GTI unit (including the Master GTI) to
match the telephone line to be connected to it.
7.
GTI DIP SWITCH SETTINGS
8.
GTI INTERFACE BOARD MOUNTING
9.
GTI & IAM MOUNTING
10.
GTI CONNECTIONS
•
Telephone line connection
•
Power / Audio cable connection
•
PCM / Data Bus cable connection
•
Serial Data cable connections (two required - for Master GTI only)
- Make the following connections to the GTI units and Master GTI:
- Set the DIP switches on the side of each GTI unit (including the Master GTI).
- Install the GTI Interface board in the GTI unit that is to be the Master GTI.
- Mount the GTI units, Master GTI, and optional IAM (if supplied).
11.
IAM SOFTWARE
12.
IAM CONNECTIONS
•
Power cable connection
•
PCM / Data Bus cable connection
•
Alarms (optional - no cables supplied)
•
Printer (optional - no cables supplied)
13.
IAM DIP SWITCH SETTINGS
14.
GETC MODIFICATION
- Record the IAM software version number (if supplied).
- Make the following connections to the IAM unit (if supplied):
- Set the DIP switches on the front of the IAM unit (if supplied) as needed.
- Modify the GETC in each EDACS MASTR III repeater that will be connected to a GTI unit
or Master GTI.
15.
SITE CONTROLLER CONFIGURATION
- Configure the telephone interconnect parameters in the Site Controller
computer’s active database using the System Manager.
16.
GTI CONFIGURATION
- Configure the GTI Configurator user database using the GTI Configurator software in an
office PC (PC and cables not supplied).
Ericsson Inc.
Private Radio Systems
Mountain View Road
Lynchburg, Virginia 24502
1-800-528-7711 (Outside USA, 804-528-7711) Printed in U.S.A.
 Loading...