

Ericsson ACeS OG698 User Manual
The phone that lets you stay in touch with the rest of the world.
ACeS OG698
Satellite/GSM 900 Cellular Phone
User’s Guide
Preliminary Edition 1C

Preliminary Edition, Version 1C
January 25, 1998
This manual is published by Ericsson Inc. without any warranty. Improvements and changes to this manual necessitated by typographical errors, inac-
curacies of current information, or changes and improvements to this manual and/or equipment, may be made at any time and without notice. Such
changes will be incorporated into new editions of this manual.
All rights reserved.
Copyright Ericsson Inc., 1998
Publication Number LZT 132 3714 P1C
Address comments about this manual to:
Yvonne Gray, Technical Documentation Specialist
Hopson Road, 407 Keystone
Ericsson, RTP, North Carolina
919-472-1113
qusyvgr@am1.ericsson.se

ACeS OG698 Phone User’s Guide
Version P1C Note:
Some features and menus are operator dependent
Page i
Welcome... ........................................................................
1
About Your Phone............................................................
2
Operators & Subscriptions ........................................................ 2
GSM 900/ACeS........................................................................... 2
SIM Card.................................................................................... 2
Your PIN.................................................................................... 2
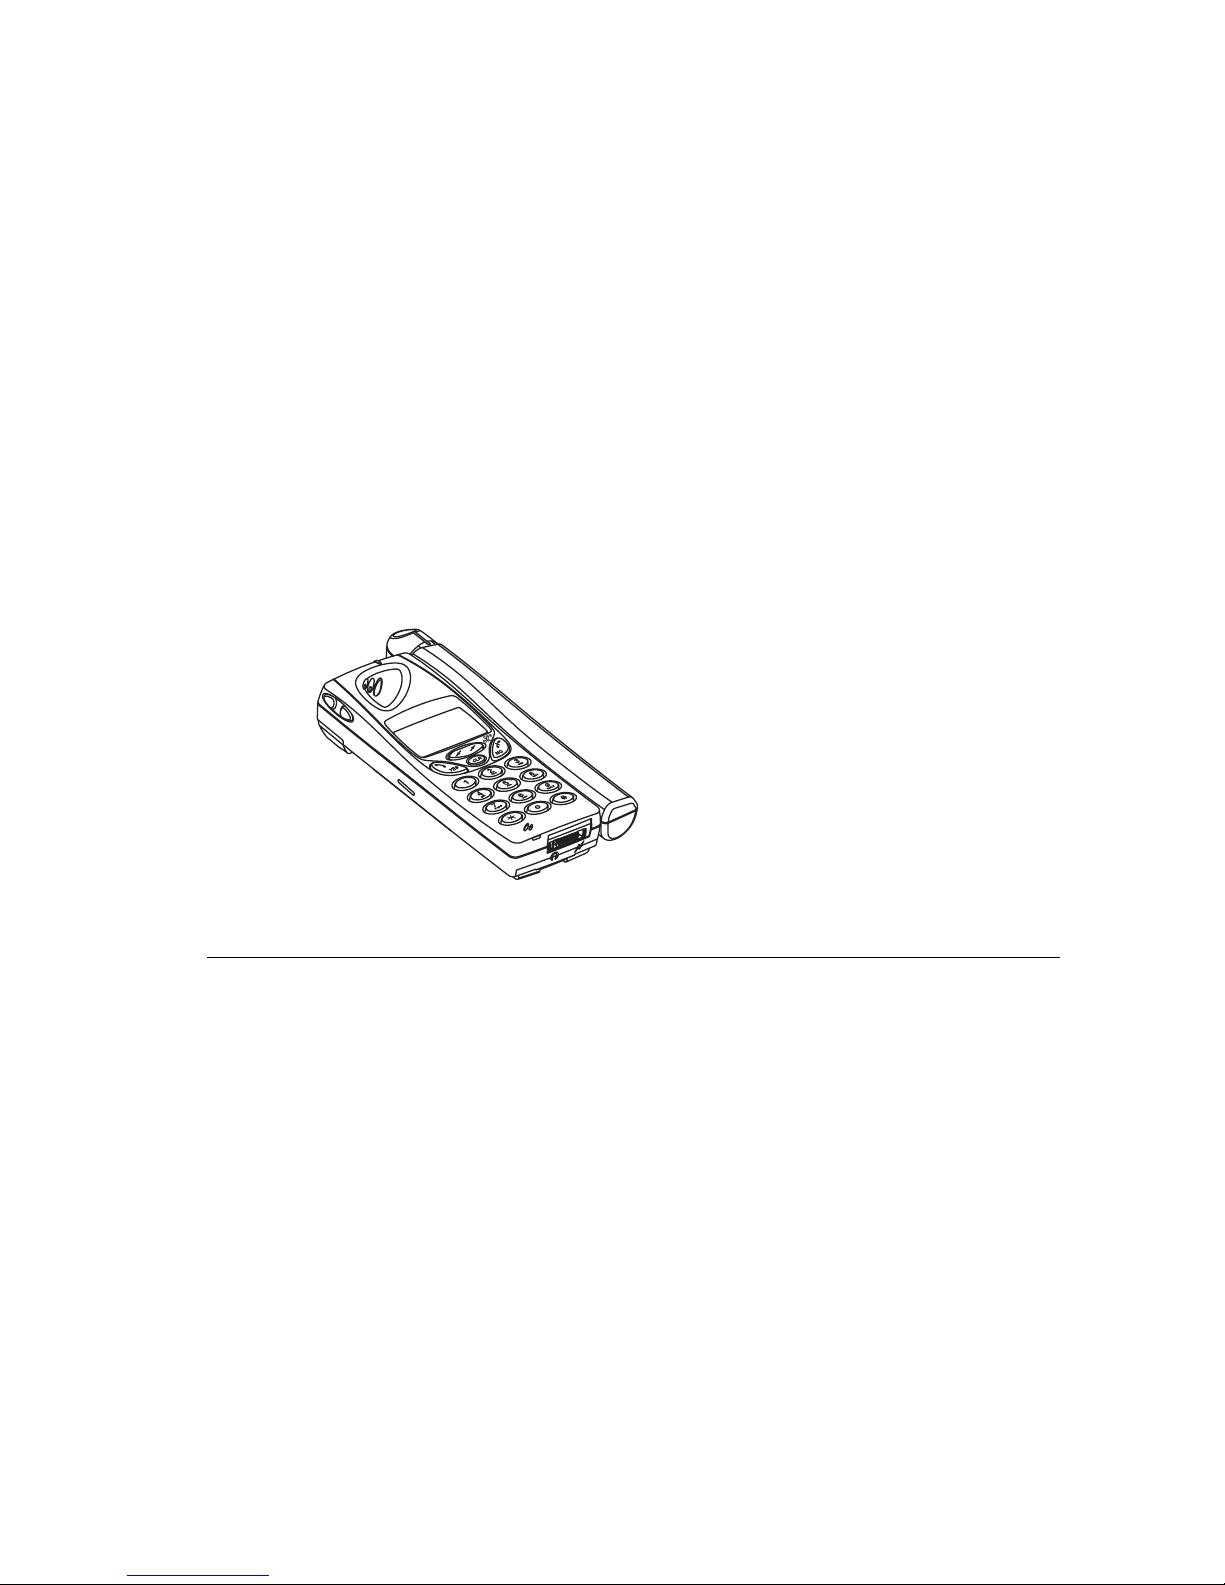
The Phone................................................................................. 3
The Keypad................................................................................ 3
Prepare Your Phone for Use............................................
4
The SIM Card ............................................................................ 4
The Battery ................................................................................ 6
Charging the Battery................................................................. 7
The Antenna.............................................................................. 9
Turning On the Phone........................................................... 10
Turning Off the Phone........................................................... 10
Navigating the Menu System .........................................
11
Initial Phone Settings....................................................
12
Master Reset............................................................................ 12
Lock and Unlock Your Phone................................................ 12
Set Phone Numbers................................................................ 12
Display Phone Number.......................................................... 13
Set an Emergency Number.................................................... 13
Set Language.......................................................................... 13
Set the Key Click Preference .................................................. 13
Set Clock................................................................................. 14
Set Satellite Antenna Pointing............................................... 14
Network Settings ............................................................
15
Select a Network Preference................................................... 15
Set Satellite Search Preferences............................................. 15
Set GSM Search Preferences.................................................. 16
Preferred Network List ........................................................... 16
Locating a Network ........................................................
17
Position the Antenna ............................................................. 17
Point Antenna........................................................................ 17
Satellite Indicators................................................................. 19
Search for a Network ............................................................. 19
Satellite Only Mode................................................................ 20
Satellite Preferred Mode ........................................................ 20
GSM
Only Mode .................................................................... 20
GSM Preferred Mode.............................................................. 21
New Search ............................................................................ 21
Single Search for a Satellite Network.................................... 21
Extensive Search.................................................................... 23
Single Search for a GSM Network......................................... 23
Search Without Changing Defaults ...................................... 23
Update the Network Lists....................................................... 23
Making and Receiving Calls...........................................
25
Emergency Calls .................................................................... 25
Domestic GSM Calls............................................................... 25
Domestic Satellite Calls ......................................................... 26
Satellite or GSM International Calls ..................................... 27
Roaming ................................................................................ 28
Receiving a Call..................................................................... 28
Personalize Your Phone.................................................
29
Direct Mobile-to-Mobile Calls ............................................... 29
Time and Date ....................................................................... 29
The Alarm .............................................................................. 30
Select Ring Type .................................................................... 31
Compose Your Own Melody.................................................. 31
Table of Contents

ACeS OG698 Phone User’s Guide
Page ii Note:
Some features and menus are operator dependent
Version P1C
Change the Ear Piece Volume............................................... 32
Set Handsfree Volume............................................................ 33
Set Answer Mode .................................................................... 33
Change the Greeting Text...................................................... 33
Set the Minute Minder ........................................................... 34
Change the Display Backlight ............................................... 34
Set the Ring Signal Level....................................................... 34
Set the Key Sound Preference................................................ 35
Set Mail Alert.......................................................................... 35
Features..........................................................................
36
Redial a Number.................................................................... 36
Clear Call Memory ................................................................. 37
Missed Calls............................................................................ 37
Return Calls............................................................................ 38
Hiding or Showing Your Number.......................................... 39
Changing Functions During a Call....................................... 39
Using the Display as a Scratch Pad....................................... 40
Sending Tone Signals............................................................ 40
Call Divert .............................................................................. 41
Call Waiting............................................................................ 42
Set Next Call Order and Type ................................................ 45
Baring Calls............................................................................ 45
Conference Calls .................................................................... 46
Caller ID................................................................................. 47
Fixed Numbers Dialling......................................................... 47
Call Time/Call Cost Information........................................... 47
Calling or Credit Card Calls................................................... 49
The Calculator ....................................................................... 51
Handsfree Calling .................................................................. 52
Select Answer Mode................................................................ 52
Area Information ................................................................... 53
Voice Mail.......................................................................
56
Accessing Voice Mail.............................................................. 56
The Phone Book.............................................................
57
Before You Start..................................................................... 57
Phone Book Memories .......................................................... 57
Entering Characters............................................................... 58
Create Your Personal Phone Book........................................ 59
Recall a Phone Number........................................................ 60
Communicating Via Modem ..........................................
63
Making Fax and Data Calls................................................... 63
Communicating Via Modem–ACeS Mode ............................ 63
Communicate Via Modem–GSM Mode ................................ 64
Short Message Service (SMS) ........................................
65
Two Memories ....................................................................... 65
Composing and Sending Messages....................................... 67
Security ..........................................................................
71
The SIM Card Lock................................................................ 71
The Phone Lock..................................................................... 73
Call Barring Password........................................................... 73
The Key Lock ......................................................................... 74
Fixed Number Dialling.......................................................... 74
Calling Cards Security........................................................... 75
Call Security Information...................................................... 76
SIM Verification Information................................................ 76
Safe and Efficient Use ....................................................
77
Efficient Phone Operation..................................................... 77
Safe Phone Operation ........................................................... 77
Product Care.......................................................................... 79
Indicators in the Display ...............................................
81
List of Terms...................................................................
82
Spotbeam Map................................................................
83

Version P1C Note:
Some features and menus are operator dependent
Page 1
W...
and thank you for choosing the ACeS OG698 satellite/cellular phone, the revolutionary
mobile phone that helps you keep in touch with the rest of the world.
The ACeS OG698 handheld satellite/cellular phone, hereafter throughout this
manual referred to as “your phone”, literally puts the world at your fingertips.
Your phone is small enough to fit in the palm of your hand or slip into a shirt
pocket, yet the technology built into the phone allows you to receive and send
phone calls from remote areas of the world where there are no telephone systems or cellular transmitters. When you make a call, your phone transmits a
signal to a satellite, which then beams the signal back to your service provider
who forwards the signal to the number you dialed.
Your phone operates in ACeS or GSM mode, allowing you to place satellite calls
from remote areas, then when you return to an area with reliable cellular service it allows you to switch over to the less expensive cellular mode.
Your phone is designed to roam the remote areas of the world with you,
whether you are travelling on international business, for pleasure, or for an
emergency. Your phone will be a valuable communication tool whether you
are a vacationer on holiday, a world business traveller, or a member of a geological survey, disaster relief, or search and rescue team. Whether you are a scientist, an explorer, or a retired person living out your dream of travelling
around the world, you are no longer limited by ordinary telecommunication
systems which may be inconvenient or out of reach.
Your phone sets a new standard for others to follow while meeting the highest
standards for durability, service and sound. It comes packed with features that
help you stay in touch with the world from anywhere in the world.
These features include:
◗
Satellite mode for areas where cellular service is not available
◗
Cellular service for areas where it is available
◗
Voice, data and fax calls
◗
A phone book where you can store names and phone numbers
◗
An alarm clock, calendar, and calculator
This guide introduces you to your phone and shows you how to get the most
out of it. Before you start, read “Safe and Efficient Use” on page 77.
Welcome...

ACeS OG698 Phone User’s Guide
Page 2 Note:
Some features and menus are operator dependent
Version P1C
Operators & Subscriptions
Before you can use your phone you must obtain a subscription to a network.
The services included in your subscription depend on your choice of operator
and/or subscription. Therefore, some of the services and functions described in
this manual may not be accessible to you. For a complete list of the services
included in your subscription, please contact your network operator.
GSM 900/ACeS
Your phone operates in either GSM 900 or ACeS (Satellite) mode.
SIM Card
You will receive a SIM (Subscriber Identity Module) card with your subscription. The SIM card must be a dual mode SIM card in order for your phone to
operate in both GSM and Satellite modes.
The SIM card contains a computer chip that keeps track of your phone number, the services you ordered from your network operator and your Phone Book
information, among other things.
Your PIN
Your operator will provide you with a security code or Personal Identity Number (PIN) when you receive your SIM card. This number allows you to lock
your SIM card. See “The SIM Card Lock” on page 71.
Store your PIN in a safe place. It is your protection against unauthorized use of
your phone. Do not write it on your phone or place it where someone might
see it.
The first time you turn on your phone you are prompted to enter your PIN (if
the PIN is activated.) Your PIN may also be required when you change settings
in your phone. Some services require a second PIN, the PIN2.
Enter your PIN carefully. If you enter your PIN incorrectly three times in succession, the SIM card will be blocked. If this happens you can unlock it by
using a Personal Unblocking Key (PUK) code. You must contact your operator
to obtain this code. See “Unblocking the SIM Card” on page 71
For information on changing your PIN, see “Changing the PIN Code” on
page 72.
About Your Phone
ACeS OG698 Phone User’s Guide
Version P1C Note:
Some features and menus are operator dependent
Page 3
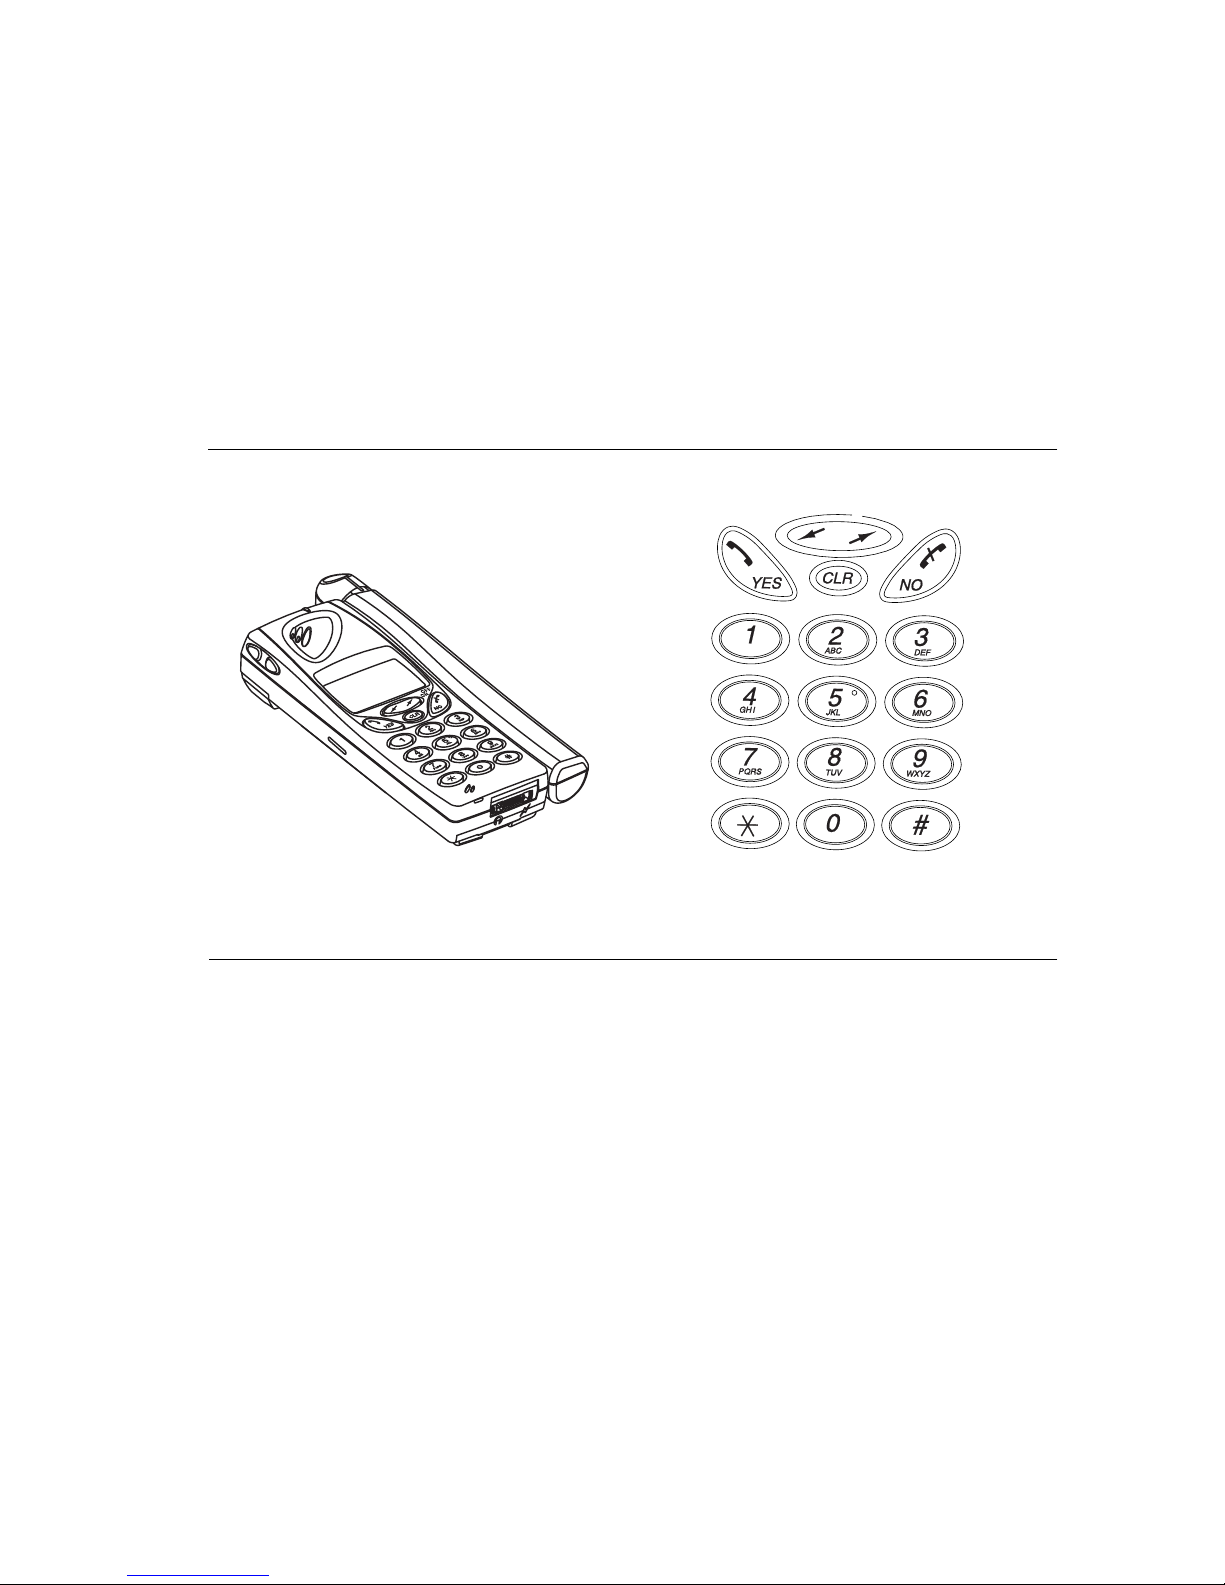
The Phone The Keypad
ACeS OG698 Phone User’s Guide
Page 4 Note:
Some features and menus are operator dependent
Version P1C
Before you can use your phone for the first time you must install the SIM card
if it is not already installed, charge the battery, install the battery, and set
default parameters for the phone and networks.
The SIM Card
When you register as a subscriber with a network service, you receive a SIM
card. The SIM card stores information about your phone number and your
subscription, among other things.
If you purchased your phone from your service provider the SIM card may
already be installed. If not, you must install it before you can use your phone.
The SIM card that comes with your subscription is about the
size of a postage stamp. Many services provide a credit card
size card with postage stamp size SIM card that you punch
out.
Note! If you try to use a SIM card that is not a 3-volt card,
the message “Insert card” will display and you may only be
able to make emergency calls on your phone.
Opening the SIM Card Holder
To open the SIM card holder, remove the battery if attached, then:
1 Release the SIM card holder by
sliding it toward the top of the phone
2 Fold out the holder as shown
Prepare Your Phone for Use
ACeS OG698 Phone User’s Guide
Version P1C Note:
Some features and menus are operator dependent
Page 5
Inserting the SIM Card
To insert the SIM card, remove the battery (if attached) then:
1 Hold the SIM card with the angled
corner at the top right position
2 Slide the card into the holder
3 Fold down the holder
4 Lock the holder by pressing it
down and sliding it toward the bottom
of the phone
Op
erating Without A SIM Card
When operating in GSM mode, you can make emergency calls on your phone
without a SIM card by dialling 112 or an alternate emergency number. (See
“Locating a Network” on page 17 and “Emergency Calls” on page 25.)
Important! You cannot access satellite mode related services without a SIM
card.
ACeS OG698 Phone User’s Guide
Page 6 Note:
Some features and menus are operator dependent
Version P1C
Operating With a GSM Standard SIM Card
Your phone will operate in ACeS mode with a Standard 3-volt GSM SIM card.
You can change the default GSM or Satellite mode parameters to your personal
preferences. Also see “Roaming with a Standard GSM SIM Card” on page 28.
When you turn your phone on the first time, the new SIM card is detected and
the System mode and Home Subscription menus display.
1 When Systemmode displays press the navi-
gation keys to the left or right to display GSMonly, GSM-preferred, Satellite-only, or Satellitepreferred mode
2 Press YES to select the mode
For more information on setting system mode
preferences see “Select a Network Preference” on page 15, “Set Satellite Search
Preferences” on page 15, and “Set GSM Search Preferences” on page 16.
3 The Home Subscription menu then dis-
plays. Press the navigation keys to display ACeS
or GSM
4 Press YES to enter the type of your home sub-
scription.
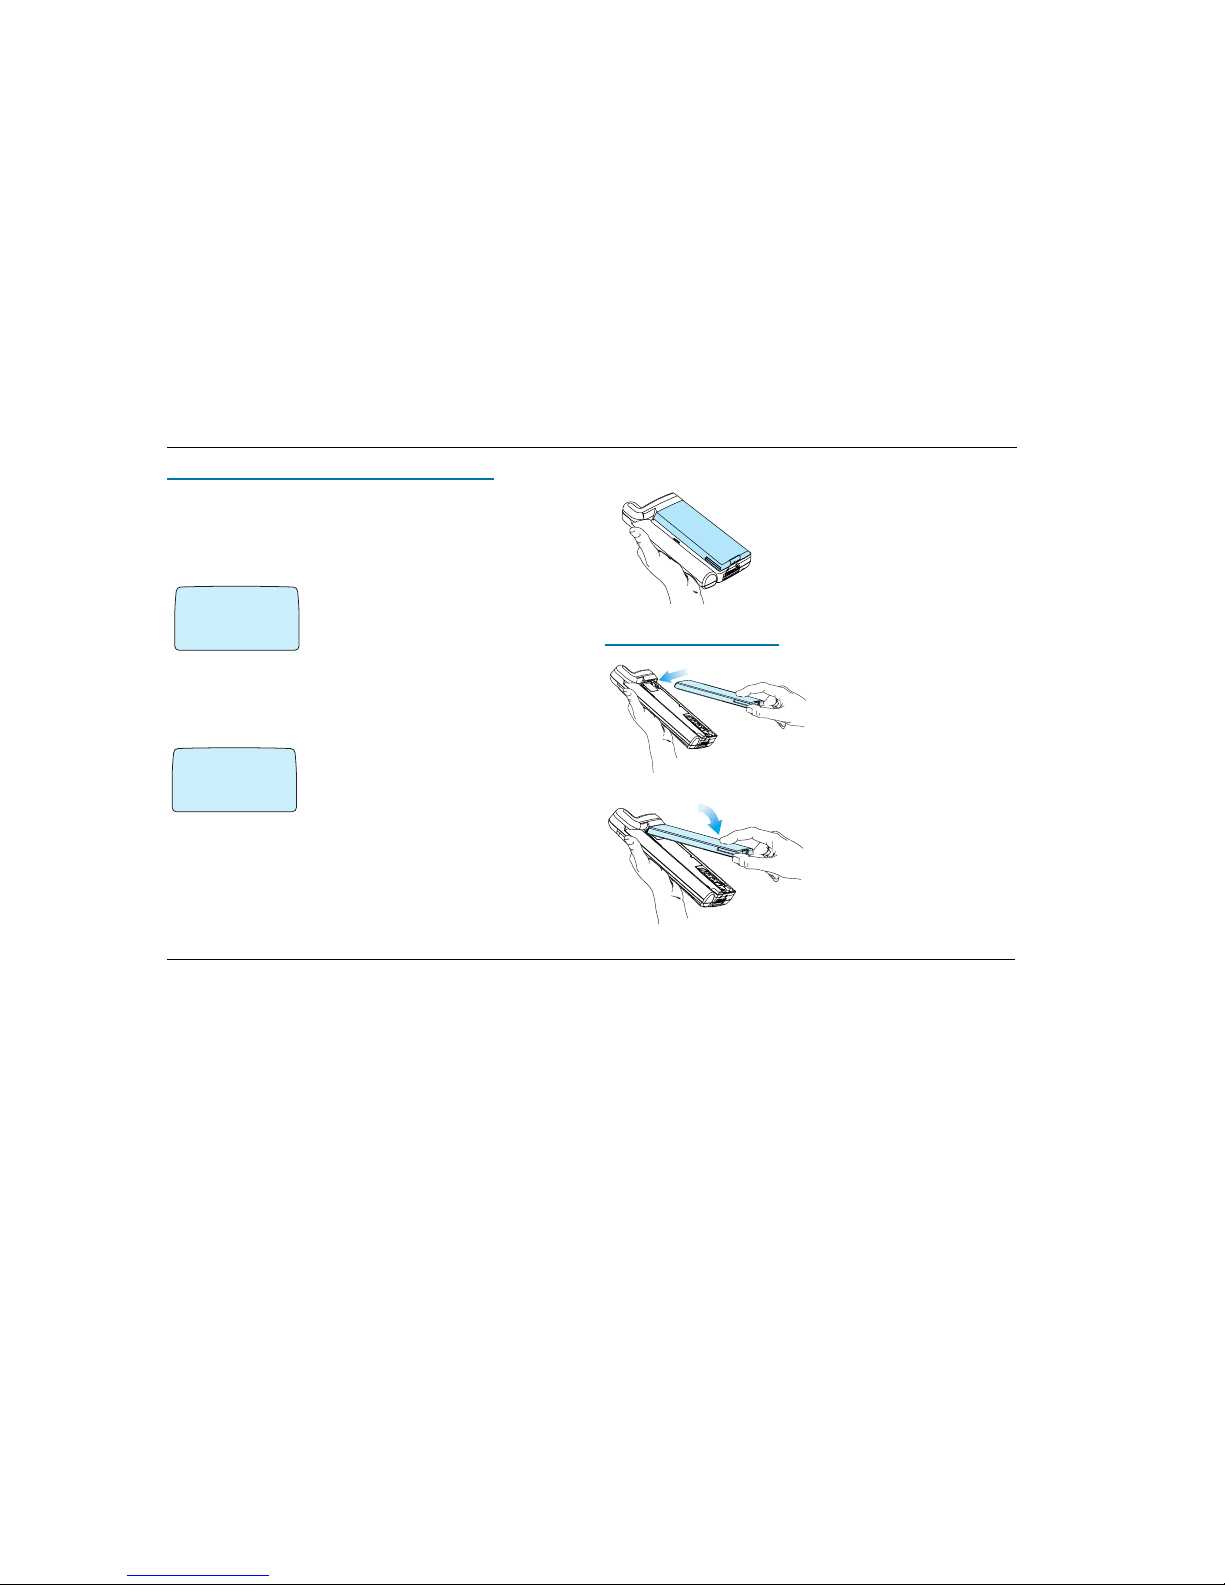
The Battery
Your mobile phone comes with a nickel
metal hydride (NiMH) battery. The battery is
not charged when purchased, but there may
be enough power to turn on the phone. You
will need to charge the battery after you
attach it to the phone. See “Charging the
Battery” on page 7.
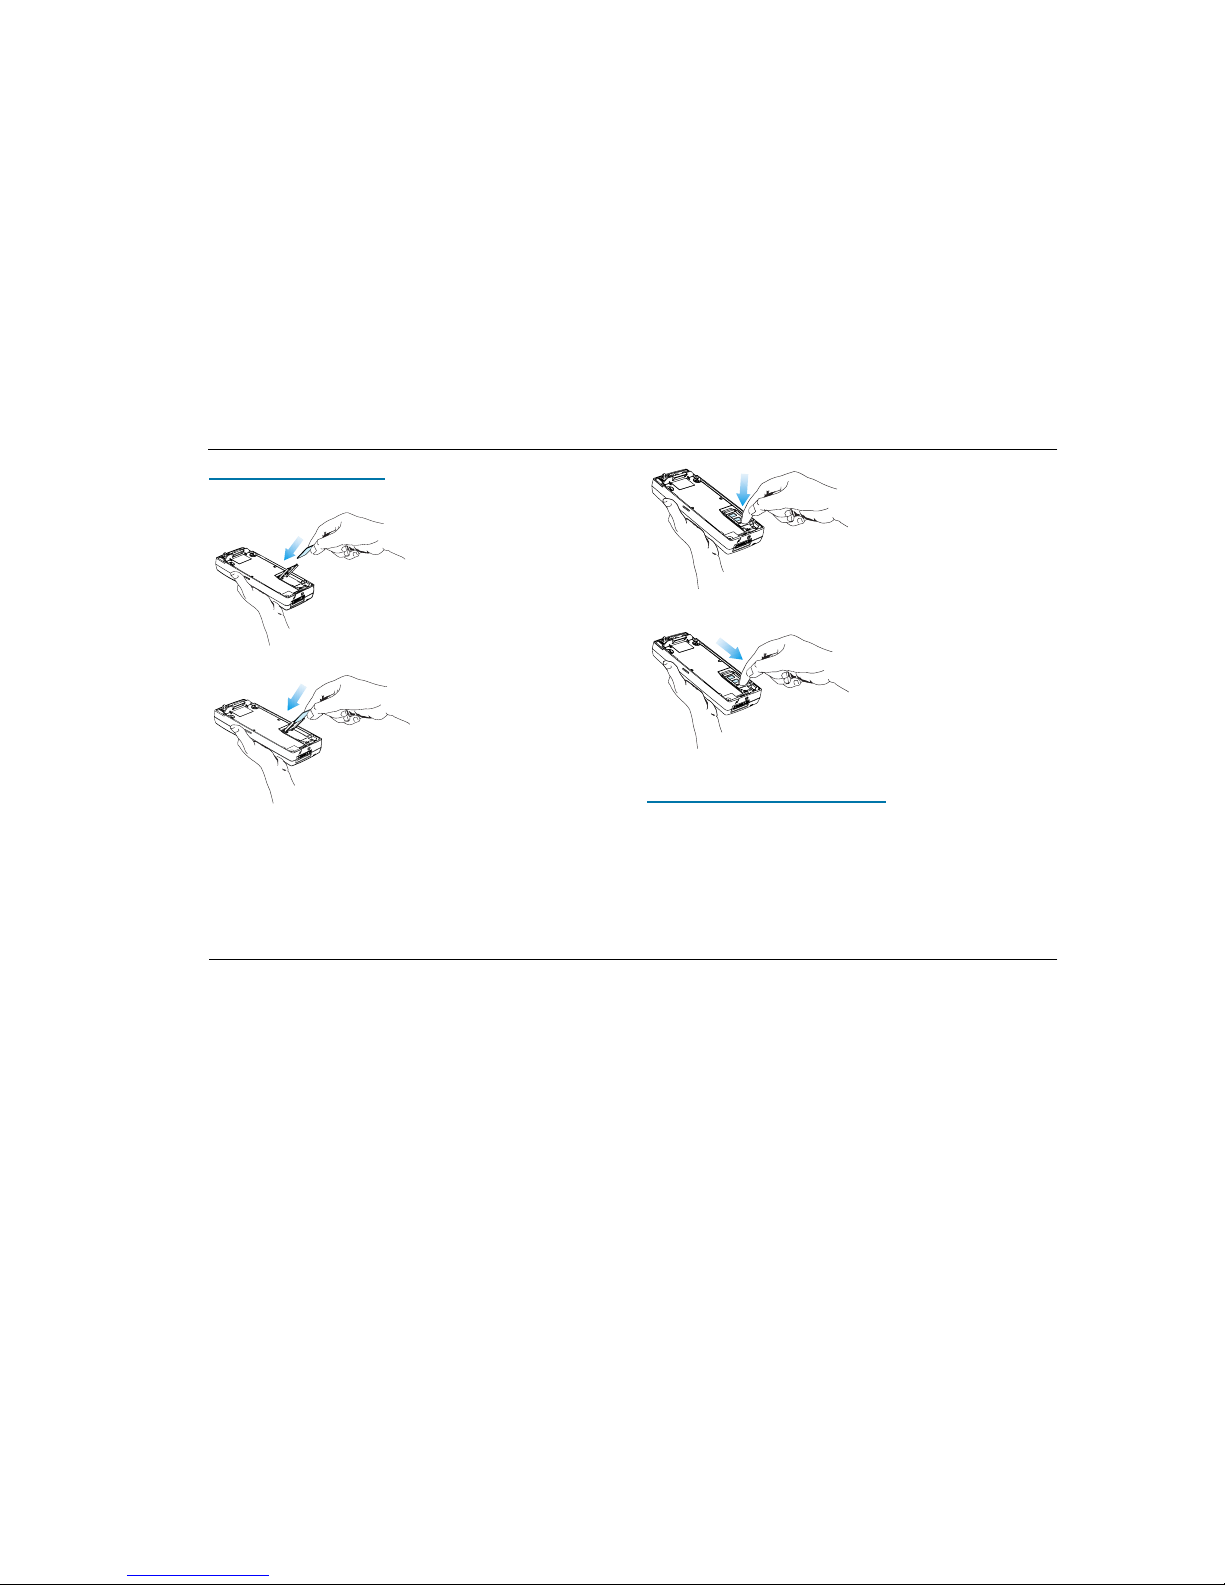
A
ttaching the Battery
1 Place the battery on the back of
the phone
2 Press the battery forward and press
down on the battery until you hear a
click
SYSTEM MODE
‹
@
GSM
¯˘
fl
HOME
‹
@
GSM
¯˘
fl
ACeS OG698 Phone User’s Guide
Version P1C Note: Some features and menus are operator dependent Page 7
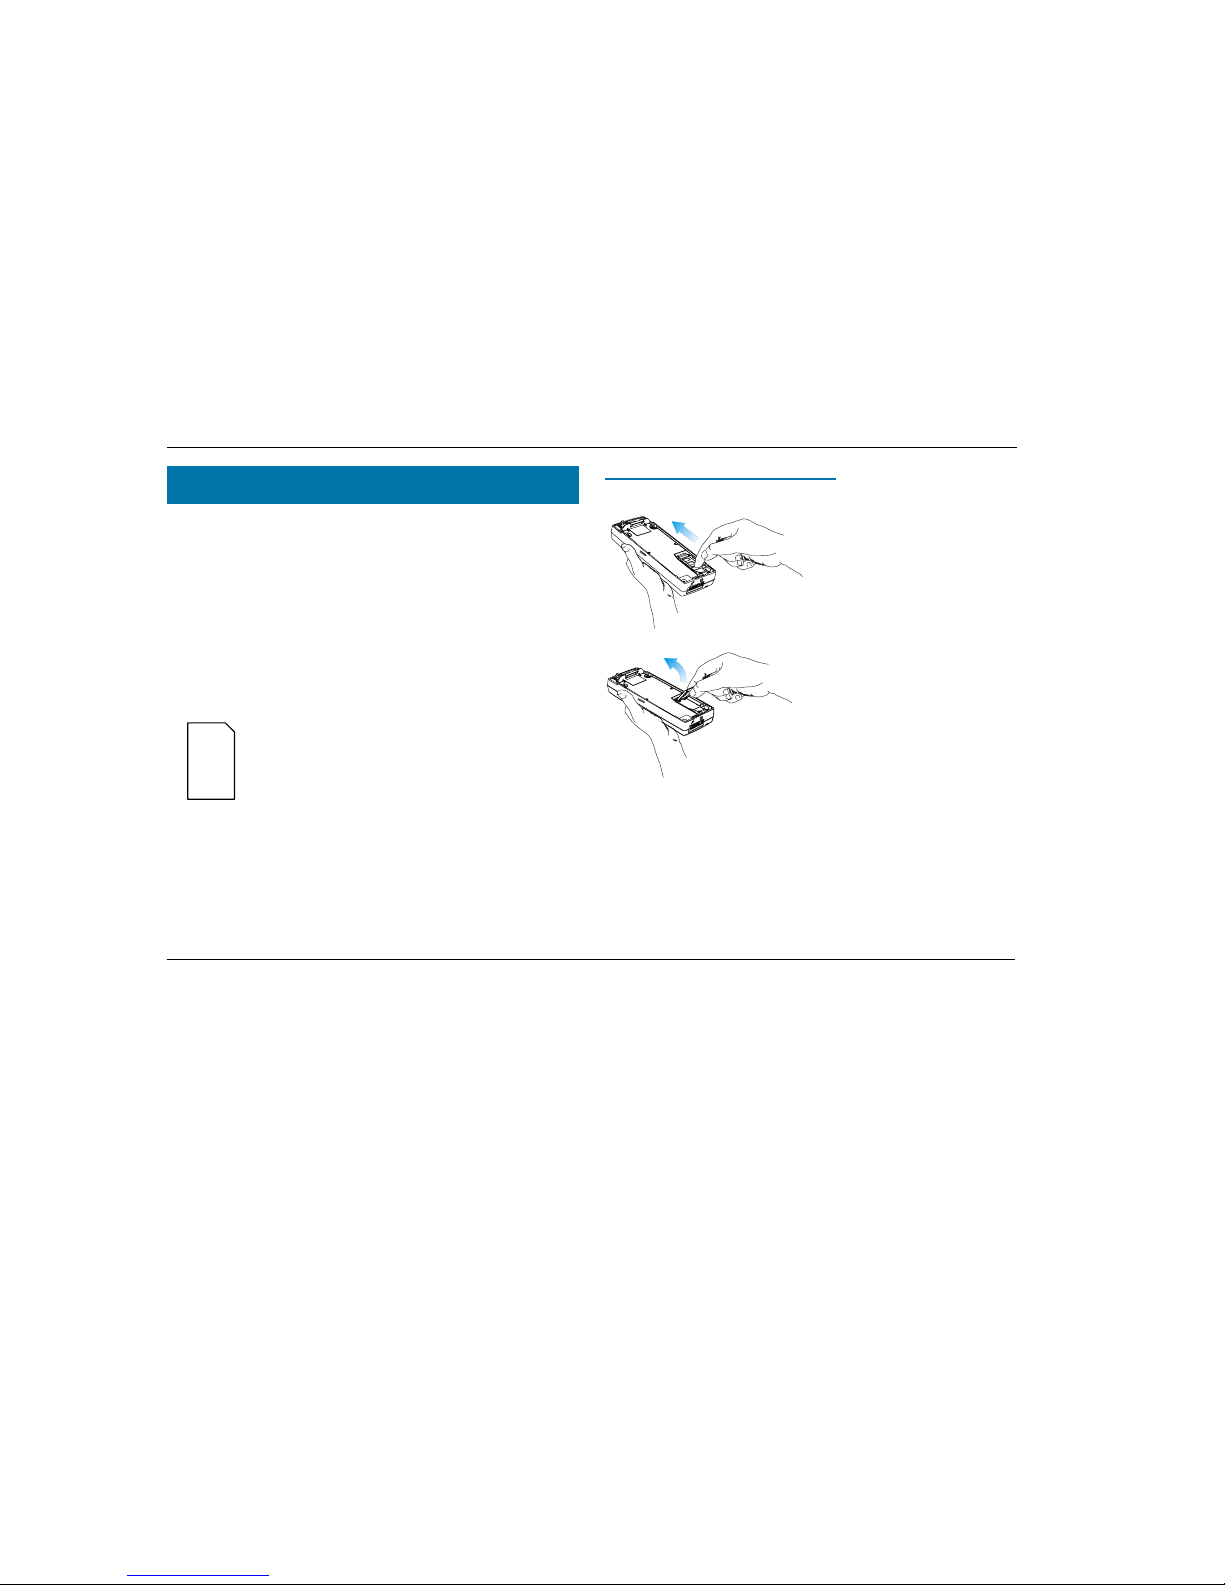
Removing the Battery
Make sure that the phone is turned off before removing the battery, then:
1 Press forward on the battery
2 Lift the battery up and away from
the phone.
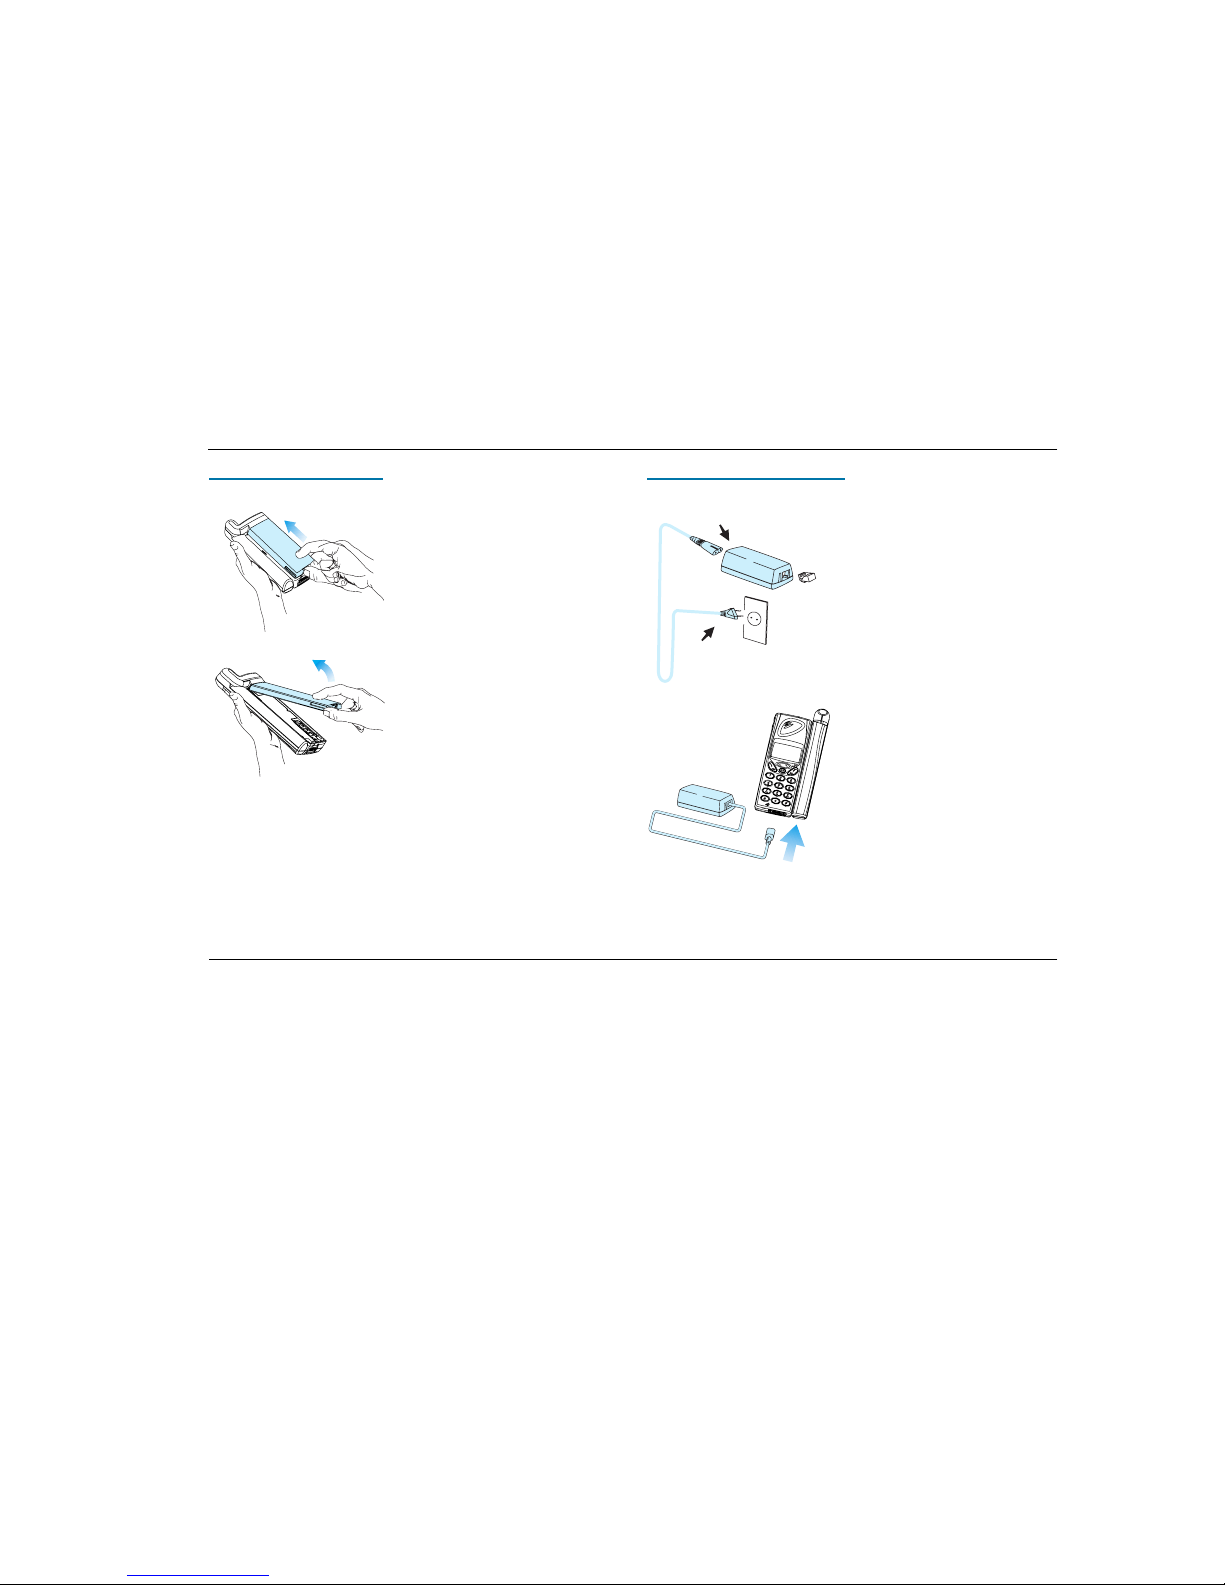
Charging the Battery
The phone comes with an AC battery charger. You will need to charge the battery before using your phone for the first time.
Attaching the AC charger
Follow these steps to connect the charger:
1 If applicable, connect the plastic plug
on the charger cable to the charger
2 Connect the charger to the outlet
Note! The flash symbol on the plug must
face upwards. You may have to press
hard.
3 Connect the other end of the charger
cable to the phone
The battery starts charging as soon as
you attach the charger. A green indicator
on the charger lights up. If it does not,
disconnect the charger from the phone
and try attaching it again, pressing hard.
You should hear a click.
The phone may be charged when it is
ON or OFF.
ACeS OG698 Phone User’s Guide
Page 8 Note: Some features and menus are operator dependent Version P1C
◗ If a charger is attached but the phone is turned
off the message “Charging Battery Only” is dis-
played
◗ If the phone is on the display will continue to
operate normally
Charging is indicated by the following:
◗ the battery meter in the display is continuously filled and emptied
◗ the indicator on top of the phone shows a steady red light if the phone is off,
green if the phone is on
When the battery is fully charged, the battery meter in the display shows full
and the indicator on top of the phone show a steady green light.
It is possible to use the phone while the battery is being charged. However, the
charging time is increased.
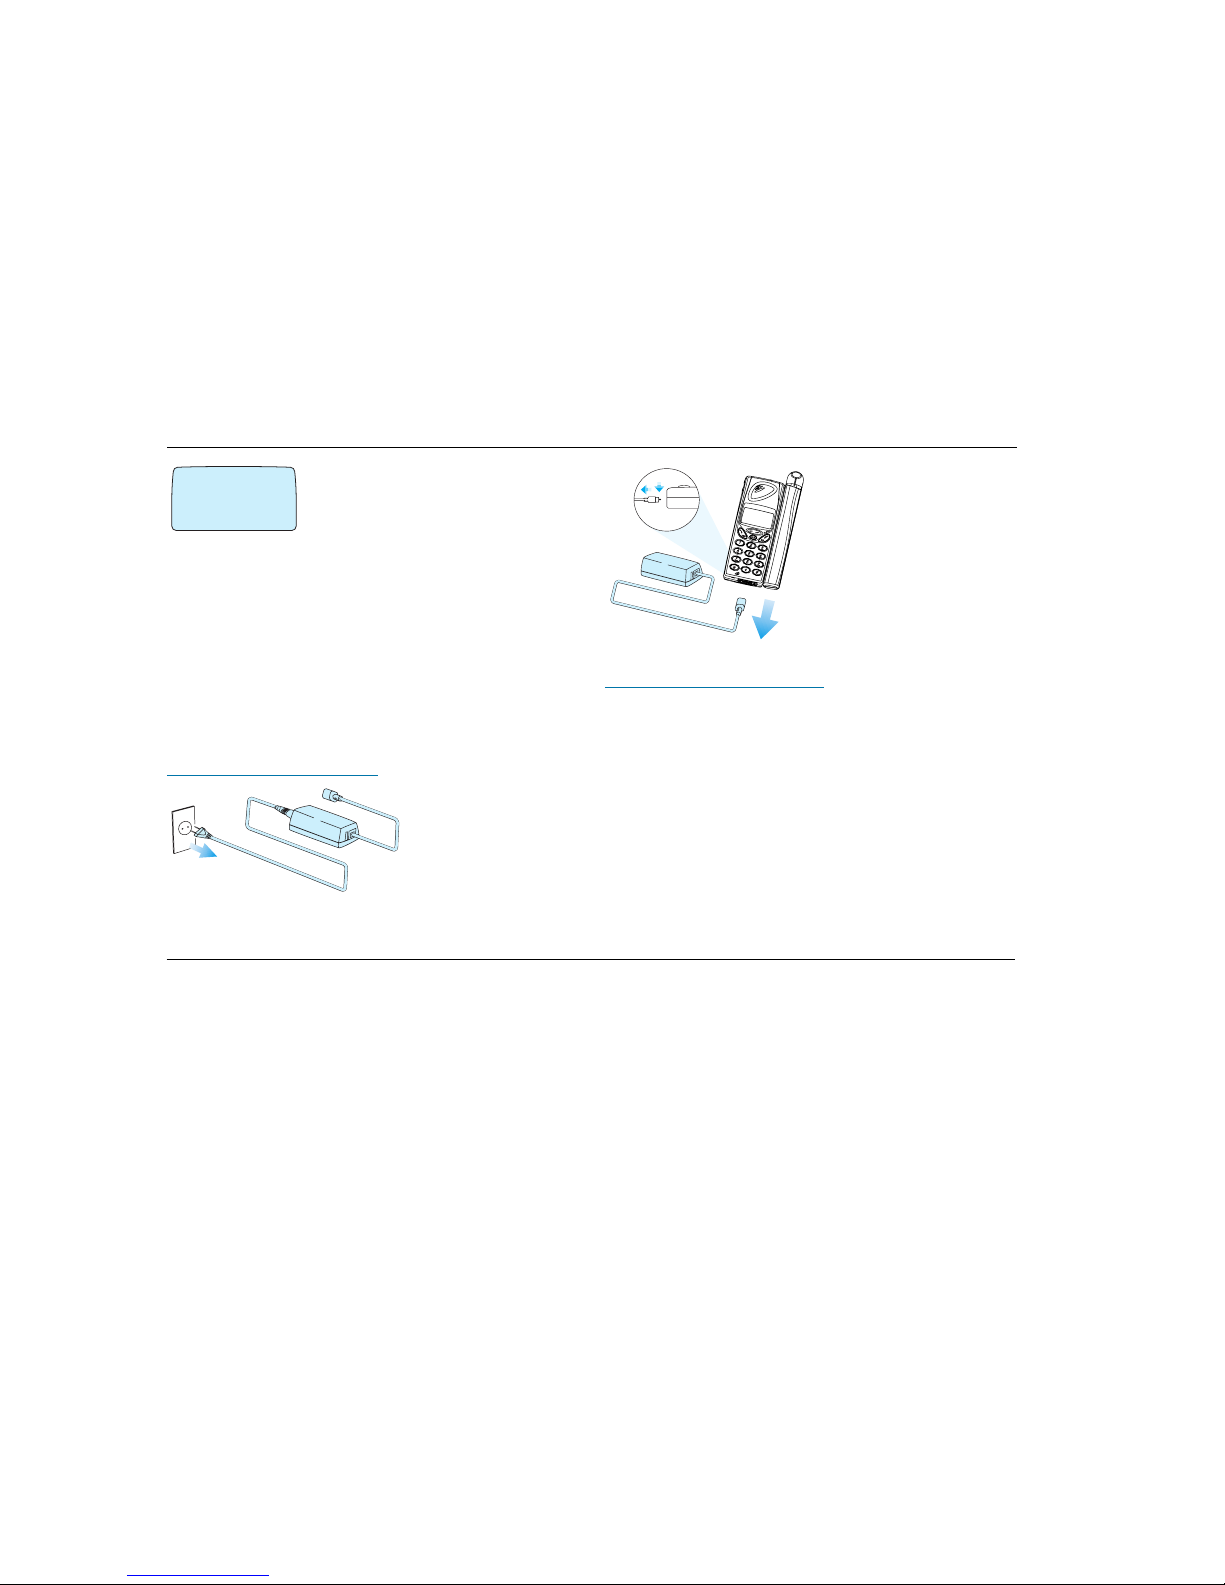
Disconnecting the Charger
1 Disconnect the charger
from the electrical outlet
2 Lift the plug connected to
the phone upwards and pull it
out.
When to Charge the Battery
The nickel metal hydride (NiMH) battery that comes with your phone can be
charged as often or as long as you wish without losing performance. This is not
the case with the nickel cadmium type batteries, often sold as accessories from
other suppliers.
Important! For optimal talk and standby time, it is recommended that you
use only nickel metal hydride (NiMH) batteries with your phone.
When the battery needs charging the following happens:
◗ An alarm signal (a long beep) sounds and the message Battery low appears
for ten seconds in the display
◗ The indicator light on top of the phone starts blinking red
◗ The alarm may sound again after 10 minutes, depending on the battery type
and how fast it is being discharged
Charging
Battery
Only
#
ACeS OG698 Phone User’s Guide
Version P1C Note: Some features and menus are operator dependent Page 9
Low Battery Alarm
When the battery has discharged, the low battery alarm (described above)
sounds, then the phone automatically shuts off. You might be able to turn the
phone on again, but you can not make or receive any calls until the battery is
charged, or replaced with a charged one.
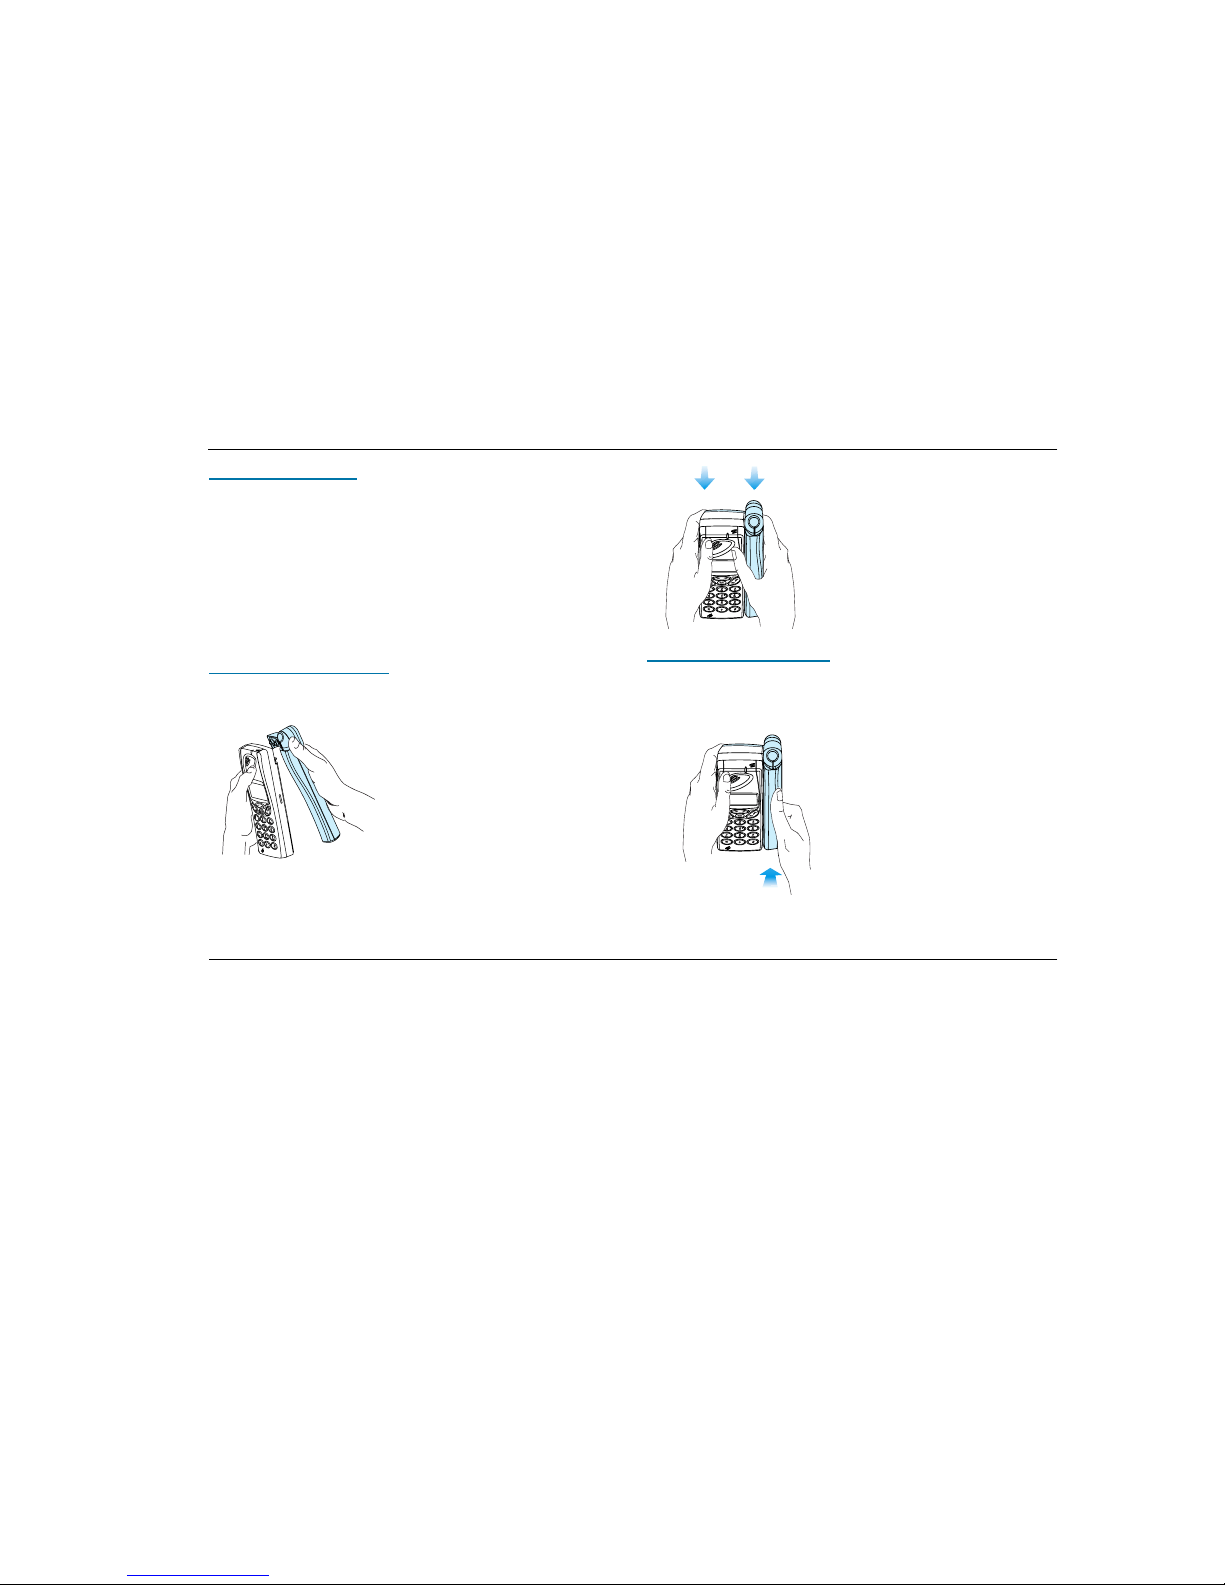
The Antenna
You will need to attach the antenna to your phone in order for it to receive the
strongest network signal possible.
Attaching the Antenna
To attach the antenna:
1 Place the antenna behind the phone as
shown
2 Press together as shown. You will hear a
click when the two are attached properly.
Removing the Antenna
When you do not need to make calls you may remove the antenna from your
phone.
To remove the antenna:
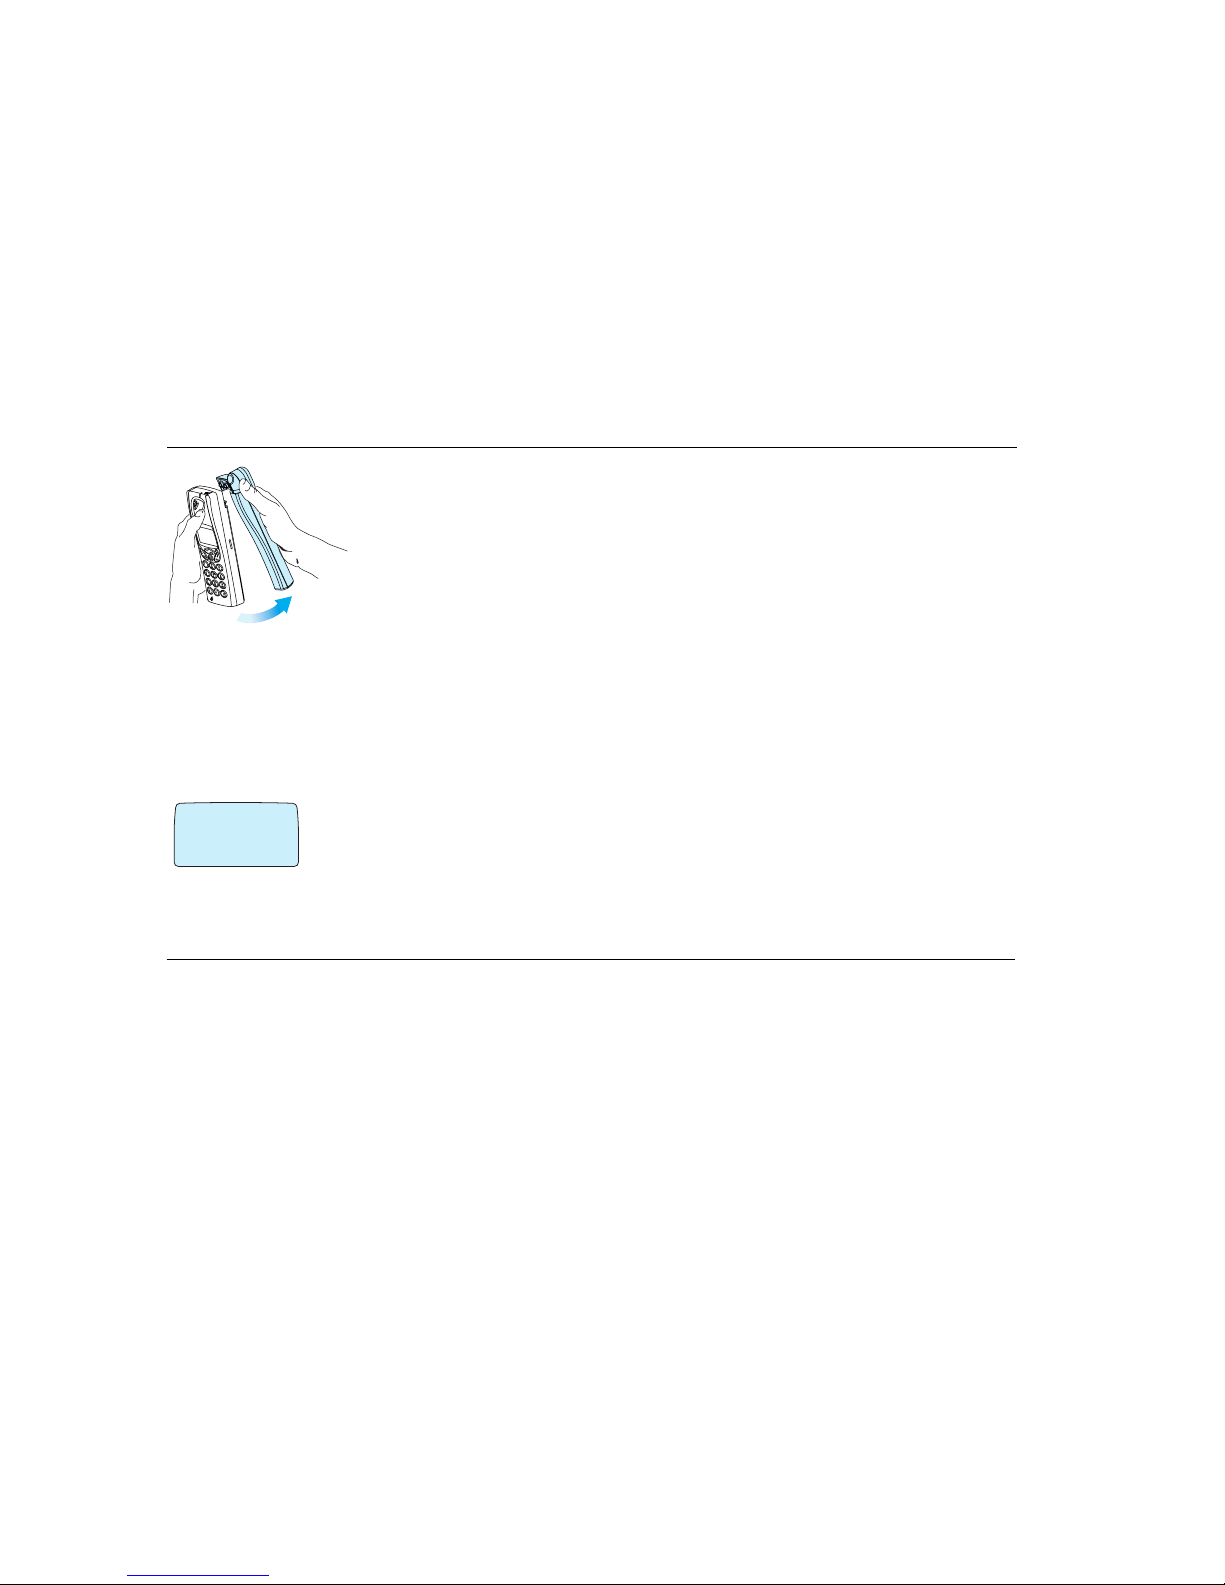
1 Grasp the phone with both hands.
2 Place your right thumb on the lower
part of the antenna
3 Press back on the antenna
ACeS OG698 Phone User’s Guide
Page 10 Note: Some features and menus are operator dependent Version P1C
4 Lift off the antenna with a slight rota-
tion from bottom to top
Turning On the Phone
Note! The first time you turn on your phone you will need to enter the PIN
(SIM lock code) given you by your service provider. You may change your PIN
or turn the SIM lock off. See “The SIM Card Lock” on page 71 for instructions.
The digits appear as stars (*) in the display. If you make a mistake while entering your PIN, erase the digit by pressing the CLR key.
To turn on the phone:
1 Press and hold down the NO (ON/OFF) key
until you hear a click.
2 Enter your PIN
3 Press YES
If you entered your PIN correctly, you will receive a welcome message.
Turning Off the Phone
To turn off your phone press and hold the NO (ON/OFF) key until the display is turned off.
Enter PIN #
‹
#
ACeS OG698 Phone User’s Guide
Version P1C Note: Some features and menus are operator dependent Page 11
The menus are arranged in a continuous loop which you move through with
the YES, NO, CLR and Navigation keys.
To select a menu or make a setting:
1 Press the navigation key to the until you reach the desired menu or function
2 Press YES to enter the menu or to select the function
3 Press the LEFT or RIGHT navigation key to find the desired submenu
4 Press YES to enter the submenu or to confirm the setting
Note! If you do not press any key for 60 seconds, the phone will return to
standby.
Display Text and Symbols
When you navigate the menus the following indications apply:
◗ Uppercase letters indicate the menu or function selected
◗ Text within brackets ( [ ] ) indicates the current setting for the function dis-
played ¯ and ˘ indicate you can scroll through more options with the navigation key
Indicators in the display
See the table “Indicators in the Display” on page 81 for examples of symbols
used in the display.
Navigating the Menu System
Key Name and function
Navigation Key: Press right or left to activate menu
mode and scroll through menus.
YES key: Answers a call, turns phone on, selects a
menu or function, or sends a call when digits are displayed.
NO key: Ends a call, turns phone off, backs up one
level and/or leaves a setting unchanged, clears the
display if pressed while digits are on the display.
Clear key: Takes you back to the standby menu. If
pressed during an incoming call or call pending notification, it mutes the ringer.
Version P1C Note: Some features and menus are operator dependent Page 12
You will need to set certain parameters before using your phone for the first
time. You will need to set other parameters before using some of the features.
You can also personalize your phone by changing settings such as the ring
tone or melody, ring level, or display light. See “Personalize Your Phone” on
page 29.
Master Reset
If you should make changes and then decide that you do not want to keep
those changes, you can reset your phone to the default factory settings with the
following procedure:
1 Access the SETTINGS menu and select Mas-
ter reset
2 Enter your phone lock code and press YES
Lock and Unlock Your Phone
Keypad Lock
Use the ACCESS menu to lock the keypad on
your phone so keys cannot be accidently pressed
when you are transporting it. See “The Key Lock”
on page 74 for instructions on locking and
unlocking the keypad.
Phone Lock
The phone lock protects the phone against unauthorized use in the event of
theft. It is not activated when you purchase the phone.
Use the ACCESS menu to set a Phone lock or
Key lock code, to change your code, lock your SIM
card, or to bar certain incoming or outgoing calls.
See “The Phone Lock” on page 73 for detailed
instructions.
Set Phone Numbers
You may have as many as three different phone numbers associatedwith your
satellite subscription. If the phone numbers exist on your SIM and your subscription allows you to change the numbers, you can store them and display
them when needed.
Initial Phone Settings
SETTINGS
@
‚
#
Ø
Master
reset
¯˘
ÂACCESS ¬
‚
#
Ø
Keylock
on?
¯˘
ÂACCESS ¬
‚
#
Ø
Phone lock
(Unlocked)
¯˘

ACeS OG698 Phone User’s Guide
Version P1C Note: Some features and menus are operator dependent Page 13
1 From the SETTINGS menu select Set
Number
2 Select the phone number you want to set:
◗ SAT Phone no
◗ SAT Fax no
◗ SAT Data no
Display Phone Number
To display a number:
◗ From the INFO menu select Number
◗ Scroll to Phone no, Fax no, or Data no
and press YES
Set an Emergency Number
The emergency number 911 is prestored in your phones memory for easy
access.
You can change this number from the CALLS
menu.
1 Scroll to CALLS\Set Emerg #. The current
number is displayed.
2 Enter the new number
3 Press YES to confirm
You can dial this number, or the standard emergency number 112, to make an
emergency call in either GSM or Satellite mode.
Set Language
English is the default language in your phone’s display. In some phones it is
the only language available. In phones with more than one language available
you may change the language from the SETTINGS menu.
Set the Key Click Preference
The key sound you set determines whether you can send DTMF (Duel Tone
Multifrequency) tones or not. For more information on DTMFs see “Sending
Tone Signals” on page 40.
1 Select SETTINGS\Key Sound
2 Press YES
3 Select Silent, Click, or Tone
4 Press YES
◗ If Silent is selected, you cannot generate DTMF tones.
◗ If Click is selected, you can generate DTMF tones
◗ If Tone is selected, you can generate DTMF tones and they will be sent
automatically
◗ If you have numbers displayed during a call you can send DTMF tones by
pressing YES.
SETTINGS
@
‹
#
Set number
¯˘
fl
CALLS
&
›
#
Set emerg.
(...)
¯˘
fl
SETTINGS
@
‹
#
fl
Key sound
(Click)
¯˘

ACeS OG698 Phone User’s Guide
Page 14 Note: Some features and menus are operator dependent Version P1C
Set Clock
Your phone displays the time when in standby mode. During a call, it displays
the time elapsed since the call began. You can also set other clock-related
functions such as date, time and date format and the alarm. See “Time and
Date” on page 29.
To set the time:
1 From the TOOLS\Clock menu select Set
clock
2 Enter the time in hours and minutes
If Clock/Clockmode is set to AM/PM, you can
switch between AM and PM by pressing * or #.
3 Press YES
Set Satellite Antenna Pointing
When the satellite signal is not strong enough for the phone to receive calls or
register with the network, the Antenna Pointing feature can sound a signal that
will assist you with positioning the antenna when receiving a call. See “Point
Antenna” on page 17.
To activate the antenna pointing feature:
1 Scroll to display SETTINGS\Point antenna\ON
2 Press YES to enable the feature
To deactivate the Antenna Pointing feature:
1 Scroll to display SETTINGS\Point antenna\OFF
2 Press YES
◗ If set to ON, you will hear the satellite assist signal consisting of different
pitches (depending on the signal strength) when receiving notification of a
pending call. The signal will continue until time-out or a full satellite signal
is acquired, or until you press CLR to turn it off.
◗ If set to OFF, instead of the signal described above, the call pending notifi-
cation signal of three short tones is repeated every 5 seconds until timeout
or your phone locks onto a signal that is strong enough for your phone to
respond to it
◗ If set to ON, you will see the display shown at
the left when antenna pointing assistance is
needed.
The volume for the Antenna Pointing signal is the
same as the ring volume. To change the setting
see “Set the Ring Signal Level” on page 34.
¤
@fl
CLOCK
(Set clock)
[08:35]
¯
˘
SAT pointing
‹
@
On
Ø
¯
˘
ACeS OG698 Phone User’s Guide
Version P1C Note: Some features and menus are operator dependent Page 15
You will need to set defaults for the networks you will use before you use your
phone for the first time.
Select a Network Preference
You can select the networks you want to use and the order in which you want
your phone to search for them. You only need to do this once unless you want
to change your preference.
1 Select NETWORKS from the menu
2 Select Systemmode
3 Press YES
The current setting will display. The default is
Satellite preferred mode.
Select one of the following options and press YES:
◗ Satellite only: searches only for a satellite network
◗ Satellite pref: searches first for a satellite network. If none is found, it
searches for a GSM network
◗ GSM only: searches only for a GSM network according to the search pat-
tern set in GSM Search Options.
◗ GSM pref: searches for a GSM network. If none is found the phone
searches for a satellite network.
Set Satellite Search Preferences
You can set a default search pattern for a Satellite network. Your phone will use
this search pattern to search for a satellite network each time you turn your
phone on.
You only need to do this once unless you want to change your defaults. You
must be in Satellite mode to set satellite search preferences. (You must be in
GSM mode to set GSM preferences.)
1 Select NETWORKS\Search opt\Sat
2 Select Searchmode
3 You will be prompted to select a search pattern
◗ Select Long for a long search pattern. This
can take up to 12 minutes.
◗ Select Short for a short search pattern.
This normally takes less than two minutes if
successful.
Your phone will remember short search patterns used to acquire service.
Therefore, you only need to use the long search option if you travel long distances to a new location.
Network Settings
NETWORKS
#
‚
#
System mode
(SAT pref)
¯˘
Ø
‹
@
SearchingSAT
long
02:18
Ø
‹
@
SearchingSAT
short
04:25
Ø

ACeS OG698 Phone User’s Guide
Page 16 Note: Some features and menus are operator dependent Version P1C
Set GSM Search Preferences
You can set a default search pattern for a GSM network. Your phone uses this
search pattern to find a GSM network each time you turn your phone on. You
only need to do this once unless you want to change your defaults.
Your GSM subscription is your home GSM service provider, either A or B.
You must be in GSM mode for GSM search options to display. (You must be in
Satellite mode to set SAT preferences.)
1 From the NETWORKS menu select Search
Opt\GSM
2 Select Searchmode
3 You will be prompted to select one of the fol-
lowing search modes
◗ Auto
◗ Manual
Preferred Network List
You can create a list of satellite networks to select from manually when your
home network is not within range. Use this feature in the future when more
satellite networks become available.
Note! This list does not define the order in which your phone selects a network, as the strongest radio signal is always selected.
The number of networks that can be stored in the list depends on your SIM
card.
1 Select NETWORKS\Search opt\Sat
2 Press YES
3 Select Search opt/Edit list
4 Press YES
5 Scroll through the network list displayed. If
you have more than one, press YES to select a
network list to edit.
6 Press the arrow keys to scroll through the list of network names. Press * to
display the complete network name.
7 Press YES when the network you want to add is displayed.
8 To update the list and add new networks to select from see “Update the Net-
work Lists” on page 23.
NETWORKS
#
‹
@
Search opt
GSM
¯˘
Ø
NETWORKS
#
‹
@
Search opt
GSM
¯˘
Ø
SEARCH OPT
⁄
@
Search mode
(A then B)
fl
NETWORKS
#
‚
@
Search opt
Satellite
¯˘
Ø
Version P1C Note: Some features and menus are operator dependent Page 17
When you have installed the SIM card, charged the battery, attached the
antenna, and completed the initial setup as explained in “Initial Phone Settings” on page 12, you are ready to use your phone. A network search begins
as soon as you turn on your phone. When a network is found, the phone beeps
three times.
The indicator light on top of the phone flashes green once every second and
your network operator’s name (in most cases abbreviated) is shown in the display. If the charger is connected, the indicator displays a steady green light
instead of a flashing green light.
(If this is the first time you have used your phone, see “Set Satellite Search
Preferences” on page 15, and “Set GSM Search Preferences” on page 16.)
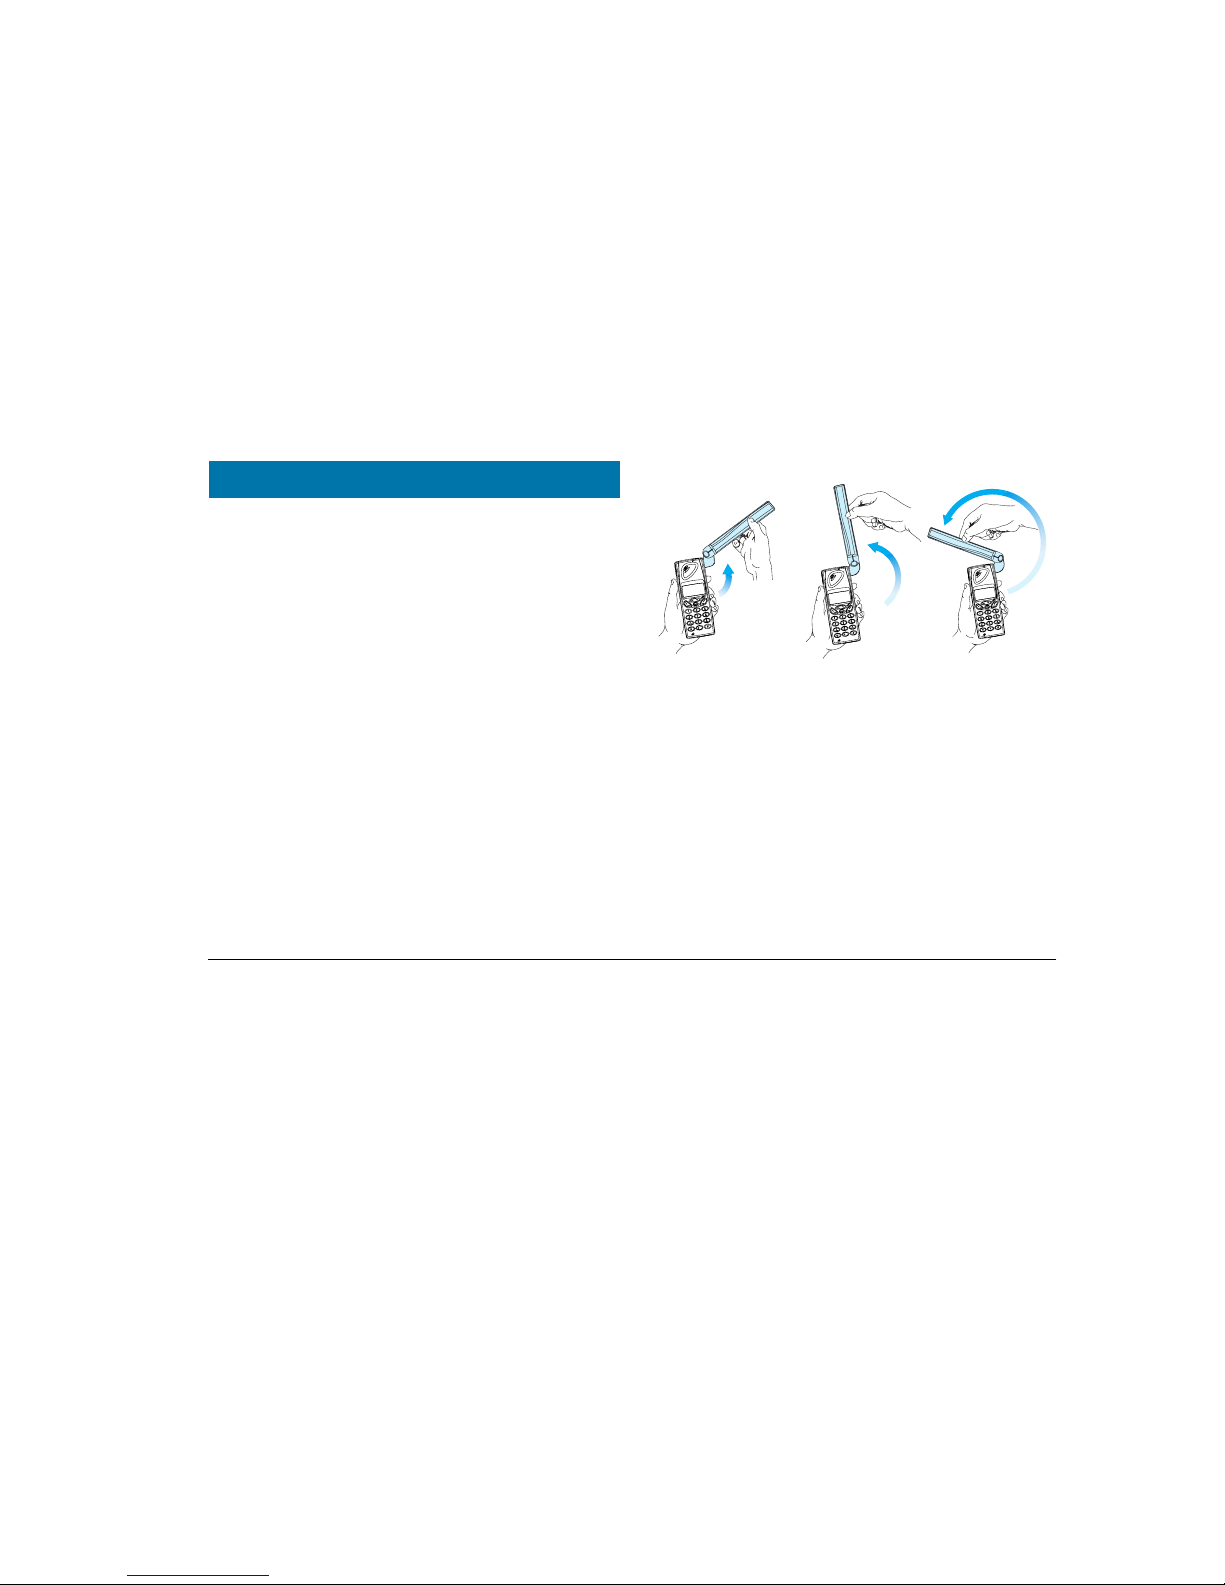
Position the Antenna
You will need to position the antenna in order to receive a full satellite signal.
Grasp the antenna and flip it upward until it clicks into one of the three
upward positions shown in the figure below.
Important! You may be able to receive a network signal without raising the
antenna. However, the antenna should be in one of the three upward positions
shown above for your phone to work most efficiently.
For more information on positioning the antenna properly see “Point
Antenna” on page 17, and “Satellite Indicators” on page 19.
Point Antenna
If you activated the Antenna Pointing feature, you can use it to assist you in
locating a full-strength satellite signal. See “Set Satellite Antenna Pointing” on
page 14.
Locating a Network
Position 1
Position 2
Position 3

ACeS OG698 Phone User’s Guide
Page 18 Note: Some features and menus are operator dependent Version P1C
Point Antenna to Receive Call
◗ If a satellite network is in range but signal
reception is not strong enough for you to receive a
call, you can only receive notification of a pend-
ing call.
◗ If the Antenna Pointing is set to ON, you will
hear the satellite assist signal consisting of differ-
ent pitches (depending on the signal strength)
when receiving notification of a pending call. The
signal will continue until time out, a sufficiently
strong satellite signal is acquired, or until you
press CLR to turn it off.
◗ If set to OFF, instead of the signal described
above, the call pending notification signal of three
short tones is repeated every 5 seconds until time
out or your phone finds a signal that is sufficiently
strong enough for your phone to respond to it
Move the phone and antenna to different positions
until the Position Ant message disappears.
If the phone receives a full service signal before
the time-out, Connecting displays, the phone
rings, and you can answer the call.
Point Antenna to Make Call
If you are receiving a satellite signal, but it is not
strong enough to make a call (a half circle is displayed), Position Ant message displays when
you initiate a call. The call will be pending until a
sufficiently strong signal is received.
If the Antenna Pointing is set to ON, and you
press YES again, the Antenna Pointing feature
will be activated to help you place the call. Reposition the phone until you hear a beep and Calling
displays.
Point Antenna At End of Search
If a satellite network is found but the signal is not
sufficiently strong enough for the phone to register with it. The phone will display the “Position
antenna” message and the empty circle service
indicator.
The Antenna Pointing feature can help you
register with a satellite network signal.
1 Make sure the Antenna Pointing feature is
set to ON
Recieving page
⁄
@
Postion ant
Ø
SAT pointing
‹
@
On
Ø
¯
˘
⁄
@
Postion ant
Ø
⁄
@
Connecting . . .
Ø
⁄
@
Postion ant
Ø
SAT pointing
‹
@
On
Ø
¯
˘
⁄
@
Position ant
Ø
SAT pointing
‹
@
On
Ø
¯
˘

ACeS OG698 Phone User’s Guide
Version P1C Note: Some features and menus are operator dependent Page 19
2 From the NETWORKS menu select Point
at\satellite
3 Position the phone with the antenna pointing
up, and reposition until a strong satellite signal is
received and you hear three beeps
Until a sufficiently strong signal is located, “No
Network” and “Position Antenna” messages will display.
Satellite Indicators
The following satellite service indicators are displayed:
◗ An empty circle indicates limited or no satellite
service.
◗ An empty circle with Position Ant displayed
indicates you should position the antenna to
obtain a better signal and full satellite service for
both making and receiving calls.
◗ An empty circle with No Network access
displayed, indicates you can make emergency
calls only
◗ A half circle indicates you can receive notifica-
tion of an incoming satellite call. You will not be
able to receive the complete call, however, until
you position the antenna to obtain full service.
◗ A full circle indicates satellite full service. All
types of calls can be made and received.
Search for a Network
One of the following messages is displayed during the network search:
◗ Searching Sat or No network is displayed
while the phone is searching for satellite service
◗ Searching GSM or No network is dis-
played while the phone is searching for GSM service
◗ No Network Access indicates a network
was found but you do not have permission to use
it except to make emergency calls
NO NETWORKS
‹
@
Position Ant
¯˘
Ø
⁄
@
Position ant
Ø
No Network
access
0
‹
@
ACeS
o
‹
@
ø
‚
`!
SearchingSAT
short
01:04
Ø
‚
`!
No network
17-Dec-98
01:09
Ø

ACeS OG698 Phone User’s Guide
Page 20 Note: Some features and menus are operator dependent Version P1C
◗ Position Antenna indicates a satellite net-
work was found but your radio signal is not strong
enough to make or receive calls. You must posi-
tion your antenna until a full circle is displayed.
◗ Until a strong signal is located the message No
Network/Position Antenna displays
Satellite Only Mode
If you have selected Satellite Only as your default mode, a search for a satellite signal begins with the message Searching Sat Short or Searching
Sat Long. See “Set Satellite Search Preferences” on page 15 for more information.
◗ If the last search completes without finding a
satellite, No network is displayed. After a short
while the search will repeat.
◗ If you want to restart the search process at any
time, select NETWORKS/New Search. (See
“New Search” on page 21.)
Satellite Preferred Mode
When you select Satellite Pref mode as the default, and a search for a satellite begins, your phone displays the messages Searching Sat/Short or
Searching SAT/Long.
◗ If no network is located, No network is dis-
played and the search will restart after a short
while
◗ You can enter NETWORK/New Search at
any time to restart the search process or change it
GSM Only Mode
When you select GSM Only mode a search
begins for a GSM network and the message
Searching GSM is displayed
◗ If no network is found, No network is dis-
played. The signal strength indicator will indicate
none
◗ You can enter NETWORKS/New Search at
any time to restart the search process
‹
@
Position Ant
¯˘
Ø
‚
@
SearchingSAT
short
Ø
No Network
0
‚
@
NEW SEARCH
Ø
‹
@
SearchingSAT
short
04:25
Ø
fi
!
Searching
GSM?
No network
fl
NETWORKS
#
‚
#
New Search
GSM
¯˘

ACeS OG698 Phone User’s Guide
Version P1C Note: Some features and menus are operator dependent Page 21
GSM Preferred Mode
In GSM pref mode, the phone searches first for
a GSM network.
◗ If no GSM network is found the phone begins a
search for a satellite network
◗ If no network is found, No Network is dis-
played and the search repeats after a short while
You can enter NETWORKS/New Search at any
time to restart the search process or change it.
New Search
If no network is found by using the searches
described above, or you want to change the current network, you can initiate a new search on a
mode opposite the one you are currently in, or
you can initiate another search in the current
mode.
This allows you to do a quick search without changing any of the defaults in
the NETWORKS/Systemmode menu.
New search in opposite mode
If you are operating in Satellite Preferred mode or GSM Preferred
mode and want to switch to the opposite mode:
1 Scroll to the NETWORKS menu. Select
New search/<opposite mode>
2 Press YES
A search begins for a network in the opposite
mode.
New search in current mode
If you are operating in Satellite Only or GSM Only mode you can initiate
a new search in the current mode.
1 Scroll to NETWORKS menu, select New
search\<current mode> is displayed
2 Press YES
A search begins for a network. in the current
mode.
Single Search for a Satellite Network
Note! Contact your operator for a Channel number. If you are unsure of the
Spot beam and Channel numbers you may attempt to use the data displayed
with each prompt. You must be in Satellite mode to attempt to access the
NETWORKS/Search opt/Satellite/One search menu.
fi
!
Searching
GSM?
No network
fl
NETWORKS
#
‚
#
New Search
GSM
¯˘
NETWORKS
#
‚
#
New Search
GSM
¯˘
NETWORKS
#
‚
#
New Search
GSM
¯˘
NETWORKS
#
‹
#
New Search
Satellite
¯˘

ACeS OG698 Phone User’s Guide
Page 22 Note: Some features and menus are operator dependent Version P1C
To select a network:
1 Select NETWORKS/Search opt/Satel-
lite and press YES
2 Select SEARCH OPT/One search
3 Press YES
4 Select ONE SEARCH/Select net by press-
ing YES. The list of satellite networks is
displayed
5 Use the navigation keys to scroll through the
Satellite network list that is displayed
6 Press YES to search for the network that is dis-
played
Select a spotbeam number
If you know the spotbeam number of your location, you can search for it. If
you don’t know the spotbeam number, contact your service provider or refer to
“Spotbeam Map” on page 83.
1 Scroll to NETWORKS/Search opt/Satel-
lite and press YES
2 Scroll to SEARCH OPT/One search and
press YES
3 Scroll to ONE SEARCH/Spot beam/
(current number) and press YES
4 SPOT BEAM/Enter/new #___ will dis-
play. Press YES
You may enter up to 3 digits or you may attempt
to use the default number that is displayed. The
highest spotbeam number is 140.
Select a channel number
You can also search for a particular satellite channel. If you don’t know the
channel number, contact your service provider.
1 Select NETWORKS/Search opt/One
search and press YES
2 Scroll to SEARCH OPT/One search and
press YES
3 Scroll to ONE SEARCH\Channel # (cur-
rent if known) and press YES
You will be prompted for the channel number.
Contact your operator for this number.
4 Enter the Channel number and press YES.
Please wait... will display until the correct
channel is located.
SEARCH OPT
‚
@
One search
¯˘
Ø
ONE SEARCH
‚
@
Select net
¯˘
Ø
ONE SEARCH
‚
@
Spot beam
(27)
Ø
SPOT BEAM
Enter number
‚
@
Ø
CHANNEL
Enter number
‚
@
Ø
CHANNEL
Enter number
‚
@
( )
Ø

ACeS OG698 Phone User’s Guide
Version P1C Note: Some features and menus are operator dependent Page 23
Extensive Search
If no other satellite search is suggested you can select an Extensive search.
To select an Extensive search (this may take several minutes):
1 Select NETWORKS/Search opt/Satel-
lite and press YES
2 Scroll to SEARCH OPT/One search and
press YES
3 Select ONE SEARCH\Extensive
search. Please wait... will display
4 When a network is located you are prompted to
select it or reject it.
The information displayed refers to:
◗ System operator: Home or Roam
◗ Spacecraft (multi-spacecraft system only): Home or Roam
◗ Press YES to accept the Satellite Network displayed
◗ Press NO and the search will continue
Single Search for a GSM Network
You must be in GSM mode to attempt to access the NETWORKS/Search opt/
GSM menu. To perform a single search for a GSM network:
1 Scroll to NETWORKS/Search opt/GSM
and press YES
2 SEARCH OPT/Select net displays. Press
YES. The list of GSM networks is displayed
3 Scroll through the list of networks until the
network you want to use is displayed
4 Press YES to search for this network
Search Without Changing Defaults
You can search for a satellite or GSM network without changing the default
search pattern with the New Search option. See “New Search” on page 21.
Update the Network Lists
You can update the GSM and the Satellite network lists, which are used when
searching for service, one list at a time.
ONE SEARCH
‚
@
Spot beam
(27)
Ø
SEARCH OPT
‚
@
One search
¯˘
Ø
ONE SEARCH
‚
@
Extensive
search
Ø
NETWORKS
#
‹
@
Search opt
GSM
¯˘
Ø
SEARCH OPT
⁄
@
Select net
\
¯˘
 Loading...