

Page 1

A2218z User’s Guide
Register your new phone, purchase Ericsson original accessories, and see the latest in products by visiting us at:
www.ericsson.com/us/consumer
6/00 PBM
This manual is published by Ericsson Inc., without any warranty. Improvements and changes to this manual necessitated by typographical
errors, inaccuracies of current information, or improvements to programs and/or equipment, may be made by Ericsson Inc., at anytime and
without notice. Such changes will, however, be incorporated into new editions of this manual.
"Ericsson", "Ericsson
LM Ericsson of Sweden.
“Tegic" and "T9" are each registered U.S. Trademarks owned by Tegic Communications, Inc. of Seattle, Washington, U.S.A. The T9® text
input product is provided under license from Tegic Communications Inc. and is covered by U.S. Pat. 5,818,437, U.S. Pat. 5,953,541, U.S.
Pat. 6,011,554 and other patents pending.
© 2000, Ericsson Inc. All rights reserved.
Publication Number: AE/LZT 123 5632 R1
Printed in USA
" and "ERICSSON ORIGINAL ACCESSORIES" are each registered U.S. Trademarks owned by Telefonaktiebolaget
Page 2

Page 3

Table of Contents
Some menus/features are operator dependent.
Guidelines fo r S a fe a n d E fficient Us e . . . . . 1
Safety . . . . . . . . . . . . . . . . . . . . . . . . . . . . . . . . . . . . . . . . .1
Product Care and Operation . . . . . . . . . . . . . . . . . . . . . . .3
Battery Information . . . . . . . . . . . . . . . . . . . . . . . . . . . . . .4
FDA Consumer Update . . . . . . . . . . . . . . . . . . . . . . . . . .5
A2218z Features . . . . . . . . . . . . . . . . . . . . . 10
Getting Started. . . . . . . . . . . . . . . . . . . . . . . 13
Demonstration . . . . . . . . . . . . . . . . . . . . . . . . . . . . . . . .13
Assembling Your Phone . . . . . . . . . . . . . . . . . . . . . . . . . .13
Powering On Your Phone . . . . . . . . . . . . . . . . . . . . . . . .16
Display Language . . . . . . . . . . . . . . . . . . . . . . . . . . . . . .17
Display Icons . . . . . . . . . . . . . . . . . . . . . . . . . . . . . . . . . .17
Using Menus . . . . . . . . . . . . . . . . . . . . . . . . 19
Moving Through the Menus . . . . . . . . . . . . . . . . . . . . . .19
Menu System . . . . . . . . . . . . . . . . . . . . . . . . . . . . . . . . . .19
My Shortcuts . . . . . . . . . . . . . . . . . . . . . . . . . . . . . . . . . .20
Making and Receiving Calls . . . . . . . . . . . . 22
Making and Receiving Calls . . . . . . . . . . . . . . . . . . . . . .22
During a Call . . . . . . . . . . . . . . . . . . . . . . . . . . . . . . . . .23
Personalizing Your Phone . . . . . . . . . . . . . 25
Ring Signals . . . . . . . . . . . . . . . . . . . . . . . . . . . . . . . . . . 25
More Personalization Options . . . . . . . . . . . . . . . . . . . . 26
Profiles . . . . . . . . . . . . . . . . . . . . . . . . . . . . . . . . . . . . . . 28
Adding Accessories to a Profile . . . . . . . . . . . . . . . . . . . . 29
Your Phone Book . . . . . . . . . . . . . . . . . . . . 30
Memories . . . . . . . . . . . . . . . . . . . . . . . . . . . . . . . . . . . . 30
Creating a Phone Book Entry . . . . . . . . . . . . . . . . . . . . 30
Calling a Phone Book Entry . . . . . . . . . . . . . . . . . . . . . 31
Shortcuts to Phone Book Entries . . . . . . . . . . . . . . . . . . 31
Keeping the Phone Book Up to Date . . . . . . . . . . . . . . . 31
Copying Entries From One SIM to Another . . . . . . . . . 32
Checking the Status of the Memories . . . . . . . . . . . . . . . 32
When the SIM Card Memory Is Full . . . . . . . . . . . . . . . 32
Telephone Banking Services . . . . . . . . . . . . . . . . . . . . . . 33
Groups . . . . . . . . . . . . . . . . . . . . . . . . . . . . . . . . . . . . . . 33
E-mail Addresses . . . . . . . . . . . . . . . . . . . . . . . . . . . . . . 34
Entering Special Characters . . . . . . . . . . . . . . . . . . . . . . 34
Using the Call List . . . . . . . . . . . . . . . . . . . . . . . . . . . . . 35
Calling Cards . . . . . . . . . . . . . . . . . . . . . . . . . . . . . . . . . 36
i
Page 4

Some menus/features are operator dependent.
Voicemail Service . . . . . . . . . . . . . . . . . . . . 39
Voicemail Notification . . . . . . . . . . . . . . . . . . . . . . . . . . 39
Storing your Voicemail number . . . . . . . . . . . . . . . . . . . 39
Calling Your Voicemail . . . . . . . . . . . . . . . . . . . . . . . . . . 39
Changing the Message Alert Signal . . . . . . . . . . . . . . . . . 39
Text Messaging (SMS). . . . . . . . . . . . . . . . . 41
Enabling Your Phone to Send SMS . . . . . . . . . . . . . . . . 41
Sending Text Messages . . . . . . . . . . . . . . . . . . . . . . . . . . 41
Customizing Your Text Messages . . . . . . . . . . . . . . . . . . 42
Templates for Text Messages . . . . . . . . . . . . . . . . . . . . . 42
Receiving a Text Message . . . . . . . . . . . . . . . . . . . . . . . . 43
Area Information . . . . . . . . . . . . . . . . . . . . . . . . . . . . . . 45
Cell Information . . . . . . . . . . . . . . . . . . . . . . . . . . . . . . . 46
Call Information. . . . . . . . . . . . . . . . . . . . . . 47
Total Call Time or Call Cost . . . . . . . . . . . . . . . . . . . . . 47
Determining the Call Cost . . . . . . . . . . . . . . . . . . . . . . . 47
Credit Limit for Calls . . . . . . . . . . . . . . . . . . . . . . . . . . . 48
Call Options . . . . . . . . . . . . . . . . . . . . . . . . . 49
Call Forwarding . . . . . . . . . . . . . . . . . . . . . . . . . . . . . . . 49
Restrict Calls . . . . . . . . . . . . . . . . . . . . . . . . . . . . . . . . . . 49
Fixed Dialing . . . . . . . . . . . . . . . . . . . . . . . . . . . . . . . . . 50
Closed User Groups . . . . . . . . . . . . . . . . . . . . . . . . . . . . 51
Accept Calls . . . . . . . . . . . . . . . . . . . . . . . . . . . . . . . . . . 51
Handling Multiple Calls. . . . . . . . . . . . . . . . 53
The Call Waiting Service . . . . . . . . . . . . . . . . . . . . . . . . 53
Receiving a Second Call . . . . . . . . . . . . . . . . . . . . . . . . .53
Making a Second Call . . . . . . . . . . . . . . . . . . . . . . . . . . .54
One Active Call and One Call On Hold . . . . . . . . . . . . . 54
Conference Calling . . . . . . . . . . . . . . . . . . . . . . . . . . . . . 54
Using Two Voice Lines . . . . . . . . . . . . . . . . . . . . . . . . . . 55
Voice Activation . . . . . . . . . . . . . . . . . . . . . 57
Voice Dialing . . . . . . . . . . . . . . . . . . . . . . . . . . . . . . . . .57
Voice Answering . . . . . . . . . . . . . . . . . . . . . . . . . . . . . . . 58
Recording Problems . . . . . . . . . . . . . . . . . . . . . . . . . . . . 58
Calendar. . . . . . . . . . . . . . . . . . . . . . . . . . . . 59
Adding a Meeting . . . . . . . . . . . . . . . . . . . . . . . . . . . . . . 59
Adding a Phone Call . . . . . . . . . . . . . . . . . . . . . . . . . . . .59
Adding a Reminder . . . . . . . . . . . . . . . . . . . . . . . . . . . . . 60
Using Your Calendar . . . . . . . . . . . . . . . . . . . . . . . . . . . .60
Managing Your Calendar . . . . . . . . . . . . . . . . . . . . . . . .61
Setting Network Preferences . . . . . . . . . . . 62
Forbidden Networks . . . . . . . . . . . . . . . . . . . . . . . . . . . . 62
List of Preferred Networks . . . . . . . . . . . . . . . . . . . . . . . 63
Search Modes . . . . . . . . . . . . . . . . . . . . . . . . . . . . . . . . . 63
ii
Page 5

Some menus/features are operator dependent.
Security. . . . . . . . . . . . . . . . . . . . . . . . . . . . . 64
SIM Card Lock . . . . . . . . . . . . . . . . . . . . . . . . . . . . . . . .64
Phone Lock . . . . . . . . . . . . . . . . . . . . . . . . . . . . . . . . . . .64
Keypad Lock . . . . . . . . . . . . . . . . . . . . . . . . . . . . . . . . . .65
Extras . . . . . . . . . . . . . . . . . . . . . . . . . . . . . . 66
Alarm Clock . . . . . . . . . . . . . . . . . . . . . . . . . . . . . . . . . .66
Calculator . . . . . . . . . . . . . . . . . . . . . . . . . . . . . . . . . . . .66
Games . . . . . . . . . . . . . . . . . . . . . . . . . . . . . . . . . . . . . . .66
Timer . . . . . . . . . . . . . . . . . . . . . . . . . . . . . . . . . . . . . . .68
Stopwatch . . . . . . . . . . . . . . . . . . . . . . . . . . . . . . . . . . . .68
Online Services . . . . . . . . . . . . . . . . . . . . . . 70
Online Services . . . . . . . . . . . . . . . . . . . . . . . . . . . . . . . .70
New Menu . . . . . . . . . . . . . . . . . . . . . . . . . . . . . . . . . . .70
Proactive SIM . . . . . . . . . . . . . . . . . . . . . . . . . . . . . . . . .70
Data Download to the SIM Over the Air . . . . . . . . . . . .71
SIM Card Initiated Features . . . . . . . . . . . . . . . . . . . . . .71
Details of Services Offered . . . . . . . . . . . . . . . . . . . . . . . .71
Ericsson Mobile Internet . . . . . . . . . . . . . . . . . . . . . . . . .72
Using the WAP B row s e r . . . . . . . . . . . . . . . 73
Terminology . . . . . . . . . . . . . . . . . . . . . . . . . . . . . . . . . .73
Before You Start . . . . . . . . . . . . . . . . . . . . . . . . . . . . . . .73
Setting Up Your WAP Connection . . . . . . . . . . . . . . . . .73
Viewing a WAP Page . . . . . . . . . . . . . . . . . . . . . . . . . . . .74
Opening Your Homepage . . . . . . . . . . . . . . . . . . . . . . . 74
Opening a Bookmarks . . . . . . . . . . . . . . . . . . . . . . . . . . 74
Manually Opening Websites . . . . . . . . . . . . . . . . . . . . . 75
Profiles . . . . . . . . . . . . . . . . . . . . . . . . . . . . . . . . . . . . . . 75
Operator Page . . . . . . . . . . . . . . . . . . . . . . . . . . . . . . . . 76
Your Browsing Options . . . . . . . . . . . . . . . . . . . . . . . . . 76
Displaying Images . . . . . . . . . . . . . . . . . . . . . . . . . . . . . 77
Returning to the Browser after Accessing the Menus . . . 77
Changing the WAP Settings Manually . . . . . . . . . . . . . . 77
Troubleshooting . . . . . . . . . . . . . . . . . . . . . 79
Error Messages . . . . . . . . . . . . . . . . . . . . . . . . . . . . . . . . 79
Other Problems . . . . . . . . . . . . . . . . . . . . . . . . . . . . . . . 80
Accessories, Accessibility, and Internet . . . . . . . . . . . . . . 80
Index. . . . . . . . . . . . . . . . . . . . . . . . . . . . . . . 81
iii
Page 6

Some menus/features are operator dependent.
iv
Page 7

Guidelines for Safe and Efficient Use
Some menus/features are operator dependent.
Since its introduction in the mid 1980s the mobile phone has been
one of the most exciting and innovative products ever developed.
Your phone can help you to stay in touch with your office, your
home, emergency services and others.
Safety
Exposure to Radio Frequency Signals
Your wireless handheld portable telephone is a low power radio
transmitter and receiver. When it is ON, it receives and also sends
out radio frequency (RF) signals.
In August, 1996, the Federal Communications Commission (FCC)
adopted RF exposure guidelines with safety levels for handheld wireless phones. Those guidelines are consistent with the safety standards
previously set by both US and international standards bodies:
• ANSI C95.1 (1992)*
• NCRP Report 86 (1986)*
• ICNIRP (1996)*
Those standards were based on comprehensive and periodic evaluations of the relevant scientific literature. For example, over 120 scientists, engineers, and physicians from universities, government health
agencies, and industry reviewed the available body of research to
develop the ANSI Standard (C95.1).
The design of your phone complies with the FCC guidelines (and
those standards).
* American National Standards Institute: National Council on Radiation Protection and Measurements; International Commission on NonIonizing Radiation Protection.
Antenna Care
Use only the supplied or an approved replacement antenna. Unauthorized antennas, modifications, or attachments could damage the
phone and may violate FCC regulations.
Phone Operation
NORMAL POSITION: Hold the phone as you would any other
telephone with the antenna pointed up and over your shoulder.
TIPS ON EFFICIENT OPERATION: For your phone to operate
most efficiently:
• Extend your antenna fully (where applicable).
• Do not touch the antenna unnecessarily when the phone is in use.
Contact with the antenna affects call quality and may cause the
phone to operate at a higher power level than otherwise needed.
Driving
Check the laws and regulations on the use of wireless telephones in
the areas where you drive. Always obey them. Also, if using your
phone while driving, please:
Guidelines for Safe and Efficient Use 1
Page 8

Some menus/features are operator dependent.
• Give full attention to driving - driving safely is your first responsi-
bility.
• Use handsfree operation, if available.
• Pull off the road and park before making or answering a call if
driving conditions so require.
In addition, Ericsson suggests the following safe driving tips if you
are using your phone while driving:
• Get to know your wireless phone and its features such as speed dial
and redial.
• Position your wireless phone within easy reach.
• Suspend conversations during hazardous driv-
ing conditions or situations.
• Do not take notes or look up phone numbers
while driving.
• Dial sensibly and assess the traffic; if possible,
place calls when you are not moving or before
pulling into traffic.
• Do not engage in stressful or emotional conversations that may be
distracting.
• Use your wireless phone to call for help.
• Use your wireless phone to help others in emergencies.
• Call roadside assistance or a special wireless non-emergency assis-
tance number when necessary.
Electronic Devices
Most modern electronic equipment is shielded from RF signals.
However, certain electronic equipment may not be shielded against
RF signals from your wireless phone.
Pacemakers
The Health Industry Manufacturers Association recommends that a
minimum separation of six (6”) inches be maintained between a
handheld wireless phone and a pacemaker to avoid potential interference with the pacemaker. These recommendations are consistent
with the independent research by and recommendations of Wireless
Technology Research.
Persons with pacemakers:
• Should ALWAYS keep the phone more than six inches from their
pacemaker when the phone is turned ON.
• Should not carry the phone in a breast pocket.
• Should use the ear opposite the pacemaker to minimize the poten-
tial for interference.
• If you have any reason to suspect that interference is taking place,
turn your phone OFF immediately.
Hearing Aids
Some digital wireless phones may interfere with some hearing aids.
In the event of such interference, you may want to consult your service provider (or call the customer service line to discuss alternatives).
Other Medical Devices
If you use any other personal medical device, consult the manufacturer of your device to determine if it is adequately shielded from
external RF energy. Your physician may be able to assist you in
obtaining this information.
Turn your phone OFF in health care facilities when any regulations
posted in these areas instruct you to do so. Hospitals or health care
2 Guidelines for Safe and Efficient Use
Page 9

Some menus/features are operator dependent.
facilities may be using equipment that could be sensitive to external
RF energy.
Vehicles
RF signals may affect improperly installed or inadequately shielded
electronic systems in motor vehicles. Check with the manufacturer
or its representative regarding your vehicle. You should also consult
the manufacturer of any equipment that has been added to your
vehicle.
Posted Facilities
Turn your phone OFF in any facility where posted notices so
require.
Aircraft
FCC regulations prohibit using your phone while in the air. Switch
OFF your phone before boarding an aircraft.
Blasting Areas
To avoid interfering with blasting operations, turn your phone OFF
when in a “blasting area” or in areas posted: “Turn off two-way
radio.” Obey all signs and instructions.
Potentially Explosive Atmospheres
Turn your phone OFF when in any area with a potentially explosive
atmosphere and obey all signs and instructions. Sparks in such areas
could cause an explosion or fire resulting in bodily injury or even
death.
Areas with a potentially explosive atmosphere are often but not
always clearly marked. They include fueling areas such as gasoline
stations; below deck on boats; fuel or chemical transfer or storage
facilities; vehicles using liquefied petroleum gas (such as propane or
butane); areas where the air contains chemicals or particles, such as
grain, dust, or metal powders; and any other area where you would
normally be advised to turn off your vehicle engine.
For Vehicles Equipped with an Air Bag
An air bag inflates with great force. DO NOT place objects, including both installed or portable wireless equipment, in the area over
the air bag or in the air bag deployment area. If in-vehicle wireless
equipment is improperly installed and the air bag inflates, serious
bodily injury could result.
Product Care and Operation
This device complies with Part 15 of the FCC Rules. Operation is
subject to the following two conditions: 1) This device may not
cause harmful interference, and 2) This device must accept any
interference received, including interference that may cause undesired operation.
Ericsson suggests you read and observe the following for safe care
and operation of your phone:
• Do not allow children to play with your phone. They could hurt
themselves or others, or could accidentally damage the phone.
Your phone may contain small parts that could be detached and
create a choking hazard.
• Do not expose your mobile phone to moisture or extreme temper-
atures.
Guidelines for Safe and Efficient Use 3
Page 10

Some menus/features are operator dependent.
• Only Ericsson original accessories are recommended. Failure to
use them may result in loss of performance or product damage,
and will void the warranty.
• Do not attempt to disassemble the product. Doing so will void
warranty. This product does not contain consumer serviceable
components. Service should only be performed by Authorized Service Centers.
• Do not allow objects to fall on, or liquids to spill on products.
• Connect AC (power supply) only to designated power sources as
marked on the product.
• To reduce risk of damage, remove the electrical cord from the out-
let by pulling the AC adapter at the outlet rather than the cord.
• Make sure the electric cord is located so that it will not be stepped
on, tripped over, or otherwise subjected to damage or stress.
• To reduce risk of electric shock, unplug the unit from the power
source before attempting any cleaning. Once unplugged, use a soft
cloth lightly dampened with water for cleaning.
• DANGER - Never alter the AC cord or plug. If the plug will not
fit into the outlet, have a proper outlet installed by a qualified electrician. Improper connection can result in risk of electric shock.
• Don’t twist the antenna. Excess twisting will damage the antenna.
Battery In formation
New Batteries
The battery packaged with your phone is not fully charged. For maximum battery capacity, use your charger to condition the battery.
Recycling Your Battery
The battery must be disposed of properly. The battery should not be
disposed of in municipal waste. Check local regulations for proper
disposal instructions.
Battery Use and Care
A rechargeable battery has a long service life if treated properly. A
new battery, or one that has not been used for a long period of time,
should be conditioned before using your phone. Avoid recharging a
fully-charged or almost fully-charged battery. If your phone shuts off
due to low battery power, you should charge the battery within 24
hours for the battery to reach full capacity.
This phone is powered by a rechargeable Lithium-Ion (Li-Ion) battery pack.
WA RN IN G! This battery may explode and cause potential injury if
exposed to or disposed of in a fire.
• Do Not expose the battery to temperatures above 140° F (60°C),
such as in a car parked in the usn or on a hot day.
• Do Not short-circuit the battery’s metal contacts with metallic
objects, such as keys in your pocket, as it may damage the battery.
• Do Not disassemble the battery.
• Use only Ericsson Original accessory chargers (including hands-
free units that act as a charger) and the AC/DC adapter supplied
with your battery charger. Use on a non-Ericsson Original accessory may be hazardous and damage from such use will void your
phone warranty.
• Charging the battery at room temperatures below 41°F (5°C) or
above 113°F (45°C) may degrade battery performance and could
be hazardous.
4 Guidelines for Safe and Efficient Use
Page 11

Some menus/features are operator dependent.
• Keep away from children and do not allow the battery to be placed
in their mouth. Battery electrolytes may be toxic if swallowed.
Avoid battery electrolyte contact with your skin and eyes.
• Do Not use a damaged battery or charger.
• Turn off your phone before removing the battery.
• Do Not expose the battery to water or other liquids.
• Avoid dropping the battery while removing it from the phone.
• Avoid puncturing or crushing the battery.
• Only use the battery for its intended purpose.
FDA Consumer Update
FDA has been receiving inquiries about the safety of mobile phones,
including cellular phones and PCS phones.
The following summarizes what is known--and what remains
unknown--about whether these products can pose a hazard to health,
and what can be done to minimize any potential risk. This information may be used to respond to questions.
Why the concern?
Mobile phones emit low levels of radiofrequency energy (i.e., radiofrequency radiation) in the microwave range while being used. They
also emit very low levels of radiofrequency energy (RF), considered
non-significant, when in the stand-by mode. It is well known that
high levels of RF can produce biological damage through heating
effects (this is how your microwave oven is able to cook food). However, it is not known whether, to what extent, or through what mechanism, lower levels of RF might cause adverse health effects as well.
Although some research has been done to address these questions, no
clear picture of the biological effects of this type of radiation has
emerged to date. Thus, the available science does not allow us to
conclude that mobile phones are absolutely safe, or that they are
unsafe. However, the available scientific evidence does not demonstrate any adverse health effects associated with the use of mobile
phones.
What kinds of phones are in question?
Questions have been raised about hand-held mobile phones, the
kind that have a built-in antenna that is positioned close to the user’s
head during normal telephone conversation. These types of mobile
phones are of concern because of the short distance between the
phone’s antenna--the primary source of the RF--and the person’s
head. The exposure to RF from mobile phones in which the antenna
is located at greater distances from the user (on the outside of a car,
for example) is drastically lower than that from hand-held phones,
because a person’s RF exposure decreases rapidly with distance from
the source. The safety of so-called “cordless phones,” which have a
base unit connected to the telephone wiring in a house and which
operate at far lower power levels and frequencies, has not been questioned.
How much evidence is there that hand-held mobile
phones might be harmful?
Briefly, there is not enough evidence to know for sure, either way;
however, research efforts are on-going. The existing scientific evidence is conflicting and many of the studies that have been done to
date have suffered from flaws in their research methods. Animal
experiments investigating the effects of RF exposures characteristic
of mobile phones have yielded conflicting results. A few animal stud-
Guidelines for Safe and Efficient Use 5
Page 12

Some menus/features are operator dependent.
ies, however, have suggested that low levels of RF could accelerate
the development of cancer in laboratory animals. In one study, mice
genetically altered to be predisposed to developing one type of cancer
developed more than twice as many such cancers when they were
exposed to RF energy compared to controls. There is much uncertainty among scientists about whether results obtained from animal
studies apply to the use of mobile phones. First, it is uncertain how
to apply the results obtained in rats and mice to humans. Second,
many of the studies that showed increased tumor development used
animals that had already been treated with cancer-causing chemicals,
and other studies exposed the animals to the RF virtually continuously--up to 22 hours per day.
For the past five years in the United States, the mobile phone industry has supported research into the safety of mobile phones. This
research has resulted in two findings in particular that merit additional study:
1 In a hospital-based, case-control study, researchers looked for an
association between mobile phone use and either glioma (a type of
brain cancer) or acoustic neuroma (a benign tumor of the nerve
sheath). No statistically significant association was found between
mobile phone use and acoustic neuroma. There was also no association between mobile phone use and gliomas when all types of
types of gliomas were considered together. It should be noted that
the average length of mobile phone exposure in this study was less
than three years.
When 20 types of glioma were considered separately, however, an
association was found between mobile phone use and one rare
type of glioma, neuroepithelliomatous tumors. It is possible with
multiple comparisons of the same sample that this association
occurred by chance. Moreover, the risk did not increase with how
often the mobile phone was used, or the length of the calls. In fact,
the risk actually decreased with cumulative hours of mobile phone
use. Most cancer causing agents increase risk with increased exposure. An ongoing study of brain cancers by the National Cancer
Institute is expected to bear on the accuracy and repeatability of
these results.
1
2 Researchers conducted a large battery of laboratory tests to assess
the effects of exposure to mobile phone RF on genetic material.
These included tests for several kinds of abnormalities, including
mutations, chromosomal aberrations, DNA strand breaks, and
structural changes in the genetic material of blood cells called lymphocytes. None of the tests showed any effect of the RF except for
the micronucleus assay, which detects structural effects on the
genetic material. The cells in this assay showed changes after exposure to simulated cell phone radiation, but only after 24 hours of
exposure. It is possible that exposing the test cells to radiation for
this long resulted in heating. Since this assay is known to be sensitive to heating, heat alone could have caused the abnormalities to
occur. The data already in the literature on the response of the
micronucleus assay to RF are conflicting. Thus, follow-up research
is necessary.
2
FDA is currently working with government, industry, and academic groups to ensure the proper follow-up to these industryfunded research findings. Collaboration with the Cellular Telecommunications Industry Association (CTIA) in particular is
expected to lead to FDA providing research recommendations and
scientific oversight of new CTIA-funded research based on such
recommendations.
Two other studies of interest have been reported recently in the literature:
6 Guidelines for Safe and Efficient Use
Page 13

Some menus/features are operator dependent.
1 Two groups of 18 people were exposed to simulated mobile phone
signals under laboratory conditions while they performed cognitive function tests. There were no changes in the subjects’ ability
to recall words, numbers, or pictures, or in their spatial memory,
but they were able to make choices more quickly in one visual test
when they were exposed to simulated mobile phone signals. This
was the only change noted among more than 20 variables com-
3
pared.
2 In a study of 209 brain tumor cases and 425 matched controls,
there was no increased risk of brain tumors associated with mobile
phone use. When tumors did exist in certain locations, however,
they were more likely to be on the side of the head where the
mobile phone was used. Because this occurred in only a small
number of cases, the increased likelihood was too small to be statistically significant.
4
In summary, we do not have enough information at this point to
assure the public that there are, or are not, any low incident health
problems associated with use of mobile phones. FDA continues to
work with all parties, including other federal agencies and industry,
to assure that research is undertaken to provide the necessary answers
to the outstanding questions about the safety of mobile phones.
What is known about cases of human cancer that have
been reported in users of hand-held mobile phones?
Some people who have used mobile phones have been diagnosed
with brain cancer. But it is important to understand that this type of
cancer also occurs among people who have not used mobile phones.
In fact, brain cancer occurs in the U.S. population at a rate of about
6 new cases per 100,000 people each year. At that rate, assuming 80
million users of mobile phones (a number increasing at a rate of
about 1 million per month), about 4800 cases of brain cancer would
be expected each year among those 80 million people, whether or
not they used their phones. Thus it is not possible to tell whether
any individual’s cancer arose because of the phone, or whether it
would have happened anyway. A key question is whether the risk of
getting a particular form of cancer is greater among people who use
mobile phones than among the rest of the population. One way to
answer that question is to compare the usage of mobile phones
among people with brain cancer with the use of mobile phones
among appropriately matched people without brain cancer. This is
called a case-control study.
The current case-control study of brain cancers by the National Cancer Institute, as well as the follow-up research to be sponsored by
industry, will begin to generate this type of information.
What is FDA’s role concerning the safety of mobile
phones?
Under the law, FDA does not review the safety of radiation-emitting
consumer products such as mobile phones before marketing, as it
does with new drugs or medical devices. However, the agency has
authority to take action if mobile phones are shown to emit radiation
at a level that is hazardous to the user. In such a case, FDA could
require the manufacturers of mobile phones to notify users of the
health hazard and to repair, replace or recall the phones so that the
hazard no longer exists.
Although the existing scientific data do not justify FDA regulatory
actions at this time, FDA has urged the mobile phone industry to
take a number of steps to assure public safety. The agency has recommended that the industry:
• support needed research into possible biological effects of RF of
the type emitted by mobile phones;
Guidelines for Safe and Efficient Use 7
Page 14

Some menus/features are operator dependent.
• design mobile phones in a way that minimizes any RF exposure to
the user that is not necessary for device function; and
• cooperate in providing mobile phone users with the best possible
information on what is known about possible effects of mobile
phone use on human health.
At the same time, FDA belongs to an interagency working group of
the federal agencies that have responsibility for different aspects of
mobile phone safety to ensure a coordinated effort at the federal
level. These agencies are:
• National Institute for Occupational Safety and Health
• Environmental Protection Agency
• Federal Communications Commission
• Occupational Health and Safety Administration
• National Telecommunications and Information Administration
The National Institutes of Health also participates in this group.
In the absence of conclusive information about any possible risk, what can concerned individuals do?
If there is a risk from these products--and at this point we do not
know that there is--it is probably very small. But if people are concerned about avoiding even potential risks, there are simple steps
they can take to do so. For example, time is a key factor in how
much exposure a person receives. Those persons who spend long
periods of time on their hand-held mobile phones could consider
holding lengthy conversations on conventional phones and reserving
the hand-held models for shorter conversations or for situations
when other types of phones are not available.
People who must conduct extended conversations in their cars every
day could switch to a type of mobile phone that places more distance
between their bodies and the source of the RF, since the exposure
level drops off dramatically with distance. For example, they could
switch to:
• a mobile phone in which the antenna is located outside the vehi-
cle,
• a hand-held phone with a built-in antenna connected to a differ-
ent antenna mounted on the outside of the car or built into a separate package, or
• a headset with a remote antenna to a mobile phone carried at the
waist.
Again, the scientific data do not
harmful. But if people are concerned about the radiofrequency
energy from these products, taking the simple precautions outlined
above can reduce any possible risk.
demonstrate that mobile phones are
8 Guidelines for Safe and Efficient Use
Page 15

Some menus/features are operator dependent.
Where can I find additional information?
For additional information, see the following websites:
• Federal Communications Commission (FCC) RF Safety Program
(select “Information on Human Exposure to RF Fields from Cellular and PCS Radio Transmitters”)
http://www.fcc.gov/oet/rfsafety
• World Health Organization (WHO) International Commission
on Non-Ionizing Radiation Protection (select Qs & As)
http://www.who.int/emf
• United Kingdom, National Radiological Protection Board
http://www.nrpb.org.uk
• Cellular Telecommunications Industry Association (CTIA)
http://www.wow-com.com
• U.S. Food and Drug Administration (FDA) Center for Devices
and Radiological Health
http://www.fda.gov/cdrh/consumer/
Footnotes
1 Muscat et al. Epidemiological Study of Cellular Telephone Use
and Malignant Brain Tumors. In: State of the Science Symposium;1999 June 20; Long Beach, California.
2 Tice et al. Tests of mobile phone signals for activity in genotoxicity
and other laboratory assays. In: Annual Meeting of the Environmental Mutagen Society; March 29, 1999, Washington, D.C.;
and personal communication, unpublished results.
3 Preece, AW, Iwi, G, Davies-Smith, A, Wesnes, K, Butler, S, Lim,
E, and Varey, A. Effect of a 915-MHz simulated mobile phone signal on cognitive function in man. Int. J. Radiat. Biol., April 8,
1999.
4 Hardell, L, Nasman, A, Pahlson, A, Hallquist, A and Mild, KH.
Use of cellular telephones and the risk for brain tumors: a casecontrol study. Int. J. Oncol., 15: 113-116, 1999.
Guidelines for Safe and Efficient Use 9
Page 16

Some menus/features are operator dependent.
A2218z Features
Advice of Charge
Enables you to monitor the cost of calls made from your mobile
phone. Details of the last call and total calls made are shown in the
phone’s display. See “Call Information” on page 47.
Alternate Line Service
Enables you to have two lines with two different phone numbers on
a single mobile phone subscription. This makes it possible to have
separate numbers for business and personal calls. See “Using Two
Voice Lin e s” on page 55.
Area Information
Area Information is another type of text message which is sent to all
subscribers in a certain network area. The information may be a local
road report or a phone number to a local taxi. See “Area Information” on page 45.
Ask to Save
Prompts you to save names and numbers in your Phone Book when
the phone does not recognize the number of the most recent call. See
“Display Language” on page 17.
Calendar
Calendar is an appointment manager that can hold up to 100
appointments. Allows viewing by day, week, or month. See “Calen-
dar” on page 59.
Caller identification Services
Identifies, by name or number, who is calling you. See “Using the
Call List” on page 35.
Closed User Group
Limits outgoing calls to specified numbers. This can be very useful
when operators give lower rates for specific groups. See “Closed User
Groups” on page 51.
Demonstration
A hands-off demonstration of the phone’s menus. See “Demonstra-
tion” on page 13.
Fixed Dialing
Allows calls to be made only to certain numbers saved on the SIM
card. If an attempt is made to call other numbers, the message
Number not permitted
page 50.
appears in the display. See “Fixed Dialing” on
Forward Calls
Lets you forward your voice, fax, and data calls, provided your subscription supports fax and data calls. These options are available:
• All Voice Calls - forward all voice calls
• When Busy - forward calls if you are already on the phone
10 A2218z Features
Page 17

Some menus/features are operator dependent.
• No Reply - forward calls that you do not answer within a specified
time limit (operator dependent)
• Not Reachable - forward calls if your phone is turned off or if you
are unreachable
See “Call Forwarding” on page 49.
Games
Te t ri s ®, Erix, Maze, and Solitaire. See “Games” on page 66.
Lithium Ion Battery
This high capacity Lithium Ion (LiIon) battery has no memory
effect and is lightweight with highest energy density.
Keypad Lock
Helps you to avoid accidental dialing, which can happen if you keep
your phone in your pocket. You can choose between manual and
automatic keylock. See “Keypad Lock” on page 65.
Menu Help
Appears if you pause briefly while browsing your menu system. The
help texts will self-scroll through the descriptions of some features.
See “Display Language” on page 17.
Mobile Wiz™
Steps you through the initial setup of the phone and manages the
top 10 settings: language, date, date format, time, ring signal, ring
volume, auto keylock, menu help, message alert, and T9® predictive
text input. See “Mobile Wiz™” on page 16.
Network Initiated Time Zone (NITZ)
Updates your phone’s internal clock as you enter new time zones. See
“More Personalization Options” on page 26.
Online Services
Your network operators’ way of offering customized services, independently of mobile phones and mobile phone manufacturers. See
“Online Services” on page 70.
Phone Book
Allows 200 entries in the phone in addition to the number of entries
offered on your SIM. See “Your Phone Book” on page 30.
Predictive Text Input (Tegic® T9®)
Makes entering SMS messages and phone book entries much easier.
Although you will still use the keypad to enter letters/characters, the
software will recognize what you are trying to enter. This feature is
especially helpful when entering SMS messages and the Phone Book
names. You can use the # key to toggle between input methods. To
change input methods, see “More Personalization Options” on
page 26.
Profiles
Settings which are set to suit a certain environment. For example,
when you go to a meeting, you can choose the
number of settings that suit a meeting are set. See “Profiles” on
page 28.
Meeting
profile and a
A2218z Features 11
Page 18

Some menus/features are operator dependent.
Security
Protects your phone and subscription from unauthorized use with
security features such as Phone Lock, SIM Lock, and Keypad Lock.
See “Security” on page 64.
Short Message Service (SMS)
SMS allows you to send and receive text messages. With the new
SMS Concatenation feature, longer messages are accepted. If the
recipient of your message does not have this service, your message
will be sent as several short messages. SMS is also used by many network operators to notify you of a new voicemail message. See “Te x t
Messaging (SMS)” on page 41.
SMS Templates
Saves up to five standard message templates that can be reused whenever you want. Each template can consist of 30 characters each. Your
templates are saved in the phone memory. See “Tem p la te s f or Tex t
Messages” on page 42.
Stopwatch
Times certain activities with your phone’s built-in stopwatch. See
“Stopwatch” on page 68.
Voice Recognition
Making and receiving calls is even easier when your phone recognizes
your voice commands. See “Voice Activation” on page 57.
Voicemail
Allows callers to leave a voice message when you cannot answer your
calls. See “Voicemail Service” on page 39.
Wireless Application Protocol (WAP)
An open, global specification that makes it possible for mobile users
with wireless devices to connect to the Internet and access specially
designed interactive services and view WAP pages. See See “Using
the WAP Browser” on page 73.
12 A2218z Features
Page 19
Getting Started
Some menus/features are operator dependent.
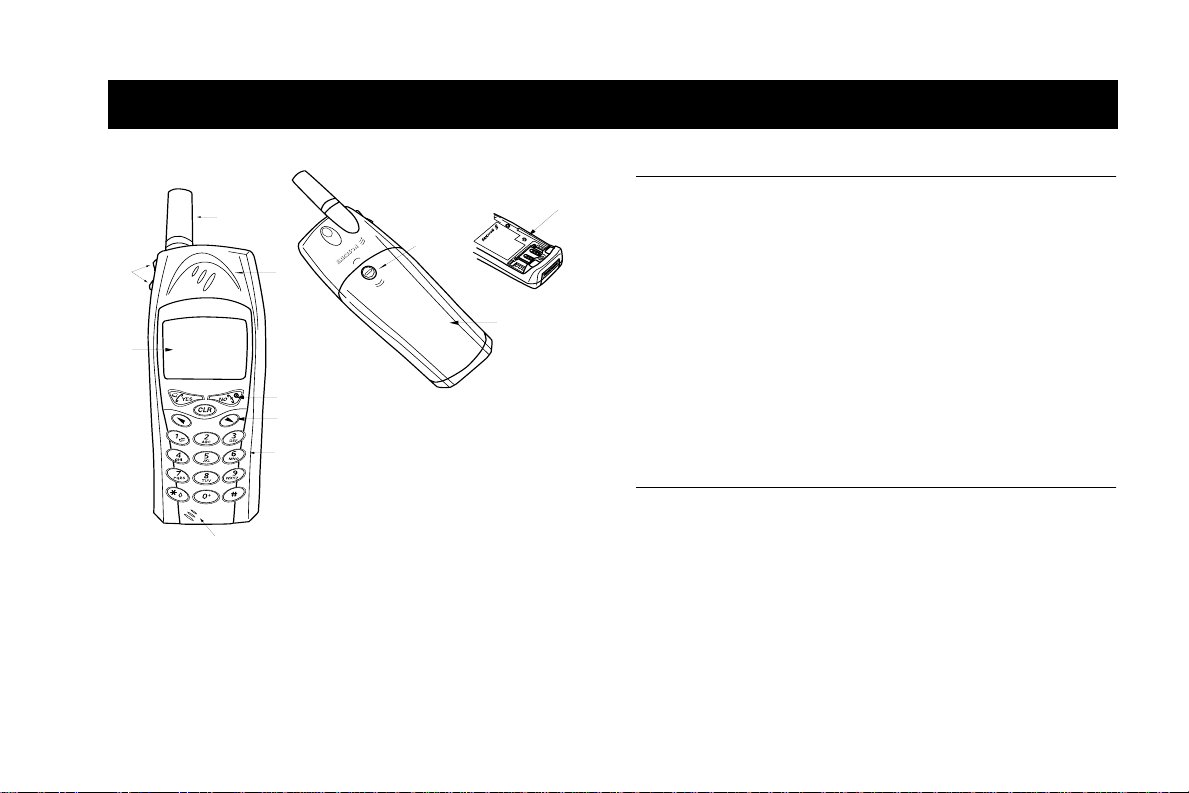
Demonstration
1
9
8
2
11
Before using your phone, you may wish to view the hands-off demonstration. The demonstration will preview the start-up show, menu
system, help texts, language settings, Wireless Application Protocol
(WAP®), and Standby mode.
Note! The demonstration runs without a SIM card inserted. The demon-
10
7
1 Antenna
2 Earpiece
3
3 NO (ON/OFF) Key
4
4 Navigation Keys
5 Keypad
5
6 Microphone
7 Display
8 Side Volume Keys
9 Battery Release Latch
10 Battery Cover
6
11 Hardware Reset Button
stration will not prevent you from making emergency calls to 911 (or
112, the international emergency number).
Insert Card or Press Yes for demo
will appear. Press YES to run the
demonstration. You can end the demonstration at any time by pressing any key.
Assembling Your Phone
Assembling your phone in five easy steps:
1 Remove the Battery Cover
2 Insert SIM Card
3 Attach the Battery
4 Replace the Battery Cover
5 Charge the Battery
Getting Started 13
Page 20
Some menus/features are operator dependent.
Step 1: Remove the Battery Cover
1 Use a coin or your fingernail
to turn the latch counterclockwise.
2 Once the screw has been loos-
ened sufficiently, remove the
battery cover.
Step 2: Insert the SIM Card
When you register as a subscriber with a network operator, you get a SIM (Subscriber Identity Module) card.
The SIM card contains a computer chip that keeps track
of your phone number, the services included in your subscription,
your Phone Book information, and other information.
1 Locate the SIM card
holder on the back of the
phone and slide the
holder to the right until it
unlatches.
2 Lift the holder up.
3 Insert the SIM card with
the cut corner to the top
right (a diagram of proper
card insertion appears on
the front side of the SIM
card holder).
4 Lower the SIM card latch
and slide back to the left
to lock the holder in
place.
Note! Remove the SIM by unlatching the holder, raising the edge of the
SIM card, and sliding it out.
14 Getting Sta rted
Page 21

Some menus/features are operator dependent.
Step 3: Attach the Battery
1 Locate the connector at the end of the
blue, red, and black wires. Insert the
plug as shown in the diagram.
Note! The cable will only properly
fit one way - do not force it.
2 Holding the battery at a perpendicu-
lar angle, slip the left side of the battery into the hinge. Snap the right side
in.
3 Lower the battery until it lays flat.
Note! Remove the battery by removing the back panel as described above.
Raise the battery and slide it out of the hinges - one side at a time.
Step 4: Replace Battery Cover
1 Insert the cover, bottom first, on the back of the phone.
2 Turn the screw clockwise to tighten.
Step 5: Charge the Battery
When to Charge
Note! For detailed information on safely handling your LiIon battery, see
“Battery Information” on page 4.
Your phone comes with a LiIon battery. The battery is not charged
when you buy your phone, but there may be enough power to switch
the phone on. You should fully charge the battery before use. It is
safe to make and receive calls while your phone is charging. You
should not need to remove your battery after it is installed. Your battery can be charged whenever you wish without affecting its performance. You can also charge the battery when the phone is off.
The battery meter icon on your standby screen indicates how much
remaining strength your battery has.
Tip! If you have an Ericsson-approved battery, you can check the remain-
ing talk and standby times in the S
ume keys when in standby mode. The total remaining standby and
talk time depends on the type of battery you use and your position
in the network. Please note that these times are approximate and you
may have 20% less time than is shown in the display.
Note! The phone turns itself off when the battery can no longer power it
satisfactorily.
TATUS menu using the side vol-
Getting Started 15
Page 22

Some menus/features are operator dependent.
Charging Indicators
• Needs Charging
Attention! Battery low
(short beep)
• Currently Charging
Optimized Charging
approved batteries). The meter in display pulses continuously.
• Non Ericsson-Approved Battery
Charging Battery
appears in the display. Alarm signal sounds
briefly appears in display (only with Ericsson-
appears in display and battery charges very slowly.
Charging
1 Make sure that the battery is attached to the phone.
2 Connect the charger to the electrical outlet.
3 Connect the charger to the phone as shown in the picture. The
flash symbol on the plug must face upwards.
Note! The main electrical plug may look different depending on the elec-
trical socket in your country. The plug may not be used for other
products than Ericsson chargers.
Disconnecting the Charger
Move the plug connected to the phone
upwards to remove it, as shown in the picture.
Powering On Your Phone
Press and hold the NO key to turn the phone On and
Off
.
If “PIN:” Appears in the Display
Most SIM cards are supplied with a security code, also known as
PIN (Personal Identity Number), which you need to access the network. When you turn on your phone, you may be asked to enter
your PIN. You will find your PIN in the information provided by
your operator. Some operators may have services that require a second PIN, your PIN2.
PIN:
appears in the display after you have turned on the phone:
If
1 Enter your PIN. If you make a mistake while entering your PIN,
erase the wrong number by pressing the
YES.
2 Press
If your PIN is entered incorrectly three times in a row, the SIM card
is blocked. You can unblock it by using your PUK. See “SIM Card
Lock” on page 64. If
phone lock code. The default phone lock code is 0000. See “Phone
Lock” on page 64.
Phone locked
CLR key.
appears in the display, enter your
Network Search
After you have turned on the phone (and entered your PIN), the
phone searches for a network. When a network is found, the phone
beeps three times. Your network operator’s name (abbreviated in
most cases) appears in the display.
This is called
Standby Mode
. You can now make and receive calls.
Mobile Wiz™
Mobile Wiz™ setup wizard will guide you through the initial setup
of your phone. This feature manages 10 major settings: language,
16 Getting Sta rted
Page 23
Some menus/features are operator dependent.
date, date format, time, ring signal, ring volume, auto keylock, menu
help, message alert, and T9® predictive text input.
The wizard will start with brief animation when you power on your
phone. A help screen will appear before each setting. Press
enter the setting. A message will indicate where you are in the wizard’s settings (for instance, 2 of 10 will indicate that you are in the
second setting - date).You can also use the numeric keys to enter a
specific help screen (for instance, press
setting the date). Press
NO to exit the menu and return to the wizard.
2 to enter the help screen for
Aborting the Wizard
1 Press NO while
appears
YES to temporarily postpone (the Wizard will appear the
2 Press
next time you power On) or
Note! Mobile Wiz is always available under E
1 Select E
2 Select
XTRAS .
Mobile Wiz
Mobile Wiz
is running.
NO to permanently abort.
and follow the prompts.
Postpone Mobi le Wiz ?
XTRAS.
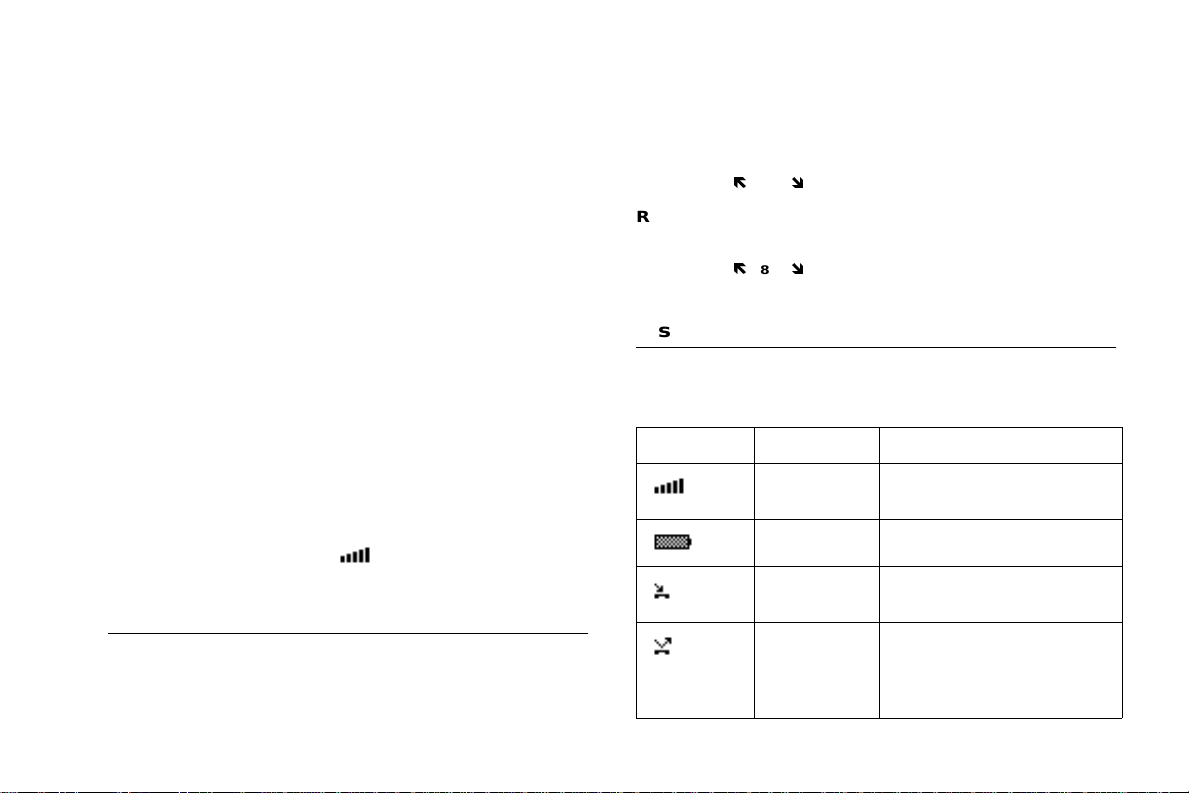
Signal Strength
The signal strength icon indicates how strong your signal is. More
bars indicate more strength.
Display Language
Most SIM cards automatically set the display language to the language of the country where you bought your SIM card (
If this is not the case, the preset language is
English
YES to
Automatic
. You can easily
reset your phone to English or the automatic language if you do not
understand the language that appears.
Reset to English
If not in standby mode, press and hold the NO key to go to standby >
Ð
0000 Ó.
enter
Reset to Automatic
If not in standby mode, press and hold the NO key to go to standby >
Ð
8888 Ó.
enter
Display Icons
This table shows all possible display icons. Some of the features represented in this table are network dependent.
Icon Name Explanation
Signal strength Tells you the strength of the
Battery meter Tells you the status of the battery.
Missed call
indicator
Forward
indicator
).
Accept Some/
None indicator
network signal.
You have missed an incoming call.
All incoming calls will be
forwarded to a defined number.
No calls or only certain calls from
numbers in a list are received.
Getting Started 17
Page 24
Some menus/features are operator dependent.
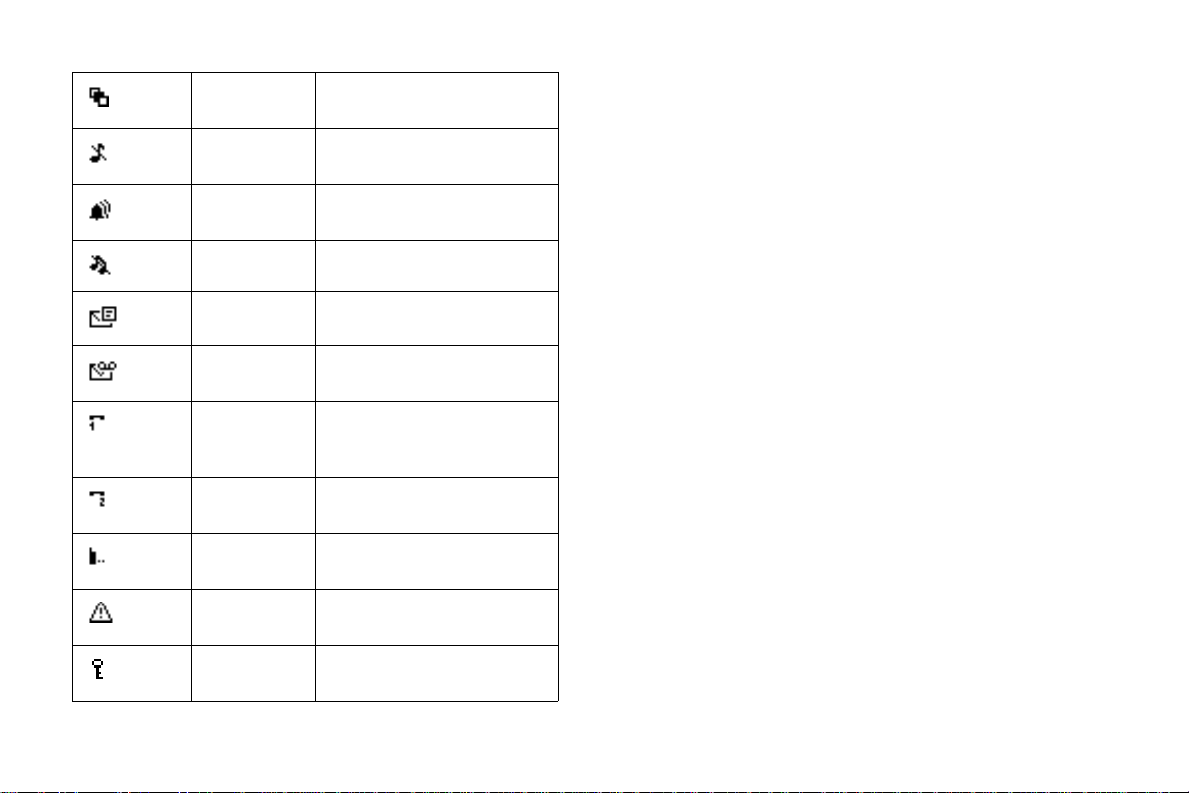
Profile
indicator
Ring signal off
indicator
Alarm indicator The alarm clock has been set and is
Silent indicator All audible signals are turned off.
SMS indicator You have received a text message.
Voice mail
indicator
Line 1
indicator
Line 2
indicator
Infrared
modem
Ciphering
indicator
Keylock
indicator
A profile, other than Normal, has
been chosen.
No sound can be heard when you
receive a call.
on.
You have received a voice message.
Line 1 is in use for outgoing calls if you subscribe to the Two Line
Service
Line 2 is in use - if you subscribe to
the Two Line Service.
The infrared modem appears if a
modem is attached.
Ciphering is currently not being
provided by the network.
Indicates that the keypad is locked.
18 Getting Sta rted
Page 25
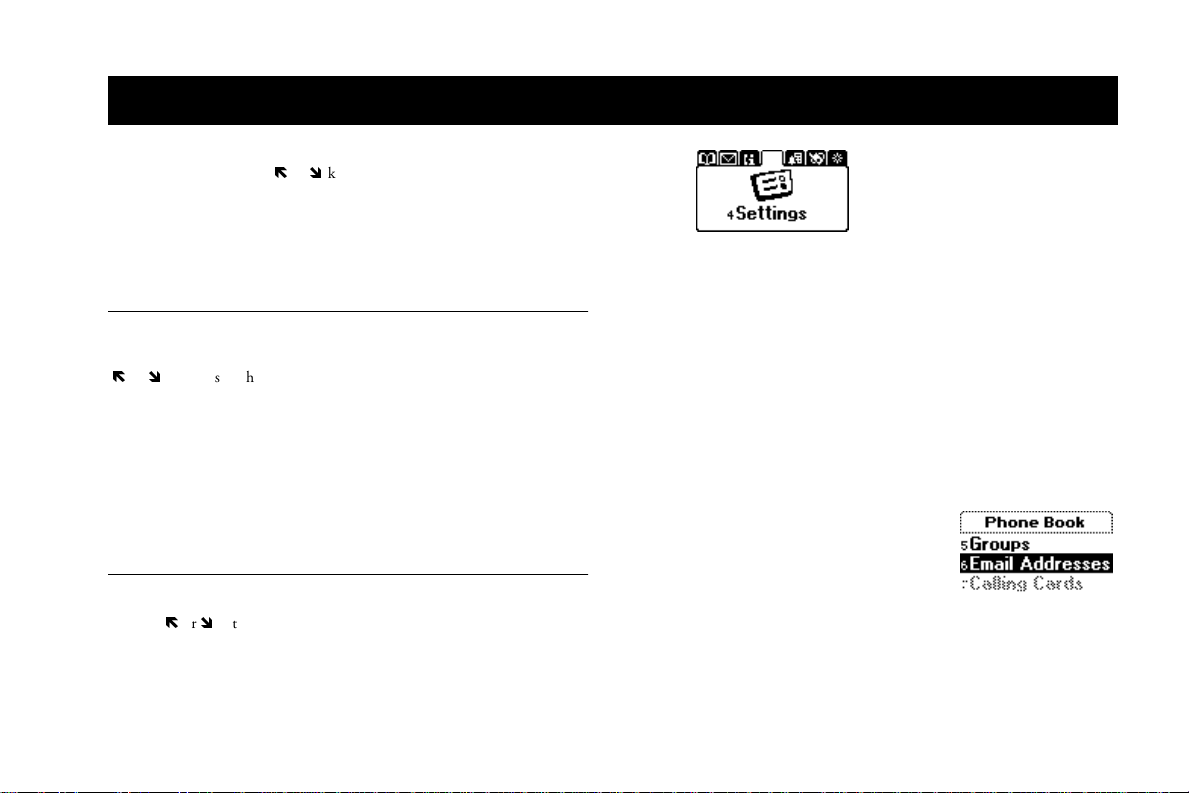
Using Menus
The menus are arranged in a loop, which you enter and move (scroll)
through with the
contains a list of options. Some menus have submenus with additional options. The complete menu system is diagramed on the
inside front cover of this user’s guide.
Moving Through the Menus
Press... to...
Ð
or
Ó
YES
NO
CLR
switch between menus or functions
select a menu, submenu or setting
go back one level in the menu system,
exit a setting or leave a setting unchanged,
press and hold to return to standby mode
delete an item from a list
Menu System
Your phone has seven main menus. You enter the menus by pressing
Ð
or Ó. At the top of the display there are icons symbolizing each
menu. The icon is enlarged when the menu is selected. In the diagram below, the Phone Book menu is selected. Refer to the front of
this User’s Guide for a diagram of the complete menu structure.
Ð
or Ó keys or by using shortcuts. Each menu
Some menus/features are operator dependent.
You phone contains seven menus:
• Menu 1 - Phone Book
• Menu 2 - Messages
• Menu 3 - Call Info/Ongoing Call
• Menu 4 - Settings
• Menu 5 - Extras
• Menu 6 - WAP Services
• Menu 7 - My Shortcuts
Display Text
When you move through the menu system, the display changes. The following
hints can help you:
• Black text within a frame at the top
indicates the menu you have chosen
(for example, C
• White text on a black layer indicates your position in the submenu
system. Press
ALL INFO). Press YES to enter the menu.
YES to enter this submenu or select this setting.
Using Menus 19
Page 26
Some menus/features are operator dependent.
• Grey text indicates a function that is temporarily unavailable, not
included in your subscription, or is not activated.
• Text marked with a tick or filled
radio button indicates the current
setting or settings selected.
Menu Help
Menu Help
system. The help texts will self-scroll through the descriptions of
some features. Menu Help will be activated when you purchase your
phone. You can turn off
through the
SETTINGS > YES >
menu help icon identifies help text.)
appears if you pause briefly while browsing your menu
SETTINGS menu.
Menu Help
Display
> YES >
through the
Menu Help > Off
Paths in This User’s Guide
Throughout this user’s guide, you will find “paths” that will lead you
through a series of steps. Also, in this user’s guide, menu names
appear in bold all capital letters (
bold and mixed case alphabet (
The following example shows the path you would follow to change
your alarm clock signal. You will also see the step-by-step explanation for changing the alarm clock signal. You can always return to
standby by pressing
SETTINGS > YES >
select a setting >
NO.
Sounds & Alerts
YES.
1 Scroll to SETTINGS menu.
YES.
2 Press
SETTINGS) and submenus appear in
Sounds & Alerts
> YES >
).
Alarm Signal
Mobile Wiz
> YES (The
> YES >
or
3 Scroll to
4 Press
YES.
5 Select
Alarm Signal.
Sounds & Alerts
submenu.
6 Press YES.
7 Scroll to the setting that you want.
YES.
8 Press
Note! Phone numbers used in this User’s Guide are for example only. We
do not recommend dialing these numbers.
My Shortcuts
A quicker way to move through the menus is to use the shortcuts.
When you buy your phone, the M
few settings which you can remove if you wish. You can also add a
setting from another menu to M
reach the settings you use most, quickly and easily.
Tip! You can quickly access the first submenu in M
pressing and holding
Ð
.
Note! Your phone may not have all the menu alternatives described in this
manual since many of them are network and subscription dependent. Because of this, the shortcut numbers may vary between
phones.
Adding a Setting to My Shortcuts
1 Scroll to MY SHORTCUTS > YES >
2 Select a setting from the list by pressing
in the box next to the menu.
Y SHORTCUTS menu contains a
Y SHORTCUTS. In this way, you can
Y SHORTCUTS by
Edit Shortcuts
> YES.
*or #. A check will appear
20 Using Menus
Page 27

3 The first available position will appear or you can enter the posi-
tion number you want for your setting in this menu.
4 Press
YES.If you want to add another setting, repeat steps 2 and 3.
To re mo v e a se t ti n g f r om M
5 Press
YES to exit the list.
Y SHORTCUTS, repeat steps 1 and 2.
Some menus/features are operator dependent.
Using Menus 21
Page 28

Some menus/features are operator dependent.
Making and Receiving Calls
Making and Receiving Calls
In this chapter, we assume that you have turned on your phone and
that you are within range of a network.
1 Enter the phone number (you must also add the area code, city
code, or country code if you are calling outside your local area).
YES.
2 Press
Note! When you are engaged in a call, the ongoing call icon appears and
the C
ALL INFO menu is replaced with ONGOING CALL.
Ending a Call
Press NO to end the call.
Ask to Save
Ask to Save
Book when the phone does not recognize the number of the most
recent call.
phone. To turn Ask to Save off:
P
Redialing a Previously Called Number
In the
missed.
prompts you to save names and numbers in your Phone
Ask to Save
HONE BOOK > YES >
Call List
will be turned On when you purchase your
Options
> YES >
you find numbers that you have dialed, answered or
Ask to Save
> Off > YES
YES >
Call List
> scroll to the number you want to call > YES
For more information, see “Using the Call List” on page 35.
Automatic Redialing
If the network is busy when you first called, the display shows
You can now redial the number by pressing
matically redials (up to 10 times):
• until the call is answered. When the call is successfully connected,
you hear a ring signal
• until you press a key or receive a call
Note! Automatic redialing is not available for fax and data calls.
YES. Your phone auto-
Making International Calls
1 Press and hold the 0 key until a + sign appears.
+ replaces the international prefix number of the country
2 The
from which you are calling.
3 Enter the phone number.
YES.
4 Press
Note! Entering the
national prefix.
+ symbol is not necessary if you have entered the inter-
Making Emergency Calls
1 Enter 911 (or 112, the international emergency number).
Retry?
.
22 Making and Receiving Calls
Page 29

2 Press
YES.
Note! The emergency numbers
country, with or without a SIM card inserted, if a GSM network is
within range. Some network operators may require that a SIM card
is inserted, and in some cases that the PIN code has been entered as
well. Some networks may not use the international emergency number 112 (or 911). Operators may designate additional emergency
numbers. Refer to your operator for more information.
911 and 112 can normally be used in any
Receiving a Call
When you receive a call, the phone rings and the display shows
Answer?
Press YES to answer the call.
Note! If your subscription includes the Calling Line Identification (CLI)
service and the caller’s network sends the number, you see the caller’s
number in the display. If your subscription supports Calling Party
Name (CNAP), the caller’s name will also appear. If the incoming
call is a restricted number, the display shows
Withheld.
Muting the Ringer
Temporarily silence the ringer by pressing CLR when a call is incoming.
Rejecting a Call
• Press either side volume key twice.
or
NO.
• Press
The display shows
will appear (if available). The caller hears a busy tone if this is supported by the caller’s subscription. If
Busy signal
and the phone number of the caller
Forward Calls When Busy
is on,
Some menus/features are operator dependent.
the call is forwarded to the number you have specified. See “For-
warding Incoming Calls” on page 53.
Ciphering
Ciphering is a built-in feature that scrambles your calls and
messages to provide additional privacy. An exclamation mark
is shown in the display during a call to indicate that ciphering is currently not being provided by the network.
During a Call
Your phone has several functions, which you might find helpful
while a call is in progress.
Changing the Listening Volume
You can easily change the listening volume during a call by pressing
the side volume keys.
• Upper key will increase the volume.
• Lower key will decrease the volume.
Muting the Microphone
1 Press and hold down the CLR key.
2 To continue your conversation, release the
Note! Instead of pressing and holding the
hold.
Putting a Call on Hold
1 Press YES.
Call held
appears in the display.
Mute d
appears in the display.
CLR key.
CL R key, you can put the call on
Making and Receiving Calls 23
Page 30

Some menus/features are operator dependent.
2 To continue your conversation, press
YES again.
Sending Tone Signals
To use telephone banking services or to control an answering
machine, you need to use codes. These codes are sent as tone signals
(also known as DTMF tones or touch tones). With your mobile
phone, you may use these codes during a call. If you press
# during a call, these numbers and characters are sent as tone signals.
0-9, * and
Note! You can also save codes only or codes together with a phone number
in your Phone Book. See “Telephone Banking Services” on page 33.
However, it may be a risk to save your codes in the phone in case it is
stolen.
The Notepad
If you want to make a note of a phone number during a call, you can
use your phone display as a notepad. When you end the call, the
number remains in the display or, if
Ask to Save
is On, you will be
asked to save the number in your phone book. You can also find the
number in
Add Number
in the
P
HONE BOOK
menu. See “Creating a
Phone Book Entry” on page 30.
Checking the Duration or Cost of the Call
During a call, the display normally shows the duration in minutes
and seconds. Depending on your subscription, you may see the call
cost displayed instead.
Minute Minder
If you turn on the minute minder, you hear a beep once every
minute during a call as a reminder of the duration of the ongoing
call. See “More Personalization Options” on page 26.
More than One Call Simultaneously
Your phone is capable of handling more than one call simultaneously. When you press
will automatically be put on hold. You can also set up a conference
call with up to five people. See “Handling Multiple Calls” on
page 53.
YES to answer the second call, the first call
24 Making and Receiving Calls
Page 31

Personalizing Your Phone
Some menus/features are operator dependent.
Ring Signals
Silent Ring Signal
Press and hold CLR >
appears in standby.
Note! All audible signals are turned off.
Ring Signal Volume
You can set the volume in six steps. The first step means that two
clicks are heard when you receive a call. You can also turn the ring
signal off (0). An icon then appears in standby.
ETTINGS > YES >
S
level of the ring volume appears in the display. Use
increase or decrease the volume. The phone rings once with the
actual setting as you increase the volume.) >
Note! Use the side volume keys to change the volume silently.
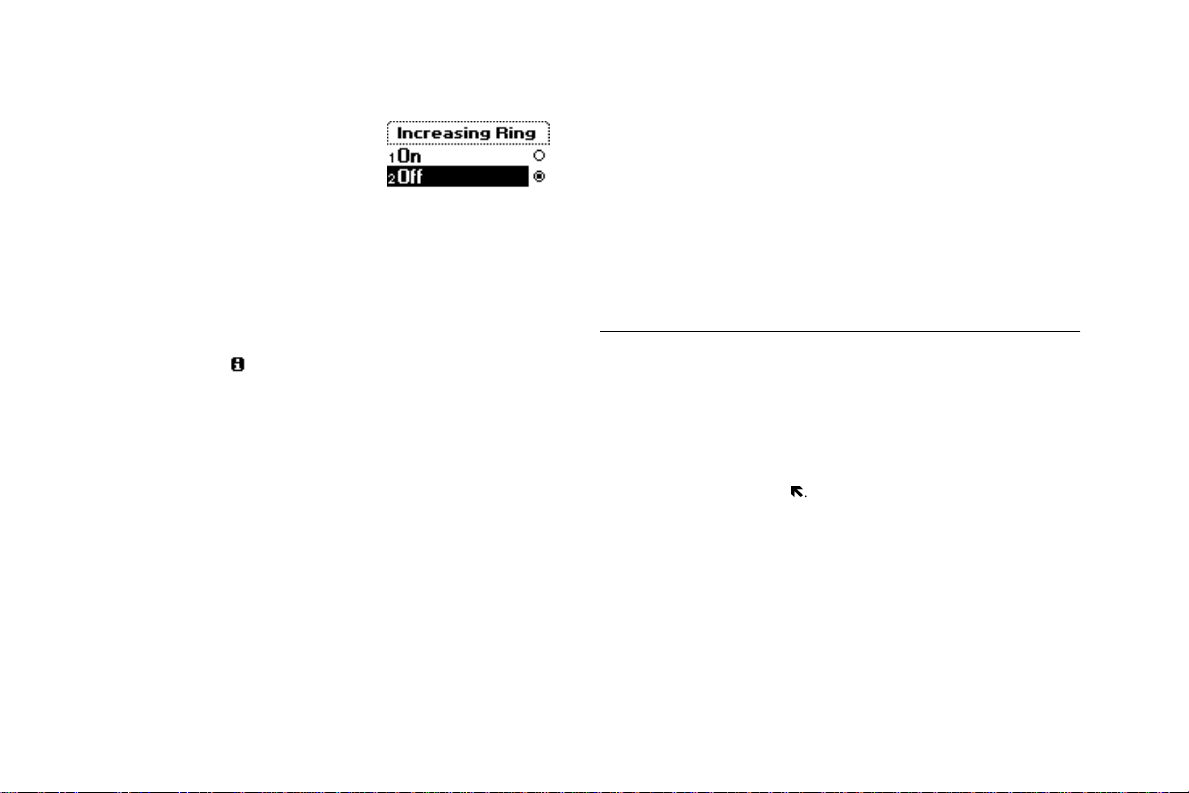
Increasing Ring
SETTINGS > YES >
On
.
The Increasing Ring must be Off for the ring signal volume to
apply.
Personalizing Your Phone 25
Tur n o n Si le nt
Sounds & Alerts
Sounds & Alerts
/Turn off Silent > YES. An icon
> YES >
> YES >
Ring Volume
YES.
Increasing Ring
> YES (The
Ð
or Ó to
> YES >
Note! When increasing ring is activated, you will receive a warning if you
attempt to change the ring volume or set silent mode.
Ring Signal Type
Choosing an existing ring signal
SETTINGS > YES >
Voice C a lls
Note! When scrolling through the list, the melody currently stored in the
highlighted position is played. If you do not wish to disturb other
people, use the volume keys on the side of the phone to scroll
silently.
Sounds & Alerts
> YES > select the ring signal type that you want > YES.
> YES >
Ring Signals
> YES >
Different Ring Signals
If you subscribe to the Two Line Service, you can set different ring
signals for the two lines. Line 1 and Line 2 are displayed instead of
Voi c e. Provided your SIM subscription supports Fax and Data calls,
you can set different ring signals for voice, fax and data calls respectively.
Specific Ring Signals for Personal Calls
If your subscription includes the Calling Line Identification (CLI)
service, you can assign a personal ring signal to up to 10 callers.
Tip! You can have one ring signal for a friend and another one for a col-
league. If the last seven digits of a caller’s number correspond to a
number you have specified, then that caller’s ring signal is used.
Page 32

Some menus/features are operator dependent.
B
Tip! You can include question marks (?) in a phone number. If you enter
919555???, calls from phone numbers between 919555000 and
919555999 will have the same personal ring signal. You get a question mark by pressing and holding
#. For more information on
entering phone book entries, see “Creating a Phone Book Entry” on
page 30.
Specifying a Caller’s Number and Ring Signal
SETTINGS > YES >
sonal Rings
YES > Select the ring signal type you want > YES
> YES >
Sounds & Alerts
Add new?
> YES
> YES >
Ring Signals
>
Enter the caller’s number >
> YES >
Deleting a Caller’s Number
SETTINGS > YES >
sonal Rings
Delete
> YES
Sounds & Alerts
> YES >
Ring Signals
> YES >
> YES > scroll to the number you wish to delete > YES >
Composing and Editing Your Own Ring Signals
You can compose four different ring signals.
ETTINGS > YES >
1 S
odies
> YES > Select
Melody 3
or
display.
2 The keypad now works as a keyboard (see figure in
margin above).
Use the keypad to enter notes:
• Press and hold a key to enter a long note.
0 to raise the note one octave.
• Press
# once to raise the note one halftone.
• Press
Sounds & Alerts >
My Melody 1, My Melody 2, My
My Melody 4 >
Press CLR to clear the
YES >
My Mel-
Per -
Per -
# twice to lower the note one halftone.
• Press
3 To listen to your melody, press
YES again to save it or press NO to continue editing.
4 Press
YES.
Editing a ring signal
SETTINGS > YES >
scroll to either
> YES >
Melody4
The notes are displayed and you can edit the melody notes with the
keys. Press
Note! You can also compose your own and download existing ring melo-
dies from the Ericsson Mobile Internet:
http://mobileinternet.ericsson.com
Sounds & Alerts
> YES >
My Melodies
My Melody 1, My Melody 2, My Melody 3 or My
Edit
.
YES to play it.
> YES >
More Personali zation Options
Alarm Signal SETTINGS > YES >
>
Alarm Signal
Ask to Save PHONE BOOK > YES >
On
/Off > YES
Network Initiated
Time Zone (NITZ)
ETTINGS > YES >
S
> YES > On/Off
Zone
Sounds & Alerts
> YES
> YES > select a setting > YES
Options
> YES >
Ask to Save
Time and Date
>
YES
> YES >
Auto Time
>
26 Personalizing Your Phone
Page 33

Some menus/features are operator dependent.
Date S
ETTINGS > YES >
YES > enter the year (two digits), month, and day
YES
Note! If you have chosen another date format you
must enter the date differently.
Date Format S
ETTINGS > YES >
> YES > select date format > YES
Display Language S
ETTINGS > YES >
> select language >
Note! From standby, enter Ð 0000 Ó to choose
English
. Enter Ð 8888 Ó to chose
Display Light S
ETTINGS > YES >
select setting >
YES
Input Method SETTINGS > YES >
to select or deselect an input method >
Note! Press and hold # to toggle between input
methods when you are entering or editing a
phone book entry or a message.
Key Sound S
ETTINGS > YES >
YES > select a setting > YES
>
Master Reset SETTINGS > YES >
Menu Help S
phone lock code
ETTINGS > YES >
Off
> YES
Time and Date
Time and Date
Language
YES
Display
> YES >
Language
Sounds & Alerts
Master Reset
> YES >
Display
> YES >
> YES >
> YES >
> YES >
Set Menus
Light
> YES >
> YES >
Input
YES
> YES >
> YES > enter the
Menu Help > On
Set Date
>
>
Date Format
> YES
Automatic
> YES > *
Key Sound
Message Signal SETTINGS > YES >
Minute Minder CALL INFO > YES >
New Greeting SETTINGS > YES >
Phone Number
Display
.
Standard Greeting S
Time Format S
Time/Clock S
Tur n O ff Gr e et i ng S
Tur n To ne s On /O ff O
/
>
Message Alert
YES >
>
YES >
> YES > select a setting > YES
On
/Off > YES
Custom
> YES > compose greeting > YES
SETTINGS > YES >
e
>
YES
>
> Voic
enter the number
Sounds & Alerts
Call Timers
Display
Display
> YES >
> YES >
> YES >
>YES
Minute Minder
User Greeting
My Numbers >
>
YES
>
YES
(This path may vary depending on other activated
features.)
ETTINGS > YES >
YES >
Standard
ETTINGS > YES >
Display
> YES
Time and Date
> YES >
> YES >
User Greeting
Time Format
>
> YES > select 24-hour or 12-hour format (am/pm) >
YES
ETTINGS > YES >
YES > enter the time in hours and minutes
Time and Date
> YES >
Set Time
>
YES
Note! Use # to toggle between am/pm.
ETTINGS > YES >
YES >
Off
> YES
NGOING CALL > YES >
Display
> YES >
Tur n Of f
User Greeting
/On
To n e s
>
> YES
>
Personalizing Your Phone 27
Page 34

Some menus/features are operator dependent.
Profiles
Your phone is always set to one of the six profiles. When you buy
your phone, it is set to the Normal profile. You cannot create more
profiles, but you can change the name of a profile, change the settings included in a profile, or add an accessory to a certain profile.
Press the side volume key (in standby mode) to find out which profile you are currently in.
There are six programmed profiles:
• Normal
• Meeting
• In Car
• Outdoors
• Port H-free (portable handsfree)
• Home
The table below shows the settings of each profile.
Profile Name
Ring
Vo lu m e
Increasing
Ring
Accept Calls From All From All From All From All From All From All
Forward Calls Off Off Off Off Off Off
Norm Meet Car Out H-free Home
5(6) 0(6) 6(6) 6(6) 6(6) 5(6)
Off Off Off Off Off Off
Profile Name
Norm Meet Car Out H-free Home
Calling Cards None None None None None None
Light Auto Auto On Auto Auto Auto
Line 1/2 L1L1L1L1L1L1
Silent OffOnOffOffOffOff
Auto
Off Off On Off On Off
Activation
Accessories
--
Car
-Handsfree
-
Handsfree
Choosing a Profile Manually
You can always choose to use another profile than the one you currently use. If you choose another profile besides Normal, an icon is
shown in standby.
S
ETTINGS > YES > Profiles > YES > Select Profile > YES > select the
profile you want >
YES.
Note! You can also find Select Profile in the My Shortcuts menu.
Meeting
or
Normal
Note! A profile with no accessories associated, such as
,
must be chosen manually, even if automatic activation is on. The
profiles associated with accessories can be chosen automatically.
Changing the Profile Settings
You can rename the pre-programmed profiles and change the settings according to your wishes.
28 Personalizing Your Phone
Page 35

Some menus/features are operator dependent.
Changing a Profile Setting
SETTINGS > YES > Profiles > YES > Edit Profile >YES (a list of the
profile settings appears) >
according to your wishes.
Note! You cannot change the name of the Normal profile.
If you change a setting which is included in a certain profile, the profile is updated. With the Reset Profiles function, you can change all
profile settings back to the way they were set when you bought your
phone.
YES to select > change the profile setting
Resetting the Profile Settings
SETTINGS > YES > Profiles > YES > Reset Profiles >YES > answer
YES if you are sure you want to reset all profiles.
Turning Automatic Activation On/Off
SETTINGS > YES > Profiles > YES >
vation >
YES > Select On or Off.
Edit Profiles
> YES > Auto Acti-
Adding Accessories to a Profile
You can add one or many accessories to a profile.
Tip! If you usually use a portable handsfree together with a specific
charger, you may add the charger to the Port H-free profile. The
phone recognizes the accessory as it is connected and switches profile
automatically.
Note! The first accessory that is connected to the phone which switches the
profile. Only profiles associated with accessories can be activated
automatically. You must first choose the profile manually to which
you want to add an accessory, see “Choosing a Profile Manually” on
page 28.
Adding an Accessory to a Profile
Note! You cannot add an accessory to the Normal profile.
ETTINGS > YES > Profiles > YES >
1 S
YES. Now you are in the list of the accessories which are
ries >
Edit Profiles
already associated with the profile.
2 Select Add accessory?.
3 Select an accessory. The question Automatic activation on?
appears, if automatic activation is not on already.
YES to turn automatic activation on, which means that the
4 Press
profile will be chosen automatically when the accessory is connected.
You can associate 12 accessories with a profile, besides the portable
and vehicle handsfree units. Accessories above this number will work
as ordinary non-profile accessories. You cannot have the same accessory associated with several profiles.
Removing an Accessory from a Profile
1 SETTINGS > YES > Profiles > YES >
YES.
ries >
2 Scroll to the accessory that you want to remove and press CLR.
3 Delete? appears. Press YES.
Edit Profiles
> YES > Accesso-
> YES > Accesso-
Personalizing Your Phone 29
Page 36

Some menus/features are operator dependent.
Your Phone Book
Memories
HONE BOOK > YES >
1 P
Add Number
> YES >
Add new?
(a list of
numbers recently used may appear) > select a listed number or
You can save phone numbers and associated names in:
• the SIM card memory
• the phone memory
Your entries are first saved in the positions on your SIM card. The
actual number of memory positions available depends on your SIM
card. Saving your numbers in the card memory allows you to use the
numbers saved on the SIM card even when you change phones and
insert your SIM card into another phone.
By saving your numbers in the phone memory, they are always available to you in your phone, even if you change SIM cards. The phone
memory holds 200 positions in which your entries are saved when all
SIM positions are occupied.
enter a phone number that you wish to save (including the area
YES > enter a name that you want to associate with the
code) >
phone number >
YES.
2 You now have three options:
• To save the number in the suggested first empty position, press
YES.
• To save the number in another position, press the
the position number, enter a new position number and press
Overwrite?
number already in use. Press
will appear to warn that you are choosing a position
YES to overwrite.
CLR key to erase
YES.
• To save the number in the phone memory, you need to know how
many positions you have on your SIM card. You can check this in
Memory Status
in the PHONE BOOK menu. If you, for example,
have 200 positions on your SIM, you can enter position number
201 to save a number in the phone memory.
Creating a Phone Book Entry
International Numbers
Every phone number that you save includes a position number. You
can save the phone numbers together with a name to make it easier
for you to keep track of your phone numbers. For more information
on entering names with your phone book entries, see “Entering Special Characters” on page 34.
30 Your Phone Book
If you intend to use your phone both at home and abroad, it is a
good idea to save all phone numbers as international phone numbers
(with the (
+) sign which automatically replaces the international
dialing prefix for the country you are calling from) followed by the
the phone number.
Tip! Press and hold
0 to enter the + sign. You do not need to enter the +
symbol if you are entering the country code.
Page 37

Some menus/features are operator dependent.
Adding a Voice Label
If you have turned the Voice Dialing on, you are asked if you want to
add a voice label to your phone book entry. Follow the prompts. For
more information, see “Recording Voice Dialing Labels” on page 57.
Calling a Phone Book Entry
Choosing a Sort Order
You can either call a number by using the name saved with it or you
can call the number by using the memory position that it was saved
in. The order of searching for names and numbers depends on the
sort order you have chosen (by name or by position).
HONE BOOK > YES >
P
sort order.
Calling a Number
Tip! Press and hold Ó to quickly enter
alphabetical listing of entries (you must set
order to see the alphabetical listing).
HONE BOOK > YES >
P
number or the name (or the first few letters of the name) associated
with the number that you want to call >
you find the correct name and number >
Options
> YES >
Find and Call
Sort Order
Find and Call
. Press YES to enter
By Name
> YES > enter the position
YES > press
YES to make the call.
> YES > select a
in your sort
Ð
or Ó until
Shortcuts to Phone Book Entries
Tip! From standby, enter the position number followed by # to see what
is stored in that position.
Tip! Press and hold one of the keys
specific letter. Press and hold
ning with the letter
A (or closest following).
Once you are in the list of phone book entries you can use
2-9 to find an entry beginning with a
2 to take you to the first entry begin-
Ð
to scroll through the positions, or enter a position number or a letter
to go to a certain entry.
Speed Dialing
You can call the phone numbers that you have saved in positions 1–9
in the SIM memory by entering the position number and then pressing
YES.
Keeping the Phone Book Up to Date
1 PHONE BOOK > YES >
2 Enter the position number or the name for the entry that you wish
to edit. Press
press
3 Press
4 Select
5 Use
YES. If the name displayed is not the one you want,
Ð
or Ó until you find the correct name and number.
YES to select the entry.
Edit
. Edit the number and press YES.
Ð
or Ó to move the cursor. Use the CLR key to delete.
6 Edit the name and press
7 Edit the position number and press
Find and Edit
YES.
> YES.
YES.
or Ó
Your Phone Book 31
Page 38

Some menus/features are operator dependent.
Copying Entries From One SIM to Another
If you want to change SIM cards, you do not need to save all the
entries in your phone book once again. Instead, you can copy the
entries from one SIM card to another, via the phone’s memory.
HONE BOOK > YES >
1 P
card
.
2 Enter the position number on the SIM card from which you want
to start copying and press
If you do not enter a number, the phone will start copying from
position one on the SIM card.
3 Press
YES again to start copying.
4 Wait until the display reads
with the number of copied entries.
5 Switch off your phone, enter another SIM card and switch on the
phone.
HONE BOOK > YES >
6 P
card
.
7 Enter the position number from which you want to start copying
and press
YES.
If you do not enter a number, the phone will start copying from
number one, in the phone memory, over to the new SIM card.
YES again to start copying.
8 Press
9 Wait until the display reads
with the number of copied entries.
Options
> YES >
Copy
YES.
Phone book entries copied:
Options
> YES >
Copy
Phone book entries copied:
> YES >
> YES >
Copy from
together
Copy to
together
Checking the Status of the Memories
The
Memory Status
function in your phone book lets you check how
many memory positions you have left in your memories.
HONE BOOK > YES >
P
Memory Status
> YES.
When the SIM Card Memory Is Full
When all SIM card positions are full, an icon appears next to the
position number. From now on your entries are stored in the phone
memory. If all positions, including the phone memory are full, you
have to delete an old number by entering a position that is already
occupied and press
Deleting an entry from the memory
PHONE BOOK >YES >
number/name that you want to delete >
Delete?
> YES.
Deleting all entries from the phone memory
PHONE BOOK > YES >
in phone memory?
All entries in the phone memory are deleted.
YES.
Find and Edit
Options
> YES >
appears > YES >.
>YES > enter the position
YES >
Delete
Delete All
> YES >
> YES >
Delete all
32 Your Phone Book
Page 39

Some menus/features are operator dependent.
Telephone Banking Services
If you use telephone banking services, you can save the phone number of your bank together with your personal codes and account
numbers. You only need to add pauses between the phone number,
account number and security code. You insert a pause by pressing
and holding the
the phone number, codes and the number of pauses that are
required.
Saving a phone number with an account number and
security code
1 PHONE BOOK > YES >
2 After entering the phone number, press and hold the
the pause character
3 Enter the code, if needed enter another pause, another code and so
on.
4 Enter the name that you want to associate with the phone number
and code and press
5 Press
If you want to save the number in a differe nt position than the one
suggested. See “Creating a Phone Book Entry” on page 30.
To make a call with tone signal codes, proceed as described in “Call-
ing a Phone Book Entry” on page 31. When you make the call, the
phone dials the number, waits until the call is answered and then
sends the code. If you insert another pause and another code, it
pauses again, sends the next code and so on.
* key. Talk to your bank about the correct flow of
YES to save.
Add Number
p
appears in the display.
YES.
> YES.
* key until
Groups
The phone also allows you to create groups of phone book entries. In
this way you can send a text message to several recipients at the same
time. An icon will appear next to any group phone book entries.
See “Te x t M es sa g in g ( SM S) ” on page 41.
Creating a new group P
Adding a new member PHONE BOOK > YES >
Deleting a member PHONE BOOK > YES >
Deleting a group PHONE BOOK > YES >
HONE BOOK > YES >
> Add new
new?
book >
? > YES > Enter name > YES >
> YES > Select an entry in your phone
YE S >
additional members >
Add new?
NO to end.
Groups
> YES to add
Groups
>
Select group >
select new member >
Edit
> YES >
YES
Groups
>
Select group >
delete > Press
Edit
> select the member to
CL R >
Delete?
Groups
>
Select group >
Delete
> YES >
> YES
> YES
Add new?
> YES
YES
> YES
Delete?
Add
>
> YES
Your Phone Book 33
Page 40

Some menus/features are operator dependent.
E-mail Addresses
You can save e-mail addresses to be used when you want to send a
text message as an e-mail. You can save 10 e-mail addresses consist-
ing of 60 characters each. See “Sending Text Messages” on page 41.
Save an e-mail address P
HONE BOOK > YES >
Add new
>
YES > Enter a name > YES
? > YES > Enter email address >
Edit an e-mail address PHONE BOOK > YES >
> Select an entry >
YES
Delete an e-mail address PHONE BOOK > YES >
> Select an entry >
Email Addresses
Email Addresses
Edit
> Edit the address >
Email Addresses
Delete
> YES
Note! The @ sign is accessed by pressing the 0 key three times.
Entering Special Characters
Your phone is equipped with several methods for inputting text.
These features are especially helpful when entering SMS messages
and Phone Book names. Refer to “More Personalization Options”
on page 26 to change input methods. The available input methods
are:
• Predictive Text
• Multi-Tap
• Numeric
>YES
>YES
>YES
Tip! Press and hold the # key to toggle between input methods.
Predictive Text Input
The T9® software is designed to assist you when entering text - for
phone book entries, WAP bookmarks, or text messages. The software uses the phone’s internal dictionary to quickly scan possible
word variations to determine the correct word.
Selecting Predictive Text Input
SETTINGS > YES > Display > YES >
or deselect an input method >
T9 Text Input
YES
> YES > * to select
Using Predictive Text Input
Each numeral on your keypad has corresponding letters. For
instance, the
Predictive Text Input, you only need to press each key once to enter
the letter. The intelligent software will decipher what you are
attempting to spell. Occasionally, the word you are attempting to
enter may be similar to another word (for example, ball and call). If
the phone does not suggest the word you desire, press
words.
To enter the word HELLO, press each of these keys once:
5, 6.
Tip! The punctuation characters are found on the 1 key when T9 Text
Input is activated.
Tip! Since acronyms and slang words are not found in the internal dictio-
nary, you may need to toggle to multi-tap mode to enter these terms.
2 key includes letters A, B, and C. When you are using
0 to see other
4, 3, 5,
34 Your Phone Book
Page 41

Some menus/features are operator dependent.
Multi-Tap Input
Multi-tapping is another method for entering letters when you are
using the Phone Book and when you are composing a short message
(SMS). Multi-tapping is the best method for entering slang terms or
acronyms.
Press the appropriate key,
you want appears in the display.
Press… to get…
1Space - ? ! ‚ . : ; " ’ < = > ( ) _ 1
2A B C Å Ä Æ à Ç 2
3D E F è É 3 ∆ Φ
4G H I ì 4
5J K L 5
Λ
6M N O Ñ Ö Ø ò 6
7P Q R S ß 7
8T U V Ü ù 8
9W X Y Z 9
0+ & @ / ¤ % $ £ ¥ § ¿ ¡ 0
#
# *
↵
• To en t er an ‘
A’, press 2 once. To enter a ‘B’, press 2 twice quickly.
• To enter lowercase letters, enter the letter, for example an ‘
then press
you press
*. An ‘A’ appears. Lowercase letters now appear until
* again.
• To enter numbers, press and hold any numeric key.
1–9, 0 or #, repeatedly until the character
Γ
Π Σ
Θ Ξ Ψ Ω
A’ and
• To delete letters and numbers, press the
CLR to delete the entire entry.
• Press the
1 key quickly to enter a space between characters or
CLR key. Press and hold
names.
Numeric Input
Numeric Input is best used when entering numbers, such as stock
quotes, birthdays, and phone numbers.
Using the Call List
The
Call List
date, phone number and name) about the last 30 incoming and outgoing calls. Once your list exceeds 30 calls, the oldest one is deleted.
Note! Depending on whether a call is ongoing or not, the menus C
I
NFO and ONGOING CALL will replace each other.
What Calls Are Saved?
The numbers that you have dialed are always saved. If your subscription includes the Calling Line Identification (CLI) service and the
caller’s network sends the number, you will also find the numbers of
answered and missed calls in the
Party Name (CNAP), you will also see the caller’s name. If the
incoming call is a restricted number, the display shows
can call any of the numbers in the
The Call List Saves:
• Dialed Number
is a phone number log that saves information (time,
Call List
. if you subscribe to Calling
Call List
..
Withheld
ALL
. You
Your Phone Book 35
Page 42

Some menus/features are operator dependent.
• Answered Calls
• Missed Calls
All the calls are saved together in chronological order. The last call
you have made is saved in the first position. If the same number is
called more than once, the latest call replaces earlier ones. If you
check a call within 24 hours, the time of the call is displayed. Otherwise, the time is replaced by the date.
Note! If you change SIM cards or turn the Call List off, the list is cleared.
Called numbers may remain in the SIM card memory though.
Using the Call List
Calling a number from the list C
ALL INFO > YES >
scroll to the number > YES
Deleting a number from the
list
Clearing the list C
CALL INFO > YES >
scroll to a number > Press CLR > YES (after
Delete?
prompt)
ALL INFO > YES >
Clear Call List
Tur ni ng th e li st O n /O f f CALL INFO > YES >
Set Call List
Call List
Call List
Options
> YES >
Clear?
Options
> YES > On/Off
> YES >
> YES >
> YES >
> YES
> YES >
Missed Calls
If you have missed a call, the message
standby mode, where the number
calls.
YES to display the missed calls.
1 Press
Missed Calls: 1
1
indicates the number of missed
appears in
2 If you wish to call a number from the list of mis sed calls, press
at the number you want to call.
Note! You can also see the
calls are also saved in the
Missed Calls List
Call List
in the CALL INFO menu. Missed
.
Showing And Hiding Your Number
Some operators offer subscriptions where your phone number is normally hidden. You can choose to show or hide your number for a
particular call, if Calling Line Identification Restriction service
(CLIR) is supported by your subscription.
Call Info
>YES >
Enter the phone number you wish to call >
> YES >
Call
Hide My Number
(or
Show My Number) >
YES
Next
to make
the call.
Calling Cards
When making international or long distance calls, you may not want
your operator to charge you for these calls on your normal account.
If you have a credit card or a calling card, you may want to redirect
the charges to one of these accounts instead. The
lets you redirect the charges to either a credit card account or to a
calling card account.
You can save two separate card numbers in your phone. These numbers are protected by a four- to eight-digit phone lock code. When
you buy your phone the code is set to
0000
code to one that you choose yourself. See “Phone Lock” on page 64.
Note! You cannot use the Calling card service when making a fax or a data
call.
Calling card
service
. You may change the
YES
36 Your Phone Book
Page 43

Some menus/features are operator dependent.
Activating the Calling Card Service
PHONE BOOK > YES >
enter your phone lock code (
The Calling card service is now on and the sub-menu
available in the P
Options
> YES >
0000
) > YES > On.
HONE BOOK menu.
Set CallingCards
Calling Cards is
> YES >
Saving Calling Card Numbers
You can save two calling card numbers in your phone.
1 Scroll to P
HONE BOOK > YES >
2 Enter your phone lock code and press
Select Add new?
3
Calling Cards
YES.
> YES.
4 Enter the access number of the calling card server and press
5 Enter a name that you want to associate with your calling card
server and press
YES.
6 Enter the verification code of the calling card server and press
YES.
7 Select whether you want to send the number that you want to call
or the verification code first and press
YES to confirm your choice.
Note! Your service provider will give you the information needed for the
verification codes.
Deleting a card number
1 Scroll to PHONE BOOK > YES >
2 Scroll to the card number that you want to delete and press
Delete
3 Select
4 Press
. The question
YES. The card number has been deleted.
Calling Cards
Delete?
appears in the display.
>YES.
YES.
YES.
Editing a card number
1 Scroll to PHONE BOOK > YES >
2 Scroll to the card number that you want to edit and press
3 Select
Edit.
You may now edit the card number.
YES to confirm the new number.
4 Press
You may now also edit the name and code.
Calling Cards
Choosing a Card
If you have saved two card numbers, you must choose which card
you want to use before making a calling card call.
Scroll to P
HONE BOOK > YES >
phone lock code >
Activate card
.
YES > select the card that you want to use > select
Calling Cards
> YES > enter your
Making a Calling Card Call
1 In standby mode, enter the phone number of your calling card
server or retrieve it from the
Ó
.
2 Press and hold
YES.
The access number of the calling card server is called and during
the connecting phase, you are asked to send the phone number of
the person that you want to call and the verification code, in the
order chosen earlier (see above).
3 To send the number and verification code during the connecting
phase, press
YES when the display shows
onds and they are sent automatically. Now you are connected to
your personal phone call.
Phone Book
by pressing and holding
Send
> YES.
YES.
or wait a few sec-
Your Phone Book 37
Page 44

Some menus/features are operator dependent.
38 Your Phone Book
Page 45

Voicemail Service
Some menus/features are operator dependent.
Voicemail Notification
Some operators inform you of a new voicemail by posting a specific
Vo ic e ma i l
icon . Most operators, however, inform you by send-
ing a text message (SMS), for example asking you to call your
mail Service
voicemail.
Note! For more information about your Voicemail Service, please refer to
the information provided by your network operator.
. You may also hear an alert signal or see the message New
Vo ic e -
Storing your Voicemail number
If you want your phone to easily interact with your
you can store the number to your
number in the information provided by your network operator.
ESSAGES > YES >
M
your Voicemail number >
Note! The number to your Voicemail Service may be different if you are
calling from a network that is not your home network.
Voicemail Service 39
Options
> YES >
YES.
Voicemail Service
Voice m a il No.
Voicemail Service
. You will get the
> YES > enter
Changing Voicemail Numbers
Note! MESSAGES > YES >
hold
CLR to delete the existing number > enter your new Voicemail
number >
YES.
Options
> YES >
Calling Your Voicemail
Tip! Press and hold 1 from standby to easily call your Voicemail Service.
When you receive notification of a new voicemail, press
Voicemail Service
your
Service
at a later time to listen to your recorded messages.
,
Note! You can also access your voicemail through the menu system:
ESSAGES > YES >
M
. If you press NO, you can call your
Call Voicemail
Changing the Message Alert Signal
MESSAGES > YES >
signal you want.
If you subscribe to the Two Line Service, you may have different
Voicemail numbers for your two lines. You may also set different
options for the two lines.
Options
> YES >
Voice m a il No.
> YES.
Message Alert
> YES > press and
YES to call
Vo ic e ma i l
> YES > select the
Page 46

Some menus/features are operator dependent.
Tip! You can set all incoming calls on Line 1 to be forwarded to your
Voicemail and let all incoming calls on Line 2 be connected.
40 Voicemail Service
Page 47

Text Messaging (SMS)
Some menus/features are operator dependent.
Enabling Your Phone to Send SMS
If your SIM card does not contain the phone number to your network service center, you must specify the number yourself. Otherwise you cannot reply to received messages or send your own
messages.
Activate Service Center MESSAGES > YES >
Service Centers
number you want >
Enter a Phone Number to
Your Servic e C e nter
Text Messaging (SMS) 41
If no number is found in the list, you
have to set the number yourself. You
can obtain the service center number
from your network operator.
ESSAGES > YES >
M
Service Centers
> enter the number, including the
international (
YES.
code >
Options
> YES >
> YES > scroll to the
YES >
Activate.
Options
> YES >
+) sign, and country
> YES >
Add new?
> YES
Sending Text Messages
Composing a Text Message
MESSAGES > YES >
Enter the recipient’s phone number or recall it from the phone book
by pressing
by
Message has been sent.
Note! Your phone will default to predictive text input when you are com-
posing an SMS. For more information on entering text and the letters, see “Entering Special Characters” on page 34.
Storing the Message for Later Use
If you do not want to send the message now, you can save it in the
phone memory and send it later.
NO when you are asked to enter a phone number. The message
Press
can now be recalled from the
Sending the Message Later
MESSAGES > YES >
send (the message appears in the display) >
Note! The same procedure is used with all types of messages, for example e-
mail, fax messages, etc. Check with your network operator to find
out which message types you can use.
Ð
> YES.
Send New
> YE S > Enter your message > YES >
Sending message
Unsent
> YES > Select the message you want to
appears in the display followed
Unsent
list in the MESSAGES menu.
YES >
Send
.
Page 48

Some menus/features are operator dependent.
Sending Text Messages to a Group
With your phone you can send text messages to a pre-defined group.
You need to specify a group and save it in your phone book before
you can send text messages to a group. When you send text messages
to a group, you will be charged for each member included in that
group.
ESSAGES > YE S >
M
HONE BOOK >
P
Send New
Groups
> YES > enter your message > YES >
> YES > select the group you want > YES.
Customizing Your Text Messages
Message Type
Your phone can send different types of messages. Your network operator’s service center may offer the option of converting a text message
into a format (e-mail, fax, etc.) that suits the equipment that is going
to receive the message. Please contact your network operator to find
out which message types you can use and how.
You can set a standard message type that you want to use or you can
turn on a Set on Send option, which means that you are asked to
select which message type you want to send, before sending it.
ESSAGES > YES >
M
Default
> YES > Select the message type you want.
The selected message type is now standard until you change it.
Turning the Set on Send Function On/Off
MESSAGES > YES >
Send
> YES > Select
Options
Options
On
/Off.
> YES >
> YES >
Message Type
Message Type
> YES >
> YES >
Set
Set on
Validity Period
Vali d ity Peri o d
not be delivered because the recipient has turned off the phone, your
service center can save the message to send it later. If the service center has not been able to reach the recipient within a certain time, the
message will be deleted. You can set a validity period as your standard or you can turn on a Set on Send option, which means that you
are asked to set the validity period before sending the message.
ESSAGES > YES >
M
Default
Note! The selected validity period is now your standard until you change
it.
is a network dependent feature. If your message can-
Options
> YES >
Vali d ity Peri o d
> YES > select the validity period you want.
> YES >
Reply to Messages
If you want the recipient of your message to reply, you can turn on
the Request Reply option. When this function is on, you are asked
to choose if you want the recipient to reply or not before your message is sent. If you want the recipient to reply, select
YES.
ESSAGES > YE S >
M
On
/Off.
Options
> YES >
Reply Request
On
and press
> YES > Select
Templates for Text Messages
Templates are predefined messages that make sending an SMS much
easier. You can create you own templates for messages that you frequently send. For instance, “Please call me back” or “I’ll be late for
dinner.” You can also create templates that give you the option of
Set
42 Text Messaging (SMS)
Page 49

Some menus/features are operator dependent.
filling in spcific information. For instance, “I will be __ minutes late
for the meeting on ___.”
Saving a Template M
ESSAGES > YES >
Add new?
> YES > enter the message >
YES >
Send message now?
> enter phone number >
Note! If you want to wait to send the
message, press
Send message now?
The message is saved as a template for later use.
Sending a template M
ESSAGES > YES >
Te m p l a t e s
select the template you want to send >
YES >
Deleting a template M
Create SMS
desired >
number >
ESSAGES > YES >
> edit the template if
YES > enter recipient’s phone
YES.
Te m p l a t e s
select the message to delete >
Delete?
appears > YES.
For more information on how to enter text, See “Entering Special
Characters” on page 34.
Receiving a Text Message
When you receive a message, you hear a beep or tone and the message
New message Read now?
appears in the display.
Te m pl a t e s
appears > YES
YES.
NO after the
prompt.
> YES >
> YES >
> YES >
CLR >
Reading the message now
1 Press YES when you see the question
display shows when the message was received and from what number it was sent, if your network supports the Calling Line Identification service (CLI). If you have saved the number together with a
name in the phone book, the name is shown instead.
2 Scroll through the message using the arrow keys. An arrow at the
bottom right corner of the display indicates that there is more text
in the message.
3 At the end of the message, when the arrow in the display disap-
Proceed?
pears.
will appear. Press YES. A new menu with different
options appears:
• Delete
• Reply
• Forward
• Save
• Call
• Read Next
Note! If the sender of the message wants you to reply, the message
requested Reply?
appears in the display when you press YES, if this
function is supported by your network operator. If you do not want
to reply, press
NO.
New message Read now?
Deleting Messages
You can also delete a message by pressing CLR while reading it. The
Delete?
message
sage while reading it.
You can also delete the message without reading it.
appears in the display. Press YES to delete the mes-
The
Reply
Text Messaging (SMS) 43
Page 50

Some menus/features are operator dependent.
M
ESSAGES > YES >
delete >
CLR (
Inbox
Delete?
> YES > select the message you want to
appears) >YES.
Saving Messages to Read Later
The Phone Memory
The phone memory can hold 30 messages. When all memory positions are full, the oldest read message is overwritten when a new message is received. If the phone memory becomes full of unread
messages, new messages are automatically saved on the SIM card.
Messages remain in the phone memory until you delete them, until
you insert a different SIM card or until the phone needs the memory
space to save new messages.
Note! Concatenated messages can take more than one segment, depending
on the length of the message.
The SIM Card Memory
You can save important messages on your SIM card. Messages that
are saved on the SIM card remain there until you delete them. They
will not be overwritten if you receive any new messages. The maximum number of messages that you can save depends on your SIM
card.
Saving Messages
1 When you have read the message, press YES.
2 Select
Save
The message automatically moves from the phone memory to the
SIM card memory. The display shows the position of the message
and the number of saved messages, for example the third message
of fifteen that can be saved on the SIM card.
in the option list.
Note! If you save your messages on the SIM card, you can reach them if
you should use your SIM card with another phone.
Saving Unread Messages
Press NO when you see the question
The message is now saved in the phone memory and an envelope
icon appears at the top of the display. The envelope icon disappears as soon as you have read the message. If you want to read the
message later you can retrieve it from the Inbox menu (see below).
New message Read now?
Reading a Saved Text Message
MESSAGES > YES >
read > read the message.
indicates an unread message.
indicates that the message that you already read and saved on
the SIM card.
If you want to read the next message, press
message > choose
Inbox
> YES > Select the message you want to
YES at the end of the
Read Next
in the option list.
Calling a Phone Number Found in a Message
1 Select the phone number, for example,
YES when the number is highlighted.
2 Press
Call 9195551212
.
Calling the Sender of the Message
1 When you have read the message, press YES
2 Select
Call
in the option list.
If you have saved the number together with a name in the phone
44 Text Messaging (SMS)
Page 51

Some menus/features are operator dependent.
book, the name of the person who sent the message appears
together with
Call
.
Area Information
Note! This feature may not be available on all networks.
ESSAGES > YES >
M
On /Off.
Area Information Message Types
Each type of Area Information message is identified by a three-digit
code. The list below shows examples of the Area information codes
that exist today.
Code: Message Type:
000 Index
010 Newsflashes
020 Hospitals
022 Doctors
024 Pharmacies
030 Long-distance road reports
032 Local road reports
034 Taxis
040 Weather
050 District cell information
052 Network information
Options
> YES >
Area Info
> YES >
Reception
Code: Message Type:
054 Operator services
056 Directory inquiries (national)
057 Directory inquiries (international)
058 Customer care (national)
059 Customer care (international)
>
Note! These codes are operator dependent. For information about the area
information services that you can use, please refer to the information
supplied by your network operator.
Area Information Message List
You can decide which types of area information messages you wish to
receive. The number of Area Info codes that can be saved depends
on your SIM card.
Inserting an Area Information code
MESSAGES > YES >
YES >
Add new?
Options
> YES >
Area Info
> YES >
> YES > Enter the new code > YES.
Edit List
>
Deleting the code
MESSAGES > YES >
YES > select the code you want to delete > CLR >
Options
> YES >
Area Info
> YES >
Erase?
Edit List
> YES.
>
Receiving an Area Message
When you receive an Area Information message, the message automatically appears in the display. You read the message in the same
way as you read an ordinary text message, see “Receiving a Text Message” on page 43. When you have read the message, press
message is deleted.
YES. The
Text Messaging (SMS) 45
Page 52

Some menus/features are operator dependent.
Cell Information
The Cell information channel (see “Area Information Message List”
on page 45) is used by network operators for sending messages to
their subscribers within a certain network area. For example, the
operator may inform you that you are within your home network
area and that you can now make calls at a lower rate.
This feature may not be supported by your network operator.
ESSAGES > YES >
M
Off.
Options
> YE S >
Cell Information
> YES > On/
46 Text Messaging (SMS)
Page 53

Call Information
Some menus/features are operator dependent.
During a call, the duration of the call is shown in the display. When
you end the call, the call duration information is shown for another
three seconds. If you subscribe to cost information, the call cost (or
the number of call units) is displayed instead of the call duration.
Note! Depending on whether a call is ongoing or not, the menus ‘Call Info’
and ‘Ongoing Call’ will replace each other.
Total Call Time or Call Cost
The Call Info menu allows you to check the total time or cost of
your calls.
Check duration of last call CALL INFO > YES >
Check cost of the last call. CALL INFO > YES >
Check time of outgoing
calls
Check total call time CALL INFO > YES >
Check total call cost CALL INFO > YES >
Last Call
>YES
Last Call
> YES
CALL INFO > YES >
Outgoing Time
Tot al Ti me
Tot al Co s t
> YES
> YES
> YES
Call Timers
Call Costs
Call Timers
Call Timers
Call Costs
> YES >
> YES >
> YES >
> YES >
> YES >
Reset total call time CALL INFO > YES >
Reset total call cost C
Note! If you subscribe to cost information, you must enter your PIN2 to
clear the cost or time counter.
Clear Timers
clear
ALL INFO > YES >
Clear Total Cost
Call Timers
> YES > choose a timer to
Call Costs
> YES > enter PIN2
> YES >
> YES >
Determining the Call Cost
The Ta ri f f function lets you enter and specify the price per call unit.
The price entered is stored on your SIM card.
Note! This service must be supported by your subscription and your net-
work.
If you do not specify a price per call unit, the number of call units is
displayed during a call, and in ‘Last call’ and ‘Tot a l c os t ’ in the ‘Call
Info’ menu.
Entering a Price Per Call Unit
Scroll to CALL INFO > YES >
enter your PIN2 >
the currency you want.
Tip! USD for US Dollar >
ple 0.75) >
YES > Select
YES.
Call Costs
> YE S >
Set Tariff
> YES >
Change Tariff >
YES > enter the price per call unit (for exam-
enter the code for
Call Information 47
Page 54

Some menus/features are operator dependent.
To enter the decimal point, press
#.
To revert to call units
Scroll to CALL INFO > YES >
enter your PIN2 >
YES > select
Call Costs
Units.
> YES >
Set Tariff
> YES>
Credit Limit for C a lls
If both your network and SIM card support this feature, you can
enter a total amount of money that can be used for making calls.
This could be useful when you lend your phone to someone and do
not want their call costs to exceed a certain amount which you can
decide. After a call is made, the cost is deducted from this amount.
When the amount reaches zero, no more calls can be made.
Note! As the price of a call may vary due to where you are calling from, at
what time of the day you are calling and so on, the credit limit is
only an estimated value.
Set a specific credit limit C
Set unlimited credit CALL INFO > YES >
Note! If you set the credit to Unlimited, the cost counter starts from zero
and increases.
ALL INFO > YES >
Set Credit
> YES > Enter PIN2 > YES >
Change Credit >
Set Credit
Unlimit ed
enter amount > YES
> YES > Enter PIN2 > YES >
Call Costs
Call Costs
> YES >
> YES >
48 Call Information
Page 55

Call Options
Some menus/features are operator dependent.
Call Forwarding
If you want to make certain that your incoming calls are correctly
handled when you are unable to answer them, you can use the For-
ward Calls service to forward them to another phone number.
If you subscribe to the Two Line Service, you may set different For-
ward Calls for your two voice lines (Line 1 and Line 2). You will
then have an additional forward alternative (All Line 2 Calls).
If you placed your phone in a specific Ericsson Desktop Charger,
your calls may be forwarded automatically.
When you are making a phone call and the phone call is forwarded
to another number, this is indicated in your display, if supported by
your subscription. Similarly, when receiving an incoming phone call
which has been forwarded from another number, this is indicated in
your display, if supported by your subscription.
Activating Call
Forwarding
Call Options 49
SETTINGS > YES >
Forward Call s
forwarding option >
recently used number for the forward
function will appear) enter a new number,
if desired >
The forward calls icon will appear in
the display.
Call Options
> YE S > choose a
Activate
YES
> YES >
> (the most
Canceling Call
Forwarding
Checking the Status of Call
Forward
Checking the Status of all
Forwarded Calls
SETTINGS > YES >
Forward Calls
cancel >
ETTINGS > YES >
S
Forward Calls
check >
ETTINGS > YES >
S
Forward Call s
>
Cancel
> YES > select the option to
YES >
Cancel
> YES > select the option to
YES >
Get Status
> YES >
Call Options
Call Options
Call Options
Restrict Calls
A password, obtained from your network operator, is required to
activate call restriction.The following calls can be restricted.
• All Outgoing - all outgoing calls
• Outgoing Intl- all outgoing international calls
• Outg Intl Roam - all outgoing international calls except to your
home country
• All Incoming - all incoming calls
• Inc when Roam - all incoming calls when you are abroad (when
roaming),
Check All
> YES >
> YES >
> YES >
> YES
Page 56

Some menus/features are operator dependent.
Note! If you forward incoming calls, you cannot activate some Restrict
Calls options. Likewise, if you restrict calls, you cannot activate some
Forward Calls options.
Activate Call Restrict S
ETTINGS > YES > Call Options >
YES > Restrict Calls >YES > select
type (activate, cancel, get status) >
Cancel All Restrict Calls SETTINGS > YES > Call Options >
YES > Restrict Calls >YES > Cancel
YES >enter password > YES
All >
Check Status of Call Restrict SETTINGS > YES > Call Options >
YES > Restrict Calls >YES > scroll to
option >
YES > Get Status > YES
Change Passwords SETTINGS > YES > Call Options >
YES > Restrict Calls >YES >Change
Passwd >
YES > enter new password > YES >
repeat new password>
YES > enter old password >
YES
Fixed Dialing
The Fixed Dialing function allows calls to be made only to certain
numbers saved on the SIM card. If an attempt is made to call other
numbers, the message
Fixed Dialing requires a SIM card that allows fixed numbers to be
saved. The fixed numbers are normally protected by your PIN2. The
quantity of fixed numbers you can save depends on your SIM card.
Number not permitted
appears in the display.
YE S
It is possible to save partial numbers, for example an area code, or an
area code followed by the first digits common to several numbers.
Tip! Storing 919555 allows calls to be made to all numbers starting with
919555 Numbers beginning with the international (+) sign and
country code can also be saved, allowing you to make calls abroad.
Numbers which include question marks can be saved. A question
mark should be read as a wild card (it can represent any number 0-
9). To enter a question mark press and hold
#.
Note! The Fixed Dialing service does not prohibit calls to the emergency
number 911(or international emergency number 112).
Activate Fixed Dialing Phone Book > YES > Options > YES >
Fixed Dialing >
YES > select On/Off.
Save Fixed Numbers Phone Book >
YES > Add new?, YES > enter your PIN2
YES > enter the fixed number > YES >
>
YES > enter your PIN2 >
YES > Fixed Numbers >
enter the name you want to associate with
YES
YES >
YES > edit
YES > edit the name >
Edit a Saved Fixed
Number
the number >
Phone Book > YES > Fixed Numbers >
YES > Edit > YES > scroll to the fixed
number that you want to edit >
select Edit > enter your PIN2 >
the fixed number >
YES > enter the position number > YES
50 Call Options
Page 57

Some menus/features are operator dependent.
Delete a Fixed Number Phone Book >
>
YES > scroll to the fixed number that
you want to delete >
enter your PIN2 >
YES > Fixed Numbers
YES > select Delete >
YES. The fixed number
is deleted.
Closed User Groups
This feature limits outgoing calls to specified numbers. This can be
very useful when operators give lower rates for specific groups.
Note! The index numbers are provided by your network operator.
Add a Closed User Group S
Activate a Closed User Group SETTINGS > YES > Call Options > YES
Call Outside a Closed User
Group
ETTINGS > YES > Call Options > YES
> Closed Groups >
YES > Add new? > YES >enter the
name of the group >
index number of the group >
> Closed Groups >
YES > scroll to the group > YES >
Activate >
YES > Edit List >
YES > enter the
YES
YES > Edit List >
YES
SETTINGS > YES > Call Options > YES
> Closed Groups >
>
YES> On
YES > Open Calls
Edit a Name in the List SETTINGS > YES > Call Options > YES
> Closed Groups >
YES > scroll to the group to edit > YES
> Edit > enter a new name >
YES > Edit List >
YES
Delete a Group from the List SETTINGS > YES > Call Options > YES
> Closed Groups >
YES > scroll to the group to delete >
YES > Delete
YES > Edit List >
Accept Calls
With the Accept Calls service, you can choose to receive calls only
from certain numbers. Other calls are automatically rejected by a
busy tone. You have to store the numbers that you want to receive in
an Accepted List. The rejected calls are saved in the Call List in the
ALL INFO menu. When you buy your phone, the setting for the
C
Accept Calls service is set to From All and you will receive calls as
normal. To change the Accept Calls options, follow this path and the
extension noted in the table.
Add New Numbers to List S
Delete Numbers from the
List
ETTINGS > YES > Call Options > YES
> Accept Calls > YES > Accepted List
>
YES > Add new? > YES > select a
number from your phone book
ETTINGS > YES > Call Options > YES
S
> Accept Calls > YES > Accepted List
>
YES > scroll to the number to delete >
CLR > YES
press
Call Options 51
Page 58

Some menus/features are operator dependent.
Activate the From List S
Activate the From No One
Function
Activate the From All
Function
ETTINGS > YES > Call Options > YES
> Accept Calls > YES > Accepted List
YES > select From list
>
ETTINGS > YES > Call Options >
S
YES > Accept Calls > YES > Accepted
List >
YES > select From No One
ETTINGS > YES > Call Options >
S
YES > Accept Calls > YES > Accepted
YES > select From All
List >
52 Call Options
Page 59

Handling Multiple Calls
Some menus/features are operator dependent.
Note! Depending on whether a call is ongoing or not, the menus C
I
NFO and ONGOING CALL will replace each other.
The Call Waiting Service
If you wish to be able to receive a second call while another call is in
progress, you must turn on the
Call Waiting
The
service may not be available on all networks. If you
are engaged in a fax or a data call, you will not hear any incoming
calls. Incoming calls are rejected.
Activate Call Waiting SETTINGS >YES >
Cancel Call Waiting SETTINGS >YES >
Check Status SETTINGS >YES >
Call Waiting
>
YES >
Call Waiting
Activate
> YES
>
YES >
Call Waiting
Cancel
> YES
YES >
Call Waiting
>
Status
>YES
service.
Call Options
>YES >
Call Options
>YES >
Call Options
>YES >
Get
ALL
Receiving a Second Call
If the
Call Waiting
receive a second call. The number or name of the caller is normally
shown at the top of the display together with a list of the alternatives
Answer, Busy
number, the display shows
Put Current Call on
Hold to Answer
Waiting Call.
Reject Waiting Call Select
End Current Call
and Answer Waiting
service is on, you hear a tone in the earpiece if you
and
Release & Answer
Press
YES. Your held call is marked in
. If the incoming call is a restricted
Private.
grey in the display and the
active call is marked in
black.
Busy.
If the caller’s network
supports it, the caller hears
a busy tone.
If
Forward When Busy
on, the waiting call is
forwarded to the number
you have specified.
Release
Select
& Answer.
You will now be connected
to the second caller.
is
Call
Handling Multiple Calls 53
Page 60

Some menus/features are operator dependent.
Note! You may also receive a third call. You must disconnect one of the
calls or create a conference call before you can answer the third call.
See “Conference Calls” on the following page.
Making a Second Call
Put the current call on hold by pressing YES > enter the number you
wish to call >
Tip! You may also retrieve the number from your phone book by pressing
and holding
Note! You can only put one call on hold.
YES.
Ó
.
One Active Call and One Call On Hold
When you have one active call and one call on hold, you can do one
of the following:
Switch Between the Two
Calls
End Active Call and Return
to Call on Hold
End Both Calls O
YES.
NO >
Retrieve call?
you press
appears > YES. (If
NO, the call on hold will be
ended.)
NGOING CALL > YES >
YES
Release all
Connect the two calls (Call
transfer)
Join Two Calls into a
Conference Call
ONGOING CALL > YES >
YES
ONGOING CALL > YES >
YES
Tra ns fer ca ll
Join calls
>
>
Conference Calling
A conference call is a call with more than two participants. As in an
ordinary conference, all participants can hear each other at the same
time. You may include up to five participants in a conference call.
To create a conference call, you must have one active call and one call
on hold.
NGOING CALL > YES >
O
Adding New Participants to the Conferen ce Group
You may put the conference group on hold and then add new participants.
YES to put the conference group on hold > Call the next per-
Press
son you wish to include in the conference group > scroll to O
ING CALL > YES >
You can include up to five participants in the conference group by
>
repeating process.
Checking the Participants in the Conference Group
ONGOING CALL > YES >
Join Calls
Join Calls
Parties in Conf
> YES.
NGO-
> YES.
> YES.
54 Handling Multiple Calls
Page 61

Some menus/features are operator dependent.
The first participant’s phone number is displayed, if available. If the
participant’s number and name are stored in your phone book, the
name is displayed instead. Otherwise the display shows party 1, 2,
etc.
Scroll with
Ð
or Ó to check the other participants.
Having a Private Conversation with one Participants
If you wish to have a private conversation with one of the participants, you may extract that participant from the conference and put
the other participants on hold.
NGOING CALL > YES >
O
that you want to extract >
Extract Part
YES.
> YES > select the participant
To rejoin the participant to the conference group, scroll to O
ING CALL
> YES >
Join Calls
> YES.
Releasing Participants from the Conference Group
You can release participants from the conference group one by one or
all at once.
O
NGOING CALL > YES >
that you want to release >
To release all participants, scroll to
YES.
Release Part
YES.
Ongoing Call
> YES > select the participant
> YES >
Release All
Making a Call while a Conference Call Is in Progress
You can put the conference group on hold and make another call.
You can then switch between the new call and the conference call.
YES > enter the number you wish to call > YES
NGO-
• Press YES to switch between the new call and the conference
group.
• Press
ference group.
Ending the Conference Call
Press NO.
Using Two Voice Lines
If your subscription supports the Tw o L in e Se rv ic e, your phone will
have two voice lines with different phone numbers, separate bills and
perhaps different subscription services. This is useful, for example, if
you want to keep business calls and private calls on separate lines.
When you buy your phone, the names of the lines are normally Line
1 and Line 2, but you can change their names. You can only send
text messages (SMS) on Line 1. An icon ( ) indicates the line
currently chosen for outgoing calls.
S
ETTINGS > YES >
line > enter a new name >
>
Changing Phone Lines
Note! Incoming calls can be received on both lines, regardless of the line
currently chosen.
C
ALL INFO > YES >
Switch to Line 2
From now on, all outgoing calls are made on this line.
NO and then YES to end the new call and return to the con-
Display
> YES >
YES.
Next Call
Edit Line Tags
>YES > select
>YES > select a
Switch to Line 1
(or
).
Handling Multiple Calls 55
Page 62

Some menus/features are operator dependent.
Note! Depending on whether a call is ongoing or not, the menus C
I
NFO and ONGOING CALL will replace each other.
Different Settings for Each Line
You may have different settings for each line, for example, the ring
signal or forward calls. You may also have separate voicemail numbers for each phone line, if supported by your subscription. Some
operators may show the call time or call cost for each line respectively.
ALL
56 Handling Multiple Calls
Page 63

Voice Activation
Some menus/features are operator dependent.
The phone is equipped with a built-in voice recognition system
known as Voice Activation.
This system allows you to:
• voice dial - make calls
• voice answer - answer and reject calls
Voice Dialing
Activating the Voice Dialing function
PHONE BOOK > YES >
Recording Voice Dialing Labels
You can record (save) a voice label together with a name and number
in your phone book. The voice label and the name do not have to
match. That is, you can store a number with the name
what you see in the display when searching for a number in your
phone book), but your voice label might be
labels are stored on your phone.
Note! You will need to record new voice labels if you change phones or
SIM cards. The message
when you insert a new SIM and attempt to activate the Voice Dial
feature.
Options
> YES >
Voice Dialing
Voice Dial Error SIM Changed will appear
Christina
> On.
Home
. The voice
(that is
If you insert a new SIM card and attempt to record a new voice label,
SIM changed! Erase all voice labels?will appear. Press NO to keep the
original labels.
Note! Your phone can hold up to 10 different voice labels.
Adding a Voice Dialing Label to a Phone Book Entry
1 PHONE BOOK > YES >
ical list (according to sort order) or enter the name.
2 Select the name you want to add a voice label to >
Add voice
3
4
> YES.
After the Tone, Say the Name
Ok?
appears. Press YES to store or press NO to start over.
The voice label icon appears next to the position number.
Find and Edit >
appears.
Playing the Recording - Is it
YES
>
YES to see alphabet-
YES.
Replacing or Erasing Voice Dialing Label
1 Scroll to PHONE BOOK > YE S >
erase or replace.
2 The name and number is displayed and the voice label is played.
YES to select > select
3 Press
low prompts.
Voice L abel s >
Replace voice
select a label to
or
Erase voice
> YES > fol-
Using Voice Dialing
Once you have recorded your voice labels and the Voice Dialing
function is on, you can start using the Voice Dialing system.
Voice Activation 57
Page 64

Some menus/features are operator dependent.
1 Clear the display using
2 Press and hold the
CLR.
YES key, or the press the upper side volume key
briefly
3 Say the voice label after the prompt.
Voice Label List
If the Voice Dialing function is on, the PHONE BOOK menu
includes a list of labels. When selected, you can scroll through the
names and numbers which have a voice label attached. When such a
number is displayed, its voice label is played back. You can call the
number by pressing
HONE BOOK > YES >
P
YES.
Voic e l a be l s
> scroll through the list to hear
the labels.
Voice Answering
Recording the Voice Answering Labels
Voice Answering
maximize sound quality, you should be attached to a handsfree
device when you are recording your voice answering labels. Be certain the
vated.
Turning On Voice Answer in g
SETTINGS > YES >
YES.
is only available when you are in handsfree mode. To
Voice Answering
option in the SETTINGS menu is acti-
Handsfree
> YES >
Voice Answering
> YES >
On
Creating Voice Answering Labels
The word that you choo se to accept or reject calls can be any word in
any language, but the recording time is limited. Try to make the
words unique and not too short, such as
to accept and
Busy
Answer
to reject incoming calls.
1 Scroll to S
YES > ON > YES.
ETTINGS > YES
> Handsfree
> YES >
Voice Answering
>
2 Follow the phone’s prompts to add the voice answering labels. For
instance, say “Answer” for answering and “Busy” for rejecting.
YES when prompted to save your recordings.
Press
Note! Be sure that you have two different words for accepting or rejecting.
Voice Answering
When you receive an incoming call, clearly say the voice command
that you have recorded.
Recording Prob lems
If the phone could not detect any speech, one of the following might
have happened:
• The name of the voice label was too short
• The background noise of your recording location was too loud
• Yo u s poke too so f t l y
>
• You spoke before the beep
• The label is too similar in sound to another label
Try to change one of these factors and repeat the steps in “Adding a
Voice Dialing Label to a Phone Book Entry.”
58 Voice Activation
Page 65

Calendar
Some menus/features are operator dependent.
The Calendar makes it possible for you to keep track of important
phone calls that you need to make or meetings that you need to
attend. You can also have the phone remind you before an appointment. In this way, you can be sure that you don’t miss anything
important, no matter where you are.
You can store three different types of appointments in your Calen-
dar:
• Meeting, including date and time, duration, subject, location and
a reminder.
• Phone call, including date and time, duration, what phone num-
ber to call, subject and a reminder.
• Reminders, including date, time and subject.
Adding a Meeting
1
Extras
> YES >
Calendar
Meeting
2 Select
3 Enter the
4 Enter the
Ð
or Ó to select the
5 Use
select a duration.
YES.
6 Press
> YES >
> YES.
Start date:
> YES.
Start time:
> YES. (Use * to toggle between am/pm).
Add new
> YES.
Duration
time for the meeting. Use * to
Note! The phone will alert you if you are scheduling a meeting that con-
flicts with another appointment.
Subject
7 Enter the
input. See “Predictive Text Input” on page 34.
8 Enter the
9 Use
Ð
or Ó to select when to get a
Use * to select a reminder time.
YES. When the reminder has been stored, the display shows
10 Press
New entry added
> YES. The phone will default to predictive text
Location >
YES.
Reminder
about the meeting.
.
Adding a Phone Call
1
Extras
> YES >
Calendar
> YES >
Add new
> YES.
Phone call
2 Select
3 Enter the
4 Enter the
Ð
5 Use
select a duration.
YES.
6 Press
Note! The phone will alert you if you are scheduling a meeting that con-
flicts with another appointment.
7 Enter the phone number of the person you are going to call. >
YES.
> YES.
Start date:
> YES.
Start time:
or Ó to select the
> YES. (Use * to toggle between am/pm).
Duration
time for the meeting. Use * to
Calendar 59
Page 66

Some menus/features are operator dependent.
8 Enter the
Subject
> YES. The phone will default to predictive text
input. See “Predictive Text Input” on page 34.
Ð
or Ó to select when you want your
9 Use
Reminder
to sound or
appear. Use * to select a reminder time.
YES.
10 Press
New entry added
appears.
Using the Phone Call Reminder Function to Place a Call
When you add a reminder to a phone call entry, the phone number
will appear along with the reminder. When setting the reminder,
On Time
choose
to have the reminder appear at the same time you
have scheduled the call.
1 When the reminder appears (or sounds), press
Call?
will appear. Press YES to call the stored number.
2
YES.
Adding a Reminder
1
Extras
> YES >
Calendar
> YES >
Add new
> YES.
2 Select
Reminder
and then press YES.
Start date:
Start time:
Subject:
and press YES.
and press YES.
and press YES.
New entry
3 Enter the
4 Enter the
5 Enter the
When the reminder has been stored, the display shows
added
.
Using Your Calendar
Viewing Today’s Appointments
1
Extras
> YES >
Calendar
> YES >
View today
2 Navigate through the appointments using
new
to add a new appointment for today.
Viewing Weekly/Monthly Appointments
The weekly overview displays all your appointments during a certain
week. All your appointments are displayed as boxes, and the number
of the week is displayed in the top right-hand corner.
Extras
> YES >
Calendar
> YES >
1
Week view
2 Use the keypad in the following ways:
• Use the side volume keys to jump from one day to another.
1 and 3 to jump a week backward or forward.
• Press
4 and 6 to jump a month backward or forward.
• Press
7 and 9 to jump a year backward or forward.
• Press
• Use
Ð
or Ó to move backward and forward within one day.
CLR to return to today’s date in the month view. Press and
• Press
YES to jump to the weekly overview.
hold
• Press
YES to see daily overview.
Calling a Phone Number Stored in an Appointment
1
Extras
> YES >
Calendar
> YES.
2 Go to the day of the appointment in which the phone number is
stored, by selecting either
View today, Week v ie w
> YES.
Ð
or Ó, or select
/Month view > YES.
or
Month view
Add
.
60 Calendar
Page 67

Some menus/features are operator dependent.
3 Scroll to the appointment and press
4 Select
Call
from the list.
YES and then YES again.
Managing Your Calendar
Deleting Appointments
1
Extras
> YES >
Calendar
> YES.
2 Go to the day of the appointment you wish to delete by selecting
View today, Week view,
either
3
Note! In
View today
Week view
> scroll to the appointment you wish to delete > CLR.
and
Month view
and then scroll to the appointment you wish to delete and press
Editing Calendar Appointments
1
Extras
> YES >
Calendar
2 Go to the day of the appointment you wish to edit by selecting
View today, Week view,
either
3 Scroll to the appointment you wish to edit and press
YES again.
4 Select
Edit
.
5 Enter the correct date and time. Press
Note! If you do not want to change a part of an entry, for example, the
date, press
fully changed when you see the text
YES and it remains the same. The entry has been success-
or
Month view
.
: First select the day of the appointment
> YES.
or
Month view
.
YES after each selection.
Saved
in the display.
YES. Press
CLR.
Calendar 61
Page 68

Some menus/features are operator dependent.
Setting Network Preferences
When you turn on the phone, it searches for the last accessed network. If this is not within range, you may use another network, provided your home network has an agreement that allows you to do so.
This is called
The order of preference in which the phone chooses a network is
determined by a list of preferred networks on your SIM card. Your
phone includes a number of functions that let you determine how it
searches for a network. You may also choose a network yourself from
those within range.
Selecting a Specific
Network
Automatic Search
roaming
.
Settings
> YES >
Network >
If there is more than one network within
range, scroll to the network you want and
press
YES to select it.
Settings
> YES >
> YES
Mode
The phone automatically starts searching
for a network according to the list of
preferred networks stored on your SIM
card.
Networks >
YES
Networks >
YES >
YES >
Select
Search
Display Information
The active network is marked with a filled button. The network
name and the following information is available in the display. Other
networks without icons are available.
Preferred
network
indicator
Forbidden
network
indicator
Home network
indicator
Indicates that a network is
preferred and can be used.
Indicates that a network is
forbidden and cannot be used.
Indicates that your network is
within range and can be used.
Forbidden Networks
The names of the forbidden networks are stored on your SIM card.
If such a forbidden network is within range, it is left out when the
phone searches for a network (automatic search mode).
If your home network and a forbidden network come to an agreement that allows you to use the forbidden network, you can select
this network even though the message
Forbidden
is displayed.
62 Setting Network Preferences
Page 69

Some menus/features are operator dependent.
List of Preferred Networks
You can create and edit a list that defines which order your phone
will select a network during automatic network selection, when your
home network is not within range. The number of networks that can
be stored in the list depends on your SIM card.
You can review the network list and rearrange the order of the networks. You can also add new networks to the list and delete networks
from it. Follow this path and the extensions noted below.
Review list S
View network name SETTINGS > YE S >
Delete a network SETTINGS > YE S >
Rearrange the list S
ETTINGS > YES >
Preferred Nets
Networks
> YES > scroll with Ð or
Networks
Preferred Nets
name >
> YES > scroll to network
YES >
Full Name
Networks
Preferred Nets
network to delete >
ETTINGS > YES >
Preferred Nets
network to move >
> YES > scroll to the
YES >
Networks
> YES > scroll to the
YES >
> enter new position >
> YES >
> YES >
> YES >
Delete
> YES >
Change Priority
YES
Add a network SETTINGS > YES >
Preferred Nets
scroll to the network to add >
Networks
> YES >
> YES >
Add new?
> YES >
YES* >
enter a position number > YES.
*If the network you want does not appear
Other
in the list, scroll to
and press YES.
Enter the three-digit country number and
the two-digit network number and press
YES. All lower prioritized networks will be
shifted one step down in the list.
Ó
Search Modes
Automatic search mode
accessed network first. If this is not available, it automatically
searches for another available network within range.
.
Manual search mode
accessed network first. If this is not available, the question
appears. You then need to choose a network as described on the previous page.
Automatic Search
Manual Search
means that your phone searches for the last
means that your phone searches for the last
Select net?
Settings >
YES >
Networks
YES >
>
Settings >
>
YES >
Automatic
YES >
Manual >
> YES >
>YES
Networks >
YES
YES >
Search Mode
Search Mode
Setting Network Preferences 63
Page 70

Some menus/features are operator dependent.
Security
This icon indicates ( ) that either SIM Card Lock or Phone Lock
is activated.
SIM Card Lock
The SIM card lock only protects your subscription and not your
phone itself from unauthorized use. If you change SIM cards, the
phone still works with the new SIM card. Most SIM cards are locked
at the time of purchase. If the SIM card lock is on, you have to enter
the PIN every time you turn on your phone.
Note! If you enter your PIN incorrectly three times in a row, the SIM card
is blocked. This is indicated by the message
pens you need to unblock it to access your subscription. If you enter
the wrong PUK 10 times in a row, your card is permanently blocked.
If this happens, you should contact your network operator.
Unblock SIM Card
PIN blocked
(or PUK2) which you will find in the
information supplied by your network
operator >
eight-digit PIN (or PIN2) >
enter the new PIN (or PIN2) to
confirm >
PIN blocked
. If this hap-
appears > enter your PUK
YES > enter a new four- to
YES > re-
YES.
Change PIN SETTINGS >YES >
> YES >
Lock
YES >enter the old PIN* > YES > enter
the new PIN >
YES.
Turn Off/On SIM Card Lock SETTINGS >YES >
Lock
> YES >
(or
On
) > YES >
Note! If the message
Codes do not match
appears, this means you entered
the new PIN incorrectly. If the message
Old PIN:
by
, you entered your old PIN incorrectly.
Locks
Change PIN
YES > repeat new PIN >
Locks
Protection
Enter PIN2
Wron g PI N
Phone Lock
The phone lock protects the phone against unauthorized use if it is
stolen and the SIM card is exchanged. It is not on when you buy the
phone. You can change the phone lock code (0000) to any 4- to 8digit personal code.
The phone lock can be
Phone Lock O n
If the phone lock is On, the message
appears each time you turn on the phone. You have to enter your
code followed by
On, Automatic,
or
Phone locked Phone lock code:
YES to use your phone.
Off
.
> YES >
Card
(or
PIN2
) >
> YES >
> YES >
Card
Off
> YES.
appears, followed
64 Security
Page 71

Some menus/features are operator dependent.
Automatic
If the phone lock is set to Automatic, you do not need to enter your
phone lock code until a different SIM card is inserted in the phone.
After the phone lock code has been entered correctly, the phone can
be used with the new SIM card. You are not asked to enter the phone
lock code again until the original SIM card or a different SIM card is
inserted.
Changing the Phone Lock
Code
Setting the Phone Lock S
ETTINGS > YES >
S
Lock
> YES >
the old code >
YES > repeat new code > YES.
ETTINGS > YES >
> YES >
Lock
Automatic/Off
Locks
> YES >
Phone
Change Code
YES > enter the new code >
Prot ection
> YES > enter
Locks
> YES >
> YES > select On/
Phone
(the current selected setting
is not available in the list) > enter the
phone lock code >
is shown).
status
YES (the new lock
Keypad Lock
This icon indicates the keypad is locked.
Note! Calls to 911 (or112, the international number) can be made when
the keypad is locked. If the phone alarm rings, you can turn it off by
pressing any key.
The keypad remains locked until you:
• answer an incoming call.
• replace the battery.
• unlock the keypad.
Manual Keylock
Lock Keypad From Standby, press and hold CLR > 2 to
select
Keylock On
Unlock Keypad From Standby, press and hold
Keylock off
> YES.
CLR >
> YES.
Automatic Keylock
Automatic keylock means that if no keys are pressed in 25 seconds,
the keypad will be locked. The keypad lock is always disabled if the
phone is connected to vehicle handsfree equipment.
S
ETTINGS > YES > Locks > YES > Auto Keylock > YE S > On > YES.
Security 65
Page 72

Some menus/features are operator dependent.
Extras
Alarm Clock
The phone has an alarm clock, which you may find useful when
traveling. When it is on, an icon is shown in the display.
The alarm rings at the time set and the display flashes, even if the
phone is turned off. The volume of the alarm signal is always increasing, provided the battery is attached and charged.
The alarm rings for 60 seconds and is repeated every nine minutes, if
you do not turn it off. After 60 minutes, the repeat function is
turned off automatically.
Set the Alarm EXTRAS > YES >
enter the time >
Change Alarm E
XTRAS > YES >
Set New Time
YES.
Tur n A la rm Of f W hen it
Rings
Press any key to turn the alarm off
when it rings.
If you do not want the alarm to be
repeated, press
Tur n A la rm Of f EXTRAS > YES >
Cancel
Select
Alarm Clock
YES.
Alarm Clock
> YES > enter the time >
YES
Alarm Clock
.
> YES >
> YES >
> YES >
Calculator
The phone has a built-in calculator, which can add, subtract, divide
and multiply. E
• Press
• Press
• Press
XTRAS > YES >
# to get
+, -, x, /
CLR to erase a figure to the left of the cursor.
Calculator
.
* to enter a decimal point.
Using the Calculator
In this example we are going to divide 134 by 32.
XTRAS > YES >
Tip! E
until the division sign (
To clear the display, press
Calculator
> YES > enter 134 > press # repeatedly
/) appears > enter 32 > YES to get the answer.
CLR.
Games
Your phone has four different games for your enjoyment. There are
help texts available in each game as a guide for you to get started.
The following games are available:
• Te t r i s ®
• Solitaire
66 Extras
Page 73

Some menus/features are operator dependent.
• Maze
• Erix
Tetris®
The object of Te t ri s is to prevent the blocks from reaching the top.
Each time you fill a line, the line disappears.
XTRAS > YES >
E
Te t r i s
appears in the display > select
Ð
using
Games
> YES >
Te t ri s
or Ó > Press any key to start.
> YES.
Start
> select level (1–10) by
Controlling the game
• Press 8 or the lower side volume key = move left
2 or the upper side volume key= move right
• Press
5 or 9 to rotate
• Press
• Press
3 or 6 to drop faster
CLR to pause
• Press
NO to quit
• Press
Tetris®; © Elorg 1987. Classic Tetris™; © Elorg 1998
Tetris Logo by Roger Dean, © The Tetris Company 1997
All Rights Reserved
Solitaire
The object of Solitaire is to form four piles of cards, one per suit,
running from ace to king. The cards are dealt out into seven columns. The last six columns have one or more cards facing downward. If the top card in a column is removed, revealing the facedown card, you may turn it face up. Only kings, or stacks of cards
beginning with a king may be moved to an empty column.
Columns of cards are built up in descending order and alternating
color. For example, the eight of hearts may be placed on either the
nine of clubs or spades.
The remaining cards in the deck are available for play. You can turn
these cards one at a time. The card in the discard pile may be placed
on the columns or the ace piles. When you run out of cards in the
deck, you can flip it over and continue.
XTRAS > YES >
E
Solitaire
appears in the display > to start a game select
Resume game
Instead of choosing Start you can scroll with
Games
> YES >
Solitaire
if you have played before).
> YES.
Ð
Resume game or Help (at step 2 above).
Controlling the game
• Press 1 to select card/pile, confirm move, clip card
2 to turn up new card from game deck
• Press
3 to put card on ace pile
• Press
• Press
4 to view a pile (selection and move is possible)
Maze
The objective of Maze is to eat the items in the Maze while avoiding
the monsters. Once accomplished, the degree of difficulty will
increase.
XTRAS > YES >
E
Games
> YES >
Maze
> YES > YES to start game
Controlling Maze
• Press Ð or Ó to change selections (help, game difficulty, etc.)
• Press
CLR to pause the game.
New game
or Ó to select
(or
Extras 67
Page 74

Some menus/features are operator dependent.
• Press
2 to move up
• Press
8 to move down
6 to move right
• Press
4 to move left
• Press
Erix
The objective of Erix is to isolate the bouncing objects into as small a
space as possible. You will draw lines to reduce the playing space.
The percentage of space to isolate is displayed in the top corner of
the screen. Once accomplished, the degree of difficulty will increase.
XTRAS > YES >
E
Games
> YES >
Erix
> YES > YES to start game
Controlling Erix
• Ð or Óto change selections (help, game difficulty, etc.), to move
left and right within the game.
CLR to pause the game.
• Press
2 to move up
• Press
• Press
8 to move down
6 to move right
• Press
4 to move left
• Press
Timer
The phone has a built-in 24-hour timer. You set the time you want
and when that time is out, an alert signal sounds.
Setting the Timer
EXTRAS > YES >
YES.
onds >
The countdown begins. The timer is shown in standby mode.
When the alert sounds, press any key to turn it off.
Timer
> YES > enter the hours, minutes and sec-
Setting a New Time When the Timer is Running
EXTRAS > YES >
YES.
time >
The countdown begins. The timer is shown in standby mode.
When the alert sounds, press any key to turn it off.
Timer
> YES >
Set New Time
> YES > enter the
Turning Off the timer
E
XTRAS
> YES >
Timer
> YES > select
Cancel
.
Note! The timer does not work when the phone is turned off.
Stopwatch
The phone has a built-in stopwatch for you to time a certain activity.
Running the Stopwatch
EXTRAS > YES >
YES again to stop it.
Resetting the Stopwatch
Press CLR when the stopwatch is not running.
Note! By pressing
lap times. Press
Stopwatch
> YES > YES to start the stopwatch >
# when the stopwatch is running, you can store up to 9
Ð
or Ó to check your stored lap times. If you receive
68 Extras
Page 75

an incoming call or voice or text message while the stopwatch is running, the stopwatch is turned off. If you exit the stop watch menu
the stop watch is turned off.
Some menus/features are operator dependent.
Extras 69
Page 76

Some menus/features are operator dependent.
Online Services
Online Services
The Online Services is the network operators’ way of offering customized services, independently of mobile phones and mobile phone
manufacturers.
Compatibility
Added value services based on the
in order to work:
• a mobile phone that supports the
Your Ericsson phone is such a phone.
• a network operator offering the
Note! The Online Services on the SIM are designed and run by network
operators and not by mobile phone manufacturers. If you require
further information about the Online Services, please contact your
network operator.
Online Services
Online Services.
Online Services
require two things
.
New Menu
A SIM card which supports the
way as a normal SIM card.
When you have inserted your SIM card and turned on your phone,
your network operator may download data to your SIM card. After
the first data download and after restarting your phone, the proactive
70 Online Services
Online Services
works in the same
SIM offers a new menu in the phone. The menu offers you new features and services, which can be used instantly.
Extras
In your phone, this menu appears under the
only be one new submenu entry under the main menu, but there can
be several submenus under the new submenu entry.
menu. There can
Entering your New Menu System
1 EXTRAS > YES >
If any submenus appear, select the one that you want and press
YES.
NO to go back to the standby menu.
2 Press
Note! Some operators may not use the name Online Services for this
menu. Please consult your network operator for more information.
Online Services
> YES.
Proactive SIM
The
Online Services
SIM can tell the phone to take certain actions. These actions could
include:
• Showing text from the SIM in the phone’s display
• Setting up a call to a number on the SIM
• Initiating a dialog with the user
provides a proactive SIM. This means that the
Page 77

Some menus/features are operator dependent.
Note! All these actions are taken by the SIM card and have nothing to do
with the phone’s software.
Data Download to the SIM Over the Air
Your network operator may at any time download new data to your
SIM card over the air. This new data could consist of new features or
a new menu.
Resetting your SIM Card
When the operator updates your SIM card over the air, the phone
notifies you by showing a message in your display. You also hear a
beep.
In order for your new SIM settings to take effect, you have to turn
off your phone and then turn it on again.
Note! After a data download the phone may not work and you will not be
able to use it until you restart it. This feature is operator dependent
and will probably not happen very often.
SIM Card Initiated Features
Note! Some SIM cards may not allow certain numbers to be processed
through your network. You will receive a message from the phone
that the call is not possible or is not allowed. Refer to your provider
for more details.
The SIM card may prompt you to make a call. This could happen
even if you are already engaged in a call.
When this happens, the phone will notify you by producing a sound
and showing a message in the display.
• If you are not engaged in a call, a message is shown in the display,
asking you whether you want to confirm and make the SIM card
initiated call.
If you want to make the SIM card initiated call, press
If you do not want to make the SIM card initiated call, press
• If you are already engaged in a call, you are asked either to put the
current call on hold or to end it.
A message appears in the display, asking you whether you want to
confirm and make the SIM card initiated call.
If you want to make the SIM card initiated call, press
If you do not want to make the SIM card initiated call (you may
want to continue with the ongoing call), press
Sending a SIM Card Initiated SMS
The SIM card may set up an SMS (text message) and ask you to send
this message, for example by the question
YES if you want to send the SMS.
Send message now?
Details of Services Offered
All services and functions that come with the
work dependent. Please contact your network operator for details of
services offered by the
Online Services.
Online Services
YES.
NO.
YES.
NO.
Press
are net-
Online Services 71
Page 78

Some menus/features are operator dependent.
Ericsson Mobile Internet
When you are on the move and in need of communication and
information, the
Mobile Internet
The
for you to communicate and receive information quickly, wherever
you are. It gives you access to various messaging services, on-line customer services, user manuals and other useful information. With the
Mobile Internet
ensure you get the best out of your Ericsson products.
The Ericsson Mobile Internet address is:
http://mobileinternet.ericsson.com
Mobile Internet
is a service supplied by Ericsson to make it easier
you can also download communications software to
is the answer.
72 Online Services
Page 79

Using the WAP Browser
Some menus/features are operator dependent.
Examples of
• Ericsson Mobile Internet (
tal offering you online access to customer services, user’s guides,
and useful information when you are traveling
• Reservation services
• News, sports, and weather
• Restaurants, cinemas, games, etc.
• Banking and stock exchange quotes
• Voice mail, e-mail, and fax mail
WAP SERVICES you will be able to find are:
http://mobileinternet.ericsson.com)
Terminology
In this chapter and in the WAP Services menu, you will see many
new terms. Here is a brief description of some of the terms that may
appear.
WAP -
Wireless Application Protocol. A standard created specifically
for mobile communications devices that gives you fast and easy
internet access from your phone.
Gateway Address
operator’s WAP gateway. Contact your service provider if this infor-
mation is not stored in your WAP Services settings.
Bookmark
to store your favorite bookmarks.
- The SMS Gateway access number to your network
- Like any Internet browser, your phone has the capability
a por-
Homepage
browsing. Each profile has its own homepage.
Profile
its own settings such as gateway number, homepage, password, and
name.
- The page your phone will default to when you begin
- Customized settings to simplify browsing. Each profile has
Before You Start
Make sure the WAP settings in your phone are correctly set. Your
operator should provide you with all the necessary information when
you sign up for your subscription to the WAP service: for example
user name and gateway address. These settings can either be entered
in your phone at the time you buy it, or later via an SMS sent to
your phone. See “Changing the WAP Settings Manually” on
page 77.
Note! Please contact your network operator before you decide to change
the settings manually. This way you can be sure the entered settings
are correct.
Setting Up Your WAP Connection
1 WAP SERVICES > YES >
Gateway
>
2 Enter the user id to your gateway > YES.
> YES >
WAP Settings
User ID
>YES > select a profile > YES
> YES.
Using the WAP Browser 73
Page 80

Some menus/features are operator dependent.
3 Select
Password
> YES > enter the password to your gateway >
YES.
Gateway
4 Select
YES.
5 Press NO to return to
> YES > enter the phone number to your gateway >
Profile
submenu > select
Service Center
> enter the phone number to your service center > YES.
Viewing a WAP Page
You can open WAP pages in three different ways:
1 Open your homepage
2 Open a bookmark
3 Enter a WAP address manually
If your network operator has entered its own page into your
SERVICES menu, you can also start the browser by selecting this
address. See “Operator Page” on page 76.
This animation will appear when your phone is searching for, or
connecting to, a WAP site.
Note! WAP Browser - Your phone uses SMS (Short Message Service) as a
bearer for WAP. Not all network operators support WAP over SMS.
For more information, please contact your operator.
Opening Your Homepage
WAP SERVICES > YES >
on which profile you have selected) >
Mobile Internet
(this will change depending
YES.
> YES
WAP
Opening a Bookmarks
Adding a bookmark
Note! You can only add bookmarks while you are browsing.
1 Scroll to
2 Start your browsing by selecting either
3 Find the WAP page that you want to bookmark. Press and hold
4 Scroll to the submenu
5 Your new bookmark has been saved when you see the text
Opening a Bookmark While Browsing
1 While browsing, press and hold YE S until
2
Deleting a Bookmark
You can store a maximum of 10 bookmarks. If you have reached this
limit, you can delete some of the bookmarks that you do not use any
more.
WAP SERVICES > YES.
Mobile Internet, Bookmarks
or
Enter address
.
Read more about how to use these menus in the rest of this chapter.
YES until options appear.
Add bookmark
and press YES. If there are
any empty positions left in your bookmark list (you can save up to
10 bookmarks), your new bookmark is stored. If your bookmark
list is full, you have to delete another bookmark before you can
save the new one.
mark stored
.
Options
Go to
> YES >
Suspend
> YES >
to open >
YE S >
Go to
Bookmarks
> YES.
> select the bookmark
Book-
appears.
74 Using the WAP Browser
Page 81

Some menus/features are operator dependent.
WAP SERVICES > YES >
wish to delete >
Delete
Bookmarks
>
Delete?
> YES > select the bookmark you
appears > YES.
Editing a bookmark
1 Scroll to WAP SERVICES > YES >
2 Select the bookmark you wish to edit >
Edit.
3 Select
4 Under the heading
Title:
title of the bookmark. Enter the correct name of the bookmark
and then press
5 Under the heading
YES.
Address:
the address. Enter the correct address and then press
Bookmarks
> YES.
YES.
, use the Ð or Ó keys to move within the
, use the Ð or Ó keys to move within
YES.
Sending a bookmark to another person via SMS
1 Scroll to WAP SERVICES > YES >
2 Select the bookmark you wish to send and press
3 Select
Send as link
YES.
> YES > enter a message following the link >
4 Enter the recipient’s phone number or retrieve it from the phone
Ð
book by pressing
Sending message
5
been sent
.
.
appears in the display followed by
Note! To send the bookmark you are currently visiting in the browser:
Options
open the
menu by pressing and holding YES and then select
Send as link.
Bookmarks
> YES.
YES.
Message has
Manually Opening Websites
1 Scroll to WAP SERVICES > YES >
2 Enter the URL address of the WAP page you want to go to, for
example: http://mobileinternet.ericsson.com
YES.
3 Press
Note! Forward slashes (
//
) and the @ symbol can be accessed with the 0
key. Periods (.) can be accessed with the
If the WAP address starts with http://, you do not need to enter this
prefix. You only need to enter the prefix if it starts with something
else, for example, ftp://.
Enter Address
1 key.
Profiles
Your phone comes with three WAP profiles to assist in simplifying
browsing. You can, for example, associate one profile to your operator’s WAP page and one to your company’s intranet. Instead of hav-
ing to enter the access settings, when you want to switch between
your operator’s WAP page and your company’s intranet, you can
simply switch profiles. It is important to remember two things about
the WAP profiles:
• You can set different homepages for each WAP profile. When you
switch profiles, the homepage changes to the homepage set for
that profile.
• A saved bookmark may not work with all WAP profiles. When
you save a bookmark, it is associated with the WAP profile that
you are currently using. If you cannot access a bookmark, you may
> YES.
Using the WAP Browser 75
Page 82

Some menus/features are operator dependent.
solve the problem by switching profiles and then accessing the
bookmark again.
Selecting a Profile
WAP SERVICES > YES >
YES.
The homepage associated with this profile will now be the homepage
listed under the WAP Services menu.
Wap Pr o f i le
> select a profile by pressing * >
Renaming a Profile
WAP SERVICES > YE S >
enter the new name >
Wap Settings
YES to store.
> select a profile >
Rename
Changing the Profile Homepage Name and Address
WAP SERVICES > YE S >
Homepage
> enter the new title for the homepage > YES to store >
enter the new address >
Wap Settings
YES to store.
> select a profile >
Chg
Operator Page
Depending on the network, you can find the homepage of your network operator.
1 Scroll to
WAP SERVICES
name is decided by your operator) >
2 Your operator’s WAP page appears.
Note! If you cannot find this menu, your network operator does not sup-
port this service.
> YES > select your operator’s page (the
YES.
Your Browsing Options
When you are browsing a WAP page, you can access the Options
menu. The options you can choose from this menu are supplied with
the pages, and therefore the menu may look a bit different depending on which page you are looking at. Generally, on the Options
menu you can also find functions that are useful when browsing.
Options
You can reac h t h e
• No matter where you are browsing, press and hold
Options
>
• Scroll to an area on the WAP page that does not contain any links,
menu appears.
phone numbers or e-mail addresses and press
find an empty row at the bottom of the WAP page.
The Options Menu
The
Options
page you are looking at, because it can contain special features. However, it always contains the options below:
•
Suspend.
access your bookmarks among other things.
Reload
•
content.
Add bookmark.
•
list of bookmarks.
Send as link
•
phone via SMS.
New homepage
•
•
Exit
menu may look a bit different depending on which
Go back to the WAP SERVICES menu where you can
. Get the latest version of the WAP page by refreshing its
. Send the current page as a bookmark to another
the browsing session.
menu in two ways:
YES until the
YES. You can always
Add the page you are currently browsing to your
. Set the current WAP page as your homepage.
76 Using the WAP Browser
Page 83

Some menus/features are operator dependent.
Displaying Images
You can choose whether you want to see images or not when you are
browsing. The images take extra time to download, but the WAP
pages looks better with them. When you buy the phone, the image
On
load is set to
Scroll to
Image Load
>
.
WAP SERVICES > YES > WAP
> YES > On/
Off
> YES.
Settings
> select a profile > YES
Note! If you have turned off the image load, the images are displayed as
icons in the display. If a picture contains a link, you can access this
link by highlighting the image and pressing
YES.
Returning to the Browser after Accessing the Menus
If you have selected the option Suspend in order to access the WAP
menu, you can easily return to the site you were visiting when you
left the browser.
1 Scroll to
2 You return to the beginning of the WAP site where you were when
Note! You will end up at the first page of the site, even if you were in the
middle of it when you left the browser.
WAP SERVICES > YES >
you left the browser.
Resume
> YES.
Changing the WAP Settings Manually
Note! Please contact your network operator before you start changing the
settings manually. This way you can be sure the entered settings are
correct.
Setting Your User Information
When you start your browsing session, your phone connects to a
network computer. In order for this network computer to establish a
connection to your phone, you need to enter your user ID (user
identification), password, IP address and the phone number to your
gateway.
1 Scroll to
WAP SERVICES > YES > WAP
YES >
Gateway
> YES >
User ID
2 Enter your user ID and press
3 Scroll to
4 Scroll to
YES.
Password
and press YES. Enter your password and press
Gateway
and press YES.
5 Enter access number to the SMS WAP Gateway you should con-
nect to when browsing.
YES.
6 Press
Download Time Out
When you try to access some WAP pages, you may have to wait for a
long time while your phone tries to download the page. You can set
the time that will pass before the download attempt is stopped.
1 Scroll to
WAP SERVICES > YES > WAP
file >
Response Timer
>YES.
YES.
> YES.
Settings
> select a profile >
Settings
> YES > select a pro-
Using the WAP Browser 77
Page 84

Some menus/features are operator dependent.
2 Enter after how many seconds you want the download to continue
before it stops. Press
YES.
Hardware Reset Button
If you are browsing and need immediate access to phone mode, you can
reset the phone by pressing the
hardware reset button. To access the
button, you must remove the back
panel and the battery.
Note! You will need to power on the
phone after pressing the reset button. Your connection to the web will
be lost until you reconnect.
78 Using the WAP Browser
Page 85

Troubleshooting
Some menus/features are operator dependent.
This chapter lists some problems that you might encounter while
using your phone. Some problems require that you call your service
provider, but most of the problems you encounter you can easily correct yourself.
Error Messages
Insert Card
There is no SIM card in the phone or you may have inserted it incorrectly. Insert a SIM card. See “Step 2: Insert the SIM Card” on
page 14.
Insert Correct SIM Card
The phone is set to only work with certain SIM cards. Insert the correct SIM card.
SOS Calls Only
You are within range of a network but you are not allowed to use it.
However, in an emergency, some operators allow you to call the
international emergency number 112 (or 911). See “Making Emergency Calls” on page 22.
No Network
There is no network within range or the received signal is too weak.
You have to move to get a signal that is strong enough.
Wrong PIN, Wrong PIN2
You have entered your PIN or PIN2 incorrectly. Enter the correct
PIN or PIN2, and press
YES. See “SIM Card Lock” on page 64.
Codes do not match
When you want to change a security code (for example your PIN)
you have to confirm the new code by entering it again. The two
codes that you have entered do not match. See “SIM Card Lock” on
page 64.
PIN/PIN2 Blocked
You have entered your PIN or PIN2 incorrectly three times in a row.
To u n bl o ck , s e e “SIM Card Lock” on page 64.
PUK blocked- Contact operator
You entered your personal unblocking key code (PUK) incorrectly
10 times in a row. Contact your network provider or service operator.
Phone Locked
The phone is locked. To unlock the phone, see “Phone Lock” on
page 64.
Phone lock code:
Your phone comes with the phone lock code, 0000. You can change
it to any four-to eight-digit code. See “Phone Lock” on page 64.
Troubleshooting 79
Page 86

Some menus/features are operator dependent.
Number not permitted
The Fixed Dialing function is on and the number you have dialled is
not part of your fixed numbers list. See “Fixed Dialing” on page 50.
Charging, alien battery
The battery you are using is not an Ericsson-approved battery and is
charging slowly for safety reasons.
Other Problems
No Indication of Charging
When you start charging a battery that is empty or a battery that has
not been used for a long time, it make take a while until the indicator on the top of the phone shows a red light and the battery meter
appears.
Network is not responding in WAP mode
If you are using WAP services and need immediate access to phone
mode, you can press the Hardware Reset button (located under the
battery). You may need to power on your phone before making a
call.
The Phone Cannot Be Powered On
Recharge or replace the battery. See “Step 3: Attach the Battery” on
page 15.
Accessories, Accessibility, and Internet
Technical Assistance/Ordering Accessor ies
• North America - 1-800 ERICSSON (1-800-374-2776)
• Latin America - 305-755-6789
• Other countries - 919-472-7908
Accessible Solutions/Special Needs
For information on Accessible Solutions for individuals with special
needs call the Ericsson Special Needs Center at 877-878-1996
(TTY) or 877-207-2056 (voice), or visit the Ericsson Special Needs
Center at http://www.ericsson-snc.com
Internet
Visit Ericsson on the internet at: http://www.mobile.ericsson.com
80 Troubleshooting
Page 87

Index
Some menus/features are operator dependent.
A
Accept Calls 51
Accessible Solutions 80
Accessories
adding to profiles 29
Advice of Charge 10
Alarm 66
Alarm indicator 18
Alternate Line Service 10
Answering Calls 23
Area Information 1045
message types 45
receiving area messages 45
Ask to Save 10
Assembling the Phone 13
B
Banking by phone 33
Battery
attaching 15
charging 15
meter 17
removing 15
Bell. See Alarm indicator
Browser 73
C
Calculator 66
Calendar 1059
storing general reminders 59
storing meetings 59
storing phone calls 59
weekly overview 60
Call
restricting 49
Call Cost
setting a credit limit 48
specifying price per unit 47
Call Forward
indicator 17
setting 49
Call Waiting 53
Calling Cards
making a call 37
saving number 37
services 37
Calling Line Identification (CLI) 35
Calls
adding to calendar 59
answering 23
forwarding 49
putting on hold 2354
receiving 23
redialing 22
rejecting 23
CB. See Area Information
Cell Broadcast. See Area Information
Changing Phone Lines 55
Charger 16
Ciphering Indictor 18
Closed User Group 1051
Conference Calls 54
Contacting Ericsson 80
Copying SIMs 32
Credit Cards
making a call 37
saving a number 37
D
Demonstration 10
DTMF tones 24
E
Emergency Calls 22
Error messages 79
Extras 66
Index 81
Page 88

Some menus/features are operator dependent.
F
Find and Call 31
Fixed Dialing 1050
Forwarding Calls 1049
G
Games 1166
H
Help Texts 11
Homepage 74
I
Infrared Modem Indicator 18
International Calls 22
International Emergency Number 22
Internet Access 73
K
Keylock Indicator 18
L
Letters, entering 34
Line indicator 18
Locks
keypad 65
phone 64
SIM, phone 64
M
Missed Call Indicator 17
Missed Calls 36
Mobile Internet 73
Mobile Wiz 11
Muting microphone 23
My Shortcuts 20
N
Network
forbidden networks 62
preferred networks 63
search modes 63
Note Pad 24
O
Online Services 1170
P
Personal ring signal 25
Phone Book 11
checking status of memory 34
e-mail addresses 34
entering letters 34
erasing phone number 32
groups 33
international numbers 30
keeping up to date 31
memory full 32
shortcuts 31
Phone Lock
auto lock 65
full lock 64
Phone Number in SMS 44
PIN 1664
Predictive Text Input 34
Proactive SIM 70
Profiles 1128
auto activation 29
changing settings 28
choosing manually 28
indicator 18
PUK 64
R
Receive Calls 23
Receiving messages (SMS) 43
Redialing Numbers 22
Rejecting Calls 23
Request reply (SMS) 42
Restrict Calls 49
Ring Signal
choosing 25
composing own 26
off 18
personal 25
volume 25
Ringer Volume 25
82 Index
Page 89

Some menus/features are operator dependent.
S
Security 1264
Sending Messages (SMS) 41
Short Message Service 12
Shortcuts 20
Signal Strength Indicator 17
Silent Mode 25
Silent Mode Indicator 18
SIM
card 14
data download to 71
features initiated by 71
inserting 14
proactive 70
removing 14
resetting 71
SMS 12
composing messages 41
deleting a message 44
embedded numbers 44
enabling phone for sending 41
indicator 18
message types 42
reading stored messages 44
receiving messages 43
reply requested 42
sending messages 41
storing messages 44
templates 1242
Special Characters 34
Special Needs 80
Speed Dialing 31
Stopwatch 1268
Stored Messages (SMS) 44
T
Technical Support 80
Tegic® T9® 11
Telephone Banking 33
Text
input 11
messages (SMS) 12
Timer 66
Tone Signals 24
Touch tones 24
Troubleshooting 79
TTY Phone Number 80
Turning Your Phone On 16
Two Line Service 55
V
Voice Label
icon 57
recording 57
Voice Labels 12
Voice Recognition 12
Voicemail 12
calling 39
changing number 39
indicator 18
Volume
changing 23
W
WAP 1273
Index 83
Page 90

Some menus/features are operator dependent.
84 Index
Page 91

Find and Call: Press and hold the right
arrow key. Press YES to see an
alphabetical listing (depends on sort
order).
My Shortcuts: Press and hold the left
arrow key to access the first submenu
in the MY SHORTCUTS Menu.
Viewing Phone Book Entries: Hold
down a number key to view Phone
Book entries beginning with the
corresponding letter (for instance, press
4 to see entries beginning with G).
Voicemail: Press and hold 1.
Microphone Mute (during a call):
Press and hold CLR.
http://mobile.ericsson.com
Keypad Lock/Silent Mode: Press and
hold CLR to lock/unlock the keypad or
turn on/off silent mode.
Voice Dialing: Press and hold YES or press
and hold a side volume key to prompt
voice dialing. Say the label after the
prompt.
Checking Battery Status: Press a side
volume key.
Phone Book Position Information: Press
the position number and # to view what is
stored in that position.
Toggle Input Methods: Press and hold #
while you are entering text.
ERICSSON Z
Storing Numbers in Phone Book:
Enter phone number > PHONE
YES > Add Number > YES >
BOOK >
YES to select number > enter name >
YES to select next available position.
Adding a Voice Label to an Existing
Phone Book Entry: Scroll to
PHONE BOOK > YES > Find and
Edit > enter the name or press YES
again to view the entire list > Add
voice > Follow the prompts to record
and store.
Emergency Calls:
112) and press
Enter 911 (or
YES to call.
Handling Multiple Calls: When on a call,
scroll to HANDLE CALLS. Use this
menu to initiate conference calls, to toggle
between several calls, and transfer calls.
Setting the Alarm: EXTRAS > Alarm
Clock > enter the alarm time, in hours
and minutes >
YES. When the alarm
sounds, press any key to deactivate. Press
YES to turn off the alarm
International Calls: Press and hold down
0 until + appears (the + symbol replaces
the international code). Enter the number.
Press YESto call.
Some menus/features are operator dependent.
AE/LZT 123 5632 R1
Page 92

A2218z Menu Structure
Find and Call
Add Number
Find and Edit
Voice Labels
Groups
Email Addresses
Calling Cards
Options
Memory Status
Fixed Numbers
Call Voicemail
Inbox
Send New
Unsent
Templates
Sent Items
Options
Missed Calls
Call List
Call Costs
Call Timers
Next Call
Options
Turn off Tones*
Hold Call
Switch Calls
Release Active
Join Calls
Transfer Call
Release All
Call Info
Sounds & Alerts
Profiles
Call Options
Networks
Display
Language
Time and Date
Locks
Handsfree
Master Reset
Alarm Clock
Calendar
Calculator
Games
Timer
Stopwatch
Mobile Wiz
Demo
Accessories*
Ongoing Call menu replaces Call Info when engaged in a call.
The Accessories submenu only appears when an accessory is connected.
Some menus/features are operator dependent.
Homepage Name
Bookmarks
WAP Profile
Enter Address
Resume
WAP Settings
Select Profile
Ring Volume
Edit Shortcuts
 Loading...