

Page 1
A1018s/A1018sc Standard Electrical Repair
Approved according to 1776-2/FEA 209 544
Trouble-shooting
instruction
A1018s/A1018sc
Standard electrical repairs
4/00021-2/FEA 209 544/16.B
Page 2
A1018s/A1018sc Standard Electrical Repair
Table of contents
1 Conditions .......................................................................................... 3
1.1 Component classes. ......................................................................... 3
1.2 Abbreviations .................................................................................. 4
2 No serv / not able to connect calls. ................................................... 5
3 Doesn´t start. ..................................................................................... 8
4 Audiofel ............................................................................................ 13
5 Display ............................................................................................. 21
6 Charging .......................................................................................... 24
7 SIM fault .......................................................................................... 26
8 Keyboard ......................................................................................... 28
9 Illumination and buzzer ................................................................. 32
10 RTC .................................................................................................. 40
11 Component lists ............................................................................... 42
4/00021-2/FEA 209 544/16.B 2 (42)
Page 3

1 Conditions
1.1 Component classes.
All the components of the board are divided into four classes: A, B, C and D. The
class of the component depends on how much of the performance of the phone is
affected when replacing it.
Class A and B: A test call towards the real network (not only towards a GSM test
instrument) and run it through thenormal tests is enough to verify the functionality,
since the performance of the phone is only slightly affected.
Class C: Since the tolerances of the component are so great it can substantially
affect the performance of the phone you need to calibrate it at station level after
replacing the component.
Class D: Class D components need to be calibrated at board level using advanced
equipment and may therefore not be replaced.
A1018s/A1018sc Standard Electrical Repair
4/00021-2/FEA 209 544/16.B 3 (42)
Page 4

1.2 Abbreviations
B: Crystal.
C: Capacitor.
D: Digital circuit.
F: Over voltage protection.
H: Buzzer, LED, pads for display.
J: Connector.
L: Coil.
N: Analogue circuit.
P: Test point.
R: Resistor.
V: Transistor or diode.
A1018s/A1018sc Standard Electrical Repair
W: Antenna connection.
X: Contact surface at the circuit board.
Z: Filter
AGND: Ground for analogue signal.
AFMS: Audio From Mobile Station
ATMS: Audio To Mobile Station
DCIO: DC voltage used for charging the battery through the system connector.
GND: Ground.
LED3K: Logical signal used to activate the background illumination.
RTC: Real time clock. The clock that keeps track of time and date.
VBATT: Battery voltage (~4.8 V).
VDIG: DC voltage for the processor and memory (3.2 V).
VCORE: DC voltage for the processor and DSP (2.5 V).
VRAD: DC voltage for the radio part (3.8 V).
4/00021-2/FEA 209 544/16.B 4 (42)
Page 5

A1018s/A1018sc Standard Electrical Repair
2 No serv / not able to connect calls.
2.1 Type of fault.
Connect the phone to a GSM test instrument and try to get serv at –68.5 dBm input
signal, check both bands (GSM 900 & 1800).
If the phone:
• Doesn´t get serv at any of the bands, proceed to section 2.2.
• Gets serv at GSM 900, but not at GSM 1800, proceed to section 2.3.
• Gets serv at GSM 1800, but not at GSM 900, proceed to section 2.4.
• Gets serv, but can´t connect a call at any of the bands, proceed to section 2.5.
If the phone can connect a call against the GSM instrument, but not at the real network, make sure the phone isn´t locked out from the system due to theft.
2.2 The phone doesn´t get serv.
Replace the antenna and try again.
Make sure the frame of the phone isn´t mechanically damaged.
Open the phone and check for liquid damages.
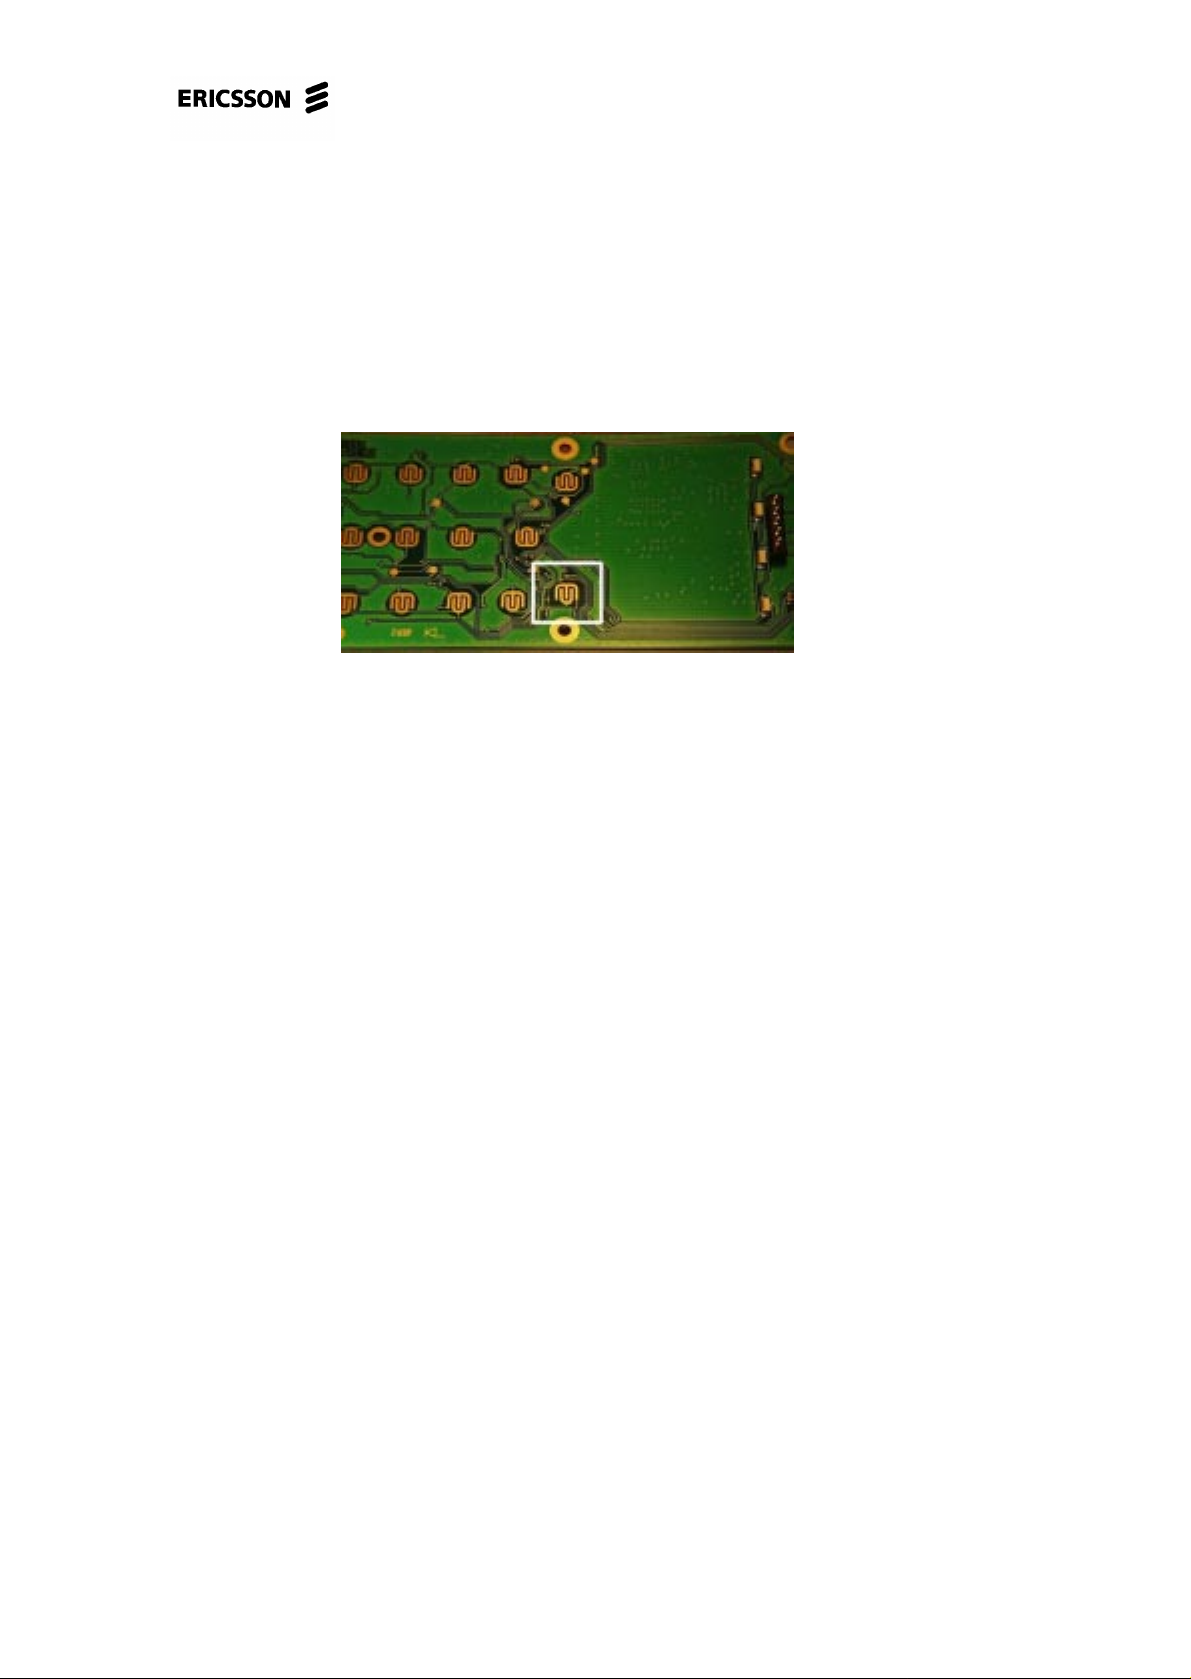
Make sure the antenna connection W101 (class A, fig. 2.1) isn´t oxidised or
mechanically damaged.
Check the soldering at N202 (class C), N203 (class B) and N300 (class B)(all in
fig.2.1).
If the fault remains, send the phone to the next repair level.
4/00021-2/FEA 209 544/16.B 5 (42)
Page 6

A1018s/A1018sc Standard Electrical Repair
Fig. 2.1
2.3 The phone only gets serv at GSM 900.
Open the phone and check for liquid damages.
Check the soldering at N330 (class B), N332 (class B) and N202:40,41 (class C)(all
in fig.2.1).
Replace N330.
If the fault remains, send the phone to the next repair level.
2.4 The phone only gets serv at GSM 1800
Open the phone and check for liquid damages.
Measure the resistance of N203:5 (class B, fig 2.1) to ground. The resistance should
be high (>1 Mohm). If it is considerably low (a few ohm), is the fault probably due
to Z200 (class B).
Check the soldering at N331 (class B), N333 (class B) and N202:43,44 (class C)(all
in fig.2.1).
Replace N331.
If the fault remains, send the phone to the next repair level.
4/00021-2/FEA 209 544/16.B 6 (42)
Page 7

A1018s/A1018sc Standard Electrical Repair
2.5 The phone gets serv, but can´t connect a
call.
Open the phone and check for liquid damages.
Check the soldering at the components around N202 (class C) and N550 (class
C)(both at fig. 2.1).
If the fault remains, send the phone to the next repair level.
4/00021-2/FEA 209 544/16.B 7 (42)
Page 8
3 Doesn´t start.
3.1 Type of fault.
Attach a dummy battery.
• If the phone starts automatically, proceed to section 3.2.
Press the On/Off button.
If:
• The phone starts (lights up the illumination, asks for SIM or PIN or searching for
a network), check the charging function by connecting a charger to the system
connector.
* If the charging doesn´t work, proceed to chapter 6 (“Charging”-fault).
* If the charging works, the phone probably is okay (the fault can be due to
problem with the battery).
A1018s/A1018sc Standard Electrical Repair
• The phone only works as long as the On/Off button is being pressed, proceed to
section 3.3.
• The phone doesn´t start, proceed to section 3.1.1
• The fault is intermittent, proceed to section 3.4
3.1.1 Doesn´t start.
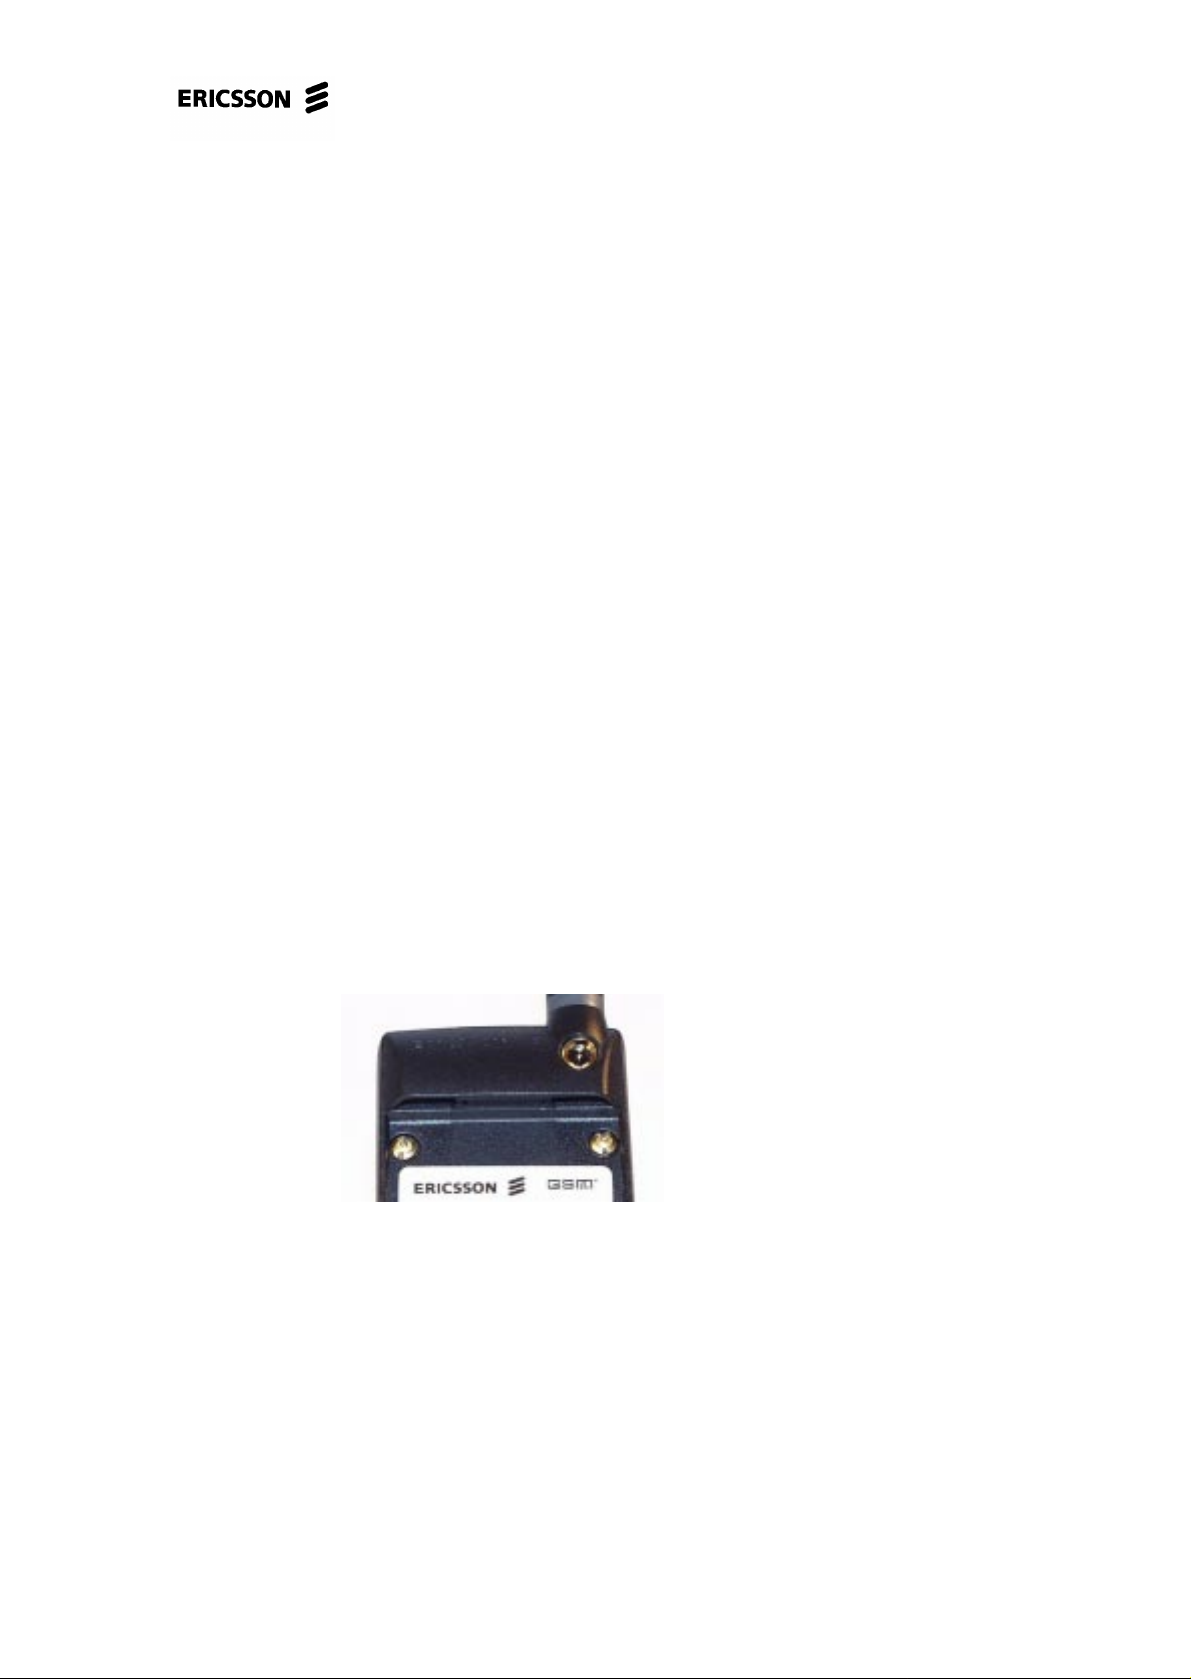
Make an outer visual check and make sure the battery screws (fig 3.1) are okay and
properly mounted.
Fig. 3.1
Keep the On/Off button pressed. Check the current consumption.
If:
• The phone doesn´t consume any current at all, proceed to section 3.5.
• The phone consumes between 1-200 mA, proceed to section 3.6.
• The phone consumes more then 200 mA, proceed to section 3.7.
4/00021-2/FEA 209 544/16.B 8 (42)
Page 9
A1018s/A1018sc Standard Electrical Repair
3.2 Start immediately when the battery is
attached.
Open the phone and check for liquid damages.
Make sure there is no dirt making a short circuit at the On/Off pads (”No” key, fig
3.2).
Clean if necessary, use alcohol and a brush.
Fig. 3.2
If the fault still remains, send the phone to the next repair level.
3.3 The phone works as long as the On/Off button is being pressed.
Open the phone and check for liquid damages.
Check the soldering at D600:116 (fig. 3.3).
Diode measure V702:2-3 (fig. 3.3). Replace if it is faulty.
Measure the resistance between D600:116 – V702:2 to verify an eventual foil damage, in that case the board has to be discarded.
Replace D600.
If the fault still remains, send the phone to the next repair level.
4/00021-2/FEA 209 544/16.B 9 (42)
Page 10

A1018s/A1018sc Standard Electrical Repair
Fig. 3.3
3.4 The fault is intermittent.
Make an outer visual check and make sure the battery screws (fig 3.1) are okay and
properly mounted.
Open the phone and check for liquid damages, also make sure the connection pads
for the battery screws are clean.
Check the soldering at D600 and D610 (fig. 3.3).
If the soldering is correct and the fault remains, send the phone to the next repair
level.
3.5 The phone doesn´t consume any current at
all.
Open the phone and make a visual check of the board. Check for liquid damages on
both sides of the board, dirty or oxidised pads at the system connector and the battery connections, and if there are any obviously damaged components.
4/00021-2/FEA 209 544/16.B 10 (42)
Page 11
A1018s/A1018sc Standard Electrical Repair
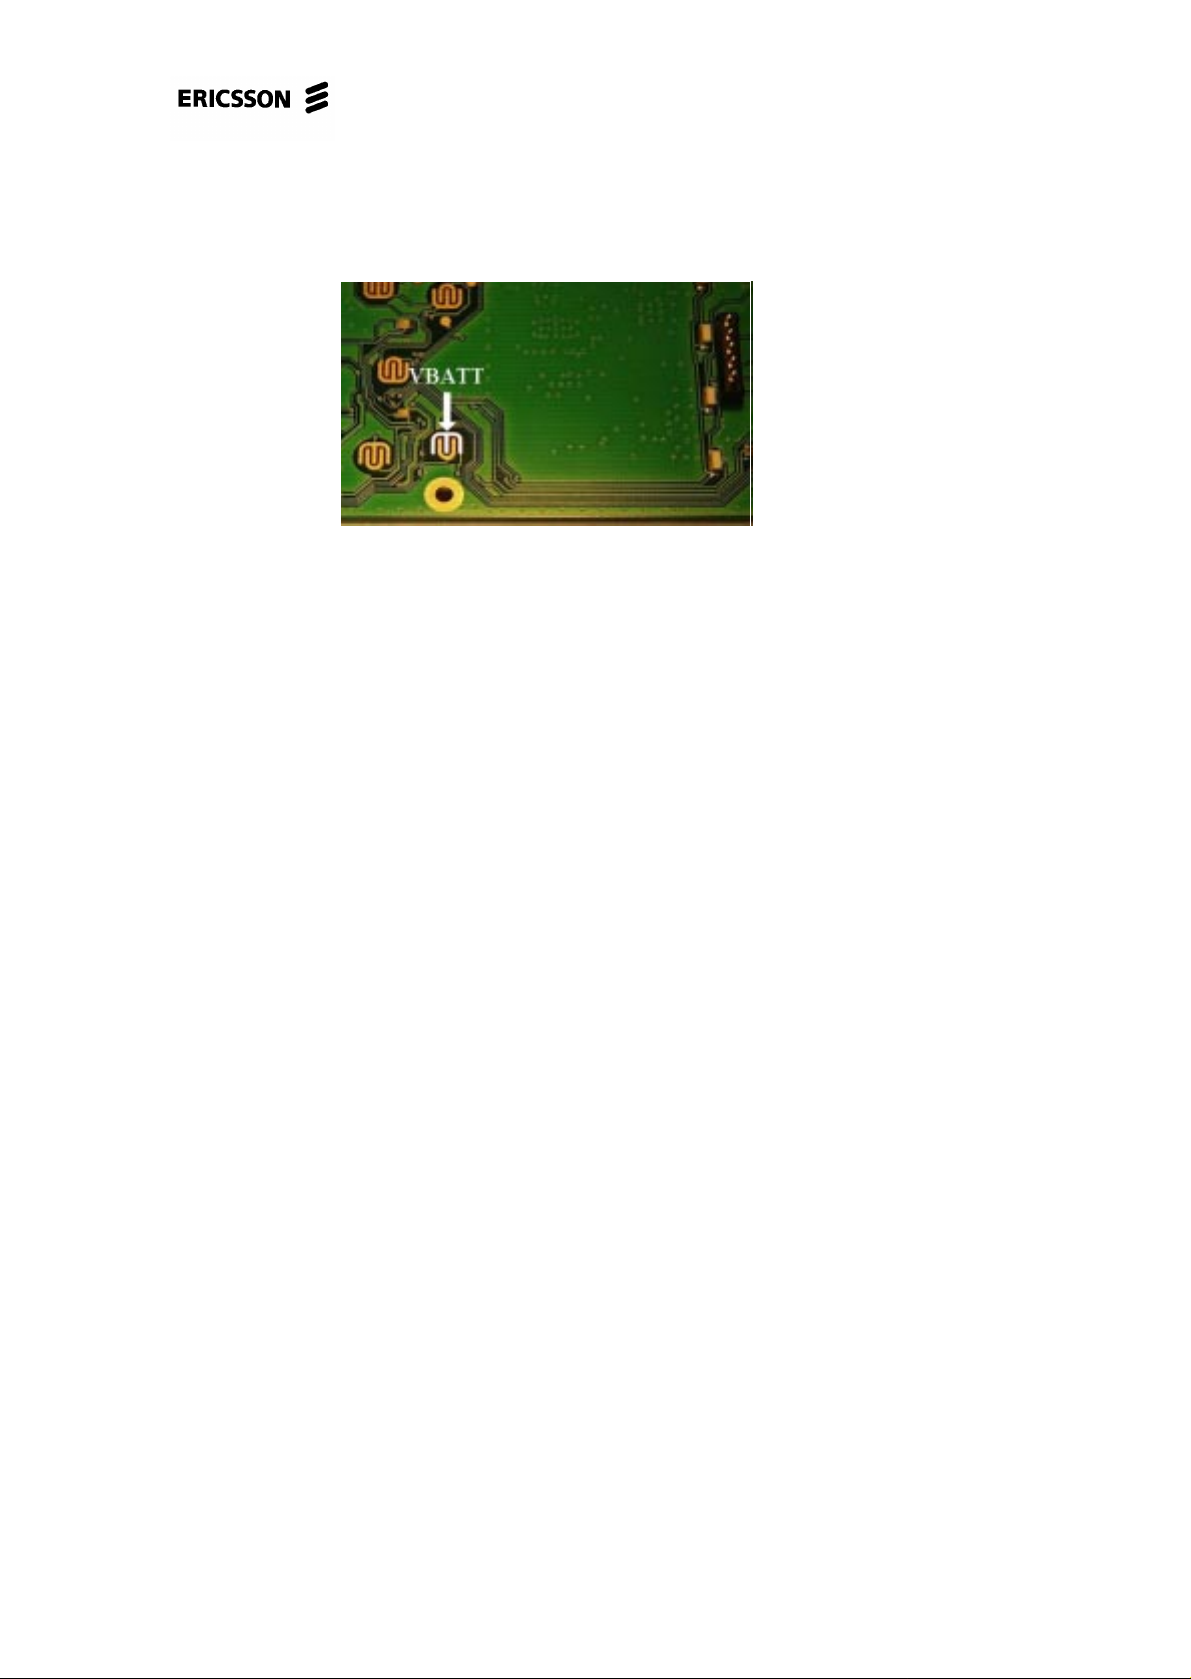
Givethe board power and make sure VBATT exists at the marked side of the On/Off
button (fig. 3.5). If VBATT doesn´t exist, is there a foil damage and the board has to
be discarded.
Fig. 3.5
Make sure R703 (4.7 kOhm) and R704 (0 Ohm, both fig. 3.3) is correctly mounted
and has got the correct resistance.
Give the board power again. Keep the On/Off button pressed and measure the voltage at V702:3 (~3.5 V when VBATT=5.0 V)
• Incorrect: Replace V702.
• Correct: Replace V703 and V704.
Note! The components V703,V704, R703 and R704 are only mounted at the board
version 3920/2.
If the fault still remains, send the phone to the next repair level.
3.6 The current consumption is between 1-200
mA.
Try to program the phone again. Make sure the system connector is okay.
Open the phone and check for liquid damages and other damages.
Check the soldering at D600 and D610 (fig. 3.3).
Measure the voltage at N701:5 (~3.2 V) and N700:5 (~2.5 V) (fig. 3.3).
• Incorrect: Replace the faulty component. If the fault remains, send the phone to
the next repair level.
4/00021-2/FEA 209 544/16.B 11 (42)
Page 12

A1018s/A1018sc Standard Electrical Repair
Measure the voltage at the marked side of C710 (~3.1 V).
• Incorrect: Replace C710
• Correct: Replace D610. Try to program the phone again
Replace D600
If the fault still remains, send the phone to the next repair level.
3.7 The current consumption is >200 mA.
Open the phone and check for liquid damages and other damages.
If one or more class A/B component is mechanically damaged or burned, replace it/
them.
Otherwise, send the phone to the next repair level.
4/00021-2/FEA 209 544/16.B 12 (42)
Page 13
4 Audiofel
4.1 Type of fault.
Make a call from the phone that is to be tested (later called the phone) to a phone
that is working correctly (later called the reference phone).
Check the function of the microphone and the earphone.
Connect a handsfree unit to the system connector of the phone.
Check the function of the phone’s external connections by listening to the external
speaker/earphone when talking in the reference phone and by listening to the earphone of the reference phone when talking in the external microphone of the phone.
• If there is low or no sound in the earphone of the phone, proceed to section 4.2.
• If both the earphone and the handsfree speaker don’t work, send the phone to the
• If the sensitivity of the microphone is low (low or no sound in the reference
• If both the microphone in the phone and the microphone of the handsfree don’t
• If both the microphone and the earphone don’t work, proceed to section 4.4.
• If the microphone, the earphone and the handsfree don’t work, send the phone to
• If the microphone of the handsfree doesn’t work, proceed to section 4.5.
• If the speaker of the handsfree doesn’t work, proceed to section 4.6.
• If both the microphone and the speaker of the handsfree don’t work, proceed to
• If the phone sounds strange (the sound is distorted, scrambled, full of static or
• If the phone isn’t able to mute a car stereo through a car mounted handsfree (the
A1018s/A1018sc Standard Electrical Repair
next level.
phone), proceed to section 4.3.
work, send the phone to the next level.
the next level.
section 4.7.
“chopped”), send the phone to the next level.
mute signal doesn’t work), proceed to section 4.8.
4.2 Earphone out of order.
Open the phone and check for liquid damages.
Most of the earphone faults are mechanical. Therefore you should start with replac-
ing the front (with the earphone) to one you know works and try again.
If the fault remains, make sure the earphone connector (J810, fig. 4.1) is intact and
correctly soldered.
Check the soldering at N800 (fig. 4.2).
Measure the resistance between the pins of J810 (>1 MOhm).
• If it is too low, replace C842 (class A, fig. 4.1)
4/00021-2/FEA 209 544/16.B 13 (42)
Page 14

A1018s/A1018sc Standard Electrical Repair
Measure the resistance of C840 or C841 (>1 MOhm, class A, fig. 4.1) to check if
there is a short circuit in any of them.
If the fault remains, send the phone to the next repair level.
Fig. 4.1
4/00021-2/FEA 209 544/16.B 14 (42)
Page 15

A1018s/A1018sc Standard Electrical Repair
Fig. 4.2
4.3 The microphone is out of order.
Open the phone and check for liquid damages. Clean the pads to the microphone if
necessary.
Replace the microphone with one you know is working. Assemble the phone and try
again.
Measure the resistance of R817, R819 (both 1 kOhm, class A) and R818 (22 kOhm,
class A, all fig. 4.2).
Check the soldering at N800:14,15,16 (class C, fig. 4.2).
If the fault remains, replace C818 and C819 (class A, fig. 4.2).
Measure the resistance between the pads of X830 (~48 kOhm, fig. 4.1).
• If it is incorrect, replace C815 and C814 (both class A, fig. 4.2).
Measure the resistance between P800 (fig. 4.1) and ground (~47 kOhm).
• If the resistance is incorrect, measure the resistance of R812 (1.5 kOhm) and
R814 (470 Ohm, both class A, fig. 4.2).
4/00021-2/FEA 209 544/16.B 15 (42)
Page 16

A1018s/A1018sc Standard Electrical Repair
If both resistances are correct, measure the resistance between P800 (fig. 4.1) and
N800:14 (fig. 4.2) (~2 kOhm).
• If it is too large, is there a foil damage and the board has to be discarded.
Measure the resistance between P801 (fig. 4.1) and ground (1.5 kOhm).
• If the resistance is too low, replace C820 (class A, fig. 4.2).
• If the resistance is too large, replace R820 (1.5 kOhm, class A, fig. 4.2).
If the fault still remains, send the phone to the next repair level.
4.4 Both the earphone and the microphone are
out of order.
Open the phone and check for liquid damages.
Check the soldering at N800 (Note! Class C) and D600 (fig. 4.2)
Give the board power and start it using the On/Off button.
Measure the voltage VDIG at N701:5 (~3.2 V, fig. 4.2).
• Incorrect: Proceed to chapter 3 (“Doesn´t start”-fault).
Measure the voltage (~3.2 V) at both sides of R601 (fig. 4.1) and at D600:70 (fig.
4.2).
Measure the voltage (~3.2 V) at both sides of R605 (fig. 4.1) and at D600:67.
• If the voltage at R601 or R605 (both class A) is too low at only one side, replace
the resistor.
* If that doesn´t make it, replace D600.
• If the voltage is too low at both sides of R601 or R605, measure the voltage at
R635 and R636 (~3.2 V, class A, fig. 4.1).
* If a resistor is incorrect, replace it. If VDIG (~3.2 V) is missing at R635 and
R636, but exists at N701:5, the board has got a foil damage and has to be discarded.
If the fault still remains, send the phone to the next repair level.
4/00021-2/FEA 209 544/16.B 16 (42)
Page 17

A1018s/A1018sc Standard Electrical Repair
4.5 The handsfree microphone is out of order.
Open the phone and check for liquid damages, especially around the pads of the
system connector, J602:1,2,4 (fig. 4.3).
Fig. 4.3
Measure the resistance between J602:2 and ground, it should be larger then 30
kOhm. If the resistance is too low (ATMS has a short circuit), try to replace C651
(class A, fig 4.1).
Check the soldering at N800 (Note! Class C, fig. 4.2).
Check the resistance at:
R825 (3,3 kOhm)
R814 (470 Ohm)
C814 (>20 kOhm)
C810 (>50 kOhm)
C812 (>1 MOhm)
R802 (3.9 kOhm)
R805 (15 kOhm)
R803 (1 kOhm)
If any component is faulty, replace it (all class A, fig. 4.4).
4/00021-2/FEA 209 544/16.B 17 (42)
Page 18

Fig. 4.4
A1018s/A1018sc Standard Electrical Repair
If the fault still remains, send the phone to the next repair level.
4.6 The handsfree speaker is out of order.
Open the phone and check for liquid damages, especially around the pads of the
system connector, J602:1,2,4 (fig. 4.3).
Measure the resistance between the system connector J602:1 and ground (~100
kohm), if it is too low, replace F601 (fig. 4.1), C650 and C668 (fig. 4.2) (all class A,
fig. 4.1).
Check the soldering at N800 (fig. 4.2).
Check the resistance of :
R806 (100 Ohm)
R804 (100 kOhm)
C813 (>1 MOhm)
If any component is faulty, replace it (all class A, fig. 4.2).
If the fault still remains, send the phone to the next repair level.
4/00021-2/FEA 209 544/16.B 18 (42)
Page 19

A1018s/A1018sc Standard Electrical Repair
4.7 Both the handsfree microphone and the
handsfree speaker is out of order.
Make sure the system connector is okay and not dirty.
Open the phone and check for liquid damages, especially around the pads of the
system connector. If necessary, use alcohol and a brush to clean.
Measure the resistance between J602:3 (fig. 4.3) and R635 (~0 Ohm at one side, the
resistance of the resistor is 22 kOhm, fig. 4.1).
Measure the resistance between J602:5 (fig. 4.3) and R636 (~0 Ohm at one side, the
resistance of the resistor is 22 kOhm, fig. 4.1).
• If any of R635 or R636 is incorrect, replace them.
• If the resistance is too high, is there a foil damage and the board has to be dis-
carded.
Measure the resistance of R601 and R605 (both 1 kOhm, class A, fig. 4.1).
• If all resistances are correct, check the soldering at N800 and D600:67,70 (fig.
4.2).
If the fault still remains, send the phone to the next repair level.
4.8 Mute fault.
Connect a call and measure the voltage between AGND of the system connector,
J602:4 (fig. 4.5) and MUTE, J602:6, it should be 3.2 V during a connected call.
• If the voltage exists, the fault probably is in the handsfree unit.
• If the voltage doesn´t exists, open the phone and check for liquid damages, espe-
cially around the pads of the system connector.
4/00021-2/FEA 209 544/16.B 19 (42)
Page 20

A1018s/A1018sc Standard Electrical Repair
Fig. 4.5
Measure the resistance between J602:6 (fig. 4.5) and ground, it should be >1
Mohm.
• If it is incorrect, replace C665 (class A, fig. 4.1).
* If the resistance still is incorrect, replace D600 (class B, fig. 4.2).
Measure the resistance between J602: 6 and D600:92 (fig. 4.2), it should be 470
ohm.
• If it is larger, replace R602 (class A, fig. 4.1) and measure again.
* If the resistance still is too large, is there probably a foil damage.
* If the resistance is correct and the fault still remains, replace D600 (class B,
fig. 4.2).
If the fault still remains, send the phone to the next repair level.
4/00021-2/FEA 209 544/16.B 20 (42)
Page 21

5 Display
A1018s/A1018sc Standard Electrical Repair
5.1 Type of fault.
Start the phone, with a fully charged battery attached, using the On/Off button.
If:
• The phone doesn´t start, proceed to chapter 3 (“Doesn´t start”-fault).
• The display misses one or more segments, proceed to section 5.2.
• The display doesn´t show anything at all, proceed to section 5.3.
• The display is black, proceed to section 5.4
5.2 Segments are missing.
Open the phone and check for liquid damages. Replace the display.
5.3 The display shows nothing at all.
Open the phone and check for liquid damages. Make sure the connection H623 is
okay, isn´t dirty or oxidised and the soldering is correct. If the connection is faulty,
the phone should be send to the next repair level. Otherwise try replacing the display.
Give the board power and start it in the fixture. Make sure the voltages at the connection H623 are correct (fig. 5.1).
4/00021-2/FEA 209 544/16.B 21 (42)
Page 22

A1018s/A1018sc Standard Electrical Repair
Fig. 5.1
If:
1 - VLCD (~ 6.2 V) is incorrect, diode measure V608:1-3, V611:1-3 and V611:2-3
(fig. 5.2). Replace if faulty.
Measure the voltage at V611:1 (~3.8 V).
• If the voltage is missing, make sure N580 (fig. 5.2) is correctly soldered, if it is
replace N580.
* If the voltage is still missing, send the phone to the next repair level.
Measure the resistance between VLCD and ground.
• If it is <100 kOhm, replace C633 (fig. 5.2) and C673 (fig. 5.1).
Measure the voltage at D600:95 (~3.0 V) and D600:96 (~0.2 V).
• If any of the voltages are incorrect, measure the resistances of C634 and C636
(fig. 5.2) to make sure there isn´t a short circuit. Replace if faulty. If C634 and
C636 are correct, replace D600.
If the fault remains, send the phone to the next repair level.
2 - VDIG (~ 3.2 V) is incorrect, replace N701 (fig. 5.2). If that doesn´t work, send
the phone to the next repair level.
4/00021-2/FEA 209 544/16.B 22 (42)
Page 23

A1018s/A1018sc Standard Electrical Repair
3 - I2CDAT (~ 3.2V) is incorrect, measure the resistance of R619 (6.8 kOhm, fig.
5.2). Check the soldering at D600:3. If all is correct, replace D600.
5 - I2CCLK (~3.2 V) is incorrect, measure the resistance of R620 (6.8 kOhm, fig.
5.2). Check the soldering at D600:4. If all is correct, replace D600.
Fig. 5.2
5.4 The display is black.
Open the phone and check for liquid damages. Try again using a display you know
is correct. If the fault remains, measure the resistance of R808 (33 kOhm, fig. 5.2).
If the resistance is very low, replace C824 and C826, otherwise replace R807 and
R808 (all in fig.5.2).
If the fault still remains, send the phone to the next repair level.
4/00021-2/FEA 209 544/16.B 23 (42)
Page 24

6 Charging
6.1 Type of fault.
To verify that it is the phone that is faulty, use a charger and a battery you know is
working and try to charge the battery. Note! The phone doesn´t begin to charge if
the charger is connected to a phone without a SIM card inserted (the display shows
”Insert Card”).
Perform a visual check of the battery screws and the system connector, change if
necessary. Start the phone using the On/Off-button and a fully charged battery, but
without the charger connected.
• If the phone doesn´t start, proceed to chapter 3 (“Doesn´t start”-fault).
• If the phone starts and shows charging, send the phone to the next repair level.
A1018s/A1018sc Standard Electrical Repair
Connect a charger to the system connector.
• If the phone shows charging and the red top indicator is lit, the phone is without
fault.
• If the phone doesn´t show charging, proceed to section 6.2.
• If the phone starts and shows charging, but the battery isn´t charged, proceed to
section 6.3.
• If the phone shows charging, but the red top indicator isn´t lit, proceed to chapter
9 (“Illumination and buzzer”-fault).
6.1.1 Verification of the charging function.
Attach a normal battery to the phone. The battery voltage must be high enough to
start the phone, it will not begin to charge at once otherwise.
Cut a cable from a battery charger to make a charging test cable. Connect the test
cable to a power supply that shows the current consumption. Make sure the positive
side from the power supply connects to DCIO (the lonely pin at the system connector, pin 12). An alternative solution is to use a battery charger with a ammeter connected in series.
Set the power supply to 7.6 V and the current limit to 700 mA. Connect the test
cable to the system connector of the phone and check the current consumption. If
the phone starts and shows charging and the current consumption varies between a
few mA and 700 mA (the alternative solution gives ~500-800 mA depending on
what kind of charger you use) with a few seconds interval, the charging function is
okay.
You have to verify the charging function after every repair of any part of the
charging function
4/00021-2/FEA 209 544/16.B 24 (42)
Page 25

A1018s/A1018sc Standard Electrical Repair
6.2 Doesn´t show charging in the display.
Open the phone and check for liquid damages. Make sure the pads of the system
connector are not burned or have oxide or dirt on them. Clean them with isopropyl
alcohol if necessary. If the gold plating is damaged, the board has to be discarded.
Replace V450 (class A, Fig. 6.1)
Fig. 6.1
If the fault still remains, send the phone to the next repair level.
6.3 Starts and shows charging, but the battery
isn´t charged.
Open the phone and check for liquid damages, especially at the system connector.
Measure the resistance of R553 (0.1 Ohm, class A, Fig. 6.1). Replace if it is incor-
rect.
If the fault still remains, send the phone to the next repair level.
4/00021-2/FEA 209 544/16.B 25 (42)
Page 26

7 SIM fault
7.1 What is SIM fault?
Insert a working SIM card and attach a fully charged battery to the phone.
If the display shows:
• ”Wrong card” or ”Insert correct card”, the phone is SIM locked and can´t be
• ”Phone lock”, the phone is locked by the customer with a personal code. It will
• ”PIN:” or ”Enter PIN”, the SIM card is locked with a personal code.
• ”Insert card”, (and only “Insert card” !!) is it a SIM fault.
7.2 ”Insert card” is shown in the display.
Remove the SIM card. Make sure the connection plates of the SIM connection, J603
(Fig. 7.1), are not mechanically damaged or dirty and also make sure the soldering
is correct.
A1018s/A1018sc Standard Electrical Repair
repaired at this level.
be unlocked in the reset program in the normal repair flow.
Open the phone and check for liquid damages.
Fig. 7.1
4/00021-2/FEA 209 544/16.B 26 (42)
Page 27

A1018s/A1018sc Standard Electrical Repair
Give the board power and start it.
Measure VVIC at D901:1 (3.2 V, Fig. 7.1).
• If the voltage is missing:
* Replace C910 and R920 (class A).
• If the voltage exists:
* Measure the voltage at D901:2 (3.2 V).
* If the voltage exists:
1. Measure the resistance between D901:8 and J603:2 (~33 Ohm).
Incorrect: 1. Replace R600 (class A).
2. Foil damage, the board has to be discarded.
2. Measure the resistance between D901:11 and J603:7 (~33 Ohm).
Incorrect: 1. Replace R628 (class A).
2. Foil damage, the board has to be discarded.
3. Measure the resistance between D901:9 and J603:3 (~ 33 Ohm).
Incorrect: 1. Replace R627 (class A).
2. Foil damage, the board has to be discarded.
4. Measure the resistance between D901:11 and D901:14 (~ 15 kOhm).
Incorrect: 1. Replace R626 (class A).
2. Foil damage, the board has to be discarded.
5. Measure the resistance of C909 (> 1 MOhm).
Incorrect: 1. Replace C909 (class A).
6. Measure the resistance between D901:14 and ground (> 1 MOhm).
Incorrect: 1. Replace C908 (class A).
7. Measure the resistance between D901:14 and J603:1 (~ 0 Ohm).
Incorrect: Foil damage, the board has to be discarded.
8. Replace D901 (class A).
9. Replace R634 (class A).
10. Replace D600 (class B).
* If the voltage is missing at D901:2 (3.2 V):
* Measure the resistance between D901:2 and D600:77 (~0 Ohm)
Correct: Replace D600 (class B).
Incorrect: Foil damage, the board has to be discarded.
If the fault still remains, send the phone to the next repair level.
4/00021-2/FEA 209 544/16.B 27 (42)
Page 28

8 Keyboard
8.1 Type of keyboard fault.
Insert a SIM card and attach a fully charged battery. Start the phone using the On/
Off-button. If the phone doesn´t start at all, proceed to chapter 3 (“Doesn´t start”fault).
Press all keys and verify which one that doesn´t start.
The easiest way to do the verification is as follow:
• Go to Menu/Settings/Key sound and choose “Click”.
• Press the keys "1", "2", "3"... ..."*"," 0" ," #". You should hear a click sound and
see the responding figure in the display when pressing each key. Then press
"Yes", "No", "Clr", "<" and" >". When pressing "Yes"the phone tries to connect
a call, press "No" and the phone should stop connecting a call. Press "<" or " >"
and you scroll the menus and "Clr" clears the display from the figures that came
up.
A1018s/A1018sc Standard Electrical Repair
Open the phone and check for liquid damages, especially around the faulty keys.
Clean the keyboard pads thoroughly and assemble the phone with a new keyboard.
Check if the keys are working according to the test above.
• If a complete row or a complete column (according to fig. 8.1) is faulty, proceed
to section 8.2.
• If only some keys are faulty, proceed to section 8.3.
4/00021-2/FEA 209 544/16.B 28 (42)
Page 29

A1018s/A1018sc Standard Electrical Repair
Fig. 8.1
8.2 A complete row or column is faulty.
Check the corresponding soldering at D600 (Fig. 8.1 and 8.2) for the faulty row/column.
4/00021-2/FEA 209 544/16.B 29 (42)
Page 30

A1018s/A1018sc Standard Electrical Repair
Fig. 8.2
If the soldering is correct, measure the resistance from one of the faulty pads (row/
column see Fig. 8.3) to the corresponding pin of D600 (Fig. 8.2). Should be ~0
Ohm, otherwise is there a foil damage.
Fig. 8.3
4/00021-2/FEA 209 544/16.B 30 (42)
Page 31

A1018s/A1018sc Standard Electrical Repair
If the resistance is correct, replace D600
8.3 Some keys (not a complete row/column)
are faulty.
Make sure the soldering at D600:1,120-128 are correct.
If the soldering is correct there is a foil damage and the board has to be discarded.
To verify it, measure the resistance between the faulty pad and a working pad in the
same row/column (should be ~0 Ohm). The foil damage is usually caused bye a liquid damage.
For example: The keys 5 & 6 doesn´t work. Measure the resistance between the
“row-side” of key pad 4 and the “row-side” of the key pad 5 to verify a foil damage
(should be ~0 Ohm).
Fig. 8.4
4/00021-2/FEA 209 544/16.B 31 (42)
Page 32

9 Illumination and buzzer
9.1 Type of fault.
Insert a SIM card and attach a dummy battery to the phone. Start the phone by
pressing the On/Off -button and wait for the phone to get serv (against an instrument
or a “real” network).
• If the phone doesn´t beep directly at start, go to “Menu/Ring Vol” and try to raise
the volume (not from full to “step” as that doesn´t generate any sound). If the
buzzer sounds faint or not at all, proceed to section 9.2.
• If the background illumination for the display doesn´t light up at start, proceed to
section 9.3.
• If the keyboard illumination doesn´t light up at start, proceed to section 9.4.
• If the top indicator doesn´t flash green when the phone has got serv, proceed to
section 9.5.
When the phone has got serv and flashes green, lower the battery voltage to 4.2 V.
The top indicator should then start to flash red, the battery indicator in the display
should show an empty battery and the phone should warn with a beep.
A1018s/A1018sc Standard Electrical Repair
• If the battery indicator doesn´t show an empty battery and the phone doesn´t
either beep or flashes red, the phone needs a battery calibration.
• If the battery indicator shows an empty battery and beeps, but the top indicator
doesn´t flash red, proceed to section 9.6.
9.2 The buzzer is faint or dead.
Open the phone and check for liquid damages.
Make sure H600, V605, V606, R606, R651 or D600:91 is correctly soldered.
Fig. 9.1
4/00021-2/FEA 209 544/16.B 32 (42)
Page 33

A1018s/A1018sc Standard Electrical Repair
• If all soldering is correct, replace the buzzer (H600). Try the buzzer again by
starting the board in the fixture, the buzzer should sound because there is no SIM
card inserted.
• If the fault remains, make sure R606 is ok by measure the voltage at both sides of
it (VBATT). VBATT should also exist at H600:3. If it doesn´t, is there a foil
damage. If the voltage is correct, replace V606 and R651.
* If that doesn´t fix it, measure the resistance from R651 (marked side) to
D600:91. It should be ~0 Ohm, otherwise is there a foil damage and the board
has to be discarded
• Replace D600.
If the fault still remains, send the board to the next repair level.
9.3 The background illumination to the display
is missing or faintly glowing.
Open the phone and check for liquid damages.
Make sure all LEDs (H651, H652, H653 and H654. All four class A, Fig. 9.2) are
mounted and correctly soldered.
Fig. 9.2
Give the board power and start the board.
• If only a couple of the LEDs are faulty, replace them.
• If none of the LEDs are lit, measure the resistance at one of them.
* If the resistance is ~0 Ohm, is there a foil damage in at least one of the
LEDs. Remove the LEDs one by one in the following order: H654; H651,
H653 and finally H652. Measure the resistance after each removal. When the
resistance increases, the fault is fixed.
4/00021-2/FEA 209 544/16.B 33 (42)
Page 34

A1018s/A1018sc Standard Electrical Repair
* If the resistance of the LEDs are too high, make sure VBATT exist on the
them. If VBATTis missing, the phone is probably liquid damaged. If VBATT
is correct, make sure R607 (~1.0 Kohm, class A) and R609 (~2.7 Ohm, class
A) are mounted and correctly soldered.
Fig. 9.3
• If none of the LEDs H651-H660 are lit, measure the voltage at marked side of
R607 (~0.55 V, Fig. 9.3). Before measuring you have to press one of the keys to
let the processor set LED3K high for approximately 10 seconds.
* If the voltage is missing, check the soldering at D600:69 (Fig. 9.4).
4/00021-2/FEA 209 544/16.B 34 (42)
Page 35

A1018s/A1018sc Standard Electrical Repair
Fig. 9.4
* If the soldering is correct, replace D600 (class B).
If the fault still remains, send the phone to the next repair level.
9.4 The keyboard illumination is missing or
faintly glowing.
Open the phone and check for liquid damages.
Make sure all LEDs (H655-H660, all class A, Fig. 9.5) are mounted and correctly
soldered.
4/00021-2/FEA 209 544/16.B 35 (42)
Page 36

A1018s/A1018sc Standard Electrical Repair
Fig. 9.5
Give the board power and start the board.
• If only a couple of the LEDs are faulty, replace them.
• If none of the LEDs are lit, make sure VBATT exists at them. If VBATT is miss-
ing, the phone probably is liquid damaged. If VBATT is correct, make sure R607
(~1.0 kOhm, class A) and R610 (~4.7 Ohm, class A) (both Fig. 9.6) is mounted
and has got correct resistance.
Fig. 9.6
• If none of the LEDs H651-H660 are lit, measure the voltage at the marked side
of R607 (~0.55 V, Fig. 9.6). Before measuring you have to press one of the keys
to let the processor set LED3K high for approximately 10 seconds.
* If the voltage are missing, check the soldering at D600:69 (Fig. 9.4).
* If the soldering is correct, replace D600 (class B).
4/00021-2/FEA 209 544/16.B 36 (42)
Page 37

A1018s/A1018sc Standard Electrical Repair
If the fault still remains, send the phone to the next repair level.
9.5 Green top indicator doesn´t work.
Open the phone and check for liquid damages.
If the red top indicator doesn´t work either (to check it see section 1), measure the
resistance of R646 (~470 Ohm) and check the soldering of it (R646).
Fig. 9.7
Make sure the double LED H650 (class A, Fig. 9.7) or D600:94 (Fig. 9.8) is correctly soldered.
Fig. 9.8
4/00021-2/FEA 209 544/16.B 37 (42)
Page 38

A1018s/A1018sc Standard Electrical Repair
• If the soldering is correct, replace H650.
* If that doesn´t fix it, measure the resistance between H650:3 (fig. 9.7) and
D600:94 (fig 9.8) (~0 Ohm)
* If the resistance is ~0 Ohm, replace D600
* If the resistance is larger, is there a foil damage.
If the fault still remains, send the phone to the next repair level.
9.6 Red top indicator doesn´t work.
Open the phone and check for liquid damages.
If the green top indicator (should flash green when the phone has got serv) doesn´t
work either, make sure the soldering is correct and measure the resistance of R646
(~470 Ohm, Fig. 9.7).
Make sure the double LED H650 (class A, Fig. 9.7) or D600:93 (Fig. 9.9) are correctly soldered.
Fig. 9.9
• If the soldering is correct, replace H650.
4/00021-2/FEA 209 544/16.B 38 (42)
Page 39

A1018s/A1018sc Standard Electrical Repair
* If that doesn´t fix it, measure the resistance between H650:1 and D600:93
(~0 Ohm).
* If the resistance is ~0 Ohm, replace D600.
* If the resistance is larger, is there a foil damage.
If the fault still remains, send the phone to the next repair level.
4/00021-2/FEA 209 544/16.B 39 (42)
Page 40

10 RTC
A1018s/A1018sc Standard Electrical Repair
10.1 Find the fault.
Start the phone with a SIM card inserted and a fully battery attached. Set the clock
at the right time. Remove the battery and reattach it after one minute.
• If the clock in the phone shows 00:00, proceed to section 10.2.
Compare to a clock with the correct time.
• If the clock in the phone is speeding or halted, proceed to section 10.3.
The component side of the board is shown in figure 10.1.
Fig. 10.1
10.2 The clock shows 00:00 after removing and
reattaching the battery.
Open the phone and make sure the backup capacitor C720 (class A, Fig. 10.2) is
correctly soldered.
Fig. 10.2
4/00021-2/FEA 209 544/16.B 40 (42)
Page 41

A1018s/A1018sc Standard Electrical Repair
If it is, replace it. Assemble the phone, start it and set the correct time again. Wait a
few minutes to allow the backup capacitor to begin charging. Remove the battery
and reattach it after one minute. Make sure the fault is fixed. (The backup capacitor
needs to be charged for a few hours before it is fully charged.) Compare to a clock
with a correct time. If the clock still is speeding or halted, proceed to section 10.3.
10.3 The clock is speeding or halted.
Open the phone and make sure the crystal B600 is correctly soldered. If it is, replace
B600 (class A), C690 (class A) and C691 (class A, all components in Fig. 10.3).
Assemble the phone and compare to a clock with the correct time.
Fig. 10.3
If the fault still remains, send the phone to the next repair level.
4/00021-2/FEA 209 544/16.B 41 (42)
Page 42

11 Component lists
Component lists in document 131 22-2/FEA 209 544/16
A1018s/A1018sc Standard Electrical Repair
4/00021-2/FEA 209 544/16.B 42 (42)
 Loading...