

Erato Apollo 7 User Manual
Specifications
Bluetooth version
Bluetooth profiles
Audio codecs
Wireless range
(from paired device)
Battery capacity
Driver size
Sensitivity
Frequency
Impedance @ 1kHz
MEMS omnidirectional
microphone input sensitivity
Water proof
4.1
A2DP 1.2, AVRCP 1.4, HFP 1.6, HSP 1.2
aptX/AAC/SBC
10 meters (30 feet)
Earphone (50mAh)
Charging case (Li-Ion rechargeable,
300mAh)
Ø 5.8mm Micro Driver
100dB/mW
20Hz-20KHz
16ohm
-42dB (+/- 2dB)
Nano coating technology
EN
Pairing Apollo 7 with a
Bluetooth-enabled device for the
first time
Insert either earbud in your ear, then press and hold
its button until you hear "Power On", followed
by
"Pairing", then release the button and connect to your
paired device, tap “Apollo 7-L" or “Apollo 7-R”
in the
Bluetooth device list and you will hear
"Phone Connected". Next, insert the second earbud
and
press/hold its button until you hear "Power On".
Release the button, and you will hear
“Headset Connected“. This means the two earbuds
are in sync.
*You can enjoy the music by pairing earbud
individually, but we suggest pairing both with the
same device so you can answer calls or activate
Siri/Google voice assistance.
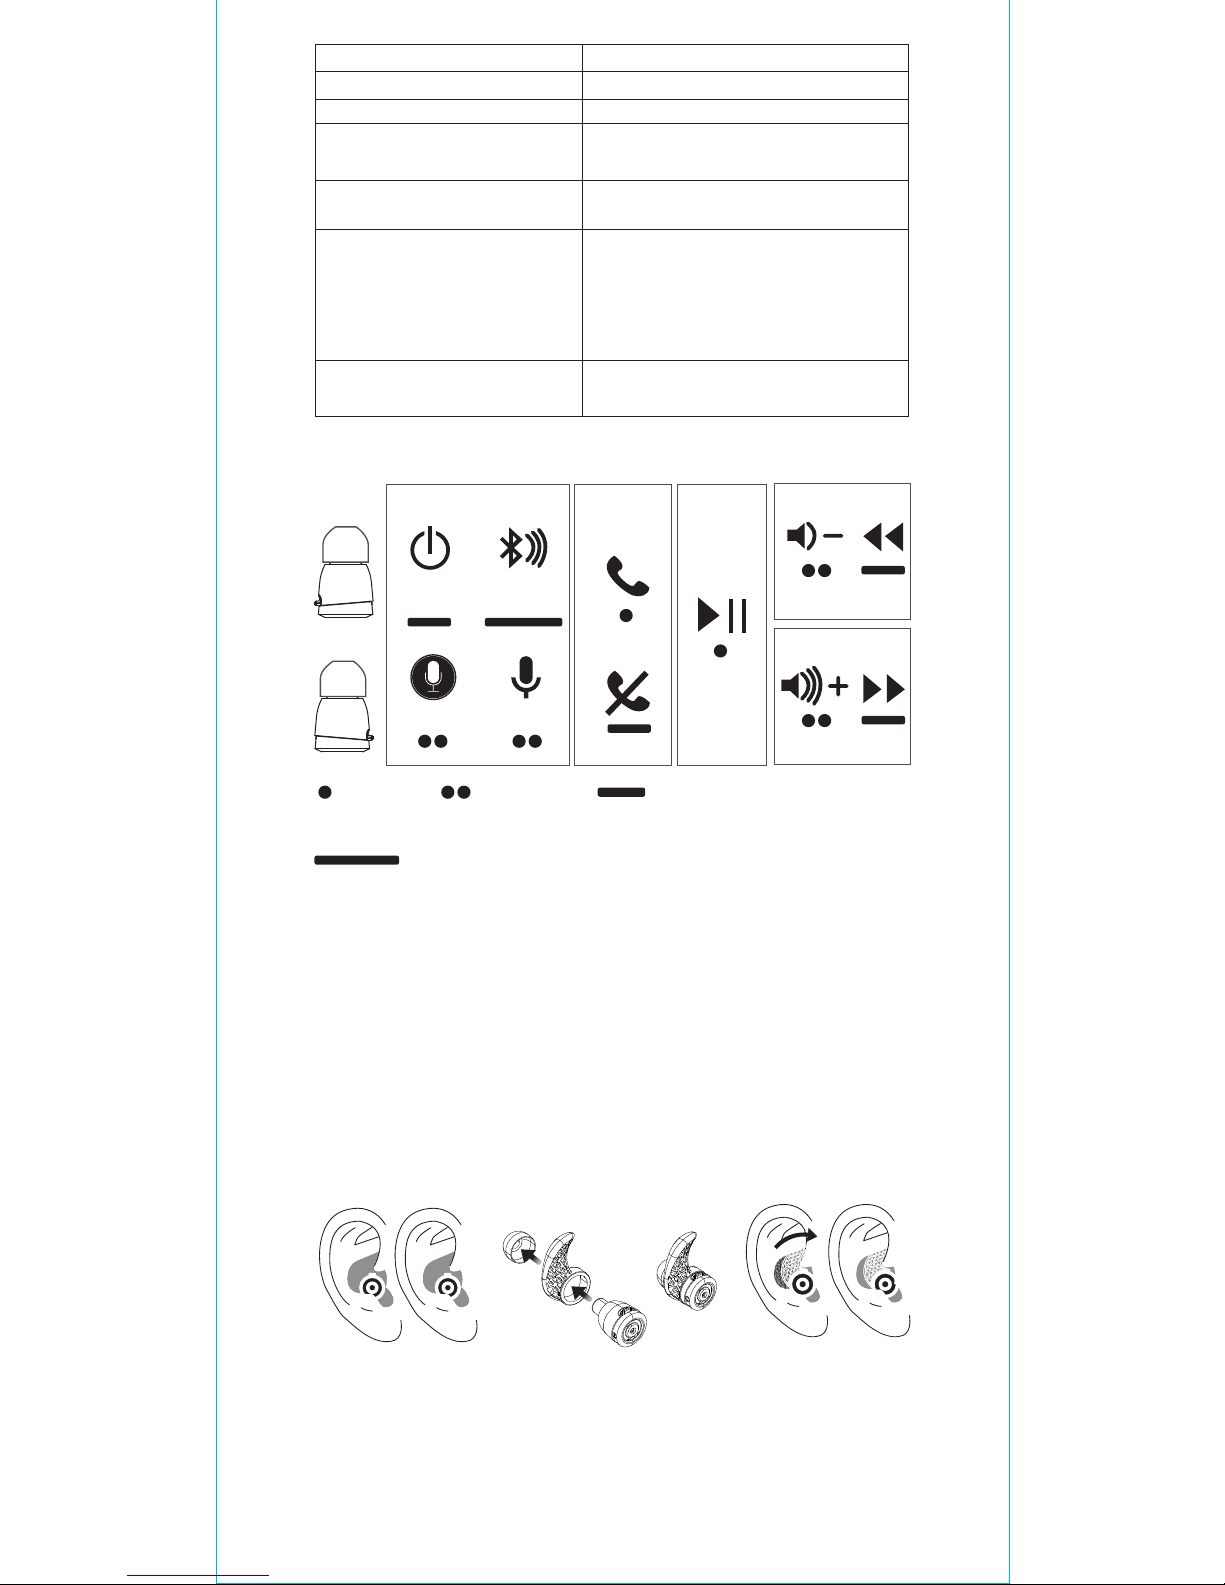
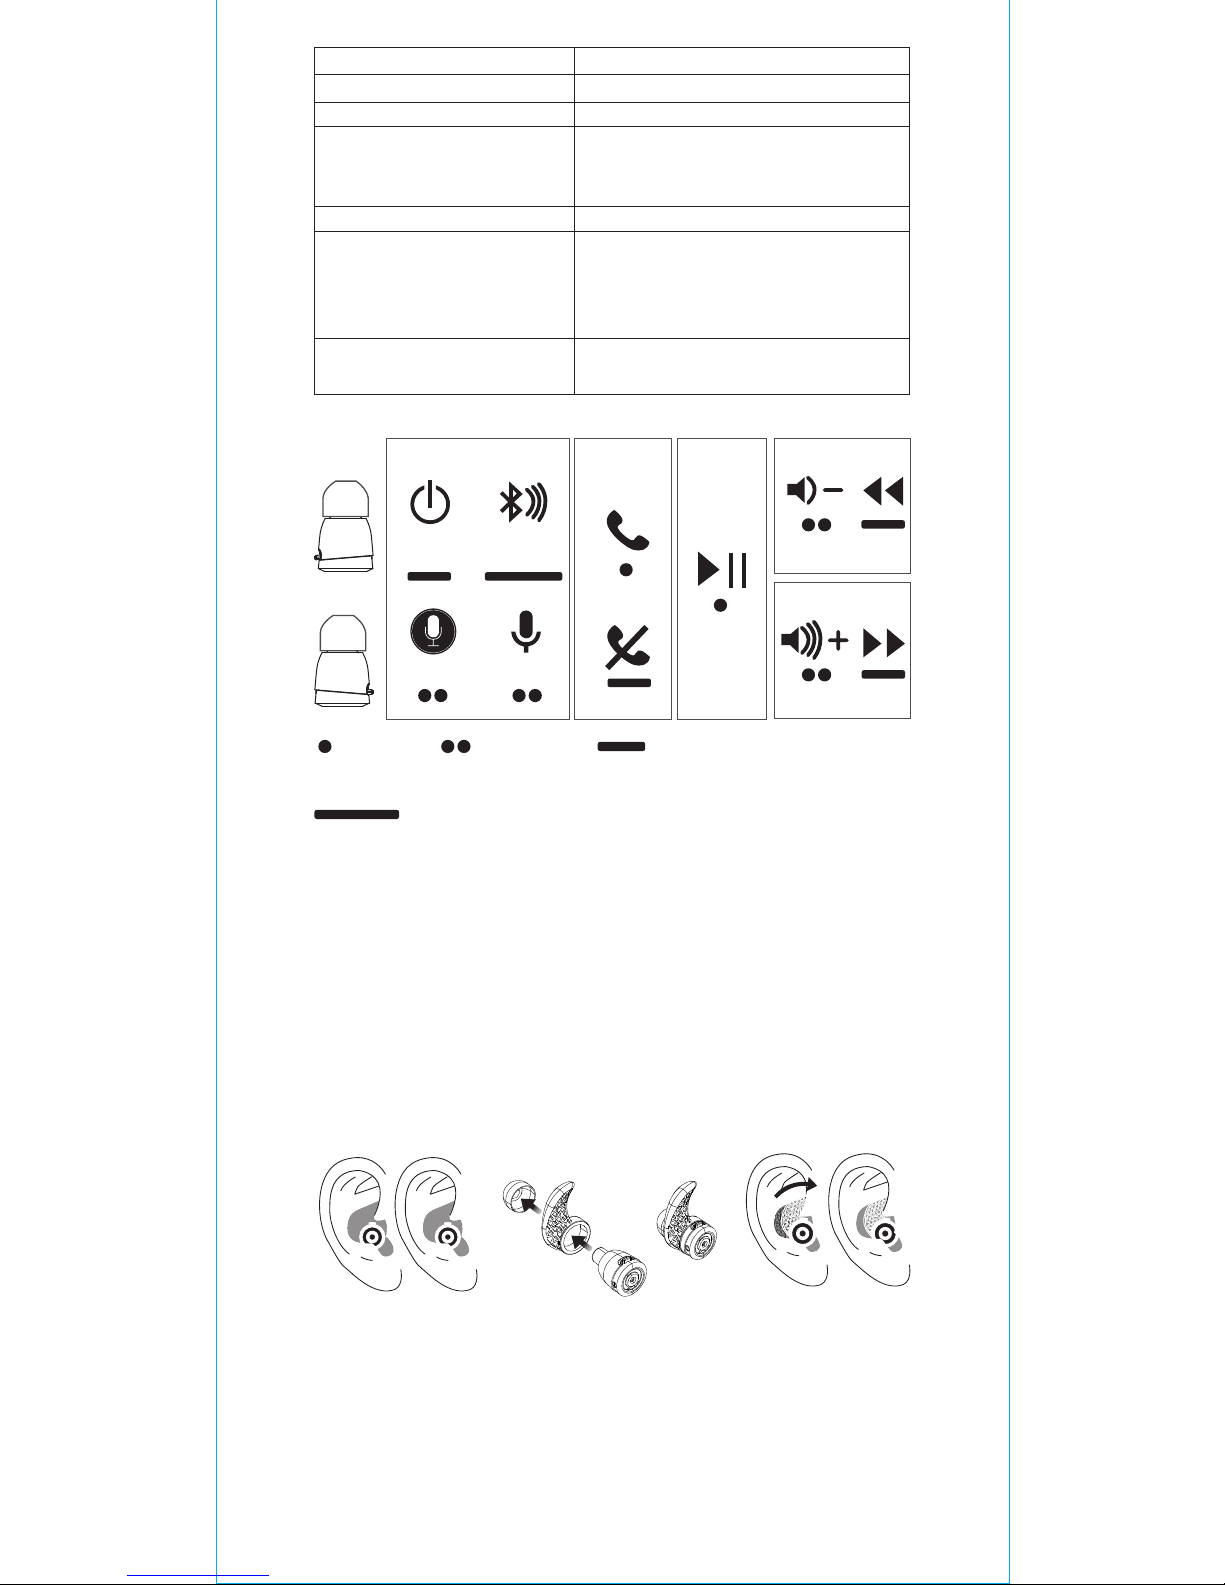
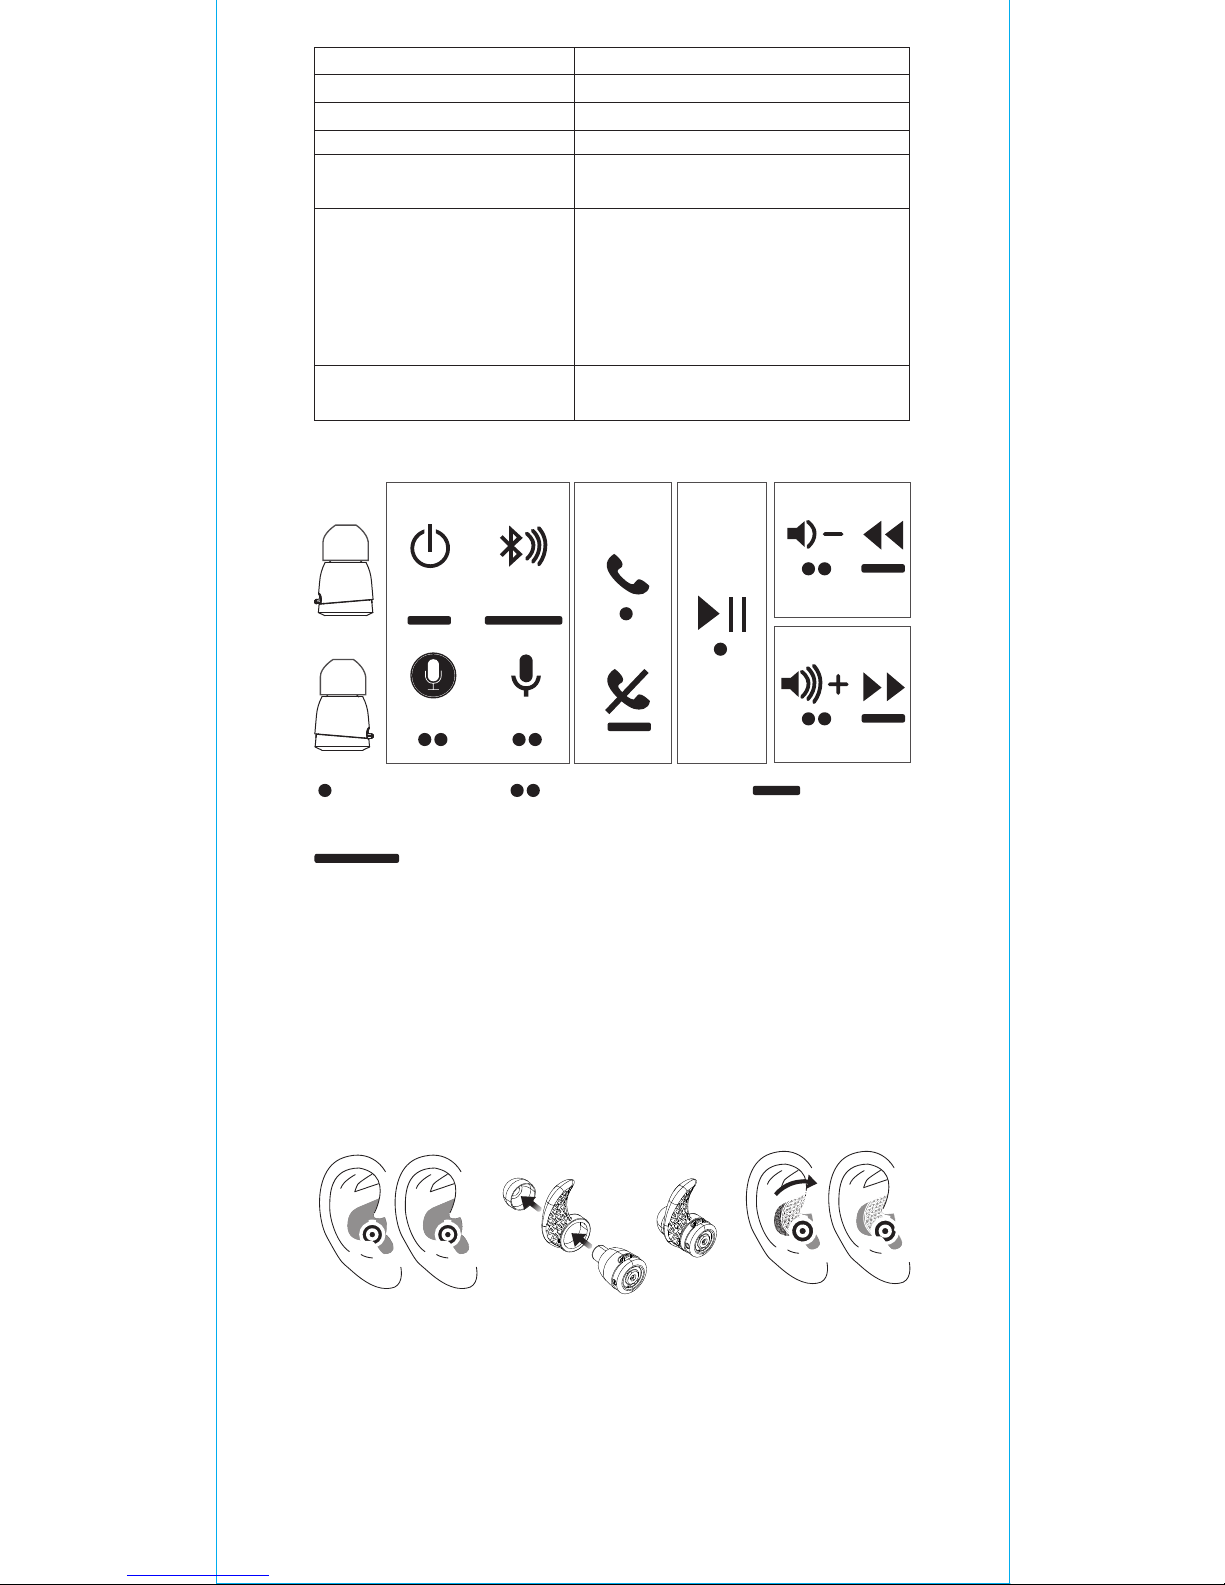
Single-touch multifunction
Power on/off, volume up/down, pairing, play/pause,
play next/previous track, call accept/reject, and Siri
are accessible with one button. Please read and
follow these guidelines to ensure the best and safest
experience with your Apollo 7
Apollo 7 True Wireless
Headset

Earphone stabilizer
*Due to directional antenna, in order to get better
connectivity, please keep
the button upright.
Dimensions
Weight
Earphone:
15.4mm (D) x 22.2mm (L)
6.06in (D) x 8.74in (L)
Charging case:
62.5mm (L) x 40mm (D) x 25.5mm (H)
2.46in (L) x 1.6in (D) x 1in (H)
Earphone:
4g x 2pcs / Charging case: 52g
0.14oz x 2pcs / Charging case: 1.83oz
ON/OFF
Phone
Call
Play
Music
Basic
R
L
Google
Pairing
Siri
One click Double click
Long press 2 secs
Long press 5 secs
* Press and hold the left earbud button for
2 seconds to restart the current song. Press and
hold again within 3 seconds to skip to the previous
song.
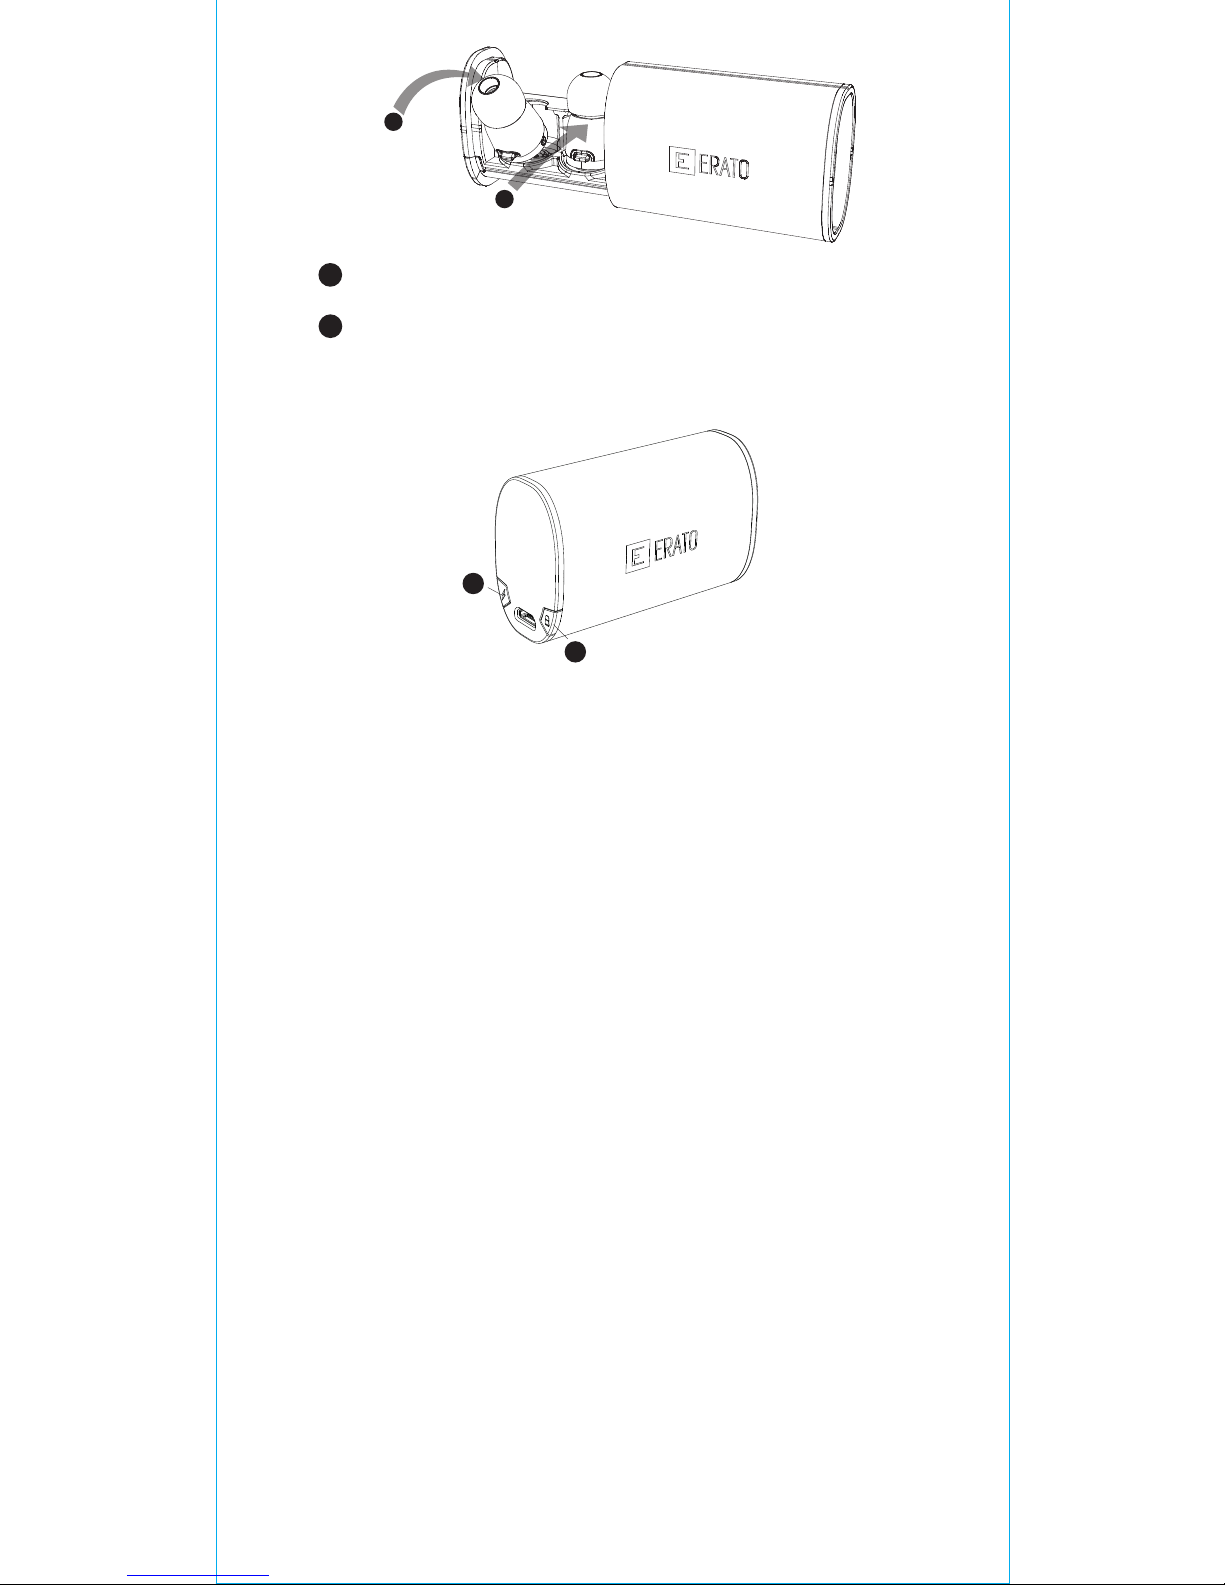
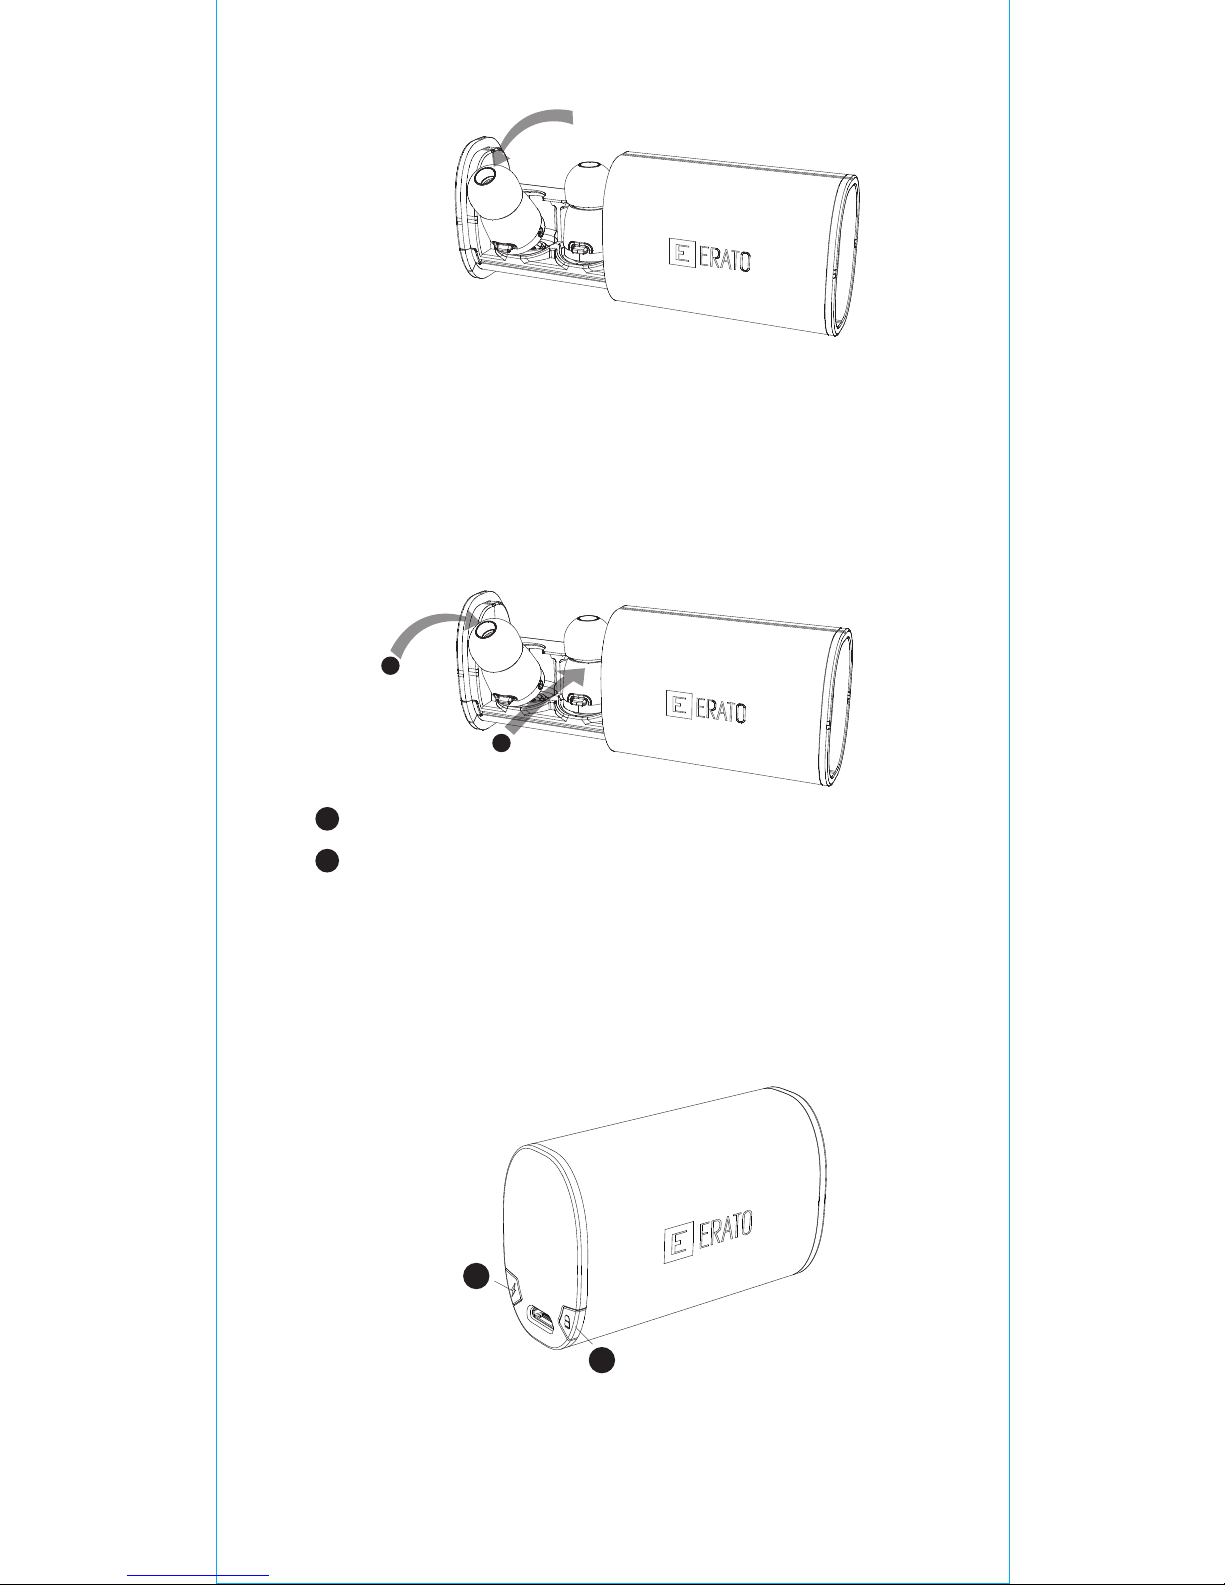
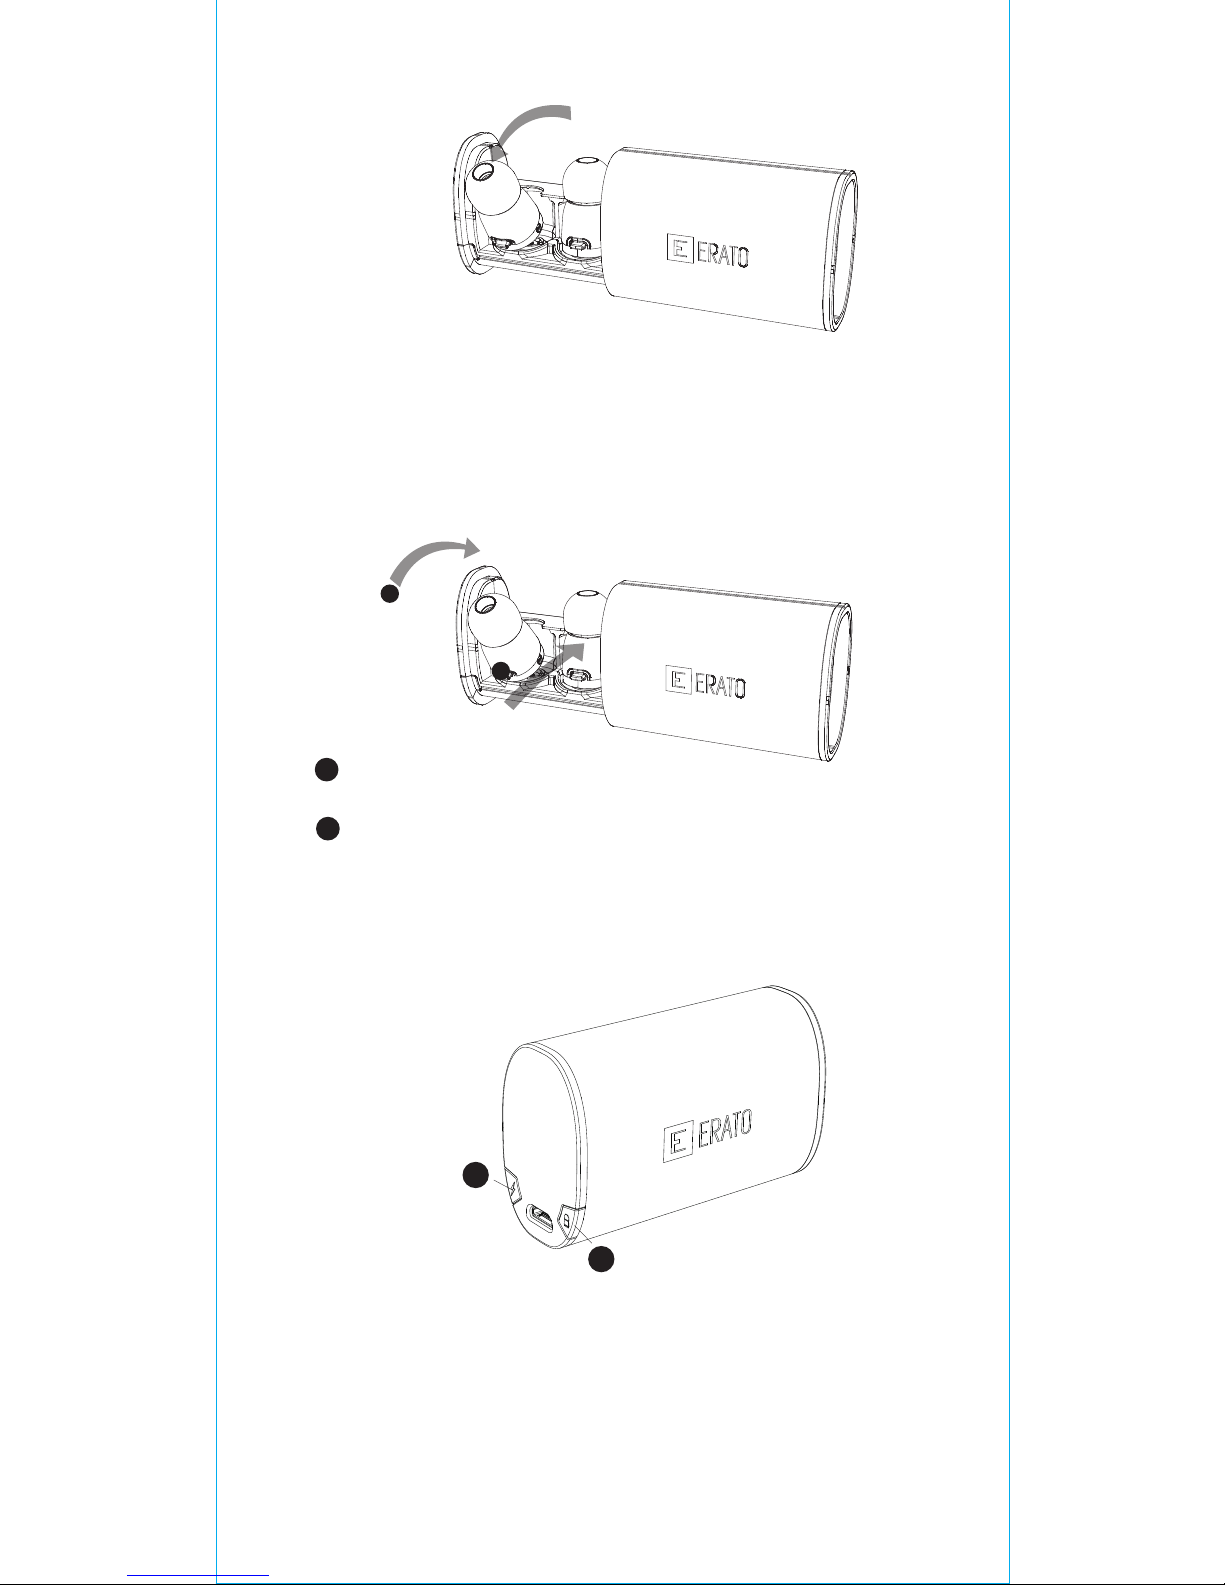
Charging case
● Easy one-pull removal
● Earbuds auto turn off and charge after being
placed in the charging case.
Charging auto stops when batteries are full.
PULL
1
PLACE
1
2
PUSH UNTIL CLICK-IN/CHARGING STARTS
2
Caution
1.Use the Micro USB cable to recharge the charging
case. The cable is for charging only, not for data
transfer
2.Do not leave this product inside a parked vehicle.
Direct exposure to heat and sunlight may damage
the charging case
3.Do not expose the charging case to high
temperatures or humid environments
4.Do not insert metal or other foreign objects into
the product, so as to avoid short-circuit and physical
damage
5.Do not disassemble, damage, jolt, or burn the
product. Do not place any heavy weight on it
6.Do not discard this product with household waste.
As it contains batteries, recycle it in accordance
with
local laws and regulations
1
2
With both earbuds inserted:
Charging case LED 2 turns on, then off when
headset is fully charged
With 1 earbud inserted:
Charging case LED 2 flickers and turns off after
single earbud is fully charged
If charging case battery is lower than 30% (with
earbuds inserted) the LED 1 flickers as a reminder to
connect the charging case to a power source
If earbud battery charge is 5% or less you will hear a
“Low Battery” reminder every 30 seconds
**Charging case light indicators
and notices **

Federal Communications Commission (FCC) Statement
15.21
You are cautioned that changes or modifications not expressly
approved by the part responsible for compliance could void the user’s
authority to operate the equipment.
15.105(b)
This equipment has been tested and found to comply with the limits
for a Class B digital device, pursuant to part 15 of the FCC rules. These
limits are designed to provide reasonable protection against harmful
interference in a residential installation. This equipment generates,
uses and can radiate radio frequency energy and, if not installed and
used in accordance with the instructions, may cause harmful
interference to radio communications. However, there is no guarantee
that interference will not occur in a particular installation. If this
equipment does cause harmful interference to radio or television
reception, which can be determined by turning the equipment off and
on, the user is encouraged to try to correct the interference by one or
more of the following measures:
-Reorient or relocate the receiving antenna.
-Increase the separation between the equipment and receiver.
-Connect the equipment into an outlet on a circuit different from that
to which the receiver is connected.
-Consult the dealer or an experienced radio/TV technician for help.
This device complies with Industry Canada license-exempt
RSS standard(s). This device complies with part 15 of the FCC rules.
Operation is subject to the following two conditions:
(1) this device may not cause harmful interference, and
(2) this device must accept any interference received,
including interference that may cause undesired operation.
FCC RF Radiation Exposure Statement:
“For body worn operation, this device has been tested and meets FCC
RF exposure guidelines when used with an accessory that contains no
metal and that positions the device a minimum of 0mm from the body.
Use of other accessories may not ensure compliance with FCC RF
exposure guidelines.”
Industry Canada (IC) Statement
Canada, Industry Canada (IC)
This Class B digital apparatus complies with Canadian ICES-003 and
RSS-247.
This device complies with Industry Canada licence-exempt RSS
standard(s).
Operation is subject to the following two conditions:
(1) This device may not cause interference, and
(2) This device must accept any interference, including interference
that may cause undesired operation of the device.
IC RF Radiation Exposure Statement:
For body worn operation, this device has been tested and meets RF
exposure guidelines when used with an accessory that contains no
metal and that positions the device a minimum of 0mm from the body.
Use of other accessories may not ensure compliance with RF exposure
guidelines.
FCCID:2AHD9-ANAP070000
IC:21132-ANAP070000
7.If not used long term, recharge the headset and
charging case every three months to maintain
battery lifespan and prevent premature
performance degradation
8.Do not leave the charging case fully out of power
for prolonged periods (LED indicator remains dim)
to
prevent battery damage. Make sure the charging
case is at least 30% charged at all times
9. Output current varies based on input charge

Spécifications
4.1
A2DP 1.2, AVRCP 1.4, HFP 1.6, HSP 1.2
aptX/AAC/SBC
10 mètres (30 pieds)
Écouteur (50mAh)
Boîtier de charge (Li-Ion rechargeable,
300mAh)
Micro Driver Ø 5,8mm
FR
Pairing Apollo 7 with a
Bluetooth-enabled device for the
first time
Insérez l’un des écouteurs dans votre oreille, puis
appuyez et maintenez enfoncé son bouton jusqu’à
entendre « Power On (Allumé) », suivi de « Pairing
(Association) », puis relâchez le bouton et connectez
à votre appareil associé, appuyez sur « Apollo 7-L » ou
« Apollo 7-R » dans la liste des appareils Bluetooth et
vous entendrez « Phone Connected
(téléphone Connecté) ». Ensuite, insérez le deuxième
écouteur et appuyez/maintenez enfoncé son bouton
jusqu’à entendre « Power On (Allumé) ». Relâchez
le bouton, et vous entendrez « Headset Connected
(Casque connecté) ». Cela signifie que les deux
écouteurs sont synchronisés.
*Vous pouvez écouter la musique en associant
individuellement les écouteurs, mais nous vous
suggérons d'associer les deux avec le même appareil
afin de pouvoir répondre à des appels ou activer
l'assistance vocale Siri/Google.
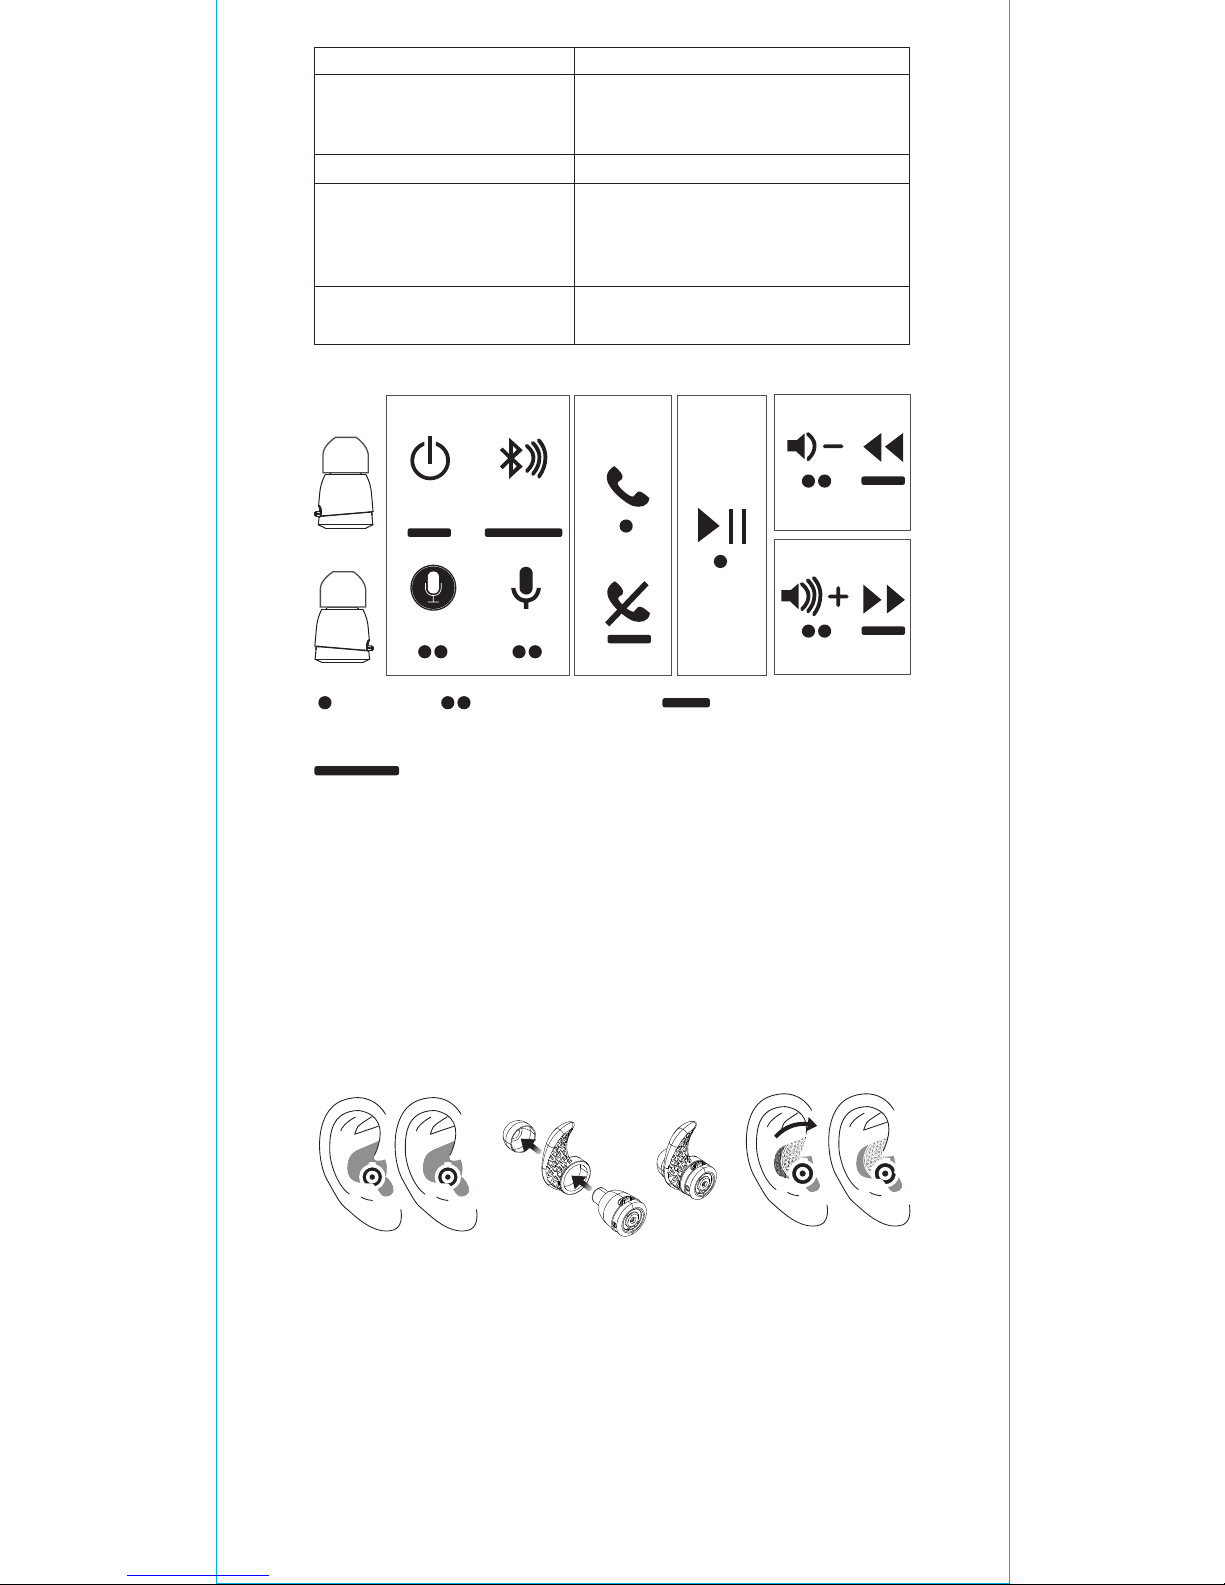
Multifonction en une seule pression
Allumé/Eteint, augmenter/diminuer le volume,
association, lecture/pause, lire la piste
suivante/précédente, accepter/rejeter un appel, et Siri
sont accessibles avec un seul bouton.
Lisez et suivez ces directives pour assurer la meilleure
expérience possible en toute sécurité avec votre
Apollo 7
Véritable casque sans fil
Apollo 7
Version Bluetooth
Profils Bluetooth
Codecs audio
Portée sans fil
(de l'appareil associé)
Capacité de la batterie
Taille du driver
100dB/mW
20Hz-20KHz
16ohm
-42dB (+/- 2dB)
Technologie de nano revêtement
Technologie de nano revêtement
Écouteur :
15,4mm (P) x 22,2mm (l)
Boîtier de charge :
62,5mm (l) x 40mm (P) x 25,5mm (H)
Écouteur : 4g x 2pcs
Boîtier de charge : 52g
Sensibilité
Fréquence
Impédance @ 1kHz
Sensibilité d'entrée du
microphone omnidirectionnel
MEMS
Étanche
Dimensions
Poids
Stabilisateur d'écouteur
*Du fait de l'antenne directionnelle, afin d'obtenir
une meilleure connectivité, gardez le bouton vertical.
ALLUMÉ/
ÉTEINT
Appel
téléphonique
Ecouter
de la
musique
Base
R
L
Google
Association
Siri
Un clic Double clic
Appuyez longuement
2 secondes
Appuyez longuement 5 secondes
* Appuyez et maintenez enfoncé le bouton de
l'écouteur gauche pendant 2 secondes pour
redémarrer la chanson en cours. Appuyez et maintenez à nouveau pendant 3 secondes pour
passer à la chanson précédente.
Boîtier de Charge
● Retrait facile en une traction
● Les écouteurs s'éteignent et se chargent automati
quement après avoir été placés dans le boîtier de
charge.
La charge s'arrête automatiquement lorsque les
batteries sont pleines.
1
PLACER
1
2
POUSSER JUSQU'AU CLIC/DÉMARRAGE DU
2
TIRER
1
2
Avec les deux écouteurs insérés :
La LED 2 du boîtier de Charge s'allume, puis s'éteint
quand le casque est
complètement chargé
**Voyants du boîtier de charge et
indications **

Attention
1. Utilisez le câble Micro USB pour recharger le boîtier de
charge. Le câble sert uniquement à charger, pas au transfert
des données
2. Ne laissez pas cet appareil dans un véhicule stationné.
L'exposition directe à la chaleur et à la lumière du soleil peut
endommager le boîtier de charge
3. N'exposez pas le boîtier de charge à des températures
élevées ou à des environnements humides.
4. N'insérez pas d'objets métalliques ou de corps étrangers
dans le produit, de manière à éviter tout court-circuit et de
l'endommager.
5. Ne pas démonter, endommager, secouer ou brûler le
produit. Ne placez pas d'objets lourd dessus
6. Ne jetez pas ce produit avec les ordures ménagères. Il
contient des batteries, aussi recyclez-le conformément aux
lois et règlements locaux
7. S'ils ne sont pas utilisés pendant une période prolongée,
rechargez le casque et le boîtier de charge tous les trois
mois afin de maintenir la durée de vie de la batterie et
d'éviter la dégradation prématurée des performances
8. Ne laissez pas le boîtier de charge complètement
déchargé pendant des périodes prolongées
(le voyant LED reste faible) pour éviter d'endommager la
batterie. Assurez-vous que le boîtier de charge est chargé au
moins à 30% à tous moments
9. Le courant de sortie varie en fonction de la charge
d'entrée
Cet appareil numérique de classe B est conforme à la norme
NMB-003 et RSS-247
Le présent appareil est conforme aux CNR d'Industrie
Canada applicables aux appareils radio exempts de licence.
L'exploitation est autorisée aux deux conditions suivantes:
(1) l'appareil ne doit pas produire de brouillage, et
(2) l'utilisateur de l'appareil doit accepter tout brouillage
radioélectrique subi, même si le brouillage est susceptible
d'en compromettre le fonctionnement.
Déclaration de l'exposition aux radiations RF:
Pour le fonctionnement du corps, cet appareil ce a été testé
et répond aux directives d'exposition RF lorsqu'il est utilisé
avec un accessoire qui ne contient pas de métal et qui place
le combiné d'un minimum de 0mm du corps.
Utilisation d'autres accessoires peut ne pas assurer le
respect des directives d'exposition RF.
Avec 1 écouteur inséré :
La LED 2 du boîtier de Charge clignote et s'éteint
une fois qu'un écouteur est complètement chargé
Si la batterie du boîtier de charge est chargée à
moins de 30% (avec les écouteurs insérés) la LED 1
clignote pour vous rappeler de brancher le boîtier
de charge à une source d'alimentation
Si la batterie de l’écouteur est chargée à 5% ou
moins vous entendrez le rappel « Low Battery
(Batterie faible) » toutes les 30 secondes

Specifiche
4.1
A2DP 1.2, AVRCP 1.4, HFP 1.6, HSP 1.2
aptX/AAC/SBC
10 metri (30 piedi)
Auricolare (50mAh)
Custodia di ricarica (ricaricabile Li-Ion,
300mAh)
Micro Driver Ø 5,8mm
IT
Abbiamento di Apollo 7, con un
dispositivo Bluetooth per la prima
volta
Inserire uno degli auricolari nell’orecchio, poi premere
e tenere premuto il suo pulsante finché non
si sente "Power On (Accensione)", seguito da “Pairing
(Abbinamento)", quindi rilasciare il pulsante e
connettersi al dispositivo associato, toccare
"Apollo 7-L" o "Apollo 7- R “nell’elenco dei dispositivi
Bluetooth e si sente “Phone Connected
(Telefono collegato)”. Quindi, inserire il secondo
auricolare e premere / tenere premuto il suo pulsante
finché non si sente "Power On (Accensione)".
Rilasciando il pulsante si sente “Headset Connected
(Auricolare collegato)”. Questo significa che due
auricolari sono in sincronia.
*Potete godere la musica accoppiando ciascun
auricolare singolarmente, ma suggeriamo sempre
l'abbinamento di entrambi con lo stesso dispositivo
in modo da poter rispondere alle chiamate o attivare
l'assistenza vocale Siri/Google.
Cattivo funzionamento tocco singolo
Accensione/spegnimento, volume alto/basso, accoppi
amento, riproduzione/pausa, riprodurre brano
successivo/precedente, chiamata accettare/rifiutare,
e Siri sono accessibili con un solo tasto.
Si prega di leggere e seguire queste linee guida per
assicurare la migliore e più sicura esperienza con il
vostro Apollo 7
Cuffie Apollo 7 True Wireless
Versione Bluetooth
Profili Bluetooth
Codec audio
Range Wireless
(da dispositivo accoppiato)
Capacità batteria
Dimensione driver

100dB/mW
20Hz-20KHz
16ohm
-42dB (+/- 2dB)
Tecnologia nanorivestimento
Auricolare:
15,4mm (P) x 22,2mm (L)
Custodia di ricarica:
62,5 mm (L) x 40mm (P) x 25,5mm (A)
Auricolare: 4g x 2pz
Custodia di ricarica: 52g
Sensibilità
Frequenza
Impedenza @ 1kHz
MEMS sensibilità di ingresso
microfono omnidirezionale
Impermeabile
Dimensioni
Peso
Stabilizzatore auricolare
* A causa dell’antenna direzionale, al fine di ottenere
una migliore connettività, tenere il pulsante in
posizione verticale.
ON/OFF
Telefonata
Riprodurre
musica
Di base
R
L
Google
Abbinamento
Siri
Un clic Doppio clic
Pressione lunga 2 sec.
Pressione lunga 5 sec.
* Premere e tenere premuto il pulsante auricolare
sinistro per 2 secondi per riavviare il brano corrente.
Premere e tenere premuto di nuovo entro 3 secondi
per passare al brano precedente.

Custodia di ricarica
● Rimozione facile tirando una volta
● Auricolari si spengono automaticamente e si
caricano dopo essere stati posti nella custodia di ri
carica.
La ricarica si interrompe automaticamente quando
le batterie sono cariche.
1
POSIZIONARE
1
2
PREMERE FINO A QUANDO NON SI SENTE UN
CLIC/INIZIA LA RICARICA
2
TIRARE
1
2
Con entrambi auricolari inseriti:
Il LED 2 della custodia di ricarica si accende, quindi
si spegne quando le cuffie sono completamente
cariche
Con 1 auricolare inserito:
Il LED 2 della custodia di ricarica sfarfalla e si
spegne appena un singolo auricolare è
completamente carico
** Gli indicatori luminosi della
custodia di ricarica e avvisi **

Se la ricarica della custodia della batteria è inferiore
al 30% (con auricolari inseriti) il LED 1 lampeggia
come un promemoria per collegare la custodia di
ricarica a una fonte di alimentazione
Se la carica della batteria dell’auricolare è al 5% o
meno si sente un promemoria "Low Battery
(Carica batteria insufficiente)" ogni 30 secondi
Attenzione
1. Usare il cavetto micro USB per ricaricare la
custodia di ricarica. Il cavetto serve solo per la
ricarica e non per il trasferimento dei dati
2. Non conservare il prodotto in un veicolo chiuso.
L’esposizione diretta al calore e la luce solare può
danneggiare la custodia di ricarica.
3. Non esporre la custodia di ricarica ad alte
temperature o ad ambienti umidi.
4. Non inserire oggetti metallici o altri corpi estranei
nel prodotto, in modo da evitare cortocircuiti e
danni.
5. Non smontare, manomettere, scuotere o bruciare
il prodotto. Non appoggiare pesi su di esse
6. Non smaltire questo prodotto con i rifiuti
domestici. In quanto contiene le batterie, riciclarlo
in conformità alle leggi e alle normative locali
7. Se non viene utilizzata per un lungo periodo di
tempo, ricaricare la cuffia e custodia di ricarica ogni
tre mesi per mantenere la durata della batteria e
prevenire il degrado prematuro delle prestazioni
8. Non lasciare la custodia di ricarica
completamente scarica per periodi prolungati
(indicatore LED rimane debole) per
evitare di danneggiare la batteria. Assicurarsi che la
custodia di ricarica sia sempre carica almeno al 30%
9. La corrente di uscita varia in base alla carica in
ingresso

Spezifikationen
4.1
A2DP 1.2, AVRCP 1.4, HFP 1.6, HSP 1.2
aptX/AAC/SBC
10 Meter (30 Fuß)
Kopfhörer (50mAh)
Ladetasche (Li-Ion Akku, 300mAh)
Ø 5,8mm Micro Treiber
DE
Das Apollo 7 erstmalig mit einem
Bluetooth-fähigen Gerät koppeln
Stecken Sie einen Ohrstöpsel in Ihr Ohr, halten Sie die
Tastegedrückt, bis Sie „Power On (Einschalten)“
gefolgt von „Pairing (Kopplung)“ hören, und lassen
Sie die Taste anschließend los, um eine Verbindung
mit Ihrem gekoppelten Gerät herzustellen. Tippen Sie
auf „Apollo 7-L“ oder „Apollo 7-R“ in der Bluetooth
Geräteliste. Sie werden „Phone Connected (Telefon
verbunden)" hören. Stecken Sie den zweiten
Ohrstöpsel in Ihr Ohr und halten Sie die Taste
gedrückt, bis Sie „Power On (Einschalten)" hören.
Lassen Sie die Taste los und Sie werden „Headset
Connected (Headset verbunden)" hören. Das
bedeutet, dass die beiden Ohrstöpsel miteinander
synchronisiert sind.
*Sie können die Musik durch die individuelle
Kopplung der Ohrstöpsel genießen, aber wir
empfehlen beide mit demselben Gerät zu koppeln, so
dass Sie Anrufe annehmen oder den Siri/Google
Sprachassistenten aktivieren können.
Single-Touch Multifunktion
Einschalten/Ausschalten, Lauter/Leiser, Kopplung,
Wiedergabe/Anhalten, Wiedergabe des
nächsten/vorherigen Titels, Anruf
annehmen/abweisen und Siri sind mit einem
Tastendruck verfügbar.Bitte lesen und befolgen Sie
die nachstehenden Anweisungen, um die beste und
sicherste Anwendung mit Ihrem Apollo 7 zu
gewährleisten
Apollo 7 True Wireless
Headset
Bluetooth Version
Bluetooth Profile
Audiocodecs
Drahtlosbereich
(von gekoppelten Geräten)
Akkukapazität
Treibergröße
100dB/mW
20Hz-20KHz
16ohm
-42dB (+/- 2dB)
Nanobeschichtungstechnologie
Kopfhörer:
15,4mm (T) x 22,2mm (L)
Ladetasche:
62,5mm (L) x 40mm (D) x 25,5mm (H)
Kopfhörer: 4g x 2 Stk.
Ladetasche: 52g
Empfindlichkeit
Frequenz
Impedanz @ 1kHz
MEMS omnidirektionale
Mikrofon
Eingangsempfindlichkeit
Wasserdicht
Abmessungen
Gewicht
Kopfhörerstabilisator
*Halten Sie die Tasten wegen der Richtantenne für
eine bessere Verbindung nach oben.
EIN/AUS
Telefonanruf
Musikwiedergabe
Standard
R
L
Google
Kopplung
Siri
Ein Klick Zwei Klicks
Langer Druck 2 Sek.
Langer Druck 5 Sek.
* Halten Sie die Taste am linken Ohrstöpsel 2
Sekunden lang gedrückt, um den aktuellen Titel
neu zu starten. Halten Sie sie innerhalb von 3
Sekunden erneut gedrückt, um zum vorherigen
Titel zurückzukehren.

Ladetasche
● Einfaches Entfernen durch Ziehen
● Die Ohrstöpsel schalten sich automatisch aus und
werden aufgeladen, nachdem Sie in die Ladetasche
eingesetzt wurden.
Die Aufladung wird automatisch gestoppt, wenn die
Akkus voll sind.
1
ABLEGEN
1
2
DRÜCKEN BIS EINRASTEN/AUFLADUNG STARTET
2
ZIEHEN
1
2
Wenn beide Ohrstöpsel eingesetzt sind:
Die LED 2 der Ladetasche leuchtet auf und geht aus,
wenn das Headset aufgeladen ist
Wenn 1 Ohrstöpsel eingesetzt ist:
Die LED 2 der Ladetasche wird blinken und
ausgehen, wenn der einzelne Ohrstöpsel
aufgeladen ist
**Ladetasche Anzeigen und
Hinweise **

Wenn der Akkustand der Ladetasche weniger als
30% beträgt (wenn die Ohrstöpsel eingesetzt sind),
wird die LED 1 als Erinnerung daran blinken, die
Ladetasche mit einer Stromquelle zu verbinden.
Wenn der Akkustand eines Ohrstöpsels 5% oder
weniger beträgt, wird alle 30 Sekunden eine
„Low Battery (Akku schwach)" Erinnerung zu hören
sein
Achtung
1. Verwenden Sie das micro USB-Kabel, um die
Ladetasche aufzuladen. Das Kabel ist nur zum Laden
geeignet, nicht für die Datenübertragung
2. Lassen Sie dieses Produkt nicht in einem
geparkten Fahrzeug liegen. Der direkte Kontakt mit
Hitze und Sonnenlicht könnte die Ladetasche
beschädigen
3. Die Ladetasche darf nicht hohen Temperaturen
oder hoher Luftfeuchtigkeit ausgesetzt werden
4. Führen Sie keine Metallgegenstände oder andere
Fremdkörper in das Produkt ein, um Kurzschlüsse
und andere Beschädigungen zu vermeiden.
5. Das Produkt darf nicht auseinander genommen,
beschädigt, geschüttelt oder verbrannt werden.
Legen Sie keine schweren Gewichte darauf ab
6. Dieses Produkt nicht im normalen Hausmüll
entsorgen. Da es Akkus enthält, muss es gemäß den
lokalen Gesetzen und Vorschriften entsorgt werden
7. Wenn es über einen längeren nicht verwendet
wird, laden Sie das Headset und die Ladetasche alle
drei Monate auf, um die Lebensdauer des Akkus zu
erhalten und eine vorzeitige Leistungsminderung
zu vermeiden
8. Lassen Sie die Ladetasche nicht über einen
längeren Zeitraum vollständig entladen (LED
Anzeige leuchtet nicht), um Schäden am Akku zu
vermeiden. Stellen Sie sicher, dass die Ladetasche
immer zu mindestens 30% aufgeladen ist
9. Der Ausgangsstrom hängt von einer
Eingangsladung ab

Especificaciones
4.1
A2DP 1.2, AVRCP 1.4, HFP 1.6, HSP 1.2
aptX/AAC/SBC
10 metros (30 pies)
Auricular (50mAh)
Base de recarga (Li-Ion recargable,
300mAh)
Audífono micro de Ø 5,8mm
100dB/mW
20Hz-20KHz
ES
Asociar Apollo 7 con un dispositivo
con Bluetooth por primera vez
Inserte un auricular en el oído, a continuación
mantenga presionado el botón hasta que escuche
«Power On (encendido)», seguido de «Pairing
(asociando)», a continuación, suelte el botón y
conéctese a su dispositivo asociado, toque en
«Apollo 7-L» o «Apollo 7- R»en la lista de dispositivos
Bluetooth y oirá «Phone Connected (teléfono
conectado)". A continuación, inserte el segundo
auricular y presione o mantenga presionado el botón
hasta que escuche «Power On (encendido)». Suelte el
botón y escuchará “Headset Connected (auriculares
conectados)“. Esto significa que los dos auriculares
están sincronizados.
*Podrá disfrutar de la música al asociar el auricular
de forma individual, pero sugerimos la asociación
de ambos con el mismo dispositivo para que pueda
responder a las llamadas o activar la asistencia por
voz de Siri/Google.
Multifunción de un sólo toque
Encendido / apagado, volumen más / menos,
asociación, reproducción / pausa, reproducir la pista
anterior / siguiente, aceptar / rechazar llamada y Siri
se pueden acceder con un sólo botón.
Lea y siga estas directrices para garantizar una
experiencia mejor y más segura con su Apollo 7
Apollo 7 Verdaderos
auriculares inalámbricos
Versión Bluetooth
Perfiles Bluetooth
Códecs de audio
Alcance inalámbrico
(desde el dispositivo
asociado)
Capacidad de la batería
Tamaño del audífono
Sensibilidad
Frecuencia
16ohm
-42dB (+/- 2dB)
Nanotecnología de recubrimiento
Auricular:
15,4mm (F) x 22,2mm (L)
Base de carga:
62,5mm(L) x 40mm(An) x 25,5mm(Al)
Kopfhörer: 4g x 2 Stk.
Ladetasche: 52g
Impedancia a 1kHz
Sensibilidad de entrada del
micrófono omnidireccional
MEMS
Resistente al agua
Dimensiones
Peso
Estabilizador del auricular
*Debido a la antena direccional, para obtener la
mejor conexión, mantenga el botón hacia arriba.
Encendido/
apagado
Llamada
de
teléfono
Reproducir
música
Básica
R
L
Google
Asociación
Siri
Un clic Hacer doble clic
Mantener presionado
durante 2 seg
Mantener presionado durante 5 seg
* Pulsar y mantener pulsado el botón del auricular
izquierdo durante 2 segundos para volver a
escuchar la canción actual. Pulsar y mantener
pulsado de nuevo durante 3 segundos para volver a
la canción anterior.

Cargar la carcasa
● Retirada con sólo tirar
● Los auriculares se apagan automáticamente y se
cargan al colocarlos en el estuche de carga.
La carga automática se detiene cuando la batería
está llena.
Die Aufladung wird automatisch gestoppt, wenn die
Akkus voll sind.
1
COLOCAR
1
2
PRESIONAR HASTA QUE SE INSERTE/LA CARGA
COMIENCE
2
SACAR
1
2
Con ambos auriculares insertados:
El LED 2 de la carcasa de carga se enciende, luego
se apaga cuando los auriculares se han cargado por
completo
Cuando se inserta 1 auricular:
El LED 2 de la carcasa de carga parpadea y se apaga
cuando el auricular se ha cargado por completo
Si la carga de la batería de la carcasa es inferior al
**Luces indicadoras de la carcasa
y avisos **

30% (con ambos auriculares insertados) el LED 1
parpadea para avisarle de que debe conectar la
carcasa de carga a una fuente de alimentación
Si la carga de la batería del auricular es del 5% o
menor se escuchará un aviso de «Low Battery
(batería baja)» cada 30 segundos
Precaución
1. Utilice el cable Micro USB para recargar la carcasa.
El cable es sólo para cargar, no para transferencia
de datos
2. No deje este producto en el interior de un
vehículo aparcado. La exposición directa a la luz
solar y el calor puede dañar la carcasa de carga
3. No exponga la carcasa de carga a altas
temperaturas o ambientes húmedos
4. No deje que entren objetos metálicos extraños en
el interior del producto, para evitar un posible
cortocircuito o daños
5. No desmonte, dañe, sacuda o queme el producto.
No coloque objetos pesados encima
6. No desechar este producto con la basura domésti
ca. Puesto que contiene baterías, recíclelo según las
leyes y regulaciones locales
7. Si no se usa durante mucho tiempo, recargue los
auriculares y la carcasa cada tres meses para
mantener la vida útil de la batería y evitar una
pérdida en su rendimiento
8. No deje la carcasa de carga completamente vacía
durante mucho tiempo (el indicador LED
permanece atenuado) para evitar daños en la
batería. Asegúrese de que la carcasa de carga esté
al menos al 30% de carga en todo momento
9. La corriente de salida varía según la carga de
entrada
Especificações
4.1
A2DP 1.2, AVRCP 1.4, HFP 1.6, HSP 1.2
aptX/AAC/SBC
10 metros (30 pés)
Fone de ouvido (50mAh)
Estojo de carregamento
(Lí-Ion descarregável, 300mAh)
Micro driver Ø 5,8mm
100dB/mW
20Hz-20KHz
PT
Emparelhamento Apollo 7 com um
dispositivo habilitado para Bluetooth
pela primeira vez
Insira um fones de ouvido em seu ouvido, em seguida,
pressione e segure o botão até ouvir “Power On
(Ligado)”, seguido por “Pairing (Emparelhamento)”,
em seguida, solte o botão e se conecte ao seu
dispositivo emparelhado, toque em “Apollo 7-L” ou
“Apollo 7- R “na lista de dispositivo Bluetooth e você
vai ouvir” Phone Connected (Telefone conectado) “.
Em seguida, insira o segundo fone e
pressione/segure o botão até ouvir “Power On
(Ligado)". Solte o botão, e você vai ouvir “Headset
Connected (Fone de ouvido conectado)". Isso significa
que os dois fones de ouvido estão em sincronia.
* Você pode desfrutar da música através do
emparelhamento do fone individualmente, mas
sugerimos emparelhar ambos com o mesmo
dispositivo para que possa atender chamadas ou
ativar a assistência de voz Siri/Google.
Multifunção de toque único
Ligar/desligar, aumentar/diminuir volume,
emparelhamento, reproduzir/pausar, reproduzir
próxima faixa/faixa anterior, aceitar/rejeitar chamada
e Siri são acessíveis com um botão.
Leia e siga estas orientações para assegurar a melhor
e mais segura experiência com o seu Apollo 7
Apollo 7 Fones sem fio
verdadeiros
Versão Bluetooth
Perfis Bluetooth
Áudios codecs
Alcance sem fio
(de um dispositivo
emparelhado)
Capacidade da bateria
Tamanho do driver
Sensibilidade
Frequência

16ohm
-42dB (+/- 2dB)
Tecnologia de revestimento nano
Fone de ouvido :
15,4mm (P) x 22,2mm (C)
Estojo de carregamento:
62,5mm (C) x 40mm (P) x 25,5mm (A)
Fone de ouvido : 4g x 2 pçs.
Estojo de carregamento: 52g
Impedância @ 1kHz
MEMS sensibilidade de
entrada do microfone
omnidirecional
À prova d'água
Dimensões
Peso
Estabilizador do fone de ouvido
* Devido à antena direcional, a fim de obter uma
melhor conectividade, por favor, mantenha o botão
para cima.
LIGADO/
DESLIGADO
Chamada
telefônica
Reproduzir
música
Básico
R
L
Google
Emparelhando
Siri
Um clique Clique duplo
Pressão longa 2 seg
Pressão longa 5 seg
* Pressione e segure o botão do fone de ouvido
esquerdo por 2 segundos para reiniciar a música
atual. Pressione e segure novamente dentro de 3
segundos para voltar para a música anterior.
Estojo de carregamento
● Fácil remoção de um puxão
● Os fones de ouvido desligam automaticamente e
carregam depois de serem colocados no estojo de
carregamento.
O carregamento para automaticamente quando as
baterias estão carregadas.
1
LOCAL
1
2
EMPURRE ATÉ DAR UM CLIQUE/INICIAR O
CARREGAMENTO
2
EMPURRAR
1
2
Com ambos fones de ouvidos inseridos:
OLED 2 do estojo de carregamento liga, depois
desliga quando o fone de ouvido está
completamente carregado
Com um fone de ouvido inserido:
OLED 2 do estojo de carregamento pisca e apaga
após um único fone estar totalmente carregado
Se o estojo de carregamento de bateria estiver
**Avisos e indicadores de luz do
estojo de carregamento **

abaixo de 30% (com fones de ouvido inseridos) o
LED 1 pisca como um lembrete para conectar o
estojo de carregamento a uma fonte de energia
Se a carga de bateria do fone de ouvido estiver a
5% ou menos, você ouvirá um lembrete de
“Low Battery (Bateria fraca)” a cada 30 segundos
Cuidado
1. Utilize o cabo USB Micro para carregar o estojo de
carregamento. O cabo serve apenas para
carregamento e não para transferência de dados
2. Não deixe esse produto em um veículo fechado.
A exposição direta ao calor e luz solar pode danificar
o estojo de carregamento
3. Não exponha o estojo de carregamento a altas
temperaturas ou ambientes úmidos
4. Não insira metais ou objetos estranhos no
produto para evitar curto-circuito e danos físicos
5. Não desmonte, danifique, una ou queime o
produto. Não coloque qualquer objeto pesado
sobre ele
6. Não descarte este produto no lixo doméstico.
Como contém baterias, reciclar em conformidade
com as leis e regulamentos locais
7. Se não for utilizado a longo prazo, recarregar o
fone de ouvido e o estojo de carregamento a cada
três meses para manter a vida útil da bateria e
evitar a degradação prematura do desempenho
8. Não deixe o estojo de carregamento
completamente fora da fonte de energia por
períodos prolongados (o indicador LED permanece
fraco), para evitar danos à bateria. Certifique-se de
que o estojo de carregamento está, pelo menos,
com 30% de carga todo o tempo
9. A corrente de saída varia de acordo com a carga
de entrada
Este equipamento opera em caráter secundário,
isto é, não tem direito a proteção contra
interferência prejudicial, mesmo de estações do
mesmo tipo, e não pode causar interferência a
sistemas operando em caráter primário.

Dane techniczne
4.1
A2DP 1.2, AVRCP 1.4, HFP 1.6, HSP 1.2
aptX/AAC/SBC
10 metrów
Słuchawka (50 mAh)
Etui z ładowarką (akumulator Li-Ion,
300 mAh)
PL
Pierwszeparowanie Apollo 7 z
włączonym urządzeniem Bluetooth
Włóż jedną ze słuchawek do ucha, następnie wciśnij i
przytrzymaj jej przycisk aż do usłyszenia
„Power On”, a następnie „Pairing”, zwolnij przycisk i
połącz się z parowanym urządzeniem stukając
„Apollo 7-L” lub „Apollo 7-R” na liście urządzeń
Bluetooth swojego urządzenia po czym usłyszysz
„Phone Connected”. Następnie włóż drugą słuchawkę
do ucha oraz wciśnij/przytrzymaj jej przycisk
aż usłyszysz „Power On”. Zwolnij przycisk, a usłyszysz
„Headset Connected“. Oznacza to, że obie
słuchawki są zsynchronizowane.
*Nawet parując indywidualne słuchawki można
cieszyć się muzyką, jednak sugerujemy parowanie
obu słuchawek z tym samym urządzeniem, tak aby
można było odbierać połączenia lub aktywować
pomoc głosową Siri/Google.
Wielofunkcyjny pojedynczy przycisk
Włączanie/wyłączanie zasilania,
Podwyższanie/zmniejszanie głośności, parowanie,
odtwarzanie/pauza, odtwarzanie kolejnego/
poprzedniego nagrania, odbieranie /odrzucanie
połączeń oraz Siri są dostępne za przyciśnięciem
jednego przycisku.
Zapoznaj się i postępuj zgodnie z poniższymi
wskazówkami, aby zapewnić najlepsze oraz
najbezpieczniejsze doświadczenia z Apollo 7
Apollo 7 Prawdziwie
bezprzewodowy zestaw
słuchawkowy
Wersja Bluetooth
Profile Bluetooth
Kodeki audio
Zasięg łączności
bezprzewodowej
(ze sparowanym urządzeniem)
Pojemność akumulatora
Ø 5,8 mm Micro Driver
100 dB/mW
20 Hz–20 kHz
16 Ω
-42 dB (+/-2 dB)
Technologia nanopowłoki
Słuchawka:
15,4 mm (głęb.) x 22,2 mm (dług.)
Etui z ładowarką:
62,5 mm (dług.) x 40 mm (głęb.) x
25,5 mm (wys.)
Słuchawka: 4 g x 2 szt.
etui z ładowarką: 52 g
Wielkość głośnika
Czułość
Częstotliwość
Impedancja przy 1 kHz
Czułość mikrofonu
wszechkierunkowego MEMS
Wodoodporność
Wymiary
Masa
Stabilizator słuchawki
*Ze względu na zastosowanie anteny kierunkowej w
celu uzyskania lepszej łączności należy ustawić
przycisk pionowo.
WŁ./WYŁ.
Rozmowa
telefoniczna
Odtwarzanie
muzyki
Podstawowe
R
L
Google
Parowanie
Siri
Jedno kliknięcie Podwójne kliknięcie
Przytrzymanie
2 sekundy
Przytrzymanie 5 sekund
* Wciśnij i przytrzymaj przycisk lewej słuchawki
przez 2 sekundy, aby ponowić bieżące nagranie.
Wciśnij i przytrzymaj ponownie w ciągu 3 sekund,
aby przeskoczyć do poprzedniego.

Futerał do ładowania
● Proste usuwanie jednym pociągnięciem
● łuchawki automatycznie się wyłączają i ładują po
umieszczeniu w futerale ładującym.
Ładowanie zostaje automatycznie zatrzymane gdy
baterie są pełne.
1
UMIEŚĆ
1
2
WCISKAJ AŻ DO ZATRZAŚNIĘCIA/
ROZPOCZĘCIA ŁADOWANIA
2
POCIĄGNIJ
1
2
Przy włożonych obu słuchawkach:
Wskaźnik LED 2 futerału włącza się, a następnie
wyłącza kiedy zestaw jest w pełni naładowany
Przy włożonej jednej słuchawce:
Wskaźnik LED 2 futerału miga, a następnie wyłącza
się kiedy jedna słuchawka jest w pełni naładowana
Jeżeli stan naładowania baterii futerału jest niższy
niż 30% (z podłączonymi słuchawkami) wskaźnik
**Wskaźniki i powiadomienia
futerału do ładowania **
 Loading...