


Tablet
ES716HQ

Attention
This handbook contains important security information and instructions
for the correct use of the product to avoid damages or accidents. Please
make sure to read the manual carefully before use the device.
1. Please do not place the device in a high temperature, moisture or
dusty place also liquids will damage the device and touch screen.
2. Please do not leave the device in high temperature places especially in
summer do not store the device inside a car.
3. Avoid drop, fall or violent collision of the device, do not apply
excessive pressure to the display, also vibration could cause the
abnormal display of partial or complete damage to the screen.
4. Please choose the appropriate volume level and when using
headphones adjust the volume to a safe level of comfort.
5. Please charge the device with the original charger as follows :
When the battery power ICONS shows have low or no power.
If system automatically shut off, startup after power off soon
Or when the operation buttons do not respond.
When the device top right corner show red icons.
6. When the device in the format or upload and download a file
Please, do not suddenly disconnect the power, this could cause
applications error or internal memory damages.
7. In case of any user damage to the product, repair, or other causes of
erased the memory, the company shall not be liable for any responsibility,
please follow the user manual for the standard operation of the device.
8. Do not disassemble the product or apply any cleaning liquids.
9. Do not use the device one of the place of prohibit the use electronic
equipment in regional (such as the plane).
10. Please do not use the Tablet PC when you in driving or walking.
11. Do not charge or connect the device with a non original part.
1

Tabl et P arts
Name function
1. TF Card slot Insert a memory card (up to 32GB)
2. HOST Port
3. Camera Front 0.3MP, Rear 2.0MP
4. Reset
5. Earphone jack
6. Volume + Press the button to increase the volume
PC connection peripheral connection through
cable for external memory and power adapter
When the Tablet under the condition of the
crash, use the small objects to short press
RESET button, Tablet will force to shutdown.
Connect earphone to this standard 3.5mm
jack
7. Volume - Press the button to decrease the volume.
8. Power
Keep pressed to turn on/off the tablet and
gently press to activate from standby
2

Getting Started
Battery Charging
The tablet has a built-in rechargeable Li-polymer battery.
1. To charge connect the AC power adapter to the HOST port.
2. The battery icon shows the battery status and charging level.
3. The tablet can be used even if the battery is being charged.
Use carefully to avoid the damages of power cord or HOST port.
4. Do not remove or puncture the battery this can cause an explosion or
hazard situation may happen.
5. Recharge it for at least half hour if it has been idle for long time and
fails to start, also do not leave the battery empty of charge
6. Regularly charge the tablet at least once a month to prevent battery
damage. Do not charge battery for more than 6 hours.
Disposal
The battery contain polluting and toxic materials, please contact the
official recycling location before disposing the tablet pc.
3

Power ON
Press and hold the
button for 5 seconds until screen turns ON.
Power OFF
and hold the button for continuous 5 seconds and it will appear
Press
On screen the power options then select OK to power OFF the tablet
Screen Lock
This feature locks the screen, at the same time turn OFF the screen
backlight after a few seconds normally the screen locks when:
1. System is idle.
2. Manually activated by pressing the Power button once.
Screen unlock
Home screen
The Home screen will look similar to the picture below. It is actually five
screens, each of can have a different layout of icons. To switch between
screens, simply slide your finger left or right across the display.
The status bar and navigation buttons are always visible.
4

The Desktop contains shortcuts to your most used applications and
widgets touch the screen icon to quickly do a search in the internet .
The
icon will launch the application menu.
The status bar displays system information, such as current time, wireless
connectivity and battery. Touch to expand the status bar for more detailed
information.
The
The
The
button moves back one step to the previous menu/page.
buttons returns immediately to the main desktop.
button display a menu of recently opened applications.
Settings Menu
The settings menu allows you to adjust Tablet system configuration.
To change settings:
Touch the "Settings"
menu icon on the application menu.
1. Guide your finger up or down the left side of the screen to scroll
through the list of available categories.
2. Touch a category to view further options on the right side of the screen.
Connect to disconnect from wireless networks, view connection status
Data usage - Enable / disable mobile data, view current usage, set mobile
data limit (this function is available only on devices supplied with 3G card)
Sound - Change volume, touch sound, screen lock sounds etc.
Display - Change brightness, wallpaper, sleep settings, font size etc.
Storage - Manage NAND and TF card, view available capacity etc.
Battery - See battery status and power usage by applications.
Apps - Manage applications, running services etc.
Accounts - Manage accounts etc.
5

Location services - Change approximate location detection, improve
search results.
Security - Change screen lock type, encryption, password, credential
storage etc.
Language & input Select language, add to the dictionary, edit on-screen
keyboard settings, vocal search, etc.
Backup & reset - Backup & restore data, perform factory reset, etc.
Date & time - Set date, time zone, time, clock format etc.
Accessibility - Set up large text, auto-rotate screen, speak password etc
Developer options - Advanced functions for Android developers -
debugging, HDCP check etc.
About tablet - Information about your device software version.
How to Use TF card
1. Insert the TF card into the TF card slot. Gently push TF card into slot
until it clicks into place.
2. A prompt will be seen on the screen saying “ Preparing card “
Removing TF card
1. Close all applications and documents which have been opened from
the TF card.
2. Select “Setting” and find “ Storage” then click “Unmount card”.
3. A prompt will be seen on the screen saying “ TF card safe to remove”
4. Gently press the TF card to remove and pull out the TF card.
Note: Insert the TF card in correct position, otherwise it will damage the
card and the slot.
Software Keyboard
The tablet has a software keyboard which automatically show up when
you tap the place on screen where text or number are to be entered.
6

Touch Screen
The touch screen responds to finger touch.
Note: do not place any object on the touch screen for it may damage or
crush the screen. Clean touch screen with dry cleaning cloth.
Single Click: single click one icon to choose the icon or option you want.
Long Press: press and hold one icon to make appear a menu related to
the executed function (if available).
Drag: drag on the screen and you can move between magic cube sides
or drag the application icons into the shortcut bar.
How to connect with computer
Note: Turn on your Tablet before connect the Tablet to PC by data cable.
1 Use data cable to connect MID with computer. System will notice
device connected on bottom of screen.
2 Press connected on the top bar, then click Turn on storage, click OK.
3. Then the data connection with your PC has been successfully.
4. Do not disconnect data cable while memory is reading or while you
Copy or remove any files, this can cause internal memory damage,
Please safely disconnect the device before unplug the data cable.
7

Connection to Internet
Wireless:
1 Select “ Settings”
2 Select wireless and slide OFF to ON status.
3 All detected wireless networks in the area will be listed, Click to select
desired wireless connection.
4 Enter WEP key or network key if necessary.
5 Once connected to a wireless network, settings will be saved
6 Wireless icon will appear on the taskbar when connected
successfully.
Note: when the tablet detects the same wireless network in the future, the
device will connect to the network automatically with same password
record.
Web Browsing
Connect to the internet and launch the browser.
8
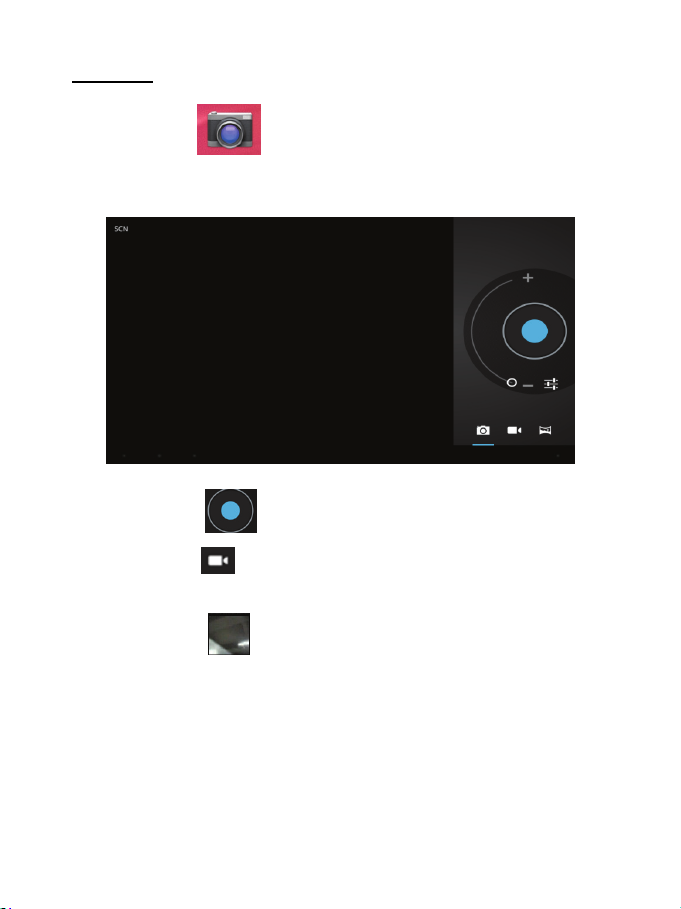
Camera
Touch the icon to enter camera mode and the interface is
shown as follows:
1. Touch the icon
2. Move the icon
camera recording mode.
3. Touch the icon
you can also delete, share, set it as the wallpaper. Click return button to
exit camera interface.
in the middle to take photo
on bottom and you can switch camera mode to
on the top right to see the previous picture and
9

Trouble Shooting
Close Application
All running applications take up system memory and will slow down
system response. Please shut down all idle applications to release
memory and get the system speed back to normal.
To close the application, click the icon
the system configuration interface. Select the Application → Running
services and the interface is shown as follows:
Tap the application you want to close. A pop-up window will be displayed.
Tap “Stop” to close that application.
Mandatory Power OFF
1. Press and hold the power button for 5 seconds and the device will be
powered off.
10
on the shortcut bar to enter

2. Press the reset button on the back and the device will be forced to be
powered off.
Restore Default Setting
If you want to reset the factory setting and erase all materials, please
press Settings → Privacy → Factory data reset.
** Warning: Factory data reset setting will delete your data and
configuration of system and applications from downloading.
**Please use this function carefully.
11

VIEWMAX WARRANTY POLICY
General Terms of Warranty
ViewMax warrants Graphics card and Tablet (Products) excluding (free) bundled accessories
that may be delivered together with the Product, to be free from defects in materials and
workmanship for a period of 12 month(s) depending on your specific model. If the product fails
during normal and proper use within the warranty period ViewMax will, subject to exclusions and
at ViewMax’ discretion, repair or replace the product or components. Any products and or
components repaired or replaced by ViewMax will be under warranty for the remaining period of
warranty or for no less than 3 months. This warranty applies only to products that are new on the
date of purchase from an authorized ViewMax product reseller. The Tablet product line is
covered under a parts and labor repair or buffer exchange warranty for hardware, manufacturing,
and/or power related issues, excluding power surges and/or electrical spikes. This ViewMax
warranty does not include failure caused by improper installation, operation, cleaning or
maintenance, accident, damage, misuse, abuse, non- ViewMax modifications to the product, any
software programs, normal wear and tear or any other event, act, default or omission outside
ViewMax control.
Software Support
Your ViewMax product is supplied with pre-installed software. If you have any related technical
problems when using your ViewMax product, we suggest you check the manual or Viewmax
support web site to carry out preliminary trouble shooting. ViewMax will be limited to support your
product if the operating system has been altered. Third party software may require support from
such vendors.
Shipping Terms
ViewMax Graphics card and Tablet products feature one-way ground shipping terms. Customer
shall be responsible for any and all freight costs associated with sending in your product for
service, and ViewMax will cover the freight cost of shipping back to the customer after warranty
service and/or repairs are completed.
Warranty Extension Program (WEP)
This product line features models that are eligible for the warranty extension program. Please
contact your regional distributor, regional reseller, or regional ViewMax Service facility for more
information.
12

General Product Warranty Service Terms
During the Limited Warranty Period as stated above, ViewMax will, at its sole discretion, repair or
replace any defective component. All spare parts or modules removed under this limited
warranty period become the property of ViewMax. The terms and conditions of this Limited
Warranty constitute the complete and exclusive warranty agreement between you and ViewMax
for the product and supersede any prior agreement or representations made in any ViewMax
sales document, literature or advice that may be provided to the customer by any ViewMax
representative in connection with the customer ’s purchase of the product. No change to the
conditions of this Limited Warranty is valid unless it is made in writing and signed by an
authorized ViewMax representative.
Limitations of Liability
If the product fails during normal and proper use within the warranty period, ViewMax will, at its
discretion, repair or replace the defective parts within the product, or the product itself, with items
that are functionally equivalent to that as originally supplied, or better, during the warranty period
defined for the model, using new or refurbished parts or units. If the product is under warranty,
the ownership of the replaced defective parts will automatically be transferred to ViewMax. All
components repaired or replaced by ViewMax will be under warranty for the remaining period of
your warranty. ViewMax will recover the originally configured operating system bundled with the
product if the hard drive is to be replaced. ViewMax will not be liable to restore or transfer the
user’s data or programs from the original hard disk.
THIS LIMITED WARRANTY IS IN LIEU OF ALL OTHER WARRANTIES, WHETHER EXPRESS,
IMPLIED, OR STATUTORY, AND VIEWMAX SPECIFICALLY DISCLAIMS ANY WARRANTIES
OF MERCHANTABILITY, OR FITNESS FOR A PARTICULAR PURPOSE.
IF THIS PRODUCT FAILS TO WORK AS WARRANTED ABOVE, THE CUSTOMER’S SOLE
AND EXCLUSIVE REMEDY AND VIEWMAX’ SOLE LIABILITY SHALL BE REPAIR OR
REPLACEMENT. VIEWMAX’ MAXIMUM LIABILITY UNDER THIS LIMITED WARRANTY IS
EXPRESSLY LIMITED TO THE LESSER OF THE PRICE YOU HAVE PAID FOR THE
PRODUCT OR THE COST OF REPAIR OR REPLACEMENT OF ANY HARDWARE
COMPONENTS THAT MALFUNCTION UNDER NORMAL USE. ALL VIEWMAX WARRANTY
TERMS AND AGREEMENTS ARE NON-TRANSFERABLE AND ONLY APPLY TO THE
ORIGINAL UNIT AND ORIGINAL PURCHASER. VIEWMAX IS NOT LIABLE FOR A CLAIM
MADE BY A THIRD PARTY OR MADE BY YOU FOR A THIRD PARTY.
Exclusions from this Limited Warranty Service
ViewMax does not warrant uninterrupted or error-free operation of this product. Any technical or
other support provided for the product under warranty, such as assistance via telephone with
13

“how-to” questions and those regarding product setup and information will be provided without
warranties of any kind. The warranty only covers failures or malfunctions that occur during the
warranty period and under normal use conditions as well as any material or workmanship defect.
The warranty will not apply to or be valid under conditions including but not limited to the
following:
a) The serial number of the ViewMax product, components or accessories has been altered,
cancelled, removed, or otherwise not valid as identified by ViewMax;
b) The product has been tampered with, repaired and/or modified by non-authorized personnel;
c) The product warranty seals have been broken or altered;
d) There is damage caused by natural disaster, intentional or unintentional misuse, abuse,
neglect, acts of war, improper maintenance, or use under abnormal conditions;
e) There is damage caused by accidental drops, spills, fire, or power surges.
f) There is damage from improper installation, improper connection, or use of parts and/or
components not manufactured or sold by ViewMax;
g) There is damage from use outside of the operation or storage parameters or environment
detailed in the User's Manual or reasonably acceptable for similar product usage models
deemed industry standard best practices;
h) There is damage to or loss of any program, data or removable storage media, or if there are
costs from recovering any program or data;
i) There is damage from third party software or from virus(es);
j) There is software loss or data loss that may occur during repair or replacement.
k) Support and costs involved to install or configure the product for any third party software
application or hardware device, or network/wireless configuration.
l) Due to technology limitations, some devices (e.g. DVD ROM and software player may not play
certain titles if applicable to your product) may be limited or not compatible with the ViewMax
product. These limitations are common to defined standards within the hardware industry and
are not specific to your ViewMax product.
m) You have failed to follow all return materials authorization (“RMA”) instructions provided to
you by ViewMax.
If Service is required:
Returning your product to ViewMax during the warranty period does not automatically mean that
it will be repaired free of charge. Upon receiving your product, ViewMax reserves the right to
check the validity of your warranty and your request for warranty service. Neither ViewMax,
ViewMax’ Service Centers, ViewMax’ Authorized Service Providers, nor your authorized
ViewMax product reseller are responsible for any of your confidential, proprietary or personal
information contained in the product which you return to ViewMax for any reason. You should
14

remove all such information from the product prior to its return. ViewMax is not responsible for
damage or loss of any personal data, programs, or removable storage media. ViewMax is not
responsible for the restoration or reinstallation of any data or programs other than software
installed by ViewMax when the product was manufactured.
Before contacting ViewMax :
•Back up all your personal data and remove any confidential, proprietary information on the hard
drive. ViewMax will not be responsible for any loss of your own programs, data or information.
•If you received an error message, write it down with the fault description and include it with the
product.
•Retrieve the following information from your ViewMax product: operating system version, BIOS
version, and notify if you have made any recent hardware or software changes.
•Ensure you have the following information readily available: your ViewMax product’s model
name, serial number, sales invoice/receipt with date of purchase and warranty card. You will be
required to provide proof of purchase before warranty service can be performed.
Make sure you are in front of your ViewMax product and have your product turned on (if possible)
when you call to perform troubleshooting procedures.
When preparing your product for shipment to ViewMax, you will need to observe the following:
•ViewMax recommends that the product be returned in its original packaging. The original
packaging will provide better protection for your product during transit. Warranty may be voided if
the product is damaged due to improper packaging. Original packaging may not be retuned once
service is completed.
•Please do not send in anything but the product itself unless specially requested by ViewMax.
Any other items and accessories included in the package received by ViewMax will be treated as
packaging material, and may not be returned.
Please note: if your product is received packed in anything other than its original packaging,
ViewMax’ Service Site may charge you for appropriate anti-shock packaging when your product
is returned.
© 2015 ViewMax Technology. All rights reserved. ViewMax, ViewMax Technology, ViewMax
Just For The Winners, are registered trademarks of ViewMax Technology. All other trademarks
are the property of their respective owners. ViewMax reserves the right to change without notice,
product offerings or specifications.
MADE IN CHINA
15

FCC Information and Copyright
This equipment has been tested and found to comply with the limits for a Class B digital device,
pursuant to part 15 of the FCC Rules.
These limits are designed to provide reasonable protection against harmful interference in a residential
installation. This equipment generates,
uses and can radiate radio frequency energy and, if not installed and used in accordance with the
instructions, may cause harmful interference
to radio communications. However, there is no guarantee that interference will not occur in a particular
installation. If this equipment does
cause harmful interference to radio or televi si on rece pt i on , whi ch can be determined by turning the
equipment off and on, the user is
encouraged to try to correct the interference by one or more of the following measures:
—Reorient or relocate the receiving antenna.
—Increase the separation between the equipment and receiver.
—Connect the equipment into an outlet on a circuit different from that to which the receiver is
connected.
—Consult the dealer or an experienced radio/TV technician for help.
15.19 Labelling requirements.
This device complies with part 15 of the FCC Rules. Operation is subject to the
following two conditions:
(1)This device may not cause harmful interference, and
(2) this device must accept any interference received, including interference that may
cause undesired operation.
changes or modifications not expressly approved by the party responsible for compliance could
void the user's authority to operate the equipment.
FCC RF warning statement: the device has been evaluated to meet general RF exposure
requirement , The device can be used in portable exposure condition without restriction.
 Loading...