

Page 1

USER MANUAL
Page 2
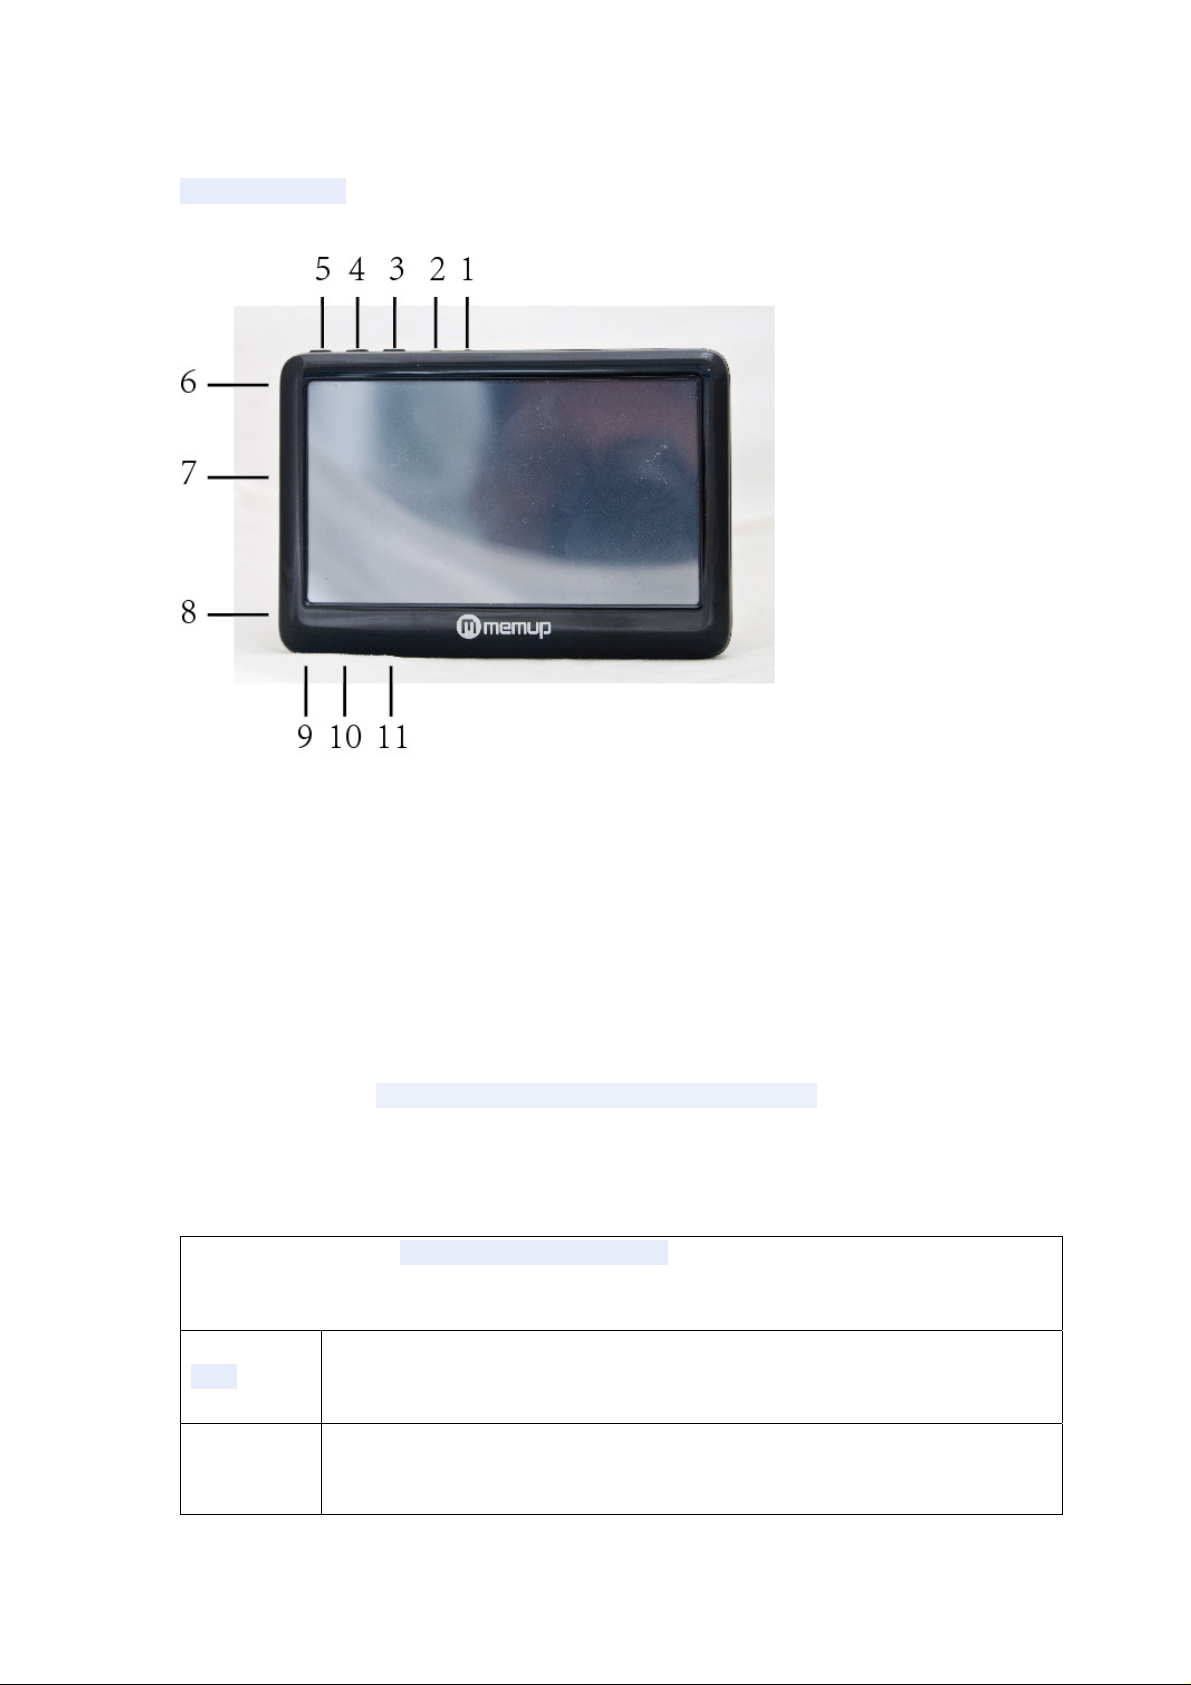
Hardware rules:
1: VOL +
2: VOL3: Back to the home screen
4: Press the buttom to show the tools.
5: Return (Return to last interface.)
6: Earphone Connector
7: MICRO SD Card slot
8: USB Connector
9: Power ON/OFF, Short press to enter or leave the hibernation.
10: RESET
11: MIC Slot
MID hardware parameters
CPU
Memory
BOXCHIP F20 533MHz
256MB DDR2 RAM
Page 3
Storage
Wireless
USB
Audio
Memory built-in 2GB/4GB/8GB/16GB
Support Micro SD card to expand memory upto 16GB
WiFi 802.11B/G/ N
USB2.0 OTG high speed interface
3.5mm headphone jack
High-quality stereo loud speaker
Built-in microphone
Frequency response: 20Hz-20KHz
SNR: greater than 90db
4.3 inch
Size
Screen
Other
Startup and shutdown
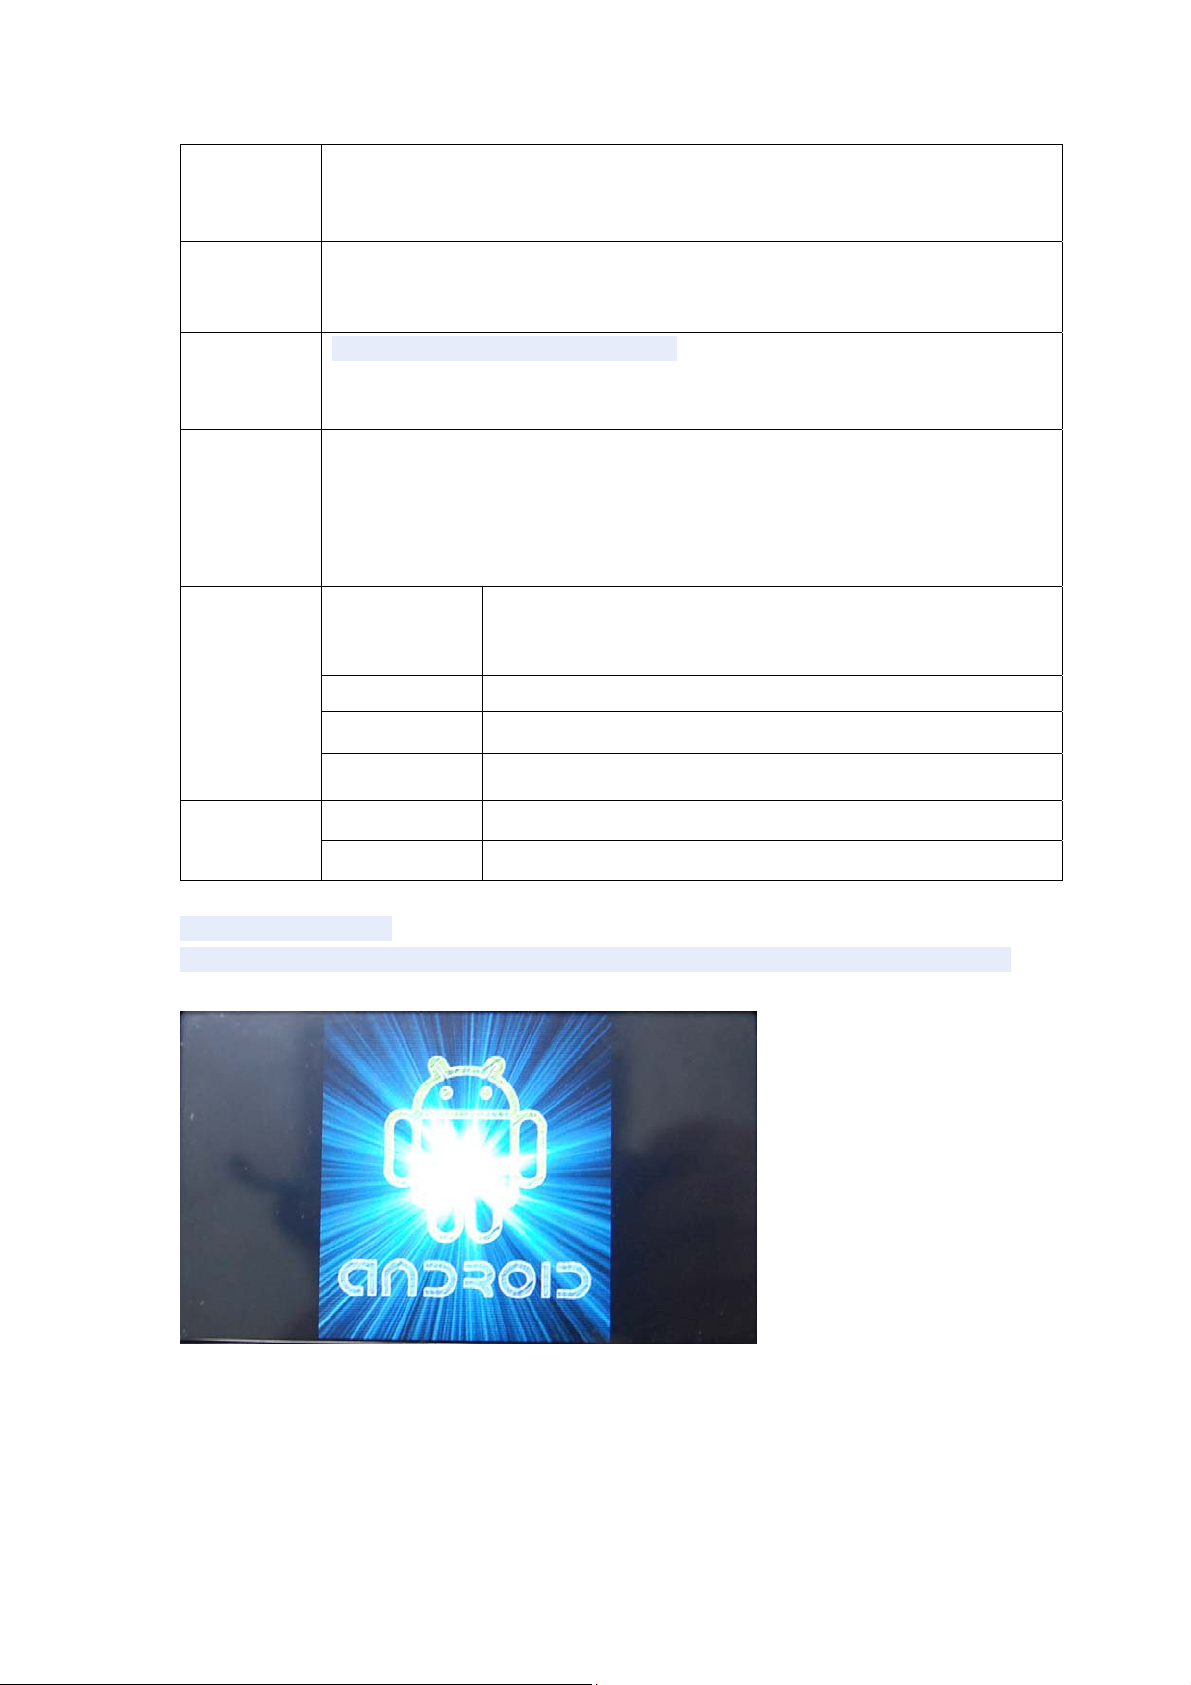
*Boot: Press and hold the power button, the system will enter the startup process,
System has been started, are entering the Android system:
Resolution 480X272
Color
Operating
Size
Battery
65K colors
Resistive touch panel
115*76*11 mm
Built-in lithium polymer battery 1200MAH
The system enters the default home interface.
Page 4
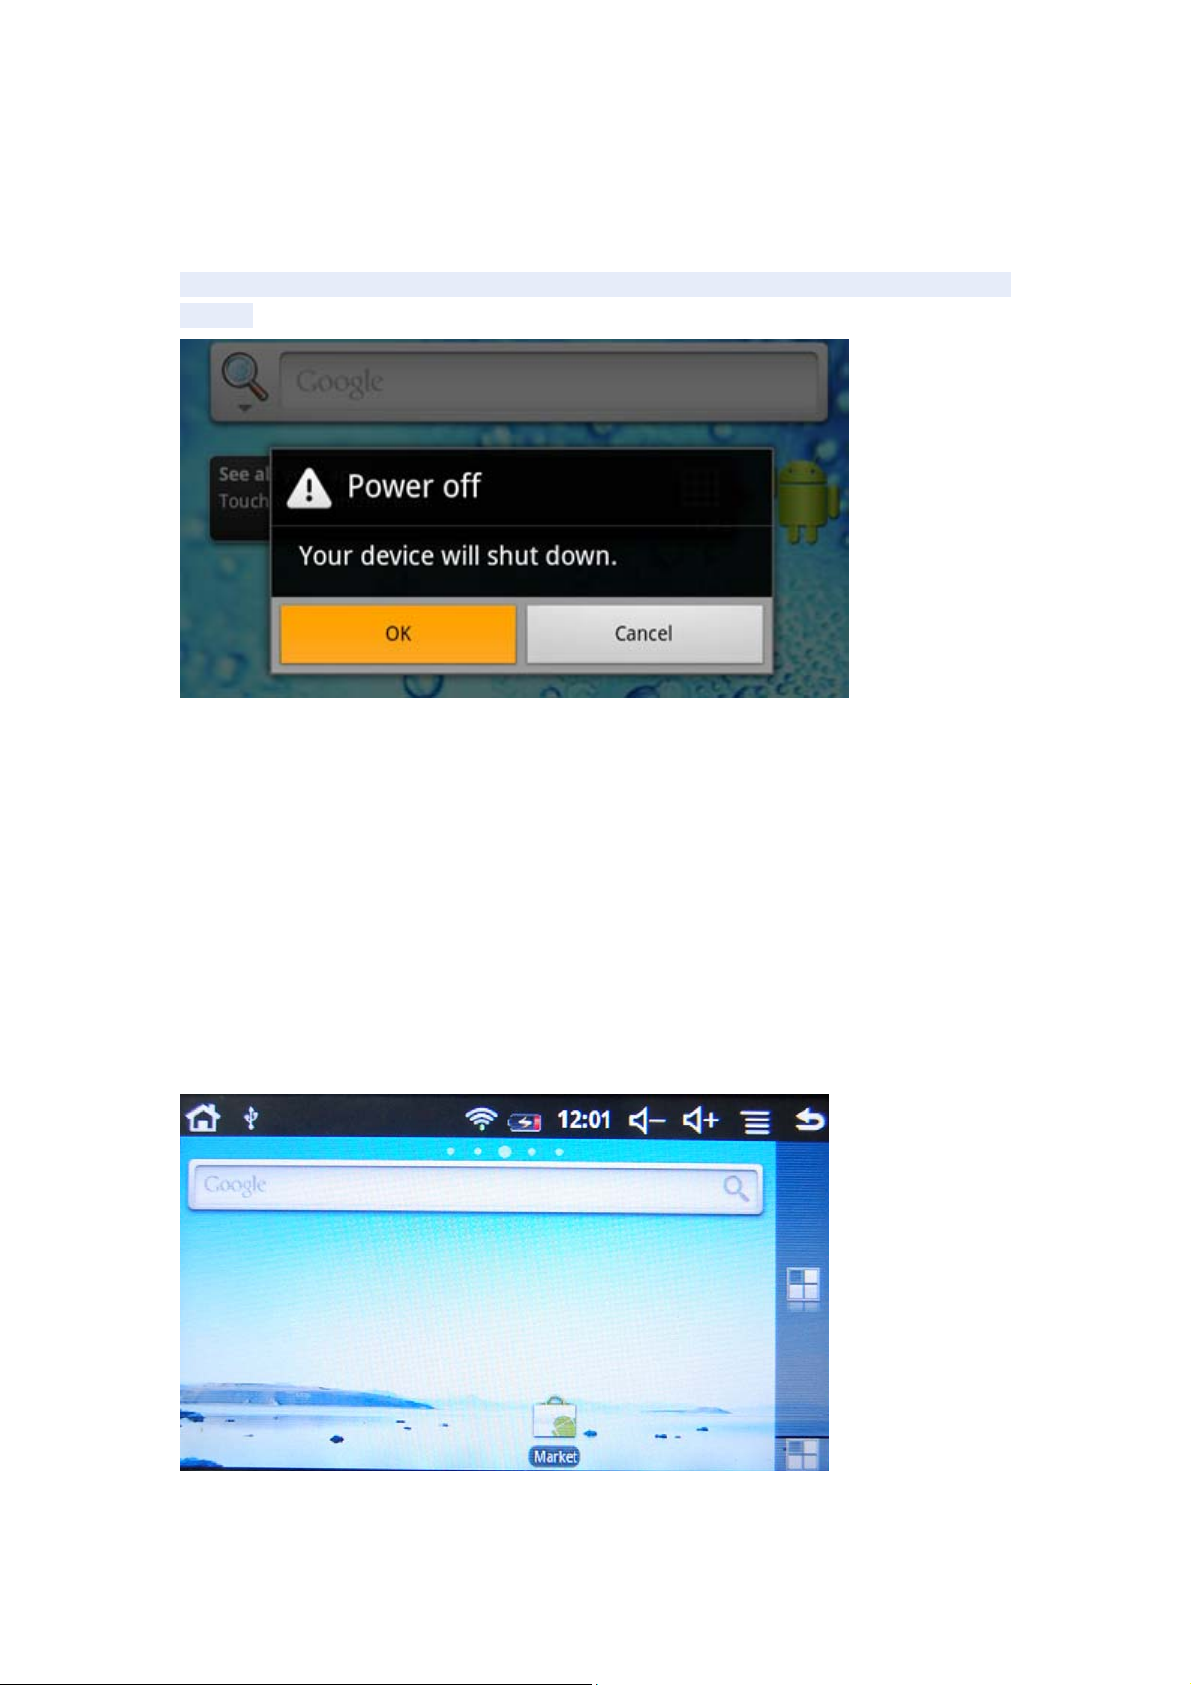
*Shutdown: Press the power button, pop-up device options, select Shut Down, as
follows:
Click OK, you can safely shut down.
*Sleep: the machine under normal operating conditions, Short press the power button,
Into hibernation, Now, Screen will close. Short press the power button again, Be able
to resume normal mode. When the time being use this MID can enable this feature
when, To reduce power consumption.
Desktop:
System after the completion of normal start, Desktop can see Status Bar、Quick
Search Bar、Main menu labels and market.
Page 5
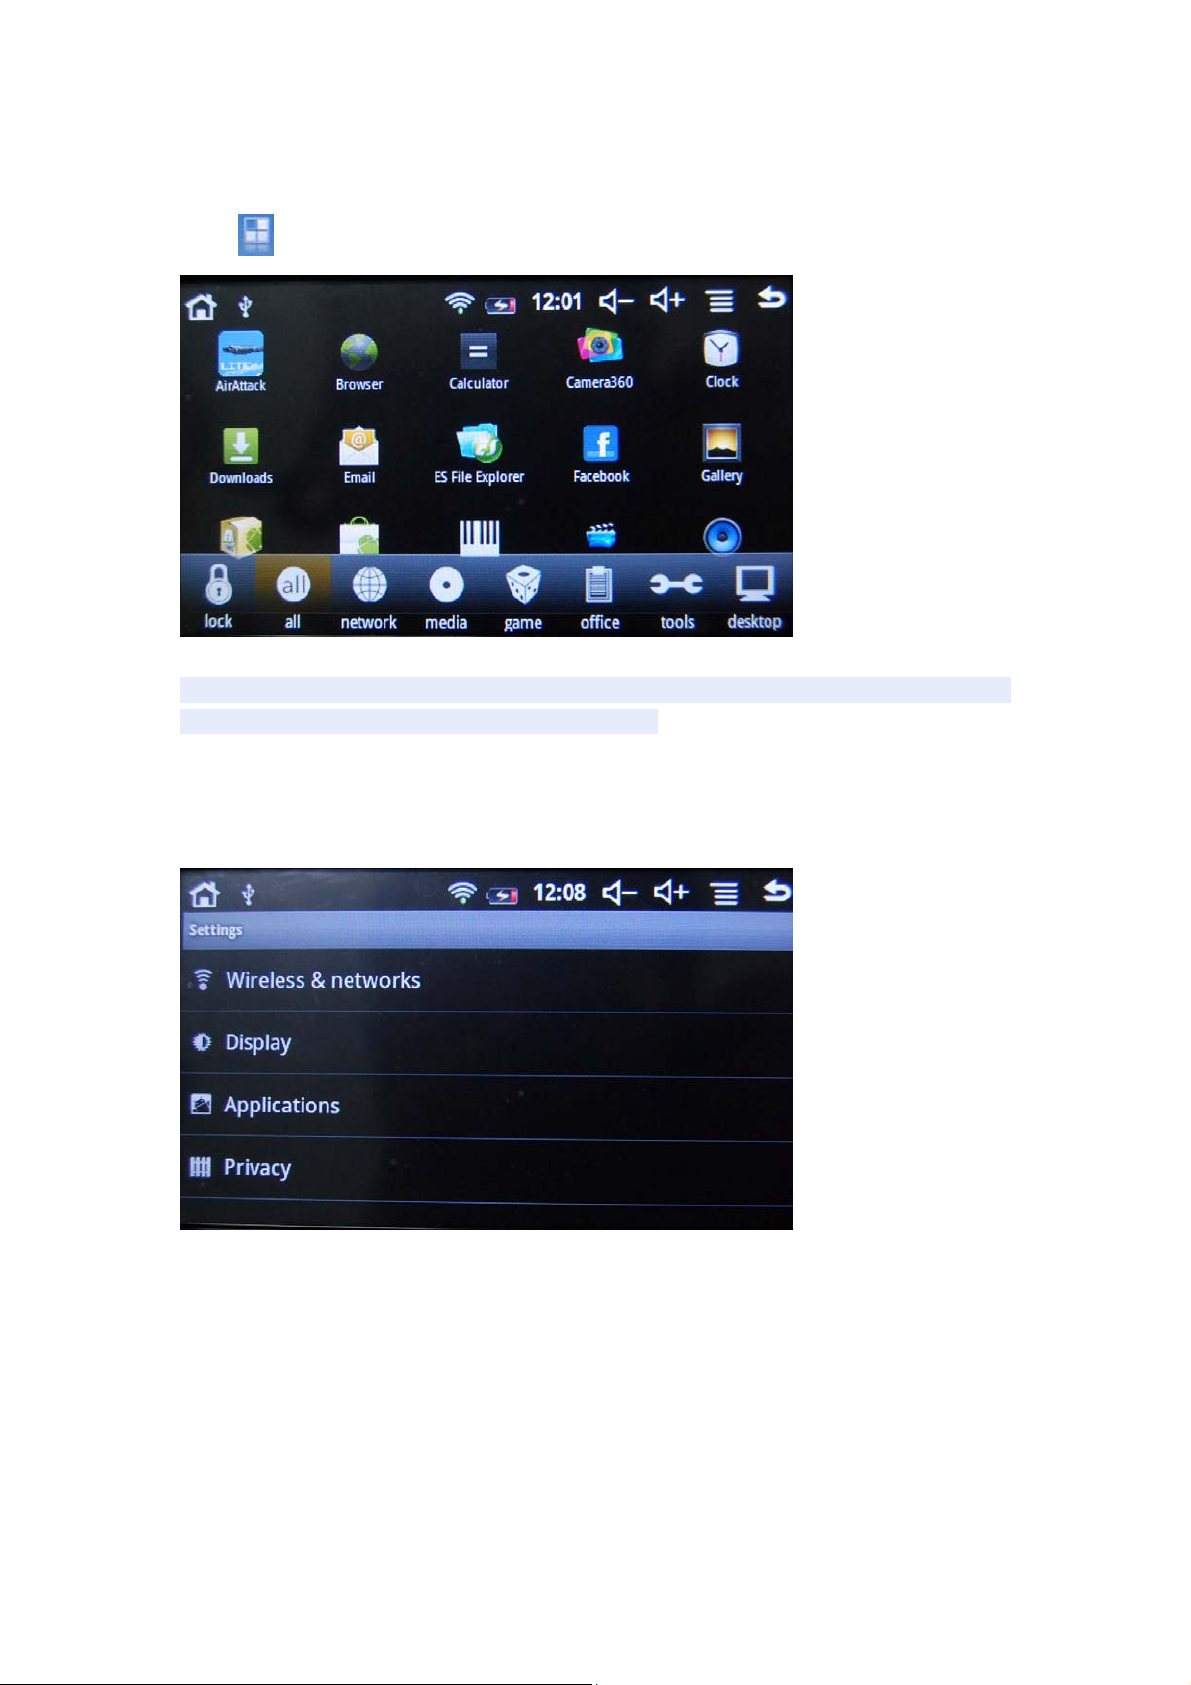
Main Menu Operation:
Click to show the main menu ,And is as follows:
In the main menu, the system can be set to run existing applications, music player,
video player, web browsing and other operations.
System Settings:
Click the main menu interface in the "Settings" icon, you can open the system
settings interface, as shown below:
Select the appropriate operation of the relevant items, such as:
* Wireless and network
* display
* Date & time
* About Device
Etc
*Date and time settings:
Page 6
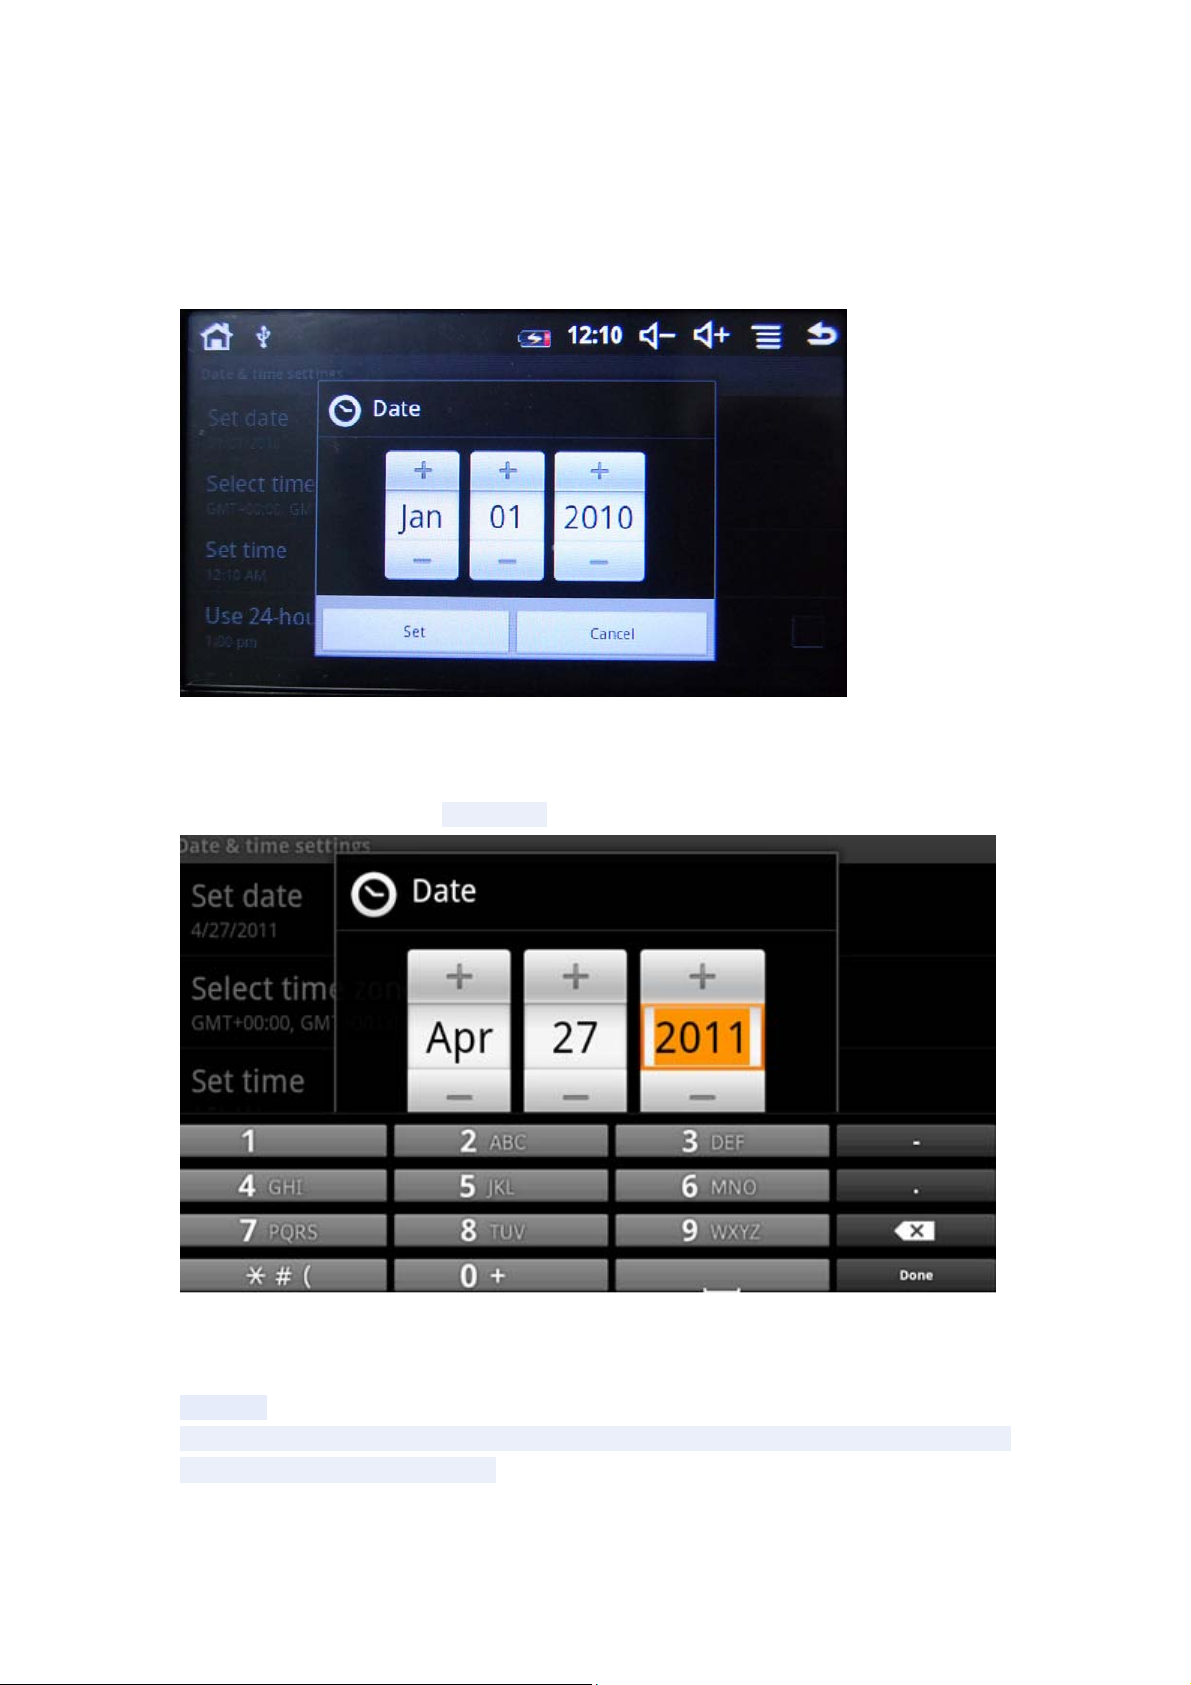
Set interface options "time and date settings options" to enter the date and time
settings interface:
Can also select to set the date, select the time zone, set the time, time format, date
format and other information.
For example, choose to set the date, as follows:
Select +: that the increase of 1 unit,
Select -: that the reduction of 1 unit.
Also can choose the number, enter the input mode. Directly entering the desired
number, then select Done. As follows:
Select "Settings." If you enter the number of legitimate, then the operation is
successful, the system will set the option to use the new.
*Display:
In the setup interface choose "Display" to enter the display settings interface, select
"Brightness", there are interface:
Page 7
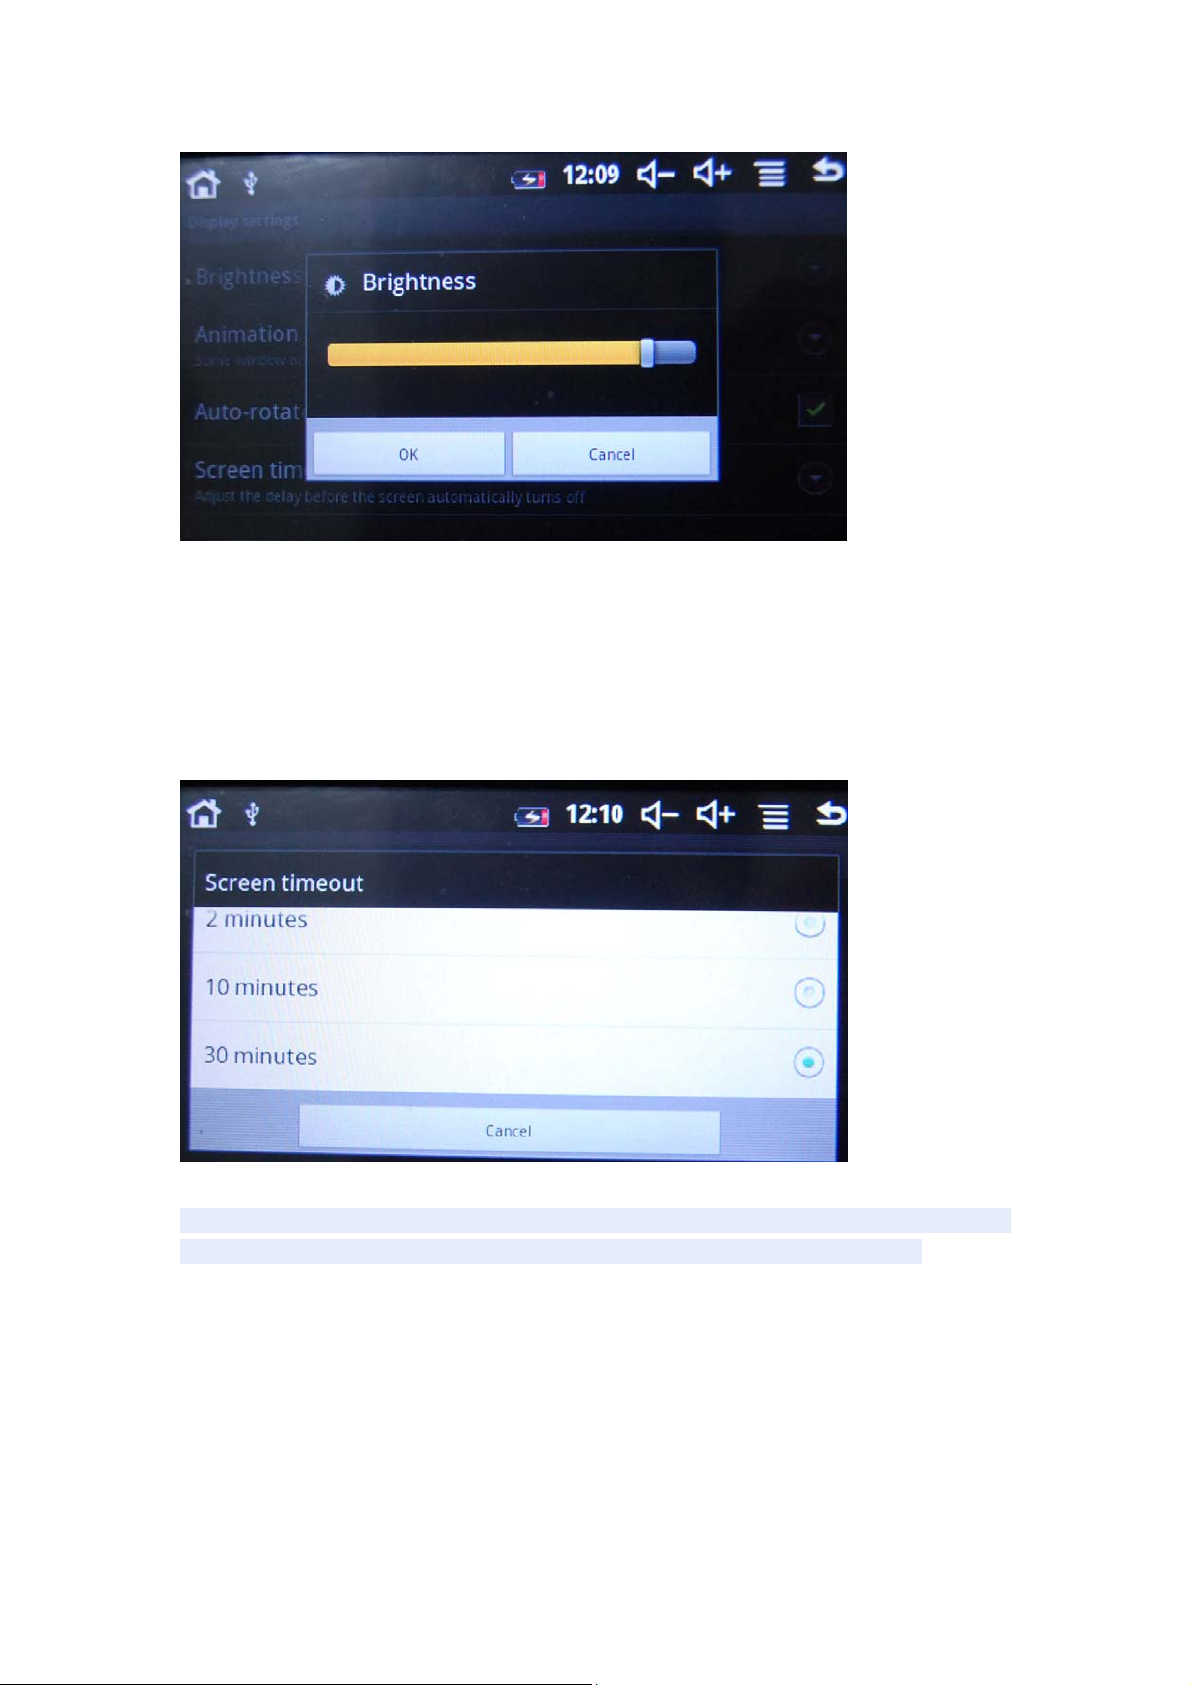
*screen timeout:
Screen timeout: the screen automatically locks the delay before.
In the setup interface choose " display settings" to enter the display settings
interface, scroll down section, select the " screen timeout " interface appears, as
follows:
Note: In the video, the screen auto-standby function does not.
*WIFI Wireless Connection:
Click the main menu "Settings" icon, go to "System Settings" screen, click on
"Wireless and network" into the "Wireless and network" setup interface. Click the
"WIFI" section to quickly open the WIFI feature, click on "WIFI settings" column enter
"WIFI set interface" as shown below:
Page 8
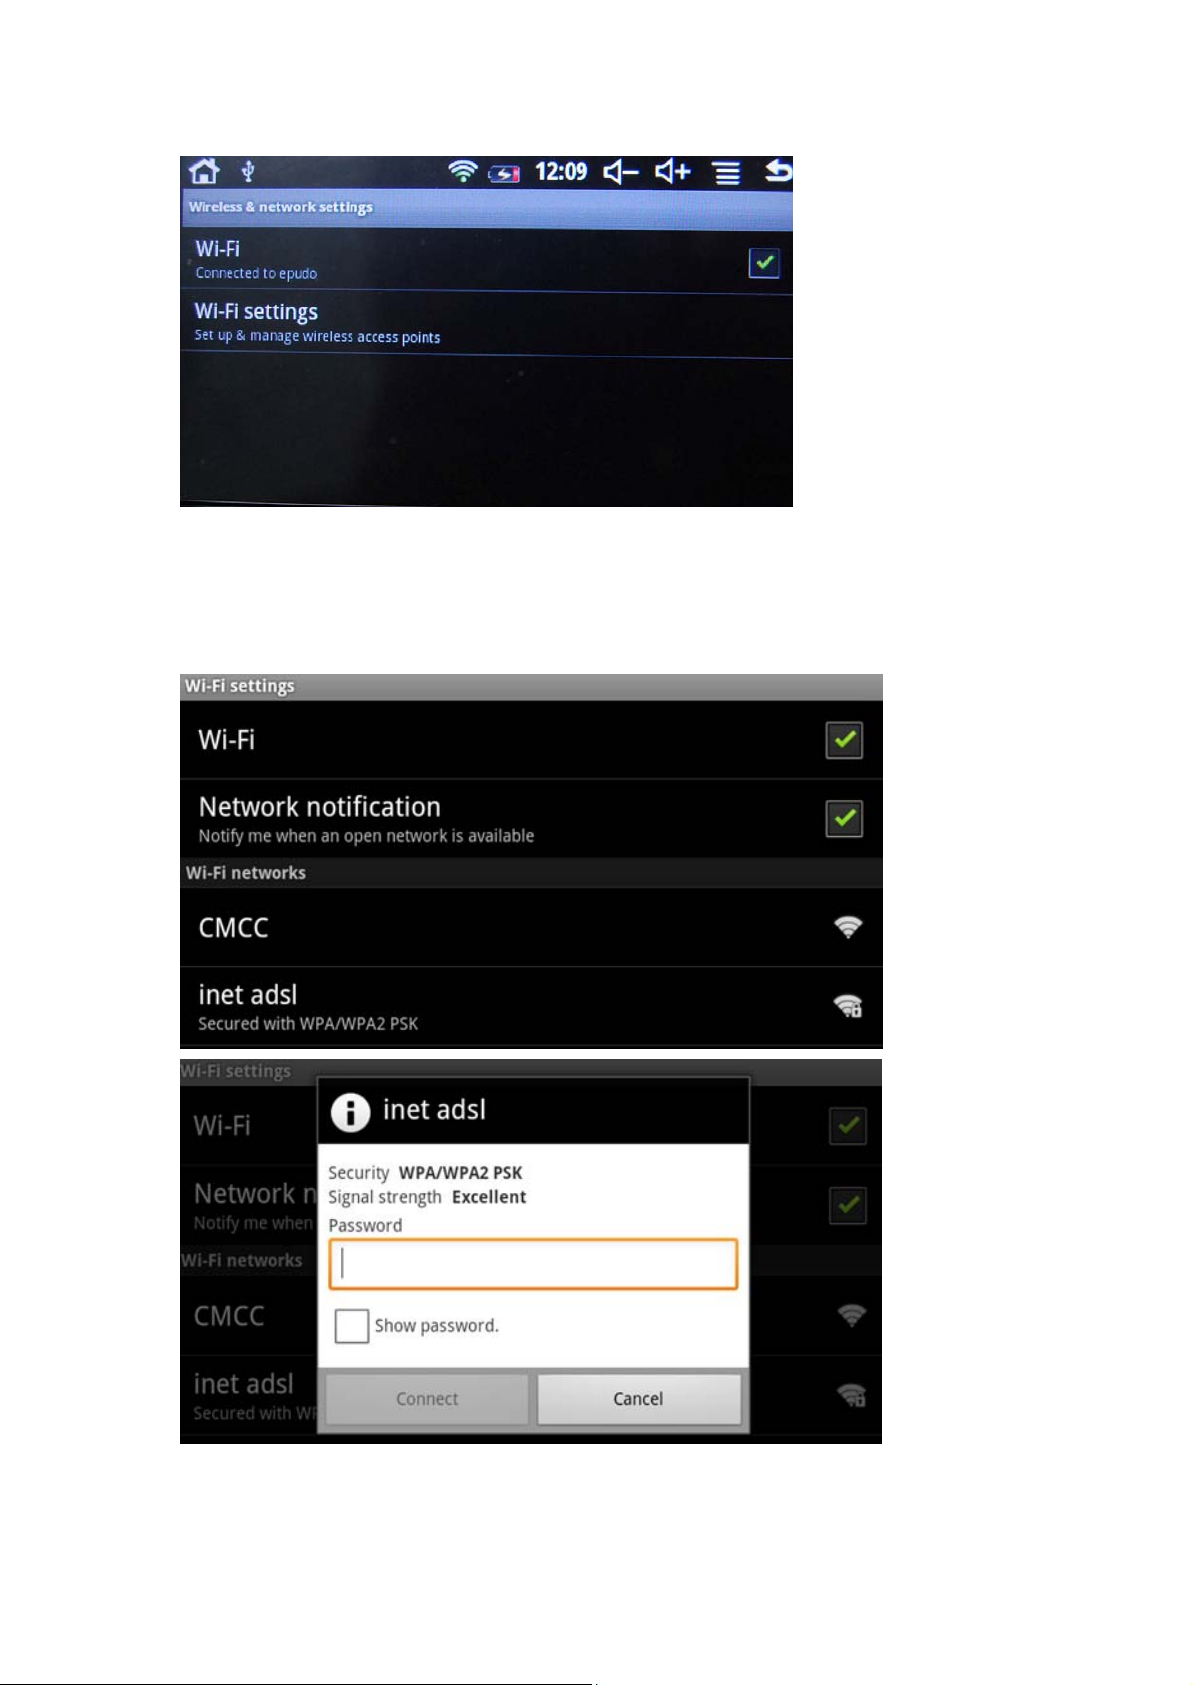
In the "WIFI settings" interface (above), click on the WIFI column also can open and
close the WIFI feature, click on the "Network Notice" lists MID search to the wireless
router,click t he search name will pop up settings window , please follow the prompts to
complete the WIFI network links. Some encrypted network, need to enter a valid key.
Link diagram below:
Page 9

According to the above method to connected Wi-Fi.
Touch Calibration
When you first start the system by default called touch calibration procedures. Users
can also in the main menu, select "touch calibration", enter the touch calibration
procedures.
Follow the prompts to complete the calibration operation, if successful touch
calibration, the system prompts and automatically exit the touch calibration interface.
As follows:
After complete calibration,must reboot the MID to keep calibraiton valid.
Network:
Web browsing:
When the connected network, open the Web browser enter the URL, you can
quickly browse the Web; or through the main desktop search bar enter the URL,
open the web page.
Page 10
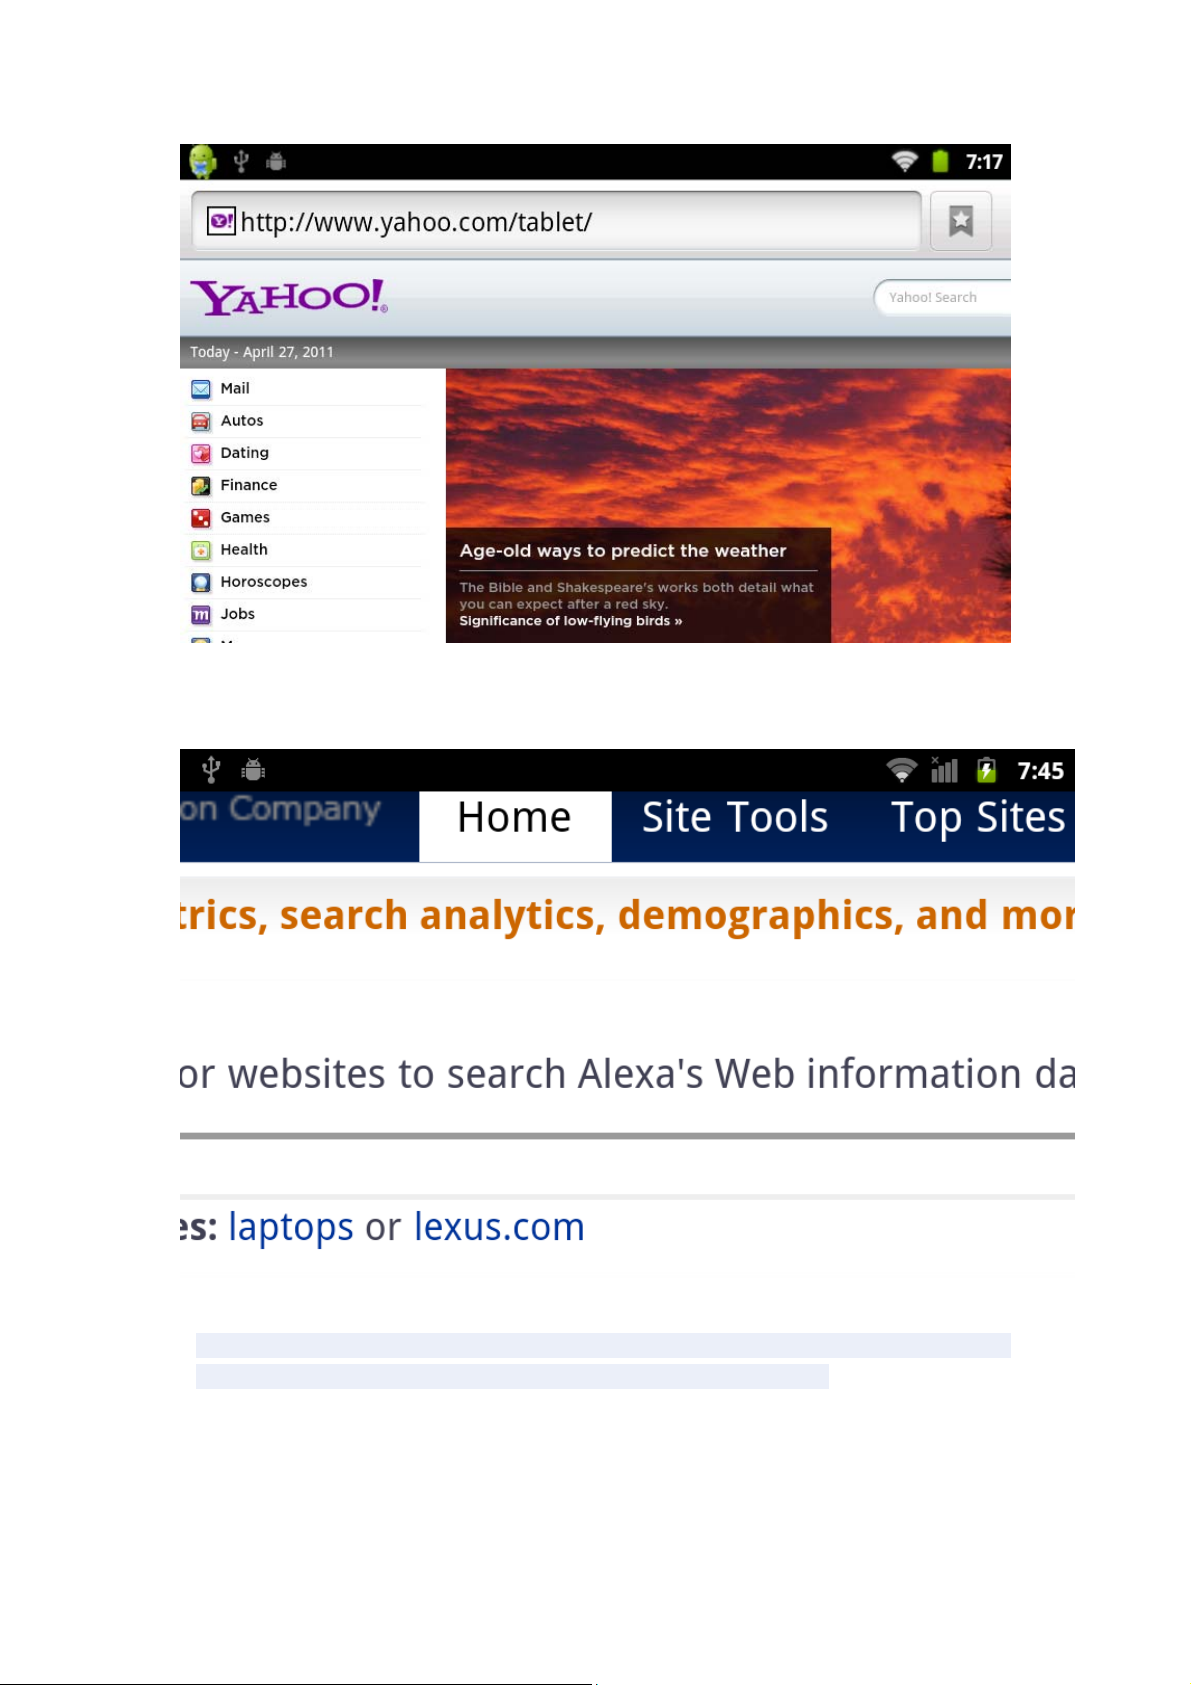
Free page can use the zoom controls zoom, as shown below:
Online video:
Through "Android market" or other means to download online video player software,
online TV player, online music software, then install to this MID. Open the software
installed, you can watch online video or online TV, listening to online radio stations.
Users can also download other third-party Web applications, includ ing web browsing,
video playback, Web client, instant messaging software, etc.
Page 11
Music:
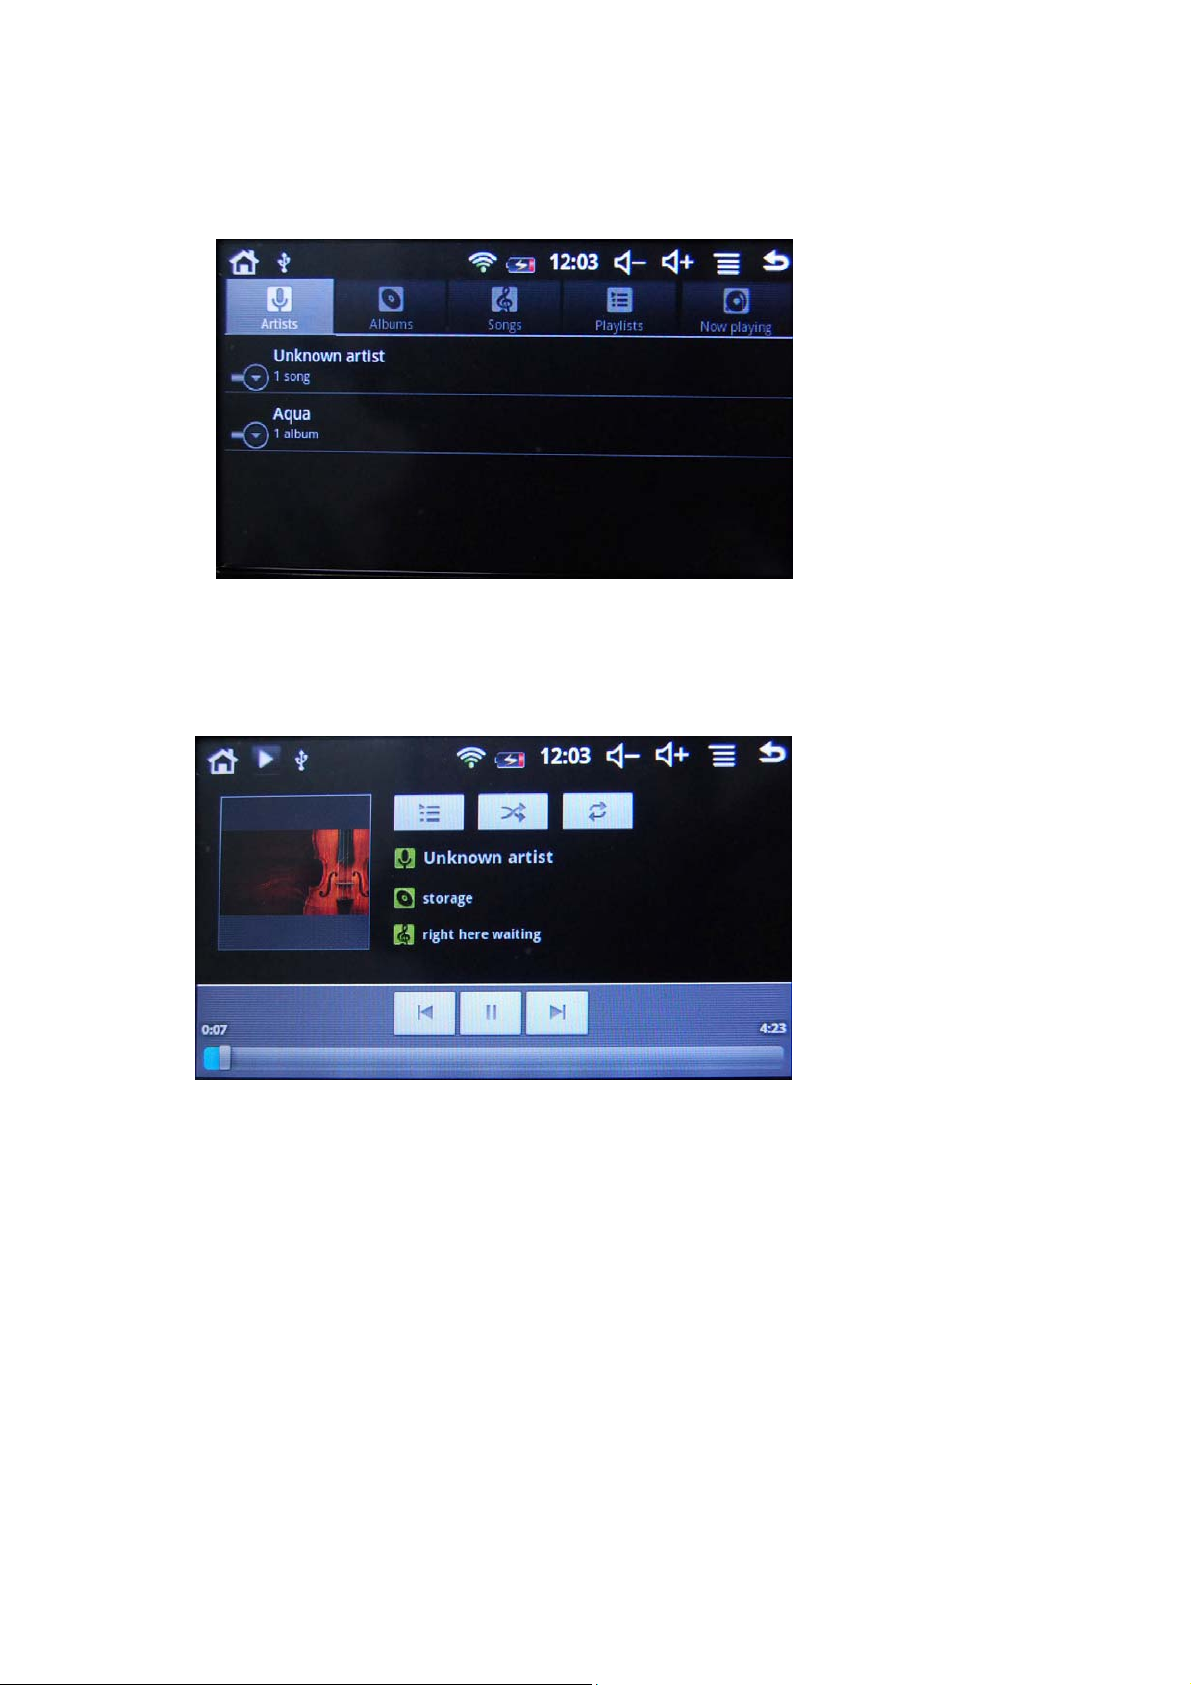
Click the main menu in the "music" icon, you can enter the music player interface.
Here lists the system default user data area of all audio files. As shown below:
We can spread through the USB audio files synchronized manner, or by inserting
the SD card with audio files were audio files, you can also download the audio files
via the network.
Select the appropriate tab key, you can see for example "Artist", "album", "songs"
and other interfaces. Select song to play.
Video:
Click the main menu in the " Video Player " into the "Video Player" the main interface,
there will list all the video files. As shown below:
Page 12
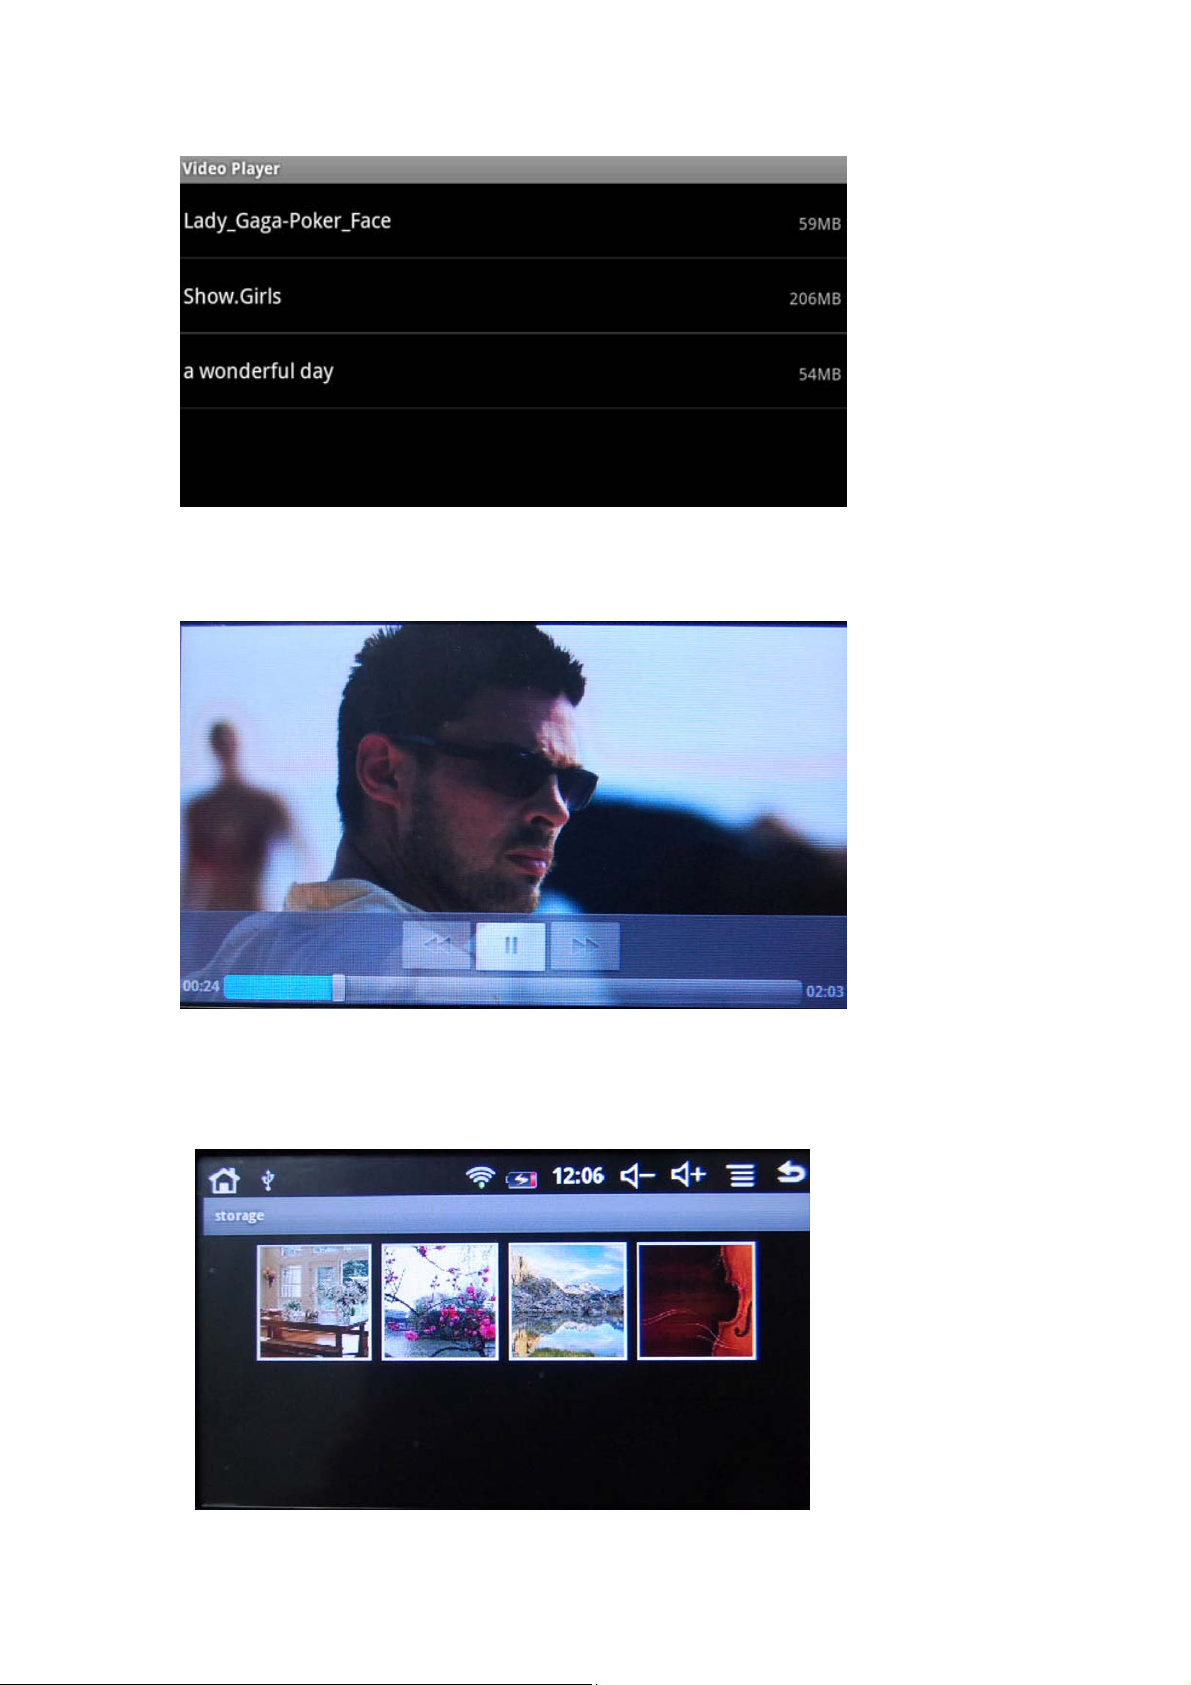
Select video file into the video player interface, as shown below. Can select "Play",
"stop", "Volume +", "Volume -", "fast forward", "rewind", "progress bar" and control
keys to control playback of the progress.
Photo Browse:
Click the "Photo Browser" , there will list all the picture files . As shown below:
Page 13
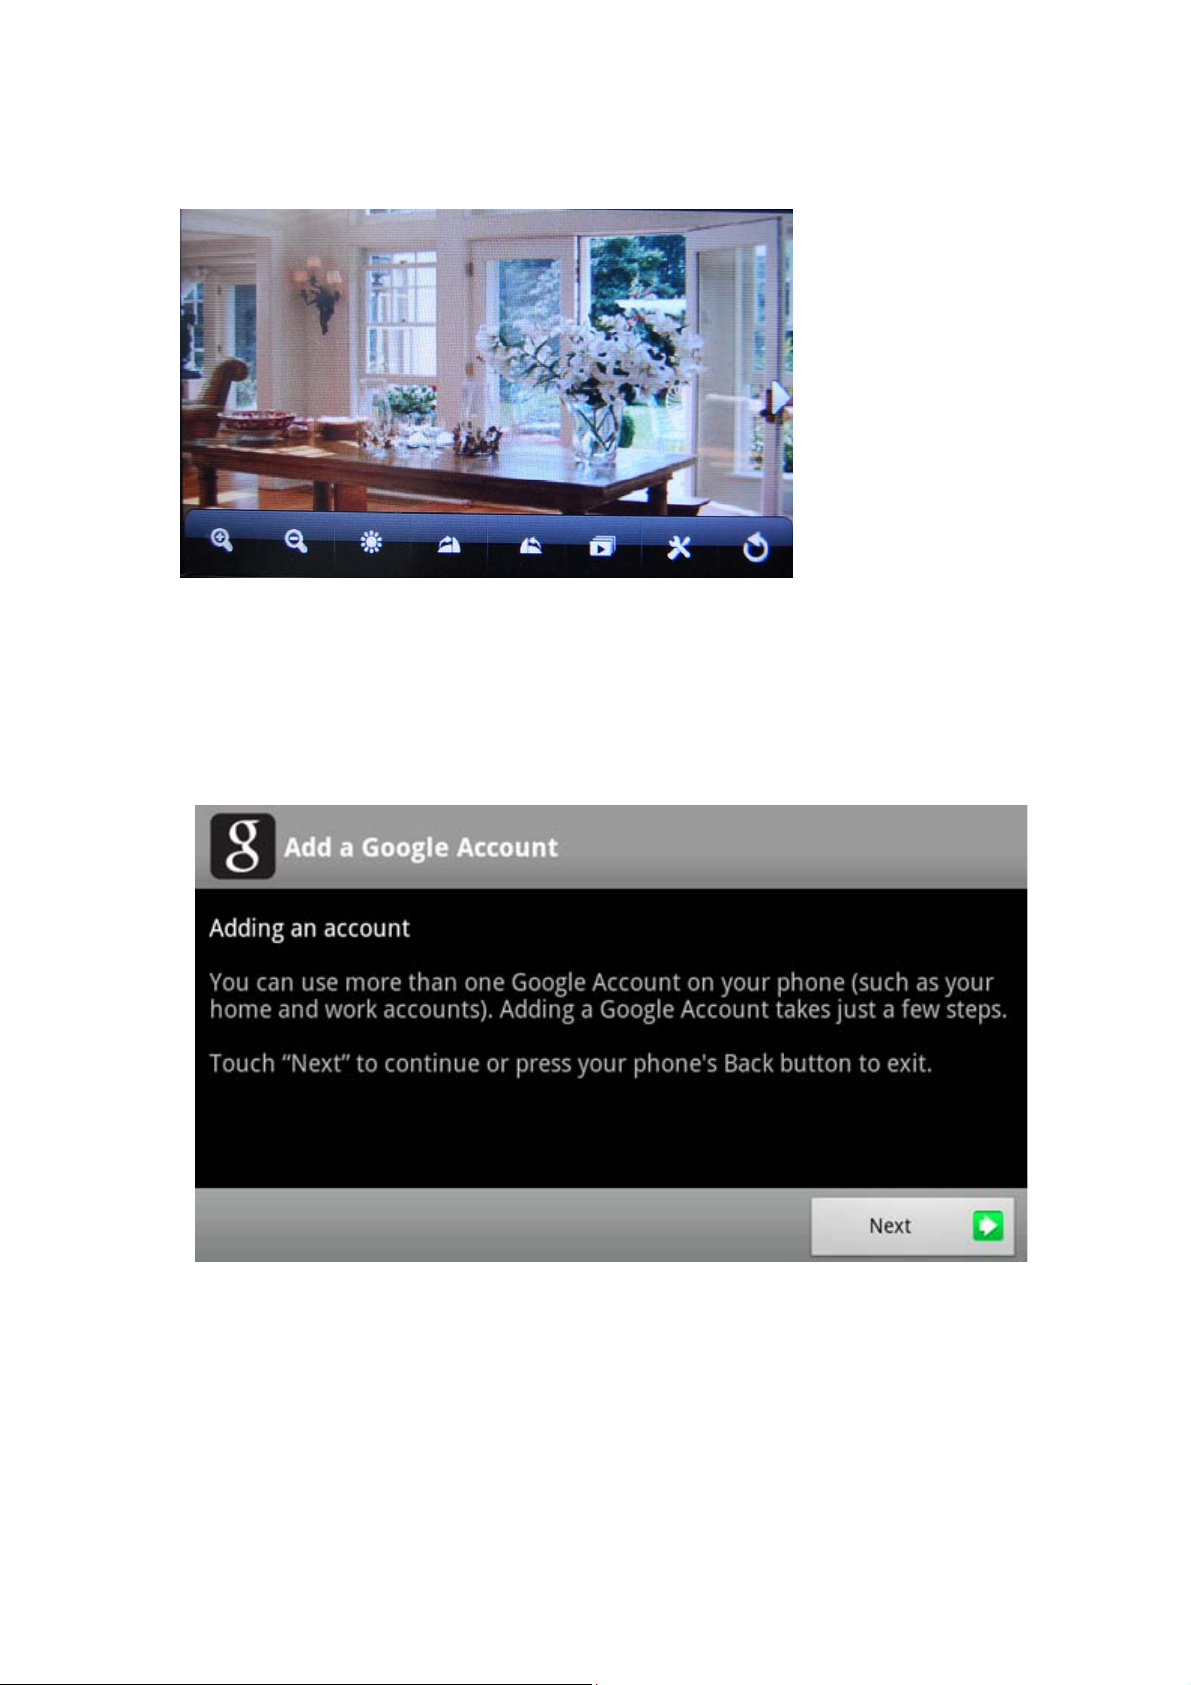
Select a picture file, enter the picture playback interface, as shown below. Can select
"Zoom", "narrow" "set" and "delete" etc operation.
Market:
Click the main menu in the "Market" icon into the "Market" the main interface. As
shown below:
Select “ Next”, as shown below:
Page 14
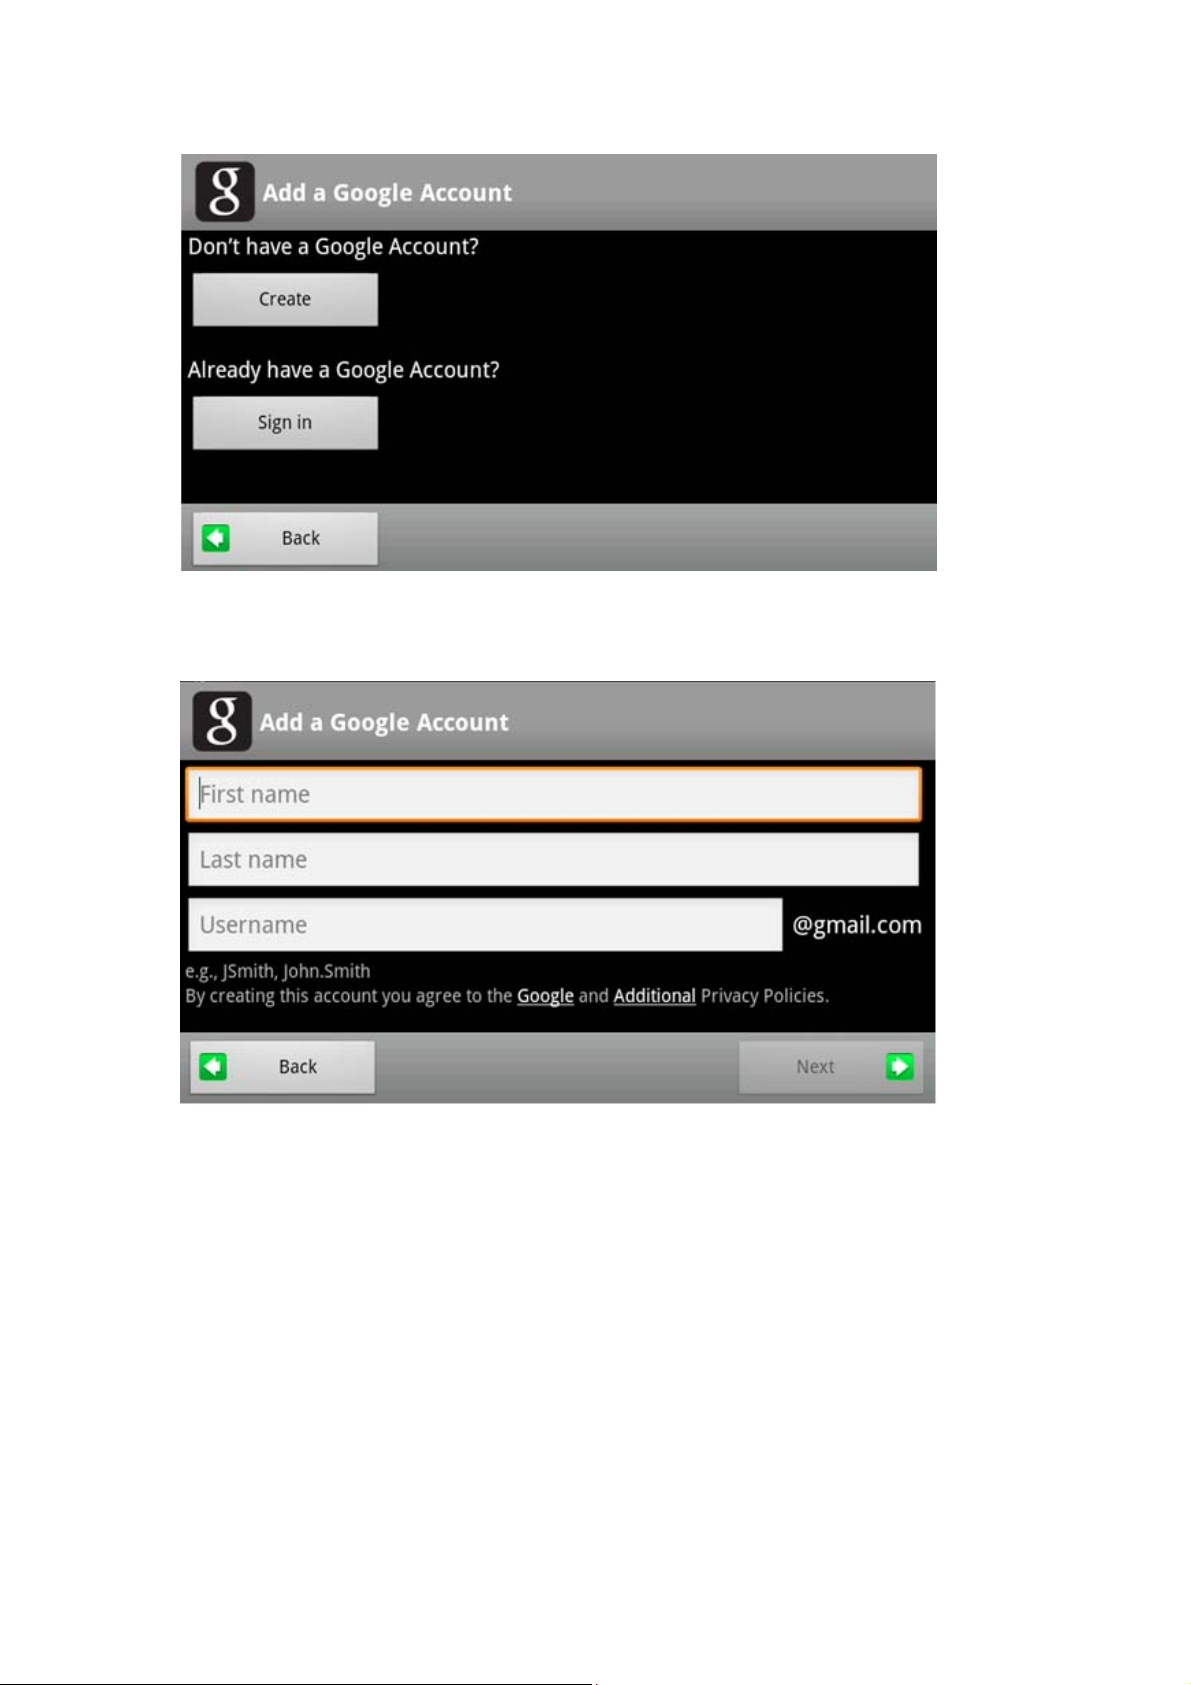
If have no Gmail account, should create a Gmail account, as shown below:
Set a “Google account” account, as shown below:
Page 15
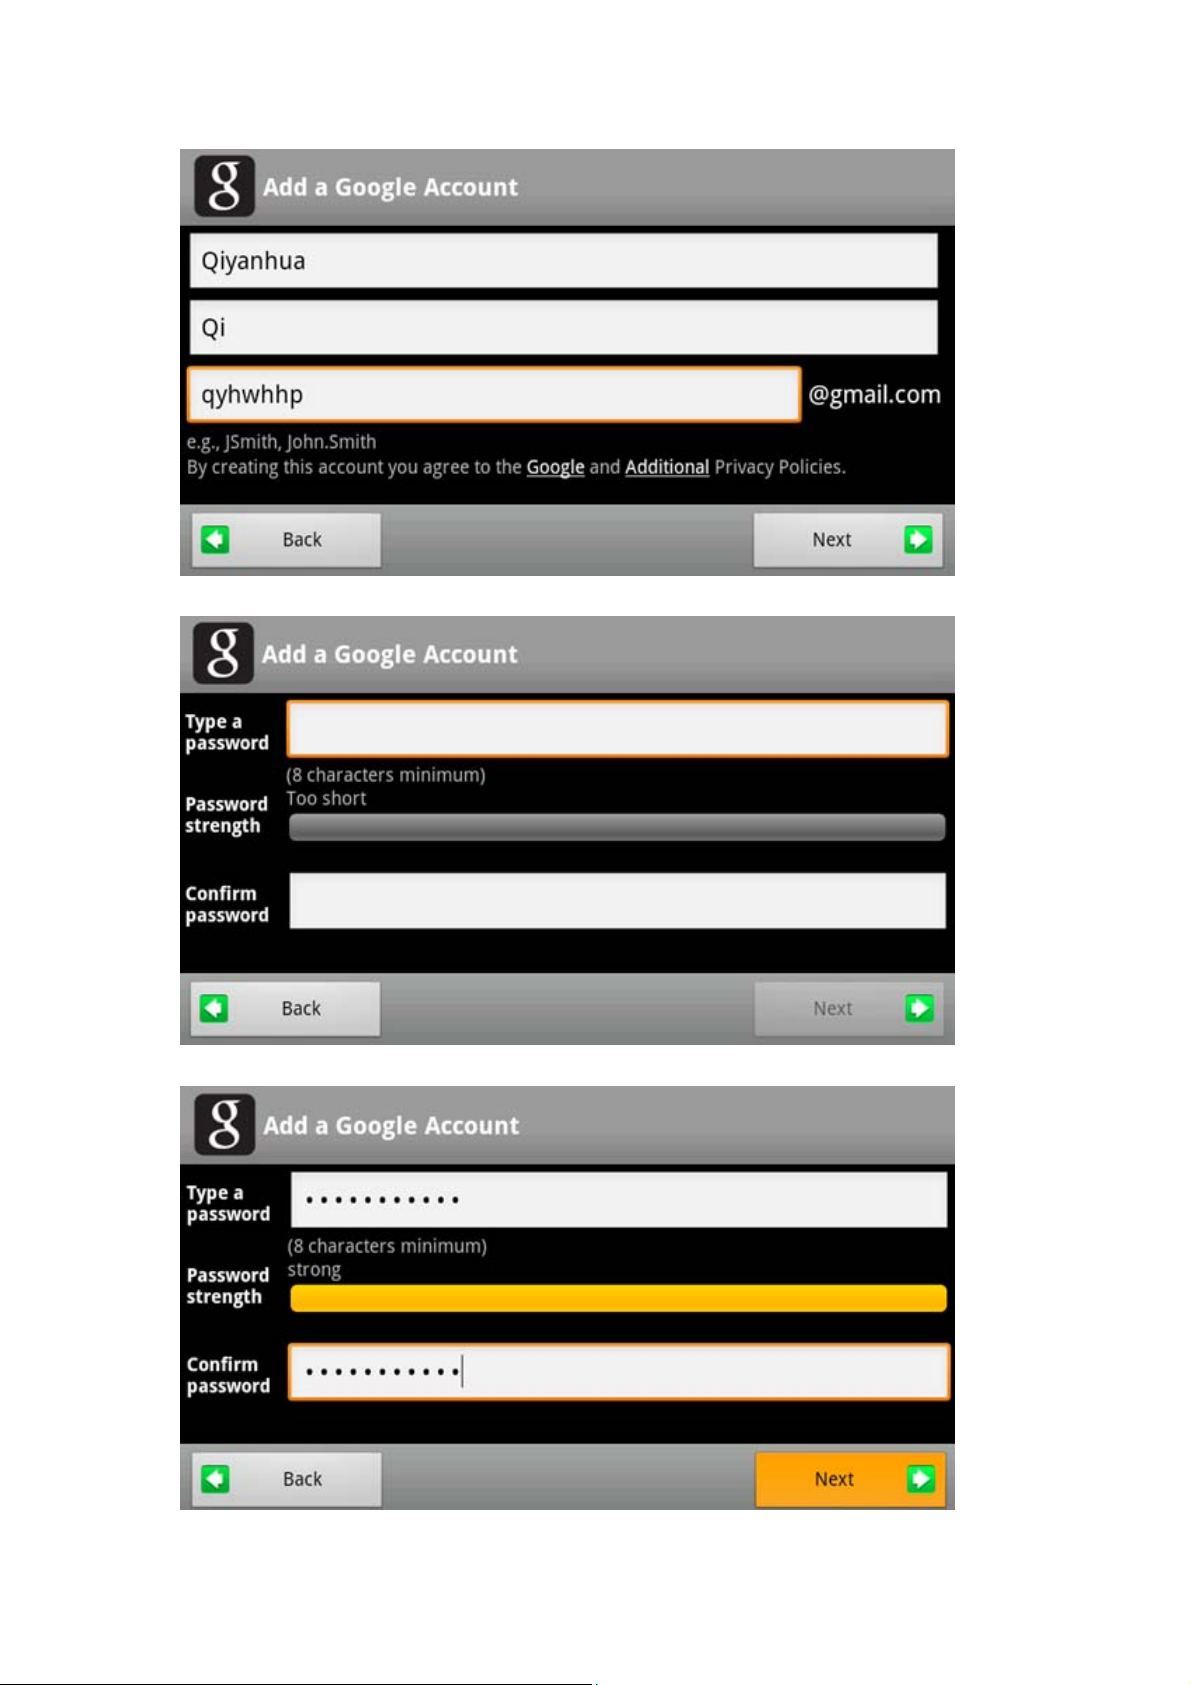
Select ”Next”, as shown below:
Set password for the above account, then select “Next”, as shown below:
Page 16
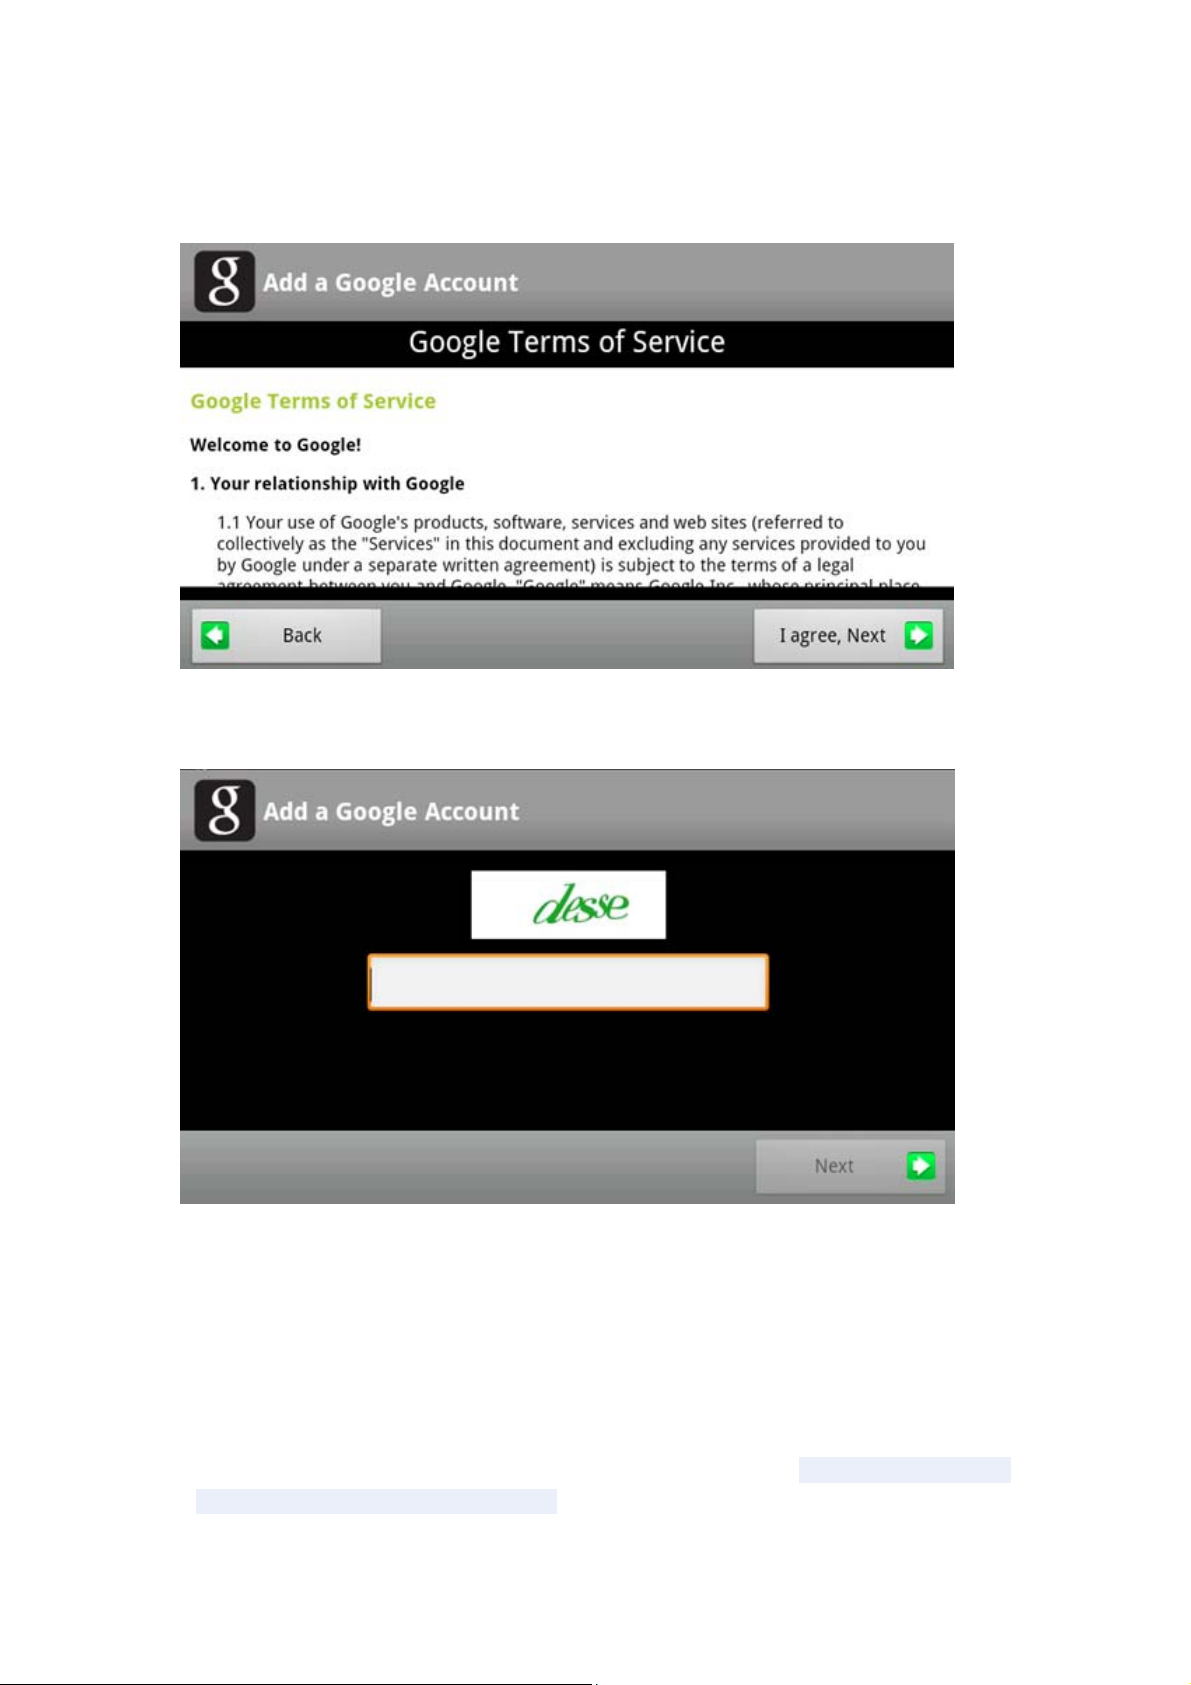
The final picture as shown below:
Select “I agree, Next’, as shown below:
Fill in Security Code, select “Next” to enter market.
E-mail client:
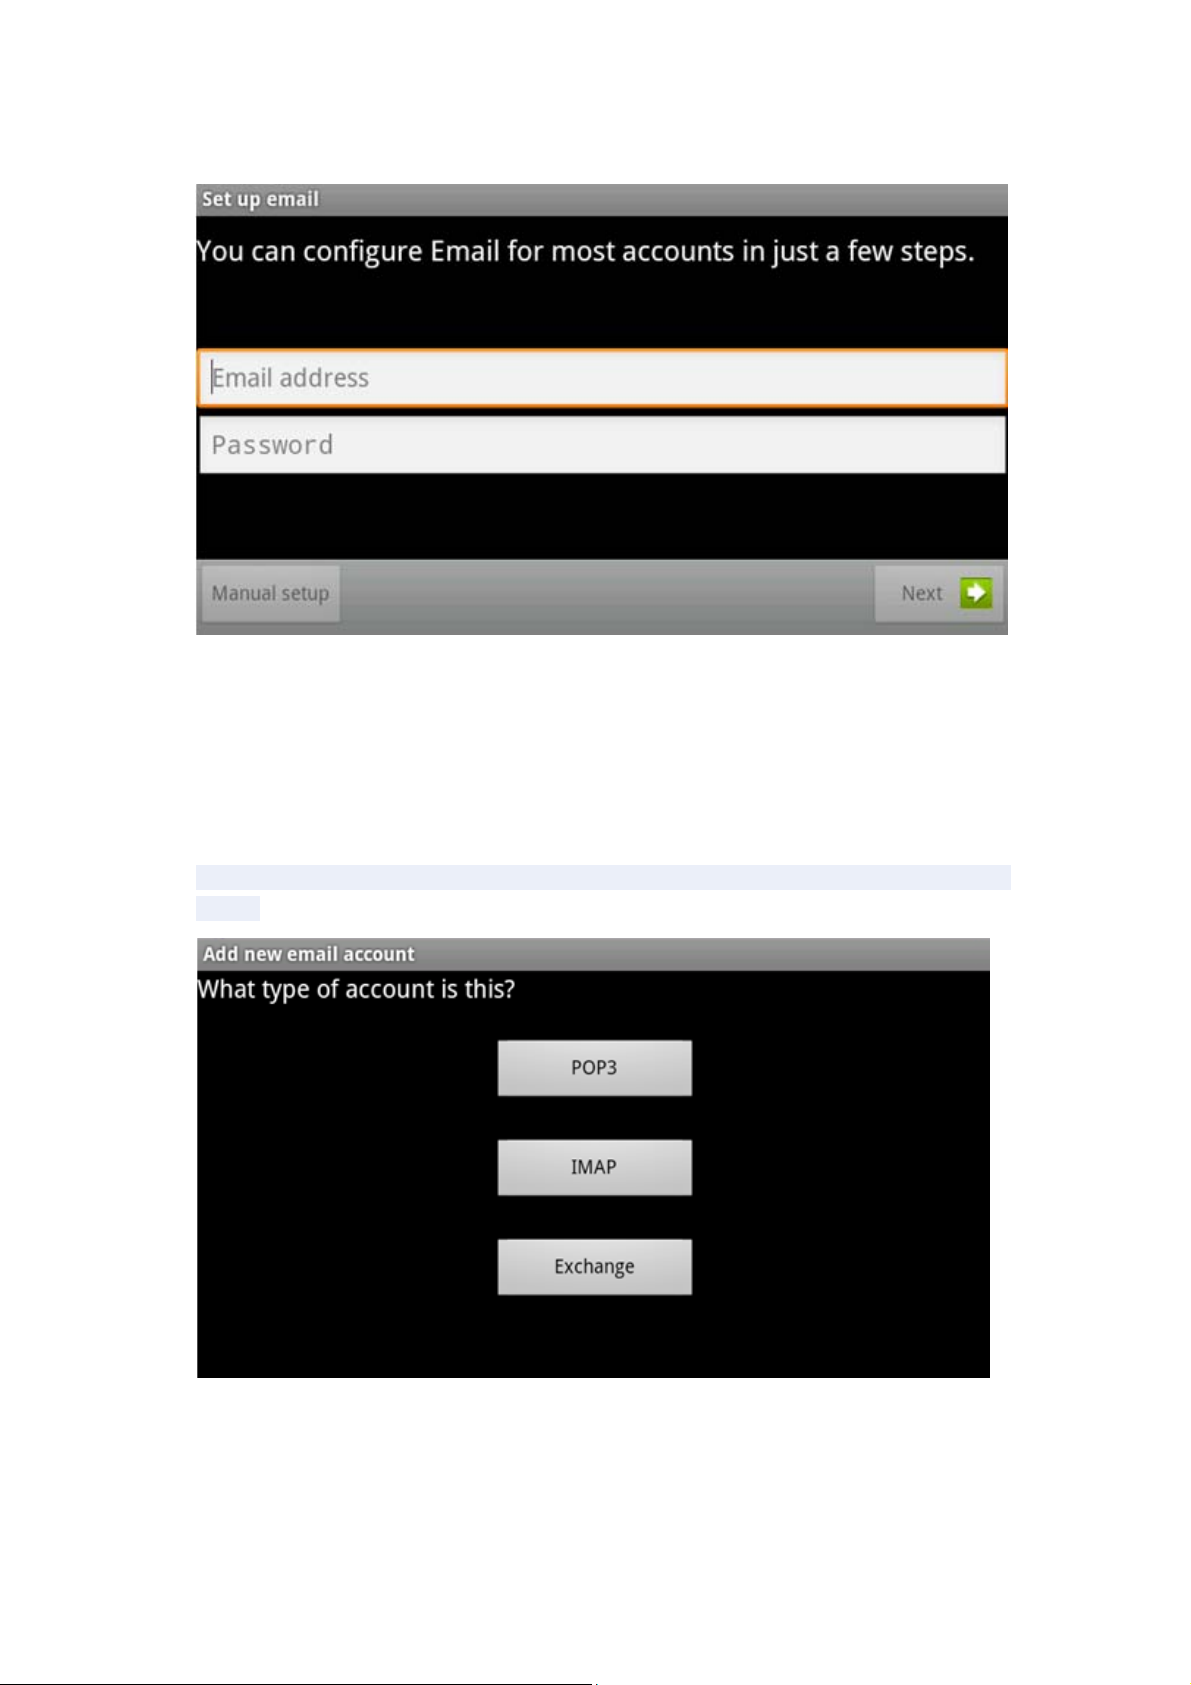
In the main menu, click "Email" icon to enter the e-mail client. The first entry will ask
to configure the account information. As shown below:
Page 17
]
E-mail require network support, please email links to ensure normal.
Here we [email protected] Case:
[email protected] (Enter the email address bar inside your valid e-mail
address: [email protected]).
In the Password field enter your valid password: ********.
You can then select the "Next", select the account type interface appears as shown
below:
Here we are using a POP3 account type. Appears to accept the server after setting
the interface as follows:
Page 18
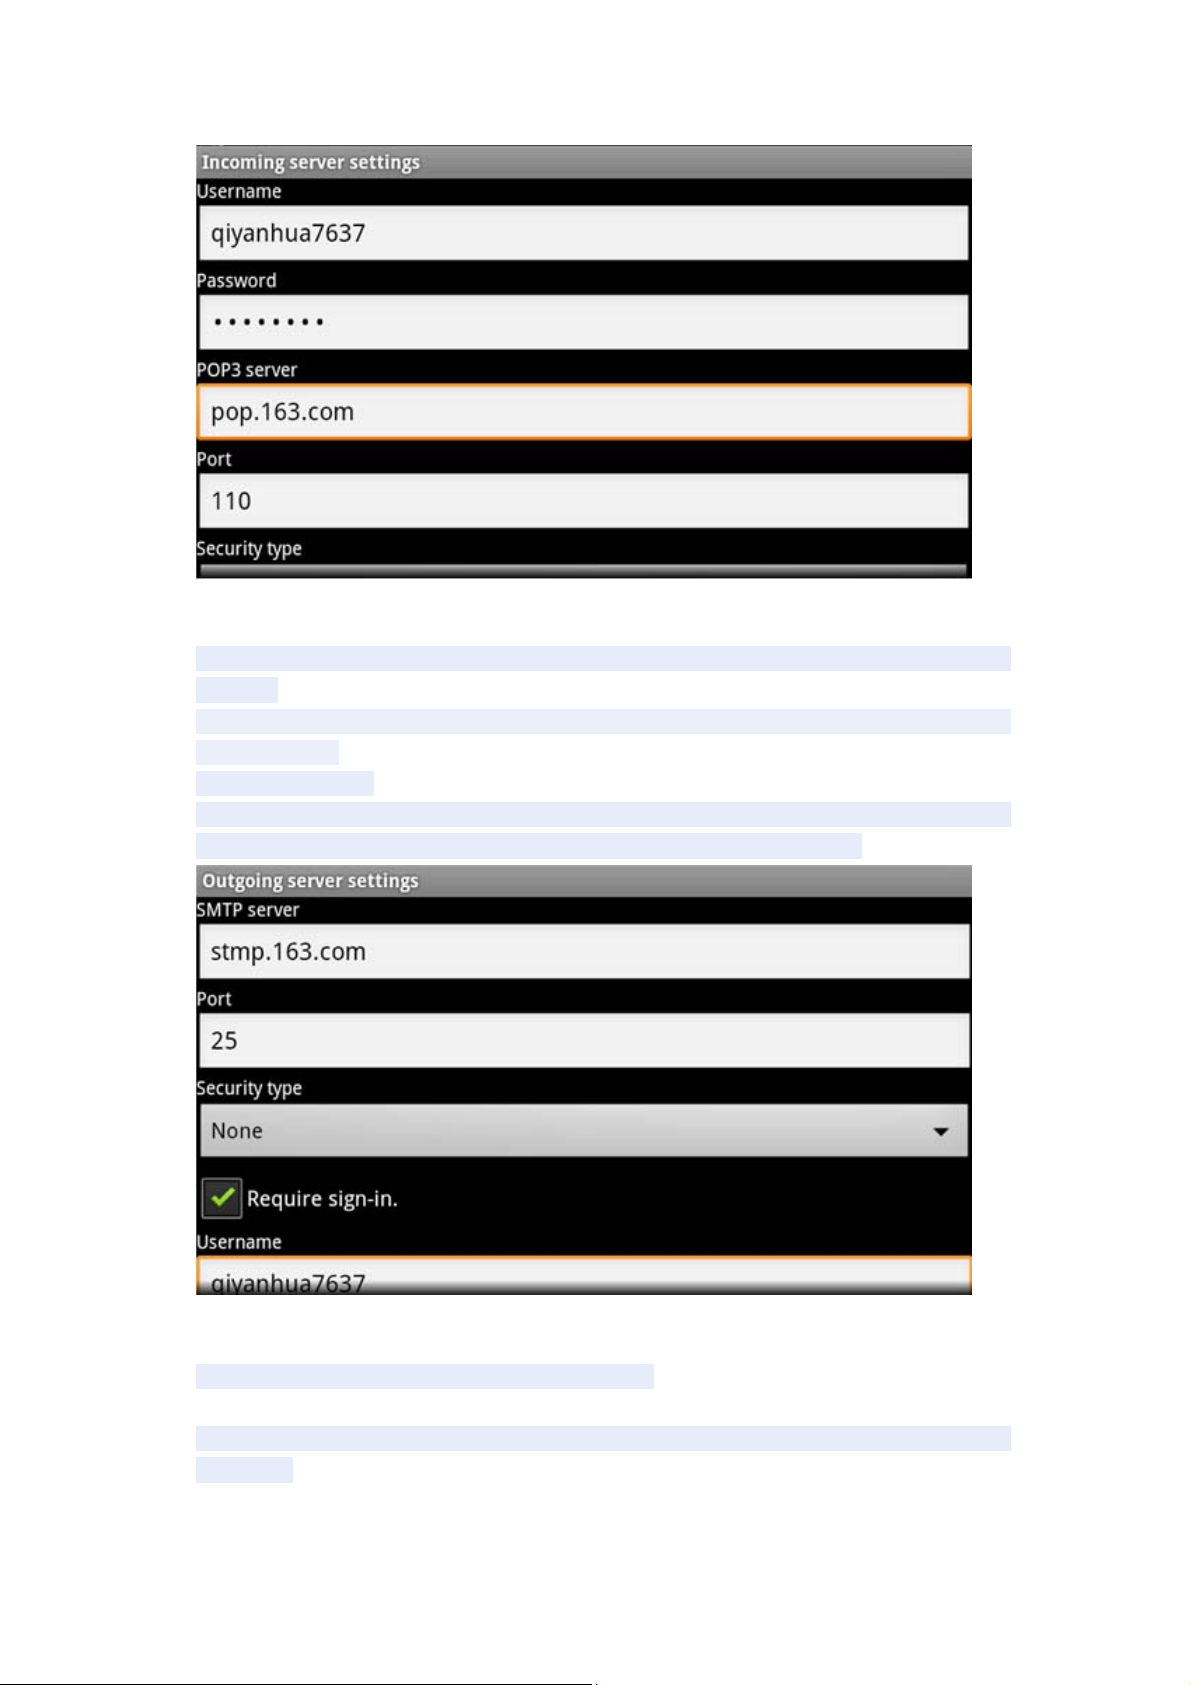
Please e-mail providers, each based on the information, set different parameters,
such as:
POP3 server: The system default is "163.com", should be amended to
"pop.163.com"
Port number "110"
Then select "Next", will enter the "Check to accept the server settings", if set
correctly, there will be "outgoing server settings" interface as follows:
sed SMIP server "163.com" as "smtp.163.com"
Modify the port number "587" to "25"
Drag the scroll bar, select "Next" and enter "Check outgoing server settings"
interface. If the settings are correct, will enter the following interface:
Page 19
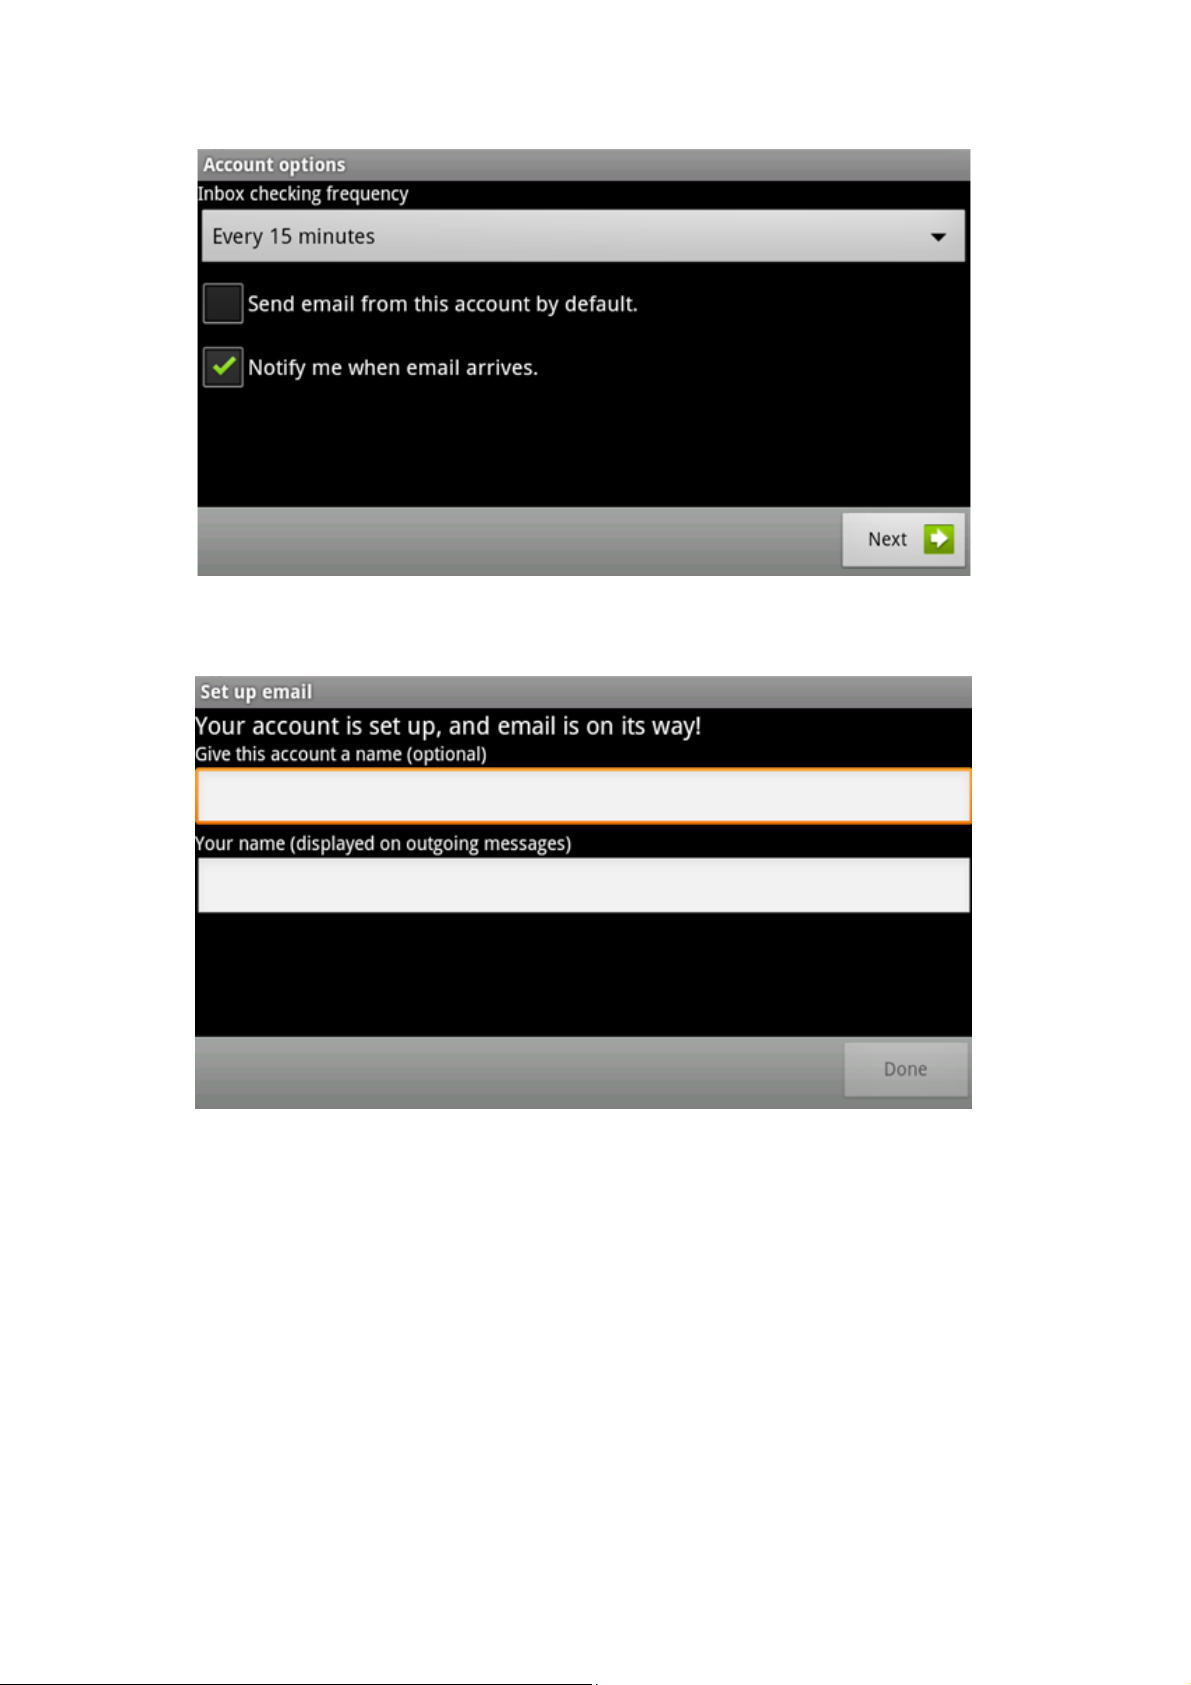
Select "Next", you can enter the account information to customize the interface:
In the "Your Name" enter the bar you want to show the name of outgoing mail, enter
here: Rocky
Then click "Finish" button to enter the mail interface. It will automatically load the
e-mail, Select a column can view the messages, you can view the column inside a
"reply", "delete", "Open attachment" and other operations.
Page 20
External devices:
*USB connection:
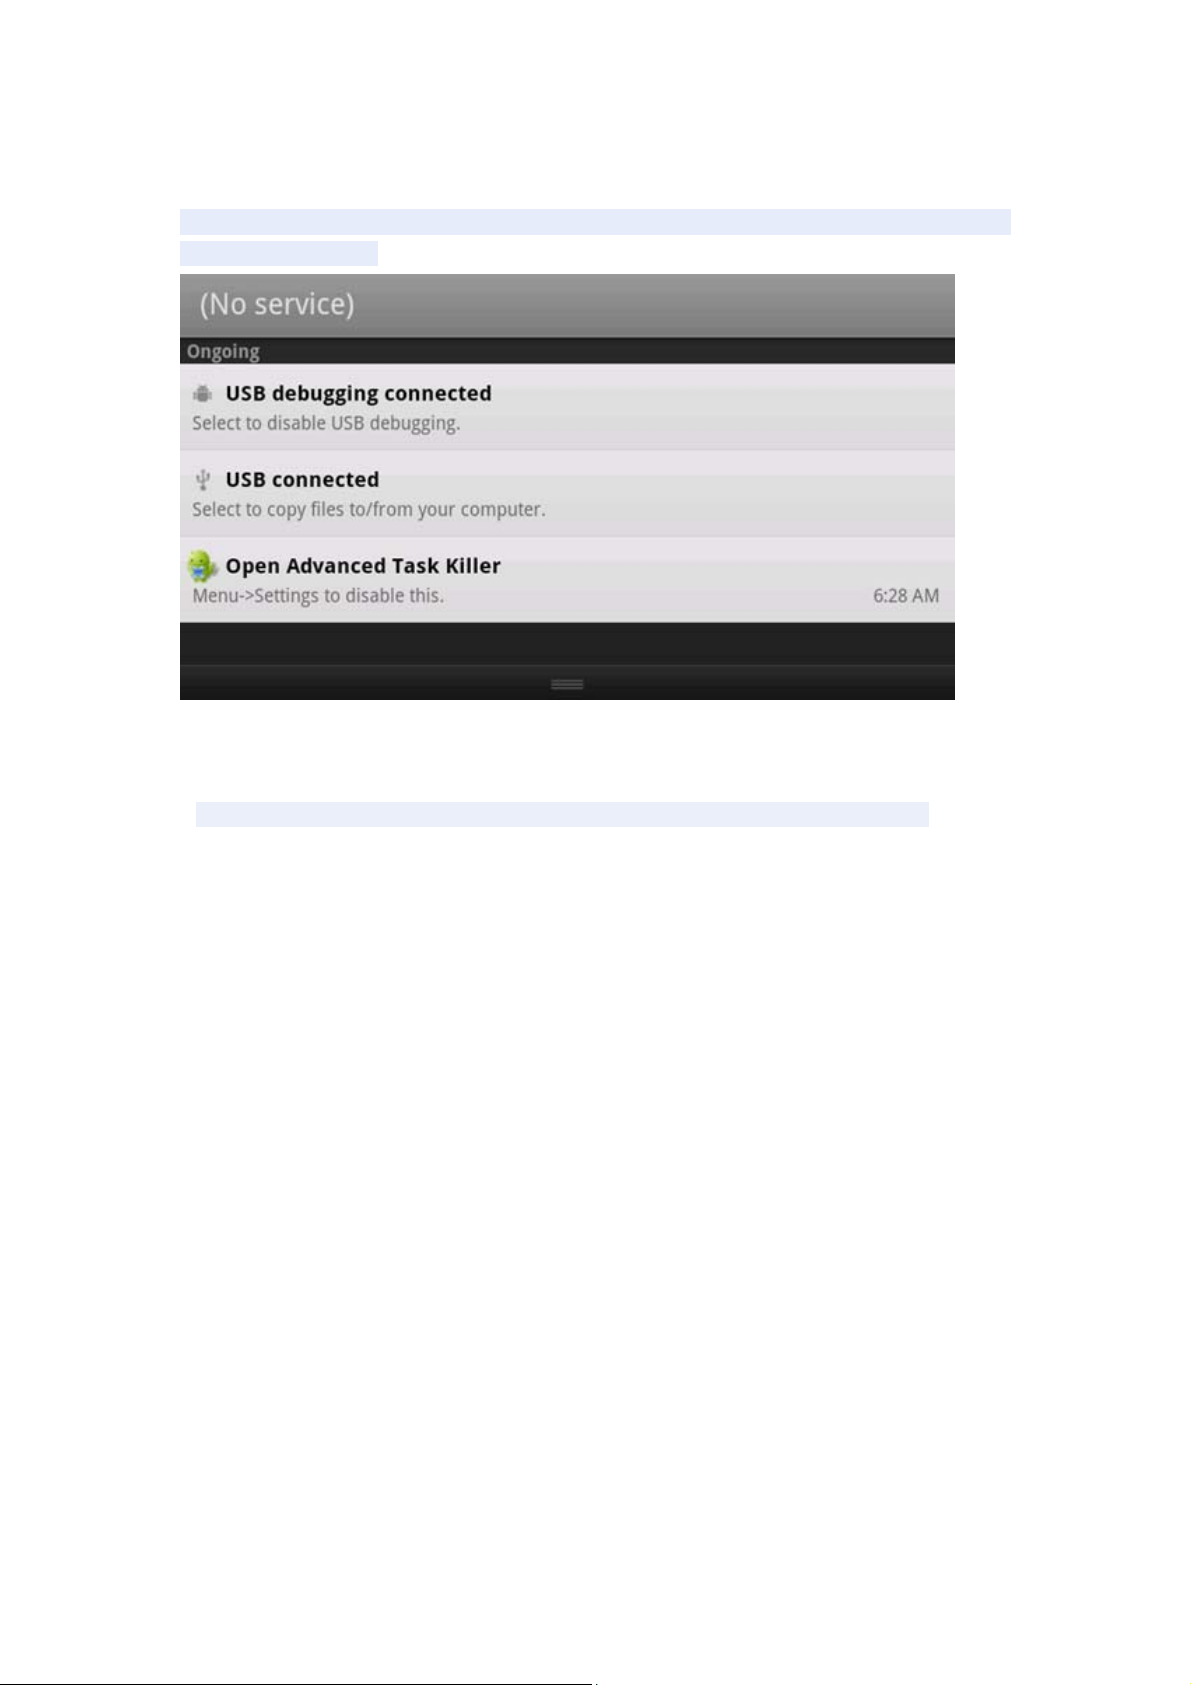
MID using the USB connection and PC, the default connection method is the
synchronous mode. Can drag the status bar pulled down, there are interface:
"USB is connected": said external memory (SD card).
Loading is complete, you can see in the PC end of the corresponding letter.
Page 21

FCC Caution: Any changes or modifications not expressly approved by the party responsible
for compliance could void the user's authority to operate this equipment.
This device complies with Part 15 of the FCC Rules. Operation is subject to the following two
conditions: (1) This device may not cause harmful interference, and (2) this device must
accept any interference received, including interference that may cause undesired operation.
This device and its antenna(s) must not be co-located or operating in conjunction with any
other antenna or transmitter.
NOTE: This equipment has been tested and found to comply with the limits for a
Class B digital device,
pursuant to Part 15 of the FCC Rules.
These limits are designed to provide reasonable protection against harmful interference in a
residential installation. This equipment generates, uses and can radiate radio
frequency energy and, if not installed and used in accordance with the
instructions, may cause harmful interference to radio communications.
However, there is no guarantee that interference will not occur in a particular installation.
If this equipment does cause harmful interference to radio or television reception,
which can be determined by turning the equipment off and on, the user is
encouraged to try to correct the interference by one or more of the following
measures:
-- Reorient or relocate the receiving antenna.
-- Increase the separation between the equipment and receiver.
-- Connect the equipment into an outlet on a circuit different
from that to which the receiver is connected.
-- Consult the dealer or an experienced radio/TV technician for
help.
 Loading...