

Page 1

日本語の説明は、裏面をご覧ください。
©Seiko Epson Corporation 2003-2018. All rights reserved.
Printed in XXXXXX / YYYYYYYYYYYY
UB-BOARD Replacing Procedure (For UB-U05)
The following standards are applied only to the printers that are so labeled.
(EMC is tested using the Epson AC Adapters and TM series printer.)
• Europe CE marking • North America FCC Class A, ICES-003 Class A
• Oceania Radiocommunications (Electromagnetic Compatibility) Standard, Class A
WARNING
EMC Standard Applied
The connection of a non-shielded interface cable to this board will invalidate the EMC standards of this device. You are cautioned that changes or
modifications not expressly approved by Seiko Epson Corporation could void your authority to operate the equipment.
CE Marking
☞ www.epson.eu/conformity
WARNING
This is a Class A product. In a domestic environment this product may cause radio interference, in which case the user may be required to take
adequate measures.
FCC Compliance Statement for Users in the USA
This equipment has been tested and found to comply with the limits for a Class A digital device, pursuant to Part 15 of the FCC Rules. These limits
are designed to provide reasonable protection against harmful interference when the equipment is operated in a commercial environment.
This equipment generates, uses, and can radiate radio frequency energy and, if not installed and used in accordance with the instruction manual,
may cause harmful interference to radio communications. Operation of this equipment in a residential area is likely to cause harmful interference, in
which case the user will be required to correct the interference at his own expense.
For Users in Canada
This Class A digital apparatus complies with Canadian ICES-003.
Pour les utilisateurs au Canada
Cet appareil numérique de classe A est conforme à la norme canadienne NMB-003.
This manual describes how to replace the currently installed UB-BOARD with a UB-U05 board
in TM series printers designed for this board.
Precautions
• Disconnect the power supply from the printer before you remove or install a UB-U05; otherwise you
may damage the UB-U05 and the printer. You must disconnect the power supply because the
electrical current is flowing in some parts of the printer circuit even when the power switch is turned
off.
• Wear a grounded wrist strap when handling the UB-U05 to prevent damage from static electricity.
• To avoid contamination, do not touch the UB-U05 connector.
Operation Environments and Models
• Operation Environments (*1):
Hardware: USB compliant PC
OS: Windows 98 (Second Edition is recommended.) or later
Software: You need device driver if you use the UB-U05.
Please ask your dealer how to get the device driver for the
(*1) Even if the above operation environments are satisfied, your system may not
work properly, depending on the devices connected to your system.
• Supported printers:
There is limitation of the printers that can be used with the UB-U05. Please ask your dealer
for the printer information.
UB-U05 and how to install it.
1
Page 2
Unpacking
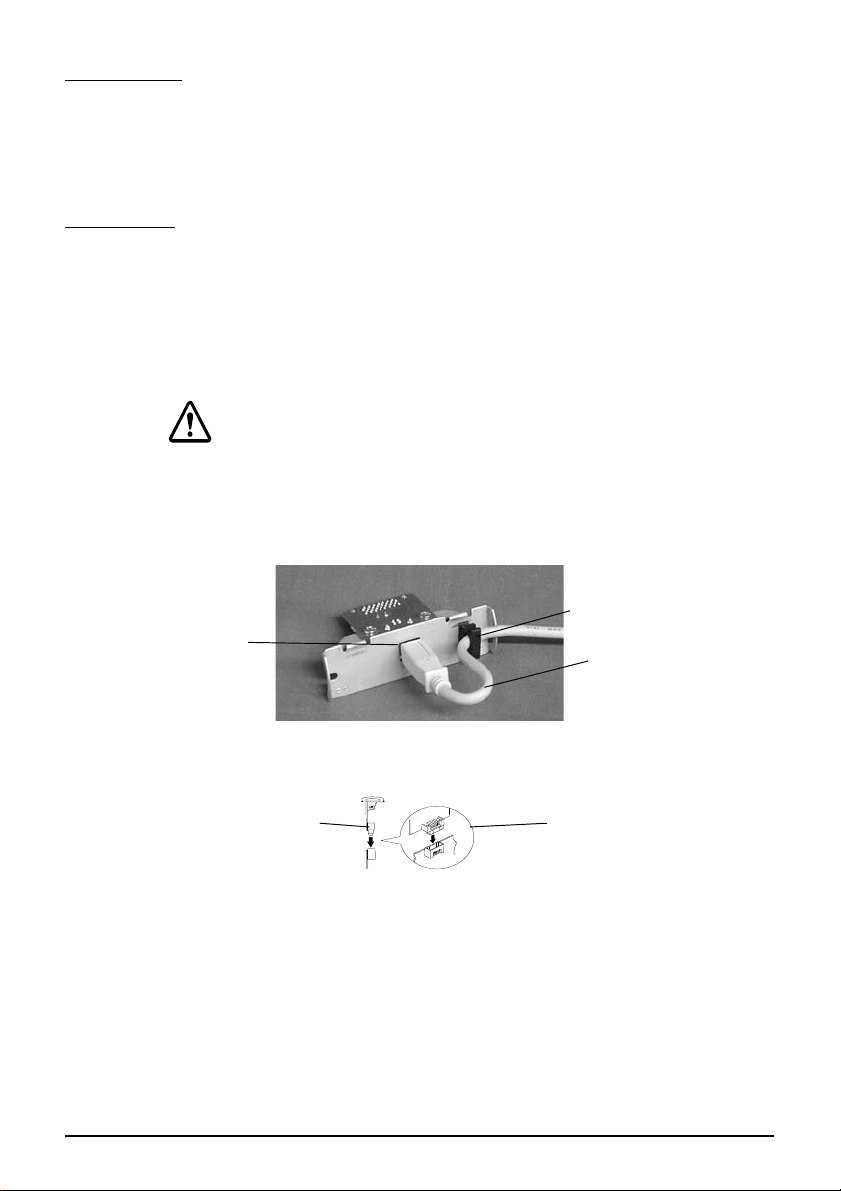
Locking wire strain relief
USB up stream connector
USB cable
connector of the TM printer
connector of the UB-U05
Make sure you have these items. If any item is missing or damaged, please contact your dealer for
assistance. (If necessary, you can get a locking wire strain relief separately through your dealer by
using the part number in the bracket.)
• UB-U05 • This manual • Locking wire saddle <109104700>
Procedure
If a UB-BOARD is currently installed in your printer, you need to remove it first before you can
install the new UB-U05 board. Disconnect the power supply from the printer and follow the steps
below.
1. Removing the current UB-BOARD from the printer.
Remove the two screws that secure the UB-BOARD; then pull the UB-BOARD to remove it. You
will use the screws when installing the UB-U05.
CAUTION:
Put the UB-BOARD into an anti-static bag for storage to prevent damage from static
electricity.
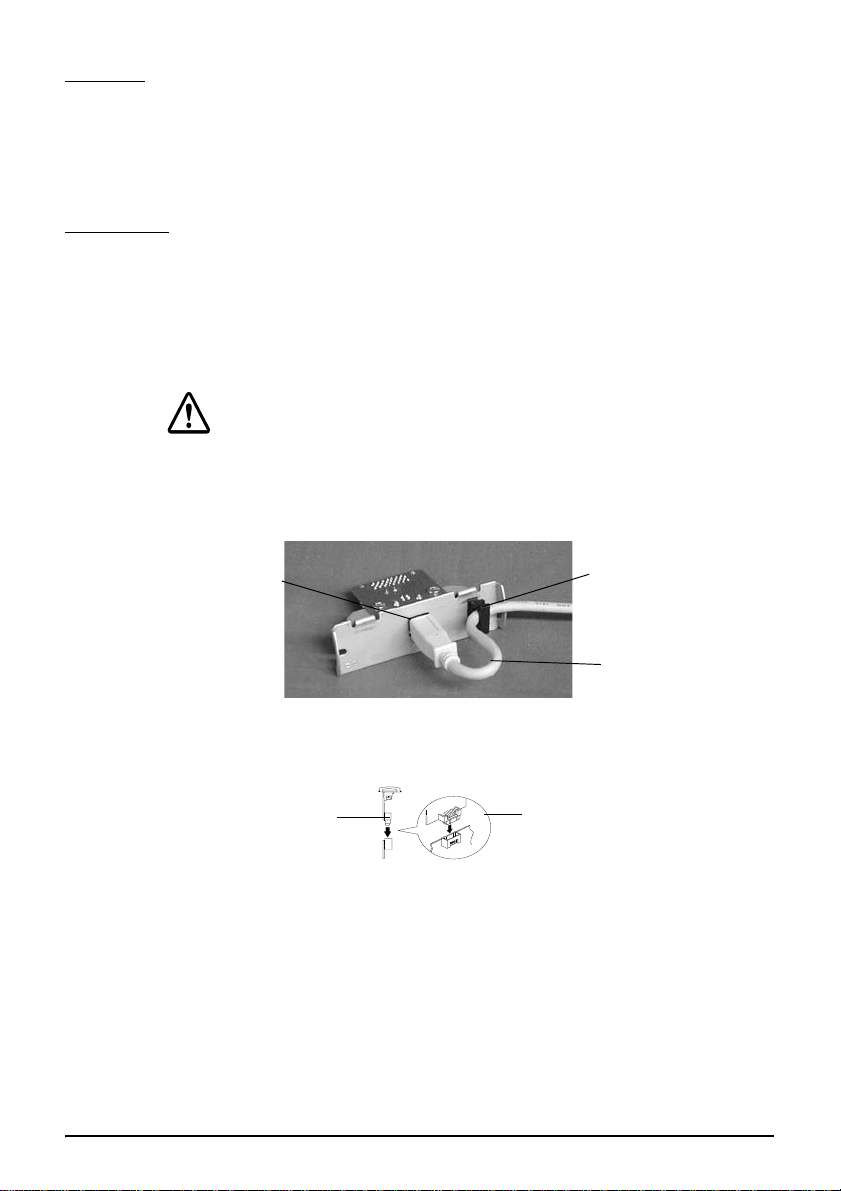
2. Installing the Locking Wire Strain Relief
Install the locking wire strain relief in the position shown in the illustration below.
3. Installing the UB-U05 enclosed in the package
Hold the UB-U05 as shown in the illustration below. Push the UB-U05 in gently until you feel the
connector fit into the place.
4. Setting the UB-U05
Secure the UB-U05 with the two screws.
5. Setting the printer settings
Change the printer settings following the printer manual.
6. Installing the USB cable
You can hook USB cable through the locking wire strain relief to keep it from falling out.
7. Installing the Software
Install the device driver for the UB-U05. Please ask your dealer how to install it.
2
Page 3

UB-BOARD交換手順書(UB-U05用)
電波障害自主規制について
この装置は、クラス A情報技術装置です。この装置を家庭環境で使用すると電波妨害を引き起こす
ことがあります。この場合には使用者が適切な対策を講ずるよう要求されることがあります。
VCCI-A
本書は、TM シリーズプリンタ(UB-BOARD 対応)に取り付けられている UB-BOARD
の交換方法について説明しています。
マニュアルの記号の見方について
本書では以下の記号が使われています。記号の意味をよく理解してから交換作業をしてください。
注意 :
この表示を無視して、誤った取り扱いをすると、人が傷害を負う可能性が想定され
る内容および物的損害のみの発生が想定される内容を示しています。
交換作業上の注意
• 作業の前にプリンタから電源を取り外してください。(電源スイッチをオフにするだけでな
く、電源を取り外してください。)
• プリンタの電源スイッチをオフにしても、内部の回路基板には通電しているところがあり
ます。電源を取り付けたまま交換作業を行うと、UB-BOARD、およびプリンタが故障する
可能性があります。
• 作業中は接地されたリストバンドを装着してください。リストバンドを装着せずに作業を
すると、静電気による故障の原因になります。
• UB-BOARD のコネクタを手で触れないでください。汚れによる動作不良を起こす可能性が
あります。
動作環境及び対象機種
• 動作環境
ハードウェア : USB をサポートする PC
OS: Windows98 以降(SecondEdition を推奨)
ソフトウェア : 本製品を使用するには、デバイスドライバが必要となります。
デバイスドライバの入手方法、及びインストール手順につきま
しては、ハードウェアをお買い求め頂いた販売店にお問い合わせ
ください。
(*1)上記動作環境を満たした場合でも、機器の組み合わせによっては正常に動作しない
場合があります。
• 対象機種 本製品を使用できる機種は限定されています。使用可能な機種に
ついては、ハードウェアをお買い求め頂いた販売店にお問い合わせ
ください。
3
Page 4
同梱品
USB ケーブル
ロッキングワイヤサドル
USB アップストリームコネクタ
UB-U05 のコネクタ
TM プリンタのコネクタ
本製品の同梱品は次のとおりです。万一、梱包品の不足や不良がございましたら、お
買い求めいただきました販売店までご連絡ください。またロッキングワイヤサドルは、
<> 内の部品番号で別途ご購入頂けます。
·UB-BOARD
·本書 ·ロッキングワイヤサドル<109104700>
交換手順
すでに UB-BOARD が取り付けられている場合は、先にそれを取り外してから UB-U05
を取り付けてください。
1. プリンタから UB-BOARD を取り外す
UB-BOARD を固定している 2 つのネジを外して、UB-BOARD を抜き取ってください。
取り外したネジは、UB-U05 を取り付ける際に使用します。
注意 :
取り外した UB-BOARD は、静電気による故障を防ぐため、静電気防止処置
をした袋などに保管してください。
2. UB-U05 にロッキングワイヤサドルを取り付ける
ロッキングワイヤサドルを下図の位置に取り付けます。
3. UB-U05 をプリンタに取り付ける
図のようにUB-U05のコネクタをプリンタのコネクタに合わせます。UB-U05を押して
コネクタを接続してください。
4. UB-U05 を固定する
2つのネジでUB-U05を固定します。
5. プリンタの設定をする
プリンタのマニュアルを参照して設定を行ってください。
6. ケーブルの接続
USBケーブルを写真のようにロッキングワイヤサドルのフックに引っ掛けることによ
り、ケーブルが抜け落ちるのを防ぎます。
7. ソフトウェアのインストール
UB-U05 用デバイスドライバをインストールします。インストール手順は、ハードウェ
アをお買い求め頂いた販売店にお問い合わせください。
4
 Loading...