

Page 1
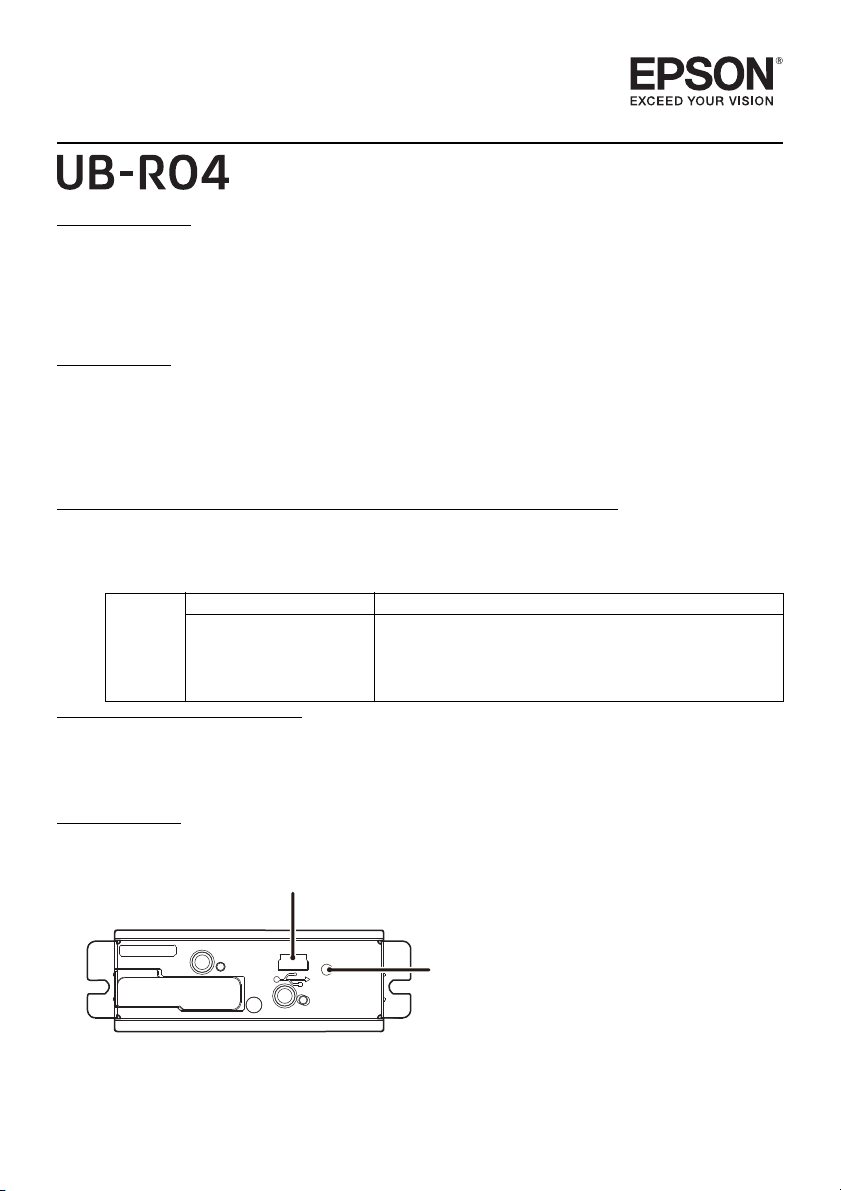
Mini USB connector (for wireless LAN setting)
Push button
412749200
Printed in China
User’s Manual
Introduction
The UB-R04 is an interface board on which is installed an IEEE 802.11a/b/g/n Radio Frequency (RF)
module for EPSON TM printers.
This manual provides instructions, including a simple setup for operators of POS printers on which the
UB-R04 is installed so that the operators can use the UB-R04 safely and correctly.
RF Module
This equipment contains the following wireless module.
Manufacturer: SMK Corporation
Type of equipment: WLAN complete modeule
Model number: VRL4149-0601F
Where You can Use the UB-R04 and Usage Precautions
The UB-R04 is an interface board on which is installed an IEEE 802.11a/b/g/n Radio Frequency (RF)
module for EPSON TM printers.
Model 614 Where you can use UB-R04 India
Usage precautions W56 (CH100 - H140) is unavailable.
Using W52 (CH36 - CH48), W53 (CH52 - CH64) and W58
(CH149 - H165) in ad hoc mode is prohibited.
Using W52 (CH36 - CH48), W53 (CH52 - CH64) and W58
(CH149 - H165) outdoors is prohibited.
Features and Functions
❏ 64/128-bit WEP, WPA™, WPA2™
❏ Protocols: TCP, UDP, ICMP, IP, LP/LPR (for APD), TCP socket port (for OPOS)
❏ OPOS, APD enabled
Part Names
1
Page 2
DIP Switches
When using this interface board, the interface of the TM printer must be selected as “parallel” with the
appropriate settings. Set the reset signal for pin 31 to “enable,” if you are using a TM printer that has this
setting. See the manual for each TM printer for details.
Note:
When using the UB-R04 with the following printers and firmware, be sure that DIP switch 1-8 is set to ON.
• TM-T88V Firmware version 30.21 ESC/POS and earlier
• TM-H6000IV (Standard model) Firmware version 20.04 ESC/POS and earlier
• TM-H6000IV (Validation model) Firmware version 21.04 ESC/POS and earlier
• TM-H2000 Firmware version 1.51 ESC/POS and earlier
How to Set Up the UB-R04
You can set the UB-R04 with the wireless LAN connection or USB connection by using one of the
following methods. For details, see the UB-R04 Technical Reference Guide.
Wireless LAN USB
Using a Web browser Supported Not supported
Using the EpsonNetConfig Ver. 4.1 or later Supported Supported
Preparation
❏
For wireless LAN connection
• Printing a Status Sheet
Power on the printer. Wait for about 20 seconds. Then hold down the push button on the interface
board for more than 3 seconds. The printer prints the parameters for the UB-R04. You can check
all setting values necessary (SSID, Network mode, IP address, Subnet mask, Gateway address) for
the network connection.
• Factory Default Settings
The table below shows the UB-R04 default settings.
Parameters Settings
Communication standard 802.11b/g/n
Network mode Infrastructure mode
SSID EpsonNet
WPA certification WPA2-Personal
Encryption method AES
Passphrase EpsonNet
• Connection
Set the setting of the host PC and AP to match the network setting that you have confirmed with
the status sheet.
You can check whether the connection to the printer has been correctly done by inputting the ping
command through the command prompt.
Example: Ping 192.168.192.168
Note:
Although the example shows the address 192.168.192.168, use whatever IP address is reported on the
status sheet.
Because the default IP addresses for all the wireless printers are the same, you should power on and
configure only one printer at a time.
❏
For USB connection
Connect the USB cable and turn on the printer power.
Note:
Connect the USB cable only when setting. USB connection is available only for setting parameters.
2
Page 3

Resetting the UB-R04 to Factory Defaults
1. Turn on the printer power while holding down the push button on the interface board and
continue to hold it down. A message that printer initialization has started is printed out after
approximately 30 seconds.
2. Continue holding down the push button until the status sheet printing is completed; all
internal settings return to their factory defaults (initial settings).
Setup
❏
Using a Web browser
1. Start Windows Internet Explorer (or your Web browser).
2. Input the IP address of the UB-R04 in the browser address bar and press Enter (Example: http://
192.168.192.168, or https://192.168.192.168 [default]).
3. In the Password authentification screen, enter "epson" for [user], and "epson" for [password].
(Defaults)
4. *The user name is fixed to "epson," but the password is changeable.
5. You can modify the parameters by following the menus. You must click Submit to send the
change to the printer.
6. To make the submission effective, you must click Reset on the Web page that is displayed after
the submission. If you change the IP address, SSID, etc., you have to change the setting of the host
PC and AP to match the printer’s setting.
❏
Using the EpsonNetConfig (version 4.1 or later)
The EpsonNetConfig (version 4.1 or later) and the UB-R04 Technical Reference Guide are necessary
for setup. Obtain them from the appropriate web site below:
For customers from North America, go to the following web site:
http://www.epsonexpert.com/
For customers from other countries, go to the following web site:
http://download.epson-biz.com/?service=pos
Notes on Using the Printer
Before use the printer, observe the following points.
1. Be sure to attach the connector cover to the TM-T90/TM-L90 to prevent malfunction due to
static electricity if you install the UB-R04.
2. Select USB vendor-defined class for the printer that support both USB vendor-defined class
and USB printer class.
When using the printer in environments where kitchen microwaves and other devices that may interfere
radio waves are installed, observe the following points.
1. Keep the printer away from the decices that may cause radio wave interference.
2. Use channels that are away from the frequency bands that may cause radio wave
interference.
3. Place shields between the printer and the decices that may cause radio wave interference.
4. Select either 2.4 GHz or 5 GHz, whichever is free from radio wave interference.
5. In auto channel setting for the access point, do not select a channel in which the printer may
cause radio wave interference.
Notes on Using Wireless LAN
1. Examine the radio wave situation in the surrounding area before use.
2. Avoid using the same channel that is used in the neibouring shops where wireless LAN is
used.
Notes on Wireless Connection
Because not all the possible combinations of this product and the wireless LAN devices have been checked
for operation, we cannot guarantee this product will operate in combination with all the wireless LAN
devices. Especially in the ad hoc mode, this product may not operate normally, depending on the
combination of connected devices. Be sure to carry out thorough evaluation of operation before use.
3
Page 4

Open Source Software License
1. This product includes open source software programs listed in Section 4) according to the
license terms of each open source software program.
2. We provide the source code of the GPL Programs and LGPL Programs (each is defined in
Section 4) to you on a CD-ROM for a charge covering the cost of performing such
distribution, such as the cost of media, shipping and handling until five (5) years after the
discontinuation of same model of this product. If you desire to receive the source code
above, please contact the customer support for your region.
3. The open source software programs are WITHOUT ANY WARRANTY; without even the
implied warranty of MERCHANTABILITY AND FITNESS FOR A PARTICULAR
PURPOSE. See the license agreements of each open source software program for more
details, which are described on "OPEN SOURCE SOFTWARE LICENSE TERMS" in this
documentation.
4. The list of open source software programs included with this printer product and the whole
license agreements of each license can be found in the following URL.
http://xxx.xxx.xxx.xxx
* For the underlined part in the above URL, input each printer’s IP address.
/licenses.html
All rights reserved. No part of this publication may be reproduced, stored in a retrieval system, or transmitted in any form or by
any means, electronic, mechanical, photocopying, recording, or otherwise, without the prior written permission of Seiko Epson
Corporation. No patent liability is assumed with respect to the use of the information contained herein. While every precaution
has been taken in the preparation of this book, Seiko Epson Corporation assumes no responsibility for errors or omissions.
Neither is any liability assumed for damages resulting from the use of the information contained herein.
Neither Seiko Epson Corporation nor its affiliates shall be liable to the purchaser of this product or third parties for damages,
losses, costs, or expenses incurred by purchaser or third parties as a result of: accident, misuse, or abuse of this product or
unauthorized modifications, repairs, or alterations to this product, or (excluding the U.S.) failure to strictly comply with Seiko
Epson Corporation’s operating and maintenance instructions.
Seiko Epson Corporation shall not be liable against any damages or problems arising from the use of any options or any
consumable products other than those designated as Original EPSON Products or EPSON Approved Products by Seiko Epson
Corporation.
EPSON is a registered trademark of Seiko Epson Corporation in Japan and other countries/regions.
Windows is a registered trademark of Microsoft Corporation in the United States and other countries.
General Notice: Other product and company names used herein are for identification purposes only and may be trademarks of
their respective companies.
Notice: The contents of this manual are subject to change without notice. Please contact us for the latest information.
Copyright © 2014 by Seiko Epson Corporation
4
 Loading...