

Page 1
User’s Manual
Copyright © Seiko Epson Corporation 2012
Introduction
The UB-P500 is a dedicated interface board for Epson EU-T482 series.
This manual provides instructions, including a simple setup for operators to
use the interface board safely and correctly.
Important Safety Information
Key to Symbols
The symbols in this manual are identified by their level of importance, as
defined below. Read the following carefully before handling the product.
CAUTION:
Cautions must be observed to avoid minor injury to yourself, damage to
your equipment, or loss of data.
Note:
Notes have important information and useful tips on the operation of your equipment.
Safety Precautions
CAUTION:
Do not install the UB-P500 into other printers than the Epson EU-T482
series.
The printers may not work properly.
Be sure to make the printer setting appropriately for each interface.
Disconnect the power supply from the printer before you remove the
interface board. The electrical current is flowing in some parts of the
printer circuit even when the power switch is turned off. The interface
board and printer may become damaged if you install the interface
board with the power supply connected to the printer.
Wear a grounded wrist strap when handling the interface board to
prevent damage from static electricity.
To avoid contamination, do not touch the board connector.
Printed in China
Unpacking
The following items are included. If any item is damaged, contact your dealer.
❏ UB-P500
❏ User’s Manual (this manual)
1
Page 2
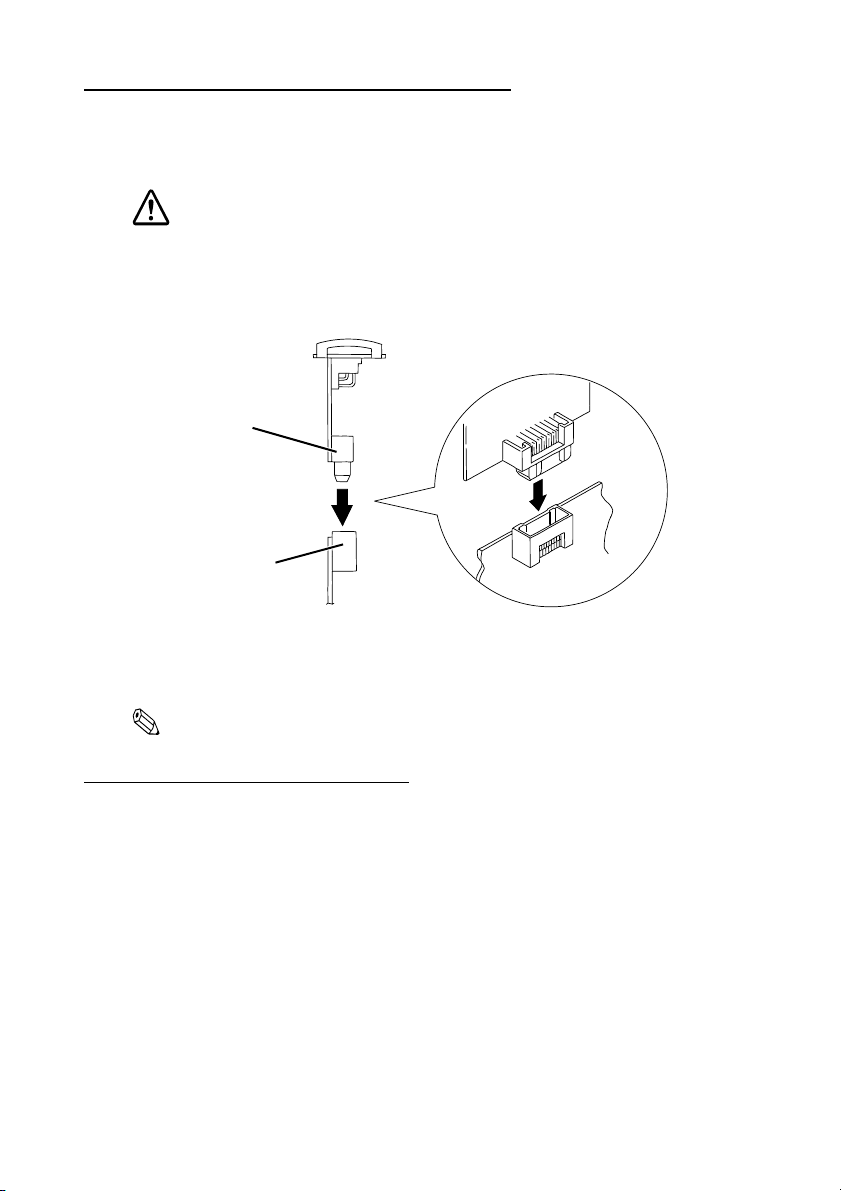
Installing the UB-P500 in the Printer
Connector of the
EU-T482 series
Connector of
the UB-P500
1. Remove the two screws that securing the interface board; then pull the
board and remove it. You will use the screws when installing the UBP500.
CAUTION:
Put the removed interface board into an anti-static bag for storage to
prevent damage from static electricity.
2. Hold the UB-P500 as shown in the illustration below. Push the UB-P500 in
gently until you feel the connector fits into place.
3. Secure the UB-P500 with the two screws.
4. Change the printer settings to match the printer to the new interface. See
the printer documentation for the settings.
Note:
Be sure to make the printer settings, or the printer may not work correctly.
Standards and Approvals
The following standards are applied only to the interface boards that are so labeled. (EMC is tested using the
EPSON power supplies and EU-T482 series.)
Europe: CE marking
North America: FCC/ICES-003 Class A
Oceania: AS/NZS CISPR22 Class A
This is a Class A product. In a domestic environment this product may cause radio interference, in which
case the user may be required to take adequate measures.
The printers in which this board is installed becomes class A devices.
The connection of a non-shielded printer interface cable to this board will invalidate the EMC standards of
this device.
You are cautioned that changes or modifications not expressly approved by Seiko Epson Corporation could
void your authority to operate the equipment.
WARNING
2
Page 3

CE Marking
The printer conforms to the following Directives and Norms:
Directive 2004/108/EC
FCC Compliance Statement For American Users
This equipment has been tested and found to comply with the limits for a Class A digital device, pursuant to
Part 15 of the FCC Rules. These limits are designed to provide reasonable protection against harmful
interference when the equipment is operated in a commercial environment.
This equipment generates, uses, and can radiate radio frequency energy and, if not installed and used in
accordance with the instruction manual, may cause harmful interference to radio communications.
Operation of this equipment in a residential area is likely to cause harmful interference, in which case the
user will be required to correct the interference at his own expense.
EN 55022 Class A
EN 55024
IEC 61000-4-2
IEC 61000-4-3
IEC 61000-4-4
IEC 61000-4-5
IEC 61000-4-6
For Canadian Users
This Class A digital apparatus complies with Canadian ICES-003.
À l'intention des utilisateurs canadiens
Cet appareil numérique de la classe A est conforme à la norme NMB-003 du Canada.
All rights reserved. No part of this publication may be reproduced, stored in a retrieval system, or
transmitted in any form or by any means, electronic, mechanical, photocopying, recording, or otherwise,
without the prior written permission of Seiko Epson Corporation. No patent liability is assumed with respect
to the use of the information contained herein. While every precaution has been taken in the preparation of
this book, Seiko Epson Corporation assumes no responsibility for errors or omissions. Neither is any liability
assumed for damages resulting from the use of the information contained herein.
Neither Seiko Epson Corporation nor its affiliates shall be liable to the purchaser of this product or third
parties for damages, losses, costs, or expenses incurred by purchaser or third parties as a result of: accident,
misuse, or abuse of this product or unauthorized modifications, repairs, or alterations to this product, or
(excluding the U.S.) failure to strictly comply with Seiko Epson Corporation’s operating and maintenance
instructions.
Seiko Epson Corporation shall not be liable against any damages or problems arising from the use of any
options or any consumable products other than those designated as Original EPSON Products or EPSON
Approved Products by Seiko Epson Corporation.
EPSON is a registered trademark of Seiko Epson Corporation in Japan and other countries/regions.
Windows is a registered trademark of Microsoft Corporation, USA.
General Notice: Other product and company names used herein are for identification purposes only and may
be trademarks of their respective companies.
Notice: The contents of this manual are subject to change without notice. Please contact us for the latest
information.
3
Page 4

4
 Loading...