

Page 1

©Seiko Epson Corporation 2010-2018. All rights reserved.
User’s Manual
Introduction
The UB-E03, designed for Epson TM printers, is a 10BASE-T/100BASE-TX Ethernet
interface board.
This manual provides instructions, including a simple setup for operators of POS
systems in which the UB-E03 is installed so that the operators can use the UB-E03
safely and correctly.
Key to Symbols
The symbols in this manual are identified by their level of importance, as defined
below. Read the following carefully before handling the product.
CAUTION:
Cautions must be observed to avoid minor injury to yourself, damage to your
equipment, or loss of data.
Note:
Notes have important information and useful tips on the operation of your equipment.
Caution Label
The caution label on the product indicates the following precaution.
Printed in XXXXXX
CAUTION:
Do not connect a telephone line, a display module cable, or a drawer kick cable to the
UB-E03’s 10BASE-T/100BASE-TX Ethernet connector.
Features and Functions
❏ Protocols: TCP, UDP, ICMP, IP, LP/LPR, TCP socket port
❏ Communication standard: 10Base-T/100Base-TX, Full duplex/half duplex
1
Page 2
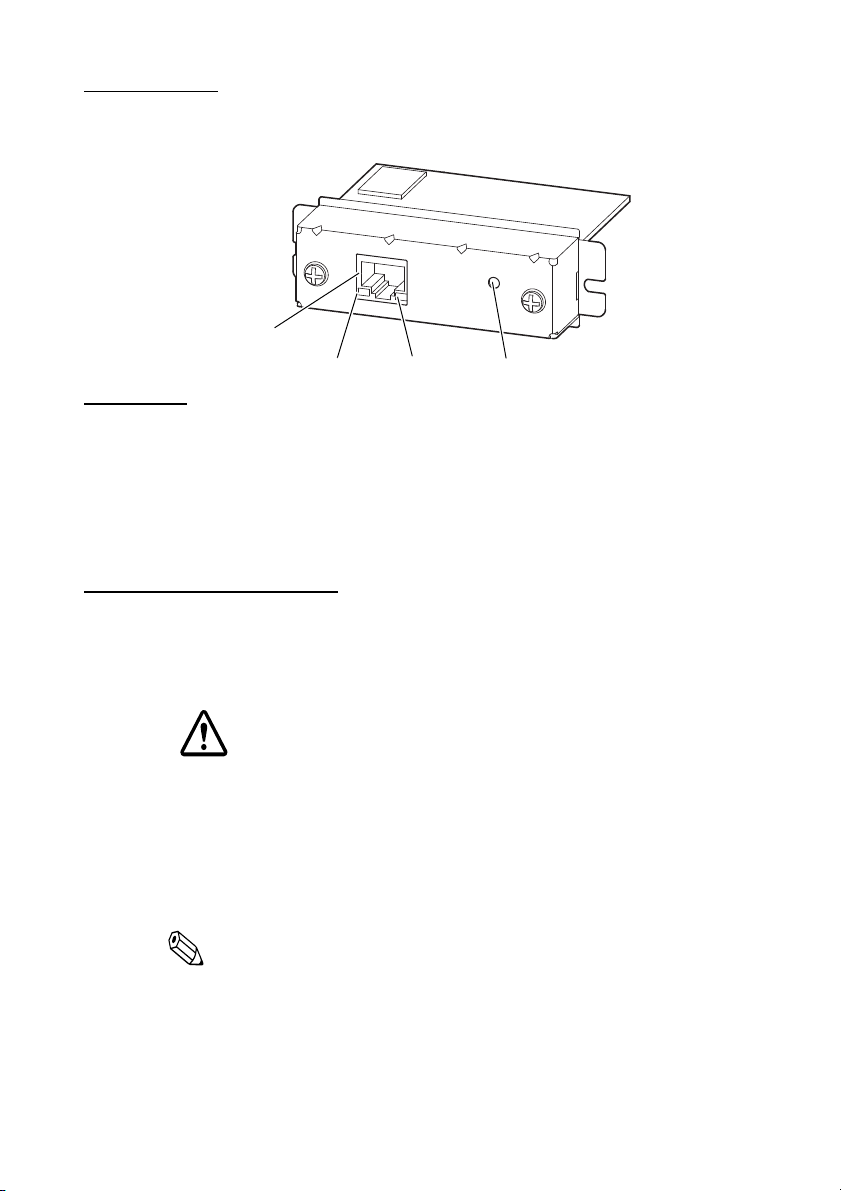
Part Names
10BASE-T/100BASE-TX
Ethernet interface
connector
LED (green) LED (yellow)
Push button
The following view shows the part names of the UB-E03.
Switches
When using this interface board, the DIP switches of the TM printer must be set to
“parallel” with the appropriate settings. Set the reset signal for pin 31 to “enabled” if
you are using a TM printer that has this setting. Refer to the manual for your TM
printer for details.
For the TM-T90/L90/J7000/J7100/J7500/J7600 printers, set the reset signal for pin 25
of the memory switches to “enabled.” For new models, please ask the dealer where you
purchased your product.
Connecting the Cables
1. Make sure both the printer and the host computer are turned off.
2. Plug the 10BASE-T/100BASE-TX cable connector securely into the UB-E03’s
10BASE-T/100BASE-TX Ethernet connector until you feel it click.
When the UB-E03 is installed, a customer display connector on the TM printer
cannot be used.
3. Connect the power supply cable to the printer.
CAUTION:
❏
Do not connect a telephone line, a display module cable, or a drawer kick
cable to the UB-E03’s 10BASE-T/100BASE-TX Ethernet connector.
❏
Connecting an outdoor over head LAN cable directly to your product may lead
to lightning damage. If you need to connect such a cable to your product, the
cable must be protected against an electrical surge between the cable and
your product. You should avoid connecting your product to a non-surge
protected outdoor overhead LAN cable.
Note:
2
Page 3

How to Set Up the UB-E03
Preparation
Printing a Status Sheet
Power on the printer. Then, hold down the push button on the interface card for more
than 3 seconds. The printer prints the parameters for the UB-E03. You can check all
setting values necessary (IP address, Subnet mask, Gateway address) for the network
connection.
Connection
Set the setting of the host PC to match the network setting that you have confirmed
with the status sheet.
You can check whether the connection to the printer has been correctly done by
inputting the ping command through the command prompt.
Example: Ping 192.168.192.168
Note:
Although the example shows the address 192.168.192.168, use whatever IP address is
reported on the status sheet.
Because the default IP addresses for all the printers are the same, you should power on
and configure only one printer at a time.
Resetting the UB-E03 to Factory Defaults
Hold down the push button on the interface card while turning on printer power and
continue to hold it down until a message that initialization starts is printed
(approximately for 10 seconds). This causes all internal settings to return to their
factory defaults.
Setup
There are two ways for the setup. For details, see the UB-E03 Technical Reference Guide.
❏ Using a Web browser
1. Start Windows Internet Explorer (or your Web browser.)
2. Input the IP address of the UB-E03 in the browser address bar and press
Enter (Example: http://192.168.192.168 [default]).
3. The browser displays an opening screen.
4. You can modify the parameters by following the menus. You must click
Submit to send the change to the printer and then click Reset to make the
submission effective on each Web page. If you change the IP address, etc.,
you have to change the setting of the host PC to match the printer’s setting.
❏ Using the EpsonNet Config
The EpsonNet Config is utility for Windows to make network settings on a TM
printer with an Ethernet interface and a wireless LAN interface.
3
Page 4

You can download the UB-E03 Technical Reference Guide and the EpsonNet Config
from one of the following URLs.
For customers in North America, go to the following web site:
www.epson.com/support/
For customers in other countries, go to the following web site:
www.epson-biz.com/
Standards and Approvals
The following standards are applied only to the interface
boards that are so labeled. (EMC is tested using the Epson
power supplies and TM series printers.)
Europe: CE marking
North America: FCC Class A, ICES-003 Class A
Oceania: Radiocommunications (Electromagnetic
Compatibility) Standard, Class A
WARNING
This is a Class A product. In a domestic environment this
product may cause radio interference, in which case the user
may be required to take adequate measures.
The printers in which this board is installed becomes class A
devices.
The connection of a non-shielded printer interface cable to
this board will invalidate the EMC standards of this device.
You are cautioned that changes or modifications not
expressly approved by Seiko Epson Corporation could void
your authority to operate the equipment.
CE Marking
☞ www.epson.eu/conformity
Trademarks
Windows is a registered trademark of Microsoft Corporation in the United States and/or other countries.
EPSON is a registered trademark of Seiko Epson Corporation. Exceed Your Vi sion is a registered trademark or trademark of Seiko Epson
Corporation.
All other trademarks are the property of their respective owners and used for identification purpose only.
Caution
No part of this publication may be reproduced, sto red in a retrieval system, or transmitted in any form or by any means, electronic, mechanical,
photocopying, recording, or otherwise, without the prior written permission of Seiko Epson Corporation. No pate nt liability is assumed with
respect to the use of the information contained herein. While every precaution has been taken in the preparation of this book, Seiko Epson
Corporation assumes no responsibility for errors or omissions. Neither is any liability assumed for damages resulting from the use of the
information contained herein.
Neither Seiko Epson Corporation nor its affiliates shall be liable to the purchaser of this product or third parties for damages, losses, costs, or
expenses incurred by purchaser or third parties as a result of: acc ident, misuse, or abuse of this product or unauthorized modifications, repairs, or
alterations to this product, or (excluding the U.S.) failure to strictly comply with Seik o Epson Corporation’s operating and maintenance
instructions.
Seiko Epson Corporation shall not be liable against any damages or problems arising from the use of any options or any consumable products other
than those designated as Original Epson Products or Epson Approved Products by Seiko Epson Corporation.
NOTICE: The contents of this manual are subject to change without notice.
FCC Compliance Statement for Users
in the USA
This equipment has been tested and found to comply with the
limits for a Class A digital device, pursuant to Part 15 of the
FCC Rules. These limits are designed to provide reasonable
protection against harmful interference when the equipment is
operated in a commercial environment.
This equipment generates, uses, and can radiate radio
frequency energy and, if not installed and used in accordance
with the instruction manual, may cause harmful interference to
radio communications.
Operation of this equipment in a residential area is likely to
cause harmful interference, in which case the user will be
required to correct the interference at his own expense.
For Users in Canada
This Class A digital apparatus complies with Canadian ICES-
003.
Pour les utilisateurs au Canada
Cet appareil numérique de classe A est conforme à la norme
canadienne NMB-003.
4
Page 5

ユーザーズマニュアル
はじめに
本製品はエプソン TM プリンター用に開発された、10BASE-T/100BASE-TX
イーサーネットインターフェイスボードです。
本書には、UB-E03 が取り付けられた POS システムを操作するお客様に、
UB-E03 を安全に、正しく取り扱っていただくための説明および簡単な設置
方法が書かれています。
マニュアルの記号について
本書では、以下の記号が使われています。記号の意味をよく理解してから取
り扱ってください。
注意 :
この表示を無視して、誤った取り扱いをすると、人が傷害を負う可能性が想
定される内容および物的損害のみの発生が想定される内容を示しています。
注記 :
製品の性能を維持するための必要な制限事項、および本製品の取り扱いにつ
いて有効な情報を示しています。
注意ラベルについて
本製品に貼ってあるラベルは、以下の注意事項を示しています。
注意 :
UB-E03 の 10BASE-T/100BASE-TX イーサーネットコネクターには、
カスタマーディスプレイコネクターケーブル、ドロワーキックコネクター
ケーブル、および一般公衆回線を差し込まないでください。
特徴と機能
❏ プロトコル:TCP、UDP、ICMP、IP、LP/LPR、TCP ソケットポート
❏ 物理的通信仕様:10BASE-T/100BASE-TX、全二重 / 半二重
1
Page 6

各部の名称
10BASE-T/100BASE-TX
イーサーネット
インターフェイスコネクター
LED( 緑 ) LED( 黄 )
プッシュボタン
UB-E03 の各部の名称を以下に示します。
スイッチ
UB-E03 を使用するときは、必ずプリンターのディップスイッチの設定を、
パラレルインターフェイスの設定にしてください。#31 ピンリセット信号の
設定が可能なプリンターをご使用の場合は、設定を「使用する」にしてくだ
さい。詳細は、プリンターのマニュアルのパラレルインターフェイスの設定
を参照してください。
TM-T90/TM-L90 においては、メモリースイッチの #25 ピンリセット信号を
有効にしてください。今後の新製品の設定については、製品をお買い求めの
販売店にお問い合わせください。
ケーブルの接続
1. プリンターおよびホストコンピューターの電源がオフであることを確認
します。
2. UB-E03 の 10BASE-T/100BASE-TX イーサーネットコネクターに、
10BASE-T/100BASE-TX ケーブルをカチッという音がするまで押し込み
ます。
❏ UB-E03 の 10BASE-T/100BASE-TXイーサーネットコネクター
注意 :
には、カスタマーディスプレイコネクターケーブル、ドロワーキッ
クコネクターケーブルおよび一般公衆回線を差し込まないでくださ
い。
2
Page 7

❏ 屋外に架空配線された LANケーブルから直接接続されますと、誘導
雷によって機器が故障するおそれがあります。このようなケーブル
と直接接続する場合は、一旦他のサージ対策の施された機器を必ず
経由してから接続するか、屋外の架空配線を避けてください。
注記 :
UB-E03 を取り付けると、TM プリンター本体側のカスタマーディスプレ
イコネクターは使用できなくなります。
3. 電源ケーブルをプリンターに接続します。
イーサーネット通信の設定
設定の前に
ステータスシートの印字
プリンターの電源を入れます。インターフェイスボードのプッシュボタンを
3秒以上押し続けると、プリンターが UB-E03 のパラメータを印字します。
このステータスシートによって、ネットワークの接続に必要なすべての設定
(IP アドレス、サブネットマスク、ゲートウェイアドレス)を確認すること
ができます。
接続
PC の設定を、ステータスシートで確認したネットワークの設定に合わせてく
ださい。
コマンドプロンプトに ping コマンドを入力することで、プリンターの接続が
正しく行われたかどうかを確認することができます。
(例)Ping192.168.192.168
(ステータスシートに、192.168.192.168 と記載された場合)
注記 :
UB-E03 の初期設定の IP アドレスは、すべてのプリンターについて同じです
ので、UB-E03 の設定を行うときは、プリンターを1台ずつネットワークに
接続して、必要な設定を行ってください。
UB-E03 の設定を工場出荷時の状態に戻す
インターフェイスボードのプッシュボタンを押した状態で、プリンターの電
源をオンにし、初期化開始メッセージが印刷されるまで(約 10 秒)プッシュ
ボタンを押し続けてください。すべての設定が、工場出荷時の設定(デフォ
ルト)に戻ります。
設定
設定には、以下の2つの方法があります。詳細については、UB-E03 詳細取
扱説明書を参照してください。
3
Page 8

❏ Web ブラウザーを使用する
1. Windows のインターネットエクスプローラー(お使いの Web ブラ
ウザー)を起動します。
2. ブラウザーアドレスバーに、UB-E03 の IP アドレスを入力し、
Enter
キーを押します(例:http://192.168.192.168[ 初期設定値 ])。
3. ブラウザー上に、初期画面が表示されます。
4. メニューに従って、必要なパラメーターの設定を行います。各設定ご
と、
Submit
キーを押して設定内容を UB-E03 に送信し、
Reset
キー
を押して設定を有効にします。
IP アドレスなどを変更する場合は、必ず PC の設定をプリンターの設
定に合わせてください。
❏ EpsonNetConfig を使用する
EpsonNetConfig は、イーサーネットインターフェイスや無線 LAN イン
ターフェイスが搭載された TM プリンターで、ネットワーク関連の設定
をするための Windows 用のユーティリティーです。
UB-E03 詳細取扱説明書や EpsonNetConfig は、下記 URL からダウンロー
ドしてご使用ください。
www.epson.jp/support/sd/
Windowsは、米国MicrosoftCorporationの米国およびその他の国における登録商標です。
EPSONおよびEXCEEDYOURVISIONはセイコーエプソン株式会社の登録商標です。
その他の製品名および会社名は、各社の商標または登録商標です。
電波障害自主規制について
この装置は、クラス A情報技術装置です。この装置を家庭環境で使用すると電波妨害を引き起こすことがあります。
この場合には使用者が適切な対策を講ずるよう要求されることがあります。
ご注意
(1) 本書の内容の一部または全部を無断で転載、複写、複製、改ざんすることは固くお断りします。
(2) 本書の内容については、予告なしに変更することがあります。
(3) 本書の内容については、万全を期して作成いたしましたが、万一ご不審な点や誤り、記載もれなど、お気づきの点がありまし
たらご連絡ください。
(4) 運用した結果の影響については、上項にかかわらず責任を負いかねますのでご了承ください。
(5) 本製品がお客様により不適切に使用されたり、本書の内容に従わずに取り扱われたり、またはエプソンおよびエプソン指
定の者以外の第三者により修理・変更されたことなどに起因して生じた損害などにつきましては、責任を負いかねますので
ご了承ください。
(6) エプソン純正品およびエプソン品質認定品以外のオプションまたは消耗品を装着してトラブルが発生した場合には、責任を負
いかねますのでご了承ください。
VCCI-A
4
 Loading...