

Page 1

EN
Basic Operation Guide
- for use without a computer -
ID
Panduan Dasar Pemakaian
- untuk penggunaan tanpa komputer -
Page 2
About This Guide
Tentang Panduan Ini
Follow these guidelines as you read your instructions:
Ikuti pedoman berikut saat Anda membaca instruksi yang ada:
Warning:
Warnings must be followed
carefully to avoid bodily injury.
Peringatan:
Peringatan harus diikuti dengan
hati-hati untuk menghindari
cacat sik.
2
w c
Caution:
Cautions must be observed
to avoid damage to your
equipment.
Perhatian:
Perhatian harus dipatuhi untuk
menghindari kerusakan pada
peralatan Anda.
Must be observed to avoid
bodily injury and damage to
your equipment.
Harus dipatuhi untuk
menghindari cacat sik dan
kerusakan peralatan.
Q R &
Note:
Notes contain important
information and hints for using
the printer.
Catatan:
Catatan berisi informasi
penting dan petunjuk untuk
menggunakan printer ini.
Indicates a page number where
additional information can be
found.
Menunjukkan nomor halaman di
mana informasi tambahan dapat
ditemukan.
Page 3
R & 19R & 13
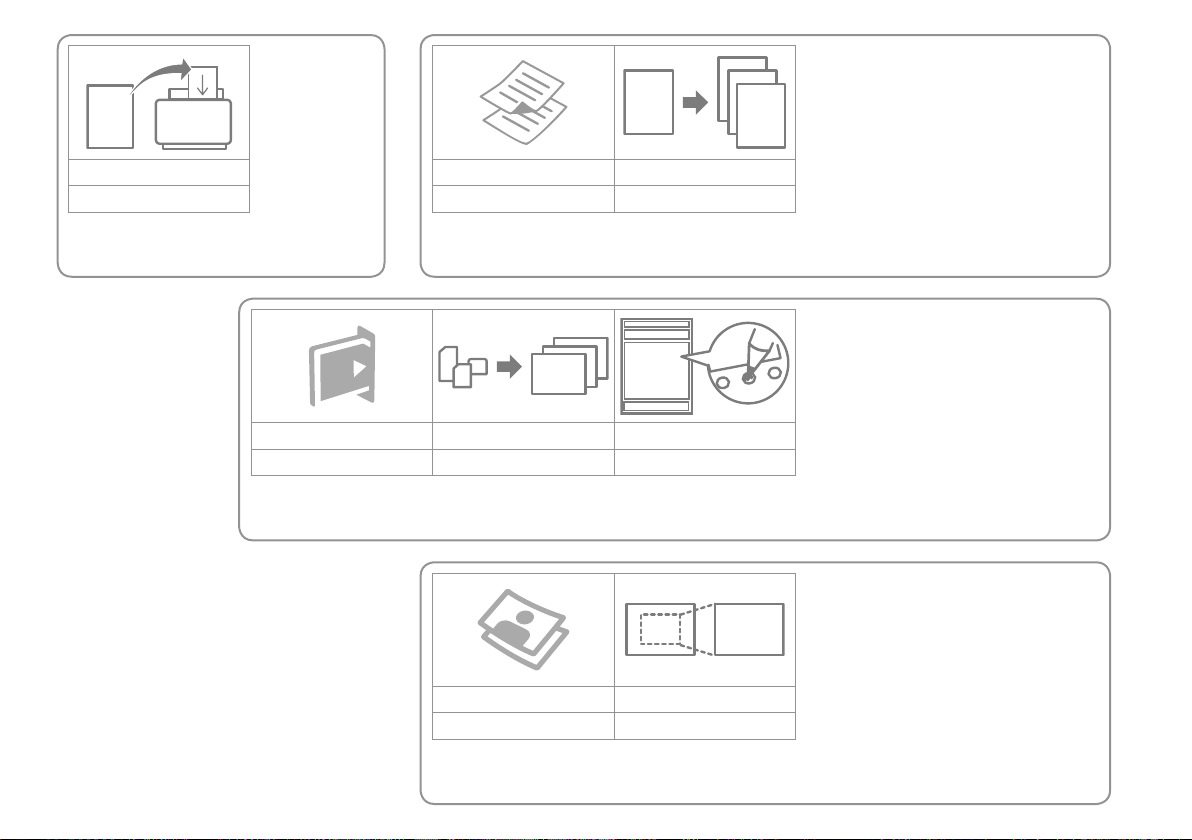
Handling
Penanganan
Copy Mode Photos/Documents
Mode Salin Foto/Dokumen
R & 25
Memory Card Mode Photos Index Sheet
Mode Kartu Memori Foto Lembar Indeks
R & 33
Photo Print Mode Reprint
Mode Cetak Foto Cetak ulang
3
Page 4
Contents
EN
Important Safety Instructions ............................................................................................................................. 6
Guide to Control Panel .......................................................................................................................................... 8
Using the LCD Screen...........................................................................................................................................10
Handling Media
Selecting Paper ..................................................................................................................................................14
Loading Paper ....................................................................................................................................................15
Placing Originals ...............................................................................................................................................16
Inserting a Memory Card ...............................................................................................................................17
Copying
Copying Photos or Documents ...................................................................................................................20
Copy Mode Menu List .....................................................................................................................................22
Printing from a Memory Card
Printing Photos ..................................................................................................................................................26
Printing From an Index Sheet .......................................................................................................................28
Memory Card Mode Menu List ....................................................................................................................31
Photo Print Mode
Reprint / Restore Photos ................................................................................................................................34
Photo Print Mode Menu List .........................................................................................................................36
Setup Mode (Maintenance)
Checking the Ink Cartridge Status ..............................................................................................................40
Checking/Cleaning the Print Head .............................................................................................................42
Aligning the Print Head ..................................................................................................................................44
PictBridge Setup................................................................................................................................................46
Setup Mode Menu List ....................................................................................................................................48
Solving Problems
Error Messages ...................................................................................................................................................52
Replacing Ink Cartridges ................................................................................................................................54
Paper Jam ............................................................................................................................................................57
Print Quality Problems ....................................................................................................................................58
Print Layout Problems .....................................................................................................................................59
Contacting Customer Support.....................................................................................................................60
Index ..........................................................................................................................................................................61
Daftar Isi
ID
Instruksi Keamanan Penting................................................................................................................................6
Panduan untuk Panel Kontrol ............................................................................................................................. 8
Menggunakan Layar LCD ...................................................................................................................................10
Penanganan Media
Memilih Kertas ...................................................................................................................................................14
Memuatkan Kertas ...........................................................................................................................................15
Menempatkan Dokumen Asli ......................................................................................................................16
Memasukkan Kartu Memori .........................................................................................................................17
Menyalin
Menyalin Foto atau Dokumen......................................................................................................................20
Daftar Menu Mode Copy ................................................................................................................................22
Mencetak dari Kartu Memori
Mencetak Foto ...................................................................................................................................................26
Mencetak Dari Lembar Indeks .....................................................................................................................28
Daftar Menu Mode Memory Card ...............................................................................................................31
Mode Cetak Foto
Mencetak kembali/ Memulihkan Foto ......................................................................................................34
Daftar Menu Mode Photo Print ...................................................................................................................36
Mode Setup (Pemeliharaan)
Memeriksa Status Cartridge Tinta ...............................................................................................................40
Memeriksa/Membersihkan Print Head ..................................................................................................... 42
Meratakan Print Head .....................................................................................................................................44
PictBridge Setup................................................................................................................................................46
Daftar Menu Mode Setup ..............................................................................................................................48
Menyelesaikan Masalah
Pesan Kesalahan ................................................................................................................................................52
Mengganti Cartridge Tinta ............................................................................................................................54
Kertas Tersangkut .............................................................................................................................................57
Masalah Kualitas Cetakan ..............................................................................................................................58
Masalah Penataan Cetakan ...........................................................................................................................59
Menghubungi Dukungan Pelanggan .......................................................................................................60
Indeks ........................................................................................................................................................................62
4
Page 5

5
Page 6
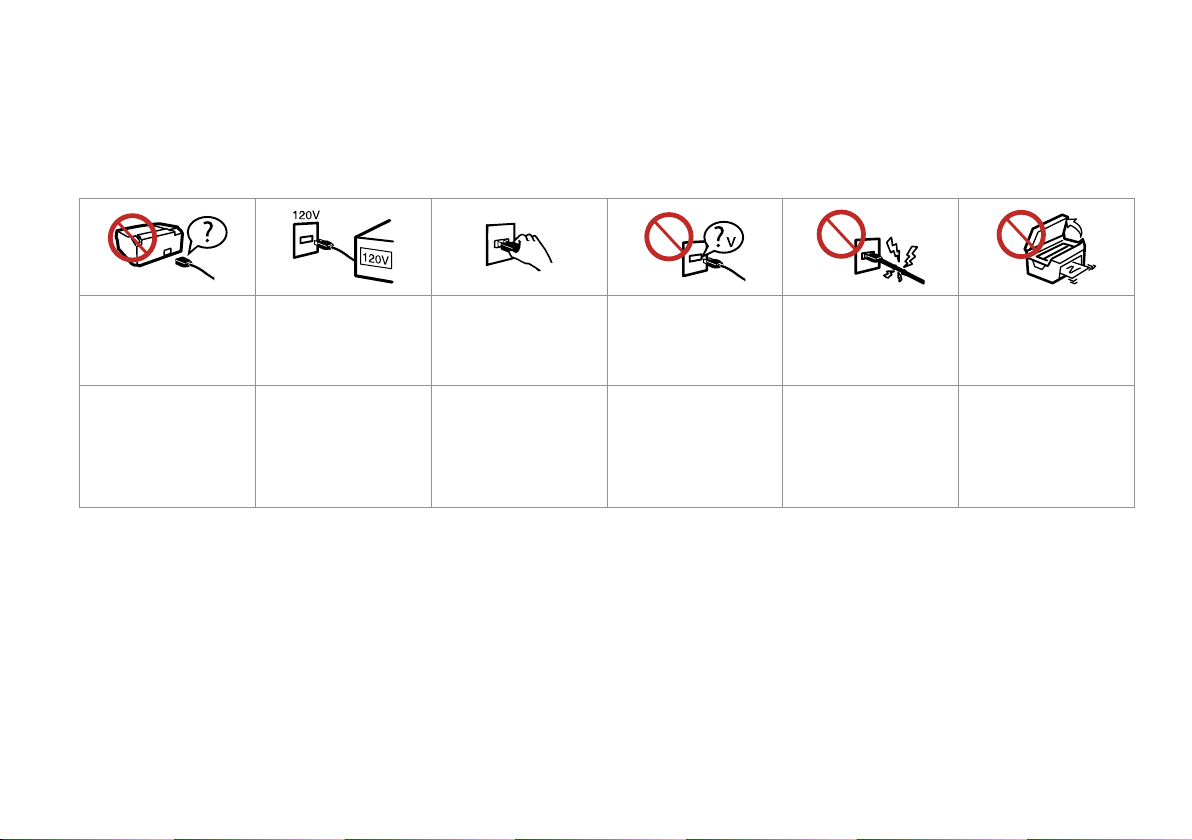
Important Safety Instructions
Instruksi Keamanan Penting
Use only the power cord that
comes with the printer. Use of
another cord may cause re or
shock. Do not use the cord with
any other equipment.
Gunakan hanya kabel daya
yang disertakan dengan
printer. Penggunakan kabel
lain dapat menyebabkan
kebakaran atau sengatan listrik.
Jangan gunakan kabel dengan
peralatan lain.
6
Make sure the power cord
meets all relevant local safety
standards.
Pastikan kabel daya memenuhi
semua standar keamanan lokal
yang relevan.
Place the printer near a wall
outlet where the power cord
can be easily unplugged.
Tempatkan printer di dekat
stopkontak dinding di mana
kabel daya dapat dicabut
dengan mudah.
Use only the type of power
source indicated on the label.
Gunakan hanya jenis sumber
daya yang dsebutkan pada
label.
Do not let the power cord
become damaged or frayed.
Jangan biarkan kabel daya
rusak atau terkoyak.
Do not open the scanner unit
while copying, printing, or
scanning.
Jangan buka unit pemindai
sampai penyalinan,
pencetakan, atau pemindaian
selesai.
Page 7
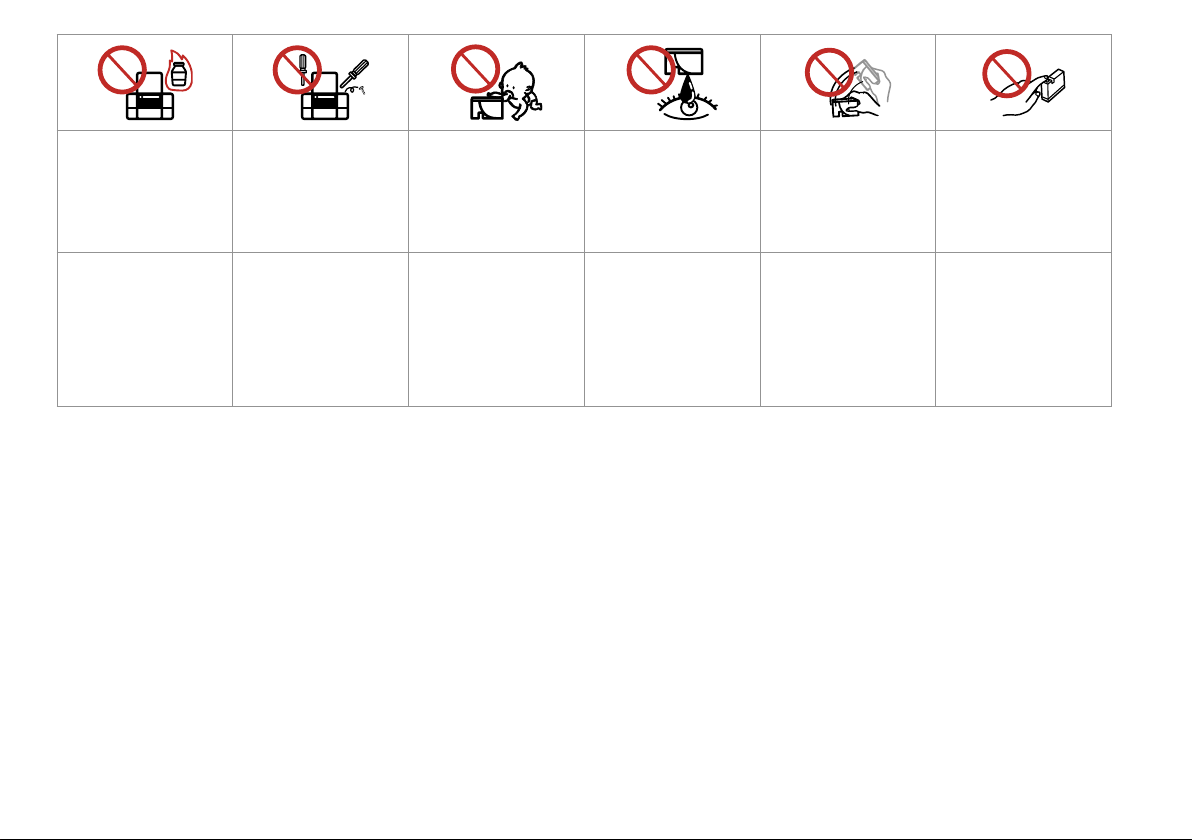
Do not use aerosol products
that contain ammable gases
inside or around the printer.
Doing so may cause re.
Jangan gunakan produkproduk aerosol yang
mengandung gas yang
mudah terbakar di dalam atau
di sekitar printer. Ini dapat
menyebabkan kebakaran.
Except as specically explained
in your documentation, do not
attempt to service the printer
yourself.
Kecuali secara khusus
dijelaskan di dalam
dokumentasi Anda, jangan
pernah mencoba untuk
memperbaiki printer Anda
sendiri.
Keep ink cartridges out of the
reach of children and do not
drink the ink.
Jauhkan cartridge tinta dari
jangkauan anak-anak dan
jangan minum tinta.
If ink gets on your skin, wash
it o with soap and water. If it
gets in your eyes, ush them
immediately with water. If
you still have discomfort or
vision problems, see a doctor
immediately.
Jika tinta mengenai kulit Anda,
cuci bersih dengan sabun dan
air. Jika tinta mengenai mata
Anda, siram segera dengan
air. Jika Anda masih merasa
tidak nyaman atau mengalami
masalah pengelihatan,
kunjungi dokter segera.
Do not shake ink cartridges
after opening their packages;
this can cause leakage.
Jangan kocok cartridge tinta
setelah membuka bungkusnya;
ini dapat menyebabkan
kebocoran.
If you remove an ink cartridge
for later use, protect the ink
supply area from dirt and
dust and store it in the same
environment as the printer. Do
not touch the ink supply port
or surrounding area.
Jika Anda melepaskan cartridge
tinta untuk digunakan lain
waktu, lindungi wilayah
persediaan tinta dari kotoran
dan debu dan simpan di
lingkungan yang sama dengan
printer Anda. Jangan sentuh
port persediaan tinta atau
wilayah sekitarnya.
7
Page 8
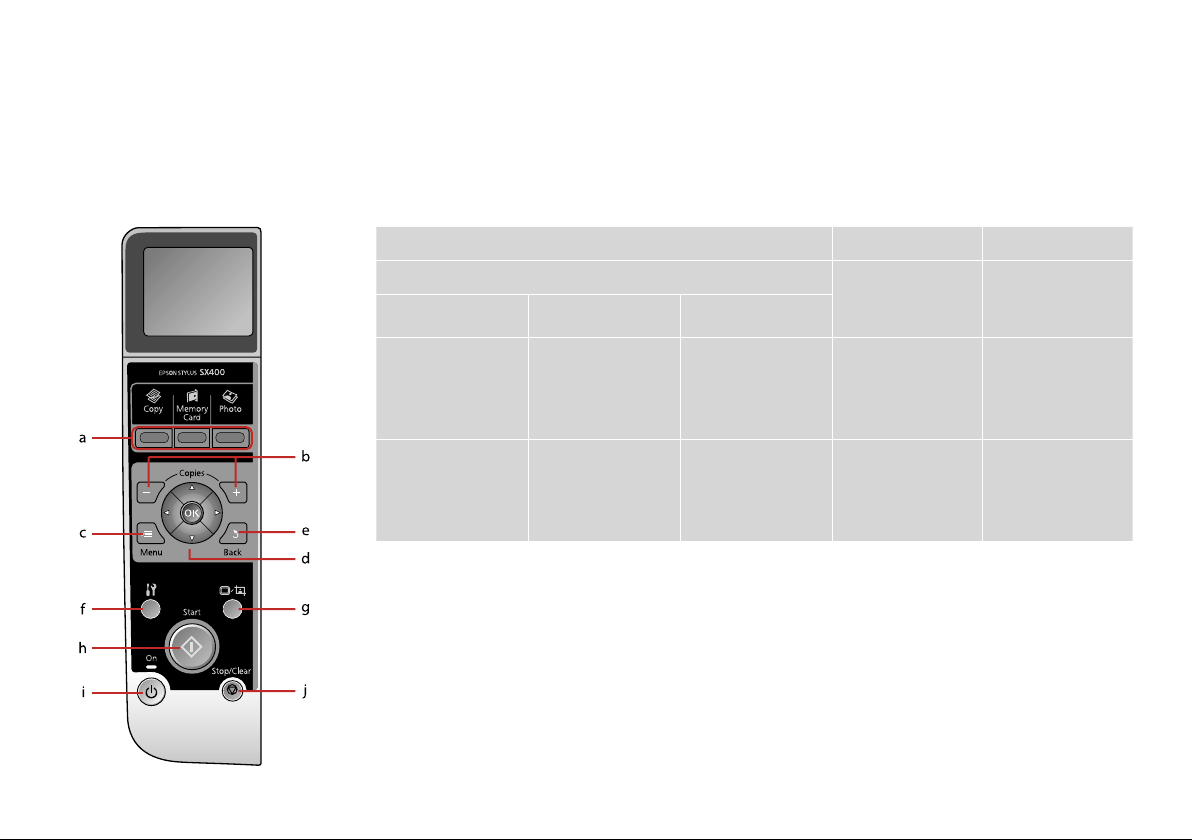
Guide to Control Panel
Panduan untuk Panel Kontrol
a b c
Mode
r [Copy] C [Memory Card] J [Photo]
Enters Copy mode. Enters Memory Card
mode.
Enters Photo Print
mode.
+, -
Sets the number of
copies.
x
Displays detailed
settings for each
mode.
Masuk mode Copy. Masuk mode Memory
Card.
Masuk mode Photo
Print.
Menetapkan jumlah
salinan.
Menampilkan
pengaturan rinci
untuk tiap mode.
8
Page 9

Control panel design varies by area.
Desain panel kontrol tergantung pada wilayah.
d e f g h i j
Selects photos and
menu items.
Memilih foto dan item
menu.
y F [Setup]
Cancels/returns to the
previous menu.
Membatalkan/kembali
ke menu sebelumnya.
Runs maintenance
programs.
Menjalankan program
pemeliharaan.
G [Display/
Crop]
Changes the view of
photos or crops the
photos.
Mengubah tampilan
foto atau memotong
foto.
x P On y
Starts copying/
printing.
Mulai menyalin/
mencetak.
Turns on/o printer. Stops copying/
Menghidupkan/
Mematikan printer.
printing or resets
settings.
Berhenti menyalin/
mencetak atau
mengembalikan
pengaturan.
9
Page 10
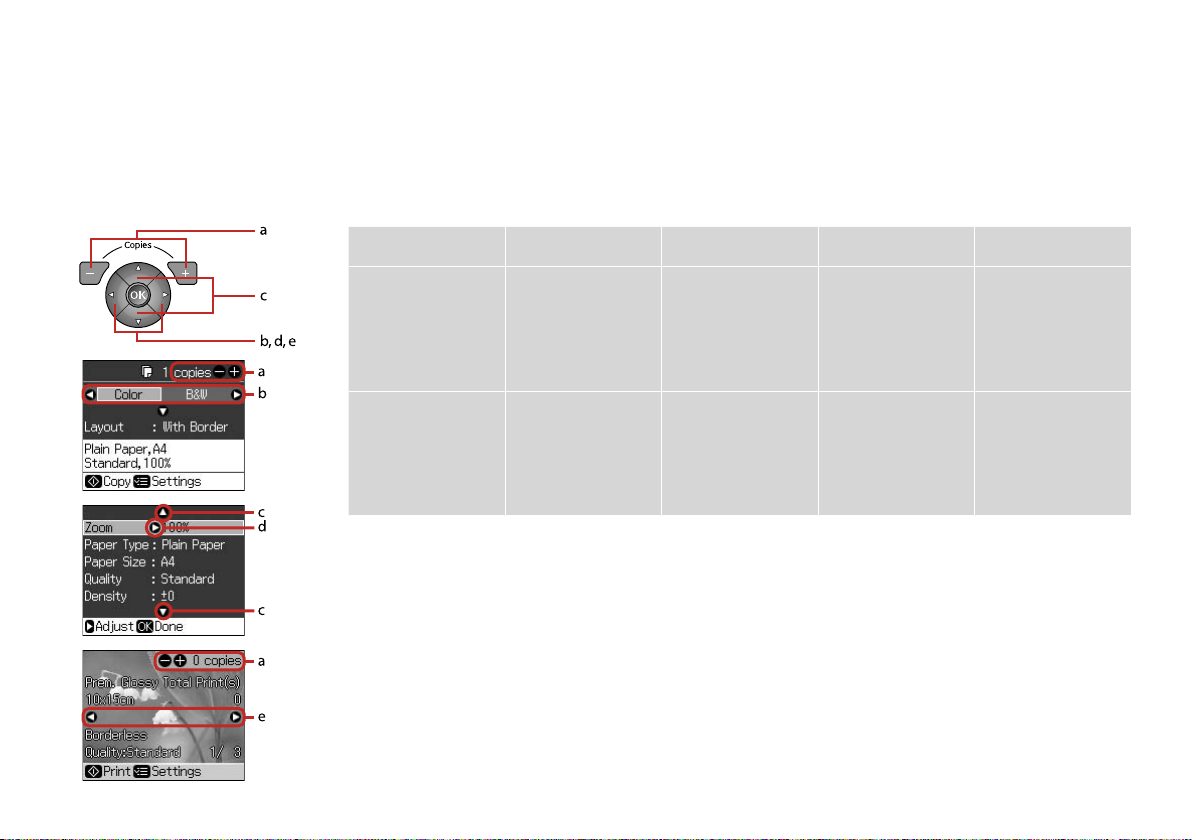
Using the LCD Screen
Menggunakan Layar LCD
a b c d e
Use Copies + or - to set
the number of copies for
the selected photo.
Press l or r to select the
setting item.
Press u or d to select
the menu item. The
highlight moves up or
down.
Press r to open the
setting item list.
Press l or r to change
the photo displayed on
the LCD screen.
10
Gunakan Copies + atau
- untuk menentukan
jumlah salinan foto yang
dipilih.
Tekan l atau r
untuk memilih item
pengaturan.
Tekan u atau d
untuk memilih item
pengaturan. Sorotan
bergeser ke atas atau ke
bawah.
Tekan r untuk
membuka daftar item
pengaturan.
Tekan l atau r untuk
mengganti foto yang
ditampilkan pada layar
LCD.
Page 11

Q
The icon is displayed on a cropped image.
Ikon ditampilkan pada gambar yang dipotong.
11
Page 12

12
Page 13

Handling Media
Penanganan Media
13
Page 14

Selecting Paper
Memilih Kertas
The availability of special paper
varies by area.
Ketersediaan kertas khusus
tergantung pada wilayah.
If you want to print
on this paper...
(a) Plain paper Plain Paper [12 mm] *¹
(b) Epson Bright
White Paper
(c) Epson Premium
Ink Jet Plain Paper
(d) Epson Matte
Paper Heavyweight
(e) Epson Photo
Quality Ink Jet
Paper
(f) Epson Premium
Glossy Photo Paper
(g) Epson Premium
Semigloss Photo
Paper
(h) Epson Ultra
Glossy Photo Paper
(i) Epson Glossy
Photo Paper
*1 Paper with a weight of 64 to 90 g/m².
Choose this Paper
Type on the LCD
screen
Plain Paper 80
Plain Paper 80
Matte 20
Matte 80
Prem.Glossy 20
Prem.Glossy 20
Ultra Glossy 20
Photo Paper 20
Loading capacity
(sheets)
Jika Anda ingin
mencetak pada
kertas ini...
(a) Kertas biasa Plain Paper [12 mm] *¹
(b) Kertas Putih
Terang Epson
(c) Kertas Biasa
Tinta Jet Premium
Epson
(d) Kertas Matte
Epson Heavyweight
(e) Kertas Ink Jet
Kualitas Foto Epson
(f) Kertas Foto
Glossy Premium
Epson
(g) Kertas Foto
Semigloss Premium
Epson
(h) Kertas Foto
Glossy Ultra Epson
(i) Kertas Foto
Glossy Epson
*1 Kertas dengan berat 64 sampai 90 g/m².
Pilih Jenis Kertas ini
pada layar LCD
Plain Paper 80
Plain Paper 80
Matte 20
Matte 80
Prem.Glossy 20
Prem.Glossy 20
Ultra Glossy 20
Photo Paper 20
Kapasitas muatan
(lembar)
14
Page 15
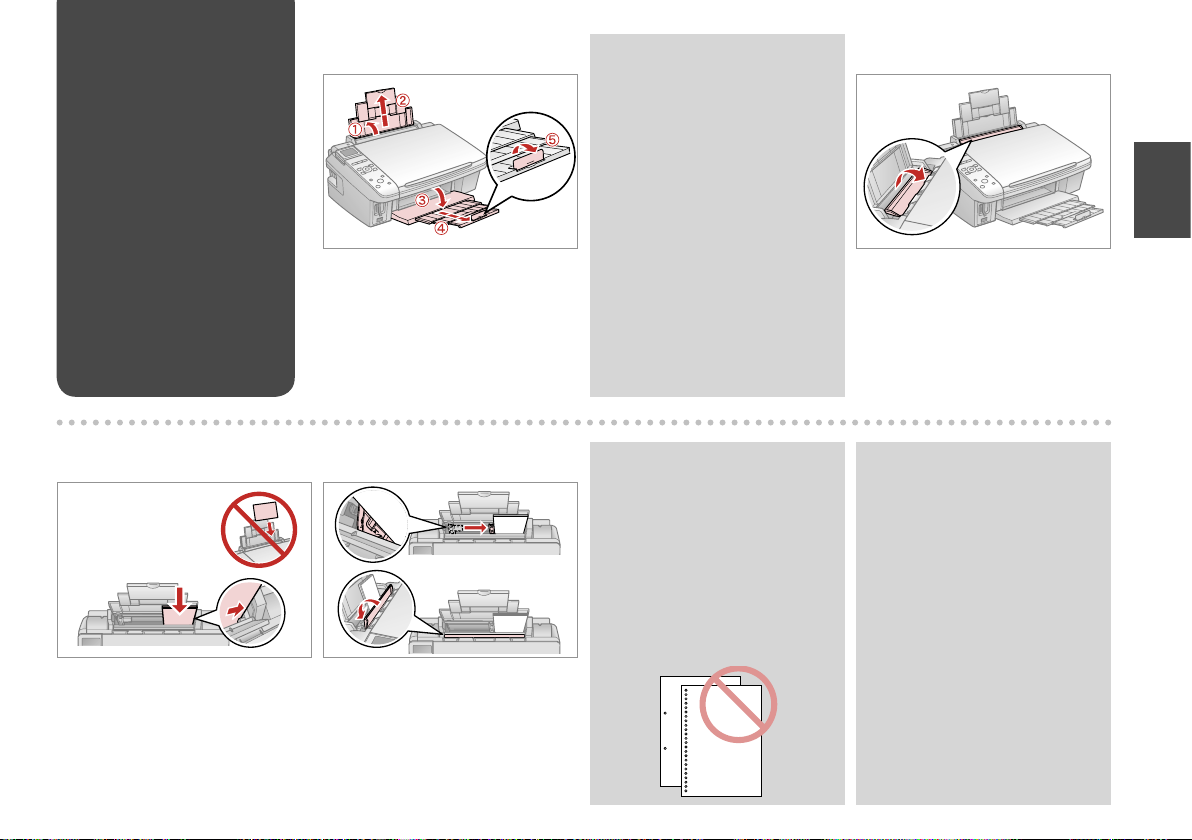
Loading Paper
Memuatkan Kertas
A B
Q
See the online User’s Guide when
using Legal size paper.
Lihat Panduan Pengguna online
saat menggunakan kertas ukuran
Legal.
Open and slide out.
Buka dan geser keluar.
C D
Load printable side up.
Muatkan sisi yang untuk dicetak
menghadap ke atas.
Fit.
Pas kan.
Q
Do not use paper with binder
holes.
Jangan gunakan kertas dengan
lubang jilidan.
Flip forward.
Balikkan ke depan.
Q
Align the edges of the paper
before loading.
Ratakan tepi kertas sebelum
memuatkan.
15
Page 16

Placing Originals
Menempatkan
Dokumen Asli
A B
Q
You can reprint photos from
30 × 40 mm to 127 × 178 mm.
Anda dapat mencetak foto dari
ukuran 30 × 40 mm sampai
127 × 178 mm.
16
Place face-down horizontally.
Tempatkan menghadap ke bawah
secara horizontal.
Q
You can copy photos of dierent
sizes at the same time if they are
larger than 30 × 40 mm.
Anda dapat menyalin berbagai
ukuran foto pada saat yang sama
jika ukurannya lebih dari 30 × 40
mm.
Place image in the corner.
Tempatkan gambar pada ujung.
Place photos 5 mm apart.
Tempatkan foto-foto 5 mm secara
terpisah.
Page 17
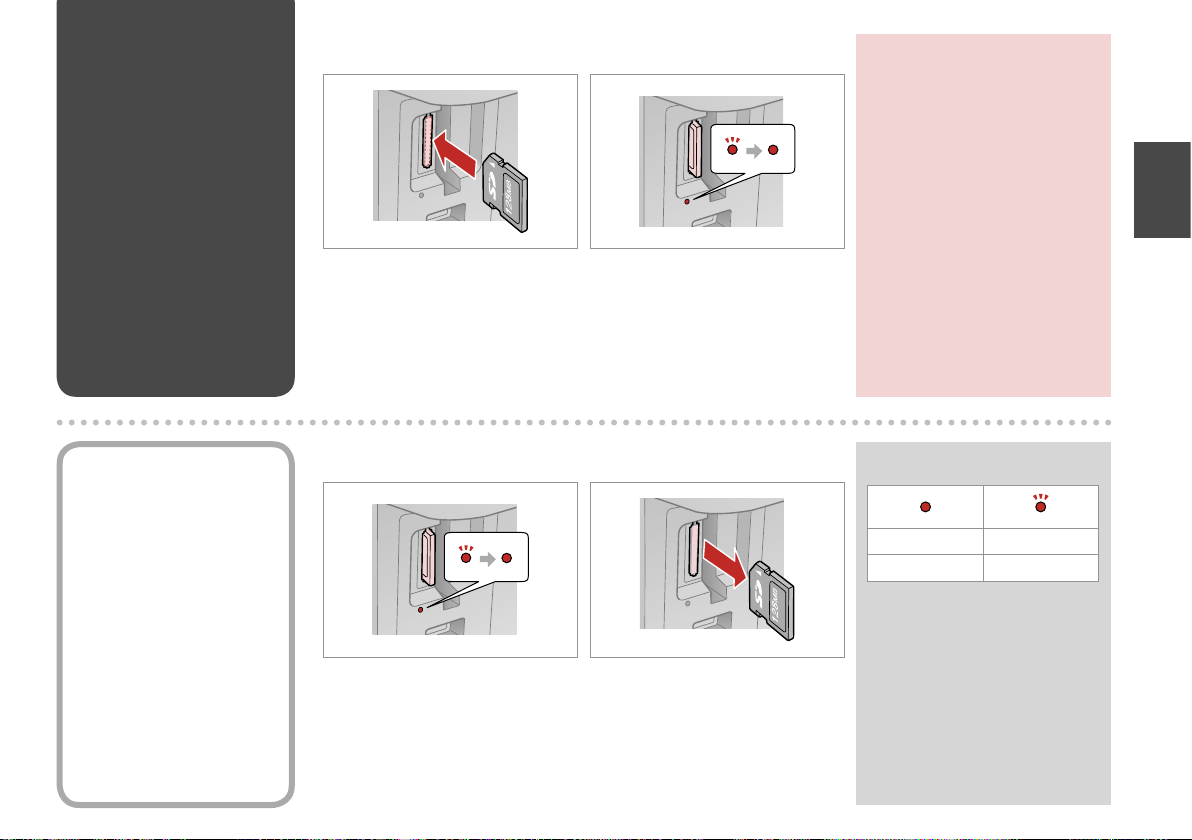
Inserting a Memory
Card
Memasukkan Kartu
Memori
A B
c
Do not try to force the card all the
way into the slot. It should not be
fully inserted.
Jangan coba memaksakan kartu
masuk sepenuhnya ke dalam slot.
Kartu tidak boleh dimasukkan
sepenuhnya.
Removing a Memory
Card
Mengeluarkan Kartu
Memori
Insert one card at a time.
Masukkan kartu satu per satu.
Check the light.
Periksa lampunya.
A B
Check the light.
Periksa lampunya.
Remove.
Keluarkan.
Q
On Flashing
Menyala Berkedip
17
Page 18
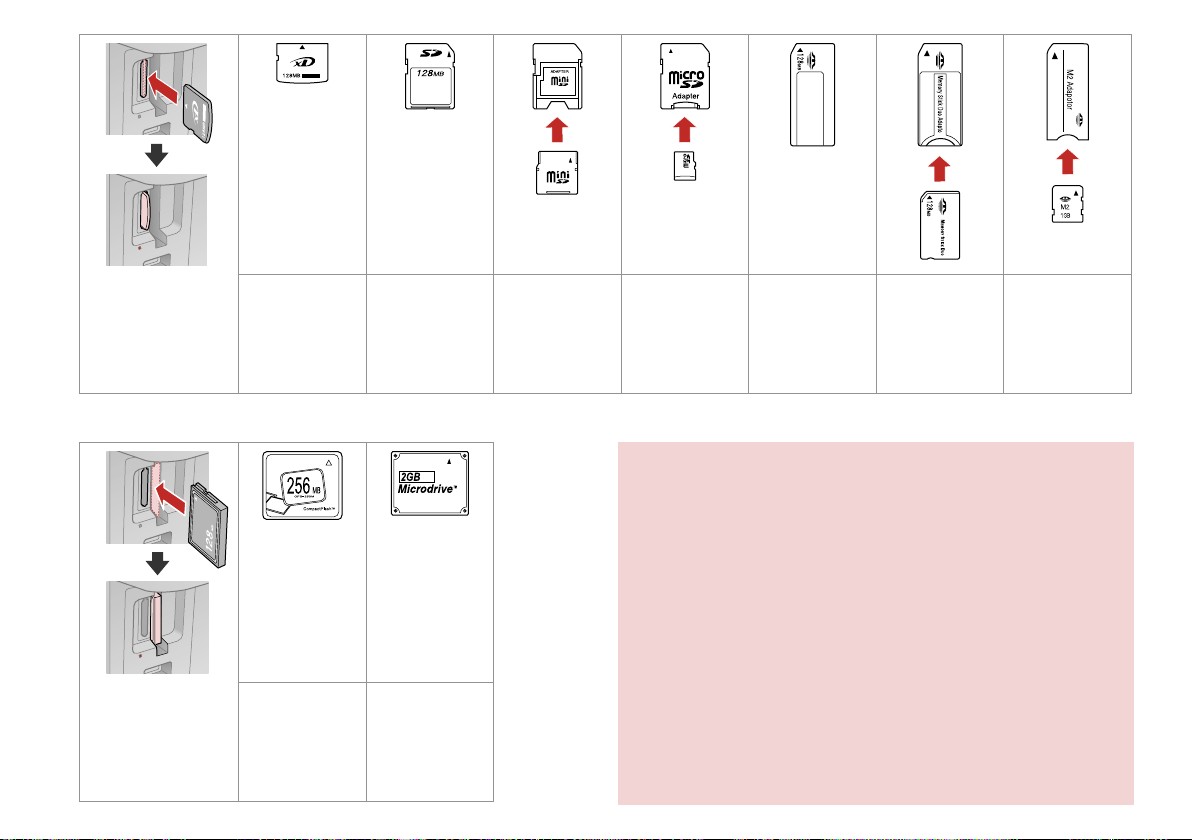
xD-Picture Card
xD-Picture Card
Type M
xD-Picture Card
Type H
SD Memory Card
SDHC Memory Card
MultiMediaCard
miniSD *
miniSDHC *
microSD *
microSDHC *
Memory Stick
Memory Stick Pro
MagicGate Memory
Stick
Memory Stick Duo *
Memory Stick Pro
Duo *
MagicGate Memory
Stick Duo *
Memory Stick
Micro *
18
*Adapter required
*Adaptor
diperlukan
c
If the memory card needs an adapter then attach it before inserting the
card into the slot, otherwise the card may get stuck.
Jika kartu memori memerlukan adaptor, pasang adaptor sebelum
memasukkan kartu ke dalam slot, jika tidak kartu dapat macet.
Compact Flash Microdrive
Page 19

Copying
Menyalin
19
Page 20
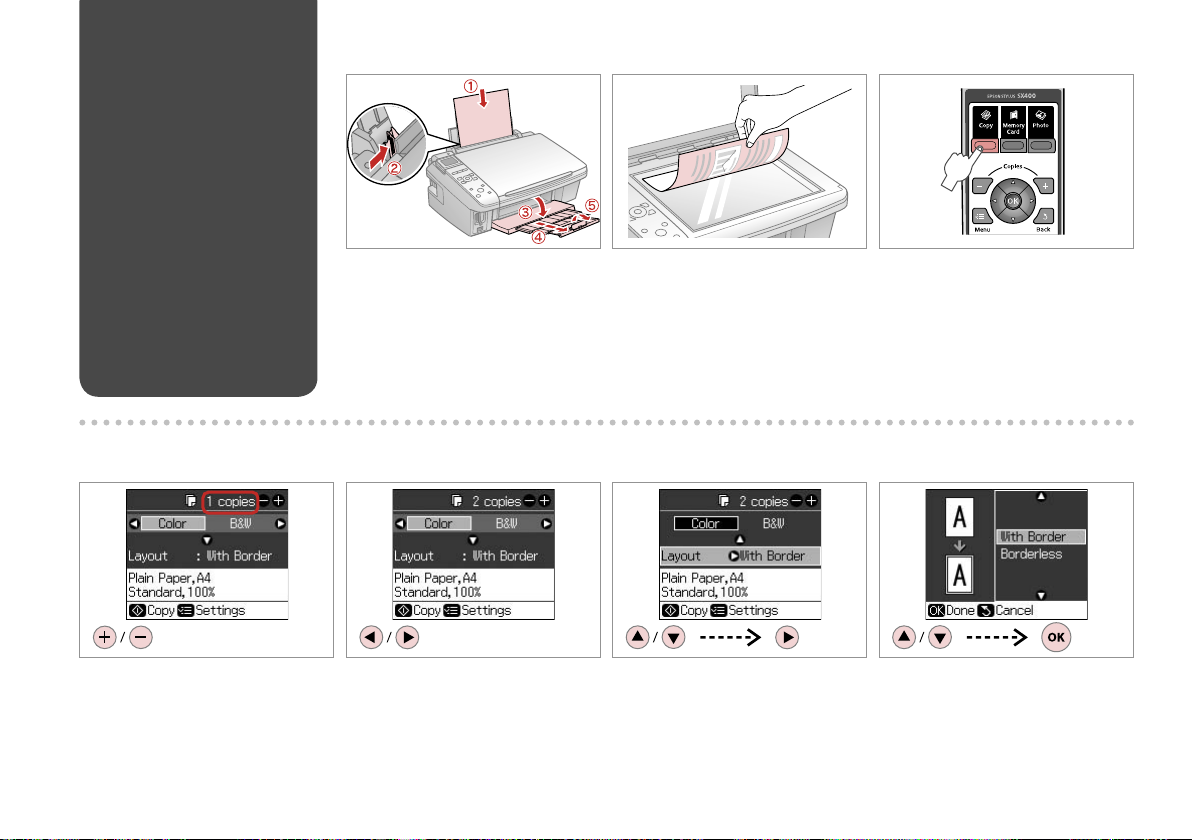
Copying Photos or
Documents
Menyalin Foto atau
Dokumen
A R & 15 B R & 16 C
D E
Set the number of copies.
Tentukan jumlah salinan.
20
Load paper.
Muatkan kertas.
Select a color mode.
Pilih mode warna.
Place original horizontally.
Tempatkan dokumen asli secara
horisontal.
Enter the Copy mode.
Masukkan mode Copy.
F G
Select document layout.
Pilih penataan dokumen.
Select setting item.
Pilih item pengaturan.
Page 21

H J K
I R & 22
Enter the copy setting menu.
Masukkan menu pengaturan salinan.
Select copy settings. (N essential)
Pilih pengaturan salinan. ( N
penting)
Finish the settings.
Selesai pengaturan.
Start copying.
Mulai menyalin.
21
Page 22

22
Copy Mode Menu
List
Daftar Menu Mode
Copy
EN
R & 23
ID
R & 23
Page 23

EN
ID
r Copy Mode
copies 1 to 99
Color/B&W Color, B&W
Layout With Border, Borderless *¹
x Print settings
Zoom Actual, Auto Fit Page
Paper Type Plain Paper, Matte, Prem.Glossy, Ultra Glossy, Photo Paper
Paper Size A4, 10 × 15 cm, 13 × 18 cm
Quality Draft, Standard, Best
Density -4 to +4
Expansion *² Standard, Mid., Min.
*1 Your image is slightly enlarged and cropped to ll the sheet of paper. Print quality
may decline in the top and bottom areas of the printout, or the area may be
smeared when printing.
*2 Select the amount the image is expanded when printing Borderless photos.
r Mode Copy
salinan 1 sampai 99
Color/B&W Color, B&W
Layout With Border, Borderless *¹
x Pengaturan cetak
Zoom Actual, Auto Fit Page
Paper Type Plain Paper, Matte, Prem.Glossy, Ultra Glossy, Photo Paper
Paper Size A4, 10 × 15 cm, 13 × 18 cm
Quality Draft, Standard, Best
Density -4 sampai +4
Expansion *² Standard, Mid., Min.
*1 Gambar Anda sedikit diperbesar dan dipotong untuk mengisi lembar kertas.
Kualitas cetakan mungkin menurun di bagian atas dan bawah cetakan, atau bagian
tersebut mungkin terdapat bercak pada saat dicetak.
*2 Pilih nilai perbesaran gambar pada saat mencetak foto Tanpa Bingkai.
23
Page 24

24
Page 25

Printing from a Memory Card
Mencetak dari Kartu Memori
25
Page 26

Printing Photos
Mencetak Foto
A R & 15 B R & 17 C
D E
Select View and Print Photos.
Pilih View and Print Photos.
26
Load photo paper.
Muatkan kertas foto.
Select a photo.
Pilih sebuah foto.
Insert a memory card.
Masukkan kartu memori.
Enter the Memory Card mode.
Masuk mode Memory Card.
F G
Set the number of copies.
Tentukan jumlah salinan.
Enter the print setting menu.
Masuk menu pengaturan cetak.
Page 27

H R & 31 I J
Select print settings. (N essential)
Pilih pengaturan cetak. ( N penting)
Q
After step 5, you can crop and
enlarge your photo. Press G and
make the settings.
Setelah langkah 5, Anda dapat
memotong dan memperbesar
foto Anda. Tekan G dan lakukan
pengaturan.
Finish the settings.
Selesai pengaturan.
Start printing.
Mulai mencetak.
Q
To select more photos, repeat
steps 5 and 6.
Untuk memilih lebih banyak foto,
ulangi langkah 5 dan 6.
27
Page 28

Printing From an
Index Sheet
Mencetak Dari
Lembar Indeks
Select photos on the index sheet (A4), then scan it to print photos.
Pilih foto pada lembar indeks (A4), lalu pindai untuk mencetak foto.
A R & 15
Load A4-size plain paper.
Masukkan kertas biasa berukuran
A4.
28
Enter the Memory Card mode.
Masuk mode Memory Card.
Select Print Index Sheet.
Pilih Print Index Sheet.
DB C
Select Print Index Sheet / Select.
Pilih Print Index Sheet / Select.
Page 29

E
F
G
Select the range of photos.
Pilih sejumlah foto.
H
Select a paper size.
Pilih ukuran kertas.
Print the index sheet.
Cetak lembar indeks.
I J
Select border or borderless.
Pilih dengan margin atau tanpa
margin.
Select to print with a date stamp.
Pilih untuk mencetak dengan tanda
waktu.
Check u aligns with the corner.
Pastikan u sejajar dengan sudutnya.
K
Select the number of copies.
Pilih jumlah salinan.
29
Page 30

L
M R & 15 N
Place the index sheet face-down.
Tempatkan lembar indeks
menghadap ke bawah.
Load the photo paper.
Muatkan kertas foto.
Q
You can print photos on Ultra Glossy Photo Paper, Premium Glossy Photo
Paper, or Premium Semigloss Photo Paper.
Anda dapat mencetak foto pada Ultra Glossy Photo Paper (Kertas Foto
Glossy Ultra), Premium Glossy Photo Paper (Kertas Foto Glossy Premium),
atau Premium Semigloss Photo Paper (Kertas Foto Semigloss Premium).
30
Print photos from the index sheet.
Cetak foto dari lembar indeks.
Page 31

Memory Card Mode
Menu List
Daftar Menu Mode
Memory Card
EN
R & 32
ID
R & 32
31
Page 32

EN
ID
C Memory Card Mode
View and Print Photos
Print All Photos
Print by Date
Print Index Sheet
Slide Show
x Print settings
Paper Type Prem.Glossy, Ultra Glossy, Photo Paper, Plain Paper, Matte
Paper Size 10 × 15 cm, 13 × 18 cm, 16:9 wide, A4
Layout Borderless *¹, With Border
Quality Standard, Best
Date None, yyyy.mm.dd, mmm.dd.yyyy, dd.mmm.yyyy
Bidirectional *² On, O
Expansion *³ Standard, Mid, Min
*1 Your image is slightly enlarged and cropped to ll the sheet of paper. Print quality
may decline in the top and bottom areas of the printout, or the area may be
smeared when printing.
*2 Select On to increase the print speed. Select O to improve the print quality (but
your photos print more slowly).
*3 Select the amount the image is expanded when printing Borderless photos.
C Mode Memory Card
View and Print Photos
Print All Photos
Print by Date
Print Index Sheet
Slide Show
x Pengaturan cetak
Paper Type Prem.Glossy, Ultra Glossy, Photo Paper, Plain Paper, Matte
Paper Size 10 × 15 cm, 13 × 18 cm, 16:9 wide, A4
Layout Borderless *¹, With Border
Quality Standard, Best
Date None, yyyy.mm.dd, mmm.dd.yyyy, dd.mmm.yyyy
Bidirectional *² On, O
Expansion *³ Standard, Mid., Min.
*1 Gambar Anda sedikit diperbesar dan dipotong untuk mengisi lembar kertas.
Kualitas cetakan mungkin menurun di bagian atas dan bawah cetakan, atau bagian
tersebut mungkin terdapat bercak pada saat dicetak.
*2 Pilih On untuk meningkatkan kecepatan cetak. Pilih O untuk meningkatkan
kualitas cetak (tetapi pencetakan foto lebih lambat).
*3 Pilih nilai perbesaran gambar pada saat mencetak foto Tanpa Bingkai.
32
Page 33

Photo Print Mode
Mode Cetak Foto
33
Page 34

Reprint / Restore
Photos
Mencetak kembali/
Memulihkan Foto
A R & 15 B R & 16
C
34
D
Proceed.
Lanjutkan.
Load paper.
Muatkan kertas.
E
Preview your photo.
Tinjau foto Anda.
Place photo(s) horizontally.
Tempatkan foto(-foto) secara
horizontal.
F
Set the number of copies.
Tentukan jumlah salinan.
Enter the Photo Print mode.
Masuk mode Photo Print.
G
Enter the print setting menu.
Masuk menu pengaturan cetak.
Page 35

H R & 36
I J
Select print settings. (N essential)
Pilih pengaturan cetak. ( N penting)
Q
After step 6, you can crop and
enlarge your photo. Press G and
make the settings.
Setelah langkah 6, Anda dapat
memotong dan memperbesar
foto Anda. Tekan G dan lakukan
pengaturan.
Finish the setting.
Pengaturan selesai.
Start copying.
Mulai menyalin.
35
Page 36

36
Photo Print Mode
Menu List
Daftar Menu Mode
Photo Print
EN
R & 37
ID
R & 37
Page 37

EN
ID
J Photo Mode
Restoration On, O
x Print settings
Paper Type Prem.Glossy, Ultra Glossy, Photo Paper, Matte
Paper Size 10 × 15 cm, 13 × 18 cm, A4
Layout Borderless *¹, With Border
Quality Standard
Expansion *² Standard, Mid, Min
*1 Your image is slightly enlarged and cropped to ll the sheet of paper. Print quality
may decline in the top and bottom areas of the printout, or the area may be
smeared when printing.
*2 Select the amount the image is expanded when printing Borderless photos.
J Mode Photo
Restoration On, O
x Pengaturan cetak
Paper Type Prem.Glossy, Ultra Glossy, Photo Paper, Matte
Paper Size 10 × 15 cm, 13 × 18 cm, A4
Layout Borderless *¹, With Border
Quality Standard
Expansion *² Standard, Mid., Min.
*1 Gambar Anda sedikit diperbesar dan dipotong untuk mengisi lembar kertas.
Kualitas cetakan mungkin menurun di bagian atas dan bawah cetakan, atau bagian
tersebut mungkin terdapat bercak pada saat dicetak.
*2 Pilih nilai perbesaran gambar pada saat mencetak foto Tanpa Bingkai.
37
Page 38

38
Page 39

Setup Mode (Maintenance)
Mode Setup (Pemeliharaan)
39
Page 40

Checking the Ink
Cartridge Status
Memeriksa Status
Cartridge Tinta
A B
C
Enter the Setup mode.
Masuk mode Setup.
C M Y B
Cyan Magenta Yellow Black Ink is low.
Sian Magenta Kuning Hitam Tinta hampir
40
Select Ink Levels.
Pilih Ink Levels.
habis.
Continue or change cartridge.
Lanjutkan atau ganti cartridge.
Page 41

Q
You can replace an ink cartridge if the ink cartridge is not expended.
Press F [Setup], select Maintenance, and press OK. Select Change Ink
Cartridge, and press OK.
Anda dapat mengganti cartridge tinta jika cartridge tinta tidak habis. Tekan
F [Setup], pilih Maintenance, dan tekan OK. Pilih Change Ink Cartridge,
dan tekan OK.
Q
Epson cannot guarantee the quality or reliability of non-genuine ink. If
non-genuine ink cartridges are installed, the ink cartridge status may not
be displayed.
Epson tidak menjamin kualitas atau keandalan tinta yang tidak asli. Jika
yang dipasang cartridge tinta palsu, status cartridge tinta mungkin tidak
ditampilkan.
41
Page 42

Checking/Cleaning
the Print Head
Memeriksa/
Membersihkan Print
Head
A R & 15 B
C
D E
Select Nozzle Check.
Pilih Nozzle Check.
42
Load a A4-size paper.
Muatkan kertas ukuran A4.
Start the nozzle check.
Memulai pemeriksaan nozzle.
Enter the Setup mode.
Masuk mode Setup.
F
Check the pattern.
Memeriksa pola.
Select Maintenance.
Pilih Maintenance.
Page 43

G
H
Q
Print head cleaning uses ink, so clean the print head only if quality
declines.
Untuk membersihkan Print Head diperlukan tinta, jadi bersihkan Print
Head hanya jika kualitas menurun.
Start head cleaning.
Memulai pembersihan Print Head.
Finish head cleaning.
Pembersihan Print Head selesai.
Q
If it does not improve after cleaning four times, turn o the printer for at least six hours. Then try cleaning the print
head again. If quality does not improve, one of the ink cartridges may need to be replaced. If quality is a problem
after replacing the cartridges, contact your dealer.
Jika tidak menjadi lebih baik setelah membersihkan empat kali, matikan printer selama kurang lebih enam jam.
Coba bersihkan Print Head sekali lagi. Jika kualitasnya tidak menjadi lebih baik, salah satu cartridge tinta mungkin
perlu diganti. Jika kualitas tetap menjadi masalah setelah cartridge diganti, hubungi distributor Anda.
43
Page 44

Aligning the Print
Head
Meratakan Print
Head
A R & 15 B
C
D E
Select Head Alignment.
Pilih Head Alignment.
44
Load a A4-size paper.
Muatkan kertas ukuran A4.
Print patterns.
Pola cetak.
Enter the Setup mode.
Masuk mode Setup.
F
Select the most solid pattern.
Pilih pola yang paling padat.
Select Maintenance.
Pilih Maintenance.
G
Select the pattern number.
Pilih nomor pola.
Page 45

H
I
J
Enter the number.
Masukkan nomor.
Repeat steps 7 and 8 if necessary.
Ulangi langkah 7 dan 8 jika perlu.
Finish aligning the print head.
Penyejajaran Print Head selesai.
45
Page 46

PictBridge Setup
PictBridge Setup
A B
C
D R & 48 E
Select print settings.
Pilih pengaturan cetak.
46
Remove.
Keluarkan.
Connect and turn on.
Hubungkan dan nyalakan.
Enter the Setup mode.
Masuk mode Setup.
F
See your camera’s guide to print.
Lihat panduan kamera Anda untuk
mencetak.
Select PictBridge Setup.
Pilih PictBridge Setup.
Page 47

Compatibility PictBridge
File Format JPEG
Image size 80 × 80 pixels to 9200 × 9200 pixels
Kompatibilitas PictBridge
Format File JPEG
Ukuran gambar 80 × 80 pixel sampai 9200 × 9200 pixel
Q
Depending on the settings on this
printer and the digital camera,
some combinations of paper
type, size, and layout may not be
supported.
Tergantung pada pengaturan pada
printer ini dan kamera digitalnya,
beberapa kombinasi jenis, ukuran,
dan rancangan kertas mungkin
tidak didukung.
Q
Some of the settings on your
digital camera may not be
reected in the output.
Beberapa pengaturan pada
kamera digital Anda dapat tidak
tercermin pada keluarannya.
47
Page 48

48
Setup Mode Menu
List
Daftar Menu Mode
Setup
EN
R & 49
ID
R & 49
Page 49

EN
ID
F Setup Mode
Ink Levels
Maintenance Nozzle Check
Head Cleaning
Head Alignment
Change Ink Cartridge
Language English, French, German, Italian, Spanish,
Display Format 1-up with Info, 1-up without Info, View
PictBridge Setup
Restore Default Settings
Portuguese, Dutch, Russian
Thumbnail Images
F Mode Setup
Ink Levels
Maintenance Nozzle Check
Head Cleaning
Head Alignment
Change Ink Cartridge
Language English, French, German, Italian, Spanish,
Portuguese, Dutch, Russian
Display Format 1-up with Info, 1-up without Info, View
Thumbnail Images
PictBridge Setup
Restore Default Settings
49
Page 50

50
Page 51

Solving Problems
Menyelesaikan Masalah
51
Page 52

Error Messages
Pesan Kesalahan
EN
R & 52
ID
R & 53
EN
Error Messages Solution
Press the OK button to replace the cartridges.
A printer error has occurred. Turn o the printer and turn it on
again. Please see your documentation.
A scanner error has occurred. See your documentation. Turn the printer o and then back on. If the error message still
Waste ink pad in the printer is saturated. Contact your dealer to
replace it.
Cannot recognize the memory card or disk. Make sure the memory card or storage disk has been inserted
Replace the expended ink cartridges. R & 54
Turn the printer o and then back on. Make sure that no paper
is still in the printer. If the error message still appears, contact
your dealer.
appears, contact your dealer.
Contact your dealer to replace the ink pad.
correctly. If so, check to see if there is a problem with the card or
disk and try again.
52
Page 53

ID
Pesan Kesalahan Solusi
Press the OK button to replace the cartridges.
A printer error has occurred. Turn o the printer and turn it on
again. Please see your documentation.
A scanner error has occurred. See your documentation. Matikan printer dan lalu nyalakan kembali. Jika pesan kesalahan
Waste ink pad in the printer is saturated. Contact your dealer to
replace it.
Cannot recognize the memory card or disk. Pastikan kartu memori atau cakram penyimpanan telah
Ganti cartridge tinta yang telah habis. R & 54
Matikan printer dan lalu nyalakan kembali. Pastikan tidak ada
lagi kertas di dalam printer. Jika pesan kesalahan masih muncul,
hubungi distributor Anda.
masih muncul, hubungi distributor Anda.
Hubungi distributor Anda untuk mengganti bantalan tinta.
dimasukkan dengan benar. Jika sudah, periksa untuk
mengetahui apakah terdapat masalah pada kartu atau cakram
tersebut kemudian coba lagi.
53
Page 54

Replacing Ink
Cartridges
Mengganti Cartridge
Tinta
54
Ink Cartridge Handling Precautions
c
Never move the print head by hand.
O
Some ink is consumed each time cartridges are
O
inserted because the printer automatically checks
their reliability.
For maximum ink eciency, only remove an ink
O
cartridge when you are ready to replace it. Ink
cartridges with low ink status may not be used
when reinserted.
Epson recommends the use of genuine Epson ink
O
cartridges. Epson cannot guarantee the quality
or reliability of non-genuine ink. The use of
non-genuine ink may cause damage that is not
covered by Epson’s warranties, and under certain
circumstances, may cause erratic printer behavior.
Information about non-genuine ink levels may
not be displayed, and use of non-genuine ink is
recorded for possible use in service support.
Make sure you have a new ink cartridge before
O
you begin replacement. Once you start replacing
a cartridge, you must complete all the steps in one
session.
Leave the expended cartridge installed until you
O
have obtained a replacement. Otherwise the ink
remaining in the print head nozzles may dry out.
Do not open the ink cartridge package until you
O
are ready to install it in the printer. The cartridge is
vacuum packed to maintain its reliability.
Other products not manufactured by Epson may
O
cause damage that is not covered by Epson’s
warranties, and under certain circumstances, may
cause erratic printer behavior.
Do not turn o the printer during ink charging as
O
this will waste ink.
When an ink cartridge is expended, you cannot
O
continue printing even if the other cartridges still
contain ink.
Tindakan Kewaspadaan Dalam Menangani Cartridge Tinta
c
Jangan pernah gerakkan Print Head dengan tangan.
O
Sejumlah tinta akan terpakai setiap kali cartridge
O
dimasukkan karena printer secara otomatis akan memeriksa
kualitasnya.
Untuk esiensi tinta yang maksimal, keluarkan cartridge
O
tinta hanya jika Anda siap untuk menggantinya. Cartridge
tinta dengan status tinta yang hampir habis mungkin akan
tidak dapat digunakan jika dimasukkan kembali.
Epson merekomendasikan penggunaan cartridge tinta
O
Epson yang asli. Epson tidak menjamin kualitas atau
keandalan tinta yang tidak asli. Penggunaan tinta yang tidak
asli dapat menyebabkan kerusakan yang tidak dicakup
oleh jaminan Epson, dan dalam kondisi tertentu, dapat
menyebabkan perilaku printer yang tidak wajar. Informasi
mengenai tingkat tinta yang tidak asli mungkin tidak akan
ditampilkan, dan penggunaan tinta yang tidak asli dicatat
untuk kemungkinan penggunaan dalam dukungan layanan.
Pastikan Anda memiliki cartridge tinta baru sebelum Anda
O
mulai proses penggantian. Setelah Anda mulai mengganti
cartridge, Anda harus menyelesaikan semua langkah dalam
satu waktu.
Biarkan cartridge yang telah habis tetap terpasang sampai
O
Anda memperoleh penggantinya. Jika tidak tinta yang
tersisa pada nozzle Print Head dapat mengering.
Jangan buka kemasan cartridge tinta sampai Anda siap
O
untuk memasangnya pada printer. Cartridge dikemas
hampa udara untuk menjaga mutunya.
Produk lain yang tidak diproduksi oleh Epson dapat
O
menyebabkan kerusakan yang tidak dicakup dalam jaminan
Epson, dan dalam kondisi tertentu, dapat menyebabkan
perilaku printer yang tidak wajar.
Jangan matikan printer pada saat mengisi tinta karena ini
O
akan memboroskan tinta.
Saat sebuah cartridge tinta habis, Anda tidak dapat
O
melanjutkan pencetakan meskipun jika cartridge tinta yang
lain masih berisi tinta.
Page 55

A B
c
Do not lift up the scanner unit
when the document cover is open.
Jangan angkat unit pemindai saat
penutup dokumen terbuka.
Check the color to replace.
Memeriksa warna untuk mengganti.
Open.
Buka.
C D E
Open.
Buka.
Remove.
Keluarkan.
Shake new cartridge.
Kocok cartridge yang baru.
c
Be careful not to break the hooks
on the side of the ink cartridge.
Berhati-hatilah agar tidak
mematahkan kait pada sisi
cartridge tinta.
55
Page 56

F G H
c
If you nd it dicult to close
the cover, press down on each
cartridge until it clicks into place.
Jika Anda mengalami kesulitan
menutup penutupnya, tekan ke
bawah tiap-tiap cartridge sampai
berbunyi klik.
Remove the yellow tape.
Singkirkan pita kuning.
I
Close and start charging ink.
Tutuplah dan mulai mengisi tinta.
56
Insert and push.
Masukkan dan dorong.
Close.
Tutup.
Q
If you had to replace an ink cartridge during copying, to ensure copy
quality after ink charging is nished, cancel the job that is copying and
start again from placing the originals.
Jika Anda harus mengganti cartridge tinta pada saat menyalin, untuk
memastikan kualitas salinan setelah pengisian tinta selesai, batalkan
pekerjaan yang sedang melakukan penyalinan dan mulai lagi dari
menempatkan dokumen asli.
Page 57

Paper Jam
Kertas Tersangkut
Paper Jam - jammed
inside
Kertas Tersangkut tersangkut di dalam
A
B
C
Close.
Tutup.
D
Press.
Tekan.
Open.
Buka.
Q
If paper still remains near the rear
feeder, gently pull it out.
Jika kertas masih berada di dekat
pengumpan belakang, tarik keluar
perlahan-lahan.
Remove.
Keluarkan.
57
Page 58

Print Quality
Problems
Masalah Kualitas
Cetakan
Try one or more of the following solutions in order from the top. For further information, see your online User’s Guide.
Clean the print head. R & 42
O
Align the print head. R & 44
O
If quality is not improved, try aligning using the printer driver utility. See your online User’s Guide to align the print head.
To clean the inside of the printer, make a copy without placing a document on the document table.
O
Use up ink cartridge within six months of opening vacuum package. R & 54
O
Try to use genuine Epson ink cartridges and paper recommended by Epson.
O
Coba satu atau beberapa solusi berikut sesuai urutan dari atas. Untuk informasi lebih lanjut, lihat Panduan Pengguna online Anda.
Bersihkan Print Head. R & 42
O
Sejajarkan Print Head. R & 44
O
Jika kualitas tidak menjadi lebih baik, coba sejajarkan menggunakan utilitas driver printer. Lihat Panduan Pengguna online
Anda untuk menyejajarkan Print Head.
Untuk membersihkan bagian dalam printer, buat salinan tanpa menempatkan dokumen apapun pada bidang dokumen.
O
Habiskan isi cartridge tinta dalam enam bulan setelah membuka kemasan hampa udara. R & 54
O
Coba gunakan cartridge tinta Epson asli dan kertas yang direkomendasikan oleh Epson.
O
58
Page 59

Print Layout
Problems
Masalah Penataan
Cetakan
Check the following points.
Make sure you selected the correct Paper Size, Layout, and Zoom setting for the loaded paper. R & 22, 31, 36
O
Make sure you loaded paper correctly. R & 15
O
Make sure the original is placed correctly. R & 16
O
If the edges of the copy or photo are cropped o, move the original slightly away from the corner.
O
Clean the document table. See your online User’s Guide.
O
Periksa hal-hal berikut.
Pastikan Anda memilih pengaturan Paper Size, Layout, dan Zoom yang benar untuk kertas yang diumpankan. R & 22, 31, 36
O
Pastikan Anda telah memuatkan kertas dengan benar. R & 15
O
Pastikan dokumen asli telah ditempatkan dengan benar. R & 16
O
Jika tepian salinan atau foto terpotong, geser dokumen asli sedikit menjauh dari sudut.
O
Membersihkan bidang dokumen. Lihat Panduan Pengguna online Anda.
O
59
Page 60

Contacting
Customer Support
Menghubungi
Dukungan
Pelanggan
If you cannot solve the problem using the troubleshooting information, contact customer support services for assistance. You can
get the contact information for customer support for your area in your online User’s Guide or warranty card. If it is not listed there,
contact the dealer where you purchased your product.
Jika Anda tidak menyelesaikan suatu masalah menggunakan informasi pemecahan masalah, hubungi layanan dukungan
pelanggan untuk memperoleh bantuan. Anda dapat memperoleh informasi kontak dukungan pelanggan di area Anda pada
Panduan Pengguna online atau kartu garansi. Jika tidak terdaftar di sana, hubungi distributor tempat Anda membeli produk Anda.
60
Page 61

Index
EN62IndeksID
A
Aligning the Print Head .....................................................................44
B
Bidirectional (print speed) ................................................................32
Borderless/With Border ..........................................................23.32.37
Buttons, Control Panel ....................................................................8.10
C
Change Ink Cartridge ..........................................................................49
Color restoration ...................................................................................34
Control Panel .....................................................................................8.10
Copying, photos or documents ...................................................... 20
Copying, restore faded photo ..........................................................34
Crop photo .........................................................................................9.27
D
Date stamp .............................................................................................32
Density (copy setting).........................................................................23
Digital Camera, printing from ..........................................................46
E
Error messages ...................................................................................... 52
Expansion ................................................................................................37
Expansion (borderless printing) ................................................23.32
I
Index Sheet .............................................................................................28
ink cartridge, replacing ......................................................................54
Ink Cartridge Status .............................................................................40
J
Jams, paper .............................................................................................57
L
Language (change display) ..............................................................49
Layout ...........................................................................................23.32.37
M
Maintenance ..........................................................................................39
Memory Card .........................................................................................17
P
Panel .....................................................................................................8.10
Paper, jams ..............................................................................................57
Paper, loading ........................................................................................15
Paper Size ....................................................................................23.32.37
Paper Type ............................................................................ 14.23.32.37
PictBridge Setup ............................................................................. 46.49
Printing Photos ...............................................................................26.28
Q
Quality .......................................................................................... 23.32.37
R
Restore Default Settings .................................................................... 49
S
Supported Paper ..................................................................................14
T
Troubleshooting ...................................................................................51
V
Viewer .......................................................................................................10
Z
Zoom (copying) ....................................................................................23
Zoom (cropping) ..............................................................................9.27
61
Page 62

B
Bahasa (ubah tampilan) ..................................................................... 49
C
cartridge tinta, mengganti ...............................................................54
D
Dua arah (kecepatan cetak) ..............................................................32
E
Ekspansi ...................................................................................................37
Ekspansi (cetak tanpa bingkai) ..................................................23.32
J
Jenis Kertas ........................................................................... 14.23.32.37
K
Kamera Digital, mencetak dari ........................................................46
Kartu Memori .........................................................................................17
Kertas, memuatkan .............................................................................15
Kertas, tersangkut ................................................................................57
Kertas yang Didukung ........................................................................14
Ketebalan (pengaturan salinan)......................................................23
Kualitas .........................................................................................23.32.37
L
Lembar Indeks ......................................................................................28
M
Memulihkan Pengaturan Default ..................................................49
Mencetak Foto .................................................................................26.28
Mengganti Cartridge Tinta ...............................................................49
Menyalin, foto atau dokumen .........................................................20
Menyalin, memulihkan foto yang buram ....................................34
Meratakan Print Head .........................................................................44
P
Panel .....................................................................................................8.10
Panel Kontrol...................................................................................... 8.10
Pemecahan Masalah ...........................................................................51
Pemeliharaan .........................................................................................39
Pemulihan warna .................................................................................34
Penataan ......................................................................................23.32.37
Pesan kesalahan ...................................................................................52
PictBridge Setup ............................................................................. 46.49
Potong foto ........................................................................................9.27
S
Status Cartridge Tinta .........................................................................40
T
Tanda tanggal ........................................................................................32
Tanpa bingkai/Dengan Bingkai...........................................23.32.37
Tersangkut, kertas ................................................................................57
Tombol, Panel Kontrol .................................................................... 8.10
U
Ukuran Kertas ............................................................................23.32.37
V
Viewer .......................................................................................................10
Z
Zoom (memotong) .......................................................................... 9.27
Zoom (menyalin) .................................................................................. 23
Page 63

Copyright Notice
Peringatan Hak Cipta
No part of this publication may be reproduced, stored in a retrieval system, or transmitted in any form or by any means, electronic, mechanical, photocopying, recording, or otherwise, without the prior
written permission of Seiko Epson Corporation. The information contained herein is designed only for use with this product. Epson is not responsible for any use of this information as applied to other
printers.
Neither Seiko Epson Corporation nor its aliates shall be liable to the purchaser of this product or third parties for damages, losses, costs, or expenses incurred by the purchaser or third parties as a result of
accident, misuse, or abuse of this product or unauthorized modications, repairs, or alterations to this product, or (excluding the U.S.) failure to strictly comply with Seiko Epson Corporation’s operating and
maintenance instructions.
Seiko Epson Corporation shall not be liable for any damages or problems arising from the use of any options or any consumable products other than those designated as Original Epson Products or Epson
Approved Products by Seiko Epson Corporation.
Seiko Epson Corporation shall not be held liable for any damage resulting from electromagnetic interference that occurs from the use of any interface cables other than those designated as Epson Approved
Products by Seiko Epson Corporation.
EPSON® is a registered trademark and EPSON STYLUS™ and Exceed Your Vision are trademarks of Seiko Epson Corporation.
PRINT Image Matching™ and the PRINT Image Matching logo are trademarks of Seiko Epson Corporation. Copyright © 2001 Seiko Epson Corporation. All rights reserved.
SDHC™ is a trademark.
Memory Stick, Memory Stick Duo, Memory Stick PRO, Memory Stick PRO Duo, MagicGate Memory Stick, and MagicGate Memor y Stick Duo are trademarks of Sony Corporation.
xD-Picture Card™ is a trademark of Fuji Photo Film Co., Ltd.
General Notice: Other product names used herein are for identication purposes only and may be trademarks of their respective owners. Epson disclaims any and all rights in those marks.
63
Page 64

SX400
Series
TX400 Series
Available ink cartridge sizes vary by area.
Ketersediaan ukuran cartridge tinta tergantung pada wilayahnya.
BK C M Y
T0891 T0892 T0893 T0894
T0711 T0712 T0713 T0714
T0711H - - -
73N (T0731N)/
73HN (T0731HN)
73N
(T0732N)
73N
(T0733N)
73N
(T0734N)
(F)
The online User’s Guide provides instructions for printing
and scanning from your computer and information on the
software. To read this guide, double-click the icon on your
desktop after printer installation.
Panduan Pengguna online menyediakan instruksi untuk
pencetakan dan pemindaian dari komputer Anda dan
informasi mengenai perangkat lunak. Untuk membaca
panduan ini, klik ganda ikon pada desktop Anda setelah
instalasi printer selesai.
EN
ID
( ): The ink cartridge numbers between the parenthesis may be displayed depending on the area.
( ): Nomor cartridge tinta di antara tanda kurung tersebut dapat ditampilkan tergantung pada
wilayahnya.
Black Cyan Magenta Yellow
Hitam Sian Magenta Kuning
Copyright © 2008 Seiko Epson
Corporation. All rights reserved.
Printed in XXXXXX
 Loading...