

Page 1
All in One Product
Setup Guide
4010626
XXX-00
Page 2

Contents
Attaching the Paper Support . . . . . . . . . . . . . . . . . . . . . . . . . . . . . 1
Plugging in the EPSON Stylus Scan . . . . . . . . . . . . . . . . . . . . . . .1
Connecting the Stylus Scan to Your Computer . . . . . . . . . . . . . . 2
Using the parallel port (for Windows 98 or 95) . . . . . . . . . 2
Using the USB port (for Windows 98 or Macintosh) . . . . . 3
Installing the Drivers and Other Software on Your PC . . . . . . . 4
For Windows 98 and 95 with a parallel connection . . . . . . 5
For Windows 98 with a USB connection . . . . . . . . . . . . . . . 9
Installing the software in your Macintosh . . . . . . . . . . . . . . 17
Installing the Ink Cartridges . . . . . . . . . . . . . . . . . . . . . . . . . . . . . . 24
Checking the Stylus Scan . . . . . . . . . . . . . . . . . . . . . . . . . . . . . . . . . 31
Loading Paper . . . . . . . . . . . . . . . . . . . . . . . . . . . . . . . . . . . . . 31
Printing the Nozzle Check Pattern . . . . . . . . . . . . . . . . . . . . 32
Cleaning the Print Head . . . . . . . . . . . . . . . . . . . . . . . . . . . . .33
After Setup . . . . . . . . . . . . . . . . . . . . . . . . . . . . . . . . . . . . . . . . . . . . . 35
Changing the Connection Port (for Windows 98) . . . . . . .35
i
Page 3

ii
Page 4
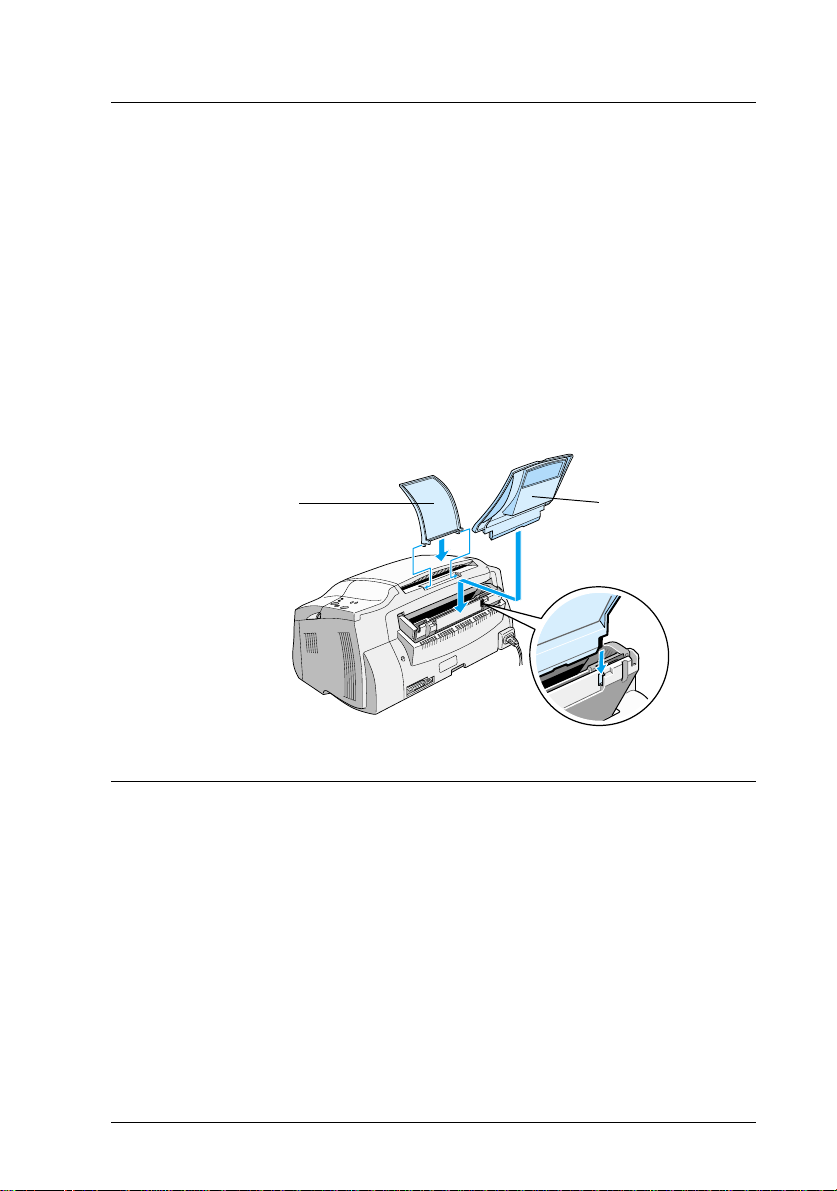
Attaching the Paper Support
The EPSON Stylus Scan comes with two paper supports.
Paper support (gray)
❏
Fit the paper support into the slots at the rear of the Stylus
Scan.
Document support (transparent)
❏
Carefully fit the document support into the holes at the rear
of the Stylus Scan.
document support
paper support
Plugging in the EPSON Stylus Scan
1. Make sure that the Stylus Scan is turned off. It is off when the
power button protrudes slightly from the surface of the
P
control panel.
2. Check the label on the back of the Stylus Scan to make sure
the voltage required by the Stylus Scan matches that of the
electrical outlet you plug it into. Also, make sure that you have
the correct power cable for your power source.
1
Page 5

Caution:
c
3. If the power cord is not attached to the Stylus Scan, connect it
to the AC inlet at the back of the Stylus Scan.
4. Plug the power cord into a properly grounded electrical
outlet.
It is not possible to change the Stylus Scan's voltage. If the
rated voltage and your outlet voltage do not match, contact
your dealer for assistance. Do not plug in the power cord.
Connecting the Stylus Scan to Your Computer
Your Stylus Scan has two ports through which it can be connected
to a computer; a parallel port and a USB port. Use the port
appropriate for your computer.
Note:
❏ If your computer has both a parallel and USB port, be sure to follow
the correct steps to connect to the desired port.
❏ Do not use the Stylus Scan’s parallel port and USB port
simultaneously. Connect the Stylus Scan to one computer at a time.
Using the parallel port (for Windows 98 or 95)
To connect the Stylus Scan to your PC using the parallel port, you
need a shielded, twisted-pair parallel cable. Follow the steps
below to connect your Stylus Scan via the parallel port.
1. Make sure both the Stylus Scan and computer are turned off.
2
Page 6

2. Plug the cable connector securely into the parallel interface
connector at the rear of the Stylus Scan. Squeeze the wire clips
together until they lock in place on both sides.
3. Plug the other end of the cable into the computer’s parallel
interface. If there is a ground wire at the computer end of the
cable, connect it to the ground connector at the back of the
computer.
You are now ready to install the Stylus Scan drivers. For
installation instructions, see “For Windows 98 and 95 with a
parallel connection” on page 5.
Using the USB port (for Windows 98 or Macintosh)
To connect the Stylus Scan to your computer using the USB port,
you must first install the Stylus Scan drivers.
See “For Windows 98 with a USB connection” on page 9 to install
the drivers and connect the Stylus Scan to your Windows 98
computer using the USB port.
To install the software and connect the Stylus Scan to your
Macintosh, see “Installing the software in your Macintosh” on
page 17.
3
Page 7

Installing the Drivers and Other Software on Your PC
Your Stylus Scan comes with the
Software for Windows
your Stylus Scan.
To print and scan with your Stylus Scan, you need to install the
following software included on the CD-ROM.
❏ EPSON SMART PANEL
Provides easy access to the Stylus Scan’s scanning, printing,
and copying features.
❏ EPSON Stylus Scan 2000 Drivers
Printer Driver
Allows you to use the Stylus Scan’s printer function.
EPSON Stylus Scan SF TWAIN
Allows you to use the Stylus Scan’s scanner function.
The included CD-ROM also contains the following software.
❏ Acrobat Reader
This software enables you to read the manuals for EPSON
SMART PANEL and WinFAX, or any other files that are in
the Portable Document Format (PDF).
CD-ROM which includes software for
EPSON Stylus Scan 2000
❏ WinFax BASIC EDITION
Includes applications that support the Stylus Scan’s fax
features and other special operations.
4
Page 8
For Windows 98 and 95 with a parallel connection
After connecting the Stylus Scan to your computer as described
in “Using the parallel port (for Windows 98 or 95)” on page 2,
follow the steps below to install the drivers and other software.
Note for users with a parallel connection:
Before installing the software on your computer, make sure there is no
Stylus Scan driver already installed on your computer. If there is, see
“Uninstalling the parallel driver” on page 36 to uninstall the software
before following the steps below.
1. Turn on the computer and start Windows.
Note:
If you turn on the EPSON Stylus Scan before turning on your PC,
the computer may detect the Stylus Scan and display the New
Hardware Found dialog box or a similar wizard, following start-up.
If this occurs, click the
continue with installation as described below.
Cancel
button to close the dialog box, and
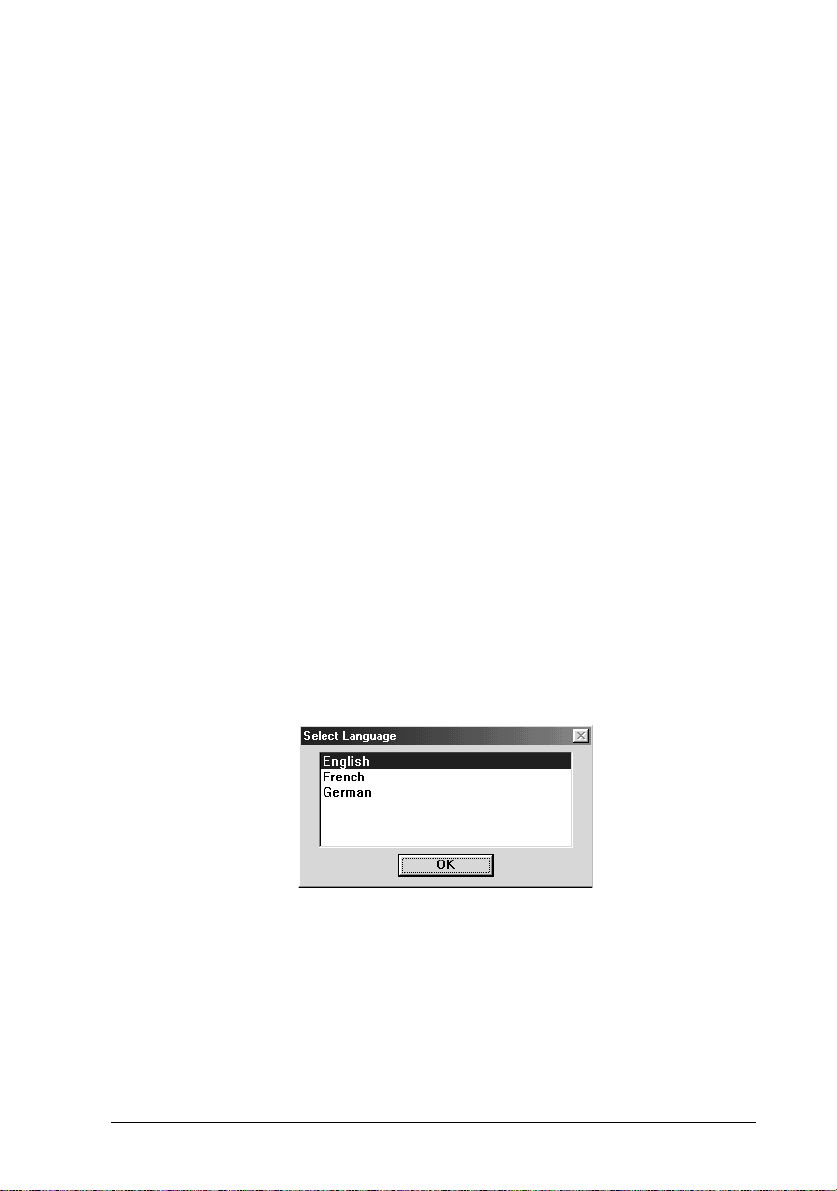
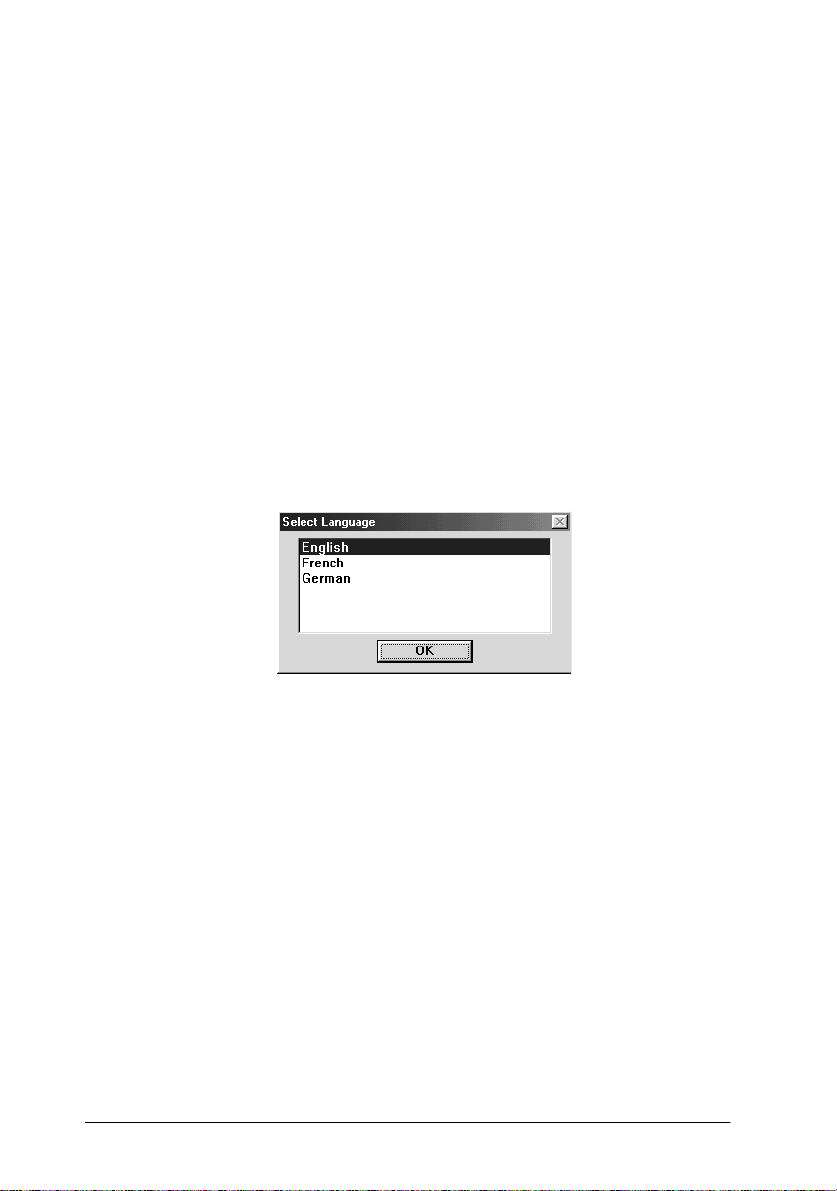
2. Insert the
CD-ROM in the CD-ROM drive. The Select Language dialog
box appears.
3. Select the language you want and click OK.
EPSON Stylus Scan 2000 Software for Windows
5
Page 9
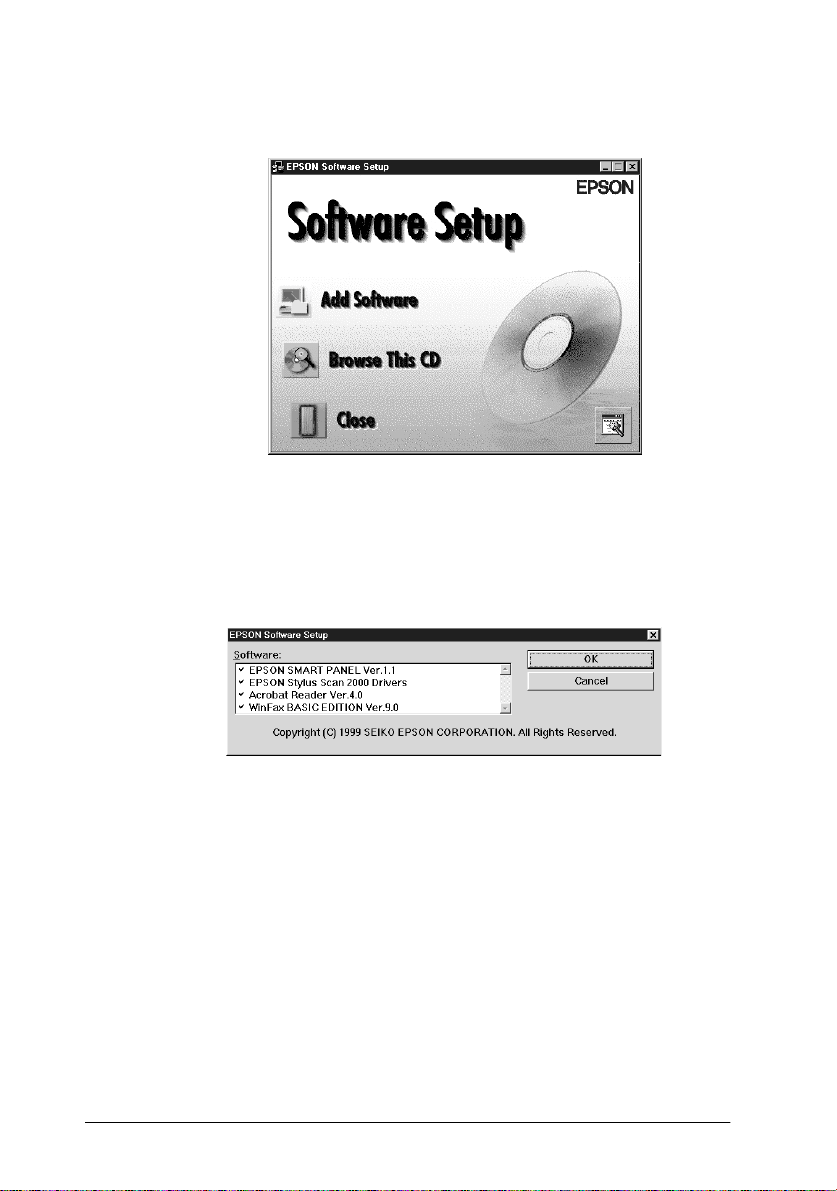
4. Click the
5. The EPSON Software Setup dialog box appears. Make sure
there is a check mark next to
EPSON Stylus Scan 2000 Drivers
to the names of any software that you do not want to install.
Add Software
button.
EPSON SMART PANEL
. Clear the check marks next
and
6. Click OK.
7. Follow the on-screen instructions to install EPSON SMART
PANEL.
6
Page 10
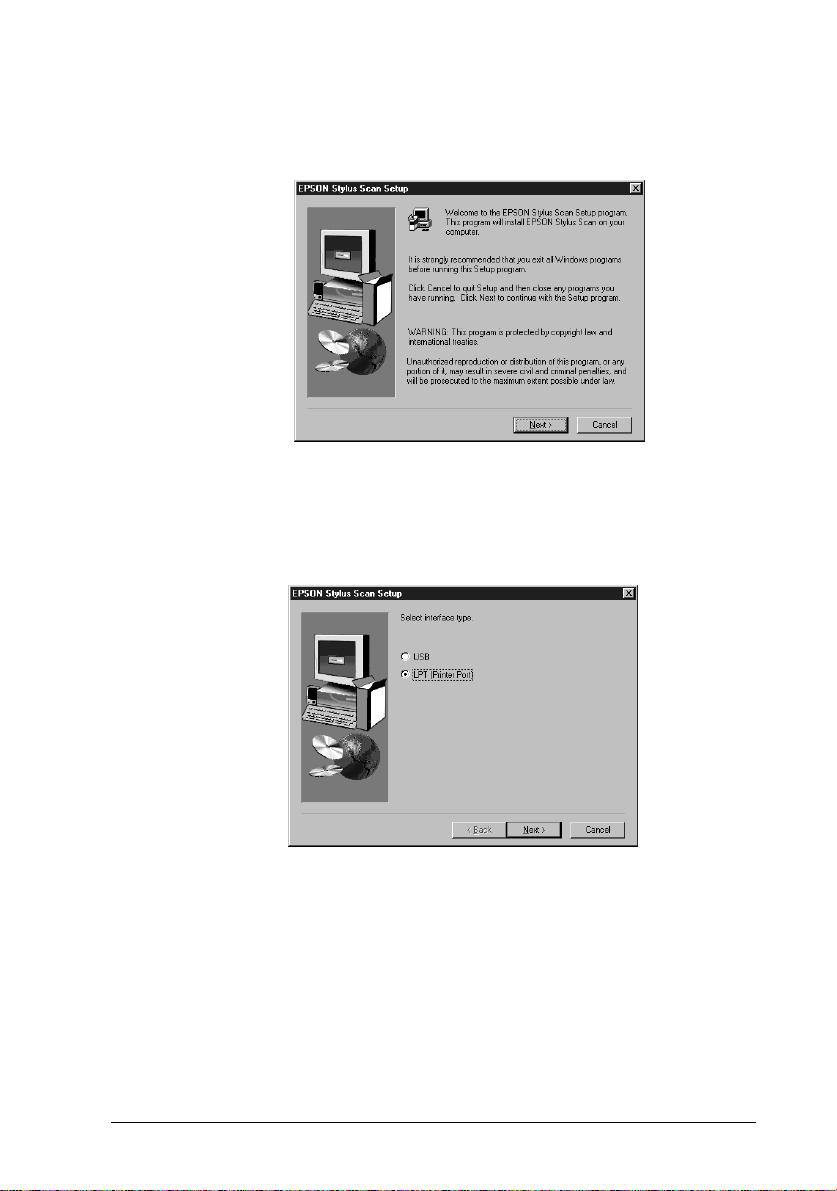
8. When installation is complete, the EPSON Stylus Scan Setup
dialog box appears. Click
Next
.
9. In Windows 98, the following dialog box appears. Select
(Printer Port)
dialog box does not appear, go to the next step.)
, then click
to begin installation. (If this
Next
LPT
7
Page 11
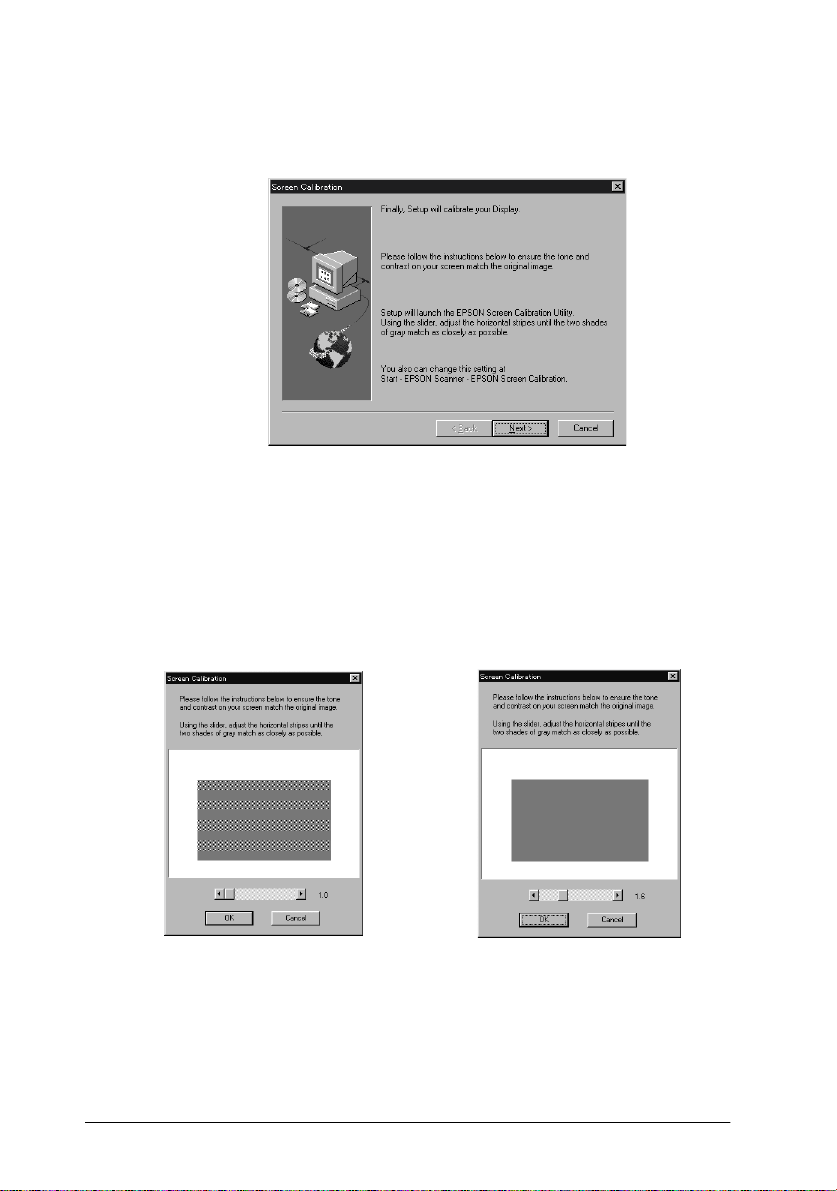
10. When installation is complete, click OK to start the EPSON
Screen Calibration utility.
Note:
Be sure to calibrate your screen and Stylus Scan to ensure that the
colors of reproduced images closely match the originals.
11. In the following window, move the slider to the right or left
until the two shades of gray horizontal stripes match.
8
d
Note:
The gray stripes will not perfectly blend together; however, try to
make the two tones match as closely as possible.
Page 12

12. Click OK to register the calibration setting.
13. When the EPSON Stylus Scan Drivers installation is complete,
installation for other applications begins automatically.
Follow the on-screen instructions.
14. After all applications have been installed, a message appears
asking you to restart your computer. Click OK.
15. Restart the computer, then turn on the Stylus Scan by pressing
the
Note:
Do not change the printer name (leave it as Stylus Scan 2000), otherwise
your Stylus Scan does not work correctly.
power button.
P
For Windows 98 with a USB connection
Before connecting the Stylus Scan to your Windows 98 computer
using the USB port, you must first install the Stylus Scan software.
This section guides you through the software installation and also
includes instructions on connecting to your computer using the
USB port. Follow the steps below.
Note:
Your computer must be a Windows 98 pre-installed model. You may not
be able to install or run the USB Printer Driver on a computer which is
not equipped with a USB port or which is upgraded from Windows 98
to 95.
9
Page 13
1. Make sure the Stylus Scan is off, and that it is not connected
to your computer. Then turn on the computer and start
Windows 98.
Note:
If you turn on the EPSON Stylus Scan before turning on your
computer, the computer may detect the Stylus Scan and display the
New Hardware Found dialog box, or a similar wizard, following
start-up. If this occurs, click the
box and remove the USB cable. Then continue with installation as
described below.
Cancel
button to close the dialog
2. Insert the
CD-ROM in the CD-ROM drive. The Select Language dialog
box appears.
3. Select the language you want and click OK.
EPSON Stylus Scan 2000 Software for Windows
10
Page 14

4. Click the
5. The EPSON Software Setup dialog box appears. Make sure
there is a check mark next to
EPSON Stylus Scan 2000 Drivers
to the names of any other software that you do not want to
install.
Add Software
button.
EPSON SMART PANEL
. Clear the check marks next
and
6. Click OK.
7. Follow the on-screen instructions to install EPSON SMART
PANEL.
11
Page 15

8. When installation is complete, the EPSON Stylus Scan Setup
dialog box appears. Click
Next
.
9. The following dialog box appears. Select
10. The following message appears.
Click OK. Installation for other applications begins
automatically. Follow the on-screen instructions.
USB
, then click
Next
.
12
Page 16

11. After the applications have been installed, the following
message appears.
Click OK and restart your computer. Then turn on the Stylus
Scan by pressing the
12. Plug the appropriate end of the cable into the USB port on the
back of the Stylus Scan. (The end that attaches to the Stylus
Scan has a different shape from the end that attaches to the
computer.)
power button.
P
Note:
To connect the Stylus Scan to a USB port, you need a standard
shielded USB cable.
13. Connect the other end of the cable to the computer’s USB port.
Note:
If you have more than one USB hub connected to your computer,
connect the Stylus Scan to the hub that is connected directly to your
computer. If the EPSON Stylus Scan does not work properly when
connected to the hub, connect it directly to the computer’s USB port.
13
Page 17

14. If the following dialog box appears, click
skip to step 19.
. Otherwise
Next
15. The following dialog box appears. Click
16. In the following dialog box, clear all the check boxes, then
click
Next
.
Next
.
14
Page 18

17. In the following dialog box, click
drivers.
Note:
If a dialog box appears asking you to specify the location of the
Windows 98 CD-ROM, insert the Windows 98 CD-ROM into the
CD-ROM drive and click OK.
to install the required
Next
18. Click
19. The following message appears.
to complete the USB Hub driver installation.
Finish
15
Page 19

Make sure the
Windows
.
OK
20. The following dialog box appears.
EPSON Stylus Scan 2000 Software for
CD-ROM is still in your CD-ROM drive, and click
In the
Copy files from
your preferred language), then click OK. Substitute the
appropriate drive letter if necessary. The system installs the
required driver.
Note:
Depending on your system, you may have to repeat steps 19 and 20
to install the printer driver and the scanner software.
21. During driver installation, the EPSON Screen Calibration
utility starts automatically.
Note:
Be sure to calibrate your screen and Stylus Scan to ensure that the
colors of reproduced images closely match the originals.
box, type
D:\EPSON\ENGLISH
(or
16
Page 20

22. In the following window, move the slider to the right or left
until the two gray horizontal stripes match.
r
Note:
The gray stripes will not perfectly blend together; however, try to
make the two tones match as closely as possible.
23. Click OK to register the calibration setting.
24. Follow the on-screen instructions to complete installation.
Note:
Do not change the printer name (Stylus Scan 2000), otherwise your
Stylus Scan will not work correctly.
Installing the software in your Macintosh
To print and scan with your Stylus Scan, you need to install the
following software included on the
Software for Macintosh
Scan. This software must be installed before connecting the Stylus
Scan to your Macintosh.
CD-ROM shipped with your Stylus
EPSON Stylus Scan 2000
17
Page 21

❏ EPSON SMART PANEL
Provides easy access to the Stylus Scan’s scanning, printing,
and copying features.
❏ EPSON Stylus Scan 2000 Drivers
Printer Driver
Allows you to use the Stylus Scan’s printer function.
EPSON Stylus Scan SF TWAIN
Allows you to use the Stylus Scan’s scanner function.
The included CD-ROM also contains the following software.
❏ Acrobat Reader
This software enables you to read the manual for EPSON
SMART PANEL, or any other file that is in the Portable
Document Format (PDF).
❏ FAXstf
Includes applications that support the Stylus Scan's fax
features and other special operations.
Follow these steps to install your Stylus Scan software, and to
connect the Stylus Scan to your Macintosh.
Caution:
c
Note for iMac users:
If you are using Mac OS 8.1, you need to install iMac Update 1.0 before
installing the Stylus Scan software. This update, along with complete
update information, is available online from the Apple Web site. If you
are using Mac OS 8.5 or later, you do not need to install iMac Update
1.0.
18
Turn off all virus protection programs before you install your
EPSON Stylus Scan software.
Page 22

1. Turn on your Macintosh and insert the
2000 Software for Macintosh
drive. The EPSON window appears.
CD-ROM in the CD-ROM
EPSON Stylus Scan
2. Double-click the
dialog box appears.
3. Select the language you want and click OK.
4. Click the
Add Software
Software Installer
button.
icon. The Select Language
19
Page 23

5. The EPSON Software Setup dialog box appears. Make sure
there is a check mark next to EPSON SMART PANEL and
EPSON Stylus Scan 2000 Drivers. Clear the check marks next
to the names of any software that you do not want to install.
Note:
Please note that FAXstf cannot be installed at the same time as other
applications. To use FAXstf, you must install it separately.
6. Click OK.
7. Follow the on-screen instructions to install EPSON SMART
PANEL.
8. When installation is complete, the following dialog box
appears.
9. Click
, then follow the on-screen instructions.
Install
20
Page 24

10. When the following dialog box appears, click
11. The EPSON Screen Calibration utility starts automatically. In
the following window, move the slider to the right or left until
the two shades of the gray horizontal stripes match.
Restart
.
r
Note:
The gray stripes will not perfectly blend together; however, try to
make the two tones match as closely as possible.
12. Click OK to register the calibration setting. The computer
restarts automatically.
13. Turn on the Stylus Scan by pressing the
power button.
P
21
Page 25

14. Plug the appropriate end of the USB cable into the USB port
at the back of the Stylus Scan. (The end that attaches to the
Stylus Scan has a different shape from the end that attaches
to the computer.)
Note:
To connect the Stylus Scan to a USB port, use a standard shielded
USB cable.
15. Connect the other end of the cable to the computer’s USB port.
Note:
If you have more than one USB hub connected to your computer,
connect the Stylus Scan to the hub that is connected directly to your
computer. If the EPSON Stylus Scan does not work properly when
connected to the hub, connect it directly to the computer’s USB port.
Selecting your EPSON Stylus Scan in the Chooser
After you install the printer software in your Macintosh, you need
to open the Chooser to select your Stylus Scan. You have to choose
the Stylus Scan the first time you use it or whenever you want to
switch to another printer. Your Macintosh always prints using the
last printer selected.
22
Page 26

1. Choose
icon and the port your Stylus Scan is connected to.
Chooser
from the Apple menu. Then click the
SS2000
2. Click the
background printing on or off.
When background printing is on, you can use your Macintosh
while it is preparing a document for printing. You must turn
on background printing to use the EPSON Monitor3 utility to
manage print jobs.
3. Close the Chooser.
Background Printing
radio button to turn
Notice for USB users
If you connect several units of the same type, each unit is assigned
a separate USB port number, such as USB port 1, USB port 2, and
so on. Performing any of the following functions may cause the
USB port numbers for the individual units to change.
Restarting your Macintosh
❏
Turning the Stylus Scan off and on
❏
Detaching and reconnecting the USB cable
❏
Please check the assigned USB port number in the Chooser after
performing any of these functions.
23
Page 27

Before turning on your USB hub (if necessary) and your Stylus
Scan, turn on the Macintosh and wait until the desktop appears.
When unplugging the USB cord, wait a few seconds before
plugging it back in. Otherwise, the Macintosh may not recognize
your Stylus Scan and you may be unable to print correctly.
Installing the Ink Cartridges
Follow the steps below to install the ink cartridges.
Warning:
w
Note:
Do not open the ink cartridge packages until just before you install them,
or the ink may dry up.
1. Lower the output tray, then lower the front cover.
The ink cartridges are self-contained units. Under ordinary use,
ink will not leak from a cartridge. If ink does get on your hands,
wash them thoroughly with soap and water. If ink gets into your
eyes, flush them immediately with water.
24
Page 28

2. Turn on the Stylus Scan by pressing the
print head moves left to the color ink cartridge installation
position.
Caution:
c
3. Lift the ink cartridge clamp.
Do not move the print head by hand. Doing so may damage
the Stylus Scan.
power button. The
P
25
Page 29

4. Open the color ink cartridge package that came with your
Stylus Scan. Remove the yellow tape seal from the ink
cartridge.
Caution:
c
❏ Be sure to remove the yellow tape seal from the cartridge
before installing it; otherwise the cartridge will become
unusable.
❏ Do not remove the blue portion of the tape seal from the
cartridge; otherwise the cartridge will become clogged,
making it impossible to print.
❏ Do not remove the tape seal from the bottom of the
cartridge; otherwise, ink will leak.
5. Hold the color ink cartridge with the label facing up. Set the
cartridge gently into the holder. Do not press down on it.
26
Page 30

6. Press the cartridge clamp down until it locks into place. The
ink out light goes out after you close the clamp.
A
Caution:
c
Once you install the ink cartridges, do not open the clamps
again until you replace the ink cartridges. Otherwise, the
cartridges will become unusable.
7. Press the
moves left to the black ink cartridge installation position.
Caution:
c
Install both ink cartridges. If either of the cartridges is not
installed, the EPSON Stylus Scan will not work.
cleaning button and release it. The print head
R
27
Page 31

8. Lift the ink cartridge clamp.
9. Open the black ink cartridge package that came with your
Stylus Scan. Remove the yellow tape seal from the ink
cartridge.
28
c
Caution:
❏ Be sure to remove the yellow tape seal from the cartridge
before installing it; otherwise the cartridge will become
unusable.
❏ Do not remove the blue portion of the tape seal from the
cartridge; otherwise the cartridge will become clogged
and unable to print.
❏ Do not remove the tape seal from the bottom of the
cartridge; otherwise, ink will leak.
Page 32

10. Hold the black ink cartridge with the label facing up. Set the
cartridge gently into the holder. Do not press down on it.
11. Press the cartridge clamp down until it locks into place.
c
Caution:
Once you install the ink cartridges, do not open the clamps
again until you replace the ink cartridges. Otherwise, the
cartridges will become unusable.
29
Page 33

12. Press the R cleaning button and release it. The EPSON
Stylus Scan moves the print head and begins charging the ink
delivery system.
The ink charging process takes about one minute and a half
to complete. While the ink is charging, the
flashes and the Stylus Scan produces a variety of mechanical
sounds. These sounds are normal. When the ink delivery
system has been charged, the print head returns to the home
(far right) position and the
Caution:
c
Never turn off the EPSON Stylus Scan while the
light is flashing.
power light comes on.
P
power light
P
P
power
13. Close the front cover.
30
Page 34

Checking the Stylus Scan
Before using your EPSON Stylus Scan, make sure it works
correctly by printing a nozzle check pattern. You may also need
to clean the print head.
Loading Paper
Follow the steps below to load A4 or Letter size plain paper in the
paper feeder. The Stylus Scan prints on this paper when printing
and making copies.
1. Lower the output tray and slide out the extension. Next, slide
the paper edge guide to adjust the width of the loading area
so that it is slightly wider than the width of your paper.
paper edge guide
output tray
2. Fan a stack of paper; then tap it on a flat surface to even the
edges.
31
Page 35

3. Load the stack of paper with the printable side up and the
p
right edge of the paper resting against the right side of the
paper feeder. Then slide the edge guide against the edge of
the paper.
printable side u
Note:
❏ Always load paper into the paper feeder short edge first.
❏ Make sure the paper stack fits under the arrow mark inside the
edge guide.
Printing the Nozzle Check Pattern
Follow the on-screen instructions to check the print-head nozzles.
If you do not see any on-screen instructions, do the following:
32
Page 36

Make sure that the EPSON Stylus Scan is turned off. Hold down
load/eject button (➀ in the illustration below) and press the
the
E
power button (➁ in the illustration below) to turn on the
P
EPSON Stylus Scan. Then release both buttons. The Stylus Scan
starts printing a nozzle check page.
Here are sample printouts.
Good sample Print head needs to be cleaned
segments are missing
If the nozzle check page does not print satisfactorily (for example,
if any segment of the printed lines is missing), then clean the print
head as explained below. If the printout was satisfactory, you are
ready to print your first page.
Cleaning the Print Head
1. Make sure that the
black and Acolor ink out lights are off.
B
power light is on and that both the
P
33
Page 37

2. Hold down the Rcleaning button for three seconds, then
release it.
The Stylus Scan starts cleaning the print head and the
power light begins flashing. Print head cleaning takes
P
about one minute to complete.
Caution:
c
Never turn off the EPSON Stylus Scan while the
light is flashing. Doing so may damage the Stylus Scan.
P power
3. When the
a document to confirm that the head is clean and to reset the
cleaning cycle.
If the print quality still has not improved after checking the
nozzles and cleaning four or five times, contact your dealer.
34
power light stops flashing, print a few lines from
P
Page 38

After Setup
Changing the Connection Port (for Windows 98)
If you need to change the port from which the Stylus Scan is
connected to your computer, you must first uninstall the Stylus
Scan drivers currently installed in your PC.
Follow the steps below to uninstall the Stylus Scan drivers.
Uninstalling the USB driver
1. Click
2. Double-click the
3. Select
4. Click OK and close the dialog box.
5. Double-click the
6. Select
, point to
Start
EPSON Stylus Scan 2000
EPSON Printer Software
Settings
Scanners and Cameras
Add/Remove Programs
and
, then click
, then click
Control Panel
icon.
Remove
icon.
Add/Remove
.
.
.
35
Page 39

7. Select
EPSON Stylus Scan 2000
screen instructions.
, then click OK. Follow the on-
8. After the uninstall is complete, select
Devices
instructions. The computer restarts automatically.
To connect the Stylus Scan using the parallel port, see “Using the
parallel port (for Windows 98 or 95)” on page 2.
and click
Add/Remove
EPSON USB Printer
. Follow the on-screen
Uninstalling the parallel driver
1. Click the
, then click
Scan
2. Follow the on-screen instructions.
3. After the uninstall is complete, click the
Settings
4. Double-click the
EPSON Printer Software
5. Select
6. Follow the on-screen instructions.
7. After finishing, restart your computer.
EPSON Stylus Scan 2000
button, point to
Start
Uninstall EPSON Stylus Scan SF TWAIN
, then point to
Add/Remove Programs
Programs
Control Panel
and click
Add/Remove
, then click OK.
, select
Start
.
EPSON Stylus
button, point to
icon, then select
.
.
To connect the Stylus Scan using the USB port, see “Using the USB
port (for Windows 98 or Macintosh)” on page 3.
36
Page 40

EPSON OVERSEAS MARKETING LOCATIONS
EPSON AMERICA, INC.
20770 Madrona Ave.
P.O. Box 2842
Torrance, CA 90509-2842
Phone: (800) 922-8911
Fax: (310) 782-5220
EPSON DEUTSCHLAND GmbH
Zülpicher Straße 6,
40549 Düsseldorf Germany
Phone: (0211) 56030
Fax: (0211) 5047787
EPSON AUSTRALIA PTY. LTD.
70 GIBBES STREET, CHATSWOOD 2067 NSW.
Phone: 2-9903-9000
Fax: 2-9903-9177
EPSON HONG KONG LTD.
Rooms 4706-10, 47/F,
China Resources Bldg.,
26 Harbour Road, Wanchai, Hong Kong
Phone: 2585-4300
Fax: 2827-7083
EPSON ITALIA S.p.A.
V.le F.lli Casiraghi 427
20099 Sesto S.Giovanni
MI, Italy
Phone: 2-262331
Fax: 2-2440750
EPSON UK LTD.
Campus 100, Maylands Avenue,
Hemel Hempstead, Herts,
HP2 7TJ, U.K.
Phone: (+44) 01442 261144
Fax: (+44) 01442 227227
EPSON FRANCE S.A.
68 bis, rue Marjolin
92300, Levallois-Perret, France
Phone: 33.1.40.87.37.37
Telex: 610657
EPSON SINGAPORE PTE. LTD.
No. 1 Temasek Avenue #36-00
Millenia Tower, Singapore 039192
Phone: (065) 33 77 911
Fax: (065) 33 41 185
EPSON TAIWAN TECHNOLOGY &
TRADING LTD.
10F, No. 287 Nanking E. Road, Sec. 3,
Taipei, Taiwan, R.O.C.
Phone: (02) 717-7360
Fax: (02) 712-9164
EPSON IBERICA S.A.
Av. de Roma, 18-26
08290 Cerdanyola del Valles
Barcelona, Spain
Phone: 582. 15.00
Fax: 582. 15.55
SEIKO EPSON CORPORATION
(Hirooka Office)
80 Harashinden, Hirooka
Shiojiri-shi, Nagano-ken
399-0785 Japan
EPSON PORTUGAL, S.A.
R. do Progresso, 471, 1° Perafita
4460 Matosinhos, Portugal
Phone: (02) 996 14 02
Fax: (02) 996 14 11
1998 February
Page 41

All in One Product
Setup Guide
Printed in Japan
99.XX-X
 Loading...