

Page 1
*410409100*
*410409100*
Star t Here
Ep so n Stylus® C X5800F
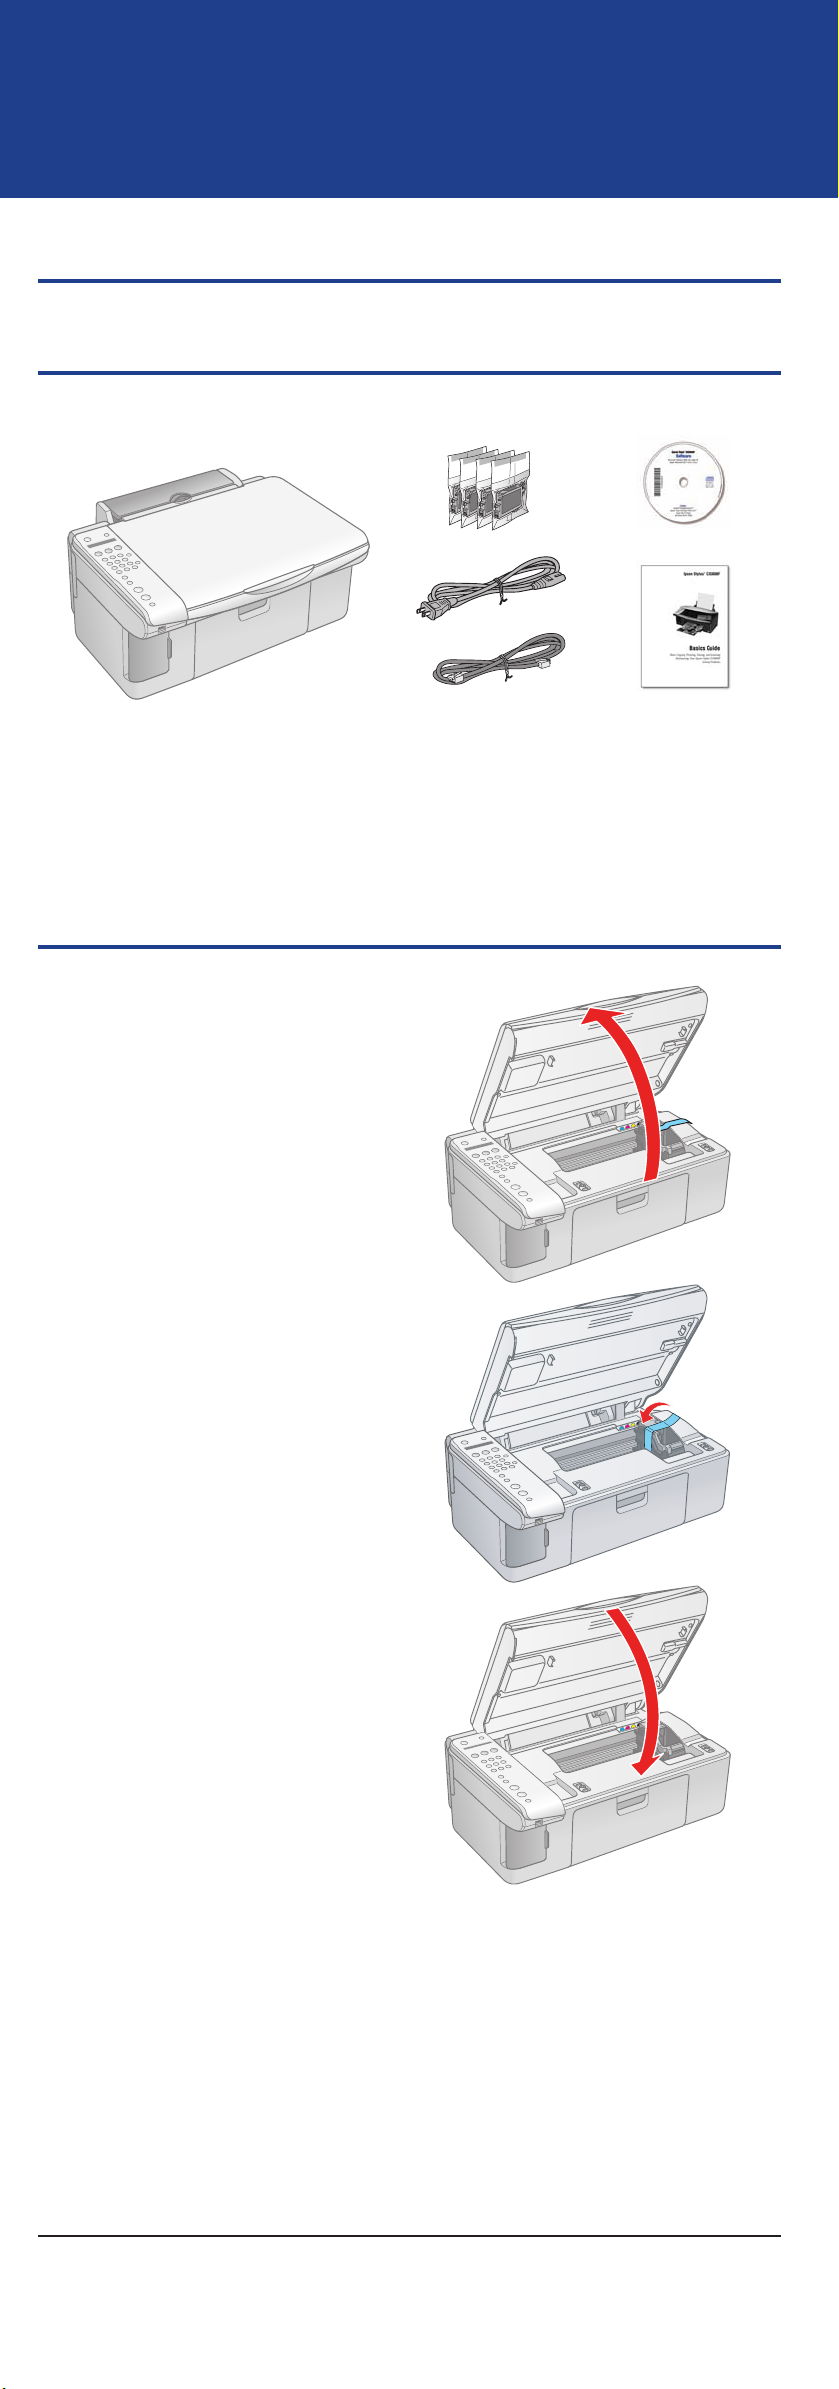
1 Unpack
Remove all the tape.
If anything is missing, contact Epson® as described on the back in
“Any Questions?”.
2 Unlock the Printer
1 Lift up the scanner.
2 Remove the tape from the ink
cartridge holder.
3 Close the scanner.
Page 2
Start
Color
OK
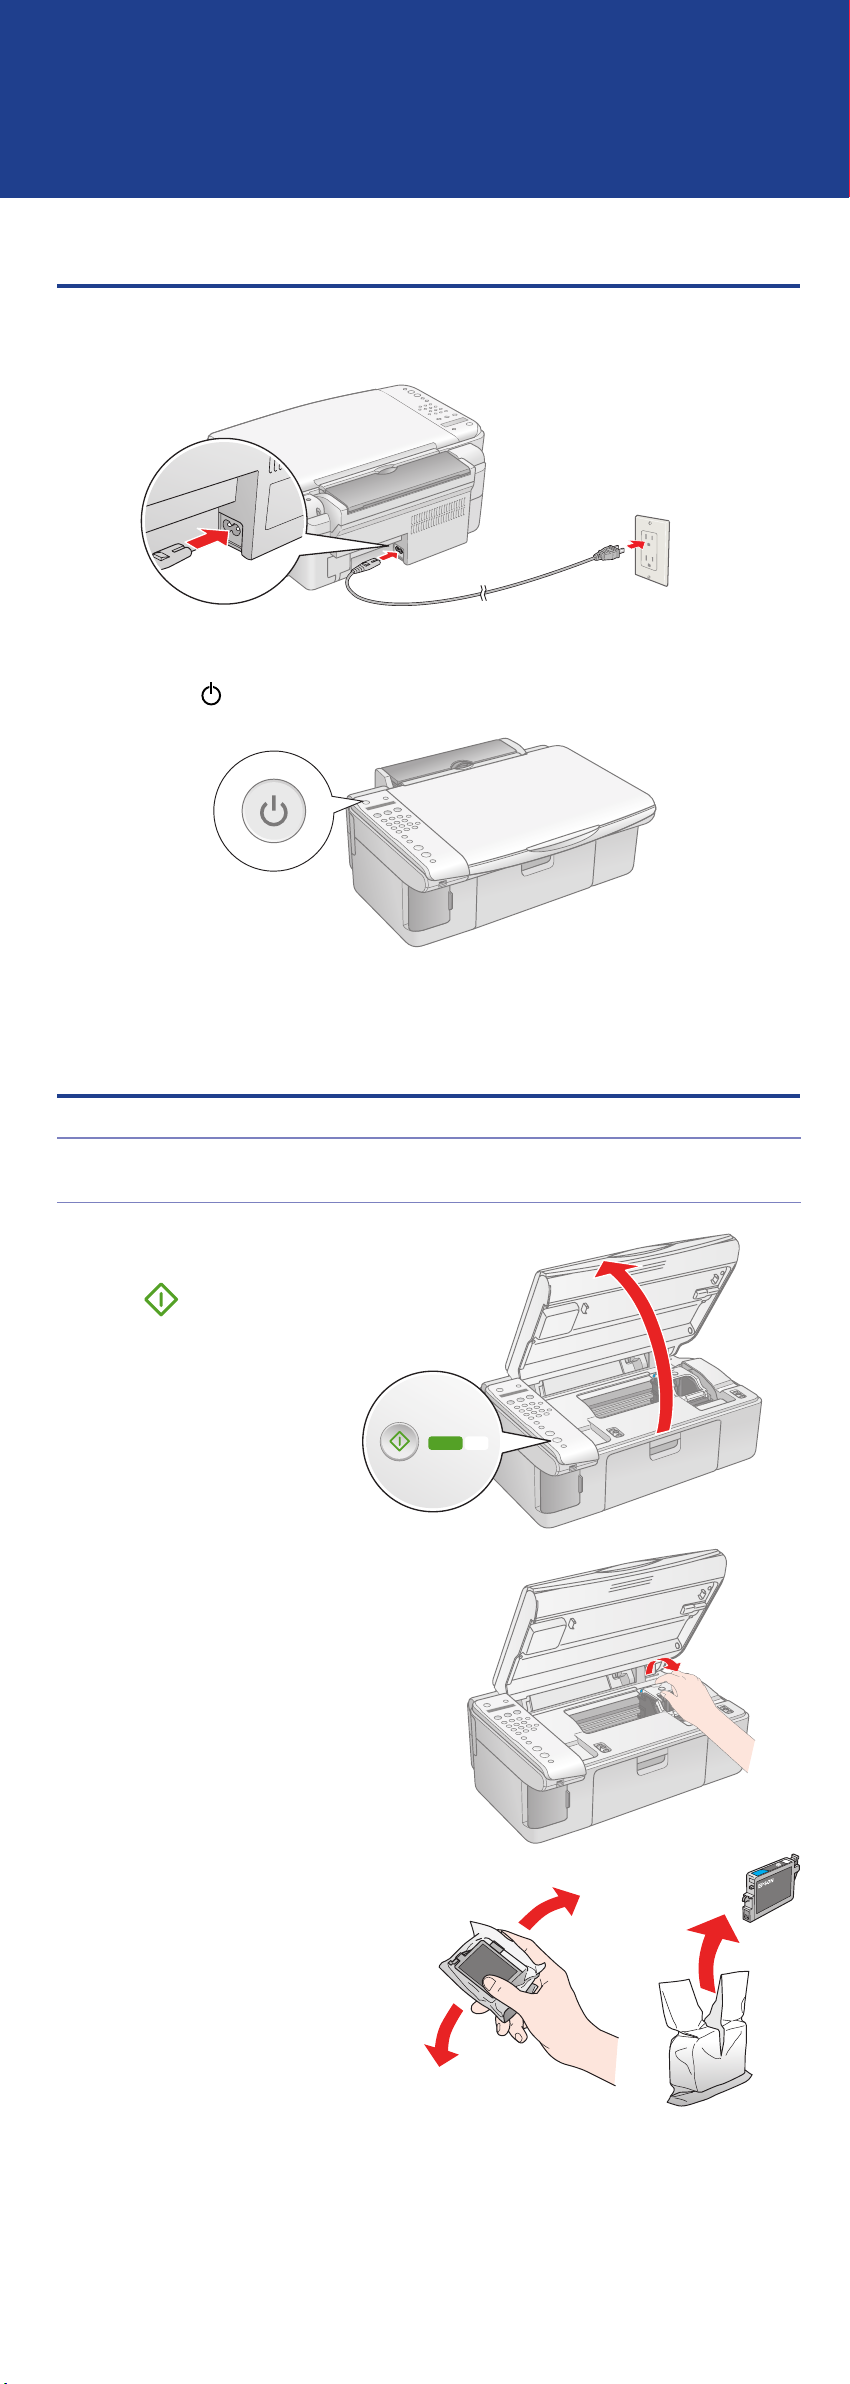
3 Tu r n O n t h e E p s o n S t y l u s C X 5 8 0 0 F
1 Connect the power cable.
2 Press the
On button.
4 Install Ink Car t r i d g e s
Note: Don’t load paper before installing the ink cartridges.
1 Lift up the scanner, then press
the OK button.
2 Open the ink cartridge cover.
3 Shake the ink cartridges, then
unpack them.
Page 3
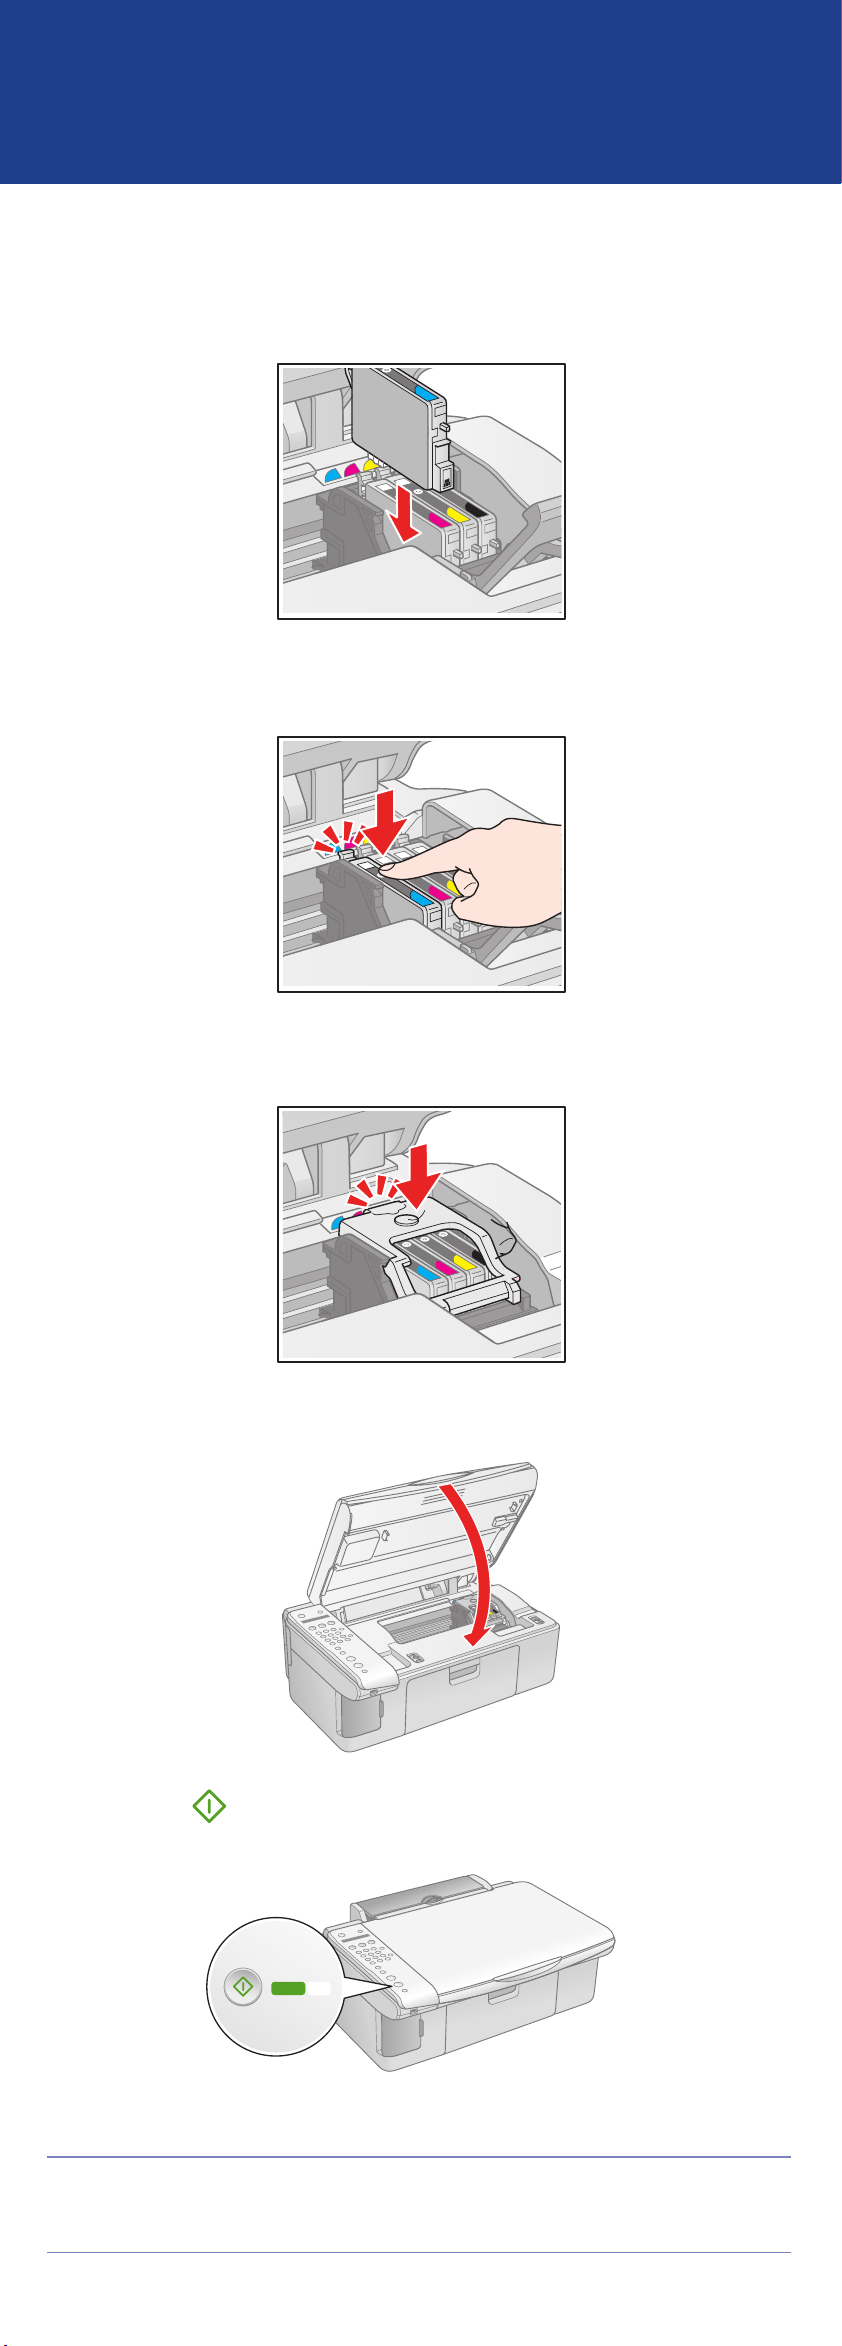
4 Insert the cartridges in the holder for each color.
Start
Color
OK
5 Press the cartridges down until they click.
6 Close the ink cartridge cover and press it down until it clicks.
7 Close the scanner.
8 Press the OK button to charge ink. Charging takes about
2 minutes.
Caution: Don’t turn off the Epson Stylus CX5800F while Charging
appears on the LCD screen or you’ll waste ink.
Page 4

5 Load Pa p e r
1 Open the paper support and pull up its extensions.
2 Open the output tray and pull out its extension.
3 Flip the feeder guard forward.
Paper support
Output tray
4 Slide the edge guide left.
5 Load paper against the right edge guide and slide the left edge
guide over.
Letter size 4 x 6-inch or 5 x 7-inch
6 Flip the feeder guard back.
Page 5

6 Install Sof t ware
Your software works with Windows® 98SE, Me, 2000,
and XP, and Macintosh® OS X 10.2.x to OS X 10.4.x.
Windows
Make sure the Epson Stylus CX5800F is
1
NOT CONNECTED to your computer.
Note: If you see a screen like this,
click Cancel and disconnect the
USB cable. You can’t install your
software that way.
2 Insert the Epson Stylus CX5800F CD.
3 Click Install and follow the
on-screen instructions. Software
installation takes several minutes.
4 When prompted, connect the USB cable. Use any open USB port on
your computer.
Note: If installation doesn’t continue after a moment, make sure you
securely connected and turned on the Epson Stylus CX5800F.
5 When you’re done, remove the CD and restart your computer.
You’re ready to copy, print, and scan! See the Basics Guide or your
on-screen User’s Guide.
To connect your Epson Stylus CX5800F to a phone line for faxing,
see “Connect Phone Line” to the right.
Page 6

Macintosh
Insert the Epson Stylus CX5800F CD.
1
2 Open the Epson CD-ROM desktop icon
and double-click the
Epson icon.
3 Click Install and follow the
on-screen instructions. Software
installation takes several minutes.
If necessary, close any open
windows on your screen to
return to the installer.
4 Connect the USB cable. Use any open USB port on your computer.
5 Remove the CD and restart your Macintosh.
6 Open the Applications > Utilities folder and select the Printer
Setup Utility (OS X 10.3.x to 10.4.x) or Print Center (OS X 10.2.x).
7 Click the Add button.
8 In OS X 10.4.x, select Stylus CX5800F.
In OS X 10.2.x to 10.3.x, select EPSON USB at the top and
Stylus CX5800F below.
Mac OS X 10.2.x to 10.3.x
Mac® OS X 10.4.x
9 Click Add.
10 Quit the Printer Setup Utility or Print Center.
You’re ready to copy, print, and scan! See the Basics Guide or your
on-screen User’s Guide.
To connect your Epson Stylus CX5800F to a phone line for faxing,
see the next section.
Page 7

7 Connect Phone Line
SB
EXT.
LINE
Cancel/Back
Setup
100%
Fit to Page
Auto Answer
Print From Index
Answer
Mode
Tone
Redial
/
Pause
Print All/DPOF
Fax Resolution
Print IndexSend
/
Rec. Fax
Fax Contrast
Plain Paper
Photo Paper
Letter5“x7”
4“x6”
On
Copy
Copy
Memory Card
Fax
Fax
12
ABC3DEF
4
GHI5JKL6MNO
7
PQRS8TUV9WXYZ
symb
0
Start
B&W
Start
Color
OK
If you are going to connect a dedicated phone line to the Epson Stylus
CX5800F for faxing, connect it as shown below.
If you want to connect a telephone or answering machine, see the Basics
Guide for instructions.
Connect the phone cable leading from your telephone wall jack to the
LINE port on the back of the Epson Stylus CX5800F.
Note: If you connected the Epson Stylus CX5800F to a DSL phone line,
you must install a DSL filter to the line or you won’t be able to fax. Contact
your DSL provider for the necessary filter.
Any Problems?
On light
Display
Start Color/OK button
If the green On light is flashing, just wait until it stops before pressing
any control panel buttons.
If you see a Paper out message on the display, reload paper and
press the OK button to continue.
If you see a No ink cartridge message on the display, an ink
cartridge may be installed incorrectly. Press the OK button, then
open the scanner and push down the cartridges and cartridge cover
all the way. See section 4 on the front of this sheet for instructions.
If you see a Paper jam message on the display, press the
button to eject the paper, then pull out the jammed sheets from
the sheet feeder or output tray. See the Basics Guide for details.
OK
See your Basics Guide and on-screen User’s Guide for more
problem-solving information.
Page 8

Any Questions?
Look here for answers:
Basics Guide
Basic steps for using the Epson Stylus CX5800F.
On-screen User’s Guide
Double-click the desktop shortcut for easy access to Epson Stylus
CX5800F information.
On-screen help with your software
Select Help or ? when you’re using your software.
Epson Technical Support
World Wide Web
http://support.epson.com
Automated Telephone Services
Call (800) 922-8911 with a touch tone telephone. Use Epson
SM
SoundAdvice
Speak to a Technical Support Representative
Call (562) 276-4382 (U.S.) or (905) 709-3839 (Canada), 6
Pacific Time, Monday through Friday. Toll or long distance charges
may apply.
Express Code 82710 for the Epson Stylus CX5800F.
AM to 6 PM,
Software Technical Support
ArcSoft PhotoImpression™
(510) 440-9901
Web: www.arcsoft.com
E-mail: support@arcsoft.com
Ne e d P a p e r a n d I n k ?
For the best prints, copies, and faxes, use genuine Epson ink and paper.
Get them from your local store or contact Epson for dealer referral.
T060120
Black
Premium Glossy Photo Paper
Heavyweight paper with a high gloss finish
for beautiful photographs in a variety of sizes,
with borders or borderless.
Other fine Epson papers are available.
See your Basics Guide for details.
T060220
Cyan
T060320
Magenta
T060420
Yellow
Epson and Epson Stylus are registered trademarks of Seiko Epson Corporation. DURABrite is a registered
trademark and SoundAdvice is a service mark of Epson America, Inc.
General Notice: Other product names used herein are for identification purposes only and may be trademarks
of their respective owners. Epson disclaims any and all rights in those marks.
© 2005 Epson America, Inc. 9/05
CPD-20212R1
Printed in XXXXXX XX.XX-XX XXX
 Loading...