

Page 1

-
Macintosh & Macintosh Power PC
-
--
_
Version
for
3.1
EPSON Stylus Color
EPSON
Stylus Pro
EPSON Stylus Pro XL
INSTALLATION &
OPERATION
MANUAL
Page 2

PowerRIP
The Software Program That
Into a
True
Adobe PostScr@C Level 2
Turns
6icllm-
Adobe PostScript
EPSON Stylus
lmager
Page 3

0
1995 Birmy
Graphics Corporation. All Bights Reserved.
Information contained in this document is subject to change without notice and does not represent a
Birmy
commitment on the part of
Graphics Corporation. The software described in this document is
furnished under the dealer agreement or nondisclosure agreement. The software may be used or copied
only in accordance with the terms of the agreement. II is against the law to copy the software on any
medium except as specifically allowed in the license or nondisclosure agreement. No part of this manual
may be reproduced or transmitted in any form or by any means, electronic or mechanical, including
photocopying and recording, for any purpose without the express written permission of
Birmy
Graphics.
PowerRIP is a registered trademark of
Adobe and PostScript are trademarks of Adobe Systems Incorporated which may be registered in
Birmy
Graphics Corporation.
certair
jurisdktions.
EPSON and EPSON Stylus are registered trademarks of Seiko Epson Corporation.
PANTONP
and PANTONE
CALIBRATEDTM
are trademarks of Pantone,
Inc
Suitcase is a registered trademark of Fifth Generations Systems, Inc.
All other trademarks are the property of their respective companies.
This program was
no warranties whatsoever, either express or implied, regarding
respect to its merchantability or its
to Apple Computer, Inc. and is licensed to
combination with the
wrftten
with
MacApp% 19851Q88
PowerRfP applicatiin
Apple Computer, Inc. Apple Computer, Inc. makes
this
product, including warranties with
Rtness
for any particular purpose. The
Bimry
Graphics Corporation for distribution only for use in
and the PowerRIP Upgrade Utility.
MacApp
software is proprietary
Printed in the U.S.A.
Part number:
851-9002 (7193
Page 4

TABLE OF CONTENTS
Chapter 1 Introduction & Installation
Operational Overview
PANTONEa
Optional Features
Installation Requirements
Registering PowerRIP
Quick Start (Stand-Alone & Server Mats)
Quick Start (Networked Mats)
Application Menus....................
Print Menu Options
Print Menu Options Definitions
Step-by-Step PowerRIP Installation
ColorSync™
Color Support
2.0
..................
.............
.....................
...............
..................
...........
...................
..........
........
Installation
.............
...
1
1
2
2
3
3
5
6
7
9
10
13
Chapter 2
Getting Started
Launching PowerRIP..................
Creating a PowerRIP Printer
Choosing a
PowerRIP Controls
Chapter 3 Menu Command Reference
PPDD
......................
...................
Apple Menu.........................
File Menu
..........................
Edit Menu..........................
Printer Menu........................
Print Job Menu
.......................
Help Menu..........................
Chapter 4
Appendix
Glossary
Troubleshooting . . . . . . . . . . . . . . . . . . . . . . 31
Epson Stylus Printer Setup Dialog . . . . . . . . 35
List of Terms . . . . . . . . . . . . . . . . . . . . . . . .
.............
15
16
18
20
25
25
25
28
29
30
37
Birmy
Graphics Corporation
. . .
iii
Page 5

Birmy
For technical assistance with the installation, configuration and operation of the
Birmy
of operation are 9am-8pm EST
Please do not call the Birmy Fulfillment Center for technical information. There
are no support personnel at that location; the phone number is for PowerRIP
registration only.
Please refer to Troubleshooting, Chapter 4, before calling Customer Support.
When calling for technical assistance, be ready to identify your system and its configuration, the serial number of your copy of PowerRIP, and a description of the
problems you are encountering. It is highly recommended that you enable the Log
Messages option when creating a PowerRIP printer. The entries in the log will help
our support staff to identify PostScript error messages.
Birmy
Graphics Technical Support
PowerRIP, please call
Graphics Corporation
Birmy
Customer Support
Voice
FAX
Email
(407)
Support@birmy.com
(407)
(407)
723-2893
768-9669
723-2893. The hours
Mailing address
iv
Birmy
Birmy Graphics Corporation
250 East Drive, Suite H
Melbourne, FL 32904
Graphics Corporation
Page 6

INTRODUCTION &
The
Birmy
PowerRIP” application is a software raster image
processor (RIP) for the Macintosh computer. PowerRIP reads and
interprets
devices. Features include interpretation by the Adobe Configurable
Interpreter (CPSI), print job spooling, support for multiple printers and multiple
users, printer selection using the Chooser desk accessory, and job logging and saving. PANTONE’ Calibrated support files are also included. Optional features
include Open
Adobe™
PrePress
Level 2
PostScript™
Interface (OPI) substitution and spoken error messages.
INSTALLATION
and prints color raster images on imaging
PostScript™
Operational Overview
PowerRIP works on a stand-alone Macintosh or a non-dedicated or dedicated
Macintosh PowerRIP server if more than one Macintosh is to access PowerRIp
The imaging device is connected to the PowerRIP server, and at least one PowerRIP
printer is defined for the imaging device. The PowerRIP server is the Macintosh
running the PowerRIP application.
To print to an EPSON Stylus managed by PowerRIP, you must first launch
RIP and create and open at least one PowerRIP printer.
Once opened, the PowerRIP printer appears as a PSPrinter in the Chooser dialog
displayed on a PowerRIP client. A PowerRIP client can be any Macintosh
networked to the PowerRIP server. You may select any PowerRIP printer in the
Chooser list as the current printer. You can then print to the PowerRIP printer
normally, simply by selecting the Print command in your application.
Ah PowerRIP printers are closed when PowerRIP quits. You must open the
RIP printer that you want after you start the PowerRIP application.
Printing from a PowerRIP server requires that you add a job file to the appropriate
printer file. You can create a new job file by choosing the File destination option in
the LaserWriter Print dialog and selecting the destination folder to be the jobs
folder. Alternately, you can copy a previously saved job file to the jobs folder using
the Finder. Never print directly to a PowerRIP printer from a PowerRIP server.
Power-
Power-
PANTONE@ Color Support
PANTONE palette files are included in your PowerRIP package. These files can be
read directly into PANTONE-licensed applications so the user will have calibrated
versions of Pantone colors. User instructions are included on the PANTONE disk.
ColorSync™
Disk 5 of the installer disks contains the ICC profiles required by ColorSync 2.0.
Use these profiles in applications that support ColorSynch
2.0
Support
Birmy
2.0.
See page
13.
Graphics Corporation
1
Page 7

PowerRIP Manual
Optional Features
PowerRIP can be configured to speak critical messages using the optional
Speech Recognition feature available from
Apple™
Computer, Inc.
Installation Requirements
PowerRIP will run on any Macintosh computer with the following configuration:
l Macintosh Centris, Quadra, or
PowerMac.
For the Centris and Quadra,
an FPU (Floating Point Unit) is strongly recommended.
l
12
inch diagonal monitor or larger (“Classic” monitor not supported).
l Atleast
12MB of RAM (7.5MB f
Por
owerRIP, 4.5
MB for system, fonts, etc.).
For optimal performance, at least 16 MB of RAM is highly recommended. Also,
any memory requirements for optional software, e.g.,
OPI
server, must be added
to this total.
See page
l
At
least 80 MB of disk space (6-7 MB required for installation). As the maxi-
29
for suggestions on increasing your available memory (RAM).
mum number of files in the jobs folders increases, this disk space requirement
increases. Furthermore, when “Faster Copies” is selected, rendered images will be
spooled
l System
Any Macintosh computer with the following minimum configuration can be a
PowerRIP client:
l System 6.5 or later (System
l AppleTalk or Ethertalk network connection with the PowerRIP server.
to
disk, requiring even more disk space.
7.0
or later (System
7.1
or later recommended).
7.1
or later recommended).
l 8 MB of RAM to install PowerRIP Client software.
Note: If you have less than 8 MB of RAM you will have to manually insert the
necessary files into the System Folder of this client Macintosh. First install
PowerRIP on your server Macintosh. Then go into the server’s System Folder, the
Extensions subfolder, and copy the Chooser Extension PSPrinter onto a diskette or
directly, via your network, to the same location on the client Macintosh. You will
also need to copy the PPDs (PostScript Printer Descriptions) which are located in
the Printer Descriptions folder of the Extensions subfolder. The PPDs are named:
Stylus Color (with
Stylus Pro.PPD, Stylus Pro XL (with
necessary to copy the PPDs for the EPSON Stylus you are going
Quark).PPD,
Stylus Color.PPD, Stylus Pro (with
Quark).PPD,
Stylus Pro XL.PPD. It is only
to
use. Put the
Quark).PPD,
appropriate PPDs into the Printer Descriptions folder of the Extensions subfolder
on the client Macintosh.
2
Birmy Graphics Corporation
Page 8

In
troductions/Ins
talla
Registering PowerRIP
PowerRIP must be registered before using. To register your copy of PowerRIP:
1.
Insert the diskette labeled Key Disk.
2.
Double click on the
BirmyRegister
ettmy fkgstmon
Saris1
Number:
Prtnter
Code:
icon and the following menu will appear.
Your Serial Number
Your Printer Code
tion
Fulfltlmant
Response:
-J
piGi--
3.
Call the
days a week). You will be asked for your Serial Number, Printer Code, and
the model of your Stylus. (Stylus Color, Stylus Pro, or Stylus Pro XL.)
4.
The Fulfillment Center will give you the required response number. Type that
number in the Fulfillment Response box on the
Before clicking on Register, record the number for future use. Fulfillment
Response:---_-----.
Quick Start
Make backup copies of all installation disks
Connecting Stylus To Your Mac
Install your Stylus per the manufacturer’s instructions. Your EPSON Stylus should
be plugged into the printer port if you have a stand-alone Macintosh. You will have
to disable LocalTalk in this case. To disable LocalTalk, go to the Network Control
Panel and select Remote Only.
Birmy
Fulfillment Center at 800-613-3031
(24
Birmy
hours a day, seven
Registration menu.
(for stand-alone or server Macintosh computers)
Via Serial
Port
If you have multiple Mats that are on an AppleTalk network, your EPSON Stylus
must be plugged into the modem port. If you are using modem software, it must be
disabled.
Connecting Stylus To Your Mac Via EPSON’s Optional
Interface Card
Follow the instructions in the EPSON User’s Guide for installation, networking
and naming your printer.
Birmy
Graphics Corporation
AppleTalk/Ethertalk
3
Page 9

PowerRIP Manual
Install PowerRIP
1.
If you have an anti-virus utility, temporarily disable it. You do this by holding
down the Shift key while you restart your Macintosh.
2.
Insert Disk 1 and double click on the PowerRIP installer.
3.
Click on Continue.
4.
Click on Install for default installation.
5.
Click on InstaIl to install in the PowerRIP
6.
Follow the screen prompts for inserting Disk 2 through Disk 4, and then
Disk 1 again. You will get the following message.
3.1
folder on your hard disk.
lnrtallatlon
you
further
7.
Click on Quit, eject Disk 1, and reboot your Macintosh.
Note: If your EPSON Stylus is connected to the serial port and you are run-
was successful. Choose Cult if
ere flnlshed nr Ccdlnue
lnstallatlonr.
to perform
ning System 7.5.1, or earlier, it is suggested that you update your serial driver.
See page
Launching PowerRIP
1.
Open the PowerRIP
PowerRIP icon to launch the application and open the PowerRIP Control
12, item
10
for details.
3.1 foIder
on your hard drive and double click on the
Panel.
2.
Under File, select a New Printer and select the model of your EPSON Stylus
printer. If you have installed EPSON’S optional
select the model designated (AppleTalk). See the screen examples
AppleTalk/Ethertalk
on pages 35
and 36 for sample Stylus Setup and naming printer queue folders.
card,
3.
To select the proper PPD (PostScript Printer Description), open the Chooser
&)
(under
and click on the PSPrinter icon. The printer you named (printer
queue) will be displayed in the right column. Highlight the printer name and
make AppleTalk
Setup...,then on More Choices. Do not click on Auto Setup. On next menu
Active (button on bottom of Chooser window). Click on
click on Select PPD. Scroll down, if necessary, to PPDs for Stylus printers
(Stylus
sponds to your Stylus and click on
Color.PPD
through Stylus
Pro.PPD
Select, then click OK on the next menu.
Highlight the one that corre-
Close the Chooser by clicking on the upper left box.
4
Birmy
Graphics Corporation
Page 10

In
troduction/lnstalla
Using PowerRIP With Your Desktop Applications
1.
If your Mac has sufficient RAM, you may keep PowerRIP open in the back-
ground while you work in other applications. If you don’t have enough RAM
(your Mac will tell you so), you must quit
2.
When setting up your documents, be sure to consider the printable area of
your Epson Stylus. Minimum margins can be viewed in Page Setup menus.
3.
You cannot print directly to PowerRIP unless you have multiple networked
Mats. Instead you must create a PostScript file (save to disk), an option available in all PostScript applications. PostScript files should be saved to the
printer queue folder you created inside the PowerRIP
the PostScript file to some other destination, you can drag and drop it into
the proper printer queue folder. Don’t save jobs to the Printed Jobs folder
inside the printer queue; jobs reside there after they have printed.
4.
When you print a job and PowerRIP is open in the background, your job will
start processing as soon as it gets to the printer queue. If you had to quit
PowerRIP because of low memory, use the following instructions: After the
PostScript file has been sent to the printer queue, quit the application, launch
PowerRIP, and open the printer you previously created (under
select
Open Printer-open the printer queue folder and double click on the
printer icon). Your job will process and print after the printer starts your job.
PowerRIP.
3.1
folder. If you saved
File at top
tion
Quick Start
Installing PowerRIP on Client Macintosh Computers
Any networked Macintosh can be used as a client. See note on page 2 if you
have less than 8 MB of RAM.
1.
Insert Disk 1 and double click on installer icon.
2.
Click on Continue.
3.
Click on Custom, then highlight PowerRIP
4.
Follow the prompts to insert Disk 2 through Disk 4, and then Disk 1 again.
When the installation is complete, click OK and eject Disk
Printing To PowerRIP Server From Client Mats
A Client is any Macintosh connected to the Server Macintosh via AppleTalk or
Ethertalk. When the PowerRIP Control Panel and a printer are open on a server
Mac, you will see the name of your printer in the Chooser of a client Mac. Select
the proper PPD as in previous instructions and print directly to the printer; there is
no need to create a PostScript file.
(for networked Mats)
Bit-my Graphics Corporation
3.1
Client and click on Install.
1.
5
Page 11

PowerRIP Manual
Application Menus
QuarkXPress®
Page Setup for “Epson Stylus” Print Queue
(stand-alone and server Mac)
Quark Page Setup.. .
Click here to view
Printer Type
Select the proper
Halftone screen
Leave it however it comes up
You may have color options in
in your Quark setup (Click none)
margins
PPD
(does not apply]
-
Quark Page Setup Options
Click on Options in above menu
De-select Substitute Fonts
to download fonts with file
Click on OK
Quark Print Menu
Destination
Select File
Click on Options
.O Subrtltute
Optlaw: q cdlbntrd
Fonts
output q Prm
colors II* crap
6
Bitmy Graphics Corporation
Page 12

In
troductionhs
talla
tion
Print Menu (Options)
Most Applications
Me: To get this menu in
PageMaker 5 hold down the
Opt/on key before pulling
down F//e and selecting
Print.
Optimum settings for
360 dpi
output on
coated paper are shown
See page 9 for explanation
of options in this menu
Click on OK then on Save
CreatingPostScript
Navigate to Printer Queue
(See page 4, launching
PowerRlP,
item 2)
File (MostApplications)
Priniec
c0Pl.f:~
PfhlS Ogllont
Couer
“Epson
Page: 8 None
Callbreled
Prlnl:l
PostScript”’
Slylur”
Pages: 0 fill
OEefore
Colorl6royrcele ‘I
trrorr:
No Special
_..
ORfler Ocmumenl
Rspcwting 7
.
. .
.._.
_ ..__
_ _ _ __
~CMSlhdOnk
(
Note:
Scroll down
to select all
options
. _
Name of job t
.ps
(Use alphanumeric characters,
i.e.
abc123
and period)
Format: PostScript Job
Select
Binary
and Level 2 Only
Select All
1
-
-W
0 RSCII
@ BIWJQJ Q LoVeI 2 Only
Font lncluslon:~
t
0
Lwel
I
Compatlbla
Click on Save
The PostScript file will be written to the Printer Queue. If PowerRIP is open in the
background, the job will start to process and print. If PowerRIP is not open, double
click on the PowerRIP icon in the PowerRIP
3.1
folder. When the PowerRIP Con-
trol Panel opens, select File... Open Printer and navigate to the Printer Queue
folder (in this example, Epson Stylus). Double click on Epson Stylus; the job is
processed and then the printer begins printing your file.
Birmy
Graphics Corporation
7
Page 13

PowerRIP Manual
Adobe PageMaker 6
Print Document
Menu
Click on
display the printing options
for the EPSON Stylus
PageMaker 6
Print Features Menu
After selecting the desired
printing features, click on
Options
Options Menu
Features to
to get the Print
Prlhter: Epson Stylus
Stylus Pro
copies: m
0
Yrint all pUbltcatlnnP tn hook
0
Urn payer settings at anch
Color Calibration:
Printer’s
Scrsenlng:
Prlnter’r aclault
IILPPD
default
pltblwtion
Print Options Menu
PageMaker 6
Sample menu for setting
up a PostScript file
Click on Save as...
RsroluIlon:
Prlntsr’r default
TFklhnlpn
Send Image data: [Normall
Data
encodlng:
PortOnbt
ooumload rontr: PostScript
pII
Ilra symbol Font
0
Include PostScrIpt
q
wrrIe P0CtsCriptt0
Send
blnay
For
tpeclal charactert
wror
handler
me:
Image data
sncl TrueType
lJObNarne.pr s00e 01..
(Itylc...)
[tancel)
(locumenl]
[Paper)
8
Birmy
Graphics Corporation
Page 14
Introduction/installation
Write PostScript to file
PageMaker 6
Navigate to Printer Queue
(See page
PowerRIP,
Click on OK to write PostScript
to the Printer Queue
The PostScript file will be written to the Printer Queue. If PowerRIP is open in the
background, the job will start to process and print. If PowerRIP is not open, double
click on the PowerRIP icon in the PowerRIP
trol Panel opens, select
folder (in this example, Epson Stylus). Double click on
processed and then the printer begins printing your file.
4,
Launching
item 2)
File...
Write PostScript to file
[Cancel)
.._-.. ..---..............
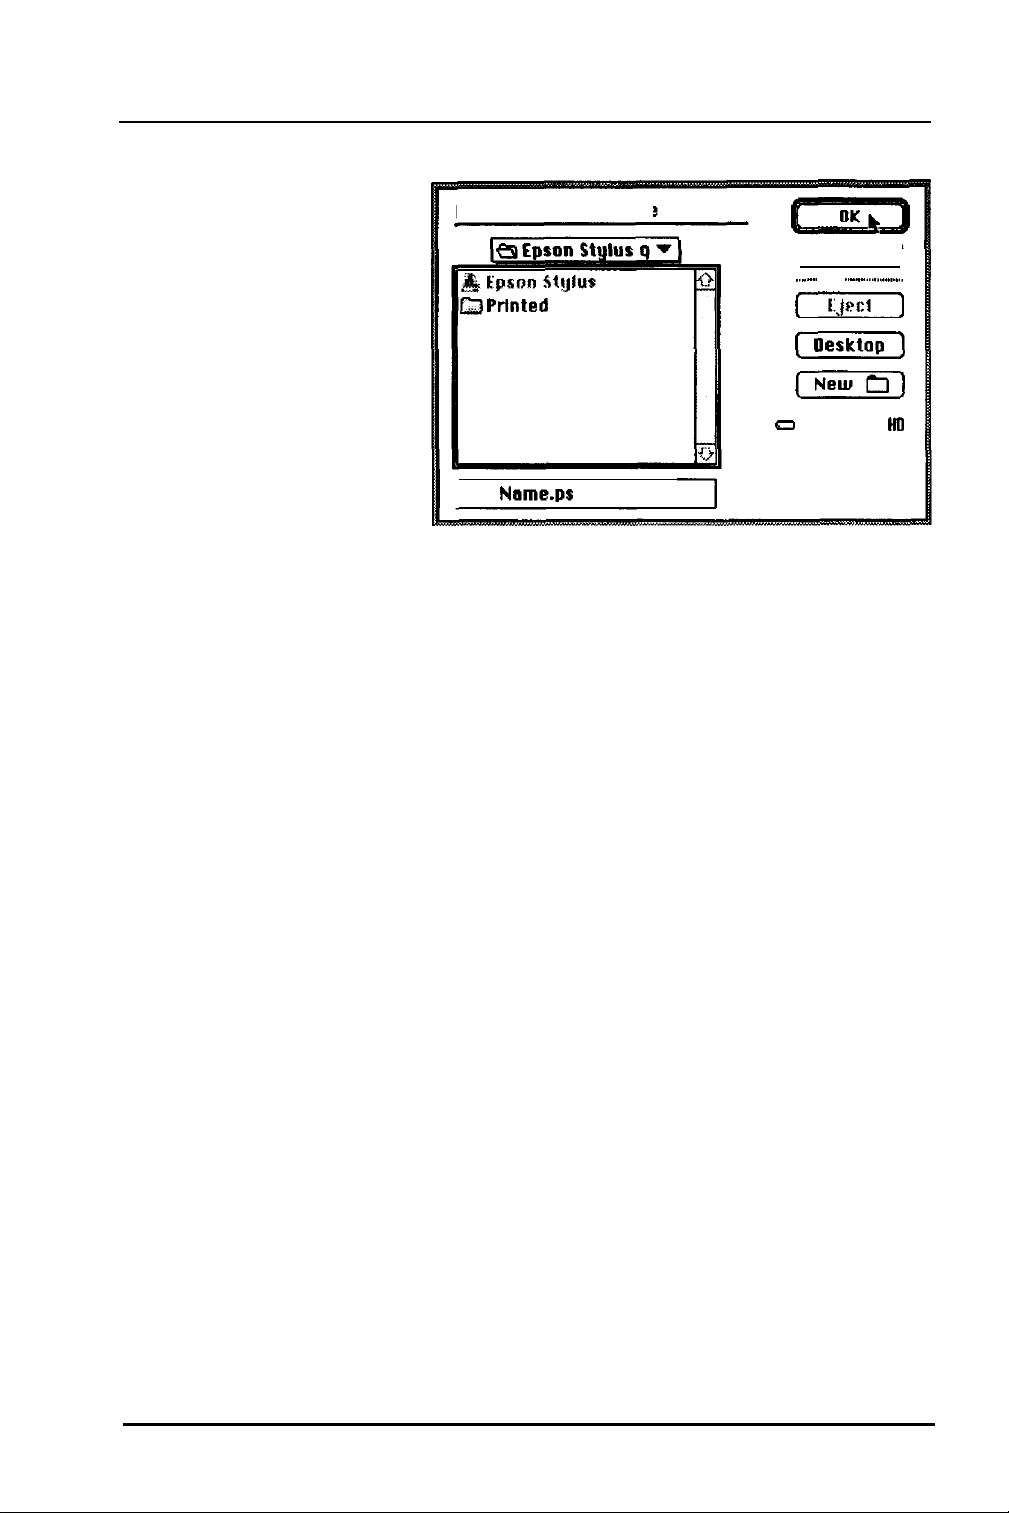
Prlnted
Files
Job
Name.ps
3.1
folder. When the PowerRIP Con-
Open Printer and navigate to the Printer Queue
Epson Stylus; the job is
(----Q&T]
(Oesttop)
[Neur)
CI
Macintosh
HLI
Print Menu Options Definitions
Selectable items having special meaning in the Print Options menu are listed below:
Print
Resolution
Paper Type
Black and White (Monochrome), Color/Grayscale,
Calibrated Color/Grayscale.
Printer’s Default
(360
dpi), 180
dpi, 360 dpi, 720 dpi.
Resolution is a measure of the amount of detail that can be
represented. Resolution of printed images is measured in
the number of dots per inch
(dpi).
The higher the number,
the finer the resolution. Lower resolutions print faster.
Printer’s Default (Coated Paper), Plain Paper, Coated
Paper, Glossy Paper, Transparency.
Select the paper you are printing on. PowerRIP has Color
Rendering Dictionaries to produce the maximum image
quality for the individual Epson Special Paper stocks.
Birmy
Graphics Corporation
9
Page 15

PowerRiP
Manual
Screening
Color Calibration
MicroWeave
High Speed Mode
Printer’s Default (Stochastic Always), Stochastic Always,
Application’s Default.
Stochastic Screening is a random dot pattern as opposed to
a fixed screen ruling. Stochastic Screen produces more
tones and has better detail than fixed screen rulings.
Printer’s Default (PowerRIP Defined), PowerRIP
Defined, Application Defined.
Calibrated
of Red, Green and Blue combinations, commonly used in
the computer industry, to a specific standard; CIE based
ABC. Application Defined utilizes optional third party
color calibration software.
Printer’s Default (On), On, Off.
MicroWeave is a printing method in which images are
printed in finer increments to reduce the possibility of
banding (white lines) and produce laser-like images.
Printer’s Default (OK), On, Off.
When High-Speed Mode is on, the printer prints in bi-
directional mode: it prints a line from right to left and on
the next line left to right. High-Speed mode is faster but
print quality is decreased when it is turned on.
RGB
references the I6 million possible shades
Step-by-Step PowerRIP Installation
Before installing PowerRIP, you should make backup copies of all the installation
disks. There is no copy protection on the disks, so you may copy them using the
Finder or any of several available utilities.
If your system does not meet the minimum hardware and software requirements
previously listed, the program will not be installed successfully.
To install PowerRIP server, stand-alone or PowerRIP client, do the following:
1.
Turn off all extensions by holding down the shift key while rebooting
your Macintosh.
2.
3.
10
Insert the floppy disk labeled PowerRIP
Double click on the PowerRIP installer icon. The PowerRIP installer
starts, and the PowerRIP screen is displayed.
Birmy
Graphics Corporation
InstaIler
Disk
1.
Page 16

Introduction/Installation
4.
Click on Continue. The main installation window is displayed.
To do a default installation on a PowerRIP server or a stand-alone
5.
7.
Macintosh, click on the Install button and go to step
The default
installation will copy all files necessary to run Power-RIP as well as the
PSPrinter PostScript printer driver, and PostScript Printer Descriptions
(PPDs) for Epson supported PowerRIP devices.
To install fewer files than the default. click on the Custom button.
PowerRIP
3.1
Click on Install to install euerything you
need to run Pourer-RIP
3.1
on this
Macintosh.
Click on Custom to instell support files
on a Macintosh client node.
. . . . . . . . I.. . . . . . . .. .._.................................................................... ” ..,....,.,,.....,..,..
“...... .. . . . . . . . .
installation requires:
. . . .
,.-
. . .
. . . . .
. . . . . . . .
9383K
Birmy
Graphics Corporation
11
Page 17

PowerRIP
6.
Manual
The custom installation window is now displayed with all installation
options listed.
lighted.
PowerRIP 3.1, the default installation option, is high-
you select the Minimum PowerRIP
If
3.1
Server option, only those
files necessary to run PowerRIP will be installed. PowerRIP client files
to support printing from the PowerRIP server will not be copied.
In this case, you may also
select/unselect
additional options by holding
down the Command key and clicking on the name of the option.
If you are installing the program on a PowerRIP client, you should
choose only
the PowerRIP
3.1
dent option to install the PSPrinter
PostScript printer driver and PostScript Printer Descriptions (PPDs) for
Epson imaging devices supported by PowerRIP
When you have selected all appropriate options, click on Install.
7.
A standard Save File dialog is now displayed requesting a name and
location of a folder in which you would like folders and files to be
installed. The default folder name is PowerRIP
3.1.
Note that some
folders and files are not copied to the specified folder but rather to the
System Folder.
If you have selected the PowerRIP
3.1
client option, this dialog is
skipped, since all files are copied to the System Folder.
8.
Insert the other diskettes as requested by the installation program.
9.
When the installation is complete, click on Quit or Continue. If your
EPSON Stylus is plugged into the serial port, and your Macintosh is
running System
7.5.1
serial driver.
10.
If PowerRIP installation is being performed on a:
a.
Macintosh 68040 other than an AV model, Power Macintosh
500
series, or Power Macintosh
click on Quit, eject Disk 1, and reboot your Macintosh.
b.
Power Macintosh
84OAV,
all running System
the next menu click
click on
Install. This places an updated serial driver, from Apple
Computer, Inc., into the Extensions Folder. Follow the screen
prompts for inserting
again. You will get a message saying installation was successful.
Click on OK, eject Disk 1, and reboot your Macintosh.
12
Birmy
or earlier, it is suggested that you update your
100
series running System
100
series,
on Custom. Highlight
Disk 2 through Disk
CentrislQuadra 66OAV,
7.5.1
or less; click on Continue. On
SeriaIDMA,
4,
and then Disk 1
7.5.2;
or Quadra
then
Graphics Corporation
Page 18

Introduction/Installation
For a default or PowerRIP
3.1
client installation, the PSPrinter driver is copied to
the System Extensions folder, and the PostScript Printer Description (PPD) files are
copied to the Printer Descriptions subfolder of the System Extensions folder.
PSPrinter is a PostScript level 2 driver; it can be used in place of a LaserWriter
8.0
driver version
should first
or later. When printing to PowerRIP with a level 2 driver, you
use the Chooser to select the PPD file matching the supported
PowerRIP EPSON imaging device.
ColorSync™
5
of the PowerRIP installation package contains the ICC profiles required by
Disk
ColorSync
2.0
2.0.
These profiles Should be placed in the Preferences sub-folder inside
the System Folder. The profiles represent the Stylus Pro and Stylus Pro XL printers
at 360
dpi
on EPSON coated stock, 720
dpi
on EPSON coated stock, and
720 dpi
on EPSON high gloss stock.
When using these profiles with applications that support ColorSync 2.0,
choose the
Print Menu option ‘Application Defined” under Color Calibration. This gives the
application the ability to convert
based ABC. ColorSync 2.0 and the ICC profiles are designed to work with
colors and not CMYK colors. Files saved as CMYK colors as not affected by
RGB
colors to a calibrated standard such as CIE
RGB
Color-
Sync 2.0 and PowerRIP defined color calibration.
Note: PowerRIP must be registered before using. If you have not yet registered, see
Registering PowerRIP on page
3.
Do not insert the Key Disk when installing
software on a PowerRIP client; registration is not necessary.
Birmy
Graphics Corporation
13
Page 19

PowerRIP Manual
The following files and folders are copied to the PowerRIP
Step 7 on page
PowerRIP This is the PowerRIP application file. Open or double-click on
12:
3.1
folder selected in
this file to launch PowerRIP
PostScript.VM
fonts
This file is required by the interpreter.
This folder contains a minimum set of PostScript fonts. It also
contains a number of files with the extension
‘.upr’.
These files
point to all PostScript fonts in this folder, the System Folder, and
any selected extra font folder.
Important Note: If you move or rename the PowerRIP folder
Prep Files f
Resource
or the System Folder, you should remove
restarting PowerRIP.
This empty folder is required by the interpreter.
This folder contains special resources required by PowerRIP The
all ‘.upr’
files before
ColorRendering subfolder contains color rendering dictionaries,
ProcSet
the
the
Resource.upr
subfolder contains special PostScript procedures, and
file contains pointers to all PostScript resources
used by PowerRIP You should never modify the contents of this
folder
Startup f
This folder contains PostScript startup files for EPSON imaging
devices supported by PowerRIp You should never modify the
contents of this folder except under the following
circumstance.
If your application or printer driver does not produce PostScript
Level 2 color operators, you may still use
editing the startup file corresponding to the imaging device and
remove the leading % from the line
Operators get
tors to be mapped to Level 2 color operators; however, with some
applications, incorrect output may be produced.
tmp
This folder contains some files and folders required by the interpreter. It is also used for temporary scratch files.
14
Birmy
expert mode
CIEBasedABC
%
dup BGRedefineColor-
exec.
This change will cause Level 1 color opera-
Graphics Corporation
color by
Page 20

Launching PowerRIP
This section describes how to run PowerRIP, create PowerRIP printers, print to the
created PowerRIP printers, and reprint the last job. The PowerRIP Control Panel
Window, the Printer Setup Dialog, and the PowerRIP Completed Jobs Window are
described in detail.
Before launching PowerRIP, connect your EPSON Stylus to the PowerRIP server
(the Macintosh you have installed the PowerRIP application on). If you have a Mac
network, connect the Stylus to the
a stand-alone
in the
Network Control Panel. Make sure that the printer is powered on.
If you haven’t registered your copy of PowerRIP you will not be able to launch the
application. See Registering PowerRIP on page
Mac, connect the Stylus to the Printer port and choose Remote Only
Printer port or Ethernet connection. If you have
3.
To launch PowerRIP for the first time, open the PowerRIP
on your hard drive and double click on the PowerRIP icon.
The application will launch and the PowerRIP-Control Panel window
will be displayed. This window is always open while PowerRIP is running.
3.1
folder
P
Birmy Graphics Corporation
15
Page 21

PowerRIP Manual
Creating A PowerRIP Printer
After launching PowerRIP for the first time, you must create a PowerRIP printer.
Follow these steps:
1.
Click on File at the top of the screen.
2.
Hold down mouse button and select New Printer menu command. You will
see a listing of EPSON printers supported by this version of PowerRIP For
this example we will
use the Stylus Pro.. .
lar EPSON printer from this menu.
Printer Setup dialog for the printer you choose is displayed. All EPSON
A
Printer Setup dialogs have the same elements. A sample Printer Setup dialog
for the EPSON Stylus Pro is shown below.
Serial Port
Sample tatup
Customize
according to
your needs
See
page 22
for definition
al options
3
Purge printed jobs after
3 Ltmtt
post-print queue to
] OPI Image Substitutions
]
Faster Copies
1
D
but you should select your particu-
41
hours
lobs
0
Black Background
q
callala
v
CoplFs
AppleTalk/
Ethertalk
Sample setup
Printer Name
Use the EPSON
Namer to name
your printer and
type that exact
name here.
1
If the Printer
Name does not
agree, PowerRIP
will not find the
networked printer.
( Cancel
$J
Purge printed jobs after
g
Ltmtt post-print queue to
]
OPI Image
]
Faster Copies
Printer
Neme:
]
Substltutlons
lStulus Pro
[ Cancel ]
41
1
D
q
p c~~1Is:e
hours
Jobe
Black
Background
C3318i
-Select port
~1
I
16
Birmy
Graphics Corporation
Page 22

Getting Started
3.
Select the options desired for your printer and then click OK The next menu
will ask you to name the printer queue. In this example it was named Epson
Stylus.
.
-
Save to
(a
PowerRIP
3.1 7 1
cx
CM Hard Disk
f
fliert
I
Prlntar nama
4.
Enter the name for your printer and then click Save. The PowerRIP Control
Panel will display the Epson Stylus.
::::::::l:i::,::i: . . . . . . . . . . . . . . . . . . . . . . . . . . . . . .
Idle
. . . . . . . ...”
..,..,..,..,..,.
PowerRIP
/....
ControlPanel
-
~
PhltO~
quaua
displayad
l
= printing;
l
= cancrling; H = Held; h = printer held
( Hold Printer ] ( Hold Job ]
merragcr
7/13/95 9:12:44
71131% 9:12:59
7/13&S
9:13:21 PM Epson Stylus: Started
prlntcrr
L
H =
Held;
S = Start-; C = Closing
IN bg mcrrlgcr
Recording messages *I existing log file “Message Lop”
PM
Printer: printer parameters changed
PM
@oubk
click printer to set it up)
Birmy
Graphics Corporation 17
(Option-drag job to change priority)
[ Cancel Job
]
pt-print
rctrrn
mrx
B
c?
J3
Page 23

PowerRIP Manual
Choosing a
PPD
Follow these steps to choose a PPD (PostScript Printer Description):
1.
Open the Chooser under the Apple symbol at the top of the screen to select
the
PPD
for your particular printer. The PowerRIP Control Panel and a
printer must be open in order to see the device in the Chooser.
2.
Click on the PSPrinter icon in the left column. (The LaserWriter 8 may also
be used.) Your printer queue will be shown in the right column.
3.
AppleTalk must be active for PowerRIP to function; click on the Active
button at bottom of menu.
BackgroundPrlntlng
4.
Click on the Setup... button.
5.
On the next menu click on Select PPD. (If this menu is not displayed click
on More Choices.) Auto Setup is not implemented in this version of
Power-
RIP; do not use.
11
Current Printer Description File
Yieneric”
(rel.ctrPD...$ (
Fewer Choices ) (
Configure ) ( Printer Info ] [Help)
Rut0
Setup
(PPO)
Cencel
Selected:
I
18
Birmy
Graphics Corporation
Page 24

Getting Started
A list of available PPDs will be displayed when you click on Select PPD... Scroll
down if necessary.
Select e PostScript” Printer Description file:
&I Printer
Bescriptions
Color General
General
LasertUriter
Stylus Color (with Qua&.PPU
Stylus Coior.PPD
Stylus Pro (with
Styius
Pro ill
Quaric).PP
With QuatWPB
Stylus Pro HLPPD
Select
Stuius
Pro.PPD
Printer Model:
Blrmy
6.
In the menu above, the PPD selected is Stylus
the menu the actual printer name is displayed. Choose the appropriate
and click on Select.
PowerRiP Mac (Epson Stylus Pro)
f
a
Internal
(Eject]
* Oesktap
I Cdncei
[
Use Generic
Pro.PPD.
At the bottom of
1
J
PPD,
7.
Click OK on the next menu and close the Chooser by clicking on the box at
the upper left of the menu.
You have now created a Print
ticular printer.
For a detailed explanation of the PowerRIP controls see the following section.
Queue and selected the proper PPD for that par-
Birmy
Graphics Corporation
19
Page 25

PowerRiP Manual
PowerRIP Controls
Getting Started
Pre-Print
This view lists ail jobs that have yet to be printed for ail open printers. Each line in
the list includes the following:
Job Status
Job Name
Creation Date
Creator
Page Count
Queue List
This is a single character in the far left column of the list.
Character Meaning
H the job is held
h
F
.
*
blank
This is the name of the original job, not necessarily the name
of the PostScript file you created.
This is the date and time that the job was created.
This is the name of the user who created the job.
This is the number of pages in the job. If no page count is
specified in the job, the page count starts at
as each page of the job is processed.
the printer is held
the job failed
the job is currently processing
the job is currently being canceiled
the job is ready to print
1 and increments
Printer
Job Size
Printer Controls
Buttons for controlling the printer and jobs in the Pre-Print Queue are described
below.
Hold Printer
20
This is the name of the PowerRIP printer on which the job
will be printed.
This is size of the job, e.g., 743.2K.
Jobs that are not held are printed in the order in which they
appear in the list. To modify this order, hold down the option
key and drag a job up or down to a new position in the list.
This button is a shortcut for the Hold Printer and Release
Printer commands in the Printer menu. When the printer
selected in the Printer List is held, this button changes to
Release Printer. The currently printing job will not be held. See
the full description of this command on page
Birmy
Graphics Corporation
28.
Page 26

Getting Started
Hold Job
This button is a shortcut for the Hold Job and Release Job
commands in the Print Job menu. When the job selected in
the Pre-Print Queue is held, this button changes to Release
Job. See the description of this command on page
29
for
more information.
Cancel Job
This button is a shortcut for the Cancel Job command in the
Print Job menu. See the description of this command on page
30
for more information.
Print This button is a shortcut for the Print Job, Pause Printing,
and Resume Printing commands in the Print Job menu.
When the job selected in the Pre-Print Queue is printing, this
button changes to Pause; when the selected job is paused, this
button changes to Resume. See the descriptions of these commands on pages
Double-clicking on a job in the Pre-Print
29
and
30
for more information.
Queue or selecting
a job and typing Return or Enter is identical to clicking on
this button.
Back Channel Logs
Back Channel logs are fries created by PowerRIP for reviewing RIP activities such as
printing times, error messages, etc. These message logs can
be opened in TeachText
(or SimpleText). You will need a word processor, such as Microsoft Word, to open
the logs if you allow them to get too large.
Message Log View
This view displays all informational and error messages gener-
ated by PowerRIP since its launch.
Log Messages
This check box is a shortcut for the Log Messages command
in the File menu. See the description of this command for
more information.
Speak Urgent
Messages
This check box is visible only when optional speech
tion software has been installed on the PowerRIP server.
recogni-
When checked, critical warning messages written to the
Message Log View are also spoken. This is useful if you wish
to be informed of status when not sitting at the PowerRIP
server.
Birmy
Graphics Corporation
21
Page 27

PowerRIP Manual
Printer List
This view lists all open printers. Each line in the list includes the following:
Note Double-clicking on a printer name is a shortcut for the Setup
Printer command in the Printer menu.
Printer Status
Printer Name
OPI
Flag
Purge Time
Maximum Jobs
Purge Printed Jobs
This is a single character in the far left column of the list.
Character
H
S
C
blank
Meaning
the printer is held
the printer is starting up
the printer is closing
the printer is ready to print
This is name of the PowerRIP printer.
OPI
If this printer performs
the string
OPI;
otherwise, this field is blank.
substitution, this field contains
This field contains the time after which any printed jobs for
this printer are removed, e.g., 3
fied, this field contains the infinity character,
days.
If no purge time is speci-
00.
This field contains the maximum number of printed jobs to
be kept for this printer. If no maximum is specified, this field
contains the infinity character,
00.
When checked, jobs are deleted from the Printed Files folder
for this PowerRIP printer after the specified number of seconds, minutes, hours, days, or weeks. When not checked,
printed jobs remain in the printed files folder until you
remove them.
Note: If you change the Purge Time in the Printer Setup to a
smaller time frame, previously saved files will be erased.
Limit Post-Print
Queue
When checked, the oldest jobs are removed from the Printed
Files folder for this PowerRIP printer when the specified
number of jobs is exceeded. When not checked, there is no
maximum number of jobs already printed.
OPI Image
Substitution
This check box is enabled only when a supported
cation is running. When checked,
for TIFF placement images on a page. When not checked,
OPI
substitution will not take place.
22
Birmy
Graphics Corporation
OPI appli-
OPI
substitution will occur
Page 28

Getting Started
Black Background
Faster Copies
Collate Copies
When checked, pages are output with a black background.
When unchecked, pages are output with a white background.
When checked, pages are ripped to a spooled image file on
disk before being sent to the imaging device. For multiple
copies, pages are only ripped once, then output multiple
times. However, the spooled image file uses a large amount of
disk space; therefore, you should use this option with caution.
When unchecked, pages are output directly to the imaging
device.
This check box is enabled only when Faster Copies is
checked. When checked, entire documents are ripped to a
spooled image file. Thus, the document is ripped once, then
multiple collated copies are output to the imaging device.
Since ail pages must be written to the spooled image file, this
option should be used only when a very large amount of free
disk space is available.
When unchecked, only one page at a time is written to the
spooled image file, and multiple copies are printed
uncoiiated.
Post-Print
Queue List
Reprint Job
Reprint On
This view lists ail jobs that have already been printed but not
yet removed.
This button is a shortcut for the Reprint Job command in the
Print Job menu. See the description of this command on page
29
for more information.
Double-clicking on a job in the Post-Print Queue or selecting
a job and pressing Return or Enter is identical to clicking on
this button.
This button is a shortcut for the Print Job On command in
the Print Job menu. See the description of this command on
29
pages
and 30 for more information.
Birmy
Graphics Corporation 23
Page 29

PowerRIP Manual
24 Birmy Graphics
Corporation
Page 30

This section describes ail of the PowerRIP menus and each of the commands in
these menus.
Apple Menu
About PowerRIP
File Menu
New Printer
This command displays a screen containing the name of
this application, its version number, and other important
information.
This menu consists of a single command for each available
imaging device. You can create a new PowerRIP printer by
choosing an imaging device name.
When this command is selected, a Printer Setup Dialog for
the chosen imaging device is displayed. You may change
any of the default parameters, then click on OK. For a
detailed description of the EPSON Stylus Printer Setup
dialogue, see the appendix.
A standard save file dialog is then displayed. Specify a
name and location for the
click on Save to complete this operation. You must wait
until the printer no longer displays a starting up status,
before using it.
new PowerRIP printer, then
'S',
Sirmy Graphics Corporation
25
Page 31

Power-RIP Manual
Open Printer
Close Window
This command displays a standard open file dialog from
which you may choose a previously created PowerRIP
printer file. A printer file is located in the jobs folder for
that printer.
When you create a new PowerRIP printer, a printer file
containing the currently selected setup for that printer is
created. When changes to a printer are saved, the printer
file is updated.
You may also create an alias to the printer file and select
the alias in this command.
Like most Macintosh applications, you may also launch
PowerRIP and open PowerRIP printers from the Finder by
opening a printer file or by dropping a printer file on the
PowerRIP application icon.
This command closes the front-most PowerRIP window, if
it has a close box. If dimmed, the front-most window is
either not closable or is modal. In the latter case, you must
click on a button to dismiss the dialog.
Save Printer Changes
Log Messages
This command saves changes made to any open PowerRIP
printers. All changes made to ail open printers are saved. If
dimmed, no changes have been made.
The PowerRIP printer files corresponding to the changed
printers are updated appropriately.
This command is a toggle. When unchecked, selecting this
command causes it to be checked; when checked, selection
causes it to be unchecked.
When checked, any message written to the Message Log
View is also written to the currently specified log file. If no
log file has been specified, then this command displays a
standard save file dialog to get a log file name and location.
26
Birmy Graphics Corporation
Page 32

Menu Command Reference
New Log File
Extra Font Folder
Quit
This command closes any open log file and displays a
standard save file dialog to get a new log file name and
location. If message logging is disabled, it is enabled for
the new log file. The previous log file is not deleted.
Log files can be read with any standard text editor. Since
these files may get very large, you should monitor their size
and delete old messages when necessary.
This command displays a standard folder selection dialog
to get the location of an additional folder containing
LaserWriter fonts. Normally, only the System Folder and
the resources subfolder of the PowerRIP application folder
are searched for LaserWriter fonts. This command allows
you to specify one additional folder to be searched.
For example, if you are running with
LaserWriter fonts in folder . .
Fonts:, you must select the Printer Fonts folder with this
command.
This command terminates the PowerRIP application. Ail
open PowerRIP printers are automatically closed.
.Resources:Fonts:Printer
Suitcase™
with
Edit Menu
Undo
cut
COPY
This command reverses the most recent action you took.
If dimmed, the most recent action cannot be undone.
After selecting this command, this menu item changes to
Redo. Selecting it again performs your most recent action
again.
This command cuts any selected text and pastes it in the
Clipboard. Jobs cannot be copied; use the Reprint Job and
Print Job On commands to move jobs from the Post-Print
Queue to the Pre-Print Queue.
This command cuts any selected text and pastes it onto the
Clipboard. Jobs cannot be copied; use the Reprint Job and
Print Job On commands to move jobs from the Post-Print
Queue to the Pre-Print Queue.
Birmy Graphics Corporation
27
Page 33

PowerRIP Manual
Paste
Clear
This command copies any text on the Clipboard to the
currently selected text view. If any text is selected, it is
replaced at the insertion point.
This command deletes any selected text. If no text is
selected, any character before the insertion point is deleted.
Printer Menu
Except where noted, these commands operate on the selected printer in the Printer
List.
Hold Printer
This command prevents any jobs for the selected printer
from being printed. The printer hold status is indicated by
an H to the left of the printer name. The jobs for this
printer are marked with an h to their left. However, the
currently printing job cannot be held; rather, you must
pause or cancel it to stop printing immediately.
If dimmed, the selected printer is already held.
Any jobs in the Pre-Print Queue for other printers are still
printed in order.
Release Printer
Hold All Printers
Release
Close
Setup Printer
Show Completed Jobs
AlI
Printers
Printer
This command releases a previously held printer. If
dimmed, the selected printer is not held.
This command holds all open printers. The selected
printer is ignored.
This command releases any previously held printers. The
selected printer is ignored.
This command closes the selected printer. Once closed,
the printer can no longer be used by a PowerRIP client.
This command displays the Printer Setup Dialog for this
printer. For a detailed description of the Printer Setup
Dialog, see the appendix.
Note that changes to printer parameters do not take effect
until completion of all ready jobs for that printer.
This command opens the PowerRIP Completed Jobs
Window. If this window is already open, it is made the
front-most window.
28
Birmy Graphics Corporation
Page 34

Menu Command Reference
Print Job Menu
Except where noted, these commands operate on the selected job in the Pre-Print
Queue or Post-Print Queue.
Hold Job
Release Job
Print Job
Remove Job
Reprint Job
This command prevents the selected job in the Pre-Print
Queue from being printed. The job hold status is indicated
by an
H to the left of the job name. The currently printing
job cannot be held; rather, you must pause or cancel it to
stop printing immediately.
If dimmed, the selected job is already held.
jobs in the Pre-Print Queue are still printed in order.
Any
This command unblocks a previously held job. If dimmed,
selected job is not held.
the
This command releases and prints the selected held job in
the Pre-Print
Queue. If dimmed, another job is already
printing.
This command removes the selected job from the queue.
To remove a currently printing job, you must first cancel it.
This command moves the selected job from the Post-Print
Queue to the Pre-Print Queue and starts printing it.
Print Job On
This command displays a dialog
tion about the selected job. You must specify
printer on which the job should be printed as well as a
copy count, then click on OK.
Which printer do you want the Job printed on?
[
Cancel
Copies:
1
a
Birmy Graphics Corporation
used to modify informa-
a PowerRIP
port-print
rrtril
max
29
Page 35

PowerRiP Manual
If the selected job is in the Post-Print Queue, it is then
moved to the Pre-Print
the requested number of copies are then printed to the
selected printer.
Queue. If the job is not held,
Cancel Job
Pause Printing
Resume Printing
Purge Spooled Image
This command aborts the currently printing job. If
dimmed, there is no currently printing job. When a
canceled, it is held and left in the Pre-Print
Queue.
job is
This command suspends the currently printing job. If
dimmed, there is no currently printing
job, or the cur-
rently printing job has already been paused.
This command continues the currently printing job. If
dimmed, there is no currently printing job or the currently
printing
job is not paused.
This command deletes any spooled image files for the
selected job. If dimmed, there are no spooled image files
for the selected job.
Normally, the spooled image files are deleted when the job
completes. However, if a job is canceled, the spooled image
re-rip
files are maintained. This avoids having to
the pages.
You may want to use this command to free the disk space
allocated for the spooled image file.
Help Menu
Show Balloons
30
This command enables and disables Balloon Help. Balloon
Help is currently available for all PowerRIP menu items.
Birmy Graphics Corporation
Page 36

This troubleshooting guide lists possible solutions for common problems. Before
using this guide, you should check the Message Log View for errors. If no errors are
indicated, then use this guide to find a solution to your problem. If
problem after reviewing this section, please call Birmy Customer Support
you still have a
(407)
723-2893. Hours of operation are 9am-8pm EST.
The Following Message Appears When Attempting to Launch PowerRIP
Could not
PowerFIIPI)
Pierre tall the
PowerRIP has not been registered-see Registering PowerRIP on page 3. If you
l
rlart
ha*
appllcdllon because
the
a01
been rcglrlered.
Slnoy
fulflllmanl center
have registered and still get this message:
Have you loaded PowerRIP on a different Macintosh?
l
Have you replaced or changed your System boot-up disk?
l
See Registering PowerRIP on page 3 to reinstall the
recorded the Fulfillment
Responce
number it is not necessary to call the
BirmyKey.
If you have
Fulfillment Center; type that number in the Response box and click on Register.
Have you purchased an additional EPSON Stylus that has not been registered?
l
Call
Birmy
Customer Support to arrange for registration information.
Out of Memory, Memory Low and VM Error Messages
Birmy
There are other ways to increase your RAM rather than purchasing and
installing expensive SIMMs. PowerRIP’s performance will be enhanced by the
addition of available memory, especially on complex jobs.
Virtual Memory On. Go to Control Panel under the Apple symbol and select
l
the Memory Control Panel. Click the On button in the Virtual Memory panel.
Install RAM Doubler. A relatively low-cost Extension from Connectix which
l
effectively doubles the amount of your physical RAM.
Birmy Graphics Corporation
31
Page 37

PowerRIP
l Allocate more memory to PowerRIP. If running, quit PowerRIP While on the
Manual
desktop, highlight the PowerRIP icon. Under File, select Get Info. Increase
the number in the Preferred size box relative to the amount of available memory
you have. Keep in mind that the System Software requires available memory
in addition to other applications you may want to have active while PowerRIP
is running.
Font Not Found: Using Courier, Findfont Errors
l Are you allowing Font Substitution in your page setups?
l Do you have PostScript compatible printer fonts or just screen fonts?
l Are your fonts available to the system? In order for fonts to be available to the
system they must be placed in the Fonts subfolder inside the System Folder.
If your font library is too extensive to be placed in the Fonts subfolder, you
might consider purchasing Suitcase
™M
a font handling utility from Fifth
Generation Systems, Inc.
l Have you renamed or moved the PowerRIP folder after the original installation?
You will have to
folder inside the PowerRIP folder and trash the five .upr files
FonFonts.ups,
re-establish
the font paths. To do this; open the font
ResFonts.upr, SysFonts.upr,
sub-
(ExtFonts.upr,
and XtraFonts.upr.). New .upr files
will automatically be created when you restart PowerRIP If the problem still
persists; open the Preferences sub-folder inside the System Folder and trash the
PowerRIP™
Preferences. A new preference file will automatically be created
when you restart PowerRIP.
Images on Printed Pages are Clipping
l Are your considering the printable image area of your EPSON Stylus? You may
have to increase your margins.
l Are you selecting the proper PPD in the Chooser Setup?
Printer Out of Synch - Outputting Repeated Pages of Extraneous Code
l If Cancel Job or Hold Printer have no effect, power down the EPSON Stylus to
avoid wasting paper.
l Force Quit the PowerRIP application. While holding down the option and
command keys, press the escape key to Force Quit. Your Macintosh will have to
be rebooted after doing this to reestablish communication with the printer.
32
Birmy Graphics Corporation
Page 38

Troubleshooting
Printer Cannot Be Opened Because Printer Not Available
l
Is the imaging device’s power on?
l
Is the imaging device connected properly to the PowerRIP server? Defective
serial cables are a common problem.
l
If using EPSON’s optional
named the printer correctly in the Printer Setup dialog menu? See page 36 for
detailed instructions.
Job in the-Print Queue Not Printed on Imaging Device
l
Is the PowerRIP printer ready rather than held, starting up, or closing?
l
Is this job set up to print to the correct PowerRIP printer?
l
Is the imaging device ready? Are any error indicators lit on the device?
l
Is the imaging device powered on?
l
Is the imaging device connected properly to the PowerRIP server?
LocalTalk/Ethertalk
interface board, have you
Job Does Not Appear in Pre-Print Queue
l
Is the PowerRIP printer for this job open?
l
Was job placed in the proper queue? When creating a PostScript file make sure
you save it to the printer queue you have set up. If you saved it to some other
location you can drag it into the proper print queue.
l
Has the PowerRIP printer been selected in the Chooser on the client?
l
Are both the PowerRIP server and client on the same enabled network?
Job Prints in Black and White or One or More Colors Are Missing
l
Did you specify color output in your application’s print dialog?
l
Is one or more of the colors in color ink cartridge exhausted?
Job Just Printed Not in Post-Print Queue
l
Did you specify a purge time of 0 in the Printer Setup Dialog for the PowerRIP
printer?
l
Did you specify a maximum job count of 0 in the Printer Setup Dialog for the
PowerRIP printer?
Birmy Graphics Corporation
33
Page 39

PowerRlP
Manual
Multiple Page Document Stops Outputting Before Job is Complete
l Do you have Faster Copies checked in the Setup Printer dialog menu? When
Faster Copies is checked, pages are ripped to a spooled image file on disk before
being sent to the printer. This spooled image file uses a large amount of disk
space. Uncheck Faster Copies in the Setup Printer menu and try again.
Client Times Out While Sending Job to PowerRIP
l Did you switch to another application on the PowerRIP server? If so, the other
application may not give PowerRIP enough time to maintain its connection
with the client. Switch back to PowerRIP and try again.
l Is PowerRIP running on a slower Macintosh computer, and are there several
clients trying to print to PowerRIP simultaneously? If so, your server may not be
fast enough to support a large number of simultaneous transfers. Wait for some
of the clients to completely send their jobs to PowerRIP, then try again.
Rendering Stopped or Slower Than Normal
l Are one or more clients sending jobs to PowerRIP? On slower Macintosh
computers, transfer operations may require most of the available time; therefore,
rendering during transfers slows down considerably.
l Is a dialog open? If so, rendering is suspended until the dialog is closed.
OPI
Substitution Not Made
l Is the
OPI
check box turned on in the Printer Setup Dialog for the PowerRIP
printer?
l Have you moved the
OPI
folder? If so, PowerRIP is unable to locate the folder
and, thus, the high-resolution image.
34
Birmy
Graphics Corporation
Page 40

EPSON STYLUS
PRINTER SETUP DIALOG
Sample
Customize according
to your needs
Purge Printed Jobs
setup
q Purge printed jobs after
N
Limit post-print queue to
0 OPI
image Substitutions
0
Faster Copies
Cancel
1
(
I[
hours 7
jobs
0
Black Background
q
Cnllste
Copies
1
41
When checked, jobs are deleted from the Printed Files
subfolder for this PowerRIP printer after the specified
number of seconds, minutes, hours, days, or weeks. When
not checked, there is no time limit on jobs already printed.
Limit Post-Print
Queue
When checked, the oldest jobs are removed from the
Printed Files subfolder for this PowerRIP printer when the
specified number of jobs is
exceeded. When not checked,
there is no maximum number of jobs already printed.
OPI Image Substitution This check box is enabled only when OH is running.
OPI
When checked,
substitution using certain
OPI
grams will occur for TIFF placement images on a page.
Black Background
When not checked,
When checked, pages are output with a black background.
OPI
substitution will not take place.
When not checked, pages are output with a white back-
ground.
Birmy Graphics Corporation
pro-
35
Page 41

PowerRlP
Manual
Faster Copies
Serial Port
Collate
Copies
When checked, pages are ripped to a spooled image file on
disk before being sent to the imaging device. For multiple
copies, pages are only ripped once, then output multiple
times. However, the spooled image file uses a large amount
of disk space; therefore, you should use this option with
caution.
When unchecked, pages are rendered directly to the imag-
ing device.
Use this radio cluster to select whether the EPSON Stylus
is connected to the printer port or modem port.
This selection is “grayed out”-all multiple page jobs will
be collated if more than one copy is requested.
Printer Setup With Epson’s Optional LocalTalk or
Ethertalk Interface Board
Printer Name
If you have installed the EPSON optional LocalTalk interface board in your EPSON Stylus and you have selected an
AppleTalk printer, the Setup screen will display Printer
Name. Refer to the EPSON Stylus User’s Guide to assign a
name to your printer.
Printer Name: ,
Use the EPSON Namer
to name your printer
and type that exact
name here. If the
Printer Name does not
agree, PowerRIP will
not find the the networked printer.
36
IxI
Purge printed jobs after
q
0 OPI
0
Lfmft
post-print queue to
Image
Faster Copies
I
Substitutfons
Cancel
1
1
-1
Birmy Graphics Corporation
41 hours v f
jobs
0
Black Background
gj Collrrte CODISS
1
Page 42

LIST OF TERMS
Several terms having special meaning within the context of this manual are listed
below.
CPSI
FPU
Framing
Imaging Device
Configurable PostScript Interpreter. This Adobe Level 2
PostScript interpreter runs on a Macintosh server rather
than on a hardware peripheral device. PowerRIP uses this
interpreter to render a raster image.
Floating Point Unit. A chip capable of executing
operations with real numbers. The FPU may be built
in or available as an add on to the main CPU. [In the
Macintosh computer, the FPU is either a separate MC
68881
processor or is built into the main processor
(MC 68040 or PPC
The process by which a complete raster image of a page is
created in memory prior to output to an imaging device.
If the available memory is sufficient, then PowerRIP will
frame a page. Since disk spooling of bands is unnecessary,
framing is usually faster than banding.
A device capable of printing a raster image on a physical
medium, e.g., a printer, imagesetter, digital film recorder,
ink jet printer, etc.
60
l)].
Interpreter
Job
Jobs Folder
A set of software functions to convert PostScript language
operators and operands into a raster image. PowerRIP uses
the CPSI interpreter.
A file containing PostScript language operators and
operands residing in a Jobs folder and listed in either the
Pre-Print Queue or the Post-Print Queue.
A folder containing a PowerRIP printer file and all jobs for
that printer. Jobs to be printed are in the Jobs folder; jobs
already printed are in the Printed Files subfolder of the
Jobs folder.
Birmy Graphics Corporation
37
Page 43

PowerRIP Manual
LaserWrite+
Message Log View
Network
OPI
Post-print Queue
PostScript
A printer driver used by an application to create a PostScript file describing the visible contents of a document.
A scrolling text view in
the
PowerRIP control panel con-
taining all logged messages.
EtherTalk or AppleTalk cabling and required software
to
link Macintosh computers to each other. In the case of
PowerRIP, to link the clients to the server.
Open
Pre-Press
Interface. A standard whereby a
highresolution image is substituted for a low-resolution placement image (or no image) on a page. The substitution is
controlled by special TIFF tags. Since the high-resolution
image may reside on the server, the long transfer time of
the high-resolution image can be avoided.
A scrolling list in the PowerRIP Completed Jobs Window
containing all jobs already printed for all open PowerRIP
printers.
An interpretive programming language, developed by
Adobe, used co describe the text, graphic, and image con-
tent of a document.
PowerRIP Client
PowerRIP Completed
Jobs Window
PowerRIP Control
Panel Window
PowerRIP Printer
PowerRIP Printer File
A Macintosh computer on which the user runs most appli-
cations. The user may prim from applications to an imaging device attached to a PowerRIP server.
A window of the PowerRIP application containing the
Post-Prim Queue.
The main window of the PowerRIP application containing
the Pre-Print Queue, the message log view, and the printer
list.
A virtual imaging device representing a physical imaging
device with a user-selectable set of characteristics. Each
PowerRIP printer has a separate Jobs folder. The names of
all open PowerRIP printers appear as LaserWriter devices
in the Chooser dialog opened on a PowerRIP client.
A file representing a PowerRIP printer residing in the Jobs
folder for that printer.
38
Birmy Graphics Corporation
Page 44

Glossary
PowerRIP Server
Pre-Print Queue
A Macintosh computer running the PowerRIP application.
A scrolling list in the PowerRIP Control Panel Window
containing all jobs yet to be printed for all open PowerRIP
printers.
Printer List A scrolling list in the PowerRIP Control Panel Window
containing all open PowerRIP printers.
Printer Setup Dialog A physical device dependent dialog for selecting character-
istics for a PowerRIP printer.
PSPrinter™
A printer driver used by an application to create a Post-
Script file. This driver is distributed with PowerRIP and
may be installed as a substitute for a LaserWriter driver.
Within this manual, all references to LaserWriter should be
interpreted as references to either LaserWriter or PSPrinter.
Raster Image
A bitmap representing an interpreted PostScript page to be
output to an imaging device. For each device pixel on the
page, there is a corresponding color in the color space
appropriate for the imaging device.
Render
RIP
SCSI
SCSI Address
TIFF
The process by which PostScript language operators and
operands are interpreted and a raster image is produced.
Raster Image Processor. An application or device that
renders PostScript language inputs and outputs the resulting raster image to an imaging device.
Small Computer Systems Interface. A standard communication technology to pass data between a host computer
and a peripheral device.
A physical switch or jumper to designate the address of a
SCSI device. Each SCSI device must be addressed with its
own unique number from 1 to
6.
Tagged Image File Format. This is a standard image file
format consisting of labeled fields.
Birmy Graphics Corporation
39
 Loading...