

Page 1

COLOR INK JET PRINTER
Reference Guide
All rights reserved. No part of this publication may be reproduced, stored in a retrieval
system, or transmitted in any form or by any means, electronic, mechanical, photocopying,
recording, or otherwise, without the prior written permission of Seiko Epson Corporation.
No patent liability is assumed with respect to the use of the information contained herein.
Neither is any liability assumed for damages resulting from the use of the information
contained herein.
Neither Seiko Epson Corporation nor its affiliates shall be liable to the purchaser of this
product or third parties for damages, losses, costs, or expenses incurred by purchaser or
third parties as a result of: accident, misuse, or abuse of this product or unauthorized
modifications, repairs, or alterations to this product, or (excluding the U.S.) failure to
strictly comply with Seiko Epson Corporation’s operating and maintenance instructions.
Seiko Epson Corporation shall not be liable against any damages or problems arising from
the use of any options or any consumable products other than those designated as
Origin al EPSON Products or EP SON App r oved Products by Seiko Epson Corporation.
EPSON, EPSON Stylus, and EPSON ESC/P are registered trademarks and
EPSON ESC/P 2 is a trademark of Seiko Epson Corporation.
EPSON Connection is a service mark of Epson America, Inc.
Windows printer driver copyright Software 2000 Ltd Oxford, England. Portions copyright
Seiko Epson Corporation.
General Notice: Other product names used herein are for identification purposes only and
may be trademarks of their respective owners. EPSON disclaims any and all rights in
those marks.
The Energy Star emblem does not represent EPA endorsement of any product or service.
Copyright © 1995 by Epson America, Inc. 10/95
Printed on recycled paper with at least 10% post-consumer content
Page 2

FCC Compliance Statement
For United States Users
This equipment has been tested and found to comply with the limits for a Class B digital
device, pursuant to Part 15 of the FCC Rules. These limits are designed to provide
reasonable protection against harmful interference in a residential installation. This
equipment generates, uses, and can radiate radio frequency energy and , if not installed
and used in accordance with the instructions, may cause harmful interference to radio or
television reception. However, there is no guarantee that interference will not occur in a
particular installation. If this equipment does cause interference to radio and television
reception, which can be determined by turning the equipment off and on, the user is
encouraged to try to correct the interference by one or more of the following measures.
❑ Reorient or relocate the receiving antenna.
❑ Increase the separation between the equipment and receiver.
❑ Connect the equipment into an outlet on a circuit different from that to which the
receiver is co nne cted.
❑ Consult the dealer or an experienced radio/TV technician for help.
WARNING
The connection of a non-shielded equipment interface cable to this equipment will
invalidate the FCC Certification of this device and may cause interference levels which
exceed the limits established by the FCC for this equipment. It is the responsibility of the
user to obtain and use a shielded equipment interface cable with this device. If this
equipment has more than one interface connector, do not leave cables connected to unused
interfaces. Changes or modifications not expressly approved by the manufacturer could
void the user’s authority to operate the equipment.
For Canadian Users
This digital apparatus does not exceed the Class B limits for radio noise emissions from
digital apparatus as set out in the radio interference regulations of the Canadian
Department of Communications.
Le présent appareil numérique n’émet pas de bruits radioélectriques dépassant les limites
applicables aux appare ils numé riques de Classe B prescrites dans le règlement s ur le
brouillage radioélectrique édicté par le Ministère des Communications du Canada.
ii
Page 3

Contents
Introduction
Energy Star Compliance . . . . . . . . . . . . . . . . . . . . . . 1
Energy-saving Tips . . . . . . . . . . . . . . . . . . . . . . . 2
How to Use This Manual . . . . . . . . . . . . . . . . . . . . . . 2
Where to Get Help . . . . . . . . . . . . . . . . . . . . . . . . . 3
Electronic Support Services . . . . . . . . . . . . . . . . . . 4
Important Safety Instructions . . . . . . . . . . . . . . . . . . . 6
Chapter 1
Choosing Paper and Other Media . . . . . . . . . . . . . . . . . 1-2
Setting the Paper Thickness and Adjustment Levers . . . . . . 1-3
Setting the Paper Thickness Lever . . . . . . . . . . . . . . 1-3
Setting the Thickness Adjustment Lever . . . . . . . . . . . 1-4
Loading Plain Paper . . . . . . . . . . . . . . . . . . . . . . . . . 1-5
Loading Special Papers and Other Media . . . . . . . . . . . . 1-7
Loading Special Papers and Transparencies . . . . . . . . . 1-8
Loading Envelopes . . . . . . . . . . . . . . . . . . . . . . . 1-10
Chapter 2
Using the Printer’s Control Panel . . . . . . . . . . . . . . . . . 2-2
Lights . . . . . . . . . . . . . . . . . . . . . . . . . . . . . . . 2-3
Buttons . . . . . . . . . . . . . . . . . . . . . . . . . . . . . . 2-4
Using the Default Setting Mode . . . . . . . . . . . . . . . . . . 2-7
Chapter 3
Paper Handling
Controlling the Print er
Maintenance
Cleaning the Print Heads . . . . . . . . . . . . . . . . . . . . . . 3-2
Replacing Ink Cartridges . . . . . . . . . . . . . . . . . . . . . . 3-3
Selecting the Correct Ink Cartridges . . . . . . . . . . . . . 3-4
Removing and Installing Ink Cartridges . . . . . . . . . . . 3-5
Cleaning the Printer . . . . . . . . . . . . . . . . . . . . . . . . . 3-8
Transporting the Printer . . . . . . . . . . . . . . . . . . . . . . 3-9
Calibrating the Printer When Printing from DOS . . . . . . . . 3-10
iii
Page 4

Chapter 4
Print Quality Problems . . . . . . . . . . . . . . . . . . . . . . . . 4-2
Problems with Printing . . . . . . . . . . . . . . . . . . . . . . . 4-6
Paper Handling Problems . . . . . . . . . . . . . . . . . . . . . . 4-12
Paper Jam Problems . . . . . . . . . . . . . . . . . . . . . . . 4-12
Paper Feeding Problems . . . . . . . . . . . . . . . . . . . . . 4-12
Other Paper Handling Problems . . . . . . . . . . . . . . . . 4-13
Troubleshooting
Appendix A
Printing . . . . . . . . . . . . . . . . . . . . . . . . . . . . . . . . A-2
Paper . . . . . . . . . . . . . . . . . . . . . . . . . . . . . . . . . . A-3
Ink Cartridges . . . . . . . . . . . . . . . . . . . . . . . . . . . . . A-5
Mechanical . . . . . . . . . . . . . . . . . . . . . . . . . . . . . . . A-6
Electrical . . . . . . . . . . . . . . . . . . . . . . . . . . . . . . . . A-7
Environmental . . . . . . . . . . . . . . . . . . . . . . . . . . . . A-7
Safety Approvals . . . . . . . . . . . . . . . . . . . . . . . . . . . A-7
Fonts . . . . . . . . . . . . . . . . . . . . . . . . . . . . . . . . . . A-8
Interface Specifications . . . . . . . . . . . . . . . . . . . . . . . . A-9
Parallel Interface . . . . . . . . . . . . . . . . . . . . . . . . . A-9
Serial Interface . . . . . . . . . . . . . . . . . . . . . . . . . . A-11
Initialization . . . . . . . . . . . . . . . . . . . . . . . . . . . . . . A-12
Default Settings . . . . . . . . . . . . . . . . . . . . . . . . . A-13
Appendix B
Command List . . . . . . . . . . . . . . . . . . . . . . . . . . . . B-2
EPSON ESC/P 2 Commands . . . . . . . . . . . . . . . . . . B-2
IBM X24/X24E Emulation Codes . . . . . . . . . . . . . . . . B-3
Character Tables . . . . . . . . . . . . . . . . . . . . . . . . . . . B-4
International Character Sets . . . . . . . . . . . . . . . . . . . B-8
Characters Available with ESC (^ Command . . . . . . . . . B-9
Technical Specifications
Commands and Character Tables
Glossary
Index
iv
Page 5
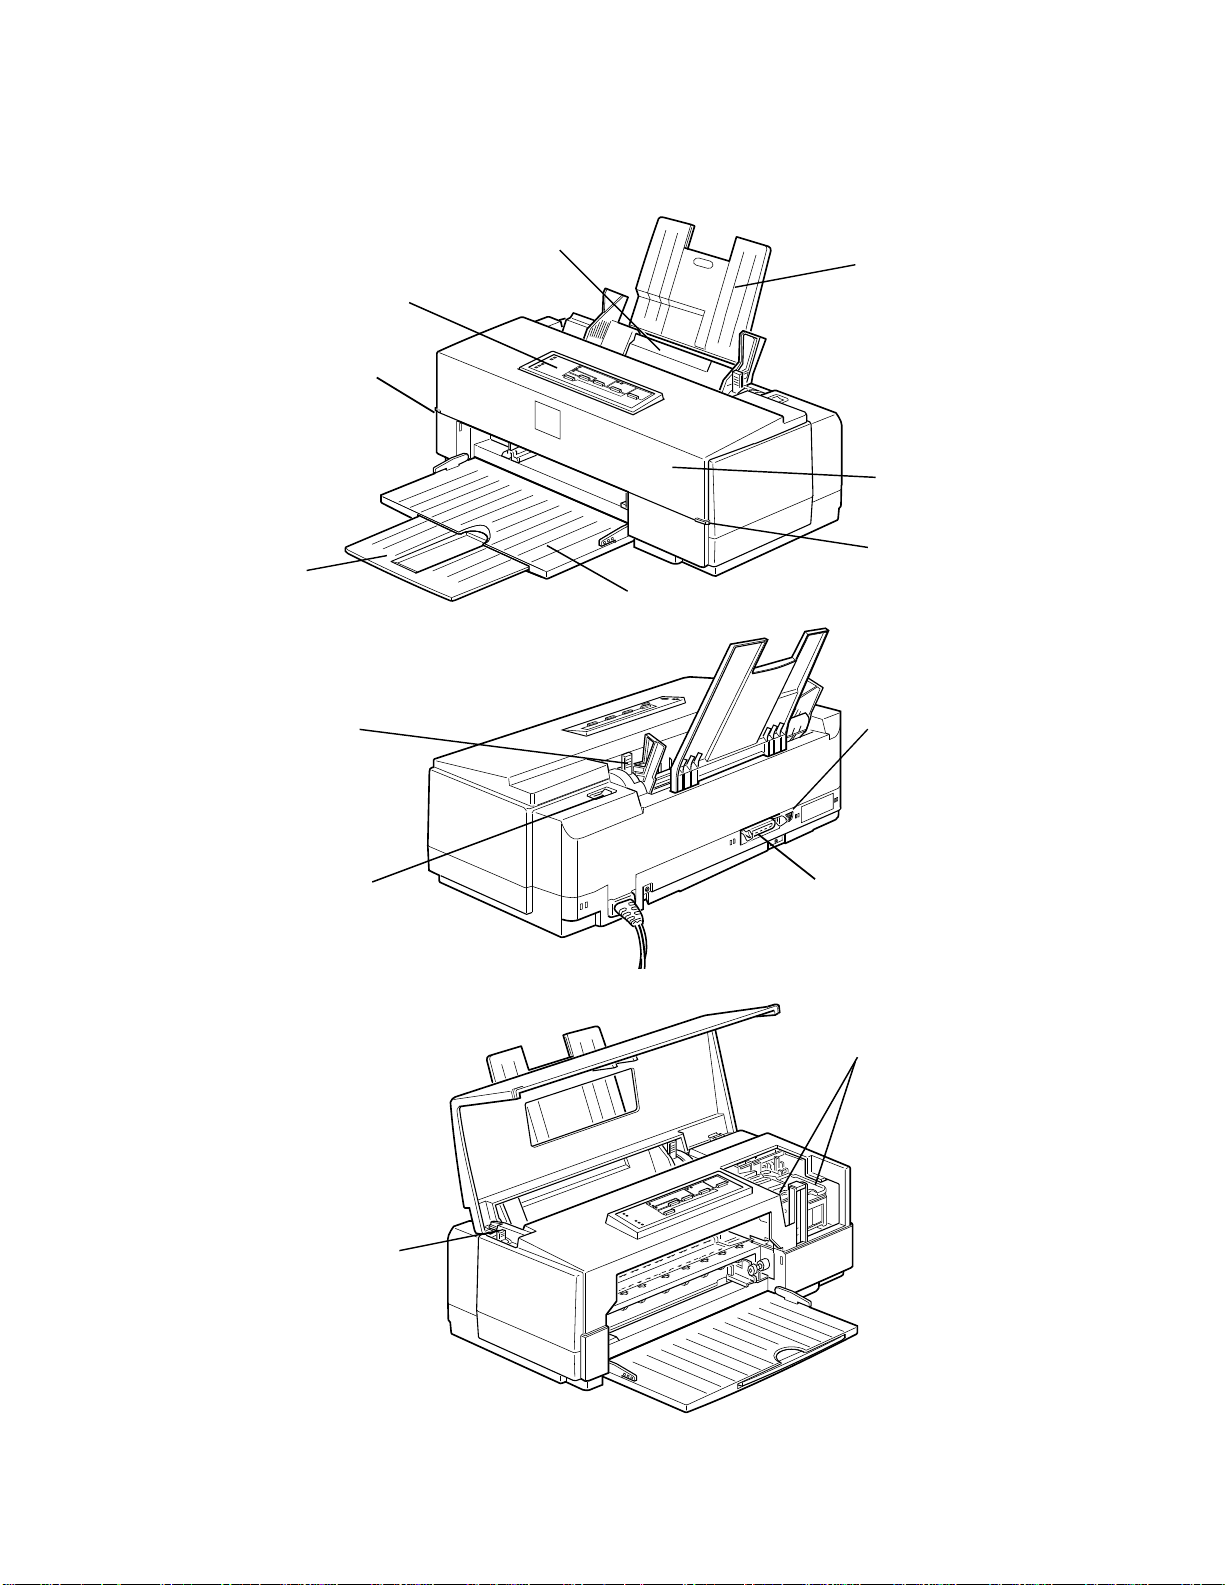
Printer Parts
control panel
output tray
extension
paper thickness
lever
notch
sheet feeder
paper support
printer cover
notch
output tray
serial interface
connector
power switch
thickness
adjustment
lever
parallel interface
connector
ink cartridge clamps
Page 6

Introduction
This manual contains general operating and maintenance
instructions for your EPSON
troubleshooting guidelines and technical specifications. For
instructions on setting up your printer and using the
®
Microsoft
see the appropriate Setup and Software Guide.
Note:
After you install the driver, check the ReadMe icon in the EPSON
group in Windows or on the Macintosh hard disk for the latest
information about your printer and software.
Your printer supports a wide variety of settings that give you
the flexibility to improve print quality or speed up printing.
Using the printer driver software (described in the Setu p and
Software Guide), you can control settings such as document
type, printing mode, and halftoning to produce just the right
effects in your printed documents.
Windows® or Apple® Macintosh® printe r driver,
®
Stylus® COLOR II, as well as
To make your job easy, both the Windows and Macintosh
printer drivers include an option that analyzes the elements on
a page to be printed and automatically adjusts the driver
settin gs so your printed re sults are appropri ate fo r the image
type. See the Setup and Software Guide for complete instructions
on using the driver and for color print samples of the kinds of
output the printer can produce.
Energy Star Compliance
As an Energy Star Partner, EPSON has determined
that this product meets the Energy Star guidelines
for energy efficiency.
Introduction
1
Page 7

The EPA estimates that if all desktop computers, printers, and
other peripheral devices met Energy Star standards, energy
cost savings would exceed $1 billion annually and carbon
dioxide emissions would be reduced by 20 million tons.
All of EPSON’s ink jet printers conform to Energy Star
standards.
Energy-saving Tips
Here are a few tips you can use to be even more energy-wise:
❑ If your monitor isn’t Energy Star compliant, turn it off
when you ’re not using it.
❑ Turn off your computer, printer, and monitor each day
when you are done using them.
❑ Use the print preview option in your software before you
print something so you can catch errors before you commit
them to paper.
❑ If you have an electronic mail system available to you, send
E-mail rather than memos. Not only is this faster, but you’ll
save paper and storage space too.
How to Use This Manual
After you have set up the printer as described in the Setup and
Software Guide, refer to this manual for the following
information:
Chapter 1, “P aper Handling,” explains how to select the right
paper for your print job and load special paper and other
media in your printer.
Introduction
2
Page 8

Chapter 2, “Controlling the Printer,” provides instructions for
managing the printer’s operation through its control panel. It
also explains how to access the printer’s Default setting mode.
Chapter 3, “Maintenance,” contains instructions for cleaning
the print heads, replacing the ink cartridges, cleaning and
transporting the printer, and calibrating the printer from DOS.
Chapter 4, “Troubleshooting,” contains troubleshooting
guidelines for any print quality and printer operation problems
you may have.
Append ix A, “Technical Specifications,” gives the
specifications for the Stylus COLOR II printer.
Append ix B, “Commands and Character Tabl es,” lists the
EPSON ESC/P 2
and IBM® X24/X24E emulation commands
supported by the printer and shows the printer’s built-in
character tables.
A Glossary and Index are provided at the end of the manual.
Where to Get Help
If you purchased your printer in the United States or Canada
and you need technical assistance you can call an EPSON Color
Specialist at (800) 788-0343.
EPSON also provides customer support and service through a
network of Authorized EPSON Customer Care Centers and
provides the following services when you dial (800) 922-8911:
❑ EPSON technical information library fax service
❑ Product literature on current and new products
❑ Assistance in locating your nearest Authorized EPSON
Reseller or Customer Care Center
Introduction
3
Page 9

❑ Technical information on the installation, configuration,
and operation of EPSON products
❑ Customer relations.
You can purchase ink cartridges, paper, parts, printed manuals,
and accessories for EPSON products from EPSON Accessories
at (800) 873-7766 (U.S. sales). In Canada, call (800) BUY-EPSON
for sales locations.
If you purchased your printer outside the United States or
Canada, contact your EPSON dealer or the marketing location
nearest you for customer support and service.
If you need help with any software program you are using,
see that program’s documentation for technical support
information.
Electronic Support Services
If you have a modem, the fastest way to access helpful tips,
specifications, drivers, application notes, DIP switch or jumper
settings, and bulletins for EPSON products is through the
online services below.
Worl d Wide Web
If you are connected to the Internet and have a Web browser,
you can access EPSON’s World Wide Web site at
http://www.epson.com. EPSON’s home page links users to
What’s New, EPSON Products, EPSON Connection,
Info and EPSON Contacts. Link to the EPSON Connection for
the latest drivers and FAQs (Frequently Asked Questions) and
the EPSON Chat area. To get in touch with EPSON around the
world, EPSON Contacts includes Contact Information for local
EPSON subsidiaries.
SM
Corporate
Introduction
4
Page 10

EPSON Bulletin Board Service
You can call the EPSON Bulletin Board Service (BBS) at
(310) 782-4531. No membership is required. Make sure your
communications software is set to 8 data bits with 1 stop bit,
no parity bit, and a modem speed of 28.8 Kbps or less. See the
documentation that came with your communications software
for more information.
CompuServe online support
CompuServe® members can call the Epson America Forum on
CompuServe. If you are already a member, simply type
GO EPSON at the menu prompt to reach the Forum.
If you are not currently a member, you are eligible for a free
introductory membership as an owner of an EPSON product.
This membership entitles you to:
❑ An introductory credit on CompuServe
❑ Your own user ID and password
❑ A complimentary subscription to CompuServe Magazine,
CompuServe’s monthly publication.
To take advantage of this offer, call (800) 848-8199 in the United
States and Canada and ask for representative #529. In other
countries, call the following U.S. telephone number:
(614) 529-1611, or your local CompuServe access number.
Introduction
5
Page 11

Import ant Safety In s t ructi ons
Before using your printer, read the following safety
instructions to make sure you use the printer safely and
effectively.
❑ Turn off and unplug the printer before cleaning. Clean with
a damp cloth only. Do not spill liquid on the printer.
❑ Do not place the printer on an unstable surface or near a
radiator or heat register.
❑ Do not block or cover the openings in the printer’s cabinet
or insert objects through the slots.
❑ Use only the type of power source indicated on the
printer’s label.
❑ Connect all equipment to properly grounded power
outlets. Avoid using outlets on the same circuit as
photocopiers or air control systems that regularly switch
on and off.
❑ Do not let the power cord become damaged or frayed.
❑ If you use an extension cord with the printer, make sure the
total ampere rating of the devices plugged into the
extension cord does not exceed the cord’s ampere rating.
Also, make sure the total of all devices plugged into the
wall outlet does not exceed 15 amperes.
❑ Except as specifically explained in this Reference Guide, do
not attempt to service the printer yourself.
❑ Unplug the printer and refer servicing to qualified service
personnel under the following conditions:
If the power cord or plug is damaged; if liquid has entered
the printer; if the printer has been dropped or the cabinet
damaged; if the printer does not operate normally or
exhibits a distinct change in performance. Adjust only those
controls that are covered by the operating instructio ns.
Introduction
6
Page 12

Cha pter 1
Paper Handling
Choosing Paper and Other Media . . . . . . . . . . . . . . . . . 1-2
Setting the Paper Thickness and Adjustment Levers . . . . . . 1-3
Setting the Paper Thickness Lever . . . . . . . . . . . . . . 1-3
Setting the Thickness Adjustment Lever . . . . . . . . . . . 1-4
Loading Plain Paper . . . . . . . . . . . . . . . . . . . . . . . . 1-5
Loading Special Papers and Other Media . . . . . . . . . . . . 1-7
Loading Special Papers and Transparencies . . . . . . . . . 1-8
Loading Envelopes . . . . . . . . . . . . . . . . . . . . . . . 1-10
1
Paper Handling
1-1
Page 13

Read this chapter for information about choosing the best
paper or other media for your printing needs and for
instructions on loading them in your printer.
Choosing Paper and Other Media
You can use most plain paper with your printer and achieve
good results. Coated papers give you better results because
they reduce the amount of ink that is absorbed. However, if the
coated paper does not absorb enough ink, the ink can smear.
To ensure the best results, EPSON provides special papers and
transparencies that are formulated for the inks used in EPSON
ink jet printers. These papers include the following:
❑ EPSON special coated paper for 360 dpi. Use this paper for
best results when printing at 360 dpi.
❑ EPSON special coated paper for 720 dpi. Use this paper for
best results when printing at 720 dpi. Five sample sheets
are included with the printer.
❑ EPSON high-quality glossy paper. Use this paper with
720 dpi to produce camera-ready composites. When
printing on glossy paper, use only EPSON high-quality
glossy paper.
❑ EPSON transparency film. When printing transparencies,
use only EPSON transparencies. For best results, use
transparencies within six months of opening the package.
Do not use 720 dpi when printing transparencies.
To order EPSON papers and transparencies, contact your
dealer or call EPSON Accessories at (800) 873-7766 (U.S. only).
In Canada, call (800) BUY-EPSON for sal es loca tions.
1-2
Paper Handling
Page 14
Use the following part numbers when ordering:
Paper or other media Size Part number
Special coated paper for
720 dpi
Special coated paper for
360 dpi
High-quality glossy paper Letter (8.5 ×11 inches) S041072
Transparency film Letter (8.5 ×11 inches) S041064
Letter (8.5 × 11 inches)
Legal (8.5 × 14 inches)
Letter (8.5 × 11 inches) S041060
S041062
S041048
Setting the Paper Thickness and Adjustment Levers
Before you start printing, you should check the paper thickness
and adjustment levers to make sure they are set correctly for
the type of paper or other media you are loading.
Caution:
c
Before you change the lever settings, make sure there is no
paper in the paper path and that printing is paused. To do this,
press the
Pause
button or turn off the printer.
Setting the Paper Thickness Lever
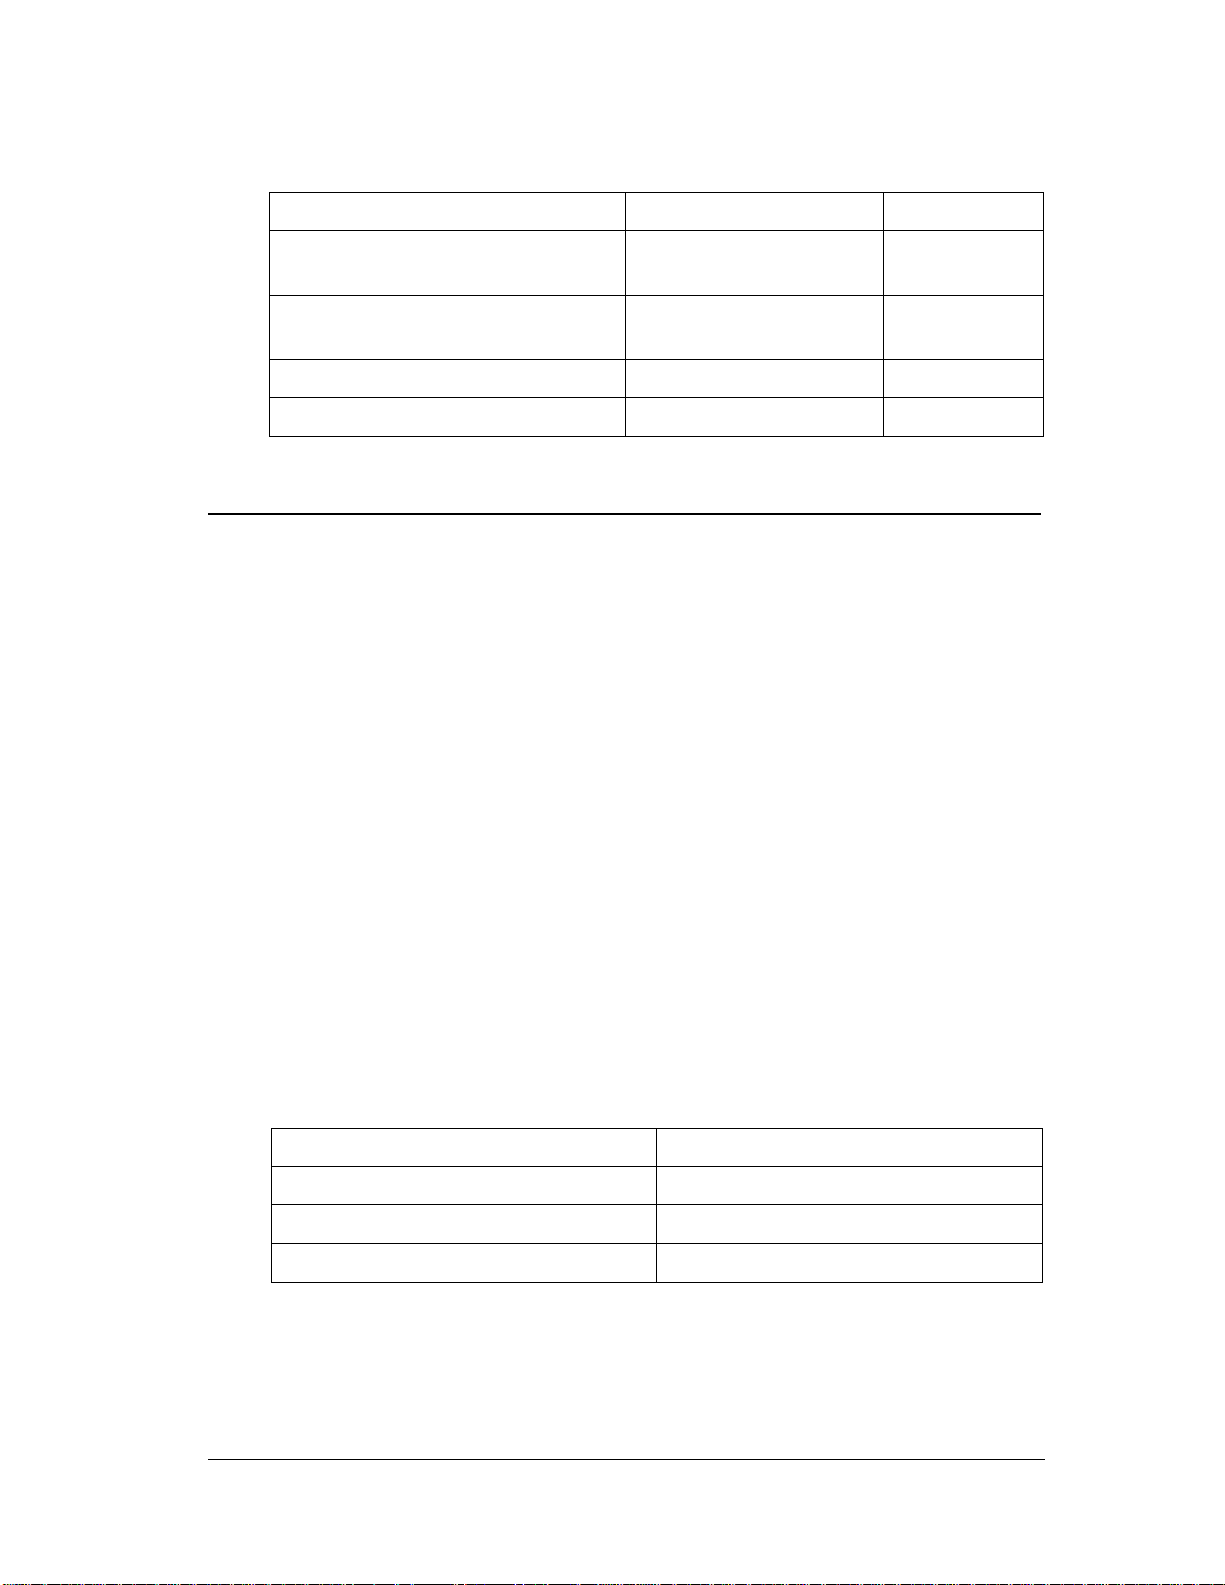
The paper thickness lever on the right side of the sheet feeder
has two settings: plain paper and thick paper. Set the lever to
the position that best suits the paper or other media you plan
to use, as shown in the following table and illustration.
Paper type Paper thickness lever position
Stand ar d pap e r Plain paper
Transparency film Plain paper
Envelopes or labels Thick paper
Paper Handling
1-3
Page 15
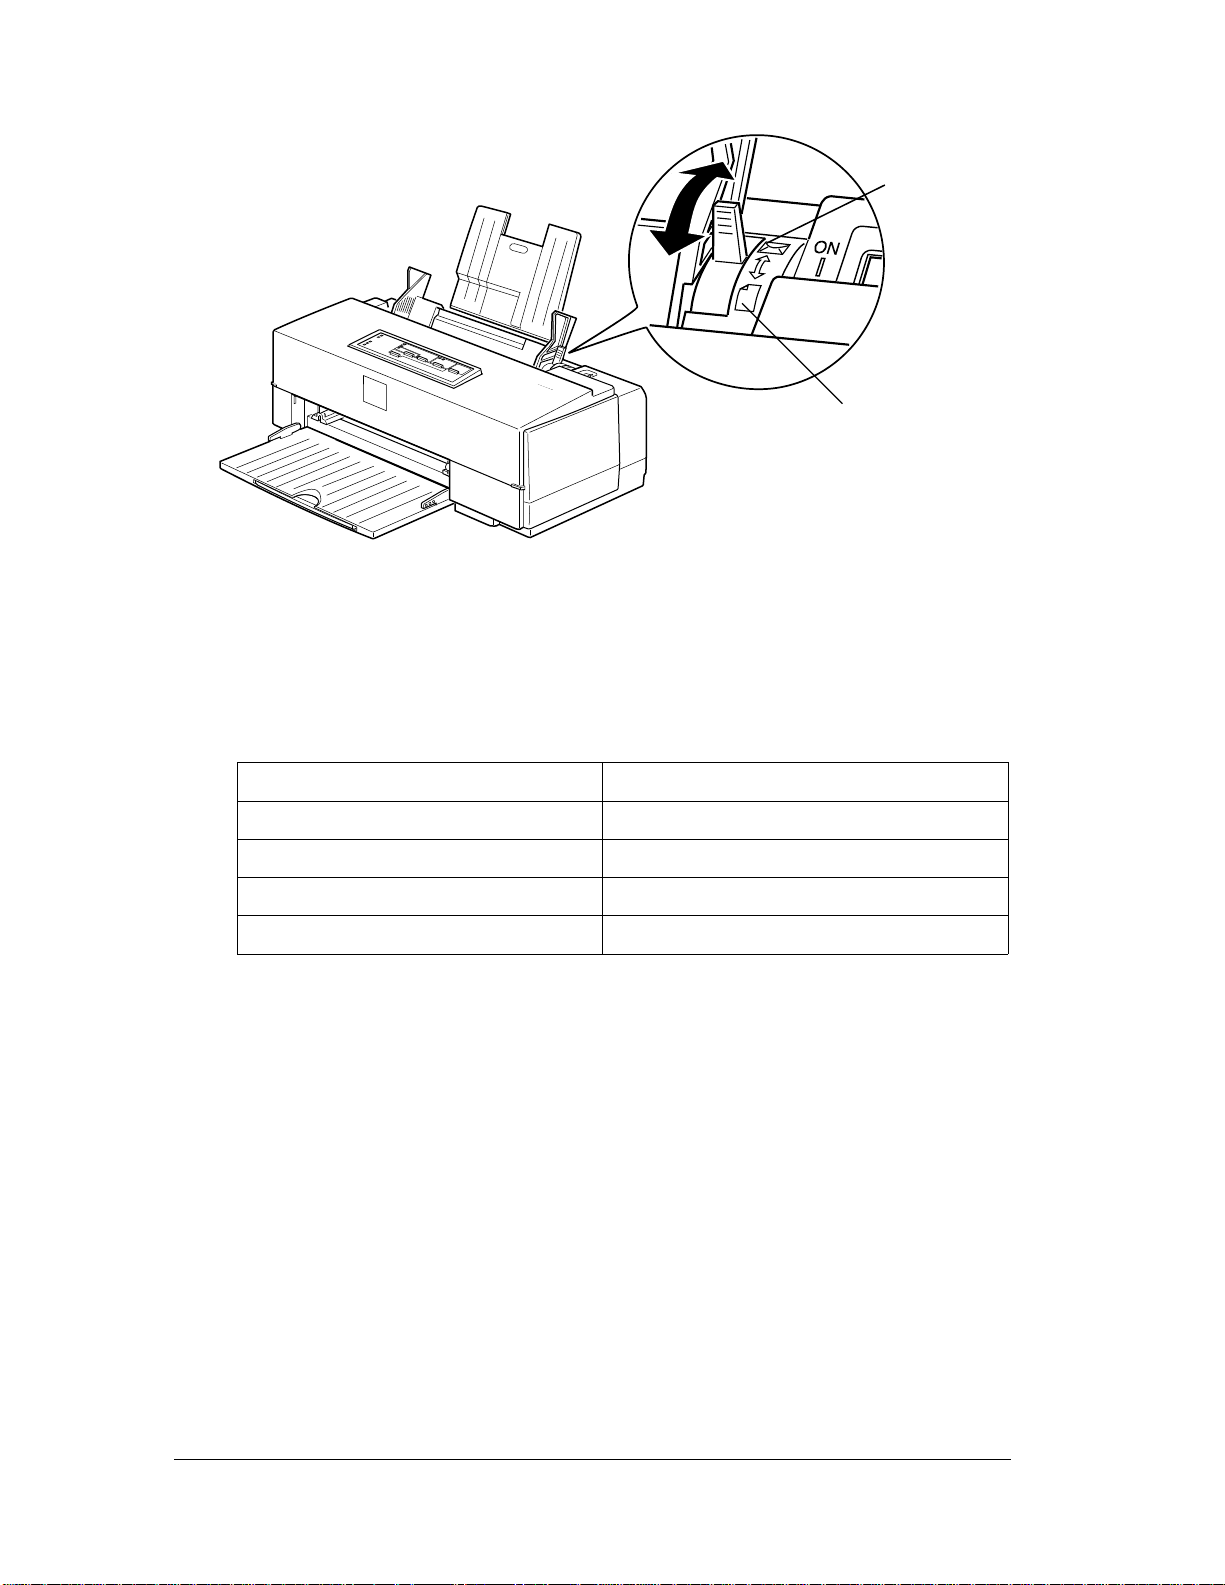
Setting the Thickness Adjustment Lever
Use the table below to set the thickness adjustment l ever for
your media type.
thick paper
setting
plain paper
setting
Paper type Thickness adjustment lever position
Standard paper 0
Transparency film 0
Envelopes or labels +
Previously smeared documents +
If a document is smeared, set the thickness adjustment lever to
the + position (regardless of the paper type) and print it again.
To access the lever, open the printer cover; the lever is in the
left back corner, as shown in the following illustration.
1-4
Paper Handling
Page 16
thickness
adjustment
lever
Loading Plain Paper
The following procedure explains how to load plain bond
paper. For instructions on loading coated or glossy paper,
envelopes, and transparencies, see page 1-7.
You can load up to 100 sheets of plain paper. For paper
specifications, see Appendix A.
Always load plain paper with the printable surface facing
upward. The printable surface is marked with an arrow on
most plain paper packaging.
Note:
You can use these instructions for printing on labels; however, be
sure to set the paper thickness lever to the Thick paper position and
the thickness adjustment lever to the + position. Also make sure no
labels are curled or peeling away from the backing when you load
them.
Paper Handling
1-5
Page 17
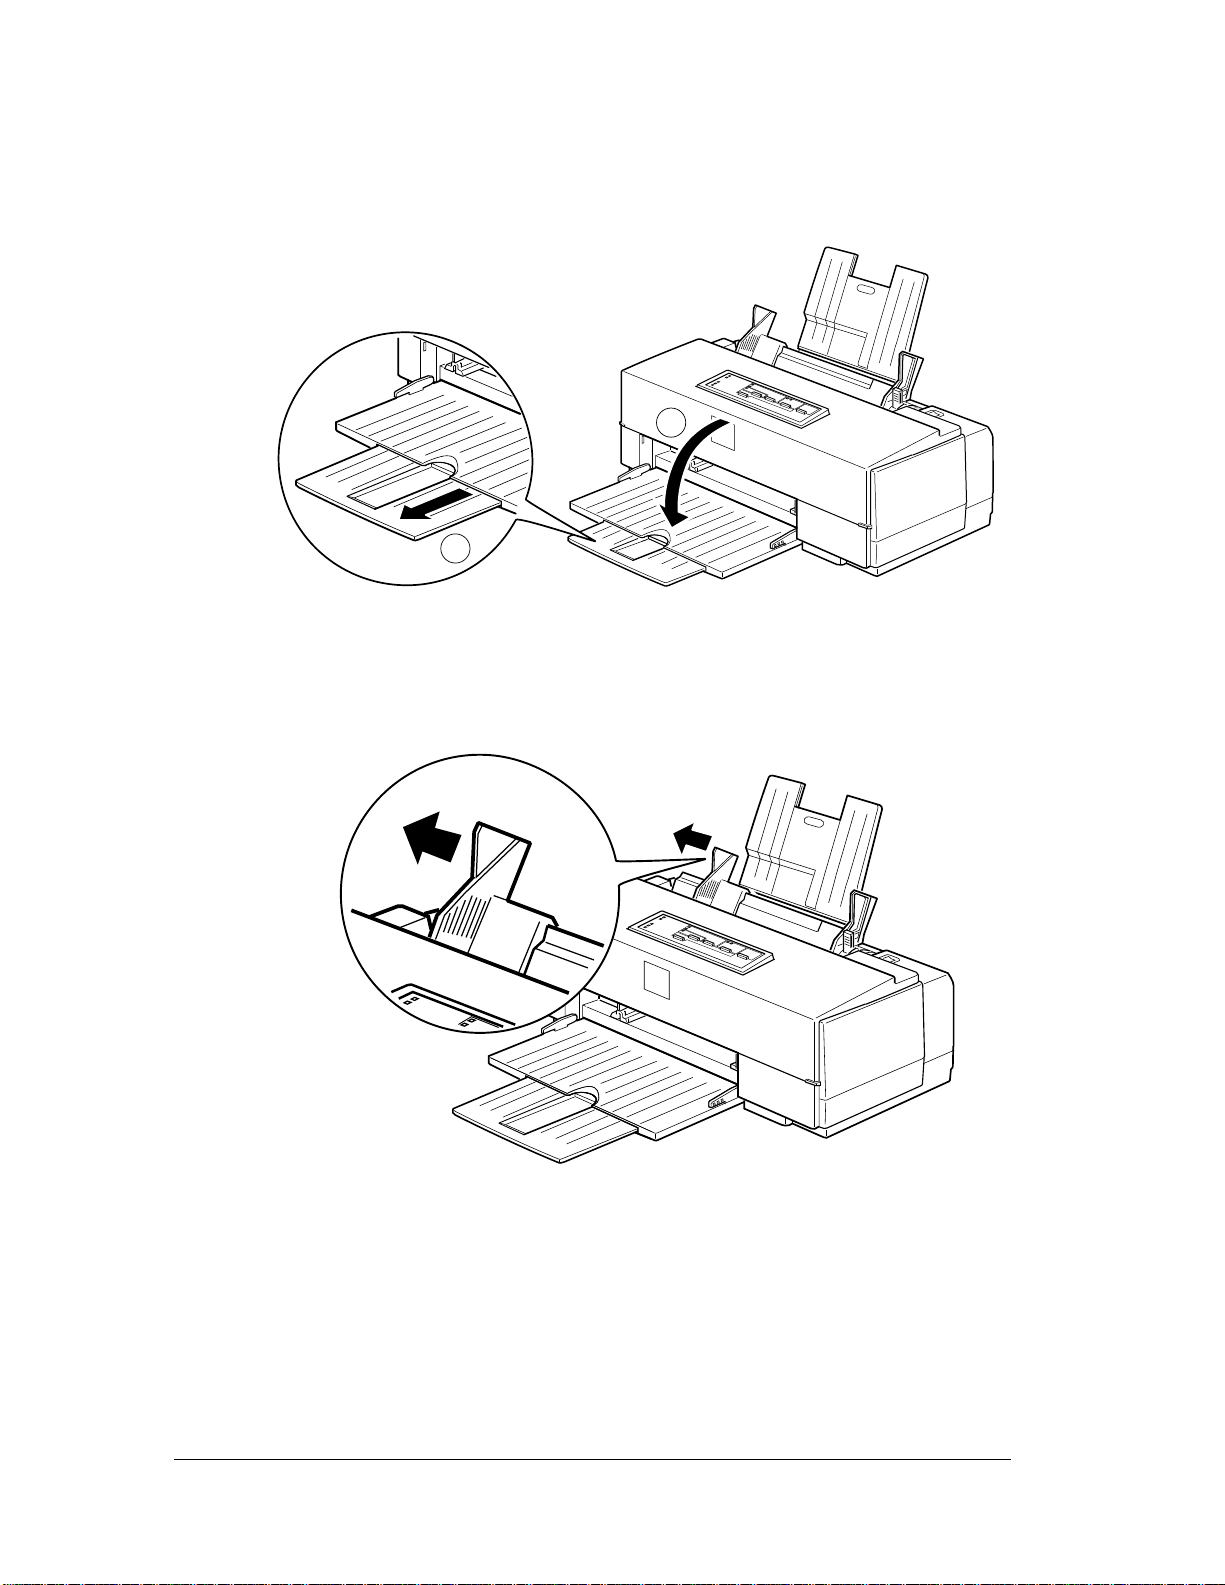
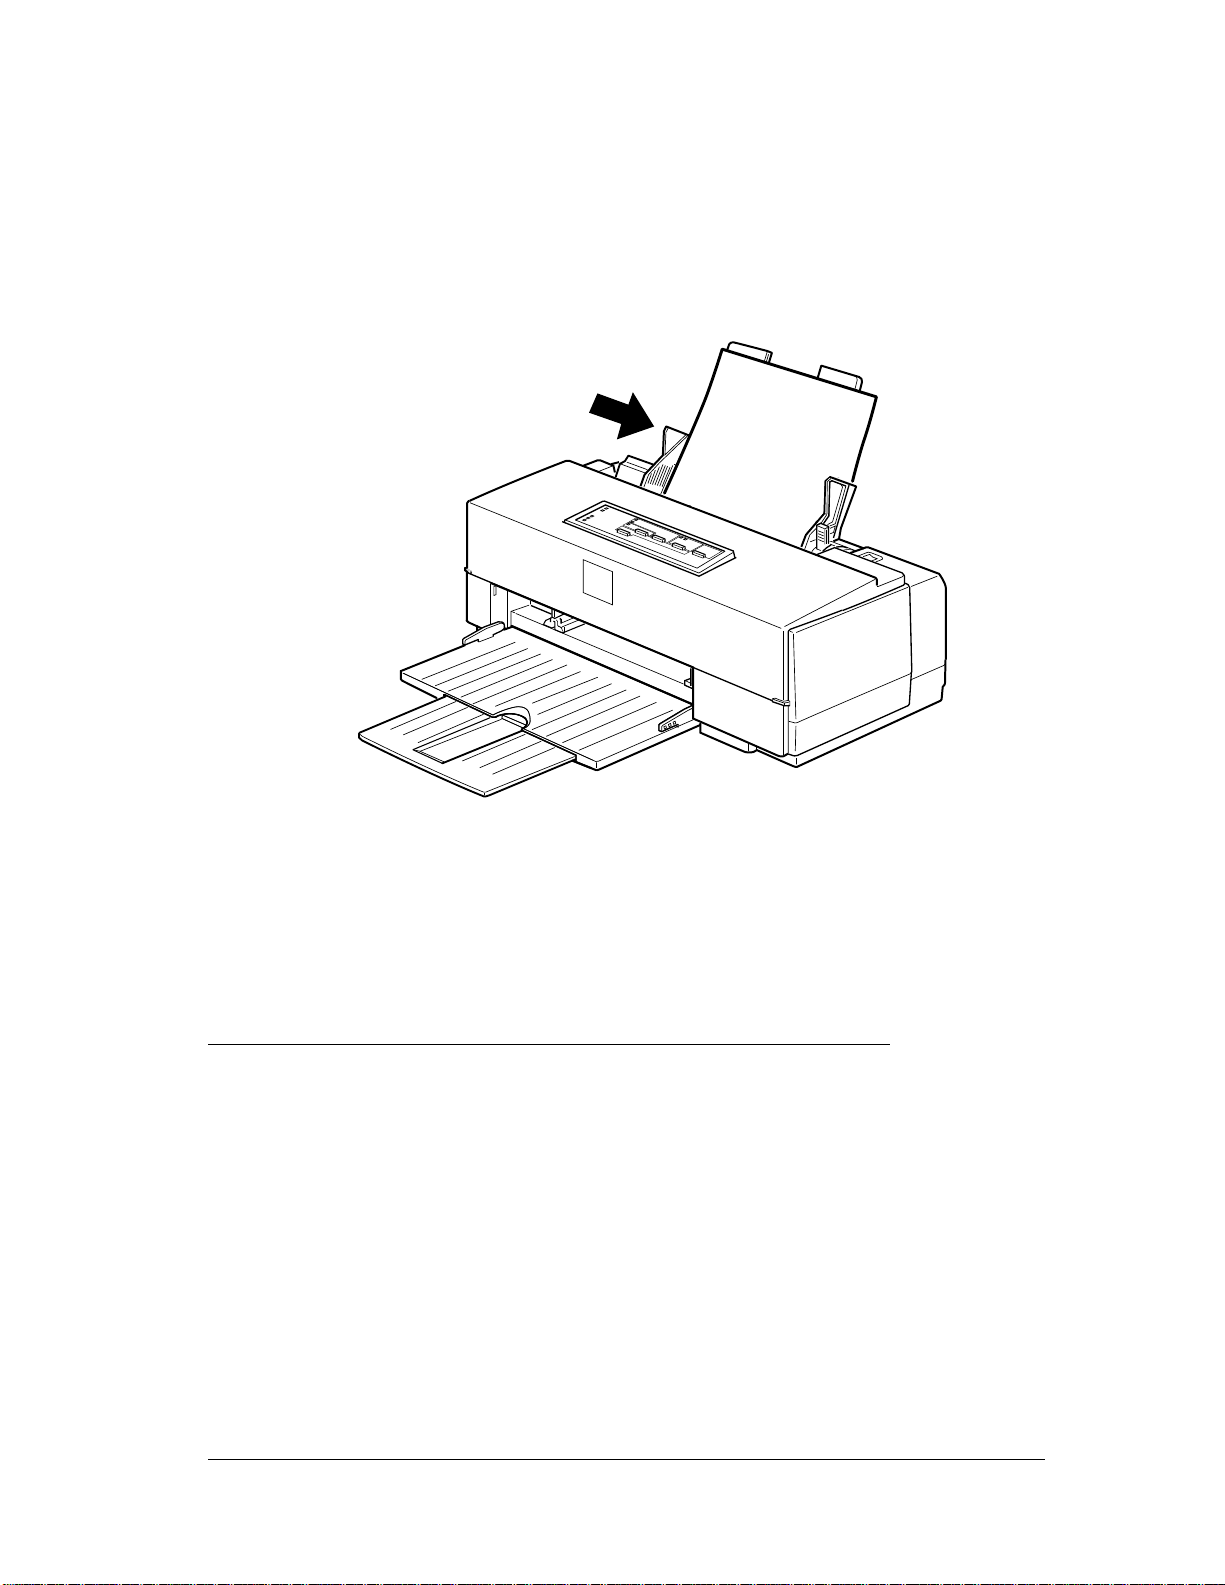
1. Lower the o utput tray at the front of the printer. Then slide
out the extension.
1
2
2. Slide the left edge guide on the sheet feeder to the left as
far as it will go.
3. Fan a stack of paper; then tap it on a flat surface to even the
1-6
edges.
Paper Handling
Page 18
4. Load the stack of paper, printable side up, so that its right
edge is firmly against the right side of the sheet feeder. (Do
not load pape r above the arrow printed o n the inside o f the
left edge guide on the sheet feeder.) Then slide the left edge
guide against the left edge of the paper.
5. Change the Media Type and other printer driver settings so
they are appropriate for the paper or labels you loaded. For
instructions see your
select Plain paper as your Media Type.)
Setup and Software Guide
. (For labels
Loading Special Paper s and Other Media
When using special coated paper, glossy paper, transparencies,
or envelopes, keep the following in mind:
❑ Use special coated paper and glossy paper within one year
of purchase. Use transparencies within six months.
❑ Do not touch the printable surface of the paper; hold the
sheets by their edges. The moisture and oils on your hands
can reduce print quality.
Paper Handling
1-7
Page 19

❑ After printing on high-quality glossy paper or
transparencies, remove each sheet from the output tray
immediately. Make sure each sheet is dry before stacking.
❑ You can print on sheets of labels in your printer; just follow
the instructions for loading plain paper on page 1-5.
❑ Return unused sheets and envelopes to their original package
as soon as possible after you finish printing. Unfavorable
storage conditions—especially high temperature, humidity,
and direct sunlight—can damage the media.
❑ Follow any other special loading procedures included in
the rest of this section.
Loading Special Papers and Transparencies
The following procedure explains how to load coated papers,
glossy paper, and transparencies. You can load up to the
following number of sheets in the sheet feeder:
❑ 70 sheets of special coated paper
Note:
If you load legal-size special coated pap er for 720 dpi, do not load
it more than halfway to the arrow on the left edge guide of the
sheet feeder.
❑ 50 sheets of transparency film with one sheet of plain paper
beneath the last transparency in the stack
❑ 30 sheets of high-quality glossy paper with a sheet of plain
paper beneath the last sheet in the stack; to avoid printing
on the plain paper, print your document one page at a time.
If you load a single sheet of glossy paper, place a sheet of
plain paper beneath it and print one page at a time.
1-8
Paper Handling
Page 20
Note:
If you load multiple sheets of glossy paper, the minimum top
margin is 1.2 inches (30 mm). To print with a smaller top
margin, load and print glossy paper one sheet at a time.
Follow these steps to load special paper or transparency film:
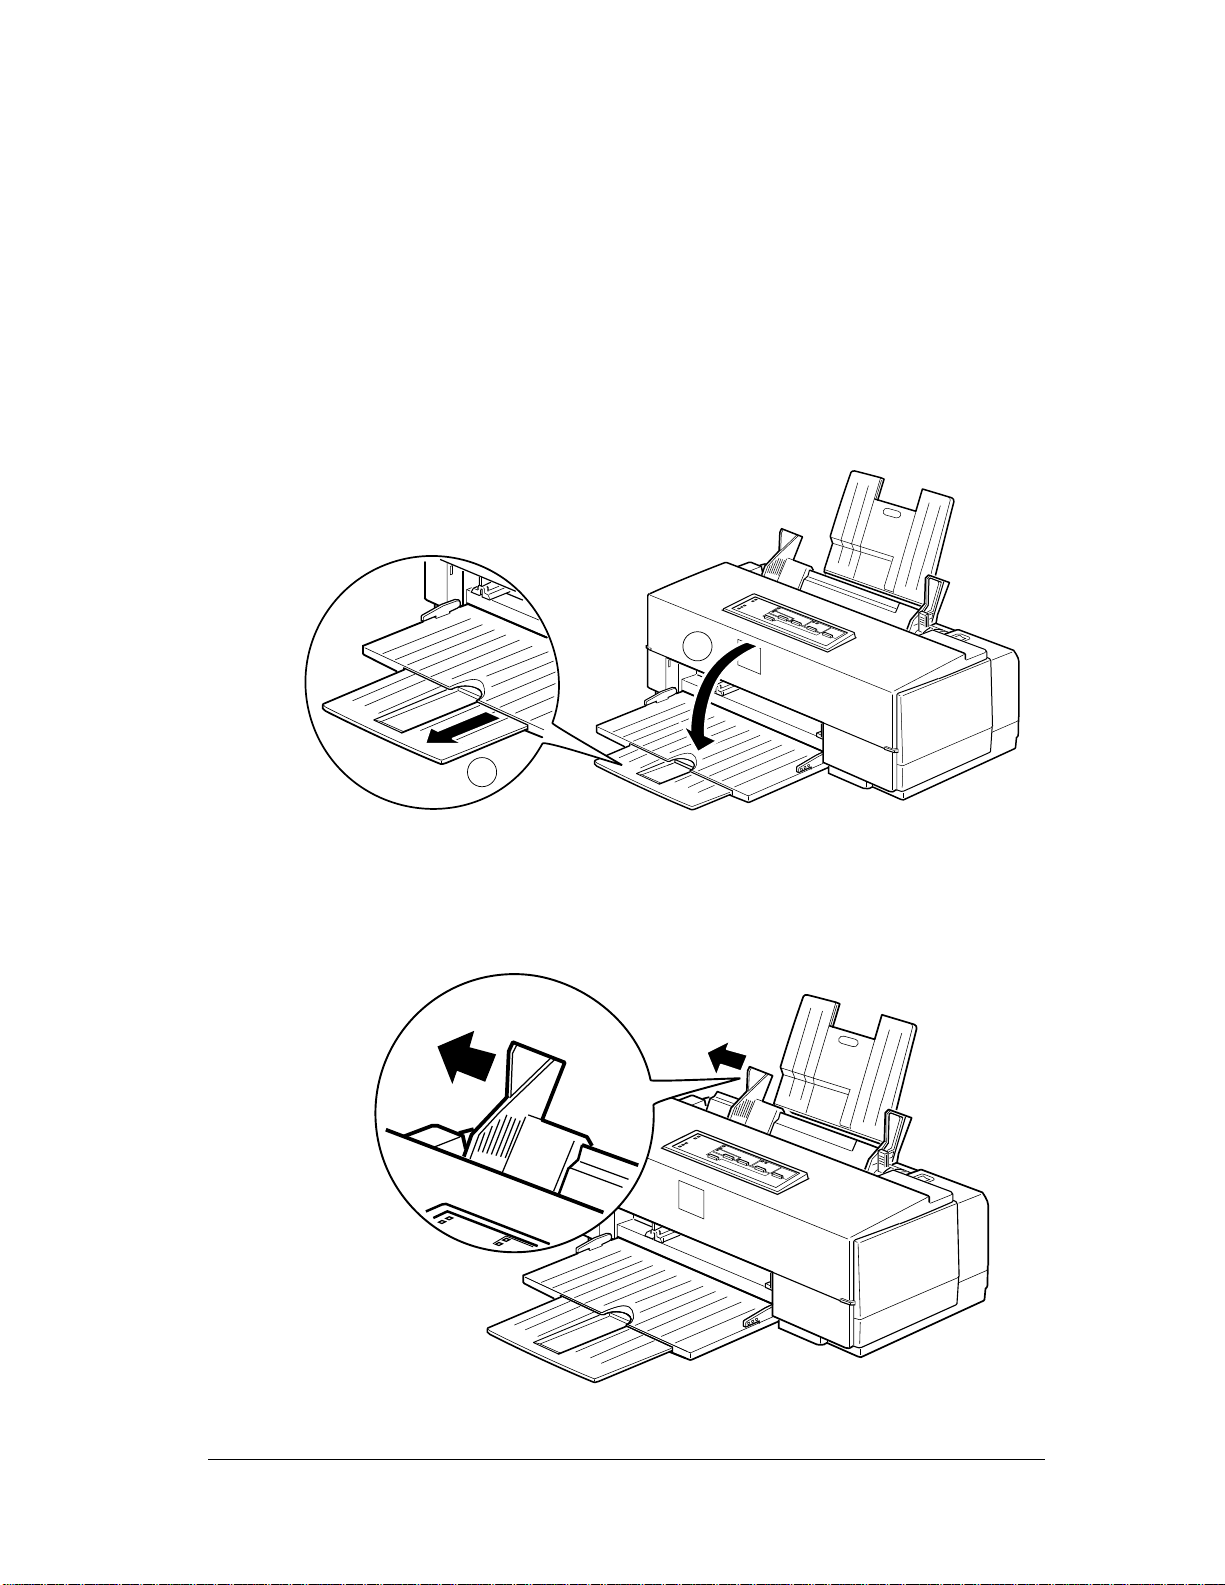
1. Lower the output tray at the front of the printer and slide
out the extension.
1
2
2. Slide the left edge guide on the sheet feeder to the left as far
as it will go.
Paper Handling
1-9
Page 21
3. Prepare the paper or transparency film as described on the
previous page.
4. If you are loading a s tack of paper or transparencies, fan the
stack and then tap it on a flat surface to even the edges.
5. Before you load paper, make sure the printable surface faces
up. For coated papers, the printable side is whiter than the
other side. For glossy paper and transparencies, the
printable side is face up when the cut corner is positioned
as shown in the illustration below.
6. Change the Media Type and other printer driver settings so
they are appropriate for the paper or transparency film you
loaded. (For instructions, see your
Loadin g En ve lo pe s
For detailed specifications on the thickness and weight of the
envelopes you can load, see Appendix A. Do not use envelopes
that are curled or folded, or ones that are too thin; they may
curl during printing. Also, do not choose 720 dpi resolution for
envelope printing.
1-10
Paper Handling
Setup and Software Guide
.)
Page 22
Follow the se step s to load envelopes:
1. Make sure you set the paper thickness and thickness
adjustment levers to the correct positions for envelope
printing, as described on page 1-3.
2. You can load up to 10 envelopes in the sheet feeder with the
printable side facing up as shown.
3. Adjust the left edge guide so the envelopes feed straight into
the paper path.
4. Change the Media Type and other printer driver settings
so they are appropriate for the envelopes you loaded. (For
instructions, see your
Setup and Software Guide
.)
Paper Handling
1-11
Page 23

Cha pter 2
Controlling the Printer
Using the Printer’s Control Panel . . . . . . . . . . . . . . . . . 2-2
Lights . . . . . . . . . . . . . . . . . . . . . . . . . . . . . . . 2-3
Buttons . . . . . . . . . . . . . . . . . . . . . . . . . . . . . . 2-4
Using the Default Setting Mode . . . . . . . . . . . . . . . . . . 2-7
2
Controlling the Printer
2-1
Page 24
This chapter explains how to control the printer using the
control panel. It also describes the additional printer functions
you can perform using the Default setting mode.
Using the Printer’s Control Panel
The printer’s control panel contains lights for displaying the
printer status and buttons for controlling certain functions, as
described in this section.
Since most printer settings can be controlled from your
software, you do not often need to use the control panel.
Norma lly you need to use it onl y to do the following:
❑ Clean the black or color print heads
❑ Replace the ink cartridges
❑ Pause the printer temporarily
❑ Turn on economy or condensed mode
❑ Change the prin ter’s default setti ngs
❑ Reset the printer.
2-2
Controlling the Printer
Page 25

Lights
Power
Data
Ink Out
Ink Out
On when the printer is on.
Flashes when data is being received by the printer.
On when data remains in printer memory or when
printing a self test or demonstration page.
O Flashes when the black ink cartridge is low on ink.
On when the black ink cartridge is empty or not
installed. The printer will not work if the black ink
cartridge is empty or not installed.
NNN Flashes when the color ink cartridge is low on ink.
On when the color ink cartridge is empty or not
installed. The printer will not work if the color ink
cartridge is not installed.
If color ink runs out while you’re printing, the
printer stops. You can continue to print with the
black ink cartridge by switching to monochrome
printing. To do thi s, turn off the printer, turn it on
again, and resend your print job.
Paper Out
Economy
Condensed
On when the printer runs out of paper. Flashes
rapidly if there is a paper jam.
On when economy printing mode is selected. In
economy mode the printer uses less ink by printing
fewer dots per character. It also makes black printing
appear gray. Use this mode for rough drafts of text
only that are printed from DOS applicati ons.
On when condensed mode is selected. The printer
prints selected fonts at 60% of their width so more
characters fit on a page. (Software can override this
setting.)
Controlling the Printer
2-3
Page 26

Pause
Print Mode
Buttons
In addition to the button functions explained below, you can
perform additional functions using certain button combinations
and power-on sequences, as described on page 2-5.
Alt
On when printing is paused and flashes when you
clean the print heads or replace ink cartridges. The
Pause
turn off the printer when the
See
light also flashes when an error occurs. Never
light is flashing.
Print Mode
Pause
in the next section.
Used alone or in combination with other buttons to
reset the printer, clean the print heads, or replace the
ink cartridges; see the next section for more
information.
Pause
(or
Reset
)
Stops printing temporarily. Press it again to resume.
Economy/Condensed
Selects economy or condensed mode as indicated by
the
Economy
button only if you print from a DOS application.
(or
Cleaning
and
O)
Condensed
lights. Use this
2-4
Controlling the Printer
Page 27

Print Mode
(or
Cleaning
NNN)
Selects the paper and ink type when using DOS. The
current setting is indicated by the left and right
Mode
Paper type Left light Right light
Plain paper (true black) Off Off
Plain paper (composite black) Off On
Coated or glossy paper On Off
Transpa r e ncy fi lm On On
lights, described in the following table.
For most printing on plain paper, select Plain paper
(true black). If the black ink on the printout is
blurred, select Plain paper (composite black).
Composite black is produced by mixing cyan,
magenta, and yellow ink.
Print
Load/Eject
Loads or ejects a sheet of paper. The printer
normally loads and ejects paper automatically.
Button combinations and power-on functions
The button combinations below perform additional functions
to control yo ur printer.
Alt
Alt
+
Pause
+
Economy/Condensed
(or
Reset
)
Clears the printer’s buffer and resets the printer
settings to their factory defaults; see “Initialization”
in Appendix A for more information.
(or
Cleaning
O)
Cleans the black print head; see “Cleaning the Print
Heads” in Chapter 3 for more informa tion.
Controlling the Printer
2-5
Page 28

Alt + Print Mode
Cleans the color print head; see “Cleaning the Print
Heads” in Chapter 3 for more information.
Load/Eject
+
POWER
Checks the paper length and performs a printer self
test. Hold down
page. See “Testing the Printer” in Chapter 1 of your
Setup and Software Guide
Load/Eject
+
Print Mode
When connected to a PC, prints a page containing a
hexadecimal representation (hex dump) of the data
sent to the printer for troubleshooting use; see
Chapter 4. Hold down
until the printer feeds a page. To exit hex dump
mode, press the
printer. (If a partial page feeds before you press
Pause
(or
Cleaning
switch
+
, press
NNN)
Load/Eject
POWER
switch
Load/Eject
Pause
button and turn off the
Load/Eject
until the printer feeds a
for more information.
and
Print Mode
to clear the paper path.)
Alt
+
POWER
switch
Prints a demonstration page of the printer’s fonts
and colors. (Paper must be loaded in the printer.)
Hold down
demonstration mode, wait until the
comes o n; then turn off the pr inter.
Economy/Condensed
Enters the printer’s Default setting mode and prints
an instruction page; see the next section for more
information. Hold down
until the printer feeds a page. To exit Default setting
mode, press the
printer. (If a partial page feeds before you press
Pause
, press
Alt
+
POWER
Load/Eject
until the printer feeds a page. To exit
Pause
light
switch
Economy/Condensed
Pause
button and turn off the
to clear the paper path.)
2-6
Controlling the Printer
Page 29

Pause
+
POWER
switch
Enters printer adjustment mode and prints a
multilingual instruction sheet on calibrating the
printer. (Paper must be loaded in the printer.) Use
this mo de only if you are printin g from DOS
applications. Hold down
feeds a page. To exit printer adjustment mode, press
the
Pause
partial page feeds before you press
Load/Eject
button and turn off the printer. (If a
to clear the paper path.)
Using the Default Setting Mode
Additional printer fun ctions are available through the Defau l t
setting mode. Because the printer’s factory defaults are
designed to meet the needs of almost all users, you rarely need
to change the printer functions listed below. If necessary,
however, you can turn on the Default setting mode and change
the settings using the control panel buttons.
Pause
until the printer
Pause
, press
❑ Print direction. Specifies how the print head moves across
the page. The options are Uni-D, Bi-D, and Auto (default).
When Uni-D is on, the print head prints in only one
direction to provide the most precise alignment for
graphi cs and text. In Bi-D printing, the print head prints in
both directions. Bi-D is faster but the vertical alignment
may not be as precise as Uni-D. When Auto is selected, the
printer switches automatically between Uni-D and Bi-D as
necessary when it receives data.
❑ Font and Pitch. Select the built-in printer font and character
pitch used as the default. Normally you use your software
to select the font and pitch. The defaul t Font and Pit ch is
Courier 10 cpi (characters per inch).
Controlling the Printer
2-7
Page 30

❑ Interface mode. Determines from which interface the
printer receives p rint data. T he default setting, Auto, allows
the printer to automatically switch as needed between the
parallel and serial interfaces. However, if you experience
communication problems, you might want to set the
interface mode to either Parallel or Serial.
❑ Auto interface wait time. Sets the time period for the
printer to wait for data from the current interface (and
accept no data from the other interface) when you’re using
the Auto interface mode. You can select a 10-second
(default) or 30-second timeout.
❑ Software. Specifies the printer control language to use:
EPSON ESC/P 2 (default) or IBM X24/X24E. If your
software allows you to select EPSON ESC/P 2, choose it for
the most advanced fonts and graphics.
❑ Auto CR. Specifies that the printer perform a carriage
return and line feed operation if the print positions exceed
the right margin of the paper. (Used in IBM X24/X24E
mode only.)
❑ AGM (Alternate Graphics Mode). Specifies that the printer
use high-resolution, 24-pin graphics commands. (Used in
IBM X24/X24E mode only.)
❑ Character table. Selects the set of characters and symbols
that ca n be prin ted. The default is the Itali c U.S.A. character
table. If you commonly use a language containing accents,
symbols, or other characters not available in the Italic
U.S.A. character table, change to a different character table.
For a list of the character tables, see Appendix B.
❑ Auto line feed. Specifies that a carriage return character
encountered in the print file be accompanied by a line feed
command. By default, auto line feed is off. If text lines print
on top of one another, turn on auto line feed.
2-8
Controlling the Printer
Page 31

❑ Network interface mode. If you’re having trouble printing
when the printer is connected to multiple computers, turn
on network interface mode. By default, network interface
mode is off.
❑ Loading position. Determines the top margin by defining
how close to the paper edge the first line can print. The
loading position can be 3 mm (default) or 8.5 mm.
Normally you should use your software to adjust your top
margin.
❑ Thick paper. Select Index card (portrait) or Envelope
(default) if you print on these media.
To turn on Default setting mode and print in structions, turn off
the printer. Then hold down the
Economy/Condensed
button whil e you turn the printer back on. F ollow the
instructions the printer prints to change the default settings by
pressing the buttons on the control panel. When you are
finished, press
Pause
setting mode. (If a partial page feeds before you press
press
Load/Eject
and turn off the printer to exit Default
to clear the paper path.)
Pause
,
Controlling the Printer
2-9
Page 32

Cha pter 3
Maintenance
Cleaning the Print Heads . . . . . . . . . . . . . . . . . . . . . . 3-2
Replacing Ink Cartridges . . . . . . . . . . . . . . . . . . . . . . 3-3
Selecting the Correct Ink Cartridges . . . . . . . . . . . . . 3-4
Removing and Installing Ink Cartridges . . . . . . . . . . . 3-5
Cleaning the Printer . . . . . . . . . . . . . . . . . . . . . . . . . 3-8
Transporting the Printer . . . . . . . . . . . . . . . . . . . . . . 3-9
Calibrating the Printer When Printing from DOS . . . . . . . . 3-10
3
Maintenance
3-1
Page 33

Instructions in this chapter tell you how to do the following to
maintain and care for your printer:
❑ Clean the print heads
❑ Replace the ink cartridges
❑ Clean the printer
❑ Transport the printer
❑ Calibrate the printer when printing from DOS.
Cleaning the Print Heads
The printer periodically cleans its print heads automatically, so
normally you should not need to manually activate a cleaning
cycle. However, if print quality diminishes, you can run a
cleaning cycle to unclog the print head nozzles so they deliver
ink properly.
You can clean one or both print heads. Each cleaning cycle
takes about one minute, during which the carriage moves and
you hear the printer recharging the print heads. The
Pause
light flashes throughout the cleaning cycle and then stays on
when the cycle is finished.
To clean the color print head:
1. Make sure the printer is turned on and press the
Pause
button.
2. Hold do wn the
Alt
button and press
Prin t Mode
. The
cleaning cyc le begins.
3. Press the
Pause
button.
3-2
Maintenance
Page 34

To clean the black print head:
1. Make sure the printer is turned on and press the
button.
2. Hold do wn the
The cleaning cycle begins.
3. Press the
After you clean the print heads, turn off the printer; then hold
down the
prints a demonstration page so you can see if your print quality
has improved. (After the page prints, the
on; turn off the printer to exit demonstration mode.)
It can sometimes take up to five cleaning cycles to improve
print quality. If the print quality does not improve after you
clean the print heads five times (printing a demonstration page
to check after each cleaning), and you are sure the cartridges
are not low on or out of ink (as described in the next section),
contact your dealer or authorized EPSON servicer.
Pause
Alt
button as you turn the printer back on. This
Alt
button and press
button.
Economy/Condensed
Pause
Pause
light comes
.
Replacing Ink Cartridges
The printer’s
tell you when your ink cartridges are low on ink and when you
need to replace them. If one of these lights flashes, the
indicated cartridge is low on ink; if it remains on, you need to
replace the cartridge.
Caution:
c
❑
Ink Out
Do not replace an ink cartridge unless its
tells you to. If you replace a cartridge before its light
flashes, the sensor that tells you when ink is out will not
work with the new cartridge.
O (black) and
Ink Out
NNN (color) lights
Ink Out
Maintenance
light
3-3
Page 35

❑
Leave the old cartridge installed in the printer until you
are ready to replace it with a new one. Attempting to print
without a cartridge installed can damage th e printer.
❑
If you replace a cartridge when the
must turn off your printer and then turn it back on. This
erases the data received by the printer and you must
resend your print job.
❑
Once you install the ink cartridges, do not open the clamps
or remove the cartridges except to replace them with new
ones. Once you remove a cartridge, you cannot reuse it.
When the color ink cartridge is empty, you can continue
printing with the black ink cartridge by switching to
monochrome mode. To do this, turn off the printer, then turn it
back on and resend your print job.
If the black ink cartridge is empty, you cannot continue
printing, even if the color cartridge still contains ink.
Selecting the Correct Ink Cartridges
Data
light is on, you
Use only these EPSON ink cartridges:
When you need new ink cartridges, contact your dealer or call
EPSON Accessories at (800) 873-7766 (U.S. only). In Canada,
call (800) BUY-EPSON for sales locations.
c
3-4
Black ink cartridge S020047
Color ink cartridge S020049
Caution:
Use only genuine EPSON in k cartridges and do not refill
them. Other products may cause damage not covered by
EPSON’s warranty.
Maintenance
Page 36

Removing and Installing Ink Cartridges
Follow these steps to replace either or both ink cartridges:
1. Make sure the printer is on and one of the
flashing or turned on.
2. Press the
comes on).
3. Lower the output tray on the front of the printer and then
lift up the printer’s cover by the notches on its sides.
w
4. Hold do wn the
print head moves slightly left to the ink cartridge install
position. The
returns to the home position after 30 seconds if the ink
cartridges are not removed.)
Pause
Warning:
Never insert your hand in the paper path beneath the
center of the cover; you may injure your hand.
button (check that the
Alt
button for about five seconds until the
Pause
light begins blinking. (The carriage
Ink Out
Pause
lights is
light
5. Pull up the cartridge clamp to open it. The cartridge rises
partially out of the printer.
Maintenance
3-5
Page 37

6. Lift the cartridge out of the printer and dispose of it carefully
so any excess ink does not spill out. Do not take the used
cartridge apart or try to refill it.
Warning:
w
7. Open the package containing the ink cartridge and remove
the cartridge from its foil wrapper. Remove the tape seal
from the top of the cartridge.
If ink gets on your hands, wash them thoroughly with soap
and water. If ink gets into your eyes, flush them
immediately with water.
black
cartridge
c
color
cartridge
Caution:
You must remove the tape seal from the top of the
cartridge; leaving the tape on will permanently damage it.
Do not remove the tape seal from the bottom of the
cartridge; ink will leak out.
3-6
Maintenance
Page 38

8. Lower the ink cartridge into its holder with the label facing
up and the arrow pointing to the back of the printer.
9. Push down the ink cartridge clamp until it locks in place.
10. Press the
printer charges the ink delivery system.
11. Close the printer cover. When the charging cycle finishes,
Pause
the
Pause
Alt
button again. The
light stops flashing and stays on. Press the
button to turn off the light and resume printing.
Pause
light flashes as the
Maintenance
3-7
Page 39

Cleaning the Printer
If you want to clean the printer, follow these steps:
1. Turn off the printer and disconnect any cables connected
to it. Be sure to keep the printer cover closed as you clean it.
2. Remove any paper or other media from the sheet feeder.
3. Carefully clean away loose dust and dirt with a soft brush.
4. Clean the exterior with a soft cloth dampened in mild soap.
5. To clean ink out of the printer’s interior, wipe it gently with
a damp cloth.
c
Caution:
❑
Never use alcohol or thinner to clean the printer; these
chemicals can damage the components and the printer case.
❑
Do not use a hard or abrasive brush; these can scratch the
printer surfaces.
❑
Do not allow water to get on the printer mechanism or
any electronic components.
❑
Do not touch the gears inside the printer.
❑
Do not spray inside the printer with lubricants or oi ls;
they can damage the printer mechanisms.
3-8
Maintenance
Page 40

Transport in g the Pr inter
If you need to transport your printer, follow these steps:
1. Press the
2. Open the printer cover and make sure that the print head
is locked in the far right position. If it isn’t, turn on the
printer, wait about 10 seconds, and turn it off.
c
3. Unplug the power cord from the electrical outlet.
4. Disconnect the interface cable from the printer.
5. Remove any paper from the sheet feeder and remove the
paper support.
6. Push in the output tray extension and close the tray.
Pause
Caution:
Do not remove the ink cartridges when transporting the
printer. Transporting the printer without th e cartri dges
installed can damage the printer.
button and turn off the printer.
7. Install the transportation s crew to secure the prin t head to
the carriage as described in the sticker above the print head.
8. Attach any other protective materials to the printer. See the
Notice Sheet that was packed with the printer.
9. Repack the printer and attachments in the original box.
Be sure to keep the printer flat as you transport it. If you notice
problems with your printed output after transporting the
printer, clean the print heads as described on page 3-2. If the
image is misaligned, calibrate the printer as described in your
Setup and Software Guide
printing from DOS.
or as described below, if you are
Maintenance
3-9
Page 41

Calibrating the Printer When Printing from DOS
If vertical lines are misaligned when you print from DOS
applications, you may need to calibrate the printer using its
adjustment mode. To verify that your printer needs calibrating,
print a demonstration page as instructed on page 2-7. Examine
the demonstration printout; if vertical lines are misaligned,
calibrate you printer. Do not calibrate your printer too often.
Follow these steps:
1. Make sure paper is load in the printer and turn it off.
2. Hold do wn the
enter printer adjustment mode. It prints a multilingual
instruction sheet.
3. Follow the instructions on the sheet to calibrate your printer.
4. When you are finished, press
to exit printe r adju stment mode.
When you turn on the printer and send your next print job, the
lines should be aligned.
Pause
button and turn on the printer to
Pause
and turn off the printer
3-10
Maintenance
Page 42

Cha pter 4
Troubleshooting
Print Quality Problems . . . . . . . . . . . . . . . . . . . . . . . 4-2
Problems with Printing . . . . . . . . . . . . . . . . . . . . . . . 4-6
Paper Handling Problems . . . . . . . . . . . . . . . . . . . . . 4-12
Paper Jam Problems . . . . . . . . . . . . . . . . . . . . . . . 4-12
Paper Feeding Problems . . . . . . . . . . . . . . . . . . . . 4-12
Other Paper Handling Problems . . . . . . . . . . . . . . . 4-13
Troubleshooting
4
4-1
Page 43

This chapter describes what you can do if you are having
problems printing. It is divided into these sections:
❑ Print quality p roblems. See this section if the print quality
is not good or not what you expect.
❑ Problems with printing. See this section if your printer is
having trouble printing.
❑ Paper handling problems. See this section if you have
paper jams or other problems with paper handling.
If you have a printing problem, check the appropriate section
and follow all suggestions that apply to your problem. Also
check the ReadMe icon in the Windows EPSON group or on
the Macintosh for the latest information. If none of the
suggested solutions solve your problem, see “Where to Get
Help” in the Introduction.
Print Quality Problems
To help you determine the na ture of the problem, you may
want to print a demonstration page and analyze elements on it.
See Chapter 2 for instructions.
Print quality problems can often be solved by cleaning the print
heads as described earlier in this chapter. Note that it may take
as many as five cleaning cycles to solve a print quality problem.
If cleaning the print heads does not improve the print quality,
try the following:
❑ Check the status of the
see whether the ink cartridges are low on ink. If so, replace
the cartridges as described in Chapter 3.
❑ For color or complex grayscale images, turn on
MicroWeave and turn off High Speed mode.
Ink Out
O and
Ink Out
NNN lights to
4-2
Troubleshooting
Page 44

❑ Use a higher quality paper. For best print quality, use
EPSON special coated papers for 360 and 720 dpi or
EPSON high-quality glossy paper (720 dpi only).
Note:
Do not use high-quality glossy paper when you print at 360 dpi.
❑ Make sure the M edia Type setting matches th e type of
paper or other media loaded in the printer.
❑ If you’re printing a scanned image and the colors are not
right, first try to fix the problem using your scanning
software program.
If print quality does not improve, see the following specific
problems.
Printed output is not what you expect or is faint or blurred.
You may not be printing on the correct side of the paper. Test
both sides to determine which side gives you the best print
quality. On coated paper, print only on the white coated side;
on glossy paper or transparencies, print only with the cut
corner facing the right side of the sheet feeder and remove each
sheet as it is printed to prevent smearing by the next sheet.
Check that the paper thickness and thickness adjustment levers
are set correctly for the media type. (See “Setting the Paper
Thickness and Adjustment Levers” in Chapter 1 for more
information.) Faint or blurred printouts can result if you print
on plain paper or labels with these levers in incorrect positions.
Use a higher quality paper. Also, check that the Media Type
settin g in the driver is set f or the type of paper o r other media
you loaded. If you are using 720-dpi res oluti on, you get better
results when you use EPSON special coated paper for 720 dpi
or EPSON high-quality glossy paper.
Troubleshooting
4-3
Page 45

Check whether economy printing mode is on. To turn off this
mode, press the
Economy
Check whether your paper is mo ist or damp. I nk jet printers
are sensitive to moisture absorbed by paper. Do not store paper
in damp or humid places.
If you are printing color graphics at 360 or 720 dpi, make sure
MicroWeave is on and High Speed mode is off. Also check that
Brightness
the
setting (Macintosh driver) are appropriate for the image.
light goes off.
Economy/Condensed
and
Contrast
settings (PC driver) or
button until the
Light/Dark
Try using the printer driver’s
driver determine the appropriate image settings.
If you are using a DOS application and the black ink in the
image is blurred, select Plain paper (composite black) using the
Print Mode
and start the print job again.
Your Windows video driver may not be compatible with the
printer. Use the standard Windows VGA driver or contact the
manufacturer of your video card for an updated driver. For
information on changing the video driver, see your Windows
documentation.
Clean one or both print heads as described in Chapter 3.
Replace one or both ink cartridges.
control panel button, as described in Chapter 2,
Automatic
feature to let the
Vertical or horizontal lines do not align.
Calibrate your printer as described in your
Guide
chapter.
4-4
. If you are printing from DOS, see the instructions in this
Troubleshooting
Setup and Software
Page 46

You see white banding in your printouts.
Turn on MicroWeave in the printer driver.
If you still see white banding, clean the print heads as
described earlier in the chapter.
The printout contains incorrect or garbled characters.
Make sure EPSON Stylus COLOR II is selected as the default
Windows printer driver (PC driver) or is the last printer
selected in the Chooser (Macintosh driver).
If you are running Windows, make sure the Print Manager is
turned off in the Control Panel Printers utility; see your
Windows documentation or online help for instructions.
Print jobs may be held in the EPSON Spool Manager
(Windows) or the EPSON Monitor2 utility (Macintosh). Select
any print jobs marked pending, waiting, or held; then select
Delete or Cancel Printing
.
If you still see incorrect or garbled characters, try printing a
demonstration page to see if the problem is with your printer;
see Chapter 2 for instructions. If the demonstration page prints,
you may have a problem with your application software or
your printer cable. Make sure your cable is connected securely
and see your program’s documentation for troubleshooting
information. If no demonstration page prints, you may have a
problem with your printer; contact your EPSON dealer or an
authorized EPSON servicer.
You see incorrect colors in your printout.
Make sure EPSON Stylus COLOR II is selected as the default
Windows printer driver (PC driver) or is the last printer
selected in the Chooser (Macintosh driver).
Troubleshooting
4-5
Page 47

Check that the printer driv er’s
settings (PC driver) or
are appropriate for the image.
If you scanned the image, the different color interpretation
technologies used by your scanner, monitor, and printer can
never produce an exact color match with the original image.
However, check your scanner documentation for utilities you
can use to calibrate your scanner to your monitor and printer to
more closely match colors.
If you are printing from a DOS application using economy
mode, black text or graphics will appear gray on your printout;
turn off economy mode to achieve deeper blacks.
Light/Dark
Brightness
setting (Macintosh driver)
and
Contrast
Printing starts too high or too low on the page, or the page
length or margins are not what you expect.
Make sure you selected the correct
printer driver; see your
Use your software program to adjust the margins, or change
the number of lines per page, or change the page length setting
to match the paper you are using.
Chang e the loa ding position of the paper using Default setting
mode as described in Chapter 2.
Problems with Printing
If you cannot get the printer to print, first check that paper is
loaded in the printer. Then check that the printer is plugged
into a working electrical outlet that is not controlled by a switch
or timer. Verify that the interface cable is securely connected to
the printer and computer. If all this is correct, see the following
specific problems.
Paper Size
Setup and Software Guide
option in the
for instructions.
4-6
Troubleshooting
Page 48

Printing has stopped and the
Printing is temporarily suspended. Press the
continue.
Printing has stopped but the
One or both ink cartridges may be empty or too old. A
cartridge is too old if it has been used longer than six months or
beyond the date on its packaging. First clean the print heads as
described earlier in this chapter. If this does not solve the
problem, replace the ink cartridges.
Caution:
c
If pressing the
turn off your printer and disconnect the interface cable. Then
reconnect the cable and turn on the printer.
If you replace an ink cartridge before its
the sensor that tells you when the ink is out will not work with
the new cartridge.
Pause
button does not turn on the
Pause
Pause
light is on.
Pause
light is off.
Ink Out
button to
light flashes,
Pause
light,
The cable between the printer and computer may not meet
the specifications for the printer or computer. See “System
Requirements” in your
guidelines.
Turn off the printer and perform a self test as described in
The
Chapter 1 of your
not print, the problem is with the printer. If the self test prints
correctly, the problem is probably caused by your software.
Ink Out
OO
or
Setup and Software Guide
Ink Out
the printer does not print.
One or both ink cartridges are low on ink or empty; replace the
indicated cartridge as described in Chapter 3.
Setup and Software Guide
. If the self test does
light flashes or remains on and
NNNNNN
for cable
Troubleshooting
4-7
Page 49

All lights except the
Contact your dealer or your Authorized EPSON servicer.
Power
light flash and nothing prints.
Printing stops and the
There is a problem with the carriage. Turn off the printer. After
a few seconds, turn it back on and try printing again. If this
does not solve the problem, contact your dealer or an
authorized EPSON servicer.
Data
and
Pause
lights flash.
You see a system memory error message on your PC and
the printer does not print.
Copies
The
additional system memory. If you see an error message or are
unable to print using these options, try closing any unnecessary
applications, reducing the size of your print job, turning off the
Copies
options in the Windows pri nter driver req uire
options, or increasing system memory.
The Windows printer driver installed with Windows 3.1 does
not work correctly after you upgrade to Windows 95.
You need to reinstall the printer driver after upgrading to
Windows 95 so the driver is set up correctly for Windows 95.
See the
Setup and Software Guide for Wi ndows
for instructions.
The printer sounds like it is printing, but nothing prints.
The print heads may need cleaning. See “Cleaning the Print
Heads” in Chapter 3 for instructions.
One or both ink cartridges are empty or too old. A cartridge is
too old if it has been used longer than six months or beyond the
date on its packaging. First clean the print heads as described
earlier in this chapter. If this does not solve the problem,
replace the ink cartridges.
4-8
Troubleshooting
Page 50

You see error messages on your PC because of printing
conflicts.
Before send ing print jobs to the printer, the EPSON Spool
Manager stores them in a temporary directory. If you see
conflict error messages or printing is very slow, the problem
may be caused by other temporary files in this directory. To
change the EPSON Spool Manager default directory, follow
these steps:
1. Make a directory on your hard disk to store the Spool
Manager files, for example, C:\SPLTEMP.
2. Open the EPSON program group and double-click the
Spool Manager
icon.
3. Make sure
the Queue menu.
4. Select
spool directory to the one you created in step 1.
5. Also make sure the
checkbox is checked. Then select OK.
6. Open the Options menu and se lect
7. In the dialog box, change the spool directory to the one you
created in step 1. Then select
8. Close the Spool Manager.
Epson Stylus Color II
Setup
. In the Queue Setup dialog box, change the
Use Print Manager for this port
The printer prints blan k pages.
Make sure EPSON Stylus COLOR II is selected as the default
Windows printer driver (PC driver) or is the last printer
selected in the Chooser (Macintosh driver).
is selected, and then open
Default Spool Direc tory
OK
.
.
Troubleshooting
4-9
Page 51

Make sure you selected the correct
printer driver; see your
instructions. Also make sure the margins you selected in your
application software fit the paper size you’re using.
Text printing is slow.
You may be using printer driver settings that are more suitable
for graphics printing and unnecessarily slowing down text
printing. To speed up text printing only, turn off MicroWeave
mode and turn on High Speed mode. Some combinations of
Printing Mode
to select these settings; if this is the case for your settings, select
a lower resolution, possibly using 180 dpi for drafts and 360 dpi
for your final output. However, do not turn off MicroWeave
when printing final copies of high-quality graphics or
photographs.
(resolution) and
Paper Size
Setup and Software Guide
Media Type
option in the
do not allow you
for
If you’re printing text from DOS applications and you selected
composite black mode using the control panel
buttons, text printing will be much slower than true black
printing. Select true black mode instead; see Chapter 2 for
control panel instructions.
Print Mode
Ink cartridges do not last as long as expected.
The ink cartridge life depends on the amount of ink used in
printing. If you often print pages with large graphics and dense
text with little white space, you will use up cartridges faster
than if you print pages with lots of white space. The printer
also uses ink during a print head cleaning cycle, so do not
perform cleaning cycles unless necessary.
If you replace an ink cartridge before its
the sensor that tells you when ink is out will not work correctly
with the new cartridge.
Ink Out
light flashes,
4-10
Troubleshooting
Page 52

The printer does not seem to receive print jobs.
On a PC, release any print jobs that may be held in the EPSON
Spool Manager. Start Spool Manager and click any job marked
pending or held. Then open the Document menu and select
Delete
held , open the Queue menu and click
checkmark beside the option.
On a Macintosh, release any print jobs that may be held in the
EPSON Monitor2 utility. Click the upper right corner of the
screen and select
shown under Waiting and click
Make sure EPSON Stylus COLOR II is selected as the default
Windows printer driver (PC driver) or is the last printer
selected in the Chooser (Macintosh driver).
If you still get no output, try printing a demonstration page to
see if the problem is with your printer; see Chapter 2 for
instructions. If no demonstration page prints, you may have a
problem with your printer; contact your EPSON dealer or an
authorized EPSON servicer.
. Verify the EPSON Stylus COLOR II print queue is not
Monitor2
Hold
from the menu. Click any print job
Cancel Printing
if there is a
.
If the demonstration page prints, you may have a problem with
your application software or your printer cable. Make sure
your cable is connected securely and see your program’s
documentation for troubleshooting information. On a PC,
you can use the printer’s hex dump mode to pinpoint
communication problems between the printer and a software
program. To turn on hex dump mode, first turn off the printer.
Then hold down the
on the printer, and send a print job. The printer prints the exact
codes it receives from the computer in hexadecimal format.
Report the codes to your support technician.
Load/Eject
Print Mode
and
buttons, tu rn
Troubleshooting
4-11
Page 53

Paper Handling Problems
This section describes how to prevent paper jams and ensure
that paper feeds properly.
Paper Jam Problems
If paper jams inside the printer frequently, try the following:
❑ Use a higher quality paper that is suitable for ink jet
printers and is not too thin, too thick, or rough. For best
quality, use EPSON special coated and high-quality glossy
papers. See Appendix A for paper specifications.
❑ Fan the stack of paper before you load it.
❑ If you loaded plain paper, try turning the stack over. The
printable side may have been facing down.
❑ Do not load too many sheets in the sheet feeder. You can
load up to 100 sheets of plain paper, 70 sheets of special
coated paper, 10 envelopes, 50 sheets of transparency film
(with one sheet of plain paper beneath the stack), or 30
sheets of high-quality glossy paper (with one sheet of plain
paper beneath the stack).
Paper Feeding Problems
If paper does not feed properly, the most likely causes are:
❑ Paper is curled or folded. Use flat, undamaged paper.
❑ The paper is of poor quality; use a better quality paper.
❑ The paper is too thin or thick; see Appendix A for paper
size and type specifications.
4-12
Troubleshooting
Page 54

❑ The paper was exposed to excess humidity, over 60%. See
Appendix A for specifications on required environmental
conditions.
❑ The le ft edge guide is too tight or too loose; adjust it for the
size of the paper.
❑ Too many sheets are loaded in the sheet feeder. You can
load up to 100 sheets of plain paper, 70 sheets of special
coated paper, 10 envelopes, 50 sheets of transparency film
(with one sheet of plain paper beneath the stack), or
30 sheets of high-quality glossy paper (with one sheet of
plain paper beneath the stack).
Other Paper Handling Problems
If you still have paper handling problems, see the following
suggestions.
The printer loads more than one sheet at a time.
Remove the stack of paper and fan it. Tap it on a flat surface to
even the edges. Then reload the paper.
The paper is too thin or thick, or was exposed to excess
humidity; see Appendix A for exact specifications.
Make sure the paper thickness and thickness adjustment levers
are set correctly for your media type; see Chapter 1 for
instructions.
Make sure the printer driver’s
settin g in your application sof tware are set to print one copy at
a time. Also verify that you have selected the correct paper size
in the driver and in your application software.
Copies
setting and the copies
Troubleshooting
4-13
Page 55

Ejected paper is wrinkled.
The paper is too thin or damp. Do not store paper in damp or
humid places.
Single-sheet paper does not fully eject.
Use the
The paper is too long. Use paper that is within the specified
size. See Appendix A for exact specifications.
Load/Eject
button to eject the page.
Paper is feeding crooked.
The paper is old or creased. Use only new, smooth sheets of
paper.
Too much paper is loaded in the sheet feeder. Remove a few
sheets.
The paper is not the proper size and quality; see Appendix A
for exact specifications.
4-14
Troubleshooting
Page 56

Appendix A
Technical Specifications
Printing . . . . . . . . . . . . . . . . . . . . . . . . . . . . . . . . A-2
Paper . . . . . . . . . . . . . . . . . . . . . . . . . . . . . . . . . A-3
Ink Cartridges . . . . . . . . . . . . . . . . . . . . . . . . . . . . A-5
Mechanical . . . . . . . . . . . . . . . . . . . . . . . . . . . . . . A-6
Electrical . . . . . . . . . . . . . . . . . . . . . . . . . . . . . . . A-7
Environmental . . . . . . . . . . . . . . . . . . . . . . . . . . . . A-7
Safety Approvals . . . . . . . . . . . . . . . . . . . . . . . . . . A-7
Fonts . . . . . . . . . . . . . . . . . . . . . . . . . . . . . . . . . A-8
A
Interface Specifications . . . . . . . . . . . . . . . . . . . . . . . A-9
Parallel Interface . . . . . . . . . . . . . . . . . . . . . . . . . A-9
Serial Interface . . . . . . . . . . . . . . . . . . . . . . . . . . A-11
Initialization . . . . . . . . . . . . . . . . . . . . . . . . . . . . . A-12
Default Settings . . . . . . . . . . . . . . . . . . . . . . . . . A-13
Technical Specifications
A-1
Page 57

Printing
Printing method: On-demand ink jet
Nozzle configuration: 64 monochrome (black) nozzles
Printable columns and printing speed: *
60 color (cyan, magenta, yellow) nozzles
(20 × 3; 20 for each color)
Character pitch
(characters per inch)
10 80 200
12 96 240
15 120 300
17 (10 condensed) 137 343
20 (12 condensed) 160 400
* Print speeds vary depending on system configuration, software application,
resolution, and amount of page covered. Figures based on letter-size
paper with color printing.
Resolution:
Paper feed speed:
Printable
columns
LQ printing speed
(characters per second)
Maximum 720 × 720 dpi
92 milliseconds per
1
⁄
-inch line
6
Input buffer: 56KB
Print direction: Bidirectional with logic seeking for text and
graphics; unidirectional and autodirectional
modes available in Default setting mode
Control code: ESC/P 2 and expanded raster graphics code
Paper feeding: Auto sheet feeder
Line spacing:
Character tables: 1 Italic and 8 graphics character tables
Character sets: 1 legal and 14 International character sets
A-2
Technical Specifications
IBM X24/X24E emulation code
1
⁄
-inch (default),
6
1
⁄
in
-inch increments
360
1
⁄
-inch, or programmable
8
Page 58

Paper
Note:
Since the quality of any particular brand or type of paper may be changed by the
manufacturer at any time, EPSON cannot guarantee the use of any particular
brand or type of pa per. Always test samples of paper stock before purchasing large
quantities or printing large j obs.
Paper path: Sheet feeder, top entr y
Sheet feeder capacity: 100 sheets of plain paper at 17 lb (64 g/m
Paper sheets:
70 sheets of EPSON special coated paper
30 sheets of EPSON high-quality glossy
paper (with one sheet of plain paper
beneath the stack or each single sheet
loaded)
50 transparency films (with one sheet of
plain paper at bottom of stack)
10 envelopes
2
)
Size
Letter (8.5 × 11 inches)
A4 (210 × 297 mm)
Legal (8.5 × 14 inches)
Statement (8.5 × 5.5 inches)
Executive (7.5 × 10 inches)
Paper types Plain paper, EPSON’s Special coated
paper, High-quality glossy paper, and
transparencies
Thickness 0.003 to 0.004 inch (0.08 to 0.11 mm)
Paper weight 17 to 24 lb (64 to 90 g/m
Use 24 lb (90 g/m
2
2
)
) paper under normal
temperature and humidity conditions.
Envelopes:
Size
No. 10 9.5 × 4.1 inches (241 × 104 mm)
DL 8.7 × 4.3 inches (220 × 110 mm)
Paper types Plain, bond, or air mail paper
Thickness 0.006 to 0.02 inch (0.16 to 0.52 mm)
2
Paper weight 12 to 24 lb (45 to 90 g/m
)
Technical Specifications
A-3
Page 59

Transparencies:
A
Size A4 (210 × 297 mm)
Letter (8.5 ×11 inches)
Thickness 0.003 to 0.0033 inch (0.075 to 0.085 mm)
Note:
❑
Poor quality paper may reduce print quality and ca use paper jams and other
problems. If you encounter problems, switch to a higher grade of paper.
❑
Print on special coated paper, high-quality glossy paper, envelopes, and
transparencies only under these normal conditions:
Temperature: 59 to 77°F (15 to 25°C)
Humidity: 40 to 60% RH
(High-quality glossy paper can be stored at 20 to 60% relative humidity.)
❑
Do not load folded or curled paper, envelopes, and tran sparencies.
❑
The following EPSON genuine papers are avai lable:
S041062 Special coated paper for 720 dpi printing (Letter)
S041048 Special coated paper for 720 dpi printing (Legal)
S041060 Special coated paper for 360 dpi printing (Letter)
S041072 High-quality glossy paper (Letter)
S041064 Transparency film (Letter)
Printable area:
Single sheets
A
BL
BR
C
A-4
Technical Specifications
Page 60

Envelopes
A
BL
A
The minimum top margin is 0.12 inch (3.0 mm).
Note: When printing multiple sheets of glossy paper, the minimum
top margin is 1.2 inches (30 mm).
BL
The minimum left margin is 0.12 inch (3.0 mm).
BR
The minimum right margin is:
0.12 inch (3.0 mm) for Statement and Executive paper
0.38 inch (9.7 mm) for Letter and Legal paper and transparencies
0.15 inch (3.8 mm) for A4 paper
0.54 inch (13.8 mm) for DL envelopes
1.38 inch (35.1 mm) for #10 envelopes
C
The minimum bottom margin is 0.54 inch (14.0 mm).
Ink Cartridges
BR
C
Black ink cartridge (S020047):
Color Black
Print capacity* 620 pages (A4 paper; text)
Cartridge life* 2 years from production date and up to
6 months after opening the package at
77°F (25°C)
Temperature Storage: –4 to 104°F (–20 to 40°C)
1 month at 104°F (40°C)
Transit: –22 to 140°F (–30 to 60°C)
1 month at 104°F (40°C)
120 hours at 140°F (60°C)
Freezing:** 24.8°F (–4°C)
Dimensions
1.8 i n ch es (W ) × 2.3 inches (D) × 1.5 i nc h es (H )
Technical Specifications
A-5
Page 61

Color ink cartridge (S020049):
Colors Cyan, magenta, and yellow
Print capacity* 320 pages (A4; 360 dpi; 5% of each color)
Cartridge life* 2 years from production date and up to
6 months after opening the package at
77°F (25°C)
Temperature
Dimensions
* Ink cartridge life may vary. If you often print large graphics and dense text
with little white space, you use ink faster than if you print pages with lots
of white space.
** T he in k thaws in approximat e ly 3 hou r s at 77 ° F (2 5° C).
Caution:
❑
c
Use only genuine EPSON ink cartridges and do not refill them.
Other products may cause damage not covered by EPSON’s
warranty.
❑
Do not use an ink cartridge after the expiration date on the packa ge.
Storage:
Transit:
Freezing:** 24.8°F (−4°C)
1.7 i n ch es (W ) × 2.2 inches (D) × 1.5 i nc h es (H)
−4
to 104°F (−20 to 40°C)
1 month at 104°F (40°C)
−
22 to 140°F (−30 to 60°C)
1 month at 104°F (40°C)
120 hours at 140°F (60°C)
Mechanical
Paper feed method: Friction with auto sh eet feeder, top entry
Total print volume: 75,000 pages (A4 paper; text)
A-6
Technical Specifications
Page 62

Dimensions and weight: Storage
Electrical
Input voltage range: 103.5 to 132 V
Rated frequency range: 50 to 60 Hz
Input frequency range: 49.5 to 60.5 Hz
Rated current: 0.5 A
Width 17.0 inches (433 mm)
Depth 9.8 inches (248 mm)
Height 7.8 inches (198 mm)
Weight 11.3 lb (5 kg), without ink cartridges
Printing
Width 17.0 inches (433 mm)
Depth 22.9 inches (582 mm)
Height 11.7 inches (297 mm)
Weight 11.3 lb (5 kg), without ink cartridges
Power consumption: Approx. 20 W (during self test, LQ at 10 cpi)
Environmental
Temperature: Operation 50 to 95°F (10 to 35°C)
Humidity: Operation 20 to 80% RH
* Stored in shipping container
Safety Approvals
Safety standards: UL 1950 with D3, CSA 22.2 950 with D3
EMC: FCC part 15 subpart B class B
Storage*
Storage* 5 to 85% RH
−
4 to 140°F (−20 to 60°C)
1 month at 104°F (40°C)
120 hours at 140°F (60°C)
(without condensation)
Technical Specifications
A-7
Page 63

Fonts
The printer comes with an installed set of fonts, which are selectable using
the Default setting mode. However, the printer always uses the fonts you
select with your software program. The only time you need to select the
printer’s installed fonts is when your software program does not allow
you to select fonts.
You can select other font and pitch combinations using ESC/P 2
commands, as described in Appendix B.
Bitmap fonts
Fonts 10 cpi 12 cpi 15 cpi Proportional
EPSON Roman √√√ √
EPSON Sans Serif √√√ √
EPSON Courier √√√ —
EPSON Prestige √√√ —
EPSON Scr ipt √√√ —
Scalable fonts
Minimum
Fonts
EPSON Roman 8 32 2
EPSON Sans Serif 8 32 2
EPSON Roman T 8 32 2
EPSON Sans Serif H 8 32 2
point size
Maximum
point size Increments
Font samples
A-8
Technical Specifications
Page 64

Interface Specifications
Parallel Interface
Data format: 8-bit parallel, IEEE P1284 compatible mode
Synchronization:
Handshake timing: BUSY and
Signal level: TTL compatible
Connector: 36-pin, Centronics compatible connector
Pin assignments
Signal
Pin
119
2
3
4
5
6
7
8
9
Return
Pin Signal Direction Description
20
21
22
23
24
25
26
27
STROBE pulse
ACKNLG signals
STROBE IN STROBE pulse to read data.
DATA 0
DATA 1
DATA 2
DATA 3
DATA 4
DATA 5
DATA 6
DATA 7
IN
IN
IN
IN
IN
IN
IN
IN
These signals represent
information in bits 0 to 7 of
parallel data respectively.
Each signal is at HIGH level
when data is logical 1 and
LOW when it is logical 0.
10 28
11 2 9 BUSY OUT A HIGH signal indicates the
ACKNLG OUT About a 5-µs pulse. LOW
indicates data has been
received and the printer is
ready to accept more data.
printer cannot receive data.
The signal goes HIGH in the
following cases:
1) During data entry
(for each character)
2) During initialization
3) During self test,
demonstration, and
default-setting printing
4) During a printer-error state
Technical Specifications
A-9
Page 65

Signal
Pin
12 28 PE OUT A HIGH signal indicates the
13 28 SLCT OUT Pulled up to +5 V through
Return
Pin Signal Direction Description
printer is in a paper-out state
or in an error state.
1 kΩ resistance
14 30
15 — NC — Not used
16 — GND — Logic ground level
17 — CHASSIS
18 — Logic H OUT Pulled up to +5 V through
19-30 — GND — Twisted-pair return signal
31 30
AUTO
FEED
XT
GND
INIT IN When this signal goes LOW,
IN When this signal is LOW, the
paper is automatically fed
one line after printing.
— Printer’s chassis ground,
which is connected to the
logic ground
3.9 KΩ resistance
ground level
the printer controller is reset
to its state when the power is
first turned on and the print
buffer is cleared. This level is
normally HIGH; its pulse width
must be more than 50 µs at
the receiving terminal.
A-10
32 29
33 — GND — Same as for Pins 19-30
34 — NC — Not used
35 — +5 V OUT Pulled up to +5 V through
36 30 SLIN IN Not used
ERROR OUT This signal level goes LOW
when the printer:
1) Is out of paper
2) Is in an error state
3) Has no ink cartridges
installed
3.3 KΩ resistance
Technical Specifications
Page 66

Note:
❑
The column heading “Direction” refers to the direction of signal flow as
viewed from the printer.
❑
“Return Pin” denotes the twisted-pair return pin to be connected at signal
ground level. For the interface wiring, be sure to use a twisted-pair cable for
each signal and to complete the connection on the return side.
❑
All interface conditions are based on TTL level. Both the rise and fall times of
each signal must be less than 0.2 microseconds.
❑
Data transfer must be carried out by observing the ACKNLG or BUSY
signal. Data transfer to this printer can be carried out only after receipt of
the
ACKNLG signal or when the level of the BUSY signal is LOW.
Timing chart
BUSY
ACKNLG
DATA
STROBE
0.5 µs (Min.)
Transition time (the rise and the fall) of every signal must be less than 0.2 µs.
Serial Interface
The printer’s built-in serial interface is based on the RS-422 standard so
you can connect the printer to an Apple Macintosh.
Standard: Based on RS-422
Synchronization: Asynchronous
Bit rate: 57.6 Kbps/230.4 Kbps
Handshaking: DTR protocol
0 µs (Min.)
5 µs (Typ.)
0 µs (Min.)
Technical Specifications
A-11
Page 67

Word format:
Data bit
Parity bit
Start bit
Stop bit
Connector: 8-pin mini-circular connector
Recommended cable: Apple System Peripheral-8 cable (M0197)
Initialization
The printer can be initialized (returned to a fixed set of conditions) in
these ways:
Hard ware initialization ∗ The printer is turned on.
Software initialization ∗ Software sends the ESC @ (initialize the
8 bits
None
1 bit
1 bit
∗ The printer receives an
the parallel interface: pin 31 goes LOW
printer) command; the last panel
settings are kept
INIT signal from
Control panel initialization ∗ Hold down the Pause button and the
Alt button; the last panel settings are
kept
All three initialization methods reset the font according to the default
settings selected using the control panel. However, ESC @ does not
initialize the printer mechanism, clear the input data buffer, or clear the
user-defined character set. The control panel initialization does not
initialize the printer mechanism or clear the user-defined character set.
A-12
Technical Specifications
Page 68

Default Settings
The table below shows th e default settings that take effect when the
printer is initialized.
Item Default setting
Top-of-form position Current paper position
Page length Single sheets:
Left and right margins Cancelled
Line spacing
Character pitch Last font selected in Default setting mode
Vertical tab position Cleared
Horizontal tab positions Every eight characters
Font selection Last font selected in Default setting mode
Special printing effects Cancelled (except condensed and
61 lines for letter-size paper
65 lines for A4-size paper
1
-inch line spacing
⁄
6
economy printing)
User-defined character
set
Hardware/control pane l init ia li z ati on: clea r ed
Software initialization: deselected only
In addition, hardware and control panel initialization erases any text in
the data buffer.
Technical Specifications
A-13
Page 69

Appendix B
Commands and Character Tables
Command List . . . . . . . . . . . . . . . . . . . . . . . . . . . . B-2
EPSON ESC/P 2 Commands . . . . . . . . . . . . . . . . . B-2
IBM X24/X24E Emulation Codes . . . . . . . . . . . . . . . B-3
Character Tables . . . . . . . . . . . . . . . . . . . . . . . . . . . B-4
International Character Sets . . . . . . . . . . . . . . . . . . B-8
Characters Available with ESC (^ Command . . . . . . . . B-9
B
Commands and Character Tables
B-1
Page 70

Command List
This printer works with the two sets of commands described in
this section.
EPSON ESC/P 2 Commands
Select the EPSON ESC/P 2 printer commands in your software
programs for the most advanced fonts and graphics available.
If you need more information about using printer commands,
you can purchase the
from EPSON Accessories by calling (800) 873-7766 (in the U.S.
only). In Canada, call (800) BUY-EPSON for sales locations.
General operation:
ESC @, ESC U, ESC EM
Paper feeding:
CR, FF, LF, ESC 0, ESC 2, ESC 3, ESC +
Page format:
ESC ( C, ESC C, ESC C 0, ESC Q, ESC I, ESC ( c, ESC N, ESC O
Print position motion:
ESC $, ESC \, ESC ( V, ESC D, HT, ESC B, VT, ESC J
Font selection:
ESC k, ESC X, ESC P, ESC M, ESC g, ESC p, ESC x, ESC 4, ESC 5, ESC E,
ESC F, ESC !
Font enhancement:
SI, DC2, SO, ESC W, DC4, ESC w, ESC G, ESC H, ESC S, ESC T, ESC ( -,
ESC -, ESC q
Spacing:
ESC SP, ESC ( U, ESC c
Character handling:
ESC ( t, ESC t, ESC R, ESC &, ESC :, ESC %, ESC 6, ESC 7, ESC ( ^
ESC/P 2 Reference Manual
(ESCP2REF)
B-2
Bit image:
ESC *
Graphics:
ESC ( G, ESC ., ESC ( e
Color:
ESC r
Printing mode:
ESC ( K
MicroWeave:
ESC ( i
Commands and Character Tables
Page 71

IBM X24/X24E Emulation Codes
This printer emulates the IBM Proprinter with th e following
commands. (For detailed information, see the IBM X24/X24E
reference manual.)
General operation:
NUL, DC3, ESC j, BEL, CAN, DC1, ESC Q, ESC [ K, ESC U
Paper feeding:
FF, LF, ESC 5, ESC A, ESC A (AGM*), ESC 0, ESC 1, ESC 2, ESC 3, ESC 3
(AGM*), CR
Page format:
ESC C, ESC X, ESC N, ESC O, ESC 4
Print pos iti o n mo ti on:
ESC d, ESC R, ESC D, HT, ESC B, VT, ESC J, ESC J (AGM*)
Font selection:
DC2, ESC P, ESC :, ESC E, ESC F, ESC I
Font enhancement:
DC4, SO, ESC SO, ESC W, ESC [ @, SI, ESC SI, ESC G, ESC H, ESC T,
ESC S, ESC -, ESC _
Spacing:
BS, SP, ESC [ \
Character handling:
ESC 6, ESC 7, ESC [ T, ESC ^, ESC \
Bit image:
ESC K, ESC L, ESC Y, ESC Z, ESC [ g, ESC * (AGM*)
* Alternate Graphics Mode
Commands and Character Tables
B-3
Page 72

Character Tables
The printer comes with an installed set of character tables.
However, when printing from Windows and most DOS
software programs, the printer prints the characters you see on
screen and does not use its built-in character tables. Unless
you’re printing from a DOS program, and cannot print the
character you need, you should never have to change the
character table.
Note:
You never need to select the printer’s character tables or fonts when
using the printer with a Macintosh.
These character tables are selected using the printer’s Default
setting mode or by using software commands.
All tables except the italic are the same as the PC437 table for
hex codes 00 through 7F, so only the PC437 table is shown
completely. The rest of the tables show only the characters for
hex codes 80 through FF.
PC437 (U.S., Standard Europe )
B-4
Commands and Character Tables
Page 73

PC850 (Multilingual) PC860 (Portuguese)
PC861 (Icelandic) PC863 (Canadian-French)
Commands and Character Tables
B-5
Page 74

PC865 (Nordic) Abicomp
BRASCII
B-6
Commands and Character Tables
Page 75

Italic
No characters are available for
hex code 15 in the italic character
.
table
Commands and Character Tables
B-7
Page 76

International Character Sets
You can select one of the following international character sets
using the prin ter’s Default s etting mode or th e ESC R
command. For example, when you select “Italic France,” the
characters in the “France” row on the table below are used in
the italic character table.
The following eight international character sets can be selected
using Default setting mode or with the ESC R command.
The following seven additional sets can be selected only with
the ESC R command.
B-8
Commands and Character Tables
Page 77

Characters Available with ESC (^ Command
To print the characters in the table below, use the ESC ( ^
command.
Commands and Character Tables
B-9
Page 78

Glossary
auto line feed
When this feature is selected in the printer’s Default setting mode, each
carriage return code (CR) is automatically followed by a line feed (LF)
code.
bidirectional printing
Printing in which the print head prints in both directions (bidirectionally).
This increases print speed but may reduce precise vertical alignment. Also
called high speed printing.
brightness
The lightness or darkness level of an image.
character tab le
The collection of letters, numbers, and symbols that constitute the set of
characters used in a particular language.
CMYK
A method of specifying and creating colors using cyan (blue-green),
magenta, yellow, and black (K).
condensed printing
Printing in which the width of each character is approximately 60% of the
width of standard characters. Useful for fitting wide tables or
spreadsheets onto the paper.
contrast
The range of difference between the darkest and lightest colors in an
image. The greater the difference, the higher the contrast.
control code
A special code used to control a printer function such as performing a
carriage return or line feed.
default
A value or setting that takes effect when the equipment is turned on,
reset, or initialized.
dithering
A way of arranging dots on a page to simulate a shade or tone. See also
halftoning.
Glossary
1
Page 79

dpi
Dots per inch. The dpi measures the resolution. See also resolution.
driver
See printer driver.
economy mode printing
Printing in which images are printed with fewer dots to save ink.
Economy mode printing is faster, too.
error d iffusion
A halftoning method where dot patterns are randomly distributed in an
image to create soft edges.
ESC/P
®
EPSON Standard Code for Printers. The system of commands sent by the
computer to control the printer. It is standard for all EPSON printers and
supported by most application software for personal computers.
ESC/P 2
Enhanced version of the ESC/P printer command language, including
scalable fonts and enhanced graphics.
font
A style of type designated by a family name, such as Courier or
Helvetica.
grayscale
An image consisting of multiple shades of gray, ranging from white to
black.
halftoning
Method of repeating tiny dot patterns to represent images.
hex dump
A troubleshooting feature that helps advanced users find the cause of
communication problems between the printer and the computer. When
the printer is in hex dump mode, it prints each code it receives in
hexadecimal notation and ASCII characters. Also called data dump.
2
initialization
The process of re storing the printer’s de fault settings (fixed set of
conditions).
Glossary
Page 80

ink je t
A non-impact method of printing in which the printer produces each
character by precisely spraying ink onto paper.
interface
The connection (via a cable) between the computer and the printer over
which print data is transmitted to the printer.
media
Materials upon which data is printed such as envelopes, plain paper,
special paper, transparency film, and index cards.
MicroWeave
A printing method in which images are printed in finer increments to
reduce the possibility of banding and to produce laser-like images.
printabl e area
The area of a page on which the printer can print. It is smaller than the
physical size of the page due to margins.
printer driver
A software program that sends commands for using the features of a
particular printer.
reset
To return a printer to its defaul ts.
resolution
A measure of the amount of detail that can be represented. Resolution of
printed images is measured in number of dots per inch (dpi). Your printer
has three resolution setting s: 720 × 720, 360 × 360, and 180 × 180 dpi.
RGB
A method of specifying color by its component proportion of red, green,
and blue. Computer monitors use this method to represent colors.
unidirectional printing
Printing in which the print head prints in one direction only.
Unidirectional printing is useful for printing graphics because it allows
precise vertical alignment.
Glossary
3
Page 81

Index
A
Accessories, purchasing, Intro-4, 3-4
Adjustment mode, 2-7, 3-10
AGM, see Alternate Graphics Mode
Aligning vertical lines, 2-7, 3-10
Alt button, 2-4–6, 3-2
Alternate Graphics Mode, 2-8
Apple Macintosh, Intro-1, 4-2
Auto carriage return, 2-8
Auto interface wait time, 2-8
Auto line feed, 2-8,
Auto sheet feeder, A-2–3, A-6
B
Banding, 4-5
BBS, see Bulletin Board Service
Bidirectional printing, 2-7,
Black ink cartridge, see Ink cartridges
Blurred images, 4-3–4
Bottom margin, 4-6, A-5
Brightness, G-1
Buffer, input, 2-5, A-2
Bulletin Board Service, I ntro-5
Buttons, control panel, 2-2, 2-4–6
Cleaning
buttons, 2-4–6
print heads, 2-2, 2-4–5, 3-2–3
printer, 3-8
CMYK, G-1
Coated papers
loading, 1-7–10
selecting, 1-2–3
specifications, A-3–5
Color ink cartridge, see Ink cartridges
Commands
ESC/P 2, B-2
IBM X24/X24E, 2-8, B-3
CompuServe, Intro-5
Condensed
button, 2-4–6
light, 2-4
mode, 2-2, 2-4
printing, G-1
Contrast, G-1
Control code, A-2, G-1
Control panel, 2-2–5, 2-7
Copies setting, 4-13
Cord, power, 3-9
Customer support, Intro-3–5
C
Cable, printer, 4-6–7
Calibrating the printer, 2-7, 3-10, 4-4
Carriage return, 2-8
Cartridges, see Ink cartridges
Character pitch, 2-7, A-13
Character tables
available, A-2, B-4–7
definition, G-1
international, B-8
selecting, 2-9
D
Data light, 2-3
Default settings
at initialization, 2-5, A-12–13
mode, 2-2, 2-7–9
Demonstration page, 2-3, 2-6, 3-3,
4-2, 4-5, 4-11
Diffusion, error, G-2
Dimensions, printer, A-7
Dithering, G-1
DOS
calibrating printer for, 2-7, 3-10
printing from, 2-5
Index
1
Page 82

Dpi, A-2, G-2
Driver, see Printer, driver
Dump, see Hex dump mode
E
Economy
button, 2-4–6, 3-2
light, 2-3
mode, 2-2–3, 4-4
printing, G-2
Edge guide, see Left edge guide
Ejecting paper, 2-5
Electrical specifications, A-7
Electronic support services, Intro-4–5
Energy Star compliance, Intro-1–2
Energy, conserving, Intro-2
Envelopes
loading, 1-7, 1-10,
specifications, A-3–5
Environmental specifications, A-7
EPSON
Accessories, Intro-4, 3-4
America Forum, Intro-5
Bulletin Board Service, Intro-5
Customer Care Centers, Intro-3
papers, 1-2–3, A-4
Spool Manager, 4-5, 4-9, 4-11
Error diffusion, G-2
Error messages, 4-8–9
ESC ( ^ command, B-9
ESC @ command, A-12
ESC R command, B-8
ESC/P, G-2
ESC/P 2
commands, 2-8, B-2
definition, G-2
F
Factory defaults, 2-7
Faint images, 4-3–4
Fast printing, 2-7
Feeder, see Auto sheet feeder
Film, see Transparencies
Fonts
built-in, 2-7
condensed, 2-4
default selection, A-13
definition, G-2
printing demonstration page, 2-6
specifications, A-8
G
Glossy paper
loading, 1-7–10
selecting, 1-2–3
specifications, A-3–4
Grayscale, 4-2, G-2
H
Halftoning, G-2
Heads, see Print heads
Help, where to get, Intro-3, Intro-5
Hex dump mode, 2-6, 4-11, G-2
High Speed mode, 4-2
Horizontal tab positions, A-13
Humidity
for paper, 1-8, 4-13, A-3–4
for printer, A-7
I
IBM X24/X24E commands, 2-8, B-3
Initialization, A-12–13, G-2
Ink cartridges
conserving ink, 4-10
empty, 3-3–4, 4-7–8
life expectancy, 4-8, 4-10, A-5–6
old, 4-7–8
ordering, 3-4
print capacity, A-5–6
replacing, 2-4, 3-3–7, 4-8
specifications, A-5–6
tape seal, 3-6
Ink delivery system, charging, 3-7
Ink jet, A-2, G-3
Ink Out lights, 2-3, 3-3, 4-7
2
Index
Page 83

Input buffe r, 2-5, A-2
Interface
cable, 4-6–7
definition, G-3
mode, 2-8
parallel, 2-8, A-9–11
serial, 2-8, A-11
specifications, A-9–12
wait time, auto, 2-8
International character tables, B-8
Internet, Intro -4
J
Jammed paper, preventing, 4-12
L
Left edge guide, 1-6–7, 1-9, 1-12, 4-13
Left margin, A-5, A-13
Levers
paper thickness, 1-3–4, 1-12, 4-3
thick ness ad justment, 1 -3–5, 1 -12, 4-3
Lights, control panel, 2-3–4, 4-7–8
Line feed, auto, 2-8, G-1
Line spacing, A-2, A-13
Lines, aligning, see Vertical lines,
aligning
Load/Eject button, 2-5
Loading
coated papers, 1-7–10
envelopes, 1-10, 1-12
glossy paper, 1-7, 1-10
transparencies, 1-7–10
Loading position, adjusting, 2-9
M
Macintosh, Intro-1, 4-2
Maintenance, 3-2–8
Manuals, how to use, Intro-2–3
Margins
left and right, A-5, A-13
top and bottom, 2-9, 4-6, A-5
Mechanical specifications, A-6–7
Media Type, 4-3, G-3
Messages, error, 4-8–9
Microsoft Windows, Intro-1, 4-2
MicroWeave, 4-2, G-3
Monitor2 utility, 4-5, 4-11
Moving the printer, see Transporting
the printer
N
Network interface mode, 2-9
Notice shee t, 3-9
Nozzles, print head, 3-2, A-2
O
Online support, Intro-5
Output tray, 1-6–7, 1-9
P
Page length, A-13
Paper
coated, 1-2–3, 1-9
ejecting, 2-5
envelopes, see Envelopes
feed speed, A-2
feeding problems, 4-12
glossy, see Glossy paper
handling, 1-2–10, 1-12, 4-12–14
jams, preventing, 4-12
ordering EPSON, 1-2–3, A-4
path, A-3
plain, 1-2, 1-5–7, A-3
printable area, A-4–5
printable surface, 1-5, 1-7, 1-10
selecting type, 1-2, 2-5
size, A-3
special, see Special papers
specifications, A-3–5
storing, 1-8, 4-4
thickness, A-3–4
transparencies, see Transparencies
Index
3
Page 84

Paper (continued)
types, 1-2–3, 4-3, A-3–4
weight, A-3
wrinkled, 4-14
Paper jams, 2-3, 4-12
Paper Out light, 2-3
Paper thickness lever, 1-3–4, 1-12,
4-3, 4-13
Parallel interface, 2-8, A-9–11
Pause
button, 2-4–5, 2-7
light, 2-4
Pin assignments, A-9–11
Pitch, character, 2-7, A-13
Plain paper, 1-2, 1-5– 7, A-3
Power
consumption, A-7
cord, 3-9
light, 2-3
switch, 2-6–7
Print direction, 2-7, A-2
Print heads
clea ning, 2-4–5, 3-2–3
nozzles, 3-2, A-2
securing, 3-9
Print Mode
button, 2-5–6
lights, 2-4
Print quality
improving, 3-2–3
problems with, 4-2–6
Print speed
increasing, 2-7
specifications, A-2
Printable area, A-4–5, G-3
Printable columns, A-2
Printable surface, 1-5, 1-7, 1-10
Printer
adjustment mode, 2-7, 3-10
buffer, 2-5, A-2
cable, 4-6–7
calibrating, 2-7, 3-10, 4-4
cleaning, 3-8
clea ning print h eads, 2-2, 2- 4, 3-2
controlling, 2-2, 2-4–6, 2-8–9
defaults, 2-7–9
dimensions, A-7
driver, Intro-1, 1-10–11, 4-5, 4-8–9,
4-11, G-3
hex dump mode, 2-6, 4-11, G-2
initializing, 2-5, A-12–13, G-2
pausing, 2-2, 2-4
problems with, 4-2–14
resetting, 2-2, 2-4
specifications, A-2–13
testing, 2-3, 2-6, 4-7
transporting, 3-9
weight, A-7
Printing
bidirectional, 2-7, G-1
demonstration page, 2-3, 2-6, 3-3,
4-2, 4-5, 4-11
fast, 2-7
method, A-2
problems with, 4-6–14
specifications, A-2
unidirectional, 2-7, G-3
Problems, see Troubleshooting
Q
Quality, see Print quality
R
4
ReadMe icon, Intro-1, 4-2
Reset, 2-2, 2-4, G- 3
Resolution, A-2 , G-3
RGB, G-3
Right margin, A-5, A-13
Index
Page 85

S
U
Safety approvals, A-7
Safety instructions, Intro-6
Securing print heads, 3-9
Self test, 2-3, 2-6, 4-7
Serial interface, 2-8, A-11
Service, Intro-3–5
Sheet feeder, auto, A-2–3, A-6
Spacing, line, A-2, A-13
Special papers
loading, 1-7–10, 1-12
selecting, 1-2
specifications, A-3–5
Special printing effects, A-13
Specifications, A-2–13
Speed, see Print speed
Spool Manager, 4-5, 4-9, 4-11
Support, online, Intro-5
T
Tab positions, A-13
Technical assistance, Intro-3–5, 4-2
Telephone number, Intro-3
Telephone numbers, Intro-5
Temperature
for ink cartridges, A-5–6
for paper, 1-8, A-4
for printer, A-7
Testing the printer, 2-3, 2-6, 4-7
Thickness adjustment lever, 1-3–5,
1-12, 4-3, 4-13
Timing chart, A-11
Top margin, 2-9, 4-6, A-5
Transparencies
loading, 1-7
selecting, 1-2, 1-8–10, A-3
specifications, A-3–4
Transporting the printer, 3-9
Troubleshooting, 2-6, 4-2–14
Unidirectional printing, 2-7, G-3
User-defined character set, A- 13
V
Vertical lines, aligning, 2-8, 3-10
Vertical tab position, A-13
W
Wait time, auto interface, 2-8
Weight
paper, A-3
printer, A-7
White banding, 4-5
Windows, Intro-1, 4-2, 4-4–5, 4-8
World Wide Web, Intro-4
Wrinkled paper, 4-14
Index
5
 Loading...