

Page 1
Safety Instructions . . . . .3
Setting Up Your Printer . . . . .7
Printer Part s and Control Panel Func tions . . . . 10
Attaching the Paper Support . . . . 12
Connecting the Pr inter to Your P C . . . . 19
Instal ling the P rint er So ftwa r e in You r PC . . . . 20
Connecting t he Printe r to You r Macinto sh . . . . 24
Installing the Printe r Sof tware in Your M acintos h . . . . 25
Selectin g Your Printer in the Chooser . . . . 29
Printing You r Fi rst Page Usin g Wind ows . . . . 33
Printing Your Firs t Page Usin g a Mac intos h . . . . 35
System Req uirements . . . . . 7
Plugging in the Printer . . . . 12
Installi ng the I nk Cartrid ges . . . . 13
Loading Paper . . . . 32
Loading Special Paper . . . .38
Replac ing I nk Cartr idges . . . .41
Maintenance . . . .47
Checking the Print H ead Nozzles . . . . 47
Cleaning the Pr int Head . . . . 50
Aligning the Print Head . . . . 53
Troubleshooting . . . .54
Typical Pro bl e ms and So lu t ions . . . . 56
Error Indicators . . . . 54
Cancelling Printing . . . . 58
Where to Get Help . . . . 60
Options and Consumable P roducts . . . .66
4009813
xxx-00
Page 2

Where t o F i n d Info rmation
This Setup & Daily Use guide
Read this manual first to set up and begin using your printer. This
manual includes the foll owing i n format ion.
❏ Setup Contains information on setting up your printer
and insta lling the printer sof tware.
❏ Daily Use Provides information on daily operation. Also
contains troubleshooting tips and customer
support contact informatio n if you need
assistance.
USB User's Guide
❏ Read this guide if using a USB cable to connect yo ur printer
to a computer.
DOS User's Guide
❏ Read this guide if you are using DOS.
Online Guides included on the CD-ROM
The guides on this CD-ROM will help you learn more about your
printer and color printing. To view these guides, you must have
a Web b rowser i nstall ed on y our comp uter. For more i nform ation
on using this CD-ROM, see the included CD-ROM Booklet.
❏ Reference Guide Provides further information a b out printer
software settings, printing on special paper,
maintenance, and problem solving.
❏ Color Guide Includes sample images, explanations and
troubleshooting information that will help
answer your q uestions about c olor print ing.
Page 3

All rights reserved. No part of this publication may be reproduced, stored in a retrieval
system, or transmitted in any form or by any means, electronic, mechanical, photocopying,
recording, or otherwise, without the prior written permission of SEIKO EPSON
CORPORATION. The information contained herein is designed only for use with this EPSON
printer. EPSON is not responsible for any use of this information as applied to other printers.
Neither SEIKO EPSON CORPORATION nor its affiliates sha ll be liable to the purcha s e r of
this product or third parties for damages, losses, costs, or expenses incurred by the purchaser
or third parties as a result of: accident, misuse, or abuse of this product or unauthorized
modifications, repairs, or a lterations to this pr oduct, or (ex cluding th e U.S.) f ailure to strictly
comply with SEIKO EPSON CO R PORATION's operating and maintenan ce instructions.
SEIKO EPSON CORPORATION shall not be liable for any damages or problems arising from
the use of any options or any consumable products other than those designated as Original
EPSON Products or EPSON Approved Products by SEIKO EPSON CORPORATION.
SEIKO EPSON CORPORATION shall not be held liable for any damage resu lting from
electromagnetic interference that occurs from the use of any interface cables othe r than
EPSON Approved Products by SEIKO EPSON CORPORATION.
EPSON is a registered trademark and EPSON ESC/P 2 and EPSON Stylus are trademarks of
SEIKO EPSON CORPORATION.
Microsoft and Windows are registered trademarks of Microsoft Corporation.
General Notice: Other product names used herein are for identification purposes only and may be
trademarks of their respective owners. EPSON disclaims any and all rights in those marks.
Copyright © 1999 by SEIKO EPSON CORPORATION, Nagano, Japan.
Page 4

Page 5

Safety Instructions
Important Safety Instructions
Read all of these instructions before using your printer. Also be
sure to follow all warnings and i nstructions ma rked on the
printer.
❏ Do not block or cover the op e ni ngs in the printer’s cabinet.
❏ Do not insert objects th rough the sl ots. Take care not to s p ill
liquid on the printer.
❏ Use only the type of power source indicated on the printer’s
label.
❏ Connect all equipment to properly grounded power outlets.
Avoid using outlet s on t he sam e circ uit as photocopier s or air
control systems that regularly switch on and off.
❏ Avoid electrical outlets controlled by wall switches or
automa tic timers.
❏ Keep the ent ire computer system away f rom potential sources
of electromagnetic interference, such as loudspeakers or the
base units of cordless telephones.
❏ Do not use a damaged or frayed power cord.
❏ If you use an extension cord with the printe r, make sure the
total ampere rating of the devices plugged into the extension
cord does not exceed the cord’s ampere rating. Also, make
sure the total ampere rating of all device s pl ugged into the
wall outlet does not exceed the wall outlet’s ampere rating.
❏ Do not attemp t to service the printer yourself.
3
Page 6

❏ Unplug the print er and refe r servicin g to qualified service
personnel under the following conditions:
The power cord or plug is damaged; liquid has entered the
printer; the printer has been dropped or the cabinet damaged;
the printer does not operate normally or exhibits a distinct
change in performa nce.
❏ If you use the printer in Germany, observe the followi ng:
To provide adequate short-circuit protection and overcurrent pro tection f or this prin ter, the buil ding insta llation
must be protected by a 16 Amp circuit breaker.
Bei Anschluß des Druc ke rs an die Stromversorgu ng muß
sichergestellt werden, daß die Gebäudeinstallati on mit einem
16 A-Überstromschalter abgesichert ist.
A Few Precautions
When using the printer
❏ Do not put your hand inside the printer o r touch the i nk
cartridg e s during printing.
❏ Do not move th e print head by hand ; otherwise you may
damage th e printer.
❏ Always turn the printer off using the
this button is pressed, the
goes off. Do not unpl ug the printer or turn off t he power to
the outlet until the
❏ Before transporting the printer, make sure the print head is in
the home ( far right) position and the ink ca rtridges are in
place.
P power l ig ht stops flash ing.
P power l ig ht flashes briefly then
P power button. When
4
Page 7

When handling the ink cartridges
❏ Keep ink cartridges out of the reach of children. Do not allow
children to drink or o therwise handle th e cartridges.
❏ If ink ge ts on you r skin, w ash it off with soap and water . If it
gets in your eyes, flush them immediately with water.
❏ Do not shake an ink cartridge; this can cause leakage.
❏ Install the ink cartridge immediately after you remove it from
its package. Leavin g the cartridge unpacked for a long time
before use may result in reduce d print quality.
❏ Once you install an ink cartridge, do not open the clamp or
remove the cartridge except to replace it with a new one. The
cartridge may become unusable otherwise .
❏ Do not use an ink cartridge beyond the date p rinted on the
cartridge carton. For best results , use up the ink cartridges
within six months of installing them.
❏ Do not dismantle the ink cartridges or try to refill them. This
could damage the print head.
When choosing a place for the printer
❏ Place the prin ter on a flat, stable surf ace that is larger than the
printer. The printer will not operate properly if it is tilted or
at an angle.
❏ Avoid places subje ct to rapid changes in te mperature and
humidity. Also keep the printer away from direct sunlight,
strong light, or heat sources.
❏ Avoid places subject to shocks and vibrations.
❏ Leav e enough room around the printer to allow for sufficient
ventilation.
5
Page 8

❏ Place the printer near a wall outlet where the plug can be
easily unplugged.
Note for French- speaki ng users:
Placez l’imprimante près d’une prise de contacte où la fiche peut être
débranchée facile ment.
NERGY STAR Compliance
E
As an ENERGY STAR Partner, EPSON has
determined that this product me e ts the
S
TAR guidelines for energy efficiency.
E
NERGY
The International
a voluntary partnership with the computer and office equipment
industry to promo te the introduct ion of energy-effi cient person al
computers, monitors, printers, fax machines, and copiers in an
effort to re duce air pollution caused by power generation.
E
NERGY STAR Office Equipment Program is
Warnings, Cautions, and Notes
Warnings
must be followed c arefully to avoid bodil y injury .
w
Cautions
must be observed to avoid damage to your equipment.
c
Notes
of your printer.
contain importan t information and useful tips on the operation
6
Page 9

Setting Up Your Printer
System Requirements
For PCs
To use your printer, you need Microsoft® Windows® 3.1,
®
Windows
95, Windows® 98, Windows® NT 4.0, or DOS; and a
shielded, twisted-pair parallel cable. If you want to connect your
printer to a USB port, you need a Windows 98 pre-installed PC
equipped with a USB port; and a shielded USB cable.
Your computer should also meet the following system
requirements.
Minimum System Requirements Recommended System
i386/25 MHz proces sor for Windows3.1
i486/2 5 MH z f or W i nd ows95 an d N T 4 . 0
i486/66 MHz for Windows 98
16 MB RAM 32 MB RAM or more for
10 MB hard disk space for Windows 3.1,
95, and 98
20 MB for Windows NT 4.0
VGA monitor VGA or bett er monitor
Pentium or higher processor
Windows 3.1, 95 and 98
64 MB or more for Windows
NT 4.0
50 MB or mo re free disk space
for Windows 3.1, 95, and 98
100 MB or mo re for Windows
NT 4.0
Your computer dealer can help you update your system if it does
not meet these requirements.
7
Page 10

For Macintosh computers
You can us e this printer wi th the following Apple® Maci ntos h®
computers. You also need a standard Apple System Peripheral-8
cable (8-pin mini-circular connector) or equivalent.
Applicable computer models (as of September 1, 1998 )
Macintosh LC475, LC575, LC630
Macintosh Quadra Series
Macintosh Centris Series
Macintosh PowerBook™ Series (PowerBook 190, 520, 540, 550
or later)
Macintosh PowerBook Duo 280, 2300c/100
Macintosh Performa 475, 575, 588, 630, 5210 or later
Power Macintosh Series
iMac Series (for USB)
If you want to connect your printer to a US B port, you n eed
an iMac computer with a USB port, an d a shielded USB cable.
Your Macintosh must also meet the following system
requirements.
Minimum System Requirements Recommended System
System 7.5.1 System 7.6 or later
5 MB of available memory
12 MB of av ailable memory w hen
background printing is t urned on.
14 MB or more of available
memory
23 MB of available memory when
background printing is turned on.
8
Page 11

Note:
❏ The amount of available memory varies according to the number and
kind of applications that are o pen . To see how much memory is
available, choose
refer to the memory size (listed in kilobytes) under “Largest Unused
Block” (1,024K=1 MB).
About This Maci nto sh
from the Apple menu and
❏ The memory requirements above are for printing on Letter size
paper. These requirements may vary depending on the size of the
paper, the type of applic at ion you are using, and the c omplexity of
the document you want to print.
In addition to these system and memory requirements, you also
need 10 MB of free hard disk space to install your printer software.
To print, you need extra hard disk space amounting to about
double the si z e of the file you want to print.
9
Page 12

Printer Parts and Control Panel Functions
paper support
edge guides
sheet feeder
prin ter co v er
output tray
output tray exten s ion
ink cartridge clamps
10
control panel
adjust lever
Page 13

Buttons
Button Function
P
Power
E
Load/Eject
R
Cleaning
Lights
Light Printer Status
P
Power
S
Paper out
B
Black ink out
A
Color ink out
Turns the printer on and off.
Clears the printer's memory if pressed twice while the
power is on.
Loads or ejects paper if pr essed and relea sed within
2 seconds.
Resumes printing if pressed and released after a paper
out error.
Moves the print head to the ink cartridge replacement
position if pressed for 3seconds while the
color ink out light is flashing or on.
A
Returns the print head to its home position after ink
cartridge replacement.
Performs print head clean ing if pressed for 3 seconds
when the
On when the pr inter is on.
Flashes when rec eiving data, pri nting, replac ing an ink
cartridge, charging ink, or cleaning the print head.
On when th e pr int er i s ou t of p ape r. Loa d p aper in th e
sheet feeder; then press the
resume printing.
Flashes when paper is j amme d. T ake all the pa per o ut
of the feeder, and reload the paper. If t he light
continues to flash , tu rn off t he prin ter and gently pull al l
the paper out of the printer.
Flashes whe n black ink is low. T he black ink cartridg e is
nearly empty.
On when black ink is out. The bla ck ink cartridge is
empty. Replace the black ink cartridge (T003✽✽✽).
Flashes when color ink is low. The color ink cartridge is
nearly empty.
On when color i nk is out. The color ink cartridge is
empty. Replace the color in k cartridge (T005✽✽✽).
B
black or
color ink out light is off.
A
E
load/ejec t bu tton to
B
black or
11
Page 14
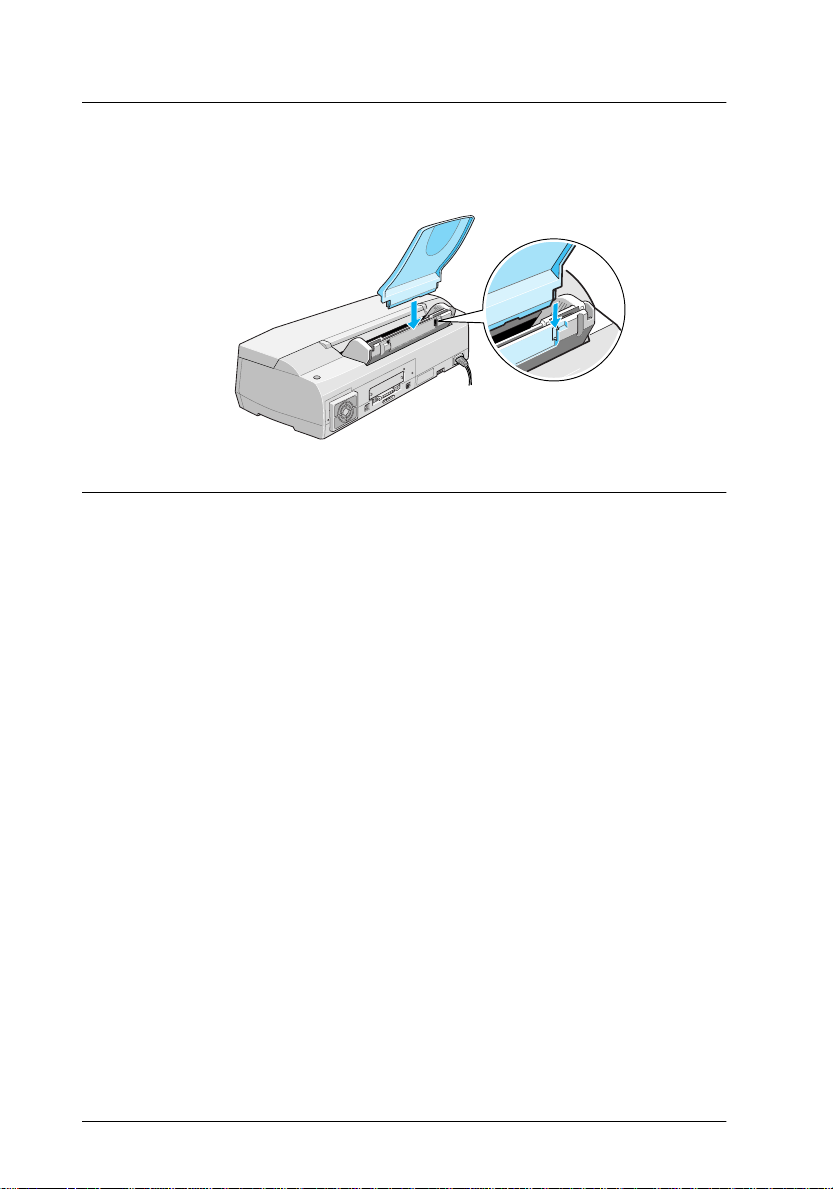
Attaching the Paper Support
Insert the paper support into the slots at the re ar of the prin te r.
Plugging in the Printer
1. Make sure that the printer is turned off. It is off when the
P power light is off.
2. Check the label o n the back o f the printer to make sure the
voltage required by the printer matches that of the electrical
outlet you wil l b e plugging it into. Al so, make sure that you
have the correct pow er cable for your power s ource.
Caution:
c
3. If the power cord is not atta ched to the printer, con ne ct it to
the AC inlet on the ba ck of the printe r.
4. Plug the power cord into a properly grounded electrical
outlet.
12
It is not possible to change the printer's voltage. If the rated
voltage and your outlet voltage do not match, contact your
dealer for assistance. Do not plug in the power cord.
Page 15
Installing the Ink Cartridges
Before installing the ink car tri dges, note the following.
Warning:
w
Note:
❏ Do not open the ink cartridge packages until just before you install
❏ Use the ink cartridges packed with your printer the first time y ou
Install the ink cartridge s as follows:
1. Lower the output tray; th en open the printer cover.
The ink cartridges are self-contained units. Under ordinary use,
ink will not leak from a cartridge. If ink does get on your hands,
wash them thoroughly with soap and water. If ink gets into your
eyes, flush them immed iately with water.
them, or the ink may dry up.
install ink cartridges; otherwise the printer may not cha r g e ink
properly.
13
Page 16
2. Turn on the printer by press ing the
The print head moves slightly to the left, which is the black
ink cartridge installation position. The
and the
B black and
A color ink out lights come o n.
P power button.
P power light flashes
14
c
Caution:
Do not move the print head by hand. Otherwise you may
damage the printer.
Page 17
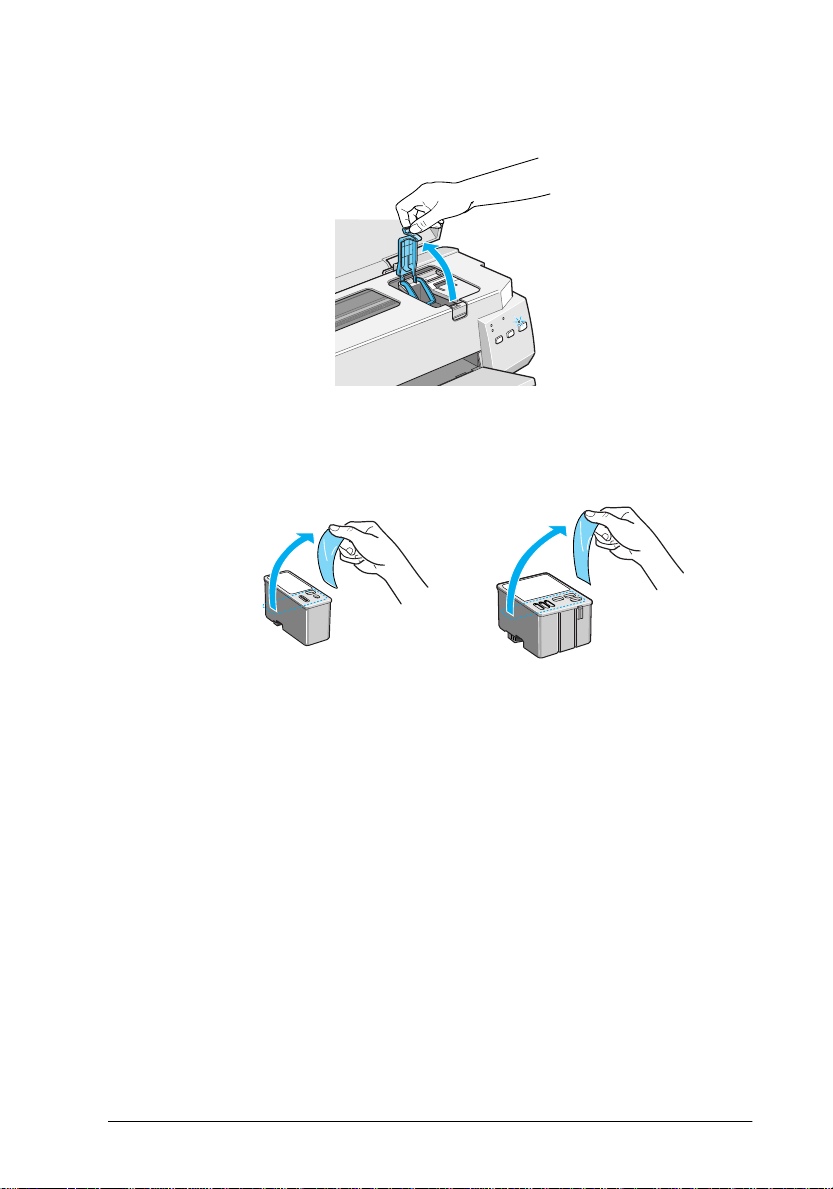
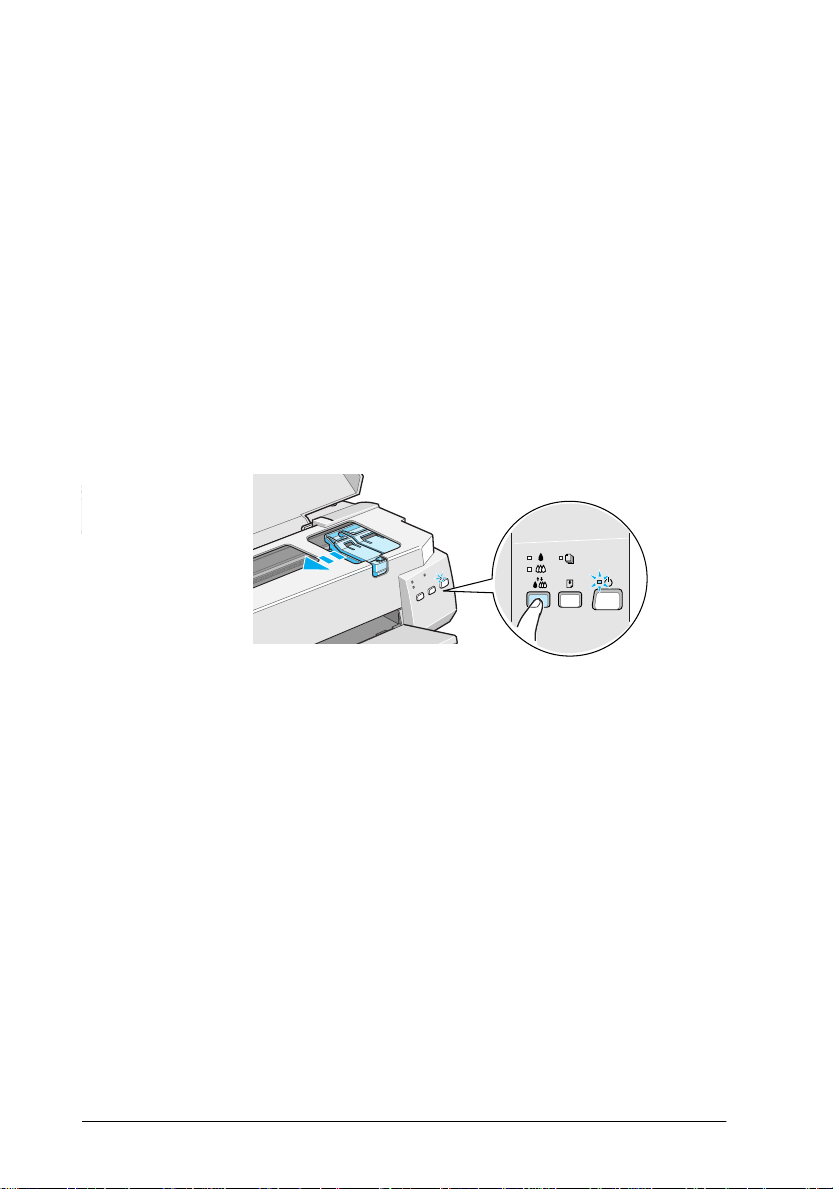
3. Lift up the black i nk cartridge c lamp.
4. Open the ink cartridge packages that came with your printer.
Next, remove only the yellow tape seals from ea ch cartridge .
c
Caution:
❏ Remove the yellow tape seals from the cartridges before
❏ Do not remove the blue portion of the tape seals from the
❏ Do not remove the tape seals from the bottom of the
installing them; otherwise the cartridges may bec om e
unusable.
cartridges; otherwise the print head may become clogged
and cannot print.
cartridges; otherwise, in k will leak.
15
Page 18
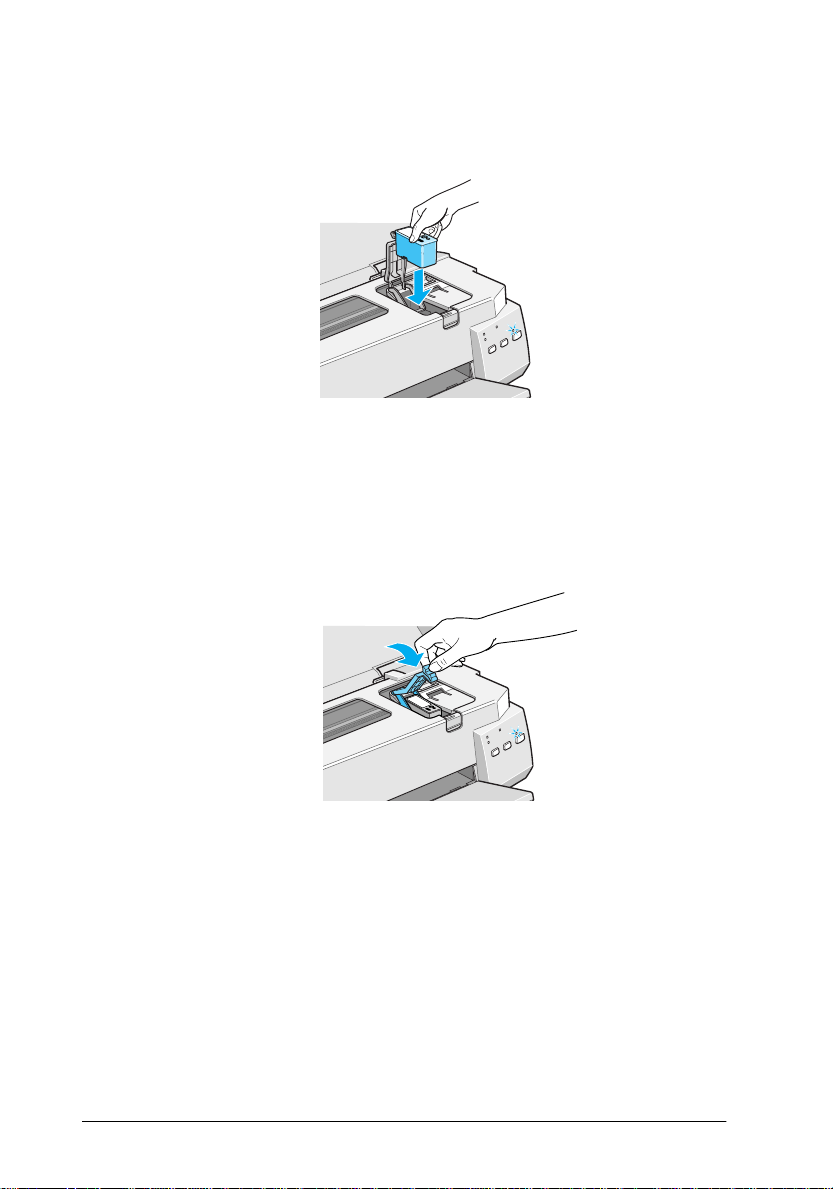
5. Place the black ink cartridge gent ly into its h older with the
labels facing up. Do not press down on the cartridge.
Note:
Install both ink cartridges. If either of the cartridges is not installed,
the printer will not work .
6. Press the ink cartridge clamp down until it locks in place.
16
c
Caution:
Once you install the ink cartridges, do not open their clamps
again until you replace the ink cartridges. Otherwise, the
cartridges may become unusable.
Page 19
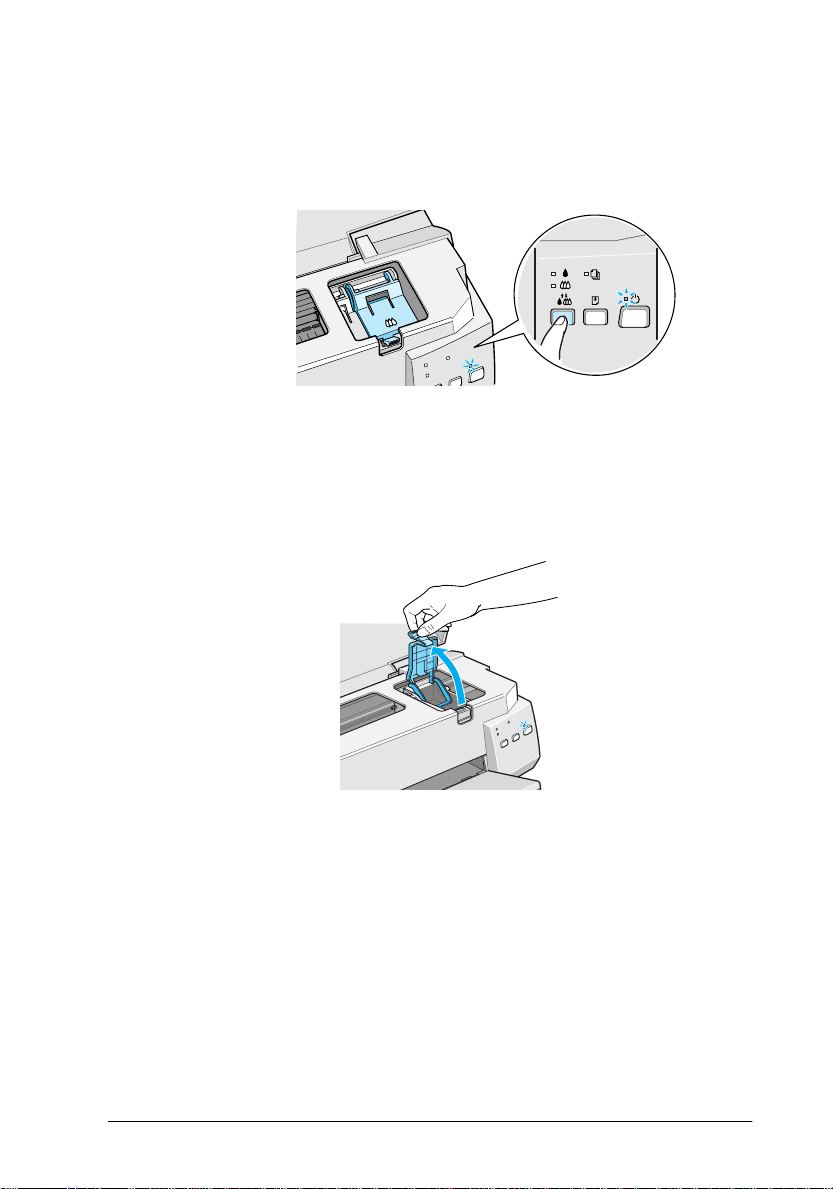
7. Press the
The printe r moves the print he ad to the c olor ink cartridge
installation position.
8. Lift up the ink cartridge clamp. Install the color ink cartridge
as described in steps 5 and 6, substituting “color ink
cartridge” for “black ink cartridge” where appropriate. Th en
go to step 9 to comple te the ink cartridge installation.
cleaning button to install the color ink cartridge.
R
17
Page 20

9. Press the
head and begins charging the ink delivery system.
The ink cha rging process ma y take abou t two minutes to
complete , during which time the
the printer produces a variety of mechanical sounds. These
sounds are normal. When the ink delivery system has been
charged, the print head returns to its home (far right) position
and the
c
10. Close the printer cover.
cleaning button. Th e pri nter moves the print
R
P power light flashes and
P power light comes on.
Caution:
Never turn off the printer while the
P power light is flashing.
Now you are ready to connect the pri nter to your computer. To
connect the printer to your PC, see the next section. To connect
the printer to a Macintosh, see “Connecting the Printer to Your
Macintosh” on page 2 4. If you plan to use a USB c ab le to conne ct
to your computer, follow the instructions in the USB User’s Guide
that cam e with your printer.
18
Page 21
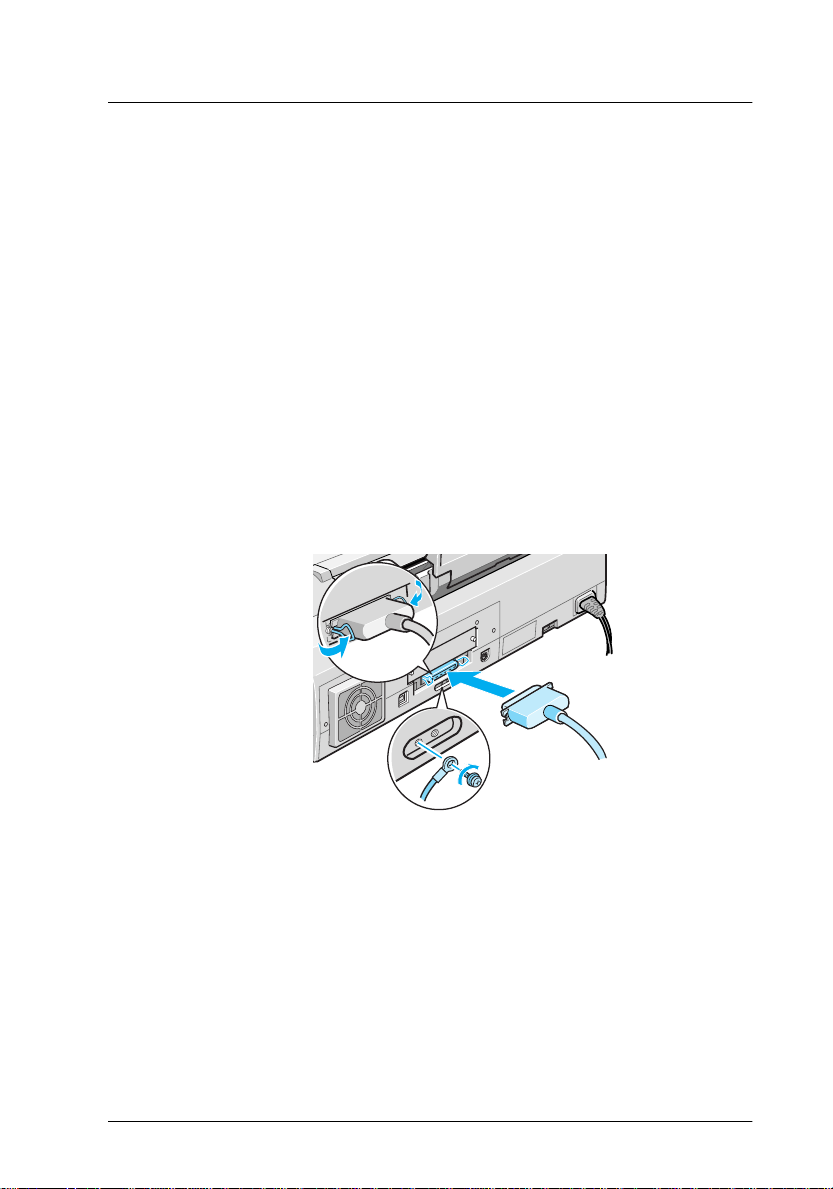
Connecting the Printer to Your PC
To connect the printer to your computer using its built-in parallel
interface, you need a shielded, twisted-pair parallel cable.
Note:
If you plan to connec t w ith a USB cable, follow t he i nstru ctions in the
USB User’s Guide th at cam e wit h y our printer.
Follow these steps to connect your printer.
1. Make sure bo th the printer and computer are turned off.
2. Plug the cabl e connector securely into the printer's in terface
connector. Then squeeze the wire cli ps together until they lock
in pl ace o n both sides . If your c able ha s a gr ound w ire, c onnec t
it to the gro und connector below the inte rface con ne ctor.
3. Plug the other e nd of the cable into the computer's pa rallel
interface. If there is a ground wire at the computer end of the
cable, connect it to the ground connector at the back of the
computer.
Now see the next section for inst ructions on insta lling the printer
software in your computer. You must install this software before
using your printer.
19
Page 22

Installing the Printer Software in Your PC
After connecting the printer to your computer, you need to install
the software included on the “Printer Software for EPSON Stylus
COLOR 900” CD-ROM shipped with your printer.
What to install
Your printer software includ e s:
❏ Printer driver
The printer driver is the software that runs, or “drives,” your
printer. With it, you can make settings such a s media type,
print quality, speed, and pa per size.
❏ Utilities
The Nozzle Check, Head Cleaning, and Print Head
Alignme nt utilities help you ke ep your printer in top
operating condition.
❏ EPSON Status Monitor 2 (not for Windows 3.1)
EPSON S ta tus Monitor 2 notifies you of printer errors and
displays pri nter status information, such as the am ount of ink
remaining. The Status Monitor al so guides yo u when
replacing i nk cartridges.
❏ HIGH QUALITY IMAGES (not for Win dows 3.1)
HIGH QUALITY IMAGES allows you to quickly and easily
see the kind of high-quality printout available from the
EPSON Stylus COLOR 900.
If you are using the floppy disk version of the software, make a
backup copy of the EPSON printer software disk before you begin
installation .
20
Page 23
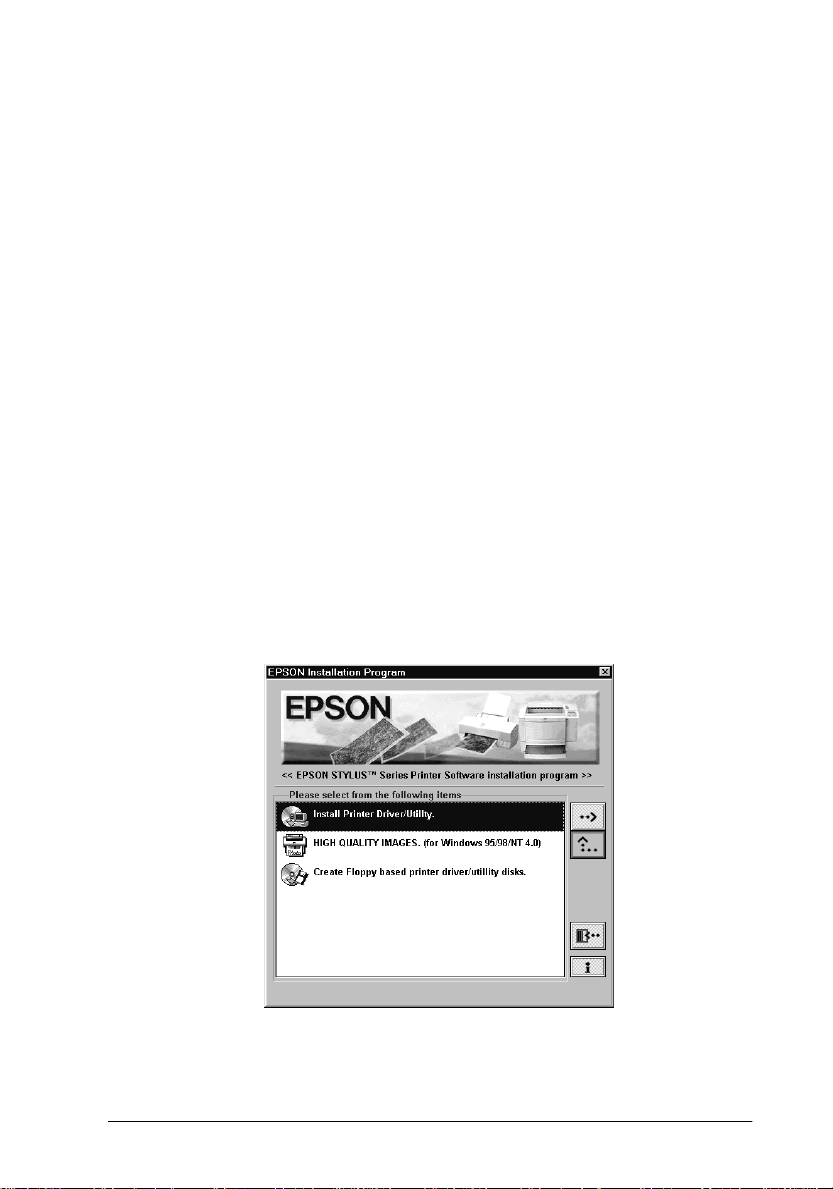
If you wish to make a floppy disk version of the printer software
on your CD-ROM, insert the printer software CD-ROM, then click
Driver disk creation utility
the
instructions. For W indows 3.1, insert the CD-R OM, then cho ose
Run
from the File menu. In the Command Line box, type
D:EPSETUP
and click OK.
button and follow the on-screen
Installing in Windows 95, 98, and NT 4.0
Follow the steps below to install the printer software in
Windows 95, 98, and NT 4.0.
If you conn e cte d your printe r using the USB interfa ce, you need
to install the EPSON USB Printer Device Driver and the printer
software included in the printer software CD-ROM. Follow the
instructi ons in the USB U ser’s Guide that came with your printer.
1. Insert the printer software CD shipped wi th your pri nter in
the CD-ROM drive. The Installer dialog box appears. (For
floppy disk users, insert the disk in a disk drive. Then doubleclick the FD drive icon, then double-click the
Setup.exe
icon.)
21
Page 24

2. Double-click
softw are installation.
Install Printer Driver/Utility
to start the printer
3. When the installation is complete, click
EPSON Status Monitor 2 installation starts automatic ally. Follow
the on-screen instructions.
Note:
❏ If the New Hardware Found screen or any other Wiz ard app ears
when you turn on your computer, click
above.
❏ Installation time varies depending on your computer.
For information o n opening and using the s oftware, see “Printing
Your First Page Usin g Windows” on page 33. See also “Us ing the
Printer So ftware for Windows” in the online R e ferenc e Guide.
If you use your printer on a network with Windows 95, 98, or
NT 4.0, see “Network Printing” in the online Reference Guide.
OK
Cancel
.
and follow the steps
Installing in Windows 3.1
Follow these steps to install the software in Windo w s 3.1.
1. Make sure Windows 3.1 is running and the Program Manager
window is open.
2. Insert the printer software CD shi pped wi th your prin te r in
the CD-ROM drive. (If you use the floppy disk version, insert
it in a disk drive.)
22
Page 25

3. Choose
In the Command Line box, ty pe
CD-ROM drive has a drive letter other than “D” or if you are
using the floppy disk version, substitute the appropriate
letter.
4. The installation program begins copying the printer software
files.
5. When the installation is complete, click OK to exit the
installation program.
The installation program automatically selects this printer as the
default printer for Windows applications.
For information on opening and us ing the software, s ee “Print ing
Your First Page Usin g Windows” on page 33. See also “Using t he
Printer So ftware for Windows” in the online Reference Guide.
Run
from the File menu. The Ru n dialog box appears.
D:SETU P
and click OK. If the
23
Page 26

Connecting the Printer to Your Macintosh
To use the printer's built-in serial interface, you need an Apple
System Peripheral-8 cable.
Note:
❏ To connect to an iMac computer using the USB cable, follow the
instructions in the USB User’s Guide that came with your printer.
❏ If y ou want to use the optional LocalTalk Int erface Card (C82312✽)
or Type B Ethern et Interfac e Card (C82362✽/C823 63✽/C82364✽),
see “Using optional interface cards” on page 70.
Follow these steps to connect the printer.
1. Make sur e b oth you r print er and Maci ntosh are s wi tch ed of f.
2. Connect one end of the interface cab le to the serial port on t he
back of the printer.
3. Connect the other end of the interface cable to either the
modem port or printe r port on the Macintosh. The ports are
marked with the following icons.
modem port
printer port
24
Page 27

Now see the next section for inst ructions on insta lling the printer
software. You must install the printer software before using your
printer.
Installing the Printer Software in Your Macintosh
After connecting the printer to your Macintosh, you are ready to
install the printer sof tware incl uded in the “ Printer Software for
EPSON Stylus COLOR 900” CD-RO M shipped with your print er.
What to install
Your printer software includ e s:
❏ EPSON Printer Driver Package
SC900
Printer driver software that runs your printer if you are using
the serial or USB interface. With it, you can make settings such
as media type, print quality, speed, and paper size.
SC900 (AT)
Printer driver software that lets you use the printe r on an
AppleTa lk network. With it, you can make settings such as
media type, print qual i ty, s peed, and paper size.
EPSON Monitor3
Monito rs and manages background printing jobs. You must
turn on background printing in the Chooser to use this utility.
StatusMoni tor
Keeps track of the current status of your printer, and alerts
you when printer errors occur.
25
Page 28

Utilities
The Nozzle Check, Head Cleaning, and Print Head
Alignme nt utilities help you ke ep your printer in top
operating condition.
❏ Epson Namer
Assigns a unique name to the printer so that you can use it on
an AppleTalk network.
❏ ColorSync 2.0 and Profiles
Matches the colors in your printout with the colors displayed
on you r scree n auto matical ly. Use this when pr inting scanne d
photographs or computer graphics.
If you are using the floppy dis k version, make a ba ckup copy of
the EPSO N Macintosh printer software disk before you begi n
installation.
Installing the software
Caution:
c
Turn off all virus protec tion p r ograms before you install your
printer software.
Follow these steps to install your printer software.
1. Turn on your Macintosh and insert the software CD in the
CD-ROM drive. (If you use the floppy disk version, in sert i t
in a disk drive.)
2. The EPSO N printer sof tware disk opens automatically.
3. If a single
separate folders containing installer icons for several
languages appear, double-click the folder for your preferred
language, then double-click the
26
Installer
icon appears, double-click the icon. If
Installer
icon .
Page 29

4. After the initial screen appears, click
following dialog box appears.
5. If you want to install all of the printer software included on
your printer software CD-ROM, make sure the Install
Location box show s the correct disk drive and click
Continue.
The
Install
.
6. If you are low on disk space, select
pop-up menu and click
the printer directly to your Macintosh’s serial or USB port), or
Network Driver Package
the printer to your Macintosh over an AppleTalk network).
Confirm the destination for installation, then click
Note:
Click the icon to get information on each componen t.
7. When a message appears informing you that installation is
finished, click
your com p uter.
Restart
Serial Driver Package
and
to complete the installation and restart
Custom Install
Epson Namer
from the
(if you connect
(if you connect
Install
.
27
Page 30

If you are going to use the optional LocalTalk Interface Card
(C82312✽) or Type B Ethernet Interface Card (C82362✽/
C82363✽/C82364✽), you need to ass i gn a name to yo ur printer
using the EPSON Namer utility as described below. If you are
using a serial or USB interface, skip to “Selecting Your Printer in
the Chooser” on page 29.
Assigning a name to the printer
Follow these steps to assign a name to your printer with EPSON
Namer.
Note:
Only the network admin istrato r sh ould assign a name to the printer.
1. Double-click the
If yo u ha ve installed the
Macintosh, its icon is locat ed in your hard disk folder. If it h as
not been installed, insert the printe r softwar e CD-ROM into
your computer’s CD-ROM drive and open the utility from
there. (If you use the floppy disk version, insert it in a disk
drive and open the utility from there.)
2. Click the
3. If there are multiple AppleTalk zones at your site, select the
zone where the printer is located.
4. Under New Name, enter a name for your printer. You should
assign a name that clearly distinguishe s your prin ter from
others on the network.
5. Click
Namer.
SC900(AT)
Rename
Epson Namer
Epson Namer
icon in the Device Types window.
and then click
icon.
utility on your
Done
to quit the EPSON
28
Page 31

Selecting Your Printer in the Chooser
After you install the printer software , y ou need to o p e n the
Chooser to select your printer. You have to choose the printer the
first time you use it or whenever you want to switch to another
printer. Your Macintosh will always print using the last printer
selected.
If you are using your computer’s serial or USB interface, choose
your printer driver as described in the following section, “Using
a serial or USB interface connection” on page 29. If your system
is connected to an AppleTalk network, see “Using the AppleTalk
connection” on page 31.
Note:
If you are using a Macintosh Quadra 950 or 900, you need to choose
Compatible
printer from the Chooser. To open t he Serial Switch dialog bo x, choo se
Control Panel
Using a serial or USB interface connection
1. Make sure the printer is conne cted to your Macintosh an d is
turned on.
in the Serial Switch dialog box before selecting your
from the Apple menu, then choose
Serial Switch
.
29
Page 32

2. Choose
printer's ic on and the port your printer is co nnected to.
Note:
❏ If you are using an iMac computer, you must selec t th e U SB
❏ If you are using an AppleTalk network, an alert messa ge may
Chooser
port.
appear when you click the po rt. In this case, reselect the other
port, or make the AppleTalk setting
port again.
from the Apple menu. Then click your
Inactive
, then select the
3. Click the
background printing on or off.
When background printing is on, you can use your Macintosh
while it is preparing a document for printing. You must turn
on background printing to use the EPSON Monitor3 utility to
manage print jobs. For more information, see “Controlling
Background Printing” in the online Reference Guide.
4. Close the Chooser.
For information o n opening and using the s oftware, see “Printing
Your First Page Using a Macintosh” on page 35. See also “Using
the Printer Software for Macintosh” in the online Reference Guide.
Background Pr int ing
radio buttons to turn
30
Page 33

Using the AppleTalk connection
1. Turn on your printer.
2. Choose
printer’s icon an d select the AppleTalk zone you wa nt to use.
A list of all the printers connected to the selected zone appears
on the righ t.
3. Click the name you assigned to y o ur EPSON Stylus
COLOR 900.
4. Click the
background printing on or off.
Chooser
Background Printing
from the Apple menu. Then click your
radio buttons to turn
When background printing is on, you can use your Macintosh
while it is preparing a document for printing. You must turn
on ba ckgro und p rint ing t o use the E PSON M onito r3 ut ili ty to
manage print jobs. For more information, see “Controlling
Background Printing” in the online Reference Guide.
5. Close the Chooser.
For information on opening and us ing the software, s ee “Printi ng
Your First Page Using a Macintosh” on page 35. See also “Using
the Printer Software for Macintosh” in the online Reference Guide.
31
Page 34

Loading Paper
Follow these steps to load A4 or Letter size plain paper.
You can also print on ink jet paper, photo-quality glossy film,
photo paper, transparencies, envelopes, index cards, and
adhesive sheets. For details on using such media, see “Loading
Special Paper” on page 38.
1. Lower the out put t ray an d slide out the exte nsio n. Next , sli de
the left edge guide so that the distance between the edge
guides is slightly wi der than the width o f your paper.
edge guide
output tray
2. Fan a stack of paper; then tap it on a flat surface to even the
edges.
3. Lo ad the stack o f paper with the printab le side up and the
right edge of the paper resting aga inst the rig ht side of the
sheet feeder. Then slide the left edge guide against the edge
of the paper.
printable
side up
32
Page 35

Note:
❏ Always load pap er into the sheet feeder short edge first.
❏ Make sure the paper stack fits under the arrow mark inside the
edge guide.
Printing Your First Page Using Windows
After loading the paper, you are ready to print your first page. In
order to check the ope ration o f your printer, we reco mmend
printing the R EADME file provided with you r pri nter softw are.
The README file contains the latest information about your
printer so ftware.
If you choose to print you r own document instead, select the
appropriate Paper Size setting in your application software, then
print the document as explained from step 3, below. (See your
software manual for details on h ow to use your application.)
Follow these steps to print the R EA DME file.
1. Make sure A4 or Letter size paper is loaded in the printer.
2. Click
3. Click
Start
, point to
Windows 95 and 98) or
NT 4.0), and then clic k
If you are using Windows 3.1, open the EPSON program
group from Progr am Manager and double-click
COLOR 900 Readme
Print
on the File menu. The Print dialog box appears.
Programs
EPSON Printers
EPSON Stylus COLOR 900 Readme
.
, point to
Epson
(for Windows
(for
EPSON St ylus
.
33
Page 36

4. Make sure your printer is s elec ted an d the n clic k
Options
or
buttons. The driver settings window appears.
. You may need to click a combination of these
Properties
,
5. Click the
Media Type box and select
6. Select
7. Make sure the Mode option is set to
When
other settings according to the Media Type and Ink settings
you make.
8. Click the
and select the paper size yo u loaded in the printer.
9. Click OK at the bottom of the window. You return to the Print
dialog box (or a similar dialog box).
10. Click
combination of these buttons.
Main
tab if necessary, then click anywhere in the
Color
as the Ink s etting.
Automatic
Paper
Close, OK
Plain paper
is selected, the print er sof tware opti mizes
tab, then click anywhere in the Paper Size box
Print
, or
to print. You may need to click a
.
Automatic
.
34
Page 37

While printing, the EPSON Progress Meter (in Windows 95, 98,
and NT 4.0) or the EPSON Despooler dia log box (in Windows 3.1)
will appear, showing the printing progress and the status of your
printer. For details, see “Monitoring and Managing Print Jobs for
Windows” in the online Reference Guide.
After printing, check your results. If pri nted satisfactorily, your
EPSON pri nter is now fully setup and ready to help you create
wonderful printouts. If the printed image is unexpectedly faint or
dots in the printed image are missing, you should check and clea n
the print head. See “Cleaning the Print Head” on page 50.
For further information about your printer, see the online
Reference Guide. For details about the printer software, see online
help. To learn more about color printing, see the online Color
Guide.
Printing Your First Page Using a Macintosh
After loading the paper, you are ready to print your first page. In
order to check the ope ration o f your printer, we reco mmend
printing the READ M E file located on your printer software CD.
The README file contains the latest information about your
printer so ftware.
If you choose to print you r own document instead, select the
appropriate Paper Size setting in your application software, then
print the document as explained from step 4, below. (See your
software documentation for de ta ils on how to use your
application.)
35
Page 38

Follow these steps to print the README file.
1. Make sure A4 or L etter size paper is load ed in the prin ter.
2. Insert the pri nter software CD.
3. Open the EPSON folder and double-click the README file.
4. Choose
dialog box appears.
5. Select the paper size you loaded in the printer from the Paper
Size list.
6. Select
7. After making your settings, click OK to close the Page Setup
dialog box.
Note:
You cannot print from the Pa ge Setup dialog box. You can only print
from the Print dialog box.
Page Setup
Portrait
as the Orientation option.
from the File menu. The following
36
Page 39

8. Choose
appears.
Print
from the File menu. The Print dialog box
9. Select
10. Select
11. Make sure the Mode option is set to
12. Click
After prin ting, check yo ur results. I f everyth in g printed
satisfactorily, your EPSON printer is now fully setup a nd ready
to help yo u create wonderful prin touts. If the pri nted image is
unexpectedly faint or dots in the printed image are missing, the
print head may need cl eaning. Se e “ Cleaning the Print Head” on
page 50.
For further information about your printer, see the online
Reference Guide. For details about the printer software, see online
help. To learn more about color printing, see the online Color
Guide.
Plain Paper
Color
When
other settings according to the Media Type and Ink settings
you make.
Automatic
Print
to start printing.
from the Media Type list.
as the Ink option.
Automatic
is selected, the printer software optimizes
.
37
Page 40

Loading Special Paper
You can prin t on a wide var iety of special me dia, including ink
jet paper, photo quality glossy film, photo paper, transparencies,
envelopes, index cards, and adhesive sheets.
When loading special paper distributed by E PSON, read the
instruction sheets packed with your s pecial media f ir st and keep
the following points in mind. For more details on using such
media, see “Paper Handling” in the online Reference Guide.
❏ Make sure the printable side of the paper is facing up when
loading media into th e sheet feeder. See the instruction sheets
packed w ith the media to dete rmine which side is t he
printable surface. Some media have cut corners to help
identify the correct loading direction, as shown in the
illustration.
cut corner
printable
side up
❏ Make su re the pap e r stack f its u nde r the a r ro w ma r k l o c a ted
on the inside surface of the left edge guide.
38
Page 41

❏ Loading capacit y for env e lop es an d EP S ON s pec ial media is
explained below.
Envelopes Up to 10 envelopes.
Note:
If the total thickness of the stack of
envelopes exceeds 10 mm, press each
envelope fla t before loading.
360 dpi Ink Jet P aper
and Photo Quality
Ink Jet Paper
Photo Quality Ink
Jet Card, Ink Jet
Note Card, and Ink
Jet Greeting Card
Photo Quality
Glossy Film
Ink Jet
Transparencies
Photo Quality Self
Adhesive Sheet
Photo Paper Up to 20 sheets. For 4 × 6 inch
Up to the arrow mark on the left
edge guide.
Up to 3 0 i ndex cards. Alw ays
place the included support sheet
under the cards.
One sheet at a time for best
resu lts. Always pu t a suppo rt
sheet* or a sheet of plain paper
under th e glossy film .
If you wish to print with multiple
sheets, load only up to 20 sheets
and set the minimu m top ma rgin
of the page to 30 mm.
Up to 30 transparencies. Always
put a sheet of plain paper unde r
the stack of transparencies.
One sheet at a time.
Photo Paper, always put a
support sheet* under the stack of
Photo Paper.
39
Page 42

Photo Stickers 16
and Photo Sticker 4
One sheet at a time. Always put
the included Support Sheets A
and B under the stack of Photo
Stickers.
Panoramic Photo
One sheet at a time.
Paper and Iron-On
Cool Peel Transfer
Paper
* Take car e not to print on support sheets loaded under special media.
40
Page 43

Replacing Ink Cartridges
The printer’s indicator lights will inform you when it is time to
obtain a replacement ink cartridge and when it is time to replace
an empty cartridge.
This tabl e de scribes the status of the lights o n your pri nte r and
the actions yo u need to take.
Lights Action
f B
Obtain a replacement black ink cartridge (T003
✽✽✽
).
o B
f A
o A
o = on,
c
Note:
You cannot continue printing with one ink cartridge empty, even if the
other cartridge still cont ains ink. Before printing, rep lace the empty
cartridge.
f = flashing
Caution:
❏ EPSON recommends the use of genuine EPSO N ink
❏ Leave the old cartridge installed in the printer until you have
Replace the empty black ink cartridge.
Obtain a replacement color ink cartridge (T005
Replace the empty color ink cartridge.
cartridges. Other products no t manufactured by EPSON
may cause damage to your printer not covered by EPSON's
warranties.
obtained a replacem ent. Otherwise, ink remaining in the
print head nozzles may dry out.
✽✽✽
).
41
Page 44
To replace an ink cartridge using the printe r’s control panel,
follow these steps.
1. Make sure the printer is on. The
but not flashing. (Determine which cartridge needs to be
replaced as indicated by the
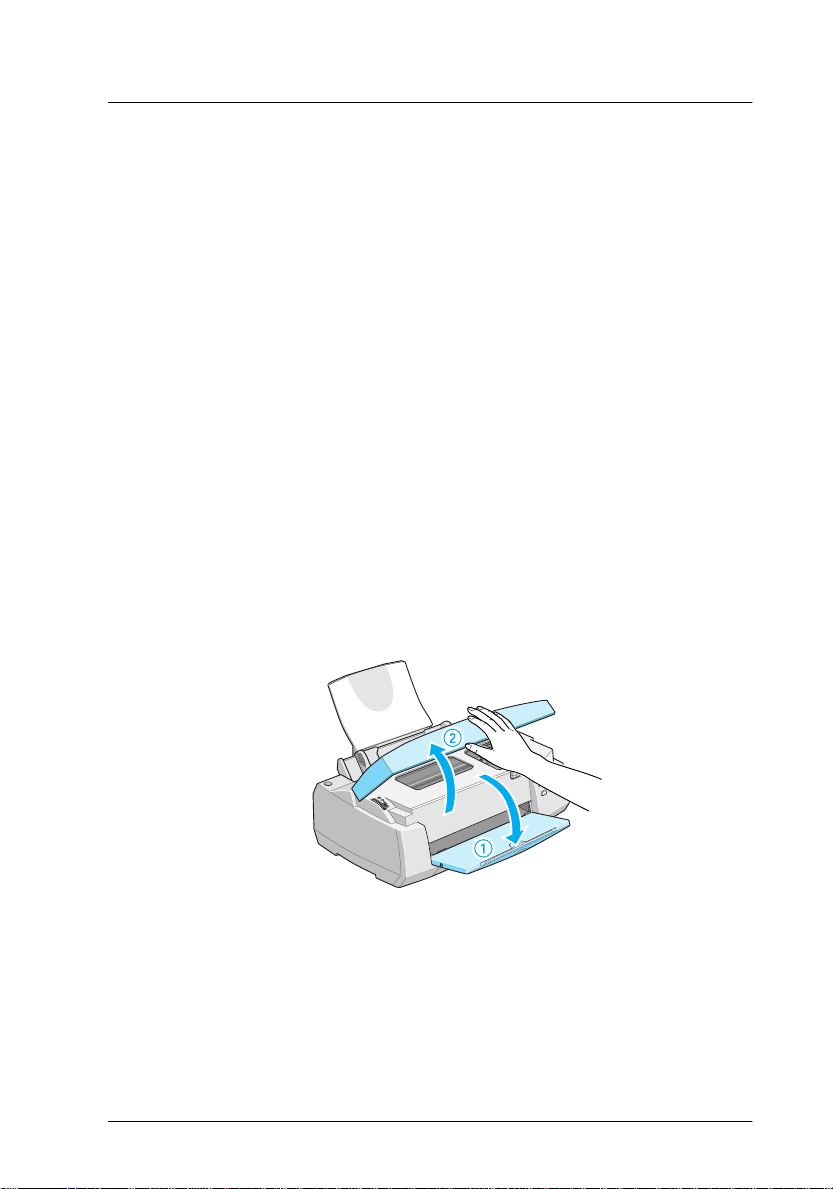
2. Lo wer the output tray at the front of t he pri nter, then o p e n
the print er cover.
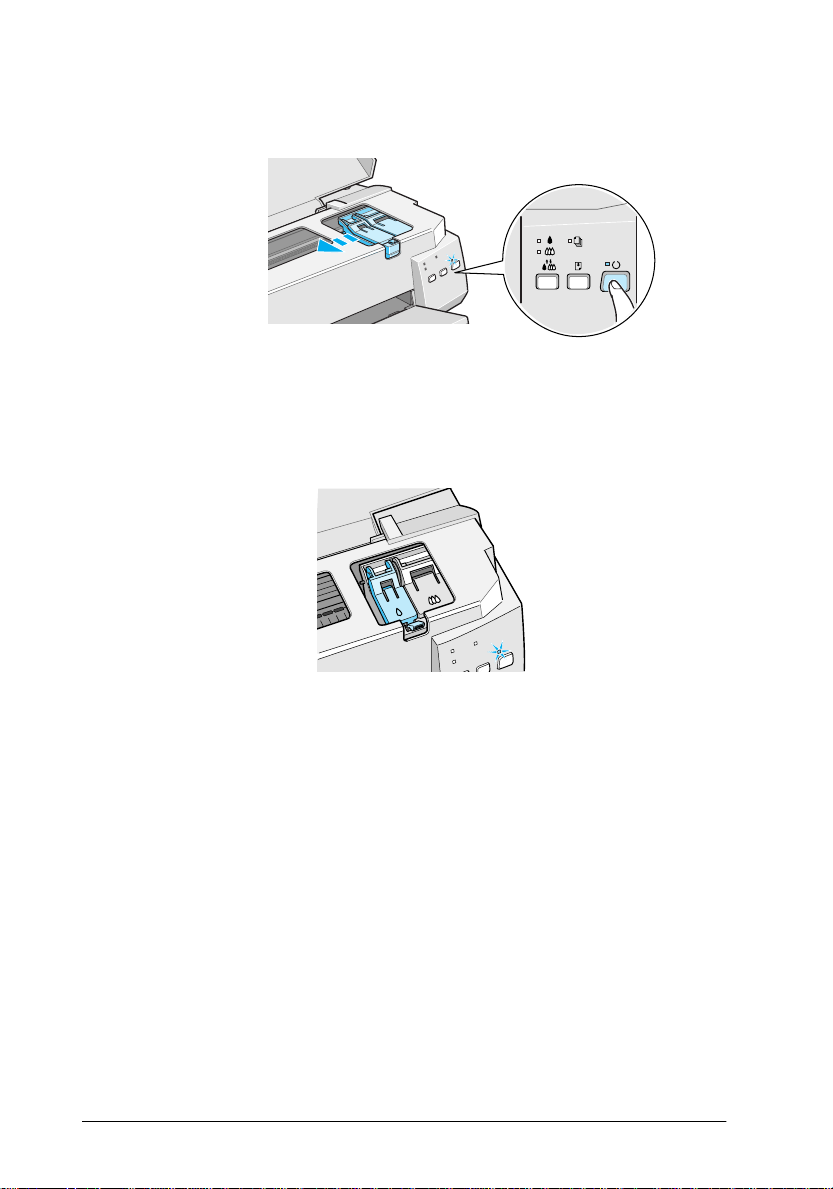
3. Hold down the
print head moves left, to the black or color cartri dge
replacement position dependi ng on which ink is empt y, and
power light b e gins flashing.
the
P
Caution:
c
Do not move the print hea d by hand as this may damage the
printer. Always use the
cleaning button for three seconds. The
R
B
power light should be on,
P
black and
cleaning button to move it.
R
color ink out light.)
A
42
Note:
If you press the
blac k and Acolor ink out lights are off, the printer starts cleaning
B
the print head.
cleaning button for three sec onds when the
R
Page 45

4. Lift up the clamp that holds the cartridge. The cartridge rises
partly out of the car tridge holder.
Caution:
c
5. Lift the cartridge out of the printer and dispose of it properly.
Do not take the used cartridge apart or try to refill it.
Once you open the ink cartri dge cla mp, the ink cartridge
becomes unusable a nd c annot be reinstalled, even if ink
remains.
w
Warning:
If ink gets on your hands, wash them thoroug h ly wit h soap
and water. If ink gets into your eyes, flush them immediately
with water.
43
Page 46

6. Remove the ink cartridge from its protective ba g. N ext,
remove only the yellow tape se al from the cartridge.
black ink cartridge (T003
Caution:
c
7. Pla ce the ink cartridge gently into t he cartridge holder wi th
the label on the cartridge facing up. Do not press down on the
cartridge.
❏ You must remove the yellow tape seal from the cartridge
before installing it. The c art rid g e will be permanently
damaged if installed with the yellow tape attached.
❏ Do not remove the blue portion of the tape seal from the
top of the cartridge; otherwise, the prin t head may
become clogged and cannot print.
❏ Do not remove the tape seal from the bottom of the
cartridge; otherwise, ink wi ll leak.
) color in k cartridge (T005
✽✽✽
✽✽✽
)
44
Page 47

8. Press the ink cartridge clamp down until it lock s in place.
Caution:
c
9. If you need to replace the color ink cartri dge as well, press the
R
Once you install the ink cartridges, do not open their clamps
again until you replac e the cart rid g es. Otherwise, the
cartridges may beco m e unusable.
cleaning button. Then repe at steps 4 through 8.
10. Make sure the
press the
head and begins charging the ink delivery system. This
process ta kes about o ne minute to compl ete. When the ink
charging process is finished, the printer returns the print head
to its home positi on and th e
R
black and
B
cleaning b utton. The printer moves the p ri nt
color ink out li ghts are off. The n
A
power light stops flashing.
P
45
Page 48

Caution:
c
11. Close the printer cover.
The
performs the ink charging operation. Never turn off the
printer while this light is flashing. Doing so can result in
incomplete charging of ink.
power light continues to flash while the printer
P
46
Page 49

Maintenance
Checking the Print Head Nozzles
If you find that the printed image is unexpectedly faint or dots in
the printed image are missing, you may be able to identify the
problem by checking the print head nozzles.
You can check the print head nozzles f ro m your computer with
the Nozzle Check utility in the printer software, or from the
printer its e lf by using the printer’s control panel buttons.
Using the Nozzle Check utility
Note:
Do not start the Nozzle Ch eck utility while print ing is in progress;
otherwise your printout may be marred.
For Windows users
1. Make sure A4 or Letter size paper is loaded in the she et feeder.
2. Click the
Nozzle Chec k
3. Follow the messages on your screen.
For Macintosh users
1. Make sure A4 or Letter size paper is loaded in the she et feeder.
2. Click the
dialog box, then click the
3. Follow the messages on your screen.
Utility
tab in th e printer win do w, then click th e
button.
Utility icon button in the Print or Page Setup
Nozzle Check
button .
47
Page 50
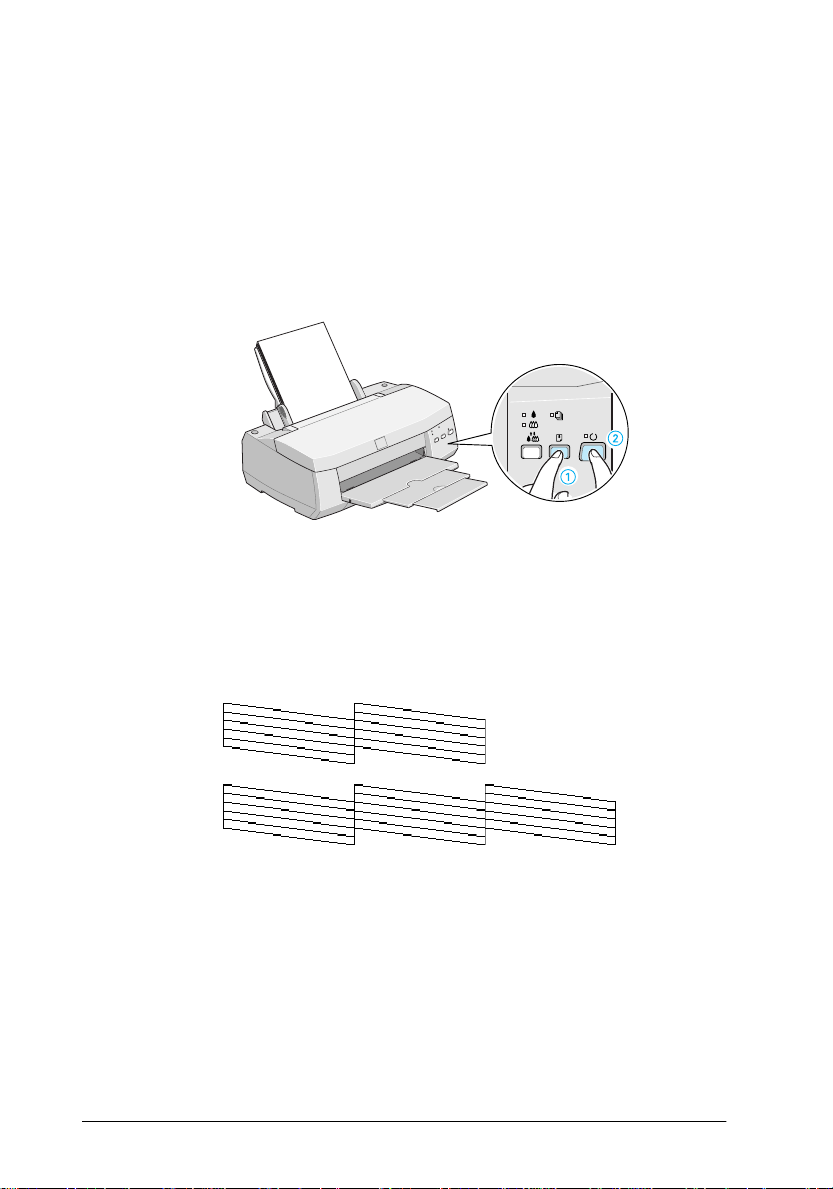
Using the control panel buttons
1. Make sure that A4 or Letter size paper is loaded in the sheet
feeder.
load/eject button (➀ in the illustration
2. Hold down the
below) and press the
below) to turn on the prin te r. Then release both buttons.
The printer prints an op e ration check page including yo ur
printer’s ROM version i nformation, the in k counter code, and
a nozzle check pattern. Here are sample printouts.
Good sample
E
P
power button (➁ in the illustra tion
48
Page 51

Print head needs to be cleaned
segments are missing
The above sample is in black and white, but the actual test prints in color
(CMYK).
If the nozzle check page does not print satisfactorily (for
example, if any segment of the printed lines is missing) there
is a problem with the printer. This could be a clogged ink
nozzle or a misaligned print head. See the next section for
detai ls on clea ning the print hea d. For in formati on on alig ning
the print head, see “Aligning the Print Head” on page 53.
49
Page 52

Cleaning the Print Head
If you find that the printed image is unexpectedly f aint or dots in
the printed image are missing, you may be able to solve these
problems by cleaning the pri nt head, w hi ch ensures that the
nozzles are delivering ink properly.
You can clean the print head from your computer with the Head
Cleaning utility in the printer software, or from the pri nter itself
by using the printer ’s control pa nel buttons.
Note:
❏ Print head cleaning uses both color and black ink. To avoid wasting
ink, clean the print head only if print quality declin es.
❏ Use the Nozzle Check utility to confirm that the print head needs to
be cleaned. This saves ink.
B
❏ When the
cannot clean the print head. Replace the appropria te ink cartridge
first.
❏ Do not star t th e Head Cleaning or Nozz le Ch eck utility while
printing is in progress; otherwise your printout may be m arred.
black or Acolor ink out light is flashing or on, you
Using the Head Cleaning utility
For Windows users
1. Make sure that both
Note:
B
If the
the print head. Replace the appropriate ink cartridge first.
2. Click the
Cleaning
3. Follow the messages on your screen.
blac k or Acolor ink out light is flashing, you can not clean
Utility
button.
50
B
black and Acolor ink out lights ar e off.
tab in the printer window, then click the
Head
Page 53

For Macintosh users
1. Make sure that the printer is on, and the
ink out lights are off.
2. Click the Utility icon button in the Print or Page Setup
dialog box, then click the
3. Follow the on-screen messages.
Head Cleaning
B
black and Acolor
button .
Using the control panel buttons
1. Make sure that the
B
black and Acolor ink out lights are off.
Note:
B
If the
clean the head, a nd this operation will st art the ink cartridge
replacement procedure. If you do not want to replace an ink cartridge
at this moment, press the
head to its home position.
2. Hold down the
black or Acolor ink out light is fl a shing o r on, you canno t
P
power lig ht i s on and th at both the
R
cleaning butto n to return the print
R
cleaning button for three se conds.
51
Page 54

The printe r starts cleaning th e print head a nd the
light begins flashing. Print head cleaning takes about one
minute t o complete.
Caution:
P
c
3. When the
a document to confirm that the head is clean and to reset the
cleaning cycle .
If print quality hasn’t improved after repeating this procedure
four or five times, t urn the printer off and leave it alone overnight.
Then do the head cleaning again.
If the print qualit y still has not improved, one or bot h of your ink
cartridges may be ol d or damage d and m ay n eed t o be replac e d.
To replace an ink cartridge before it is empty, see “Replacing an
Old or Damaged Ink Cartridge” in the online Reference Guide.
If print quality remains a problem after replacing the ink
cartridg e s, contact your deale r.
Never turn off the printer while the
Doing so may damage the printer.
P
power light st ops flashing, print a few lin es from
power light is flashing.
P
power
Note:
To maintain print quality, we recommend turning on the printer for at
least one minute every mon th.
52
Page 55

Aligning the Print Head
If you notice a mis ali gnment of ve rtic al lines, you may be able t o
solve this pro blem from yo ur comput er using the Print Head
Alignment utility in your printer software.
If you are us i ng DOS, see “Aligning the print head” in your
DOS User’s Guide.
Note:
Do not start the Print Head Alignment utility while p rinting is in
progress; otherwise your printo ut may be marred.
For Windows users
1. Make sure A4 or Letter size plain paper is loaded in t he sheet
feeder.
2. Click the
Head Alignment
3. Follow the messages on your screen to align the print head.
Utility
tab in the printer window, then click the
button.
Print
For Macintosh users
1. Make sure A4 or Letter size plain paper is loaded in t he sheet
feeder.
2. Click the Utility icon button in the Print or Page Setup
dialog box, then click the
3. Follow the messages on your screen to align the print head.
Print Head Alignment
button.
53
Page 56

Troubleshooting
Erro r Indicators
You can identify many common printer problems with the lights
on your printer’s control panel. If your printer stops working and
the lights are on o r flashing, u se the foll owing table of panel light
patterns to diagnose the problem, then follow the recommended
correctiv e measures.
Lights Problem and Solution
Paper Out
o S
f S
n B
n A
f B
o B
No paper is loaded in
the printer.
Paper Jam
Paper has jamm ed in
the printer.
Ink Low (black ink cartridge)
The black ink c artri dg e
is nearly empty.
Ink Out (black ink cartridge)
The black ink c artri dg e
is empty.
Load paper in the sheet feeder;
then press t he
button to turn this light off. The
printer resumes printing.
Press the
The printer ejects the jammed
paper and then resumes
printing. If the error is not
cleared, open the printer cover
and remove the jammed
paper then reload paper in t he
sheet feeder, and press the
E
load/eject button. The prin ter
resumes printing.
Obtain a replacement black
ink cartridge ( T003✽✽✽).
Replace the b lack ink cart ridge
with a new one (T003 ✽✽✽). See
“Replacing Ink Cartridges” on
page 41.
E
load/eject
E
load/eject button.
54
Page 57

Ink Low (color ink cartridge)
f A
o A
f P
f S
o B
o A
f P
f S
f B
f A
The color ink cartridge
is nearly empty.
Ink Out (color ink cartridge)
The color ink cartridge
is empty.
Carriage Error
The print head carriage
is caught by jammed
paper or other foreign
material and cannot
return to the home
position.
Improper Ventilation
There is not sufficient
space around the vent
on the back of the
printer.
Unknown Printer Error
An unknown printer
error has occurred.
Obtain a repl acement color ink
cartridge (T005
Replace the color ink cartridge
with a new one (T 005
“Replacing Ink Car tridges” on
page 41.
Turn off the printer. Open the
printer cover and remove any
paper fr om the paper path by
hand. Then turn the printer
back on.
If the error is not cleared,
contact your dealer.
Turn off the printer. Remove any
objects blocking the vent. Then
turn the printer back on.
If the error is not cleared,
contact your dealer.
Turn off the printer, and contact
your dealer.
✽✽✽
).
✽✽✽
). See
= on, n = off, f = flashing
o
55
Page 58

Typical Problems and Solutions
Most prin ter proble ms have simple solutions. Define th e problem
from those below and apply the recommended solutions. For
more information, see “Problem Solver” in the online Reference
Guide.
Print quality problems
If you are havi ng print quality pr oblems, try the solut ions offered
here.
Horizontal banding
❏ Make sure the printable side of the paper is face up in the sheet
feeder.
❏ Run the Head Cleaning utility to clear any clogged ink
nozzles.
Vertical misalignment
❏ Make sure the printable side of the paper is face up in the sheet
feeder.
❏ Run the Print Head Alignment utility.
❏ Turn off the
instructions, see the prin ter driver’s online help for Windows.
For Macintosh, see “Using the Advanced settings” in the
online Reference Guide.
High Speed
setting in your printer driver. For
56
Page 59

Color gaps
❏ Make sure your paper i s not damaged , dirty, or too old.
❏ Run th e He ad Cleaning utility to clear any clogged ink
nozzles.
❏ Check the
flashing, replace the ink cartridge. See “Replacing Ink
Cartridges” on page 41.
B
black and
A
color ink out lights. If a light is
Blurry or smeared printout
Try one or more of these solutions.
❏ Make sure the printable side of the paper is face up in the sheet
feeder.
❏ Make sure your paper i s not damaged , dirty, or too old.
❏ Set the adjust lever to the “+” position, and make sure the
Media Type setting is set correctly in your printer driver.
Paper feed or paper jam problems
If the printer doesn’t f eed paper, feeds multiple pages, or paper
is jammed, remov e and reload the stac k of paper, then press t he
E
load/eje ct button. Also check the following:
❏ The paper isn’t old or creased.
❏ Paper isn’t loaded above the arrow on the left edge guide.
❏ The edge guides are set correctly.
❏ The paper isn’t too thin or rough. Use paper that meets the
paper requirements for this printer. S ee the on line Refer ence
Guide for paper specificati o ns.
57
Page 60

Cancelling Printing
If the printouts are not what you expected, such as incorrect or
garbled charact er or images, you may need to cancel pri nting. To
cancel printing, follow the steps below.
For Windows 95, 98, and NT 4.0
When yo u send a pri nt job to the printer, the Progres s Meter
appears on your computer screen.
Click the
stop button to cancel printing.
For Windows 3.1
When yo u send a prin t job to the pri nte r, the Despooler appears
on your screen.
58
Click the
stop button to cancel printing.
Page 61

For Macintosh
When back gro un d pr int ing is on
1. Press the
2. Select
3. Click the
EPSON Monitor3
print job.
P
power bu tton to turn off the printer.
from the application menu.
button, then click the stop button to cancel the
When back gro un d pr int ing is off
1. Press the
2. Hold down the
(.) key to cancel the print job.
P
power bu tton to turn off the printer.
J
key on your keyboard and press the period
59
Page 62

Where to Get Help
If your printer i s not operating properl y and you cannot solve the
problem using the tr oubleshoot ing information in your pri n ter
documentation, contac t customer support servi ces for assi stance.
Customer support will be able to help you much more quickly if
you give them the following information.
Serial number of your printer
(The seria l number label is on the back of the printer.)
Printer model
Brand and model of your computer
Printer software version
(Click
Windows version you are using
Software application(s) you normally use with your printer
and their version number(s)
About
in your printer driver.)
For United Kingdom and the Republic of Irela nd Users
If you purch ased your printer in the UK or the Republic of I reland,
EPSON (UK) Limited pr ovide s a r ange of c ust omer ser vic es and
technical support.
World Wide Web
If you can connect to the Internet and have a Web browser, you
can access our Web site a t
will find information on the latest EPSON products, software
drivers, on-line user guides, and answers to frequently asked
questions.
http://www.epson.co.uk
. Here you
60
Page 63

Faxon EPSON
Contact Faxon EPSON Faxback Service fo r support information
including troubleshooting tips, switch settings, and driver
information.
To use Faxon EPSON, call 01442 227332 in the UK or 0044 1442
227332 from the Republic of Ireland using a touch-tone phone.
You will be asked to follow a simple r o uti ne to register your
document request. Once you have entered your telephone and fax
number s, Faxon E PSON wil l fax a copy of the do cument cat alogue
to your fax machine.
When you have found the docume nts that you need in the
catalogue, call Faxon EPSON again and enter the document ID
numbe rs. The documents will be faxe d to you automatically.
Bulletin Bo ar d S ervice for latest drive rs an d u ti liti es
You can call the EPSON Bulletin Board Service on 01442 227479
in the UK or 0044 1442 227479 from the Republic of Ireland. No
membership is required. Make sure that your communications
software is set to 8 data bits, 1 stop bit, no parity bit, ANSI terminal
mode emulation, and a modem speed of up to 28.8 Kbps.
Downloading protocols supported include Xmodem, Ymodem
and Zmodem. See the documentation that came with your
communications software and modem for more information.
When you first connect t o the Bulletin Bo ard Ser vice, you will be
asked for your name, company name, phone number and a
password (which you c an invent yo urself).
61
Page 64

Customer and Warranty Support
Our Customer and Warranty Support teams can be contacted by
calling 0870 163 7766 in the UK or 0044 0870 163 7766 from the
Republic of Ireland. They can provide the following services:
❏ Technical information on installing, configuring, and
operating yo ur EPSON products
❏ Arranging for fa ulty EPSON products to be repaired wi thin
the warranty period
A full list of EP SON Customer and Warr anty Su pport se rv ices is
avail able o n the te chnica l suppo rt sec tion of our Worl d Wide Web
pages at
EPSON Faxback service in document number 5085.
http://www.epson.co.uk/suppo rt/
and on Faxon
Pre Sales Enquiry Desk
The Enquiry Desk team can be contacted by calling 0800 220546
in the UK or 1 800 409132 from the R epublic o f I rel and, b y f axin g
01442 227271 in t h e UK o r 0044 1442 227271 fro m the R epublic of
Ireland, and via Email at
the following information:
info@epson.co.uk
. They can provide
❏ Pre Sales information and liter ature on new EPSON products
(also available via our world wide web site at
www.epson.co.uk
❏ Where to purchase genuine EPSON consumables,
accessories, and options
)
http://
62
Page 65

For Australian Users
EPSON Australia wishes to provide you with a high level of
Customer Service. As well as the user’s guide, we provide the
following sources for obtaining information:
EPSON FAXBACK
EPSON FAXBACK will fax you the latest specifications and
pricing for most EPSON products offered in Australia. There is
also technical information including details of the latest software
and drivers available. Phone (02) 9903 9075 and the system will
guide you through a number of choices before faxing the
informat ion to your fax machine.
EPSON Bulletin Board System
This is where you can download the latest software and drivers.
Visit the BBS to check out the latest versions. If you have a modem,
phone (02) 9417 5090.
Internet URL http://www.e ps on.c om.a u
Access the EPSON Aust ralia World Wide W e b pages. Worth
taking your modem here for the occasional surf! You can get the
same inf ormation as offered on the EPS ON FAXBACK and the
EPSON Bulletin Board plus more.
Your dealer
Don’t forget that your dealer can often help identify and resolve
problems. The dealer should alw ays be the first call for a dvice on
problems. They can often solve problems quickly and easily as
well as give you advice on the next step to take.
63
Page 66

EPSON H e lp desk
EPSON Helpdesk is provided as a final backup to make sure our
clien t s have access to advic e . Ope r ators on the H e lp desk ca n ai d
you in diagnosing hard wa re and software pro blems. They can
also advise you on the latest EPSON products and where the
nearest dealer or service age nt is loca ted. Many types of queries
are answered here.
The Helpdesk numbers are:
Phone: (02) 9903 9040
Fax: (02) 9903 9189
We encourage you to have all the relevant info rmation on hand
when you ring. The more information you prepare, the fast er w e
can help solve the problem. This inform ation incl udes the User’s
Guide for your EPSON product, type of computer, operating
system, application programs, and any ot her information you feel
is required.
For Singapore Users
Contact the telephone and fax numbers below:
Phone: (065) 337-7911
Fax: (065) 334-1185
For Hong Kong Users
To obtain technical support as well a s other af ter-sales services,
users are we lcome to co ntact EPSON Hong K ong Limited.
Internet home page
EPSON H ong Kon g has estab lished a local home page in both
Chinese and English on the Internet to provide users with the
following information:
64
Page 67

❏ Product inform ation
❏ Answers to Frequently Asked Questions (FAQs)
❏ Latest versio ns of EPSON printer drivers
Users c an access our World Wide We b home p age at:
http://www.epson.com. hk
Electronic bulletin board system
An electronic bulletin board system (BBS) is also available to
obtain printer information and the latest versions of printer
drivers. You can log on to the following number for the BBS
service:
BBS: (852) 2827-4244
Technical Support Hotline
You can also co ntact our technic al staff at the follow ing telephone
and fax numbers:
Phone: (852) 2585-4399
Fax: (852) 2827-4383
For Philippines Users
To obtain technical support as well as other after sales services,
users are welcome to contact the EPSON Philippines
Representative Office at the telephone and fax numbers below:
Phone: (632) 813-6552
Fax: (632) 813-6545
BBS: (632) 814-0595
65
Page 68

Options and Consumable Products
Options
The following interface cables and interface cards are available
for your pri nter.
Interface cables
EPSON supplies several types of interface cables. You can use any
interface cable that meets the following specifications. See your
computer manual for any additional requirements.
❏ Parallel Interface Cable (shielded) C83602✽ from D-SUB 25-
pin (compute r) to 36-pin Amphenol 57 Series (printer)
❏ Serial Interface Cable C83603✽/C83604✽ from D-SUB 25- pin
(compute r) to D-S UB 25-pin ( p ri nter)
❏ Serial Interface Cable C83605✽/C83606✽ from D-SUB 9-pin
(compute r) to D-S UB 25-pin ( p ri nter)
❏ USB Interface Cable (shielded) C83623✽ from Series A 4-pin
(compute r) to Series B 4-pin (p rinter) (This cable is not
supplied in all locations.)
Note:
The asterisk (✽) is a substitute for the last digit of the product number,
which varies by locatio n.
Caution:
c
66
Use only the interface cables listed above. Using other cables not
covered by EPSON wa rrant ies m ay cause the printer to
malfuncti on.
Page 69

Int e r face ca r ds
A number of optional interfaces are available to supplement the
printer’s built-in paral lel and serial interfaces. See “Using
optional interface cards” on page 70 for more information.
If you are not sure whether you need an optional interface or if
you want to know more about interfaces, contact your dealer.
32KB Serial Interface Card C82307✽
C82308✽
32KB Parallel Interface Card C80310✽
Twinax Interface Card C82315✽
Coax Interface Card C82314✽
LocalTalk Interface Card C82312✽
Type B Ethernet Interface Card C82362✽
C82363✽
C82364✽
Type B Bi-directional Parallel
Interface Card
Note:
The asterisk (✽) is a substitute for the last digit of the product number,
which varies by location.
C82345✽
67
Page 70

Consumable products
The followi ng ink cartri dges and EPSON special media are
available for yo ur printer.
Ink cartridges
You can us e the followin g cartridges with your printer.
Black ink cartridge T003011/T003012
T003051/T003052
T003091/T003092
Color ink c artridge T005011
T005051
T005091
Note:
The product numbers of ink cartridges vary by location.
EPSON special media
EPSON offers specifically designed media for in k jet printers to
meet most hi gh-quality printing needs.
68
EPSON 360 dpi Ink Jet Paper (A4) S041059
S041025
EPSON 360 dpi Ink Jet Paper (Letter) S041060
S041028
EPSON Photo Quality Ink Jet Paper (A4) S041061
S041026
EPSON Photo Quality Ink Jet Paper (Letter) S041062
S041029
EPSON Photo Quality Ink Jet Paper (Legal) S041067
S041048
EPSON Photo Quality Ink Jet Card (A6) S041054
EPSON Photo Quality Ink Jet Card (5 ×
EPSON Photo Quality Ink Jet Card (8 × 10”) S041122
8”)
S041121
Page 71

EPSON Photo Quality Self Adh esive Sheet (A4) S041106
EPSON Ink Jet Note Cards A6
(with envelopes)
EPSON Ink Jet Greeting Cards 5 × 8”
(with envelopes)
EPSON Ink Jet Greeting Cards 8 × 10”
(with envelopes)
EPSON Photo Quality Glossy Film (A4) S041071
EPSON Photo Quality Glossy Film (Letter) S041072
EPSON Photo Quality Glossy Film (A6) S041107
EPSON Ink Jet Transparencies (A4) S041063
EPSON Ink Jet Transparencies (Letter) S041064
EPSON Photo Paper (A4) S041140
EPSON Photo Paper (Letter) S041141
EPSON Photo Paper (4 × 6”) S041134
EPSON Photo Paper Cards (A4) S041177
EPSON Photo Stickers 16 (A6) S041144
EPSON Photo Stickers 4 (A6) S041176
EPSON Panoramic Photo Paper (210 × 594 mm) S041145
EPSON Iron-On Cool Peel Transfer Paper ( A4) S041154
EPSON Iron-On Cool Peel Transfer Paper
(Letter)
S041147
S041148
S041149
S041153
S041155
Note:
The availability of speci al m ed ia varies by location.
69
Page 72

Using optional interface cards
Note the fol l owing when using opt ional interf ac e cards:
❏ An optional LocalTalk or Ethernet interface card lets you use
your printe r o n an AppleT alk network.
❏ To use the LocalTalk Interface Card ( C82312✽), you will need
two Loc alTalk Locki ng Connector Kits ( DIN-8 version).
Attach a connector box to the AppleTalk interface card on the
printer and the other box to the printer port on the Macintosh.
Then atta ch the Loca lTalk cable between the two connector
boxes. See the documentation that comes with the connector
kits for mo re details.
❏ To use the Type B Ethernet Interface Card (C82362✽/
C82363✽/C82364✽), see the documentation that comes with
the card fo r setup information.
Follow these steps to inst all an optional inte rfa ce card.
1. Make sure the printer is turned off and all the printer’s lights
are off.
2. Unplug the power cord from the e lectrical outlet (and from
the back of the printer, if your printer’s p ower cord is
removable).
Caution:
c
3. Turn the printer around so that its back faces you, and
disconnect any existing interface cables.
70
Do not install the int erface card when the printer is
connected to an electrical outlet. Doing so may damage the
printer or your computer.
Page 73
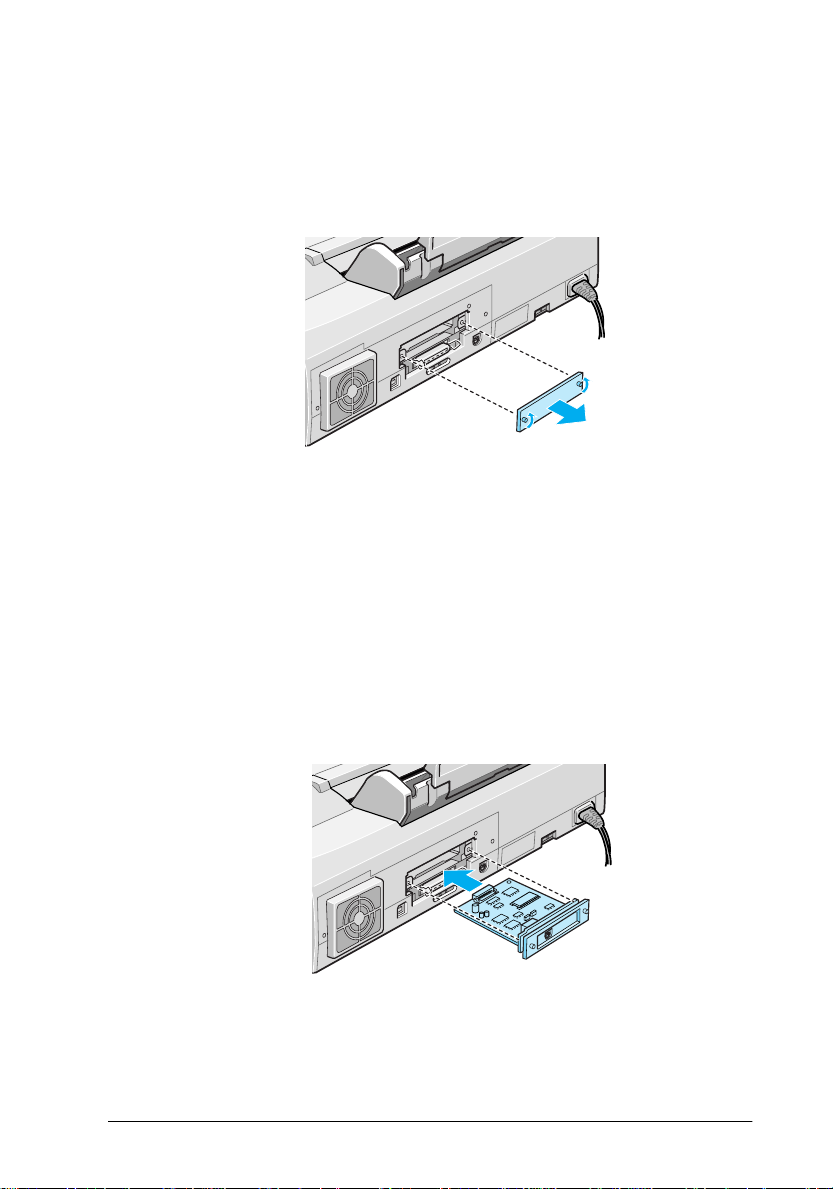
4. Use a cross- head scre wdriver to re move the two screws
securing the shield plate to the optional interface slot; then
remove the plate. Be sure to keep both screws; you may need
to use them again when you reinstall the shield plate.
5. Be sure to set any switches and jumpers on the card. See the
inte rface c a rd ’s manua l for detail s. I f your interf a ce card ha s
a jumper labeled JG, make sure that you turn it on, or the card
will not work properly.
6. Slide the interface card along the slots on both sides of the
interface compartment. Push it in firmly to fully insert the
connector at the rear of the interface ca rd into the printer’s
internal socket.
71
Page 74

7. Se cure the interface card in the slot with the two screws
included with the interface ca rd.
8. Connect the proper interface cable to the interface card an d to
your computer. If the cable has a grounding wire, connect it
to one of the screws se curing the parallel in terface.
Also, if you are usi ng more than on e computer, reconnect th e
other inte rface cab le.
9. Make sure the pr inter is turned off. The n pl ug in the po wer
cord.
72
Page 75

EPSON OVERSEAS MARKETING LOCATION S
EPSON AMERICA, INC.
20770 Madrona Ave.
P.O. Box 2842
Torrance, CA 90509-2842
Phone: (800) 922-8911
Fax: (310) 782-5220
EPSON DEUTSCHLAND GmbH
Zülpicher Straße 6,
40549 Düsseldorf Germany
Phone: (0211) 56030
Fax: (0211) 5047787
EPSON AUSTRALIA PTY. LTD.
70 GIBBES STREET, CHATSWOOD 2067 NSW.
Phone: 2-9903-9000
Fax: 2-9903-9177
EPSON HONG KONG LTD.
Rooms 4706-10, 47/F,
China Resources Bldg.,
26 Harbour Road, Wanchai, Hong Kong
Phone: 2585-4300
Fax: 2827-7083
EPSON ITALIA S.p.A.
V.le F.lli Casiraghi 427
20099 Sesto S.Giovanni
MI, Italy
Phone: 2-262331
Fax: 2-2440750
EPSON UK LTD.
Campus 100, Maylands Avenue,
Hemel Hempstead, Herts,
HP2 7TJ, U.K.
Phone: (+44) 01442 261144
Fax: (+44) 01442 227227
EPSON FRANCE S.A.
68 bis, rue Marjolin
92300, Levallois-Perret, France
Phone: 33.1.40.87.37.37
Telex: 610657
EPSON SINGAPORE PTE. LTD.
No. 1 Temasek Avenue #36-00
Millenia Tower, Singapore 039192
Phone: (065) 33 77 911
Fax: (065) 33 41 185
EPSON TAIWAN TECHNOLOGY &
TRADING LTD.
10F, No. 287 Nanking E. Road, Sec. 3,
Taipei, Taiwan, R.O.C.
Phone: (02) 717-7360
Fax: (02) 712-9164
EPSON IBERICA S.A.
Av. de Roma, 18-26
08290 Cerdanyola del Valles
Barcelona, Spain
Phone: 582. 15.00
Fax: 582. 15.55
SEIKO EPSON CORPORATION
(Hirooka Office)
80 Harashinden, Hirooka
Shiojiri-shi, Nagano-ken
399-0785 Japan
EPSON PORTUGAL, S.A.
R. do Progresso, 471, 1º Perafita
4460 Matosinhos, Portugal
Phone: (02) 996 14 02
Fax: (02) 996 14 11
1998 February
Page 76

Printed in JAPAN 1998 XX.XX
 Loading...