

Page 1

Setup Guide
Printed on recycled paper with at least 10% post-consumer content
Page 2

All rights reserved. No part of this publication may be reproduced, stored in a retrieval system, or transmitted in
any form or by any means, electronic, mechanical, photocopying, recording, or otherwise, without the prior
written permission of
with this
EPSON
printer.
SEIKO EPSON CORPORATION
is not responsible for any use of this information as applied to other printers.
EPSON
. The information contained he rein is designed only for use
Neither
SEIKO EPSON CORPORATION
nor its affiliates shall be liable to the purchaser of this product or third
parties for damages, losses, costs, or expenses incurred by purchaser or third parties as a result of: accident, misuse,
or abuse of this product or unauthorized modifications, repairs, or alterations to this product, or (excluding the
U.S.) failure to strictly comply with
SEIKO EPSON CORPORATION
SEIKO EPSON CORPORATION
shall not be liable for any damages or problems arising from the use of any options
or any consumable products other than those designated as Original
Products by
and
EPSON
SEIKO EPSON CORPORATION
Stylus are registered trademarks of
EPSON
.
SEIKO EPSON CORPORATION
’s operating and maintenance instructions.
EPSON
Products or
EPSON
Approved
.
General Notice: Other product names used herein are for identification purposes only and may be trademarks of
their respective owners.
disclaims any and all rights in those marks.
EPSON
Copyright © 1998 by Ep son America, Inc. CPD 7450
10/98
ii
Page 3

Setup Guide
This Setup Guide summarizes the process of setti ng up your
printer and configuring it to work with most networks. For
more information about your printer and printer software, see
your User’s Guide. For more information about your printer’s
Ethernet card and networking, see the Administrator’s Guide.
Using Your Software
Your printer comes with the following software:
◗ Printer driver for Windows
◗ EPSON Net!2 utility (for Windows
Windows NT
configure your printer for protocols including Novell
NetWare,
◗ EPSON Status Monitor 2 for Windows that allows you to
monitor your printer over the network and use TCP/IP for
printing in Windows 98/Windows 95 peer- t o-peer
networks.
®
4.0, and Macintosh) that allows you to
®
TCP/IP, and AppleTalk.
®
and Macintosh
®
®
®
98, Windows® 95,
®
◗ EPSON Driver Disk Creation Utility that lets you create
diskettes for systems that don’t have CD-ROM drives.
1
Page 4

Setup Guide: Setup Overview
Setup Overview
Note:
If you need to make dis kettes
and use them to install any
software programs, see
Appendix A in your
Administrator’s Guide
.
4
5
6
7
8
Follow the steps in this guide to set up the printer, install
the ink cartridges, and connect your Ethe rnet card to the
network.
Install the Network Software
See page 3 to determine whether you should install
EPSON Net!2 and EPSON Status Monitor 2 for your
protocol and opera ting system.
Configure the Printer
See page 3 to determine where you should look in this
Setup Guide and the Administator’s Guide to configure
the printer and Ethernet card to work on your network.
Set Up the Workstations
For most networks, you need to install the printer driver
on each Windows or Macintosh workstation that uses
the printer. If you like, you can also install EPSON
Status Monitor 2 on Windows workstations.
Print a Test Page
You can print a test page in Windows 98, Windows 95
or Windows NT 4.0. This ensures that the network,
printer, and printer driver are configured correctly and
working.
2
Page 5

Network Configurations
See the table below to find your network configuration
(operating system and protocol), and determine what to install
and where to find instructions for configuring your network.*
For many operating systems, you can change configuration
settings using the Ethernet card’s internal home page. See the
Administrator’s Guide for more information.
Available Network Configurations
Setup Guide: Network Configurations
Operating
system
Windows NT 4.0
(Service Pack 3,
or higher)
Network
protocol What you need to install and configure
TCP/IP 1. EPSON Net!2 (p.11)
2. EPSON Status Monitor 2 (p. 13)
3. IP address for the Ethernet card (p. 28)
4. Printer driver on each workstation** (p. 36)
NetBEUI
(TCP/IP must
also be instal led)
Novell NetWare 1. EPSON Net!2 (p.11 and p. 16)
1. EPSON Net!2 (p.11)
2. EPSON Status Monitor 2 (p.13)
3. IP address for the Ethernet card (p. 28)
4. NetBEUI settings on the Ethernet card home page***
(p. 34)
5. Printer driver on each workstation** (p. 36)
2. EPSON Status Monitor 2 (p.13)
3. Setup using NwAdmin (p. 16) or
PCONSOLE (
4. Printer driver on each workstation** (p. 36)
Administrator’s Guide
, Chapter 4)
3
Page 6

Setup Guide: Network Configurations
Available Network Configurations
Operating
system
Windows 98,
Windows 95
Windows 3.1x Novell NetWare,
Macintosh AppleTalk 1. EPSON Net!2 (p. 13 and p. 32)
UNIX TCP/IP (lpr, ftp) 1. Install a printer driver and filter. (See your UNIX
IBM OS/2 Warp NetBEUI
Network
protocol What you need to install and configure
TCP/IP 1. EPSON Net!2 (p.11)
2. EPSON Status Monitor 2 on each workstation (p. 13)
3. IP address for the Ethernet card (p. 28)
4. Printer driver on each workstation (p. 36)
NetBEUI
(TCP/IP must
also be instal led)
Novell NetWare 1. EPSON Net!2 (p.11 and p. 16)
Windows NT
Server
1. EPSON Net!2 (p.11)
2. EPSON Status Monitor 2 (p.13)
3. IP address for the Ethernet card (p. 28)
4. NetBEUI settings on the Ethernet card home page***
(p. 34)
5. Printer driver on each workstation (p. 36)
2. EPSON Status Monitor 2 (p.13)
3. Setup using NwAdmin (p. 16) or
PCONSOLE (
4. Printer driver on each workstation (p. 36)
Windows 3.1x acts as a client only; you can’t use a Windows
3.1x workstation to conf igure the Ethernet card or monitor the
printer. Install the printer driver on each workstation and
change the printer’s port setting. (p. 36)
2. Printer driver on each system (p. 36)
documentation.)
2. Configure the printer for lpr or ftp.
Administrator’s Guide,
(
(Administrator’s Guide
Administrator’s Guide
Chapter 5. )
, Chapter 6.)
, Chapter 4)
TCP/IP
*If you need to create diskettes and install your software from them, see Appendix A in your
Administrator’s Guide
**If you have Windows NT 4.0 Server, you may only need to install the driver on the server. See
your Windows NT documentation.
***To use the Ethernet card home page, you must have TCP/IP setup on your network, as well as
one of the following Internet browsers: Microsoft Internet Explorer, version 4.0 or later; Netscape
Navigator
TM
, version 3 .0 or later.
.
(Administrator’s Guide
, Chapter 6)
4
Page 7

Setup Guide: Set Up the Printer
1
Note:
To connect your printer’s
Ethernet card to the
network, you need a twiste d
pair (10BaseT) cable with an
RJ-45 connector.
Set Up the Printer
Unpack the Printer
Remove any packing material from the printer. See the Notice
Sheet in the box for details.
Make sure you’ve got all these items:
◗ Your printer and paper support
◗ One color and one black ink cartridge package
◗ The EPSON Stylus
◗ The EPSON Media Pak containing sample ink jet paper
◗ Your User’s Guide and Administrator’s Guide
◗ A network cable (not supplied)
®
COLOR 850Ne CD-ROM
paper support
color ink
cartridge
black ink
cartridge
CD-ROM
User’s Guide
Administrator’s
Guide
5
Page 8
Setup Guide: Set Up the Printer
Note:
Follow all the safety
instructions in the
Introduction of your
Guide
.
User’s
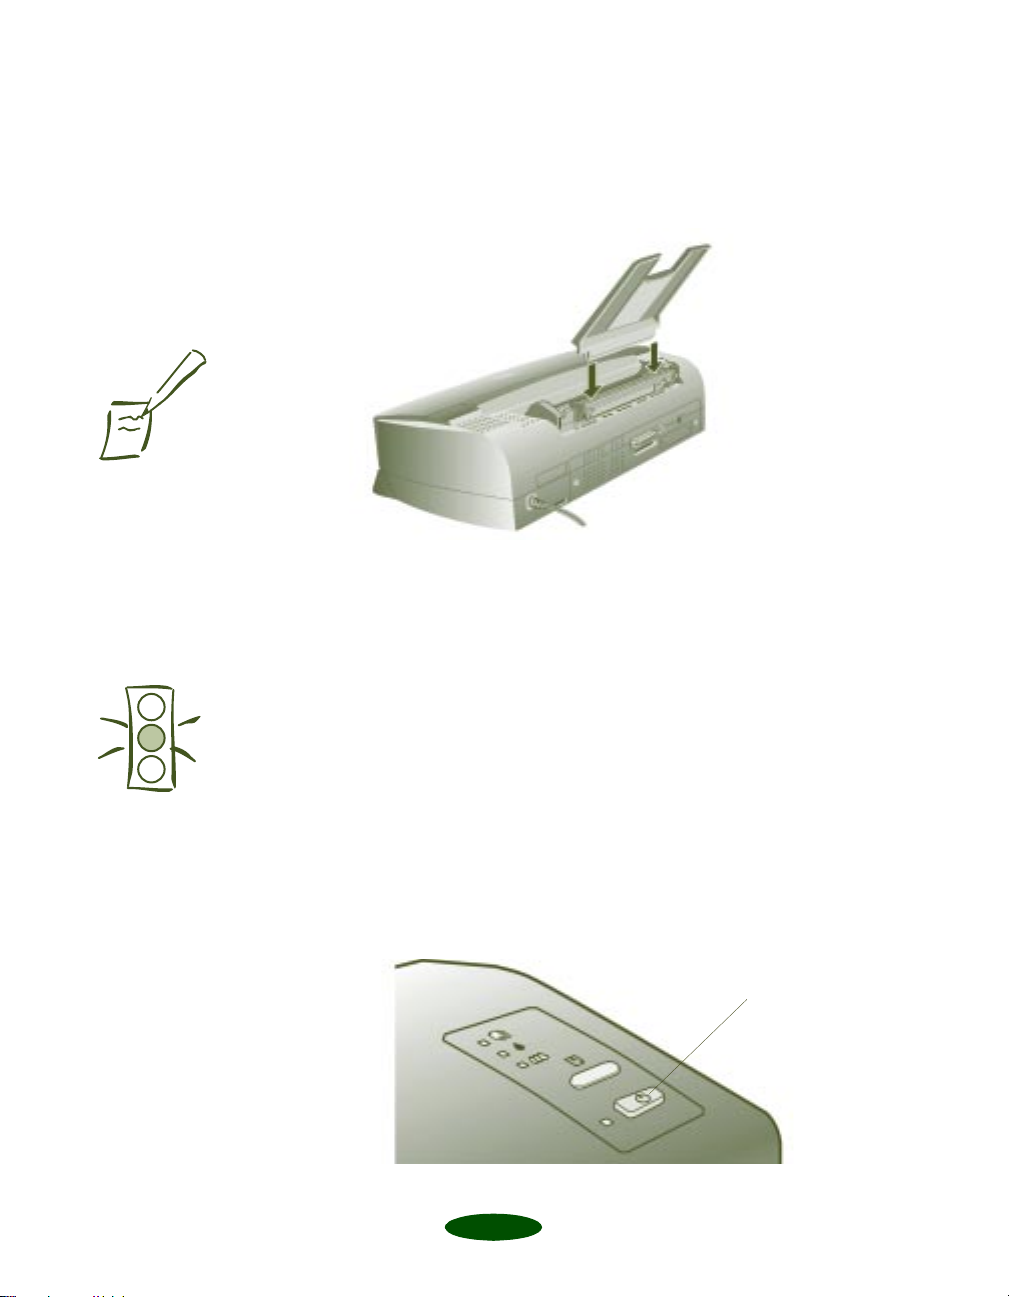
Attach the Paper Support
Insert the paper support in th e top slot on the back of the
printer.
Do not put the printer:
◗ In an area with high temperature or humidity
Caution:
Always use the
button to turn the printer on
or off. Never use the external
switch on a power strip.
Don’t use an o utlet controll ed
by a wall switch or timer, or
one that uses the same
circuit as a large appliance.
This may disrupt the power,
which can erase memory or
even damage the power
supply.
P power
◗ In direct sunlight or dusty conditions
◗ Near sources of heat or electromagnetic interference, such
as loudspeakers or cordless telephone base units
Install the Ink Cartridges
1. Make sure the printer is turned off (the
should be up). Then plug the printer’s power cord into a
grounded outlet.
6
P power button
power button
Page 9
Setup Guide: Set Up the Printer
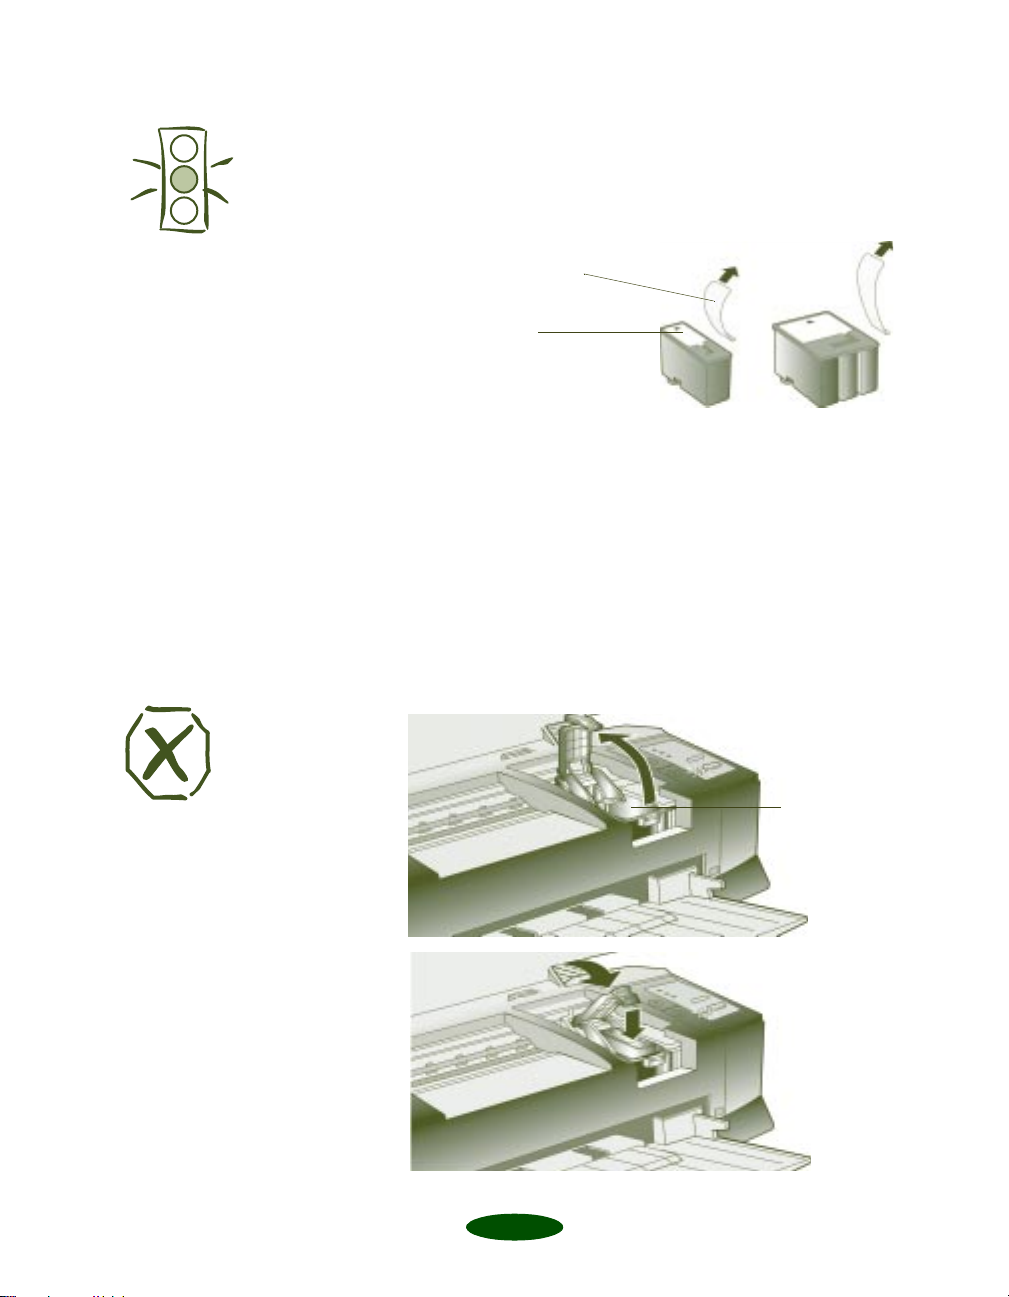
2. Remove the ink cartridges from their foil packages. Then
remove only the yellow part of the tape seal on the top of
each one. Don’t pull off the white portion or try to
remove the clear seal underneath the cartridge.
Caution:
To ensure the print heads
charge correctly, install the
ink cartridges that came
with your printer.
You must remove the
yellow tape from the top
of the cartridge or you will
permanently damage it.
It’s okay if a small corner
of the yellow tape stays on
the cartridge.
Warning:
If ink gets on your hands,
wash them thoroughly with
soap and water. If ink gets
in your eyes, flush them
immediately with water.
Remove the yellow tape
seal
Don’t remove the
white portion
3. Press the
P power light flashes and the
P power button to turn on the printer. The
B and
I ink out lights come
on. The black ink cartridge holder moves into loading
position.
4. Open the printer cover and lift up the black ink cartridge
clamp.
5. Place the black ink cartri dge in the holder as shown. Then
close the clamp, making sure it clic k s into place.
black ink
cartridge holder
7
Page 10
Setup Guide: Set Up the Printer
Caution:
If the ink cartridge holder
moves back to the right
before you install the
cartridge, don’t try moving
it back by hand. Press the
B black cleaning button and
hold it down for 3 seconds
to move the holder back
into position.
Never turn off the printer
when the
flashing, unless the printer
hasn’t moved or made any
noise for more than 10
minutes.
P power light is
6. Now press the
X color cleaning button to move the color
ink cartridge holder into loading position.
7. Repeat steps 4 and 5 to ins tall the colo r ink c artrid ge. Then
press the
E load/eject button to begin charging the ink
delivery system.
The printer moves the print heads and begins charging the ink
delivery system. The
P power light flashes, and the printer
makes various sounds.
Charging takes up to 4 minutes. Don’t turn off the printer or
interrupt this important process or you’ll use up more ink
than necessa ry.
When it’s finished, you can close the printer cover.
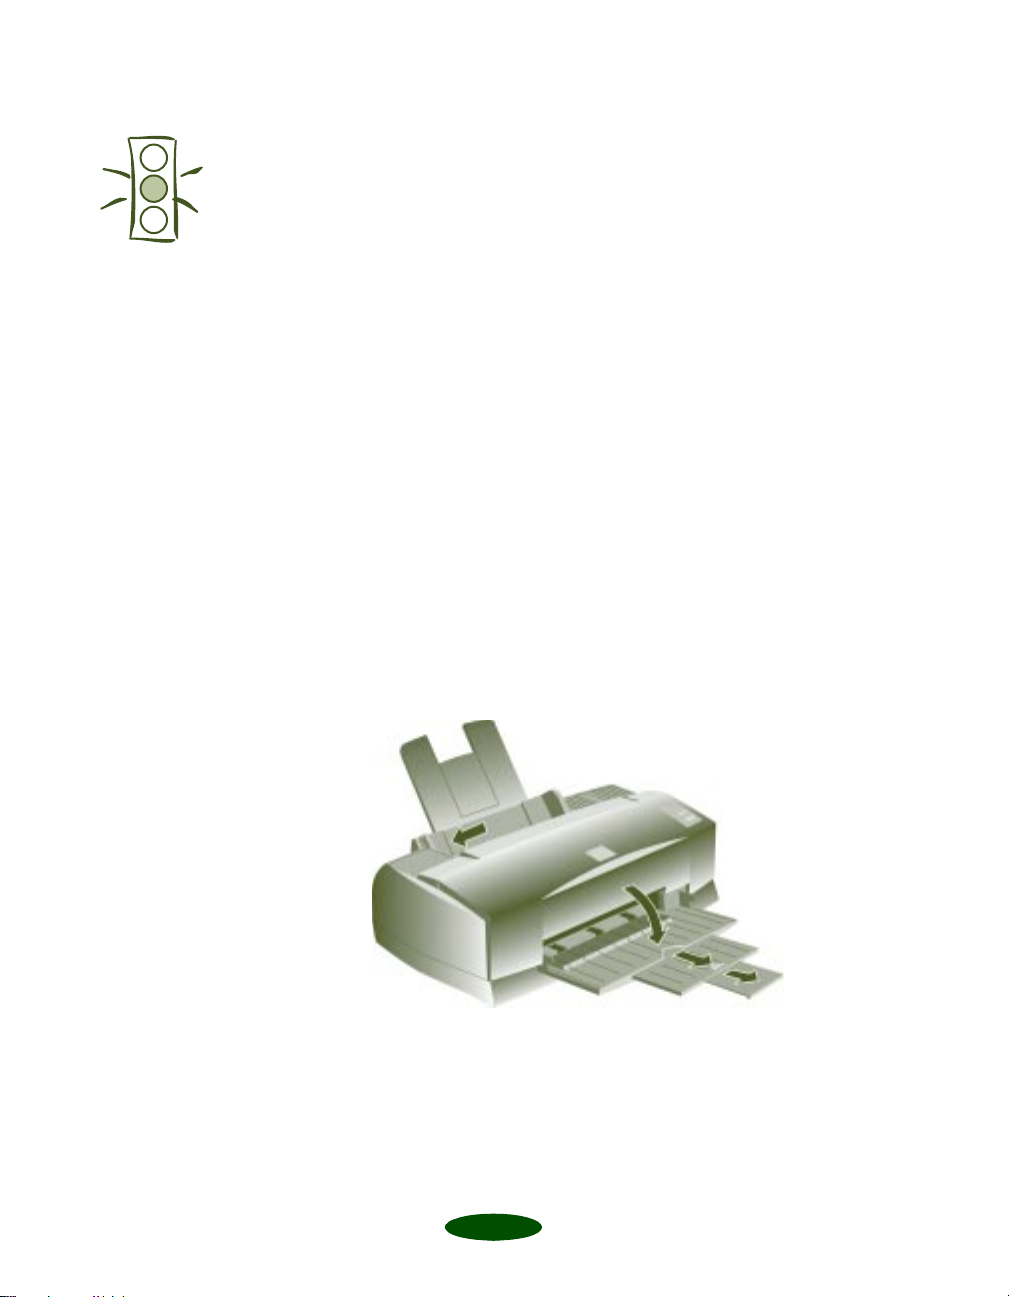
Load Paper
1. Open the output tray extensio ns and slide the left edge
guide all the way to the left.
8
Page 11
Setup Guide: Set Up the Printer
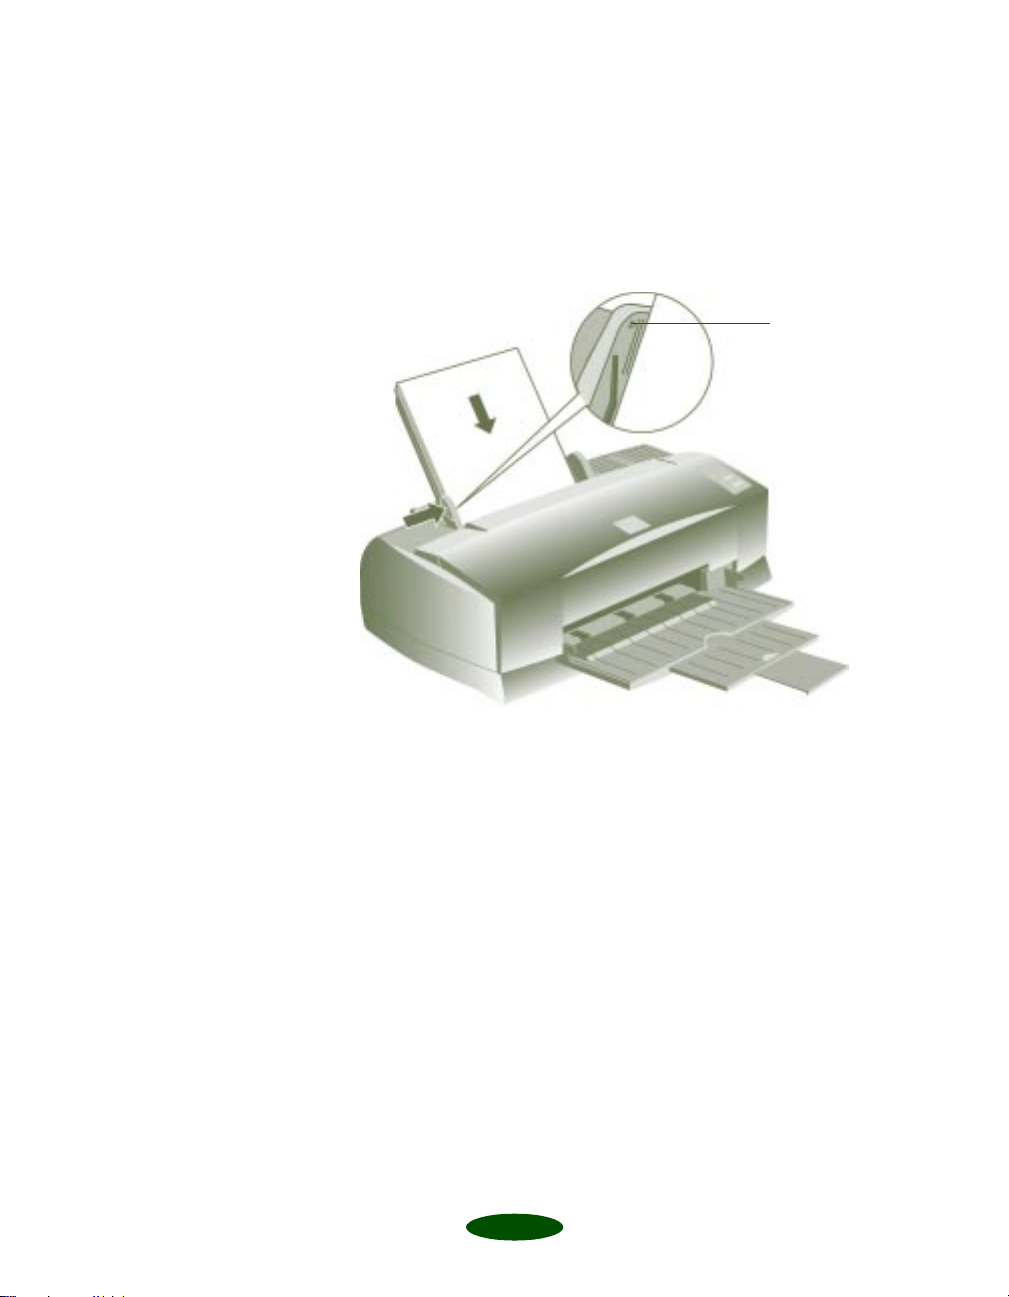
2. Load a stack of plain paper with the printable side up and
place it against the right edge guide. Then slide the left edge
guide to the paper’s left edge, making sure the stack is not
higher than the arrow mark on the guide.
don’t load paper
above the arrow
9
Page 12
Setup Guide: Set Up the Printer
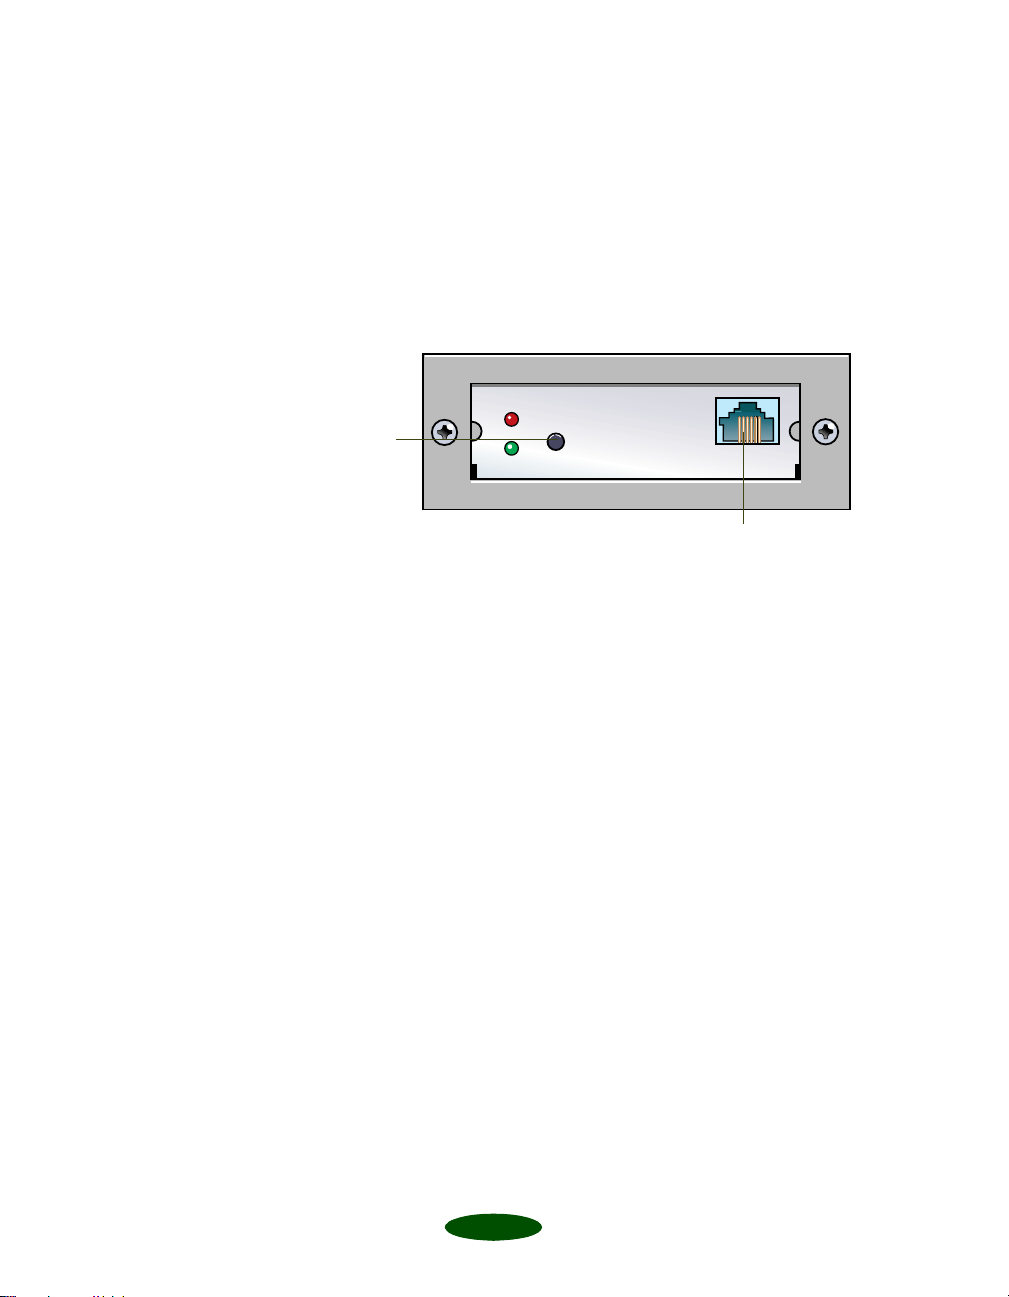
Connect the Printer to Your Network
Connect your printer to an Ethernet twisted-pair (10BaseT)
network connection.
1. Attach the network cable to the connector on the card.
status
sheet
button
twisted-pair (10BaseT)
2. To initialize the card, turn on the printer while pressing
down the status sheet button. Continue pressing the
status sheet button for five seconds.
Printing a Status Sheet:
To print a status sheet, press the status sheet button and hold it
for about three seconds. This sheet gives you important
information, including the serial number and MAC address of
the card. Keep the status sheet so you can use it when you
configure the Ethernet card.
10
Page 13

Setup Guide: Install the Network Software
2
Note:
If you need to create diskettes
to install t he software, see
Appendix A in your
Administrator’s Guide
use this
configuration instructions.
For TCP/IP networks, if you
want to use the a rp com mand
to set the card’s IP address
instead of installing EPSON
Net!2, see page 28.
Setup Guide
, then
for
Install the Network Software
To configure the Ethernet card, you only need to install the
network softwa re (EPSON Net !2) on one wo rkstati on or on the
server, depending on your network.
If you have a TCP/IP network, you need to install EPSON
Status Monitor 2 on all your Windows 98 and Windows 95
workstations to use the EPSON TCP/IP Printing protocol.
Log in as an Administrator (NT) or Supervisor (NetWare).
Before you start, tur n off all ot her acti ve appl icati ons, inc ludi ng
virus protection.
Installing EPSON Net!2
If you have the following network configurations and operating
systems, you should install EPSON Net!2 to configure the card:
◗ Windows 98, Windows95, or Windows NT 4.0 with
Novell NetWare or TCP/IP
◗ Macintosh with AppleTalk
Installing EPSON Net!2 in Windows
1. Insert the EPSON Stylus COLOR 850Ne CD-ROM in
your drive.
11
Page 14

Setup Guide: Install the Network Software
You see the EPSON Installa tion Program screen:
If the screen does not appear, go to My Computer and
double-click the
EPSON Installation program.
Epson
CD-ROM icon to start the
Note:
If you have any Windows 98
or Windows 95 systems on
your TCP/IP network, you
need to install Status
Monitor 2 on each one to use
EPSON TCP/IP Printing.
Windows 98 and Windows
95 do not have TCP/IP
printing built-in like
Window NT.
2. Highlight
Install EpsonNet! for Windows
and click the
right arrow button .
3. Follow the instructi ons on the screen to install EPSO N
Net!2.
When you are finished, you can install Status Monitor 2 to
monitor status information about y our printer inclu ding ink
level information and printer errors. See page 13.
Status Monitor 2 can create extra network traffic, so if you
don’t want to install Status Monitor 2, you can just configure
the Ethernet card with EPSON Net!2, described on page 16.
12
Page 15

Setup Guide: Install the Network Software
Installing EPSON Net!2 on a Macintosh
1. Create a folder for EPSON Net!2 on your hard disk.
2. Insert the EPSON Stylus COLOR 850Ne CD-ROM in
your drive.
3. Copy EPSON Net!2 to the folder you created.
After you install EPSON Net!2, us e it to co nfigure your print er
for AppleTalk, following the steps on page 32.
Installing Status Monitor 2
EPSON Status Monitor 2 is a single utility that you install in
two parts. These two parts work together to allow you to see
your printer’s spec ific status informati on over the network.
Status Monitor 2 lets you monitor information from the server
or from any of the workstations where you install it. It gives you
ink levels in the printer and notifies you i f the printer has any
problems. It does create network traffic, however, so you may
want to limit the number of users who monitor the printer.
Status Monitor 2 also includes EPSON TCP/IP Printing,
which allows Windows 98 and Wi ndow s 9 5 use r s t o pr int w it h
TCP/IP. If you have Windows 98 or Windows 95 systems and
use TCP/IP for printing, you need to install Status Monitor 2
on each workstation that uses the printer.
Write down your settings in the spaces provided; you need to
use the same settings when you install each part of Status
Monitor 2.
13
Page 16

Setup Guide: Install the Network Software
Follow these steps to install EPSON Status Monitor 2:
1. Insert the EPSON Stylus COLO R 850Ne CD- ROM. You
see the following screen:
Note:
You may not see screens for
all the steps here, depe nding
on your computer’s
configuration.
Write down your settings in
the spaces provided as you
install the first part of Status
Monitor 2. You need to
select the same settings for
the second part.
If the screen does not appear, type
is the drive letter of your CD-ROM) and click
D:\EPSETUP (where D:
OK
to start
the EPSON Installation program.
2. Highlight
Install Status Monitor 2 for Network
and click
the right arrow button .
3. Close any open programs and click
Next. A screen appears
asking where you want to install Status Monitor 2.
4. Click
Next to accept the default directory or choose a
different directory and click
Next.
5. If you are using Windows 98 or Windows 95 and you have
TCP/IP installed, you see a screen asking you if you want to
enable EPSON TCP/IP pr inting. Sele ct
print with TCP/IP, and then click
TCP/IP Printing: Yes_______ No_______
Yes if you want to
Next.
14
Page 17

Caution:
If you have dial-up routers in
a NetWare environment,
they may automatically dial
up the next hop a nd yo u may
be charged for the line
connection dependin g on the
number of hops you set. To
prevent this and to keep
network traffic to a
minimum, set hops ca refully.
Setup Guide: Install the Network Software
6. Select the type of printer(s) you want to monitor and click
Next
.
Monitor: EPSON TCP/IP printers______ Windows
shared printers _____ NetWare printers______
local printers_______
7. Select
Monitor
do not have drivers on your computer. Select
monitor
Printers: Monitor_______ Do not monitor_______
to monitor EPSON network printers that
Do not
if network traffic is a problem. Then click
Next
8. If you’re using NetWare, set the number of hops (0 to 15)
and click
Number of hops:_______
Next.
.
Note:
If you are not using EPSON
Net!2 on your computer, you
do not have to turn off
background monitoring.
(You should limit the number
of systems that monitor the
printer, however, to prevent
network traffic problems.)
9. Check the current settings and click
Finish
click
.
Next
. Select
No
and
Now you install the second part of Status Monitor 2:
10. From the EPSON Installation Program screen, highlight
Install Status Monitor 2 for EPSON St ylus COLOR
850Ne
11. Click
and click the right arrow button .
Next, then follow steps 5 through 8, using the same
settings you used in those steps.
12. Check the current settings and click
Finish to restart your computer.
click
Next
. Select
Yes
and
13. After you restart your computer, right-click the green
background monitoring icon in your Startup group on the
taskbar. Click
stop monitoring now. This step turns off
background monitoring, which may interfere with EPSON
Net!2 when you configure the card. (See page 4-7 in your
User’s Guide or page 3-8 in your Administrator’s Guide to
turn on background monitoring later.)
After you install the network software, configure the printer’s
Ethernet card for TCP/IP (page 28), or use EPSON Net!2 to
configure your printer for NetWare (page 16).
15
Page 18

Setup Guide: Configure the Printer
3
Note:
When printing using bindery
correspondence clients,
make the object related to
the print server right under
the Bindery context in the
directory tree.
Configure the Printer
Configuring for NetWare
You can configure the printer for NDS or bindery with
NwAdmin and EPSON Net!2. (If you want to use
PCONSOLE, see Chapter 4 in you r Administrator’s Guide.)
Before you follow the steps in the se ctions belo w, check whether
you want to use the printer as a dedicated print server or as a
remote printer. (See page 4-1 in your Administrator’s Guide for
details.)
Using NwAdmin to Set Up Your Printer
You must first use NwAdmin to define your printer, define a
print server, and set up a queue. If the client does not
correspond to NDS, set up the printer, print server, and queue
in the bindery context. (I f you need to use PCONSOLE, see
Chapter 4 in your Administrator’s Guide.)
Confirm the bindery context
path from the server with the
SET BINDERY CONTEXT
command. See your
NetWare documentation for
more information.
When you print a text file
using the NPRINT command
or DOS redirection,
misconversion or a gap in
characters might occur
depending on the client
environment.
Follow these steps to set up your printer:
1. Log in to the NDS tree (or to the server with Bindery
context) with admin or supervisor privileges.
2. Run the administrator tool (NwAdm in).
16
Page 19

Setup Guide: Configure the Printer
3. Create a printer:
Click the directory context icon (or Bindery context), and
Object
select
printer name and click
, then
Create
Create
, and then
.
Printer
. Type the
4. Create a print server:
Click the directory context icon (or Bindery context), and
Object
select
the print server name and click
, then
Create
, and then
Create
Print Server
.
. Type
5. Create a print queue:
Click the directory context icon (or Bindery context), and
select
Object
, then
Create
, and then
Print Queue
the print queue name and select the print qu eue volume.
Then click
Create.
17
. Type
Page 20

Setup Guide: Configure the Printer
6. The objects you have just created are added to the NDS
tree (or Bindery).
7. Double-click the
Administrator screen.
Printer Object
icon on the NetWare
18
Page 21

Setup Guide: Configure the Printer
8. The Printer dialog box appears. Click
then click
Add.
Assignments and
9. From the print queue list, select the queue you want to
assign and click
OK
.
10. For Print Server mode, go to step 11.
For Remote Printer mode, click
Other/Unknown
for the Printer type box and click OK.
Configuration
, select
19
Page 22

Setup Guide: Configure the Printer
11. Double-clic k the
Print Server Object icon on the
NetWare Administrator screen.
12. The Print Server dialog box appears. Click
and then click
Add.
Assignments
13. From the printer object list, select the print er object you
want to assign and click
OK.
20
Page 23

Setup Guide: Configure the Printer
14. For Print Server mode, go to step 15.
For Remote Printer mode, go back to the screen in step 12
and click the Printer Number button to set up the printer
number from 0 to 254.
15. Double-clic k the
Print Queue Object
NetWare Administrator screen.
icon on the
21
Page 24

Setup Guide: Configure the Printer
16. The Print Queue dialog box appears. Click
Assignments.
Check if the print server and the printer are assigned to the
queue.
You now need to use EPSON Net!2 to c onf igure the card:
◗ For Print Server mode, see the section below.
◗ For Remote Printer mode, go to page 25.
22
Page 25

Note:
If the Status Monitor 2
program is open, or if
background monitoring is
turned on, it may interfere
with EPSON Net!2. Close
Status Monitor 2 if it is
running and turn off
background monitoring,
following step 13 on
page 15.
If you have connected more
than one printer with the
same type of Ethernet card
to the network, you can
distinguish the cards by their
MAC addresses. Press and
hold the car d’s status sheet
button for three seconds.
See page 10 for details.
Setup Guide: Configure the Printer
Using EPSON Net!2 to Configure the Card
in Print Server Mode
Follow these steps:
1. Start EPSON Net!2. The following screen appears:
2. Highlight your EPSON Stylus COLOR 850Ne printer and
Configuration.
click
3. Click the NetWare Basic tab and make the following
settings.
If the IP address is s et to the
default IP address, the
printer model might not
appear.
23
Page 26

Setup Guide: Configure the Printer
Note:
See your NetWare manual for
the availabl e characters an d
number of characters you can
use.
4. Click the
Frame Type
Auto
You can select from one of the following:
Ethernet 802.2, Ethernet 802.3, Ethernet II
,
, or
SNAP
.
Mode
Select
Print Server
.
NDS
Select
Enable
or
Disable
.
NDS Tree Name
If you are using NDS mode, type the same name as you
used in NwAdmin (up to 31 characters).
NDS Context
NDS context is the Object rank in the Directory tree. Type
the container object (up to 255 characters) from the Object
to the Root. Do not type the “.” at the top.
Print Server
tab and make the following settings.
Primary file server name
Select the server where you created the queue.
Password
Type any new password up to 19 characters. The characters
you entered appear as “
∗”.
24
Page 27

Setup Guide: Configure the Printer
Print server name
Type any new name up to 47 characters. The default name
is shown belo w.
(Printer name) - (last 6 digits of the serial number)
Polling interval
Set the polling time from 5 to 90 seconds.
Caution:
Once you make changes to
the Ethernet card, you must
wait until it registers the
settings before you turn off
the printer.
Note:
If the Status Monitor 2
program is open, or if
background monitoring is
turned on, it may interfere
with EPSON Net!2. Close
Status Monitor 2 if it is
running and turn off
background monitoring,
following step 13 on
page 15.
5. Click
OK
to save your changes. If the message
“Configuration successfully done” appears on your screen,
the update is complete.
6. In the file Server Console’s MONITOR.NLM, select the
Connection Information. Check if the print server name
assigned to the Ethernet card has been logged in to the
Active Connections list. It takes up to five minutes to
complete this.
Using EPSON Net!2 to Configure the Card
in Remote Printer Mode
Follow these steps:
1. From the System Console of the file server where you set
the print queue, load the print server module with the
following command (use the print server name which you
assigned in step 4 under “Using Nw Admin to Se t Up Yo ur
Printer,” on page 17):
>Load PSERVER print server name
If you have connected more
than one printer with the
same type of Ethernet card
to the network, you can
distinguish the card s by their
MAC address es. Press and
hold the card’s status sheet
button for three seconds.
See page 10 for details.
25
Page 28

Setup Guide: Configure the Printer
2. Start EPSON Net!2. The following screen appears:
Note:
If the IP address is set to the
default IP address, the
printer model might not
appear.
3. Highlight your printer and click
Configuration.
4. Click the NetWare Basic tab and make the following
settings.
Frame type
Select one from t he following: Auto, Ethernet 802.2,
Ethernet 802.3, Ethernet II, Ethernet SNAP.
Mode
Remote Printer.
Select
26
Page 29

Setup Guide: Configure the Printer
NDS
Select
Enable
or
Disable
.
NDS Tree Name
If you are using NDS mode, type the same name (up to 31
characters) as you set in NwAdmin.
Note:
See your NetWare manual for
the availabl e characters an d
number of characters you can
use.
NDS Context
NDS context is the Object rank in the Directory tree. Type
the container object (up to 255 characters) from the Object
to the Root. Do not type the “.” at the top.
5. Click the Remote Printer tab and make the follo wi ng
settings.
Caution:
Once you make changes to
the Ethernet card, you must
wait until it registers the
settings before you turn off
the printer.
Primary print server name
Select the print server na me you have created.
Printer port number
Type the same port number you assigned to the print
server.
6. Click
OK to save changes. If the message “Configuration is
successfully done” appears on your screen, the update is
complete.
27
Page 30

Setup Guide: Configure the Printer
Note:
If the Status Monitor 2
program is open, or if
background monitoring is
turned on, it may interfere
with EPSON Net!2. Close
Status Monitor 2 if it is
running and turn off
background monitoring,
following step 13 on
page 15.
7. Select
Printer Status from the Console screen of the print
server. Then check t h e status.
8. Select
Queues serviced
. Check if the print queue name
which you set in step 5 on page17 under “Using
NwAdmin to Set Up Your Printer” exists in the Print
Queues Serviced By Printer box.
Configuring for TCP/IP
For a Windows 98, Windows 95, or Windows NT network
with TCP/IP, you need to set the card’s IP address. You can use
EPSON Net!2 or the arp command to do this, as described in
the sections below.
Windows 98 and Windows 95 do not come with the TCP/IP
printing protocol, so in addition to TCP/IP, you need to install
the EPSON TCP/IP Printing protocol included with Status
Monitor 2. See page 11 for instructions.
Using EPSON Net!2
Make sure the Ethernet card and printer are on the same
segment of the network as the compute r yo u ar e using to
configure the card. Also, you need to know the IP address for
the computer and the IP address you will assign to the printer’s
Ethernet card.
Follow these steps to assign an IP address:
1. Make sure Windows is running, the Ethernet card is
connected to the network, and the printer is turned on.
2. Click
Start, point to Programs, point to EPSON Net!2,
then click
EPSON Net!2.
28
Page 31

Note:
If you have connected more
than one printer with the
same type of Ethernet card
to the network, you can
distinguish the cards by their
MAC addresses. Press and
hold the car d’s status sheet
button for three seconds.
See page 10 for details.
Setup Guide: Configure the Printer
3. Click the printer where you want to set the IP address, and
then click the
Configuration
button.
click here
To use RARP, BOOTP, or
DHCP, a server for each
protocol is necessary. If
there is no corresponding
server, do not use any of
these settings. See your
network operating system
documentation for the
settings.
4. Click the
TCP/IP tab to display the TCP/IP menu.
5. Under The way of acquiring an IP address, select one of the
following:
Manual, RARP, BOOTP, or DHCP.
29
Page 32

Setup Guide: Configure the Printer
6. Assign the IP address, the Subnet mask, and the Default
gateway. If you use DHCP to acquire an IP address, you
can’t assign these items; they are as signed by the server.
If you will use the card’s
internal home pa ge, assign an
IP address manually.
The default IP address is
11.22.33.44. If you plan to
use the card’s internal home
page, change the default IP
address.
If a server or router acts as a
gateway, type the gateway
address. If there is no
gateway, type the IP address
of your computer.
7. Click
OK
to save the new settings. The update is comp le te
when the message “Configuration is successfully done”
appears. (After you click
OK
, wait a few minutes before
turning off the printer, so the se ttings have time to reach
the card.)
Before you can prin t using TCP/IP, y ou still need to do the
following on each computer that will use the printer:
◗ Install the printer driver (s ee page 3 6)
◗ Add a printer port (see page 3 8)
Using the arp Command
Make sure the Ethernet card and printer are on the same
segment of the network as the compute r yo u ar e using to
configure the card. Also, you need to know the IP address for
the computer and the IP address you will assign to the printer’s
Ethernet card.
Follow these steps to assign the IP address:
1. Click
Start
, point to
double-click the
2. In Windows 98 or Windows 95, hig hlight
Properties, then click th e Gateway tab.
In Windows NT, click the
TCP/IP Protocol and click Properties. Click the IP
Address
3. Type
tab.
11.22.33.44 in the Gateway box to set up a default
Settings
Network icon.
Protocols tab. Highlight
Control Panel
, click
TCP/IP and click
gateway. In Windows 98 or Windows 95, click
30
and
Add.
Page 33

Setup Guide: Configure the Printer
Note:
For Windows NT, substitute
colons (:) for the hyphens (-)
shown in the MAC address.
4. Click
OK to close the TCP/IP dialog box and then click OK
to close the network settings dialog box and save your
settings. Cli ck
Yes
to restart your computer.
5. Find the MAC address (hardware address) for the Ethernet
card on the status sheet (see page 10).
6. Click
Prompt
Start
, point to
icon to open a DOS window.
Programs
, then click the
MS-DOS
7. Type in the following command to set up the routing table:
ping 11.22.33.44
8. Add an entry in the ARP table that assigns an IP address to
the hardware address of the Ethernet ca rd. Use the
following command:
arp -s <IP address> <MAC address>
for example:
arp -s 192.1.1.6 00-00-48-92-BD-9A
9. Wait at least two minutes for the settings to reach the card,
then start a continuous “ping” to the card, using the
following command with the card IP address:
Note:
If you have trouble getting
the network to see the card,
check Chapter 7,
Troubleshooting, in the
Administrator’s Guide
solutions to possible
problems.
for
ping <IP address>
for example: ping 192.1.1.6
You see a message similar to the following:
Reply from 192.1.1.6: bytes=32 time<10ms TTL=30
Reply from
Reply from
Reply from
192.1.1.6: bytes=32 time<10ms TTL=30
192.1.1.6: bytes=32 time<10ms TTL=30
192.1.1.6: bytes=32 time<10ms TTL=30
This shows that the Ethernet card is correctly set up for
TCP/IP.
If you receive 4 lines that say “Request Timed Out,” the
card is not set up correctly. Check to make sure the card is
on the same segment of the network as the workstation you
are using to configure it and that you typed in the correct
IP and MAC addresses.
31
Page 34

Setup Guide: Configure the Printer
Before you can prin t using TCP/IP, y ou still need to do the
following on each computer that will use the printer:
◗ Install the printer driver (s ee page 3 6)
◗ Add a printer port (see page 3 8)
Configuring for AppleTalk
To use your printer on an AppleTalk network, you ne ed to
configure the Ethernet card for AppleTalk. Follow these steps to
configure your card using EPSON Net!2:
1. Open the EPSON Net!2 utility.
You see a window like the follo w ing:
32
Page 35

Setup Guide: Configure the Printer
2. Highlight the
click
Configuration
EPSON Stylus COLOR 850 printer and
. The IP Address Configuration and
AppleTalk Configuration dialog box appears.
3. Make the following settings in the AppleTalk
Configuration box.
Printer Name
Type the printer name (up to 31 characters). T he default
name is shown:
(Printer name)-(last 6 digits of the serial number)
Entity Type
You do not have to set this op tion.
Zone Name
Select the network zone in which you want the printer to
appear. If the zone has not been set, “
∗” appears.
Network Number Set
Select the network number setting. In most cases, you
should select
Auto.
33
Page 36

Setup Guide: Configure the Printer
Network Number for Manual Mode
The default number is 6 5535. If you have selecte d
Auto
the Network Number Set, you can’t type the network
number manually.
for
Note:
EPSON Net!2 for Windows
and the Ethernet card home
page can’t be open at the
same time.
If you have not assigned an IP
address to the Ethernet card,
or if you use the default
setting (including when you
select DHCP to acquire an IP
address), you can’t configure
the Ethernet card for
NetBEUI using the Ethernet
card home page.
4. Click the
Send
button to save the new settings to the
Ethernet card. If the message “Configuration is successfully
done” appears, the update is complete.
Configuring for NetBEUI
You can use NetBEUI in Windows 98, Windows 95, and
Windows NT 4.0 networks to print to your EPSON Stylus
COLOR 850Ne. You configure the card for NetBEUI using
the card’s internal home page.
Before you can configure the card for NetBEUI, you must:
◗ Set up TCP/IP on all the workstations that will use the
printer.
◗ Set the IP address for your Ethernet card. (See page 28.)
◗ Make sure you have either Microsoft Internet Explorer 4.0
or later, or Netscape Navigator 3.0 or later.
Then, follow these steps to access the Ethernet card home page
and configure the card:
1. Run EPSON Net!2. Click the printer you want to
configure from the list, and click the
button. EPSON Net!2 closes automatically.
Or, run the browser and type the IP address for the
Ethernet card. Do not run EPSON Net!2 while the
browser is running.
Type the following URL:
http:// (IP address of the Ethernet card) /
The home page appears.
Launch Browser
34
Page 37

Setup Guide: Configure the Printer
Note:
If Disable is on, all NetBEUI
related functions stop.
The NetBIOS name is the
name of your computer on
the network. Make sure to
give the printer a unique
name for the network.
For the workgroup name,
type the domain nam e o r the
workgroup name used in the
Windows network.
2. Click
NetBEUI under Network on the Configuration
menu. The NetBEUI setting screen appears.
3. Select
Enable
in order to use NetBEUI.
4. Type the NetBIOS name (up to 15 characters), the
workgroup name (up to 15 characters), and the device
name (up to 8 characters). There are some restrictions on
the characters you can use. For details, see your browser or
OS documentation
5. Click
SUBMIT
.
to update the settings. If you have set a
password, type the password to update the settings when
prompted.
6. If the message “Configuration change is complete!” appears
on your screen, the update is complete. Enable the changes
by pressing
RESET or turning your printer off and on.
35
Page 38

Setup Guide: Set Up the Workstations
4
Note:
If you are using only
Windows 98 and/or
Windows 95 on a TCP/IP
network, you must install
EPSON Status Monitor 2 on
each workstation.
If you don’t have a
CD-ROM drive, you can
create diskettes from the
CD-ROM using another
computer. Run the Make
Diskettes program on the
CD. For details, see page
A-1 of the
Guide
Administrator’s
.
Set Up the Workstations
For most workstations, you need to install the printer driver
before you can print.
If you like, you can install Status Monitor 2 on Windows 98,
Windows 95, and Windows NT 4.0 workstations to monitor
the ink levels and keep track of other information about your
printer. Status Monitor 2 does create traffic, so you might want
to limit the number of users who monitor the printer. To install
Status Monitor 2, see the instructions on page 13.
For Windows computers, you need to change the port settings
and for Macintosh computers, you need to select the prin ter in
the Chooser.
Install the Printer Driver
Your printer driver is on the EPSON Stylus COLOR 850Ne
CD-ROM that came with your print er. If you hav e a Windows
NT Server 4.0 network , you don’t need to install the driv er on
each workstation. See your Windows NT documentation to set
up sharing.
36
Page 39

Setup Guide: Set Up the Workstations
Installing in Windows 98, Windows 95, or
Windows NT 4.0
1. Insert the EPSON Stylus COLO R 850Ne CD- ROM. You
see the EPSON Installation Program sc reen:
If you do not see the screen, click
type
D:\EPSETUP
CD-ROM) and click
2. Highlight
button .
3. Click
Your printer is automatically set to your local port, LPT1.
You need to change it to follow the network path to your
printer by adding a port. See the section on the next page.
Install Printer Driver
OK to install the printer driver.
37
(where D: is the drive letter of your
OK
.
Start, then clic k Run and
and click the right arrow
Page 40

Setup Guide: Set Up the Workstations
Changing Your Port Setting
In Windows NT 4.0, make sure the TCP/IP Print Server
service is running before you start. Then follow these steps to
change to the co rrect port:
1. Point to
Start, Settings
2. Highlight the
, and click
EPSON Stylus COLOR 850
Printers
.
printer and
right-click the icon.
3. Select
4. In Windows 98 or Windows 95, click the
5. Click
6. In Windows 98 or Windows 95, click
Properties
.
In Windows NT 4.0, click the
Add Port.
Details
Ports tab.
Browse and choose
the server or EPSON_TCPIP_Printer that your printer is
set up on. Then click
In Windows NT 4.0, click
OK
.
LPR Port
, then type in the
printer’s IP address and the name you want to assign. Click
OK, Close, and OK again.
Installing in Windows 3.1x
tab.
1. Make sure Windows Program Manager is running and exit
any open application programs.
2. Insert the EPSON Stylus COLOR 850Ne CD-ROM.
3. Open the File menu and select
4. Type
D:\EPSETUP (where D: is the drive letter of your
CD-ROM) and click
OK. You see the Software Installation
Run.
screen (shown on page 12).
5. Highlight
Install Printer Driver and click the right arrow
button .
38
Page 41

Setup Guide: Set Up the Workstations
6. Click
OK to install the software.
Your printer is automatically set to your local port, LPT1.
You need to change it to follow the network path to your
printer. See the section bel ow.
Changing Your Port Setting
Follow these steps to change to the correct port under
Windows 3.1x:
1. Open the Print Manager and select
COLOR 850
2. Select
from the list of printers.
Network Connections from the Options menu.
3. In the New Connection area, type the network path and
port, or click
Browse
to find the network path to your
printer.
4. Click
Connect
and then click
EPSON Stylus
Close
.
Installing on a Macintosh
1. Turn on your printer and your Macintosh and turn off any
virus protection programs you may have.
2. Insert the EPSON Stylus COLOR 850Ne CD-ROM.
3. Double-click the
4. Follow the instructi ons on the screen and restart your
computer.
To use the printer or configure the printer’s Ethernet card, you
need to select the
the Chooser and make sure AppleTalk is turned on. See your
Macintosh do cumentation fo r more informat ion.
Installer icon.
EPSON Stylus COLOR 850 AT printer in
39
Page 42

Setup Guide: Print a Test Page
5
Print a Test Page
Follow the steps on a Windows98, Windows 95, or
Windows NT workstation to test the p ri n ter and make sure
that the network is working correctly. Make sure the printer is
turned on and a sheet of letter-sized paper is loaded, then follow
these steps to print a test page:
1. Point to
2. Right-click the
Properties
You see the printer driver screen.
Start, Settings, and click Printers.
EPSON Stylus COLOR 850 icon and click
.
Note:
If the test page does not
print, see Chapter 6 in your
User’s Guide
in your
for possible problems an d
solutions.
and Chapter 7
Administrator’s Guide
3. Click the
page prints and a screen asks you to confirm that it printed
correctly.
General tab and click Print Test Page. The test
40
 Loading...