

Page 1

Page 2

Page 3

Where to Find Information
This User’s Guide
Provides you with all the information you need to use your
EPSON STYLUS COLOR 850 and consumable products, from
setting up to troubleshooting.
If you use DOS, see Appendix A to get information on
installing the printer software, changing the print settings, and
maintaining the printer using the control panel. Appendix A
also may be useful for Windows and Macintosh users.
Online Help (Windows only)
Provides you with detailed information and instructions on the
Windows-based printer software that controls your printer.
(Online help will be automatically installed when you install
the printer software.) See Chapter 4 for information on
accessing online help.
Color Guide
Explains the ABC’s of color printing and shows you how to get
impressive results from your printer.
Page 4

Color Ink Jet Printer
All rights reserved. No part of this publication may be reproduced, stored in a retrieval
system, or transmitted in any form or by any means, electronic, mechanical, photocopying,
recording, or otherwise, without the prior written permission of SEIKO EPSON
CORPORATION. The information contained herein is designed only for use with this
EPSON printer. EPSON is not responsible for any use of this information as applied to
other printers.
Neither SEIKO EPSON CORPORATION nor its affiliates shall be liable to the purchaser of
this product or third parties for damages, losses, costs, or expenses incurred by the
purchaser or third parties as a result of: accident, misuse, or abuse of this product or
unauthorized modifications, repairs, or alterations to this product, or (excluding the U.S.)
failure to s t r ictly comply with SEIKO EPSON CORPORATION ’s operatin g and
maintenanc e ins t r u c t io n s.
SEIKO EPSON CORPORATION shall not be liable for any damages or problems arising
from the use of any options or any consumable products other than those designated as
Original EPSON Products or EPSON Approved Products by SEIKO EPSON
CORPORATION.
EPSON and EPSON ESC/P are registered trademarks and EPSON ESC/P 2 and EPSON
Stylus are trademarks of SEIKO EPSON CORPORATION.
Microsoft and Windows are registered trademarks of Microsoft Corporation.
General Notice: Oth er pr oduct names used herein are for identification purposes only and may be
trademarks of their respective owners. EPSON disclaims any and all ri ghts in those marks.
Copyright © 1998 by SEIKO EPSON CORPORATION, Nagano, Japan.
User’s Guide
Page 5

Declaration of Conformity
According to ISO/IEC G u i d e 22 and EN 45014
Manufactu re r: SEIKO EPSON CORP ORATION
Address: 3-5, Owa 3-chome, Suwa-sh i,
Nagano-ke n 392 Jap an
Represen ta tive: EPSON EUROP E B.V .
Address: Prof. J. H. Bavi n c k laan 5 1183
AT Amstelveen
The Netherlands
Declares that the Product:
Product Name: Ink Jet Printer
Model: P930A
Conforms to the following Direc tive(s) and Norm(s):
Directive 89/336 /EE C:
EN 55022 Class B
EN 50082-1
IEC 801-2
IEC 801-3
IEC 801-4
EN 61000-3-2
EN 61000-3-3
ii
Directive 73/23/E EC:
EN 60950
February 1998
Y. Ishii
President of EP SON EUROPE B.V.
Page 6

Contents
Safety Instructions
Important Safety Instructions . . . . . . . . . . . . . . . . . . . 0-1
A few precautions . . . . . . . . . . . . . . . . . . . . . . . . 0-2
ENERGY STAR Compliance . . . . . . . . . . . . . . . . . . . . 0-3
For United Kingdom Users . . . . . . . . . . . . . . . . . . . . 0-4
Warnings, Cautions, and Notes . . . . . . . . . . . . . . . . . . 0-5
Chapter 1
Printer Parts and Control Panel Functions . . . . . . . . . . . . 1-2
System Requirements . . . . . . . . . . . . . . . . . . . . . . . . 1-4
When using your printer with a PC . . . . . . . . . . . . . . 1-4
When using your printer with a Macintosh . . . . . . . . . 1-5
Options and Consumable Products . . . . . . . . . . . . . . . . 1-6
Options . . . . . . . . . . . . . . . . . . . . . . . . . . . . . . 1-6
Consumable products . . . . . . . . . . . . . . . . . . . . . . 1-7
Chapter 2
Unpacking the Printer . . . . . . . . . . . . . . . . . . . . . . . 2-2
Choosing a Place for the Printer . . . . . . . . . . . . . . . . . . 2-3
Using a printer stand . . . . . . . . . . . . . . . . . . . . . . 2-4
Attaching the Paper Support . . . . . . . . . . . . . . . . . . . . 2-4
Plugging in the Printer . . . . . . . . . . . . . . . . . . . . . . . 2-5
Installing the Ink Cartridges . . . . . . . . . . . . . . . . . . . . 2-6
Connecting the Printer to Your PC . . . . . . . . . . . . . . . . 2-12
Installing the Printer Software in Your PC . . . . . . . . . . . . 2-13
Installing in Windows 95 or Windows NT 4.0 . . . . . . . . 2-14
Installing in Windows 95 (using plug-and-play) . . . . . . 2-16
Installing in Windows 3.1 . . . . . . . . . . . . . . . . . . . 2-19
Getting to Know Your Printer
Getting Started
iii
Page 7

Using Your Printer on a Network . . . . . . . . . . . . . . . . . 2-21
With Windows 95 . . . . . . . . . . . . . . . . . . . . . . . . . 2-21
With Windows NT 4.0 . . . . . . . . . . . . . . . . . . . . . . 2-23
Connecting the Printer to Your Macintosh . . . . . . . . . . . . 2-26
Using the built-in serial interface . . . . . . . . . . . . . . . . 2-26
Using an optional EPSON interface card . . . . . . . . . . . 2-27
Installing the Printer Software in Your Macintosh . . . . . . . . 2-28
Installing the printer software . . . . . . . . . . . . . . . . . . 2-30
Assigning a name to the printer
Using the Chooser to select your printer . . . . . . . . . . . . 2-32
Using the AppleTalk connection . . . . . . . . . . . . . . . . 2-35
. . . . . . . . . . . . . . . .
2-31
Chapter 3
Loading Paper . . . . . . . . . . . . . . . . . . . . . . . . . . . . . 3-2
Printing With Windows . . . . . . . . . . . . . . . . . . . . . . . 3-5
Printing With Macintosh . . . . . . . . . . . . . . . . . . . . . . . 3-8
Chapter 4
Printer Software . . . . . . . . . . . . . . . . . . . . . . . . . . . . 4-2
Accessing the Printer Software . . . . . . . . . . . . . . . . . . . 4-2
From Windows applications . . . . . . . . . . . . . . . . . . 4-3
From Windows 95 or Windows NT 4.0 . . . . . . . . . . . . 4-3
From Windows 3.1 . . . . . . . . . . . . . . . . . . . . . . . . 4-4
Making Changes to Printer Driver Settings . . . . . . . . . . . . 4-5
Using the Automatic Setting
Using the Predefined Settings . . . . . . . . . . . . . . . . . . 4-6
Customizing the Print Settings . . . . . . . . . . . . . . . . . 4-8
Making the Media Type Setting . . . . . . . . . . . . . . . . 4-10
Modifying the Printout Style (Windows 95 & NT 4.0 only) . 4-12
Using EPSON Printer Utilities . . . . . . . . . . . . . . . . . . . 4-15
EPSON Status Monitor 2 (for Windows 95 only) . . . . . . . 4-16
Nozzle Check . . . . . . . . . . . . . . . . . . . . . . . . . . . 4-16
Head Cleaning . . . . . . . . . . . . . . . . . . . . . . . . . . 4-17
Print Head Alignment . . . . . . . . . . . . . . . . . . . . . . 4-17
Speed & Progress (for Windows 95 only) . . . . . . . . . . . 4-17
Starting to Print
Using the Printer Software for Windows
. . . . . . . . . . . . . . . . . .
4-5
iv
Page 8

Checking Printer Status (for Windows 95 and 3.1) . . . . . . . 4-19
Using EPSON Status Monitor 2 (for Windows 95 only) . . 4-22
Getting Information Through Online Help . . . . . . . . . . . 4-28
Accessing help from your application . . . . . . . . . . . . 4-28
Accessing help from Windows 95 or NT 4.0 . . . . . . . . . 4-28
Accessing help from Windows 3.1 . . . . . . . . . . . . . . 4-28
Chapter 5
Using the Printer Software for Macintosh
Printer Software . . . . . . . . . . . . . . . . . . . . . . . . . . . 5-2
Making Changes to Printer Driver Settings . . . . . . . . . . . 5-2
Using the Automatic Setting . . . . . . . . . . . . . . . . . 5-3
Using the Predefined Settings . . . . . . . . . . . . . . . . . 5-5
Customizing the Print Settings
. . . . . . . . . . . . . . . .
5-8
Saving your settings . . . . . . . . . . . . . . . . . . . . . . . 5-16
Changing the Paper Size . . . . . . . . . . . . . . . . . . . . 5-17
Defining a Custom Paper Size . . . . . . . . . . . . . . . . . 5-19
Modifying the Printout Method and Style . . . . . . . . . . 5-20
Using EPSON Printer Utilities . . . . . . . . . . . . . . . . . . . 5-23
EPSON StatusMonitor . . . . . . . . . . . . . . . . . . . . . 5-23
Nozzle Check . . . . . . . . . . . . . . . . . . . . . . . . . . 5-24
Head Cleaning . . . . . . . . . . . . . . . . . . . . . . . . . . 5-24
Print Head Alignment . . . . . . . . . . . . . . . . . . . . . 5-24
Configuration . . . . . . . . . . . . . . . . . . . . . . . . . . 5-24
Controlling Background Printing . . . . . . . . . . . . . . . . . 5-25
Chapter 6
Printing on Special Paper
Loading Special Paper and Other Media . . . . . . . . . . . . . 6-2
About special media cleaning sheets . . . . . . . . . . . . . 6-4
Loading Envelopes . . . . . . . . . . . . . . . . . . . . . . . . . 6-5
Loading Transparencies . . . . . . . . . . . . . . . . . . . . . . 6-6
v
Page 9

Chapter 7
Available Interfaces . . . . . . . . . . . . . . . . . . . . . . . . . . 7-2
Installing Optional Interfaces . . . . . . . . . . . . . . . . . . . . 7-3
Using the serial interface card (C82305
Using Optional Interfaces
/C82306]) . . . . . 7-5
]
Chapter 8
Replacing an Ink Cartridge . . . . . . . . . . . . . . . . . . . . . 8-2
Printing with an empty color ink cartridge . . . . . . . . . . 8-8
Cleaning the Printer . . . . . . . . . . . . . . . . . . . . . . . . . 8-9
Transporting the Printer . . . . . . . . . . . . . . . . . . . . . . . 8-10
Chapter 9
Diagnosing the Problem . . . . . . . . . . . . . . . . . . . . . . . 9-2
Error indicators . . . . . . . . . . . . . . . . . . . . . . . . . . 9-2
Status Monitor . . . . . . . . . . . . . . . . . . . . . . . . . . 9-4
Self testing . . . . . . . . . . . . . . . . . . . . . . . . . . . . . 9-5
Hex dump mode . . . . . . . . . . . . . . . . . . . . . . . . . 9-7
Problems and Solutions . . . . . . . . . . . . . . . . . . . . . . . 9-8
Power supply . . . . . . . . . . . . . . . . . . . . . . . . . . . 9-8
Operation . . . . . . . . . . . . . . . . . . . . . . . . . . . . . 9-9
Paper handling . . . . . . . . . . . . . . . . . . . . . . . . . . 9-16
Printing quality . . . . . . . . . . . . . . . . . . . . . . . . . . 9-19
Increasing the Print Speed . . . . . . . . . . . . . . . . . . . . . . 9-27
Using Speed & Progress (for Windows 95 only) . . . . . . . 9-29
Cleaning the Print Heads . . . . . . . . . . . . . . . . . . . . . . 9-32
Aligning the Print Heads . . . . . . . . . . . . . . . . . . . . . . 9-36
Ink Cartridge Problems . . . . . . . . . . . . . . . . . . . . . . . 9-37
Uninstalling Printer Software (for Windows 95 only) . . . . . . 9-39
Contacting Customer Support . . . . . . . . . . . . . . . . . . . 9-40
For United Kingdom and the Republic of Ireland users . . . 9-40
For Australian users . . . . . . . . . . . . . . . . . . . . . . . 9-43
For Singapore users . . . . . . . . . . . . . . . . . . . . . . . . 9-45
For Hong Kong users . . . . . . . . . . . . . . . . . . . . . . . 9-45
For Philippines users . . . . . . . . . . . . . . . . . . . . . . 9-46
Maintenance and Transportation
Troubleshooting
vi
Page 10

Appendix A
Using the Printer with DOS
Installing the Printer Software for DOS Programs . . . . . . . A-2
Changing the Print Settings . . . . . . . . . . . . . . . . . . . . A-3
Using the default settings . . . . . . . . . . . . . . . . . . . A-4
Changing the default settings . . . . . . . . . . . . . . . . . A-7
Selecting fonts . . . . . . . . . . . . . . . . . . . . . . . . . . A-8
Cleaning the Print Heads . . . . . . . . . . . . . . . . . . . . . . A-10
Aligning the Print Heads . . . . . . . . . . . . . . . . . . . . . . A-11
Using the print head alignment utility . . . . . . . . . . . . A-11
Using the printer’s control panel buttons . . . . . . . . . . A-12
Using Power-On Functions . . . . . . . . . . . . . . . . . . . . A-13
Appendix B
Tips for Color Printing
Basics of Color . . . . . . . . . . . . . . . . . . . . . . . . . . . . B-2
Image Resolution and Image Size . . . . . . . . . . . . . . . . . B-5
Basics of Color Documents . . . . . . . . . . . . . . . . . . . . . B-7
Appendix C
Specifications
Technical Specifications . . . . . . . . . . . . . . . . . . . . . . C-2
Printing . . . . . . . . . . . . . . . . . . . . . . . . . . . . . . C-2
Paper . . . . . . . . . . . . . . . . . . . . . . . . . . . . . . . C-4
Ink cartridges . . . . . . . . . . . . . . . . . . . . . . . . . . C-7
Mechanical . . . . . . . . . . . . . . . . . . . . . . . . . . . . C-8
Electrical . . . . . . . . . . . . . . . . . . . . . . . . . . . . . C-9
Environmental . . . . . . . . . . . . . . . . . . . . . . . . . . C-9
Safety approvals . . . . . . . . . . . . . . . . . . . . . . . . . C-10
Interface Specifications . . . . . . . . . . . . . . . . . . . . . . . C-10
Parallel interface . . . . . . . . . . . . . . . . . . . . . . . . . C-10
Serial interface . . . . . . . . . . . . . . . . . . . . . . . . . . C-11
Initialization . . . . . . . . . . . . . . . . . . . . . . . . . . . C-12
Default settings . . . . . . . . . . . . . . . . . . . . . . . . . C-13
vii
Page 11

Command List . . . . . . . . . . . . . . . . . . . . . . . . . . . . C-14
ESC/P 2 control codes . . . . . . . . . . . . . . . . . . . . . . C-14
IBM X24E emulation control codes . . . . . . . . . . . . . . . C-15
Character Tables . . . . . . . . . . . . . . . . . . . . . . . . . . . . C-16
International character sets . . . . . . . . . . . . . . . . . . . C-25
Characters available with ESC ( ^ command . . . . . . . . . C-26
Glossary
Index
viii
Page 12

Safety Instructions
Important Safety Instructions
Read all of these instructions and save them for later reference.
Follow all wa rnin g s and ins tru cti on s mark ed o n the prin te r.
q
Do not place the printer on an unstable surface or near a
radiator or heat source.
q
Place the printer on a flat surface. The printer will not
operate properly if it is tilted or at an angle.
q
Do not block or cover the openings in the printer’s cabinet.
Do not insert objects through the slots.
q
Use only the type of power source indicated on the printer’s
label.
q
Connect all equipment to properly grounded power
outlets. Avoid using outlets on the same circuit as
photocopiers or air control systems that regularly switch
on and off.
q
Do not use a damaged or frayed power cord.
q
If you use an extension cord with the printer, make sure
the total ampere rating of the devices plugged into the
extension cord does not exceed the cord’s ampere rating.
Also, make sure the total ampere rating of all devices
plugged into the wall outlet does not exceed the wall
outlet’s ampere rating.
q
Unplug the printer before cleaning. Clean with a damp
cloth only. Do not spill liquid on the printer.
q
Except as specifically explained in this guide, do not
attempt to service the printer yourself.
Safety Instructions
1
Page 13

q
Unplug the printer and refer servicing to qualified service
personnel under the following conditions:
If the power cord or plug is damaged; if liquid has entered
the printer; if the printer has been dropped or the cabinet
damaged; if the printer does not operate normally or
exhibits a distinct change in performance. Adjust only those
controls that are covered by the operating instructions.
q
If you plan to use the printer in Germany, observe the
following:
To provide adequate short-circuit protection and over-current
protection for this printer, the building installation must be
protected by a 16 Amp circuit breaker.
Bei Anschluß des Druckers an die Stromversorgung muß
sichergestellt werden, daß die Gebäudeinstallation mit
einem 16 A-Überstromschalter abgesichert ist.
A few precautions
Even if you are familiar with other types of printers, be sure to
read through the following list of precautions before operating
your ink jet printer.
q
Do not put your hand inside the printer or touch the ink
cartridges during printing.
q
Do not move the print heads by hand; otherwise you may
damage the printer.
q
Under normal circumstances, ink will not come out of the
cartridges. If ink does get on your skin, wash it off with
soap and water. If it gets in your eyes, flush them
immediately with water.
q
Keep ink cartridges out of the reach of children.
2
Safety Instructions
Page 14

q
Do not dismantle the in k cartr idges or try to refill them .
This could damage the print heads.
q
Once you install an ink cartridge, do not open the clamp or
remove the cartridge except to replace it. The cartridge may
become unusable otherwise.
q
Install the ink cartridge immediately after you remove it
from its package. Leaving the cartridge unpacked for a long
time before use may reduce print quality.
q
Do not use an ink cartridge beyond the date printed on the
cartridge carton. For best results, use up the ink cartridges
within six months of installing them.
q
Do not shake an ink cartridge; this can cause leakage.
q
Always turn the printer off using the
When this button is pressed, the
briefly. Do not unplug the printer or turn off the power to
the outlet until the
q
Before transporting the printer, make sure the print heads
are in the home (far right) position and the ink cartridges
are in place.
P power ligh t is off.
P power button.
P power light flashes
NERGY STAR Compliance
E
As an ENERGY STAR Partner, EPSON has
determined that this product meets the
TAR guidelines for energy efficiency.
S
The International
is a voluntary partnership with the computer and office
equipment industry to promote the introduction of
energy-efficient personal computers, monitors, printers, fax
machines, and copiers in an effort to reduce air pollution
caused by power generation.
NERGY STAR Office Equipment Program
E
Safety Instructions
NERGY
E
3
Page 15

For United Kingdom Users
Use of options
EPSON (UK) LTD shall not be liable against any damages or
problems arising from the use of any options or consumable
products other than those designated as Original EPSON
Products or EPSON Approved Products by EPSON (UK)
LTD.
Safety information
Warning:
for voltage and check that the appliance voltage corresponds to
w
the supply voltage.
Important:
are coloured in accordance with the following code:
Green and yellow — Earth
Blue — Neutral
Brown — Live
If you have to fit a plug:
As the colours of the mains lead of this appliance may not
match coloured markings used to identify the terminals in a
plug, please proceed as follows:
The green and yellow wire must be connected to the terminal
in the plug which is marked with the letter E or the Earth
symbol (
The blue wire must be connected to the terminal in the plug
marked with the letter N.
The brown wire must be connected to the terminal in the plug
marked with the letter L.
G).
This appliance must be earthed. Refer to rating plate
The wires in the mains lead fitted to this appliance
4
Safety Instructions
Page 16

If damage occurs to the plug, replace the cord set or consult a
qualified electrician.
Replace fuses only with a fuse of the correct size and rating.
Warnings, Cautions, and Notes
Warnings
must be followed carefully to avoid bodily injury.
w
Cautions
must be observed to avoid damage to your equipment.
c
Notes
contain important information and useful tips on the operation
of your printer.
Safety Instructions
5
Page 17

6
Safety Instructions
Page 18

Chapter 1
Getting to Know You r Printer
Printer Parts and Control Panel Functions . . . . . . . . . . . . 1-2
System Requirements . . . . . . . . . . . . . . . . . . . . . . . . 1-4
When using your printer with a PC . . . . . . . . . . . . . . 1-4
When using your printer with a Macintosh . . . . . . . . . 1-5
Options and Consumable Products . . . . . . . . . . . . . . . . 1-6
Options . . . . . . . . . . . . . . . . . . . . . . . . . . . . . . 1-6
Consumable products . . . . . . . . . . . . . . . . . . . . . 1-7
1
Getting to Know Your Printer
1-1
Page 19

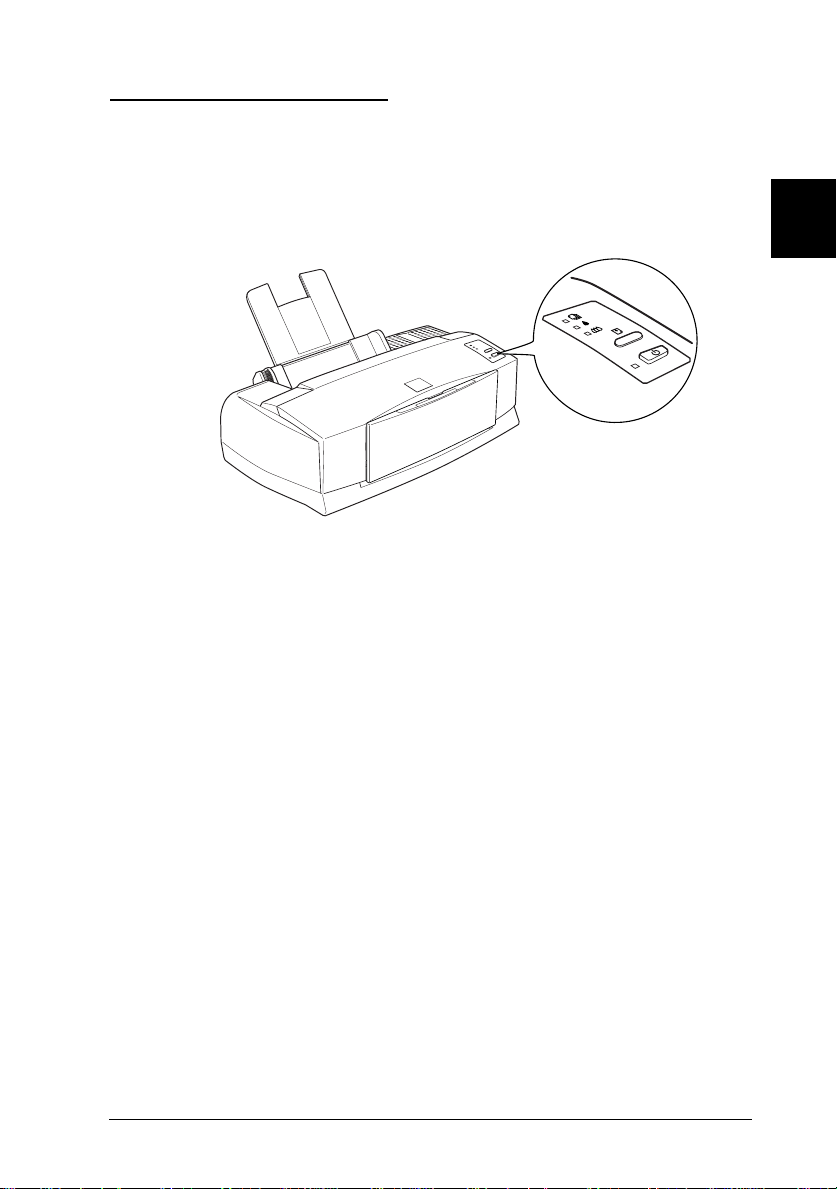
Printer Parts and Control Panel Functions
paper support extension
sheet feeder
ink cartridge clamps
output tray
paper support
edge guides
control panel
printer cover
tab
output tray
extension
black print head
cleaning button
load/eject
button
adjust lever
1-2
Getting to Kno w Your Printer
power
button
color print head
cleaning button
Page 20
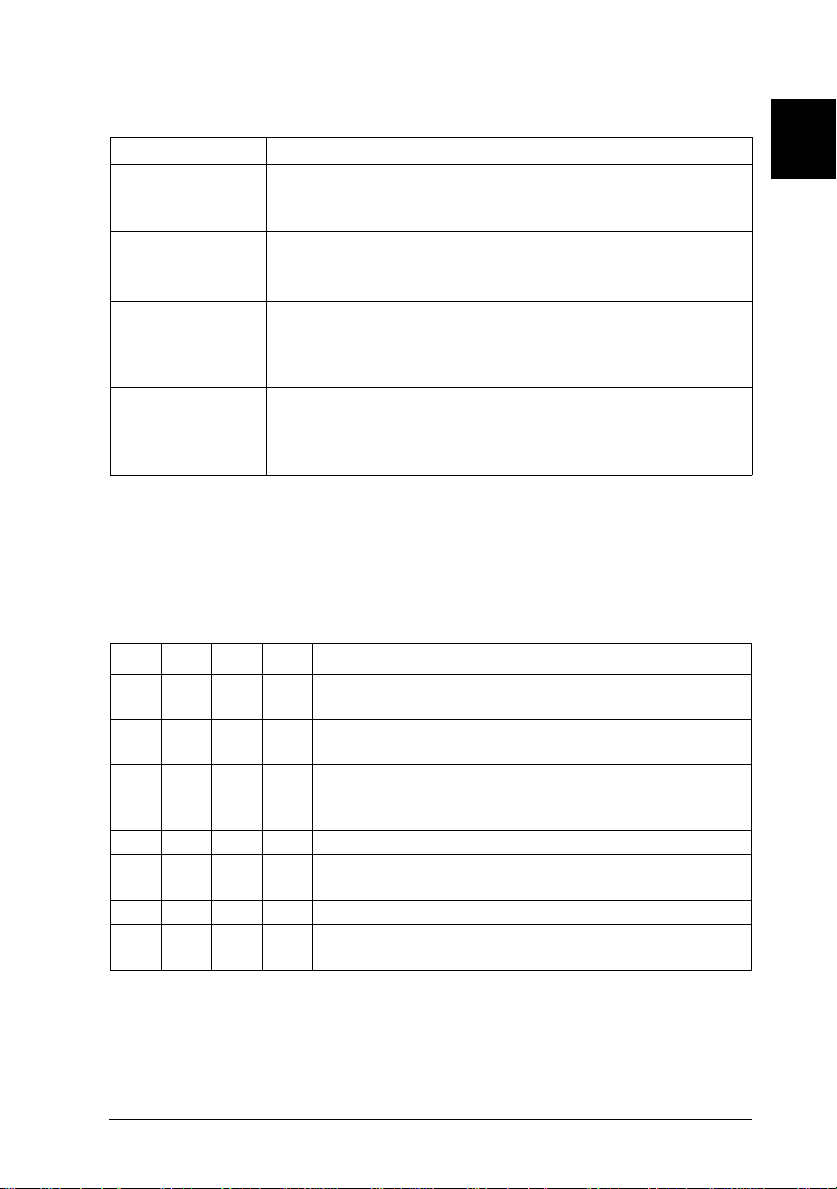
Buttons
Buttons Function
Loads and eject s paper.
E
load/eject
P
power
Y
black print
head cleaning
X
color print
head cleaning
Start s chargin g ink (after yo u finish the ink cartridge
replacement procedure).
Turns the pr i n te r on and off.
Clear s the print buffer if pressed tw ice while the
power is on.
Cleans the black prin t head if pressed for about three
seconds. S tarts the black ink cartridge replacement
B
procedure if presse d whil e the
or on. Thi s button is located insi de the printer cover.
Cleans the col or pr int head if pressed for about th r ee
seconds. Starts the color ink cartridge replacement
procedure if presse d whil e the
or on. Thi s button is located insi de the printer cover.
ink out light is flashing
A
ink out light is flashing
Lights
The lights on the front of the printer indicate the printer status,
such as receiving data, paper jam, or ink is low. The following
table describes what the lights mean.
1
A
B
S
---
---
o
f
n
n
-
-
--
--
o
= on, n = off, f = flashing, - = irrelevant
f
o
--
--
f
o
Printer Sta tus
P
Receiving data, replacing an ink cartridge,
f
charging ink, or cle ani ng pri nt heads.
Paper out. Load paper in the sheet feeder; then
press the
Paper jam. Remove the jammed paper, then
-
reload paper and press the
to resum e pr i n ting.
Ink low. The black ink cartridge is nearly empty.
Ink out. The blac k in k cart r i dg e i s em pty .
Replace the bl ac k in k cartridge (S020108).
Ink low. The color ink cartridge is nearly empty.
-
Ink out. The color ink cartridge is empty.
-
Replace the c ol or ink cartridge (S02008 9).
E
load/ej ec t button to resume pr inting.
E
load/ eject button
Getting to Know Your Printer
1-3
Page 21

System Requ irements
When using your printer with a PC
To use your printer, you need Microsoft® Windows® 3.1,
Windows for Workgroups, Windows 95, Windows NT 4.0, or
DOS; and a shielded, twisted-pair parallel cable.
To install and use the printer software (printer driver and
utilities) included on the CD-ROM or floppy disk packed with
your printer, the following is required:
Minimum system Recommended system
80386/25 MHz processor
for Windows 3.1
80486/25 MHz processor
for Wind ows 95 and NT 4.0
16MB RAM 32MB RAM or more
20MB hard disk space 50MB or more free disk space
VGA monitor VGA or better monitor
Your computer dealer can help you update your system if it
does not meet these requireme nts .
Pentium or higher processor*
* For Windows NT, Intel or Intel x86
compatible processors only
1-4
Getting to Kno w Your Printer
Page 22

When using your printer with a Macintosh
To use this printer, your Apple® Macintosh® must meet the
following system requirements and you need a standard Apple
System Peripheral-8 cable (8-pin mini-circular connector) or
equivalent.
Applicable computer models (as of July 1, 1997)
Macintosh LC II, LC III, LC475, LC520, LC575, LC630
Macintosh IIcx, IIci, IIsi, IIvi, IIvx
Macintosh Quadra Series
Macintosh Centris Series
Macintosh PowerBook Series (excluding PowerBook 100)
Macintosh PowerBook Duo Series
Macintosh Performa Series
Power Macintosh Series
Environment
Minimum system Recommended system
System 7.1 System 7.5 or late r
5MB of available memory
10MB of available memory
when background printing
is turned on.
8MB or mo re of avai lable memory
16MB of available memory wh en
backgound printing is turned on.
1
Note:
q
The amount of available memory varies according to the number
and kind of applications that are open. To see how much memory
is available, choose
About This Macintosh
from the Apple
menu and refer to the memory size (listed in kilobytes) under
“Largest Unused Block” (1, 024K= 1MB).
q
The memory requirements above are for printing on Letter size
paper. These requirements may vary depending on the size of the
paper, the type of application you are using, and the complexity of
the document you want to print.
Getting to Know Your Printer
1-5
Page 23

In addition to these system and memory requirements, you
also need 8MB of free hard disk space to install your printer
software. To print, you need extra hard disk space amounting
to about double the size of the file you want to print.
Options and Consumable Produc ts
For information on what options are available for your printer,
see the following section.
Options
Interface cards
A number of optional interfaces are available to supplement
the printer’s built-in parallel and serial interfaces. See Chapter 7
for details.
If you are not sure whether you need an optional interface or if
you want to know more about interfaces, contact your dealer.
Serial Interface Card C82305
32KB Serial Inter face Card C8230 7]/C82308
32KB Parallel Inter face Card C8231 0
32KB IEEE-488 Interface Card C82313
Twinax Interface Card C82315
Coax Interface Card C8231 4
LocalTalk Interface Card C82312
Type B Ethernet Interface Card C82357
Type B Bi-directional Parallel Interface Card C82345
Note:
]
The asterisk (
number, which varies by country.
1-6
Getting to Kno w Your Printer
) is a substitute for the last digit of the product
]
/C82306
]
]
]
]
]
]
]
]
]
Page 24

Interface cables
EPSON supplies several types of interface cables. You can use
any interface cable that meets the specifications listed below.
See your computer manual for any additional requirements.
]
Parallel Interface Cable (shielded) C83602
D-SUB 25-pin (computer) to Amphenol 57 (printer)
from
1
Serial Interface Cable C83603
D-SUB 25-pin (computer) to D-SUB 25-pin (printer)
Serial Interface Cable C83605
D-SUB 9-pin (computer) to D-SUB 25-pin (printer)
Note:
]
The asterisk (
number, which varies by country.
) is a substitute for the last digit of the product
Consumable products
Ink cartridges
Black ink cartridge S020108
Color ink cartridge S020089
]
/C83604] from
]
/C83606] from
Getting to Know Your Printer
1-7
Page 25

EPSON special media
Most plain paper works well in your printer. In addition, paper
specifically designed for ink jet printers will meet most
high-quality printing needs.
360 dpi Ink Jet Paper (A4) S041059 S041025
360 dpi Ink Jet Paper (Letter) S041060 S041028
Photo Quality Ink Jet Paper (A4) S041061 S041026
Photo Quality Ink Jet Paper (Letter) S041062 S041029
Photo Quality Ink Jet Paper (Legal) S041067 S041048
Photo Quality Ink Jet Card (A6) S041054
Photo Quality Ink Jet Card (5 × 8 in.) S041121
Photo Quality Ink Jet Card (8 × 10 in.) S041122
Photo Quality Glossy Film (A4) S041071
Photo Quality Glossy Film (Letter) S041072
Photo Quality Glossy Film (A6) S041107
Photo Quality Glossy Paper (A4) S041126
Photo Quality Glossy Paper (Letter) S041124
Ink Jet Transparencies (A4) S041063
Ink Jet Transparencies (Letter) S041064
Photo Quality Self Adhesive Sheet (A4) S041106
Photo Paper (A4) S041140
Photo Paper (Letter) S041141
Photo Paper (4 × 6 in.) S041134
Photo Stickers (A6) S041144
Panoramic Photo Paper (210 × 594 mm) S041145
Iron-On Cool Peel Transfer Paper (A4) S041154
Iron-On Cool Peel Transfer Paper (Letter) S041153 S041155
1-8
Note:
q
The availability of special media varies by country.
q
Ink jet printers are particularly sensitive to the condition of your
paper. Keep unused paper in its original packaging and store it in
a cool, dry place.
Getting to Kno w Your Printer
Page 26

Chapter 2
Getting Started
Unpacking the Printer . . . . . . . . . . . . . . . . . . . . . . . 2-2
Choosing a Place for the Printer . . . . . . . . . . . . . . . . . . 2-3
Using a printer stand . . . . . . . . . . . . . . . . . . . . . . 2-4
Attaching the Paper Support . . . . . . . . . . . . . . . . . . . . 2-4
Plugging in the Printer . . . . . . . . . . . . . . . . . . . . . . . 2-5
Installing the Ink Cartridges . . . . . . . . . . . . . . . . . . . . 2-6
Connecting the Printer to Your PC . . . . . . . . . . . . . . . . 2-12
Installing the Printer Software in Your PC . . . . . . . . . . . . 2-13
Installing in Windows 95 or Windows NT 4.0 . . . . . . . . 2-14
Installing in Windows 95 (using plug-and-play) . . . . . . 2-16
Installing in Windows 3.1 . . . . . . . . . . . . . . . . . . . 2-19
Using Your Printer on a Network . . . . . . . . . . . . . . . . . 2-21
With Windows 95 . . . . . . . . . . . . . . . . . . . . . . . . 2-21
With Windows NT 4.0 . . . . . . . . . . . . . . . . . . . . . 2-23
2
Connecting the Printer to Your Macintosh . . . . . . . . . . . . 2-26
Using the built-in serial interface . . . . . . . . . . . . . . . 2-26
Using an optional EPSON interface card . . . . . . . . . . . 2-27
Installing the Printer Software in Your Macintosh . . . . . . . 2-28
Installing the printer software . . . . . . . . . . . . . . . . . 2-30
Assigning a name to the printer . . . . . . . . . . . . . . . 2-31
Using the Chooser to select your printer . . . . . . . . . . . 2-32
Using the AppleTalk connection . . . . . . . . . . . . . . . 2-35
Getting Star te d
2-1
Page 27
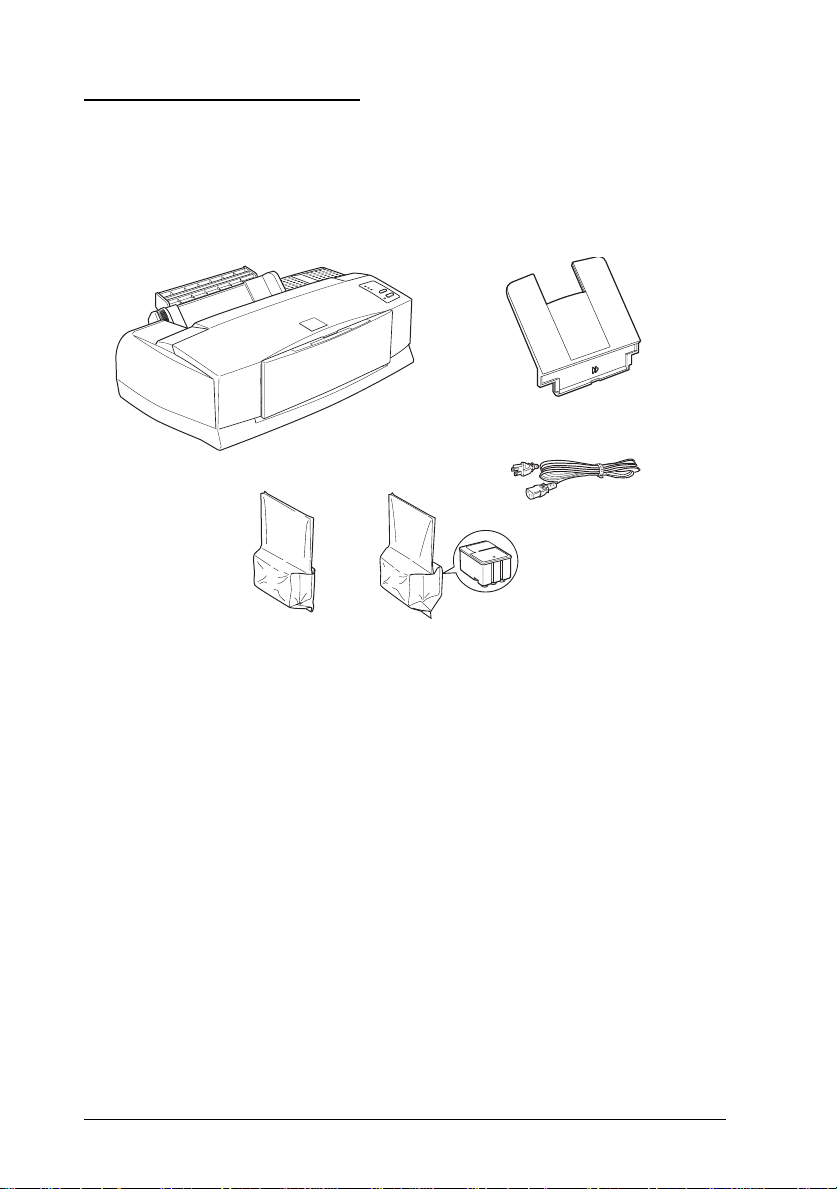
Unpacking the Printer
Your printer box should contain a CD-ROM, which includes
the printer software that runs your printer, and the following
items:
paper support
printer
power cord
color ink cartridgeblack ink cartridge
In some locations, the power cord comes attached to the
printer. The shape of the AC plug varies by country; be sure
the plug included is the right shape for your location.
Remove all protective materials packed with your printer
before you set it up and turn on the power. Follow the
instructions inserted with the printer to remove these materials.
Save all packaging and protective materials in case you need to
transport the printer later.
2-2
Getting Started
Page 28

Choosing a Place for the Printer
Follow the guidelines listed below when placing your printer.
q
Place the printer on a flat, stable surface that is larger than
the printer. The printer will not operate properly if it is
tilted or at an angle.
q
Place the printer close enough to the computer for the
interface cable to reach it easily.
q
Leave adequate room for easy operation and maintenance.
q
Leave enough room on the table at the front of the printer
to lower the output tray.
q
Avoid using or storing the printer in places subject to rapid
changes in temperature and humidity. Also keep it away
from direct sunlight, strong light, or heat sources.
q
Avoid places subject to shocks and vibrations.
q
Place the printer near a wall outlet where the plug can be
easily unplugge d.
2
Note for French-speaking users:
Placez l’imprimante près d’une prise de contacte où la fiche peut
être débranchée facilement.
q
Avoid electrical outlets controlled by wall switches or
automatic timers. If you must use electrical outlets
controlled by wall switches, do not use the wall switches to
control them. Also, avoid outlets on the same circuit as
large motors or other appliances that can cause fluctuations
in line voltage.
q
Keep the entire computer system away from poten tial
sources of electromagnetic interference, such as
loudspeakers or the base units of cordless telephones.
Getting Star te d
2-3
Page 29

q
Use a grounded power outlet; do not use an adapter plug.
Using a printer stand
When using a printer stand, note the following:
q
Use a stand that can support at least 15.0 kg (33.2 lb).
q
Never use a stand that tilts the printer. The printer should
always be kept level.
Attaching the Paper Support
Insert the paper support into the slots at the rear of the printer
as shown below.
Note:
To print on transparencies, you need to reposition the paper support
as described in “Loading Transparencies” in Chapter 6.
2-4
Getting Started
Page 30
Plugging in the Printer
1. Make sure that the printer is turned off. It is off when the
P power button protrudes slightly from the surface of the
control panel.
2. Check the label on the back of the printer to make sure
the voltage required by the printer matches that of the
electrical outlet you will be plugging it into. Also, make
sure that you have the correct power cable for your power
source.
2
Caution:
It is not possible to change the printer’s voltage. If the
c
rated voltage and your outlet voltage do not match,
contact your dealer for assistance. Do not plug in the
power cord.
3. If the power cord is not attached to the printer, connect it to
the AC inlet on the back of the printer.
4. Plug the power cord into a properly grounded electrical
outlet.
Getting Star te d
2-5
Page 31

Installing the Ink Cartridges
Warning:
The ink cartridges are self-contained units. Under ordinary
w
use, ink will not leak from a cartridge. If ink does get on your
hands, wash them thoroughly with soap and water. If ink gets
into your eyes, flush them immediately with water.
Install the included ink cartridges as follows:
Caution:
Use the ink cartridges packed with your printer the first time
c
you install ink cartridges, otherwise the printer may not charge
ink properly.
Note:
Do not open the ink cartridge packages until just before you install
them or the ink may dry up.
1. Lower the output tray at the front of the printer; then, holding
the tab on the cover, open the printer cover.
2-6
Getting Started
Page 32

2. Turn on the printer by pressing the
The print heads move slightly to the left, which is the
black ink cartridge install position (color ink cartridge
installation begins in step 7). The
come on and the
P power light flashes.
P power button.
B and
A ink out lights
2
c
Caution:
Do not move the print heads by hand. Otherwise you may
damage the printer.
Getting Star te d
2-7
Page 33

3. Lift up the black ink cartridge clamp, which is marked with a
H symbol.
4. Open the ink cartridge packages that came with your printer
and remove the cardboard, if necessary. Remove only the
yellow tape seals from each cartridge as shown below.
Note:
Use the ink cartridges packed with your printer the first time you
install the ink cartridges, otherwise the printer may not charge
ink properly.
Remove
2-8
black ink
cartridge
Caution:
c
Getting Started
q
q
color ink
cartridge
Do not remove
Remove the yellow tape seals from the cartridges
before installing them; otherwise the cartridge may
become unusable.
Do not remove the white portion of the tape seal from
the top of the cartridge; otherwise, the cartridge may
become clogged.
Page 34

q
Do not remove the tape seals from the bottom of the
cartridges; otherwise, ink will leak.
5. Lower the black ink cartridge into the cartridge holder with
the label face-up and the arrow mark pointing to the rear.
6. Press the clamp down until it locks in place.
2
c
Caution:
Once you install the ink cartridges, do not open their
clamps again until you replace the cartridges. Otherwise,
the cartridges may become unusable.
Getting Star te d
2-9
Page 35

7. Next, press the X cleaning button to install the color ink
cartridge. The printer moves the print heads to the color ink
cartridge installation position. The clamp, which is marked
with the
c
8. Lift up the color ink cartridge clamp. Install the color ink
cartridge as described in steps 5 and 6, substituting “color
ink cartridge” for “black ink cartridge” where appropriate.
Then go to step 9 to complete the ink cartridge installation.
I symbol, will appear.
Caution:
Do not move the print heads by hand. Press the
cleaning button to move them to the color ink cartridge
installation position. Otherwise you may damage the
printer.
X
2-10
Getting Started
Page 36

9. Close the printer cover then press the E load/eject button.
The printer moves the print heads and begins charging the
ink delivery system.
Note:
E
Even if you do not press the
moves the print heads and begins the ink charging process about
60 seconds after you install the ink cartridges.
The ink charging process takes up to 4 minutes to complete,
during which time the
printer produces a variety of mechanical sounds. These are
normal. When the ink delivery system has been charged,
the print heads return to their home position.
load/eject button, the printer
P power light flashes and the
2
Caution:
Never turn off the printer while the
c
flashing.
The life of a cartridge depends on the amount of text and
black-and-white graphics you print (for a black cartridge) and
the amount and the number of colors used in your documents
(for a color cartridge).
Note:
When ink runs out, see “Replacing an Ink Cartridge” in Chapter 8.
P
power light is
Getting Started
2-11
Page 37

Now you are ready to connect the printer to your computer. To
connect the printer to your PC, see the following section. To
connect it to your Macintosh, see page 2-20.
Connecting the Printer to Your PC
Connecting the printer to your computer using the built-in
parallel interface requires a shielded, twisted-pair parallel
cable. To connect the printer to a Macintosh, see page 2-26.
Follow the steps below to connect the printer to your computer:
1. Make sure both the printer and computer are turned off.
2. Plug the cable connector securely into the printer’s interface
connector. Then squeeze the wire clips together until they
lock in place on both sides. If your cable has a ground wire,
connect it to the ground connector below the interface
connector.
3. Plug the other end of the cable into the computer’s parallel
interface. If there is a ground wire at the computer end of
the cable, connect it to the ground connector at the back of
the computer.
2-12
Getting Started
Page 38

Now see the next section for instructions on installing the
printer software. You must install the printer software
before using your printer.
Installing the Printer Software in Your PC
After connecting the printer to your computer, install the
Windows printer software. It is included in the “Printer
Software for EPSON STYLUS COLOR 850” CD-ROM
shipped with your printer.
Your printer software includes:
q
Printer driver
The printe r driv er gives yo u co mple te cont ro l ove r your
printer. With it, you can make settings such as Print
Quality, Media Type, and Paper Size.
q
Utilities
The Nozzle Check, Head Cleaning, and Print Head
Alignment utilities help you to keep your printer in top
operating condition. The Status Monitor 2 utility allows
you to check the current status of your printer.
2
q
Online help
Online help gives you instant on-screen access to detailed
information and instructions on how to use your printer.
q
EPSON Status Monitor 2 (for Windows 95 only)
The EPSON Status Monitor 2 allows you to view printer
status information such as the amount of ink remaining
and check for any printer errors.
If you are using the floppy disk version of the software, make a
backup copy of the EPSON printer software disk before you
begin installation.
Getting Started
2-13
Windows
Page 39

If you wish to make a floppy disk version of the printer
software on your CD-ROM, you can use the Driver disk
creation utility included on the CD. See below for Windows 95
and NT 4.0, or page 2-19 for Windows 3.1.
Installing in Windows 95 or Windows NT 4.0
Follow the steps below to install the printer software in
Windows 95 or NT 4.0.
Note for Windows NT 4.0 users:
Printer driver installation may require network administration
privileges. Ask your network administrator for more details.
1. Make sure Windows 95 or NT 4.0 is running and the printer
is off.
2. Insert the printer software CD in the CD-ROM drive. (For
floppy disk users, insert it in the A: drive. Click
click
below appears, double-click
Run
. Type
A:\SETUP
and click OK.) If the dialog box
Install Printer Driver/Utility
Start
, then
.
Double-click
here to install
Double-click here to
make a floppy disk
version of the printer
software
If this dialog box does not appear, double-click the
Computer
(or floppy disk drive icon for floppy disk users).
2-14
Getting Started
My
icon, then double-click the CD-ROM drive icon
Page 40

If this dialog box appears, double-click
Driver/Utility
double-click the
arrows to scroll through the folder to find it.
. If this dialog box still does not appear,
Setup.exe
icon. You may need to use the
Install Printer
3. If the dialog box below appears, click OK to start the printer
software installation.
4. When the installation is complete, click OK again.
5. For Windows 95, the EPSON Status Monitor 2 utility
installation starts automatically.
Note:
q
You can stop the EPSON Status Monitor 2 installation by
clicking the
“Installing the Status Monitor 2 utility” on page 4-27.
q
Installing time varies depending on your computer system.
Cancel
button. If you want to install it later, see
2
Your printer sof twar e is no w in st all ed. Th e ins tallat io n
program automatically selects this printer as the default printer
for Windows applications.
If you use your printer on a network, you need to set up your
printer as a remote printer. See “Using Your Printer on a
Network” on page 2-21.
Getting Started
2-15
Windows
Page 41

Before using the printer software, be sure to read the
file located in the EPSON (Printers) folder. For information on
opening and using the software, see “Printing With Windows”
in Chapter 3.
Installing in Windows 95 (using plug-and-play)
Follow these steps to install the printer software using
Windows 95 plug-and-play capabilities.
Note:
To install the printer software using Windows 95 plug-and-play
capabilities, your computer’s parallel port must be an IEEE 1284
compatible, bidirectional parallel port. See your computer
documentation for more information.
1. Make sure the printer is connected to the computer’s parallel
port.
2. Turn off your printer and computer, if necessary.
3. Turn on the printer first; then turn on the computer. Your
computer begins loading Windows 95.
README
4. If you defined a password, enter it at the prompt. You see
the New Hardware Found screen.
2-16
Getting Started
Page 42

If this screen does not appear, click
installation procedure on page 2-14 instead.
5. Make sure your printer model name is displayed on the
screen. Then click the
hardware manufacturer
other buttons.
6. Click OK. You see the Install From Disk screen.
7. Insert the printer software CD shipped with your printer in
the CD-ROM drive. Depending on the country, the
CD-ROM may contain a multiple-language version of the
printer software.
Driver from disk provided by
button. Do not select any of the
Cancel
and follow the
2
First try typing
p
If no message appears
p
If a message appears
From Disk screen. Type
language by typing
Portugal
Click
other than “D”, substitute the appropriate letter.)
If you use the floppy disk version, insert it in a disk drive.
Type
disk in a drive other than drive "A", substitute the
appropriate letter.)
8. At the next screen you can type a unique name for the printer
in the Printer name box. We recommend that you keep the
model name as show n . The prog r am will co py the file s to
your hard disk and add an icon to the Printers folder using
the printer name you assign. To use this printer as the
default printer for Windows 95 applications, select
(No is the default setting.)
9. Click
OK
A:\Win95
Finish.
D:\Win95
, or
Spanish
. (If your CD-ROM drive uses a drive letter
and click OK. (If you inserted the floppy
and clicking OK.
r Proceed to step 8.
r Click OK to return to the Install
then specify your preferred
D:\
English, Francais, German, Italian
, followed by
\Win95
.
.
Yes
,
Windows
Getting Started
2-17
Page 43

Note:
q
The EPSON Status Monitor 2 utility installation starts
automatically. You can stop the installation by clicking the
Cancel
button. If you want to install it later, see "Installing the
Status Monitor 2 utility" on page 4-27.
q
Installation time varies depending on your computer system.
If you use the floppy disk version, click OK when the
installat io n is comp let ed .
Your printer software is now installed. If you use your printer
on a network with Windows 95, see page 2-21.
Before using the printer software, be sure to read the
README
file located in the EPSON folder. For information on opening
and using the software, see “Printing With Windows” in
Chapter 3.
2-18
Getting Started
Page 44

Installing in Windows 3.1
Follow these steps to install the software using Windows 3.1:
1. Make sure Windows 3.1 is running and the Program Manager
window is open.
2. Insert the Printer Software CD shipped with your printer in
the CD-ROM drive. (If you use the floppy disk version,
insert it in a floppy disk drive).
3. Select
the Command Line box, type
the CD-ROM drive has a drive letter other than "D",
substitute the appropriate letter).
If you are using the floppy disk version, type
click
than "A", substitute the appropriate letter).
Type here to
run
4. If the dialog box below appears, double-click
Driver/Utility
in the File menu. You see the Run dialog box. In
Run
D:\EPSETUP
. (If the floppy disk drive has a drive letter other
OK
.
and click
A:\SETUP
Install Printer
OK.
(If
and
2
Double-click here
to install
Getting Started
Windows
2-19
Page 45

5. Select your printer icon in the EPSON Printer Utility Setup
dialog box. Click OK. The installation program begins
copying the printer software files.
6. When the insta llat io n is comp lete , click OK to exit the
installatio n progr am .
The printer software is now installed. The installation program
automatically selects this printer as the default printer for
Windows applications.
Before using the printer software, be sure to read the
file located in the EPSON group. Fo r infor m ation on openi ng
and using the printer driver, see “Printing With Windows” in
Chapter 3.
2-20
Getting Started
README
Page 46

Using Your Printer on a Network
To use your printer on a network, you need to set up your
printer as a network printer. Setting up for a network must be
done from the host computer first, and then from the client
computer.
Host:
Computer to which the printer is connected
2
Client:
Any computer on the network which will use the printer
With Windows 95
To set up the host computer, see your Windows 95 manual. To
set up your computer as a client computer to use the printer on
a network, see below.
1. Make sure the printer software is installed. See page 2-14, if
necessary.
2. Double-click the
3. Double-click the
4. Right-click the icon of your printer, and click
5. Click the
Details
My Computer
Printers
tab. Then click the
folder.
icon.
Add Port
Properties
button.
Click this tab to
see this window
.
Windows
Then click here
Getting Started
2-21
Page 47

6. Click
Browse.
Click here to specify the
network p ath
7. Double-click the icon of the computer that is directly
connected to the printer. Then click the icon of the printer
you plan to use on the network.
Select the computer that is
connected to the printer
Select the printer
8. Click OK and follow the messages on the screen.
Now you can send print jobs to your printer over the network.
2-22
Getting Started
Page 48

With Windows NT 4.0
To set up the host computer, see your Windows NT 4.0
manual. To set up your computer as a client computer to use
the printer on a network, see below.
1. Make sure the printer software is installed. See page 2-14, if
necessary.
2
2. Click
3. Double-click the
4. Click the
5. Select the print queue where print jobs destined for this
printer will be sent or select the network path to the printer.
Note:
Be sure to confirm all network settings with the network
administrator.
, point to
Start
Network printer
Settings,
Add Printer
radio button. Click
and click
icon.
Printers
.
Next
.
Windows
Getting Started
2-23
Page 49

6. If the following dialog box appears, click OK and go to the
next step.
If this dialog box does not appear, your printer is set up and
ready to accept print jobs over the network; see your
printer manual for information on how to start printing.
7. Click
Have Disk
.
Click here
8. Insert the printer software CD or floppy disk in the
appropriate drive.
9. For the English version of the CD-ROM, type
D:\WINNT40
and click OK. For the multiple-language version CD-ROM,
type
Francais, German, Ital ian, Portugal, or Spanish
type
followed by your preferred language:
D:\
\WINNT40
, and click OK. (If you inserted the CD in a
English,
. Then
drive other than drive "D", substitute the appropriate letter.)
If you use the floppy disk version of the printer software,
type
A:\WINNT 40
and click OK. (If you inserted the FD in a
drive other than "A", substitute the appropriate letter.)
2-24
Getting Started
Page 50

10. Select your printer in the dialog box below and follow the
on-screen instructions.
Select your printer
Note for Windows NT 4.0 users
If your printer does not print correctly as a remote printer, the
following procedure may help you solve the problem.
1. Install the Windows NT 4.0 printer software in your
computer as described on page 2-14.
2. Click
3. Right-click the icon of your printer, and click
4. Select a printer port other than
5. From the DOS prompt, type the network path to your printer.
For example, type the following:
C:\net use lpt2: \\epserver\printer
, and select
Start
Settings
and
Printers
in the Port menu.
LPT1
.
Properties
2
.
Then press the
“lpt2” in step 4, substitute this port for "
command above. You should also substitute the name of
your print server for "
printer, as defined on the print server, for "
6. Restart your computer.
Note:
If you need to cancel this setting, follow the instructions above
and type
C:\net use lpt2: /d
key. If you selected a port other than
Enter
" in the
lpt2
epserver
", and the name of the
printer
in step 5.
Getting Started
Windows
".
2-25
Page 51

Connecting the Printer to Your Macintosh
There are two ways to connect the printer to your Macintosh,
using the printer’s built-in serial interface or using an optional
interface card.
Using the built-in serial interface
To use the printer’s built-in serial interface, you will need
an Apple System Peripheral-8 cable. Read the following steps
to connect the printer to your Macintosh.
1. Make sure both your printer and Macintosh are switched off.
2. Connect one end of the interface cable to the serial connector
on the back of the printer.
3. Connect the other end of the interface cable to either the
modem port or printer port on the Macintosh. The ports are
marked with the following icons.
printer port
2-26
modem port
Getting Started
Page 52

4. Turn on the printer by pressing the
5. Turn on your Macintosh.
P power button.
See the next page for instructions on installing the printer
software. You must install the printer software before using
your printer.
Using an optional EPSON interface card
An optional LocalTalk or Ethernet interface card lets you use
your printer on an AppleTalk network.
To use the LocalTalk Interface Card (C82312
two LocalTalk Locking Connector Kits (DIN-8 version). Attach
a connector box to the AppleTalk interface on the printer and to
the printer port on the Macintosh. Then attach the LocalTalk
cable between the two connector boxes. See the user’s guide
that comes with the connector kits for more details.
To use the Type B Ethernet Interface Card (C82357
user’s guide that comes with the card for setup information.
For information on installing these interface cards in the
printer, see Chapter 7, “Using Optional Interfaces.”
Note:
The asterisk in the product number is a substitute for the last digit,
which varies by country.
]
), you will need
]
2
), see the
Getting Started
Macintosh
2-27
Page 53

Installing the Printer Software in Your Macintosh
Always use the EPSON STYLUS COLOR 850 Macintosh printer
software when printing with your printer. This software is
specially designed to allow easy access to all the features of the
printer.
Caution:
Turn off all virus protection programs before you install your
c
printer software.
Your printer software includes:
q
EPSON Printer Driver Package
q
SC850
The printer driver software that runs your printer if
you are using the serial interface.
q
SC850(AT)
The printer driver software that lets you use the printer
on an AppleTalk network.
q
EPSON Monit o r3
Monitors and manages background printing jobs. You
must turn on background printing in the Chooser to
use this utility. For more information, see “Controlling
Background Printing” on page 5-25.
2-28
q
StatusMonitor
Keeps track of the current status of your printer, and
alerts you when printer errors occur. You can open it
from the Utility dialog box in the printer driver
software. For more information, see “Using EPSON
Printer Utilities” on page 5-23.
Getting Started
Page 54

q
Nozzle Check
Checks the print heads for clogging. You can open this
utility from the Utility dialog box in the printer
software. For more information, see “Using EPSON
Printer Utilities” on page 5-23.
q
Head Cleaning
Cleans the print heads to maintain the best print
quality. You can open this utility from the Utility
dialog box in the printer software. For more
information, see “Using EPSON Printer Utilities” in
Chapter 5, and "Cleaning the Print Heads" on page 9-35.
q
Print Head Alignment
Adjusts the print heads so that vertical and horizontal
lines are aligned. You can open this utility from the
Utility dialog box in the printer software. For more
information, see “Using EPSON Printer Utilities” in
Chapter 5, and "Aligning the Print Heads" on page 9-36.
q
Epson Namer
Assigns a unique name to the printer so that you can use it
on an AppleTalk network. To assign a name, see page 2-31.
2
q
ColorSync 2.0 and Profiles
Matches the colors in your printout with the colors
displayed on your screen automatically. Use this when
printing scanned photographs or computer graphics.
To use this feature, you may need to set the system profile
for your monitor. Access the ColorSync System Profile
utility through the Control Panel and click the
button. Select your monitor from the list of monitors that
appears, and then click
Select
. Close the dialog box.
Getting Started
Set Profile
Macintosh
2-29
Page 55

Installing the printer software
Follow the steps below to install your printer software. If you
are using the floppy disk version, make a backup copy of the
EPSON Macintosh printer software disk before you begin
installation.
1. Turn on your Macintosh and insert the software CD in the
CD-ROM drive. (If you use the f loppy disk ver sion, in sert it in
a disk drive.)
The EPSON printer software disk opens automatically.
2. If a single
separate folders containing installer icons for several
languages appear, double-click the folder for your
preferred language, then open the
double-click the
3. After the initial screen appears, click
dialog box appears.
4. If you want to install all of the printer software included on
your printer software CD-ROM, make sure the Install
Location box shows the correct disk drive and click
Installer
icon appears, double-click the icon. If
folder and
Disk 1
Installer
icon inside it.
Continue.
The following
Install
.
2-30
Getting Started
Page 56

If you are low on disk space, select
pop-up menu and click
connect the printer directly to your Macintosh’s serial port),
or
Network Driver Package
connect the printer to your Macintosh over an AppleTalk
network). Confirm the destination for installation, then
click
Install.
For information on the included software, see page 2-28.
Note:
Click the icon to get information on each component.
5. When a message appears informing you that installation
is finished, click
restart your computer.
If you are going to use the optional LocalTalk Interface Card
]
(C82312
need to assign a name to your printer using the EPSON Namer
utility as described below. If you are using a serial interface,
skip to “Using the Chooser to select your printer” on next page.
) or Type B Ethernet Interface Card (C82357]), you
Restart
Serial Driver Pac kage
to complete the installation and
Cusom Install
and
Epson Namer
from the
(if you
(if you
2
Assigning a name to the printer
Use the following procedure to assign a name:
1. Double-click the
It is located on your hard disk drive if installed. If it is not
installed, insert the printer software CD-ROM into your
computer’s CD-ROM drive and open the utility from there.
(If you use the floppy disk version, insert it in a disk drive
and open the utility from there.)
2. Click the
SC850(AT)
Epson Namer
icon in the Device Types window.
icon.
Getting Started
Macintosh
2-31
Page 57

3. If there are multiple AppleTalk zones at your site, select the
zone where the printer is located.
4. Under New Name, enter a name for your printer. You should
assign a name that clearly distinguishes your printer from
others on the network.
5. Click
Namer.
Rename
and then click
to quit the EPSON
Done
Using the Chooser to select your printer
After you install the printer software, you need to open the
Chooser to select your printer. You have to choose the printer
the first time you use it or whenever you want to switch to
another printer. Your Macintosh will always print using the
last printer selected.
If you are using the serial interface, choose your printer driver
as described in the following section, “Using the serial interface
connection.” If your system is connected to an AppleTalk
network, see “Using the AppleTalk connection” on page 2-35.
Note:
If you are using a Macintosh Quadra 950 or 900, you need to choose
Compatible
printer from the Chooser. To open the Serial Switch dialog box, choose
Control Panel
in the Serial Switch dialog box before selecting your
from the Apple menu, then choose
Serial Switch
.
2-32
Getting Started
Page 58

Using the serial interface connection
1. Make sure the printer is connected to your Macintosh and
turned on.
2. Choose
printer’s icon and the port your printer is connected to. If
you don’t see the appropriate icon, use the arrows on the
right to scroll th ro ug h the available icons.
Click your
printer icon
Note:
If you are using AppleTalk network, an alert message may appear
when you click the port. In this case, reselect the other port that is
available, or make AppleTalk setting
port again.
c
Chooser
Caution:
If your Mactintosh has a 68030 CPU, make AppleTalk
Inactive
from the Apple menu. Then click your
Inactive
whenever you print with your printer.
then select the
2
Click the port
your pri nter is
connected to
3. Click the
background printing on or off.
Background Printing
radio buttons to turn
Getting Started
Macintosh
2-33
Page 59

When background printing is on, you can use your
Macintosh while it is preparing a document for printing.
You must turn on background printing to use the
EPSON Monitor3 utility to manage print jobs. For more
information, see “Controlling Background Printing” on
page 5-25.
4. Close the Chooser.
2-34
Getting Started
Page 60

Using the AppleTalk connection
1. Turn on your printer.
2. Choose
icon. If you don’t see the appropriate icon, use the arrows
on the right to scroll through the available icons. Select the
AppleTalk zone you want to use. A list of all the printers
connected to the selected zone appears on the right.
3. Click the name you assigned to your EPSON STYLUS
COLOR 850.
4. Click the Background Printing radio buttons to turn
background printing on or off.
Chooser
from the Apple menu. Click your printer’s
2
When background printing is on, you can use your Macintosh
while it is preparing a document for printing. You must
turn on background printing to use the EPSON Monitor3
utility to manage print jobs. For more information, see
”Controlling Background Printing” on page 5-25.
5. Close the Chooser.
Getting Started
Macintosh
2-35
Page 61

2-36
Getting Started
Page 62

Chapter 3
Starting to Print
Loading Paper . . . . . . . . . . . . . . . . . . . . . . . . . . . . 3-2
Printing With Windows . . . . . . . . . . . . . . . . . . . . . . . 3-5
Printing With Macintosh . . . . . . . . . . . . . . . . . . . . . . 3-8
3
Starting to Print
3-1
Page 63

Loading P aper
The follow ing proce du re desc rib es ho w to load plai n pape r in
the printer.
You can also print on ink jet paper, photo-quality glossy film or
paper,transparencies, envelopes, index cards, and adhesive
sheets. For details on using such media, see Chapter 6,
“Printing on Special Paper.”
Note:
To print on transparencies, you need to reposition the paper support
as described in Chapter 6.
1. Lower the output tray at the front of the printer and slide out
the extension.
3-2
Starting to Print
Page 64

2. Slide the left edge guide to the left as far as it will go.
If you load long paper (for example, legal size paper), pull up
the paper support extension.
3
3. Fan a stack of paper; then tap it on a flat surface to even the
edges.
Starting to Print
3-3
Page 65

4. Load the stack of paper with the printable side up and the
right edge of the paper resting against the right side of the
sheet feeder.
Note:
q
Always load paper into the sheet feeder short edge first. Load
envelopes flap edge first with the flap side down.
q
Load preprinted forms or letterhead top edge first.
5. Slide the left edge guide against the left edge of the paper.
Make sure the paper stack fits under both the edge guide
tab and arrow mark as shown below.
3-4
Starting to Print
Page 66

Printing With Windows
To get started with printing right away, follow the printing
method explained below, which is typical of many Windows
applications. The actual way you print may vary depending
on the application you use. See your application manual for
details.
Note:
While many Windows applications override the settings made with
the printer driver, some do not, so you must verify the settings to get
the results you expect.
1. From your application, open the document you want to print.
2. Click
similar dialog box) appears.
3. Make sure your printer is selected and then click
Setup, Properties
than one of these buttons in different dialog boxes. The
printer software window appears.
on the File menu. The Print dialog box (or a
Print
, or
Options
. You may need to click more
Printer
,
3
Windows
Starting to Print
3-5
Page 67

4. Click the
option is set to
tab if necessary, and make sure the Mode
Main
Automatic
.
Note:
When
Automatic
is selected, the printer software optimizes
other settings according to the Media Type and Ink settings you
make.
5. Click anywhere in the Media Type box, and select the media
you loaded in the printer. If you don’t see your media in
the list, use the arrow on the right to scroll through the list.
See “Making the Media Type Setting” on page 4-10 for
more information.
Note:
Depending on the Media Type you choose, a slide bar appears in
the Mode box that lets you choose
Quality
when print quality is more important than speed.
Quality
or
Speed
.
Sele ct
6. Select
7. Click the
3-6
as the Ink setting if your document includes
Color
color. Select
if you are printing black text, a draft, or
Black
if you want colors to print as varying shades of gray.
Paper
Starting to Print
tab. The
Paper
menu appears.
Page 68

8. Select the size of the paper you loaded in the printer from the
Paper Size list. If you don’t see your paper size in the list,
use th e a r ro w on the rig h t to s c r o ll through th e l is t.
Note:
If your paper size is not included in the list, select
and enter the paper size in the dialog box that appears. For more
information on the User Defined option, see online help.
9. Make the Orientation setting. The effect of your setting is
shown in the display to the left.
10. Click OK at the bottom of the window. You return to the
Print dialog box (or a similar dialog box).
User Defined
3
11. Click
Close, OK
more than one of these buttons in different dialog boxes.
, or
to print. You may need to click
Print
For Windows 95 and 3.1 users
While your document is printing, the EPSON Despooler dialog
box (Windows 3.1) or the EPSON Progress Meter (Windows
95) appears, showing the printing progress and the status of
your printer. For details, see "Checking Printer Status" in
Chapter 4 and online help.
Windows
Starting to Print
3-7
Page 69

Printing With Macintosh
To get started printing right away, follow the printing method
explained below, which is typical of many Macintosh
applications. The actual way you print may vary depending on
the application you use. See your appli cation manual for details.
Note:
While many Macintosh applications override the settings made with
the printer driver, some do not, so you must verify the settings to get
the results you expect.
1. From your application, open the document you want to
print.
2. Choose
the dialog box shown below.
3. Select the paper size you loaded in the printer from the
Paper Size list.
4. Select
option.
5. After making your settings, click the OK button to close the
Page Setup dialog box.
Note:
You cannot print from the Page Setup dialog box. You can only
print from the Print dialog box.
Page Setup
Portrait
from the File menu. This brings up
or
Landscape as
the Orientation
3-8
Starting to Print
Page 70

6. Choose
box shown below.
Print
from the File menu. This brings up the dialog
3
7. Make sure the Mode option is set to
Note:
Automatic
When
other settings according to the Media Type and Ink settings you
make.
8. Select the type of paper you loaded in the printer from the
Media Type list. See page 5-4 for details.
Note:
Depending on the Media Type you choose, a slide bar appears in
the Mode box that lets you choose
Quality
9. Select
color. Select
if you want colors to print as varying shades of gray.
10. Click
when print quality is more important than speed.
Color
to start printing.
Print
is selected, the printer software optimizes
as the Ink option if your document includes
if you are printing black text, a draft, or
Black
Automatic
Quality
or
Speed
.
.
Select
Starting to Print
Macintosh
3-9
Page 71

3-10
Starting to Print
Page 72

Chapter 4
Using the Printer Software for Windows
Printer Software . . . . . . . . . . . . . . . . . . . . . . . . . . . 4-2
Accessing the Printer Software . . . . . . . . . . . . . . . . . . 4-2
From Windows applications . . . . . . . . . . . . . . . . . . 4-3
From Windows 95 or Windows NT 4.0 . . . . . . . . . . . . 4-3
From Windows 3.1 . . . . . . . . . . . . . . . . . . . . . . . 4-4
Making Changes to Printer Driver Settings . . . . . . . . . . . 4-5
Using the Automatic Setting . . . . . . . . . . . . . . . . . 4-5
Using the Predefined Settings . . . . . . . . . . . . . . . . . 4-6
Customizing the Print Settings . . . . . . . . . . . . . . . . 4-8
Making the Media Type Setting . . . . . . . . . . . . . . . 4-10
Modifying the Printout Style (Windows 95 & NT 4.0 only) 4-12
Using EPSON Printer Utilities . . . . . . . . . . . . . . . . . . . 4-15
EPSON Status Monitor 2 (for Windows 95 only) . . . . . . 4-16
Nozzle Check . . . . . . . . . . . . . . . . . . . . . . . . . . 4-16
Head Cleaning . . . . . . . . . . . . . . . . . . . . . . . . . . 4-17
Print Head Alignment . . . . . . . . . . . . . . . . . . . . . 4-17
Speed & Progress (for Windows 95 only) . . . . . . . . . . 4-17
4
Checking Printer Status (for Windows 95 and 3.1) . . . . . . . 4-19
Using EPSON Status Monitor 2 (for Windows 95 only) . . 4-22
Getting Information Through Online Help . . . . . . . . . . . 4-28
Accessing help from your application . . . . . . . . . . . . 4-28
Accessing help from Windows 95 or NT 4.0 . . . . . . . . . 4-28
Accessing help from Windows 3.1 . . . . . . . . . . . . . . 4-28
Using the Printer Software for Windows
4-1
Windows
Page 73

Printer Software
The printer software includes a printer driver and printer
utilitie s. The pr inte r drive r lets yo u choo se fr om a wide varie ty
of settings to get the best results from your printer. The printer
utilities help you check the printer and keep it in top condition.
There are four levels of settings:
Automatic setting The quickest and easiest way to start
printing. See page 4-5.
Predefined settings More control over printer settings
according to the kind of printout.
See page 4-6.
Custom settings Fit your individual needs.
See page 4-8.
Printout style settings Convenient functions for the printout
(Windows 95 and NT 4.0) method and style. See page 4-12.
To check the condition of the printer or perform a maintenance
procedure, go to page 4-15.
Accessing the Printer Software
You can access the printer driver settings and printer utilities
directly from any Windows application, or from My Computer
(Windows 95 and NT 4.0) or Program Manager (Windows 3.1).
The print settings made in many Windows applications
override similar settings made in the printer driver, so in most
cases you should access the printer software from your
application to make sure that the settings are appropriate for
the document you want to print.
Note:
Online help is available for details about the printer driver settings.
4-2
Using the Printer Software for Windows
Page 74

From Windows applications
How you should access the printer software varies depending
on the application, application version, and Windows version
you are using. Read the following to get a general idea of how
to access the software.
1. Choose Print or Pr int Setup from the File menu.
2. Click Printer, Setup, Properties, or Options in the dialog box
that appears. (You may need to click a combination of these
buttons.)
The Main, Paper, and Layout (for Windows 95 and NT 4.0
only) menus contain the printer driver settings. The Utility
menu contains the printer utilities.
3. Click the corresponding tab at the top of the window to view
a menu.
For information on the printer driver settings, see online help
and pages 4-5 to 4-14 in this chapter. See page 4-15 for
informat ion on the prin t er ut ilitie s.
4
From Windows 95 or Windows NT 4.0
Follow these steps to access the printer software from My
Computer.
1. Double-click the My Computer icon.
2. Double-click the Printers folder.
3. For Windows 95, right-click your printer icon, and click
Properties.
For Windows NT 4.0, right-click your printer icon, then
click Document Defaults.
Using the Printer Software for Windows
Windows
4-3
Page 75

The Main, Paper, and Layout menus contain the printer driver
settings. The Utility menu contains the printer utilities.
4. Click the corresponding tab at the top of the window to view
a menu.
For information on the printer driver settings, see online help
and pages 4-5 to 4-14 in this chapter. See page 4-15 for
information on the printer utilities.
From Windows 3.1
Follow these steps to access the printer software from Program
Manager.
1. Double-click the Control Panel icon in the Main group.
2. Double-click the Printers icon.
3. Choose your printer from the Installed Printers list.
4. Choose Setup. You see the Main menu of the printer software
window. The Main and Paper menus contain the printer
driver settings. The Utility menu contains the printer
utilities.
5 Click the corresponding tab at the top of the window to view
a menu.
For information on the printer driver settings, see online help
and pages 4-5 to 4-14 in this chapter. See page 4-15 for
information on the printer utilities.
4-4
Using the Printer Software for Windows
Page 76

Making Changes to Printer Driver Sett ings
The printer software contains the printer driver setting menus
explained below, and the Utility menu explained on page 4-15.
Main Mode, Media Type, Ink
Paper Paper Size, Copies, Orientation, Printable Area
Layout Proportional Printing, Print Layout, Watermark
The Layout menu is available only for Windows 95 and NT 4.0
users.
Using the Automatic Setting
When Automatic is selected on the Main menu, the printer
driver takes care of all detailed settings according to the Media
Type and Ink settings you make (see page 4-10 for details on
the Media Type settings). So, the only settings you need to
make are the the Media Type and Ink settings. Most Windows
applications feature paper size and page layout settings which
override similar settings on the Paper menu, but if your
application does not, you should verify the settings on the
Paper menu.
4
Using the Printer Software for Windows
Windows
4-5
Page 77

Note:
Depending on the media you choose in the Media Type list (while
Automatic
you choose
more important than speed.
Online help provides more information about the printer driver
settings. See page 4-28 for instructions on using online help.
is selected), a slide bar appears in the Mode box that lets
Quality
or
Speed
. Select
Quality
when print quality is
Using the Predefined Settings
The predefined settings are provided to help you optimize the
print settings for a particular kind of printout, such as
presentation documents or images taken by a video or digital
camera.
1. Click
2. Select the most appropriate setting from the list according to
3. Before printing, be sure to verify the Media Type and Ink
Advanced
You will find the predefined settings in the list below the
Advanced button.
the type of document or image you will print.
When you choose a predefined setting, other settings such as
Print Quality, Halftoning, and Color are set automatically.
Changes are shown in the Current Settings display at the
bottom of the Main menu.
settings, as they may be affected by the predefined setting
you select. See page 4-10 for more information on the
Media Type setting.
on the Main menu.
4-6
Using the Printer Software for Windows
Page 78

The printer driver provides the following predefined settings:
Photo
Text/Graph
PhotoEnhance
(for Windows 3.1)
PhotoEnhan ce 2
or Windows 95 and
(f
NT 4.0)
Economy
ICM
(for Windows 95)
Good for printing scanned photos
Good for printing presentation
documents such as graphs and charts
Good for printing images captured
using a video, digital camera, or
scanner. EPSON PhotoEnhance and
PhotoEnhance2 automatically adjust
the contrast, saturation, and brightness
of the original image data to produce
sharper, more vivid color printouts.
The PhotoEnhance setting does not
affect your original image data.
Note:
Printing with PhotoEnhance selected may
increase print time depending on your
computer system and the amount of data
contained in your image.
Good for printing drafts of text
ICM means Image Color Matching.
This feature automatically adjusts
printout colors to match colors on your
screen.
4
Using the Printer Software for Windows
Windows
4-7
Page 79

Customizing the Print Settings
Many users will never need to make their own print settings
manually. However, if you need more control over the driver,
want to make the most detailed settings available, or just want
to experiment, see below.
1. Click
2. Select the Print Quality setting.
3. Select the Media Type that you loaded in the printer. See the
4. Choose
5. Make other settings. For details, see online help.
Advanced
Settings
next section for details.
. The More Settings dialog box appears:
Color
on the Main menu and then click
or
in the Ink option.
Black
More
Note:
Some settings are enabled or disabled depending on the Print
Quality, Media Type, and Ink settings you make.
6. Click OK to apply your settings and return to the Main menu.
4-8
Click
Cancel
your settings.
Using the Printer Software for Windows
to return to the Main menu without applying
Page 80

To save your custom settings, click
menu. The Custom Settings dialog box appears:
Type a unique name for your custom settings in the Name box,
and click the
under the Advanced button on the Main menu.
Note:
q
You can not use a predefined setting name for your custom
settings.
button. Your settings will appear in the list
Save
Save Settings
on the Main
4
q
To delete a custom setting, click
menu, select the setting in the Custom Settings dialog box and
then click
You can not delete the predefined settings.
If you change the Media Type or Ink setting when one of your
custom settings is selected in the Advanced settings list on the
Main menu, the setting selected in the list changes to
Settings
affected by this change. To return to your custom setting,
simply reselect it from the settings list.
Delete
. The custom setting that was previously selected is not
.
Using the Printer Software for Windows
Save Settings
on the Main
Custom
Windows
4-9
Page 81

Making the Media Type Setting
On the Main menu, select the Media Type setting that matches
the paper you loaded in the printer. See the following to
determine the Media Type setting (shown in bold) for your
paper. First find your paper, then click the corresponding
Media Type setting.
Note:
If the corresponding Media Type option for your paper is not shown
in the Media Type list, change the Print Quality setting in the More
Settings dialog box, select
the predefined setting in the Advanced settings list on the Main menu.
Plain Paper
Plai n paper
Envelopes
360 dpi Ink Jet Paper
360 dpi Ink Jet Paper (A4) S041059 , S04102 5
360 dpi Ink Jet Paper (Letter) S041060 , S04102 8
Iron-On Cool Peel Transfer Paper (A4) S041154
Iron-On Cool Peel Transfer Paper(Letter)S041153, S041155
Automatic
as the Mode setting, or change
Photo Quality Ink Jet Paper
Photo Quality Ink Jet Paper (A4) S041061, S041026
Photo Quality Ink Jet Paper (Letter) S041062, S041029
Photo Quality Ink Jet Paper (Legal) S041067, S041048
Photo Quality Ink Jet Card (A6) S041054
Photo Quality Ink Jet Card (5 × 8 in.) S041121
Photo Quality Ink Jet Card (8 × 10 in.) S041122
Photo Quality Self Adhesive Sheet (A4) S041106
4-10
Using the Printer Software for Windows
Page 82

Ink Jet Transparencies
Ink Jet Transparencies (A4) S041063
Ink Jet Transparencies (Letter) S041064
Photo Paper
Photo Quality Glossy Paper (A4) S041126
Photo Quality Glossy Paper (Letter) S041124
Photo Paper (A4) S041140
Photo Paper (Letter) S041141
Photo Paper (4 × 6 in.) S041134
Panoramic Photo Pa per (210 × 594 mm) S041145
Photo Quality Glossy Film
Photo Quality Glossy Film (A4) S041071
Photo Quality Glossy Film (Letter) S041072
Photo Quality Glossy Film (A6) S041107
Photo Stickers (A6) S041144
Note:
The availability of special media varies by country.
4
Using the Printer Software for Windows
Windows
4-11
Page 83

Modifying the Printout Style (Windows 95 & NT 4.0 only)
You can modify your printout style using a variety of printer
driver settings located on the Paper and Layout menus. On the
Paper menu, you can specify the orientation of your printout,
and minimize the bottom margin. On the Layout menu, you
can have the size of your document automatically fitted to the
paper size, print 2 or 4 pages of your document on one sheet,
and put a watermark on your document.
For details about the Paper and Layout menus, see online help.
Adjusting page orientation and minimizing the bottom margin
To change the orientation of your printout, select
or
Landscape
(wide) in the Orientation box on the Paper
Portrait
(tall)
menu.
Click here to
minimize the blank
area at the bottom
of your printout
To print closer to the bottom edge of your paper, click the
Rotate by 180°
setting, which rotates your document 180
degrees vertically. This feature takes advantage of the fact that
the priner can print closer to the top edge of the paper than to
the bottom edge.
4-12
Using the Printer Software for Windows
Page 84

Fitting your document to the paper size
To fit the size of your document to the size of the paper you
will print on, use the Proportional Printing feature on the
Layout menu.
Click to fit to page or
customize the size of
a document
The Fit to Page setting proportionally enlarges or reduces the
size of your document to make it fit the paper size you select in
the Paper Size list.
The Custom setting allows you to manually define the
percentage you want to enlarge or reduce an image. Click the
arrows next to the Proportion box to select from 10% to 400%.
4
Printing 2 or 4 pages on one sheet (Windows 95 only)
To print 2 or 4 pages of your document on one sheet of paper,
use the Print Layout feature on the Layout menu.
Click here to print 2 or 4
pages of your document
on a sin gle piece of paper
Using the Printer Software for Windows
Windows
4-13
Page 85

The Page Order setting allows you to select the order of the
printed pages.
The Print page frames setting allows you to print a frame
around each page on the sheet of paper.
Printing a watermark on your document
To print a watermark on your document, click the Watermark
check box.
Click here to print
a watermark
Click the Watermark Settings button. You can select from a list
of predefined watermarks, or you can select a bitmap (.BMP)
file as your own custom watermark. The Watermark Settings
dialog box also allows you to make a variety of detailed
watermark settings, for example you can select the size, color,
and position of your watermar k.
4-14
Using the Printer Software for Windows
Page 86

Using EPSON Printer Utilities
EPSON printer utilities allow you to perform some printer
maintena nce from your screen . For Window s 95, util ities to
check the current printer status are also available.
To access the utilities, click the
window, then click the button for the utility you want to use.
The utilities are explained briefly below. For more details, see
online he lp.
Note:
q
The letter in parentheses after the utility name indicates the
shortcut key for that utility. Press
keyboard to open that utility.
tab in the printer software
Utility
For Windows 95
only
For Windows 95
only
Alt
and the letter on the
4
Windows
q
While printing is in progress, pressing any of the utility buttons,
except the EPSON Status Monitor 2 button, may mar your
printouts.
Using the Printer Software for Windows
4-15
Page 87

EPSON Status Monitor 2 (for Windows 95 only)
Provides you with printer status information such as the
amount of ink remaining and checks for printer errors.
This utility is available only when:
You have installed the Status Monitor 2 (if not, see page
q
4-27),
The printer is connected directly to the host computer via
q
the parallel port LPT1, and
Your system is configured to support bidirectional
q
communication.
Note:
You can use the Status Monitor 2 utility that comes with the optional
EPSON Type B Ethernet Interface Card (must be installed) when
conn e ct i ng ov er a network.
The online help included with the EPSON Status Monitor 2
utility provides you with detailed information about using
EPSON Status Monitor 2. Click
window.
in the Printer Status
Help
Nozzle Check
Checks the print head nozzles for clogging. Check the nozzles if
you notice a decline in print quality and after cleaning to
confirm that the print head nozzles have been cleared. In case
the nozzle check indicates the print heads need cleaning, you
can access the Head Cleaning utility directly from the Nozzle
Check utility.
4-16
Using the Printer Software for Windows
Page 88

Head Cleaning
Cleans the print heads. You may need to clean the heads if you
notice a decline in print quality. Before and after print head
cleaning, use the Nozzle Check utility to check whether the
print heads need to be cleaned (again). You can access the
Nozzle Check utility directly from the Head Cleaning utility.
Print Head Alignment
Aligns the print heads. Use this utility if you notice a
misalignment of vertical or horizontal lines.
Note:
q
Do not use the Nozzle Check, Head Cleaning, and Print Head
Alignment utilities with printers connected to your computer
through a network. If necessary, printing a self test can also help
you to check the nozzles for clogging.
q
Do not use the Nozzle Check, Head Cleaning, and Print Head
Alignment utilities while printing is in progress; otherwise your
printout may be marred.
Speed & Progress (for Windows 95 only)
Allows you to make certain print speed settings to your
system. Clicking this button shows the following dialog box:
4
Windows
Using the Printer Software for Windows
4-17
Page 89

High Speed Copies
Turns on high-speed printing fo r multiple copies. This speeds
up printing by using your hard disk space as a cache when
printing multiple copies of your document.
Show Progress Meter
Displays the Progress Meter every time you print. See also page
4-19.
EPSON Printer Port
Turns on the EPSON printer port, which is optimized for
EPSON printers, instead of the Windows default printer port.
This speeds up the data transfer rate to EPSON printers.
DMA Transfer
A message may appear below the EPSON Printer Port setting
stating the DMA transfer capability of your system. If you do
not see such a message, DMA transfer is not available for your
system.
One of the following messages may appear:
q
q
4-18
High Speed (DMA) Transfer enabled.
The DMA transfer is already enabled on your system.
For h i gher data transf er rates, use DMA transfer.
You may be able to make printing faster by enabling DMA
transfer on your system. See page 9-30 for instructions
about how to enable DMA transfer.
Using the Printer Software for Windows
Page 90

Checking Printer Status (for Windows 95 and 3.1)
When you send a print job to the printer from an application,
the Progress Meter (Windows 95), or the Despooler (Windows
3.1) appears on your computer screen.
From Windows 95 (Progress Meter )
Only appears if the
Status Monitor 2 utility is
installed
This meter shows the progress of the current print job and
provides printer status information when bidirectional
communication between the printer and computer is
established.
4
If you click the
button, you can open the Printer Status
Detail
window to obtain more detailed information.
Note:
The Progress Meter does not appear when
Show Progress
is turned
off in the Speed & Progress dialog box. See page 4-17 for information.
Stop Cancels printing
Pause Pauses printing until you press it again
Reprint Restarts printing from the current page,
reprint s the whole document, or holds
the document for printing later
Using the Printer Software for Windows
4-19
Windows
Page 91

From Windows 3.1 (Despooler)
This dialog box shows the progress of the current print job.
You can also cancel, pause and resume, and restart selected
print jobs from the Progress Me ter and the Despool er.
Stop Cancels printing
Pause Pauses printing until you press it again
4-20
Reprint Restarts printing from the current page,
reprints the whole document, or holds
the document for printing later
Using the Printer Software for Windows
Page 92

Understanding the EPSON Spool Manager
The EPSON Spool Manager is similar to Windows Print
Manager. If it receives two or more print jobs at one time, it
puts them in a line (with printers on a network this may be
called a print queue) in the order received. When a print job
reaches the top of the line, the EPSON Spool Manager sends
the job to the printer.
From Windows 95
Click the
the taskbar. You can see the status and information for the
print jobs and also you can cancel, pause and resume, or restart
selected print jobs from the Spool Manager.
From Windows 3.1
Double-click the
at the bottom of your desktop or double-click the
Manager
online he lp.
EPSON Stylus COLOR 850
EPSON Spool Manager
icon in the EPSON group. For more information, see
button after it appears on
icon after it appears
Spool
4
Windows
Using the Printer Software for Windows
4-21
Page 93

Using EPSON Status Monitor 2 (for Windows 95 only)
If you installed the Status Monitor utility, you can get detailed
information on the printer status.
Note:
q
If you have not installed the Status Monitor yet, see "Installing
the Status Monitor 2 utility" later in this chapter.
q
Before using the Status Monitor, be sure to read the
README
file located in the EPSON Status Monitor 2 folder in the Epson
folder on your hard drive.
There are two ways to access EPSON Status Monitor 2:
Double-click the printer-shaped background monitoring
q
icon on the taskbar at the bottom of your computer screen.
Note:
You must restart your computer after installing EPSON Status
Monitor 2 to view the background monitoring icon.
Click
q
EPSON Status Monitor 2
Start
, point to
Programs
.
, click
Epson
, and then click
You see the Status Monitor 2 window:
The EPSON Status Monitor 2 window displays:
4-22
Using the Printer Software for Windows
Page 94

Printer icon
The color of the print er icon ind icat es the curr en t print er sta tus .
Green Ready
Yellow Some kind of maintenance is necessary
Red Error has occurred
Dimmed Communication problem between Status
Monitor 2 and printer
Printer Name
The name of the EPSON printer connected directly to your
computer appears in this column.
Note:
q
You can add or delete printers from the list. To save
computer memory, delete printers you do not need to
monitor. (This does not remove the printer driver from your
computer.) Choose
Settings menu.
q
You can rearrange the order of the printers in the list. Click
Printer Name, Status
the
change the order of the printers.
Add Printer
, or
Delete Printer
or
Job Count
on the
title bar to
Status
Brief messages appear here regarding the current status of the
printer.
4
Windows
Using the Printer Software for Windows
4-23
Page 95

Job Count
Shows the number of jobs waiting to print.
Note:
To get more information, choose
or click the Job Status button on the tool bar.
To get more detailed information on the status of a particular
printer, open the Printer Status window by double-clicking the
printer name.
Note:
You can control the contents of the Status Monitor 2 window using
View
the
menu. See online help for Status Monitor 2.
Job Status
on the Printer menu
Printer Status window
If you access the Printer Status window from the Status
Monitor 2 window, the following window appears:
Note:
You can also access the Printer Status window from the Status Alert
dialog box. See the next section for infromation on the Status Alert
dialog box.
4-24
Using the Printer Software for Windows
Page 96

You can open the three menus described below by clicking the
tabs at the top of the Printer Status window:
Current Status
q
Provides you with detailed printer status information, a
graphic dispaly, and status messages. If a printer error
occurs, troubleshooting tips appear in the bottom message
box.
Consumables
q
Shows the graphic display for the amount of ink remaining.
Printer information
q
Provides you with information about network connections
and other printer resources (for printers connected over a
network).
For details, see online help for Status Monitor 2.
Making monitoring settings
You can make monitoring settings such as selecting the
monitoring interval and turning on or off background
monitoring.
4
1. Make sure the Status Monitor is active. (It is active if a
printer-shaped icon appears on the taskbar at the bottom of
your computer screen.) Open the EPSON Status Monitor 2
window from
to
Backgr ound Monitoring
Monitor from restart
Monitor.
Note:
The Background Monitoring and Status Alert settings are not
available while the Status Monitor is inactive.
, as described on page 4-22. Then point
Start
on the Settings menu and click
or
Monitor now
Using the Printer Software for Windows
to enable Status
Windows
4-25
Page 97

2. Select the printer you want to monitor from the Installed
Printers list, and then click
Monitoring Preferences
on the
Settings menu. The dialog box below appears.
Monitoring Interval
q
You can adjust the monitoring interval by dragging the
slider.
Note:
Setting a short monitoring interval may slow down some
applications.
Background Monitoring
q
If this is turned on, the Status Alert dialog box appears
automatically while you are using some application
programs. You can specify when the Alert dialog box
appears using the Status Alert options on the right.
Status Alert
q
You can select when you want the Status Alert dialog
box to appear.
3Click OK to save your settings.
4-26
Using the Printer Software for Windows
Page 98

Note:
If you want the Status Alert dialog box to appear in front of other
windows on the desktop, right-click the background monitoring icon
and choose
Show on Top
.
Installing the Status Monitor 2 utility
Note:
If you installed the Status Monitor 2 utilit y when you installed the
printer software, you do not need to install it again.
To use the Status Monitor 2, you need to install the software as
described below:
1 Make sure Windows 95 is running. Insert the printer
software CD-ROM in the CD-ROM driver. (For printer
software floppy disk users, insert the floppy disk in the
floppy disk drive.)
4
2 If a dialog box appears, click
3 Click
4Type
followed by
If your CD-ROM uses a drive letter other than "D", substitute
the appropriate letter. If you use the floppy disk version,
substitute the letter of the floppy disk drive.
5 Click OK. The installation starts. Follow the instructions on
the screen.
, and select
Start
and specify your preferred language (see page 2-17)
D:\
\status2
Using the Printer Software for Windows
.
Run
in the box.
Quit
.
4-27
Windows
Page 99

Getting Information Through Online Help
Your printer software has an extensive online help feature,
which will answer most of your questions about your printer
software. It provides you with instructions on printing, making
printer dr ive r sett ing s, us ing printe r ut iliti es, and
troubleshooting printer errors.
Accessing help from your application
Open the File menu and choose
Printer, Setup, Options
combination of these buttons) depending on the software you
are using. Click the
Paper, Layout, or Utility menu for help related to the items on
that menu.
For Windows 95 and NT 4.0 users :
You can get specific help related to any item on a menu by
right-c lic k ing the ite m, the n clic ki ng th e
, or
Properties
button at the bottom of the Main,
Help
or
Print
Print Setu p
(you may need to click a
What’s This?
Accessing help from Windows 95 or NT 4.0
Click
EPSON Printers
Stylus COLOR 850 Help
Start
, point to
Programs
(Windows NT 4.0), and then click
and
Epson
. You see the help contents window.
(Windows 95) or
Accessing help from Windows 3.1
Open the EPSON group and double-click the
COLOR 850 Help
icon. You see the help contents window.
EPSON Stylus
. Then click
prompt.
EPSON
4-28
Using the Printer Software for Windows
Page 100

Chapter 5
Using the Printer Software for Macintosh
Printer Software . . . . . . . . . . . . . . . . . . . . . . . . . . . 5-2
Making Changes to Printer Driver Settings . . . . . . . . . . . 5-2
Using the Automatic Setting . . . . . . . . . . . . . . . . . 5-3
Using the Predefined Settings . . . . . . . . . . . . . . . . . 5-5
Customizing the Print Settings . . . . . . . . . . . . . . . . 5-8
Saving your settings . . . . . . . . . . . . . . . . . . . . . . 5-16
Changing the Paper Size . . . . . . . . . . . . . . . . . . . . 5-17
Defining a Custom Paper Size . . . . . . . . . . . . . . . . 5-19
Modifying the Printout Method and Style . . . . . . . . . . 5-20
Using EPSON Printer Utilities . . . . . . . . . . . . . . . . . . . 5-23
EPSON StatusMonitor . . . . . . . . . . . . . . . . . . . . . 5-23
Nozzle Check . . . . . . . . . . . . . . . . . . . . . . . . . . 5-24
Head Cleaning . . . . . . . . . . . . . . . . . . . . . . . . . . 5-24
Print Head Alignment . . . . . . . . . . . . . . . . . . . . . 5-24
Configuration . . . . . . . . . . . . . . . . . . . . . . . . . . 5-24
Controlling Background Printing . . . . . . . . . . . . . . . . . 5-25
5
Using th e Printer Software for Macintosh
Macintosh
5-1
 Loading...