

Page 1

®
N
Setup Guide
Printed on recycled paper with at least 10% post-consumer content
Page 2

All rights reserved. No part of this publication may be reproduced, stored in a retrieval system, or transmitted in
any form or by any means, electronic, mechanical, photocopying, recording, or otherwise, without the prior
written permission of
with this
Neither
EPSON
printer.
SEIKO EPSON CORPORATION
SEIKO EPSON CORPORATION
EPSON
is not responsible for any use of this information as applied to other printers.
nor its affiliates shall be liable to the purchaser of this product or third
. The information contained herein is designed only for use
parties for damages, losses, costs, or expenses incurred by purchaser or third parties as a result of: accident, misuse,
or abuse of this product or unauthorized modifications, repairs, or alterations to this product, or (excluding the
U.S.) failure to strictly comply with
SEIKO EPSON CORPORATION
or any consumable products other than those designated as Original
Products by
EPSON
SEIKO EPSON CORPORATION
EPSON
and
Stylus are registered trademarks of
SEIKO EPSON CORPORATION
’s operating and maintenance instructions.
shall not be liable for any damages or problems arising from the use of any options
EPSON
Products or
EPSON
Approved
.
SEIKO EPSON CORPORATION
.
General Notice: Other product names used herein are for identification purposes only and may be trademarks of
EPSON
their respective owners.
disclaims any and all rights in those marks.
Copyright © 1997 by Epson America, Inc. CPD 5698
10/97
ii
Page 3

Contents
Using Your Software and Manuals 1
Setting Up Your Printer 2
Getting the Printer Ready 2
Installing the Ink Cartridges 4
Loading the Paper 7
Testing the Printer 8
Connecting the Printer to Your Network 8
Installing EPSON Net! 9
Installing in Windows 9
Installing in Macintosh 10
Configuring for NetWare 10
Defining Your Printer on a Print Server 10
Using EPSON Net! for NetWare Windows 12
Configuring for TCP/IP 15
Installing TCP/IP in Windows 95 15
Installing LPR Software in Windows NT 17
Configuring the Ethernet Card for TCP/IP 18
Setting Up DLC 19
Installing DLC in Windows NT 20
Configuring the Ethernet Card in Windows NT 4.x 20
Configuring the Ethernet Card in Windows NT 3.5x 21
Configuring for AppleTalk 22
Installing the EPSON Status Monitor 2 Utility 24
Installing the Printer Driver 26
Installing on a PC 26
Installing on a Macintosh 28
iii
Page 4

Setup Guide
Note:
Stylus COLOR 800
The
User’s Guide
some information that
does not apply to your
Ethernet-ready
Stylus COLOR 800N.
contains
Congratulations on purchasing your new EPSON Stylus
®
COLOR 800N printer. This guide summarizes the process of
setting up your printer and configuring it to work with your
network. For more information, see the User’s Guides for your
printer, the Ethernet card, and EPSON Status Monitor 2.
Using Your Software and Manuals
Your printer comes with the following:
Printer Software CD-ROM
◗
Contains the drivers for Windows
Answers (Windows 95, for non-network use only) and
®
LabelPro® 3.0 (Windows only).
Avery
EPSON Stylus COLOR 800
◗
Provides instructions for basic and custom printing, using
special media, maintenance, troubleshooting, and
specifications.
EPSON Net utility for Windows, Macintosh, and
◗
DOS/OS/2 (1 diskette each
Allows you to configure your printer for protocols
®
including Novell
NetWare,® TCP/IP, AppleTalk,® and
NetBIOS.
®
and Macintosh,® Epson
User’s Guide
)
EPSON Type B Ethernet Interface Card
◗
User’s Guide
Includes instructions for configuring and using the
Ethernet card with NetWare, Windows NT, UNIX,
®
OS/2.
Note that the information in the User’s Guide on
using the card with AppleTalk is incorrect for the version of
EPSON Net! included with your printer. Refer to the
Supplement for the correct instructions.
1
®
and
Page 5

Setup Guide
◗
EPSON Type B Ethernet Interface Card
Contains instructions for configuring and using the
Ethernet card with a Macintosh network, initializing the
card, using the card with NetWare on a WAN, and using
TCP/IP with Windows 95.
EPSON Status Monitor 2 for Windows
◗
Allows you to monitor your printer over the network and
configures Windows 95 peer-to-peer printing
environments (2 diskettes).
Supplement
EPSON Status Monitor 2
◗
Provides instructions for installing and using the utility in a
TCP/IP or NetWare environment.
User’s Guide
Setting Up Your Printer
First you must unpack your printer and get it ready for
operation. Then you need to install your ink cartridges and load
some paper before you can test the printer.
Getting the Printer Ready
Follow these steps:
1. Remove any packing material from the printer, as described
on the Notice Sheet in the box. Save all the packaging so
you can use it if you need to transport the printer later.
2
Page 6
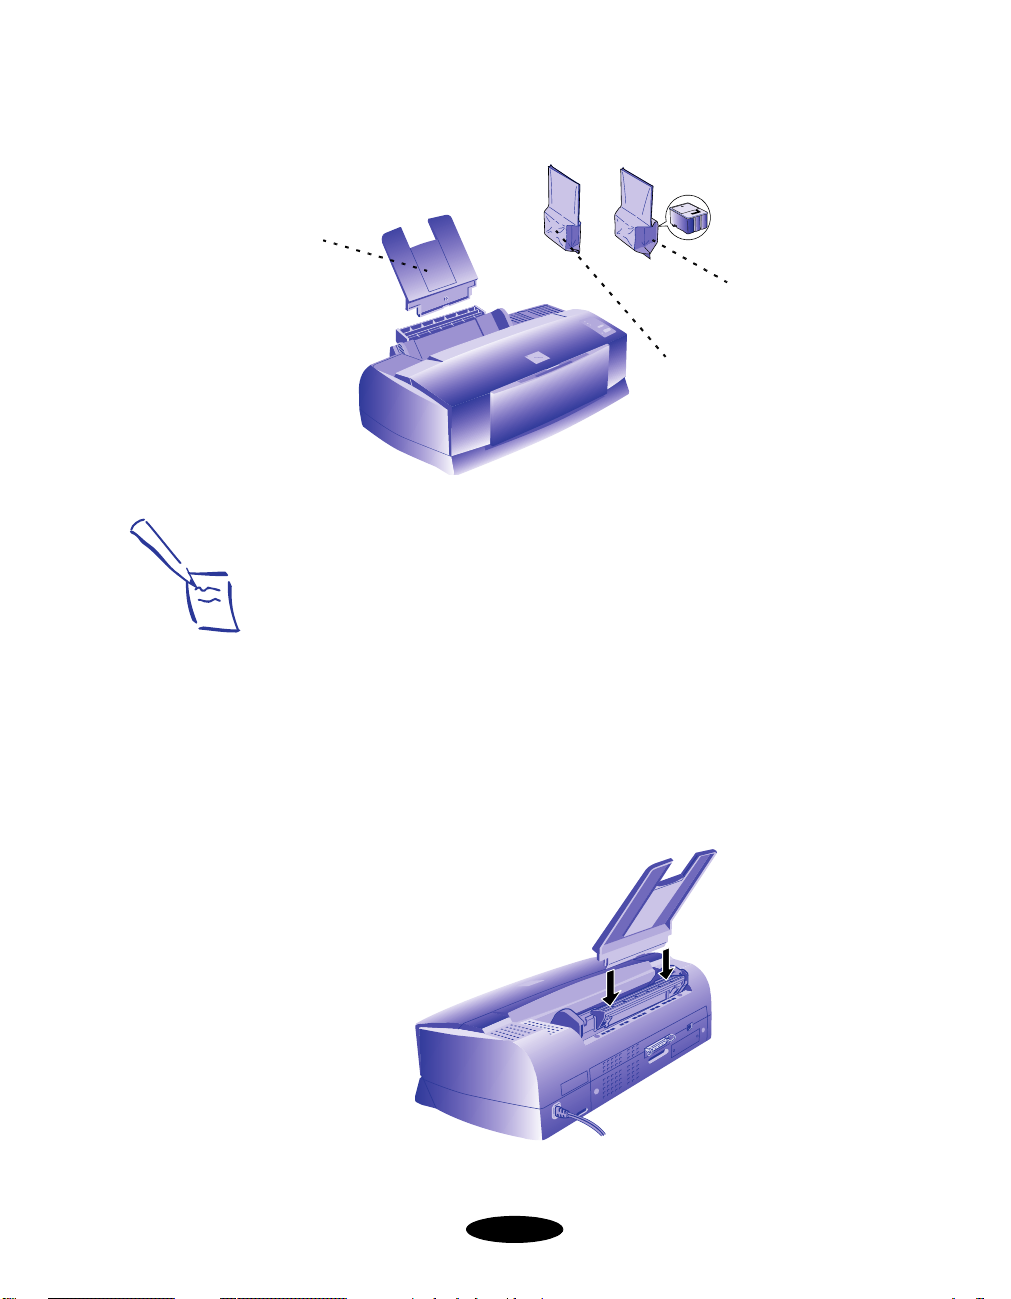
paper
support
Setup Guide
You’ll find these items inside:
color ink
cartridge
black ink
cartridge
2. Place the printer flat on a stable desk near a grounded
outlet. Leave plenty of room in back for the cables and
enough room in front for opening the output tray.
Do not put the printer:
Note:
Be sure to follow the
Safety Instructions in
the Introduction of your
User’s Guide.
printer
◗ In an area with high temperature or humidity
◗ In direct sunlight or dusty conditions
◗ Near sources of heat or electromagnetic interference,
such as loudspeakers or cordless telephone base units
3. Insert the paper support in the top slot on the back of the
printer.
3
Page 7
Setup Guide
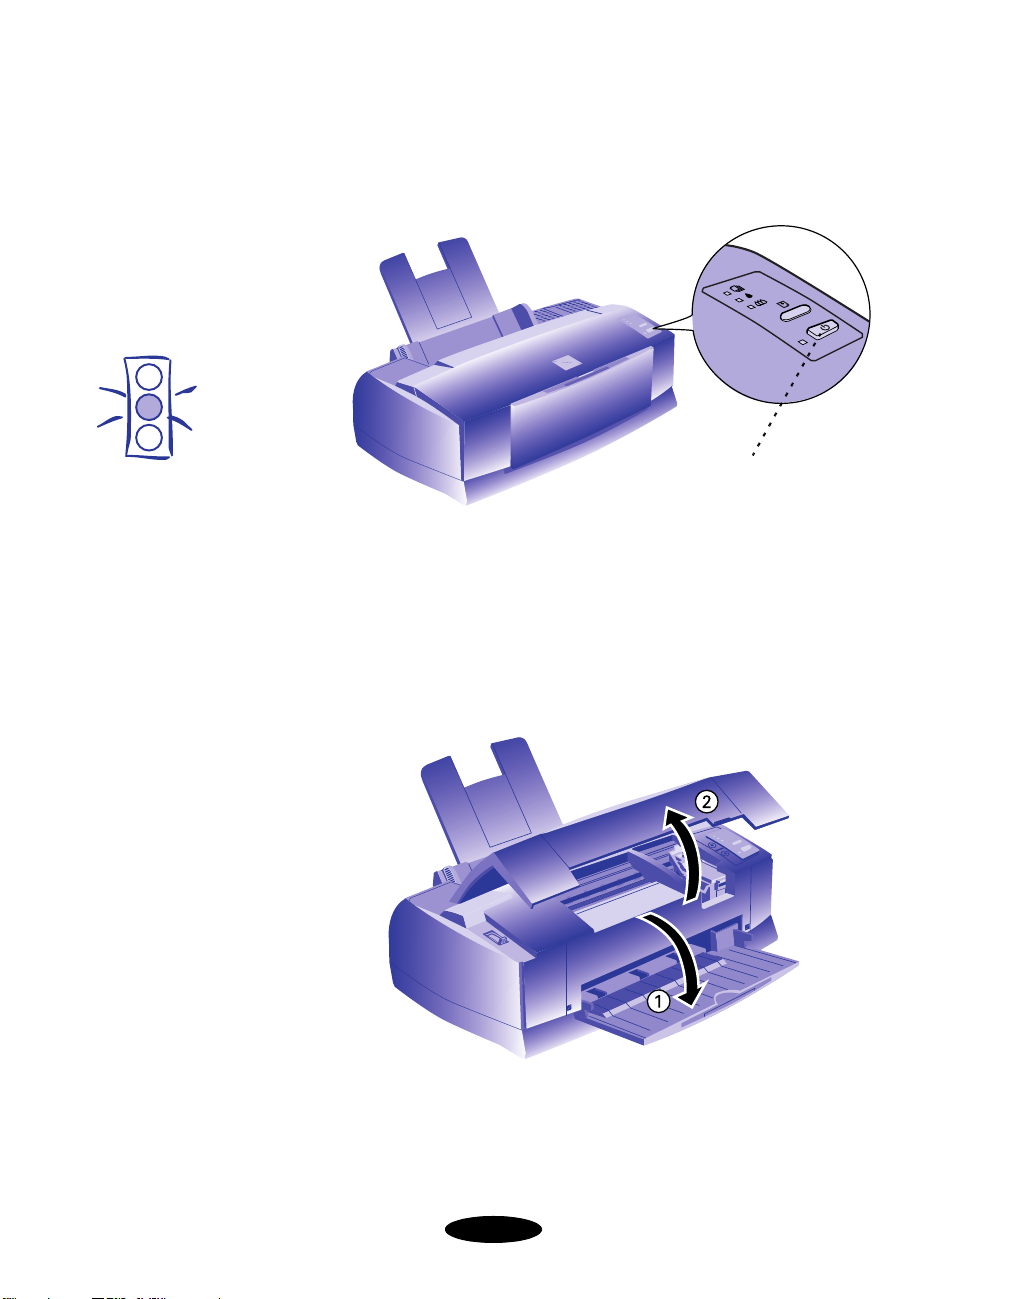
4. Before you plug in the printer, make sure the power is off.
Check the Ppower button; it’s off when its surface is raised
above the printer surface.
Caution:
Do not plug the printer
into an outlet controlled
by a wall switch or
timer, or on the same
circuit as a large
appliance. This may
disrupt the power,
which can erase
memory and damage
the power supply.
power
5. Plug the power cord into a properly grounded outlet.
Installing the Ink Cartridges
1. Lower the output tray and raise the printer cover.
2. Press the P power button to turn on the printer. The P
power light flashes, the B and I ink out lights come on,
and the ink cartridge holders move to the left.
4
Page 8
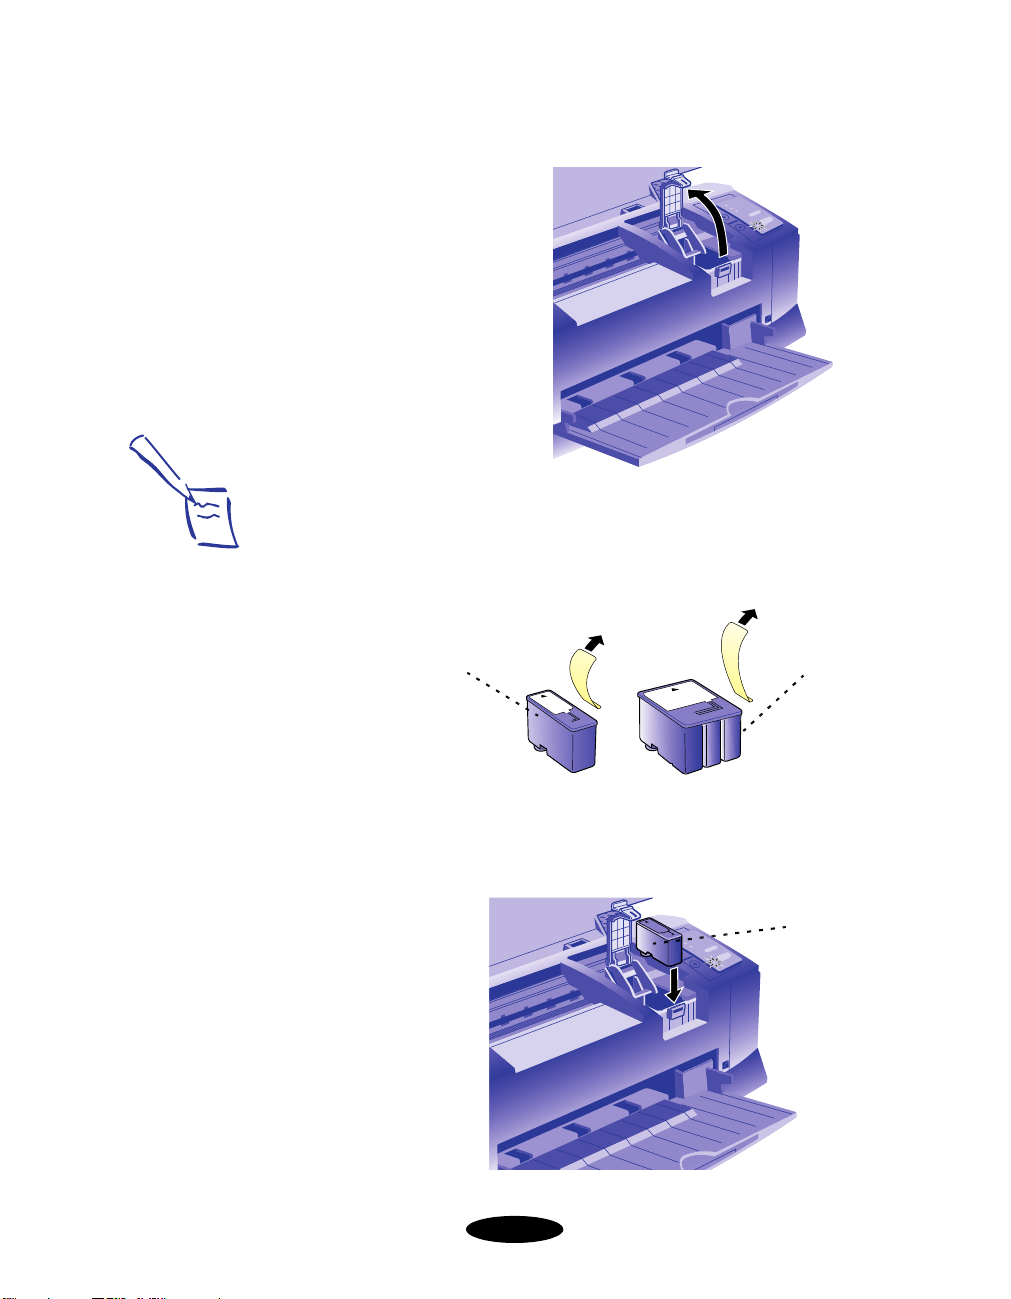
Note:
It’s OK if the tape does
not completely tear off
along the dotted line.
Setup Guide
3. Lift up the black ink cartridge clamp.
4. Open the black ink cartridge package. Remove only the
yellow part of the tape. Do not remove the white part. Also,
do not remove the clear seal on the bottom of the cartridge.
black ink
cartridge
color ink
cartridge
5. Lower the ink cartridge into the holder with the label face
up and the arrow pointing toward the back of the printer.
black ink
cartridge
5
Page 9
Setup Guide
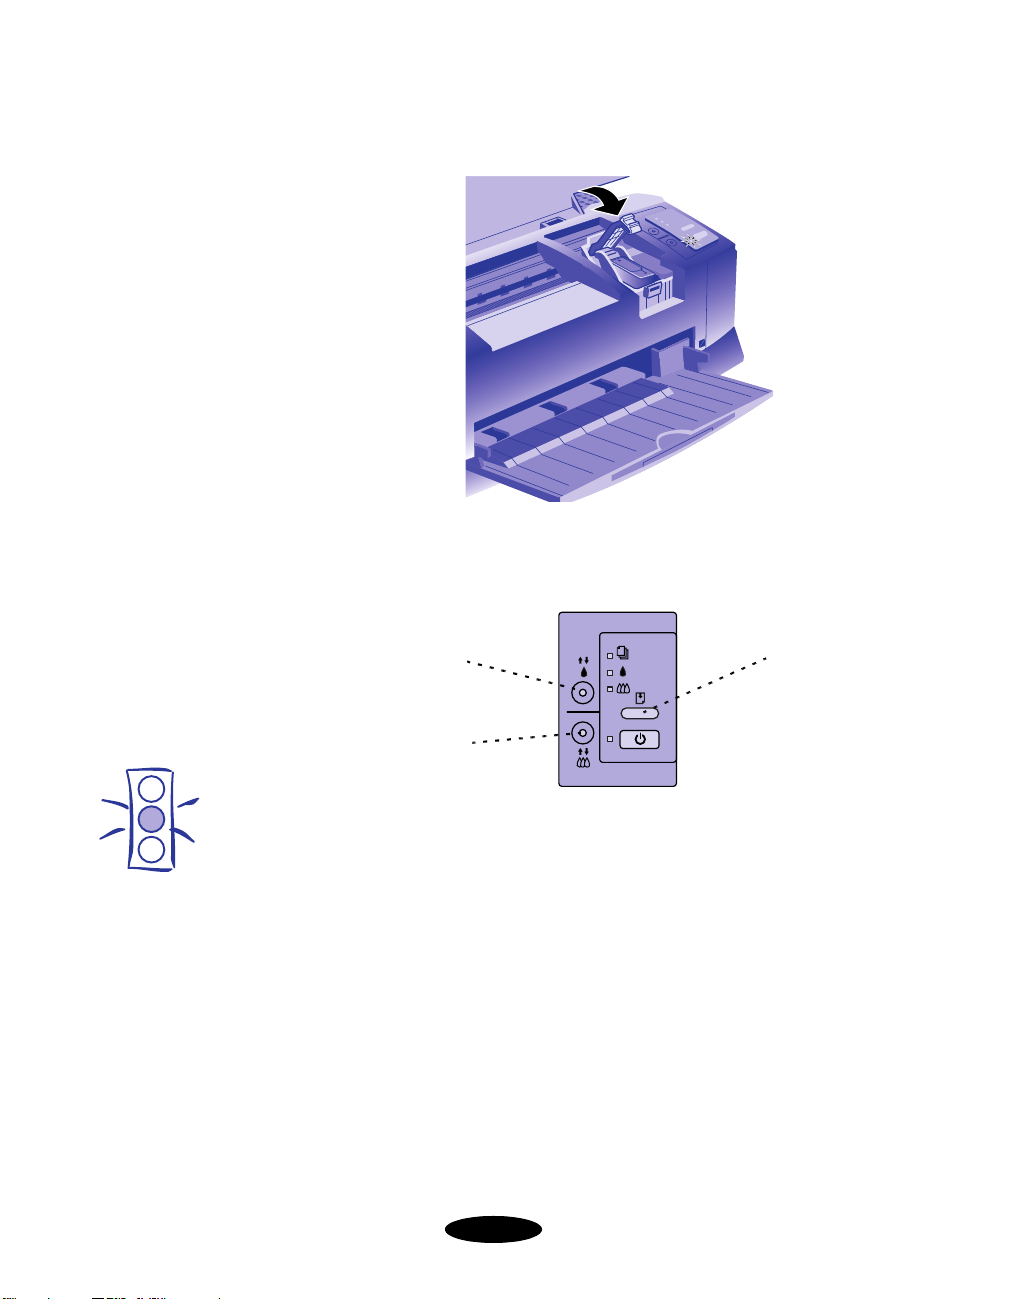
6. Push down the clamp until it locks in place.
7. Press the X color cleaning button. The print heads move to
the left again so you can install the color ink cartidge.
Caution:
Never turn off the printer
when the P power light
is flashing. However if
the P power light is still
flashing after 10
minutes and the printer
is not moving or making
noise, you may turn off
the printer.
black
cleaning
button
color
cleaning
button
load/eject
button
8. Follow steps 3 through 6 to install the color ink cartridge.
9. Press the E load eject button.
The printer moves the print heads and begins charging the ink
delivery system. The P power light flashes, and the printer
makes various sounds. Charging takes up to 7 minutes. Don’t
turn off the printer or interrupt this important process or
you’ll use up more ink than necessary. When it’s finished, you
can close the printer cover.
6
Page 10
Setup Guide
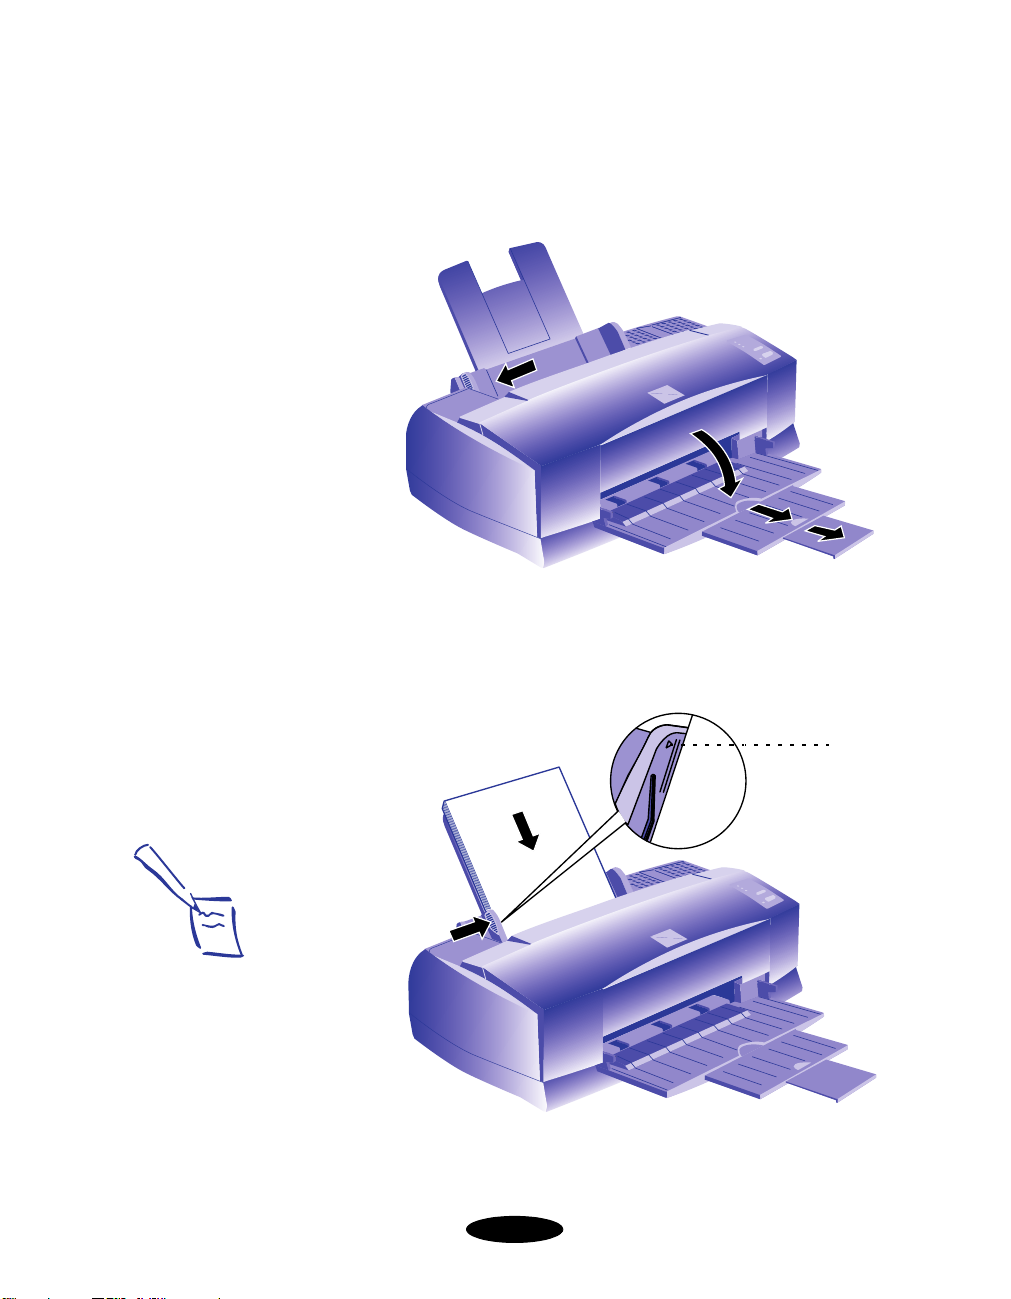
Loading the Paper
1. Slide the left edge guide all the way left and pull out the
output tray extensions.
2. Fan a stack of plain paper and then even the edges.
Note:
Don’t load paper above
the arrow mark inside
the left edge guide.
3. Load a stack with the printable surface face up. Push the
paper against the right edge guide.
arrow
mark
4. Slide the left edge guide back against the stack of paper.
7
Page 11

Setup Guide
Testing the Printer
If you want, you can run a test on your printer to see how it’s
working. Follow the steps in Chapter 6 of your printer User’s
Guide.
Turn off the printer to stop test printing.
Connecting the Printer to Your
Network
You can connect your Ethernet-ready printer to either an
Ethernet Thin Coaxial (10BASE2) or an Ethernet Twisted-Pair
(10BASE-T) network connection. You can only attach one
cable at a time. Follow these steps:
1. Attach the network cable to the appropriate connecter on
the card.
status
sheet
button
twisted-pair
(10BASE-T)
thin coaxial
(10BASE2)
2. To initialize the card, plug the printer into an electrical
outlet while pressing the status sheet button. Hold down
the button for about three seconds.
3. To print a status sheet, turn on the printer and press the
status sheet button again. This sheet gives you important
information including the serial number and hardware
address of the card. Keep the status sheet so you can use it
when you configure the card.
8
Page 12

Setup Guide
You can now install the EPSON Net! utility software, which
configures the Ethernet card.
Installing EPSON Net!
If you are using NetWare or TCP/IP, install EPSON Net! on a
workstation in the same segment as the printer. If you are using
AppleTalk, install EPSON Net! for Macintosh on a Macintosh
computer on your network.
Do not install EPSON Net! if you are using DLC with
Windows NT.
Installing in Windows
1. Insert the EPSON Net! for NetWare Windows and
Windows NT Installation Diskette.
Note:
To use Windows 95 with
TCP/IP, don’t install
EPSON Net! Follow the
instructions on page 15
under “Installing TCP/IP in
Windows 95.”
2. In Windows NT 4.x, click
In Windows NT 3.5x, select
Start, then click Run.
Run from the File menu in
Program Manager.
3. To install EPSON Net! for NetWare, type
A:\WINDOWS\INSTALL
and click OK. (If your diskette
drive is not drive A, substitute the correct letter.)
To install EPSON Net! for Windows NT, type
A:\WNT\INSTALL and click OK. (If your diskette drive is
not drive A, substitute the correct letter.)
4. Follow the instructions on the screen to complete the
installation.
After you install EPSON Net!, you use it to configure your
printer for NetWare or TCP/IP. See page 10 or page 18 for
instructions.
9
Page 13

Setup Guide
Installing in Macintosh
1. Create a folder for EPSON Net! on your hard drive.
2. Insert the EPSON Net! for Macintosh installation diskette.
3. Copy the program from the disk to the folder.
After you install EPSON Net!, you use it to configure your
printer for AppleTalk. See page 22 for instructions.
Configuring for NetWare
With NetWare, you can configure the printer as a print server,
remote printer, or have it switch automatically between these
two modes, depending on network conditions. Before you
configure the printer, check the following:
◗ Make sure Novell NetWare is set up to use print services on
your network. See your NetWare documentation for
details.
Note:
If you want to use your
printer as a dedicated
print server, skip to
“Using EPSON Net! for
NetWare Windows” on
page 12.
◗ Decide whether you want to use the printer as a dedicated
print server or as a remote printer, or whether you want to
switch automatically between these two modes.
◗ Make sure Bindery Emulation is selected. In PCONSOLE,
to switch between Bindery Emulation and
F4
press
Directory Services.
Defining Your Printer on a Print Server
If you want to use your EPSON Stylus COLOR 800N as a
remote printer, you must use PCONSOLE to define it on a
NetWare print server. You then use EPSON Net! for NetWare
to configure the operating mode and make other configuration
changes.
10
Page 14

Setup Guide
If you use NetWare 4.x, menus will differ slightly from the
menus described in the following procedure, and you must
select Bindery Emulation.
Follow these steps:
1. At the DOS prompt, type
PCONSOLE
2. From the Available Options menu, select
Information.
.
Print Server
3. Select the name of a print server from the Print Servers list
and press
4. From the Print Server Information list, select
Configuration.
Enter
.
Print Server
5. Select Printer Configuration.
6. Select a port number in the Configured Printers list.
7. Select the name of your printer on the Printer
Configuration menu. Then highlight the Printer Type and
LPT1.
select
8. Press Esc; then press Enter to save changes.
9. Select
Queues Serviced by Printer
from the Print Server
Configuration menu and assign a queue to the print server
port from the Available Queues list. Then press Esc to exit.
11
Page 15

Setup Guide
Using EPSON Net! for NetWare Windows
Follow these steps:
1. Start EPSON Net! for NetWare. After a few seconds, the
following dialog box appears:
2. Highlight your EPSON Stylus COLOR 800N printer and
Open.
click
The NetWare Status dialog box appears:
12
Page 16

Setup Guide
3. Click
Edit to configure the printer. The NetWare Config
dialog box appears:
4. Choose the operating mode you want to use:
◗ Print Server
◗ Remote Printer
◗ Auto PrintServer/Remote
5. Follow the instructions for the operating mode you chose:
◗ If you selected
Remote Printer, change the port
number and enable or disable hunting if you want.
Then click
to complete the configuration
Save
process.
◗ If you selected
Auto, enter the name of the NetWare
print server in the Print Server name box. Then
continue with step 6.
◗ If you selected
Print Server, keep the default printer
name that appears in the Print Server name box or type
a new name. Then continue with step 6.
13
Page 17

Setup Guide
6. Click
Add at the bottom of the dialog box to assign a print
queue to your print server.
The Add Queue dialog box appears:
This list indicates
which queues are
available on this
NetWare file server.
7. For Print Server mode, select the file server where the print
queue will reside, then select a print queue from the list.
You can create a new queue by entering its name in the
Queue box. Then continue with step 8.
For Auto, assign the same print queues to the printer that
are assigned to the NetWare print server. Make any
additional configuration changes for either Print Server
mode or Remote Printer mode. Then click
Save to save
your settings.
Caution:
Once you make changes
to the Ethernet card,
wait for at least five
minutes before turning
off or restarting your
printer.
8. Select a priority level for the queue in the Priority box. You
can set a level from 1 to 10, with 1 having the highest
priority.
. The NetWare Config dialog box appears again.
9. Click
OK
10. Repeat steps 6 through 8 if you want to add more print
queues to the print server. Click Save in the NetWare
Config dialog box to save your settings.
After you configure your printer, you need to install EPSON
Status Monitor 2. See page 24 for instructions.
14
Page 18

Setup Guide
Configuring for TCP/IP
You can configure the Ethernet card for TCP/IP if you are
using a UNIX TCP/IP network, a Windows 95 peer-to-peer
network, or Windows NT.
Installing TCP/IP in Windows 95
Windows 95 does not come with LPR, so in addition to
installing TCP/IP, as described below, you need to install the
EPSON TCP/IP printer protocol. The EPSON Status
Monitor 2 installer program automatically prompts you when
to install EPSON TCP/IP printer protocol.
Follow these steps to install TCP/IP:
1. Open the Control Panel.
2. Double-click the
3. If TCP/IP appears in the list of installed network
components on the Configuration screen, you can skip to
“Assigning the IP Address” on page 16. If TCP/IP does not
appear in the list, click
4. Click
5. Select
6. Click
Protocol and then click the Add button.
Microsoft from the Manufacturers list and TCP/IP
from the Network Protocols list. Then click OK.
OK again and follow any on-screen instructions to
enable TCP/IP.
Network
icon.
Add.
15
Page 19

Setup Guide
Note:
If you don’t know what
IP address to use for the
computer or the
Ethernet card, ask your
network administrator.
Or, follow the
instructions on page 19.
Assigning the IP Address
For a Windows 95 peer-to-peer network you need to set the
card’s IP address. Make sure the Ethernet card and printer are
on the same segment of the network as the computer you are
using to configure the card. Also, find out the IP address for the
computer and the IP address for the Ethernet card. Then,
follow these steps:
1. Find the hardware address (node number) for the Ethernet
card in your printer. Refer to the status sheet to determine
this number (see page 8).
2. Double-click the
MS-DOS Prompt icon to open a DOS
window.
3. Set up the routing table, using the following command:
ping <IP address>
for example: ping 127.0.1.1
4. Add an entry in the ARP table that assigns an IP address to
the hardware address of the Ethernet card. Use the
following command:
arp -s <IP address> <hardware address>
for example:
arp -s 127.0.1.200 00-00-48-92-BD-9A
5. Start a continuous "ping" to the card, using the following
command with the card IP address:
ping <IP address>
for example:
ping 127.0.1.200
You see a message similar to the following:
Reply from 127.0.1.200: bytes=32 time<10ms TTL=30
Reply from 127.0.1.200: bytes=32 time<10ms TTL=30
Reply from 127.0.1.200: bytes=32 time<10ms TTL=30
Reply from 127.0.1.200: bytes=32 time<10ms TTL=30
This shows that the Ethernet card is set up for TCP/IP
correctly.
16
Page 20

Setup Guide
If you receive 4 lines that say “Request Timed Out,” the
card is not set up correctly. Check to make sure the card is
on the same segment of the network as the workstation you
are using to configure it and that you typed in the correct
IP and hardware addresses.
Before you can print using TCP/IP, you still need to install the
Status Monitor (see page 24) and add a printer port (see
page 27).
Installing LPR Software in Windows NT
Follow these steps if you need to set up Windows NT to print
with TCP/IP:
1. Open the Control Panel.
2. Double-click the
Network
3. In Windows NT 4.x, click the
TCP/IP Printing
is listed under Network Services, you can
icon.
Services
tab. If
Microsoft
skip to “Configuring the Ethernet Card for TCP/IP” on
page 18. If it is not, click
In Windows NT 3.5x, if
Add.
Microsoft TCP/IP Printing is
listed under Installed Network Software, you can skip to
“Configuring the Ethernet Card for TCP/IP” on page 18.
If it is not, click
4. In Windows NT 4.x, select
from the Network Service list and click
Add Software.
Microsoft TCP/IP Printing
OK. Continue with
step 6.
In Windows NT 3.5x, select TCP/IP Protocol and related
component
Continue
5. In Windows NT 3.5x, select
Support
dialog box and click
s from the Network Software list and click
.
TCP/IP Network Printing
in the Windows NT TCP/IP Installation Options
Continue.
17
Page 21

Setup Guide
6. Follow the instructions on the screen, inserting the
requested diskette or CD-ROM if necessary.
When setup is complete, the Network Services tab or
Network Settings dialog box reappears.
7. In Windows NT 4.x, make sure
Printing
click
appears in the Network Services list, select it, and
Properties. The Microsoft TCP/IP Properties dialog
Microsoft TCP/IP
box appears.
In Windows NT 3.5x, make sure
Printing
box, then click
appears in the Installed Network Software list
OK. The TCP/IP Components box appears.
Microsoft TCP/IP
8. Set the IP address and the subnet mask of the Windows
NT server or workstation. If you want to use the gateway
(router), set the IP address of the nearest gateway as the
default gateway.
to restart the computer.
9. In Windows NT 4.x, click
In Windows NT 3.5x, click
Yes
Restart Now
when the
Network Settings dialog box appears.
For more information, see your Windows NT documentation.
Then follow the instructions below to configure the Ethernet
card in your printer.
Configuring the Ethernet Card for TCP/IP
If you’re using Windows NT, follow these steps to configure
your printer with EPSON Net!:
1. Double-click the
Net! for Windows.
2. Select the correct serial number for the Ethernet card in
your printer (check the printed status sheet to verify this
number) and click
and shows the current IP address.
EPSON Net! (NT) icon to start EPSON
Open. The IP Config dialog box opens
18
Page 22

Setup Guide
3. Set the following options in the IP Config dialog box:
◗
IP address
Determine and assign an IP address. Check with your
network administrator or see the note below for
information about assigning IP addresses.
Subnet mask
◗
Assign the subnet mask. Check with your network
administrator or see the note below for information
about assigning subnet masks.
Auto IP address
◗
Set to Off.
Caution:
Once you make changes
to the Ethernet card,
wait for at least five
minutes before turning
off or restarting your
printer.
4. After making your settings, click Save.
After you configure your printer, you need to install EPSON
Status Monitor 2. See page 24 for instructions.
Note About IP Addresses and Subnet Masks
If you don’t have a network administrator, you can assign IP
addresses in the range of 192.168.1.1 to 192.168.1.254. Each
computer or other device connected directly to the network
must have a unique IP number. The subnet mask should be
255.255.255.0. However, you should not use these addresses if
your network has a direct (rather than dial-up) connection to
the Internet.
Setting Up DLC
If you use Windows NT, the Ethernet card can work with the
DLC (Data Link Control) support provided in your operating
system. Follow the instructions below to install DLC support in
Windows and configure the printer.
19
Page 23

Setup Guide
Installing DLC in Windows NT
Make sure Windows NT is running, and follow these steps to
install DLC:
1. Open the Control Panel.
Note:
To verify that the DLC
protocol is installed
correctly, check the list
of installed Network
Software in the
Networks dialog box.
2. Double-click the
Network
3. In Windows NT 4.x, click the
Add.
In Windows NT 3.5x, click the
4. In Windows NT 4.x, select
Network Protocol list, and click
In Windows NT 3.5x, select
Network Software list, and click
icon.
Protocols
Add Software button.
DLC Protocol from the Select
OK.
DLC protocol from the
OK.
tab and then click
5. Follow the instructions on the screen and reboot your
system for the installation to take effect.
Configuring the Ethernet Card in Windows NT 4.x
After you have installed the DLC protocol, follow these steps to
configure the card and your printer for Window NT 4.0:
1. Double-click My Computer
Printers
icon.
, then double-click the
2. Double-click the
3. Click
4. Click
5. Select
My Computer
Add Port
Hewlett-Packard Network Port
Port.
20
Add Printer icon.
, then click
.
Next.
, then click
New
Page 24

Setup Guide
6. Type a name for the port in the
Name box. Make sure the
name is not the same as an existing port, such as LPT1.
7. Select the target node address from the
Card Address list.
Make sure this address matches the one listed under Node
Number on the status sheet.
8. Click the
Then click
9. Click
Next, then follow the instructions on the screen for
Timers
Close.
button and select the
Job Based
option.
printer driver installation.
Configuring the Ethernet Card in Windows NT 3.5x
After you have installed the DLC protocol, follow these steps to
configure the card and your printer for Windows NT 3.5x:
1. Double-click Print Manager
2. Choose
Create Printer from the Printer menu. The Create
Printer dialog box appears.
in the Main group.
Note:
If you want to share the
new printer, click Share
the Printer on the
Network. The share
name defaults to the
printer name; you can
change it if necessary.
For more information
about sharing, see your
Windows NT
documentation.
3. Type a name for the printer. Then select the printer driver
from the Driver menu. Select
Other from the Print To
menu. The Print Destinations dialog box appears.
4. Choose Hewlett Packard Network Port
from the
Available Print Destinations list.
5. Type a name for the port in the Name box. Make sure the
name is not the same as an existing port, such as LPT1.
6. Select
LAN Hardware Address (Node Address) from
the Card Address list. This address matches the one listed
under Node Number on the status sheet.
7. Click the
option. Then click
Timer button and select the Job Oriented
OK. Click OK again to exit the dialog
box.
21
Page 25

Setup Guide
8. Click
9. Set any printer-specific options, and click
OK to exit the Create Printer dialog box. A dialog box
from the selected model’s device driver appears.
OK.
Configuring for AppleTalk
To use your printer on an AppleTalk network, you need to
configure the Ethernet card for AppleTalk. Follow these steps to
configure your card using EPSON Net!:
1. Open the EPSON Net! utility. You see a window like the
following:
2. Choose
box like the following:
Zone
22
from the Options menu. You see a dialog
Page 26

Setup Guide
3. Click a zone to select it. To select multiple zones, press and
hold the
. Then click OK.
All
key while clicking the zones, or click
Shift
Select
EPSON Net! sends a packet to the selected zones and
detects the current printer’s status. The EPSON Net!
window shows the latest information about the printers
located in that zone.
4. Select your EPSON Stylus COLOR 800N printer.
5. Click
6. Click the
Open. You see the Configuration dialog box:
AppleTalk
icon. Make sure the correct serial
number of your Ethernet card is displayed. (Check the
printed status sheet to verify this number.)
23
Page 27

Setup Guide
7. Set the following options in the AppleTalk Configuration
dialog box:
◗
Available Zone
Select the network zone where you want the printer to
appear.
Printer name
◗
You can use your printer’s default name or change it. If
you have more than one printer of the same type on
your network, be sure to give them unique names.
Entity Type
◗
EPSON Net! shows the printer’s Entity type on an
AppleTalk network. You don’t have to set these
options.
Caution:
Once you make changes
to the Ethernet card,
wait for at least five
minutes before turning
off or restarting your
printer.
8. Click
OK to send the new settings to the printer and return
to the Summary dialog box. Click
Update
to send the new
settings without closing the Configuration dialog box.
9. Click Exit
.
You now need to install your printer driver and select your
printer in the Chooser. See page 28 for instructions.
Installing the EPSON Status Monitor 2 Utility
Before you start, turn off all other active applications (such as
virus protection).
If you’re using Windows NT, you need to log on as
Administrator.
1. Insert the setup disk 1 of EPSON Status Monitor 2 in your
diskette drive.
2. In Windows 95 or Windows NT 4.x, click
24
Start
and
Run
.
Page 28

Setup Guide
In Windows NT 3.5x, choose
Run from the File menu in
the Program Manager.
3. Type
A:\SETUP and click OK. If you’re not using drive A,
substitute the appropriate letter.
4. Read the on-screen instructions and click
5. Click
directory, click
, or if you want to change the destination
Next
Browse
and select your directory.
Next
If you’re using Windows 95, the following dialog box
appears:
.
Caution:
If you have dial-up
routers in a NetWare
environment, they may
automatically dial up the
next hop and you may
be charged for the line
connection depending
on the number of hops
you set. To prevent this
and to keep network
traffic to a minimum,
set hops carefully.
6. Select
Yes to enable EPSON TCP/IP printing, and then
Next
.
click
7. Select the type of printer(s) you want to monitor and click
.
Next
8. Select
Monitor
do not have drivers installed in this computer. Select
not monitor
Next.
to monitor EPSON network printers that
Do
if network traffic is a problem. Then click
9. If you’re using NetWare, set the number of hops from 0 to
15 and click
Next.
25
Page 29

Setup Guide
Note:
If you don’t have a
CD-ROM drive, you can
create diskettes from the
CD-ROM using another
computer. Under
Windows, run the Make
Diskettes program on
the CD. To make
Macintosh diskettes,
follow the instructions on
page 29.
10. Check the current settings and click
instructions on the screen. Select
Next. Follow the
and click
Yes
Finish
to
restart Windows when you see the prompt.
You now need to install the printer driver and set up your
printer in Windows.
Installing the Printer Driver
Your driver software is on the EPSON printer software
CD-ROM that came with your printer. You need to install the
driver on each computer that will send print jobs to the
EPSON Stylus COLOR 800N.
The CD-ROM also contains EPSON Answers (Windows
only), a comprehensive online guide to using your printer.
EPSON Answers was not designed to run over a network or on
the Windows NT operating system. If you use it, be aware that
some of its features may not work and may cause problems on
your system.
If you’re using Windows, Avery LabelPro 3.0 software is also
automatically installed on your system. For instructions on
using the program, see the online manual. If you require further
assistance with the program, contact Avery at (972) 389-3699.
Installing on a PC
1. Make sure the printer is on and Windows is running. Exit
any application programs.
If you’re using Windows 95 and you see the New
Hardware Found screen, click
opportunity.
2. Insert the EPSON printer software CD-ROM or
diskette 1.
26
Cancel at the first
Page 30

Setup Guide
3. If you inserted the CD-ROM and Windows starts the
installation program automatically, go to step 4.
If it doesn’t start automatically (or if you’re using Windows
NT 3.5x), click
Start
, select
Run
, and type
D:\Setup
(substitute the correct drive letter if necessary). Then click
OK. Go to step 4.
If you’re installing from diskettes, click
and type
A:\Setup
necessary). Then click
(substitute the correct drive letter if
and go to step 5.
OK
4. At the EPSON Setup CD window, make sure
Installation
5. Select
tab and click
is selected and click Next.
EPSON Stylus COLOR 800
OK.
Start, select Run,
Complete
in the Printer Model
6. Follow the instructions on the screen to install the software.
After you install the printer driver, you need to set up your port,
following the instructions below.
Changing Your Port Setting
The installation program for your printer driver automatically
sets your printer on LPT1. In Windows NT 4.x, make sure the
TCP/IP Print server service is running before you start. Then
follow these steps change to the correct port under Windows 95
or Windows NT 4.x:
1. Click
Start, Settings, Printers
.
2. Highlight the EPSON Stylus COLOR 800 printer and
right-click the icon.
3. Select
Properties
4. In Windows 95, click the
In Windows 4.x, click the
.
Details
Ports tab.
tab.
27
Page 31

Setup Guide
5. Click
6. In Windows 95, click
Add Port.
Browse and choose the server or
EPSON_TCPIP_Printer that your printer is set up on.
Then click OK
In Windows NT 4.x, click
.
LPR Port
, then type in the
printer’s IP address and the name you want to assign. Click
OK, Close, and OK again.
Installing on a Macintosh
1. Turn on your Macintosh and turn off any virus protection
programs you may have.
2. Turn on your printer.
3. Insert the EPSON printer software CD-ROM (or
diskette 1) and start the Installer.
4. Click
Continue
instructions on the screen.
, then click
and follow the
Install
5. When you see the message that installation is complete,
click
Restart
.
28
Page 32

Setup Guide
Making Macintosh Diskettes from the CD-ROM
Before you follow these steps, name the formatted diskettes
you’ll use
before the number). If they’re not named correctly, the diskettes
won’t work.
1. Turn on the Macintosh and turn off any virus protection
2. Insert the EPSON printer software CD-ROM.
3. Insert the diskette you named
Disk1 and Disk2 (using a capital “D” and no space
programs you may have.
.
Disk1
4. Select all the icons in the CD-ROM
them to the
diskette icon on the desktop.
Disk1
folder and drag
Disk1
5. When the icons are copied, eject the diskette, open the
CD-ROM Disk2 folder, and insert the diskette you named
Disk2.
6. Drag all the icons in the CD-ROM
Disk2 diskette icon on your desktop.
7. Eject
Disk2
.
Disk2 folder to the
29
 Loading...