

Page 1

EPSON Stylus COLOR 740i
Manual
Page 2

Copyright Notice
All rights reserved. No part of this publication may be reproduced, stored in a retrieval system, or transmitted
in any form or by any means, electronic, mechanical, photocopying, recording, or otherwise, without the prior
written permission of SEIKO EPSON CORPORATION. The information contained herein is designed only for
use with this EPSON printer. EPSON is not responsible for any use of this information as applied to other
printers.
Neither SEIKO EPSON CORPORATION nor its af filiates shall be liable to the purchaser of this product or
third parties for damages, losses, costs, or expenses incurred by purchaser or third parties as a result of:
accident, misuse, or abuse of this product or unauthorized modifications, repairs, or alterations to this product,
or (excluding the U.S.) failure to strictly comply with SEIKO EPSON CORPORATION’s operating and
maintenance instructions.
SEIKO EPSON CORPORATI ON shall not be liable for any damages or problems arising from the use of any
options or any consumable products other than those designated as Original EPSON Product s or EPSON
Approved Products by SEIKO EPSON CORPORATION.
EPSON, EPSON Stylus, and ESC/P are registered trademarks and ESC/P 2 is a trademark of SEIKO EPSON
CORPORATION. SoundAdvice is a service mark and PhotoEnhance and EPSON FaxAdvice are trademarks
of Epson America, Inc.
General Notice: Other product names used herein are for identification purposes only and may be trademarks
of their respective owners. EPSON disclaims any and all rights in those marks.
NERGY STAR
The E
Copyright © 1999 by Epson America, Inc. ESC740i0399
emblem does not represent EPA endorsement of any product or service.
3/99
Page 2
Page 3

Contents
Introduction
Macintosh System Requirements 10
Windows System Requirements 11
Printer Parts 13
How To Use Your Manuals 14
Warnings, Cautions, Notes, and Tips 15
ENERGY STAR Compliance 15
Year 2000 Ready 16
Important Safety Instructions 16
Basic Printing
Printing from Windows 19
Setting Printer Options from Windows Applications 20
Setting Default Printer Options 23
Checking Printer Status 24
Printing from a Macintosh 27
Setting Up Background Printing Options 30
19
9
Page 3
Page 4

Advanced Printing
Using Custom Project Types 33
Customizing Print Quality and Special Effects 36
Customizing Color Settings 40
Using PhotoEnhance3 or Digital Camera
Correction Mode 41
Using Custom Color Management Modes 42
Using a Color Correction System 45
Using ColorSync on the Macintosh 46
Selecting Paper Size and Orientation Options 48
Selecting Paper Options in Windows 49
Selecting Paper Options on a Macintosh 54
Selecting Print Layout Options 59
Choosing Print Layout Options in Windows 59
Choosing Print Layout Options on a Macintosh 69
Using Print Preview on the Macintosh 76
Saving Custom Settings 78
Redefining Custom Settings 79
Deleting Custom Settings 80
32
Page 4
Page 5

Printing on Special Media
Selecting Special Media 82
Media Loading and Handling Guidelines 84
Letterhead, Preprinted Forms, and Legal-size Paper 85
EPSON Photo Quality Glossy Paper, Film, and
Transparencies 85
Envelopes 87
EPSON Photo Paper 88
EPSON Photo Quality Ink Jet Cards 91
EPSON Photo Stickers 92
EPSON Photo Quality Self Adhesive Sheets 92
EPSON Iron-On Cool Peel Transfer Paper 93
81
Managi ng Print Jobs
Managing Print Jobs in Windows 95, Windows 98, and
Windows NT 4.0 95
Selecting the Speed & Progress Options 96
Using the Spool Manager 99
Using Status Monitor 2 100
Managing Print Jobs in Windows 3.1 110
Using the Spool Manager 110
94
Page 5
Page 6

Managing Print Jobs on a Macintosh 113
Using Monitor3 114
Using the Macintosh Status Monitor 117
Selecting Configuration Options 119
Maintenance and Transportation
Replacing an Ink Cartridge 122
Removing and Installing Ink Cartridges 123
Replacing an Outdated Ink Cartridge 126
Cleaning the Print Head 127
Using the Head Cleaning Utility 127
Using the Control Panel 128
Examining the Nozzle Check Pattern 130
Aligning the Print Head 131
Cleaning the Printer 132
Transporting the Printer 133
Troubleshooting
Diagnosing Problems 135
Checking the Control Panel Lights 136
Running a Printer Operation Check 137
Confirming the Printer ID Number 138
121
134
Page 6
Page 7

Improving Print Quality 139
Solving Printing Problems 145
Solving Printer Software Problems 149
Fixing Paper Problems 154
Solving Miscellaneous Printout Problems 157
Uninstalling Printer Software 161
Windows 95, Windows 98, and Windows NT 4.0
Instructions 161
Windows 3.1 Instructions 162
Macintosh Instructions 162
Where To Get Help 164
Specifications
Printing 166
Paper 167
Ink Cartridges 171
Mechanical 172
Electrical 173
Environmental 173
Safety Approvals 174
166
Page 7
Page 8

DOS Support 174
Control Panel Settings 175
Character Tables 176
Interfaces 177
Index
179
Page 8
Page 9

Introduction
Your EPSON Stylus
for business graphics, layout proofs, digital photography, or any
project you create o n your computer. With resoluti ons u p to 144 0 by
720 dpi and EPSON’s unique variable micro droplet technology,
you get amazingly realistic photographic images, vivid color
graphics, and razor-sharp black text.
The printer software for Macintosh® and Microsoft® Windows® and
provides advanced color management with adjustable levels of
brightness, contrast, sharpness, and other settings. Support for
ColorSync™ 2.01 and two Windows color matching methods gives
you even more precise color control.
EPSON’s speciall y form ulated ink car tri dge s an d wide var iety of ink
jet papers offer the most flexibility for getting the results you want.
With high-speed USB (Universal Serial Bus) and standard parallel
and serial ports, setting up your printer is fast and easy.
This chapter gives you general information about your printer in
these sections:
◗ Macintosh System Requirements
◗ Windows System Requirements
®
COLOR 740i printer i s the ideal outpu t de vice
◗ Printer Part s
Page 9
Page 10
Caution:
If your iMac is running
OS 8.1, you must
download and install
the iMac Update 1.0
from Ap ple at
http://swupdates.info.
apple.com before yo
install the EPSON
USB printer software.
Contact Apple
Computer if you have
problems installin g
this update.
If your iMac is running
OS 8.5, you don’t
need to download
and install the iMac
Update 1. 0; y our
system includes full
support fo r t he
EPSON USB printer
software.
◗ How To Use Your Manuals
◗ ENERGY STAR Complian ce
◗ Year 2000 Ready
◗ Important Safety Instructions
Macintosh System Requirements
To use your printer and its software with a Macintosh, your system
should have:
◗ One of the following Macintosh models:
LC475, LC575, LC630
Quadra series
Centris series
PowerBook® series (190, 520, 540, 550 or later)
PowerBook Duo 280, 2300c/100
Performa® 475, 575, 588, 630, 5210 or later
Power Macintosh® series
iMac™ Series (USB connection only
Power Macintosh G3 (USB connection only)
◗ For serial connection: System 7.1 or later (7.6 or later
recommended); some application software on the EPSON
CD-ROM may require System 7.52 or later
For USB connectio n: iMac or Power M acintosh G3 w ith System
8.1 or later
Introduction Page 10
Page 11

Caution:
Using an im properly
shielded USB cable—
especi ally a c able
more than 6.5 ft.
(2 meters) long—may
cause the printer to
malfun c tio n.
◗ At least 16MB of RAM (20MB or more recommended)
◗ At least 50MB of free hard disk space for storing images
(100MB recommended)
◗ 13-inch RGB display or better
◗ Double-speed CD-ROM drive (quad-speed or faster
recommended) for installing the printer software
◗ For serial connection, an ImageWriter® II serial cable or
equivalent (8-pin mini DIN male/male, Belkin F2V024
recommended)
For USB connection to an iMac or Power Macintosh G3, a
shielded USB “AB” interface cabl e, from Series A (co mputer) to
Series B (printer) up to 6.5 ft. (2 meters) long
Windows System Requirements
To use your printer and its software with a PC, your system should
have:
◗ An IBM
®
compatible PC with at least a 386/25 MHz (for
Windows 3.1x), 486/25 MHz (for Windows 95 or Windows
NT®4.0), or 486/66 MHz (for Windows 98) processor
(Pentium
®
processor recommended)
◗ DOS, Microsoft Windows 3.1x, Windows 95, Windows 98, or
Windows NT 4.0
Introduction Page 11
Page 12

Caution:
Using an im properly
shielded USB cable—
especi ally a c able
more than 6.5 ft.
(2 meters) long—may
cause the printer to
malfun c tio n.
◗ At least 16MB of RAM (32MB for Windows 3.1, 95, or 98 or
64MB for Windows NT 4.0 recommended)
◗ At least 50MB of free hard disk space for storing images
(100MB recommended)
◗ VGA, Super VGA, or better display adapter and monitor
◗ Double-speed CD-ROM drive (quad-speed or faster
recommended) for installing the printer software
◗ For parallel conne cti on, a high -spee d, bi dire ctional , IEEE- 1284
compliant parallel cable (6 to 10 feet long). The cable must
have a D-SUB, 25-pin, m ale connector for your compute r and a
36-pin, Centroni cs® compatible connector for the printer.
For USB connection to a computer with Windows 98 and a
Windows 98 compliant USB port, a shielded USB “AB”
interface cable, from Series A (computer) to Series B (printer)
up to 6.5 ft. (2 meters) long
Introduction Page 12
Page 13
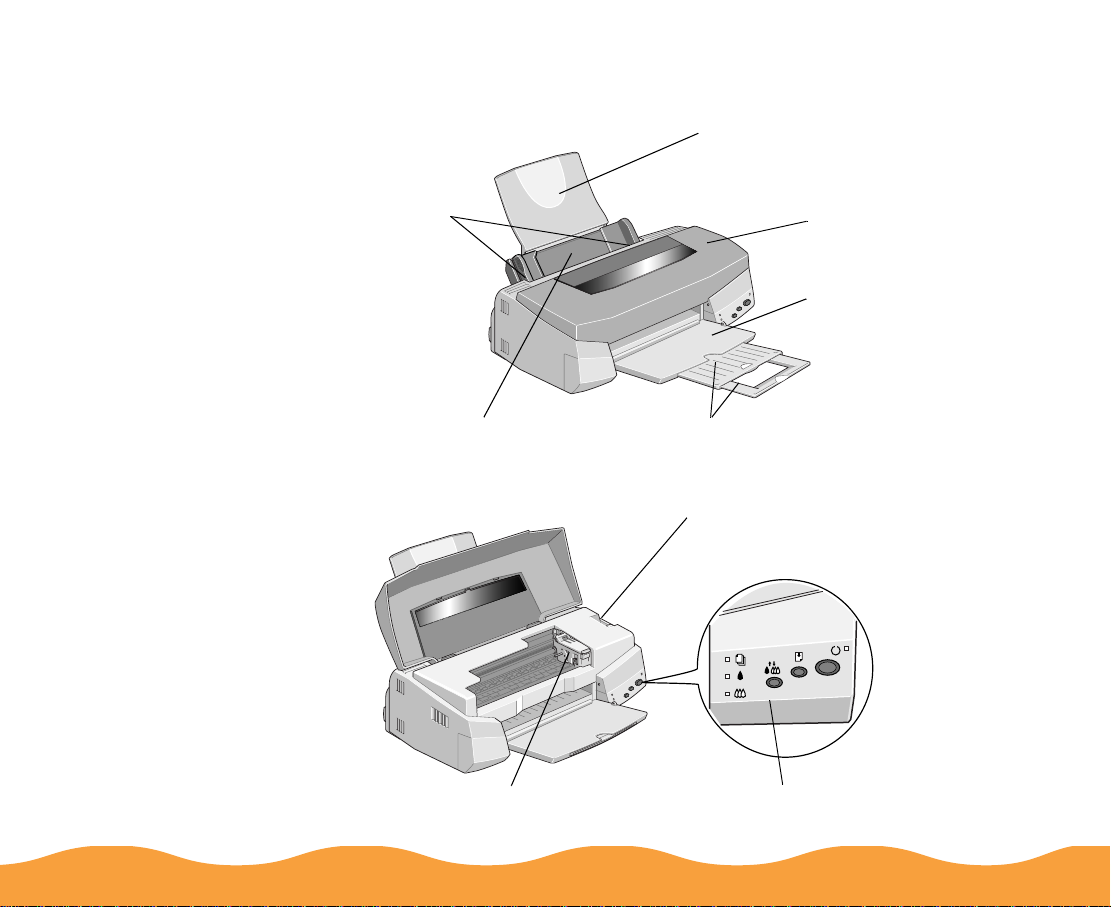
Printer Parts
paper support
edge
guides
sheet feeder
printer cover
output tray
output tray ex t ensions
paper thickness
lever
ink cartridge holders
Introduction Page 13
control pa nel
Page 14

How To Use Your Manuals
To set up your printer and install the printer software, see the
Here
card for Macintosh instructions or the
Windows instructions. This manual contains the following
information:
Basic Printing covers the basics of printing with Windows or
Macintosh.
Advanced Printing tells you how to print using custom settings for
print quality, color management, and distinctive layouts.
Printing on Special Media gives guidelines for selecting the right
paper or othe r media for your p ri nt job a nd instructions fo r loa di ng it
in your printer.
Managing Print Jobs explains how to control print jobs and check
printer status while you’re printing.
Maintenance and Tr ansportatio n gives ins tructions for replacing ink
cartridges, cleaning and aligning the print head, and cleaning and
transporting the printer.
Troubleshooting provides sol utio ns fo r a ny pr oblem s you ma y hav e
with your printer or software.
Printer Basics
Start
book for
Specifications provides the technical details on your printer, ink
cartridges, and EPSON papers.
To go right to the section you need, see the Index.
Introduction Page 14
Page 15
Warnings, Cautions, Notes, and Tips
You’ll find this information throughout your manual:
Warnings must be followed carefully to avoid bodily injury.
Cautions must be observed to avoid damage to your equipment.
Notes contain important information about your printer.
Tips contain additional hints for great printing.
ENERGY STAR Complianc e
As an E
product meets the E
The EPA E
partnership with the computer and office equipment industry to
promote the introduction of energy-efficient personal computers,
monitors, printers, fax machines, and copiers in an effort to reduce
air pollution caused by power generation.
Introduction Page 15
NERGY STAR
NERGY STAR
Partner, EPSON has determined that this
NERGY STAR
Office Equipment program is a voluntary
guidelines for energy efficiency.
Page 16

Year 2000 Ready
Caution:
Always turn the
printer of f us ing the
P
power button. Don’t
switch off the
electrical outlet or
unplug th e printer
until the Ppower light
is off.
Your EPSON printer is
the other parts of your computer system are also ready for the
year 2000.
Year 2000 Ready
. However, be sure
Important Safety Instructions
Before using your printer, read the following safety instructions to
make sure you use the printer safely and effectively:
◗ Turn off and unplug the printer before cleaning. Clean with a
damp cloth only. Do not spill liquid on the printer.
◗ Do not place the printer on an unstable surface or near a
radiator or heating vent.
◗ Do not block or cover the openings in the printer’s cabinet or
insert objects through the slots.
◗ Use only the type of power source indicated on the printer’s
label.
◗ Connect all equipment to properly grounded power outlets.
Avoid using outlets on the same circuit as photocopiers or air
control systems that regularly switch on and off.
Introduction Page 16
Page 17

◗ Place the printer near a wall outle t where the plug can be ea sily
unplugged.
Placez l’imprimante près d’une prise de contacte où la fiche
peut être débranchée facilement.
◗ Do not let the power cord become damaged or frayed.
◗ If you use an extension cord with the printer, make sure the
total ampere rating of the devices plugged into the extension
cord does not exceed the cord’s ampere rating. Also, make
sure the total ampere rating of all devices plugged into the wall
outlet does not exceed the wall outlet’s ampere rating.
◗ Except as specifically explained in this manual, do not attempt
to service the printer yourself.
◗ Unplug the printer and refer servicing to qualified service
personnel under the following conditions:
If the power cord or plug is damaged; if liquid has entered the
printer; if the p rinter has b een dropped or the cabi net damag ed;
if the printer does not operate normally or exhibits a distinct
change in performance. Adjust only those controls that are
covered by the operating instructions.
◗ Do not put your hand inside the printer or touch the cartridge
during printing.
◗ Under normal circumstances, ink will not come out of the
cartridge. If it does get on your skin, wash it off with soap and
water. If it gets in your eyes, flush them immediately with water.
Introduction Page 17
Page 18

◗ Keep ink cartridges out of the reach of children.
◗ Do not dismantle the ink cartridges or try to refill them. This
could result in damage to the print head.
◗ Once you install an ink cartridge, do not open the clamp or
remove the cartridge except to replace it with a new one. The
cartridge may become unusable otherwise.
◗ Install the ink cartridge immediately after you remove it from its
foil package. Leaving the cartridge unpacked for a long time
before use may result in reduced print quality.
◗ Do not use an ink cartridge beyond the date printed on the
cartridge package. For best results, use up the ink cartridges
within six months of installing them.
◗ Do not shake an ink cartridge; this can cause leakage.
◗ Always turn the printe r off using th e
press this button, the
Ppower light flashes briefly then goes
Ppower button. When you
out. Do not unplug the printer or turn off the power to the outlet
until the
Ppower light is off.
◗ Before transporting the printer, make sure the print head is
capped in the far right position and the ink cartridges are in
place.
Introduction Page 18
Page 19

Note:
For instruc t ions on
printing w it h D OS,
see DOS Support.
Basic Printing
It’s easy to print all your color and monochrome documents with
your EPSON Stylus COLOR 740i. First set up your printer and
install the software, following the instructions in the
or
Printer Basics
◗ Printing from Windows
◗ Printing from a Macintosh
Although your printe r is named the EPSON Stylus COLOR 740i, be
sure to select EPSON Stylus COLOR 740 in your application
(Windows) or SC 740 in the Chooser (Macintosh).
book. Read this chapter to find out about:
Printing from Windows
This section tells you about:
◗ Setting Printer Options from Windows Applications
Start Here
card
◗ Setting Default Printer Options
◗ Checking Printer Status
Page 19
Page 20
Setting Printer Options from Windows Applications
This section describes the settings you’ll need to check for all your
everyday printouts. See Advanced Pr inting for information about
advanced settings for special print jobs.
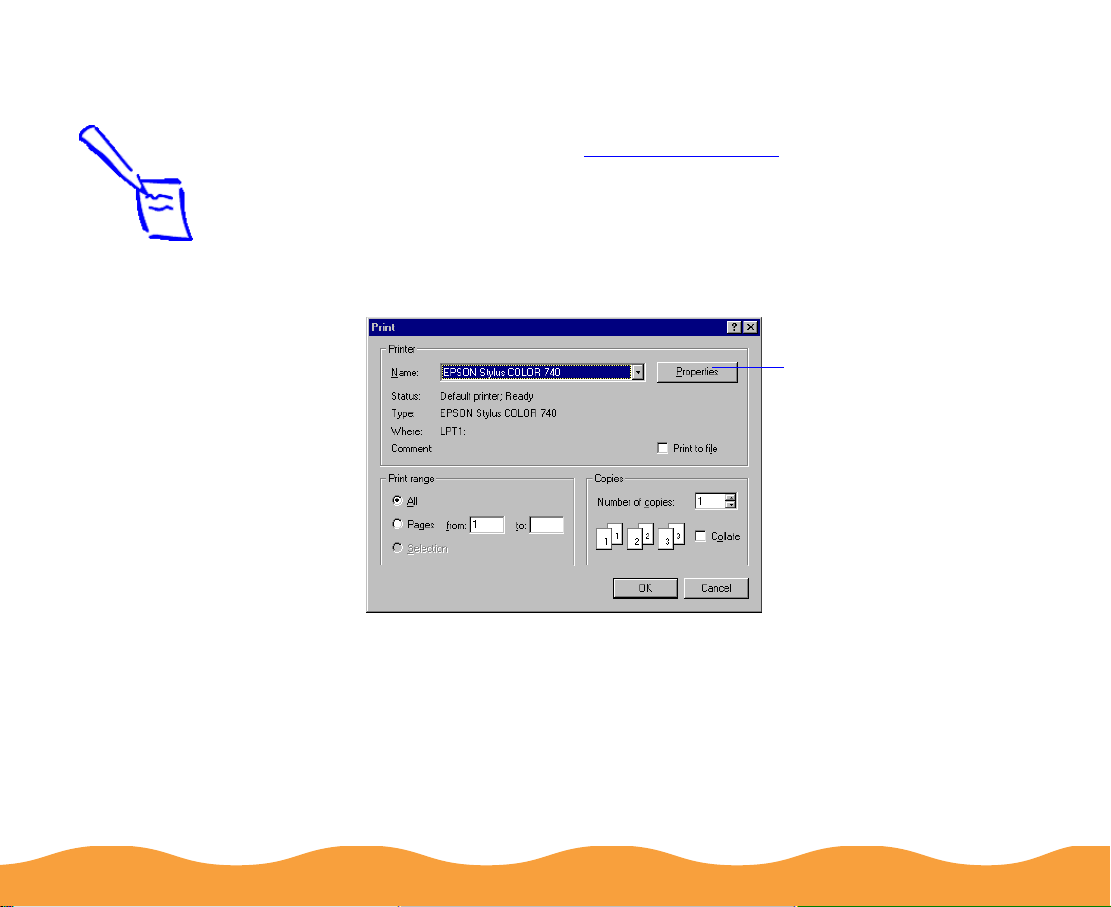
1 Open a Windows application and select a file you want to print.
Note:
You can also set
printer opt ions by
clicking Print Setup in
the File menu, then
clicking t he Printer,
Setup, Properties, or
Options button.
However, in most
applicat ions you’ll
then have to select
the Print option from
the F ile me nu to print
using your changes.
2 Open the File menu and click Print. You see the Print dialog
box for your application.
Click Properties
3 Make sure your EPSON S tylus COL OR 740 printer is selected,
and then click the Properties, Printer, Setup, or Options
button. (You may have to click a sequence of buttons in
different dialog boxes.)
Basic Printing Page 20
Page 21
To print at the highest
resolut ion (1440 dpi),
you need to use plain
paper, Photo Pap er,
or one of th e Photo
Quality media. For the
best printing at any
resolution, always use
EPSON med ia.
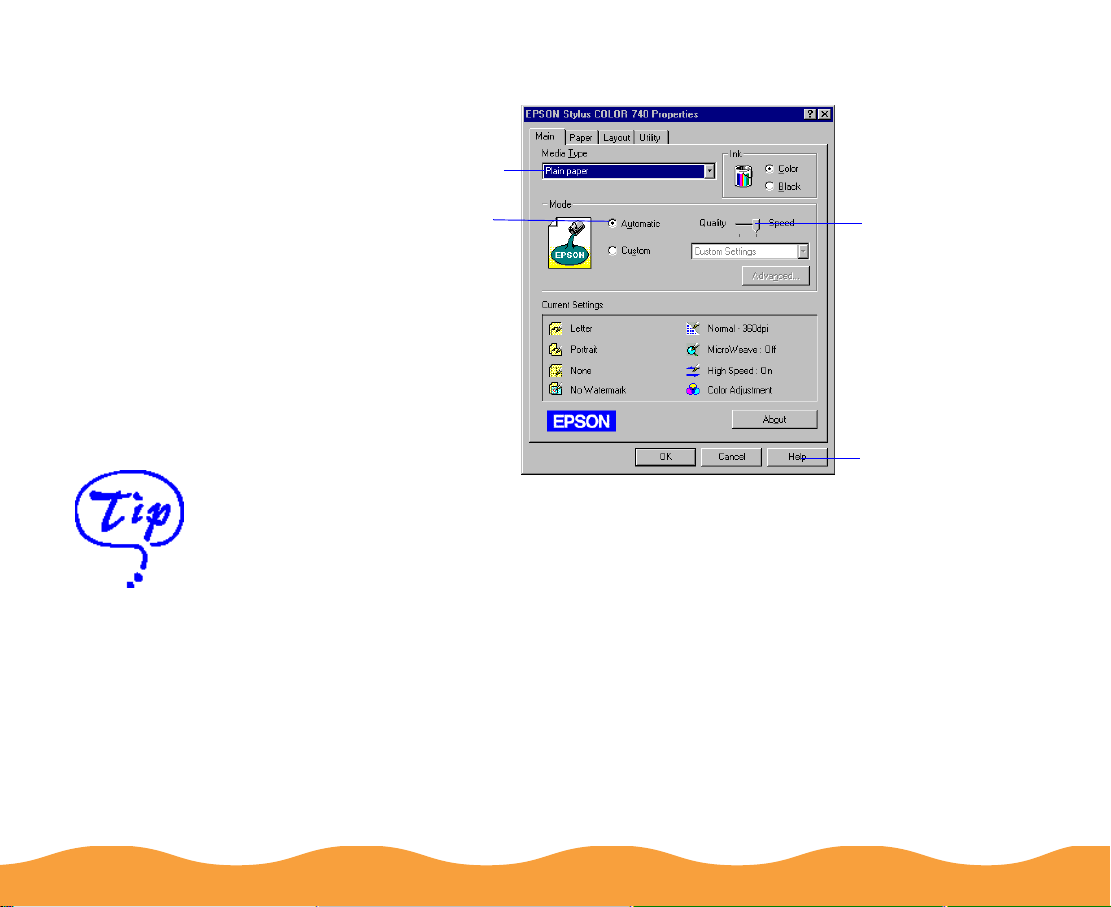
You then see the printer settings dialog box:
Click to select
your media type
Click to select
Automatic mode
Use the
Quality/Speed
slider to select
your print
resolution
Click for more
information
4 Click the Main tab if necessary. Then choose the Media Typ e
you want to print on from the following list:
◗◗◗◗ Plain paper
◗◗◗◗ 360 dpi Ink Jet Paper
◗◗◗◗ Photo Qualit y Ink Jet Paper
◗◗◗◗ Photo Paper
◗◗◗◗ Photo Quality Glossy Film
◗◗◗◗ Ink Jet Transparencies
Basic Printing Page 21
Page 22

Note:
The Quality/Speed
slider is not av ailable
for certain m edia
types.
The type of paper you choose determines the print quality
(resolution) you can use . It’s very im portant to select the correct
setting for your paper. If you’re not sure which to choose, see
Selecting Special Media.
5 Choose Color or Black ink.
6 Now make sure the Mode option is set to Automatic. This is
the easiest way to get good printing results for all kinds of
documents, on all types of paper.
7 Set the slider to Quality or Speed. This lets you choose
between the fastest printing or a high resolution for the media
you’re using.
To select 1440 dpi on plain paper or any other available
resolution for your media, you need to access the Advanced
dialog box; see Customizing Print Quality and Special Effects
for instructions.
8 Click the Paper tab and choose your paper size, number of
copies, orientation, and printable area settings. See Selecting
Paper Options in Windows for instructions.
9 Click the Layout tab (not available with Windows 3.1) and
check the reduce/enlarge, page layout, and watermark
settings. See Choosing Print Layout Options in Windows for
details.
10 Click OK when you’re finished checking your settings. The
dialog box closes. Click OK until you see the Print dialog box.
11 In the Print dialog box, click OK or Print.
Basic Printing Page 22
Page 23

While your document is printing, a window appears showing
the printer status and the progress of your print job. See
Checking Printer Status for more information.
Setting Default P ri n te r O p tions
When you change printer settings through your software
application, the settings apply only to the application you’re using.
To adjust the default settings for all your Windows applications,
access the printer settings through the Printers utility or Control
Panel (Windo ws 3.1). Close all your app lications b efor e you star t. I f
you don’t, you may have to close and reopen them to use the new
default settings.
Note:
You can access the
default Windows NT
printer s of tware
settings only if you
have the appropriat e
network access
privileges, such as
Adminis t rat or.
Basic Printing Page 23
Setting Default Options in Windows 95, Windows 98, or
Windows NT
1 Click Start, point to Settings, and select Printers.
2 Right-click the EPSON Stylus COLOR 740 icon.
3 Select Properties or Document Defaults (Windows NT), then
click the Main tab. You see the printer settings dialog box
shown under Setting Printer Options from Windows
Applications with some additional tabs at the top.
Page 24

Setting Default Options in Windows 3.1
1 Double-click the Control Panel icon in the Main group.
2 Double-click the Printers icon.
3 Select EPSON Stylus COLOR 740 from the list of printers and
click Setup. You see the printer settings dialog box shown
under Setting Printer Options from Windows Applications.
Checking Prin ter Status
While your document is printing, your printer software reports how
the job is doing. See the following for your operating system:
◗ Windows 95, Windows 98, or Windows NT 4.0
◗ Windows 3.1
Basic Printing Page 24
Page 25
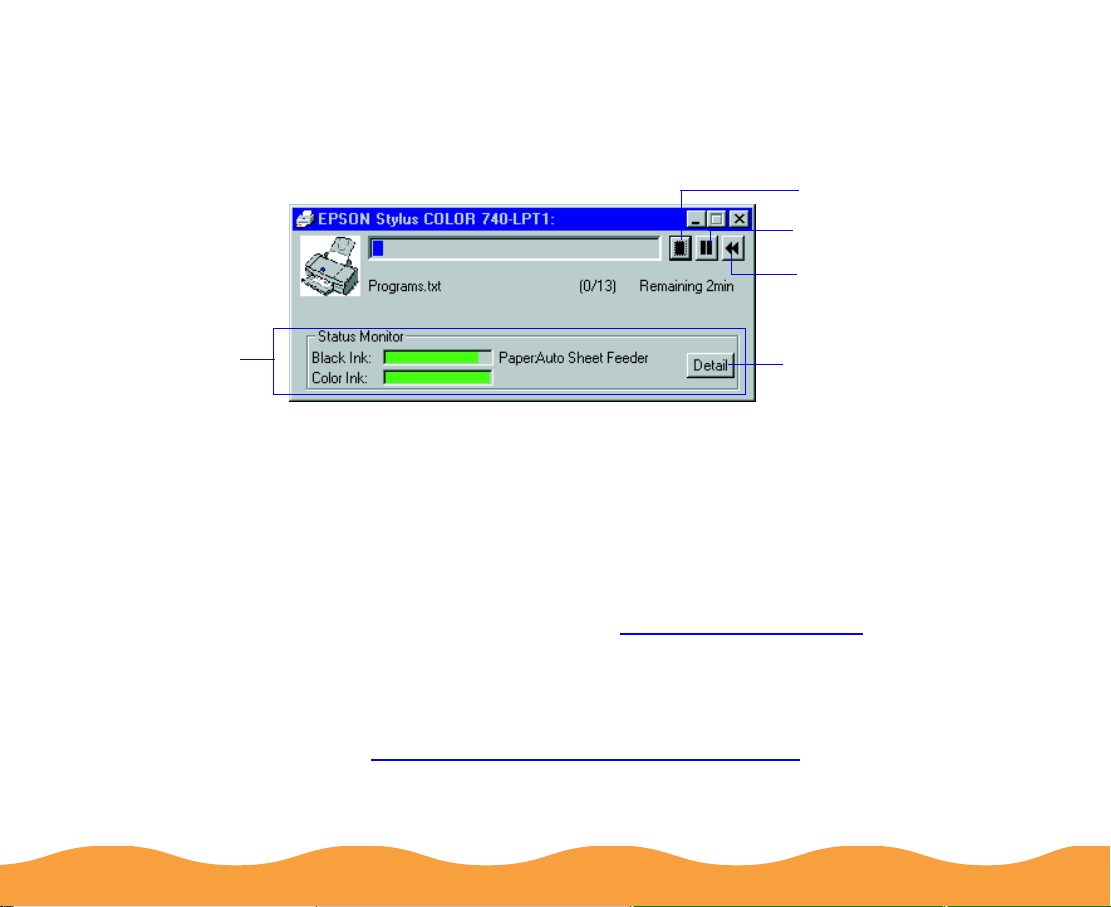
Windows 95, Windows 98, or Windows NT 4.0
After you send a print job in Windows 95, 98, or NT, the Progress
Meter window appears on your screen:
Click to cancel
Click to pa us e
This
information
appears only
if you installed
Status
Monitor 2
Click to restart
Click to view the Status
Monitor 2 Printer Statu s
window
The Progress Meter shows the progress of your print job and the
status of your printer. You can use the buttons to cancel, pause, or
restart your print job.
If you installed Status Monitor 2, you also see information about
how much ink you have left and can view the Status Monitor 2
Printer Status window. See Using Status Monitor2 for more
information.
You can also set up the way your printer software sends print jobs
and select whether to displ ay the Prog ress M eter d ialog box or not;
see Selecting the Speed & Progress Options for instructions.
Basic Printing Page 25
Page 26
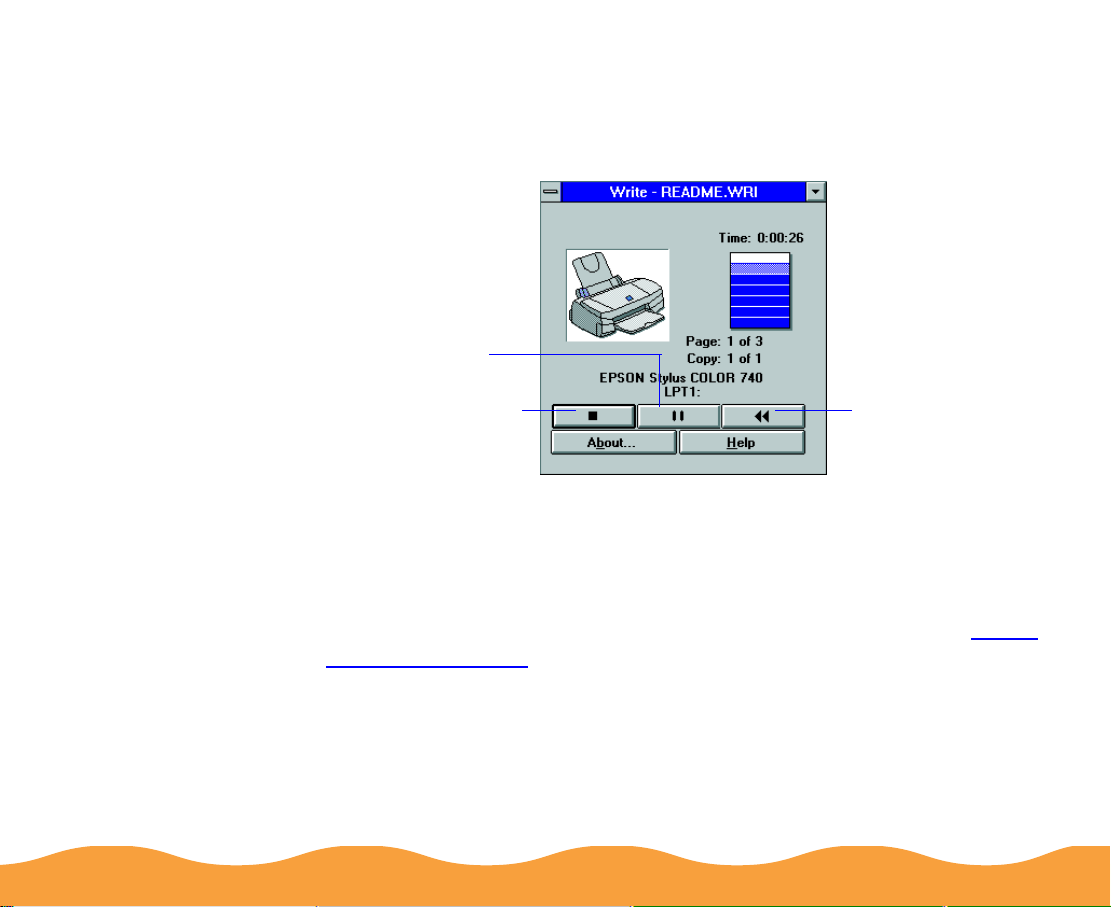
Windows 3.1
After you send your print job, the EPSON Despooler dialog box
appears on your screen:
Click to pause
or resum e
printing
Click to cancel
printing
This dialog box shows the progress of your print job and the status
of your printer. If you run out of paper while printing, for example,
the Despooler warns you. You can use the buttons to cancel,
pause, or restart your print job.
You can also control print jobs using the Spool Manager ; see Using
the Spool Manager for more information.
Click to restart
printing
Basic Printing Page 26
Page 27
Note:
On the Macintosh,
printer s et t ings are
saved with your
document, but not
from on e application
to another. If you
want to reuse
settings, you can
create document
templa te s fo r y our
favorite applications.
You can also create
custom setting groups
in your printer
software that you can
select each time you
open an application.
See Saving Custom
Settings for details.
Printing from a Macintosh
When you print with a Macintosh, you need to check the printer
software settings in each application you use. This section
describes the settings you’ll need to check for all your everyday
printouts. See Advanced Printing for information about advanced
settings for special print jobs.
Follow these steps to print from a Macintosh:
1 Open a Macintosh application and select a file you want to
print.
2 Open the File menu and click Page Setup (Document Setup
in some applications). You see the Page Setup dialog box:
3 Choose your paper size, orientation, and other options as
described in Selecting Paper Options on a Macintosh and
click OK.
Basic Printing Page 27
Page 28

Click to
select your
media type
Click to
select
Automatic
mode
For printi ng at the
highest resolution
(1440 dp i), yo u need
to use plai n paper,
Photo Paper or one of
the Photo Quality
media. For the best
printing at any
resolution, always use
EPSON media.
4 Now open the File menu and click Print. You see the main
printer settings dialog box:
Use the Quality/Speed slider to select your print resolution
5 Choose the number of copies and indicate which pages you
want to print.
6 Choose the M edi a T y pe you want to print on from the followin g
list:
◗◗◗◗ Plain Paper
◗◗◗◗ 360 dpi Ink Jet Paper
◗◗◗◗ Photo Qualit y Ink Jet Paper
◗◗◗◗ Photo Paper
◗◗◗◗ Photo Quality Glossy Film
◗◗◗◗ Ink Jet Transparencies
Basic Printing Page 28
Page 29
Note:
The Quality/Spee d
slider is n ot av ailable
for certain media
types.
The type of paper you choose determines the print quality
(resolution) you can use . It’s very im portant to select the correct
setting for your paper. If you’re not sure which to choose, see
Selecting Special Media.
7 Choose Color or Black ink.
8 Make sure the Mode option is set to Automatic. This is the
easiest way to get good printing results for all kinds of
documents, on all types of paper.
9 Set the slider to Quality or Speed. This lets you choose
between the fastest printing or a high resolution for the media
you’re using. To select 1440 dpi on plain paper or any other
available resolution for your media, you need to access the
Advanced dialog box; see Customizing Print Quality and
Special Effects for instructions.
10 Click the Layout icon and check the fit to page, watermark,
page layout, and print order settings. See Choosing Print
Layout Options on a Macintosh and Selecting Print Order
Options for details. Then click OK to return to the printer
settings dialog box.
11 To select background printing options for your print job before
you print, click the Background Printing icon. See Setting
Up Background Printing Options for details.
Basic Printing Page 29
Page 30
12 If you want to preview your printout to view how the current
layout, watermark, print order, and orientation settings look,
click the Preview icon, then click the Preview button. See
Using Print Preview on the Macintosh for details.
13 Click Print when you’re finished checking your settings.
If you chose background printing when you set up your printer,
you can continue working while your document is printing. See
Using Monitor3 for details.
Setting Up Background Printing Options
Before you print your document, you can set up the following
background printing options:
Note:
You can also turn
backgr ound printin g
on or off in the
Macintosh Chooser.
◗ Turn background printing on or off
◗ Set a priority for the print job in the print queue
◗ Set a specific time for printing the print job
◗ Hold the print job for later printing
Follow these steps:
1 Open an application and select a document you want to print.
2 Open the File menu and click Print. You see the printer
settings dialog box.
3 Click the Background Printing icon.
Basic Printing Page 30
Page 31

Not available if
backgro und
printing is
turned off
You see the following dialog box:
4 To turn background printing on or off, click the On or Off radio
button.
5 To select a priority for your pr int job in the queue of jobs waiting
to print, click one of the following:
◗ Normal to print in the order the job is received
◗ Urgent to print before any Normal priority job
◗ Print at: to print at the specific time you enter in t he day and
time in the fields to the right
◗ Hold to hold the print job in the print queue until you’re
ready to release it using EPSON Monitor 3; see Using
Monitor3 for details.
6 Click OK to save your se ttings an d ret urn to the pr inter se ttings
dialog box. (Click Cancel if you want to cancel your settings
and return.)
Basic Printing Page 31
Page 32

Note:
Although your printer is
named EPSON Stylus
COLOR 740i, be sure
to select EPSON
Stylus C OLOR 740 in
your application
(Window s ) or SC 740
in the Cho os er
(Macin to s h).
Advanced Printing
When your presentation graphics, photographs, or other projects
have special printing requirements, you can use the advanced
settings in your EPSON Stylus COLOR 740 software. You can
choose custom project types or adjust individual settings like
brightness, contrast, sharpness, and halftoning. For
professional-quality color accuracy, you can use a color matching
mode.
Your printer software’s print layout options let you print almost any
size image on your printer, proof multiple pages on one sheet of
paper, and add watermarks (not available with Windows 3.1).
This chapter includes the following information:
◗ Using Custom Project Types
◗ Customizing Print Quality and Special Effects
◗ Customizing Color Settings
◗ Using ColorSync on the Macintosh
◗ Selecting Paper Size and Orientation Options
◗ Selecting Print Layout Options
◗ Using Print Preview on the Macintosh
◗ Saving Custom Settings
Page 32
Page 33

Using Custom Project Types
Custom project types provide an easy way to fine-tune your printer
settings for a specific type of project. Follow these steps to print
with custom project types:
1 Create your image or document in your application software.
2 Access the printer settings dialog box as described in Printing
from Windows or Printing from a M acintosh. You see one of the
following dialog boxes:
Custom
Click
to see a list o f p roject types
, then click here
Advanced
Click
to see a list o f p roject types
, then click here
Windows 95, 98, NT
Advanced Printing Page 33
Windows 3.1
Page 34

Click
click here to see a list
of project types
Note:
Always choose your
Media Type and Ink
setting before you
select a custom
project type. Some
project types may not
be available with the
Media Type or Ink
settings you choose.
Printing w it h
PhotoEnhance3 or
PhotoEnhanc e m ay
take longer on some
systems and images.
Custom
, then
Macintosh
3 Choose the Media Type you want to prin t on. (If yo u’re not sur e
which setting to choose, see Selecting Special Media.)
4 Choose Color or Black ink.
5 Click Custom (in Windows 3.1, click Advanc ed), and then click
Custom Settings. You see the list of project types.
6 Choose the right setting for your project and Medi a Typ e
following these guidelines:
◗ PhotoEnhance3 (Windows 95, 98, NT, or Macintosh) or
PhotoEnhance™ (Windows 3.1)
For printing images captured using a video camera, digital
camera, or scanner. Produces sharper images and more
vivid colors by automatically adjusting the contrast,
saturation, and brightness. Corrects for overall under- and
over-exposure of the original image.
Advanced Printing Page 34
Page 35

◗ Digital Camera (not available with Windows 3.1)
For printing images captured using a scanner or digital
camera. Corrects noise and other common flaws.
◗ Text/Graph
For printing graphics-intensive documents like presentation
pages with charts and graphs. Intensifies colors and
lightens the midtones and highlights.
◗ Economy
For rough drafts of text only. Saves ink.
◗ ICM (Windows 95 and Windows 98 only)
For printing documents created in an ICM compatible
application. If you’re using an ICM compatible monitor,
adjusts printed colors to closely match the screen colors.
◗ sRGB (Standard Red Green Blue; not available with
Windows 3.1; recommended only with Windows 98)
For printing documents created in an sRGB compatible
application using sRGB colors, such as those designed for
the World Wide Web. First set up your sRGB compatible
devices (such as your monitor and printer) to use an sRGB
color profile; see your Windows 98 online help for details.
◗ ColorSync (Macintosh only)
Automatically adjusts printout colors to closely match the
colors on your screen. For more information, see Using
ColorSync on the Macintosh.
Advanced Printing Page 35
Page 36

7 In Windows, click the Paper and Layout tabs (not available on
Windows 3.1) to check or change any necessary settings, as
described in Selecting Paper Options in Windows and
Choosing Print Layout Options in Windows.
On a Macintosh, check or change any necessary settings on
the Page Setup and the Layout dialog boxes as described in
Selecting Paper Options on a Macintosh and Choosing Print
Layout Options on a Macintosh.
8 When you’re finished, cl ick OK (Windows) or Print (Macintosh).
If you’re using Windows, click any other buttons that your
application uses for printing.
Customizing Print Quality and Special Effects
After you c ustomize
your print s et t ings for
a special project, you
can save them as a
group. Then you can
reuse th em w henever
you print a s im ilar
project. See Saving
Custom Settings for
instruct ions.
Advanced Printing Page 36
If you need the maximum control over your project, or you want to
experiment with special effects, you can adjust the custom settings
in your printer software. Follow these steps:
1 Create your image or document in your application software.
2 Access the printer settings dialog box as described in Printing
from Windows or Printing from a Macintosh.
3 Click Custom, and then click the Advanced button. (In
Windows 3.1, click Advanced, then click the More Settings
button.)
Page 37

Some of these
options are
automa t ic ally s et
or disabled by
other se ttings
you choose
Some of th es e
options are
automa t ic ally s et
or disabled by
other settings
you choose
You see the Advanced dialog box (called More Settings in
Windows 3.1):
Click here t o
change y our Print
Quality (r es olution)
Windows 95, 98, NT
Click here t o
change your Print
Quality (r es olution)
Windows 3.1
Advanced Printing Page 37
Page 38

Click here to change
your Print Quality
(resolut ion)
Some of th es e
options are
automatically set
or disabled by
other settings
you choose
Macintosh
4 Choose the Media Type and Ink settings you want to use,
following the guidelines in Printing from Windows and Printing
from a Macintosh.
5 Choose one of the following Print Quality options:
Note:
The avail able Print
Quality settings may
be limited by the
Media Type you
choose.
◗ Economy
For low-resolution rough drafts on plain paper. Saves ink.
◗ Normal - 360 dpi
For most documen ts on plai n pape r, tran spare ncies, or 360
dpi Ink Jet Paper.
◗ Fine - 720 dpi
For high-resolution output on plain paper, Photo Paper, or
Photo Quality Ink Jet Paper.
Advanced Printing Page 38
Page 39

◗ Photo - 720 dpi
Excellent high-resolution output on plain paper, Photo
Paper, or Photo Quality Ink Jet Paper.
◗ Photo - 1440 dpi
For the highest-resolution output on plain paper, Photo
Paper, or Photo Quality media.
Note:
In Automatic mode,
the Halftoning setting
is selected based on
the data in y our print
job. I n Cust om mode ,
Halftoning is
preselected for each
project type setting.
Some of th e print
options at the bottom
left of the Advanced
dialog box are
automatically
selected or disabl ed
by the Pr int Quality
(resolut ion) you
choose.
6 Choose one of the following Halftoning options:
◗ No Halftoning
For printing black text only.
◗ Error Diffusion
For printing photographic images. Blends each color dot
with the dots around it.
◗ Fine Dithering
For printing graphs or other images that require precise,
solid areas of bright colors.
7 Choose any of the following print options:
◗ MicroWeave
For improved print quality. Prints graphic data in finer
increments to eliminate unwanted banding effects (light
horizontal lines). Always use for color printing.
◗ High Speed
For fast, bidirectional printing at lower quality. If vertical
lines in your printout are misaligned when you use the High
Speed setting, you may need to turn it off or align the print
head; see Aligning the Print Head for instructions.
Advanced Printing Page 39
Page 40

Note:
The appearance of
the Colo r s ec t ion of
the More Settings
dialog b ox alw ays
appear s as s hown in
Using Custom Color
Management Modes
on Windows 3.1.
◗ Flip Horizontal
Prints a mirror image of your document. Use with iron-on
transfer paper so your ironed-on printout will read correctly.
◗ Finest Detail
For printing text, graphics, and line art with very sharp
edges. Slows print speed and increases your system
memory requirements.
8 Click OK if you’re ready to return to the printer settings dialog
box, or see Customizing Color Settings if you want to adjust
your document’s color settings.
Customizin g Co lor Setti ngs
There are thre e w ays to mana ge th e color in your docum ents u sing
your printer software:
◗ Using PhotoEnhance3 or Digital Camera Correction Mode to
automatically correct digital photographs for exposure and
other common flaws, and to adjust the tone or sharpness.
◗ Using Custom Color Management Modes to select individual
color values to fine-tune the color in text, graphics, or economy
mode documents.
◗ Using a Color Correction System for maximum color accuracy.
The appearance of the Color Ma nagement se ction of the Advanced
dialog box changes, depending on the settings you’ve selected.
Advanced Printing Page 40
Page 41

Note:
The Color
Management section
also chan ges to this
view if you select the
PhotoEnhance3 radio
button on th e
Advanced dialog box.
Using PhotoEnhance3 or Digital Camera Correction Mode
To correct the exposu re, tone, and sharpness of d igital image s, you
can use PhotoEnhance3 (PhotoEnhance on Windows 3.1) and/or
Digital Camera Correction mode (not available with Windows 3.1).
1 Create your image or document in your application software.
2 Access the printer settings dialog box as described in Printing
from Windows or Printing from a Macintosh.
3 Click Custom, then select either PhotoEnhance3 or Digital
Camera as described in Using Custom Project Types.
4 Click the Advanced button. The Color Management section of
the Advanced dialog box appears as shown here:
Click to select a Tone
setting, if necessary.
Changes are shown
in the example
photograph.
Click to turn on
Digital Cam era
Correction mode
and/or sharpen
Macintosh
Advanced Printing Page 41
the image .
Windows 95, 98, NT
Page 42

5 You can customize your image using these settings:
◗ Select a Tone setting for your image: Normal for standard
tones, Hard for high contrast, or Sepia for an old-fashioned
photo look.
◗ Turn on Digital Camera Correction to correct noise and
other flaws common to digital camera images.
◗ Select Sharpness to sharpen the image, especially the
edges.
6 Click OK to return to the printer settings dialog box.
Using Custom Color Management Modes
You can choose from sever al custo m Co lo r M anag emen t mo des o r
manually adjust brightness, contrast, saturation, and CMY (cyan,
magenta, yellow) color values.
1 Create your image or document in your application software.
2 Access the printer settings dialog box as described in Printing
from Windows or Printing from a Macintosh.
3 Click Custom (in Windows 3.1, click Advanced), then select
either Text/Graph or Economy as described in Using Custom
Project Types.
Advanced Printing Page 42
Page 43

4 Click the Advanced button. The Color Management section of
the Advanced dialog box appears as shown here:
Note:
The Color
Management section
also chan ges to this
view if you d id not
select a Custom
project type or if you
select the Color
Adjustment radio
button on th e
Advance d dialog box .
Not available
with
Window s 3 .1 ;
ICM not
available with
Windows NT
Windows
Macintosh
5 Choose one of the following Color Adjustment Modes:
◗ Automatic
Analyzes the col or in form ation in yo ur project a nd optimize s
color correction accordingly.
◗ Photo-realistic
For printing color photographs.
◗ Vivid
For printing graphics-intensive documents like presentation
pages with charts and graphs. Intensifies colors and
lightens the midtones and highlights.
Advanced Printing Page 43
Page 44

◗ No Color Adjustment
Disables the color adjustment features of the printer
software so you can use a stand-alone color management
utility.
6 If you want to specify individual color correction values, use the
sliders to increase (drag right) or decrease (drag left) the
settings listed below.
◗ Brightness
Makes your image lighter or darker.
◗ Contrast
Increases or d ecrea ses th e d iffere nce betwee n th e bright or
dark parts of an image.
◗ Saturation
Makes colors more vivid or less vivid.
◗ Cyan, Magenta, Yellow
Increases or decreases the amount of the three ink colors
that combine to make a full-color picture. Use these sliders
to fine-tune the color balance in your printout.
7 Click OK to return to the printer settings dialog box.
Advanced Printing Page 44
Page 45

Note:
The Color
Management section
also chan ges to this
view if you select the
ICM, sRGB
ColorSync
button on th e
Advanced dialog box.
, or
radio
Using a Color Correction System
To achieve the maximum col or accuracy, you can use Im age C olor
Matching (ICM; Windows 95 and 98 only), Standard Red Green
Blue (sRGB; Windows 95, 98, and NT only), or ColorSync
(Macintosh only), if your system is set up to use them.
1 Create your image or document in your application software.
2 Access the printer settings dialog box as described in Printing
from Windows or Printing from a Macintosh.
3 Click Custom, then select either ICM (Windows 95 or 98 only),
sRGB (Windows 95, 98, and NT only), or ColorSync
(Macintosh only) as described in Using Custom Project Types.
4 Click the Advanced button. The Color Management section of
the Advanced dialog box appears as shown here:
Not available
with
Window s NT
Windows 95, 98, NT
Advanced Printing Page 45
Macintosh
For deta ils , se e
Using ColorSync
on the Macintosh
Page 46

5 Select one of these color correction systems:
◗ ICM (Windows 95 and Windows 98 only)
For printing documents created in an ICM compatible
application. If you’re using an ICM compatible monitor,
adjusts printed colors to closely match the screen colors.
◗ sRGB (Standard Red Green Blue; not available with
Windows 3.1; recommended only with Windows 98)
For printing documents created in an sRGB compatible
application using sRGB colors, such as those designed for
the World Wide Web. First set up your sRGB compatible
devices (such as your monitor and printer) to use an sRGB
color profile; see your Windows 98 online help for details.
◗ ColorSync (Macintosh only)
Automatically adjusts printout colors to match colors on the
screen. See Using ColorSync on the Macintosh for more
information.
6 Click OK to return to the printer settings dialog box.
Using ColorSync on the Macintosh
Every device you use for producing or viewing colors—your
monitor, scanner, and printer—employs a different color
technology. The Macintosh ColorSync system helps you control all
your devices so their colors match your printer’s as closely as
possible.
Advanced Printing Page 46
Page 47

ColorSync uses profile information from each device—including
your EPSON Stylus COLOR 740i printer—to achieve accurate
color matching. Fir st you have to make sur e your m onitor’s pro file is
set. Then you can use your printer software to specify the exact
method of color matching you want to use.
Note:
When you install your
printer so ftw are, you
automatic ally install
the ColorS y nc profile
for your pri nt er. I f
your system doesn’t
have ColorSync, the
installer a ls o
automatic ally install s
ColorSy nc 2. 0. If y ou
already hav e
ColorSy nc 2. 0, or a
later version, the
installer d oesn’t
install ColorSync.
Follow these steps to set your monitor’s ColorSync profile and use
your printer software’s ColorSync features. The steps may be
different or there may be additional steps, depending on your
Macintosh OS ver sion; see you r Macintosh document ation for more
information on setting up ColorSync.
1 Open the ColorSync System Profile under Control Panels
on the Apple menu.
2 Click the Set Profile button.
3 Select your monitor from the list, and then click Select.
4 Close ColorSync System Profile.
5 Open an application and select a document to print.
6 Open the File menu and click Print.
7 Click Custom, then click Advanced. You see the Advanced
dialog box.
8 Click the ColorSync radio button.
9 For Profile, choose EPSON Standard. This is the ColorSync
profile created especially for your printer. Don’t choose any
other printer profile you may have on your system.
Advanced Printing Page 47
Page 48

Note:
The Ren dering Intent
options may be
limited by the Media
Type you’ve selected.
10 Choose one of the following options for Rendering Intent:
◗ Perceptual
For printing scanned photographs.
◗ Saturation
For printing graphics-intensive documents like presentation
pages with charts and graphs.
◗ Colorimetric
For matching colors on your screen as exactly as possible.
Reproduces colors the way your eye distinguishes them.
11 Click OK to return to the printer settings dialog box.
Selecting Paper Size and Orientation Options
Your printer can print on paper up to 9.5 inches wide and up to
44 inches long in eithe r portrait or landsca pe ori entation. If you p rint
multi-page documents or multiple copies of documents, you can
print the pages collated and in reverse order. You can even rotate
the printed document by 180 degrees to make it closer to the
bottom of the paper (not available with Windows 3.1).
Follow the steps in the section for your operating system:
◗ Selecting Paper Options in Windows
◗ Selecting Paper Options on a Macintosh
Advanced Printing Page 48
Page 49

Selecting Paper Options in Windows
Follow these steps to select paper options on the Paper tab:
1 Create your image or document in your application software.
2 Access the printer settings dialog box as described in Printing
from Windows.
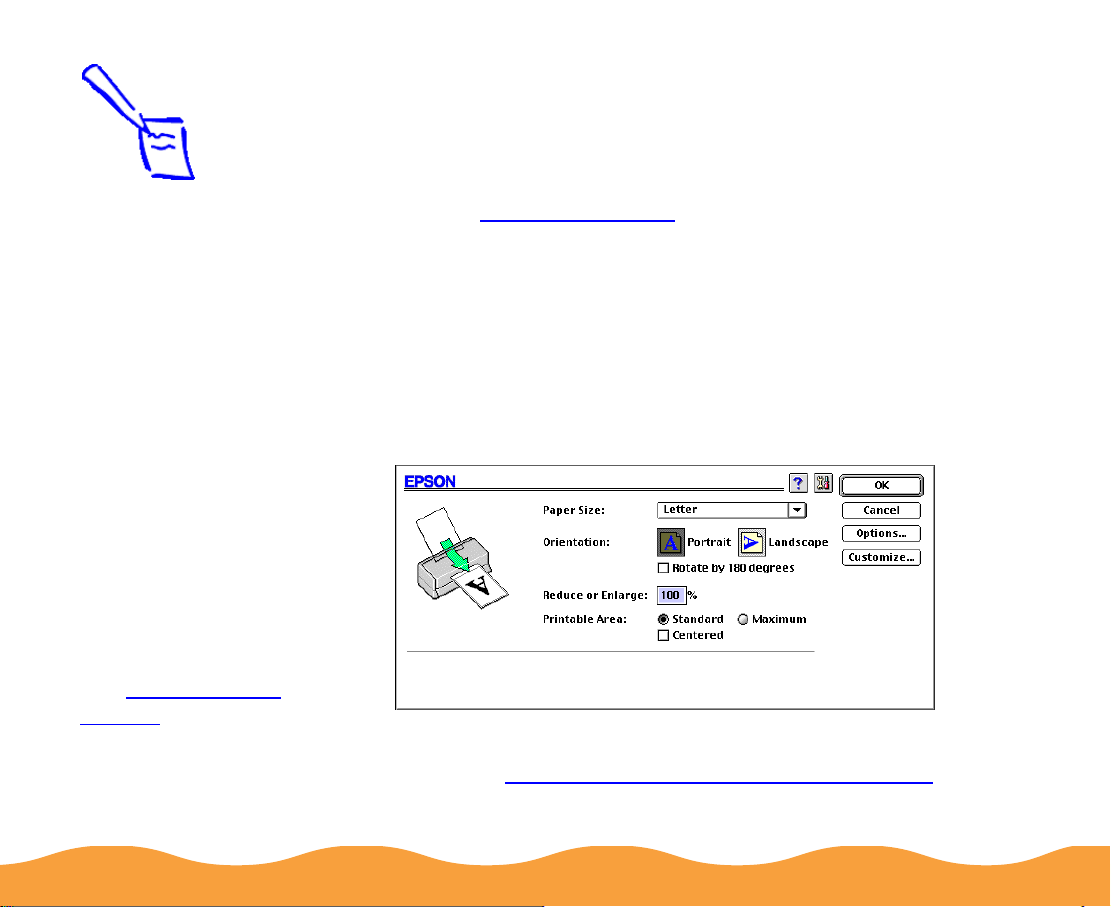
3 Click the Paper tab. You see the Paper dialog box:
Click to select
your Paper
Size
Page gr aphics
change to
show Collate
Printer graphic
reflects changes
to Orientation and
Printable Area
settings
and Rev ers e
Order set t ings
Rotate by 180°
is not available
with
Window s3.1
Advanced Printing Page 49
Page 50

Note:
If the Reduce/Enlarge
setting is set to
Normal an d y ou
select one of the
paper sizes to the
right that is m ark ed
with an asterisk (*),
you see a di alog box
asking you to select a
paper si ze tha t fits
your print er. See
Reducing and
Enlargin g Your
Document Size for
more information.
4 Click the Paper Size drop-down list to select the size of paper
you loaded in the printer.
The sizes marked with an asterisk (*; not available with
Windows 3.1) are larger than you can load in the printer and
can be used only with the Reduce/Enlarge setting on the
Layout tab; see Reducing and Enlarging Your Document Size
for more information.
A4 210
B5 182
A5 148
Letter 8 1/2
Legal 8 1/2
Executive 7 1/4
Half Letter 5 1/2
×
297 mm
×
257 mm
×
210 mm
×
11 in
×
14 in
×
10 1/2 in
×
8 1/2 in
A6 Index card 105
Index card 5
Index card 8
×
8 in
×
10 in
Envelope #10 4 1/8
Envelope DL 110
Envelope C6 114
×
×
×
148 mm
×
9 1/2 in
220 mm
162 mm
Envelope 132
Photo Paper 4
Panoramic 210
B4 257
US B 11
A3 297
×
364 mm *
×
×
420 mm *
Super A3/B 329
B3 364
A2 420
US C 17
×
514 mm *
×
594 mm *
×
User Defined (See Creating
User Defined Paper Sizes for
instructions.)
×
×
17 in *
22 in *
220 mm
6 in
×
594 mm
×
483 mm *
5 If you did not or cannot select the numb er of copies you want to
print in your application program’s Print dialog box, choose the
number in the Copies box. Don’t select the number of
copies he re and in your app licat ion ’s Prin t d ialo g b ox; yo u
may get twice the number of copies you want.
Advanced Printing Page 50
Page 51

Note:
Rotate by 180
The
setting let s yo u print
the lower portion of a
document first, with a
bottom m argin as
small as 0. 12 inch (3
mm) and a top margin
as small as 0. 55 i nc h
(14 mm). This option
is not available with
Window s 3. 1.
°°°°
6 If you’re printing multiple copies of a multi-page document and
you want the copies p rinted in se ts, cli ck th e Collate checkb ox.
The page graphics change to show collated documents.
7 If you’re pr inti ng a mu lti-page document and want the last page
printed first so the pages come out without needing to be
reordered, click the Reverse Order checkbox. The page
graphics change to show later pages printing first.
8 Select the dire ction of pri nting on th e page w ith the Orientatio n
options. To print your document oriented as shown in one of
the following illustrations, select the options listed below it.
When yo u s elect
Maximum
Printable Area
setting, print quality
may decrease in the
expanded printab le
area in the bottom
margin.
as the
Portrait Landscape
Portrait and
Rotate by 180
°
9 The Standard P rintable Area setting uses the maximum
printable area of your paper with a minimum bottom margin of
0.55 inch (14 mm). To increase the minimum bottom margin to
0.12 inch (3 mm), set the Printable Area setting to Maximum.
To center your document on the page using either setting,
Landsc ape and
Rotate by 180
°
select the Centered checkbox.
Advanced Printing Page 51
Page 52

10 Click a tab for the sett ings you want to check or ch ange next, or
click OK to print your document.
Creating User Defined Paper Sizes
You can create up to 10 custom paper sizes (one in Windows 3.1)
and add them to the Paper S iz e list using the User Defined option .
This is useful if you’re printing a custom size document, such as a
banner. You can select any width from 3.5 to 9.5 inches, and any
height (length) from 3.5 to 44 inches.
Follow these steps to create a User Defined paper size:
1 Follow the steps in Printing from Wi ndows to access the print er
software, then click the Paper tab.
2 Click the Paper Size list and scroll to the bottom of it using the
arrows or scroll bar.
3 Click the User Defined option. You see one of the following
dialog boxes:
Windows 3.1
Windows 95, 98, NT
Advanced Printing Page 52
Page 53

Note:
In Windows 95, 98,
and NT, the Paper
Widt h and Paper
Height uni ts are in
hundredth of an inch
(or centimet er)
incremen ts. F or
example, 850 equals
8.50 inches.
4 Windows 95, Windows 98, or Windows NT
Type a name (up to 24 characters) for your custom paper size
in the Paper Size Name field. Then select a Paper Width and
Paper H eight for the paper. To use centimeters instead of
inches, click the 0.01cm option. When you’re finished, click
Save. The paper size name appears in the Paper Size list in
the dialog box. Add more sizes if you want, and click OK when
you’re done.
Windows 3.1
You can create only one User Defined paper size. Type the
width in the Paper Width field and the length in the Paper
Height field. Then click OK.
5 You see the Paper tab again. The p aper size n ame you define d
is added to the Paper Size list and selected as the current
setting. (In Windows 3.1, the setting is named User Defined.)
6 Click a tab for the setti ngs you want to check or ch ange next, or
click OK to print your document
To change or delete a custom paper size:
Window s 95, Windows 98, or Windows NT
Click User Defined in the Paper Size list. Then, on the User
Defined Paper Size dialog box, select the custom paper name in
the Paper Size list and change the Paper Width, Paper Height,
and/or Unit settings as necessary, or click Delete. Click OK when
you’re done.
Advanced Printing Page 53
Page 54

Windows 3.1
You can change the custom paper size, but cannot delete it. Click
User Defined in the Paper Size list. Then, on the User Defined
Paper Size dialog box, chang e the Paper Width and Paper Hei g ht
settings as necessary. Click OK when you’re done.
Selecting Paper Opti ons on a Mac int osh
The Paper Size and Orientation options for your printer software
are on the Page Setup dialog box. The options for collating and
reversing the page order are on the Layout dialog box. Follow the
steps in these sections for selecting the paper options:
◗ Choosing Paper Size and Orientation Options
◗ Selecting Print Order Options
Advanced Printing Page 54
Page 55

Printer graphic
reflects changes
to Orienta ti on
and Printable
Area settings
Choosing Paper Size and Orientation Options
Follow these steps to select the Paper Size and Orientation:
1 Create your image or document in your application software.
2 Open the File me nu and select Page Setup. You see the Page
Setup dialog box:
Click to select
your Paper Size
Click to select your
Orientat ion option s
Click to select
your Print able
Area op tio ns
3 Click the Paper Size pop-up list to select the size of paper you
loaded in the printer.
A4 210 × 297 mm
B5 182 × 257 mm
A5 148 × 210 mm
Letter 8 1/2 × 11 in
Legal 8 1/2 × 14 in
Executive 7 1/4 × 10 1/2 in
Half Letter 5 1/2 × 8 1/2 in
A6 Index card 105 × 148 mm
Index card 5 × 8 in
Index card 8 × 10 in
Envelope #10 4 1/8 × 9 1/2 in
Envelope DL 110 × 220 mm
Envelope C6 114 × 162 mm
Envelope 132 × 220 mm
EPSON Photo Paper 4 × 6 in
Panoramic 210 × 594 mm
Advanced Printing Page 55
Page 56

Note:
Rotate by 180
The
setting let s yo u print
the lower portion of a
document first, with a
bottom m argin as
small as 0.12 inch
(3 mm) an d a t op
margin as s m all as
0.55 inch (14 mm).
°°°°
If you don’t see the exact size you need, you can create a
custom paper size; see Creating custom paper sizes.
4 Select the dire ction of pri nting on th e page w ith the Orientatio n
options. To print your document oriented as shown in one of
the following illustrations, select the options listed below it.
Portrait Landscape
Portrait and
Rotate by 180
°
Landsc ape and
Rotate by 180
°
When yo u s elect
Maximum
Printable Area
setting, print quality
may decrease in the
expanded printab le
area in the bottom
margin.
as the
5 The Standard P rintable Area setting uses the maximum
printable area of your paper with a minimum bottom margin of
0.55 inch (14 mm). To increase the minimum bottom margin to
0.12 inch (3 mm), set the Printable Area setting to Maximum.
To center your document on the page using either setting,
select the Centered checkbox.
6 To collate multiple copies of a multi-page document or reverse
the order in which pages are printed, see Selecting Print Order
Options for instructions.
If you’ve finished selecting options, click OK to close the Page
Setup dialog box. Then select Print from the File menu to print
your document.
Advanced Printing Page 56
Page 57

Creating custom paper sizes
You can create up to 8 custom paper sizes and add them to the
Paper Size list. This is useful if you’re printing a custom size
document, such as a banner. You can select any width from 3.5 to
9.5 inches, and any height (length) from 3.5 to 44 inches.
Follow these steps to create a custom paper size:
1 Open your application’s File menu and select Page Setup.
2 Click the Customize button. You see the following dialog box:
3 Click the New button. Width and Height fields and Inc hes and
cm radio buttons appear on the screen.
4 Type the width and length of your custom paper in the Width
and Height fields. If you need to change from inches to
centimeters, click the correct radio button.
5 Type a name for your paper size in the New Paper Si ze field,
then click OK. The name is added to the Paper Size list and
selected as the current setting in the Page Setup dialog box.
Advanced Printing Page 57
Page 58

Note:
For infor m at ion on
the other settings on
the Layo ut dialog
box, see C hoosing
Print Layout Options
on a Mac int os h.
6 To delete a custom paper size, click the Customize button.
Then click the na me of the cu stom paper size, and cli ck Delete.
Click OK to return to the Page Setup dialog box.
Selecting Print Order Options
Follow these steps to use the Collate and Reverse Order options:
1 Open your application program’s File menu and select Print.
2 Click the Layout icon. You see the Layout dialog box:
Print Order options
3 If you’re printing multiple copies of a multi-page document and
you want the copies p rinted in se ts, cli ck th e Collate checkb ox.
The page graphics change to show collated documents.
Advanced Printing Page 58
Page 59

4 If you’re pr in ting a mu lt i-page docu ment and w ant the la st pag e
printed first so the pages come out without needing to be
reordered, click the Reverse Order checkbox. The page
graphics change to show later pages printing first.
5 Click OK to close the Layout dialog box.
Selecting Print Layout Options
The print layout options let you reduce or enlarge almost any size
document to print on your printer. You can also select options to
proof multiple pages on one sheet of paper, add page frames, and
add a predefined or custom watermark.
Note:
Layout options are not
available with
Windows 3.1.
Follow the steps in the section for your operating system:
◗ Choosing Print Layout Options in Windows
◗ Choosing Print Layout Options on a Macintosh
Choosing Print Layout O pti ons in Wi ndows
Follow the steps in these sections to use options in the Layout
dialog box:
◗ Reducing and Enlarging Your Document Size
◗ Using Multiple Print Layouts and Page Frames
◗ Adding a Watermark
Advanced Printing Page 59
Page 60

Reducing and Enlarging Your Document Si ze
When you want to make the printed size of a document different
from its actual size, you can use your printer software’s
Reduce/Enlarge settings. You can make the document fit into the
printable area on a selected paper size or you can choose to
reduce or enlarge it to a selected percentage.
Follow these steps to reduce or enlarge your document size:
1 Follow the steps in Printing from W indows to access the print er
settings dialog box, then click the Paper tab.
2 Click the Paper Size list and select the actual size of the
document you want to print.
For example, if your document size is 11 × 22 inches, select
US C 11 × 22 in. This paper size is too large to fit in your
printer, so you’ll need to proportion it to fit on a smaller paper
size (by reducing the document size). If your document size is
5 × 8 inches, but you want it to fit in the maximum area on
Letter-size paper, you’ll need to proportion it to fit on a larger
paper size (by enlarging the document size).
3 If the Paper Size setting you selected for your document is
within the maximum paper size that can fit on your printer, but
you want to enlarge or reduce the document, you need to
select the reduction/enlargement manually. Go to step 5.
Advanced Printing Page 60
Page 61

4 If the Paper Size setting you selected is larger than the
maximum size that can be printed on your printer, you see the
following dialog box:
Output Paper
list
In the Output Paper list, select the actual size of the paper
loaded in the printer and click OK. This automatically turns on
the Fit to Page setting so the document fits into the printable
area on the output paper you select.
The selected Paper Size, reduction percentage, and Output
Paper settings now appear above the printer graphic.
Paper Size
setting
reduction
percentage
Output Paper
setting
Advanced Printing Page 61
Page 62

If you want to adjust the proportions or sizes, go to step 5. If
you’re ready to print, go to step 7.
5 Click the Layout tab. You see the Layout dialog box:
Reduce/Enlarge
settings
Advanced Printing Page 62
Page 63

Note:
If you prev iously
selected a Paper Size
setting th at is larger
than the maximum
paper siz e f or y our
printer and then
choose
Paper Size changes to
Letter 8 1/2 × 11 in
Normal
, the
.
6 Select one of the following Reduce/Enlarge settings:
◗ Select Normal to set the print proportion to 100%.
◗ Select Fit to Page to automatically reduce or enlarge the
document to fit on the paper size loaded in the printer. The
Paper Size option beneath the F it to Page setting becomes
active; select the size of paper loaded in the printer.
Select Fit to Page,
then select the size
of paper loaded in
the printe r here
◗ Select Custom, then select a percentage (10% to 400%) in
the Scale to: field to reduce or enlarge the document by a
specific amount.
7 If you’re finished selecting Layout options, click OK.
If you want to select more options, see Using Multiple Print
Layouts and Page Frames.
Advanced Printing Page 63
Page 64

Using Multiple Prin t Layouts and Page Frames
If you’re printing a multiple page document, but you want a quick
proof of the images on each page printed on one piece of paper,
you can select Print Layout op ti ons in the printer softwar e. You can
choose the way the pages are placed on the pap er and ad d a lined
frame to each page, if you want.
Follow these steps to use the Print Layout options:
1 Follow the steps in Printing from W indows to access the print er
settings dialog box.
2 Click the Layout tab. You see the Layout dialog box.
3 To print multiple pages of your document on one sheet of
paper, select either the 2 Pages or 4 Pages radio button.
Click a button to
select a m ultiple
page pr int lay out
4 If the page order of the layout shown in the on-screen graph ic is
how you want your document printed, go to step 3.
To change the page order, click the Page Order button. Then
select the page order you want to use from the Print Layout
dialog box that appears.
Advanced Printing Page 64
Page 65

Note:
To add a custom
watermark, you must
firs t create the
watermark as a bitmap
in an application
program that can
create bitmap files.
See your application’s
docum ent ation for
instructions.
5 If you want to frame each pa ge’s contents w ith a black line, one
dot wide, click the Print page frames checkbox.
6 If you’re finished selecting Layout option s, click OK. If you want
to select more options, see Adding a Watermark.
Adding a Watermark
You can add a watermark to each page in your document to
emphasize its purpose or indicate how the document should be
handled. For example, you may want to add a watermark of the
word “Confidential ” to documents you don’t want distr ibuted to other
parties. Or you can add a custom bitmap of your company logo so
your document looks like printed letterhead.
Follow these steps to add a watermark:
1 Follow the steps in Printing from W indows to access the print er
settings dialog box.
If you selected a
multiple page print
layout op t ion (as
describ ed in Using
Multiple Print Layout s
and Pag e F rames),
your watermark will
appear on each page
in the layo ut .
Advanced Printing Page 65
2 Click the Layout tab. You see the Layout dialog box.
3 To select a watermark, click in the WaterMark drop-down list.
WaterMark
drop-do w n lis t
Page 66

Then highlight one of the following watermarks:
4 To change the watermark or specify how it appears, click the
See how your
selections will
look in the
Layout
graphic
Confiden tial
Draft
Urgent
Priority
Hot
Do Not Copy
For Your Eyes Only
Review Copy
Top Secret
Duplicate
To turn off your watermark, select None from the drop-down
list.
Settings button. You see the following dialog box:
Click here to select a
predefined waterm ark
Click here t o load a
custom watermark
you’ve created
Specify how you wan t
your watermark to l o ok
using the se options
5 To load a custom watermark you’ve created as a bitmap file in
an application program, click the User Defined button.
Advanced Printing Page 66
Page 67

You see the following dialog box:
Note:
You can c reate up to
10 custom watermarks.
In Wi ndows 95 and 98,
you can use any
bitmap file up to
15MB in size. With
Windows NT, the file
can be any size.
To delete a custom
watermark from the list,
click the
button, select the
watermark, and click
Delete
User Defined
.
Click Browse to select
your bitmap file
Then type a name
for your custom
watermark here
and click Save
Click the Browse button. You see a file selection dialog box.
Navigate to the folder containing the bitmap file you want to
use, select the file, and click OK.
Type a name for the custom watermark (up to 24 characters
long) in the Watermark field. Click the Save button to add it to
the list, then click OK.
The custom watermark no w appears as the selected w atermark
in the Watermark Settings dialog box and is shown in the
on-screen graphic.
Advanced Printing Page 67
Page 68

Note:
If your mo nit or
display s o nly 16
colors, the Intensity
adjustments are not
shown in th e Layout
graphic. If you choose
the No Halftoning
setting, the Intensity
setting does not
determ ine how your
watermark is printed.
6 Now select the way you want the watermark to appear by
choosing the follow ing option s. The on- screen grap hic changes
to reflect all the settings you choose.
◗ Position selects where you want the watermark to appear
on your page: Center, Top-Left, Top-Center, Top-Right,
Left, Right, Bottom-Left, Bottom-Center, or
Bottom-Right.
◗ Size adjusts the size of the watermark, either larger or
smaller, as you move the slide bar.
◗ Color lets you choose a color for your predefined
watermark: Red, Black, Blue, Aqua, Lime, Fuchsia, or
Yellow. You cannot select a color for a custom watermark;
it is printed in its original colors.
◗ Intensity sets the lightness or darkness of the watermark
(from 5% to 100% ) ba sed on wh ere you move the slide b ar.
7 If you’re fini shed changing Layout option s, click OK to close the
Layout dialog box.
Advanced Printing Page 68
Page 69

Choosing Print La yout O p ti ons on a Ma cintosh
Follow the steps in these sections to use options in the Layout
dialog box:
◗ Using the Fit to Page Option
◗ Using Multiple Print Layouts and Page Frames
◗ Adding a Watermark
Using the Fit to Page Option
When you want to make the printed size of a document different
from its actua l size, you can use you r pr inter softwar e’s Fit to Page
option to proportion it to fit in the maximum, centered area on a
selected paper size.
Follow these steps to use the Fit to Page option:
1 Create your image or document in your application software.
2 Open the File me nu and select Page Setup. You see the Page
Setup dialog box.
3 Click the Paper Size list and select the actual size of the
document you want to print. For example, if your document
size is 8 1/2 × 11 inches, select Letter for the Paper Size
option.
Advanced Printing Page 69
Page 70

If you want to print this document on 4 × 6-inch EPSON Photo
Paper, you’ll use the Fit to Page setting to reduce the
document to that size. If you want to print this document on
Legal-size paper (8 1/2 × 14 inches), you’ll use the Fit to Page
setting to enlarge the document to that size.
4 Click OK to close the Page Setup dialog box.
5 Now open the File menu and select Print. You see the printer
settings dialog box.
6 Click the Layout icon. You see the Layout dialog box:
Fit to Page
settings
7 Select one of the following Fit to Page options:
◗ Select Off to set the print proportion to 100%.
◗ Select On to automatically reduce or enlarge the document
to fit on the paper size loaded in the printer.
Advanced Printing Page 70
Page 71

The Paper Size option beneath the Fit to Page setting
becomes active.
Select the paper size you’ve
loaded in th e printer here
Paper gra phic display s th e s elected
paper size and
document size
Now select the size of the paper you’ve loaded in the
printer. This automatically sets the correct reduction or
enlargement percentage to fit the document into the
printable area on the selected paper size. The selected
document size an d p aper size setting s no w ap pear be neath
the paper graphic.
8 If you’re finished selecting Layout options, click OK.
If you want to select more options, see Using Multiple Print
Layouts and Page Frames.
Advanced Printing Page 71
Page 72

Using Multiple Prin t Layouts and Page Frames
If you’re printing a multiple page document and you want a quick
proof of the images on each page printed on one piece of paper,
you can select Print Layout options in the printer software. You
can choose the way the pages are placed on the paper and add a
lined frame to each page, if you want.
Follow these steps to use the Print Layout options:
1 Open an application and select a document to print.
2 Open the File menu and click Print. You see the printer
settings dialog box.
3 Click the Layout button. You see the Layout dialog box.
4 To print multiple pages of your document on one sheet of
paper, select either 2 Pages or 4 Pages in the Pages pop-up
list.
Click the arr ow and
select a mu lti ple page
print layout
5 If the page order of the layout shown in the printer graphic is
how you want your document printed, go to step 6.
To change the page order, click the arrow in the Page Order
pop-up list. Then select the page order you want to use.
Advanced Printing Page 72
Page 73

6 If you want to frame each pa ge’s contents w ith a black line, one
dot wide, click the Print page frames checkbox.
7 If you’re finished selecting Layout option s, click OK. If you want
to select more options, see Adding a Watermark.
Adding a Watermark
Note:
To add a custom
watermark, you must
first create the
watermark as a PICT
file in an application
program t hat can
create PICT files. See
your applic ation’s
docume nt at ion for
instruct ions.
If you selected a
multiple page print
layout op ti on (as
describ ed in Using
Multiple Print Layouts
and Pag e F rames),
your watermark will
appear on each page
in the layo ut .
You can add a watermark to each page in your document to
emphasize its purpose or indicate how the document should be
handled. For example, you may want to add a watermark of the
word “Confidential ” to documents you don’t want distr ibuted to other
parties. Or you can add a custom PICT fi le of your company logo so
your document looks like printed letterhead.
1 Open an application and select a document to print.
2 Open the File menu and click Print.
3 In the printer settings dialog box, click the Layout button.
You see the Layout dialog box.
4 To use one of the pre defi ne d water marks, cl ick the arr ow in the
Name list in the Watermark box and choose one of these:
Confidential
Draft
Urgent
Priority
Hot
Do Not Copy
For Your Eyes Only
Review Copy
Top Secret
Duplicate
Go to step 6.
Advanced Printing Page 73
Page 74

5 To load a custom watermark you ’ve created as a P ICT file in an
application program, click the Add/Delete button. You see the
following dialog box:
Note:
You can create up to
10 custom watermarks
from PICT files up to
1MB in size.
To delete a custom
watermark from the
list, click the
Add/Delete
select the watermark,
and click
button,
Delete
.
Click the A dd button
to select a P ICT f ile
Click the Add button. You see a dialog box for selecting files.
Navigate to the folder containing the PICT file you want to use,
select the file, and click Open.
The name of your PICT file appears in th e Mark Name field and
is added to the Watermark List. Click the Save button to close
the dialog box.
The custom watermark no w appears as the selected w atermark
in the Layout dialog box and is shown in the layout graphic.
6 Now select the way you want the watermark to appear by
choosing the following options. The layout graphic changes to
reflect all the settings you choose.
◗ Color lets you choose a color for your predefined
watermark: Red, Black, Blue, Aqua, Lime, Fuchsia, or
Yellow. You cannot select a color for a custom watermark;
it is printed in its original colors.
Advanced Printing Page 74
Page 75

Note:
If your monitor
display s only 16
colors, the Intensity
adjustments are not
shown in th e Layout
graphic. If you
choose th e N o
Halftoning setting ,
the Intensity setting
does not determine
how your watermark
is printe d.
◗ Intensity sets the lightness or darkness of the watermark
(from 5% to 100%) based on where you move the slidebar.
◗ To adjust the size and position of the watermark, move the
cursor over the Layout graphic. Four boxes appear in the
corners of the graphic and the cursor changes to a hand.
Click and drag
anywh ere in here to
move the watermark
Click and drag one of
the corner boxes to
resize the w at ermark
To move the watermark, click anywhere inside the graphic
and drag it into one of these positions: center, top-center,
upper-right, middle-right, lower-right, bottom-center,
upper-left, middle-left, or lower-left.
To resize the watermark, move the cursor over one of the
corner boxes; the cursor changes to a pointing hand. Click
and drag the box corner to reduce or enlarge the
watermark.
7 If you’re fini shed changing Layout option s, click OK to close the
Layout dialog box.
Advanced Printing Page 75
Page 76

Using Print Preview on the Macintosh
You can get a preview of how your document will print with the Print
Preview feature in your Macintosh printer software. Print Preview
shows the results of the following printer software settings on your
document:
◗ Print layout settings such as Fit to Page, Page Order,
Watermark, Reverse Order, and Collate
◗ Page Setup options, such as Paper Size, Orientation, Rotate
by 180°, and Printable Area
1 Open an application and select a document to print.
2 Open the File menu and click Print. You see the printer
settings dialog box.
Click the Print Preview ic on
The Print button
changes to the
Preview button
Advanced Printing Page 76
Page 77

3 Click the Print Preview icon. The Print button changes to
the Preview button.
4 Click the Preview button. You see the print preview dialog box:
Page control
buttons
Preview
image
Preview s iz ing
buttons
5 The first preview page is the first page of your document. To
6 To change the size of the preview, click the following buttons:
Help, Cancel,
and Print buttons
change the preview page, click the or button to go back
or forward one page, or enter a page number in the Page field.
◗ Click to preview the entire page in the display area
◗ Click to enlarge the preview
◗ Click to enlarge the preview even further
7 To print your document, click Print. To close the print preview
dialog box and return to your application, click Cancel.
Advanced Printing Page 77
Page 78

Saving Custom Settings
After you’ve fine-tuned your printer settings for a special project,
you can save the settings as a group. Then you can quickly reuse
them the next time you print a similar project. You can save up to
10 (Windows) or 8 (Macintosh) groups of settings.
1 Customize your printer settings, then access the Advanced
dialog box as described in Customizing Print Quality and
Special Effects.
(In Windows 3.1, access the main printer settings dialog box as
described in Printing from Windows, then click Advanced.)
2 Click the Save Settings button. You see this dialog box:
Macintosh
Windows
3 Type a unique name for your settings (up to 16 charac ters) and
click the Save button.
Advanced Printing Page 78
Page 79

4 Click OK to close the Advanced dial og bo x (not necessary w ith
Windows 3.1).
To use the settings, click Custom (in Windows 3.1, click
Advanced). Then open the Custom Settings list and double-click
the name you selected for your custom settings group. (On a
Macintosh, the custom settings group is automatically selected.)
To redefine o r dele te your custom setti ng s, see Rede fi ning Cust om
Settings or Deleting Custom Settings.
Redefining Custom Settings
To change the options in a customized settings group but keep the
same name for it, follow these steps:
1 From the main printer settings dialog box, click Custom (in
Windows 3.1, click Advanced). Then select the name of the
custom settings group you want to redefine in the Custom
Settings list.
2 Click the Advanced button (in Windows 3.1, click More
Settings) and change the printer settings. (If you change the
Media Type and Ink settings, you’ll need to create a new
custom setting group instead of redefining an existing one.)
3 When you’re finished redefining settings, click Save Settings.
(In Windows 3.1, click OK to close the More Settings d ialog b ox
and the click S ave Settin gs on the main printer settings dialog
box.)
Advanced Printing Page 79
Page 80

4 Select the name of the custom settings grou p you’re re defini ng
in the Custom Settings dialog box.
5 If you’re using Windows, click Save. You see the Save As
dialog box. Click OK to save your redefined settings. (Click
Cancel to cancel your changes.)
On a Macinto sh, click the Re define but ton. Then cli ck Re place
at the confirmation dialog box to save your redefined settings.
(Click Cancel to cancel your changes.)
Deleting Custom Settings
1 From the main printer settings dialog box, click Custom, then
click the Advanced button. Click Save Settings on the
Advanced dialog box. (In Windows 3.1, click Advanced, then
click Save Settings on the main printer settings dialog box.)
2 Select the custom settings group in the Custom Settings box,
and click Delete. Then click OK to confirm the deletion, if
necessary. (You cannot delete any of th e pr edefi n ed d ocume nt
types.)
Advanced Printing Page 80
Page 81

Printing on Special Media
Your EPSON Stylus COLOR 740i lets you print on just about any
kind of paper you wa nt to use . Yo u can ge t gre at resu lts printi n g on
various sizes of plain paper, letterhead, and envelopes, but you’ll
get even better results with specially coated ink jet paper.
For the best output, use EPSON’s photo-quality paper: ink jet
paper, glossy paper, glossy film, note cards, and photo paper. For
special projects, you can use a variety of EPSON media designed
for ink jet printers, ranging from transparencies to iron-on transfer
paper.
Follow the steps in this chapter on:
◗ Selecting Special Media
◗ Media Loading and Handling Guidelines
Page 81
Page 82

Selecting Special Media
When you print on special media, you need to choose the correct
Media Type and Paper Size settings in your printer software. The
table below lists t he available EPSON med ia and the corresponding
Media Type setting for each one.
Media name Size Part number Media Type setting
EPSON 360 dpi Ink Jet Paper Letter
A4
EPSON Iron-On Cool Peel
Transfer Paper
EPSON H igh Quality Ink J et Pa per Lett er
EPSON Photo Quality Ink Jet
Paper
EPSON Photo Quality Ink Jet
Cards
EPSON Photo Quality Self
Adhesive Shee t s
Letter S04115 3/ S041155
A4
Letter
A4
Legal
A6
×
10 inches
8
A4 S041106
S041060
S041059
S041111
S041117
S041062
S041061
S041067
S04105 4
S04112 2
360 dpi Ink Jet
Paper
Photo Quality Ink
Jet Paper
Printing on Special Media Page 82
Page 83

Media name Size Part number Media Type setting
EPSON Photo Quality Glossy
Paper
EPSON Phot o Paper 4
EPSON Photo Quality Glossy Film Letter
EPSON Photo Stickers Kit
(CD-ROM and pa per)
EPSON Photo Stickers (refill)
EPSON Ink Jet Transparencies Letter
Letter
A4
×
6 inches
Letter
A4
Panoramic
A4
A6
A6
A6
A4
To order EPSON papers and other media, contact your dealer or
call EPSON Accessories at (800) 873-7766 or visit our web site at
www.epsonsupplies.com (U.S. sales only). In Canada, please call
(800) 873-7766 for dealer referral.
S041124
S041126
S041134
S041141
S041140
S041145
S041072
S041071
S041107
S041144-KIT
S041144
S041064
S041063
Photo Paper
Photo Quality
Glossy Film
Ink Jet
Transparencies
Printing on Special Media Page 83
Page 84

Caution:
Don’t use th e c leaning
sheets that may be
included w it h y our
special media; they
may jam inside the
printer.
Media Load in g an d Han dl in g G uid el in es
The following tips help you get the best results on any type of
paper:
◗ Always handle sheets by the edges, and don’t touch the
printable surface.
◗ When you load paper, make sure the printable side is
facing up.
◗ You can load paper up to the arrow mark on the left edge
guide.
◗ Return unused sheets and envelopes to their original package
as soon as possible. See Paper for more storage information.
◗ If your paper package included protective sheets, cover the
printed side of your paper with these sheets before stacking
your paper.
◗ Use ink jet papers within one year of purchase. Use glossy
media and transparencies within six months.
◗ Follow any specific instructions for your paper in the following
sections:
◗ Letterhead, Preprinted Forms, and Legal-size Paper
◗ EPSON Photo Quality Glossy Paper, Film, and
Transparencies
◗ Envelopes
Printing on Special Media Page 84
Page 85

◗ EPSON Photo Paper
◗ EPSON Photo Quality Ink Jet Cards
◗ EPSON Photo St ickers
◗ EPSON Photo Quality Self Adhesive Sheets
◗ EPSON Iron-On Cool Peel Transfer Paper
Letterhead, Preprinted Forms, and Legal-size Paper
Load the top edge first. When you load long paper, pull up the
paper support extension and both output tray extensions.
EPSON Photo Quality Glossy Paper, Film, and Transparencies
Before you load glossy film or transparencies, put a support sheet
(packed with the media) or a plain paper sheet beneath the stack.
(Don’t use a support sheet with Photo Quality Glossy Paper.)
You can load up to 2 0 sheets of glo ssy paper or glossy film, or up to
30 transparencies.
On Photo Quality Glossy Film, you may get better results by loading
one sheet at a time. With multiple sheets loaded, the minimum top
margin you can use is 1.2 inches (30 mm). If you want to use a
smaller top margin, load and print one sheet at a time.
Printing on Special Media Page 85
Page 86

Note:
It is best not to use
Maximum
the
printable area setting
in the printer software
when print ing on
paper with a c ut
corner. Pa rt of yo ur
docume nt m ay print
in the cut out area.
If your media has a cut corner, position it in the printer as shown
here.
cut corner
Remove each sheet from the output tray immediately after it’s
printed. Make sure each sheet is dry before stacking.
Printing on Special Media Page 86
Page 87

Note:
If the stack of
envelopes is more
than 0.4- inc h
(10 mm) thick, press
the enve lope edges
to flatten them before
stacking or load one
envelope at a time.
Envelopes
You can load up to 10 envelopes
flap edge first, with the printable
side up, as shown:
Select Plain paper as the Media
Type and choose the correct
envelope size as the Paper Size
setting in the printer software.
If ink smears when you print on
envelopes or other thick media,
set the paper thickness lever to the + position as shown. (Return
the lever to the 0 position before printing on other media.)
Printing on Special Media Page 87
Page 88

Note:
To keep your
printouts looking their
best, store them in a
resealable plastic bag
or other airtight
coverin g and protect
them from heat,
humidit y, and direct
sunlight .
EPSON Photo Paper
You can use EPSON Photo Paper to print photographs that look
almost as good as the one s you get from film pr ocessing. 4 × 6-inch
Photo Paper is perforated around the edges, so you can trim your
printouts and “bleed” the photo—extend it to the edge of the
paper—on all sides.
You can load up to 20 sheets of 4 × 6-inch, Letter-size, or A4-size
Photo Paper or 1 sheet of Panoramic paper at a time. Make sure
you place a support sheet beneath the paper if it is included in the
paper package.
Keep the following in mind when using EPSON Photo Paper:
◗ Load the paper with the whiter (glossier) side facing up.
◗ If you’re loading Panoramic Photo Paper, pull up the paper
support extension. T hen load the Pan oramic paper and hold up
its top edge while you press the
into the printer.
E load/eject button to feed it
Be sure to su pport
your Panoramic
Photo Paper as it
ejects from the printer
so it doesn’t fall onto
the floor.
Printing on Special Media Page 88
Select Photo Paper as the Media Type setting and
Panoramic 210 ×××× 594 mm as the Paper Size setting.
Page 89

◗ If you’re loading 4 × 6-inch Photo Paper, follow these steps:
1 Position the perforated margins as shown and load up to
20 sheets with support sheets A and B beneath the stack.
2 When you create the image you’ll print in your application
software, size it to 4.25 × 6.25 inches so the image covers
the perforations as shown.
0.67 in
0.24 in
0.12 in
0.12 in
Printing on Special Media Page 89
0.24 in
Tri m size
Printed image siz e
Page 90

You can use
4×6-in c h EPSON
Photo Paper like a
postcard. After
printing on the glossy
side of the Photo
Paper, let your image
dry completely.
Then se t the paper
thickness lever to the
+
position, reload the
flattened card with
the uncoated side up,
and prin t your
message in black ink
360 dpi Ink Jet
using
Paper
Type setting.
as the Media
3 Choose these printer software settings:
Photo Paper as the Media Type setting
EPSON Photo Paper 4 × 6 in as the Paper Size setting
Maximum as the Printable Area setting
4 After you print, fold the paper back and forth along the
perforations and carefully tear the margins off.
Printing on Special Media Page 90
Page 91

EPSON Photo Quality Ink Jet Cards
You can load up to 30 cards at a time. Always place the included
support sheet under the cards and load them as shown below.
Make sure you set the paper thickness lever to the + position as
shown in Envelopes. When you’re ready to print, set the Media
Type to Photo Quali ty Ink Jet P aper and the Paper Size setting to
the card size in your printer software.
Printing on Special Media Page 91
Page 92

EPSON Photo Stickers
Use these sheets of stickers to print small, decorated photos for
use on cards, invitations, or other items. You’ll need to use an
application that can create photo stickers, such as StickerPix.™
Load one sheet of Photo Stickers at a time. Make sure to place
support sheets A and B that came with the stickers beneath the
sheet.
When you’re ready to print, select Photo Quality Glossy Film as
the Media Type setting and A6 Index card 105
Paper Size in your printer software.
×
148 mm as the
EPSON Photo Quality Self Adhesive Sheets
Use these sheets to print la bels or stickers. You can load one sheet
at a time. Make sure your adhesi ve sheets are fully adher ed to their
backing sheet before you load them.
When you’re ready to print, select Photo Quality Ink Jet Paper as
the Media Type setting in your printer software.
Printing on Special Media Page 92
Page 93

EPSON Iron-On Cool Peel Transfer Paper
You can print photos, company logos, or anythin g else you want on
these transfer papers, and then iron your images onto T-shirts or
other cloth items.
Load one sheet of transfer paper at a time. Select 360 dpi Ink Jet
Paper as the Media Type setting.
Make sure you reverse your imag e befor e you print i t—esp ecially if
it includes text—so it will read correctly when it’s transferred. You
can use the Flip Horizontal setting in your printer software to do
this (see Customizing Print Quality and Special Effects for
instructions).
After you print, follow the instructions that came with the paper to
iron the image onto the shirt or other item.
Printing on Special Media Page 93
Page 94

Managing Print Jobs
Your printer software includes several utilities for managing print
jobs. You can use them to monitor your printer’s status and check
on the current print job or jobs waiting to print.
This chapter provides instructions for the following:
◗ Managing Print Jobs in Windows 95, Windows 98, and
Windows NT 4.0
◗ Managing Print Jobs in Windows 3.1
◗ Managing Print Jobs on a Macintosh
Page 94
Page 95

Windows N T 4. 0
servers and
workstations include
a messenger service
to alert you to printer
errors or let you know
when a print job is
finished. If you have
appropria t e network
access pri vi leges or
you’re con tr olling
printing from the
server, you c an also
set other options. See
your Windows NT
documentation for
details.
Managing Print Jobs in Windows 95,
Windows 98, and Windo ws NT 4.0
Your printer softwa re offers three w ays to ma nage and monitor your
print jobs:
◗ Progress Meter, w hich appea rs each ti me you send a print job,
as described in Checking Printer Status. You can turn the
Progress Meter on or off and se lect other printin g op tions u s ing
the Speed & Progress button; see Selecting the Speed &
Progress Options for details.
◗ Spool Manager (not available with Windows NT), which
appears in the taskbar at the bottom of the screen each time
you print, as described in Using the Spool Manager.
◗ Status Monitor 2, which provides a variety of print monitoring
options, as described in Using Status Monitor 2.
Managing Print Jobs Page 95
Page 96

Selecting the Speed & Progress Options
You can set up the way your printer software sends print jobs and
displays the Progress M eter usi ng th e S peed an d Pro gress dialog
box. To access the di alog box, you must open your pr inter softw ar e
from the Windows Printers utility as described below.
1 Click Start, point to Settings, then click Printers.
2 Right-click the EPSON Stylus COLOR 740 printer icon and
select Properties (Windows 95 and 98 ) or Doc ument De faults
(Windows NT) from the menu.
3 Click the Utility tab. You see the Utility menu:
Utility tab
Speed &
Progress
button
4 Click the Speed & Progress button.
Managing Print Jobs Page 96
Page 97

You see this dialog box:
Not available with
Windows NT
If you have more than
one hard dis k driv e,
you can select a folder
for storing m ultiple
copy prin t jo bs here.
You don’ t see this box
if you have only one
hard disk drive.
Select the following options:
◗ High Speed Copies speeds up printing of multiple copies
of the same document using hard disk space as a cache.
◗ Show Progress Meter lets you control whether or not the
Progress Meter is displ ayed when you send a print job. S ee
Checking Printer Status for information on the Progress
Meter.
Managing Print Jobs Page 97
Page 98

◗ EPSON Printer Port (not available with Windows NT 4.0)
lets you optimize the transfer rate of your printer port for
EPSON printers instead of using the Windows default
printer port. You may see one of these messages beneath
the EPSON Printer Port option:
◗ High speed (DMA) transfer enabled tells you that
you’re already using fast DMA transfer mode.
◗ For higher data transfer rates, use DMA transfer lets
you know that you can speed up printing by enabling
DMA transfers on your system. See your computer
documentation or contact your computer’s technical
support for instructions on using DMA transfers, if your
computer supports them.
If you see no message, you cannot enable DMA transfers
on your system.
5 Click OK to close the Speed & Progress dialog box and return
to the Utility menu. Then click OK again to exit your printer
software.
Managing Print Jobs Page 98
Page 99

Using the Spool Manager
The Spool Manager (not available with Windows NT) creates a
temporary print job file and stores it in the C:\TEMP or
C:\WINDOWS\TEMP folder. The software then sends the file to
your printer at the right time.
To open Spool Manager while you’re printing, click the EPSON
Stylus COLOR 740 button that appears on the taskbar at the
bottom of the screen. You see the Spool Manager window:
Print job file Command buttons
The Spool Manager window displays the status of your print job
files and lets you control them . To cancel, pause, resume, or re start
a print job, click the job to highlight it; then click the corresponding
command button on the bottom of the window.
Managing Print Jobs Page 99
Page 100

Note:
You can c hec k pri nter
status using Status
Monito r 2 only when
your print er is
connec t ed directly to
your computer on a
bidirect ional port.
Deleting a Stalled Print Job
If you’re having tr ouble pri nting , it may b e beca use of a stal led p rint
job. Follow these steps to delete it and continue printing:
1 Click the EPSON Stylus COLOR 740 button on the taskbar.
2 Click on any print jobs marked Held.
3 Click the Cancel button.
4 Exit Spool Manager and try printing again.
Using Status Monitor 2
Status Monitor 2 lets you view detailed information about your print
jobs and control how you want printing monitored. Before you can
use Status Monitor 2, you must enable background monitoring for
your printer if it isn’t already enabled.
Follow the instructions in these sections:
◗ Enabling Background Monitoring
◗ Setting Up Monitoring Preferences
◗ Using the Status Monitor 2 Main Window
◗ Using the Printer Status Window
◗ Using the Job Status Window
Managing Print Jobs Page 100
 Loading...