

Page 1

DOS User's Guide
Installing the Printer Driver for DOS Programs . . . . . . . . . . . . . 2
Using Built-in Fonts and Character Tables . . . . . . . . . . . . . . . . . 3
Troubleshooting and Maintenance . . . . . . . . . . . . . . . . . . . . . . . . 6
Running a Printer Operation Check . . . . . . . . . . . . . . . . . . 6
Problems and Solutions . . . . . . . . . . . . . . . . . . . . . . . . . . . . . 9
Ink Cartridge Problems . . . . . . . . . . . . . . . . . . . . . . . . . . . . . 15
Cleaning the Print Heads . . . . . . . . . . . . . . . . . . . . . . . . . . . 17
Aligning the Print Head . . . . . . . . . . . . . . . . . . . . . . . . . . . . 18
Cleaning the Printer . . . . . . . . . . . . . . . . . . . . . . . . . . . . . . . . 19
Transporting the Printer . . . . . . . . . . . . . . . . . . . . . . . . . . . . 20
Character Tables . . . . . . . . . . . . . . . . . . . . . . . . . . . . . . . . . . . . . . . 21
International character sets . . . . . . . . . . . . . . . . . . . . . . . . . . 30
Characters available with ESC ( ^ command . . . . . . . . . . . 31
Copyrigh t © 1998 by SEIKO EPSON CORPORATION,
Nagano, Japan
4008999
xxx-00
Page 2

Installing the Printer Driver for DOS Programs
Most DOS software programs include a driver for EPSON
ESC/P 2™ printers, and r equire you to select the prin ter name from
a list to install the printer driver. To take advantage of your printer's
advanced built-in scalable fo nts and graphics h andling, you need to
select an appropriate driver.
If your printer is not included in the list, contact your software
manufacturer to obtain updated software.
If the manufacturer does not have an updated printer driver for your
printer, selec t an alt ernati ve print er name from th ose bel ow, sta rting
from the top.
When printing black only:
LQ-870/1170
LQ-570 (+)/1070(+)
SQ-870/1070
LQ-850
LQ-500
When printing black and color:
EPSON Stylus PRO
EPSON S t ylus COLOR 50 0
EPSON S t ylus COLOR II
LQ-860
LQ-2550
Note:
The drivers for the printers listed above do not provide all EPSON STYLUS
COLOR 740 features, such a s 720-dpi printing, 144 0-dpi printing and
MicroWeave.
DOS software varies greatly. See the printing sectio n of your software
manual for inf ormation on acce ssing the printe r driver settings.
2
Page 3

Using Built-in Fonts and Character Tables
Your printer has eight built - i n fonts and 11 character tables
(27 characte r tables in cert ain countr ies) t hat you can select u sing the
printe r’s default-setting mode as de scribed b elow. The se ttings y ou
choose take e ffec t each time you tu rn on th e pri nter . Avai lab le fo nts
are listed in the next section. For available character tables, see
“Character Tables” on page 21.
Note:
Font and character table selections you make with your software override
the settings you make using the default-setting mode. For best results, use
your software to make these settings.
To change the default font or character table, follow these steps:
1. Make sure the printer is turned off and paper is loaded in the
sheet feeder.
Note:
Use paper at least A4 (210 mm/8.27 inches) si ze or wider. Otherwise,
the print heads will spray ink directly onto the platen, which could mar
future printouts.
cleaning button and turn on the printer to
2. Hold down the
enter the default-setting mode.
R
The printer loads a sheet of paper and prints a brief summary
and instructions. It instructs you to select the language that you
want messages printed in (English , French, G erma n, Italian, or
Spanish).
3
Page 4
3. Press the R cleaning bu tton until the following li g hts indicate
the language of your choice:
Language
English
French
German
Italian
Spanish
= On, n = Off
o
4. Press the
E
load/eject but ton to print the current defaul t font and
S
o
n
o
n
o
B
n
o
o
n
n
A
n
n
n
o
o
character table, as we ll as the next instruction s in the language
you selected. The printed instructions list all of the fonts and
chara c t e r ta b le s you can se le ct and show you how the control
panel lights appear for each selec tion. U se the in struction sheets
to change the settings from the control panel.
5. After making your changes, e xi t the default- se tting mode by
turning off the printer.
Note:
❏
You may exit the default-setting mode any time by turning off the
printer. Any cha nge s you ha ve made r emai n in e ffect until you ch ange
them agai n .
4
❏
If you want to check the current default font and character table, enter
the default-setting mode again and print the current settings. The
current settings are indicated with arrows.
Page 5

Fonts
Your printer has eight built-in character fonts including two EPSON
fonts: EPSON Roman T and EPSON Sans Serif H.
(Roma n T i s s imilar to the Ti m e s™ font; Sa n s S e rif H i s similar
to Helvetica™ . )
The table below shows the available fonts.
Fonts Sample
EPSON Courier
EPSON Roman T
EPSON Sans S erif H
EPSON Roman
EPSON Sans Serif
EPSON Prestige
EPSON Script
Draft
Note:
❏
Roman T and Sans Serif H fonts are available in proportionally spaced
fonts only.
❏
Some of the character tables might not be able to print with EPSON
Roman T and EPSON Sans Serif H fonts. In these cases, selected
character tables are printed with EPSON Roman.
5
Page 6

Scalable fonts
The size of the Roman, Sans Serif, Roman T, and Sans Serif H fonts
can be selec te d from 8 to 32 points in 2-point increments through
your software or by sending an ESC/P 2™ command. See the
document ation that came with your software for information on
sele ct i ng th e size of sca l a b le fo n t s.
EPSON
Roman
EPSON
Roman T
scalable sample
EPSON
Sans Se ri f
EPSON
Sans Serif H
Troubleshooting and Maintenance
This secti on describ e s what you can do if you are having prob lems
printing. See also “Troubleshooting and Maintenance” in your
& Daily Use
manual.
Running a Printer Operation Check
Performing a printer operation check can help you determine
whether the problem comes from the pr inter or the computer.
To print a printer operation check page, follow these steps:
1. Make sure both the printer and computer are turned off.
6
Setup
Page 7

2. Unlock the wire clips on both sides of the interface connector,
and remove the gr ound connec tor if nece ssary. Then disconn ect
the cable fr om the printer’s interface connector.
3. Make sure that paper is loaded in the sheet feeder.
Caution:
c
4. Hold down the
to turn on the printer. Then release both buttons.
Use paper at least 210 mm (8.27 i nches) wid e; for example, A4
size paper loaded short edge first. Otherwise, the print head will
spray ink directly onto the platen during the operation check
and smear any documents you print afterwards.
E
load/eject button and press the P power but ton
7
Page 8
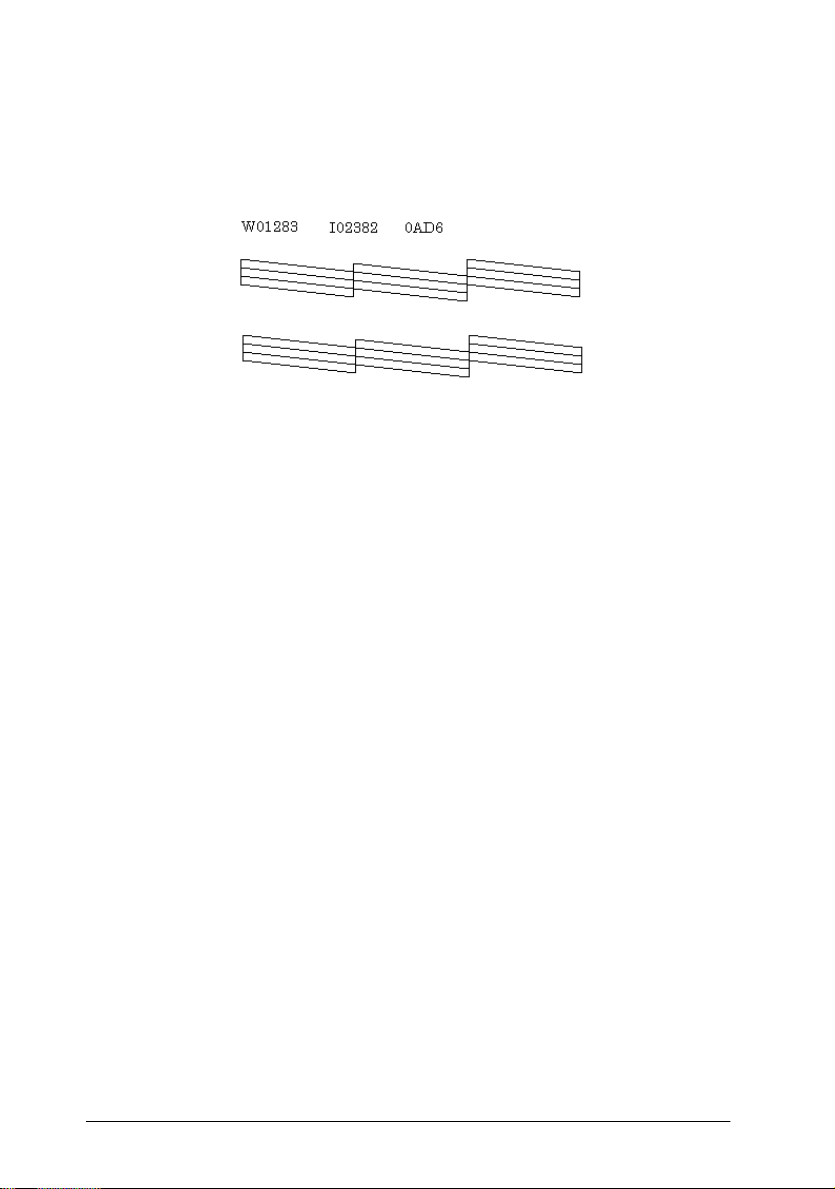
The printer prints an operation ch eck page including the v ersion
of your printer’s ROM, the ink counter code, the current code
page, and a nozzle check pattern. Here is a typical printout:
The above sampl e is in blac k and whi te, but the ac tual test pri nts in color
(CMYK).
P
5. Press the
power button to turn of f the printer af ter it finishes
printing the operation check page.
❏
If the operation c heck page results appear as shown in st ep 4, the
printer itself is all right and the problem probably lies in the
printer software settings, application settings, the interface cable
(be sure to use a shielded cable), or the computer itself.
8
❏
If the operation check page does not print satisfactorily, for
example, if any segment of the printed lines is missing, there is
a problem with the printer. This could be a clogged ink nozzle
or a misaligned print head.
Page 9

Problems and Solutions
Most printer proble ms have simple solutions. Define t he problem
from those below and apply the re commended solu tions.
Print quality problems
If you want to improve print quality, see the following problems and
solution s.
Horizontal banding
Try one or more of these solutions:
❏
Make sure the printable side of the paper is face up in the sheet
feeder when loading paper.
❏
Clean the print heads to clear clogged ink nozzles. See “Clean ing
the Print Heads” on page 17.
❏
Check the
ink cartridge. See “Replacing an Ink Cartridge” i n your
Daily Use
B
and A ink out lights. If a light is flashing, replace an
manual.
Vertical misalignment or banding
Try one or more of these solutions:
❏
Clean the print heads to clear clogged ink nozzles. See “Clean ing
the Print Heads” on page 17.
❏
Run the
Head” on page 18.
Print Head Alignment
utility. See “Aligning the Print
Incorrec t or missin g colors
Try one or more of these solutions:
❏
Make sure the printable side of the paper is face up in the sheet
feeder when loading paper.
❏
Clean the print heads. See “Cleaning the Print Heads” on page
17. If colors are still incorrect or missing, replace the ink cartridge.
Setup &
9
Page 10
Faint printouts or gaps
Try one or more of these solutions:
❏
Clean the print heads to clear clogged ink nozzles. See “Cleaning
the Print Heads” on page 17.
❏
Make sure your paper is not damaged, dirty, or old.
❏
Check the
ink cartridge. See “Replacing an Ink Cartridge” in your
Daily Use
B
and A ink out lights. If a light is flashing, replace an
manual.
Blurry or smeared pr intouts
Try one or more of these solutions:
❏
If you’r e printi ng on th ick media , such as envel opes or ca rds, set
the adjust lever to the “+” positi on, and make sure th e Med ia
Type setting is set correctly in your printer driver.
❏
Make sure the paper is dry and the printable side is face up.
❏
If you’re printing on glossy med ia or transparencies, place a
support sheet (or a piece of plain paper) beneath the stack, or
load one sheet at a time.
❏
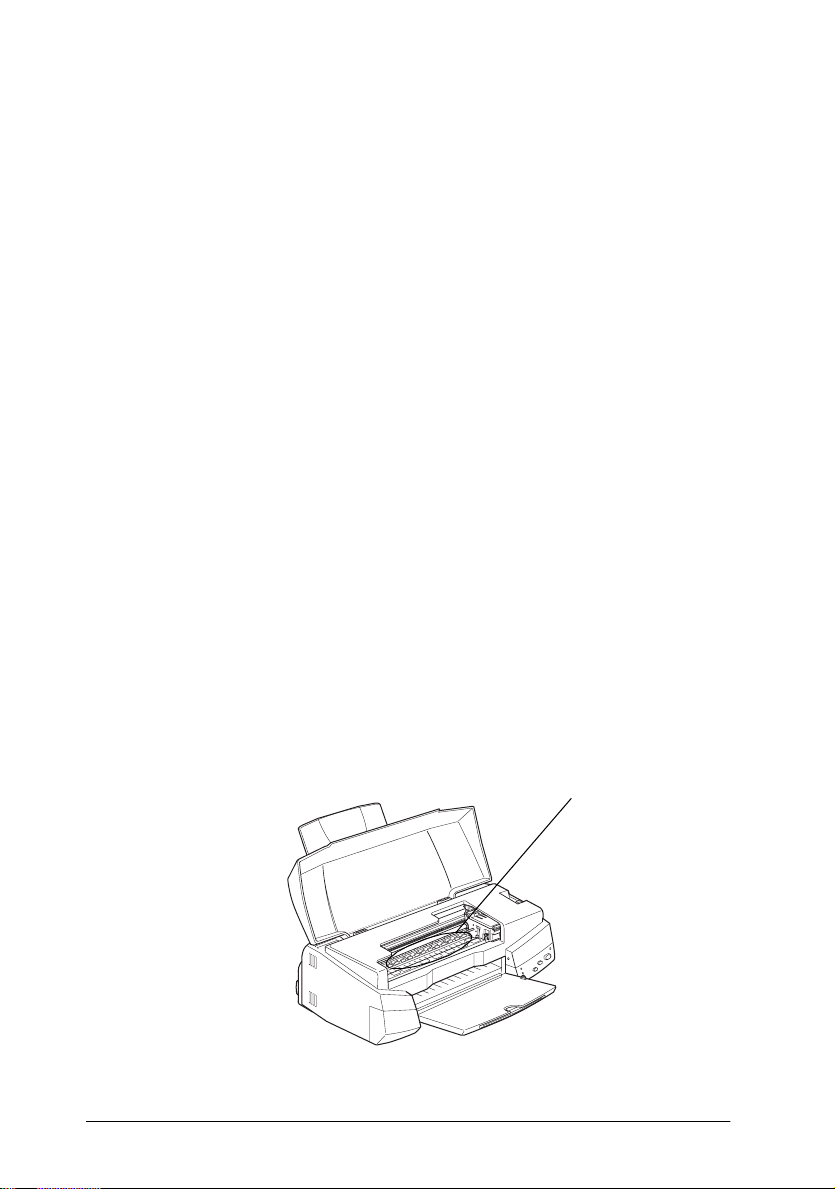
Ink may have leaked inside the printer; wipe the inside of the
printer as shown below with a soft, clean cloth.
Wipe here
Setup &
10
Page 11

❏
Clean the print heads. See “Cleaning the Print Heads” on page 17.
❏
Run the
Head” on page 18.
Print Head Alignment
utility. See “Aligning the Print
Printer does not prin t
If any of the fol lowing probl e ms have occurred, see the solutions
given b elow.
All lights are off
❏
Press the
❏
Turn off the printer and make sure the power cord is plugged in
securel y .
❏
Make sure the powe r outlet is worki ng and is not controlled by
a wall switch or timer.
P
power button and make sure the printer is on.
Lights came on and then went out
The printer’s voltage may not match the outlet rating. Turn off the
printer and unplug it immediately. Then, check the printer labels.
If the voltage doesn’t match, DO NOT PLUG YOUR PRINTER BACK
IN. See “Where to Get Help” in your
Setup & Daily Use
manual.
Only th e power light is on
Try one or more of these solutions:
❏
Turn off the printer and computer. Make sure the printer’s
interface cable is plugged in securely.
❏
Make sure there’s no packing material in the printer.
❏
Turn off the printer and computer and disconnect the printer’s
interface cable. Then print an operation check page. See
“Running a Printer Operat ion Check” on page 6.
❏
If it prints, make sure the printer software and your application
softwa re is instal led corre ctly.
11
Page 12

Note:
If you’re trying to print a large image, your computer may not have
enough memory to print.
❏
If the above doesn’t work, replace the ink cartridges. See
“Replacing an Ink Cartridge” in y our
Setup & Daily Use
Paper out light is flashing or on
If the
S
paper out light is flashing, remove the jammed paper.
❏
manual.
If the
S
paper out light is on, load more paper in the sheet feeder.
❏
One of the ink out lights is flashing or on
❏
❏
B
If the
replacement cartridge.
If the
cartridge. See “Repl acing an Ink Cartridge” in your
Use
or A ink out light is flashing, ink is low. Prepare a
B
or A light is on, ink is out. Replace the corresponding
manual.
Setu p & Dail y
All lights are flashing
Follow these steps:
1. Remove any paper in the printer.
2. Turn the pr inter off , wait a few seconds, and then tu rn it on again.
3. If the lights still flash, turn the printer off and check the inside of
the printer for any foreign objects or pieces the paper. Remove
all foreign objects and paper, then turn on the printer again.
4. If the lights still flash, contact EPSON. See “Where to Get Help”
in your
Setup & Daily Use
manual.
12
Page 13

Paper Doesn't Feed Correctly
If any of the fol lowing probl e ms have occurred, see the solutions
given b elow.
Paper doesn't feed
Remove the stack of paper and check that:
❏
The paper isn’t curled or creased.
❏
The paper isn’t too old. See th e instructi ons that cam e with the
paper for more information.
❏
The paper isn’t loaded above the arrow on the left edge guide.
❏
The paper isn’t jammed inside. If it is, remove the jammed paper.
Multiple pages feed
Remove the stack of pape r and:
❏
Make sure the paper is not too thin.
❏
Fan the edges of the stack to separate the sheets, then reload the
paper.
The paper jams
Turn off your printer, open the cover, and remove all the paper from
inside, including any torn pieces. Then load paper again.
If the paper jams frequently, make sure you:
❏
Use smooth, high-quality paper, loaded with the printable side
up.
❏
Fan the stack before loading it.
❏
Don’t load paper above the arrow mark on the left edge guide.
❏
Adjust the left edge guide to fit your paper.
13
Page 14

Paper isn't ejected fully or is wrinkled
Try one or more of these solutions:
❏
If the paper doesn’t eject fully, press the
Also check the paper size setting in your application or printer
driver.
❏
If the paper is wrinkled when it comes out, it may be damp or
too thin. Loa d a new stack.
Note:
Store any unused paper in its original package in a dry area.
E
Load/Eject button.
Printouts are no t what you expected
If any of the following problems have occurred, see the solutions
given b elow.
Incorrect o r garbled characters
Turn off the printer and computer. Make sure the printer’s interface
cable is plugged in securely.
Incorrect margins
Check the margin settings in your app licatio n softw are.
Blank pages print
Clean the print heads to clear the cl ogged nozzles. See “Cleaning the
Print Heads” on page 17.
After tryi ng one or more of these solutions, run another printe r
operation check.
Printing is too slow
Try one or more of these solutions:
❏
Don’t run too many applications at the same time. Clos e any
applications you are not currently using.
❏
Delete unnecessary files to make room on your hard disk dri ve.
14
Page 15

Ink Cartridge Problems
If output quality does not improve eve n a fter cleaning and aligning
the print head, you may need to replace one or both of the ink
cartridges.
B
To replace an ink cartridge before the
follow these steps.
B
If the
cartridge as described in “Replacing the Ink Cartridge” in your
& Daily Use
c
1. Make sure t he prin ter is on . The
2. Lower the output tray; then open the printer cover.
3. Hold down the
or A ink out light is flashing or is on, replace the empty ink
manual.
Caution:
❏
Once you remove an ink cartridge, it becomes unusable and
cannot be reinstalled even if ink remai ns.
❏
Leave the old cartridge installed in the printer until you are
ready to replace it with a new one.
not flashing .
E
load/eject button for thre e se conds; the print
head moves to the replace position. The
flashing.
or A ink ou t l ig h t fla shes,
P
power lig ht shoul d be on, bu t
P
power light begins
Setu p
15
Page 16

4. Lift the appropriate ink cartridge clamp. Dispose of the empty
ink cartridge properly.
5. Remove the yellow tape seal from the new cartridge and lower
the cartridge into the cartridge holder.
6. Press the ink cartridge clamp down until it locks in place.
Caution:
c
7. Press the
head b a ck to its home position a nd charges ink in the syst e m.
c
Once you install the cartridges, do not open their clamps again
until you replace the ink cartridges. Otherwise, the cartridges
may become unusable.
E
load/eject button again. The printer moves the print
Caution:
P
power light continues to flash while the printer performs
The
the ink charging operation. Never turn off the printer while the
P
power light is flashing. Doing so can result in incompl ete
chargi ng of ink.
16
Page 17

Cleaning the Print Heads
If print quality diminishes, use the printer’s built-in print head
cleaning cycle to ensure that the nozzles are deliver ing ink properly.
To avoid wasting ink, clean the print head on ly if print quality
declines.
B
1. Make sure that the p ri n te r is on and the
are off.
Note:
The print head cannot be cleaned if the
or on. Replace the ink cartridges as needed before proceeding.
and A ink out lights
B
or A ink out light is flashing
R
2. Press the
light begins flashing, and the printer eject s any paper in the paper
path and starts cleaning the print head. This oper ation takes
about two minutes to complete.
c
3. After the
confirm that the head is clean and reset the cleaning cycle.
If you entered the print head cleaning mode while the printer
was printing a document, the printer feeds paper and resumes
printing automatically.
If the print quality does not improve, repeat step 2, then pri nt a few
lines to che ck the output . If print quali ty hasn’t im p roved after
repeating this procedure four or five times, see “Problems and
Solutions” on page 9. If the print quality still has not improved after
following the recom m enda tio ns listed in trouble shoo ting sec ti on,
contact your dealer.
cleaning button for three se conds. The
Caution:
P
Never turn off the printer while the
Doing so may damage the printer .
P
power light stops flashing, print a few lines to
power light is flashing.
P
power
17
Page 18

Aligning the Print Head
If you find that the printed image is fuzzy or the vertical lines in your
printout are not properly aligned, you may need to align the print
head with the EPSON Print Head Alignment Utility. This utility
aligns the print head to print images clearly. You may need to align
the print head when you transport the printer or move it to a different
place.
To install this utility on your hard drive, insert the EPSON Printer
Software CD-ROM into your CD-ROM drive and then type
at the DOS prompt. (If your CD-ROM driver has a different drive
letter, or if you are using the floppy version, substitute the
appropriate letter for
running the setup program, change to the drive and directory that
contains the utility (or set the path to the directory). The n type
EPCALIB2
and press Enter. The following window appears:
D:\
.) Follow the directions on the screen. After
D:\SETUP
Make sure your printer is selected. Click
directions on the screen.
18
Next
, then follow the
Page 19

Cleaning the Printer
To keep your printer operating at its best, you should clean it
thoroughly several time s a year.
1. Make sure t he printe r is turne d off and all the pri nter’s l ights ar e
off. Then unplug the power cord.
2. Remove any paper from the sheet feeder.
3. Use a soft brush to carefully clean away all dust and dirt.
4. If the outer case or the inside of the sheet feeder is dirty, clean it
with a soft, clean cloth dampened with mild detergent. Keep the
printer cover closed to prevent water from getting inside.
5. If the inside of the printer is accidentally soiled with ink, wipe it
out with a damp cloth.
Warning:
w
c
Be careful not to touch the gears inside the printer.
Caution:
❏
Never use alcohols or thinners to clean the printer; these
chemicals can damage the components as well as the case.
❏
Be careful not to get water on the printer mechanism or
electronic components.
❏
Do not use a hard or abrasive brush.
❏
Do not spray the inside of the printer with lubricants;
unsuitable oils can damage the mechanism. Contact your dealer
or a qualified service person if lubrication is needed.
19
Page 20

Transporting the Printer
If you n eed to tr an sport y o ur pr inte r a s i gnifi can t di sta nce, ca reful ly
repack it using the original box and packing materials as follows:
1. Open the printer cover and make sure that the print head is in
the home ( far rig ht) posi tio n. I f no t, t urn on t he pr in ter and w ait
until th e pr int head ret urns to the home p osition. Then turn off
the printer and close the printer cover.
Caution:
c
2. Unplug the power cord from the electrical o utlet; then disconnect
the interface cable from the printer.
3. Remove the paper from the sheet feeder and remove the paper
support.
4. Push in the out put extensi on tray, an d then raise the output tray.
5. Attach th e protective materials to the printer.
6. Repack the printer and power cord in the original box.
Leave the ink cartridges installed during transportation,
otherwise the printer may be damaged.
7. Keep the printer level during transport.
20
Page 21

Character Tables
These character tables are selected with the d efaul t-setting mode or
by using software commands.
All tables except the it al ic character table are the same as t he PC437
table for hex codes 00 through 7F, so only the PC437 table is shown
in its enti rety . Th e res t of the tab les s h ow only the ch arac ter s for hex
code s 8 0 through F F.
The tables with an a ster isk ( *) after t he tab le name ar e on ly av ail able
in certain areas.
PC437 (U.S./Standard Europe)
21
Page 22

PC850(Multilingual) PC860(Portuguese)
PC861(Icelandic) PC863(Canadian-French)
22
Page 23

PC865(Nordic) BRASCII
Abicomp Roman 8
23
Page 24

ISO Latin 1 PC437Gre ek( Gr eek )*
PC852(East Europe)* PC853(Turkish)*
24
Page 25

PC855(Cyrillic)* PC857(Turkish)*
PC866(Russian)* PC869(Greek)*
25
Page 26

MAZOWIA(Polish)* Code MJK (CSFR)*
ISO 8859-7 (Latin/Greek) * ISO Latin 1T (Turkish)*
26
Page 27

Bulgaria* PC774 (LST 1283: 1993)*
Estonia* ISO 8859-2*
27
Page 28

PC866 LAT. (Latvian)* PC866 UKR*
PC APTEC(Arab ic)* PC708(Arabic)*
28
Page 29

PC720(Arabic)* PC AR864(Arabic)*
Italic
No charac ters are available for hex
code 15 in the it alic charac ter table.
29
Page 30

International character sets
You can select one of the following international character sets with
the default-setting mode or the ESC R command. For example, when
you select “Italic France,” the characters in the “France” row on the
table below are used in the italic character table.
The following eight international character sets can be selected with
the default-setting mode or with the ESC R command.
The following seven additional set s can be selected only wi th the ESC
R command.
30
Page 31

Characters available with ESC ( ^ command
To print the charact ers in the table below, use the ESC ( ^ c ommand.
The characters in the right table are av ailable with PC864 (Arabic),
PC AR864 (Arabic), and PC APTEC (Arabic).
31
Page 32

Printed in Japan 98.xx-x
 Loading...