

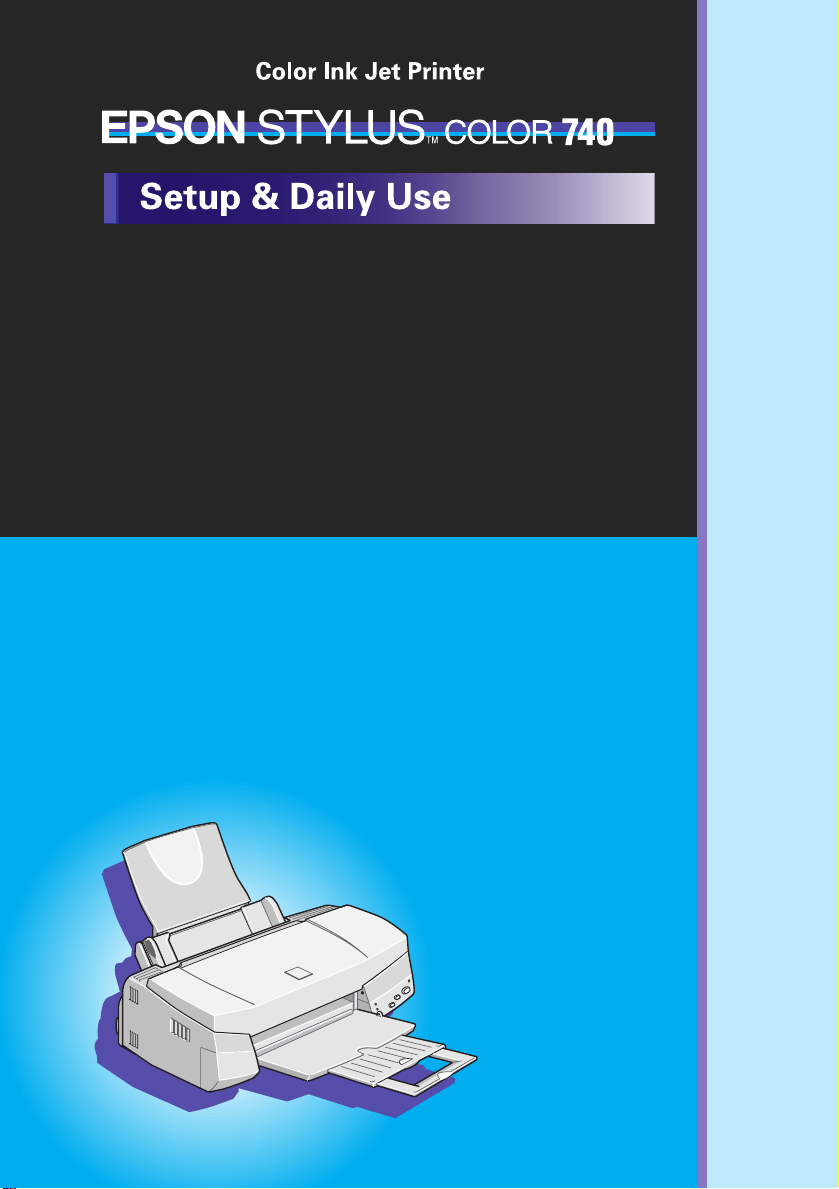
Page 1
Safety Instructions . . . . .1
Important Safety Instructions . . . . . 1
Warnings, Cautions, and Notes . . . . . 4
A Few Precautions . . . . . 2
Setting Up Your Printer . . . . .5
System Requirements . . . . . 5
Printer Parts and Functions . . . . . 8
Attaching the Paper Support . . . . 10
Connecting the Printer to Your PC . . . . 16
Installing the Printer Software in Your PC . . . . 18
Connecting the Printer to Your Macintosh . . . . 21
Installing the Printer Software in Your Macintosh . . . . 22
Selecting Your Printer in the Chooser . . . . 25
Printing Your First Page for Windows . . . . 28
Printing Your First Page for Macintosh . . . . 30
Plugging in the Printer . . . . 10
Installing the Ink Cartridges . . . . 11
Loading Paper . . . . 26
Replacing Ink Cart ridges . . . .32
Maintenance . . . .37
Checking the Print Head Nozzles . . . . 37
Cleaning the Print Head . . . . 39
Aligning the Print Head . . . . 40
Troubleshooting . . . .42
Error Indica tors . . . . 42
Where to Get Help . . . . 44
Options and Consumable Products . . . .50
4008996
xx-00
Page 2

All rights reserved. No part of this publication may be reproduced, stored in a retrieval
system, or transmitted in any form or by any means, electronic, mechanical, photocopying,
recording, or otherwise, without the prior written permission of SEIKO EPSON
CORPORATION. The information contained herein is designed only for use with this EPSON
printer. EPSON is not responsible for any use of this information as applied to other printers.
Neither SEIKO EPSON CORPORATION nor its affiliates shall be liable to the purchaser of
this product or third parties for damages, losses, costs, or expenses incurred by the purchaser
or third parties as a result of: accident, misuse, or abuse of this product or unauthorized
modifications, repairs, or alterations to this product, or (excluding the U.S.) failure to strictly
comply with SEIKO EPSON CORPORATION's operating and maintenance instructions.
SEIKO EPSON CORPORATION shall not be liable for any damages or problems arising from
the use of any options or any consumable products other than those designated as Original
EPSON Products or EPSON Approved Products by SEIKO EPSON CORPORATION.
SEIKO EPSON CORPORATION shall not be held liable for any damage resulting from
electromagnetic interference that occurs from the use of any interface cables other than
EPSON Approved Products by SEIKO EPSON CORPORATION.
EPSON and EPSON ESC/P are registered trademarks and EPSON ESC/P 2, ESC/P Raster
and EPSON Stylus are trademarks of SEIKO EPSON CORPORATION.
Microsoft and Windows are registered trademarks of Microsoft Corporation.
General Notice: Other product names used herein are for identification purposes only and may be
trademarks of their respective owners. EPSON disclaims any and all rights in those marks.
Copyright © 1998 by SEIKO EPSON CORPORATION, Nagano, Japan.
Page 3

Safety Instructions
Important Safety Instructions
Read all of these instructions before using your printer. Also be
sure to follow all warnings and i nstructions ma rked on the
printer.
❏ D o not block or cover the o p e nings in the printer’s cabi net.
❏ D o not insert objects through the slots. Ta ke care not to spill
liquid on the printer.
❏ Use only the type o f po wer sour ce indicated on the printer’s
label.
❏ Connect all equipment to properly grounded power outlets.
Avoid using outlet s on t he sam e circ uit as photocopier s or air
control systems that regularly switch on and off.
❏ Avoid electrical outlets controlled by wall switches or
automa tic timers.
❏ Keep the entire computer system away f rom potential sources
of electromagnetic interference, such as loudspeakers or the
base units of cordless telephones.
❏ Do not use a damaged or frayed power cord.
❏ If you use an ext e nsion cord with the pri nte r, make sure the
total ampere rating of the devices plugged into the extension
cord does not exceed the cord’s ampere rating. Also, make
sure the total ampere rating of all device s pl ugged into the
wall outlet does not exceed the wall outlet’s ampere rating.
❏ Do not attempt to service the printer yourself.
1
Page 4

❏ Unplug the pri nter and refer servici ng to qua lified serv ic e
personnel under the following conditions:
The power cord or plug is damaged; liquid has entered the
printer; the printer has been dropped or the cabinet damaged;
the printer does not operate normally or exhibits a distinct
change in performa nce.
❏ If you plan to us e the printer in Ge rmany, observe the
following:
To provide adequate short-circuit protection and overcurrent pro tection f or this prin ter, the buil ding insta llation
must be protected by a 16 Amp circuit breaker.
Bei Anschluß des Druc ke rs an die Stromversorgu ng muß
sichergestellt werden, daß die Gebäudeinstallati on mit einem
16 A-Überstromschalter abgesichert ist.
A Few Precautions
When using the printer
❏ D o not put your hand insi de the printe r or touch the i nk
cartridg e s during printing.
❏ D o not move the print he ad by ha nd; otherw ise you may
damage th e printer.
❏ Always turn the printer off using the
this button is pressed, the
goes off. Do not unpl ug the printer or turn off t he power to
the outlet until the
❏ Before transporting the printer, make sure the print head is in
the home ( far right) position and the ink ca rtridges are in
place.
P power l ig ht stops flash ing.
P power l ig ht flashes briefly then
2
P power button. When
Page 5

When handling the ink cartridges
❏ K eep ink cartridges ou t of the reach of child ren.
❏ If ink gets on your skin, wash it off with soap and water . If it
gets in your eyes, flush them immediately with water.
❏ Do not shake an ink cartridge; this can cause leakage.
❏ Install the ink cartridge immediately after you remove it from
its package. Leavin g the cartridge unpacked for a long time
before use may result in reduce d print quality.
❏ Once you install an i nk cartridge, do no t open th e clamp or
remove the cartridge except to replace it with a new one. The
cartridge may become unusable otherwise .
❏ D o not use an ink cartridge beyond the dat e printed on the
cartridge carton. For best results , use up the ink cartridges
within six months of installing them.
❏ Do not dismantle the ink cartridges or try to refill them. This
could damage the print head.
When choosing a place for the printer
❏ Place the printer on a flat, stable surface that is larger than the
printer. The printer will not operate properly if it is tilted or
at an angle.
❏ Av oid places subject to rapi d changes in temperature and
humidi ty. Also k eep it away f rom direct sunlight , strong li ght,
or heat sources.
❏ Avoid places subject to shocks and vibrations.
3
Page 6

❏ Place the printer near a wall outlet where the plug can be
easily unplugged.
Note for French- speaki ng users:
Placez l’imprimante près d’une prise de contacte où la fiche peut être
débranchée facile ment.
Warnings, Cautions, and Not es
Warnings
must be followed c arefully to avoid bodil y injury .
w
Cautions
must be observed to avoid damage to your equipment.
c
Notes contain important information and useful tips on the o pera tion
of your printer.
4
Page 7

Setting Up Your Printer
System Requirements
For PCs
To use your printer, you need Microsoft® Windows® 3.1,
Windows
®
95, Windows® 98, Windows® NT 4.0, or DOS; and a
shielded, twi sted-pair parallel cabl e. If you want connect your
printer to a USB port, you need a Windows 98 pre-installed PC
equipped with a USB port; and a shielded USB cable.
Your computer should also meet the following system
requirements:
Minimum system Recommended system
i386/25 MHz processor for Windows 3.1
i486/25 MHz for Windows 95 and NT 4.0
i486/66 MHz for Windows 98
16MB RAM 32MB RAM or more for
10MB hard disk space for Windows 95 and 98
20MB for Windows 3.1 and NT 4.0
VGA monitor VGA or better monitor
Pentium or higher
processor
Windows 3.1, 95 and 98
64MB or more for
Windows NT 4.0
50MB or more free disk
space for Windows 3.1,
95, and 98
100MB or more for
Windows NT 4.0
Your computer dealer can help you update your system if it does
not meet these requirements.
5
Page 8

For Macintosh computers
To use this printer, your Apple® Macintosh® must meet the
following system require ments. You als o n eed a standard Apple
System Peripheral-8 cable (8-pin mini-circular connector) or
equivalent.
Applicable computer models (as of April 1, 1998)
Macintosh LC475, LC575, LC630
Macintosh Quadra Series
Macintosh Centris Series
Macintosh PowerBook™ Series (PowerBook 190, 520, 540, 550
or later)
Macintosh PowerBook Duo 280, 2300c/100
Macintosh Performa 475, 575, 588, 630, 5210 or later
Power Macintosh Series
Environment
Minimum system Recommended system
System 7.5.1 System 7.6 or later
5MB of available memory
10MB of available memory when
background printing is turned on.
6
12MB or more of available
memory
21MB of available memory when
background printing is turned on.
Page 9

Note:
❏ The amount of available memory varies according to the number and
kind of applications that are o pen . To see how much memory is
available, choose
refer to the memory size (listed in kilobytes) under “Largest Unused
Block” (1,024K=1MB).
About This Macintosh
from the Apple menu and
❏ The m em ory requirements above are for printing on Letter size
paper. These requirements may vary depending on the size of the
paper, the type of applic at ion you are using, and the c omplexity of
the document you want to print.
In addition to these system and memory requirements, you also
need 10MB of free hard disk space to install your printer software.
To print, you need extra hard disk space amounting to about
double the si z e of the file you want to print.
7
Page 10
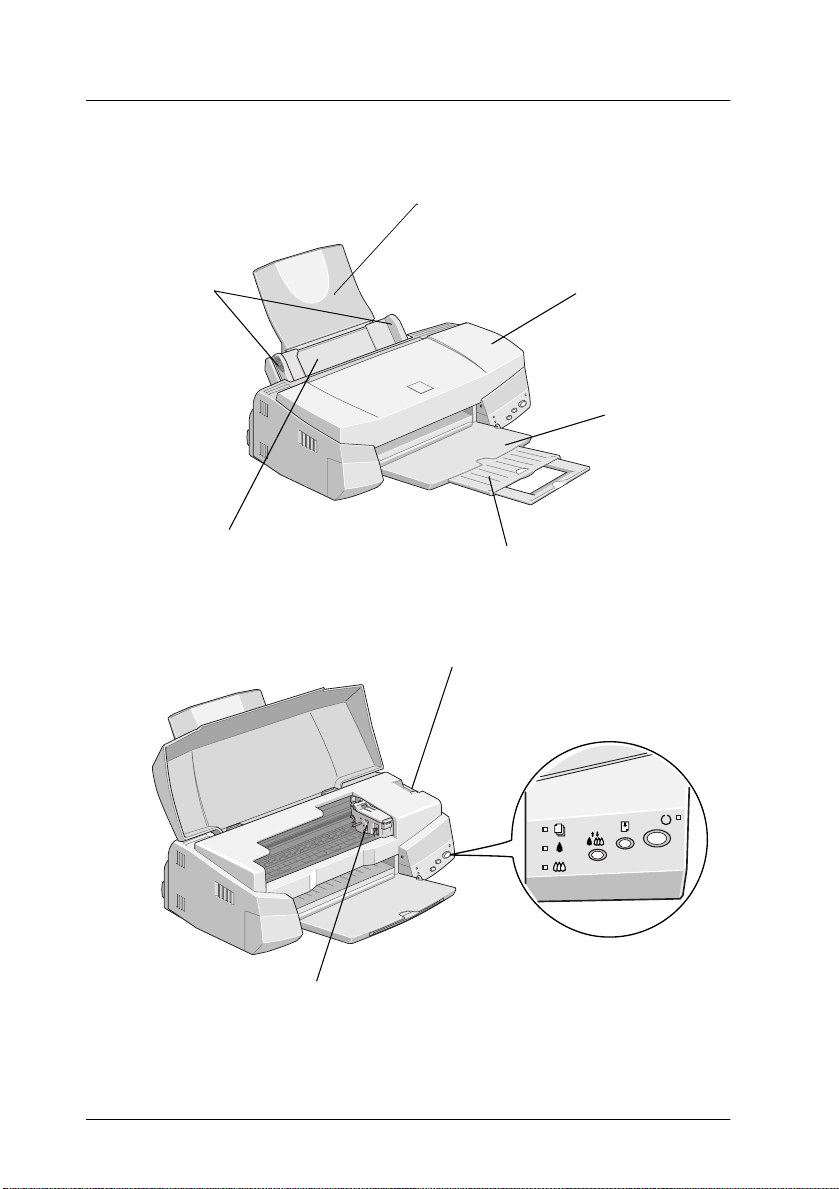
Printer Parts and Functions
paper support
edge guides
sheet feeder
printer cover
output tray
output tray extension
adjust lever
Buttons and lights
8
ink cartridge clamps
Page 11
Buttons
Button Function
P
Power
E
Load/Eject
R
Cleaning
Lights
Light Status Printer Status
o
P
Turns the printer on and off.
Clears the printer's memory if pressed twice while the
power is on.
Loads or ejects paper if pressed and released within 2
seconds.
Resumes printing if pressed and released after a paper
out error.
Moves the print head to the ink cartridge replacement
position if pressed for 3 seconds while the
light is flashing or on.
Returns the print head to its home position after ink
cartridge replacement.
Performs print head cleaning if pressed for 3 seconds
when the
Printer is on.
B or
A
ink out light is off.
B
or
ink out
A
f
o
f
f
o
f
o
o = on,
P
S
S
B
B
A
A
f = flashing
Receiving data, replacing an ink cartridge, charging
ink, or cleaning the print head.
Paper out. Load paper in the sheet feeder; then press
the
load/eject button to resume printing.
E
Paper jam. Take all the paper out of the feeder, and
reload the paper. If the light continues to flash, turn off
the printer and gently pull all the paper out of the printer.
Ink low. The black ink cartridge is nearly empty. Obtain
a black ink cartridge (S020189).
Ink out. The black ink cartridge is empty. Replace the
black ink cartridge (S020189).
Ink low. The color ink cartridge is nearly empty. Obtain
a color ink cartridge (S020191).
Ink out. The color ink cartridge is empty. Replace the
color ink cartridge (S020191).
9
Page 12

Attaching the Paper Support
Insert the paper support into the slots at the re ar of the prin te r.
Plugging in the Printer
1. Make sure that the printer is turned off. It is off when the
power button protrud e s slightly fr om the surfac e of the control
panel.
2. Check the labe l on the back of the printer to make sure the
voltage required by the printer matches that of the electrical
outlet you wil l b e plugging it into. Al so, make sure that you
have the correct pow er cable for your power s ource.
Caution:
c
3. If the power cord is not at tached to the printer, connect it to
the AC inlet on the ba ck of the printe r.
4. Plug the power cord into a properly grounded electrical
outlet.
10
It is not possible to change the printer's voltage. If the rated
voltage and your outlet voltage do not match, contact your
dealer for assistance. Do not plug in the power cord.
P
Page 13

Installing the Ink Cartridges
Before installing the ink car tri dges, note the following.
Warning:
The ink cartridges are self-contained units. Under ordinary use,
w
ink will not leak from a cartridge. If ink does get on your hands,
wash them thoroughly with soap and water. If ink gets into your
eyes, flush them immed iately with water.
Note:
❏ Do not open the ink cartridge packages until just before you install
them, or the ink may dry up.
❏ Use the ink cartridges packed with your print er the first time you
install ink cartridges, otherwise the printer may not cha r g e ink
properly.
Install the ink cartridge s as follows:
1. Lower the o utput tray; then open the printer co ver.
11
Page 14
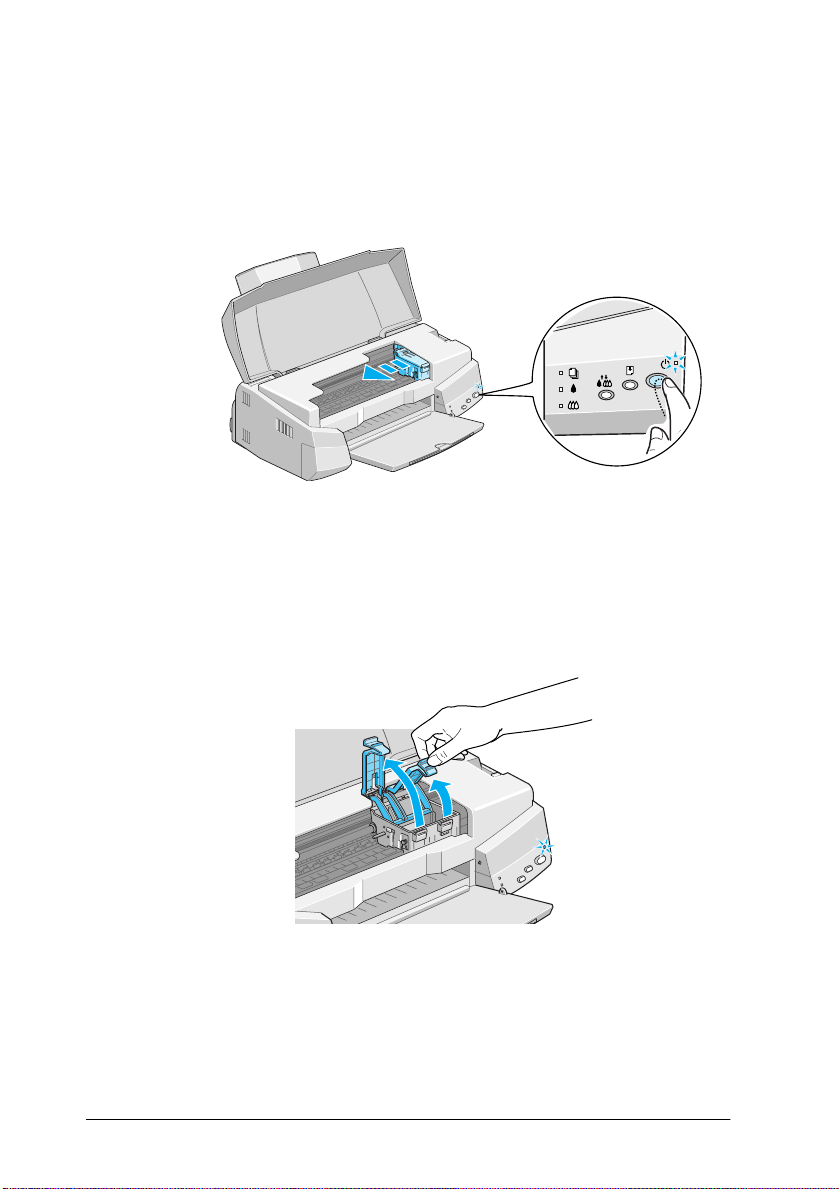
2. Turn on the printer
The print head moves slightly to the left, which is the ink
cartridge install position. The
A
and
c
3. Lift up the i nk cartridge clamps.
ink out lights come on.
Caution:
Do not move the print head by hand. Otherwise you may
damage the printer.
.
power light flashes and the
P
B
12
Page 15
4. Open the ink cartridge packages that came with your printer.
Next, remove only the yellow tape seals from ea ch cartridge .
Caution:
c
5. Place the cartridges g ently into the i r holders wi th the label s
face-up. The color ink cartridge, which is larger, goes on the
right and the black g oes on the l eft. Do not press down on th e
cartridges.
❏ Remov e the yellow tape seals from the cartridges before
❏ Do not remove the blue portion of the tape seals from the
❏ Do not remove the tape seals from the bottom of the
installing them; otherwise the cartridges may bec om e
unusable.
cartridges; otherwise the cartridges may become clogged
and cannot print.
cartridges; otherwise, in k will leak.
Note:
Install both ink cartridges. If either of the cartridges is not installed,
the printer will not work.
13
Page 16
6. Press the ink cartridge clamps down until they lock in place .
Caution:
c
Once you install the ink cartridges, do not open their clamps
again until you replace the ink cartridges. Otherwise, the
cartridges may become unusable.
7. Press the
and begins charging th e in k delivery sys te m.
The ink charging process may take about one minute to
complete , during which time the
the printer produces a variety of mechanical sounds. These
sounds are normal. When the ink delivery system has been
charged, the print head returns to its home (far right) position.
c
cleaning button. The printer moves the print head
R
power light flashes and
P
Cauti on:
Never turn off the printer while the
power light is flashing.
P
14
Page 17
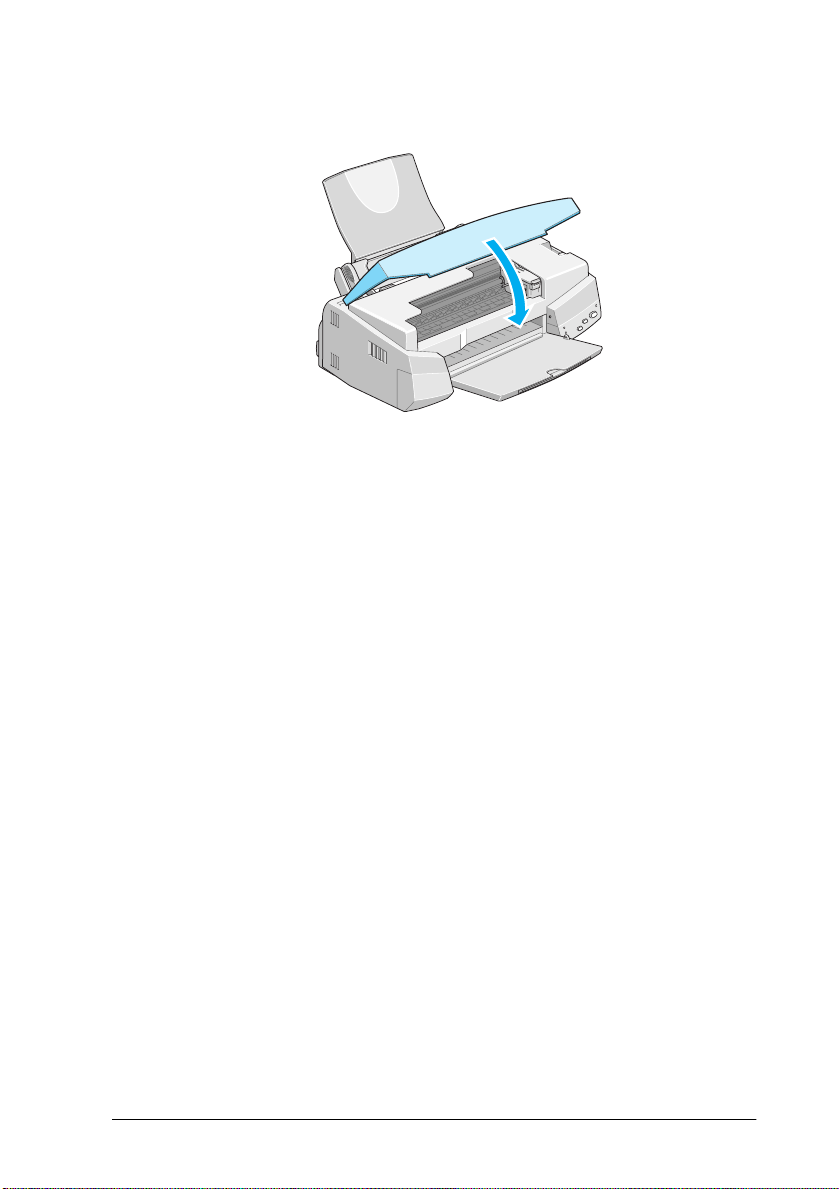
8. Close the printer cover.
Now you are ready to connect the pri nter to your compu te r. To
connect the printer to your PC, see the next section. To connect
the print e r to a Macintosh, see “Connecting the Printer to Your
Macintosh” on page 21.
15
Page 18

Connecting the Printer to Your PC
Connecting to a parallel interface
To connect the printer to your computer using the bu ilt-in parallel
interface, you need a shielded, twisted-pair parallel cable.
Follow these steps to connect your printe r.
1. M ake sure both the pri nter and co mputer a re turned o ff.
2. Plug the cable connector secu re ly into the pri nter's inte rface
connector. Then squeeze the wire cl ips together until they lock
in place on both sides. If your cable has a ground wire, con nect
it to the ground co nnector b elow the interface connector.
3. Plug the other end of the cable into the computer's parallel
interface. If ther e i s a ground wir e a t the computer en d of the
cable, connect it to the ground connector at the back of the
computer.
See “Installing the Printer Software in Your PC” on page 18 for
instructions on installing the printer software. You must install
the printer software before using your printer.
16
Page 19

Connecting to a USB port
To connect the printer to a USB port, you need a shielded USB
cable and a Windows 98 pre-installed PC.
Follow these steps to connect your printer:
1. Make sure your printer is turned off and Windows 98 is
running.
2. Connect one end of the interface cable to the printer’s USB
port.
3. Connect the other e nd to the co mputer's USB port .
See the USB manual shipped with your printer for instructions on
installing the EPSON USB Pri nter Dev ic e Driver and the printer
software in your PC. The EPSON USB Printer Device Driver and
the printer software must be installed before using your printer.
This software is in cluded in the “Printer Software for EPSO N
Stylus COLOR 740” CD-ROM shipped with your printer.
17
Page 20

Installing the Printer Software in Your PC
After connecting the printer to your computer, you need to install
the software included on the “Printer Software for EPSON Stylus
COLOR 740” CD-ROM shipped with your printer.
Your printer software includ e s:
❏ Printer driv er
The printer driver is the software that runs, or “drives,” your
printer. With it, you can make settings such a s media type,
print quality, speed, and pa per size.
❏ Utilities
The Nozzle Check, Head Cleaning, and Print Head
Alignme nt utilities help you ke ep your printer in top
operating condition.
❏ EPSON Status Monitor 2 (not for Windows 3.1)
The EPSON Status Monitor 2 notifies you of printer errors and
displays print er stat us informat ion such as the a mount of i nk
remaining. The Status Monitor al so guides yo u when
replacing i nk cartridges.
❏ HIGH QUALITY IMAGES (for Windows 95 and NT 4.0 only)
HIGH QUALITY IMAGES allows you to quickly and easily
see the kind of high-quality printout available from the
EPSON Stylus COLOR 740.
If you are using the floppy disk version of the software, make a
backup copy of the EPSON printer software disk before you begin
installation. If you wish to make a floppy disk version of the
printer software on your CD-ROM, you can use the Driver disk
creation utility included on the CD. See “Installing in Windows
95, 98, and NT 4.0” on page 19, “Installing in Windows 98 with
USB interface” on page 19, or “Installin g in Windows 3.1” on page
20.
18
Page 21

Installing in Windows 95, 98, and NT 4.0
1. Insert the printer software CD shipped with your printer in
the CD-ROM drive. The Installer dialog box appears. (For
floppy dis k user s, inse rt the disk i n a disk drive, then double click the FD drive icon and double-click the
Setup.exe
icon.)
2. Click
3. When the installation is complete, click
Note:
❏ If the New H ardware Found screen or any o ther Wizard appears
❏ Installation time varies depend ing on your computer.
For information on opening and us ing the software, s ee “Print ing
Your First Page for Window s” on pa ge 28. See also “Using the
Printer Softwar e fo r Windo ws” in the on li ne Reference Gui de .
If you use your printer on a network with Windows 95, 98, or NT
4.0, see “Network Printing” in the online Reference Guide.
Install
to start th e printer so ftware installation.
when you turn on your computer, click
above.
OK
Cancel
.
and follow the steps
Installing in Windows 98 with USB interface
If you conn e cte d your printe r using the USB interfa ce, you need
to install the EPSON USB Printer Device Driver and the printer
software included in the printer software CD-ROM. Follow the
instructi ons in the USB User’s Guide that cam e with your printer.
Note:
If you wish to make a floppy di sk version of the printer software incl uded
on your CD-ROM, insert the printer software CD-ROM, then click the
Driver disk creation utility
instructions.
button and follow the on-screen
19
Page 22

For information o n opening and using the s oftware, see “Printing
Your First Page for Windows” on page 28. See also “Using the
Printer Software for Windows ” in the online Reference Guide.
Installing in Windows 3.1
Follow these steps to install the software in Windows 3.1:
1. Make sure Windows 3.1 is running and t he Program Manager
window is open.
2. Insert the printer sof tware CD shi p ped with your prin ter in
the CD-ROM drive. (If you use the floppy disk version, insert
it in a disk drive.)
3. Choose
In the Command Line box, type
CD-ROM drive has a dr iv e letter other tha n “D” or i f you are
using the floppy disk version, substitute the appropriate
letter.
Note:
If you wish to make a floppy disk version of the printer software
included on your CD-R OM, type
the dialog box that appears, click the
button and follow the on-screen instructions.
Run
from the File menu. You see the Run dialog box.
D:SETUP
EPSETUP
Driver disk creation utility
and click OK. If the
instead of
SETUP
. In
20
Page 23

4. The installation program begins copying the printer software
files.
5. When the installation is complete, click OK to exit the
installation program.
The installation program automatically selects this printer as the
default printer for Windows applications.
For information on opening and us ing the software, s ee “Print ing
Your First Page for Window s” on pa ge 28. See also “Using the
Printer Softwar e fo r Windo ws” in the on li ne Reference Gui de .
Connecting the Printer to Your Macintosh
To use the printer's built-in serial interface, you will need an
Apple System Peripheral-8 cable.
Follow these steps to connect the printer:
1. Make sure both your printer and Macint osh ar e s witched off .
2. Connect one end of the interface cable to the serial connector
on the back of the printer.
21
Page 24

3. Connect the other end of the interface cable to either the
modem port or printe r port on the Macintosh. The ports ar e
marked with the following icons.
modem port
printer port
See the next section for instructions on installing the printer
software. You must install the printer software before using your
printer.
Installing the Printer Software in Your Macintosh
After connecting the printer to your Macintosh, you are ready to
install the printer software included in the “Printer Software for
EPSON Stylus COLOR 740” CD-ROM shipped with your printer.
Your printer software includ e s:
❏ EP S O N Printe r Driver Package
SC740
This is the printer driver software that runs your printer. With
it, you can m ake settings such as media type, print quality,
speed, and paper size.
EPSON Monitor3
Monitors and manages background printing jobs. You must
turn o n backg rou nd prin ting in the Choose r to use thi s uti lity .
22
StatusMoni tor
Keeps track of the current status of your printer, and alerts
you when printer errors occur.
Page 25

Nozzle Check
Checks the print he ad for clogging.
Head Cleaning
Cleans the print head to maintain the best print quality.
Print Head Alignment
Adjusts the print head so that vertical an d horizontal lines are
aligned.
❏ ColorSync 2.0 and Profiles
Match es the co lors in yo ur prin tout with the col ors display ed
on your screen automaticall y. Use this when printing scan ned
photographs or computer graphics.
If you are usi ng the floppy disk version, make a backup copy of
the EPSO N Macintosh printer software disk before you begin
installation.
Caution:
Turn off all virus protection programs before you install your
c
printer software.
Follow th ese steps to install your printer software :
1. Turn on your Macintosh and insert the software CD in the
CD-ROM drive. (If you use the floppy disk version, insert it
in a disk drive.)
2. The EPSON printer software disk opens automa tically.
3. If a single
separate folders containing installer icons for several
lang ua g e s appear, doub le-c l i ck the folde r f o r yo u r pref erred
language, then double-clic k the
Installer
icon appears, double-click the icon. If
Installer
icon inside it.
23
Page 26
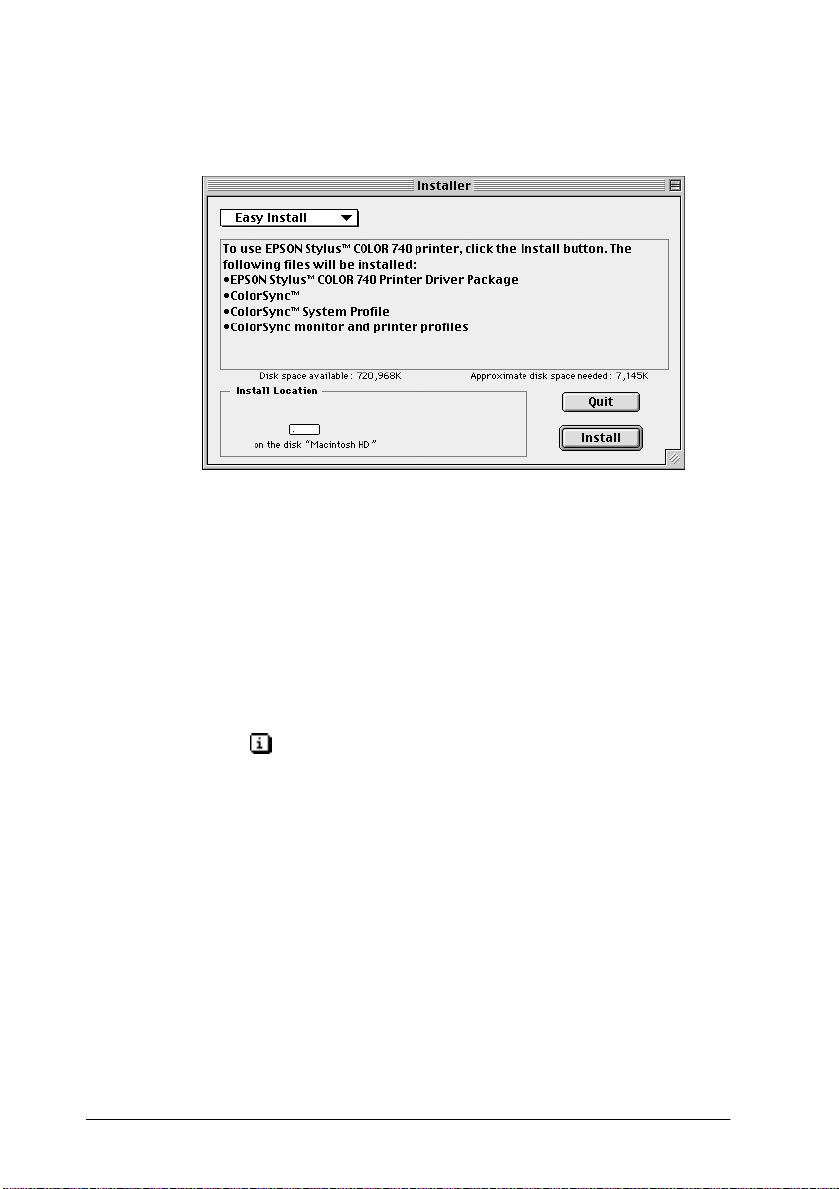
4. Aft er the initial scr een appears, click
following dialog box appears.
5. If you want to install all of the printer software included on
your printer software CD-R OM, make sure the Install
Location box shows the correct disk drive and click
Continue.
The
Install
.
6. If you are low on disk space, select
pop-up menu and click
destination for installation, then click
Note:
Click the icon to get information on each component.
7. When a message appears informing you that installation is
finished, click Restart to complete the installation and restart
your comp uter.
Serial Driver Package
Custom Install
. Confirm the
Install
.
24
from the
Page 27

Selecting Your Printer in the Chooser
After you install the printer software , y ou need to o p e n the
Chooser to select your printer. You have to choose the printer the
first time you use it or whenever you want to switch to another
printer. Your Macintosh will always print using the last printer
selected.
Note:
If you are using a Macintosh Quadra 950 or 900, you need to choose
Compatible
printer from the Chooser. To open t he Serial Switch dialog bo x, choo se
Control Panel
1. M ake sure the printer is connected to yo ur M acintosh and is
turned on.
in the Serial Switch dialog box before selecting your
from the Apple menu, then choose
Serial Switch
.
2. Choose
printer's i co n and the port your printe r is connected to.
Note:
If you are using an AppleTalk network, an alert message may appear
when you click the port. In this case, reselect the other port, or make
AppleTalk setting
Chooser
from the Apple menu. Then click your
Inactive
then select the port again.
25
Page 28

3. Click the
Background Printing
radio buttons to turn
background printing on or off.
4. When background printing is on, you can use your Macintosh
while it is preparing a document for printing. You must turn
on background printing to use the EPSON Monitor3 utility to
manage pr in t jobs.
5. Close the Chooser.
For information o n opening and using the s oftware, see “Printing
Your First Page for Macintosh” on page 30. See also “Using the
Printer So ftware for M acintos h” in th e online Ref erence Guide.
Loading Paper
Follow the se steps to load pl ain paper in the printer.
You can also print on ink jet paper, photo-quality glossy film or
paper, photo paper, transpar e nci e s, envelopes, index cards, and
adhesive sheets. For details on using such media, see “Printing
on Special Paper” in the online Reference Guide.
1. Lower th e outp ut tra y and sl ide ou t the ex tens ion. Next, slide
the left edge guide so that the distance between the edge
guides is slightly wi der than the width o f your paper.
edge guide
26
output tray
Page 29

2. Fan a stack of paper; then tap it on a flat surface to even the
edges.
3. Load the stack of paper with the printable side up and the
right edge of the paper resting a gainst the right side of the
sheet feeder. Then slide the left edge guide against the edge
of the paper.
printable
side up
Note:
❏ Alwa y s loa d pap er into the sheet feeder short edge first.
❏ Make sure the paper stack fits under the arrow mark inside the
edge guide.
27
Page 30

Printing Your First Page for Window s
After loading the paper, you are ready to print your first page. In
order to check the operation of your prin ter, we reco mmend
printing the README file provided with your printer softw are.
The README file contains the latest information about your
printer so ftware.
Follow these steps to print the README file:
1. Click
2. Click
3. Make sure your printer is selec ted an d the n clic k
Start
, point to
95, and 98) or
EPSON Stylus COLOR 740 Readme
click
Windows 3.1, open t he EPSON program group fr om Program
Manager and double-click
Readme
Options
or
buttons. The driver settings window appears.
.
Print
on the File menu. The Print dialog box appears.
. You may need to click a combination of these
Programs
EPSON Printers
EPSON Stylus COLOR 740
, point to
(for Windows NT 4.0), and then
Epson
(for Windows
. If you are using
Properties
,
28
Page 31

4. Click the
Media Type box and select the media you loaded in the
printer.
Main
tab if necessary, then click anywhere in the
5. Select
6. Make sure the Mode option is set to
7. Click OK at the bottom of the window. You return to the Print
8. Click
While printing, the EPSON Progress Meter (Windows 95, 98, and
NT 4.0) or the EPSON Despooler dialog box (Windows 3.1) will
appear, showing the printing progress and the status of your
printer. For details, see “Checking Printer Status and Managing
Print Jobs for Windows” in the online Reference Guide.
Congratulations! Your EPSON printer is now fully setup and
ready to h e lp you create wonderfu l printouts. Fo r further
informat ion about y our printer, s e e the online Reference Guide.
For details about the printer software, see online help. To learn
more about color printing, se e the online Color Guide.
Color
as the Ink setting.
Automatic
When
other settings according to the Media Type and Ink settings
you make.
dialog box (or a similar dialog box).
combination of these buttons.
Automatic
Close, OK
is selected, the printer software optimizes
Print
, or
to print. You may need to click a
.
29
Page 32

Printing Your First Page for Macint osh
After loading the paper, you are ready to print your first page. In
order to check the operation of your prin ter, we reco mmend
printing the README file located on your printer software CD.
The README file contains the latest information about your
printer so ftware.
Follow these steps to print the README file:
1. Insert the pri nter software CD.
2. Open the EPSON fo lder and double-click the README file.
3. Choose
dialog box shown below.
4. Select the paper size you loaded in the printer from the Paper
Size list.
5. Select
option.
6. After making your settings, click the OK button to close the
Page Setup dialog box.
Note:
You cannot print from the Pa ge Setup dialog box. You can only print
from the Print dialog box.
Page Setup
Portrait
or
from the File menu. This brings up the
Landscape as
the Orientation
30
Page 33

7. Choose
box shown be low.
8. Select the media you loaded in the printer from the Media
Type list.
Print
from the File menu. This brings up the dialog
9. Select
10. Make sure the Mode option is set to
11. Click
Congratulations! Your EPSON printer is now fully setup and
ready to h e lp you create wonderfu l printouts. Fo r further
informat ion about y our printer, s e e the online Reference Guide.
For details about the printer software, see online help. To learn
more about color printing, se e the online Color Guide.
Color
When
other settings according to the Media Type and Ink settings
you make.
Automatic
Print
as the Ink option.
is selected, the printer software optimizes
to start printing.
Automatic
.
31
Page 34

Replacing Ink Cartridges
Using the printer's control panel
The printer’s indicator lights will inform you when it is time to
obtain a replacement i nk cartr idge an d w hen it is t ime to replac e
an empty cartridge.
This table describes the status of the lights on your printer and
the actions you need to take.
Lights Action
f B
o B
Obtain a replacement black ink cartridge
(S020189).
Replace the empty black ink cartridge.
f A
o A
o
= on, f = flashing
Caution:
c
Note:
If the ink runs out, you cannot continue printing until you replace it,
even though the other in k cart rid g e stil l contains ink.
❏ EPSON rec om m e nd s the use of genuine EPSO N ink
cartridges. Other products not manufactured by EPSON
may cause damage to your printer not covered by EPSON's
warranties.
❏ Leave the old cartridge installed in the printer until you have
obtained a replacem ent. Otherwise, ink remainin g in the
print head nozzles may dry out.
Obtain a replacement color ink cartridge
(S020191).
Replace the empty color ink cartridge.
32
Page 35

To replace a n ink cartridge using the printer’s control panel,
follow these steps.
P
B
black and
power light should be on,
A
color ink out light.)
1. Make sure the printer is on. The
but not flashing. (Determine which cartridge needs to be
replaced as indicated by the
2. Lower the o utput tray a t the front of the printer, then open
the print e r cover.
3. Hold down the
print head moves left slightly to the cartridge replacement
position and the
Caution:
c
Note:
If you press the
and
head.
Do not move the print hea d b y ha nd . Always use the
cleaning button to move it. Otherwise you may damage the
printer.
A
ink out lights are off, the p rinter starts cleaning the print
R
cleaning button for three seconds until the
P
power light b e gins flashing.
R
cleaning button for three seco nd s when the
R
B
33
Page 36

4. Lift up the clamp that holds the cartridge you want to replace
as far as it will go. When you do, the cartridge will rise partly
out of the cartridge holder.
The illustration shows color
ink replacement. To replace
black ink, lift up only the
smaller clamp on the left.
Caution:
c
5. Lift the cartridge out of the printer and dis pose of it properly.
Do not take the used cartridge apart or try to refill it.
Once you open the ink ca rtridge clamp, the ink cartridge
becomes unusable and cannot be reinstalled even if ink
remains.
34
w
Warning:
If ink gets on your hands, wash them thoroughly with soap
and water. If ink gets into your eyes, flush them immediately
with water.
Page 37

6. Rem o ve the ink ca rtridge from its protective bag. Next,
remove only the yellow tape seal from the cartrid ge.
Caution:
c
7. Place the ink cartridge gently into the cartrid ge holder with
the label on the cartridge face up. Do not press down on the
cartridge.
❏ You must remove the yellow tape seal from the cartridge.
Leaving the tape on when you install the cartridge will
permanently damage it.
❏ Do not remove the blue portion of the tape seal from the
top of the cartridge; otherwise, the cartridge may become
clogged and cannot print.
❏ Do not remove the tape seal from the bottom of the
cartridge; otherwise, in k will leak.
35
Page 38

8. Press the ink cartridge clamp down until it locks in place.
The illustration shows color
ink replacement. To replace
black ink, press down the
smaller clamp on the left.
Caution:
c
9. Press the
and begins ch a rgi ng the ink de liv e ry system. This process
takes about 1 minute to complete. When the ink charging
process is f inished, the printer retu rns the print head to its
home position and the
c
Once you install th e c art rid ges, do not open their clamps
again until you replace the ink cartridges. Otherwise, the
cartridges may become unusable.
R
cleani ng button. T he printer moves the prin t head
P
power light stops flashing.
Caution:
P
power light continues to flash while the printer
The
performs the ink charging operation. Never turn off the
printer while this light is flashing. Doing so can result in
incomplete charging of ink.
10. Close the printer cover.
36
Page 39

Maintenance
Checking the Print Head Nozzles
If you find that the printed image is unexpectedly faint or dots in
the printed image are missing, you may be able to solve these
problems by checking the print head nozzles.
You can check the print head nozzles f ro m your computer with
the Nozzle Check utility in the printer software, or from the
printer its e lf by using the printer’s control panel buttons.
Note:
Do not start the Nozzle Ch eck utility while print ing is in progress;
otherwise your printout may be marred.
load/eject button and press the
1. Hold down the
button to turn on the pri nter. Then release both buttons.
E
P
power
37
Page 40

The printer prints an op e ration check page including yo ur
printer’s ROM version i nformation, the in k counter code, and
a nozzle check pattern. Here is a typical printout:
The above sample is in black and white, but the actual test prints in color
(CMYK).
2. Press the
P
power button to turn off the printer after it finishes
printing the nozzle check pattern.
If the nozzle check page does not print satisfactorily, for
example, if any segment of the pri nted line s is missin g, there
is a problem with the printer. This could be a clogged ink
nozzle or a misaligned print head. See the next section for
detai ls on cle aning the print hea d. For info rmation o n aligni ng
the print head, see “Aligning the Print Head” on page 40.
38
Page 41

Cleaning the Print Head
If you find that the printed image is unexpectedly faint or dots in
the printed image are missing, you may be able to solve these
problems by cleaning the pri nt head, w hich ensures that the
nozzles are delivering ink properly.
You can clean the print head from your computer with the Head
Cleaning utility in the printer software, or from the prin ter itself
by using the printer’s control panel buttons.
Note:
❏ Print head cle aning u ses b oth col or and b lack i nk. To avoid wasti ng
ink, clean the p rint head only if print quality dec lines.
❏ Use the Nozzle Check utility to confirm that the print head needs to
be cleaned. This saves ink.
B
❏ When the
the print head. Replace the appro p riat e ink cartridge first.
❏ Do not sta rt th e Head Cleaning or Nozzle Chec k utility while
printing is in progress; otherwi se your p r int out may be marred.
or A ink out light is flashing or on, you cannot clean
1. Make sure that the P power lig ht i s on and th at both the B
A
and
Note:
If the
head, and this operation will start the ink cartridge rep lac e ment
procedure. If you do not want to replace an ink cartridg e at this
moment, press the
its home position.
2. Hold down the
The printer starts cleaning the print head and the
light begins flashing. Print head cleaning takes about one
minute to complete.
ink out lights are off.
B
or A ink out light is flash ing or on, you cannot clean t he
cleaning button to ret urn the print head to
R
cleaning button for three seconds.
R
P
power
39
Page 42

c
Caution:
Never turn off the printer while the
Doing so may damage the printer.
P
power light is flashing.
3. When the
a document to confirm that the head is clean and to reset the
cleaning cycle .
If print quality hasn’t improved after repeating this procedure
four or five times, one or both of your ink cartridges may be old
or damaged and may need to be replaced. To replace an ink
cartridge before it is empty, see “Replacing an Old or Damaged
Ink Cartridge” in the online Reference Guide.
If the prin t quality still h as not improved afte r re placing the ink
cartridg e s, contact your deale r.
P
power light stop s fla shi ng, p rint a few l ines fro m
Aligning the Print Head
If you notice a mi sali gnment of v ertic al l in es, y ou may be able t o
solve this pro b l e m from your computer using the Print Head
Alignme nt utility in your print e r software.
If you are using DOS, see “Aligning the print head” in your DOS
User’s Guide.
Note:
Do not start the Print Head Align ment utility while pr inting is in
progress; otherwise your printout may be marred.
40
Page 43

For Windows users
1.Make sure paper is loaded in the sheet feeder.
Caution:
c
2.Access the printer software window. If you need instructions,
see “Accessing the printer software” in the online Reference
Guide.
Use paper at least 210 mm (8.27 inches) wide; for example ,
A4 size paper loaded short edge first. Otherwise, the print
head will spray ink directly onto the platen.
3.Click the
button.
4.Follow the messages on your screen to align the print head.
For Macintosh users
1.Make sure A4 or wider paper is loaded in the sheet feeder.
2.Click the Utility icon button in the Print dialog box. Then click
the
3.Follow the messages on your screen to align the print head.
Utili ty
tab, then click the
Pri nt Head Ali gnment
button.
Print Head Alignment
41
Page 44

Troubleshooting
Erro r Indicators
You can identify many common printer problems with the lights
on your printer’s control panel. If your printer stops working and
the lights are on o r flashing, u se the foll owing table of panel light
patterns to diagnose the problem, then follow the recommended
correctiv e measures.
Lights Problem and Solution
Paper Out
o S
f S
n B
n A
f B
No paper is loaded in
the printer.
The paper is not loaded
correctly.
Paper Jam
Paper has jammed in
the printer.
Ink Low (black ink cartridge)
The black ink cartridge
is nearly empty.
Load paper in the sheet
feeder; then press the
eject button to turn this light
off. The printer resumes
printing.
Remove and reload the
paper; then press the
eject button to turn this light
off.
Take all the paper out of the
feeder, and reload the paper;
then press the
button to turn this light off. If
the light continues to flash,
turn off the printer and gently
pull all the paper out of the
printer. If it tears and pieces
remain inside the printer, open
the printer cover and remove
the pieces of paper. Turn on
the printer and try again.
Obtain a replacement black
ink cartridge (S020189).
E
E
load/
E
load/
load/eject
42
Page 45

Ink Out (black ink car trid ge )
o B
f A
o A
f P
f S
o B
o A
The black ink cartridge
is empty.
Ink Low (color ink cartridge)
The color ink cartridge
is nearly empty.
Ink Out (color ink car tridg e )
The color ink cartridge
is empty.
Carriage Error
The print head carriage
is caught by jammed
paper or other foreign
material and cannot
return to the home
position.
Replace the black ink
cartridge with a new one
(S020189). See "Replacing Ink
Cartridges" on page 32.
Obtain a replacement color
ink cartridge (S020191).
Replace the color ink
cartridge with a new one
(S020191). See "Replacing Ink
Cartridges" on page 32.
1. Turn off the printer. After a few
seconds, turn it on again. The
printer will eject any jammed
paper.
2. If the paper is not ejected,
turn off the printer. Open the
printer cover and remove
any paper from the paper
path by hand.
If the error is not cleared,
contact your dealer.
Unknown Printer Error
f P
An unknown printer
error has occurred.
f S
f B
f A
= on, n = off, f = flashing
o
Turn off the printer, and after a
few seconds, turn it on again.
If the error is not cleared,
contact your dealer.
43
Page 46

Where to Get Help
If your printer i s not operating properl y and you cannot solve the
problem using the tr oubleshoot ing information in your pri n ter
documentation, contac t customer support servi ces for assi stance.
We will be able to help you much more quickly if you give us the
following information:
Serial number of your printer
(The seria l number label is on the back of the printer.)
Printer model
Brand and model of your computer
Printer software version
(Click
Windows version you are using
Software application(s) you normally use with your printer
and their version number(s)
About
in your printer driver.)
For United Kingdom and the Republic of Irela nd Users
If you purch ased your printer in the UK or the Republic of I reland,
EPSON (UK) Limited pr ovide s a r ange of c ust omer ser vic es and
technical support.
World Wide Web
If you can connect to the Internet and have a Web browser, you
can access our Web site a t
will find information on the latest EPSON products, software
drivers, on-line user guides, and answers to frequently asked
questions.
http://www.epson.co.uk
. Here you
44
Page 47

Faxon EPSON
Contact Faxon EPSON Faxback Service fo r support information
including troubleshooting tips, switch settings, and driver
information.
To use Faxon EPSON, call 01442 227332 in the UK or 0044 1442
227332 from the Republic of Ireland using a touch-tone phone.
You will be asked to follow a simple r o uti ne to register your
document request. Once you have entered your telephone and fax
number s, Faxon E PSON wil l fax a copy of the do cument cat alogue
to your fax machine.
When you have found the docume nts that you need in the
catalogue, call Faxon EPSON again and enter the document ID
numbe rs. The documents will be faxe d to you automatically.
Bulletin Board Service for latest drivers and utilities
You can call the EPSON Bulletin Board Service on 01442 227479
in the UK or 0044 1442 227479 from the Republic of Ireland. No
membership is required. Make sure that your communications
software is set to 8 data bits, 1 stop bit, no parity bit, ANSI terminal
mode emulation, and a modem speed of up to 28.8 Kbps.
Downloading protocols supported include Xmodem, Ymodem
and Zmodem. See the documentation that came with your
communications software and modem for more information.
When you first connect t o the Bulletin Bo ard Ser vice, you will be
asked for your name, company name, phone number and a
password (which you c an invent yo urself).
45
Page 48

Customer and Warranty Support
Our Customer and Warranty Support teams can be contacted by
calling 0870 163 7766 in the UK or 0044 0870 163 7766 from the
Republic of Ireland. They can provide the following services:
❏ Technical information on installing, configuring, and
operating yo ur EPSON products
❏ Arranging for faulty EPSON products to be repaired within
the warranty period
A full list of EP SON Customer and Warr anty Su pport se rv ices is
available on the tec hnical supp ort secti on of our world wide web
pages at
EPSON Faxback service in document number 5085.
http://www.epson.co.uk/support/
and on Faxon
Pre Sales Enquiry Desk
The Enquiry Desk team can be contacted by calling 0800 220546
in the UK or 1 800 409132 from the R epublic o f I rel and, by f axing
01442 227271 in t h e UK o r 0044 1442 227271 fro m the R epublic of
Ireland, and via Email at
the following information:
info@epson.co.uk
. They can provide
❏ Pre Sales information and literature on new EPSON products
(also available via our world wide web site at
www.epson.co.uk
❏ Where to purchase genuine EPSON c onsumables,
accessories, and options
)
http://
46
Page 49

For Australian Users
EPSON Australia wishes to provide you with a high level of
Customer Service. As well as the user’s guide, we provide the
following sources for obtaining information:
EPSON FAXBACK
EPSON FAXBACK will fax you the latest specifications and
pricing for most EPSON products offered in Australia. There is
also technical information including details of the latest software
and drivers available. Phone (02) 9903 9075 and the system will
guide you through a number of choices before faxing the
informat ion to your fax machine.
EPSON Bulletin Board System
This is where you can download the latest software and drivers.
Visit the BBS to check out the latest versions. If you have a modem,
phone (02) 9417 5090.
Internet URL http://www.epson.com.au
Access the EPSON Aust ralia World Wide W e b pages. Worth
taking your modem here for the occasional surf! You can get the
same inf ormation as offered on the EPS ON FAXBACK and the
EPSON Bulletin Board plus more.
Your dealer
Don’t forget that your dealer can often help identify and resolve
problems. The dealer should alw ays be the first call for a dvice on
problems. They can often solve problems quickly and easily as
well as give you advice on the next step to take.
47
Page 50

EPSON Helpdesk
EPSON Helpdesk is provided as a final backup to make sure our
clien t s have access to advice. Oper ators on the H e lp de sk can a id
you in diagnosing hard wa re and software pro blems. They can
also advise you on the latest EPSON products and where the
nearest dealer or service age nt is loca ted. Many types of queries
are answered here.
The Helpdesk numbers are:
Phone: (02) 9903 9040
Fax: (02) 9903 9189
We encourage you to have all the relevant info rmation on hand
when you ring. The more information you prepare, the fast er w e
can help solve the problem. This inform ation incl udes the User’s
Guide for your EPSON product, type of computer, operating
system, application programs, and any ot her information you feel
is required.
For Singapore Users
Contact the telephone and fax numbers below:
Phone: (065) 337-7911
Fax: (065) 334-1185
For Hong Kong Users
To obtain technical support as well a s other af ter-sales services,
users are we lcome to co ntact EPSON Hong K ong Limited.
Internet home page
EPSON H ong Kon g has estab lished a local home page in both
Chinese and English on the Internet to provide users with the
following information:
48
Page 51

❏ Product information
❏ Answers to Frequently Asked Questions (FAQs)
❏ Latest ver si ons of EPS ON prin ter driver s
Users c an access our World Wide We b home p age at:
http://www.epson.com.hk
Electronic bulletin board system
An electronic bulletin board system (BBS) is also available to
obtain printer information and the latest versions of printer
drivers. You can log on to the following number for the BBS
service:
BBS: (852) 2827-4244
Technical Support Hotline
You can also co ntact our technic al staff at the follow ing telephone
and fax numbers:
Phone: (852) 2585-4399
Fax: (852) 2827-4383
For Philippines Users
To obtain technical support as well as other after sales services,
users are welcome to contact the EPSON Philippines
Representative Office at the telephone and fax numbers below:
Phone: (632) 813-6552
Fax: (632) 813-6545
BBS: (632) 814-0595
49
Page 52

Options and Consumable Products
Interface cables
You can use any interface cable that meets the following
specifications. See your computer manual for any additional
requirements.
❏ Parallel Interface Cable (s hielded) C83602✽
(computer) to 36-pin Amphenol 57 Series (printer)
❏ USB Interface Cable (shielded) C83623✽ from Series A 4-pin
(computer) to Series B 4-pin (printer) (This cable not supplied
in all locations.)
Note:
The asterisk (✽) is a substitute for the last digit of th e p roduc t
number, which varies b y country.
Caution:
c
Use only the interface cables listed above. Using other cables
not covered by EPSON warranties may cause the printer to
malfunction.
from D-SUB 25-pin
50
Page 53

Ink cartridges
Black ink cartridge S020189
Color ink cartridge S020191
EPSON special media
Most plain paper works well in your printer. In addition, EPSON
offers specific ally designed media for ink jet printers to
high-quality printing needs.
EPSON 360 dpi Ink Jet Paper (A4) S041059
EPSON 360 dpi Ink Jet Paper (Letter) S041060
EPSON Photo Quality Ink Jet Paper (A4) S041061
EPSON Photo Quality Ink Jet Paper (Letter) S041062
EPSON Photo Quality Ink Jet Paper (Legal) S041067
EPSON Photo Quality Ink Jet Card (A6) S041054
EPSON Photo Quality Ink Jet Card (5 ×
EPSON Photo Quality Ink Jet Card (8 × 10”) S041122
EPSON Photo Quality Self Adhesive Sheet (A4) S041106
EPSON Ink Jet Note Cards A6
(with envelopes)
EPSON Ink Jet Greeting Cards 5 × 8”
(with envelopes)
EPSON Ink Jet Greeting Cards 8 × 10”
(with envelopes)
EPSON Photo Quality Glossy Film (A4) S041071
EPSON Photo Quality Glossy Film (Letter) S041072
EPSON Photo Quality Glossy Film (A6) S041107
EPSON Photo Quality Glossy Paper (A4) S041126
8”)
meet most
S041025
S041028
S041026
S041029
S041048
S041121
S041147
S041148
S041149
51
Page 54

EPSON Photo Quality Glossy Paper (Letter) S041124
EPSON Ink Jet Transparencies (A4) S041063
EPSON Ink Jet Transparencies (Letter) S041064
EPSON Photo Paper (A4) S041140
EPSON Photo Paper (Letter) S041141
EPSON Photo Paper (4 × 6”) S041134
EPSON Photo Stickers (A6) S041144
EPSON Pa noramic Photo Paper (210 × 594 mm) S041145
EPSON Iron-On Cool Peel Transfer Paper (A4) S041154
EPSON Iron-On Cool Peel Transfer Paper (Lett er) S041153
S041155
Note:
The availability of special media varies by country.
52
Page 55

EPSON OVERSEAS MARKETING LOCATIONS
EPSON AMERICA, INC.
20770 Madrona Ave.
P.O. Box 2842
Torrance, CA 90509-2842
Phone: (800) 922-8911
Fax: (310) 782-5220
EPSON DEUTSCHLAND GmbH
Zülpicher Straße 6,
40549 Düsseldorf Germany
Phone: (0211) 56030
Fax: (0211) 5047787
EPSON AUSTRALIA PTY. LTD.
70 GIBBES STREET, CHATSWOOD 2067 NSW.
Phone: 2-9903-9000
Fax: 2-9903-9177
EPSON HONG KONG LTD.
Rooms 4706-10, 47/F,
China Resources Bldg.,
26 Harbour Road, Wanchai, Hong Kong
Phone: 2585-4300
Fax: 2827-7083
EPSON ITALIA S.p.A.
V.le F.lli Casiraghi 427
20099 Sesto S.Giovanni
MI, Italy
Phone: 2-262331
Fax: 2-2440750
EPSON UK LTD.
Campus 100, Maylands Avenue,
Hemel Hempstead, Herts,
HP2 7TJ, U.K.
Phone: (+44) 01442 261144
Fax: (+44) 01442 227227
EPSON FRANCE S.A.
68 bis, rue Marjolin
92300, Levallois-Perret, France
Phone: 33.1.40.87.37.37
Telex: 610657
EPSON SINGAPORE PTE. LTD.
No. 1 Temasek Avenue #36-00
Millenia Tower, Singapore 039192
Phone: (065) 33 77 911
Fax: (065) 33 41 185
EPSON TAIWAN TECHNOLOGY &
TRADING LTD.
10F, No. 287 Nanking E. Road, Sec. 3,
Taipei, Taiwan, R.O.C.
Phone: (02) 717-7360
Fax: (02) 712-9164
EPSON IBERICA S.A.
Av. de Roma, 18-26
08290 Cerdanyola del Valles
Barcelona, Spain
Phone: 582. 15.00
Fax: 582. 15.55
SEIKO EPSON CORPORATION
(Hirooka Office)
80 Harashinden, Hirooka
Shiojiri-shi, Nagano-ken
399-0785 Japan
EPSON PORTUGAL, S.A.
R. do Progresso, 471, 1º Perafita
4460 Matosinhos, Portugal
Phone: (02) 996 14 02
Fax: (02) 996 14 11
1998 February
Page 56

Printed in JAPAN 1998 XX.XX
 Loading...