

Page 1
GPSSportsMonitor
UserManual
Page 2

Introduction
Checking past workouts
Features . . . . . . . . . . . . . . . . . . . . . . . . . . . . . . . . . . . . . . . 5
Using your SF-110 safely
Symbols in this manual . . . . . . . . . . . . . . . . . . . . . . . . . .7
Caring for your SF-110 . . . . . . . . . . . . . . . . . . . . . . . . . . 8
Notes on Usage . . . . . . . . . . . . . . . . . . . . . . . . . . . . . . . . . 9
Notes on using the product and components . . . . . 9
Notes on using the cradle . . . . . . . . . . . . . . . . . . . . .10
Optional heart rate monitor. . . . . . . . . . . . . . . . . . . 11
Notes on storage . . . . . . . . . . . . . . . . . . . . . . . . . . . . . . . 11
Notes on electromagnetic waves . . . . . . . . . . . . . . . . .11
Setting up your SF-110
What’s in the box . . . . . . . . . . . . . . . . . . . . . . . . . . . . . .14
Charging . . . . . . . . . . . . . . . . . . . . . . . . . . . . . . . . . . . . . 14
Before use . . . . . . . . . . . . . . . . . . . . . . . . . . . . . . . . . . 14
Charging . . . . . . . . . . . . . . . . . . . . . . . . . . . . . . . . . . . 15
Initial settings . . . . . . . . . . . . . . . . . . . . . . . . . . . . . . . . . 16
About the battery. . . . . . . . . . . . . . . . . . . . . . . . . . . .20
GPS Positioning . . . . . . . . . . . . . . . . . . . . . . . . . . . . . . . 21
Measuring function for the product . . . . . . . . . . . . 21
GPS positioning . . . . . . . . . . . . . . . . . . . . . . . . . . . . .22
Making precise measurements . . . . . . . . . . . . . . . . 23
Calibrating the stride sensor. . . . . . . . . . . . . . . . . . . . .24
About the stride sensor. . . . . . . . . . . . . . . . . . . . . . .24
Calibrating the sensor . . . . . . . . . . . . . . . . . . . . . . . .24
Basic operations . . . . . . . . . . . . . . . . . . . . . . . . . . . . . . . 25
Button functions . . . . . . . . . . . . . . . . . . . . . . . . . . . . 25
Alarm. . . . . . . . . . . . . . . . . . . . . . . . . . . . . . . . . . . . . .26
Adjusting the time. . . . . . . . . . . . . . . . . . . . . . . . . . . 27
Measuring your workouts
Viewing past workouts. . . . . . . . . . . . . . . . . . . . . . . . . .42
Measurement icons . . . . . . . . . . . . . . . . . . . . . . . . . .43
Deleting past workouts . . . . . . . . . . . . . . . . . . . . . . .43
Tracking daily activity
What is the Track Activity function?. . . . . . . . . . . . . .46
Measuring your activity . . . . . . . . . . . . . . . . . . . . . . . . .46
Checking your activity . . . . . . . . . . . . . . . . . . . . . . . . . .48
Measurable items . . . . . . . . . . . . . . . . . . . . . . . . . . . .48
Checking your current activity . . . . . . . . . . . . . . . .48
Checking your activity history . . . . . . . . . . . . . . . . .49
Stopping activity measurement . . . . . . . . . . . . . . . . . .50
Using RUNSENSE View
What is RUNSENSE View?. . . . . . . . . . . . . . . . . . . . . .53
Installing Epson Run Connect software . . . . . . . . . . .55
Creating a RUNSENSE View account . . . . . . . . . . . . .55
Uploading data to RUNSENSE View . . . . . . . . . . . . .57
Checking uploaded workout data . . . . . . . . . . . . . . . .59
Measuring heart rate
Wearing the heart rate chest strap . . . . . . . . . . . . . . . .63
Preparing the heart rate chest strap. . . . . . . . . . . . .63
Wearing the heart rate chest strap. . . . . . . . . . . . . .63
Pairing the heart rate chest strap . . . . . . . . . . . . . . .64
Enabling heart rate monitoring . . . . . . . . . . . . . . . .65
Measuring heart rate . . . . . . . . . . . . . . . . . . . . . . . . . . .67
Checking the connection . . . . . . . . . . . . . . . . . . . . .67
Displaying your heart rate . . . . . . . . . . . . . . . . . . . .67
Replacing the heart rate chest strap battery . . . . . . . .68
Disabling heart rate monitoring. . . . . . . . . . . . . . . . . .69
What is the chronograph function?. . . . . . . . . . . . . . . 30
Measurable items . . . . . . . . . . . . . . . . . . . . . . . . . . . . . . 31
Measuring . . . . . . . . . . . . . . . . . . . . . . . . . . . . . . . . . . . . 32
Displaying the Measurement screen. . . . . . . . . . . .32
Measuring a workout . . . . . . . . . . . . . . . . . . . . . . . . 32
Screen Display. . . . . . . . . . . . . . . . . . . . . . . . . . . . . . . . .34
Measurement screen . . . . . . . . . . . . . . . . . . . . . . . . . 34
Display Lap screen. . . . . . . . . . . . . . . . . . . . . . . . . . . 35
Recording laps automatically . . . . . . . . . . . . . . . . . . . . 36
Starting/stopping measuring automatically . . . . . . . .37
Setting a pace. . . . . . . . . . . . . . . . . . . . . . . . . . . . . . . . . .39
Settings
Measurement settings . . . . . . . . . . . . . . . . . . . . . . . . . .72
Changing measurement settings from the Time
screen . . . . . . . . . . . . . . . . . . . . . . . . . . . . . . . . . . . . . .72
Changing measurement settings from the
Measurement screen . . . . . . . . . . . . . . . . . . . . . . . . .73
Measurement settings . . . . . . . . . . . . . . . . . . . . . . . .75
Settings . . . . . . . . . . . . . . . . . . . . . . . . . . . . . . . . . . . . . . .76
Changing the Settings . . . . . . . . . . . . . . . . . . . . . . . .76
Settings options . . . . . . . . . . . . . . . . . . . . . . . . . . . . .77
2
Page 3

Screen . . . . . . . . . . . . . . . . . . . . . . . . . . . . . . . . . . . . . . . .80
Changing the measurement screen. . . . . . . . . . . . .80
Screen layout options . . . . . . . . . . . . . . . . . . . . . . . . 83
Measurement display abbreviations . . . . . . . . . . . . 84
Maintenance
Caring for your product . . . . . . . . . . . . . . . . . . . . . . . .86
About the strap . . . . . . . . . . . . . . . . . . . . . . . . . . . . . 86
Heart rate chest strap maintenance . . . . . . . . . . . .86
Disposing of the Product. . . . . . . . . . . . . . . . . . . . . . . .86
Updating the Firmware . . . . . . . . . . . . . . . . . . . . . . . . .87
Checking the firmware version . . . . . . . . . . . . . . . .87
Updating the firmware . . . . . . . . . . . . . . . . . . . . . . .88
Troubleshooting
Caution . . . . . . . . . . . . . . . . . . . . . . . . . . . . . . . . . . . . . .90
Problem solving . . . . . . . . . . . . . . . . . . . . . . . . . . . . . . .90
Resetting the product. . . . . . . . . . . . . . . . . . . . . . . . . . . 93
Initializing the product . . . . . . . . . . . . . . . . . . . . . . . . .94
Where to get help . . . . . . . . . . . . . . . . . . . . . . . . . . . . . .96
Appendix
Product icons . . . . . . . . . . . . . . . . . . . . . . . . . . . . . . . . .98
Product specifications . . . . . . . . . . . . . . . . . . . . . . . . . . 98
Product specifications. . . . . . . . . . . . . . . . . . . . . . . .98
Optional accessory specifications . . . . . . . . . . . . . . 99
Glossary . . . . . . . . . . . . . . . . . . . . . . . . . . . . . . . . . . . . .101
3
Page 4
Introduction
Introduction
To use the product correctly, make sure you read this User Manual along with the supplied Quick Start Guide.
Keep the Quick Start Guide handy to help you resolve any problems. Your product may look different from the
illustrations in this guide, but the instructions are the same.
Descriptions in the User Manual
Important:
c
Note:
Menu Name Indicates menu items displayed on the screen of the product.
A/B/C/D Indicates the product buttons.
See “Descriptions in the User Manual”
on page 4.
Trademarks
EPSON is a registered trademark, EPSON Exceed Your Vision is a registered logomark, and Runsense is a
trademark of Seiko Epson Corporation.
iPhone is a trademark of Apple Inc., registered in the U.S. and other countries.
The Bluetooth word mark is owned by Bluetooth SIG, Inc.
Android is a trademark of Google Inc.
General Notice: Other product names used herein are for identification purposes only and may be trademarks of
their respective owners. Epson disclaims any and all rights in those marks.
Indicates things you must or must not do. Ignoring these instructions or mishandling
this product could cause malfunction or operational problems to the product.
Indicates additional explanations and related information.
Indicates related pages. Click the link in blue text to display the related page.
Caution:
We cannot accept any responsibility for malfunctions and so on that occur due to ignoring the content of this guide,
the product being handled inappropriately, repairs or modifications performed by a third party that is not our
company or appointed by our company.
Notes:
O Unapproved copying of part or all of this guide is strictly forbidden.
O The content of this guide is subject to change without prior notice.
O We cannot accept any responsibility for mishandling due to errors in this guide.
4
Page 5

Features
Measuring running data
Measuring activity
Introduction
Allows you to measure workout data such as distance and time.
You can measure split and lap times, as well as use the GPS signal to measure distance and pace.
See “What is the chronograph function?” on page 30.
You can use the Recall screen to check your workout history.
See “Viewing past workouts” on page 42.
Allows you to the amount of calories burned throughout the day.
See “Tracking daily activity” on page 45.
Measurement settings
Allows you to change the measurement settings for the product. You can:
O Automatically record a lap when a set time or distance has been reached.
See “Recording laps automatically” on page 36.
O Automatically pause measurement when you stop running and resume measurement
when you continue.
See “Starting/stopping measuring automatically” on page 37.
O Set and measure your target pace for one mile or kilometer.
See “Setting a pace” on page 39.
O Monitors your heart rate with the optional heart rate chest strap.
See “Measuring heart rate” on page 67.
O Change the items displayed on the Measurement screen.
See “Screen” on page 80.
5
Page 6

Settings
Other features
Introduction
Allows you to change the settings for the product.
O Adjusts the screen's contrast (Adjust contrast function).
See “System settings” on page 78.
O Turns on the light automatically when the screen changes (Auto Light function).
See “System settings” on page 78.
O Resets configuration information in the product's memory (Initialize function).
See “Initializing the product” on page 94.
O You can measure pitch and stride using the built-in stride sensor.
See “Calibrating the stride sensor” on page 24.
O You can skip GPS positioning.
See “Skipping GPS positioning” on page 22.
O You can measure without performing GPS positioning.
See “Indoor mode” on page 23.
O You can monitor, analyze, compare and share your recorded data using the RUNSENSE View
web app.
See “Using RUNSENSE View” on page 52.
6
Page 7
Using your SF-110 safely
Using your SF-110 safely
Make sure you read the manuals (Quick Start Guide and User Manual) first to use this product safely.
The product may malfunction, or an accident may occur if it is handled incorrectly.
O Keep the manuals handy to help you resolve any problems.
O When taking this product out of the country of purchase, check the laws and regulations in the destination
country before you travel.
O This product is not a medical device. Use this product as an indicator during physical exercise.
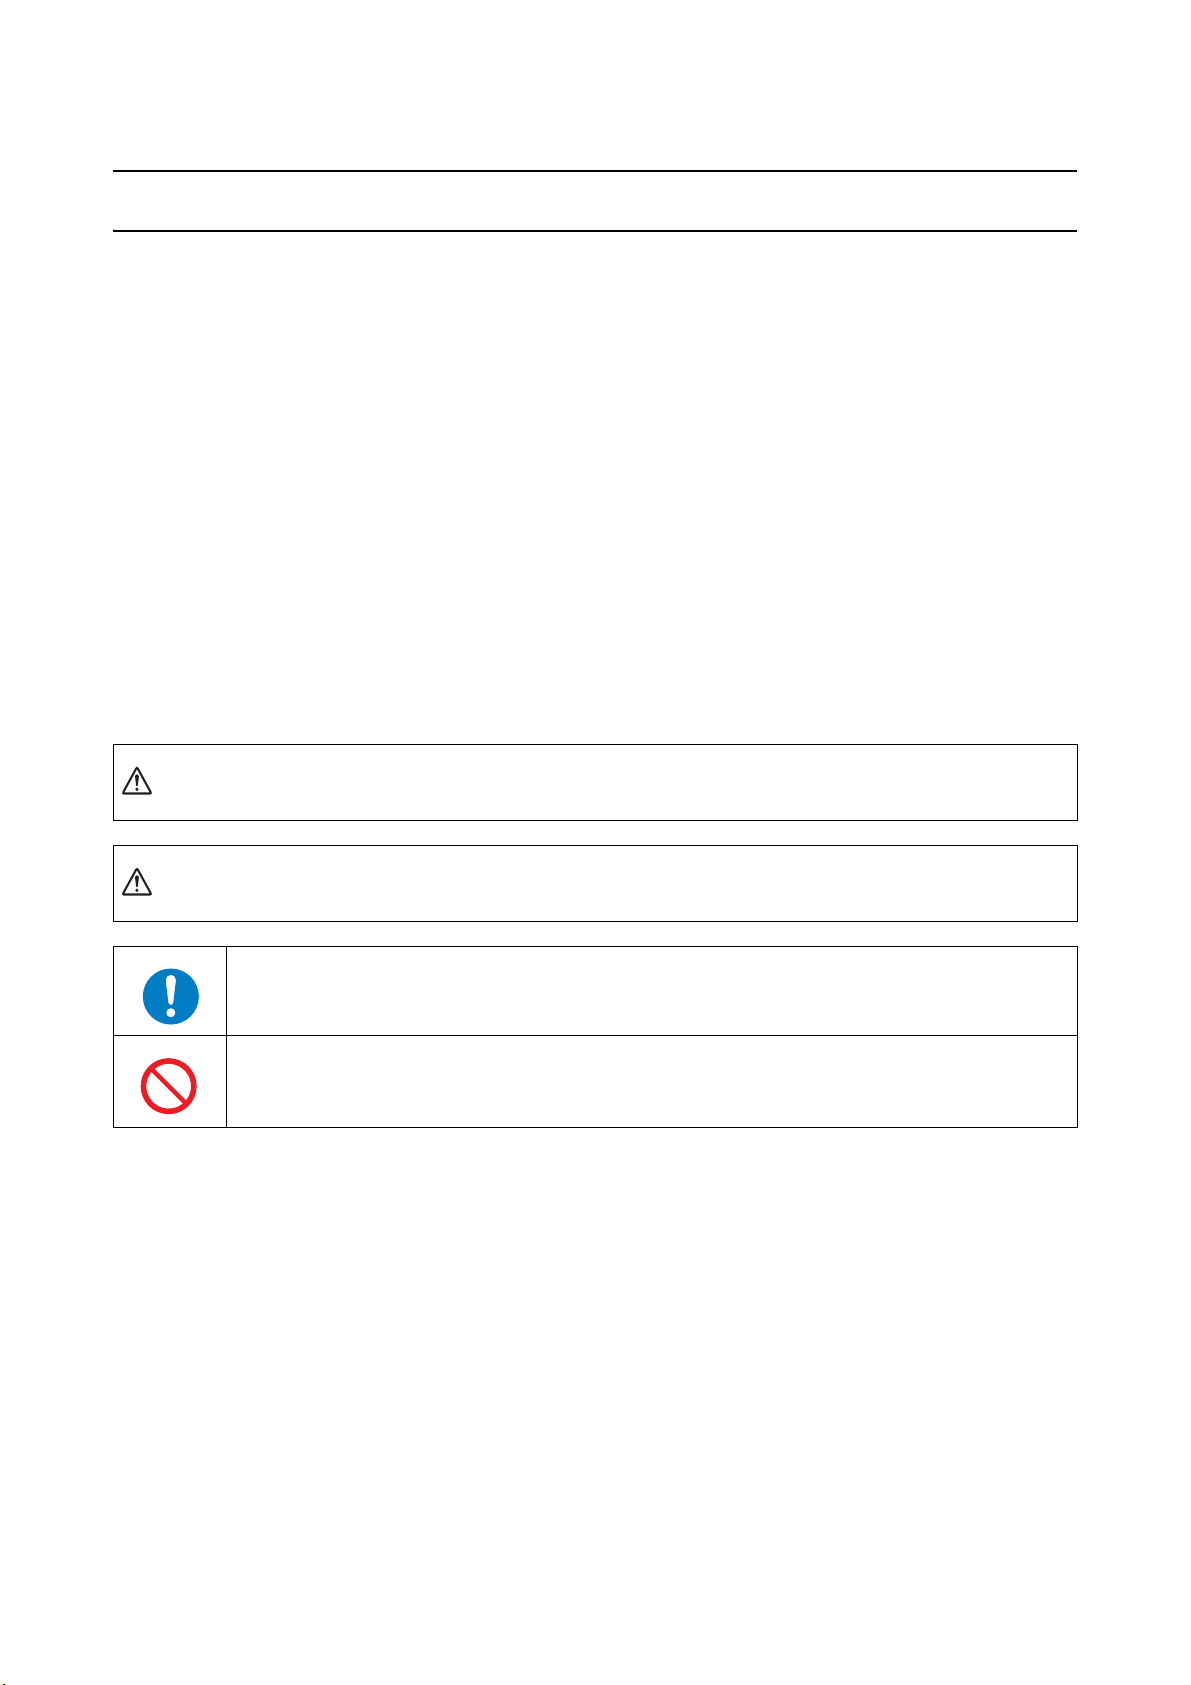
Symbols in this manual
The following symbols are used in this guide to indicate possible dangerous operations or handling. Make sure you
understand these warnings before using the product.
Warning:
This symbol indicates information that, if ignored, could possibly result in serious personal injury.
Caution:
Ignoring these instructions and mishandling this product could cause injury or damage to property.
This symbol indicates an action that should be done.
This symbol indicates an action that must not be done.
7
Page 8

Using your SF-110 safely
Caring for your SF-110
Your Runsense product is made from materials commonly used in watches and other consumer products. Since you
may wear your product over extended periods, including when you are exercising and sweating, it is important that
you take care of your skin and your product according to these instructions. Prolonged wearing of your product
without proper care could lead to skin irritation or rash.
Please follow the precautions below to ensure full enjoyment and benefit of your Runsense product:
Keep Runsense and skin clean:
1
O Clean the back of your product and the skin beneath on a regular basis, particularly after exercise, to
remove trapped dirt, sweat, lotion, sunscreen and other potentially irritating substances. You may also
use a soft brush to clean the back of your product.
O Do not use household, abrasive, or commercial cleaners on the product.
O Sweat can be corrosive because it contains salt. Remove the product, rinse your skin carefully and
thoroughly and wipe the Runsense product with a soft damp cloth to make sure that no sweat, soap,
lotion or other material remains on the skin or under the product before replacing it on your arm.
O Do not submerge the Runsense product in water or wear it in the shower or bath.
O Do not allow products such as soap, lotions, sunscreen, dirt and sweat to build up under the product.
Keep Runsense and skin dry:
2
O If your Runsense product gets wet, such as from sweating, remove after use and clean your wrist and
Runsense product thoroughly.
O Make sure that both the product and the skin beneath the product are thoroughly dry before replacing
on your arm.
O Do not let a wet Runsense product remain in contact with skin for prolonged periods of time.
Give skin a rest and some air.
3
O Your Runsense product should be worn snugly—not too loose or too tight.
O When putting on the product, make sure it does not rest on your wrist bone (ulna). This will be
uncomfortable and also interfere with the operation of the sensor. Although your product is intended for
extended wear, prolonged touching or rubbing could lead to skin irritation. Give your skin a break by
periodically removing the product for an hour or so. You must also take off the product while it charges.
8
Page 9
Using your SF-110 safely
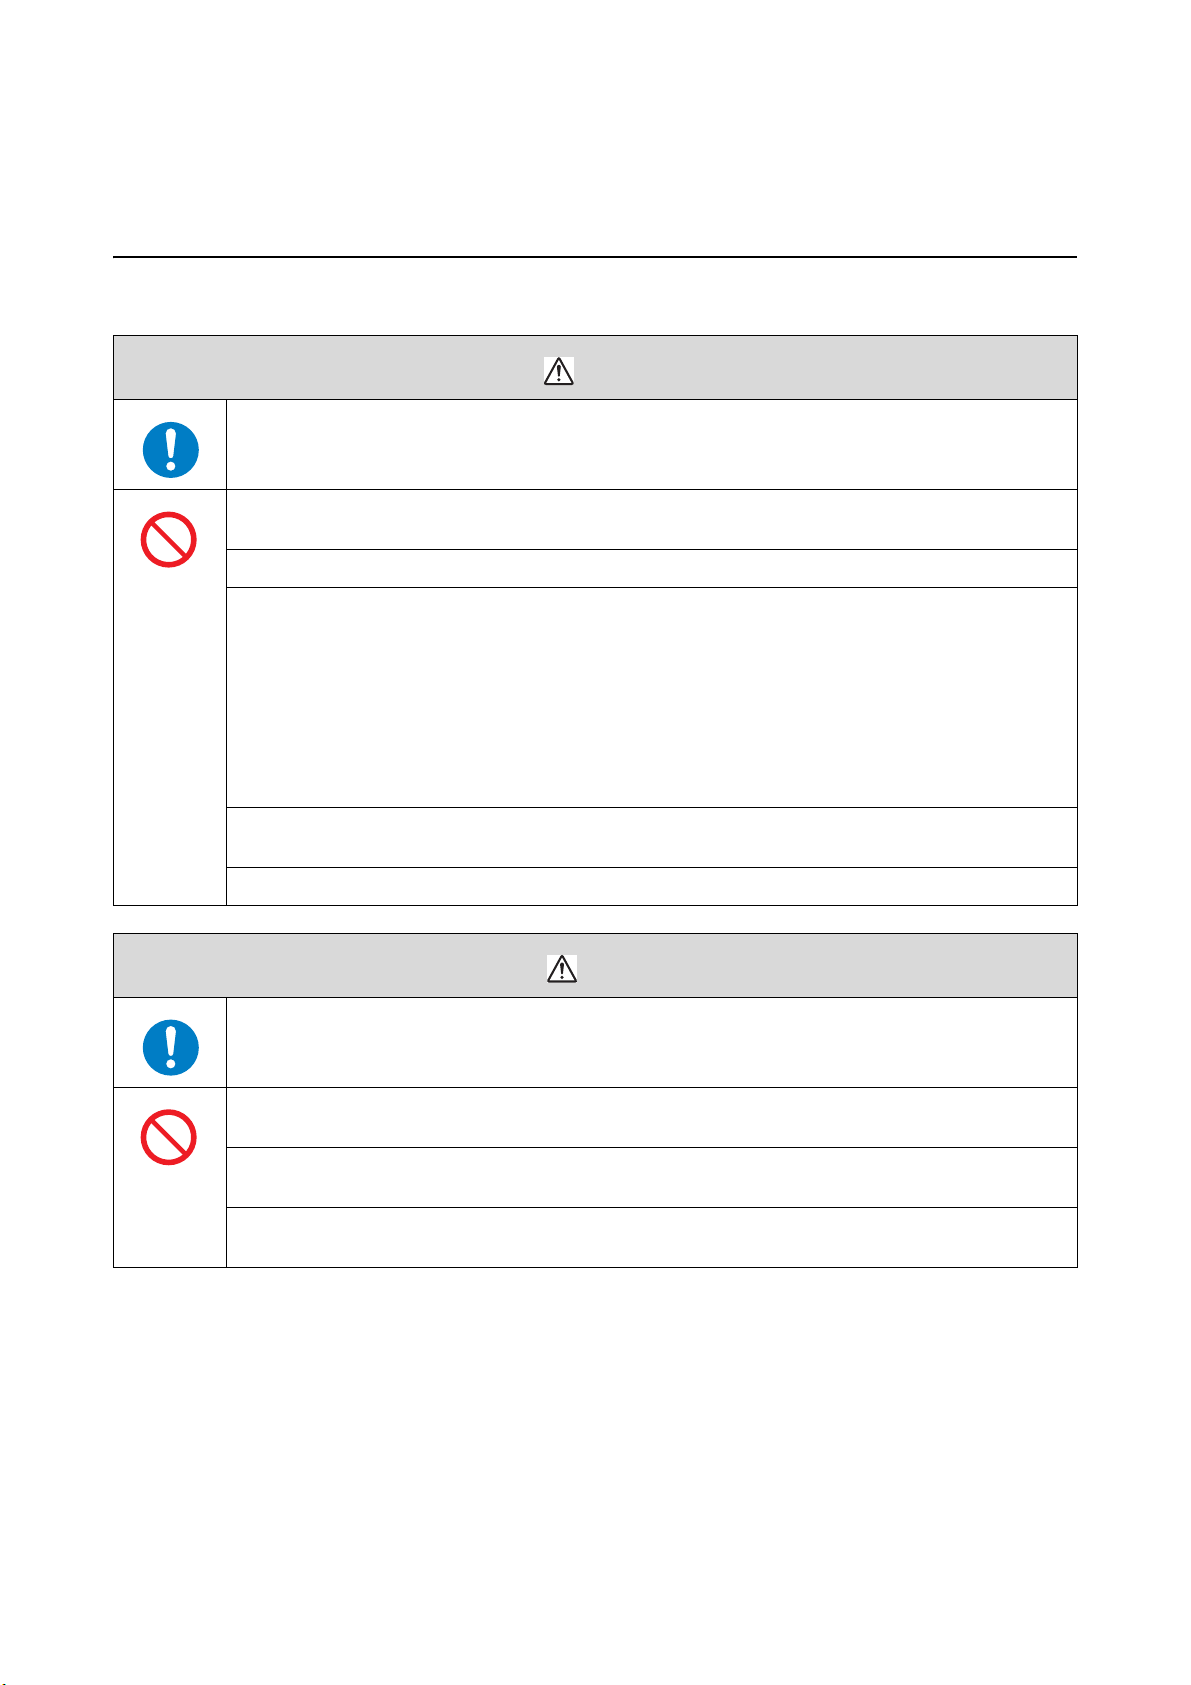
Notes on Usage
Notes on using the product and components
Warning
Exercise according to your physical capabilities. It is dangerous to exercise suddenly or excessively. Stop
exercising and consult your doctor if you feel unwell during exercise.
Do not keep your eyes on the product while exercising; otherwise you could fall or cause a traffic accident. Pay
close attention to your surroundings while using the product.
Do not use while scuba diving.
This product is made using precision parts and electronic components. Do not use or store this product in the
following environments. It may cause an electric shock or fire, or the product may malfunction or be damaged.
O Locations with very high or low temperatures or humidity
O Near volatile substances
O Dusty places
O Near a fire
O Near a strong magnetic field (for example, near a loudspeaker)
Do not disassemble this product, and do not attempt to repair this product by yourself. It may cause an electric
shock or accident.
Do not leave this product within reach of young children.
Caution
Stop using the product immediately and consult your doctor if you have an allergic reaction or a rash during
use.
The product is water resistant at 5 bar (5 ATM). Although you can use the product for swimming, do not perform
button operations under water.
Do not pour water directly from the tap onto this product. The power of the tap water stream may be strong
enough to compromise the product’s waterproof feature.
Do not wear this product in a bath or sauna. The steam and soap may compromise the waterproof feature or
cause corrosion.
9
Page 10
Notes on using the cradle
Do not use a damaged cradle; otherwise a problem or fire could occur. If it is damaged, contact a repair center.
Do not use them if you notice any abnormalities such as smoke, strange odors, or noises; otherwise a fire could
occur.
If any abnormalities occur, disconnect the cable from the cradle immediately, and contact a repair center.
Do not use if any foreign substances or liquids such as water get inside the product; otherwise an electric shock
or fire could occur. Disconnect the cable from the cradle immediately, and contact a repair center.
Do not use the cable for the cradle if any foreign substances such as dust are stuck to the connector; otherwise
a fire could occur.
Do not use the cradle to charge any other devices. Only use the cradle provided to charge the product;
otherwise a problem, electric shock, or fire could occur.
Do not use the cradle or AC adapter if they are in any way damaged, faulty or contaminated by foreign material
such as dust, water or dirt. Do not use any adapter other than the specified adapter for charging.
Using your SF-110 safely
Warning
10
Page 11
Using your SF-110 safely
Optional heart rate monitor
If the heart rate monitor battery is accidentally swallowed, contact your doctor immediately.
Be careful not to injure yourself when replacing the heart rate monitor battery.
When disposing of the heart rate monitor battery, follow your local laws and regulations.
When replacing the heart rate monitor battery, only use the type of battery specified. Also, make sure the
direction of the positive and negative terminals is correct.
Do not place the battery or the heart rate monitor with a battery installed into a fire.
Notes on storage
Warning
Caution
Do not place in a location subject to magnetic fields or electromagnetic waves, such as on top of a television.
Otherwise, data may be corrupted or lost.
Do not leave the product unattended in locations where it could come into contact with chemicals, or in
locations where chemical substances are emitted. If gasoline, nail varnish, or any spray-on liquid such as
cosmetics, as well as cleaning liquid, toilet detergent, adhesives, and so on, comes into contact with the product
or the strap, they could cause discoloring or damage.
Notes on electromagnetic waves
This product is equipped with Bluetooth® Smart technology. When operating supported heart rate monitors or
smartphones, this function wirelessly sends and receives heart rate measurement data to the product.
This product has been classified as a low electronic data communication system based on Radio Law. Therefore, this
product does not require a radio station license. The following acts may be punishable by law.
O Disassembling or remodeling the product
O Removing the verification or certification number for the product
VCCI Class B Information Technology Device
This device is a class B information technology device. This device is designed for home use, but
interference could occur when using in close proximity to radios or television antennas.
Frequency
This device uses the frequency bands 2.402 to 2.480 GHz. Other wireless devices may use the
same frequency. Note the following points to avoid wireless interference with other wireless
devices.
11
Page 12
Using your SF-110 safely
Precautions when performing wireless communication
This product operates on the 2.4 GHz band.
This product operates in the same frequency bandwidth as industrial, scientific, and medical devices such as
microwave ovens and mobile object identification (RF-ID) systems (licensed premises radio stations, amateur, and
unlicensed specified low-power radio stations (hereafter “other radio stations”)) used in factory production lines.
1. Before using this product, make sure there are no “other radio stations” being used in the vicinity.
2. If this product causes RF interference between the product and “other radio stations,” promptly move to a
different location, stop using the product, and contact your local reseller to ask for advice on preventing interference
(for example setting up partitions).
3. In addition, when harmful radio wave interference occurs between the product and “other radio stations,” and
refer to “Where to get help” to contact our service center.
See “Where to get help” on page 96.
Warning
If you notice any abnormalities on your skin and so on, stop using the product immediately.
In areas in which usage is restricted, such as on airplanes and in hospitals, follow the rules and regulations
provided (such as in-flight announcements).
Do not bring the product into an operating room, intensive care unit, and so on, and do not use the product
near medical equipment. Radio waves from the product may interfere with electronic medical equipment
causing the equipment to malfunction.
Caution
Radio waves from the product may interfere with surgically implanted medical devices such as a cardiac
pacemaker. If you have a surgically implanted medical device such as a cardiac pacemaker, make sure you
follow the instructions and warnings supplied with your medical device.
12
Page 13

Setting up your SF-110
Setting up your SF-110
“What’s in the box” on page 14
“Charging” on page 14
“Initial settings” on page 16
“GPS Positioning” on page 21
“Calibrating the stride sensor” on page 24
“Basic operations” on page 25
13
Page 14
Setting up your SF-110
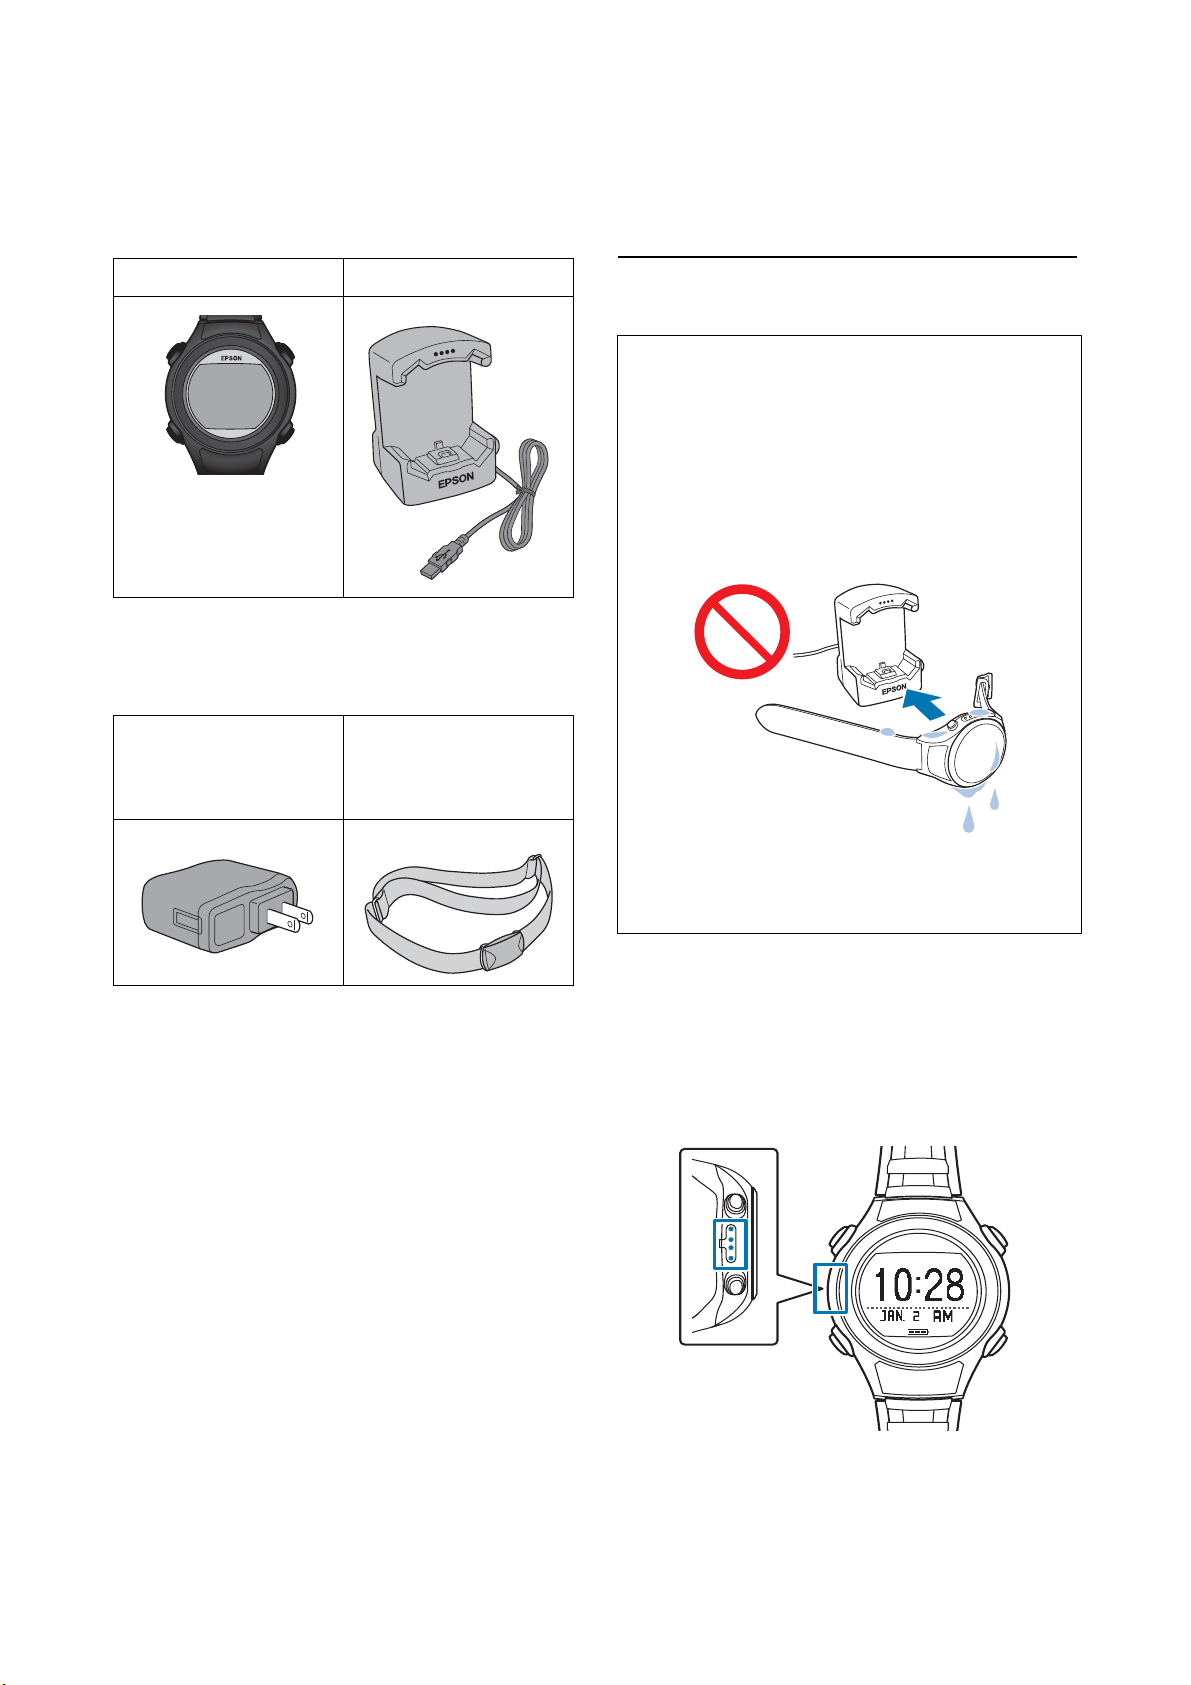
What’s in the box
SF-110 Cradle
Options
You can purchase the following optional accessories.
AC Adapter
(Model no.: SFAC04/Part
no.: E12E204001)
Heart rate chest strap
(Model no.:
SFHRM01/Part no.:
E12E204104)
Charging
Before use
Important:
c
O Make sure you use the cradle that came with
this product.
O Do not place the product in the cradle when
the product is wet. The contact points on the
cradle and the product could corrode,
malfunction, or cause a communication
failure.
O Do not press any buttons when the product is
wet or you may damage the product.
If the product is wet, wipe the contact points and
sensor lightly with a damp cloth to remove any sweat
or dirt, wipe it with a dry cloth to remove any excess
water, then let the product air dry before placing it in
the cradle.
Contact points
See “Caring for your product” on page 86.
14
Page 15
Charging
Important:
c
O Charge this product when using it for the
first time.
O Charge in an environment where the
surrounding temperature is 5 to 35°C. In any
other environment the following charge error
screen is displayed, and charging stops. When
it returns to a suitable temperature, charging
resumes.
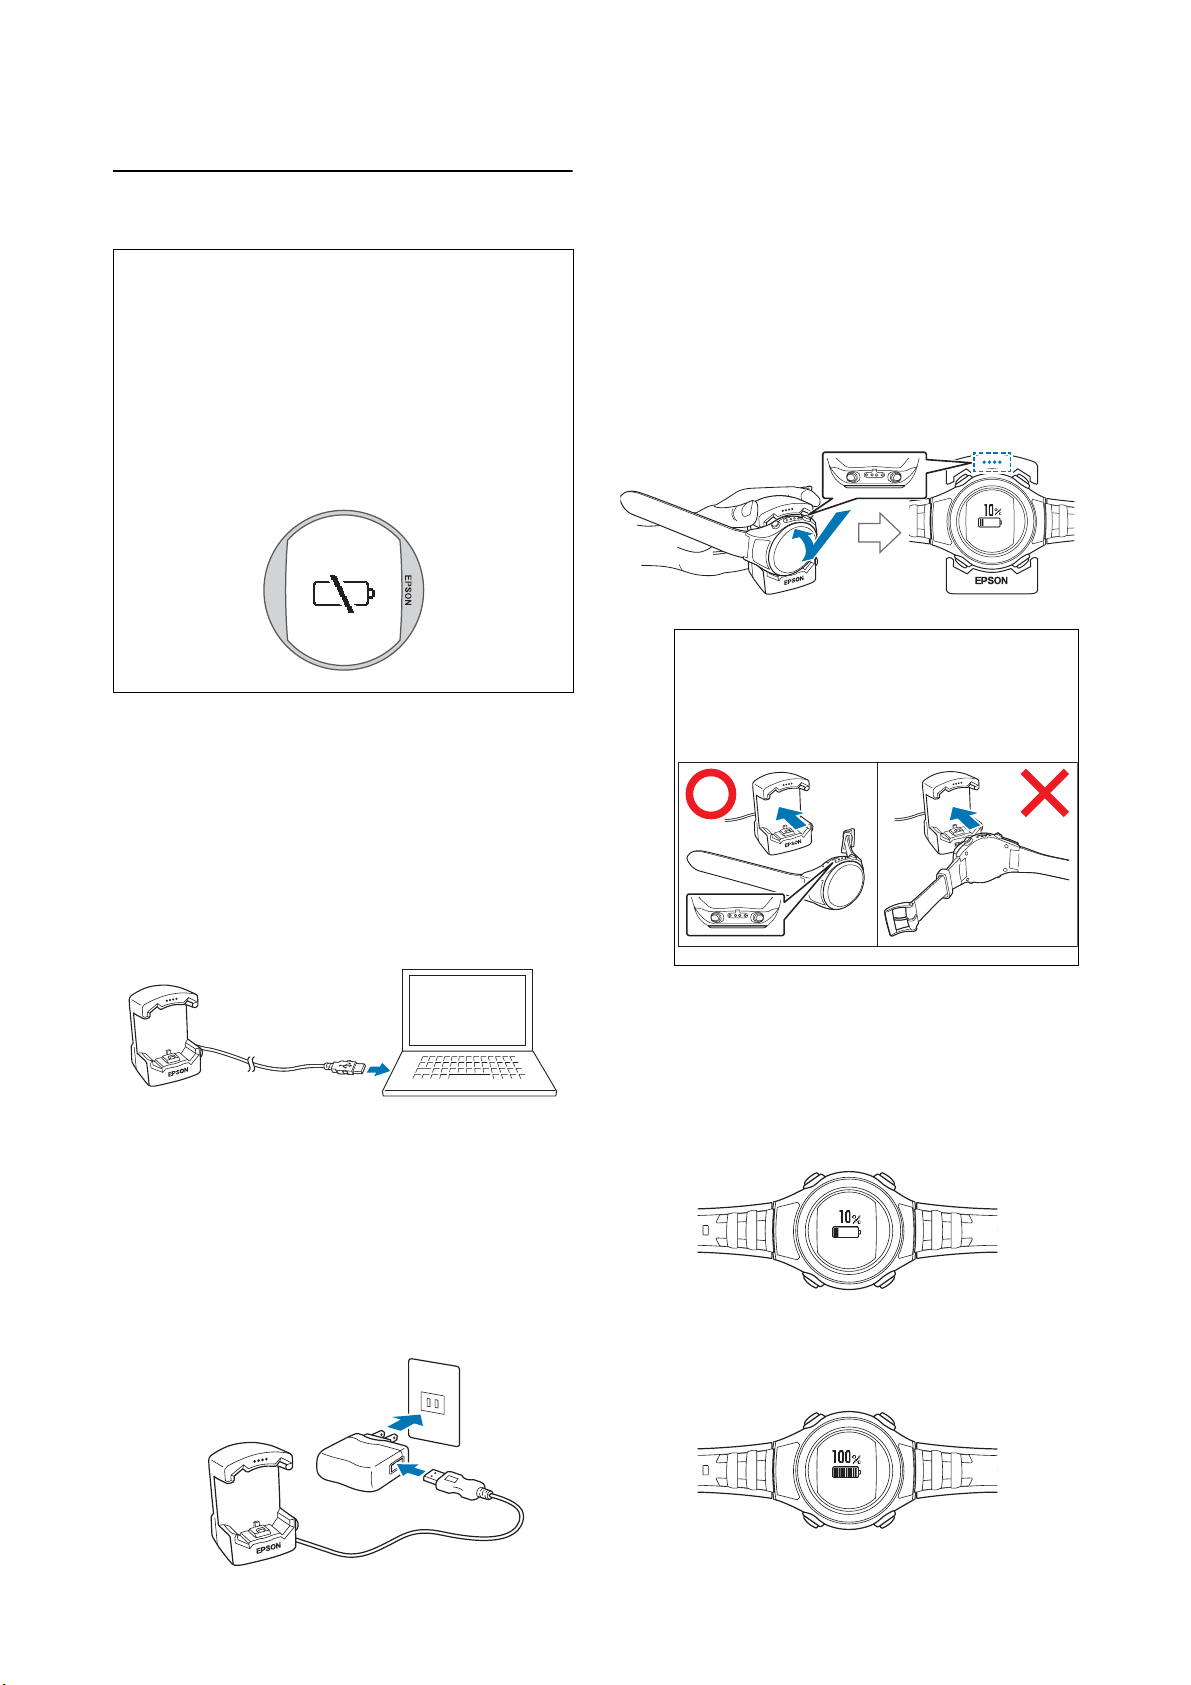
Connect the cradle using one of the following
1
methods:
Setting up your SF-110
Place the product into the cradle.
2
Check that the contact points on the product are
pointing up and match the contact marks on the
cradle.
After placing the product into the bottom of the
cradle with the LCD screen facing out, push
carefully on the top of the product until it clicks
into place.
c
Important:
Make sure the product is placed in the
correct direction; otherwise, the product or
the cradle could be damaged.
O Using a computer
Connect the cradle’s USB plug to the
computer’s USB port.
This is not guaranteed to work with all
computers. Do not use a USB hub. Connect
the cradle directly to the computer.
O Using an AC adapter
Connect the cradle’s USB plug to the AC
adapter’s USB port.
We recommend using the optional AC
adapter (model no. SFAC04/part no.
E12E204001). If you do not use a supported
AC adapter, you may not be able to charge
the product or it may not operate correctly.
When the product is placed in the correct
direction, the alarm sounds, the charging screen
is displayed, and charging starts.
A full charge normally takes approximately 2.5
to 3.5 hours, but charging time may vary.
When the battery icon on the LCD screen
displays 100%, charging is complete.
15
Page 16
Setting up your SF-110
A
A
A
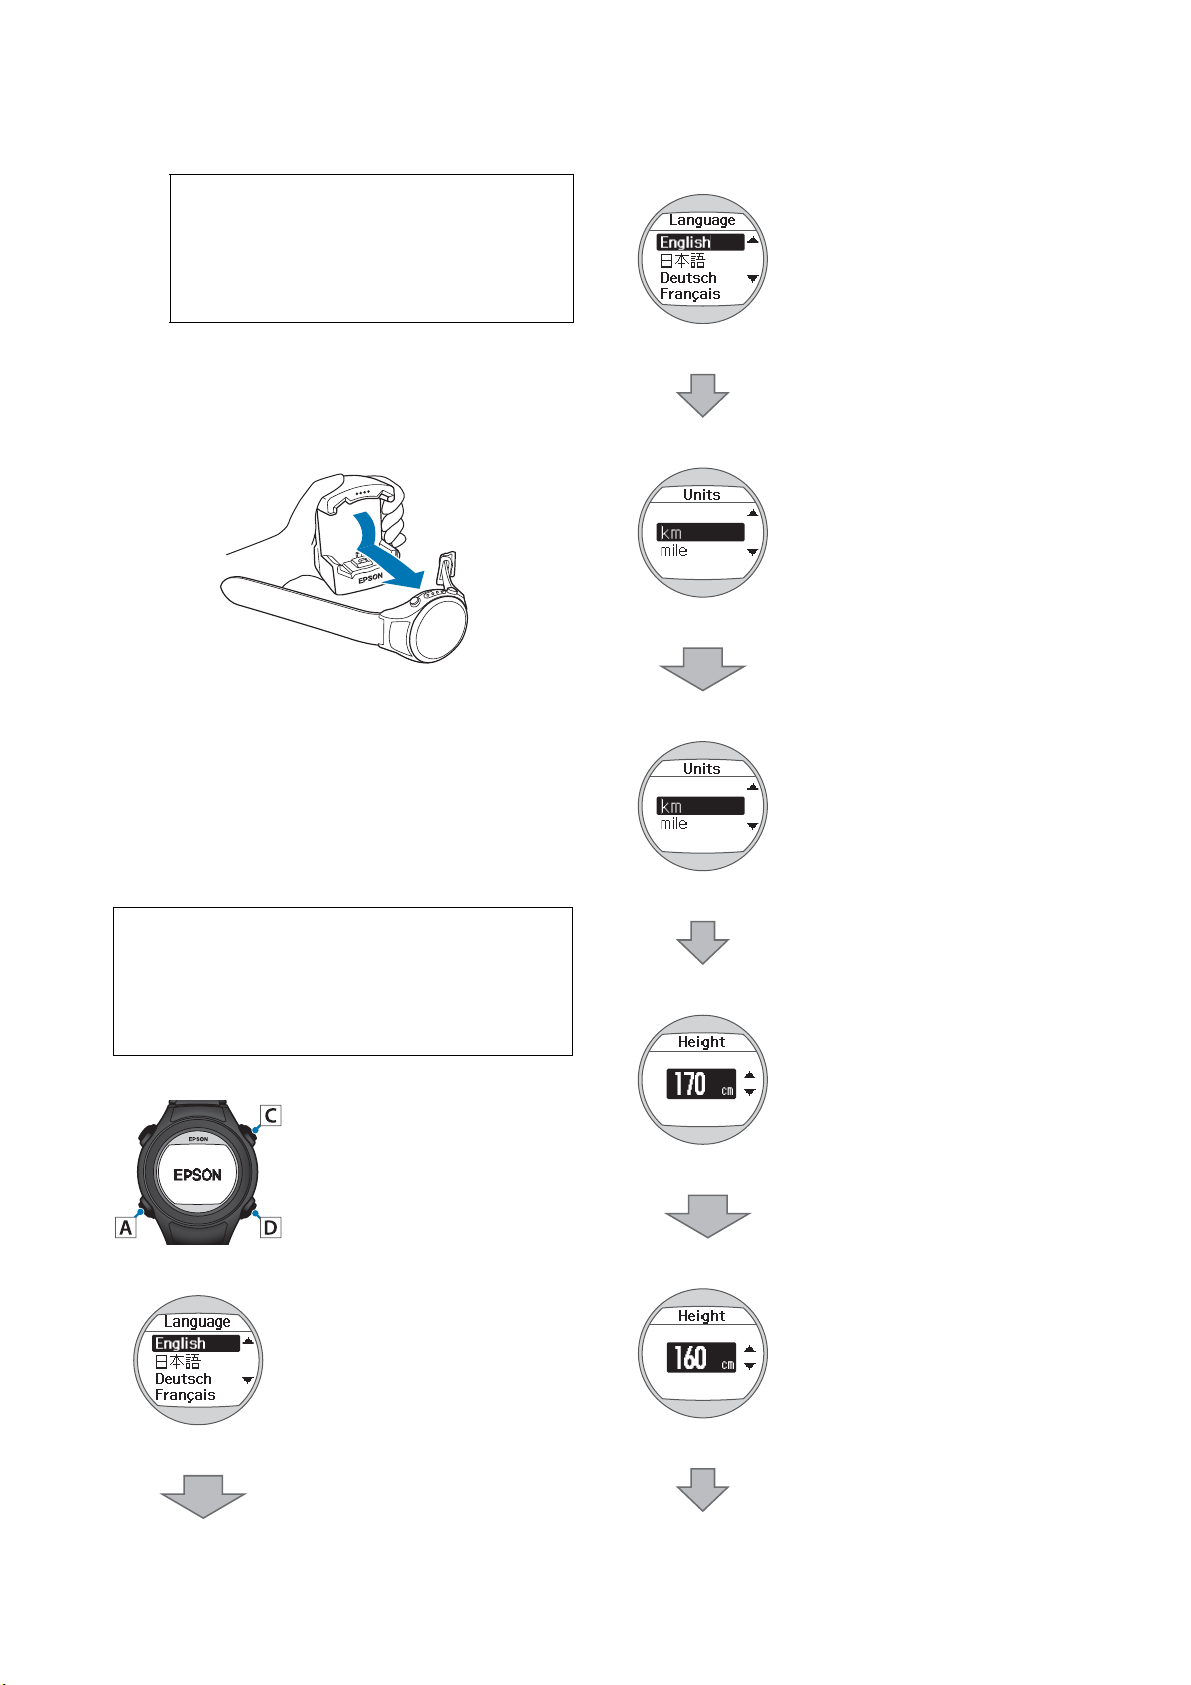
Note:
When the battery icon displays 100%, charging
automatically stops. The product will not be
damaged even if you continue to charge the
battery.
When charging is complete, hold the cradle and
3
press the product down into the lower part of
the cradle to release product.
Initial settings
After charging the product for the first time and
removing it from the cradle, follow the on-screen
instructions to select the initial settings.
Important:
c
The time is automatically detected via GPS. GPS
signals cannot be received indoors. Make sure the
initial GPS synchronization is performed
outdoors.
C/D
Press A.
Press C or D to highlight the unit of
distance you want to use.
Press A.
Press C or D to select your Height.
Press A.
C/D
C/D
Press C or D to highlight the
Language you want to use.
16
Page 17
Setting up your SF-110
C/D
A
A
A
A
A
C/D
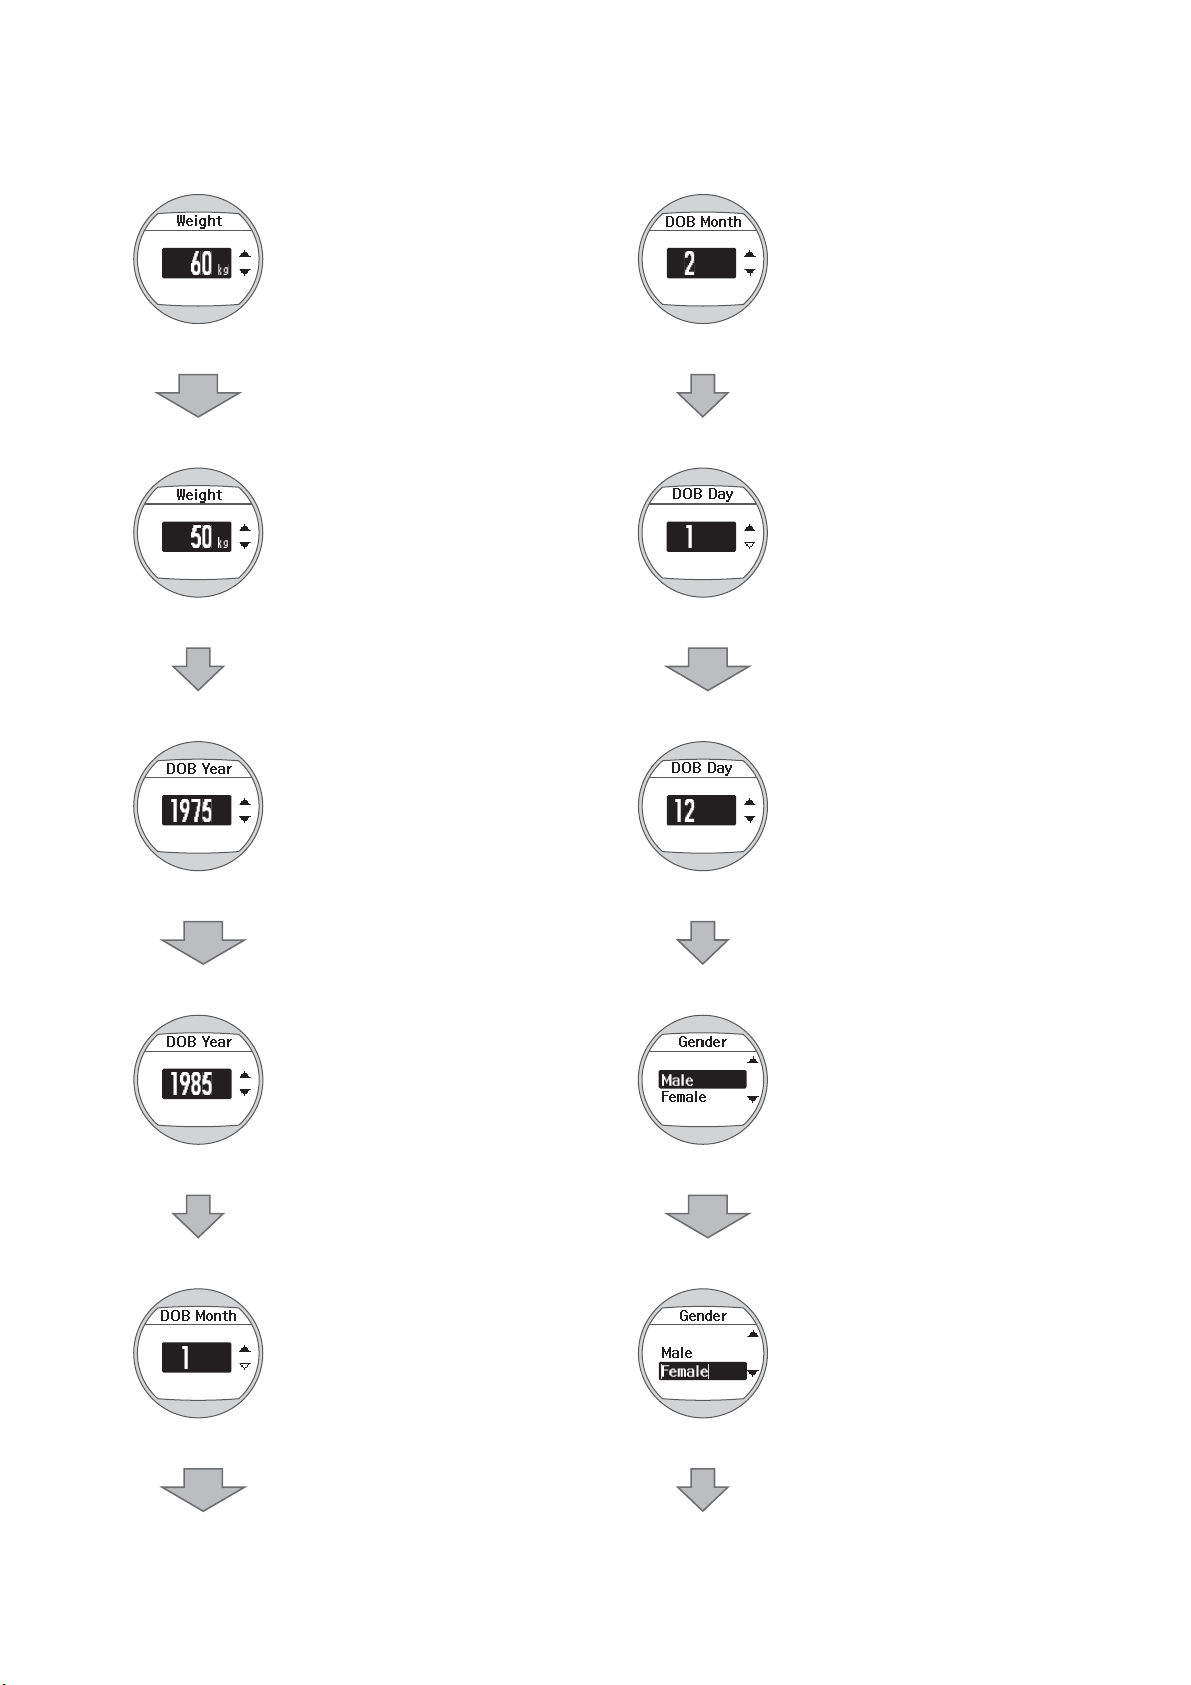
Press C or D to select your Weight.
Press A.
Press C or D to select the year you
were born.
C/D
Press A.
Press C or D to select the day you
were born.
Press A.
C/D
Press A.
Press C or D to select the month you
were born.
17
C/D
Press C or D to select your Gender.
Press A.
Page 18

Setting up your SF-110
A
A
A
A
C/D
C/D
Press C or D to select the current
year.
Press A.
Press C or D to select the current
month.
C/D
Press A.
Press C or D to select the date
format you want to use.
Press A to confirm.
C/D
Press A.
Press C or D to select the current
day.
Important:
c
Before starting GPS synchronization, go to a
location outside that isn’t surrounded by tall
buildings with no obstructions overhead.
C/D
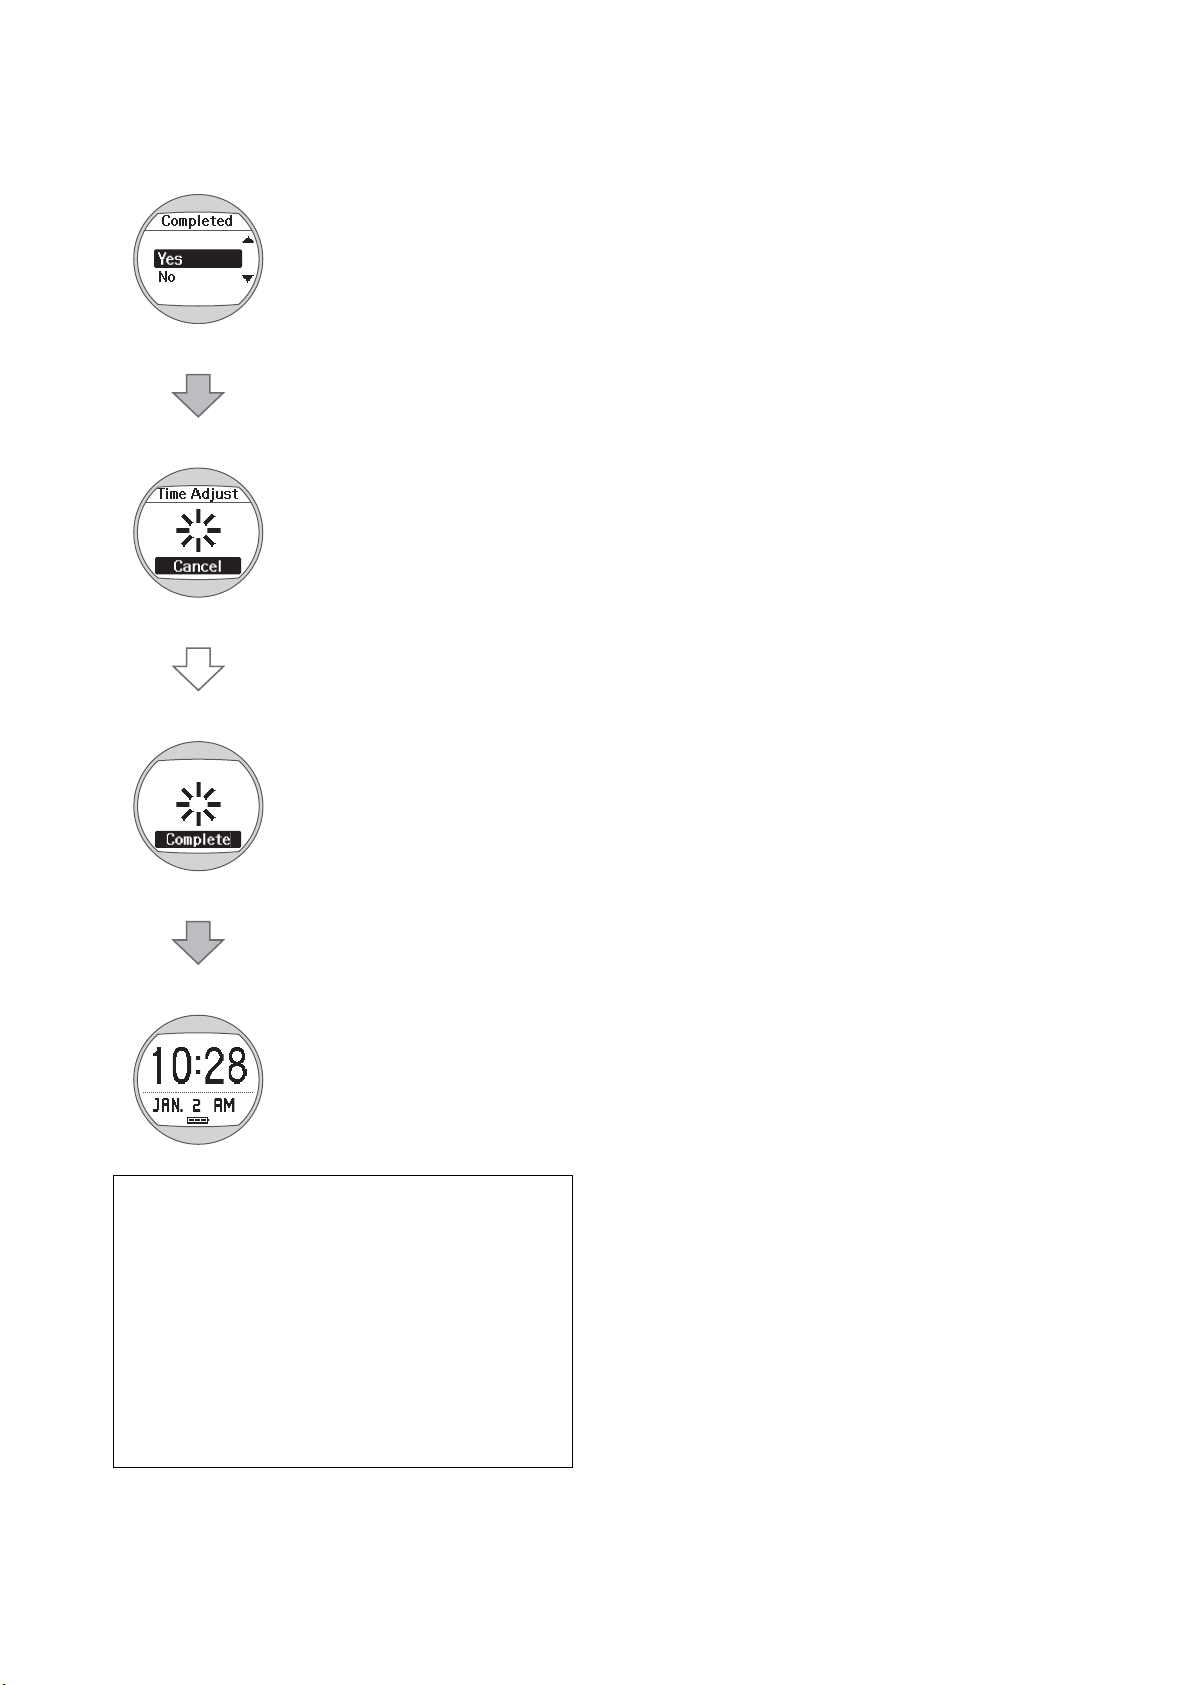
Press C or D to highlight Yes.
18
Page 19
Setting up your SF-110
A
A
If you select No, you will need to
re-enter the initial settings.
Press A.
A signal is received from the GPS
and time is automatically
synchronized.
When Complete is displayed, press
A.
The Time screen is displayed.
Note:
O When you do not use the product for a while, it
enters sleep mode and the time display turns off.
The display is restored the next time you move the
product.
O If time synchronization fails, the product may not
be able to receive a GPS signal in its current
location. Set the Time Adjust option from Clock Set
in Sys. Settings.
See “Adjusting the time” on page 27.
19
Page 20
Setting up your SF-110
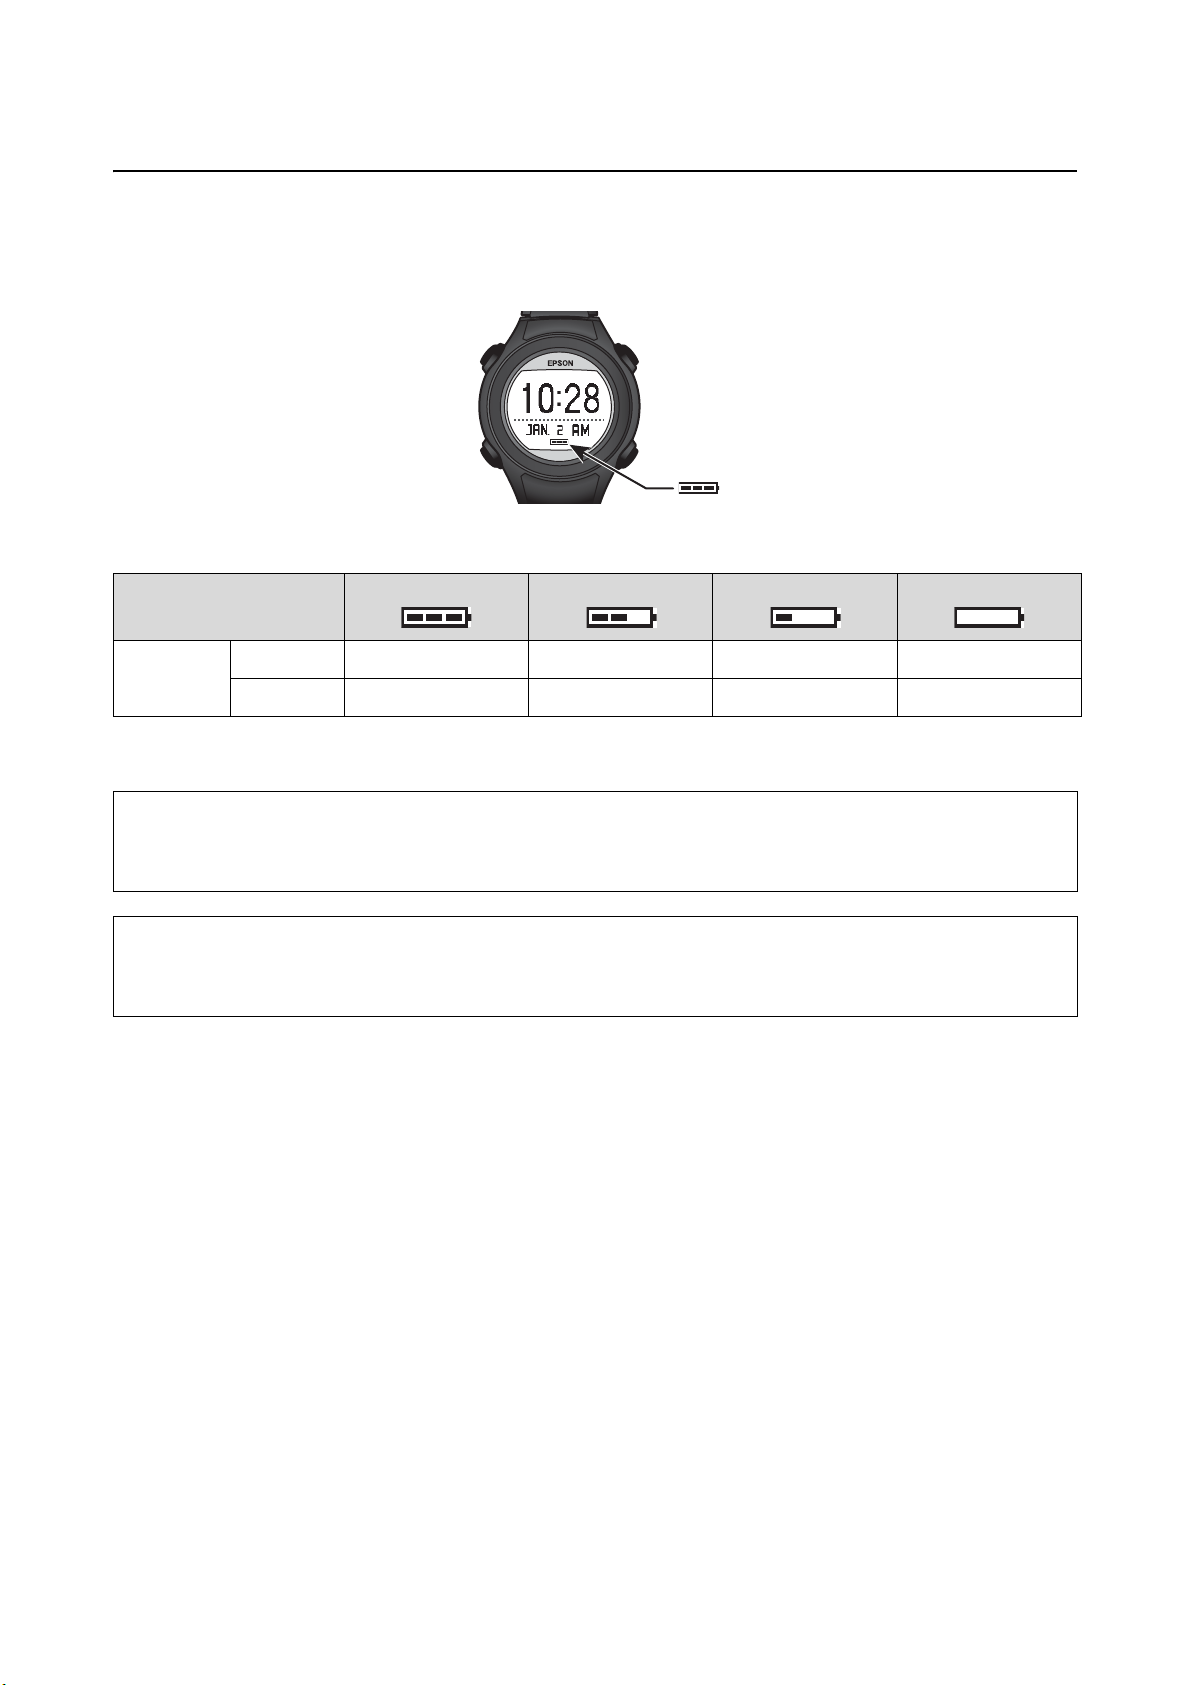
About the battery
You can check how much charge remains from the battery icon below the time display.
Battery icon and standard usage times
Battery icon
Hours
remaining*
* Approximate battery life remaining. Actual battery life will vary.
Note:
If the battery runs out, the measurement data is still stored in the memory.The date and time may reset, and the date may
need to be manually re-entered.
Important:
c
If the product is left for a long time with a low battery, the performance of the rechargeable battery will deteriorate.
Make sure you charge the product at least once every six months even when it is not being used.
GPS On 10 to 7 hours 7 to 4 hours) 4 to 1 hours 1 to 0 hours
GPS Off 10 to 7 days 7 to 4 days 4 to 1 days 1 to 0 days
20
Page 21
Setting up your SF-110
GPS Positioning
Measuring function for the product
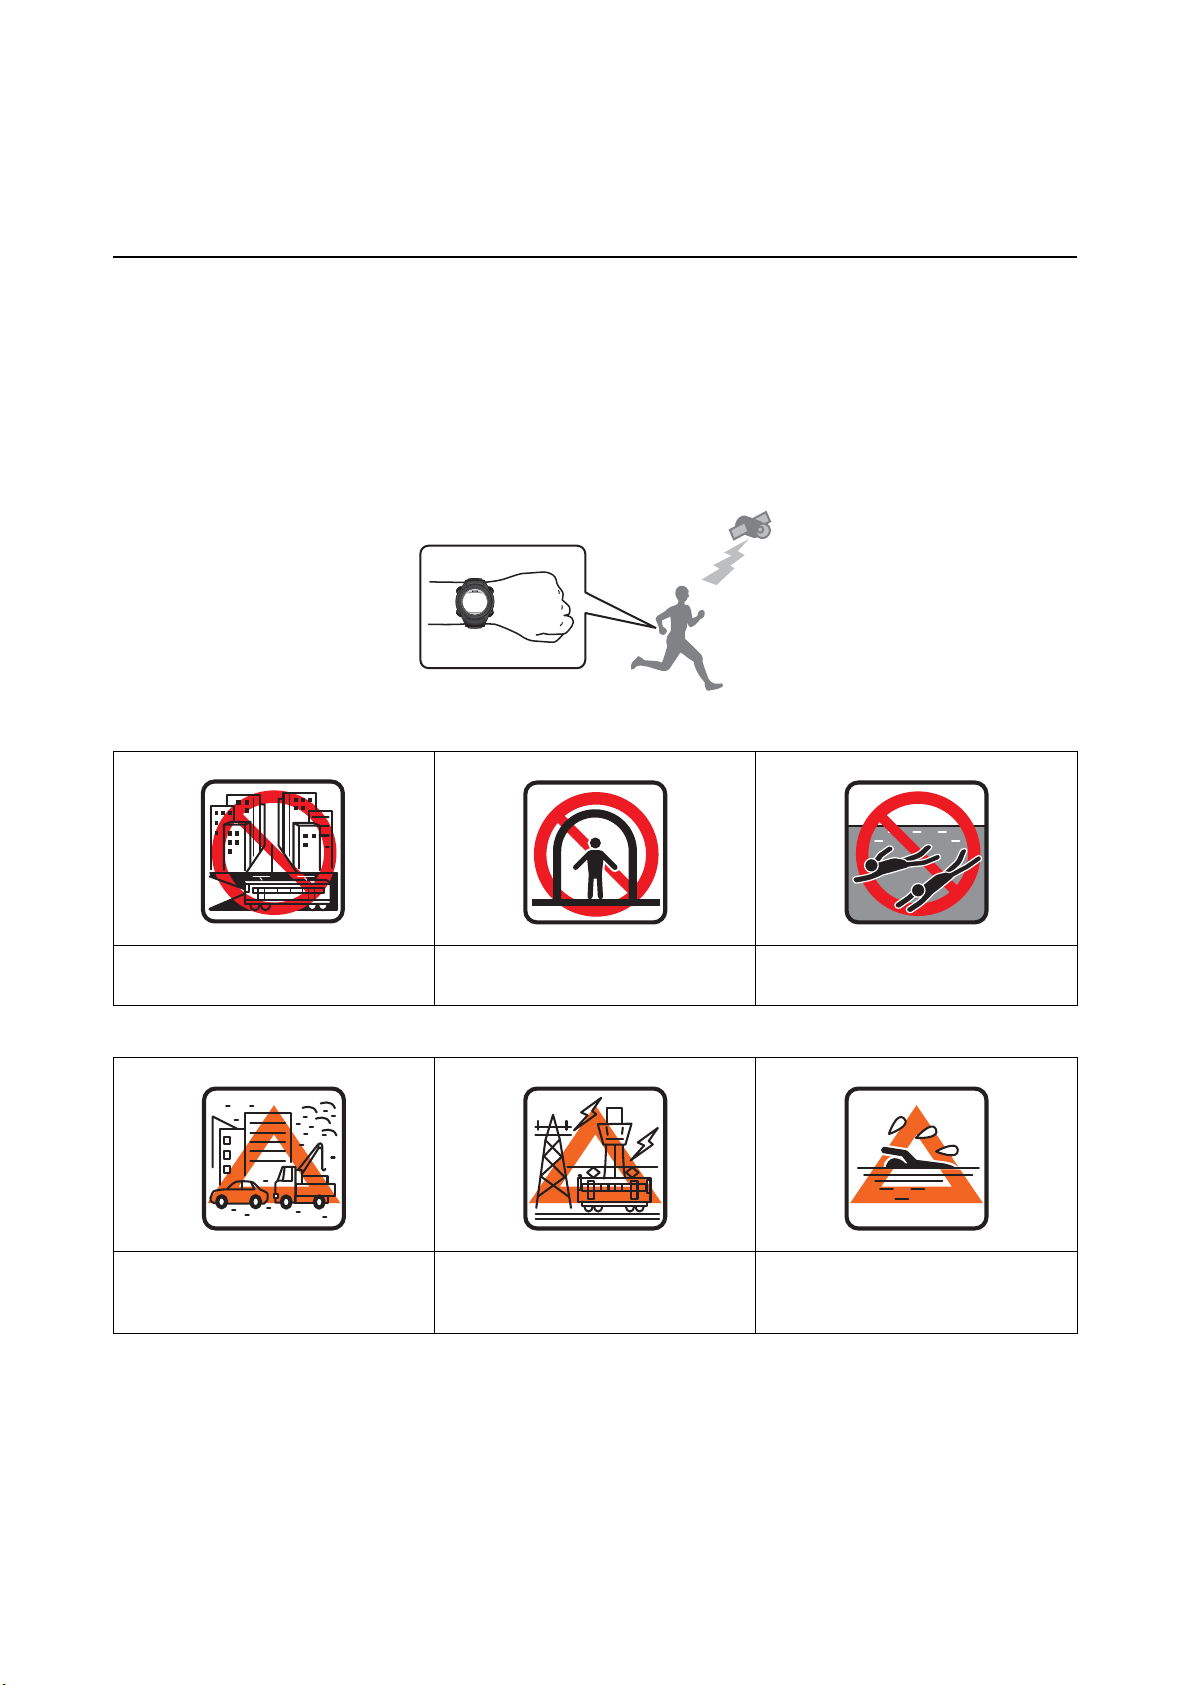
This product receives a signal from the GPS, and measures distance and pace. To make sure measurements are
performed accurately, use the product under the following conditions to allow for easy reception of GPS signals:
O Outside with no obstructions overhead
O Wear the product with the screen facing up
Locations where you cannot receive GPS signals
Inside rooms or buildings, or
underground
Locations where it is difficult to receive GPS signals
Locations with electronic interference,
such as construction sites and heavy
traffic
In tunnels Under water
Near high-voltage wires or television
towers, overhead electric wires for
trains, and roads with skyscrapers
On water
21
Page 22

Setting up your SF-110
D
A
GPS positioning
When you switch to the Measurement screen, the
product receives a signal from various satellites, and
identifies your GPS position.
Important:
c
Make sure you are outside with no obstructions
overhead, and try to keep the product as still as
possible.
When GPS positioning is complete,
an alarm sounds and the
measurement screen is displayed.
Note:
O It usually takes less than two minutes to complete
GPS positioning.
If it takes more than two minutes and Failed is
displayed, select Cancel, move to a different
location, and try again.
C/D
Press D to display the Menu.
Press C or D to highlight Workout.
Press A.
O When GPS positioning is complete, the product
receives a signal from the GPS satellite once every
hour.
When the measurement screen is displayed, you can
start measuring.
See “Measuring your workouts” on page 29.
Skipping GPS positioning
If you do not want to use GPS features, or if GPS
positioning is taking too long, press C or D to highlight
Skip, then press A.
GPS positioning starts.
22
Page 23

Setting up your SF-110
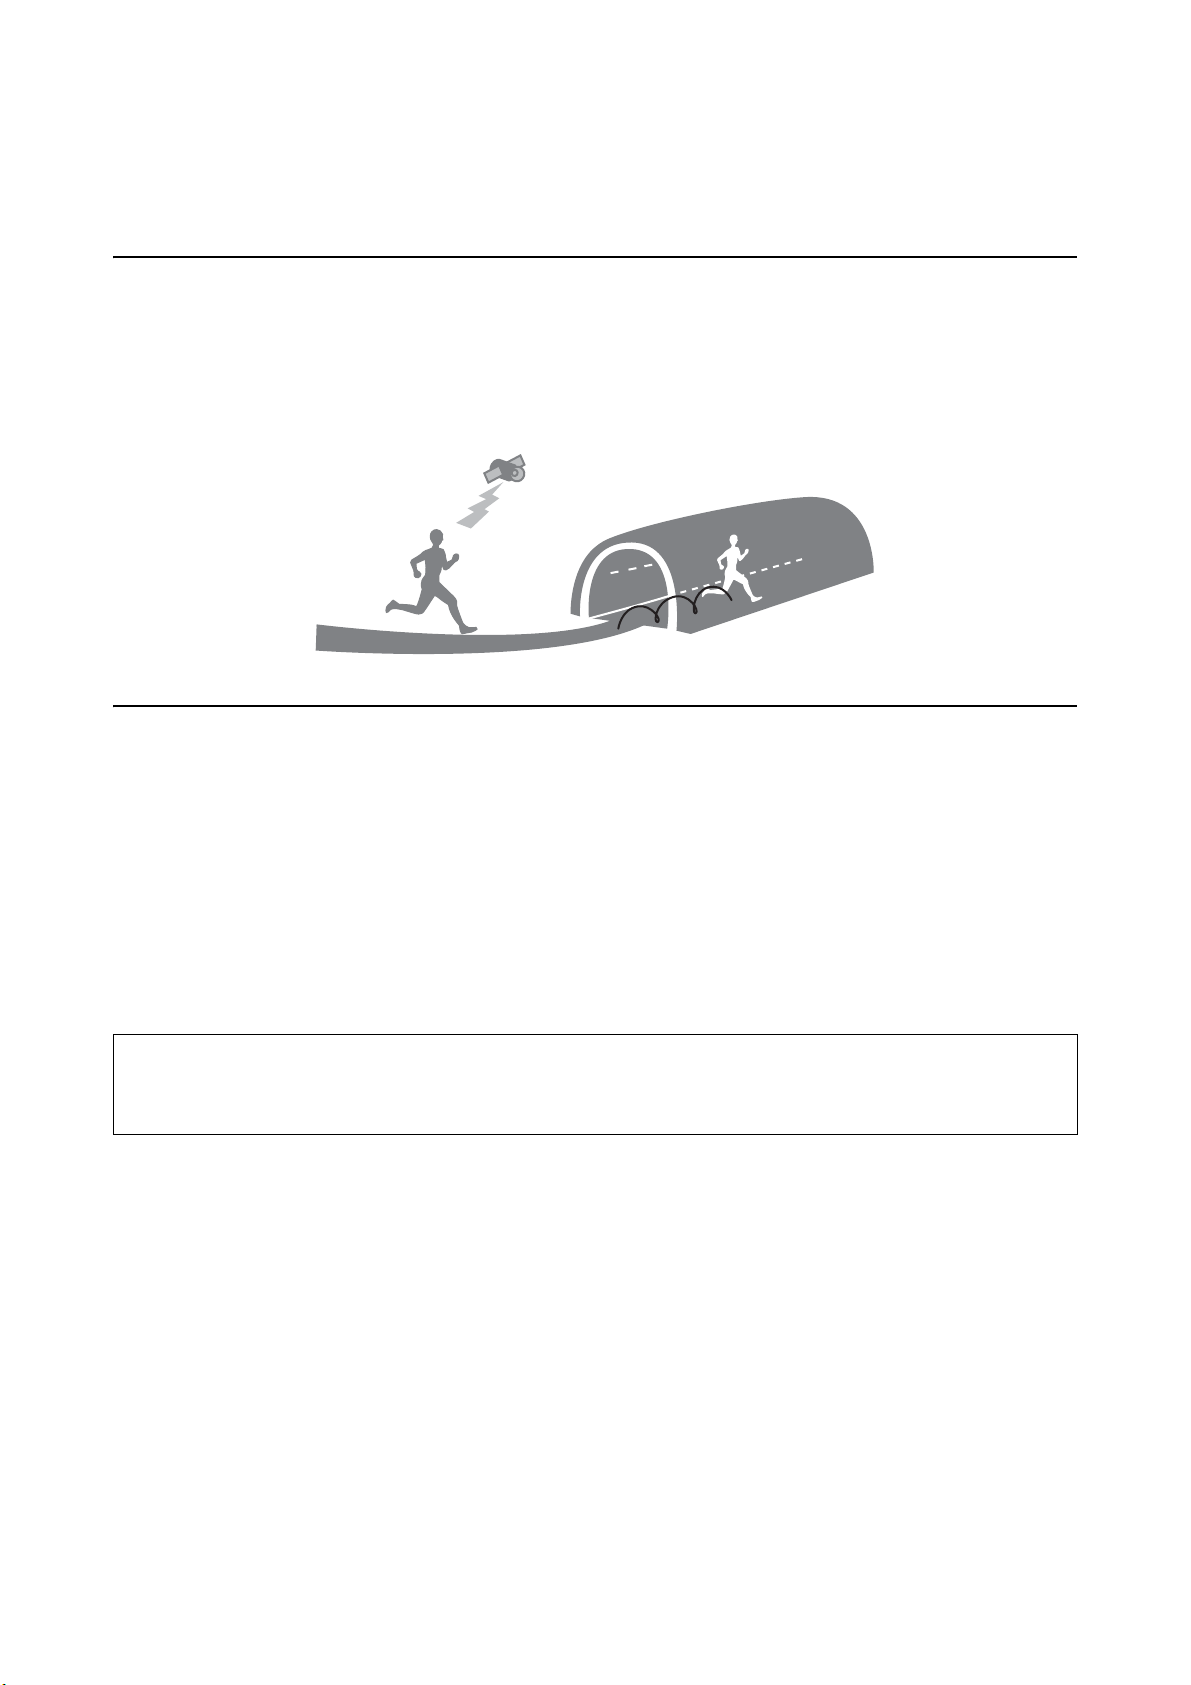
The product continues to search for a GPS signal, and
starts recording positional information when it
successfully synchronizes with a satellite. The route
you have travelled before the GPS has synchronized is
not recorded, but distance and pace data can still be
measured. The product will use the stride sensor until a
GPS connection is made.
See “Measurable items” on page 31.
Indoor mode
This function allows you to measure without
performing GPS positioning.
Your route is not recorded in Indoor mode. The
measurements recorded by your product are also
limited in Indoor mode.
See “Measurable items” on page 31.
Use either of the following methods to enter indoor
mode.
O Press C or D to highlight Indoor during GPS
positioning, then press A.
You will not need to repeat this process again unless
you do not use the product for several months.
O If GPS positioning fails, press C or D to highlight
Indoor on the screen displayed, then press A.
Making precise measurements
When you use the product for the first time or when
the product has not been used for several months, you
need to allow the product to completely synchronize
with the GPS satellites. Switch to the Measurement
screen, then wait outside for at least 15 minutes with no
obstructions overhead. Your product will track your
movements with greater accuracy after this extended
calibration.
23
Page 24
Setting up your SF-110
Calibrating the stride sensor
About the stride sensor
This product contains a stride sensor that uses a stride algorithm to learn your pace from your actual speed and your
body's vibration frequency. The stride sensor calculates distance and laps with high precision, and measures your
pitch and stride even when the GPS signal is lost.
Calibrating the sensor
When using the product for the first time, you need to run continuously for a certain amount of time to make sure
that your stride is accurately detected by the sensor. Follow these guidelines to ensure the product learns your
specific running style quickly:
O If you are outside with no obstructions overhead, make sure you run for approximately 10 minutes.
O If you are surrounded by tall buildings, make sure you run for approximately 30 minutes.
You only need to do this the first time you use the SF-110 and if you reset the product.
Note:
If you plan to use the product to measure running, run at your usual pace when you calibrate the sensor. Errors may occur
if your typical stride pattern is significantly different from your initial calibration.
24
Page 25
Setting up your SF-110
Basic operations
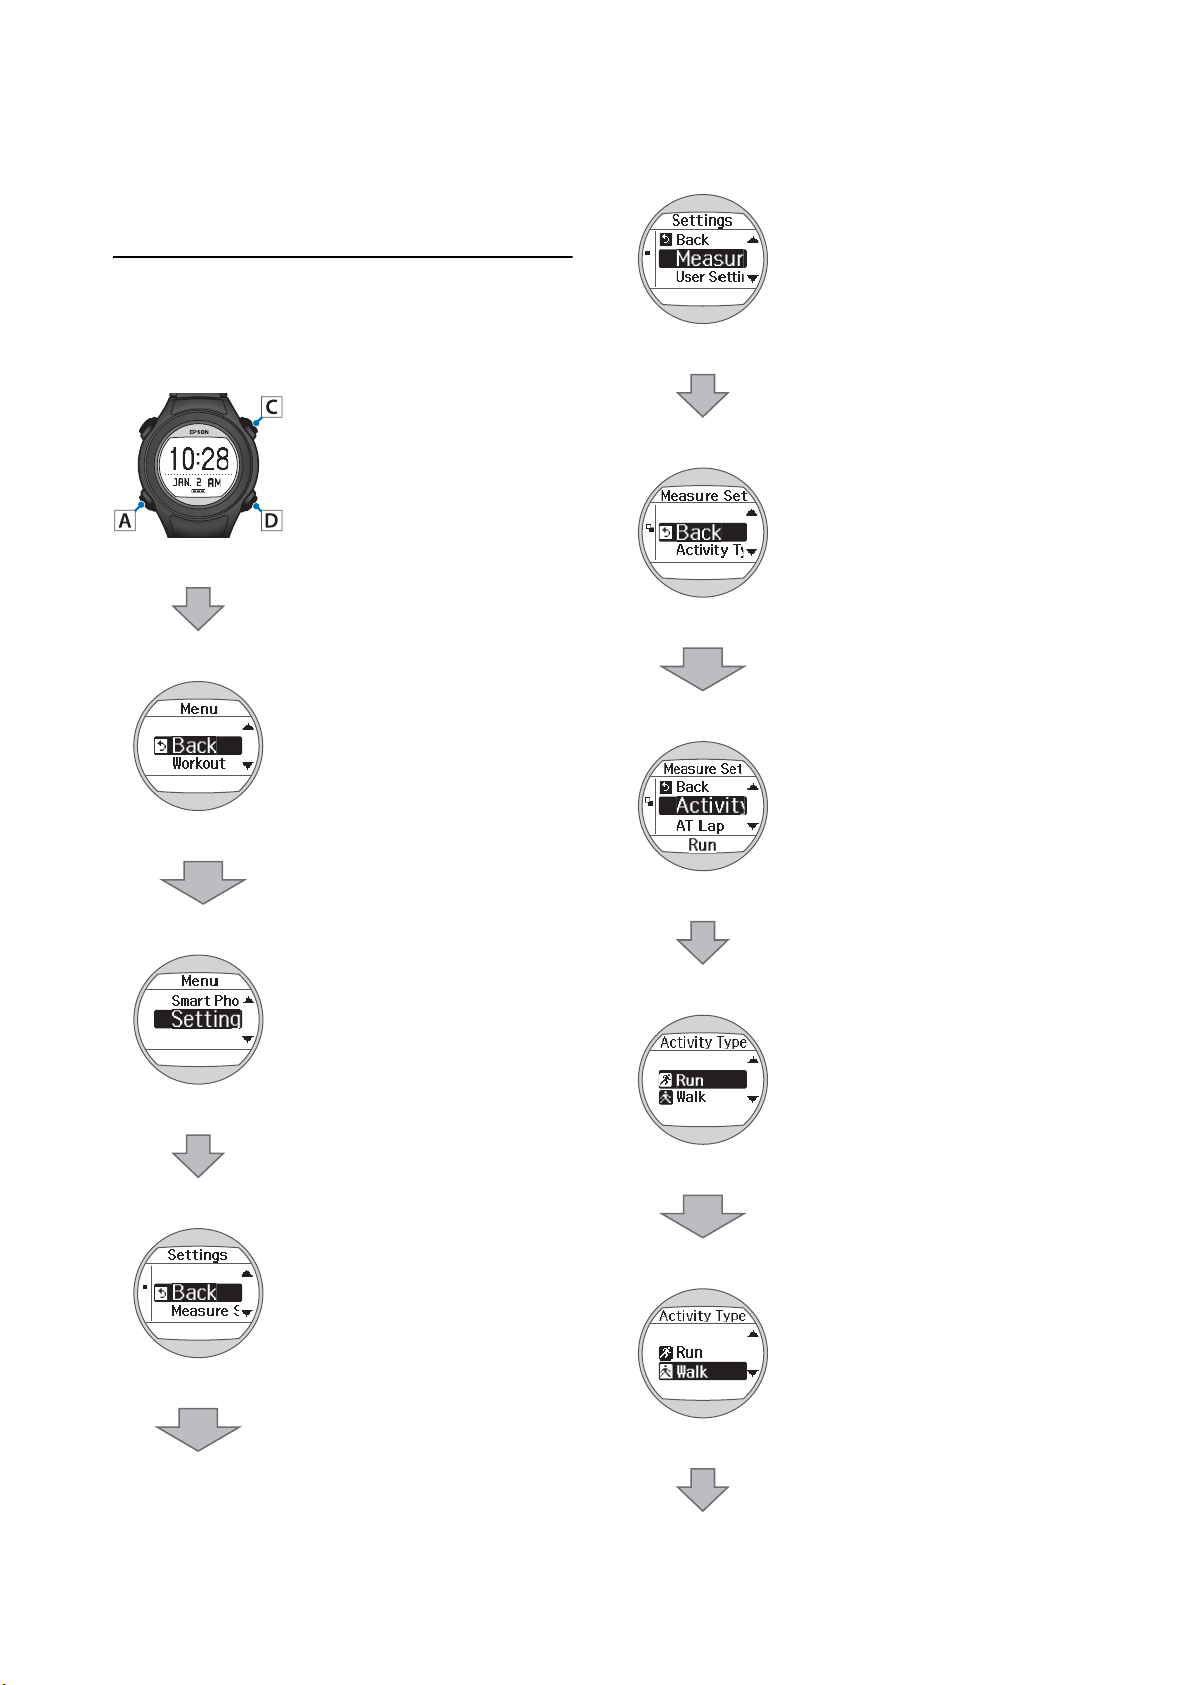
Button functions
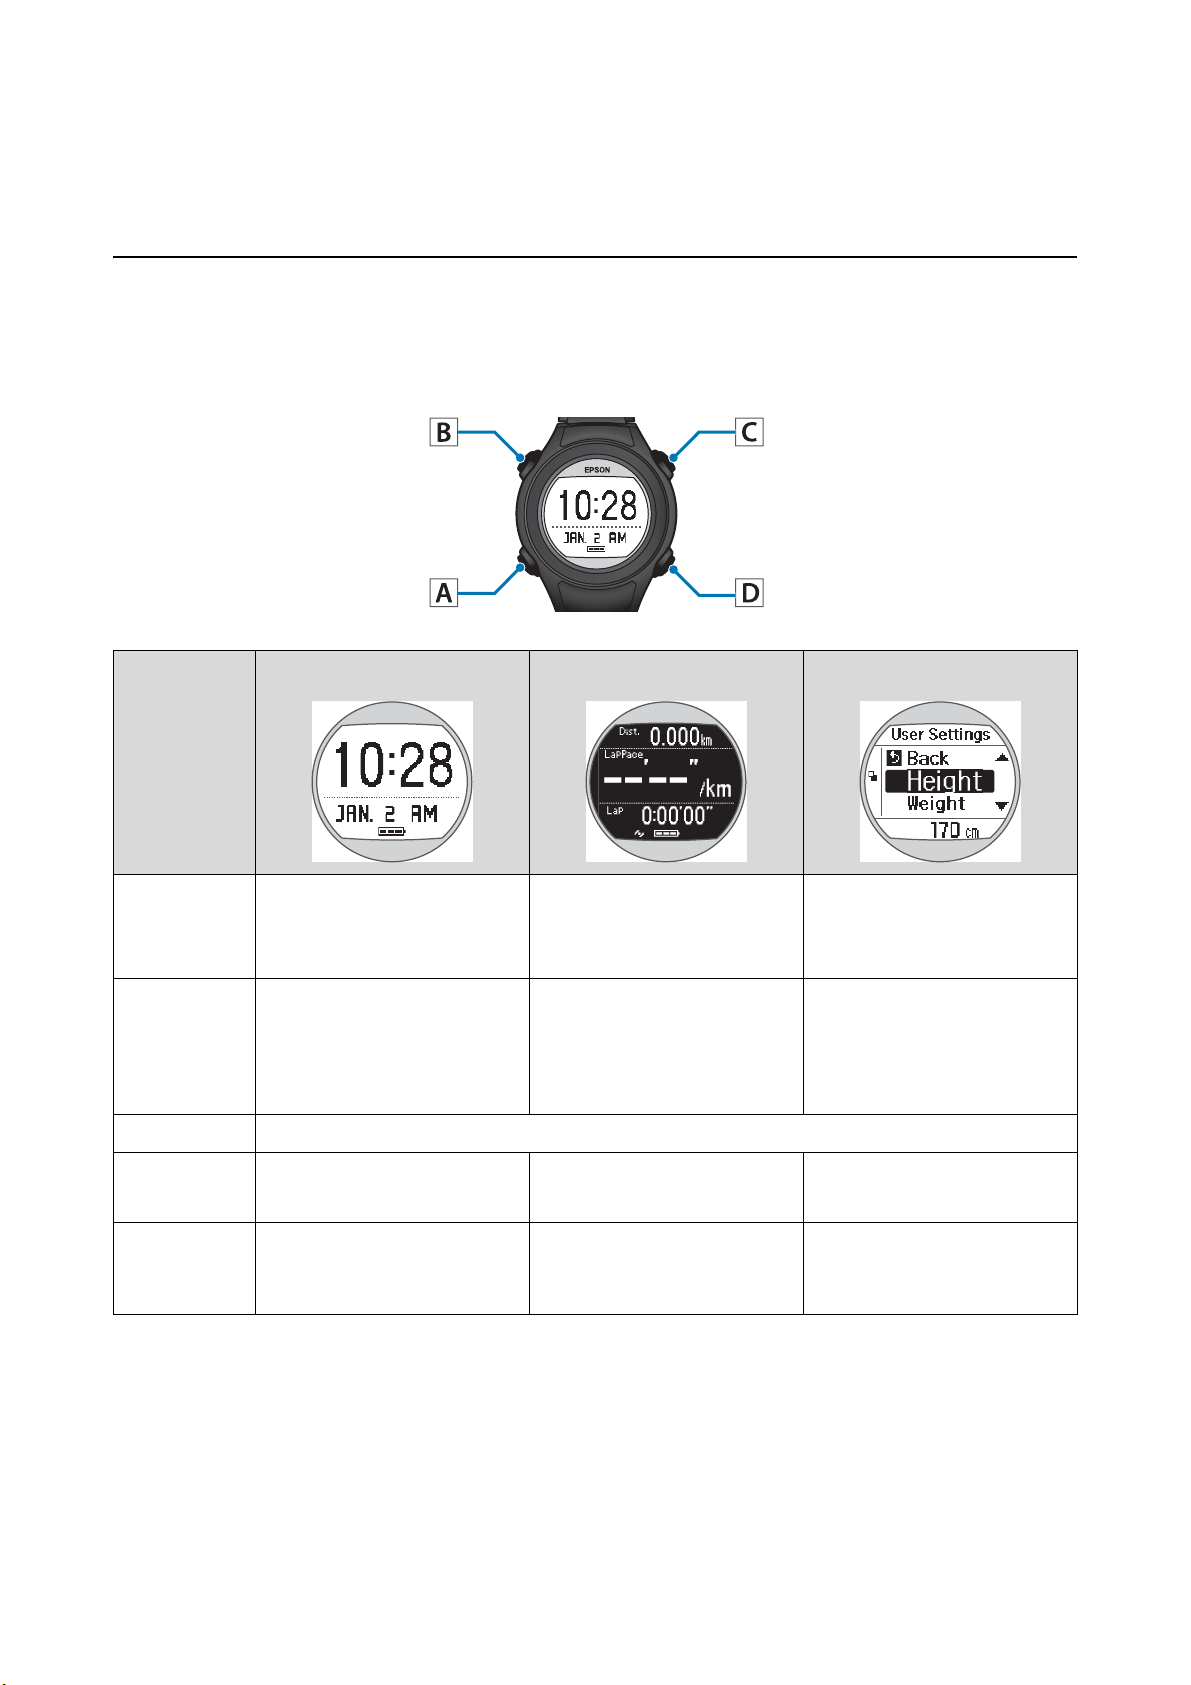
This product is comprised of a Time screen, Measurement screen, Settings screen (Settings menu and Measure Set).
You can navigate the screens with the following buttons:
Button
Operation
Displays the Track Activity
A Short press
A Long press
(two seconds
or more)
B Short press Turns the light on or off. The light turns on for approximately 10 seconds.
C Short press -
D Short press Displays the menu.
screen.
Not available when Track Activity
is off.
Turns the power on or off.
Time screen Measurement screen Settings screen
Switches between different
measurement screens.
Displays the Time screen.
Not available while measuring.
Starts, stops, or resumes
measuring.
Records laps while measuring.
Displays the Measure Menu
when measurement is stopped.
Confirms a selection.
Displays the Time screen.
When Measure Set is set from
Measure Menu, the
Measurement screen is
displayed.
Selects the upper item.
Increases the value.
Selects the lower item.
Decreases the value.
25
Page 26
Setting up your SF-110
Note:
O Hold down A on the Measurement screen (while measuring is stopped), or the Settings screen to display the Time
screen.
O When you don’t use the product for a while, it enters sleep mode and the display turns off. The display turns back on
the next time a button is pressed or you move the product. You can turn off the sleep function.
See “System settings” on page 78.
O The Time screen is displayed if you don’t press any buttons for a set period of time. This period of time varies
depending on the current screen:
Sys. Settings/User Settings/Recall screen: 3 minutes.
Measurement screen (while not measuring): 60 minutes.
Alarm
Your product can sound an alarm when certain operations or exercises are performed. The following table explains
the meaning of each alarm depending on the current watch mode.
Measurement setting Timing
AT Lap
See “Recording laps automatically” on page 36.
AT Pause
See “Starting/stopping measuring automatically” on page 37.
Target Pace
See “Setting a pace” on page 39.
When lap is paused
O When measuring is stopped
O When measuring restarts
O When you are off the target pace
26
Page 27
Setting up your SF-110
D
C/D
A
A
A
A
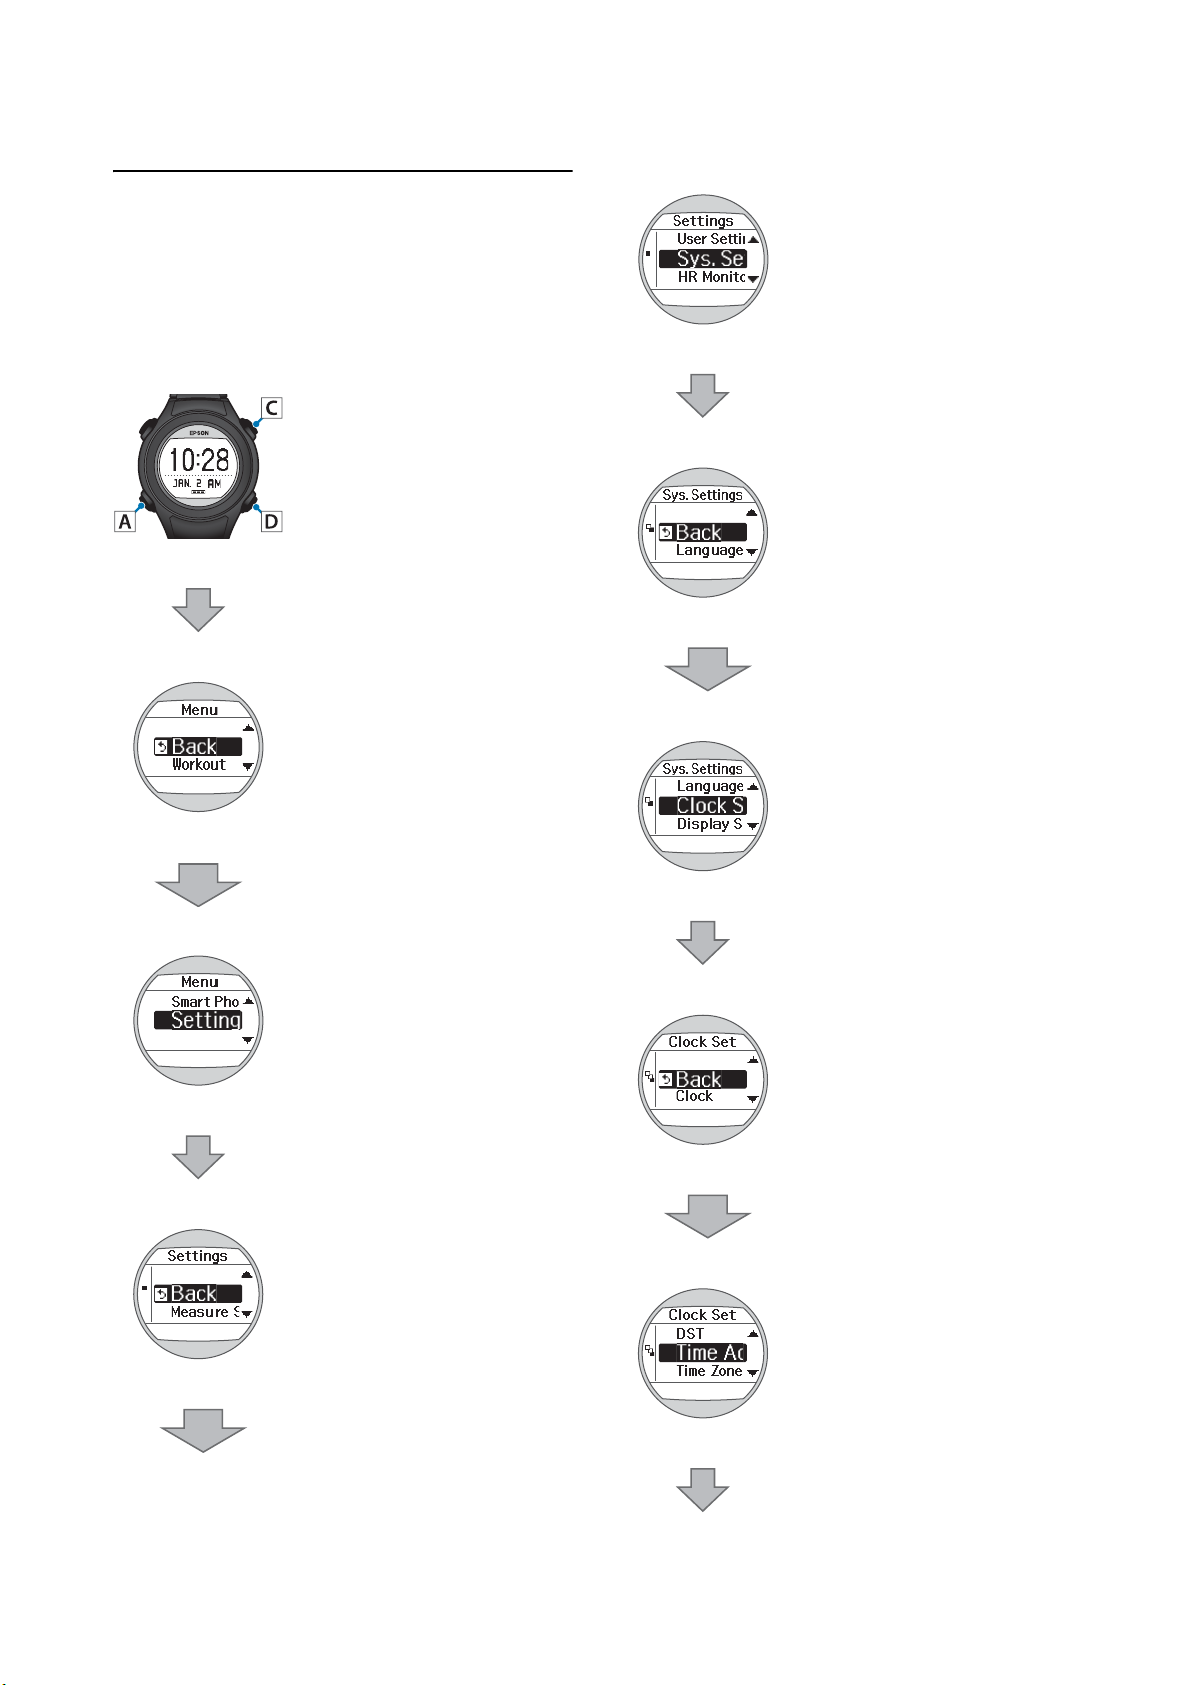
Adjusting the time
If your product hasn’t successfully synced with the
positioning satellites, make sure the screen is facing up
and you are outside with no obstructions overhead,
and then follow the steps below to adjust the time.
Press D to display the Menu.
Press A.
Press C or D to highlight Settings.
Press A.
C/D
C/D
Press C or D to highlight Clock Set.
Press A.
Press C or D to highlight Time
Adjust.
C/D
Press C or D to highlight Sys.
Settings.
Press A.
27
Page 28
Setting up your SF-110
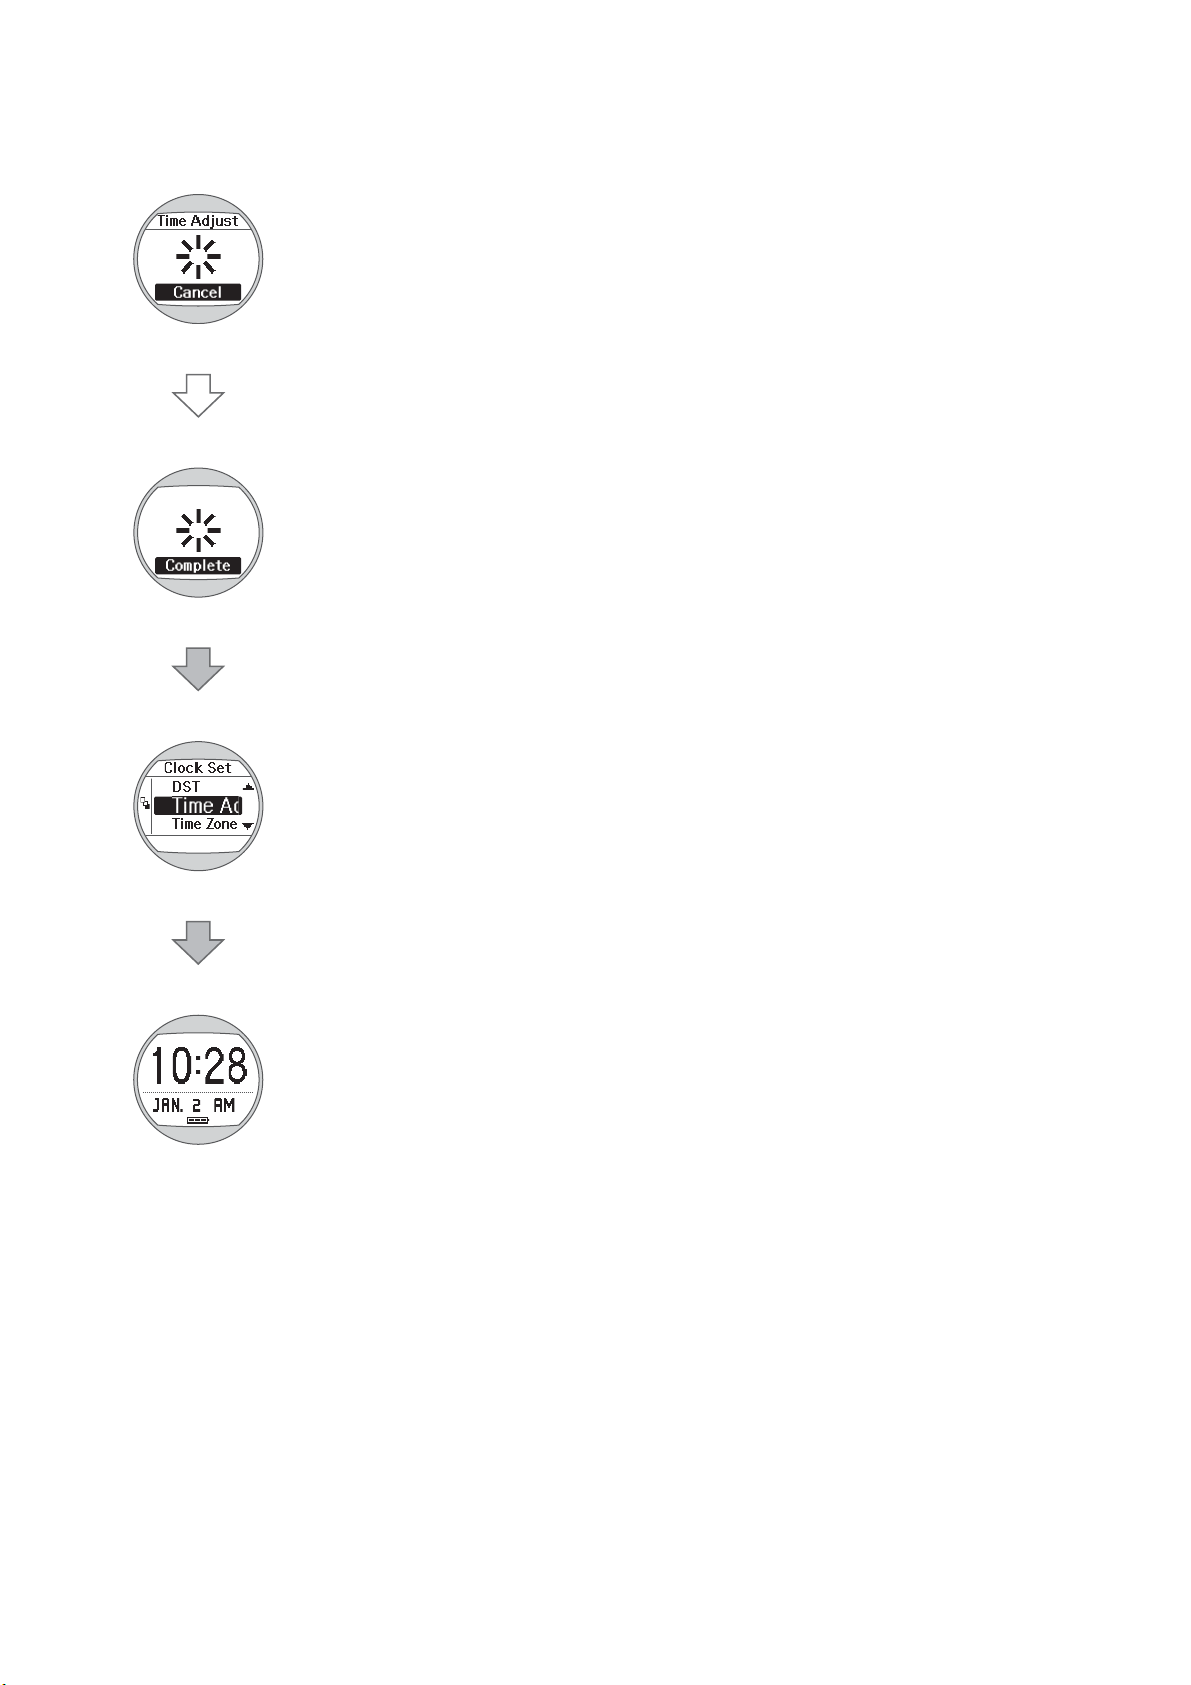
A
A
A signal is received from the GPS
and time is automatically
synchronized.
When Complete is displayed, press
A.
Hold down A.
The Time screen is displayed.
28
Page 29

Measuring your workouts
Measuring your workouts
Your product uses your GPS location to automatically measure your time, distance, and speed throughout your
workout.
“What is the chronograph function?” on page 30
“Measurable items” on page 31
“Measuring” on page 32
“Screen Display” on page 34
“Recording laps automatically” on page 36
“Starting/stopping measuring automatically” on page 37
“Setting a pace” on page 39
29
Page 30
Measuring your workouts
What is the chronograph function?
The chronograph function allows you to measure split times and lap times simultaneously. You can also
automatically measure distance, speed, and route using the positional information and time from the GPS signal.
Note:
Set the Activity Type before you start exercising.
See “Measurement settings” on page 72.
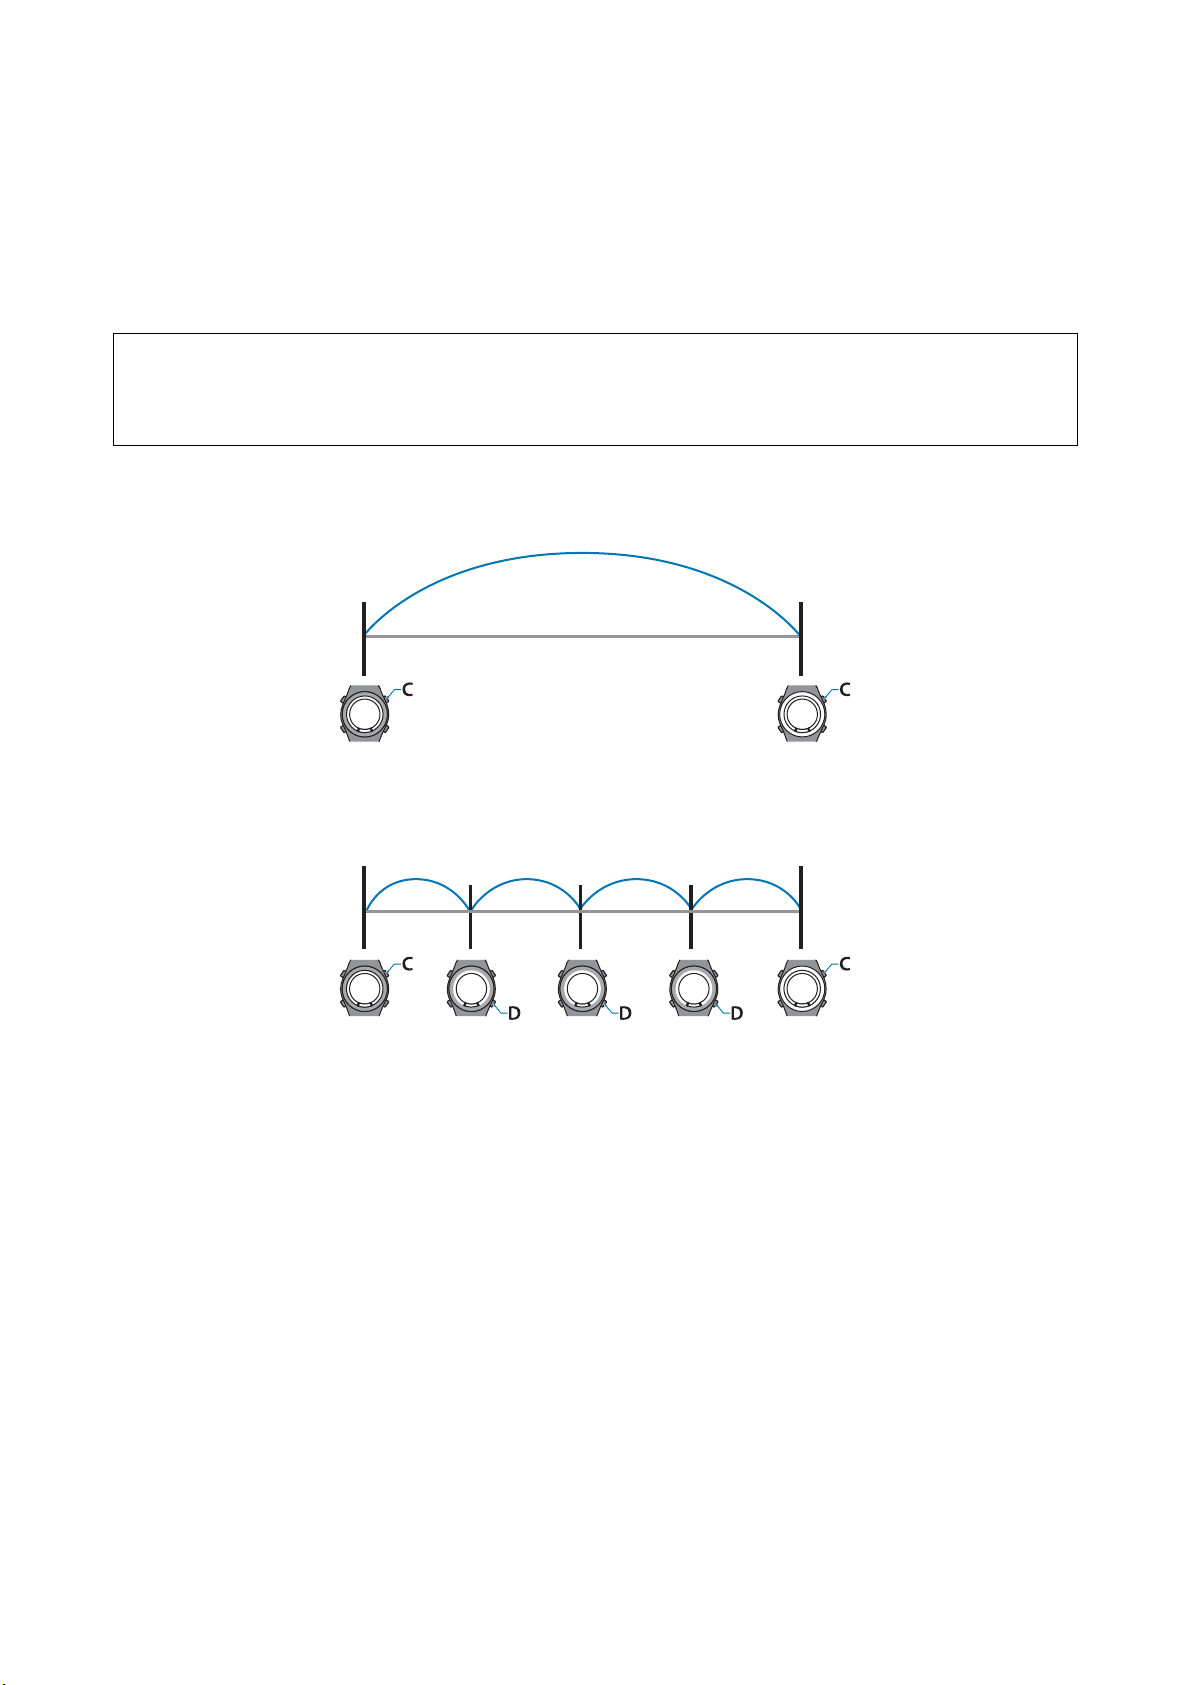
Split Time
Measures the elapsed time. Press C to start measuring, and press C again to stop measuring.
Lap Time
Records the elapsed time for each lap. To record a lap, press D while measuring.
With the AT Lap function, laps are recorded automatically when a time or distance set in advance has been reached.
See “Recording laps automatically” on page 36.
30
Page 31

Measuring your workouts
Measurable items
Items that can be measured by the product change according to the settings for the GPS function and the optional
heart rate chest strap.
The route is not recorded in indoor mode when the GPS is off.
Measurement item (display
name)
Distance (Dist.) Total distance from the start of measurements
Pace (Pace) Current pace (time taken for one kilometer/mile)
Average Pace (Av.Pace) Average pace from the start of measurements
Lap Pace (LapPace) Average pace for each lap
Split Time (Split) Total time from the start of measurements
Lap Time (Lap) Time for each lap
Time (Time) Current time
Calories Burnt (Calories) Calories burnt from the start of measurements
Steps (Steps) Number of steps from the start of measurements
1
HR (HR)
Altitude
1 Only available with the optional heart rate chest strap.
2 Not available in indoor mode.
2,3
See “Indoor mode” on page 23.
Description
Current heart rate
Current altitude
3 Not displayed on the product. Only displayed on the RUNSENSE View web app.
See “Using RUNSENSE View” on page 52.
31
Page 32

Measuring your workouts
D
A
C
D
Measuring
Displaying the Measurement screen
Press D to display the Menu.
GPS positioning starts, and the
Measurement screen is displayed
once positioning is complete.
See “GPS Positioning” on page 21.
Measuring a workout
Press C to start measuring.
C/D
Press C or D to highlight Workout.
Press A.
GPS positioning starts.
Press D while measuring to record a
lap.
Measuring continues.
The Display Lap Screen is displayed
for five seconds.
See “Display Lap screen” on page
35.
Note:
The screen shown may differ depending on the settings
you’ve selected.
See “Changing the measurement screen” on page 80.
32
Page 33

Measuring your workouts
C
D
A
Press C to stop measuring at any
time.
Press C again to resume measuring.
Press D while measuring is
stopped to display the Measure
Menu.
Press C or D to highlight Stop
C/D
Workout.
Press A.
Your workout data is saved, and the
Time screen is displayed.
You can check your past workouts on the Recall screen.
See “Viewing past workouts” on page 42.
33
Page 34

Measuring your workouts
Screen Display
Measurement screen
There are different measurement screens available. Each screen shows different information about your current
activity. Press A to switch between these screens.
Note:
You can change the number of lines displayed and the measurements displayed for each screen.
See “Screen” on page 80.
Default display
Screen Default measurements shown
Screen 1 Distance
Lap Pace
Lap Time
Screen 2 Steps
Average Pace
Calories Burnt
Screen 3 Time
Split Time
Pace
Target Pace Average Pace
Set Target Pace
34
Page 35

Measuring your workouts
D
Display Lap screen
The Lap Hold Screen is displayed for 5 seconds when a lap is recorded.
Note:
You can change the number of lines and measurements displayed on the screen.
See “Screen” on page 80.
Lap Time
(Lap)
Lap Pace
(LapPace)
35
Page 36

Measuring your workouts
D
A
A
A
Recording laps automatically
Use the AT Lap function to automatically record laps
whenever a set time or distance is reached.
C/D
Press C or D to highlight Measure
Set.
Press A.
C/D
Press D to display the Menu.
Press C or D to highlight Settings.
Press A.
C/D
Press C or D to highlight AT Lap.
Press A.
C/D
Press C or D to highlight ON.
36
Page 37

Measuring your workouts
A
C/D
A
A
D
A
Press A.
Press C or D to adjust the lap
distance.
Hold down C or D to quickly scroll
through the available settings.
Starting/stopping measuring automatically
Use the AT Pause function to automatically stop
measuring when you stop running and resume
measurement when you continue.
Press A.
The settings are saved.
Hold down A.
The Time screen is displayed.
C/D
Press D to display the Menu.
Press C or D to highlight Settings.
Press A.
37
Page 38

Measuring your workouts
C/D
A
C/D
A
C/D
A
A
Press C or D to highlight Measure
Set.
Press A.
Press C or D to highlight AT Pause.
Press A.
The settings are saved.
Hold down A.
The Time screen is displayed.
Press A.
Press C or D to highlight ON.
38
Page 39

Measuring your workouts
D
A
A
A
Setting a pace
You can use the Target Pace function to sound an
alarm if you fall behind your set pace
Set your target time per one mile or kilometer (your
target pace) and the range at which the alarm sounds
when you fall behind that target pace.
C/D
Press C or D to highlight Measure
Set.
♪
Press D to display the Menu.
♪
♪
C/D
Press A.
Press C or D to highlight Target
Pace.
C/D
Press C or D to highlight Settings.
Press A.
C/D
Press A.
Press C or D to highlight ON.
39
Page 40

Press A.
A
C/D
A
C/D
A
A
Measuring your workouts
Note:
If you want to turn off the alarm that notifies you when
you are falling behind the set pace range, select OFF as
the pace range.
Press A.
The settings are saved.
Press C or D to set your target pace
per mile or kilometer.
Hold down C or D to quickly scroll
through the settings.
Press A.
Hold down A.
The Time screen is displayed.
Press C or D to select the pace
range.
An alarm sounds if you are outside
the set pace range.
Hold down C or D to quickly scroll
through the settings.
40
Page 41

Checking past workouts
Checking past workouts
You can check your past workouts on the Recall screen.
“Viewing past workouts” on page 42
“Measurement icons” on page 43
“Deleting past workouts” on page 43
41
Page 42

Checking past workouts
D
A
C/D
A
A
A
Viewing past workouts
Press D to display the Menu.
C/D
Press C or D to highlight Recall.
C/D
C/D
Press A.
Press C or D to highlight the data
you want to check.
The Recall screen displays item
icons, the date/time measured, and
the distance.
Press C or D to scroll through the
workout data.
Press A.
Press C or D to highlight Workout.
When you’re done viewing the
workout, press A.
Press C or D to highlight Back.
Press A.
42
Page 43

Checking past workouts
A
D
A
A
Hold down A.
The Time screen is displayed.
Measurement icons
The following icons appear on the recall screen.
Icon
Press D to display the Menu.
Run mode
Walking mode
Measurement item
Distance
Split time
Average pace
Calories burned
HR
Lap steps
AT lap
Manual lap
Total distance from the start of measurements
Split time
Lap time
Lap pace
C/D
C/D
Press C or D to highlight Recall.
Press A.
Press C or D to highlight Workout.
Deleting past workouts
You can delete past workout logs from the stored
history.
Press A.
43
Page 44

Checking past workouts
C/D
A
A
C/D
A
A
A
Press C or D to highlight the
workout history that you want to
delete.
C/D
Press C or D to highlight Yes.
Press A.
Check that this is the workout that
you want to delete.
Press A.
Press C or D to highlight Delete.
Press A.
Hold down A.
The Time screen is displayed.
Important:
c
If your product’s memory is full, saved data is
automatically deleted starting with the oldest
stored workouts.
Press A.
See “System settings” on page 78.
To delete all of the history, you need to initialize the
device. When initializing, all setting information for
User Settings, Sys. Settings, and Measure Set is also
initialized along with the history information.
See “Initializing the product” on page 94.
44
Page 45

Tracking daily activity
Tracking daily activity
The Track Activity function automatically measures the amount of calories you burn during your daily activity.
“What is the Track Activity function?” on page 46.
“Measuring your activity” on page 46.
“Checking your activity” on page 48.
“Stopping activity measurement” on page 50.
45
Page 46
Tracking daily activity
D
A
A
A
What is the Track Activity function?
This function measures the amount of calories you
burn during your daily activities.
You can also measure the number of steps you take and
your total distance traveled. The amount of activity is
reset at midnight every night, and you can save and
check the data for up to seven days.
You can also check your current achievements by
setting and tracking a daily step target.
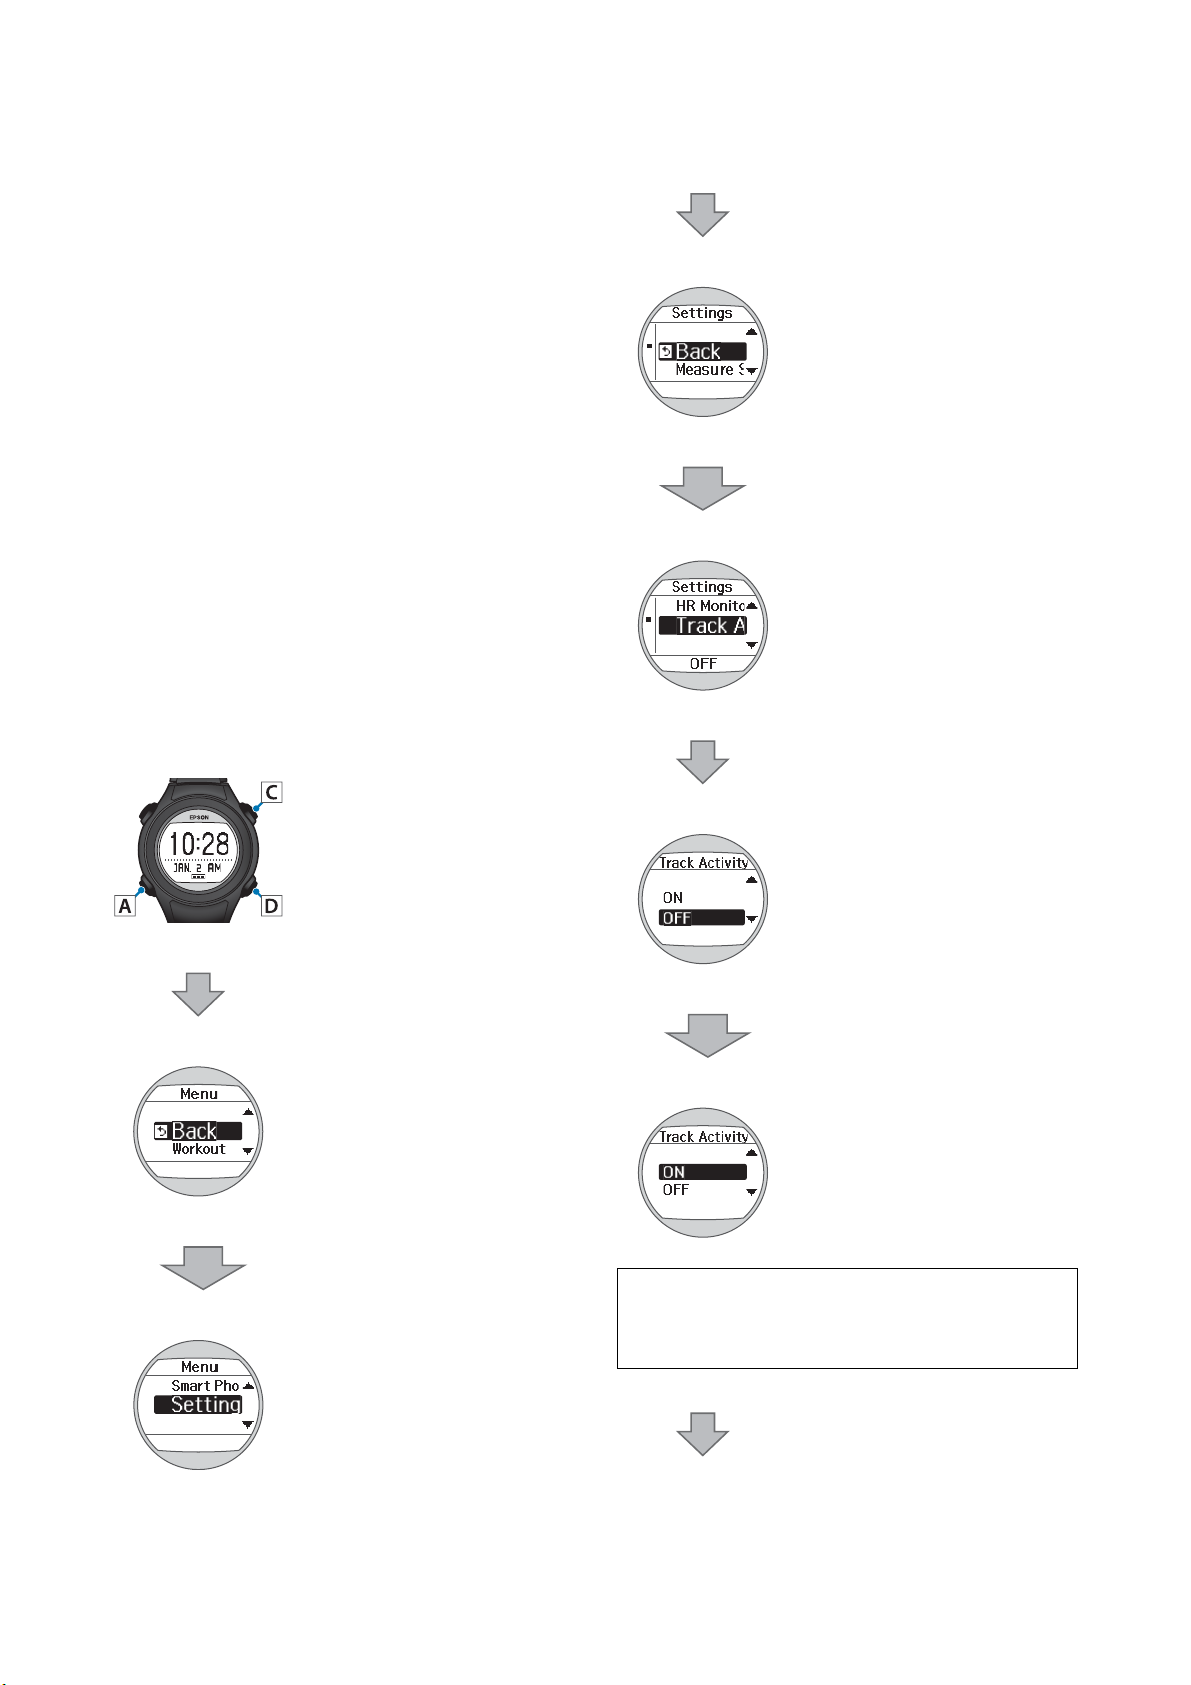
Measuring your activity
When Track Activity is set to ON, the product
measures your activity.
C/D
Press A.
Press C or D to highlight Track
Activity.
Press A.
C/D
Press D to display the Menu.
Press C or D to highlight Settings.
C/D
Note:
You cannot turn the Track Activity function on or off
from your computer or smartphone.
Press C or D to highlight ON.
Press A.
46
Page 47
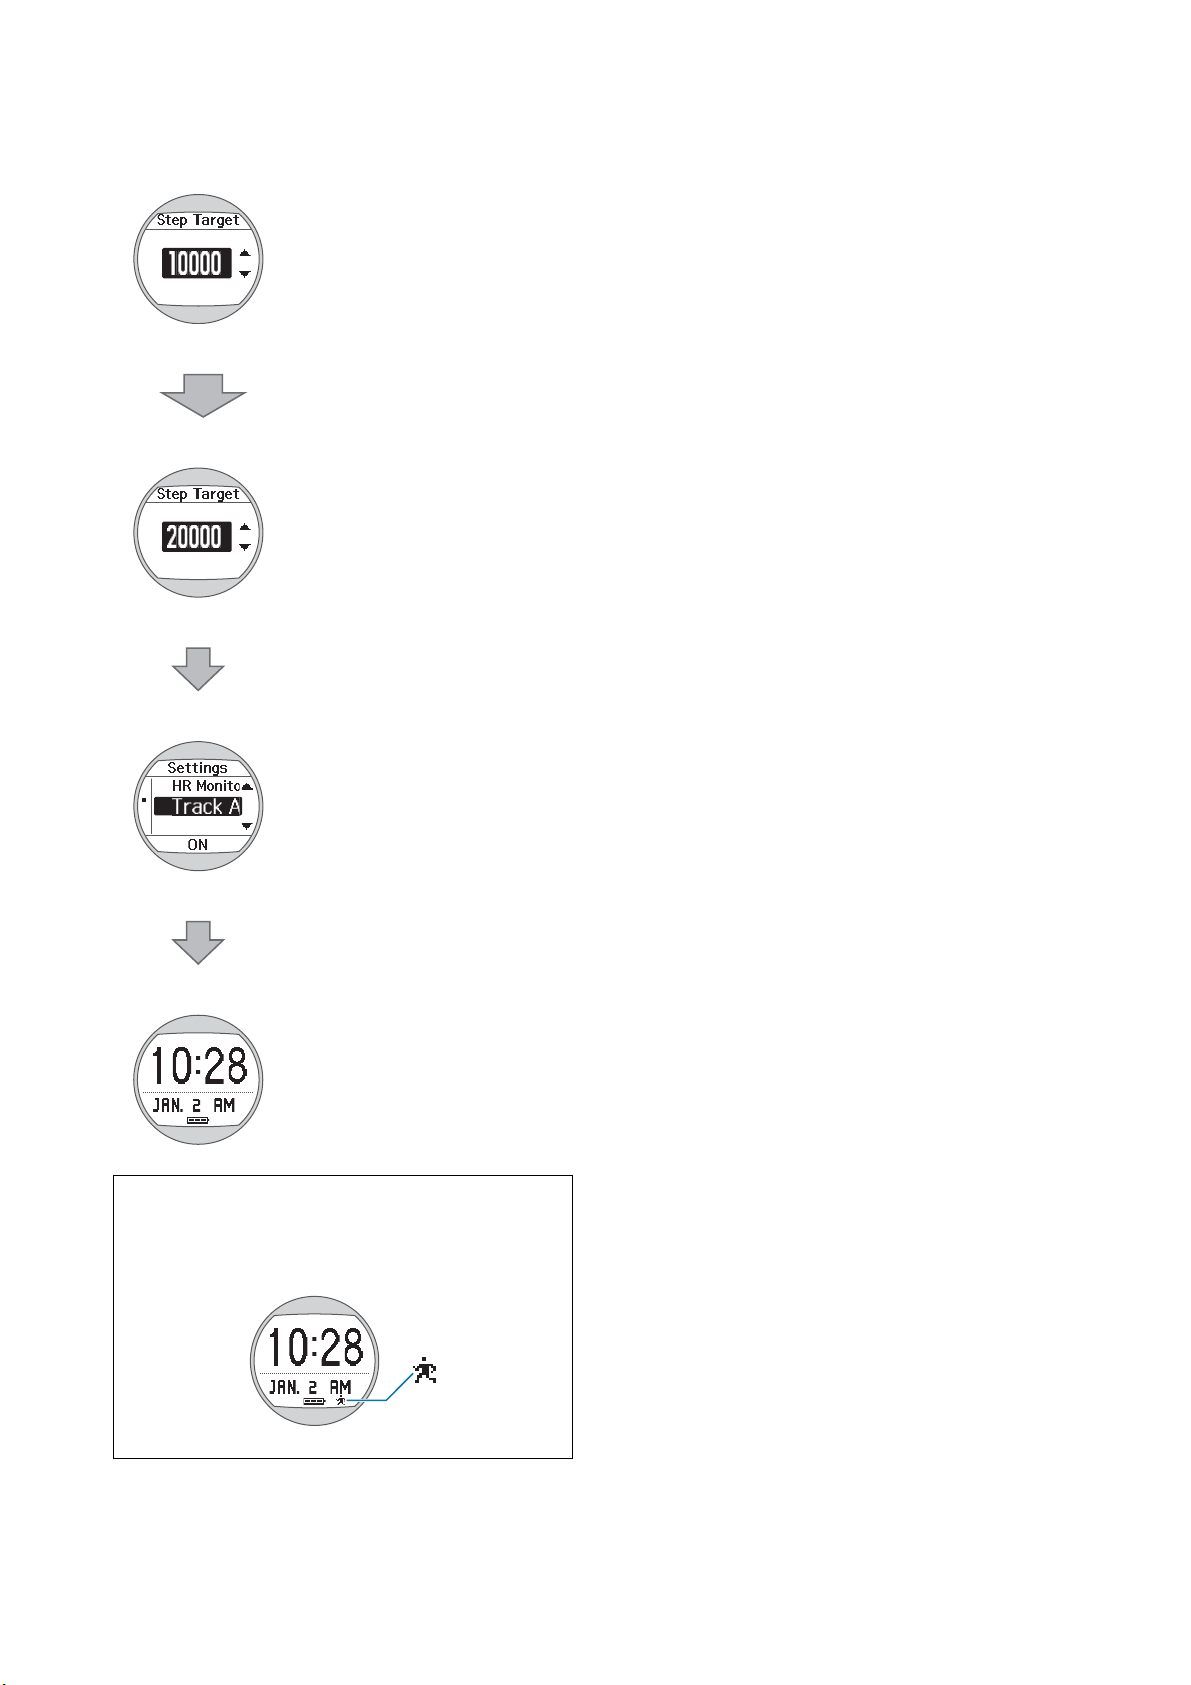
C/D
A
A
Tracking daily activity
Press C or D to highlight Step
Target.
Set your step target. You can set the
target in increments of 100 steps.
Hold down C or D to quickly scroll
through the settings.
Press A
The settings are saved.
Hold down A.
The Time screen is displayed.
Note:
When Track Activity is set to ON, an icon is displayed in
the bottom right of the Time screen.
47
Page 48

Tracking daily activity
Checking your activity
Measurable items
Icon
- Date measured Date measured
- Daily percentage of target achieved (%) Percentage of target achieved on the first day of
Meaning
Track Activity screen Recall screen
Daily steps Steps on the first day of measurement
Daily calories burnt Calories burned on the first day of measurement
Daily distance traveled Distance traveled on the first day of measurement
measurement (%)
Checking your current activity
Press A on the Time screen to display the Track Activity screen. Press A again to return to the Time screen.
A
Note:
Your activity is not updated while the Track Activity screen is displayed. Updating continues when you return to the Time
screen.
48
Page 49

Tracking daily activity
D
A
A
C/D
A
A
Checking your activity history
Important:
c
Activity data is recorded for seven days. Since
data older than this is deleted starting from the
oldest entry, we recommend uploading to the
RUNSENSE View web app as soon as possible.
See “Uploading data to RUNSENSE View” on
page 57.
Press D to display the Menu.
C/D
Press C or D to highlight Activity.
Press A.
Press C or D to highlight the activity
history that yo want to view.
C/D
The Recall screen displays the date
of the activity, your progress
towards your daily target, and
number of steps you took.
Press C or D to highlight Recall.
Press A.
Press A.
Note:
You can view different measurements on the Recall
screen.
See “Measurable items” on page 48.
Hold down A.
49
Page 50

Tracking daily activity
D
A
A
A
A
The Time screen is displayed.
Stopping activity measurement
When Track Activity is set to OFF, the product stops
measuring your activity.
C/D
Press C or D to highlight Track
Activity.
Press A.
C/D
Press D to display the Menu.
Press C or D to highlight Settings.
Press A.
C/D
Press C or D to highlight OFF.
Press A.
The settings are saved.
Hold down A.
50
Page 51

Tracking daily activity
The Time screen is displayed.
Note:
When Track Activity is set to OFF, the track activity
icon no longer appears at the bottom right of the Time
screen.
51
Page 52

Using RUNSENSE View
Using RUNSENSE View
You can manage your workout data using a dedicated web application, RUNSENSE View.
RUNSENSE View allows you to quickly manage and analyze your workout history.
Note:
O You need to create an account before you can upload workout datato RUNSENSE View.
See “Creating a RUNSENSE View account” on page 55.
If you already have an account with other Epson sensing products, you can continue using your account with this
product.
O You can also manage the measurement data using the Run Connect mobile app. See the Runsense iOS or Android
manuals for details.
“What is RUNSENSE View?” on page 53
“Installing Epson Run Connect software” on page 55
“Creating a RUNSENSE View account” on page 55
“Uploading data to RUNSENSE View” on page 57
“Checking uploaded workout data” on page 59
TM
52
Page 53

Using RUNSENSE View
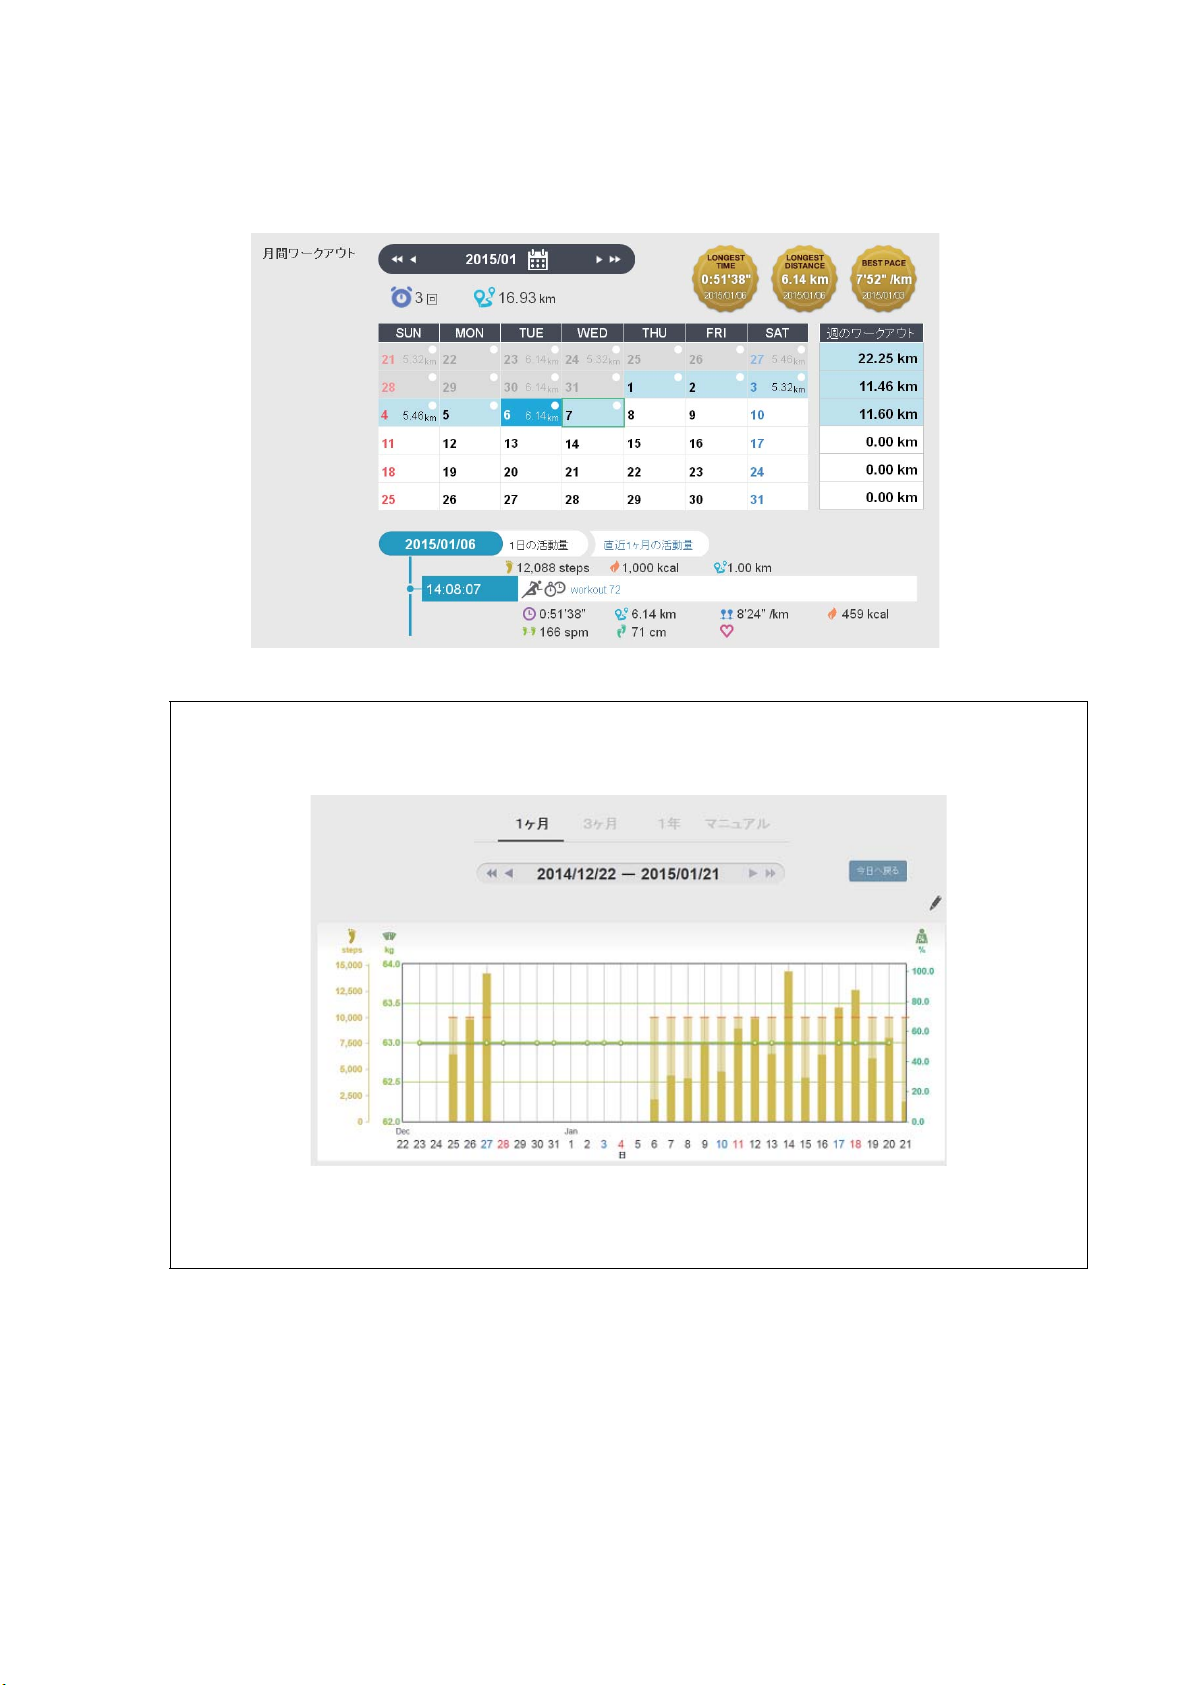
What is RUNSENSE View?
RUNSENSE View is a web app that stores your SF-110 data and allows you to monitor, analyze, compare, and share
your running route, distance, speed, heart rate, calories burned, and other measurements.
RUNSENSE View can export all of this information in a GPX format, making it easy for you to use the measurement
data with other workout-tracking applications.
Dashboard
Manage records in a calendar format to easily select and review past runs.
53
Page 54

Using RUNSENSE View
Workout details
Displays and graphs the available measurements for the selected workout.
54
Page 55

Using RUNSENSE View
Installing Epson Run Connect software
If you are using your product with a Windows PC, you need Run Connect to upload measurement data to
RUNSENSE View.
Follow the steps below to install Run Connect.
Visit epson.com/support/sf110 (U.S.) or epson.ca/support/sf110 (Canada) and download Run Connect.
1
Run the downloaded file and follow the on-screen instructions.
2
Creating a RUNSENSE View account
You need to create a RUNSENSE View account before you start uploading your workout data.
Connect the cradle to your computer using the USB cable.
1
Place the product into the cradle.
2
Check that the contact points on the product are pointing up and match the contact marks on the cradle.
After placing the product into the bottom of the cradle with the LCD screen facing out, push carefully on the
top of the product until it clicks into place.
Important:
c
Make sure you place the product in the cradle correctly or you may damage your product.
55
Page 56

Using RUNSENSE View
Click Create Account in the Run Connect screen that appears.
3
Note:
If Epson Run Connect does not automatically start, disconnect the cradle’s USB cable, wait a few seconds, and then
reconnect it. Do not remove the product from the cradle.
Enter a Login ID (email address), and Password, then click Create Account.
4
See “Uploading data to RUNSENSE View” on page 57.
56
Page 57

Using RUNSENSE View
Uploading data to RUNSENSE View
Connect the cradle to your computer with the USB cable.
1
Place the product into the cradle.
2
Check that the contact points on the product are pointing up and match the contact marks on the cradle.
After placing the product into the bottom of the cradle with the LCD screen facing out, push carefully on the
top of the product until it clicks into place.
Important:
c
Make sure you place the product in the cradle correctly or you may damage your product.
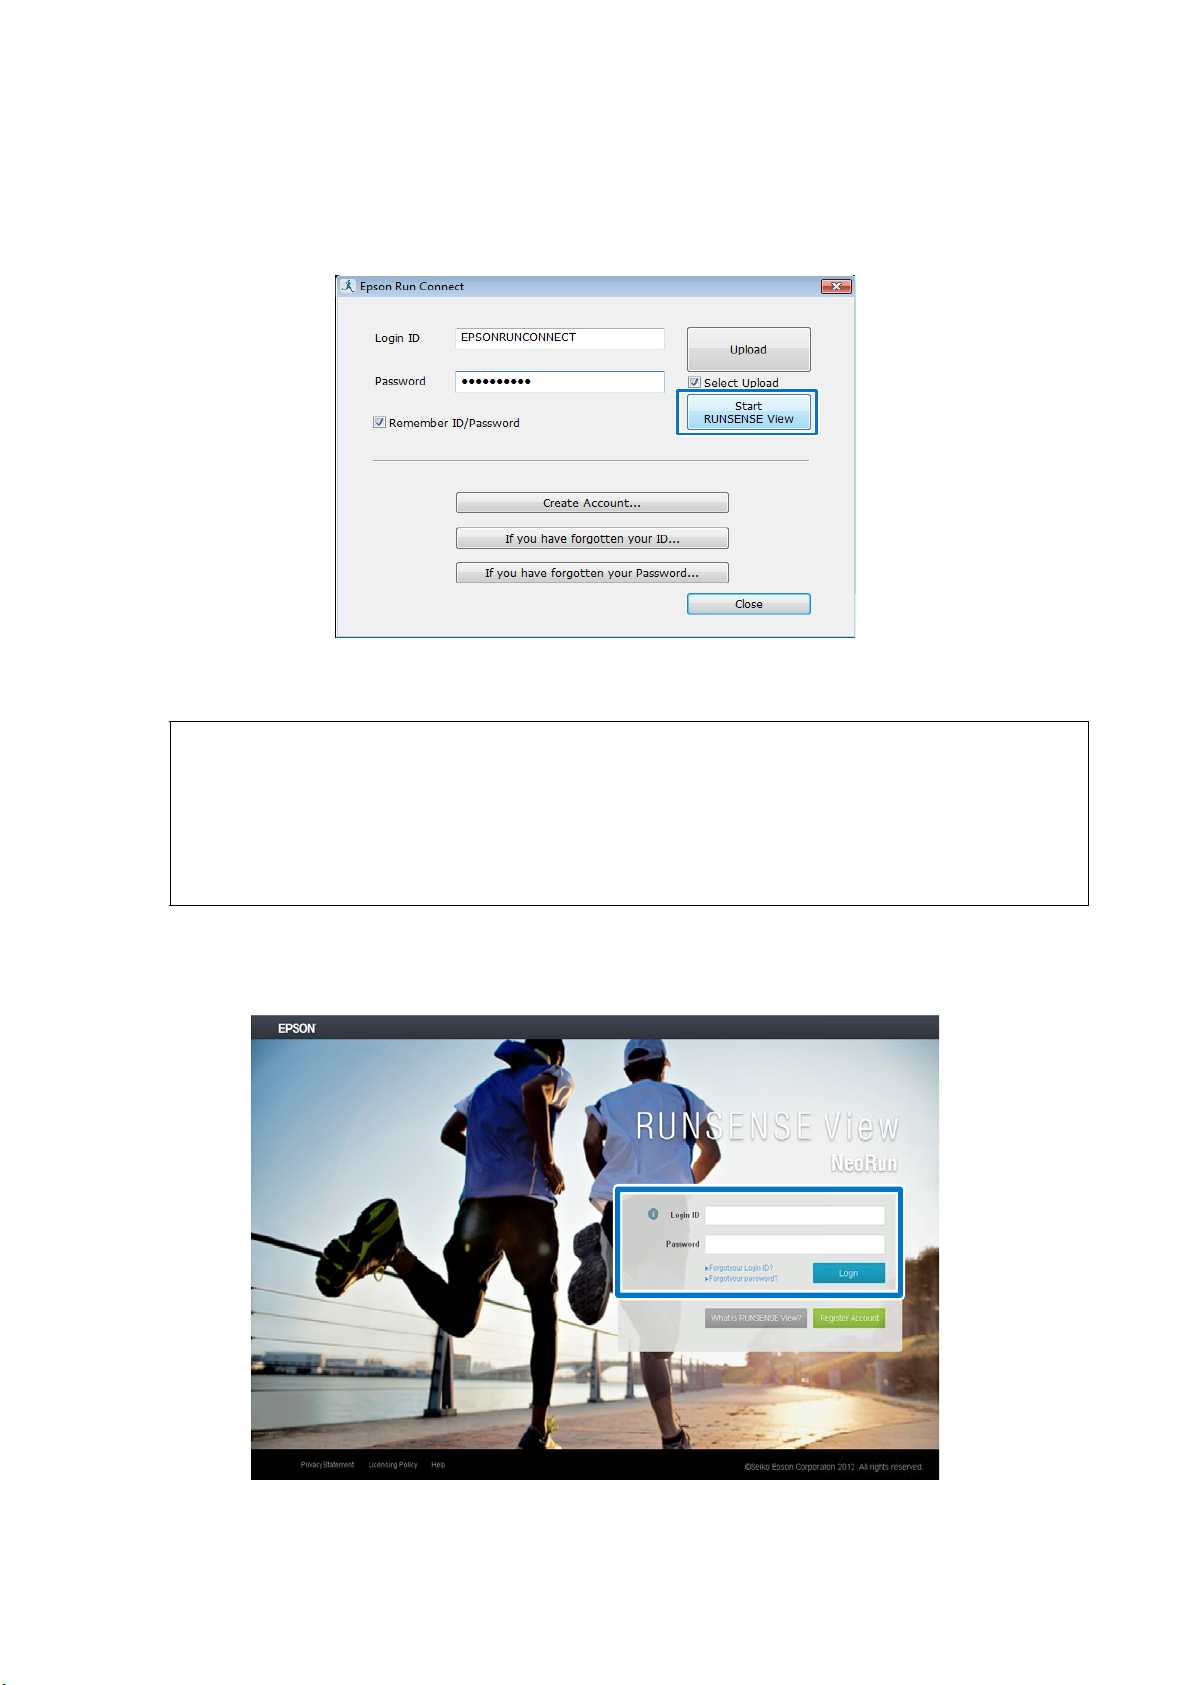
Enter your Login ID and Password on the Run Connect screen that appears, and then click Upload.
3
57
Page 58

Using RUNSENSE View
Note:
If the Select Upload box is checked, the data list selection screen is displayed when you click Upload, and you can
select the data you want to upload.
Your data is uploaded to RUNSENSE View.
Note:
Your data remains on the product even after it is uploaded to RUNSENSE View.
When the upload is complete, the RUNSENSE View Home screen appears.
58
Page 59
Using RUNSENSE View
Note:
The maximum amount of activity data recorded on the product is the last seven days. Data older than this is deleted
starting from the oldest entry. When measurement data exceeds 13 hours, hours stored in the memory are
overwritten starting with the oldest entry. After measuring, upload your data to the RUNSENSE View web app as
soon as possible.
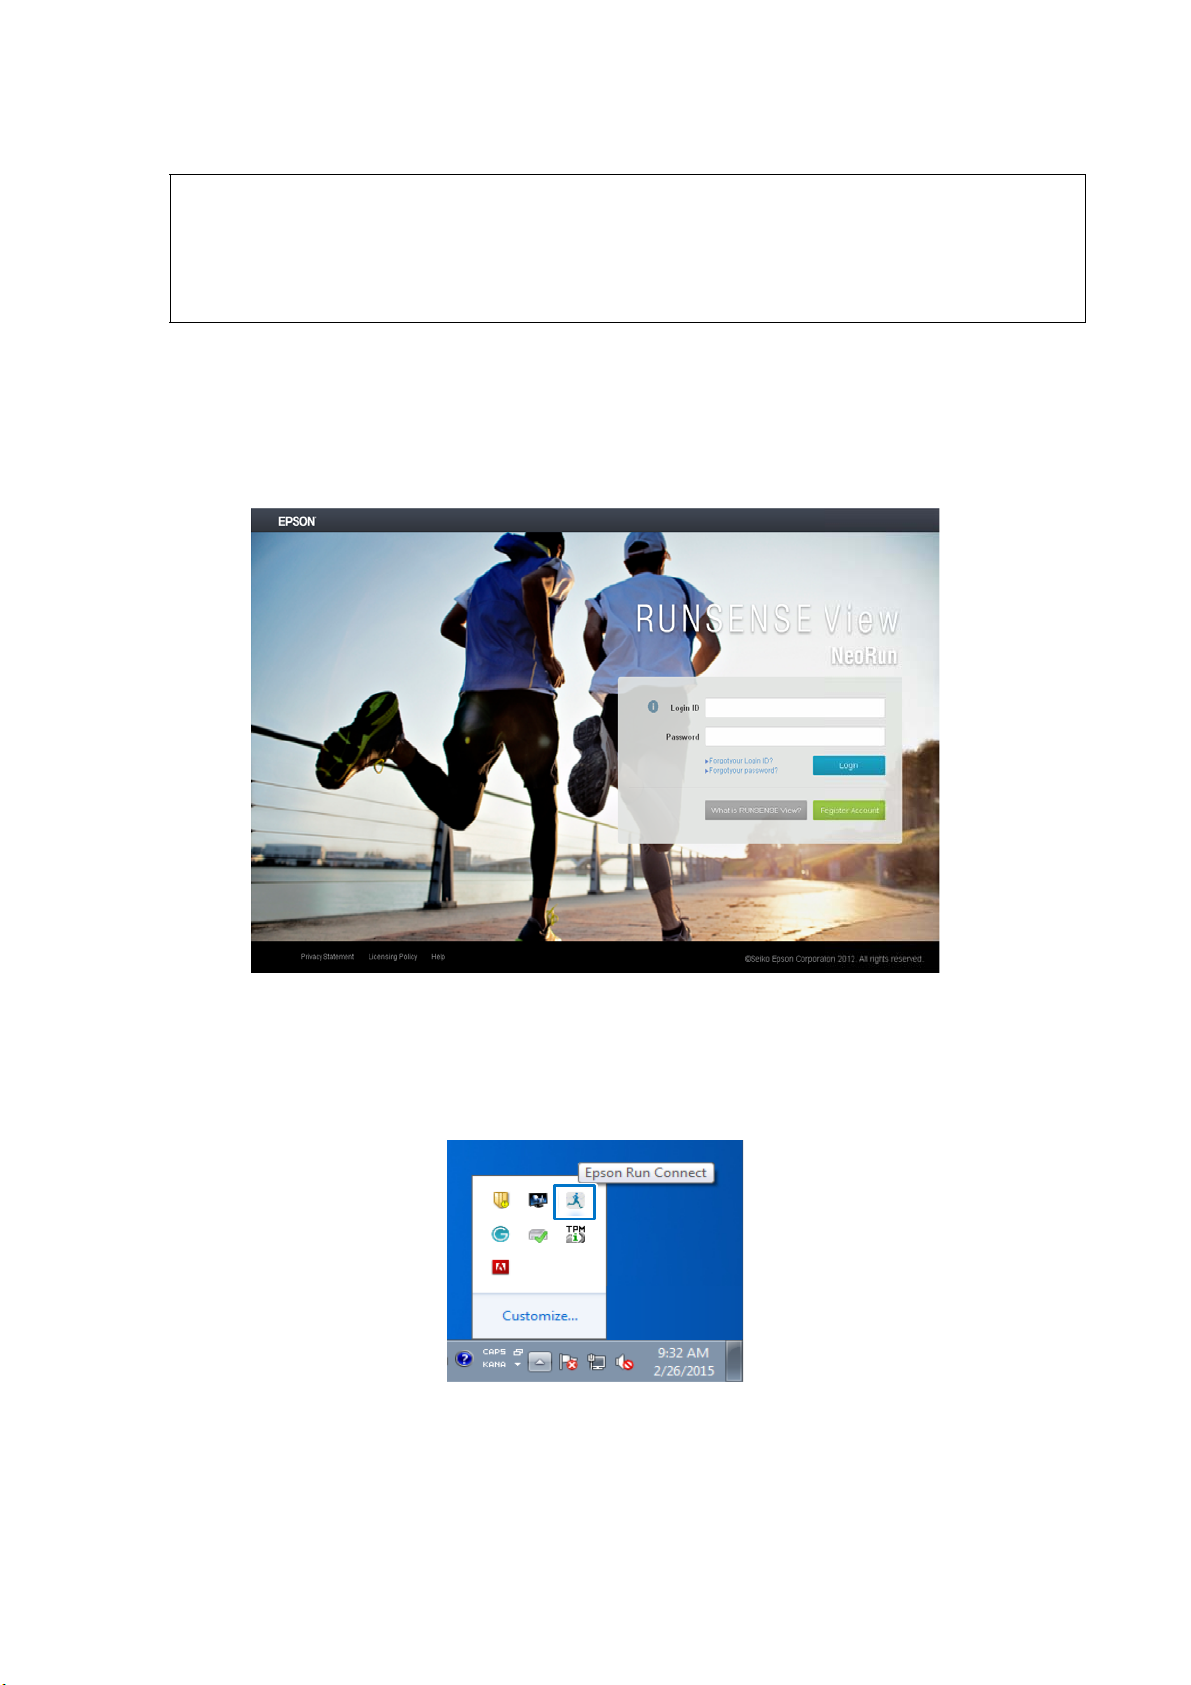
Checking uploaded workout data
Check your uploaded workout data on the RUNSENSE View web app.
Do one of the following to start RUNSENSE View:
1
O Visit https://go-wellness.epson.com/runsense-view/.
Right-click the Run Connect icon from the Windows taskbar, then select Start RUNSENSE View.
59
Page 60
Using RUNSENSE View
O Click Start RUNSENSE View on the Run Connect screen.
The Run Connect screen is displayed when you place the product in the cradle connected to the
computer.
RUNSENSE View starts and the Home screen is displayed. Go to step 3.
Note:
The Start RUNSENSE View button is not available in the following circumstances.
O When the login ID and password have not been saved or entered.
O When the product has been removed from the cradle.
O When the cradle’s USB cable is disconnected from the computer.
Enter the Login ID and Password, and then click Login.
2
60
Page 61
Using RUNSENSE View
Click the data you want to check from the uploaded data.
3
Note:
O To check activity data, click Analyze - Body Condition.
O For information on using RUNSENSE View, see the RUNSENSE View Help links on the bottom of the web
page.
61
Page 62

Measuring heart rate
Measuring heart rate
You can measure your heart rate with the optional heart rate monitor.
“Wearing the heart rate chest strap” on page 63
“Measuring heart rate” on page 67
“Replacing the heart rate chest strap battery” on page 68
“Disabling heart rate monitoring” on page 69
62
Page 63

Measuring heart rate
Wearing the heart rate chest strap
Preparing the heart rate chest strap
The heart rate monitor can be purchased as an optional accessory.
Heart rate chest strap (model number SFHRM01/part number E12E204104)
The heart rate monitor communicates with the product using Bluetooth® Smart technology.
Wearing the heart rate chest strap
Wear the heart rate chest strap so that the electrode section of the strap is snug against your chest, but not too tight.
Make sure it is attached correctly for the most accurate heart rate reading. For best results moisten the electrodes
shown below in blue.
63
Page 64

Measuring heart rate
D
A
A
C/D
A
Pairing the heart rate chest strap
Make sure you wear the heart rate chest strap while
pairing it to your product for the first time.
Important:
c
Check that there are no other heart rate monitors
in the surrounding area before pairing the chest
strap to your product.
Press D to display the Menu.
C/D
Press C or D to highlight HR
Monitor.
Press A.
Press C or D to highlight Register.
C/D
Press C or D to highlight Settings.
Press A.
C/D
Press A.
The product starts searching for the
heart rate chest strap and displays
the search results.
Press C or D to highlight the
registered heart rate chest strap.
64
Page 65

Measuring heart rate
A
A
A
D
A
Press A.
Press A.
Hold down A.
Enabling heart rate monitoring
When using the heart rate chest strap, you need to set
the HR setting to ON from the Measure set. menu.
Press D to display the Menu.
The Time screen is displayed.
Note:
If the following screen is displayed and the heart rate
chest strap can’t successfully pair, reset the heart rate
chest strap.
If an error is still displayed, the heart chest strap’s
battery may have run out. Replace the battery.
See “Replacing the heart rate chest strap battery” on
page 68.
C/D
C/D
Press C or D to highlight Settings.
Press A to confirm.
Press C or D to highlight Measure
Set.
65
Page 66

Measuring heart rate
A
A
C/D
A
A
C/D
Press A.
Press C or D to highlight HR.
Press A.
Hold down A.
The Time screen is displayed.
Note:
O When HR is set to ON, the battery life for the device
is reduced. When you are not using the heart rate
monitor, make sure HR is set to OFF.
See “Disabling heart rate monitoring” on page 69.
O You can also select Measure Set from the
measurement screen.
See “Changing measurement settings from the
Measurement screen” on page 73.
Press C or D to highlight ON.
Press A.
66
Page 67

Measuring heart rate
Measuring heart rate
Checking the connection
You can confirm the communication status of the heart rate chest strap from the Measurement screen.
If is flashing, check that you are wearing the heart rate chest strap correctly.
See “Wearing the heart rate chest strap” on page 63.
On: Communicating with the heart rate monitor.
Flashing: Cannot communicate with the heart rate
monitor.
Displaying your heart rate
The heart rate measurement is not displayed by default. You need to change the screen settings to display your heart
rate.
See “Screen” on page 80.
Measurement
HR HR HR Current heart rate
Display name
Description
1 Line 2 Lines/3 Lines
67
Page 68

Measuring heart rate
Replacing the heart rate
Insert a new battery.
4
chest strap battery
If you cannot measure your heart rate, you may need to
replace the heart rate chest strap’s battery.
The chest strap uses a CR2032 lithium battery.
Use a flat object, such as a coin or a slotted
1
screwdriver, to remove the battery cover.
Note:
You can prevent damage to the cover by
wrapping the flat object in a thin piece of fabric.
Remove the battery.
2
Make sure the + side is facing up.
Replace the battery cover.
5
Important:
c
If the internal seal has come out, put it
back in its original position, and then close
the cover. If the seal gets caught or broken
when closing the cover, sweat or water
could enter into the device and cause a
malfunction
Turn the battery over so that the negative side is
3
facing up and put it back in, and then wait for at
least three seconds.
The heart rate chest strap resets.
Note:
Any remaining charge in the chest strap’s sensor
circuitry is dispersed by removing the battery,
reinserting it with the negative side facing up,
and waiting for at least three seconds.
If the heart rate monitor temporarily freezes, you
can also reset it using this method.
Note:
When disposing of the heart rate chest strap
battery, follow your local laws and regulations.
68
Page 69

Measuring heart rate
D
A
C/D
A
A
A
Disabling heart rate monitoring
Set HR to OFF from the Measure set. menu to disable
heart rate monitoring.
Press D to display the Menu.
Press A.
C/D
Press C or D to highlight Settings.
Press A.
C/D
C/D
Press C or D to highlight HR.
Press A.
Press C or D to highlight OFF.
Press C or D to highlight Measure
Set.
Press A.
69
Page 70

Measuring heart rate
A
Hold down A.
The Time screen is displayed.
Note:
You can also select Measure Set from the measurement
screen.
See “Changing measurement settings from the
Measurement screen” on page 73.
70
Page 71

Settings
Settings
Follow the instructions in these section to change the settings on your SF-110.
“Measurement settings” on page 72
“Settings” on page 76
“Screen” on page 80
71
Page 72
Measurement settings
D
A
C/D
A
A
A
Changing measurement settings from the Time screen
Press D to display the Menu.
Settings
C/D
Press A.
Press C or D to highlight a setting
group.
C/D
Press C or D to highlight Settings.
Press A.
Press C or D to highlight Measure
Set.
C/D
Press A.
Press C or D to highlight a setting.
Press A.
72
Page 73

Depending on the option, you may need to choose
A
D
A
D
additional settings. Follow the on-screen instructions.
Hold down A.
The Time screen is displayed.
Settings
C/D
Press C or D to highlight Workout.
Press A.
Changing measurement settings from the Measurement screen
Important:
c
O When performing GPS positioning, make
sure the screen is facing up and you are
outside with no obstructions overhead.
See “GPS Positioning” on page 21.
O It usually takes less than two minutes to
complete GPS positioning.
If GPS positioning takes more than two
minutes and Failed is displayed on the LCD
screen, select Back, move to a different
location, and try again.
GPS positioning starts.
When GPS positioning is complete,
an alarm sounds and the
measurement screen is displayed.
Note:
O You can skip GPS positioning if you want to start
measuring immediately or if GPS positioning is
taking too long.
See “Skipping GPS positioning” on page 22.
O Use indoor mode if you do not need GPS data for
your workout.
See “Indoor mode” on page 23.
Press D to display the Menu.
Press D to display the Measure
Menu.
73
Page 74

Settings
C/D
A
C/D
A
C/D
A
A
Press C or D to highlight Measure
Set.
Press A.
Press C or D to highlight a setting
group.
Press A.
Depending on the option, you may need to choose
additional settings. Follow the on-screen instructions.
Hold down A.
The Measurement screen is
displayed.
Press A.
Press C or D to highlight a setting.
74
Page 75

Settings
Measurement settings
Setting Options Description
Activity Type Run* Use this setting when running or jogging.
Walk Use this setting when walking (exercising at a slow pace).
AT Lap ON Records laps automatically when running a distance set in
OFF*
AT Pause ON Automatically stops measuring when you stop running, and
OFF*
Target Pace ON* Set the target time and pace range for one mile or kilometer. An
OFF
1
HR
ON You can measure your heart rate by wearing the optional heart
OFF*
advance.
Set the lap distance.
Distance: 0.1 to 10.0 mi (0.1 to 10.0 km) in increments of 0.1 mi
(0.1 km)
See “Recording laps automatically” on page 36.
resumes when you continue running.
See “Starting/stopping measuring automatically” on page 37.
alarm sounds if you are outside the set pace range.
You can set the target pace within the following range.
Target Pace: 1'00" to 15'00"/mi or km (in increments of 1 second)
Pace Range: 00'05" to 03'00"/mi or km (in increments of 1 second)
See “Setting a pace” on page 39.
rate chest strap.
See “Measuring heart rate” on page 67.
Alarm Tones* Set the alarm type and time (1 to 10 minutes).
OFF
GPS - Displays the number of GPS satellites currently communicating
Screen Screen 1 You can display up to three Measurement screens. You can
Screen 2
Screen 3
Display Lap Screen
* Indicates the default setting.
1
Displayed after registering the heart rate monitor.
You can also set this from Sys. Settings.
with the product.
change the screen pattern and the measurement items displayed
for each screen.
You can also change the Display Lap Screen.
See “Screen” on page 80.
75
Page 76

Settings
D
A
C/D
A
A
A
Changing the Settings
Press D to display the Menu.
Settings
Press A.
C/D
Press C or D to highlight Settings.
Press A.
C/D
C/D
Press C or D to highlight a setting.
Press A.
Press C or D to select an option.
Press C or D to highlight a setting
group.
Press A.
76
Page 77

Depending on the option, you may need to choose
A
additional settings. Follow the on-screen instructions.
Hold down A.
The Time screen is displayed.
Settings
Settings options
Measurement settings
See “Measurement settings” on page 75.
User settings
Setting items Value Explanation
Height Various options Select your height.
Weight Various options Select your weight.
DOB Various options Select your date of birth.
Gender Male* Select your gender.
Female
* Indicates the default setting.
77
Page 78

Settings
System settings
Setting Options Description
Language English* Select the product language.
Deutsch
Clock Set Clock 12 Hour* Select the time format.
24 Hour
DST ON Adjusts Daylight Saving Time.
OFF*
Time Adjust Your product automatically sets the time after it has
received a GPS signal.
Signals from the GPS cannot be received while indoors.
Make sure the screen is facing up and you are outside
with no obstructions overhead.
If GPS positioning has not completed after two
minutes, we recommend select Back, move to a
different location, and try again.
Time Zone Auto* Sets the time zone for your location.
Manual
Display Set Units km Adjust the units for distance.
mile*
Date Format Day. Month Select the display format for the date.
Month. Day*
Contrast Various options Adjust the LCD screen contrast.
Auto Sleep ON* When you do not use the product for a while, this
OFF
AT Light ON When the screen changes, this function automatically
OFF*
Alarm Tones* Adjusts the alarm type and time (1 to 10 minutes).
When Auto is selected, you can use Time Adjust to set
the time zone automatically.
When Manual is selected, you can set the time zone
within a range of -12:00 to +14:00.
function automatically puts the product into sleep
status.
Sleep status reduces the amount of power
consumption.
turns on the light. When a specified time has passed,
the light automatically turns off.
OFF
Key Tones ON* Turns button sounds on or off.
OFF
78
Page 79

Settings
Setting Options Description
Initialize - Initializes all setting information (Smartphone, User
Settings, Sys. Settings and Measure Set) and stride
sensor information in the product's memory.
Measurement history data is also deleted.
Software Version - Displays the firmware version information.
* Indicates the default setting.
HR Monitor
Set to connect the HR monitor or smartphone to this product and communicate.
Settings Options Description
HR Monitor Status Connect the optional heart rate chest strap to your product.
Register
See “Pairing the heart rate chest strap” on page 64.
Track Activity
Setting items Value Explanation
Track Activity ON Turn the track activity function on or off and set your daily step
OFF*
* Indicates the default setting.
target.
See “Measuring your activity” on page 46.
79
Page 80

Settings
D
A
A
A
Screen
There are three different measurement screens available. Each screen shows different information about your
current activity.
Note:
For details on switching between screens, see “Screen Display” on page 34.
Changing the measurement screen
You can customize the Measurement screen to display
various information about your current activity.
See “Screen Display” on page 34.
Press D to display the Menu.
C/D
Press C or D to highlight Settings.
C/D
C/D
Press C or D to highlight Measure
Set.
Press A.
Press C or D to highlight Screen.
Press A.
Press A.
80
Page 81

Settings
A
A
A
A
A
A
C/D
C/D
Press C or D to highlight the screen
preset that you want to customize.
Press A.
Press C or D to highlight the screen
layout that you want to use.
See “Screen layout options” on
page 83.
C/D
C/D
Press C or D to highlight the portion
of the Measurement screen that
you want to customize.
Press A.
Press C or D to select the
Measurement that you want to
display.
Press A.
Press A .
A sample Measurement screen is
A sample Measurement screen is
displayed.
After checking, press A and go to
the following step.
displayed.
Press A.
81
Page 82

If applicable, repeat the steps to
A
customize additional lines of the
Measurement screen.
Hold down A.
The Time screen is displayed.
Settings
82
Page 83

Settings
Screen layout options
Measurement screen
Screen Pattern Screen Description
1 Line Displays one measurement item on the screen.
2 Lines Displays two measurement items on the screen by
dividing the screen into two sections.
3 Lines Displays three measurement items on the screen by
dividing the screen into three sections.
OFF - The measurement screen is not displayed.
Display Lap Screen
Screen Pattern Screen Explanation
1 Line Displays one measurement item on the screen.
2 Lines Displays two measurement items on the screen by
dividing the screen into two sections.
83
Page 84

Settings
Measurement display abbreviations
Measurement screen
Measurement
Distance Distance Dist. Total distance from the start of
Pace Pace Pace Current pace (time taken for one mile or
Average Pace Avg.Pace Av.Pace Average pace from the start of
Lap Pace LapPace LapPace Average pace for each lap
Split Time SplitTime Split Total time from the start of measurements
Lap Time LapTime Lap Time for each lap
Time Time Time Current time
Calories Burnt Calories Calories Calories burnt from the start of
Steps Steps Steps Number of steps from the start of
HR HR HR Current heart rate
Display name
Description
1 Line 2 Lines/3 Lines
measurements
kilometer)
measurements
measurements
measurements
Display Lap Screen
Display item
Split Time SplitTime Split Total time from the start of measurements
Lap Time LapTime Lap Time for each lap
Lap Pace LapPace LapPace Average pace for each lap
Display name
Description
1 Line 2 Lines
84
Page 85

Maintenance
Maintenance
Follow the instructions in this section to care for your product and update its firmware.
“Caring for your product” on page 86
“Updating the Firmware” on page 87
85
Page 86

Maintenance
Caring for your product
Important:
c
O If the product is placed in the cradle when it i s
covered in water, sweat, or dirt, the contact
points may corrode, malfunction, or cause a
communication failure.
O Do not perform button operations when it is
wet; otherwise, a malfunction could occur.
After using the product, wash the contact points lightly
with a damp cloth and allow the product to air dry.
Water, sweat, or dirt could cause the product to
malfunction.
Heart rate chest strap maintenance
O After exercising, take off the heart rate chest strap,
and carefully wash it with water.
O Make sure to wash the buttons and wipe off all
moisture.
O Do not use a washing machine or a dryer on the
heart rate chest strap.
O Do not iron, dry clean, or use a chlorine-based
detergent on the heart rate chest strap.
O Dry the heart rate chest strap completely.
Disposing of the Product
When disposing of this
product, follow your local
laws and regulations.
If your product has issues communicating with a
computer or charging, clean the contact points on the
product and the cradle with a damp cotton bud and
allow them to air dry.
Do not clean using organic solvents such as benzine,
thinner, alcohol, or detergent. This could cause the
product to degrade.
About the strap
If the strap is dirty, wash it with water, wipe it with a
dry cloth, and allow it to air dry. This strap is made
from polyurethane and after years of use the color may
fade or it may lose its elasticity.
86
Page 87

Updating the Firmware
D
A
A
A
A
You may be able to resolve problems that occur by
updating the firmware.
Important:
c
When updating the firmware, the history may be
deleted and settings may be reset to their defaults.
Before updating the firmware, we recommend
uploading your measurement data to RUNSENSE
View.
See “Creating a RUNSENSE View account” on
page 55.
Maintenance
C/D
Press C or D to highlight Sys.
Settings.
Checking the firmware version
Press D to display the Menu.
C/D
Press C or D to highlight Settings.
C/D
Press A.
Press C or D to highlight Software
Version.
Press A.
Check the firmware version.
Press A.
Hold down A.
87
Page 88

Maintenance
The Time screen is displayed.
Updating the firmware
Download the firmware for RUNSENSE View from
epson.com/support/sf110 (U.S.) or
epson.ca/support/sf110 (Canada) and update the
firmware.
Important:
c
Do not disconnect the cradle USB cable from your
computer while running the firmware update or
you may seriously damage your product.
88
Page 89

Troubleshooting
Troubleshooting
This section explains how to solve problems that occur during use.
“Caution” on page 90
“Problem solving” on page 90
“Resetting the product” on page 93
“Initializing the product” on page 94
“Where to get help” on page 96
89
Page 90

Troubleshooting
Caution
O After using the product, wash the contact points lightly with a damp cloth and allow the product to air dry. If
the product is placed in the cradle when it is dirty, it could corrode, malfunction, or cause a communication
failure.
O If charging or data transfer becomes unstable, clean the contact points on the product and the cradle with a
damp cotton bud and allow them to air dry.
O If product operations become unstable or if functions do not operate correctly, perform a system reset (hold
down all four buttons at the same time).
Problem solving
Problem Solution
Basic actions Nothing is displayed on the LCD
screen.
The product does not react to
button presses.
The LCD screen turns off or turns
blue during use
The clock turns off. When you leave the product for a while, it enters sleep
The battery needs to be charged before use. Charge the
battery.
See “Charging” on page 14.
The battery needs to be charged before use. Charge the
battery.
See “About the battery” on page 20.
If the product does not operate after charging, reset the
product.
See “Resetting the product” on page 93.
Perform a system reset.
See “Resetting the product” on page 93.
status and the time display turns off. This is not a
malfunction as the display is restored the next time a
button is pressed or you move the product. If the display
is not restored, the battery is running low. Charge the
product.
See “Charging” on page 14.
To prevent the product display from shutting off, disable
the Auto Sleep setting.
See “System settings” on page 78.
The time is not set correctly. Set Time Adjust in the Sys. Settings menu.
See “Adjusting the time” on page 27.
If the time is still incorrect, check the Time Zone and DST
(daylight-saving time) settings.
See “System settings” on page 78.
Measurement stops while
exercising.
If you are performing slower exercises, such as when
walking, turn off the AT Pause function.
See “Starting/stopping measuring automatically” on page
37.
90
Page 91

Troubleshooting
Problem Solution
GPS The product cannot receive a GPS
signal.
Signals from the GPS are hard to
receive or are interrupted.
Charging The product does not charge even
when it is placed in the cradle.
Charging stops frequently.
The charge error screen is
displayed.
The product and the cradle
become hot while charging.
Waterproofing
performance
Can I use the product when
swimming?
Go to a location outside with no obstructions overhead.
The product cannot receive GPS signals indoors. Also, if
there are any obstacles partially blocking the sky, such as
tall buildings and mountain sides, distance
measurements may not be accurate.
Even when a signal is being received, it may be
interrupted depending on the running environment.
Make sure to wear the product on the outside of your arm.
Make sure the product is seated correctly in the cradle.
Clean the contact points on the product and the cradle.
See “Caring for your product” on page 86.
A problem may have occurred if you still cannot charge
your product after cleaning the contact points and
seating the product correctly in the cradle. Stop charging
the product immediately and contact Epson.
Charge in an environment where the surrounding
temperature is 41 to 95°F (5 to 35°C).
There may be a malfunction. Stop using the product
immediately and contact Epson support.
This product is water resistant at 5 barometric pressures (5
ATM) and can be used when swimming. Do not press the
buttons while in the water. GPS signals cannot be
received under water. Do not swim while wearing the
optional heart rate chest strap.
The inside of the glass becomes
cloudy.
Accessories Acquiring optional products. The AC adapter and heart rate chest strap are available as
Condensation may occur in the product due to
differences in temperature between the product and the
air. Temporary condensation does not have any effect on
the product. You can continue to use the product in this
condition. If the condensation remains for a long time,
water may have entered the product. Contact Epson
support.
options.
91
Page 92
Troubleshooting
Problem Solution
Heart Rate Monitor The heart rate monitor is not
working correctly.
Communication The product is not recognized
correctly when it is connected to a
computer.
Check the following items.
O Make sure you are wearing the heart rate chest strap
correctly.
See “Wearing the heart rate chest strap” on page 63.
O Check that he heart rate chest strap been registered
to the device.
See “Pairing the heart rate chest strap” on page 64.
O Make sure the HR option set to ON.
See “Enabling heart rate monitoring” on page 65.
O Try resetting the heart rate chest strap. To reset the
heart rate chest strap, place the battery in the battery
compartment so that the negative side is facing up,
and leave it for three seconds.
O Replace the battery.
See “Replacing the heart rate chest strap battery” on
page 68.
O Perform a system reset for the product.
See “Resetting the product” on page 93.
Check the connection for the computer and the cradle.
Clean the contact points on the product and the cradle.
See “Caring for your product” on page 86.
Perform a system reset.
See “Resetting the product” on page 93.
Web application When communicating with a
computer, an error screen is
displayed and communication
stops.
Do not move the product and the cradle during
communication. Avoid communicating data under
environments where static electricity can be easily
generated. If the same error occurs, reconnect the cradle
to start the communication again.
If you cannot solve the problem even after trying the points above, contact Epson support.
See “Where to get help” on page 96.
92
Page 93

Troubleshooting
Resetting the product
If your product is not functioning correctly, you can reset it.
Hold down all of the buttons (A/B/C/D) at the same time.
The screen resets and the product restarts. You will need to re-select the initial settings after the restart.
See “Initial settings” on page 16.
Important:
c
Measurement data is not recorded if a system reset is performed while measuring.
The following shows the differences between a system reset and initializing.
: Data is saved
-: Data is deleted, or needs to be reset
Data/Settings System Reset Initialize
Measurement settings -
User settings -
System settings -
Recall data -
Today's activity data - -
Step Target set in Track Activity -
Stride sensor calibration -
Heart rate chest strap pairing -
Mobile device pairing -
Time adjustment - -
93
Page 94

Troubleshooting
D
C/D
A
C/D
A
A
A
Initializing the product
If you want to delete all measurement data and clear
the product's memory, you need to initialize the
product.
Press D to display the Menu.
Press A.
Press C or D to highlight Settings.
Press A.
C/D
C/D
Press C or D to highlight Initialize.
Press A.
Press C or D to highlight Yes.
Press C or D to highlight Sys.
Settings.
Press A.
94
Page 95

Troubleshooting
All of the settings and data on the product are deleted,
and the product is returned to its initial status.
See “Initial settings” on page 16.
95
Page 96

Troubleshooting
Where to get help
Internet support
Visit epson.com/support/sf110 (U.S.) or epson.ca/support/sf110 (Canada) for solutions to common problems.
You can get tips, usage information, and FAQs, download utilities, or e-mail Epson.
Telephone support
Call (800) 241-5789, (562) 276-4394 (U.S.), or (905) 709-3839 (Canada). Support hours are 6 AM to 8 PM, Pacific
Time, Monday through Friday, and 7
Days and hours of support are subject to change without notice. Toll or long distance charges may apply.
AM to 4 PM, Pacific Time, Saturday.
96
Page 97

Appendix
“Product icons” on page 98
“Product specifications” on page 98
“Glossary” on page 101
Appendix
97
Page 98

Product icons
Icon Name
Run mode (measuring while running)
Walking mode (measuring while walking)
The signal is being received from the GPS (GPS On)
GPS positioning
Communicating with the heart rate monitor
Measure activity (Track Activity on)
Average pace
Lap
Distance
Calories burned
Appendix
Split Time
AT lap
Manual lap
Steps
Product specifications
Product specifications
Model No. SF-110
Size (thickness) 5.7 in (14.5 mm)
Weight Approx. 1.6 oz (44 g)
Water resistance Water resistant at 5 barometric pressures (5 ATM)
Operating
time
When using GPS function (when Track Activity is
on)
Up to seven hours
When using GPS function (when Track Activity is
off)
When time displayed (when Track Activity ON) Up to seven days
When time displayed (when Track Activity OFF) Up to 10 days
Operating temperature 23 to 122°F (-5 to 50°C)
Possible memory time (total distance time) Approx. 13 hours
Maximum number of laps 200 per split
Up to 10 hours
1
1
All history Total 512
98
Page 99

Appendix
Heart rate measurement (using the heart rate chest strap
Pitch/stride measurement -
Indoor mode
Display range Distance/Lap Distance 0.000 to 999.99 mi (0.000 to 999.99 km)
Pace/Lap Pace/Average Pace 0'00'' to 45'00''/mi (0'00'' to 30'00''/km)
Split/Lap time 0:00'00" to 13:00'00"
Pitch -
Stride -
Steps 0 to 999999
Calories Burnt 0 to 9999 kcal
Altitude
Grade -
Total Ascent -
Total Descent -
HR 30 to 240 bpm
Target Pace 1'00'' to 25'00''/mi (1'00'' to 15'00''/km)
3
-1500 to 29,999 ft (-500 to 9,999 m)
2
2
Guide distance -
Cradle Operating temperature range 41 to 95°F (5 to 35°C)
1
12 hours/day in sleep mode
2
The heart rate chest strap is available as an optional accessory.
3
Not displayed on the product. Only displayed on the RUNSENSE View web app.
Optional accessory specifications
You can purchase the following optional accessories.
AC adapter specifications
Model no. SFAC04
Part no. E12E204001
Input AC 100V 50/60 Hz
Output DC 5V/1.0A
Heart rate chest strap specifications
Model no. SFHRM01
Part no. E12E204104
99
Page 100

Appendix
Water resistance Water resistant for daily use
100
 Loading...