

Page 1
PRODUCT REVIEW KIT
•
Hi-Definition 4
-in-
one with fax, automatic document feeder
and Wi
-Fi.
The Elegant and Intelligent 4-in-1
Epson Stylus Photo PX800FW
• Large, easy to use 19.8cm touch panel viewer.
• Print photos that exceed lab quality with Epson Clarian Photographic Ink.
• Integr ated wireless and Ethernet for shared printing and scanning.
• Dedicated dual A4 and photo paper trays.
• Copy and fax documents easily using the 30 sheet automatic document feeder.
• Print directly onto suitable CDs and DVDs.
• Save money w ith individual inks – only replace the colour you use.
Contents
Achieving the best results using the Epson Stylus PX800FW ...........................................................2
Driver Settings.....................................................................................................................................3
Softw are ..............................................................................................................................................5
Epson Scan .........................................................................................................................................7
Features ............................................................................................................................................11
Wi-Fi and Ethernet ............................................................................................................................16
Ink Cartridges and ISO Yields ..........................................................................................................17
Full Product Specifications ...............................................................................................................19
Page 2

PRODUCT REVIEW KIT
Achieving the best results using the Epson Stylus Photo
PX800FW
Make sure you select the corr ect driver and media settings.
Select Text mode for printing high-quality text documents, or Photo for high-quality
photos.
Choose the correct paper settings - e.g. select 'Premium Glossy Photo Paper' for the best
photo quality on glossy paper.
To achieve high quality photo prints, it is recommended that Epson media is used.
Choose the 'Borderless' photo setting to get true edge-to-edge printing without any
white borders.
This Epson printer includes a permanent Micro PiezoTM print head. This means that a
head alignment should not be required during the set-up process.
Page 2 of 19
Page 3
PRODUCT REVIEW KIT
Settings
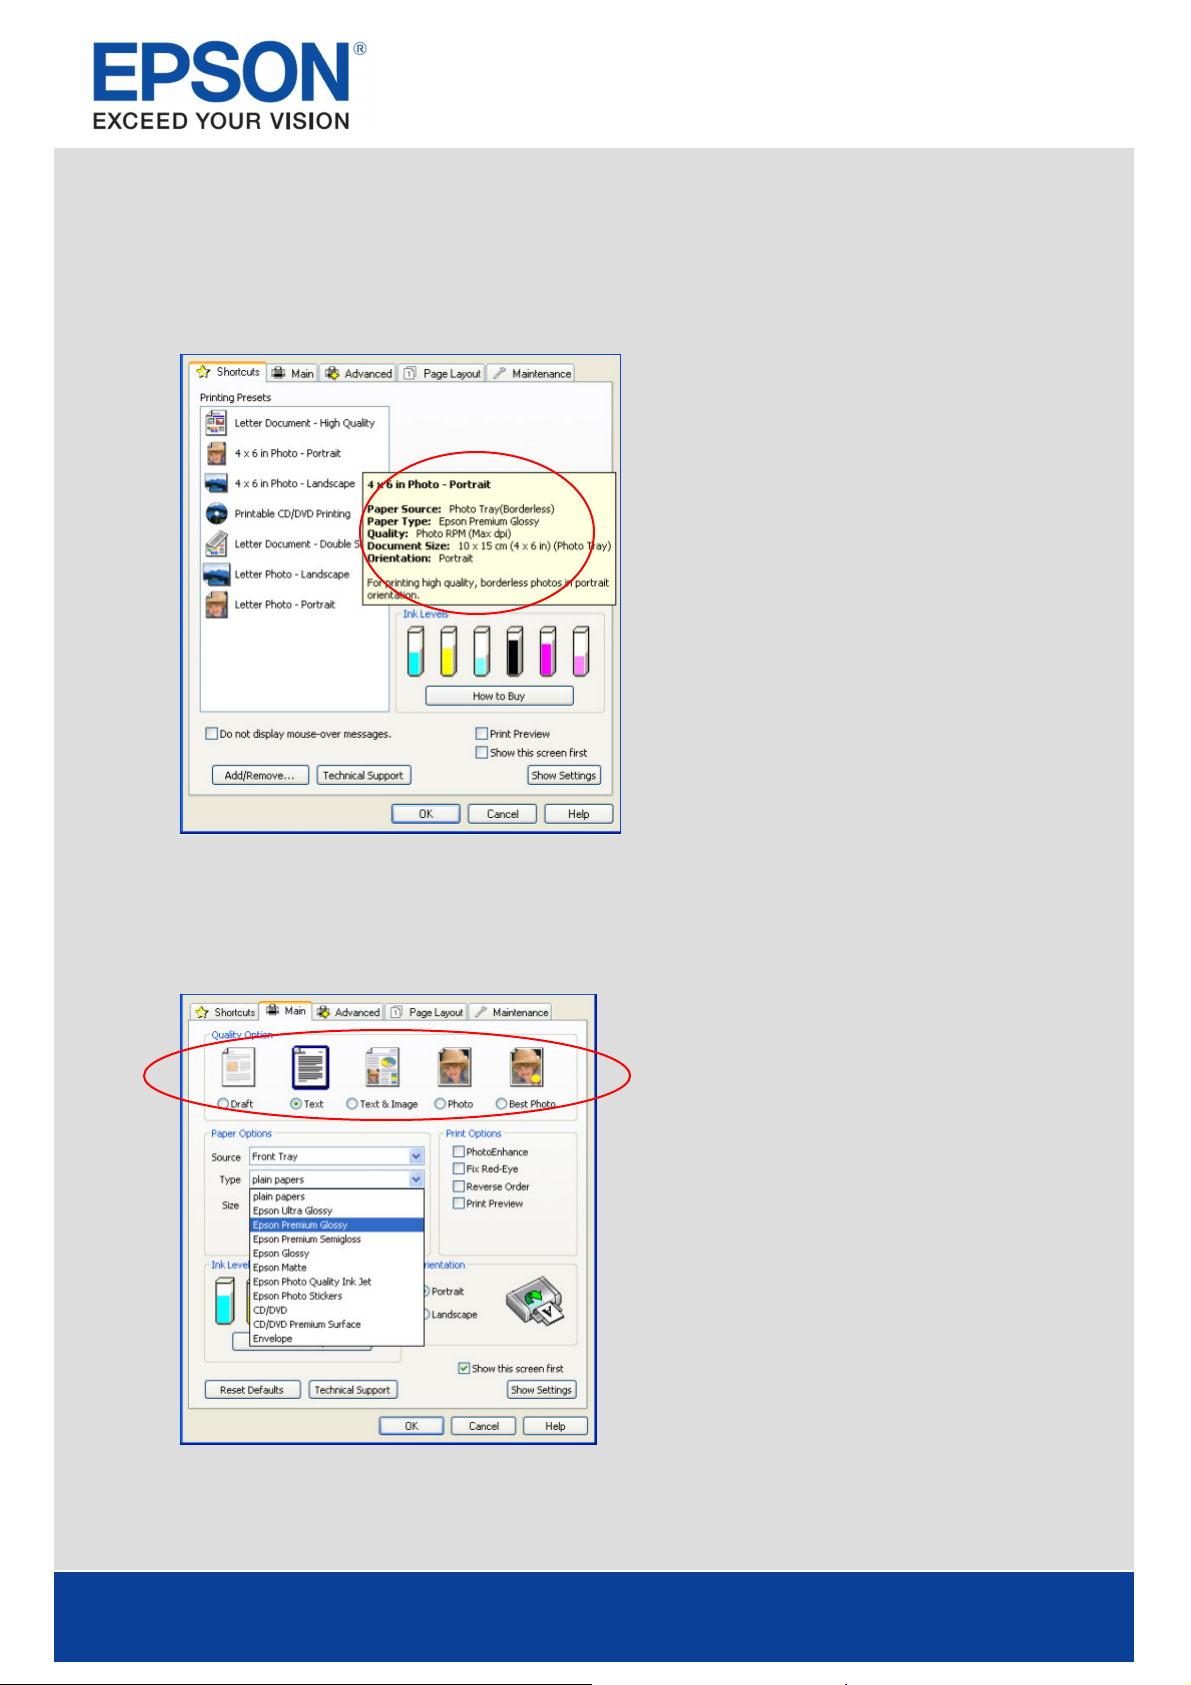
Shortcuts
The Shortcut menu below can be used to make a quick and easy selection of the pr int settings r equired.
When each pr inting pr eset is selected, a br ief description of the setting is given
.
Driver Settings
The driver settings can be contr olled manually too. It is important to select the appr opriate settings
before printing, to achieve the best r esults. Start by selecting the Main tab in the driver.
Text Printing
Select Dr aft on the pr inter dr iver for economical high
speed text printing.
Select Text mode for printing high-quality text
documents.
Select Text & Image for printing high-quality colour
documents with images.
Photo Printing
Select Dr aft mode for pr inting photo proofs.
Select Photo mode for standard day-to-day photographic
printing.
Select Best Photo mode for high-quality photographic
printing, such as album images
.
Page 3 of 19
Page 4
PRODUCT REVIEW KIT
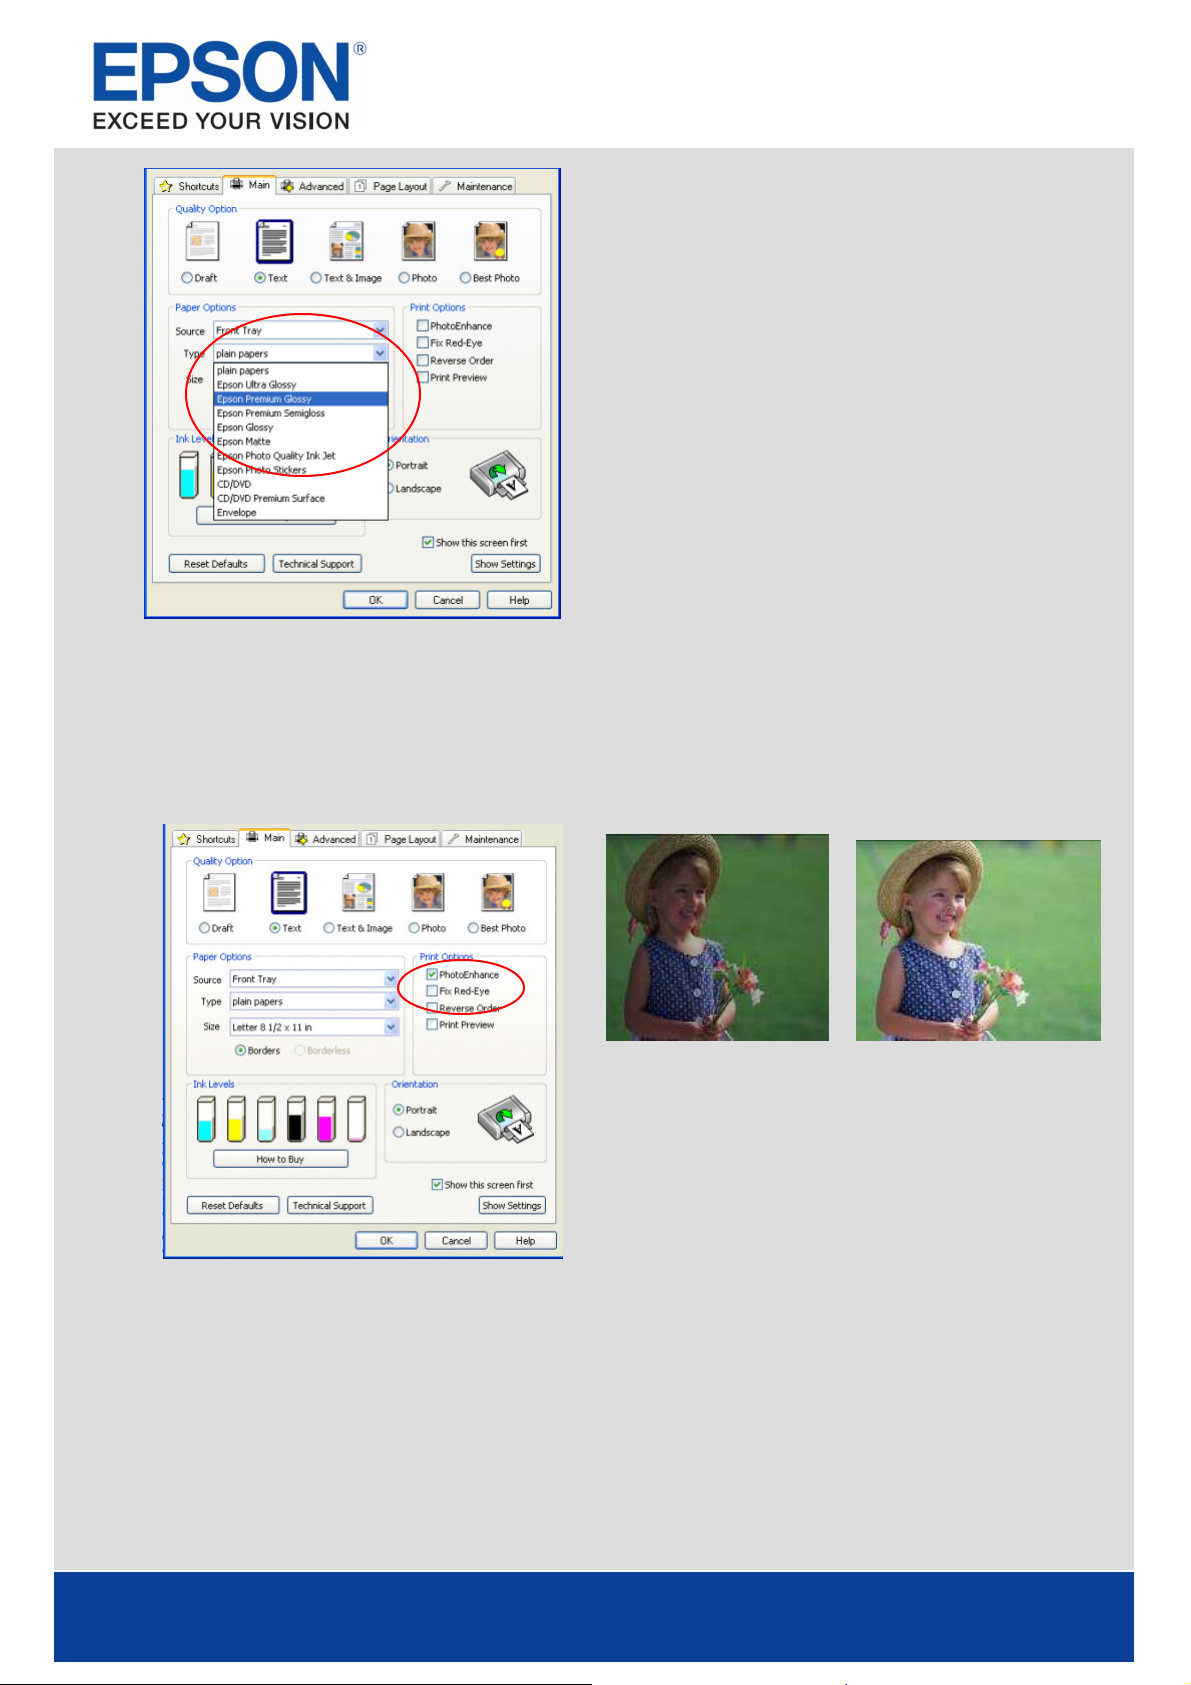
Media Settings
To get the best from an Epson pr inter, it is important to
choose the corr ect media setting.
This can be done by selecting the appr opriate media from
the dr op-down menu (see image to the left).
For optimum photo quality, Epson Premium Glossy Photo
Paper is recommended
Epson PhotoEnhance
When selected, Epson PhotoEnhance automatically adjusts colour and contr ast to your photos to ensure
perfect results. It is a default setting for printing photos on glossy media, however as you can see below,
it can be turned off by clicking on the tick box.
This is also availab le as a stand-alone feature
Software
Before After
Page 4 of 19
Page 5
PRODUCT REVIEW KIT
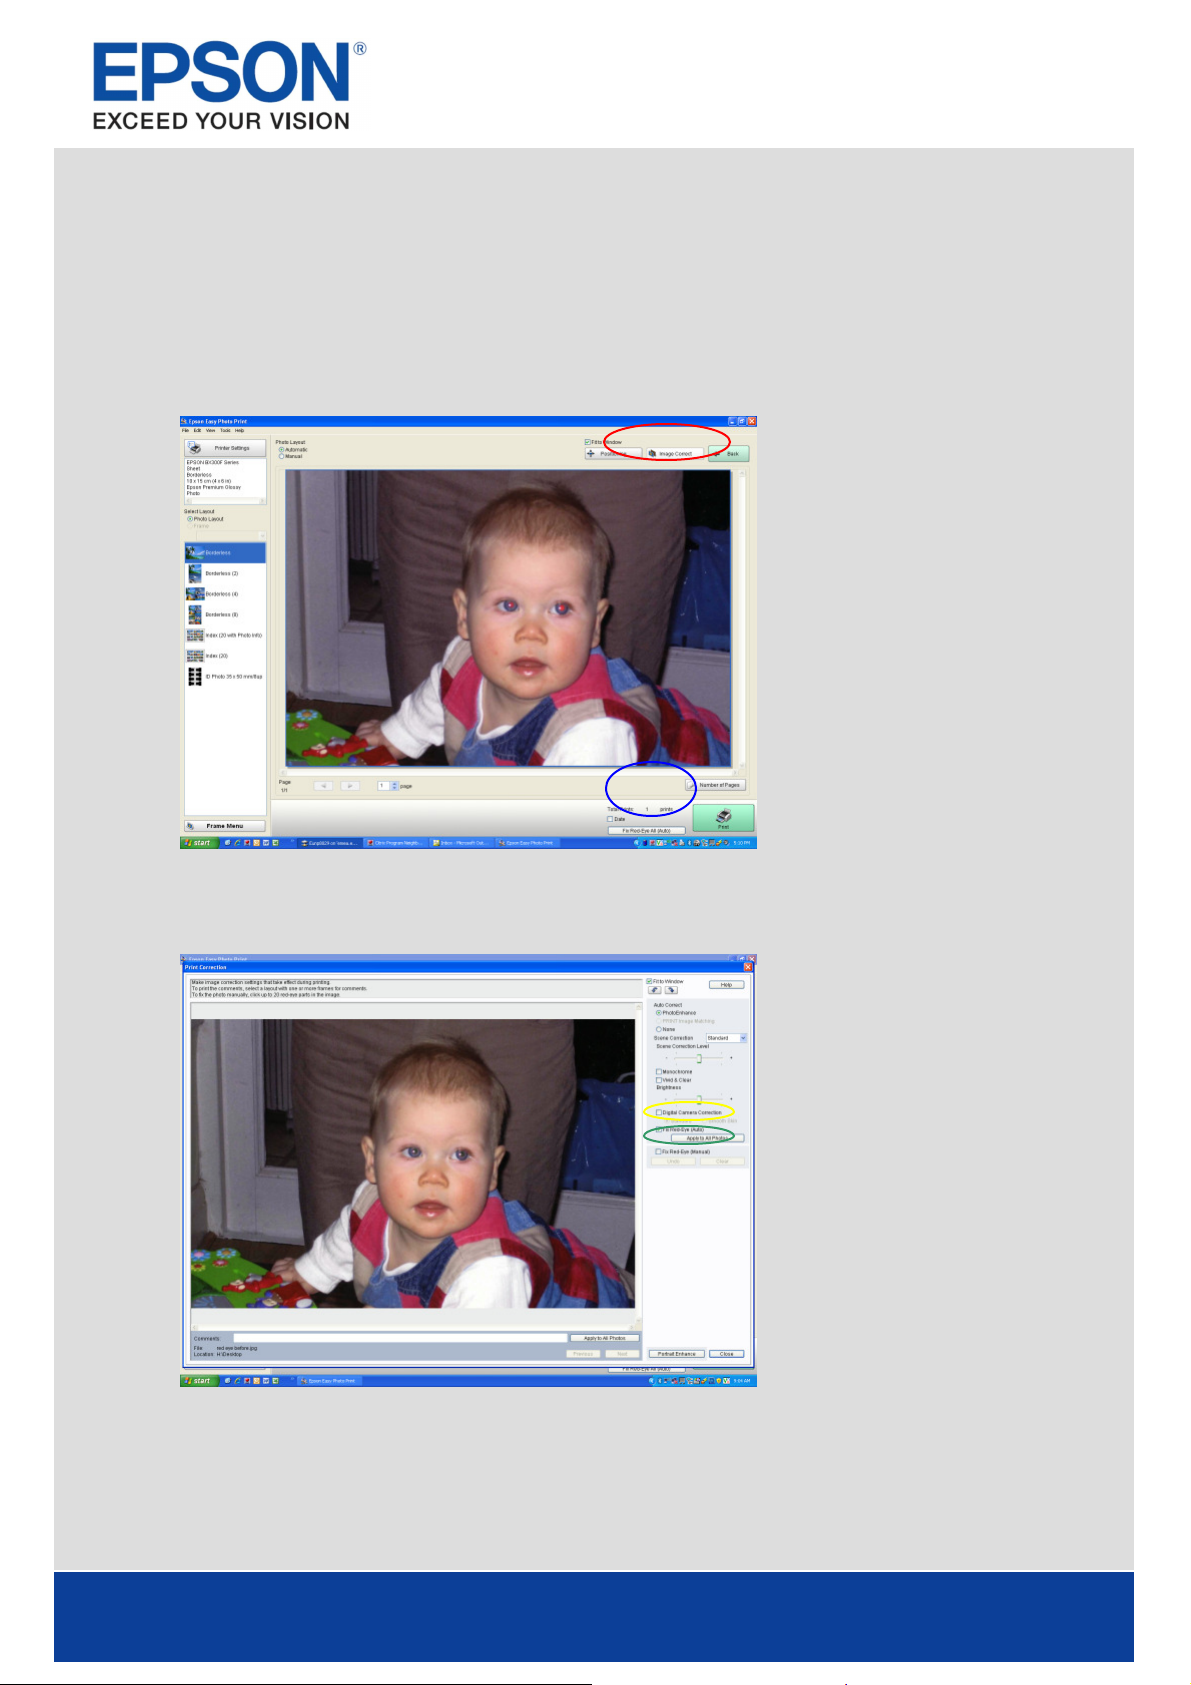
Epson Easy Photo Print
Epson Easy Photo Pr int is a softwar e which is included with all Epson inkjet printer s. It offers easy-to-use
functions such as PhotoEnhance, r ed-eye removal and adding frames.
To access, go to Start, All Programs, Epson Software and select Epson Easy Photo Pr int.
Select the image or images then click the Next Step button on the bottom right
Red-Eye Removal
You can click on Red-Eye Fix All
(circled here in blue) for automatic
red-eye removal.
Please note that this function will not
show a preview on your scr een;
however, the image wi ll be pr inted
without red-eye.
You can also manua lly or automatically
remove red-eye, with a preview, by
clicking on the Image Corr ect button
(circled in r ed).
Image Correct will take you to the
screen shown here. You can then
choose to remove red-eye manua lly
(circled in Gr een) or automatically
(circled in Yellow).
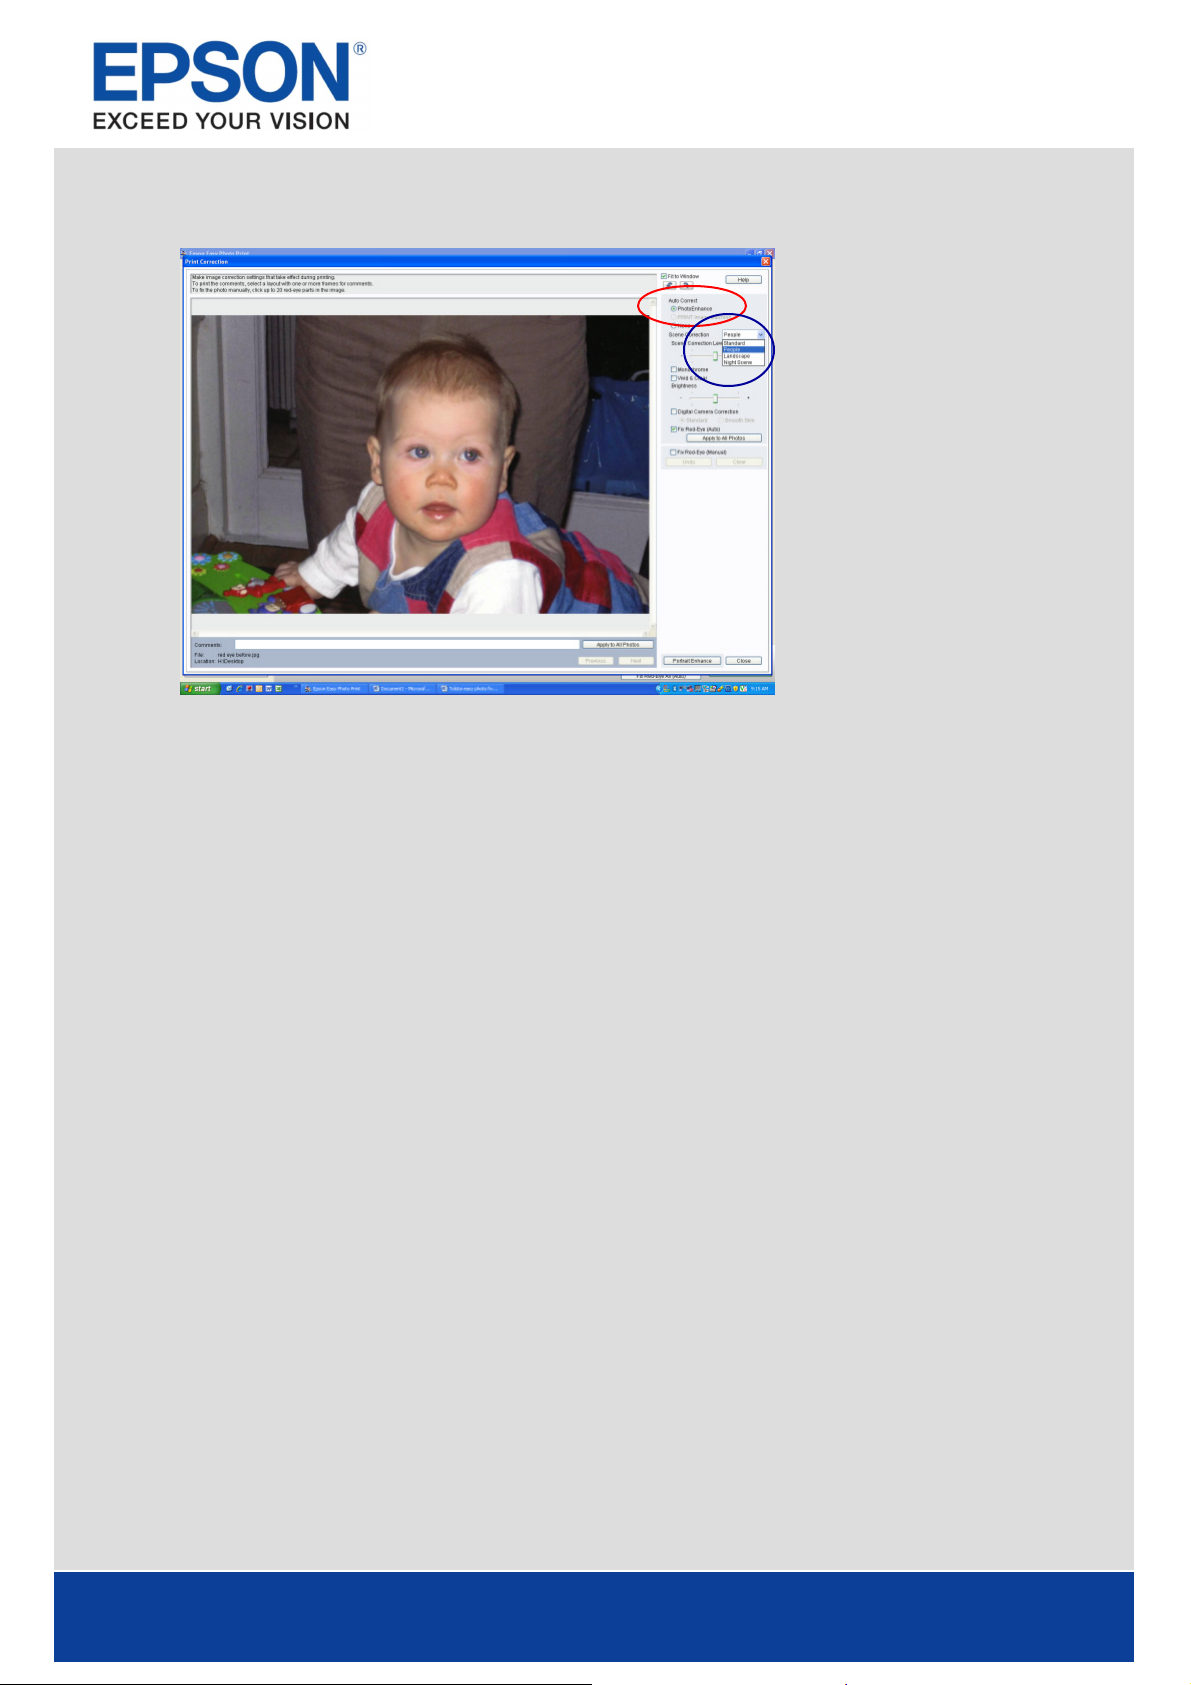
PhotoEnhance
Page 5 of 19
Page 6
PRODUCT REVIEW KIT
PhotoEnhance can also be accessed via Epson Easy Photo Print as you can see below (circled in red).
Once it is selected, you can then choose the pr eferred Scene Correction
(circled in blue).
With PhotoEnhance and Red-Eye Fix
(Auto) selected, the image can be
previewed befor e printing.
This is also availab le as a stand-alone feature
Page 6 of 19
Page 7

PRODUCT REVIEW KIT
Epson Scan
Epson Scan is a TWAIN Driver that can be accessed as a stand-a lone desktop application or thr ough a
third party imaging pr ogram.
It can be used for scanning documents and images and there are thr ee modes.
The first option is Home Mode which features scan settings
such as automatic sizing and document type.
This is ideal for advanced amateurs.
You will be ab le to access Epson Easy Photo Fix™ (circled
here in red) via this mode. It consists of Colour
Restoration, Backlight Correction and Dust Removal.
These functions can be used to restor e colour, r emove dust
and correct backlight to damaged images.
Another setting is Office Mode. This lets you quickly select
settings for scanning documents. If pr eferred, you can
preview the document before scanning by pressing the
Preview button.
It is convenient to use the Automatic Document Feeder
(ADF) when scanning multi-page documents.
Simply select ADF from the Document sour ce drop down
menu (circled here in r ed), then pr ess Scan.
The ADF has a maximum capacity of 30 sheets.
Page 7 of 19
Page 8

PRODUCT REVIEW KIT
You can also Scan one or more documents to PDF via this
mode. To do this, select ADF, then pr ess Scan.
The window below will pop up, then select the dr op down
menu for Type (circled her e in red) and select PDF.
The ADF will automatically detect multiple pages.
The third option is Professional Mode which allows complete
user control of scan settings and advanced contr ols, such as
histogr am adjustment and tone correction.
Other features include automatic exposur e, multiple crop
fr ames, densitometer and a document mode available for
more advanced users.
Images and documents can a lso be pr eviewed first before
scanning.
As you scr oll down, Epson Easy Photo Fix™ is also availab le in
this mode.
Preview Screen
Page 8 of 19
Page 9

PRODUCT REVIEW KIT
The Epson Scan dr iver allows you to pr eview images or documents before scanning in both the Home and
Professional modes. This can be done by pressing the Preview button and it is especially useful when
using the colour r estoration function as can be seen below.
Preview without Colour Restor ation: Preview with Colour Restoration turned on:
Page 9 of 19
Page 10

PRODUCT REVIEW KIT
Scanning Multiple Imag es
Multiple images can be scanned by placing them appr oximately 2mm apart on the scan bed (number of
images will depend on the size).
To do this, make sur e that Thumbnail (cir cled in r ed below) is selected before proceeding.
The image or images can then be pr eviewed as you can see above and then scanned. These will
automatica lly be saved into separ ate files.
Page 10 of 19
Page 11

Features
PRODUCT REVIEW KIT
The PX800FW features a vivid 19.8cm LCD touch panel viewer which tilts to provide the most
comfortable viewing angle. Its intelligent, context sensitive navigation system allows easy and
intuitive access to a large number of photo and other useful features.
PC-Free (Standalone) Func tions Include:
• Print photos via a memory card or PictBridge
• Print photos from movies
• Copy documents, photos and CD/DV D artwork
• Restore, r epair or enhance photos with r ed-eye removal and PhotoEnhance
• Print onto suitable DVDs/CDs
• Print photo greeting car ds
• Print bespoke stationery
• Print an index sheet
• Crop and enlarge images from memory card
• Faxing with automatic document feeder
Automatic Document Feeder
You can use the automatic document feeder to scan, copy or fax multiple documents. To ensure a
smooth work flow:
• Make sure the edges of the documents are even
• Inser t the or iginals face-up and shor t edge fir st into the
automatic document feeder
• Slide the edge guide on the automatic document feeder
• Once the documents have been inserted into the automatic
document feeder, the pr inter will automatically detect this and
switch the ADF mode on.
Faxing
Page 11 of 19
Page 12

PRODUCT REVIEW KIT
Before sending or receiving faxes, you can create a fax header by adding information such as phone
number or name by doing the following:
- Press the Home button to enter main menu, press Setup, scroll to Fax Setting , pr ess Fax Setting
- Scr oll to Header, press Header, press Fax Header.
- Input your header and pr ess Ok (Use the numeric keypad to enter the header infor mation, you
can enter up to 40 digits)
Sending a fax:
- Place the document on t he scan bed or in the automatic docum ent feeder
- Pr ess the Home button to enter main menu, press on the Fax icon
- Pr ess on the far right hand numbers icon (123). Enter number then pr ess ok. Choose B&W or
Colour Fax.
- Pr ess Start
- If you ar e sending a black and white fax it will sc an the document, save it to the memory and
then dial the fax number and send it
- If you are sending a colour fax it will dia l the fax number and send it, it will not save it to the
memory
The automatic document feeder can be used to send multiple documents. To do this, place the
documents on the automatic document feeder (it will automatically detect t his) and follow the
instructions above
Assigning speed dial buttons
- Press the Home button to enter main menu, press Setup, scroll to Fax Setting , pr ess Fax Setting
- Pr ess Speed dial setup.
- Pr ess Create
You are also able to edit and delete speed dial numbers in this menu
To use the assigned speed dial numbers betw een 1 and 60
- Press the Home button to enter main menu. Pr ess Fax, Pr ess Speed Dial.
- Using the up and down ar r ows scr oll through the assigned numbers, press start
Creating a speed dial group
- This can only happen once you have r egistered the fax numbers that you wish to use as a speed
dial entry.
- Press the Home button to enter main menu, press Setup, scroll to Fax Setting , pr ess Fax Setting
- Press Group dial setup
- Assign a group dial number, press ok.
- Enter a name for the gr oup. Press ok.
- Select speed dial number s you wish to assign to the group. You can assign up to 30 speed dial
entr ies in a gr oup dial.
Receiving a fax:
- The Epson Stylus Photo PX800FW automatica lly receives and pr ints faxes when Auto A nswer
mode is selected – pr ess
Page 12 of 19
Page 13

PRODUCT REVIEW KIT
- To receive faxes manua lly, turn off Auto Answer mode by pressing the button
- When the telephon e rings, lift the connected phone off the hook. You will then see a screen.
Press Receive.
- Press the Start button, when the fax has finished tr ansmitting replace the phone on the hook
Copying:
To make a copy, make s ur e the LCD menu shows “Copy”, (use the Home button to change to Copy if
necessar y). Place th e original face down on the flat bed then press Star t.
If you want to make a copy quick ly and do not need high quality, you ca n pr int using the “dr aft” setting.
The print quality is marginally r educed, but the spe ed increases. To do this you must:
- Pr ess the Home button to enter main menu, press Copy.
- Pr ess the Menu button to enter the settings screen
- Pr ess Paper and Copy Settings.
- Scroll to Quality, pr ess Quality, pr ess the right arrow on the control pa nel to change the
selection
To copy a document
- Pr ess Home button and press Copy.
- Set the number of copies using t he + or - or the num erical keypad
- Pr ess Start
Loading Media – CD/DVDs:
You can pr int on suitable CDs and DVDs. Unlike pr evious Epson models this CD/DV D holder is fully
automated. Do not pull or hand le the CD holder manually. F ollow the below instructions to load a
CD/DVD.
Page 13 of 19
Page 14

PRODUCT REVIEW KIT
Printing on CDs/DVDs
Printing on suitable CDs/CVDs couldn’t be easier with the Epson Stylus Photo PX800FW
- Scr oll to Print on CD/DVD and select. Select pr efered print layout.
- Select requir ed photo
- Adjust inner and outer diameter s with scr oll contr ols dependomg on the printable sur face
area on your CD/DV D (optional).
- Select Test print on A4 paper to have an idea of end product (optional).
- Once happy select Print on a CD/DVD.
Loading Media - Paper
The Epson Stylus Photo PX800FW has a media paper tray which gives the advantage of being able to ho ld
two media types simultaneously. This means that you can easily select the copied media for your print
job from the dr iver without manually swapping the media. See below for clear instructions for loading
paper into the tray.
Page 14 of 19
Page 15

PRODUCT REVIEW KIT
Other Modes
Ther e are a number of other interesting modes outside the k ey Photo, Fax, Copy and Scan functi ons.
These are:
Colouring Book mode:
This function a llows you to scan and print pictur es that can be used for colouring-in, ideal for childr en.
- Select Home
- Scr oll to Colouring Book and select
- Place picture you wish to colour in and place on scanner .
- Select either People, Scener y or Line Draw ing whichever is appropr iate to the picture
on the scanner.
- Select prefered output media either A4 Plain Paper or A4 Matte
- Load correct paper type
- Press Start.
Print Ruled Papers:
This function a llows you to print bespoke stationery
- Select Home
- Scr oll to Print Ruled Paper
- Select prefered output. If the Note Pad function is selected then you can choose the
photo r equired as background befor e pr inting.
- Ensure that A4 paper is loaded into the paper tr ay.
- Select number of copies
- Press Start.
Integrated Wi-Fi and Ethernet
Wi-Fi and Ether net ar e now integrated within the pr inter r emoving the need for an external dongle. This
allows you to share the pr inter between s everal users in your home.
Ther e is an easy installation pr ocess called EpsonNet EasyInstall which g uides you step by step when
setting up the wireless connection between yo ur printer and computers.
Your firewall or anti-spyware software may display warnings during installation. Create an exception for
EpsonNet EasyInsta ll to allow it to carr y out netw ork configur ations:
For W indows XP Service Pack 2 or later
Confir m that the pub lisher is SEIKO EPSON, and then click Unblock.
Page 15 of 19
Page 16

PRODUCT REVIEW KIT
For Mac OS X 10.5.1 or later.
Configur e the Application Firewall to allow access for EpsonNet EasyInstall.
It is necessary to have an Ethernet (wired) connection during installation to c onfigure your printer to
communicate via Wir eless LAN. Select the first method, connect an Ether net cable and switch on the
printer and click Next
- Select a printer
Page 16 of 19
Page 17

PRODUCT REVIEW KIT
- Select a connection type
- Choose a wir eless network
- Enter your WEP Key or WPA password – both are case sensitive
- Check that Obtain an IP address Start is set to Automatic
- Confirm settings are complete
ISO Yields
Page 17 of 19
Page 18

Recommended Inks
Magenta
T0803
Also Available
Magenta
T0793
L
ight Magenta
T0796
Epson Stylus Photo PX800FW
PRODUCT REVIEW KIT
INK CARTRI DGES
Black T0801 Approx. 355 pages
Cyan T0802
Yellow T0804
Light Cyan T0805
Light Magenta T0806
Black T0791 Approx. 570 pages
Cyan T0792
Codes
ISO Y ield
Approx. 890 pages
Approx. 435 pages
Approx. 660 pages
Approx. 335 pages
Approx. 660 pages
Approx. 1475 pages
Approx. 720 pages
Yellow T0794
Light Cyan T0795
Approx. 1070 pages
Approx. 540 pages
Approx. 1020 pages
The above page yields were based on ISO/IEC 24711 and 24712 and measured using the following colour
page test suite.
Full Product Specifications
Page 18 of 19
Page 19

Up to 40 ppm
Also avai lable
Approx. 26W (Standalone c opy in g, ISO10561 Letter Patte rn)
Windows 2000 / XP / XP-x64 / Vi sta, Mac OS 1 0.3.9 or l ater with USB
PRODUCT REVIEW KIT
Epson Stylus Photo PX800FW
Print technology
Print resolution Up to 5760 x 1440 optimised dpi on suitable medi a using RPM
Print speed
Copy speed
Scan speed
Scanning technology A4 flatbed colour image scanner
Scan resolution 4800 x 4800 dpi
Standalone functions LCD scr een 19.8 cm touch screen with integral 8.9cm LCD viewer
Pho to edi ting o ptio ns Photo Enhance Yes
Fax functions
Interface USB
Paper handling
Ink cartridges 6 individual ink cartr id ges
Electrical specification
Operating systems
Warrant y 1 year standard warranty Optional
General Dimensi ons (W xDxH) 446 x 385 x 198 mm
Software Eps on Ev ent Man ager
Printing me thod 6-colour inkjet printer, Ep son M ic ro Piezo™ print head
Nozzle confi gur ation 180 nozzles black / 180 nozzles each col our (Cyan,
Droplet siz e 1.5pl (minimum) with Advanced Variable -siz ed Dr oplet Technology
Ink sy stem Epson Claria™ Photographi c Ink
Black tex t A4
Colou r text A4
Photo 10x15 cm
Black tex t A4
Colou r text A4
Black A4 A4 1200 dpi 8.8 msec/line
Colou r A4 A4 1200 dpi 25.4 msec/line
Sensor type CIS
Suppo rted memory cards Co mpact Flas h (Memory car d on ly), MicroDrive, Memory Stick, Memory
Bluetooth® Opti onal (B luetooth adapter C12C824383)
Red-eye removal Yes
Type of Fax Black-and-whi te an d colour fax capability
Fa x speed Up to 33.6 kbps
Fa x speed dials ( max ) 60 names and numbers
Fa x resoluti on Standard (200 x 100), Fine (200 x 200), P hoto (200x200 with error
Erro r cor rectio n mode CCITU/ITU Group3 fax wit h Error Correction Mode
Page memory Up to 180 pages (ITU-T No.1 char t)
Fa x transmission speed Approx. 3 secs per page
Wi reless Wi-Fi 802.11b/g
Ethernet 10 Base-T, 100 Base-TX
Paper tray s 2
Capac ity
Media size A4, Letter, Legal, 9x13c m, 10x15cm, 13x18cm, 13x20cm, 20x25cm, A6 ,
Print mar gin
Doubl e-side d printing Optional (Auto Du plexer C12C80252 3)
Printa ble CD/DVD 8 cm, 12 cm
Automatic document feeder Supported media size and type - A4 p lai n paper
Recommended ink cartrid ges
Power consu mption
Voltage AC 220-240V
Wei ght 10 .8 kg (excludi ng ink cartridges and power cable )
Noise le vel XX dB, XX dB(A), according to ISO7779 pa tter n with Epso n Premi um
Magenta,Yellow,Light Cyan,Light M agenta
(Resolution Performance Management)
*2
Up to 40 ppm
Approx. 10 secs
Up to 39 cpm
Up to 39 cpm
Stick Duo*3, MagicGate Memory Stick, MagicGa te Memo ry Sti ck Duo*3,
Memory Stick PRO, Memory Stick PRO Duo*3, SD, SDHC, Mi niSD*3,
MiniSDHC*3, MicroSD*3, Mi croSDHC*3, Mul ti Media Card, MMCplus,
MMCmobile*3, MMCmicro*3, xD-Picture card, xD-Picture card Type- M, xD-
Picture card Type-H
diffusion)
Hi-Speed USB - compatible with the USB 2.0 spec ification
USB 2.0 High Speed port for extern al CD-R/Z IP/Mo drive (tbc)
PictBridge
Main paper tray: 120 sheets A4 plain paper (64 g/m2)
Photo paper tray: 20 sheets Eps on Premium Glossy Ph oto Pap er
A5, B5, Envelopes: No10, DL, C6, User Defined
0 mm top, l eft, right, bottom via custom settings in printe r driver
Paper thickness - 60 - 95 g/m2
Maximum su ppor t - 30 pages
6 individual in k cartridges
Black Cyan Magenta Yellow Li ght Cy an Li ght Magenta
T0801 T0802 T0803 T0804 T 080 5 T0806
T0791 T0792 T0793 T0794 T 079 5 T0796
Approx. 5.5W (sle ep mode)
ENERGY STAR® qualified printe r
extention to 3 years subject to availab ility
Glossy Photo Paper/Photo RPM mode
Epson Web-To-Pa ge
Epson Easy Photo Print
Epson Print CD
Epson Net EasyInstall
ABBYY FineReader® 6.0 Sprin t Plus (PC)
ABBYY FineReader® 5.0 Sprin t Plus (Mac)
*2
*2
*2
*2
*4
*5
*1
Recommend ed ink cartridges. Fo r full ink c artridge compatibility refer to the user docume nt ati on or vis it www.epson-europe.com
*2
For more information please vis it www.epson-europe.com
*3
Adaptor Required (not supplied in the box)
*4
USB cable required for PC/Mac use (not supplied in box)
*5
Otherw ise 3mm to p, left, rig ht, bottom
Page 19 of 19
 Loading...