

Page 1
Turn over
1 Unpack the projector
EPSON®PowerLite®TW100
Home Theater Projector
Quick Setup
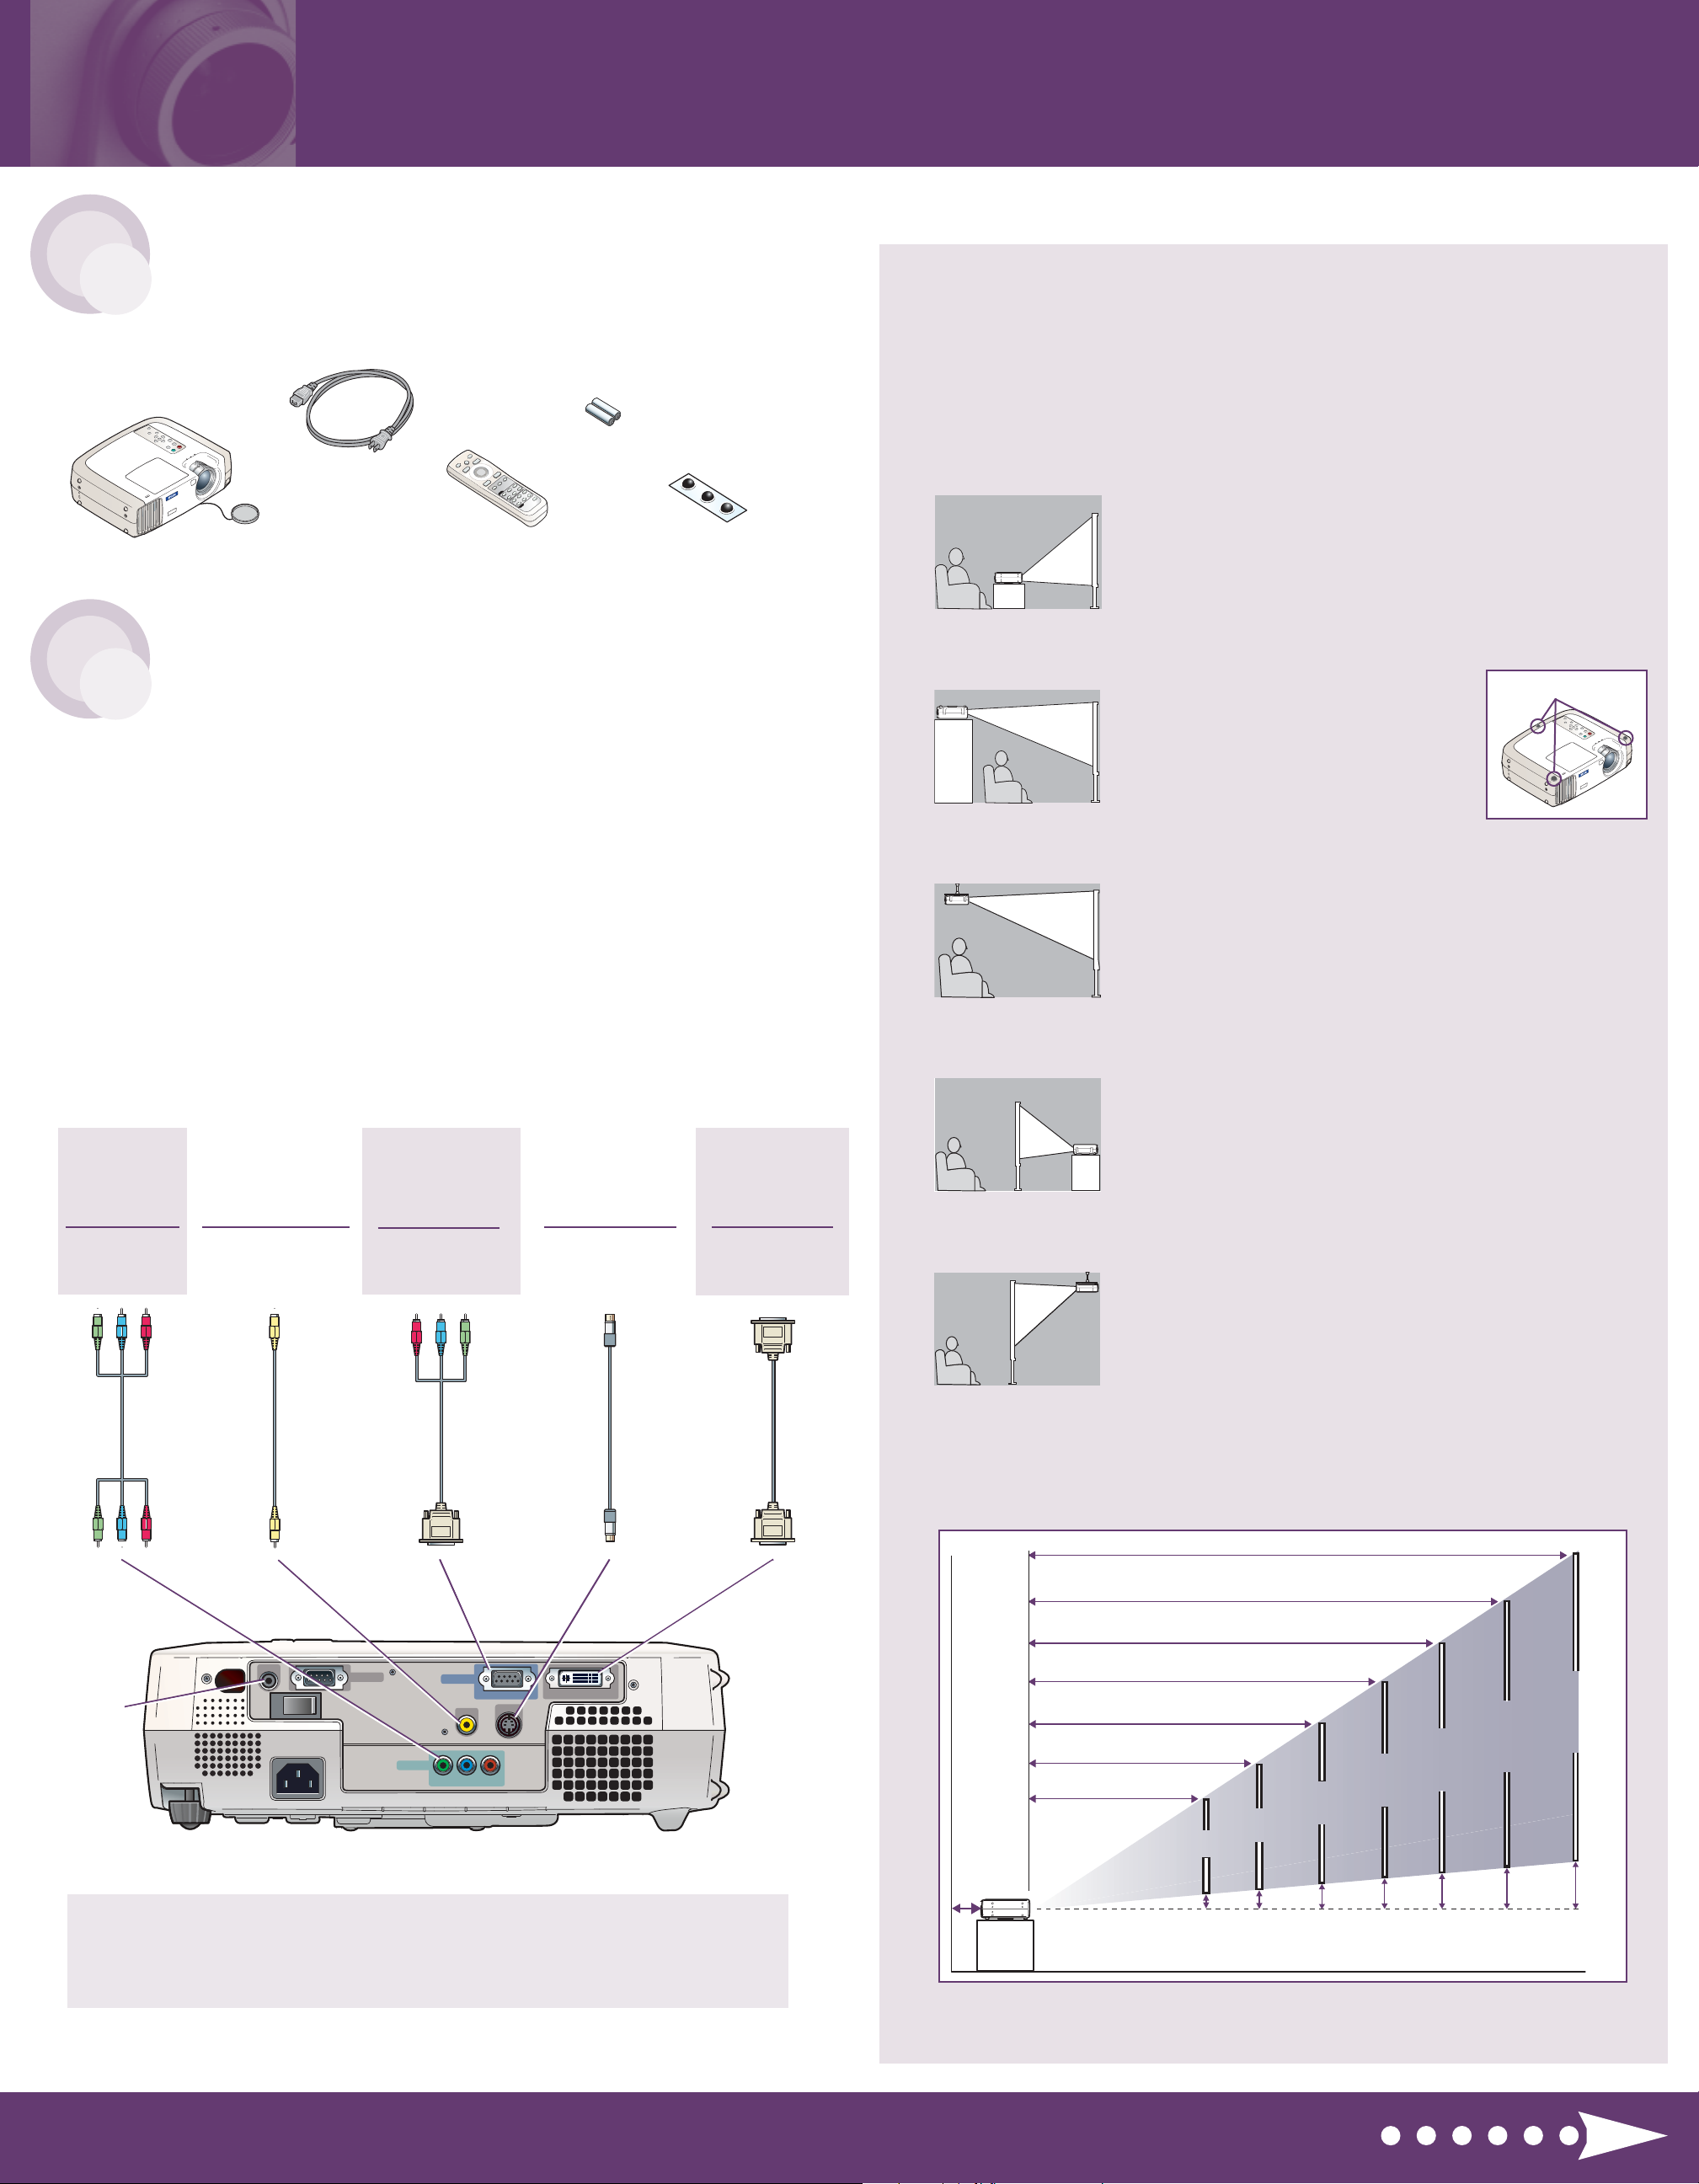
Your projector comes with the following items:
Projector
Power cord
Remote control
Batteries
Rubber feet
The projector has 5 connectors, as shown below. Each one is color-coded and requires
a different type of cable (not included). You can connect up to 5 video devices and
use the remote control to switch from one to the other.
1
Check the connectors on your video equipment. If more than one
connection is available, choose the one that provides the best quality.
For example, component video produces higher quality images than
S-video or composite video.
2
Make sure you have the right cable(s) for the connection(s) you want to use,
and the cables are long enough for your setup. If you need a cable longer
than the standard 6 to 10 feet, you may need a distribution amplifier.
3
Before you connect your equipment, make sure everything is turned off.
4
Connect your video equipment to the projector using any of the available
connections shown below.
2 Connect your video source
Choosing a location
The projector supports 5 viewing setups. Choose the best one for your home theater
environment. If you install the projector in a rear or overhead position, you’ll need
to choose the correct Projection option (identified below) from the Setting menu
after you turn it on.
Table
Convenient for temporary front projection.
Shelf
For temporary or permanent installation
on a high shelf. Attach the rubber feet
and place the projector upside-down.
Choose Front/Ceiling for the Projection
option.
Ceiling
Professional installation recommended.
Choose Front/Ceiling for the Projection option.
Rear
For permanent installation behind a translucent screen.
Choose Rear for the Projection option.
Rear/Ceiling
Professional installation behind a translucent
screen recommended. Choose Rear/Ceiling
for the Projection option.
The distance between the projector and the screen determines the size of the image.
The diagram below shows approximately how big your image will be, based on
where you set up the projector.
Attach the 3 rubber feet
TV
VCR
Camcorder
Video game console
DVD player
HDTV tuner
TV
VCR
DVD player
Camcorder
Cable/satellite box
Computer
DVD player
HDTV tuner
Note: For additional instructions on connecting a computer, see your
User’s Guide. You can also connect an optional, retractable electric
screen to the Trigger port. The screen will open when you turn on
the projector, and retract when you turn it off.
Trigger
port
RCA video cable
(composite video)
Component
video cable
S-video cable
DVI to DVI cable
or DVI to DFP cable
or DVI to VGA cable
Component video
to VGA cable or
VGA computer cable
Trig ge r
RS-232C
Input A
Input B
RGB/YCbCr/YPbPr
S-Video
Video
Y Cb/Pb Cr/Pr
A-RGB/D-RGB DVI-I
31-42'
20-28'
10-14'
Distance from projector to screen
7.9 inches
3-4'
8-11'
6-8'
4-5'
60"
40"
30"
2.6"
2"
Distance from center of lens to bottom edge of screen
4"
80"
5.4"
100"
6.7"
200"
13.5"
Screen size
(diagonal)
300"
20"
Page 2
EPSON is a registered trademark of SEIKO EPSON CORPORATION. PowerLite is a registered trademark of Epson America, Inc.
General Notice: Other product names used herein are for identification purposes only and may be trademarks of their respective owners.
EPSON disclaims any and all rights in those marks. Copyright © 2002 by Epson America, Inc. Printed in USA. 10/02
Home Theater Projector
EPSON®PowerLite®TW100
CPD-15280
You can adjust the image while viewing a video, or you can press the Pattern
button on the remote to display a test pattern. Press the Pattern button again
to display a grayscale test pattern.
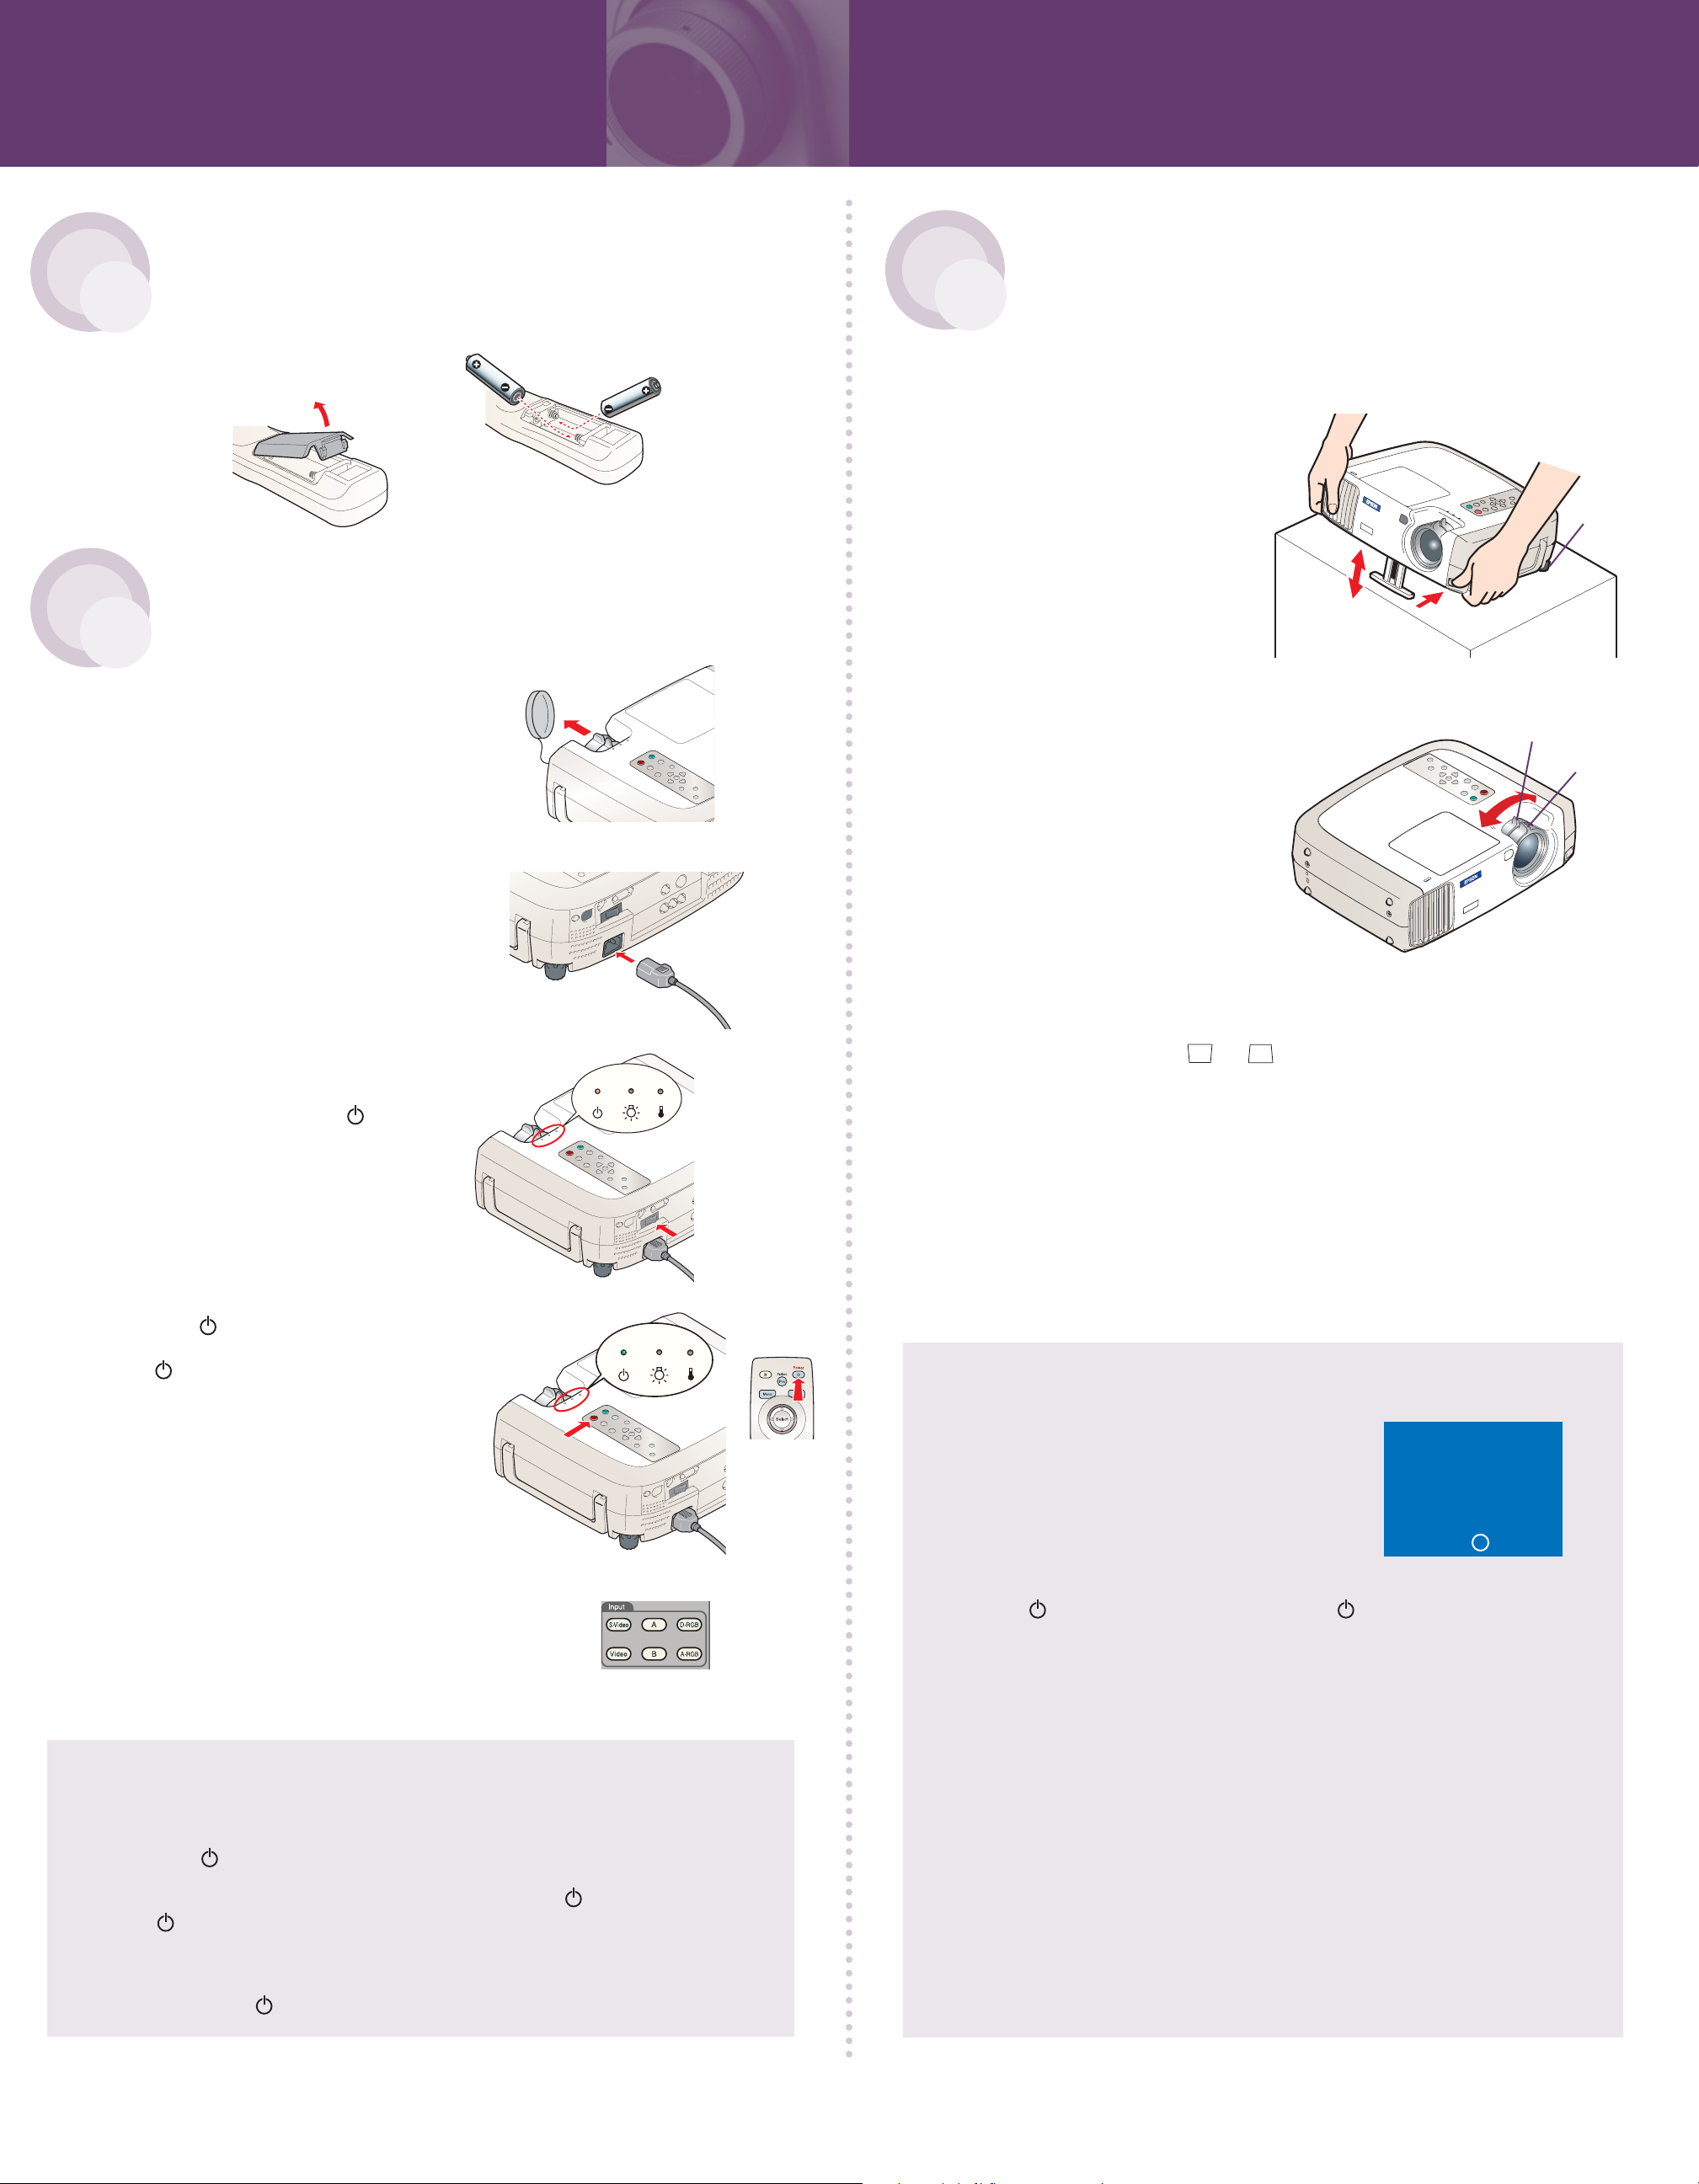
1
If you need to raise the image,
press the foot release button
and lift the front of the projector.
Release the button to lock the
foot in the position you want.
If you need to straighten the
image, rotate the round foot
at the back of the projector.
2
Rotate the focus ring to sharpen
the image.
3
Rotate the zoom ring to reduce
or enlarge the image.
4
If your image is upside-down or
reversed, you need to change the
Projection option in the Setting
menu. Press the Menu button on
the remote control and use the Select button to choose the
Setting menu. Then select the correct setting for your setup.
5
If your image looks like or , hold down the Shift button on the
projector and press the Keystone+ or Keystone – button until the image
is square. You can also use the Setting menu to make this adjustment.
6
Press the Aspect button on the remote control to cycle through the
5 available aspect ratio settings.
7
Press the Colortune button on the remote control to cycle through
the 5 available color settings.
See your User’s Guide for more information about image adjustments.
If you see a blank screen
If you see a blank screen or the No Signal or
Not Supported message, check the following:
• Make sure the lens cover is off.
• Make sure your power cord and
video cable are connected securely.
• Make sure the main power switch at the back of the projector is on.
If the power light is orange, press the Power button on either
the remote control or the projector’s control panel.
• Make sure the correct port is selected. Press the S-Video, Video,
A, B, D-RGB, or A-RGB button on the remote control to change
the image source.
• Make sure the input signal setting matches the connected source.
Use the Video Signal, Input A,orInput B commands in the Advanced
menu to select the signal format that matches the connected source.
•Try turning off your video equipment or computer and restarting it.
• If blank mode is active, press the Blank button on the remote control
to resume projection.
• If you connected a computer to the projector, it may be necessary to
change the image signal to the projector. See “Solving Problems”
in your User’s Guide.
Install the two AA batteries as shown.
3Set up the remote control
1
Remove the lens cover.
2
Connect the power cord to the
projector and plug the other end
into a grounded outlet.
3
Turn on the power switch at the
back of the projector. The power
light turns orange.
4
Turn on the other equipment
connected to the projector.
5
Press the Power button on
the projector or remote control.
The power light flashes green,
and the projector lamp comes on
in about 15 seconds.
6
Start your video. If you have connected more
than one video source, press one of the Input
buttons on the remote control to select the
one you want to watch.
See the next column to adjust the image.
Turning off the projector
1
When you’re finished using the projector, first turn off the video source.
2
Press the Power button on the projector or remote control.
3
When you see the confirmation message, press the Power button again.
The power light flashes red and then orange as the projector cools down.
When the projector has cooled, the light stays orange.
Caution: Never turn off the main power switch or unplug the projector
when the power light is green or flashing red or orange.
4 Plug in and turn on
5 Adjust the image
Back
adjustable
foot
Focus ring
Zoom ring
No signal ( ? Help
)
 Loading...