

Epson PowerLite Pro G5450WUNL, PowerLite Pro G5550NL, PowerLite Pro G5650WNL, PowerLite Pro G5750WUNL, PowerLite Pro G5950NL User Manual
Page 1

PowerLite® Pro
G5450WUNL/G5550NL/
G5650WNL/G5750WUNL/
G5950NL Multimedia Projector
User’s Guide
Page 2

Important Safety Information
WARNING: Never look into the projector lens when the lamp is turned on; the bright light can damage your eyes.
Never let children look into the lens when it is on. Never open any cover on the projector, except the lamp and
filter covers. Dangerous electrical voltages inside the projector can severely injure you. Except as specifically
explained in this User’s Guide, do not attempt to service this product yourself. Refer all servicing to qualified service
personnel.
WARNING: The projector and its accessories come packaged in plastic bags. Keep plastic bags away from small
children to avoid any risk of suffocation.
Caution: When you replace the lamp, never touch the new lamp with your bare hands; the invisible residue left by
the oil on your hands may shorten the lamp life. Use a cloth or glove to handle the new lamp.
Copyright Notice
All rights reserved. No part of this publication may be reproduced, stored in a retrieval system, or transmitted in
any form or by any means, electronic, mechanical, photocopying, recording, or otherwise, without the prior
written permission of Seiko Epson Corporation. The information contained herein is designed only for use with
this Epson product. Epson is not responsible for any use of this information as applied to other products.
Neither Seiko Epson Corporation nor its affiliates shall be liable to the purchaser of this product or third parties for
damages, losses, costs, or expenses incurred by purchaser or third parties as a result of: accident, misuse, or abuse of
this product or unauthorized modifications, repairs, or alterations to this product, or (excluding the U.S.) failure to
strictly comply with Seiko Epson Corporation’s operating and maintenance instructions.
Seiko Epson Corporation shall not be liable for any damages or problems arising from the use of any options or
any consumable products other than those designated as Original Epson Products or Epson Approved Products by
Seiko Epson Corporation.
Trademarks
Epson, Quick Corner, EasyMP, and Instant Off are registered trademarks, and Epson Exceed Your Vision is a
registered logomark of Seiko Epson Corporation.
PowerLite and PrivateLine are registered trademarks; SizeWise is a trademark; and Extra Care is a service mark of
Epson America, Inc.
Pixelworks and DNX are trademarks of Pixelworks, Inc.
HDMI and High-Definition Multimedia Interface are registered trademarks of HDMI Licensing, LLC.
This product includes RSA BSAFE™ software from RSA Security Inc. RSA is a registered trademark of RSA
Security Inc. BSAFE RSA Security Inc. is a registered trademark in the United States and other countries.
This product includes software from TOSHIBA INFORMATION SYSTEMS
CORPORATION.
is a registered trademark of TOSHIBA INFORMATION SYSTEMS CORPORATION in
Japan.
WPA™, WPA2™, and Wi-Fi Protected Setup are registered trademarks of the Wi-Fi Alliance.
2
Page 3

General Notice: Other product names used herein are for identification purposes only and may be trademarks of
their respective owners. Epson disclaims any and all rights in those marks.
This information is subject to change without notice.
© 2010 Epson America, Inc. 10/10
CPD-28144R2
3
Page 4

4
Page 5

Contents
C
Welcome . . . . . . . . . . . . . . . . . . . . . . . . . . . . . . . . . . . . . 11
Using Your Documentation . . . . . . . . . . . . . . . . . . . . . . . . . 13
Getting More Information . . . . . . . . . . . . . . . . . . . . . . . 13
Registration and Warranty . . . . . . . . . . . . . . . . . . . . . . . . . . 14
Optional Accessories. . . . . . . . . . . . . . . . . . . . . . . . . . . . . . . 15
Setting Up the Projector . . . . . . . . . . . . . . . . . . . . . 17
1
Unpacking the Projector. . . . . . . . . . . . . . . . . . . . . . . . . . . . 18
Additional Components. . . . . . . . . . . . . . . . . . . . . . . . . 18
Positioning the Projector . . . . . . . . . . . . . . . . . . . . . . . . . . . 19
Connecting to a Computer. . . . . . . . . . . . . . . . . . . . . . . . . . 30
Connecting to the DVI-D Port (G5450WUNL/
G5750WUNL only) . . . . . . . . . . . . . . . . . . . . . . 31
Connecting a DVI-D Source to the HDMI Port . . . . . . 32
Connecting to the HDMI Port . . . . . . . . . . . . . . . . . . . 33
Connecting to the Computer Port . . . . . . . . . . . . . . . . . 34
Connecting to the BNC Connectors . . . . . . . . . . . . . . . 35
Connecting to Video Equipment . . . . . . . . . . . . . . . . . . . . . 36
Connecting an HDMI Video Source . . . . . . . . . . . . . . . 37
Connecting a DVI-D Video Source to the DVI-D Port
(G5450WUNL/G5750WUNL only) . . . . . . . . . 38
Connecting a DVI-D Video Source to the HDMI Port . 39
Connecting a Composite Video Source . . . . . . . . . . . . . 40
Connecting an S-Video Source . . . . . . . . . . . . . . . . . . . 41
Connecting a Component Video Source . . . . . . . . . . . . 42
Connecting an RGB Video Source. . . . . . . . . . . . . . . . . 43
Connecting an External Monitor . . . . . . . . . . . . . . . . . . . . . 45
Playing Sound Through the Projector. . . . . . . . . . . . . . . . . . 46
Connecting External Speakers . . . . . . . . . . . . . . . . . . . . 49
5
Page 6

2
3
Connecting to a Digital Camera or Other USB Device . . . . 50
Removing the USB Device or Cable . . . . . . . . . . . . . . . 51
Turning the Projector On and Off . . . . . . . . . . . . . . . . . . . . 51
Using the Direct Power On Function . . . . . . . . . . . . . . 53
Shutting Down the Projector . . . . . . . . . . . . . . . . . . . . . 54
Displaying and Adjusting the Image . . . . . . . . 55
Displaying an Image. . . . . . . . . . . . . . . . . . . . . . . . . . . . . . . 56
Adjusting the Image . . . . . . . . . . . . . . . . . . . . . . . . . . . . . . . 56
Adjusting the Position of the Image . . . . . . . . . . . . . . . . 57
Focusing and Zooming the Image . . . . . . . . . . . . . . . . . 58
Adjusting the Image Shape. . . . . . . . . . . . . . . . . . . . . . . 58
Selecting the Color Mode . . . . . . . . . . . . . . . . . . . . . . . 60
Resizing Video Images . . . . . . . . . . . . . . . . . . . . . . . . . . 61
Projecting Two Images Simultaneously . . . . . . . . . . . . . . . . 62
Presenting With the Remote Control. . . . . . . . 65
Using the Remote Control . . . . . . . . . . . . . . . . . . . . . . . . . . 66
Controlling the Picture and Sound. . . . . . . . . . . . . . . . . . . . 66
Switching Between Picture Sources . . . . . . . . . . . . . . . . 66
Turning Off the Picture and Sound. . . . . . . . . . . . . . . . 67
Stopping Action. . . . . . . . . . . . . . . . . . . . . . . . . . . . . . . 67
Zooming Part of Your Image . . . . . . . . . . . . . . . . . . . . . 68
Controlling the Volume. . . . . . . . . . . . . . . . . . . . . . . . . 68
Highlighting Your Presentation . . . . . . . . . . . . . . . . . . . . . . 69
Using the Pointer Tool . . . . . . . . . . . . . . . . . . . . . . . . . 69
Choosing a Different Pointer Shape. . . . . . . . . . . . . . . . 69
Operating Your Computer With the Remote Control . . . . . 70
Operating Two or More Projectors With
the Remote Control . . . . . . . . . . . . . . . . . . . . . . . . . . 71
Setting the Projector ID. . . . . . . . . . . . . . . . . . . . . . . . . 71
Checking the Projector ID. . . . . . . . . . . . . . . . . . . . . . . 72
Setting the Remote Control ID . . . . . . . . . . . . . . . . . . . 72
Using the Projector on a Network. . . . . . . . . . . 75
4
6
Connecting to a Wired Network . . . . . . . . . . . . . . . . . . . . . 76
Installing the Optional Wireless 802.11g/b/a Module . . . . . 78
Page 7

Using Quick Wireless Connection . . . . . . . . . . . . . . . . . . . . 79
Configuring Basic Settings . . . . . . . . . . . . . . . . . . . . . . . . . . 80
Configuring a Wireless Connection . . . . . . . . . . . . . . . . . . . 81
Configuring the Projector . . . . . . . . . . . . . . . . . . . . . . . 82
Selecting Wireless Network Settings in Windows. . . . . . 84
Selecting Wireless Network Settings in Mac OS. . . . . . . 85
Making a WPS (Wi-Fi Protected Setup) Connection . . . 85
Using Wireless Security Options. . . . . . . . . . . . . . . . . . . . . . 90
Enabling WEP Encryption. . . . . . . . . . . . . . . . . . . . . . . 91
Enabling WPA Security . . . . . . . . . . . . . . . . . . . . . . . . . 93
Enabling EAP, LEAP, or PEAP Authentication . . . . . . . 94
Enabling EAP-TLS Certificate Validation . . . . . . . . . . . 95
Enabling Data Encryption from EasyMP
Network Projection . . . . . . . . . . . . . . . . . . . . . . . 96
Using the EasyMP Network Projection Software . . . . . . . . . 96
Removing the Wireless 802.11g/b/a Module . . . . . . . . . . . . 97
Using Projector E-mail Alerts . . . . . . . . . . . . . . . . . . . . . . . . 98
Using SNMP to Monitor the Projector. . . . . . . . . . . . . . . . 100
Using a Browser to Control the Projector . . . . . . . . . . . . . . 101
Using Web Remote Control. . . . . . . . . . . . . . . . . . . . . 102
Using Crestron RoomView to Monitor and Control
the Projector . . . . . . . . . . . . . . . . . . . . . . . . . . . . . . . 104
Setting up the Projector . . . . . . . . . . . . . . . . . . . . . . . . 104
Using a Browser to Control the Projector. . . . . . . . . . . 105
5
Fine-Tuning the Projector. . . . . . . . . . . . . . . . . . 111
Using the Menu System . . . . . . . . . . . . . . . . . . . . . . . . . . . 112
Restoring the Default Settings . . . . . . . . . . . . . . . . . . . 113
Adjusting the Image . . . . . . . . . . . . . . . . . . . . . . . . . . . . . . 114
Six-Axis Color Adjustment. . . . . . . . . . . . . . . . . . . . . . 115
Adjusting Signal Settings . . . . . . . . . . . . . . . . . . . . . . . . . . 116
Customizing Projector Features . . . . . . . . . . . . . . . . . . . . . 119
Using the Projector Security Features . . . . . . . . . . . . . . . . . 121
Enabling Password Protection . . . . . . . . . . . . . . . . . . . 121
Creating Your Own Startup Screen . . . . . . . . . . . . . . . 123
Disabling the Projector’s Buttons . . . . . . . . . . . . . . . . . 125
Customizing Power and Operation. . . . . . . . . . . . . . . . . . . 126
Multi-screen Color Adjustment . . . . . . . . . . . . . . . . . . . . . 128
7
Page 8

6
7
Projector Menu and Options List. . . . . . . . . . . . . . . . . . . . 129
Maintaining the Projector. . . . . . . . . . . . . . . . . . 133
Cleaning the Lens. . . . . . . . . . . . . . . . . . . . . . . . . . . . . . . . 134
Cleaning the Projector Case . . . . . . . . . . . . . . . . . . . . . . . . 134
Cleaning the Air Filter . . . . . . . . . . . . . . . . . . . . . . . . . . . . 134
Replacing the Air Filter . . . . . . . . . . . . . . . . . . . . . . . . . . . 137
Replacing the Lamp . . . . . . . . . . . . . . . . . . . . . . . . . . . . . . 138
Resetting the Lamp Timer . . . . . . . . . . . . . . . . . . . . . . 141
Checking Lamp Usage . . . . . . . . . . . . . . . . . . . . . . . . . 142
Replacing the Batteries . . . . . . . . . . . . . . . . . . . . . . . . . . . . 142
Transporting the Projector . . . . . . . . . . . . . . . . . . . . . . . . . 143
Solving Problems . . . . . . . . . . . . . . . . . . . . . . . . . . . 145
Using On-Screen Help . . . . . . . . . . . . . . . . . . . . . . . . . . . . 146
Checking Projector Status . . . . . . . . . . . . . . . . . . . . . . . . . 147
What To Do When the Lights Flash . . . . . . . . . . . . . . 147
Solving Projector Operation Problems . . . . . . . . . . . . . . . . 149
Solving Problems With the Image or Sound. . . . . . . . . . . . 150
Solving Network Problems. . . . . . . . . . . . . . . . . . . . . . . . . 157
Solving Problems With the Remote Control . . . . . . . . . . . 160
Where to Get Help. . . . . . . . . . . . . . . . . . . . . . . . . . . . . . . 161
Internet Support . . . . . . . . . . . . . . . . . . . . . . . . . . . . . 161
Speak to a Support Representative . . . . . . . . . . . . . . . . 161
Purchase Supplies and Accessories . . . . . . . . . . . . . . . . 162
Projector Installation . . . . . . . . . . . . . . . . . . . . . . . 163
A
8
Installation Guidelines . . . . . . . . . . . . . . . . . . . . . . . . . . . . 163
Security Features . . . . . . . . . . . . . . . . . . . . . . . . . . . . . . . . 164
Installing and Removing the Cable Cover . . . . . . . . . . . . . 165
Installing and Removing the Lens. . . . . . . . . . . . . . . . . . . . 166
Installing the Lens . . . . . . . . . . . . . . . . . . . . . . . . . . . . 166
Removing the Lens . . . . . . . . . . . . . . . . . . . . . . . . . . . 167
Page 9

B
C
Technical Specifications . . . . . . . . . . . . . . . . . . . . 169
Notices . . . . . . . . . . . . . . . . . . . . . . . . . . . . . . . . . . . . . . 179
Important Safety Instructions . . . . . . . . . . . . . . . . . . . . . . . 179
FCC Compliance Statement. . . . . . . . . . . . . . . . . . . . . . . . 183
Software Copyright. . . . . . . . . . . . . . . . . . . . . . . . . . . . . . . 184
Index. . . . . . . . . . . . . . . . . . . . . . . . . . . . . . . . . . . . . . . . 211
9
Page 10

10
Page 11

-
Welcome
W
The PowerLite
G5750WUNL/G5950NL is an easy-to-use, lightweight projector. It
offers up to 4000 lumens (G5450WUNL), 4500 lumens
(G5550NL/G5650WNL/G5750WUNL), or 5200 lumens
(G5950NL) of brightness, and provides a native XGA
(G5550NL/G5950NL), WXGA (G5650WNL), or WUXGA
(G5450WUNL/G5750WUNL) resolution. You can connect it to a
wide range of computers and video sources. You can project from a
USB storage device, or over a wired network. With the optional
Wireless 802.11g/b/a Module, you can also project over an 802.11g,
802.11b, or 802.11a wireless network.
Your projector offers these easy setup, control, and security features:
■ Manual horizontal and vertical lens shift
®
Pro G5450WUNL/G5550NL/G5650WNL/
■ Centered lens design
■ Instant Off
■ Quick Corner
■ Optical zoom lens for flexible placement and positioning (lens not
included)
■ 5 optional bayonet lenses
■ One-touch filter replacement
■ Side-loading easy lamp access
■ Security features include password, user’s logo, the ability to lock
the projector buttons, a security cable attachment (cable not
included), a slot for an optional Kensington
lens theft deterrent screw
®
feature for fast setup and shut down
®
for easy image shape/size adjustment
®
security lock, and a
11
Page 12

Additional enhancements:
■ Crestron RoomView
■ A Message Broadcasting plug-in that allows you to project timely
®
compatibility
alerts and messages to all networked projectors (to download both
the plug-in and its instructions, visit Epson’s support website at
www.epson.com/support (U.S.) or www.epson.ca/support
(Canada) and select your product).
■ Closed captioning for the hearing impaired
■ HDMI for digital connectivity (HDCP compatible)
■ DVI-D for digital connectivity (G5450WUNL/G5750WUNL
only, HDCP compatible)
■ 2000:1 (G5650WNL/G5950NL), 1500:1 (G5750WUNL), or
1000:1 (G5450WUNL/G5550NL) contrast ratio
■ Color match images from two or more projectors for a uniform,
wide-screen view
■ When you present with PowerPoint
®
, project only the slide
images while viewing handout notes and controls on the
computer screen
note
The projector is not a
medical device and cannot
be used for medical
diagnosis.
12 Welcome
■ Perform six-axis color adjustment for fine art and photography
■ Project two images simultaneously using the projector’s split
screen feature
■ Project images from different networked computers
simultaneously using the EasyMP Multi PC Projection software
■ Project X-ray photographs and other medical images using
DICOM SIM Color Mode
■ Choose between four different test patterns to use when adjusting
the projector image
Page 13

Using Your Documentation
Please follow these guidelines as you read through this manual:
■ Warnings must be followed carefully to avoid bodily injury.
■ Cautions must be observed to avoid damage to your equipment.
■ Notes contain important information about your projector.
■ Tips contain additional projection hints.
Getting More Information
Need tips on giving presentations? Quick steps for setting up your
projector? Here’s where you can look for help:
■ Quick Reference card
Provides information for connecting the projector to your
equipment, displaying and adjusting the image, using the remote
control, and solving display problems.
■ EasyMP Network Projection Operation Guide
Provides detailed instructions on using your projector in a
network environment (installed along with this manual from the
projector CD). To set up your projector for the first time on a
network, see page 75 of this User’s Guide.
note
In some cases, the
illustrations in this guide
may not exactly match your
projector.
■ EasyMP Multi PC Projection Operation Guide
Provides instructions on using the EasyMP Multi PC Projection
software to simultaneously display images from different
networked computers (installed along with this manual from the
projector CD).
■ EasyMP Monitor Operation Guide
Provides instructions on using the EasyMP Monitor software
(available for Windows only) to manage projectors on a network.
To view the guide, double-click the icon on your computer's
desktop. To download the software, double-click the
EasyMP Monitor
icon on your computer’s desktop.
Download
Welcome 13
Page 14

■ PC Free Operation Guide
Provides instructions on projecting files from a USB storage
device or digital camera that is connected to the projector
(installed along with this manual from the projector CD).
■ EasyMP Slide Converter Operation Guide
Provides instructions on using the EasyMP Slide Converter
software to convert and transfer presentations to a USB storage
device so that you can present without using a computer (installed
along with this manual from the projector CD).
■ Built-in help system
Provides assistance for common problems. Available from the
Help button on the projector or the remote control. See page 146
for details.
■ epson.com/support (U.S.) or epson.ca/support (Canada)
Download FAQs and e-mail your questions to Epson support.
■ PrivateLine
®
support
If you still need help after checking this User’s Guide and the
sources listed in this section, you can use the Epson PrivateLine
Support service to get help fast. Call (800) 637-7661 and enter
the PIN on the PrivateLine card. See page 161 for more
information.
14 Welcome
Registration and Warranty
Your projector comes with a basic warranty that lets you project with
confidence. For details, see the warranty brochure included with your
projector.
In addition, Epson offers free Extra Care
unlikely event of an equipment failure, you won’t have to wait for
your unit to be repaired. Instead, Epson will ship you a replacement
unit anywhere in the United States, Canada, or Puerto Rico. See the
brochure included with your projector for details.
Register online using your projector CD or at epson.com/webreg
Registering also lets you receive special updates on new accessories,
products, and services.
SM
Road Service. In the
.
Page 15
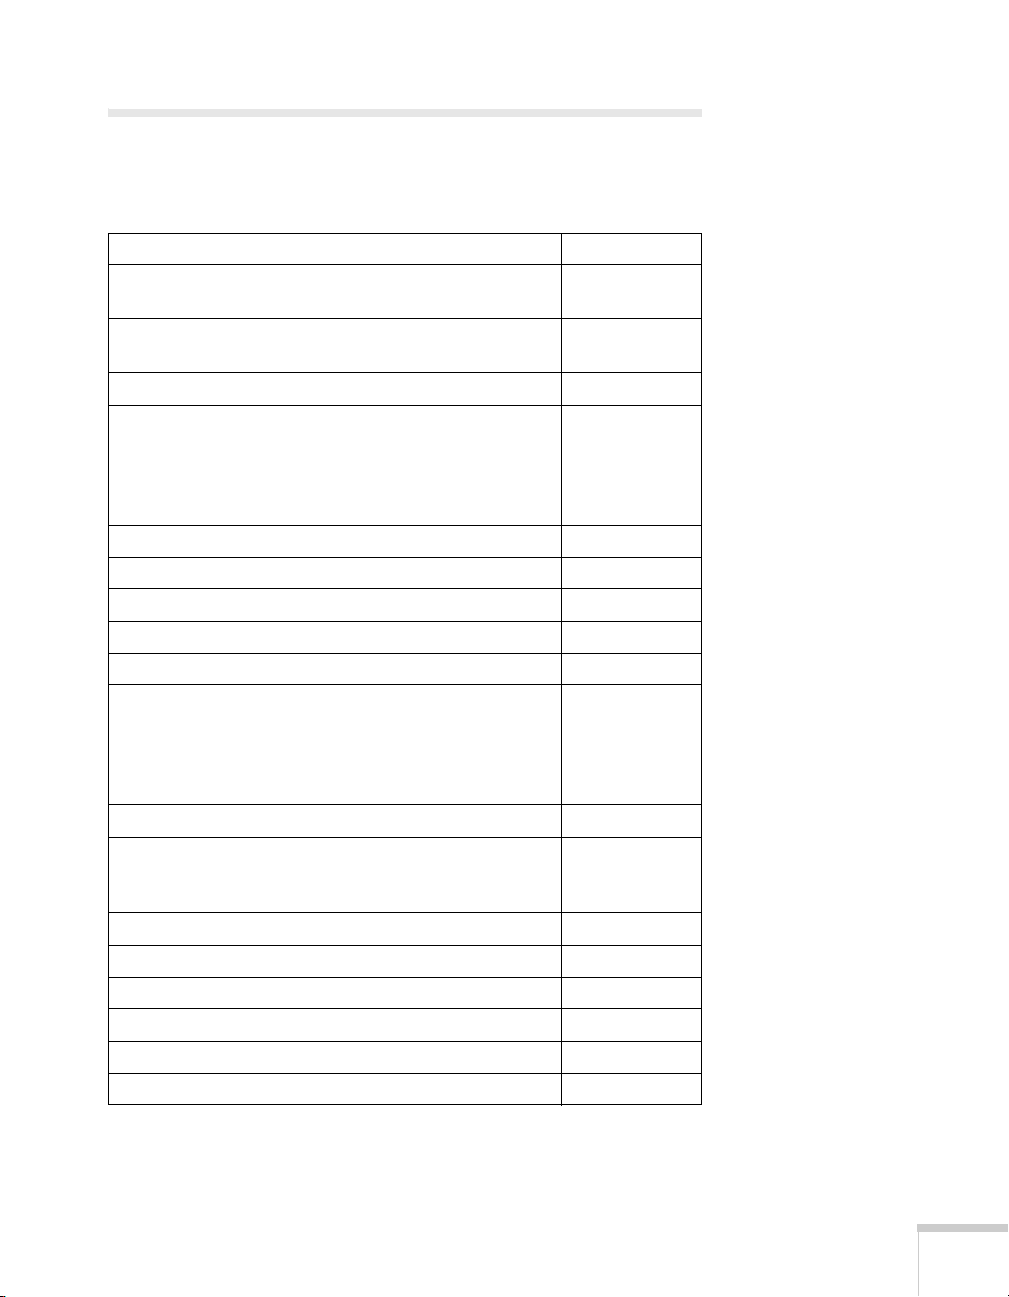
Optional Accessories
To enhance your use of the projector, Epson offers the following
optional accessories:
Product Part number
Replacement lamp for PowerLite Pro
G5450WUNL/G5550NL
Replacement lamp for PowerLite Pro
G5650WNL/G5750WUNL/G5950NL
Replacement air filter V13H134A17
Standard Zoom Lens <1.64 - 2.5>
Middle Throw Zoom Lens 1 <1.83 - 2.45>
Middle Throw Zoom Lens 2 <1.83 - 2.53>
Long Throw Zoom Lens <1.84 - 2.32>
Rear Projection Wide Lens <2.03>
Wireless 802.11g/b/a Module V12H306P11
Quick Connect Wireless Key ELPAP08
Wireless IR Mouse Receiver for Remote Control V12H007T16
Hardwire Remote Control Cable Set V12H005C28
Replacement remote control 1531179
Advanced projector ceiling mount with precision gear
Adjustable suspended ceiling channel kit
False ceiling plate kit
Structural round ceiling plate
Adjustable extension column (pipe) 8”–11”
®
Kensington
ES3000 Ultra Portable Projector Screen
50-inch portable screen (4:3 aspect ratio)
DUET™ portable projector screen
Component-to-VGA video cable ELPKC19
Distribution amplifier ELPDA01
DC-10s document camera ELPDC10S
1-Year Extended Depot Repair Service Plan EPPFTPB1
1-Year Extended Exchange Warranty EPPEXPB1
2-Year Extended Depot Repair Service Plan EPPFTPB2
MicroSaver®security lock ELPSL01
V13H010L62
V13H010L63
V12H004S05
V12H004M04
V12H004M05
V12H004L06
V12H004R03
ELPMBPRG
ELPMBP01
ELPMBP02
ELPMBP03
ELPMBC01
V12H002S3Y
ELPSC06
ELPSC80
Welcome 15
Page 16

You can purchase screens or other accessories from an Epson
authorized reseller. To find the nearest reseller, call 800-GO-EPSON
(800-463-7766). Or you can purchase online at www.epsonstore.com
(U.S. sales) or www.epson.ca
(Canadian sales).
16 Welcome
Page 17

1
1
Setting Up the Projector
This chapter tells you how to unpack the projector and connect it to
a notebook or desktop computer, to video equipment, such as a
Blu-ray Disc
game console, camcorder, or digital camera, and/or to your local area
network.
You can also connect the projector to a USB storage device or digital
camera.
Follow the instructions in this chapter on:
■ Unpacking the projector
■ Positioning the projector
■ Connecting to a computer
■ Connecting to video equipment
■ Connecting an external monitor
■ Playing sound through the projector
■ Connecting to a digital camera or other USB device
™
/DVD player, digital tuner, cable or satellite box, video
■ Turning the projector on and off
17
Page 18
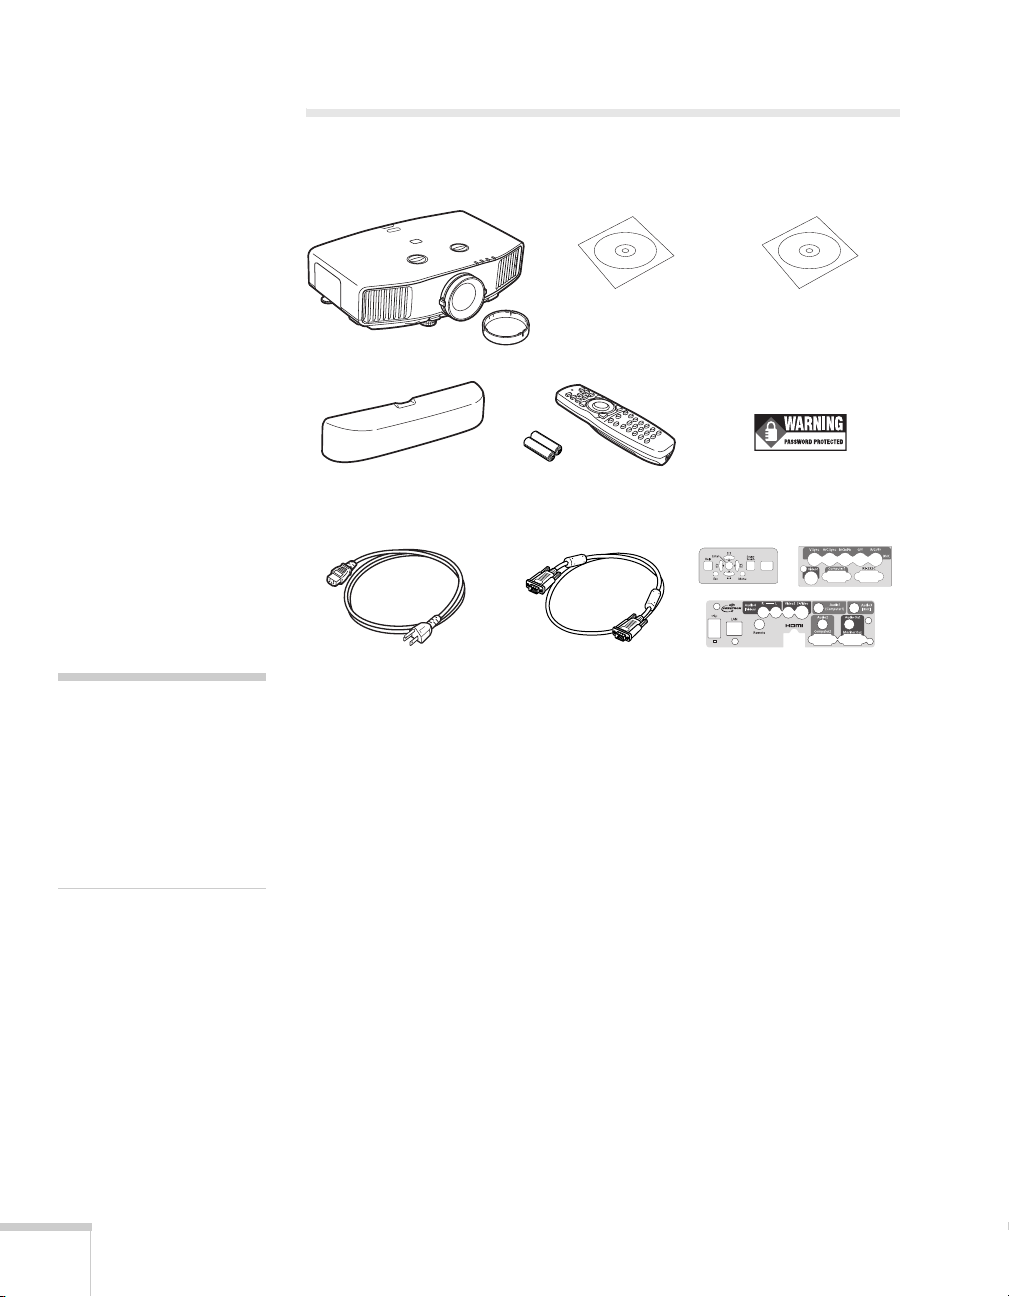
Unpacking the Projector
After unpacking the projector, make sure you have all these parts:
note
If you mount the projector
on the ceiling, the interface
and button names on the
projector will appear upside
down. Attach the interface
label stickers so that you can
more easily read the names.
Projector and lens cap
Cable cover
Power cord
PDF manuals and
registration CD-ROM
Remote control and
2 AA batteries
VGA computer cable
Projector software
CD-ROM
Password Protected
sticker
Interface label stickers
Save all packaging in case you need to ship the projector. Always use
the original packaging (or the equivalent) when you need to send the
projector to another location. If you are moving the projector by
hand, use the projector handle. See page 143 for transportation
instructions.
18 Setting Up the Projector
Additional Components
Depending on how you plan to use the projector, you may need
additional components:
■ To receive an HDMI signal from your video device, you’ll need
an HDMI cable. One may be provided with your video
equipment.
■ To receive a DVI-D video signal from your video device, you’ll
need a DVI cable (G5450WUNL/G5750WUNL only) or
DVI/HDMI conversion cable.
Page 19
■ To receive a component video signal from your video device,
you’ll need a component video cable. One may be provided with
your video equipment.
■ To receive an RGB or component video signal from a video
device that has RGB or component (PrPbY or CrCbY)
connectors, you’ll need a BNC-type video cable. One may be
provided with your video equipment.
■ To receive an S-Video signal, you’ll need an S-Video cable. One
may be provided with your video equipment.
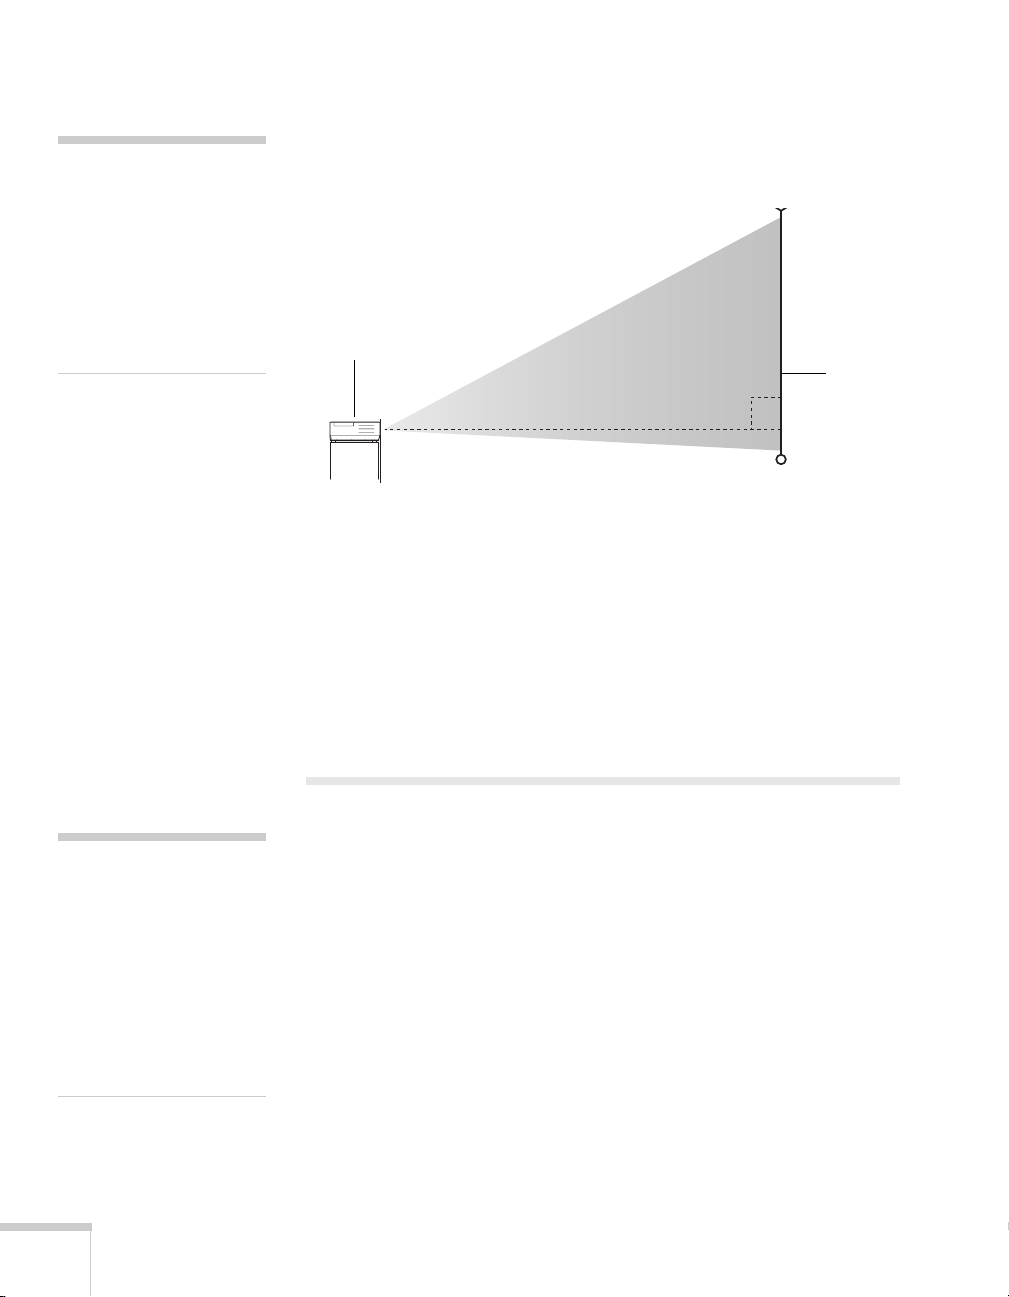
Positioning the Projector
If the projector isn’t already installed in the room you’re using, you’ll
probably want to place it on a table in front of the screen. This lets
you stand in the front of the room, face the audience, and remain
close enough to the equipment to be able to control it. Try to leave as
much space as possible between the projector and the screen to get a
good-size image.
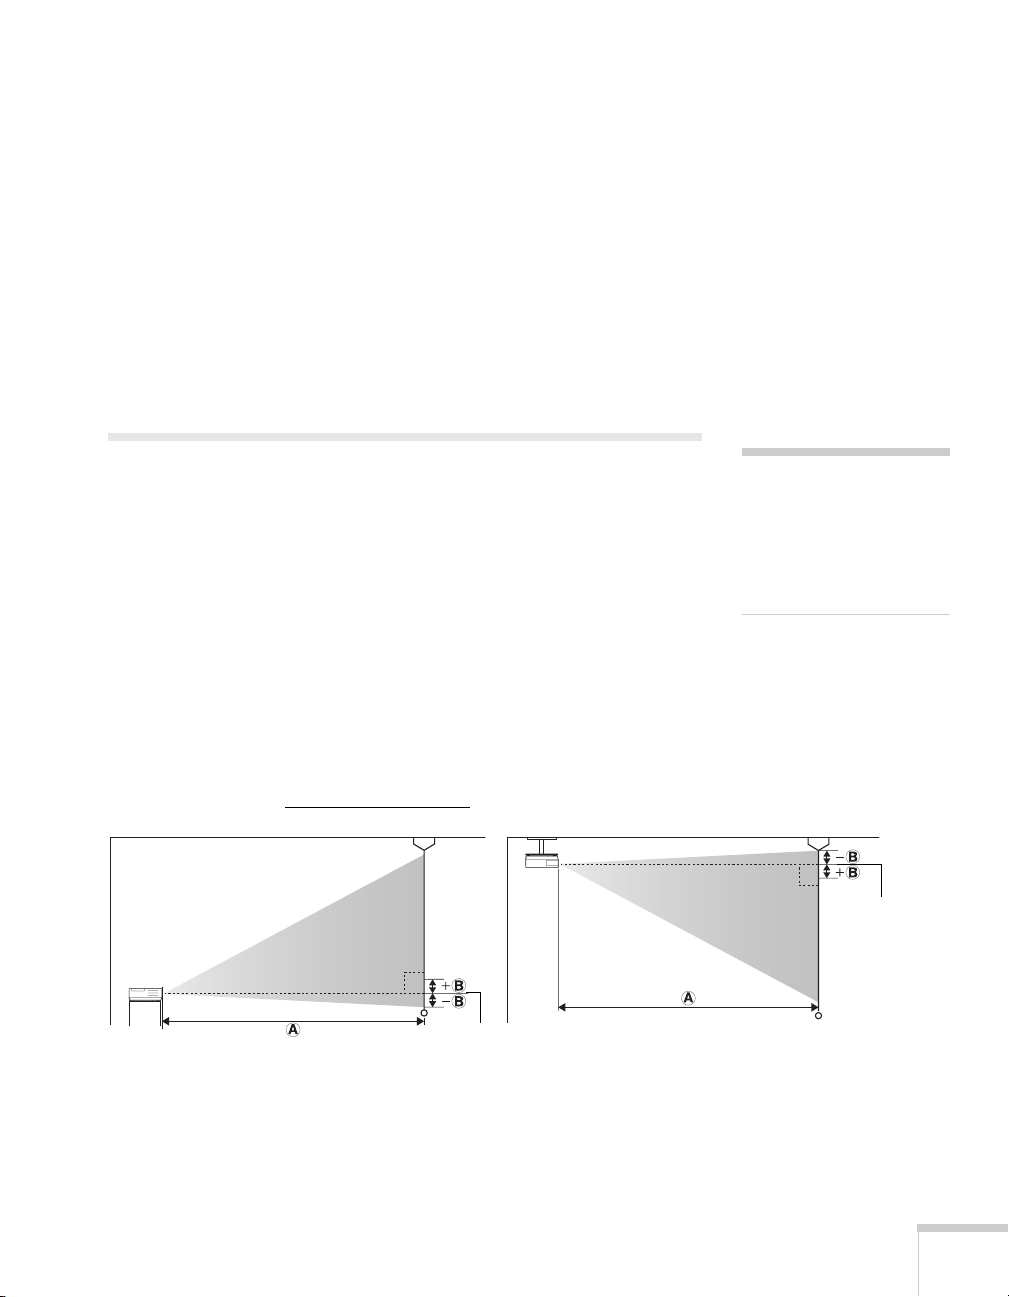
Use the illustrations and tables below to help you determine
placement. Image size increases with distance, but can vary depending
on which lens you’re using and whether you’ve adjusted the image
with vertical lens shift, zoom, or any other settings.
You can also use the Image Size Calculator
on the Epson website.
note
You can mount the projector
on the ceiling, or place it
behind a translucent screen
for rear projection. See
page 163 for details.
Center of
lens
Center of
lens
Setting Up the Projector 19
Page 20
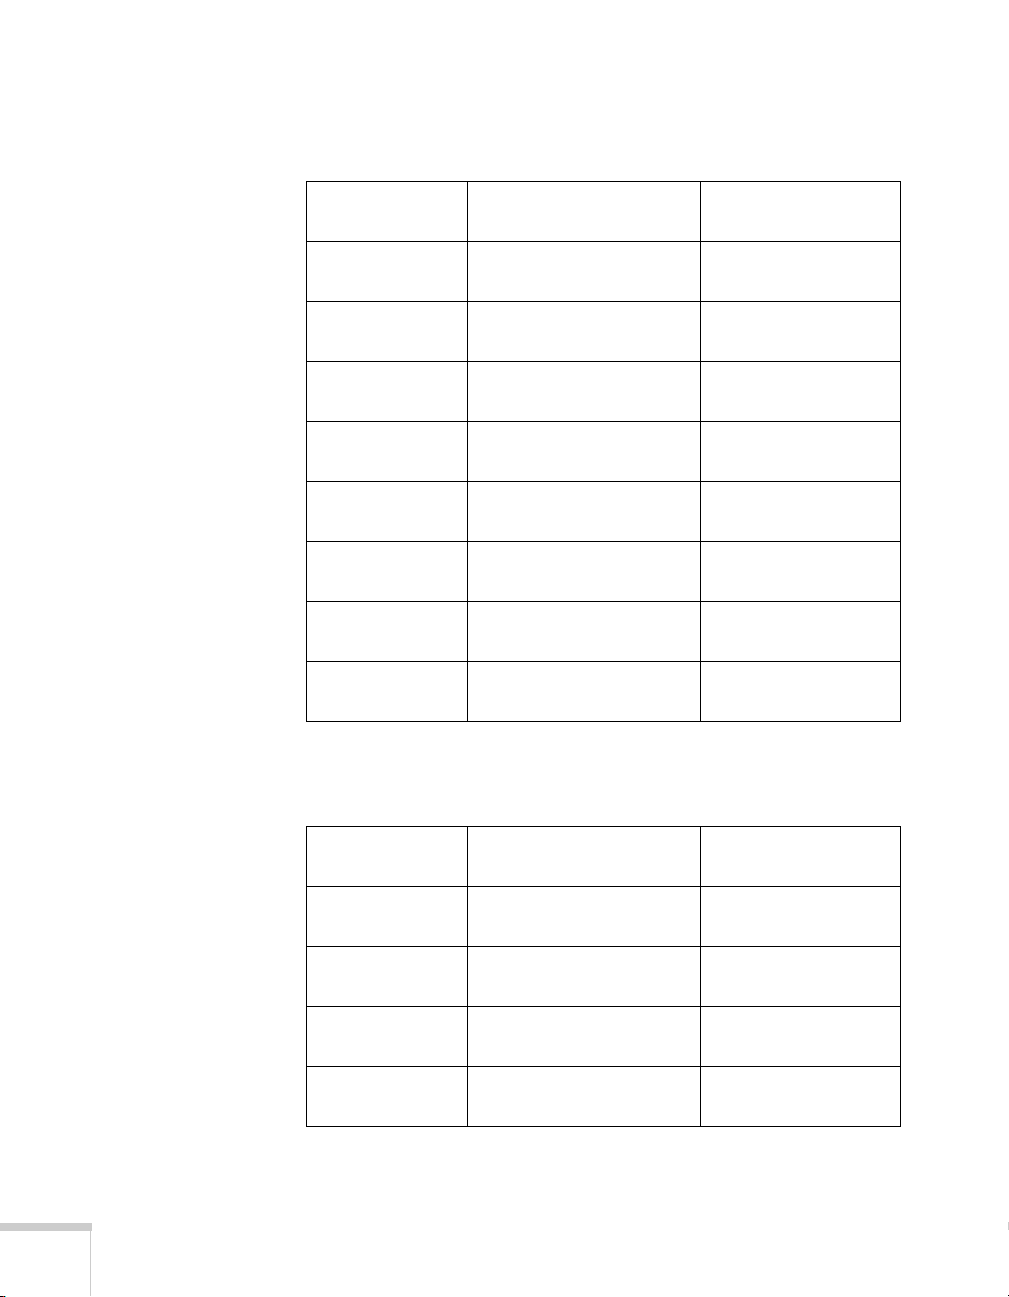
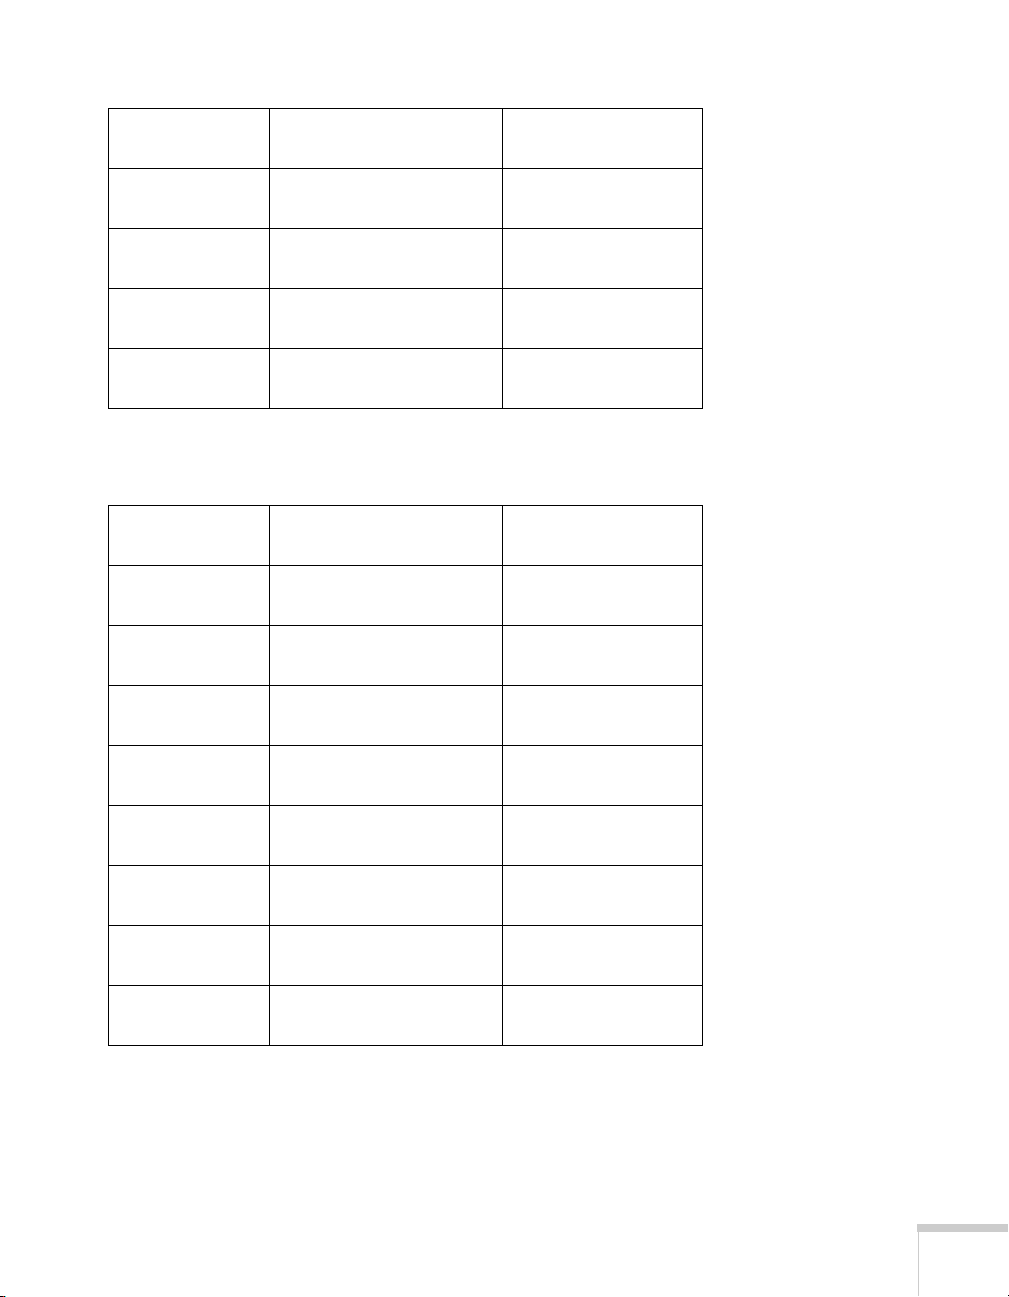
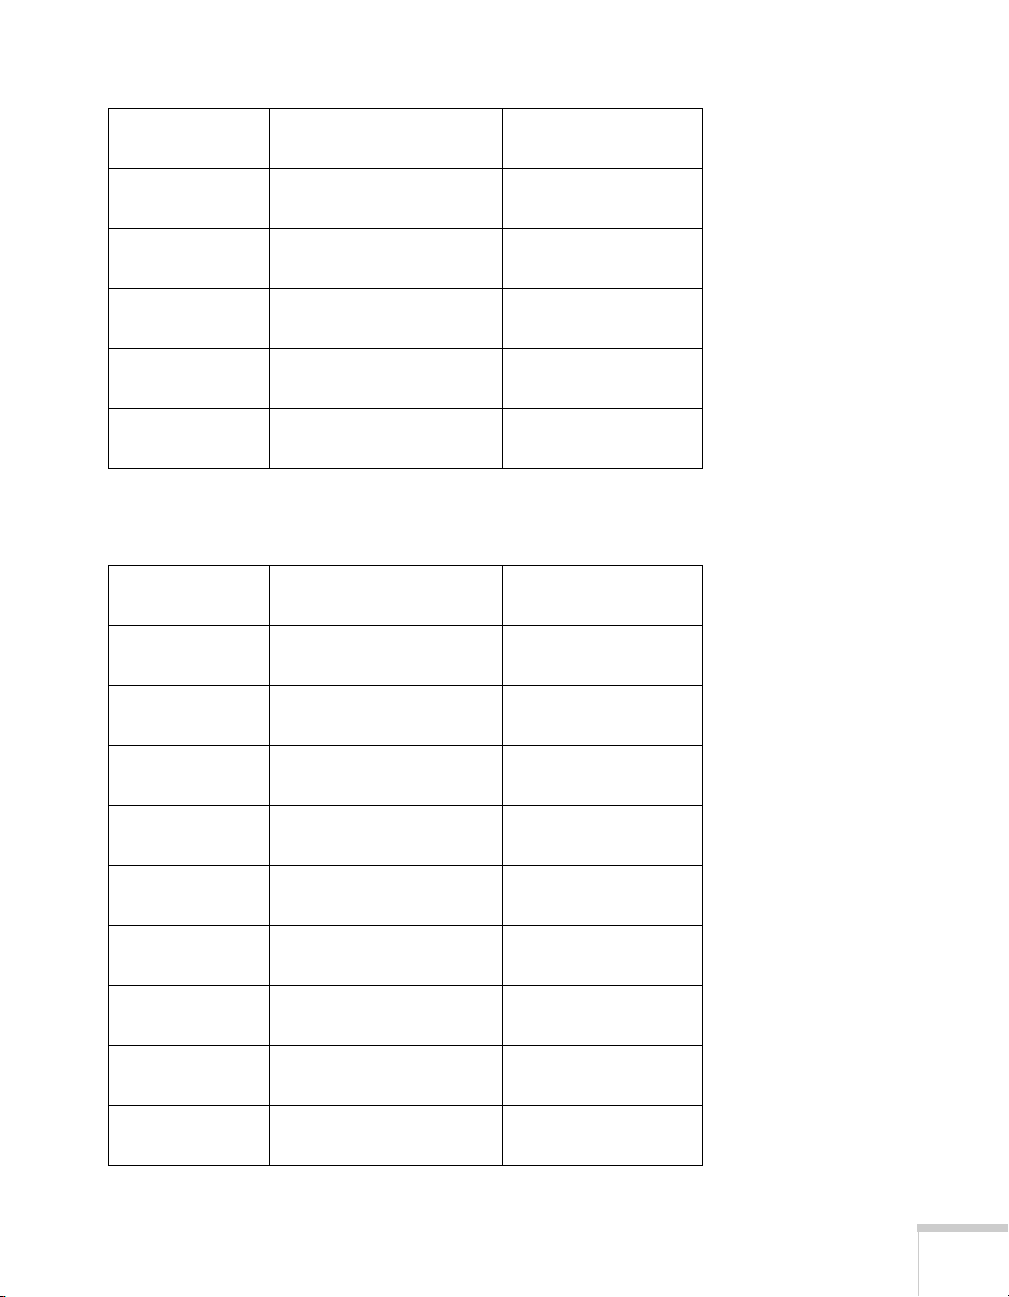
PowerLite Pro G5450WUNL/G5750WUNL, 16:10 image,
Standard zoom lens (part number V12H004S05)
Projection distance (A)
Screen size
Wide to Tele Offset (B)
50 inches 53 to 97 inches
(136 to 246 cm)
60 inches 64 to 117 inches
(164 to 296 cm)
80 inches 87 to 156 inches
(220 to 397 cm)
100 inches 109 to 196 inches
(276 to 497 cm)
150 inches 164 to 294 inches
(417 to 747 cm)
200 inches 219 to 393 inches
(557 to 998 cm)
250 inches 275 to 491 inches
(698 to 1248 cm)
300 inches 330 to 590 inches
(838 to 1499 cm)
-2.2 to 28.7 inches
(-6 to 73 cm)
-2.7 to 34.5 inches
(-7 to 88 cm)
-3.5 to 45.9 inches
(-9 to 117 cm)
-4.4 to 57.4 inches
(-11 to 146 cm)
-6.6 to 86.1 inches
(-17 to 219 cm)
-8.9 to 114.9 inches
(-22 to 292 cm)
-11.1 to 143.6 inches
(-28 to 365 cm)
-13.3 to 172.3 inches
(-34 to 438 cm)
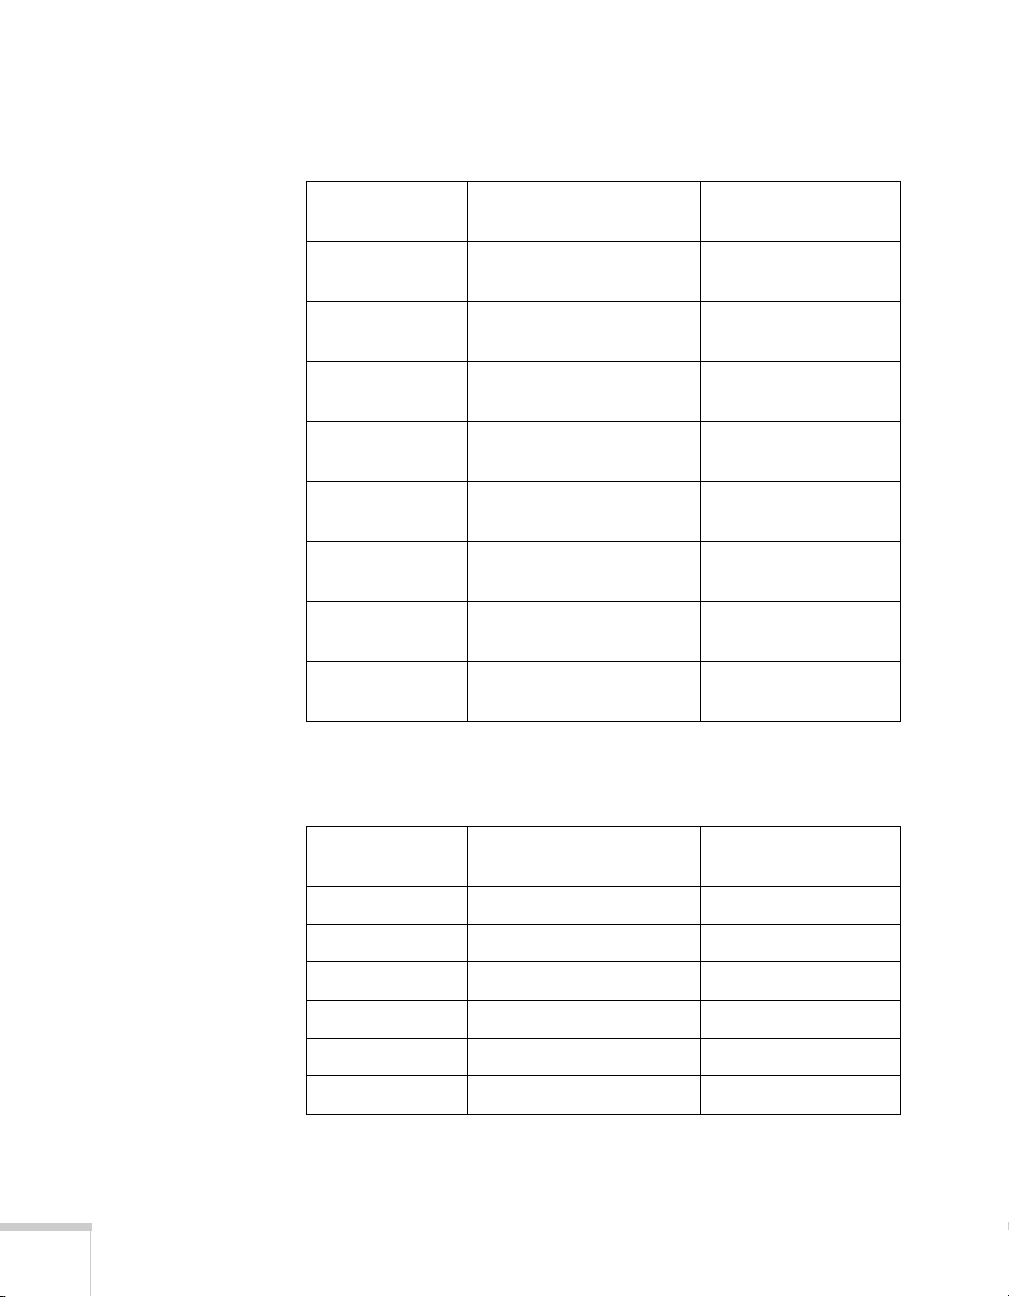
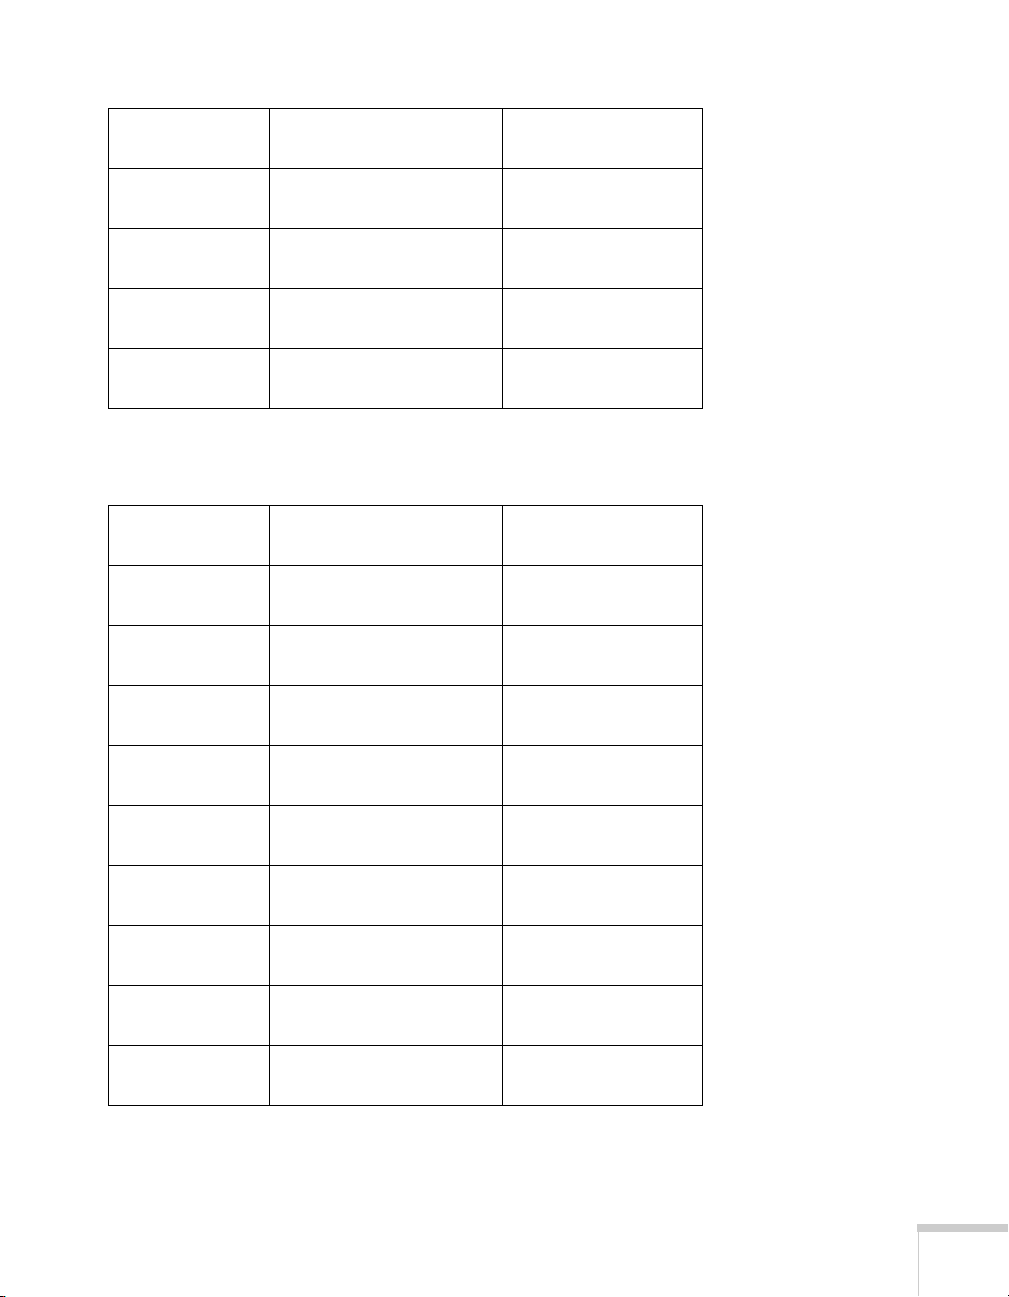
PowerLite Pro G5450WUNL/G5750WUNL, 16:10 image, Middle
throw zoom lens 1 (part number V12H004M04)
20 Setting Up the Projector
Projection distance (A)
Screen size
50 inches 95 to 146 inches
60 inches 115 to 176 inches
80 inches 155 to 236 inches
100 inches 194 to 296 inches
Wide to Tele Offset (B)
(242 to 371 cm)
(292 to 447 cm)
(393 to 599 cm)
(494 to 751 cm)
-2.2 to 28.7 inches
(-6 to 73 cm)
-2.7 to 34.5 inches
(-7 to 88 cm)
-3.5 to 45.9 inches
(-9 to 117 cm)
-4.4 to 57.4 inches
(-11 to 146 cm)
Page 21
Screen size
Projection distance (A)
Wide to Tele Offset (B)
150 inches 294 to 446 inches
(746 to 1132 cm)
200 inches 393 to 595 inches
(998 to 1512 cm)
250 inches 492 to 745 inches
(1250 to 1893 cm)
300 inches 591 to 895 inches
(1502 to 2273 cm)
-6.6 to 86.1 inches
(-17 to 219 cm)
-8.9 to 114.9 inches
(-22 to 292 cm)
-11.1 to 143.6 inches
(-28 to 365 cm)
-13.3 to 172.3 inches
(-34 to 438 cm)
PowerLite Pro G5450WUNL/G5750WUNL, 16:10 image, Middle
throw zoom lens 2 (part number V12H004M05)
Projection distance (A)
Screen size
50 inches 142 to 219 inches
60 inches 172 to 264 inches
80 inches 231 to 354 inches
100 inches 291 to 444 inches
Wide to Tele Offset (B)
-2.2 to 28.7 inches
(361 to 555 cm)
(437 to 670 cm)
(588 to 898 cm)
(739 to 1127 cm)
(-6 to 73 cm)
-2.7 to 34.5 inches
(-7 to 88 cm)
-3.5 to 45.9 inches
(-9 to 117 cm)
-4.4 to 57.4 inches
(-11 to 146 cm)
150 inches 439 to 669 inches
(1116 to 1698 cm)
200 inches 588 to 894 inches
(1494 to 2270 cm)
250 inches 737 to 1119 inches
(1871 to 2841 cm)
300 inches 885 to 1344 inches
(2249 to 3413 cm)
-6.6 to 86.1 inches
(-17 to 219 cm)
-8.9 to 114.9 inches
(-22 to 292 cm)
-11.1 to 143.6 inches
(-28 to 365 cm)
-13.3 to 172.3 inches
(-34 to 438 cm)
Setting Up the Projector 21
Page 22
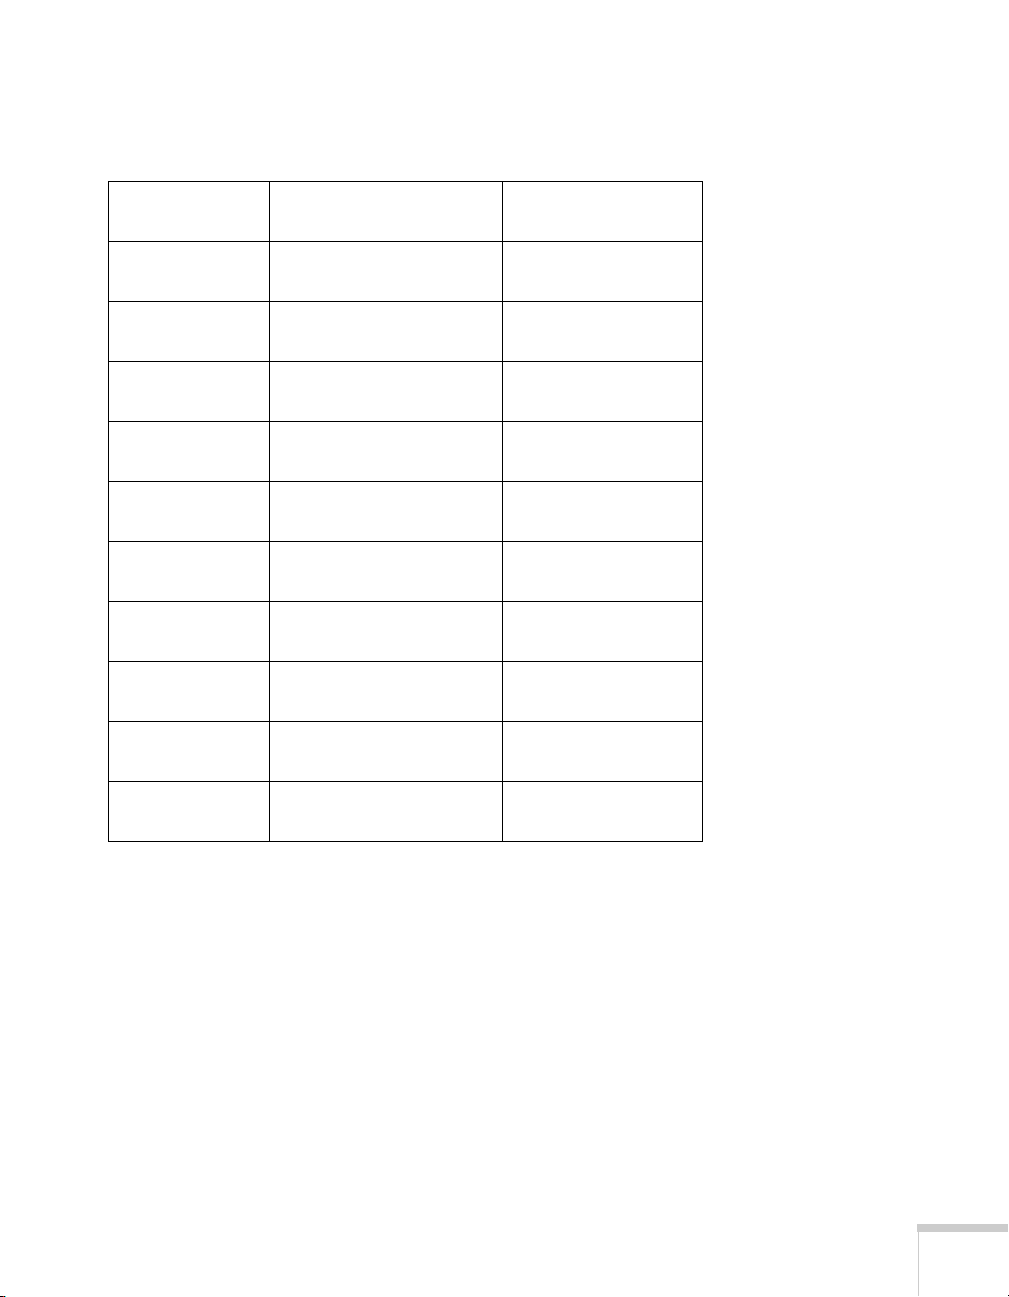
PowerLite Pro G5450WUNL/G5750WUNL, 16:10 image, Long
throw zoom lens (part number V12H004L06)
Projection distance (A)
Screen size
Wide to Tele Offset (B)
50 inches 215 to 292 inches
(546 to 742 cm)
60 inches 259 to 352 inches
(659 to 894 cm)
80 inches 348 to 472 inches
(885 to 1199 cm)
100 inches 437 to 592 inches
(1111 to 1503 cm)
150 inches 660 to 891 inches
(1675 to 2263 cm)
200 inches 882 to 1190 inches
(2240 to 3024 cm)
250 inches 1104 to 1490 inches
(2804 to 3784 cm)
300 inches 1326 to 1789 inches
(3369 to 4545 cm)
-2.2 to 28.7 inches
(-6 to 73 cm)
-2.7 to 34.5 inches
(-7 to 88 cm)
-3.5 to 45.9 inches
(-9 to 117 cm)
-4.4 to 57.4 inches
(-11 to 146 cm)
-6.6 to 86.1 inches
(-17 to 219 cm)
-8.9 to 114.9 inches
(-22 to 292 cm)
-11.1 to 143.6 inches
(-28 to 365 cm)
-13.3 to 172.3 inches
(-34 to 438 cm)
PowerLite Pro G5450WUNL/G5750WUNL, 16:10 image, Rear
projection wide lens (part number V12H004R03)
22 Setting Up the Projector
Projection distance (A)
Screen size
50 inches 31 inches (80 cm) 13.2 inches (34 cm)
60 inches 38 inches (96 cm) 15.9 inches (40 cm)
80 inches 51 inches (130 cm) 21.2 inches (54 cm)
100 inches 64 inches (163 cm) 26.5 inches (67 cm)
150 inches 97 inches (247 cm) 39.7 inches (101 cm)
200 inches 130 inches (330 cm) 53 inches (135 cm)
Wide to Tele Offset (B)
Page 23
PowerLite Pro G5650WNL, 16:10 image, Standard zoom lens (part
number V12H004S05)
Projection distance (A)
Screen size
Wide to Tele Offset (B)
30 inches 32 to 59 inches
(81 to 149 cm)
40 inches 43 to 79 inches
(109 to 200 cm)
50 inches 54 to 99 inches
(138 to 251 cm)
60 inches 66 to 119 inches
(167 to 302 cm)
80 inches 88 to 159 inches
(224 to 405 cm)
100 inches 111 to 200 inches
(281 to 507 cm)
150 inches 167 to 300 inches
(424 to 762 cm)
200 inches 223 to 401 inches
(567 to 1018 cm)
250 inches 280 to 501 inches
(710 to 1273 cm)
300 inches 336 to 602 inches
(853 to 1529 cm)
-1.5 to 17.4 inches
(-4 to 44 cm)
-2 to 23.2 inches
(-5 to 59 cm)
-2.5 to 29 inches
(-6 to 74 cm)
-3 to 34.8 inches
(-8 to 88 cm)
-4 to 46.4 inches
(-10 to 118 cm)
-5 to 58 inches
(-13 to 147 cm)
-7.6 to 87.1 inches
(-19 to 221 cm)
-10.1 to 116.1 inches
(-26 to 295 cm)
-12.6 to 145.1 inches
(-32 to 369 cm)
-15.1 to 174.1 inches
(-38 to 442 cm)
Setting Up the Projector 23
Page 24
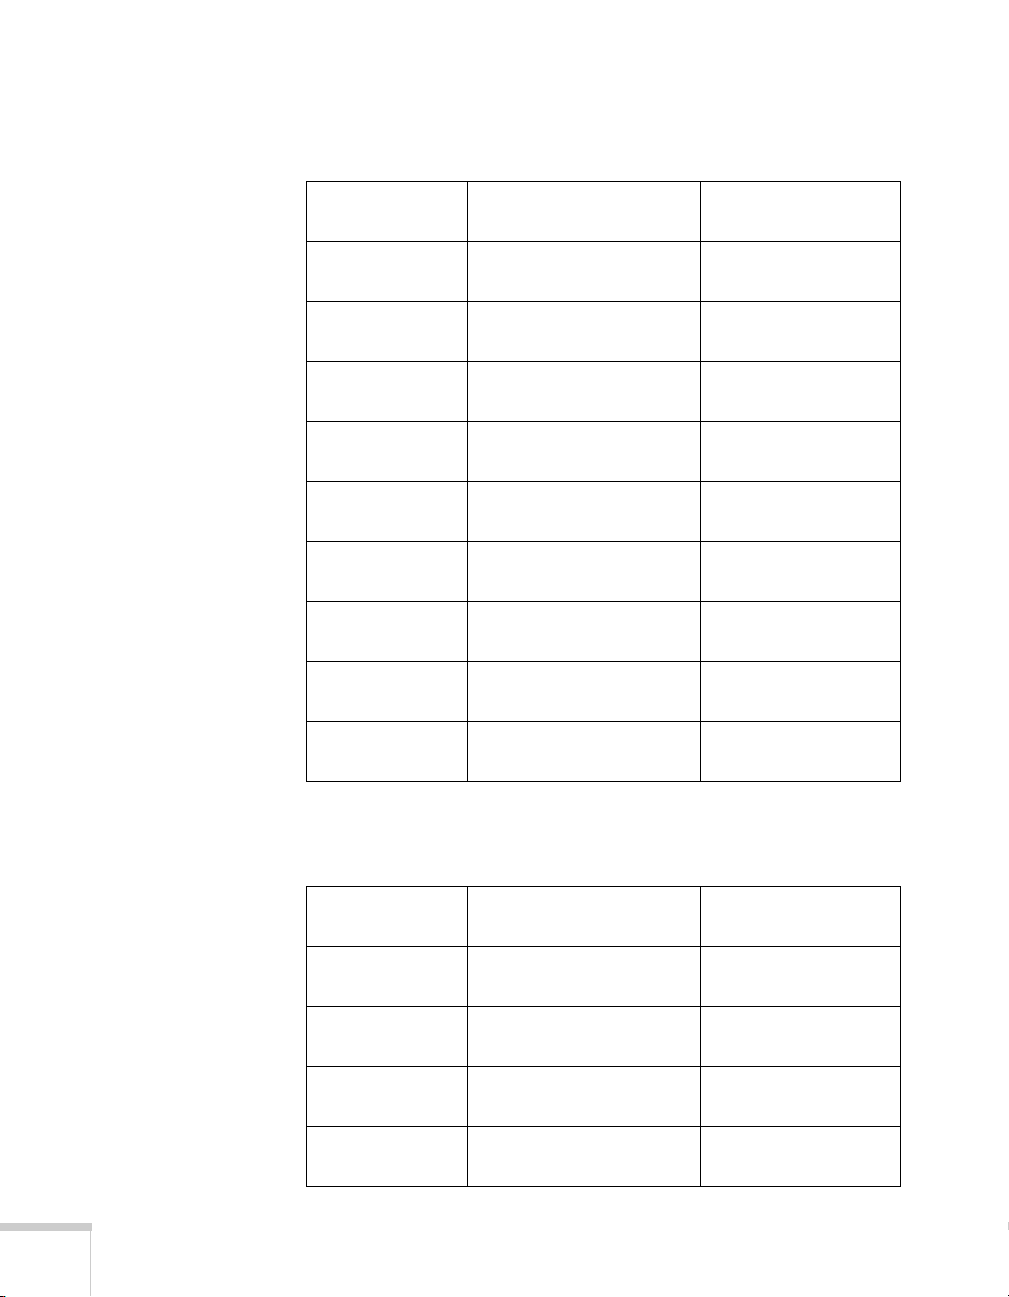
PowerLite Pro G5650WNL, 16:10 image, Middle throw zoom
lens 1 (part number V12H004M04)
Projection distance (A)
Screen size
Wide to Tele Offset (B)
40 inches 77 to 118 inches
(196 to 301 cm)
50 inches 97 to 149 inches
(247 to 378 cm)
60 inches 117 to 179 inches
(298 to 456 cm)
80 inches 158 to 241 inches
(401 to 611 cm)
100 inches 198 to 302 inches
(504 to 766 cm)
150 inches 300 to 454 inches
(761 to 1154 cm)
200 inches 401 to 607 inches
(1018 to 1542 cm)
250 inches 502 to 760 inches
(1275 to 1930 cm)
300 inches 603 to 913 inches
(1532 to 2318 cm)
-2 to 23.2 inches
(-5 to 59 cm)
-2.5 to 29.0 inches
(-6 to 74 cm)
-3 to 34.8 inches
(-8 to 88 cm)
-4 to 46.4 inches
(-10 to 118 cm)
-5 to 58 inches
(-13 to 147 cm)
-7.6 to 87.1 inches
(-19 to 221 cm)
-10.1 to 116.1 inches
(-26 to 295 cm)
-12.6 to 145.1 inches
(-32 to 369 cm)
-15.1 to 174.1 inches
(-38 to 442 cm)
PowerLite Pro G5650WNL, 16:10 image, Middle throw zoom
lens 2 (part number V12H004M05)
24 Setting Up the Projector
Projection distance (A)
Screen size
40 inches 115 to 177 inches
50 inches 145 to 223 inches
60 inches 175 to 269 inches
80 inches 236 to 361 inches
Wide to Tele Offset (B)
(292 to 450 cm)
(369 to 567 cm)
(446 to 684 cm)
(600 to 917 cm)
-2 to 23.2 inches
(-5 to 59 cm)
-2.5 to 29.0 inches
(-6 to 74 cm)
-3 to 34.8 inches
(-8 to 88 cm)
-4 to 46.4 inches
(-10 to 118 cm)
Page 25
Screen size
Projection distance (A)
Wide to Tele Offset (B)
100 inches 297 to 453 inches
(754 to 1150 cm)
150 inches 448 to 682 inches
(1139 to 1733 cm)
200 inches 600 to 912 inches
(1524 to 2316 cm)
250 inches 751 to 1141 inches
(1909 to 2899 cm)
300 inches 903 to 1371 inches
(2294 to 3482 cm)
-5 to 58 inches
(-13 to 147 cm)
-7.6 to 87.1 inches
(-19 to 221 cm)
-10.1 to 116.1 inches
(-26 to 295 cm)
-12.6 to 145.1 inches
(-32 to 369 cm)
-15.1 to 174.1 inches
(-38 to 442 cm)
PowerLite Pro G5650WNL, 16:10 image, Long throw zoom lens
(part number V12H004L06)
Projection distance (A)
Screen size
40 inches 174 to 237 inches
50 inches 219 to 298 inches
60 inches 265 to 359 inches
Wide to Tele Offset (B)
-2 to 23.2 inches
(442 to 602 cm)
(558 to 757 cm)
(673 to 912 cm)
(-5 to 59 cm)
-2.5 to 29.0 inches
(-6 to 74 cm)
-3 to 34.8 inches
(-8 to 88 cm)
80 inches 355 to 481 inches
(903 to 1223 cm)
100 inches 446 to 603 inches
(1133 to 1533 cm)
150 inches 673 to 909 inches
(1709 to 2308 cm)
200 inches 899 to 1214 inches
(2284 to 3084 cm)
250 inches 1126 to 1519 inches
(2860 to 3859 cm)
300 inches 1352 to 1825 inches
(3435 to 4635 cm)
-4 to 46.4 inches
(-10 to 118 cm)
-5 to 58 inches
(-13 to 147 cm)
-7.6 to 87.1 inches
(-19 to 221 cm)
-10.1 to 116.1 inches
(-26 to 295 cm)
-12.6 to 145.1 inches
(-32 to 369 cm)
-15.1 to 174.1 inches
(-38 to 442 cm)
Setting Up the Projector 25
Page 26

PowerLite Pro G5650WNL, 16:10 image, Rear projection wide lens
(part number V12H004R03)
Projection distance (A)
Screen size
30 inches 19 inches (47 cm) 7.9 inches (20 cm)
40 inches 25 inches (64 cm) 10.6 inches (27 cm)
50 inches 32 inches (81 cm) 13.2 inches (34 cm)
60 inches 39 inches (98 cm) 15.9 inches (40 cm)
80 inches 52 inches (132 cm) 21.2 inches (54 cm)
100 inches 65 inches (166 cm) 26.5 inches (67 cm)
150 inches 99 inches (251 cm) 39.7 inches (101 cm)
200 inches 132 inches (336 cm) 53 inches (135 cm)
Wide to Tele Offset (B)
PowerLite Pro G5550NL/G5950NL, 4:3 image, Standard zoom
lens (part number V12H004S05)
Projection distance (A)
Screen size
Wide to Tele Offset (B)
26 Setting Up the Projector
30 inches 30 to 56 inches
(77 to 142 cm)
40 inches 41 to 75 inches
(104 to 190 cm)
50 inches 52 to 94 inches
(131 to 239 cm)
60 inches 62 to 113 inches
(158 to 287 cm)
80 inches 84 to 151 inches
(213 to 385 cm)
100 inches 105 to 190 inches
(267 to 482 cm)
0 to 18 inches
(0 to 46 cm)
0 to 24 inches
(0 to 61 cm)
0 to 30 inches
(0 to 76 cm)
0 to 36 inches
(0 to 91 cm)
0 to 48 inches
(0 to 122 cm)
0 to 60 inches
(0 to 152 cm)
Page 27
Screen size
Projection distance (A)
Wide to Tele Offset (B)
150 inches 159 to 285 inches
(403 to 725 cm)
200 inches 212 to 381 inches
(539 to 968 cm)
250 inches 266 to 477 inches
(675 to 1211 cm)
300 inches 319 to 572 inches
(811 to 1454 cm)
0 to 90 inches
(0 to 229 cm)
0 to 120 inches
(0 to 305 cm)
0 to 150 inches
(0 to 381 cm)
0 to 180 inches
(0 to 457 cm)
PowerLite Pro G5550NL/G5950NL, 4:3 image, Middle throw
zoom lens 1 (part number V12H004M04)
Projection distance (A)
Screen size
40 inches 73 to 112 inches
50 inches 92 to 141 inches
60 inches 111 to 170 inches
80 inches 150 to 229 inches
Wide to Tele Offset (B)
0 to 24 inches
(185 to 285 cm)
(234 to 359 cm)
(283 to 433 cm)
(380 to 581 cm)
(0 to 61 cm)
0 to 30 inches
(0 to 76 cm)
0 to 36 inches
(0 to 91 cm)
0 to 48 inches
(0 to 122 cm)
100 inches 188 to 287 inches
(478 to 728 cm)
150 inches 284 to 432 inches
(722 to 1097 cm)
200 inches 380 to 577 inches
(966 to 1466 cm)
250 inches 476 to 723 inches
(1210 to 1835 cm)
300 inches 572 to 868 inches
(1454 to 2204 cm)
0 to 60 inches
(0 to 152 cm)
0 to 90 inches
(0 to 229 cm)
0 to 120 inches
(0 to 305 cm)
0 to 150 inches
(0 to 381 cm)
0 to 180 inches
(0 to 457 cm)
Setting Up the Projector 27
Page 28

PowerLite Pro G5550NL/G5950NL, 4:3 image, Middle throw
zoom lens 2 (part number V12H004M05)
Projection distance (A)
Screen size
Wide to Tele Offset (B)
40 inches 109 to 168 inches
(276 to 427 cm)
50 inches 138 to 212 inches
(350 to 538 cm)
60 inches 166 to 256 inches
(423 to 649 cm)
80 inches 224 to 343 inches
(569 to 871 cm)
100 inches 282 to 430 inches
(716 to 1093 cm)
150 inches 426 to 649 inches
(1082 to 1647 cm)
200 inches 570 to 867 inches
(1448 to 2202 cm)
250 inches 714 to 1085 inches
(1814 to 2756 cm)
300 inches 858 to 1304 inches
(2180 to 3311 cm)
0 to 24 inches
(0 to 61 cm)
0 to 30 inches
(0 to 76 cm)
0 to 36 inches
(0 to 91 cm)
0 to 48 inches
(0 to 122 cm)
0 to 60 inches
(0 to 152 cm)
0 to 90 inches
(0 to 229 cm)
0 to 120 inches
(0 to 305 cm)
0 to 150 inches
(0 to 381 cm)
0 to 180 inches
(0 to 457 cm)
PowerLite Pro G5550NL/G5950NL, 4:3 image, Long throw zoom
lens (part number V12H004L06)
28 Setting Up the Projector
Projection distance (A)
Screen size
40 inches 165 to 225 inches
50 inches 208 to 283 inches
60 inches 251 to 341 inches
80 inches 338 to 457 inches
Wide to Tele Offset (B)
(420 to 572 cm)
(529 to 719 cm)
(639 to 867 cm)
(857 to 1162 cm)
0 to 24 inches
(0 to 61 cm)
0 to 30 inches
(0 to 76 cm)
0 to 36 inches
(0 to 91 cm)
0 to 48 inches
(0 to 122 cm)
Page 29

Screen size
Projection distance (A)
Wide to Tele Offset (B)
100 inches 424 to 574 inches
(1076 to 1457 cm)
150 inches 639 to 864 inches
(1623 to 2194 cm)
200 inches 854 to 1154 inches
(2170 to 2932 cm)
250 inches 1070 to 1445 inches
(2717 to 3669cm)
300 inches 1285 to 1735 inches
(3264 to 4407 cm)
0 to 60 inches
(0 to 152 cm)
0 to 90 inches
(0 to 229 cm)
0 to 120 inches
(0 to 305 cm)
0 to 150 inches
(0 to 381 cm)
0 to 180 inches
(0 to 457 cm)
PowerLite Pro G5550NL/G5950NL, 4:3 image, Rear projection
wide lens (part number V12H004R03)
Projection distance (A)
Screen size
30 inches 18 inches (45 cm) 9 inches (23 cm)
40 inches 24 inches (61 cm) 12 inches (30 cm)
50 inches 30 inches (77 cm) 15 inches (38 cm)
60 inches 37 inches (93 cm) 18 inches (46 cm)
Wide to Tele Offset (B)
80 inches 49 inches (126 cm) 24 inches (61 cm)
100 inches 62 inches (158 cm) 30 inches (76 cm)
150 inches 94 inches (239 cm) 45 inches (114 cm)
200 inches 126 inches (320 cm) 60 inches (152 cm)
Also keep these considerations in mind:
■ Place the projector on a sturdy, level surface.
■ Make sure there is plenty of space for ventilation around and
under the projector.
■ Make sure the projector is within 10 feet (3 meters) of a grounded
electrical outlet or extension cord.
Setting Up the Projector 29
Page 30
note
After positioning the
projector, you may want to
connect a Kensington
MicroSaver
device to the lock port on the
projector. You can purchase
this from Epson; see
page 15.
®
anti-theft
Ideally, you should place the projector directly in front of the center of
the screen, facing it toward the screen squarely. The base of the lens
should be about level with the bottom of the screen.
Projector
Screen
If you place the projector below screen level, you can use the vertical
lens shift dial to raise the lens (see page 57). You can also tilt the
projector up by extending the front adjustable foot. Tilting the
projector causes the image to become “keystone” shaped, but you can
correct the distortion (see page 58).
For instructions on installing the projector in a permanent location,
such as a theater or conference room, see page 163.
note
To connect a Macintosh
that includes only a Mini
DisplayPort or Mini-DVI
port for video output, you
need to obtain an adapter
that allows you to connect to
the projector's VGA video
port. Contact Apple for
compatible adapter options.
30 Setting Up the Projector
Connecting to a Computer
You can connect the projector to any computer that has a standard
video output (monitor) port, including desktop models, PC and
Macintosh computers, and hand-held devices.
If you have the optional wireless mouse receiver, you can use your
remote control as a wireless mouse when projecting from a computer
(page 70).
Page 31

Connecting to the DVI-D Port (G5450WUNL/G5750WUNL only)
1. Locate a DVI-D cable.
2. Connect the cable to the DVI-D connector on your computer
and the
3. If you want to play sound through the projector, see page 46 for
instructions on connecting audio cables. With the optional
wireless mouse receiver (see page 70), you can use the remote
control as a mouse.
DVI-D connector on the projector.
4. When you’ve finished making any connections, see page 51 for
instructions on turning on the projector and Chapter 2 for
instructions on displaying and adjusting the image.
Setting Up the Projector 31
Page 32

note
With the PowerLite Pro
G5450WUNL/
G5750WUNL, you must
connect your DVI-D source
to the DVI-D port in order
to play sound.
Connecting a DVI-D Source to the HDMI Port
You can connect your DVI-D source to the projector using a
DVI/HDMI conversion cable.
1. Locate a DVI/HDMI conversion cable.
2. Connect the cable to the DVI-D connector on your computer
and the
3. With the PowerLite Pro G5550NL/G5650WNL/G5950NL, if
you want to play sound through the projector, see page 46 for
instructions on connecting audio cables. With the optional
wireless mouse receiver (see page 70), you can use the remote
control as a mouse.
4. When you’ve finished making any connections, see page 51 for
instructions on turning on the projector and Chapter 2 for
instructions on displaying and adjusting the image.
HDMI connector on the projector.
32 Setting Up the Projector
Page 33
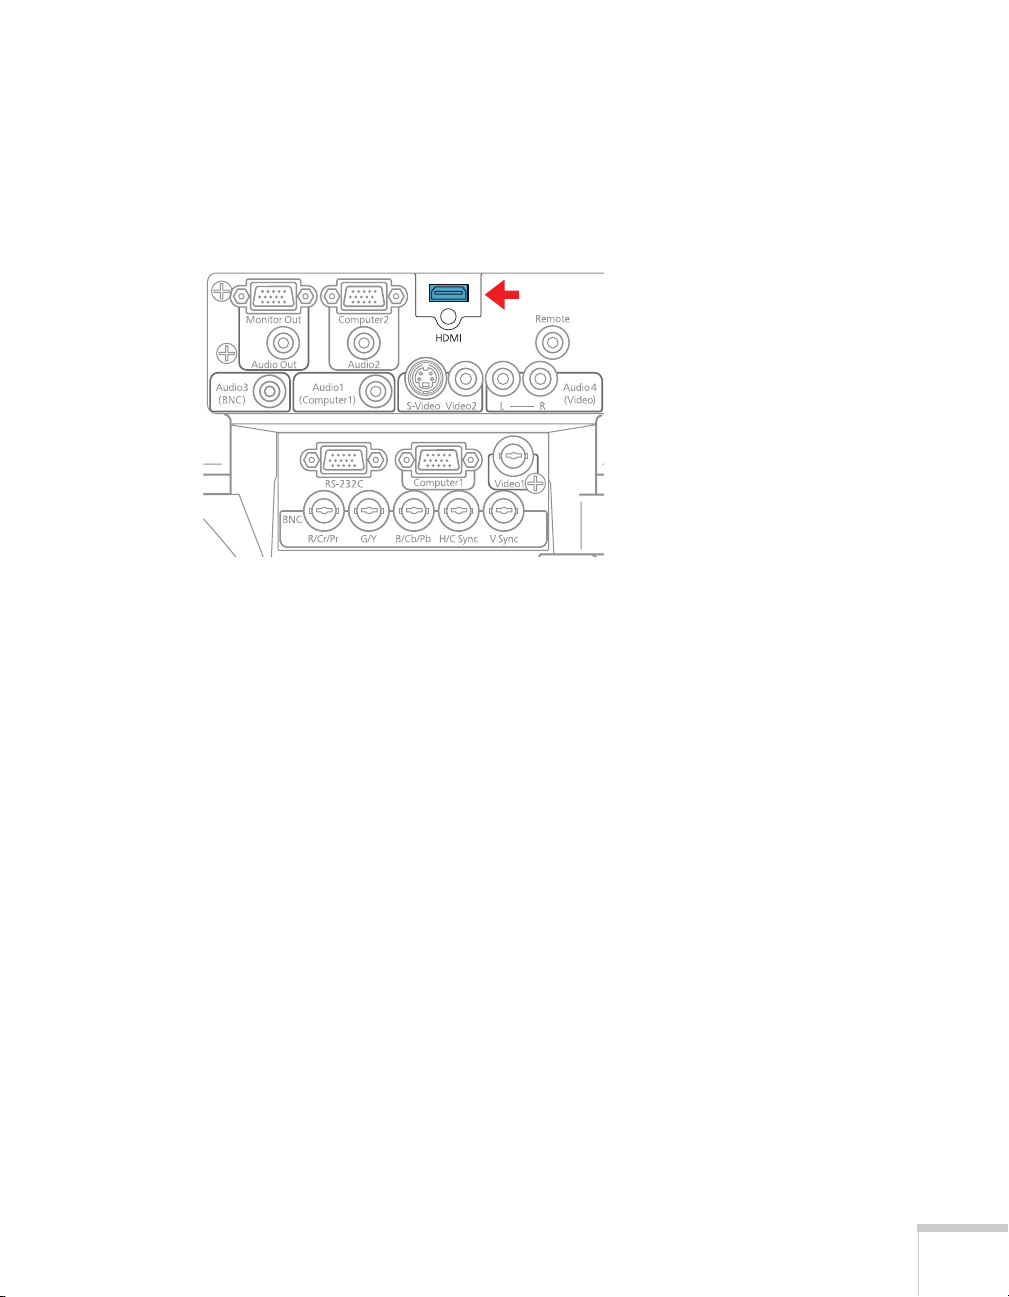
Connecting to the HDMI Port
1. Locate an HDMI cable.
2. Connect the cable to the HDMI connector on your computer
and the
3. See page 51 for instructions on turning on the projector and
Chapter 2 for instructions on displaying and adjusting the image.
With the optional wireless mouse receiver (see page 70), you can
use the remote control as a mouse.
HDMI connector on the projector.
Setting Up the Projector 33
Page 34

caution
Don’t try to force a
connector to fit a port with a
different shape or number of
pins. You may damage the
port or connector.
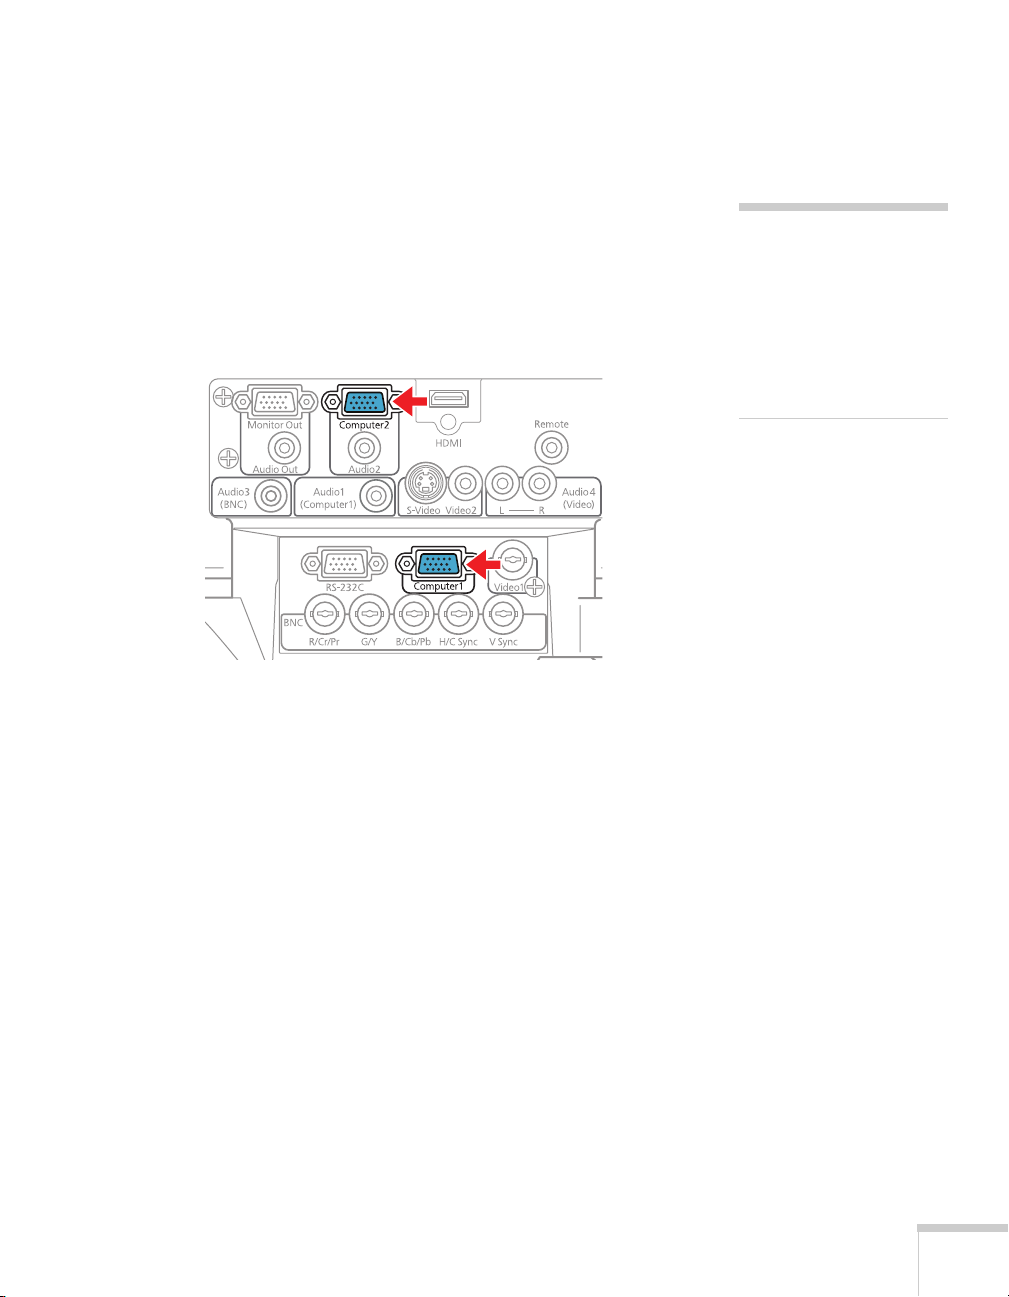
Connecting to the Computer Port
You can connect to the projector using the VGA computer cable that
came with it (the monitor port on your computer must be a mini
D-sub 15-pin port).
1. If you’re using the VGA computer cable, connect one end to the
projector’s
computer’s monitor port. With the PowerLite Pro
G5550NL/G5650WNL/G5950NL, you can also connect to the
Computer2 port.
Computer1 port, and the other end to your
34 Setting Up the Projector
2. You may need to change the Input Signal setting in the
projector’s Signal menu to
RGB (see page 118).
3. If you want to play sound through the projector, see page 46 for
instructions on connecting audio cables. With the optional
wireless mouse receiver (see page 70), you can use the remote
control as a mouse.
4. When you’ve finished making any connections, see page 51 for
instructions on turning on the projector and Chapter 2 for
instructions on displaying and adjusting the image.
Page 35

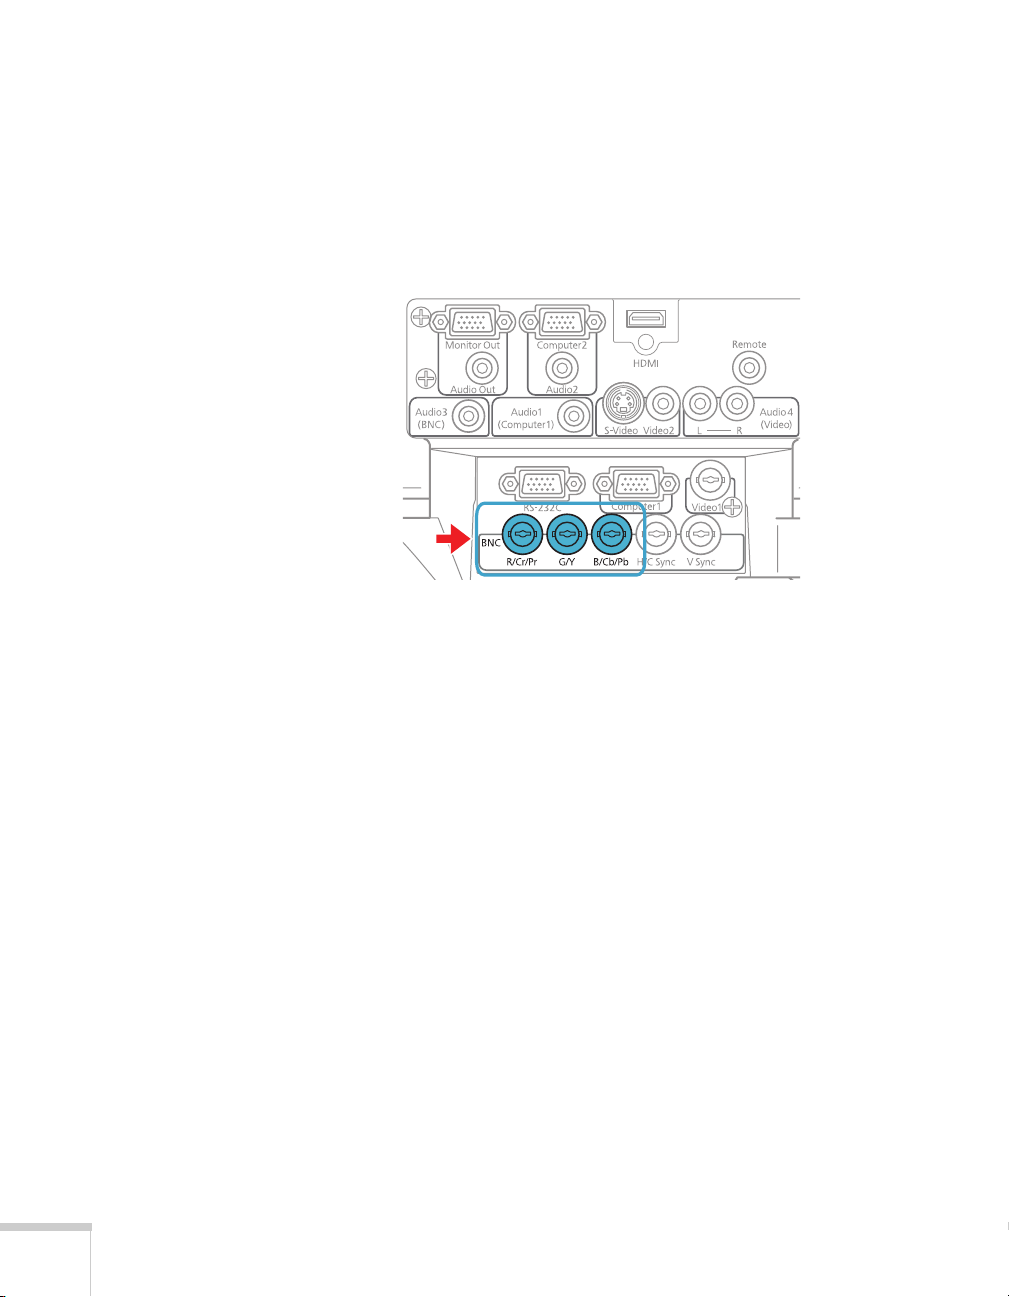
Connecting to the BNC Connectors
1. Obtain a commercially available standard BNC to VGA video
cable.
2. Plug the BNC connectors into the projector’s
R/Cr/Pr connectors as shown below. Depending on your
B/Cb/Pb, G/Y, and
computer’s video card, you may have to connect to the projector’s
V Sync and H/C Sync connectors too. (See your computer
documentation for more information.)
3. Plug the VGA connector on the other end of the cable into your
computer’s monitor port.
4. You may need to change the
projector’s Signal menu to
Input Signal setting in the
RGB (see page 118).
5. If you want to play sound through the projector, see page 46 for
instructions on connecting audio cables. With the optional
wireless mouse receiver (see page 70), you can use the remote
control as a mouse.
6. When you’ve finished making any connections, see page 51 for
instructions on turning on the projector and Chapter 2 for
instructions on displaying and adjusting the image.
Setting Up the Projector 35
Page 36

Connecting to Video Equipment
You can connect several video sources to the projector at the same
time. Before starting, look at your video equipment to determine its
available video output connections:
■ If your video player has an HDMI connector, see “Connecting an
HDMI Video Source” on page 37.
HDMI connector
■ If your video player has a DVI-D video port, see “Connecting a
DVI-D Video Source to the DVI-D Port
(G5450WUNL/G5750WUNL only)” on page 38 or
“Connecting a DVI-D Video Source to the HDMI Port” on
page 39.
■ If your video player has a component video port (three connectors
labeled either Y/Cb/Cr or Y/Pb/Pr), see “Connecting a
Component Video Source” on page 42.
■ If your video player has a yellow RCA video output connector, or
if you’re using a coax video cable, see “Connecting a Composite
Video Source” on page 40.
36 Setting Up the Projector
BNC connector
(component or
composite video)
■ If your video player has an S-Video connector, see “Connecting
RCA connector
(composite video)
an S-Video Source” on page 41.
S-Video
connector
Page 37

■ If your video player has an RGB video port (either a single
connector for a VGA monitor cable or three connectors labeled
R/G/B), see “Connecting an RGB Video Source” on page 43.
VGA connector
(RGB video)
After connecting video cables, you may also want to connect an audio
cable to play sound through the projector; see page 46. If you connect
using an HDMI cable, the video and sound are both transferred and
you won’t need to connect any additional cables for audio.
Connecting an HDMI Video Source
For best image quality, connect your video equipment to the HDMI
(High-Definition Multimedia Interface) port, if possible.
1. Locate an HDMI cable.
2. Connect the cable to the HDMI connector on your player and
HDMI connector on the projector.
the
3. See page 51 for instructions on turning on the projector and
Chapter 2 for instructions on displaying and adjusting the image.
Setting Up the Projector 37
Page 38

Connecting a DVI-D Video Source to the DVI-D Port (G5450WUNL/G5750WUNL only)
1. Locate a DVI-D cable.
2. Connect the cable to the DVI-D connector on your player and
DVI-D connector on the projector.
the
3. If you want to play sound through the projector, see page 46 for
instructions on connecting audio cables.
4. When you’ve finished making any connections, see page 51 for
instructions on turning on the projector and Chapter 2 for
instructions on displaying and adjusting the image.
38 Setting Up the Projector
Page 39

Connecting a DVI-D Video Source to the HDMI Port
You can connect your DVI-D source to the projector using a
DVI/HDMI conversion cable.
1. Locate a DVI/HDMI conversion cable.
2. Connect the cable to the DVI-D connector on your player and
HDMI connector on the projector.
the
3. With the PowerLite Pro G5550NL/G5650WNL/G5950NL, if
you want to play sound through the projector, see page 46 for
instructions on connecting audio cables.
4. When you’ve finished making any connections, see page 51 for
instructions on turning on the projector and Chapter 2 for
instructions on displaying and adjusting the image.
note
With the PowerLite Pro
G5450WUNL/
G5750WUNL, you must
connect your DVI-D source
to the DVI-D port in order
to play sound.
Setting Up the Projector 39
Page 40

note
p
f
If the video cable was not
rovided with your video
device, you can purchase one
rom an electronics dealer.
Connecting a Composite Video Source
1. If your video cable has an RCA connector, connect it to the
yellow video output connector on your player and the yellow
Video2 connector on the projector (as shown below). Or if you’re
using a coax video cable, connect it to the
the projector.
2. If you want to play sound through the projector, see page 46 for
instructions on connecting audio cables.
Video1 connector on
3. When you’ve finished making any connections, see page 51 for
instructions on turning on the projector and Chapter 2 for
instructions on displaying and adjusting the image.
40 Setting Up the Projector
Page 41

Connecting an S-Video Source
1. Connect the S-Video cable to the S-Video connector on your
player and the
2. If you want to play sound through the projector, see page 46 for
instructions on connecting audio cables.
3. When you’ve finished making any connections, see page 51 for
instructions on turning on the projector and Chapter 2 for
instructions on displaying and adjusting the image.
S-Video connector on the projector.
Setting Up the Projector 41
Page 42

note
p
p
p
p
If the component video cable
was not provided with your
video device, you can
urchase one from an
electronics dealer.
note
Be sure your video player is
not an RGB video source.
If you select the wrong
source, image quality may
suffer. Check your video
layer’s documentation.
Also, make sure the Input
Signal setting in the Signal
menu is set to
Component (see
age 118).
Auto or
Connecting a Component Video Source
1. Look at the connectors at one end of your component video cable.
If they are bayonet (BNC) connectors, go on to step 2. If they are
RCA connectors, you’ll need to attach commercially available
BNC adapters to plug the cable into your projector, then
continue with step 2.
2. Connect the cable to your player and the BNC connectors on the
projector. Match the Y/Cb/Cr (or Y/Pb/Pr) connectors on your
player to the corresponding connectors on the projector.
3. You may need to change the
projector’s Signal menu to
Input Signal setting in the
Component (see page 118).
note
If you have a
component-to-VGA video
cable, you can use it to
connect a component video
source. Connect the VGA
connector to the projector’s
Computer1 or
Computer2 (G5550NL/
G5650WNL/G5950NL
only) port, then connect the
other end of the cable to your
layer.
42 Setting Up the Projector
4. If you want to play sound through the projector, see page 46 for
instructions on connecting audio cables.
5. When you’ve finished making any connections, see page 51 for
instructions on turning on the projector and Chapter 2 for
instructions on displaying and adjusting the image.
Page 43
Connecting an RGB Video Source
Connecting Using a VGA Computer Cable
1. Locate the VGA computer cable provided with the projector.
2. Connect the cable to the video port on your player and the
Computer1 port on the projector. With the PowerLite Pro
G5550NL/G5650WNL/G5950NL, you can also connect to the
Computer2 port.
note
Be sure your video player is
not a component video
source. If you select the
wrong source, image quality
may suffer. Check your
video player’s
documentation.
3. You may need to change the Input Signal setting in the
projector’s Signal menu to
RGB (see page 118).
4. If you want to play sound through the projector, see page 46 for
instructions on connecting audio cables.
5. When you’ve finished making any connections, see page 51 for
instructions on turning on the projector and Chapter 2 for
instructions on displaying and adjusting the image.
Setting Up the Projector 43
Page 44
Connecting Using a BNC Cable
1. Locate a BNC video cable (one may be included with your video
equipment).
2. Connect the cable between your player and the corresponding
R/G/B connectors on the projector.
3. You may need to change the
projector’s Signal menu to
Input Signal setting in the
RGB (see page 118).
4. If you want to play sound through the projector, see page 46 for
instructions on connecting audio cables.
5. When you’ve finished making any connections, see page 51 for
instructions on turning on the projector and Chapter 2 for
instructions on displaying and adjusting the image.
44 Setting Up the Projector
Page 45

Connecting an External Monitor
If you want to monitor your computer presentation close-up (on a
monitor placed beside the projector) as well as on the screen, you can
connect an external monitor. You can use it to check on your
presentation even if you’ve pressed the
to a different picture source.
First make sure your computer’s VGA cable is connected to the
projector’s
G5950NL only), or
monitor to the projector’s
Computer1, Computer2 (G5550NL/G5650WNL/
BNC ports (see page 34). Then connect your
Monitor Out port, as shown:
A/V Mute button or switched
note
The monitor cannot display
component video, nor signals
connected via the
Video2, S-Video, or
HDMI ports.
Some LCD monitors may
not be able to display the
image correctly. If you have
trouble displaying the
image, connect a multiscan
monitor. If you’re projecting
computer images, make sure
the computer’s refresh rate is
set to 65 Hz or greater.
The projector must be
turned on in order for the
Monitor Out port to send a
signal to the monitor.
Video1,
Setting Up the Projector 45
Page 46

note
If you have equipment
connected to the
in most cases you do not
need to connect an
additional cable for sound.
You can, however, connect
an audio cable to the
Audio1, Audio2, or
Audio3 port (as described
in this section) and output
the sound by adjusting the
Audio Input setting. With
the PowerLite G5550NL/
G5650WNL/G5950NL,
you can also adjust this
setting for equipment
connected to the HDMI
port. See page 119.
If you are using a
DVI/HDMI conversion
cable to connect your
DVI-D source through the
HDMI port on the
PowerLite G5550NL/
G5650WNL/G5950NL,
you will need to connect an
additional audio cable and
adjust the
setting as described above.
LAN port,
Audio Input
Playing Sound Through the Projector
You can play sound through the projector’s speaker system or attach
an external speaker system.
To play sound through the projector, follow these steps:
1. Locate the appropriate cable and connect it to the appropriate
jack on the projector, as described below.
■ If you have equipment connected to the Computer1 port,
use a stereo mini-jack cable. Connect the cable to the
port.
■ If you have equipment connected to the Computer2 port
(G5550NL/G5650WNL/G5950NL only), use a stereo
mini-jack cable. Connect the cable to the
Audio2 port.
Audio1
46 Setting Up the Projector
Page 47

■ If you have equipment connected to the DVI-D port
(G5450WUNL/G5750WUNL only), use a stereo mini-jack
cable. Connect the cable to the
■ If you have equipment connected to the BNC ports, use a
stereo mini-jack cable. Connect the cable to the
Audio2 port.
Audio3 port.
Setting Up the Projector 47
Page 48

■ If you have equipment connected to the Video1, Video2,
or
S-Video ports, connect an RCA audio cable to the
Audio4 ports.
2. Connect the other end of the cable to the audio output
connector(s) on your computer or video equipment.
48 Setting Up the Projector
Page 49

Connecting External Speakers
You can output sound to external speakers with built-in amplifiers.
When you play sound through external speakers, the projector’s
built-in speaker system is disabled. You can use the remote control or
the projector’s menu system to adjust the volume.
1. Locate the appropriate cable to connect your speakers.
Depending on your speakers, you may be able to use a
commercially available audio cable with a stereo mini-jack
connector on one end and pin jacks on the other end. For some
speakers, you may have to purchase a special cable or use an
adapter.
2. Connect the stereo mini-jack end of the audio cable to the
Audio Out port on the projector.
3. Connect the other end of the cable to your speakers.
Setting Up the Projector 49
Page 50

Connecting to a Digital Camera or Other USB Device
note
Use a cable less than 10 feet
(3 meters) long and connect
the camera or other device
directly to the projector.
Your projector may not
function correctly if you use
a longer cable or connect
your camera to a USB hub.
If you connect a USB hard
drive, make sure you use the
AC adapter to power the
hard drive.
The slideshow function on
some devices may not work
with the USB connection.
You can connect your digital camera, USB flash memory drive, USB
hard drive, or multimedia storage viewer, such as the Epson P-7000 to
the projector. Use the USB cable specified for your device, if
necessary. Then you can use the projector’s PC Free feature. See the
PC Free Operation Guide for more information.
1. Follow the instructions beginning on page 51 to turn on the
projector.
2. Connect the USB drive or the flat end of the USB cable to the
USB port on the projector, as shown.
Indicator
light
50 Setting Up the Projector
3. Connect the other end of the cable to your camera or other
device, if necessary.
The indicator light turns orange when a USB device is connected and
green when PC Free is running.
Page 51

Removing the USB Device or Cable
If you’re using PC Free mode to project your images, videos, or
presentations, stop the projection before you remove the USB device
or cable from the projector.
1. If you’re projecting a still image, press the
Esc button on the
remote or the projector’s control panel.
2. If you’re projecting a slideshow of your images, a movie, or a
presentation, press the
projector’s control panel. Then select
appears and press the
Esc button on the remote or the
Exit in the window that
Enter.
3. Turn off your digital camera or other device.
4. Disconnect the USB device or cable.
Turning the Projector On and Off
Turn on any connected computer or video equipment before starting
the projector so it can automatically detect and display the image
source. If you turn on the projector first, or have multiple pieces of
connected equipment, you may have to select the image source
manually (see page 56).
Follow these steps to turn on the projector:
1. Remove the lens cover.
note
You can set the projector to
automatically turn off the
lamp and enter “sleep mode”
when it has not received any
signals for 1 to 30 minutes
(see page 126 to enable,
disable, or adjust this
setting). This conserves
electricity, cools the
projector, and extends the
life of the lamp. If you want
to start projecting again,
press the
you are done using the
projector, unplug the power
cord.
P power button. If
Setting Up the Projector 51
Page 52

2. Plug one end of the power cord into the projector, and the other
end into an electrical outlet.
The Ppower light turns orange.
Power light
52 Setting Up the Projector
3. Press the Ppower button on the remote control or on the back of
the projector.
Page 53

The projector beeps once and the P power light flashes green as
the projector warms up, then an image begins to appear. When
the Ppower light stops flashing and remains green, the projector
is ready for use.
4. If you are prompted to enter a password, see page 122.
Using the Direct Power On Function
The Direct Power On function enables faster setup. The projector
starts up automatically when you plug it in or turn it on with a wall
switch. You don’t have to press the P power button.
Follow these steps to enable Direct Power On:
warning
Never look into the lens
when the lamp is on. This
can damage your eyes, and is
especially dangerous for
children and pets.
1. Press the
select the
2. Choose
3. Choose
4. Highlight
5. Press
Menu button on the remote control or projector, then
Extended menu and press Enter.
Operation and press Enter.
Direct Power On and press Enter.
On and press Enter.
Menu to exit. The setting will take effect the next time you
plug in the projector.
note
If a power outage occurs
when Direct Power On is
enabled and the projector is
plugged in, the projector will
restart when the power is
restored.
Setting Up the Projector 53
Page 54

note
Turn off this product when
not in use to prolong the life
of the projector.
Shutting Down the Projector
This projector incorporates Instant Off technology. To turn it off, you
can press its P power button as described below, unplug it, or turn off
a power switch that supplies power to the projector. You don’t have to
wait for the projector to cool down first.
1. To turn off the projector, press the P power
control or projector.
You see a confirmation message.
(If you don’t want to turn it off,
press any other button.)
2. Press the Ppower button again. The projection lamp turns off
and the projector beeps twice, and you can unplug the power
cord.
If you want to turn the projector on again, make sure the orange
Ppower light is not flashing, then press the Ppower button.
button on the remote
54 Setting Up the Projector
Page 55

Displaying and Adjusting
2
the Image
Follow the guidelines in this chapter for:
■ Displaying an image
■ Adjusting the image
■ Projecting two images simultaneously
2
55
Page 56

Displaying an Image
You may need to select the image source if you have multiple video
sources connected to the projector (such as a computer or DVD
player). Selecting the image source lets you switch between images
input from different pieces of connected equipment.
note
The projector can display a
test pattern to help you
adjust some image settings.
See page 119.
If you don’t see the image you want, press the
of the
Source buttons on the remote control, or the Source Search
Search button or one
button on the projector until you see the image you want to project.
You can also use the
Source buttons on the remote control to switch
between devices connected to the ports identified on each button.
Adjusting the Image
Once you see your image, you need to make certain adjustments:
■ If the image is too high or too low, reposition it as described on
page 57.
■ To focus or zoom your image, see page 58.
■ If the image isn’t square, see page 58.
■ To quickly adjust the color, brightness, or contrast, see page 60.
■ To change the image aspect ratio, see page 61.
■ If you need to fine-tune the image and/or sound, see Chapter 5.
56 Displaying and Adjusting the Image
Page 57

Adjusting the Position of the Image
You can use the vertical lens shift dial on the top of the projector to
move your image up or down, or you can use the horizontal lens shift
dial to move your image left or right.
Vertical Horizontal
Additionally, if the projector is on a table, you can use the projector’s
adjustable feet to adjust the image:
1. Stand behind the projector. Press the foot release lever up and lift
the front of the projector.
note
Raising the projector with
the front adjustable foot
causes the image shape to
distort or “keystone,” but
you can correct the shape as
described on page 58.
2. Once the image is positioned where you want it, release the lever
to lock the foot in position.
Displaying and Adjusting the Image 57
Page 58

note
If you have installed the
Rear Projection Wide Lens
(part number
V12H004R03), you cannot
use the zoom ring to reduce
or enlarge the image, but
you can still use the
E-Zoom buttons on the
remote control.
3. If necessary, you can fine-tune the height or level the image by
turning any of the projector’s adjustable feet.
Focusing and Zooming the Image
Turn the focus ring on the projector to sharpen the image.
Turn the zoom ring (using the knobs on the ring) to reduce or enlarge
the image.
Focus Zoom
If the image still isn’t large enough, you may need to move the
projector farther away from the screen. You can also use the
buttons on the remote control to zoom in on a portion of the image.
See page 68 for instructions.
E-Zoom
Adjusting the Image Shape
You can maintain a square or rectangular image by placing the
projector directly in front of the screen and keeping it level. This also
produces the best picture quality. If the projector is tilted up or placed
at an angle, you’ll need to correct the image shape by using one of the
functions described below.
Using Quick Corner
Use Quick Corner to adjust the shape and size of the image when it’s
uneven on all sides. Follow these steps to select
1. Press the
2. Select the
3. From the Settings menu, select
4. Select
58 Displaying and Adjusting the Image
Quick Corner:
Menu button on the remote control or the projector.
Settings menu and press Enter.
Keystone and press Enter.
Quick Corner and press Enter twice.
Page 59

You see this screen:
5. Use the pointer button on the remote control (or the arrow
buttons on the projector) to select the corner you want to adjust,
and press
Enter.
6. Use the pointer button on the remote control (or the arrow
buttons on the projector) to adjust the shape, then press
Esc when
you are finished.
7. Repeat steps 5 and 6 as needed to adjust the other corners.
8. When you’re done, press
Esc to exit.
Using Keystone Correction
You can manually adjust the shape of the image to compensate for
vertical and horizontal keystone distortion.
Before performing horizontal or vertical keystone, use the lens shift
function to horizontally center the lens and vertically move the lens to
the top or bottom (see page 57); otherwise, the distortion will not be
corrected accurately. Also, the distortion may not be corrected
accurately for some zoom settings.
1. Press the
2. Select the
3. From the Settings menu, select
4. Select
Menu button on the remote control or projector.
Settings menu and press Enter.
Keystone and press Enter.
H/V-Keystone and press Enter.
note
To undo your Quick Corner
adjustments, press and hold
the
Esc button for about 2
seconds, select
Corner
appears, then press Enter.
Reset Quick
from the screen that
note
Epson recommends using
Quick Corner to accurately
adjust keystone distortion.
See page 58.
note
You can also use the
projector’s arrow buttons to
perform keystone correction
as long as the projector’s
Keystone setting is set to
H/V-Keystone.
Displaying and Adjusting the Image 59
Page 60

5. Select
H-Keystone (for horizontal adjustment) or V-Keystone
(for vertical adjustment) and use the pointer button on the
remote control to adjust the shape of the image.
Vertical
keystone
adjustment
Horizontal
keystone
adjustment
If the image becomes smaller, use the zoom ring to enlarge the
image so it fits the screen. If the image contains faint lines or a
gridlike pattern, decrease the sharpness setting (see page 115).
6. When you’re done, press
Menu to exit.
Selecting the Color Mode
The Color Mode adjusts the brightness, contrast, and color for various
common viewing environments. Use this setting to quickly obtain a
good picture.
Press the
from one of these options:
■ Dynamic: Brightest mode; for video games or TV in a bright
■ Presentation: For making color presentations in a bright room.
■ Theatre: For watching movies in a darkened room; gives images a
■ Photo: For vivid, high-contrast still images in a bright room
■ Sports: For vivid TV images projected in a bright room
Color Mode button on the remote control, and then select
room.
natural tone.
(RGB signals or signals input through the USB or
ports only).
(component video, S-Video, or composite video only).
LAN
60 Displaying and Adjusting the Image
Page 61

■ sRGB: Matches the color palette of standard sRGB computer
displays.
■ DICOM SIM: Ideal for projecting X-ray photographs and other
medical images.
■ Customized: For manual color adjustment (see page 115).
You can also change the Color Mode using the projector’s Image
menu. See page 114 for details.
Resizing Video Images
You can use the Aspect button on the remote control to change the
aspect (width to height) ratio, depending on the input signal.
■ Auto (video equipment and HDMI images only): Automatically
sets the aspect ratio according to the input signal. Choose this
setting to project an HDMI image in the best aspect ratio.
■ Normal (computer images only): Displays images using the full
projection area and maintains the aspect ratio of the image.
Choose this setting to automatically resize the image and make
the best use of the display area.
note
The projector is not a
medical device and cannot
be used for medical
diagnosis.
■ 4:3 (G5550NL/G5950NL only): Displays images using the full
projection area at an aspect ratio of 4:3.
■ 16:9: Converts the aspect ratio of the image to 16:9. 4:3 ratio
images are elongated horizontally to fit.
■ Full (G5450WUNL/G5650WNL/G5750WUNL only): Displays
images using the full width of the projection area, but does not
retain the aspect ratio. 4:3 ratio images are elongated horizontally.
■ Zoom (G5450WUNL/G5650WNL/G5750WUNL only):
Displays images using the full width of the projection area and
maintains the aspect ratio of the image. The image may be cut off
on the top and bottom depending on its aspect ratio.
■ Native (HDMI and computer images only if you are using the
G5550NL/G5950NL)
: Displays images as is (aspect ratio and
resolution are maintained). Black bands appear if the resolution is
less than 1024 × 768 (G5550NL/G5950NL), 1280 × 800
Displaying and Adjusting the Image 61
note
To select Full while
inputting a 1080i signal, set
the Progressive setting to
Off. See page 116.
Page 62

(G5650WNL), or 1920 × 1200 (G5450WUNL/G5750WUNL);
images are cut off if the resolution is over 1024 × 768
(G5550NL/G5950NL), 1280 × 800 (G5650WNL), or 1920 ×
1200 (G5450WUNL/G5750WUNL).
note
In order to use the Split
Screen feature, one of your
images must be input
through the
DVI-D (G5450WUNL/
G5750WUNL only) port.
The other image can be
input through the
Computer1, Computer2
(G5550NL/G5650WNL/
G5950NL only),
S-Video, Video1, or
Video2 ports.
Images input through the
cannot be projected as part
of the split screen.
USB or
HDMI or
BNC,
LAN port
Press the
Aspect button repeatedly to cycle through the available
options.
You can also change the aspect ratio using the projector’s Signal
menu. See page 116 for details.
Projecting Two Images Simultaneously
You can use the projector’s split screen feature to divide the screen
into left and right sections and simultaneously project two images.
Follow these steps to activate the split screen:
1. Press the
selected input source will move to the left side of the screen.
2. Press the
Split button on the remote control. The currently
Menu button. You see the following screen:
3. To change one of the images, highlight either
Source Right (whichever side contains the image you want to
change) and press
want to change to and press
4. To switch the images, highlight
5. To change one of the image sizes, highlight
press
Press
62 Displaying and Adjusting the Image
Source Left or
Enter. Then highlight the input source you
Enter again.
Swap Screens and press Enter.
Screen Size and
Enter. Then highlight a sizing option and press Enter again.
Menu to exit.
Page 63

Depending on the video signals that are input, the images on the
left and right may not appear at the same size even if you choose
Equal as the sizing option.
6. To end the split screen, do one of the following:
■ Press the Esc button on the remote control or the projector’s
control panel.
■ Press the Split button on the remote control.
■ Select Exit Split Screen from the Split Screen Setup window
and press
Enter.
You cannot do the following while the split screen is active:
■ Use the projector’s on-screen menus
■ Use the E-Zoom feature
■ Change the aspect ratio of either image
■ Use the User button on the remote control
■ Use the Help button (unless an error or warning is occurring)
Additionally, while you are using the split screen:
■ The audio from the source on the left side of the screen will
be output.
■ The Color Mode, Abs. Color Temp, and Color
Adjustment
settings for the image on the left are applied to
the image on the right (all of the remaining settings in the
projector’s
Image menu are set to default for the image on
the right side).
■ You cannot use the Thin Line Enhancement or Thick Line
Enhancement
Reduction
■ The Overscan setting is set to its default value, if applicable.
■ The screen will be blue for any side which is not receiving a
signal, and the screen will turn black when the
settings or the Progressive, Noise
, or 2-2 Pull-down features.
A/V Mute
button is pressed.
Displaying and Adjusting the Image 63
Page 64

■ The image on the left side of the screen can be output to an
external monitor as long as it meets the requirements (see
page 45).
You can also activate the split screen using the projector’s
menu. See page 119 for details.
Signal
64 Displaying and Adjusting the Image
Page 65

Presenting With the Remote
3
Control
The projector includes a number of tools to enhance your
presentation. All of them can be accessed using the remote control,
which lets you operate the projector from anywhere in the room—up
to 49 feet (15 meters) away.
You can use the remote control to adjust the picture and sound
(page 66), as a pointer to highlight your presentation (page 69), or to
control two or more projectors at the same time (page 71). If you have
the optional wireless mouse receiver, you can also use your remote
control as a wireless mouse when projecting from a computer
(page 70).
This chapter covers:
3
■ Using the remote control
■ Controlling the picture and sound
■ Highlighting your presentation
■ Operating your computer with the remote control
■ Operating two or more projectors with the remote control
65
Page 66

note
If a button is pressed longer
than 30 seconds, the remote
control stops operating to
conserve battery power.
When you release the
button, normal operation
resumes.
Using the Remote Control
Make sure batteries are installed as described on page 142. Follow
these tips for using the remote control:
■ Point the remote control at the front of the projector or at the
screen.
■ Stand within 49 feet (15 meters) of the projector.
Controlling the Picture and Sound
note
Using the remote under
bright fluorescent lamps or
in direct sunlight may affect
projector response.
You can use the remote control to preview and select your picture
sources, temporarily turn off the picture and sound, freeze the action,
zoom in on the picture, and adjust the volume.
Switching Between Picture Sources
If your projector is connected to more than one computer and/or
video source, you can switch between the different sources:
■ The easiest way to select your source is to press the Search button
on the remote control (or the
projector) repeatedly until you see the image you want on the
screen.
Source Search button on the
■ On the remote control, you can press one of the Source buttons
to select the connected device you need.
After you select a source, the screen goes dark for a moment before the
image appears.
66 Presenting With the Remote Control
Page 67

Turning Off the Picture and Sound
You can temporarily turn off the image and sound by pressing the
A/V Mute button on the remote control. This turns the image black
and stops the sound. To turn the image and sound back on, press the
button again.
You can have the screen turn blue (using the Display setting as
described on page 126) or display an image such as a company logo
when you press the
information on displaying an image.)
A/V Mute button. (See page 123 for more
Stopping Action
Press the Freeze button on the remote control to stop the action in
your video or computer image. The image freezes but the sound
continues.
To restart the action, press the
Freeze button again.
Presenting With the Remote Control 67
note
This function pauses the
image, not the sound.
Because the source continues
to transmit signals, when
you resume the action, it
won’t be at the point you
stopped it.
Page 68

Zooming Part of Your Image
You can zoom in on a portion of the image using the E-Zoom buttons
on the remote control.
note
You cannot use the
Progressive or Noise
Reduction features (see
page 116) while you are
using E-Zoom.
note
To temporarily shut off the
sound and picture, press the
A/V Mute button.
1. Press the
E-Zoom button on the remote control.
You see a crosshair indicating the center of the zoom-in area.
2. Use the pointer button to position the crosshair.
3. Continue pressing the
E-Zoom button to enlarge the selected
area up to 4 times.
4. While the image is enlarged, you can:
■ Use the pointer button to move around the screen.
■ Press the E-Zoom button to zoom out.
5. When done, press the
Esc button to return the image to its
original size.
Controlling the Volume
To change the volume, press the or button on the remote
control.
You can also adjust the volume using the projector’s menu system.
See page 120.
68 Presenting With the Remote Control
Page 69

Highlighting Your Presentation
You can display a pointer to call out important information on the
screen, and you can choose from three shapes for the pointer.
Using the Pointer Tool
1. To activate the pointer tool, press the Pointer button on the
remote control. A pointer appears on the screen.
Pointer
If you prefer to use a different style of pointer, see the instructions
in the next section.
2. Use the pointer button on the remote control to position the
pointer on the screen.
3. When you’re done using the pointer, press the pointer button
to clear the screen.
Choosing a Different Pointer Shape
Follow these steps to select a different pointer shape:
1. Press the
Settings menu, and press Enter. Then highlight Pointer Shape
and press
at the right.
2. Select the shape you want and press
3. Press
Menu button on the remote control, highlight the
Enter. You can select one of the pointer shapes shown
Enter.
Menu to exit.
Presenting With the Remote Control 69
Page 70

note
You can also use the Up and
Down buttons to move
through a presentation that
is being projected over a
network or from a device
connected to the projector’s
USB port.
Operating Your Computer With the Remote Control
With the optional wireless mouse receiver (see page 15), you can use
the remote control in place of your computer’s mouse. This gives you
more flexibility when delivering slideshow-style presentations, since
you won’t have to stand next to the computer to change slides.
■ Use the Up and Down buttons to move through slides or
pages in a presentation.
Use to move pointer
on screen
Left-click
Page up or down
to change slides
or pages
■ Use the pointer button to move the pointer on the screen.
■ Press the Enter button once to left-click, or twice to double-click.
Press the
■ To drag-and-drop, hold down the Enter button. Then use the
Esc button to right-click.
Right-click
pointer button to drag the object. When it’s where you want
it, release the
Enter button.
70 Presenting With the Remote Control
Page 71

Operating Two or More Projectors With the Remote Control
If you’re using more than one projector, you can control all the
projectors—or just selected ones—by using the projector ID system.
To operate a projector, set the remote control’s ID to match that of
the projector. Or you can control all the projectors at once by setting
the remote control’s ID to zero.
Setting the Projector ID
The projector’s default ID is set to Off. This lets it respond to
commands from any remote control. To change the ID, follow these
steps:
1. Press the
projector’s menu screen.
2. Select
Enter again.
3. Use the pointer button to highlight the new ID, and press
Enter to select it.
4. When you’re done, press
Menu button on the remote control. You see the
Extended, press Enter, select Projector ID, then press
Menu to exit.
Presenting With the Remote Control 71
Page 72

Checking the Projector ID
You can check the projector’s ID by following these steps:
1. Move the remote control ID switch to the
On position.
2. Point the remote control at the projector you want to check.
3. While holding the
ID button, press the Help button. You see a
message on the screen like this:
Setting the Remote Control ID
The remote control’s default ID is zero. This lets you operate any
projector. To set it to operate a specific projector, follow these steps:
1. Move the remote control ID switch to the
note
When the remote control ID
switch is in the
you can control any
projector regardless of the
projector or remote control
ID settings.
72 Presenting With the Remote Control
Off position,
On position.
Page 73

2. Press and hold the ID button on the remote control.
3. While holding the
ID button, press a numbered button on the
remote control (0 through 9) to select the desired ID. Select zero
to control all projectors, or select a number to match the ID of the
projector(s) you want to operate.
Presenting With the Remote Control 73
Page 74

74 Presenting With the Remote Control
Page 75

4l
4
Using the Projector on a Network
You can use Quick Wireless Connection or EasyMP
Projection to project images shown on your computer screen—
including text, graphics, and video—directly to your audience. See the
EasyMP Network Projection Operation Guide for information on
features and use.
You can use EasyMP Monitor (available for Windows only) to
monitor and control your projector through the network. For
information on installing and using EasyMP Monitor, see the EasyMP
Monitor Operation Guide.
You can use EasyMP Multi PC Projection to simultaneously display
images from different networked computers. For information on
installing and using EasyMP Multi PC Projection, see the EasyMP
Multi PC Projection Operation Guide.
You’ll find instructions in this chapter on:
■ Connecting the projector to a wired LAN
®
Network
■ Installing the optional wireless LAN module
■ Using Quick Wireless Connection
■ Configuring projector and network settings
■ Using wireless security options
■ Removing the optional wireless LAN module
■ Sending e-mail alerts and monitoring the projector
■ Using a browser to control the projector
75
Page 76
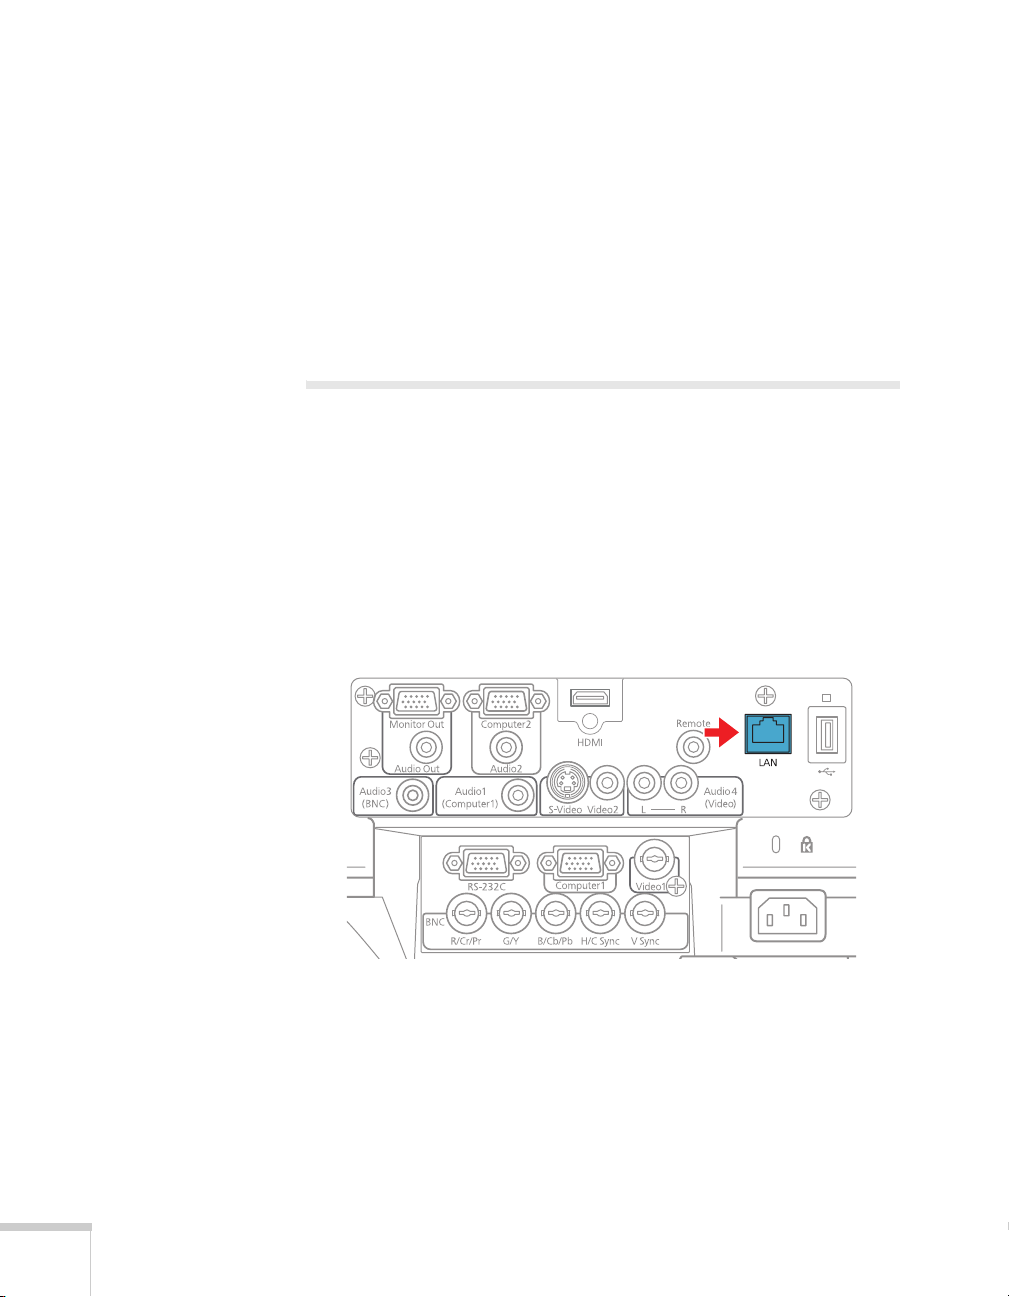
For a wireless connection, make sure you’ve installed the optional
Wireless 802.11g/b/a Module, as described on page 78. Then follow
the steps in this chapter to use Quick Wireless Connection (Windows
only) or configure your projector and network. See the EasyMP
Network Projection Operation Guide for instructions on installing the
EasyMP Network Projection software. The EasyMP Network
Projection Operation Guide also contains instructions on using the
software to project over the network.
Connecting to a Wired Network
With an Ethernet cable, you can connect the projector to your
network and configure it with an IP address.
1. Connect the projector to your network using a commercially
available 100BaseTX or 10BaseT network cable. Connect the
cable to the
proper data transmission, use a shielded, Category-5 cable or
better.
LAN port on the projector as shown. To ensure
2. Connect the other end to your Ethernet hub or router.
3. Turn on the projector.
4. Press the
Enter.
5. Choose
76 Using the Projector on a Network
Menu button, select the Network menu, then press
Network Configuration and press Enter.
Page 77

6. Choose Wired LAN and press Enter. You see the following
screen:
7. Do one of the following:
■ If your network assigns addresses automatically, turn on the
DHCP setting.
■ If your network does not assign addresses automatically, turn
off
DHCP and enter the projector’s IP Address, Subnet
Mask
, and Gateway Address.
To enter numbers, use the pointer button on the remote
control to highlight the number you want to input, then press
Enter button.
the
8. To prevent the IP address from appearing on the standby screen,
set the
IP Address Display setting to Off.
9. When you’re done making all necessary changes, highlight the
Return button at the top of the screen, then press Enter. Choose
Setup complete and press Enter, then choose Yes and press
Enter to save the changes.
10. Press
Menu to exit.
Using the Projector on a Network 77
Page 78

Installing the Optional Wireless
802.11g/b/a Module
Make sure you have the optional Wireless 802.11g/b/a Module. Turn
off the projector and disconnect the power cord before you install the
module.
1. Remove the cover from the wireless module’s insertion area.
2. Insert the Wireless 802.11g/b/a Module as shown.
3. Fasten the module using the screw that came with it.
78 Using the Projector on a Network
Insert
screw here
Page 79

If you have the optional USB key, you can use Quick Wireless
connection as described in the next section. Or, you can configure
your connection manually as described on page 80.
Using Quick Wireless Connection
Using the optional USB key, you can quickly connect the projector to
a Windows computer wirelessly without any configuration.
First, make sure you have installed the optional wireless module as
described on page 78 and turned on the projector.
1. Connect the USB key to the projector’s USB port.
2. When you see a projected message that the network information
update is complete, remove the USB key.
3. Connect the USB key to a USB port on your computer or
notebook.
In Windows 7 or Windows Vista, if you see the AutoPlay
window, select
Account Control screen, click
4. Follow the instructions on the screen to install the Quick Wireless
Connection driver.
If you see a Windows Firewall message, click
firewall.
After a few minutes, your computer image will be displayed
through the projector. If not, try restarting your computer.
5. When you’re done with your presentation, remove the USB key.
You may need to restart your computer to reactivate your wireless
interface.
Run LaunchQW.exe. When you see the User
Allow.
Yes to disable the
note
Do not attempt to write to
the USB key or use it as a
flash memory drive.
note
The Quick Wireless
Connection utility will
disable any other wireless
sessions and adapter
programs. Make sure you
leave the USB key in your
computer for your entire
Quick Wireless Connection
session.
Using the Projector on a Network 79
Page 80

Configuring Basic Settings
You can give your projector a unique name, enable a projector
keyword, or create a password for controlling the projector over the
Web.
1. Press the
2. Choose
screen like the following:
3. Make sure the projector has a unique name, so you can identify it
on your network.
If you need to rename it, highlight the
then press
Menu button, then choose Network and press Enter.
Network Configuration and press Enter. You see a
Projector Name text box
Enter.
4. Use the pointer button on the remote control to select
individual letters, then press
blank space or to navigate backward and forward through the
input text, highlight the arrows and press
symbol settings or capital letters, highlight the option and press
Enter. When you’re done, highlight Finish and press Enter.
80 Using the Projector on a Network
Enter to input a character. To add a
Enter. To toggle
Page 81

5. If you want to create a password for using PJLink to control the
projector, highlight
PJLink Password, press Enter, and enter a
password of up to 8 alphanumeric characters. When you’re done,
highlight
Finish and press Enter.
6. If you want to create a password for remote access to the
projector, highlight
Web Control Password, press Enter, and
enter a password of up to 8 alphanumeric characters. When you’re
done, highlight
Finish and press Enter.
7. If you want to set up a security keyword so that only people who
are in the same room as the projector can access it, set the
Projector keyword option to On. Then when you want to
connect to the projector, it displays a randomized four-digit
number or “keyword” on the screen. If you’re using EasyMP
Network Projection, you can enter the keyword on your
computer to connect (see the EasyMP Network Projection
Operation Guide for details).
8. When you’re done making these settings, highlight the
button at the top of the screen, then press
Complete
and press Enter, then choose Yes and press Enter to
Enter. Choose
Return
save your settings.
9. Press
Menu to exit.
Configuring a Wireless Connection
After you install the optional Wireless 802.11g/b/a Module, you can
use the EasyMP Network Projection software to connect to the
projector and send images wirelessly in two modes: Ad Hoc mode or
Access Point mode.
■ Ad Hoc mode (computer-to-computer mode) lets you connect
just one computer to the projector at a time; it’s easy to set up,
and the only equipment you need is a computer with a wireless
(802.11g, 802.11b, or 802.11a) network card or adapter, or a
Macintosh with an AirPort
connect with this mode, any connection to other wireless
networks is broken; you can connect to the projector only.
®
or AirPort Extreme card. When you
note
You can interrupt projection
even when a keyword is
used. Press the
on the remote control and
select the Close option.
Esc button
note
Make sure you’ve installed
the EasyMP Network
Projection software as
described in the EasyMP
Network Projection
Operation Guide.
To connect to the projector
over a wireless network, your
computer must be running
Windows 7, Windows
Vista, Windows XP, or
Windows 2000. Your Mac
must be running Mac OS X
10.3 to 10.6.
Access Point mode
(infrastructure mode) is
required to achieve transfer
speeds up to 54MB/sec on an
802.11g network. Ad Hoc
mode (computer-tocomputer mode) limits
network connections to
11MB/sec. This is a
standard specification of
802.11g networking.
Using the Projector on a Network 81
Page 82

■ Access Point mode (infrastructure mode) lets multiple computers
access the projector at the same time and easily trade off control
over the projector. To use Access Point mode, you need a wireless
(802.11g, 802.11b, or 802.11a) access point or an AirPort
Extreme (or AirPort) base station, and one or more computers
with wireless network cards or adapters.
Configuring the Projector
1. Press the Menu button, then choose Network and press Enter.
2. Choose
3. Choose
4. Make sure Wireless LAN Power is set to
Network Configuration and press Enter.
Wireless LAN and press Enter. You see this screen:
On. You can turn it off
to prevent unauthorized access.
5. Select one of the following connection modes:
■ Quick mode lets you easily connect one computer to the
projector at a time. You can also select this setting when
you’re using the optional Epson Quick Wireless Connection
USB key.
■ Advanced mode lets multiple computers access the projector
82 Using the Projector on a Network
at the same time and easily trade off control of the projector.
This method requires a wireless network access point or an
AirPort Extreme (or AirPort) base station.
Page 83

6. If your network is using 802.11b/g, use the pointer button on
the remote control to select a
Channel setting. If interference
occurs, select a different channel.
7. If your network is using 802.11a, use the pointer button on
the remote control to highlight
802.11a, then press Enter to
select it.
8. If you are connecting in Quick mode, you can set
Setting
to On to find the projector faster and create a more stable
SSID Auto
connection. Skip step 9 if you activate this setting. Select
you are connecting to multiple projectors from a single computer.
9. Highlight the
SSID text box, press Enter, and enter the name you
want to assign to the projector (Quick mode), or the name of your
existing wireless network (Advanced mode):
Use the arrow buttons to select individual letters, then press
to input a character. To add a blank space or to navigate backward
and forward through the input text, highlight the arrows and
press
Enter. To toggle symbol settings or capital letters, highlight
the option and press
and press
Enter.
Enter. When you’re done, highlight Finish
Off if
Enter
Note that the SSID is case-sensitive (if you enter the name in
uppercase on the projector, you must type it the same way on the
computer connecting to the projector).
10. Do one of the following:
■ If your network assigns addresses automatically, turn on the
DHCP setting.
Using the Projector on a Network 83
Page 84

■ If your network does not assign addresses automatically, turn
off
DHCP and enter the projector’s IP Address, Subnet
, and Gateway Address, as needed.
Mask
note
For specific details about
your network, please consult
your network administrator.
If you’re using AirPort, start
the AirPort Admin utility,
select your base station and
click Configure. Then click
the Network tab to see your
base station’s IP address.
note
Settings may vary,
depending on your wireless
network adapter. See the
documentation for your
adapter for more
information.
To enter numbers, use the arrow buttons on the remote
control to select each number on the screen, then press the
Enter button. When you’re finished entering an address in
the network menu, highlight
Finish, then press the Enter
button.
11. If you want to prevent the SSID from being displayed on the
standby screen, set the
SSID Display option to Off.
12. To prevent the IP address from appearing on the standby screen,
IP Address Display setting to Off.
set the
13. When you’re done making these settings, press
Return button at the top of the screen, then press Enter. Choose
Complete
and press Enter, then choose Yes and press Enter to
Esc. Highlight the
save your settings.
Now you’re ready to select the wireless network your computer, as
described in the next section.
Selecting Wireless Network Settings in Windows
Before connecting to the projector, select the correct wireless network
on your computer.
1. To access your wireless utility software, double-click the network
icon on the Windows taskbar.
2. Do one of the following:
■ If your projector is set up on an existing network (Advanced
mode), select the network name (SSID).
■ If your projector is configured for Quick mode, select the
3. Click
Now you’re ready to connect to the projector. See the EasyMP
Network Projection Operation Guide for details.
84 Using the Projector on a Network
SSID you assigned to the projector.
Connect.
Page 85

Selecting Wireless Network Settings in Mac OS
Before connecting to the projector, select the correct wireless network
on your computer.
1. Click the AirPort icon on the menu bar at the top of the screen.
2. Make sure AirPort is turned on, then do one of the following:
■ If your projector is set up on an existing network (Advanced
mode), select the network name (SSID).
■ If your projector is configured for Quick mode, select the
SSID you assigned to the projector.
Making a WPS (Wi-Fi Protected Setup) Connection
If you are using a WPS-compatible access point, you can configure the
settings for the connection between the projector and the access point
from the projector’s Configuration menu using one of these methods:
■ Push Button Method
Press both the
the access point to make the SSID and security settings. This
method is recommended when the projector and access point are
close together.
Enter button on the projector and the button on
■ PIN Code Method
With the PIN code method, you enter an 8-digit code from the
computer to enable the SSID and security settings. The
connection between the computer and the access point must have
already been established. (For connection instructions, refer to the
manual provided with the access point.) This method lets you
make the settings without having to press any buttons on the
projector, and is recommended when the projector is mounted on
the ceiling.
Follow these steps to open the WPS connection screen:
1. Press the
2. Choose
Menu button, then choose Network and press Enter.
Network Configuration and press Enter.
Using the Projector on a Network 85
Page 86
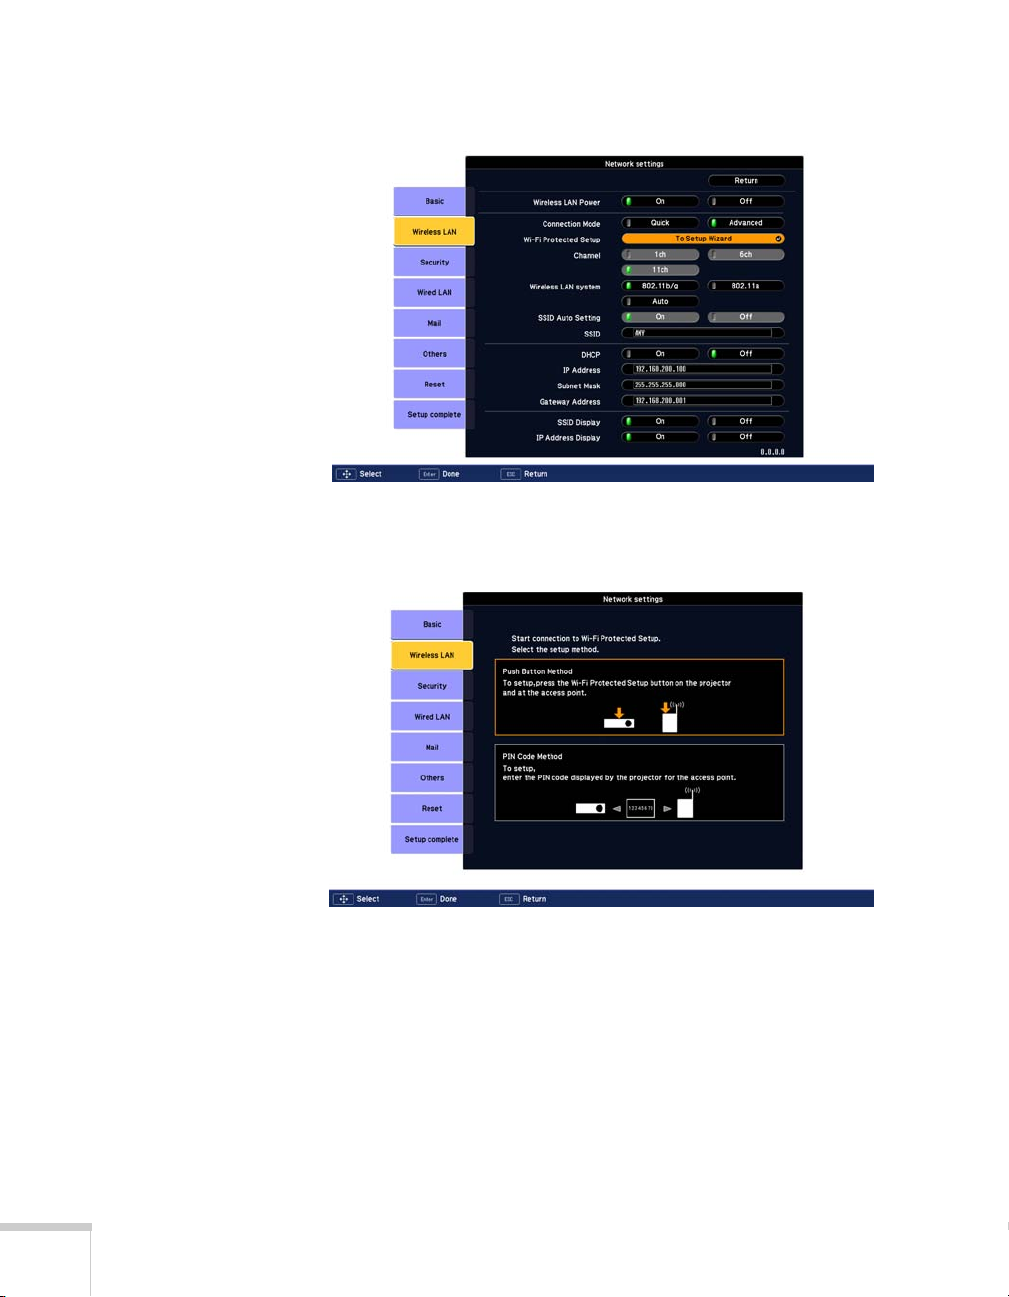
3. Choose
Wireless LAN and press Enter. You see this screen:
4. Select
To Setup Wizard, then press Enter. You see the WPS
(Wi-Fi Protected Setup) connection screen:
5. For the Push Button Method, follow the instructions on page 87.
For the PIN Code Method, follow the instructions on page 88.
86 Using the Projector on a Network
Page 87

Using the Push Button Method
1. Select Push Button Method and press Enter. You see this screen:
2. Press the
Enter button on the projector.
3. When prompted by the screen, press the
access point.
You see a message that WPS setup is complete.
4. Press the
Enter button or the Esc button to return to the wireless
LAN setting page.
WPS button on the
Using the Projector on a Network 87
Page 88

5. Select
Setup Complete and press Enter.
6. Make sure
7. Press the
Yes is selected and press Enter.
Menu button.
Using the PIN Code Method
Before you can make a connection using the PIN Code Method, a
connection must have already been established between the computer
and the access point. For details on how to make this connection, refer
to the manual provided with the access point.
1. Follow steps 1 through 4 beginning on page 85 to access the WPS
Connection Screen.
88 Using the Projector on a Network
Page 89

2. Select PIN Code Method and press Enter. You see this screen:
3. From the computer, enter the displayed PIN code for the access
point, select
Start Setup and then press Enter.
You see a progress meter on the screen.
4. When you see a message that WPS Setup is complete, press the
Enter or Esc button.
Using the Projector on a Network 89
Page 90

5. When you see the wireless LAN setting page, select
Complete
and press Enter. You see this screen:
Setup
6. Select
7. Press the
Yes and press Enter to save the settings.
Menu button and then close the configuration menu to
exit.
Using Wireless Security Options
If you have installed the optional Wireless 802.11g/b/a Module, you
can use the following security options when connecting to the
projector wirelessly: WEP encryption, WPA security, EAP-TLS
certificate validation, or LEAP, EAP, or PEAP authentication. To set
these security features on your wireless network, see your
documentation or get help from your network administrator. See the
following sections to enable the security option on your projector:
■ “Enabling WEP Encryption” on page 91
■ “Enabling WPA Security” on page 93
■ “Enabling EAP, LEAP, or PEAP Authentication” on page 94
■ “Enabling EAP-TLS Certificate Validation” on page 95
90 Using the Projector on a Network
Page 91

Enabling WEP Encryption
1. Press Menu, then highlight Network and press Enter.
2. Choose
3. Highlight
Network Configuration and press Enter.
Security and press Enter. Then press Enter again to
display the security options:
4. Highlight
WEP and press Enter.
5. For the WEP encryption setting, highlight
press
Enter.
6. For Format, highlight
enable hexadecimal input. Then press
ASCII to enable text input or HEX to
Enter.
128Bit or 64Bit and
7. If you chose
64Bit, choose Key ID 1, 2, 3, or 4.
Using the Projector on a Network 91
Page 92
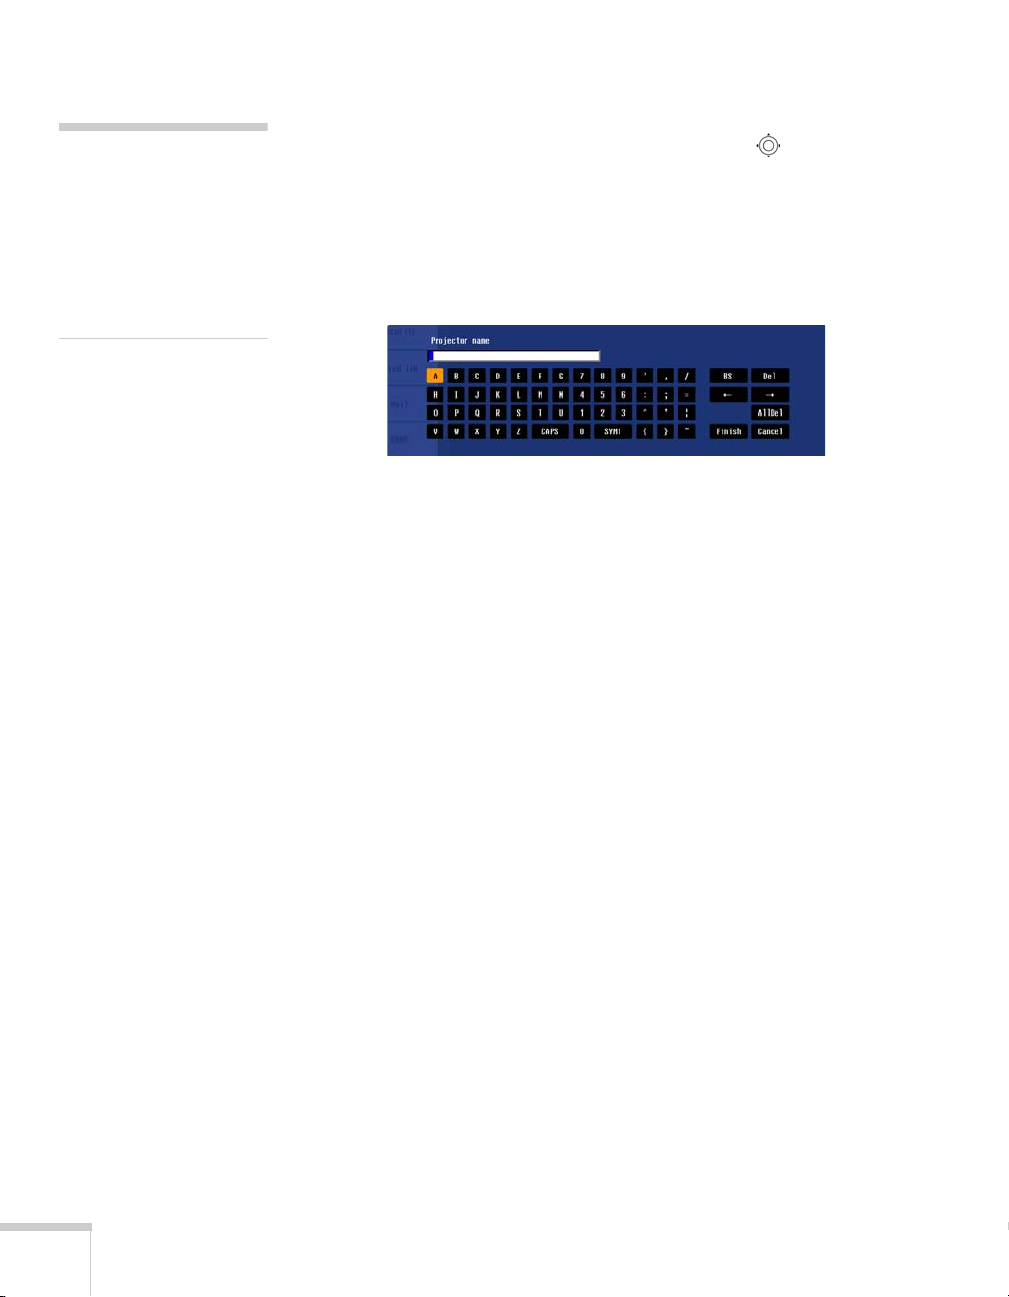
note
Text input for WEP
encryption varies with
different access points; check
with your network
administrator. Try
first. If that doesn’t work,
try Text2 and then Text3.
ASCII
Highlight the
Key ID you selected, then press
button to select individual letters, then press
Encryption key text box that corresponds to the
Enter. Press the pointer
Enter to input a
character. To navigate backward and forward through the input
text, highlight the arrows and press
settings or capital letters, highlight the option and press
When you’re done, highlight
Enter. To toggle symbol
Enter.
Finish and press Enter.
8. Check with your network administrator for directions on entering
a key for your network, and follow these general guidelines:
■ For 128 bit WEP encryption with hexadecimal input, enter
26 characters, from 0 to 9 and from A to F.
■ For 64 bit WEP encryption with hexadecimal input, enter 10
characters, from 0 to 9 and from A to F.
■ For 128 bit WEP encryption with ASCII or text input, enter
■ For 64 bit WEP encryption with ASCII or text input, enter 5
9. When you’re done making these settings, select
complete
changes.
10. Press
92 Using the Projector on a Network
13 alphanumeric characters.
alphanumeric characters.
Return, Setup
, and then Yes to confirm that you want to save the
Menu to exit.
Page 93

Enabling WPA Security
1. Press Menu, then highlight Network and then press Enter.
2. Choose
3. Highlight
Network Configuration and press Enter.
Security and press Enter. Then press Enter again to
display the security options:
4. Choose
press
Highlight the
WPA-PSK(TKIP/AES) or WPA2-PSK(TKIP/AES) and
Enter.
PSK (pre-shared key) text box and press Enter.
Press the pointer button to select individual letters, then press
Enter to input a character. To navigate backward and forward
through the input text, highlight the arrows and press
Enter. To
toggle symbol settings or capital letters, highlight the option and
press
Enter. When you’re done, highlight Finish and press Enter.
note
You can enter up to 32
characters when you use the
projector’s menu. If you
enter the pre-shared key
using a web browser (see
page 101), you can enter up
to 63 characters.
5. When you’re done making these settings, select
complete
changes. Press
, and then Yes to confirm that you want to save the
Menu to exit.
Return, Setup
Using the Projector on a Network 93
Page 94

Enabling EAP, LEAP, or PEAP Authentication
1. Press Menu, then highlight Network and then press Enter.
note
You can enter up to 32
characters when you use the
projector’s menu. If you
enter the user name and
password using a web
browser (see page 101), you
can enter up to 64
characters.
2. Choose
3. Highlight
Network Configuration and press Enter.
Security and press Enter. Then press Enter again to
display the security options:
4. Choose
PEAP/MS-CHAPv2, PEAP/GTC, LEAP,
EAP-Fast/MS-CHAPv2, or EAP-FAST/GTC. Then press Enter.
EAP-TTLS/MD5, EAP-TTLS/MS-CHAPv2,
5. Enter the user name and password that match the settings on your
authentication server.
Highlight the
pointer button to select individual letters, then press
User name text box and press Enter. Press the
Enter to
input a character. To add a blank space or to navigate backward
and forward through the input text, highlight the arrows and
press
Enter. To toggle symbol settings or capital letters, highlight
the option and press
and press
Enter.
Enter. When you’re done, highlight Finish
94 Using the Projector on a Network
Page 95

Highlight the Password text box and press Enter. Enter the
password as you entered the User name.
6. When you’re done making these settings, select Return, Setup
complete
, and then Yes to confirm that you want to save the
changes.
7. Press
Menu to exit.
Enabling EAP-TLS Certificate Validation
Once you have created an EAP-TLS certificate, follow the steps below
to enable it. (Contact your Network Administrator for more
information on obtaining or creating the certificate.)
For information on registering a certificate to the projector, see the PC
Free Operation Guide.
1. Press
2. Choose
3. Highlight
Menu, then highlight Network and then press Enter.
Network Configuration and press Enter.
Security and press Enter. Then press Enter again to
display the security options:
4. Choose
EAP-TLS and press Enter. The certificate information
appears on the screen.
5. When you’re done, select
Yes to confirm that you want to save the changes.
Return, Setup complete, and then
Using the Projector on a Network 95
Page 96

6. Press
Menu to exit.
Enabling Data Encryption from EasyMP Network Projection
When using the EasyMP Network Projection software, follow these
steps to enable data encryption.
1. Click Set options on the main screen.
2. Click the
3. Select the
4. Click
For more information, see the EasyMP Network Projection Operation
Guide.
General settings tab.
Encrypt communications checkbox.
OK.
Using the EasyMP Network Projection Software
Once you’ve set up your projector and computer for network
projection, see the EasyMP Network Projection Operation Guide for
instructions on the following EasyMP features:
■ Starting EasyMP Network Projection
■ Projecting over the network (content over IP)
■ Multi-screen projection
■ Using Presentation mode
■ Connecting to a projector on a different subnet
96 Using the Projector on a Network
Page 97

Removing the Wireless 802.11g/b/a Module
Follow these steps to remove the module from your projector.
1. If you’re running EasyMP Network Projection, click
on the control bar.
2. Check the access light to make sure it isn’t flashing.
Access light
3. Turn off the projector and unplug it.
Disconnect
Click
Disconnect
caution
Never remove the module
while its access light is green
or when projecting
wirelessly. You may damage
the module.
Using the Projector on a Network 97
Page 98

4. Unscrew the module, then pull it out.
Remove
screw here
Using Projector E-mail Alerts
When this feature is enabled, the projector sends you an e-mail alert if
it has any problems.
note
You can also set e-mail alerts
from EasyMP Monitor
(available for Windows
only). See the EasyMP
Monitor Operation Guide
for more information.
98 Using the Projector on a Network
1. Press the
Enter.
2. Choose
Menu button, select the Network menu, then press
Network Configuration and press Enter.
Page 99

3. Choose Mail, then press Enter. You see a screen like this:
4. Highlight
5. Enter the IP address for the
On to receive e-mail notifications, then press Enter.
SMTP server for the projector.
You can enter a number from 0 to 255 in each field of the address.
However, the following IP addresses cannot be used: 127.x.x.x,
224.0.0.0 to 255.255.255.255 (where x is a number from 0 to
255).
6. Enter the SMTP server’s port number. The default value is 25.
You can enter a numeric value from 1 to 65535.
7. Choose one of the
Email Address fields, then enter the e-mail
address where you want to receive a message when a problem
occurs. You can register up to three addresses. You can enter up to
32 alphanumeric characters for the e-mail address.
8. Select problems or warnings to be notified about by e-mail using
the
Setting a Notification Event section. (Numbers 1 through 3
in this section correspond to the e-mail addresses you entered.)
9. When you’re done making all necessary changes, highlight the
Return button at the top of the screen, then press Enter. Choose
Setup complete and press Enter, then choose Yes and press
Enter to save the changes.
note
If a critical problem develops
with a projector which
causes it to suddenly stop
working, it may not be
possible for the projector to
send a message.
If Standby Mode is set to
Communication On in
the Extended menu, the
projector can still be
monitored even if the
projector is in standby mode
(when the power is off but
the projector is still
connected to power and the
network).
10. Press
Menu to exit.
Using the Projector on a Network 99
Page 100

When the selected problem or warning occurs, an e-mail message
is sent to the specified notification addresses. The subject line of
the e-mail is
EPSON Projector. The e-mail includes the
following information:
■ Line 1: The name of the projector where the problem has
occurred
■ Line 2: The IP address of the projector where the problem has
occurred
■ Line 3: Details of the problem
note
If you’re a network
administrator, you can use
the SNMP option to enter a
trap IP address. This lets you
receive trap alerts for the
projectors you’re monitoring.
11. When you’re done making all necessary changes, select
select
Setup complete, and then select Yes to confirm that you
want to save the changes. Press
Menu to exit the menu system.
Return,
Using SNMP to Monitor the Projector
Network administrators can use SNMP (Simple Network
Management Protocol) to monitor projectors.
1. Press the
Enter.
2. Choose
3. Choose
Menu button, select the Network menu, then press
Network Configuration and press Enter.
Others and press Enter. You see the following screen:
100 Using the Projector on a Network
 Loading...