

Operation Guide
Multimedia Projector
PowerLite Pro
1
G5150NL/G5350NL

Contents
2
EasyMP Summary ......................................................................................4
Installing the Software ...............................................................................5
Software Supplied ................................................................................................5
Installing ............................................................................................................... 5
Connecting with EMP NS Connection
Overview of EMP NS Connection..............................................................8
Two Connection Modes and their Main Functions ............................................... 8
Steps for Connecting in Advanced Connection Mode.......................................... 9
Preparing to Connect...............................................................................10
Preparing the Computer ..................................................................................... 10
Preparing the Projector ...................................................................................... 10
Connecting to a Projector on a Network and Projecting......................11
Operating the Projector ...................................................................................... 11
Operating the Computer.....................................................................................11
Using the Connection Screen ............................................................................ 12
Using the Toolbar............................................................................................... 14
Convenient EMP NS Connection Functions
Projecting Only a PowerPoint Slide show (Presentation Mode)..........18
Projecting Movies from a Computer (Movie Sending Mode)................19
Supported File Types ......................................................................................... 19
Playing back a movie ......................................................................................... 19
Using Multi-Screen Display .....................................................................21
Example of Adjusting the Virtual Display ........................................................... 21
Procedure before using the Multi-screen Display Function................................ 22
Setting the Virtual Display .................................................................................. 22
Allocating the image to be projected ..................................................................28
The allocated image is projected ....................................................................... 29
Connecting to a Projector on a Different Sub-net
Connecting to a Projector on a Different Sub-net.................................32
Searching by Specifying the IP Address and Projector Name (For
"Advanced Connection Mode" only) ......................................................33
Performing a search with a profile..........................................................34
Making a Profile ................................................................................................. 34
Searching by Specifying a Profile ...................................................................... 36
Managing a Profile ............................................................................................. 37
Setting the EMP NS Connection Operation
Using Set Options .................................................................................... 40
General settings Tab ......................................................................................... 40
Adjust Performance Tab .................................................................................... 41
Using a Computer to Set Up, Monitor and Control
Projectors
Changing Settings Using a Web Browser (Web Control).....................43
Displaying Web Control ..................................................................................... 43
Projector Setup .................................................................................................. 43
Using the Mail Notification Function to Report Problems ................... 44
Management Using SNMP.......................................................................45
Presentations Using PC Free
PC Free Compatible Files and Copying/Deleting SD Card Files ......... 47
Specifications for Files that can be Projected Using PC Free ........................... 47
Copying or Deleting SD Card Files over the Network........................................ 48
PC Free Examples............................................................................................. 50
PC Free Basic Operations ....................................................................... 51
Starting and Closing PC Free ............................................................................ 51
PC Free Basic Operations ................................................................................. 54
Rotating the Image ............................................................................................ 55
Projecting Scenarios ...............................................................................56
Creating and Editing a Scenario ........................................................................ 56
Playing a Scenario ............................................................................................. 57
Operating During a Presentation ....................................................................... 57
Projecting image and movie files ........................................................... 58
Projecting Images/Movies................................................................................. 58
Projecting all Image and Movie Files in a Folder in Sequence (Slide show) ..... 59
Setting Image and Movie File Display Conditions and Operation Mode
60
Preparing a Scenario
(Using EMP SlideMaker2)
Scenario Summary...................................................................................62
Files that Can be Included in Scenarios ................................................ 63
Turning a PowerPoint File into a Scenario ............................................ 64

Contents
Converting all files in a single operation without starting up
SlideMaker2...............................................................................................65
Starting up SlideMaker2 and Converting Files......................................67
Setting Scenario Properties ............................................................................... 67
Including PowerPoint Files in Scenarios ............................................................69
Including Image and Movie Files in Scenarios ...................................................73
Editing a Scenario ..............................................................................................74
Sending Scenarios ...................................................................................75
Cases Like These .....................................................................................77
Checking the Projection Scenario Status from a Computer............................... 77
Setting Animations .............................................................................................78
Setting the Slide Animation ................................................................................ 78
Appendix
Connection Limitations............................................................................81
Supported Resolutions ....................................................................................... 81
Display Color...................................................................................................... 81
Connection Number ........................................................................................... 81
Others ................................................................................................................ 81
When Using Windows Vista ............................................................................... 82
Troubleshooting .......................................................................................83
System Requirements..............................................................................92
3
EasyMP Summary
4
The following functions in EasyMP (Epson Administrative System for
Meeting and Presentation) can lend you huge support in creating
varied and effective meetings and presentations.
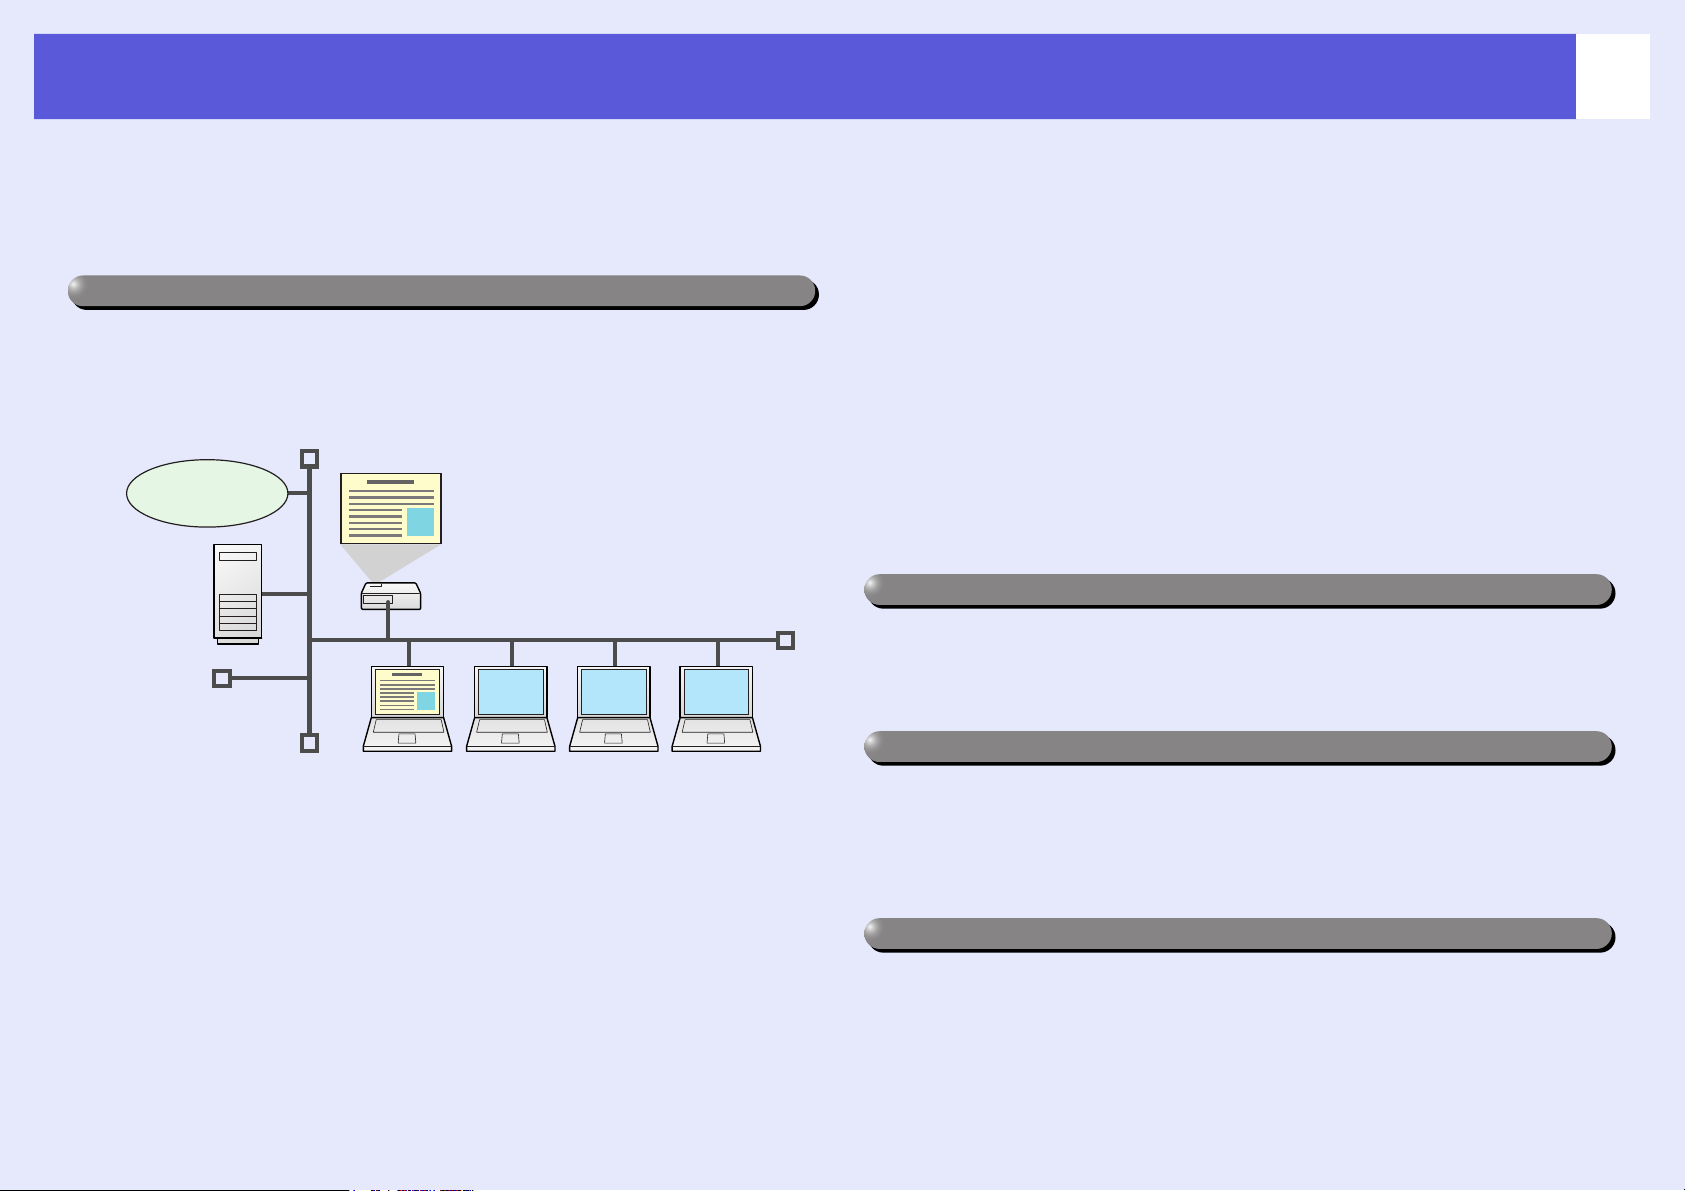
Connect the projector to a computer via a network and project (EMP NS Connection)
You can hold efficient meetings and presentations by connecting the
projector to a network.
Internet
File
server
f Various screen transfer functions
• Distribution function s p.9
• Switching function s p.9
• Multi-screen display s p.21
• Movie sending mode s p.19
• Presentation mode s p.18
f Monitor, configure, and control the projector from a remote
location
The following convenient functions collectively manage projectors in
various conference rooms.
• Monitor and detect problems from SNMP Manager on the network
s p.45
• Receive an e-mail notification if a problem occurs s p.44
• Set and control the projector by using a standard computer Web browser
s p.43
Project images from your computer using "Network projector" in Windows Vista
With Windows Vista, you can use the standard feature "Network projector" to
connect the projector to a computer via a network and then project. This lets you
make presentations via a network by simply using a standard OS function
without installing any software. See your User’s Guide for more information.
f Advance preparation is unnecessary
Because you can project materials stored on a shared file server or on your
desktop from the conference room, you do not need to make copies of
data in advance.
f Smooth progress
If the projector is connected to a network, you can share the projector
from computers on the network. When projecting data from different
computers during a meeting or presentation, you can progress smoothly
without changing the signal cable between each computer.
Even a large distance between the projector and the computer does not
cause any problems.
Project directly from SD cards and USB devices (PC Free)
You can make presentations by using SD cards or USB compatible digital
cameras or hard disks. By connecting a USB memory to the projector, JPEG
images, movies, and scenarios stored on SD cards or USB devices can be
projected directly. s p.46
Connect a USB cable to your computer and project images from the computer's screen (USB Display)
By using a commercially available USB cable to connect to a computer running
Windows you can project images from the computer. See your User’s Guide for
more information.

Installing the Software
5
To use the EasyMP functions, install the software from the supplied
EPSON Projector Software for Meeting & Presentation CD-ROM onto
your computer.
Software Supplied
You can find the following software on the EPSON Projector Software for
Meeting & Presentation CD-ROM. For system requirements information
about this software, see s p.92.
• EMP NS Connection
Software for sending computer screen images to connected projector via
a network connection.
• EMP SlideMaker2
Software for converting PowerPoint files into scenario files that can be
projected directly with PC Free.
Only the necessary slides are extracted and sorted without changing the
original PowerPoint file, and you can insert graphics files and animation
files as you progress.
• EMP Monitor
Software that lists the current status of Epson projectors connected to
the network, and monitors and controls those projectors. You can
collectively manage multiple projectors by using EMP Monitor.
Installing
Make sure you check the following points before starting installation.
• If the computer you are using is running Windows XP, Vista, or 2000
you must be logged on as the Administrator when installing.
• Make sure that you close all running applications before beginning
installation.
• Make sure you are using EMP NS Connection Version 2.4. If you are
using an older version, it may not be able to connect to the projector
correctly. Make sure you install EMP NS Connection Version 2.4 from
the EPSON Projector Software for Meeting & Presentation CD-ROM
supplied with your projector.
Procedure
For Windows
A
B
Turn on your computer.
Insert the EPSON Projector Software for Meeting &
Presentation CD-ROM into the computer.
The installer starts automatically.
C
D
Click "Recommended".
To select software and install it individually, select "Custom". To
change the language in which the software is displayed, click
"Select Language".
Check the applications to be installed, and then
click "Install".
Installing the Software
6
E
F
G
For Macintosh
A
B
When the License Agreement screen is displayed,
click "Yes".
When the "Add and Remove EPSON Virtual Display"
screen is displayed, click "OK".
To use Multi-screen display you need to setup "EPSON Virtual
Display". If you do not want to set it up now, you can do so later.
s p.22
Click "Finish" to complete the installation.
Once selected, software such as "EMP SlideMaker2" and "EMP
Monitor" is installed sequentially.
Turn on your computer.
Insert the EPSON Projector Software for Meeting &
Presentation CD-ROM into the computer.
q
• When installation does not start automatically (Windows
only) Select "Start" - "Run", and then in the "Run"
dialog box type the letter for your CD-ROM drive
followed by ":\\EPsetup.exe" and then click "OK".
• Uninstalling
For Windows
Select "Start" - "Settings" - "Control Panel" - "AddRemove Programs" or "Add or Remove Programs" and
then remove "EMP NS Connection".
For Macintosh
From "Applications" delete the "EMP NS
Connection" folder.
C
D
Double-click the "Installer for Mac OS X" icon in the
"EPSON" window.
Installation starts.
Click "Finish" to complete the installation.

Connecting with EMP NS Connection
This section explains how to connect the computer and the projector via a network in Advanced connection mode, and
the procedure for projecting images from your computer's screen with the projector.
Overview of EMP NS Connection........................ 8
• Two Connection Modes and their Main Functions..........8
"Advanced connection mode" ..........................................................8
"Quick connection mode" (Only when the optional
wireless LAN unit is installed) .................................................8
Main functions..................................................................................9
• Steps for Connecting in Advanced Connection Mode .....9
Preparing to Connect ......................................... 10
• Preparing the Computer ..................................................10
For Windows ..................................................................................10
For Macintosh.................................................................................10
• Preparing the Projector ....................................................10
Connecting to a Projector on a Network
and Projecting ...................................................11
• Operating the Projector ................................................... 11
• Operating the Computer.................................................. 11
• Using the Connection Screen........................................... 12
• Using the Toolbar ............................................................. 14

Overview of EMP NS Connection
8
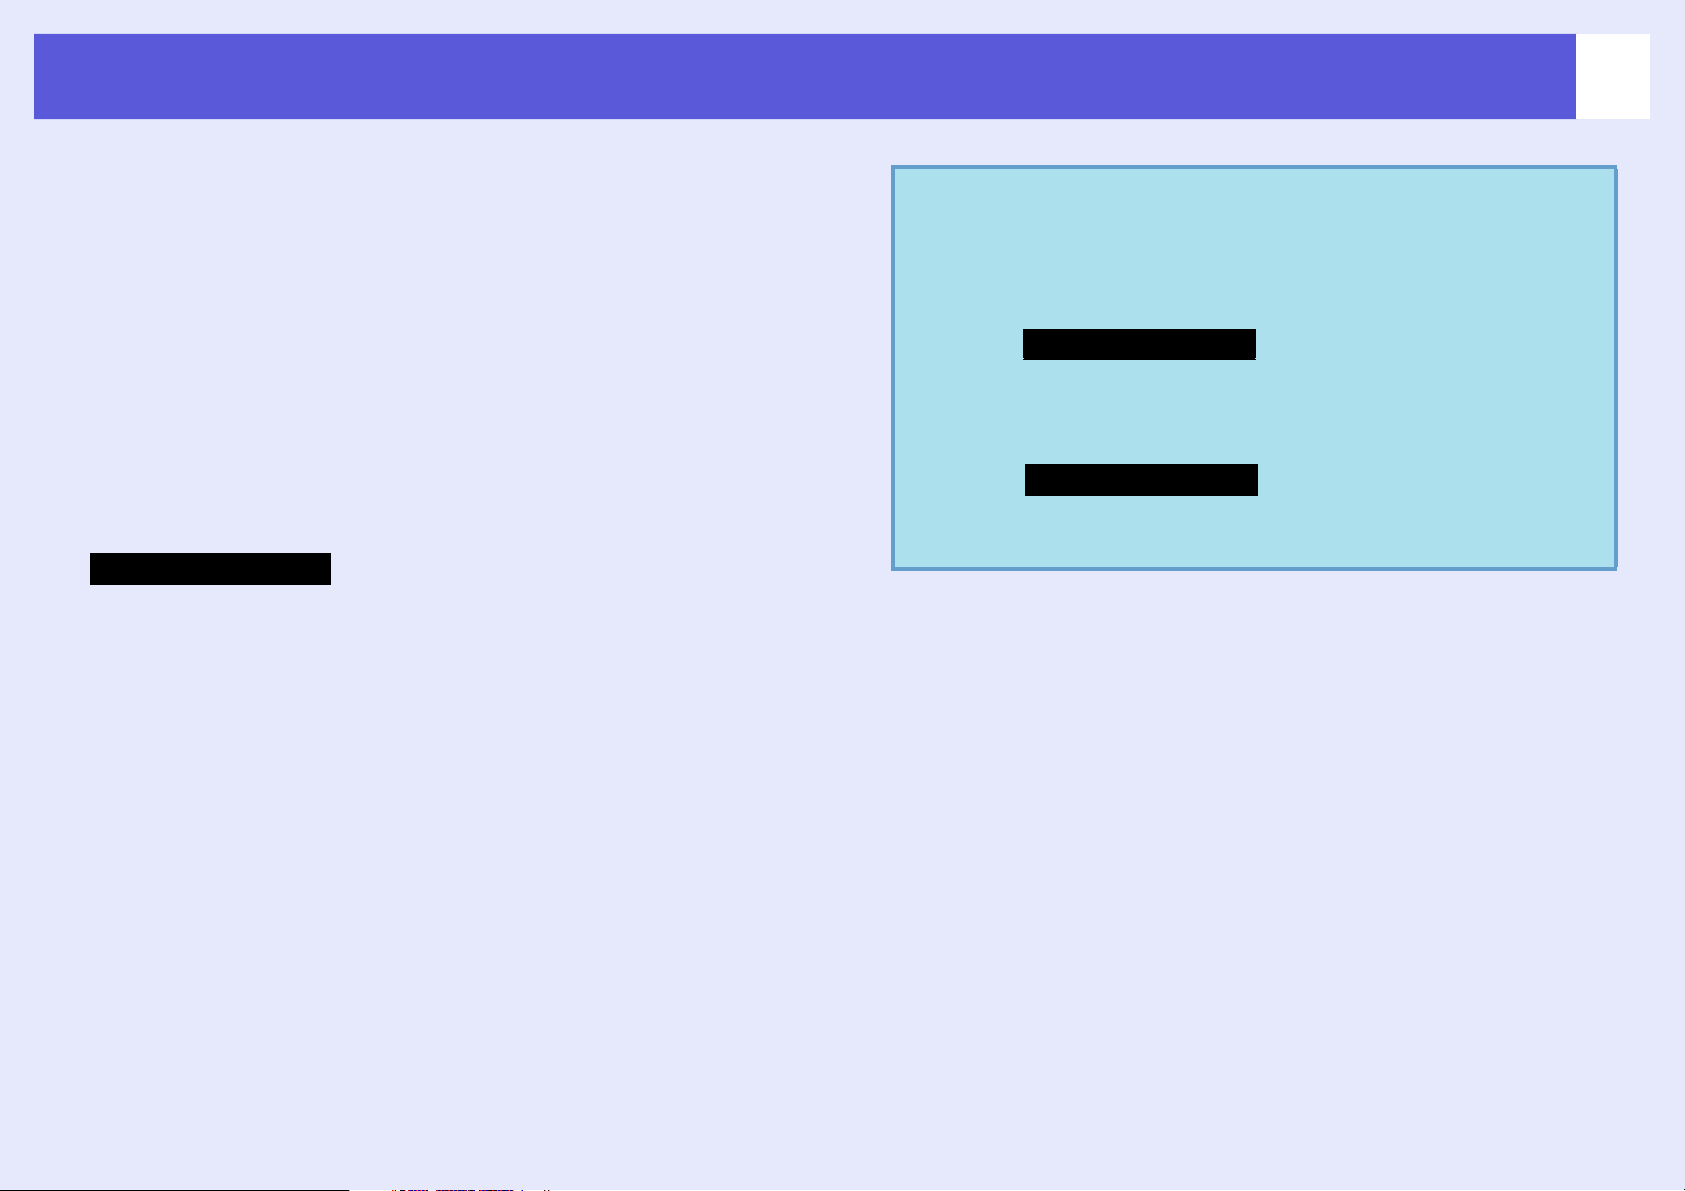
There are two methods of connecting the projector and a computer via
a network by using EMP NS Connection.
Two Connection Modes and their Main Functions
f "Advanced connection mode"
"Advanced connection mode" is an infrastructure connection, and
connects to an existing network system via a network cable.
If you install the optional wireless LAN unit in the projector, you can
connect to the network via a wireless LAN access point.
Internet
LAN
• From a conference room, you can open and project a file stored on a
computer or file server in another room.
• You can use the Internet.
• You can monitor and control projectors on a network from the
computer.
f "Quick connection mode" (Only when the optional
wireless LAN unit is installed)
"Quick connection mode" only runs when you install the optional
wireless LAN unit in the projector.
"Quick connection mode" temporarily assigns the projector's SSID to a
computer creating an ad hoc connection, and after disconnecting restores
the computer's network settings.
Optional wireless LAN unit installed Wi-Fi compliant wireless
LAN card or wireless LAN
enabled computer
• You can easily connect to a computer and project images from the
computer without making network settings.
• This lets you connect easily without a connector cable, and you can
connect even if the projector and the computer are at remote locations.
Overview of EMP NS Connection
9
f Main functions
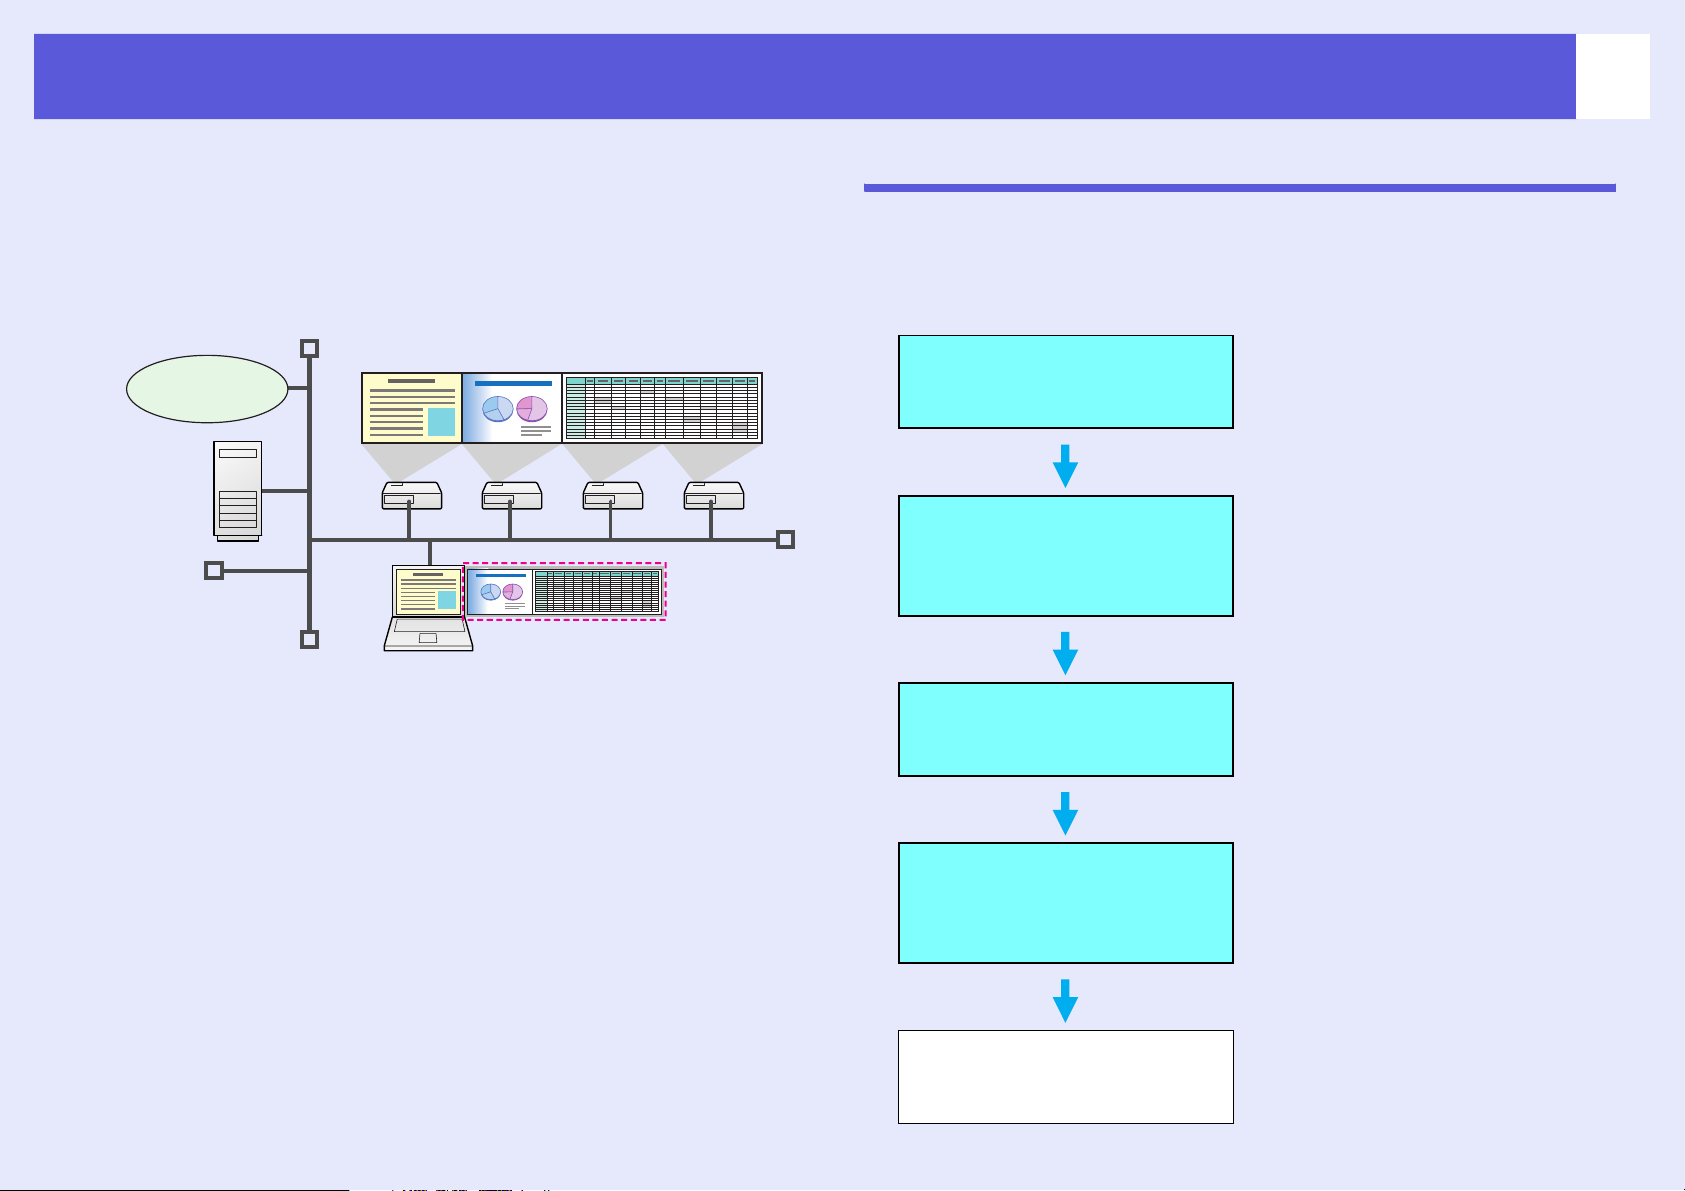
The following convenient functions let you make various meetings and
presentations.
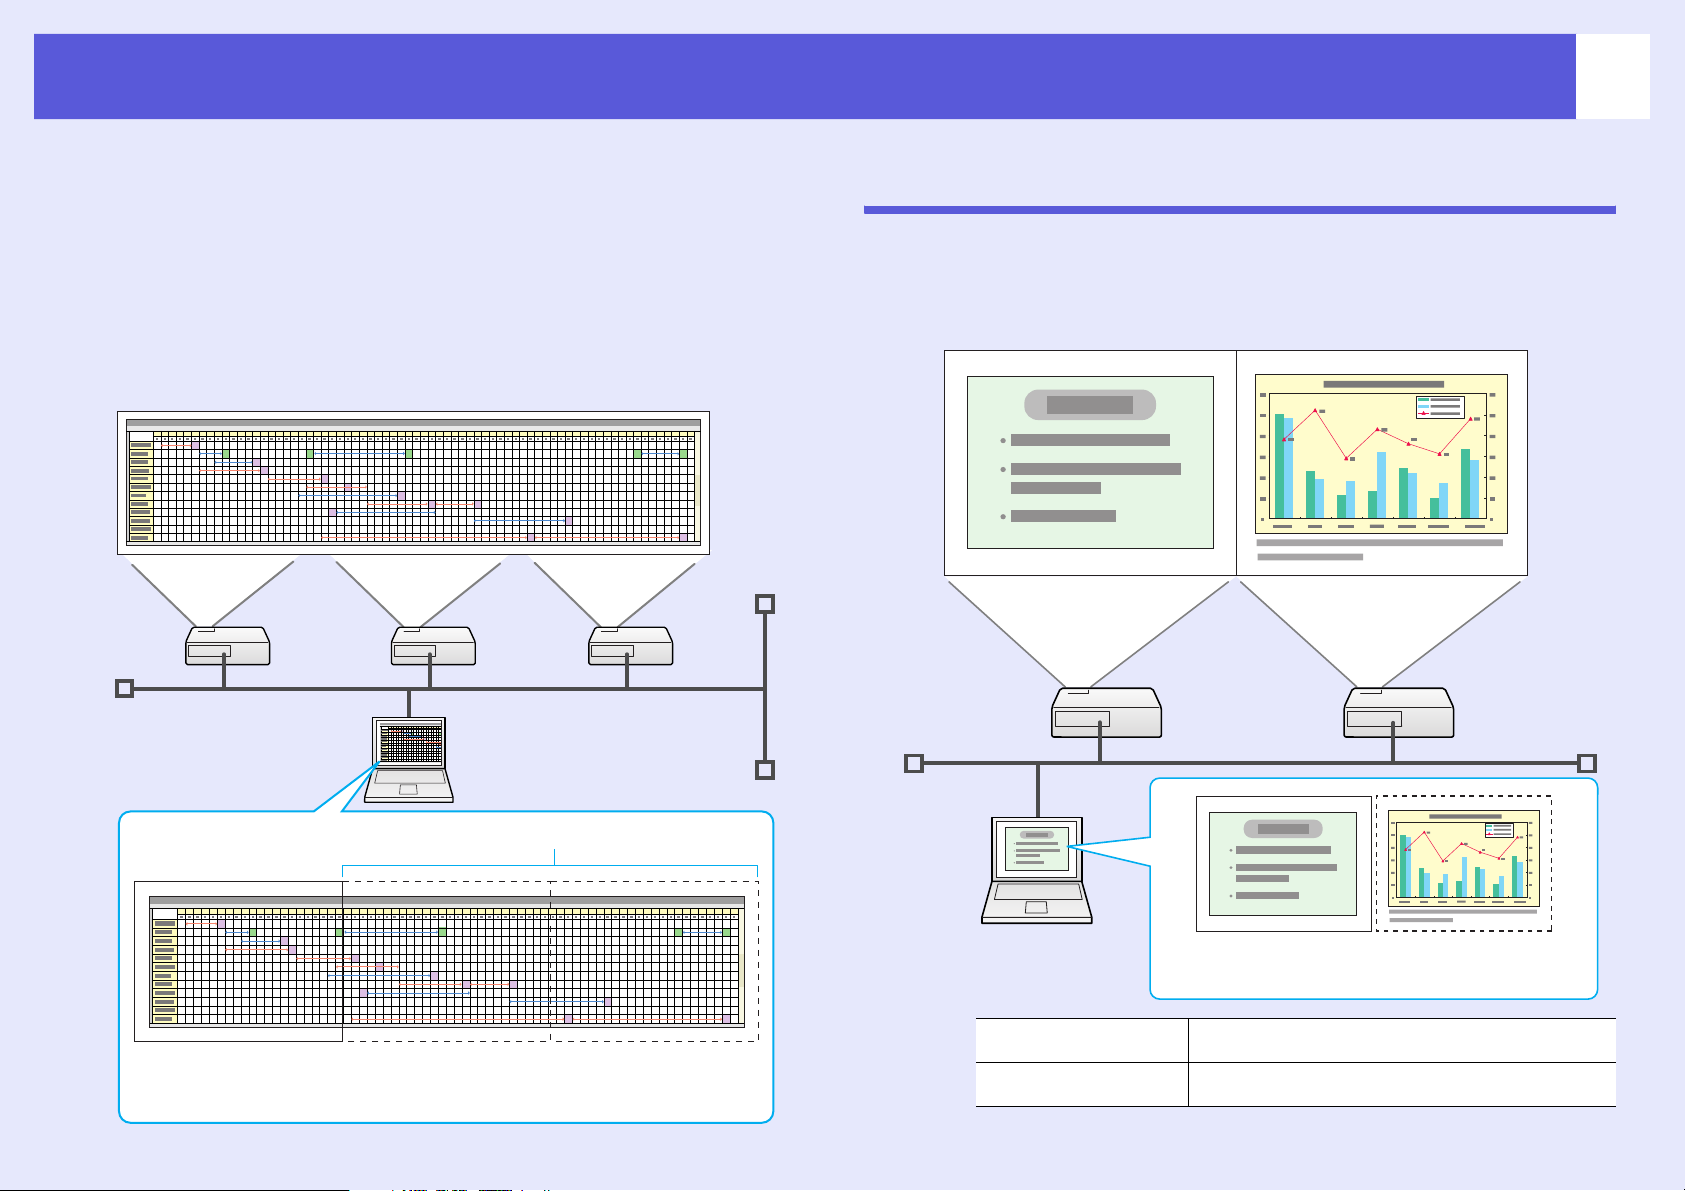
• Multi-Screen Display sp.21
You can project different images from one computer to a maximum of
four projectors, allowing you to project landscape images such as reports.
Internet
• Movie file transfer (Movie Sending Mode) s p.19
By using "Movie Sending Mode", a movie can be projected much
smoother than when it is being sent from an application running on a
PC. Because the audio is sent at the same time as the movie, you do not
need to connect the computer and the projector with an audio cable.
• Presentation mode s p.18
This function can project PowerPoint slide shows running on a
computer. You can give stylish presentations by projecting a black
screen while making preparations or when not performing a slide show
and so on.
• Distribution function
The screen being displayed by a remote computer can be simultaneously
displayed by up to four projectors with corresponding SSIDs.
• Switching function
By using the meeting switching function, if EMP NS Connection is installed
on all of the computers, the presenters can take turns and project their own
images without changing cables.
Steps for Connecting in Advanced Connection Mode
Use the following steps to connect and project in EMP NS Connection
Advanced connection mode.
In the following flowchart, you only need to perform the light blue
sections the first time you connect.
Install EMP NS Connection
on the computer to be
connected.
Make network settings on the
computer and put it into
network connection status.
s
p.10
Make network settings on the
projector and put it into network
connection status.
Connect the projector to the
network via a network cable.
See your
more information.
Start EMP NS Connection on
the computer and connect with
the projector.
s
p.5
s
User’s Guide
s
p.11
Normally, when a computer is
connected with the network and
used, you do not need to make
computer network settings.
p.10
for
Preparing to Connect
10
Use the following steps to prepare the projector and computer for
connection.
Preparing the Computer
f For Windows
Make network settings for the computer by using the utility software
supplied with the LAN adapter. For more information on the utility
software, see the User's Guide supplied with your LAN adapter.
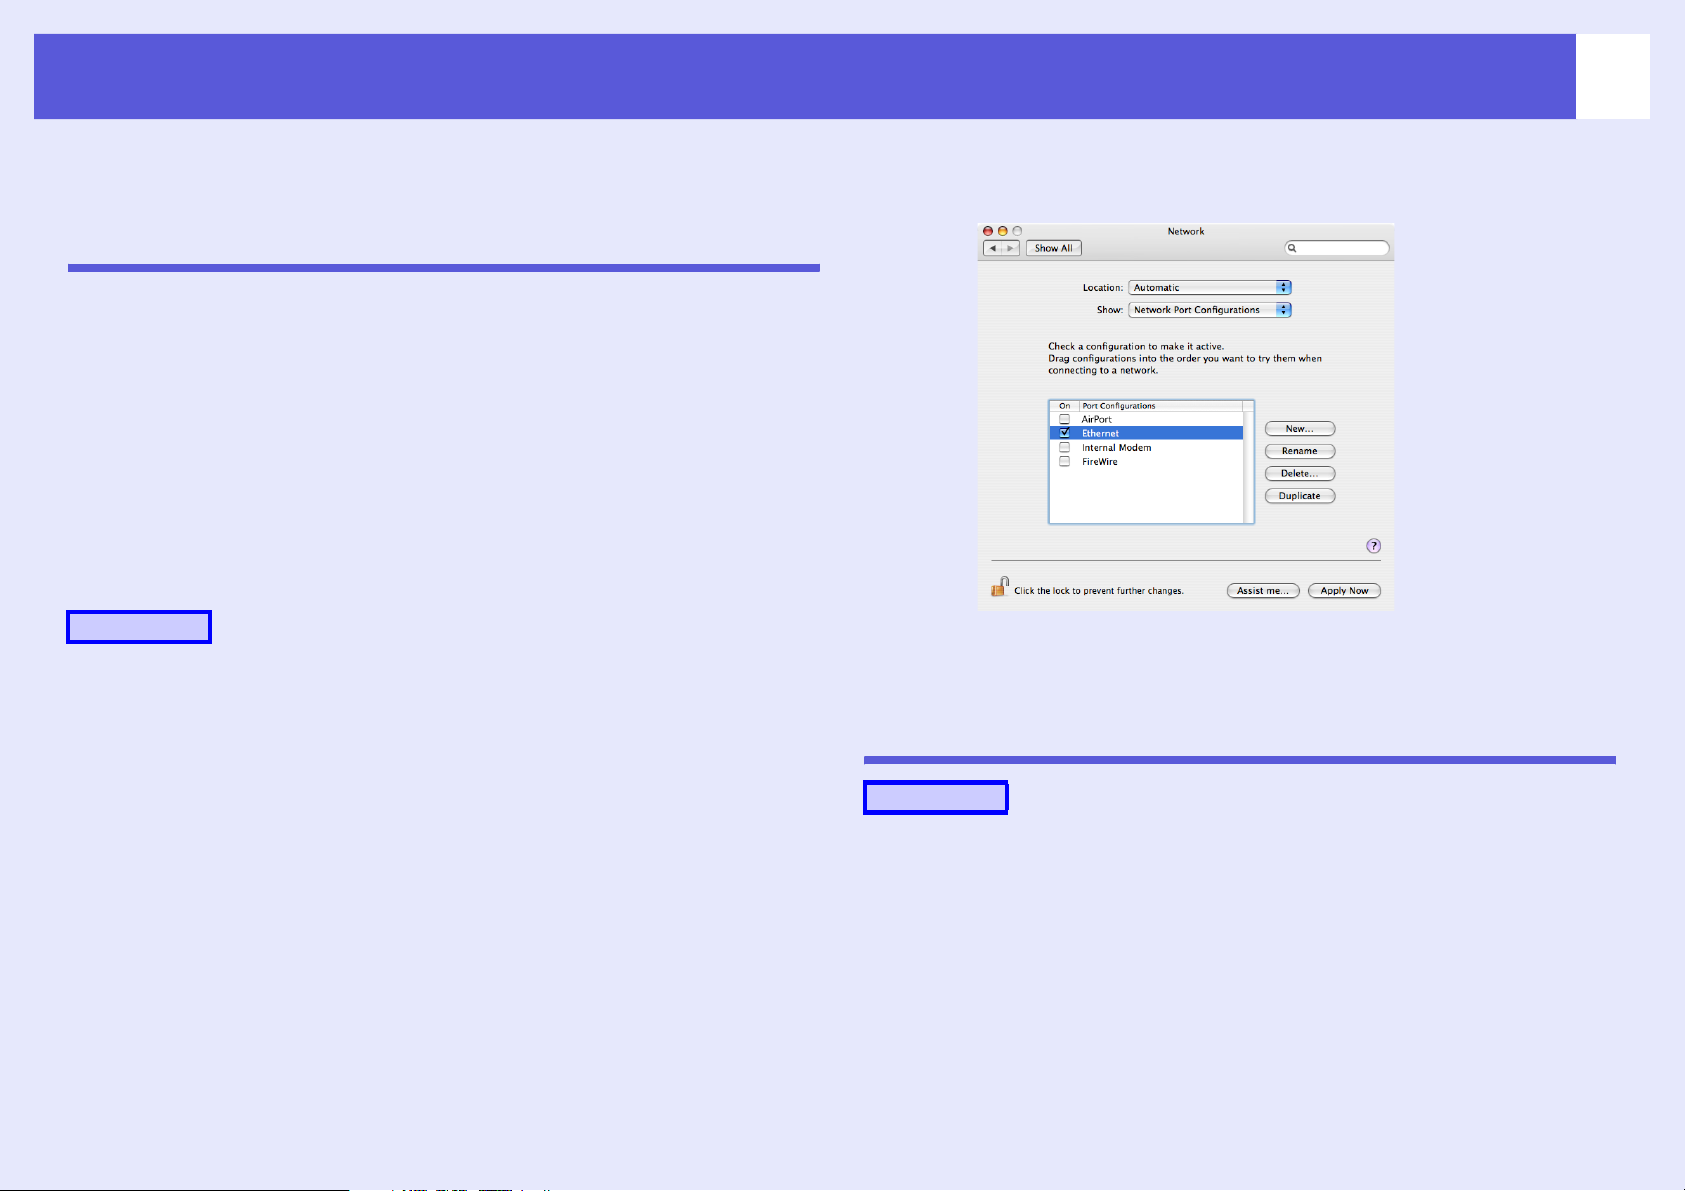
f For Macintosh
Set the network port and communication status. For more details on setting
the communication status, see the user’s guides for your computer or the
AirPort card.
Procedure
A
Select "System Preferences" - "Network" from the
Apple menu.
The network settings screen is displayed.
B
C
Preparing the Projector
Select the port used in "Port Configurations" and
click "Apply Now".
Close the screen.
Procedure
A
B
Turn on the projector and put it into projection
status.
Press the [Menu] button to display the configuration
menu, and then make network settings.
For details on making network settings, see your User's Guide.
Connecting to a Projector on a Network and Projecting
11
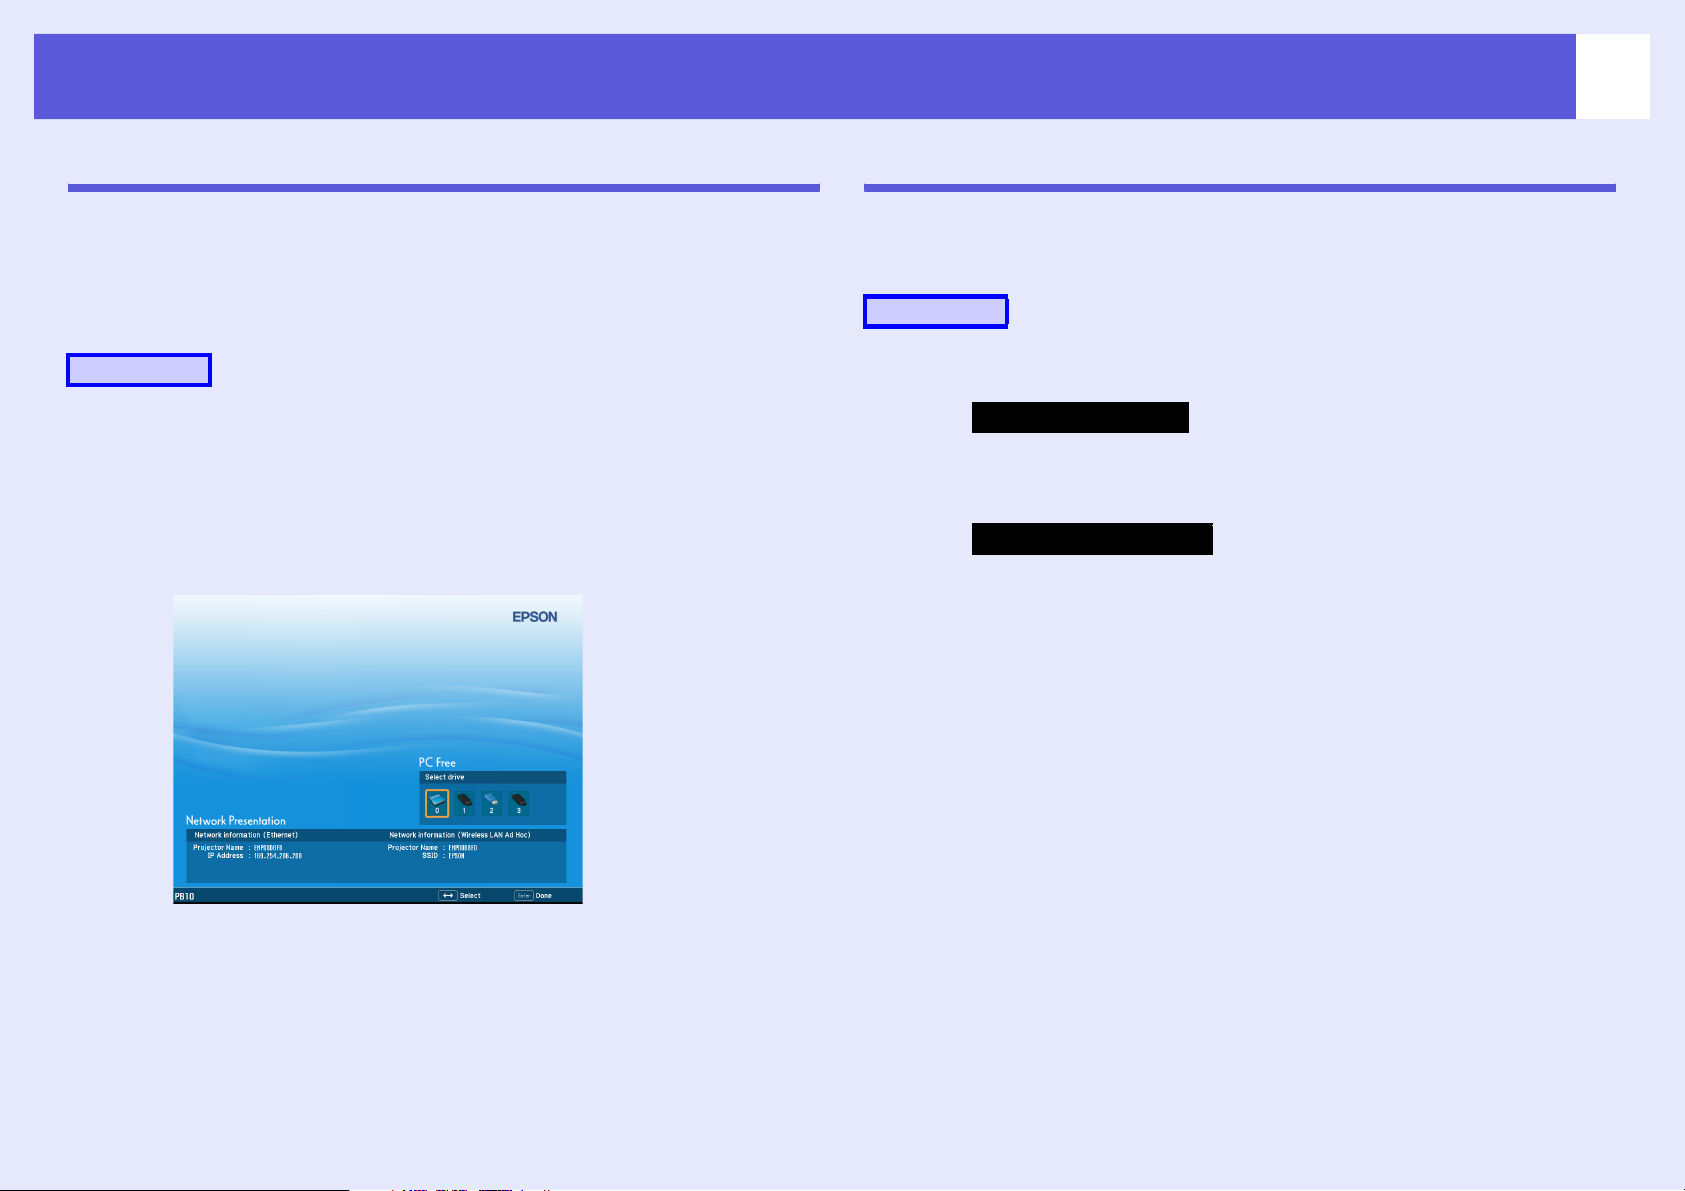
Operating the Projector
Before connecting, put the projector into connection standby status.
Make sure the projector network settings are complete, and the projector
is connected to network equipment such as a network hub via a
commercially available network cable.
Procedure
A
B
Press the [t] button on the remote control to turn
the power on.
Press the [EasyMP] button on the remote control.
The EasyMP standby screen is displayed.
Operating the Computer
In the following explanations, unless otherwise noted, Windows screen
images are used. You see the same screens even when using Macintosh.
Procedure
A
B
Start EMP NS Connection.
For Windows
Select "Start" - "Programs" (or "All Programs") - "EPSON
Projector" - "EMP NS Connection".
For Macintosh
Double-click the "Applications" folder of the hard drive volume in
which EMP NS Connection is installed, and then double-click the
EMP NS Connection icon.
Select"Advanced Connection Mode" and then click
"OK".
The projector search results are displayed. To always connect using
"Advanced Connection Mode", select "Make the connection mode
selected the default setting".
C
Select the projector you want to connect to, and
then click "Connect".
If the projector you want to connect to is not displayed in the
search results, click the "Automatic search" button. The search
takes about 30 seconds.
For details on the connection screen, see "Using the Connection
Screen". s p.12

Connecting to a Projector on a Network and Projecting
12
D
When Projector Keyword is set to "On" from the
projector, the keyword entry screen is displayed.
Enter the keyword displayed on the EasyMP
standby screen, and then click "OK".
When the connection is complete, the computer's screen is
projected. The following EMP NS Connection toolbar is displayed
on the computer screen. You can use this toolbar to operate the
projector and make settings, and to disconnect the network
connection.
For details on using the toolbar, see "Using the Toolbar". s p.14
Using the Connection Screen
When EMP NS Connection starts, the following screen is displayed. The
operation of each button or menu item is described in the following table.
When the system starts in "Advanced Connection Mode".
When the system starts in "Quick Connection Mode".
Connecting to a Projector on a Network and Projecting
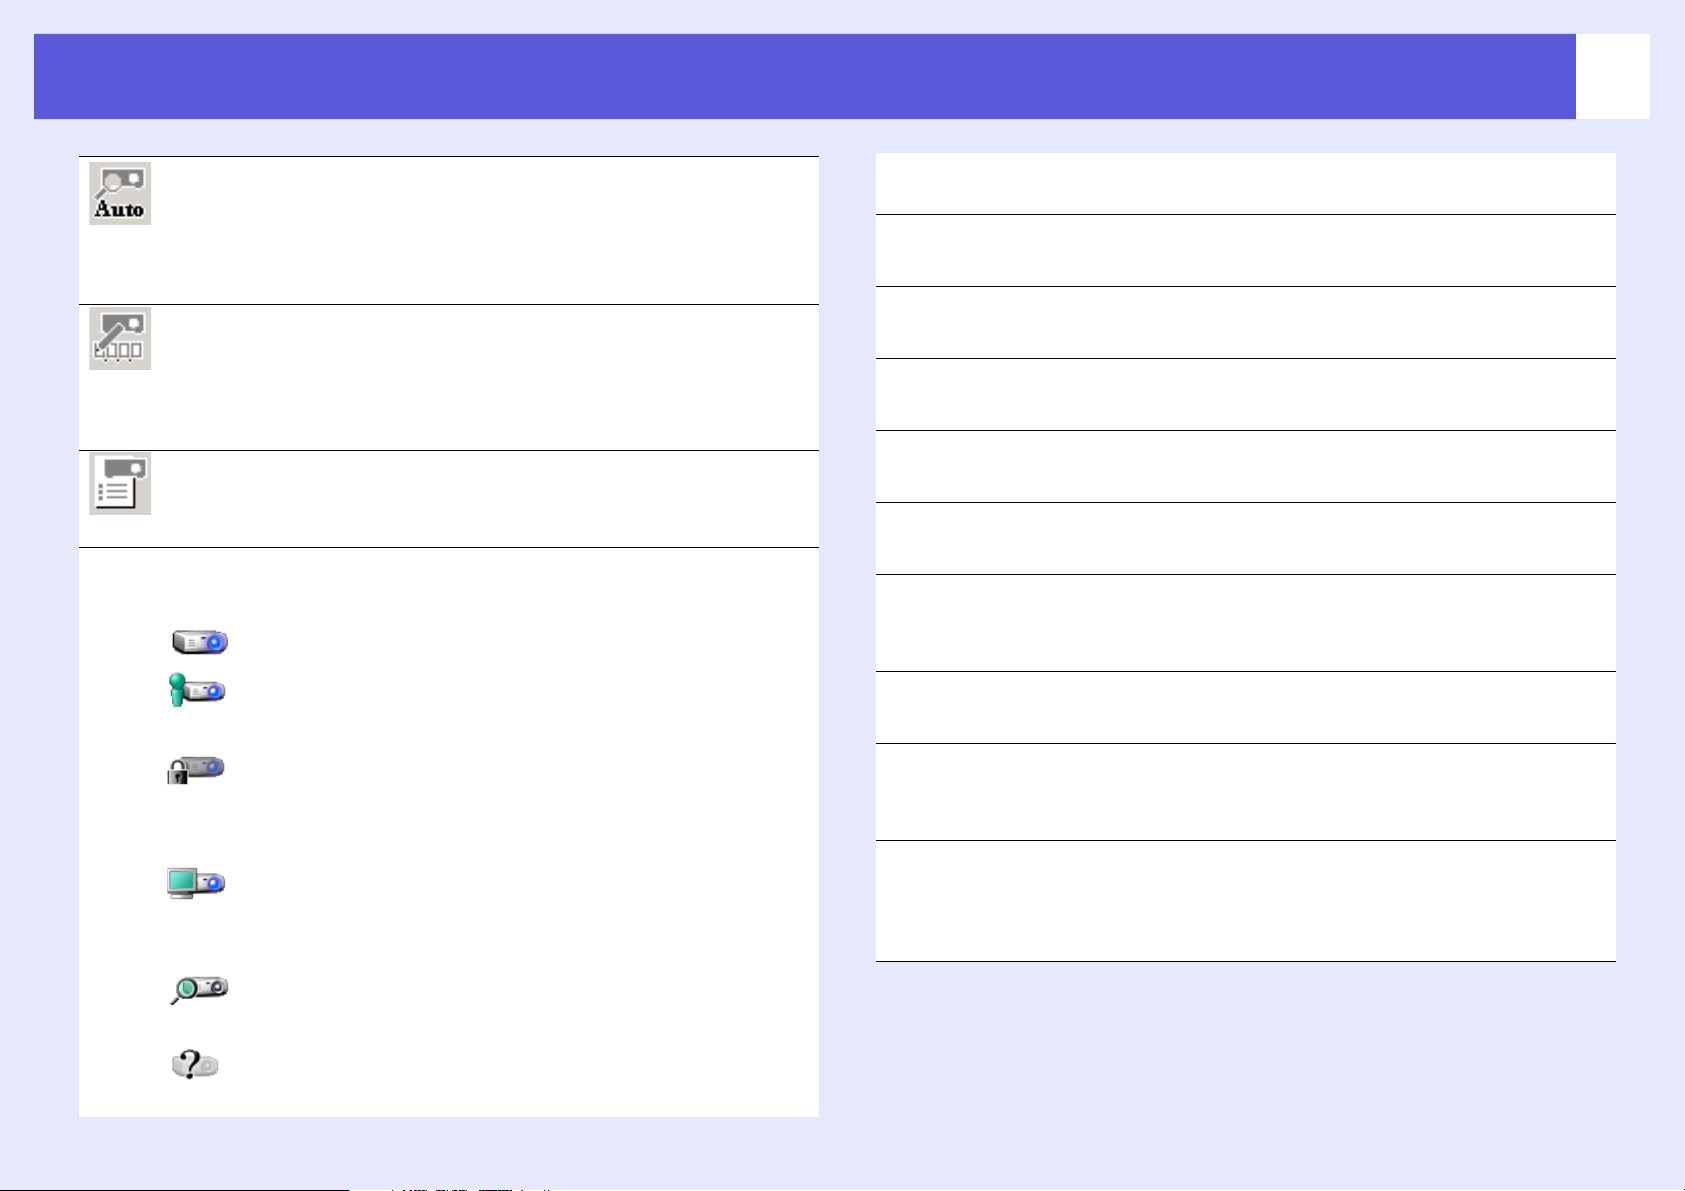
13
Automatic search
In "Advanced Connection Mode", you can search for available projectors
on the network system that the computer is connected to.
In "Quick Connection Mode", you can search for the projector based on
the SSID.
Manual search
In "Advanced Connection Mode", you can search for a projector based on
a specified IP address or projector name.
In "Quick Connection Mode", you can search for the projector based on
the SSID selected from a list.
Profile
You can search for a projector on the network using a profile saved with
"Save profile". s p.34
Status
The following six icons indicate the status of the discovered projectors.
Standby Select for connecting.
Busy Select for connecting. When you click
"Connect", the computer currently connected is
disconnected and your computer is connected.
Busy (Disable
interrupt
connection)
Currently in
use by
another
application
Cannot be selected. "Disable interrupt
connection" is set
on the other computer and it is already
connected.
The projector's configuration menu is open. You
can select it after closing the configuration
menu and running the search again.
In "Quick Connection Mode", you can only select those with the same
SSID.
Projector name
The projector's name is displayed.
IP Address ("Advanced Connection Mode" only)
The projector's IP address is displayed.
SSID ("Quick Connection Mode" only)
The projector's SSID is displayed.
Display (When "Use multi-display" is selected)
Select the display number. s p.29
Update list ("Quick Connection Mode" only)
Updates "Status" and "Signal strength".
Save in the profile
Saves the results of a search for projectors on the network as a profile.
s p.34
Clear list
Deletes all search result lists.
Disable interrupt connection
Select this to prevent an interrupt connection by other computers while
connected to the selected projector.
Use multi-display
Select this when using the Multi-screen display function. When this is
selected, "Display layout" and "Display properties" are displayed at the
bottom of the screen. s p.21
Searching
Not found Displayed when a projector cannot be found as
Displayed while running "Manual Search" or
"Profile".
a result of "Manual Search" or "Profile".
Connecting to a Projector on a Network and Projecting
14
Set options
You can make general setting options such as the processing method
when EMP NS Connection starts. For optional settings, see s p.40
Connect
Connect to the projector you selected from the search results list. When a
connection is made with a projector, a toolbar is displayed.
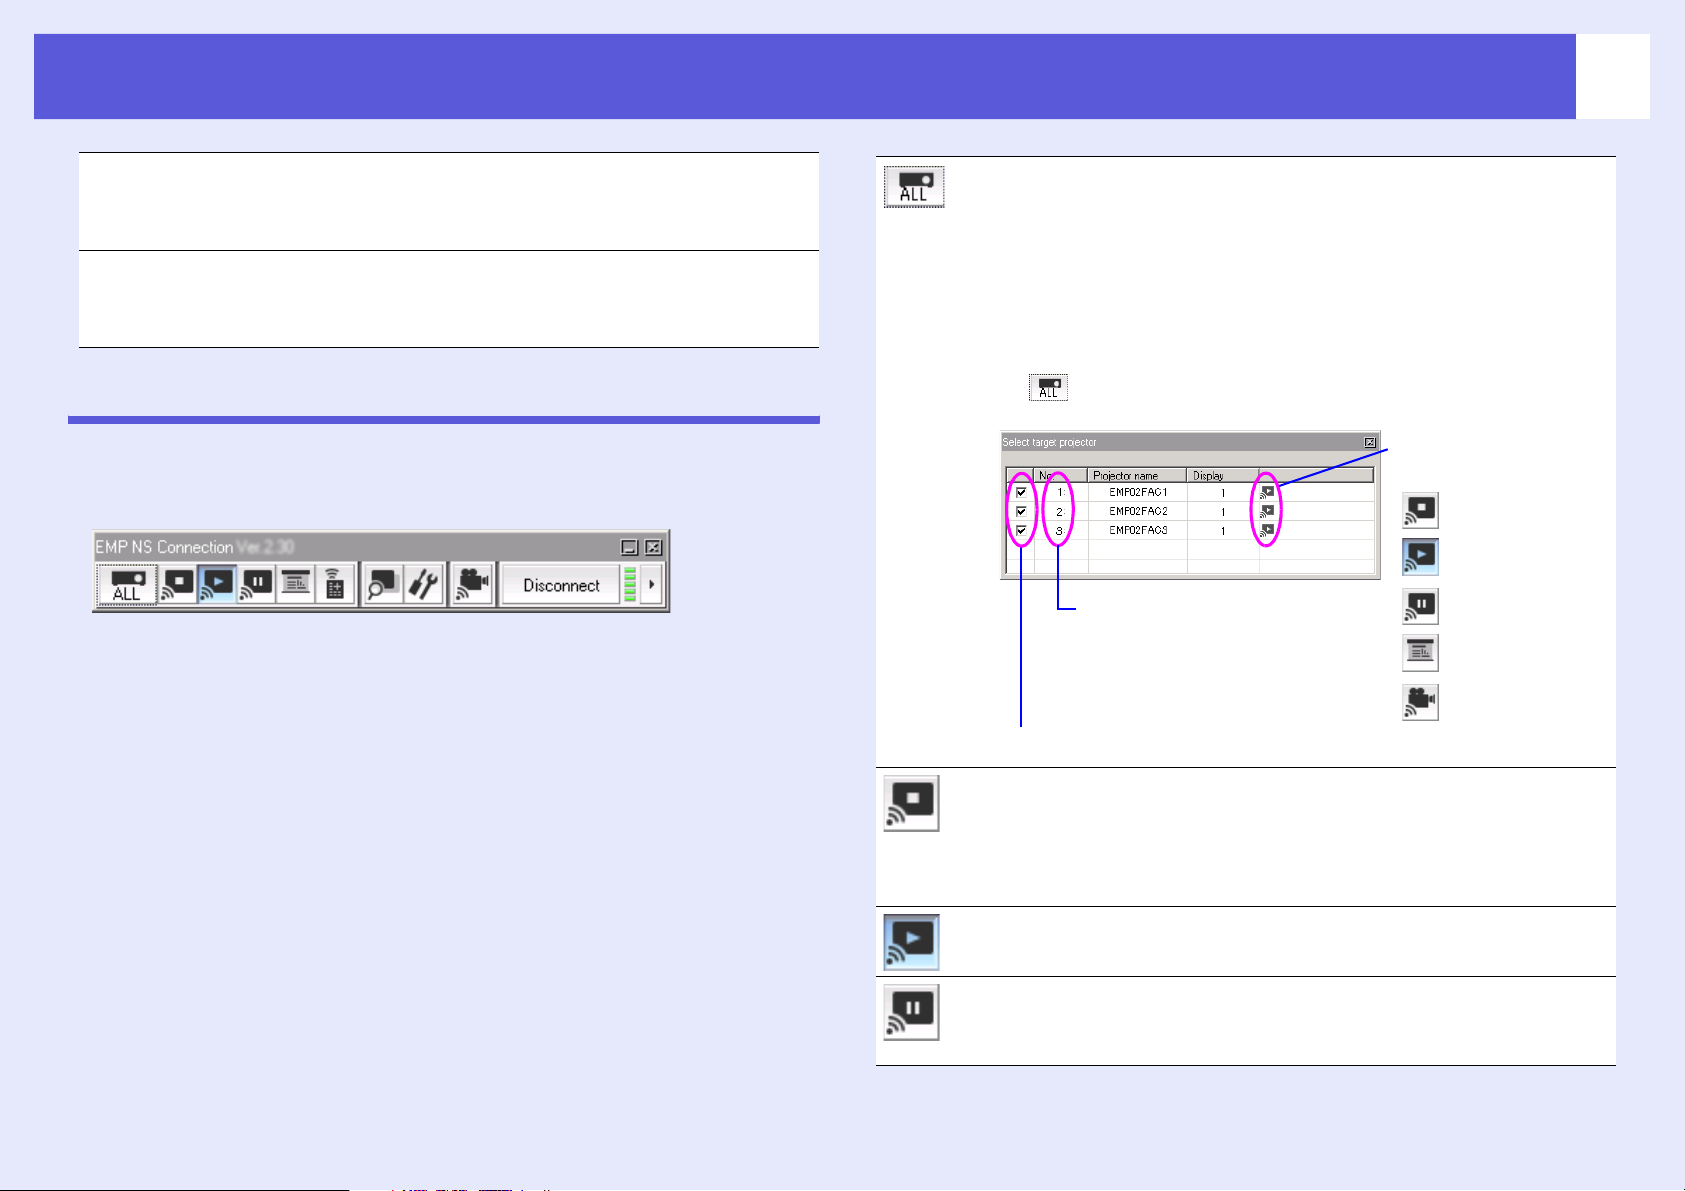
Using the Toolbar
The toolbar is displayed on the computer screen after EMP NS
Connection starts and a connection is made with the projector. You can
use this toolbar to operate and make settings for the projector.
Select target projector
Click to select which projectors can be operated from the toolbar when
projecting from multiple projectors using the distribution function or
Multi-screen display. The indication below the icon shows that the
projector can be controlled.
For example, “ALL" indicates that all of the connected projectors can be
controlled. Or when "1, 3" is displayed, projectors No. 1 and No. 3 can
be controlled.
Click to display the following screen.
Indicates the status of
the projector.
Stop
Show
Indicates the number of an
allocated projector. This No.
indicates the number of the
projector displayed as an icon that
you can control from the toolbar.
Select the projector to be controlled.
Pause
Presentation
Mode
Movie Sending
Mode
Stop
Stops projection while connected to the projector. A black screen is
projected while stopped. Audio does not stop. To stop the audio, or to
display a user-registered logo while projection is stopped, use the A/V
mute function.
Show
Releases stop or pause.
Pause
Pauses projected images while connecting to the projector. Audio does
not stop.
Connecting to a Projector on a Network and Projecting
15
Presentation Mode
Each time this is clicked, Presentation mode switches between enabled/
disabled. s p.18
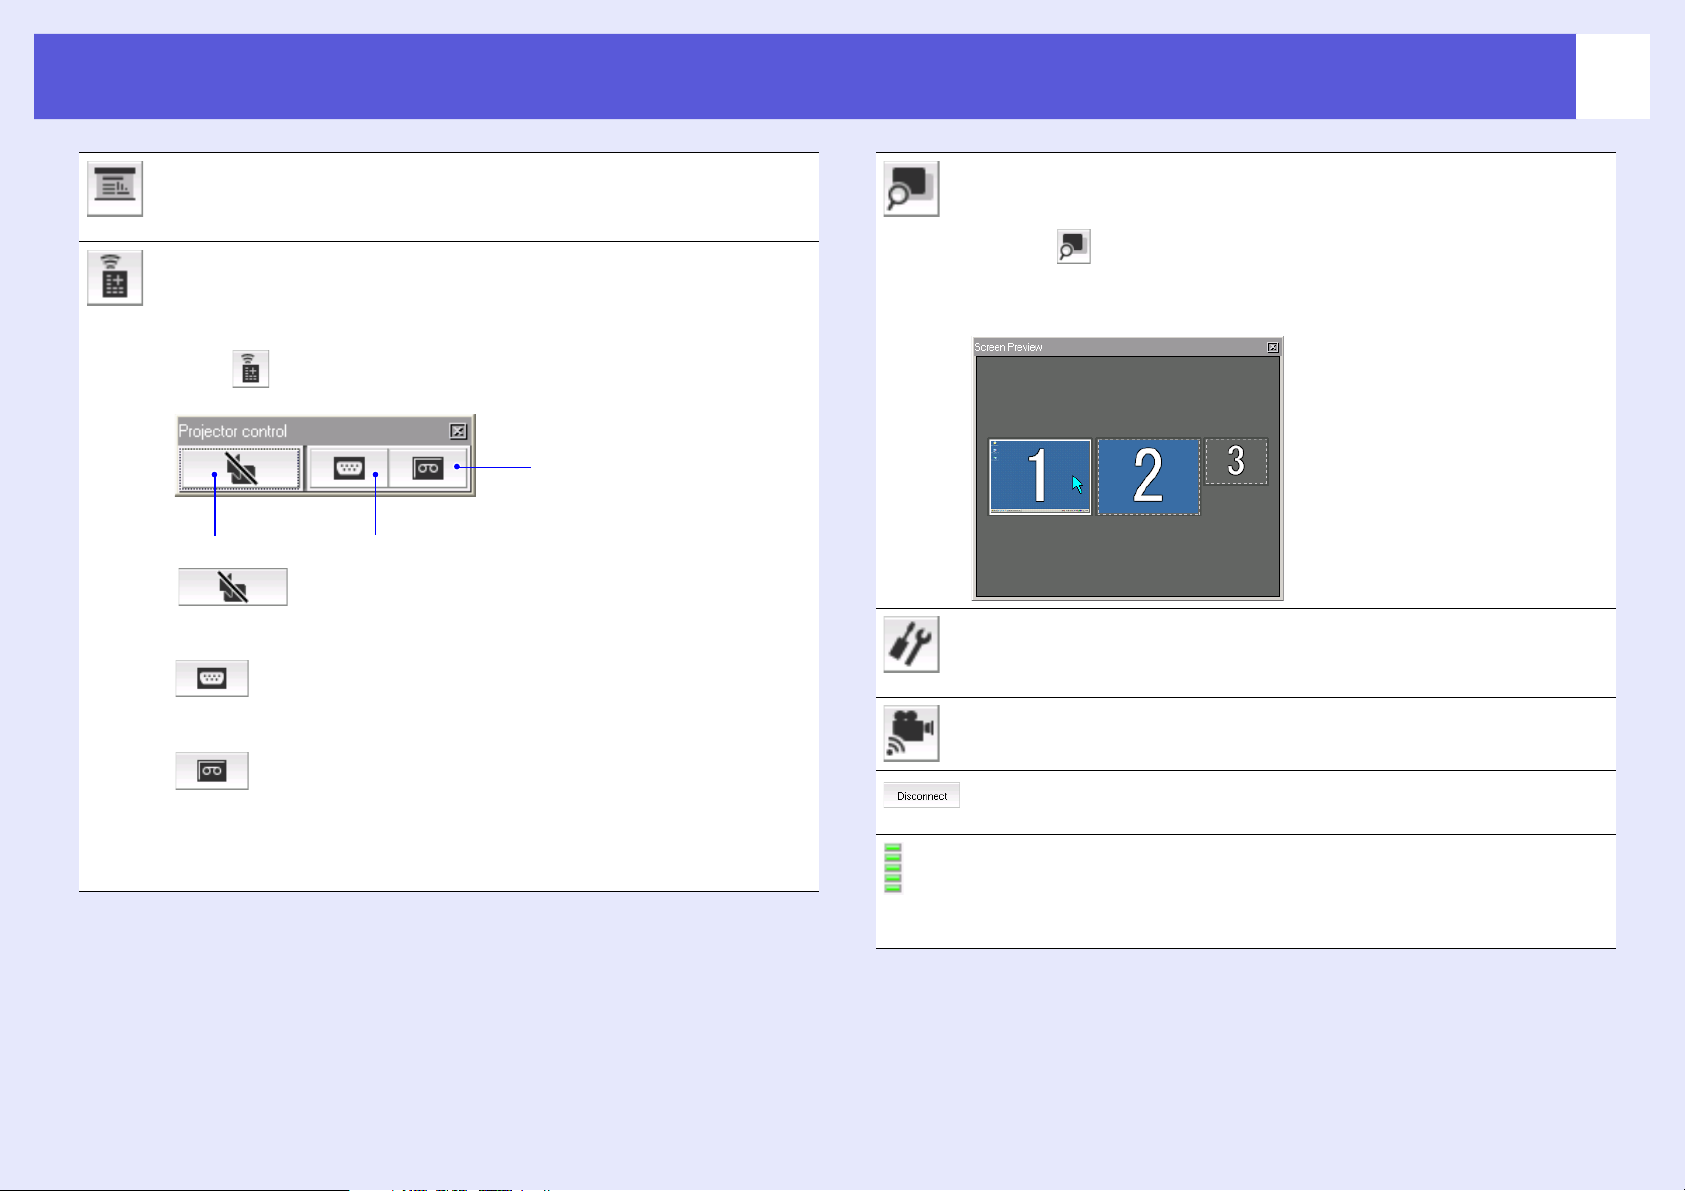
Projector control
While the projector is connected to the network, the projector's "AV
Mute", "Switch PC source" and "Switch video source" functions can be
controlled from the toolbar.
Click to display the following toolbar.
Switch video source
A/V Mute Switch PC source
A/V Mute
The same function as the [A/V Mute] button on the remote
control. See your User’s Guide for more information.
Switch PC source
Click to change the input source in the order of Computer1 input
port - Computer2 input port - BNC input port - EasyMP.
Switch video source
Click to change the input source in this order: S-video input port
- Video1 input port - Video2 input port - HDMI input port. The
projector will not switch to the S-video input if there is no cable
connected to the port.
Screen Preview
Displays the multi-screen preview screen.
Clicking causes a preview of the display with the settings you have
made to appear. Clicking each display causes each preview window to be
enlarged to full-screen.
Set options
Transmission performance during the transfer of computer images can
be adjusted. s p.40
Movie Sending Mode
Used to immediately play back a movie file. s p.19
Disconnect
Disconnects the connection to the projector.
Signal intensity
This is displayed when the connection is made in the "Quick Connection
mode". As the signal strength increases, so does the number of lit
indicators.
Connecting to a Projector on a Network and Projecting
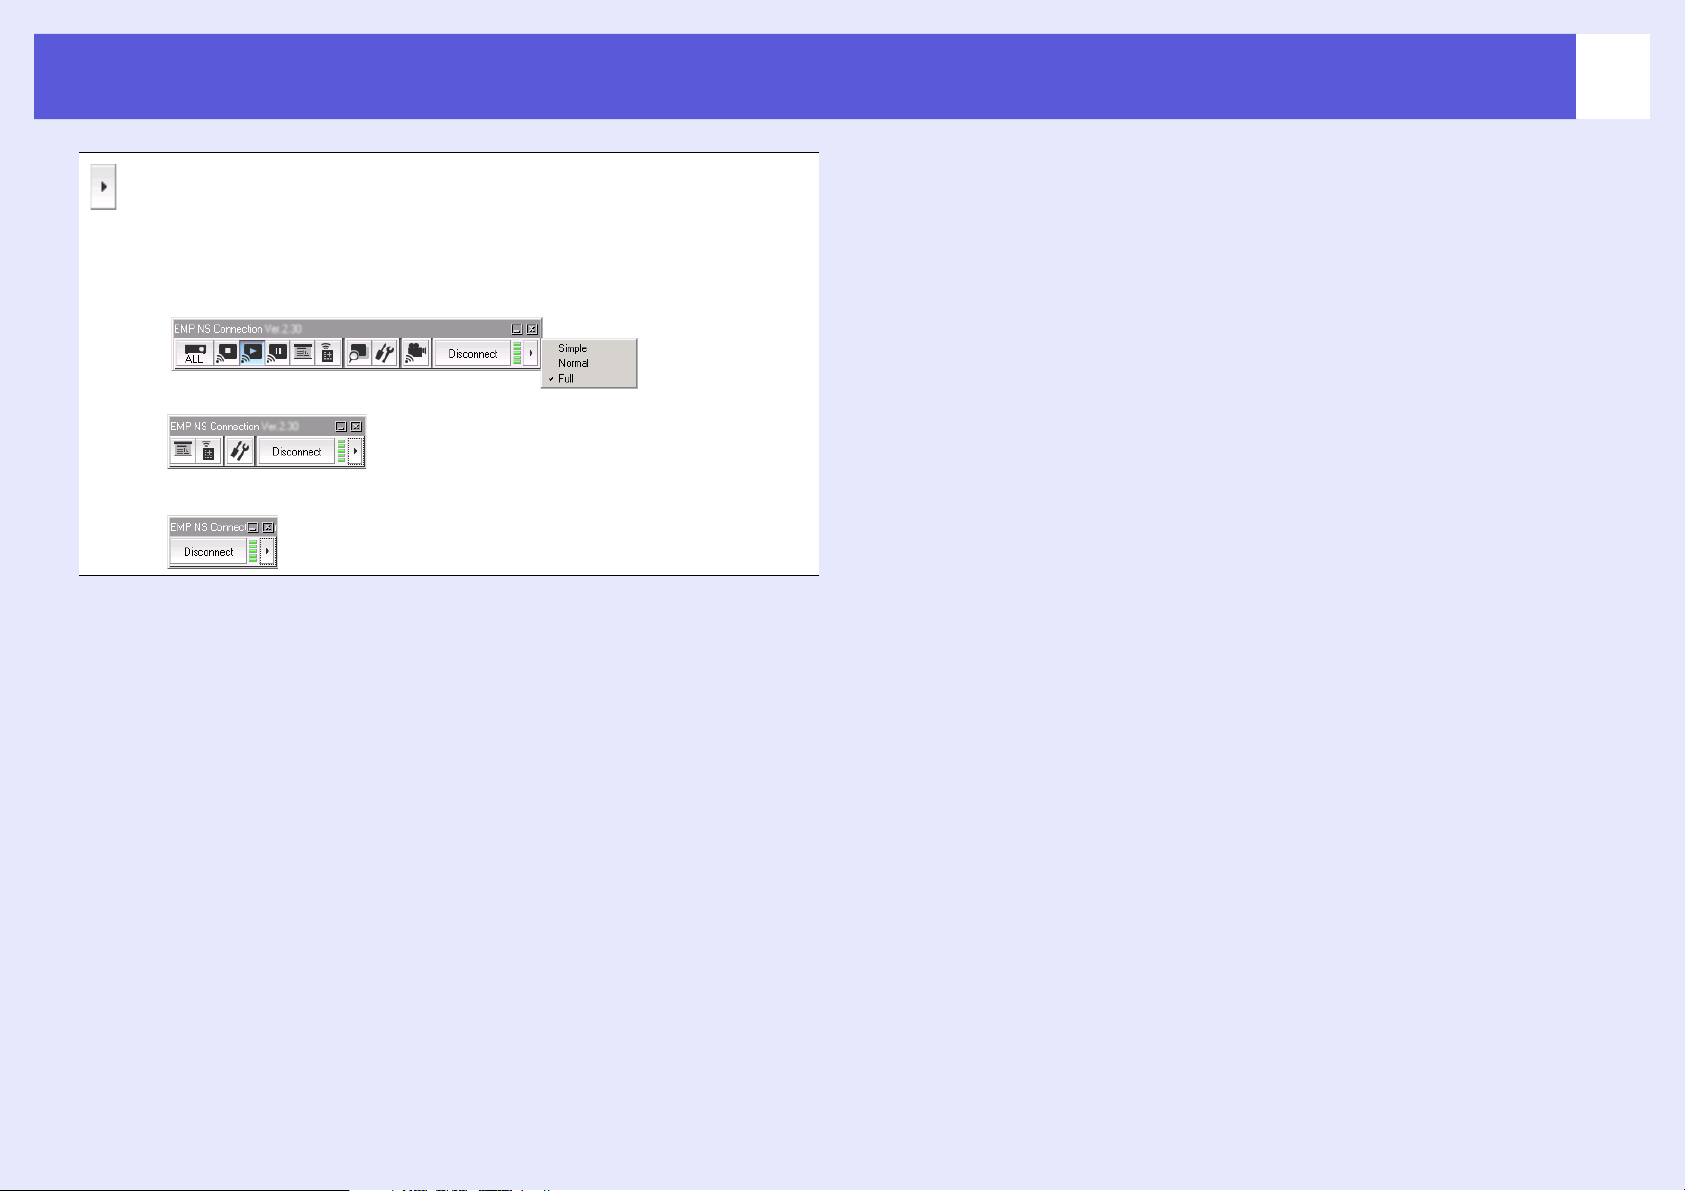
Switch toolbar display
You can switch the toolbar display as shown below. The toolbar display
you select remains in effect when you use EMP NS Connection the next
time.
Full
Normal
Simple
16

Convenient EMP NS Connection Functions
This section explains those functions that may be useful during meetings or when making a presentation, such as the ability to send a
movie file directly to a projector for playback ("Movie Sending Mode") or that which allows you to send images to multiple projectors from
a single computer ("Multi-Screen Display").
Projecting Only a PowerPoint Slide show
(Presentation Mode) ......................................... 18
Projecting Movies from a Computer
(Movie Sending Mode)...................................... 19
• Supported File Types ........................................................19
• Playing back a movie ........................................................19
Using Multi-Screen Display ............................... 21
• Example of Adjusting the Virtual Display ..................... 21
• Procedure before using the Multi-screen Display
Function .......................................................................... 22
• Setting the Virtual Display .............................................. 22
Enable the virtual display driver (Windows only)......................... 22
Virtual display arrangement........................................................... 23
• Allocating the image to be projected .............................. 28
• The allocated image is projected ..................................... 29

Projecting Only a PowerPoint Slide show (Presentation Mode)
In Presentation Mode, the image is only displayed when you are
showing a PowerPoint (Windows) or Keynote (Macintosh) slide show
on a computer. When you stop the slide show, the projector displays a
black screen.
Procedure
18
A
B
C
If necessary, select the projector you want to
control. s p.14
Click the button on the toolbar.
Presentation Mode begins.
When in Presentation Mode, click the button
again to exit Presentation Mode.
Projecting Movies from a Computer (Movie Sending Mode)
19
In Movie Sending Mode, movie files can be sent directly to a projector.
As a result, a movie can be projected much more smoother than when
it is being sent from an application running on a PC.
Also, because the audio is sent at the same time as the movie, there is
no need for an audio cable between the computer and the projector.
• Movie Sending Mode is valid for one projector only. It is
q
not possible to apply Movie Sending Mode to more than
one projector.
• Depending on the communication method and the
available reception, the image and sound may skip or stall.
Supported File Types
The file types supported by Movie Sending Mode are listed in the
following table.
File Type
(Extension)
*
.mpg
.wmv
.asf
Movie
Codec
MPEG2 MPEG1 Layer1/2
Linear PCM and AC-3 audio
cannot be played back. MPEG
contents with no sound can be
played back.
WMV8
WMV9
WMA
Audio Codec
Recording
Quality
Highest frame
rate: 30 fps
Maximum
resolution: 720
^ 576
Playing back a movie
Procedure
A
B
C
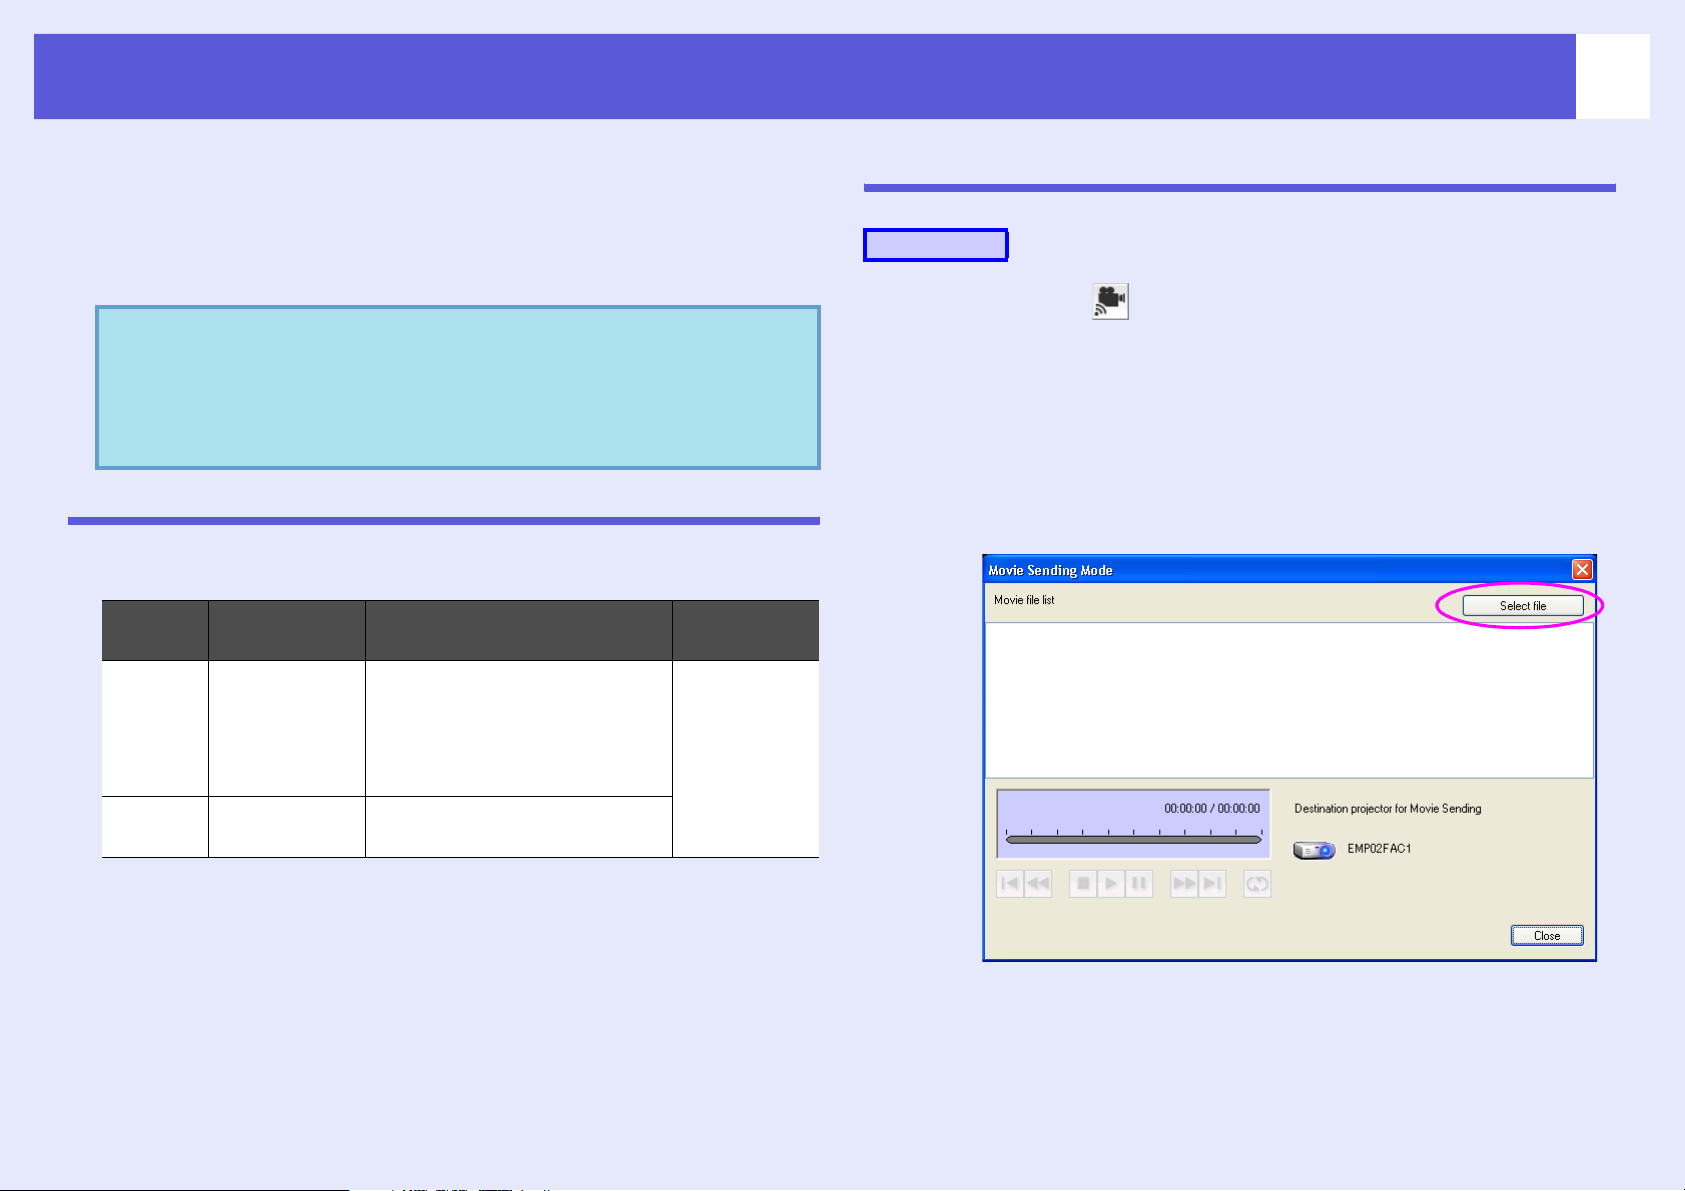
Click the button on the toolbar.
The projector selection screen is displayed.
Select the destination projector for Movie Sending
and click "OK".
The "Movie Sending Mode" screen appears.
Click "Select file".
* Files with the extension ".mpeg" cannot be projected.
Files with DRM (Digital Rights Management) applied cannot be
projected.
Projecting Movies from a Computer (Movie Sending Mode)
20
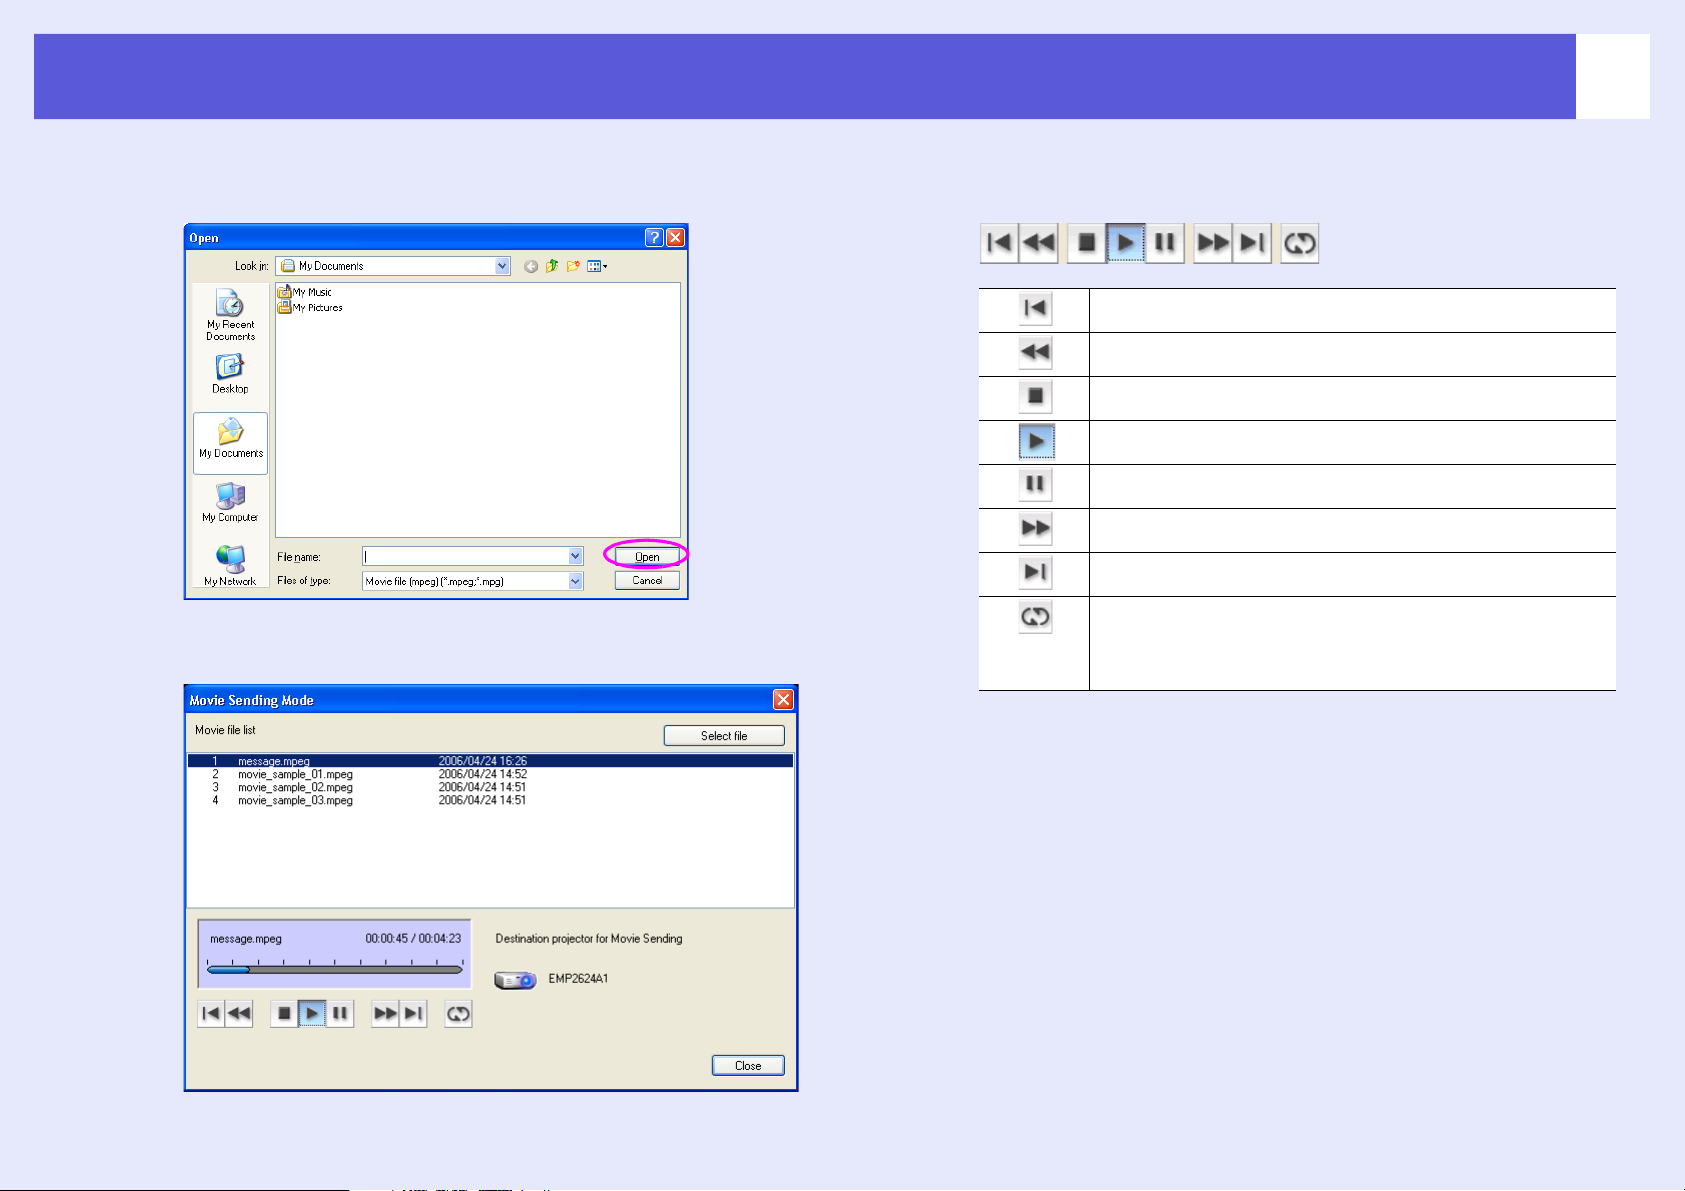
D
Select the movie file you want to play back and then
click "Open".
The "Movie Sending Mode" screen reappears. The selected files
are displayed in the Movie Playback list.
E
F
Use the operation buttons below to play and stop
the movie files.
Plays back from the beginning of the file that is playing.
Quickly rewinds the file that is playing.
Stops play back.
Plays back the file.
Pauses play back.
Quickly fast-forwards the file that is playing.
Plays back from the beginning of the next file.
Repeatedly plays back the file list in order. When there are
multiple files in the list, it is not possible to repeatedly
play back only some of those files.
Click "Close" to end Movie Sending Mode.
Using Multi-Screen Display
Multi-screen display mode allows you to project different images from multiple
projectors that are connected to a single computer.
With Windows, multiple virtual displays can be set in the computer, and each
image can be projected by the projector. This function is not available with
Windows Vista due to restrictions in the Windows Vista specifications.
For the Macintosh, an external monitor must be connected to the computer to
enable the use of the multi-screen display function. Whereas the above
explanation has referred to "virtual display", in the case of the Macintosh, the
operation relates to the screens displayed on the physically connected monitor.
21
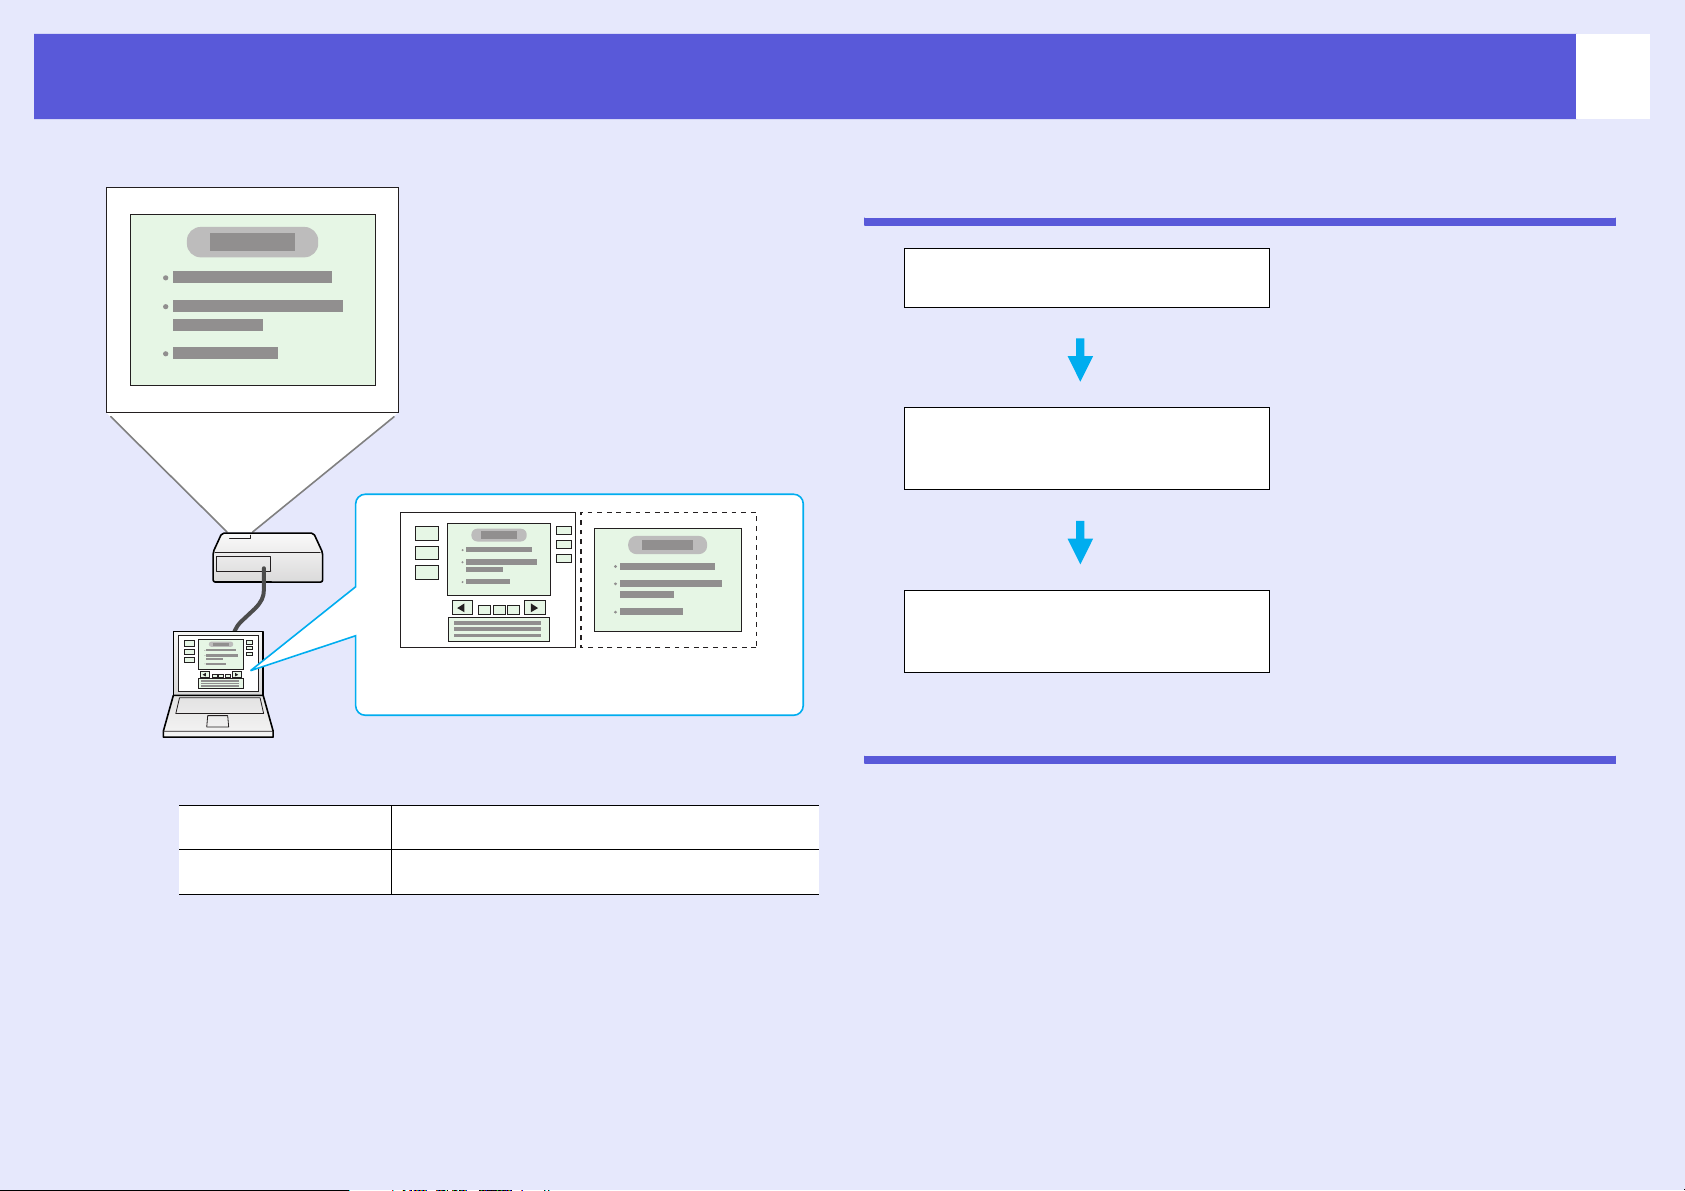
Example of Adjusting the Virtual Display
By arranging the virtual display allocation, you can project only the image
that you want to show when making a presentation or project different
images from left to right.
Arrangement example 1
Actual monitor
image
Image of virtual
display 1
Virtual display
Image of virtual
display 2
Actual monitor
image
Actual monitor PowerPoint file
Virtual display Excel file
Image of virtual
display
Using Multi-Screen Display
22
Arrangement example 2
Actual monitor
image
Image of virtual
display
Procedure before using the Multi-screen Display Function
1. Setting the Virtual Display s p.22
2. Allocating the image to be
projected s p.28
3. The Allocated Image is Projected
s p.29
In a Windows environment, enable
the virtual display driver as
necessary. And, for both Windows
and the Macintosh, set up the
virtual display arrangement.
Open the file to be projected, and
then move the screen to the virtual
display according to the actual
projection arrangement.
Allocate a virtual display number
to a projector that is connected
through the network, and then start
projection.
Setting the Virtual Display
Actual monitor PowerPoint file presenter tools
Virtual display Slide show using a PowerPoint file
The following explains how to allocate the computer image using
Arrangement example 1. s p.21
f Enable the virtual display driver (Windows only)
Enable the virtual display driver. Those users listed below do not have to
perform this operation.
• Those users who have enabled virtual displays installing EMP NS
Connection.
• Those users who are using Macintosh computers.
Using Multi-Screen Display
23
Procedure
A
B
C
Start Windows on the computer, then select "Start" "Programs" (or "All Programs") - "EPSON
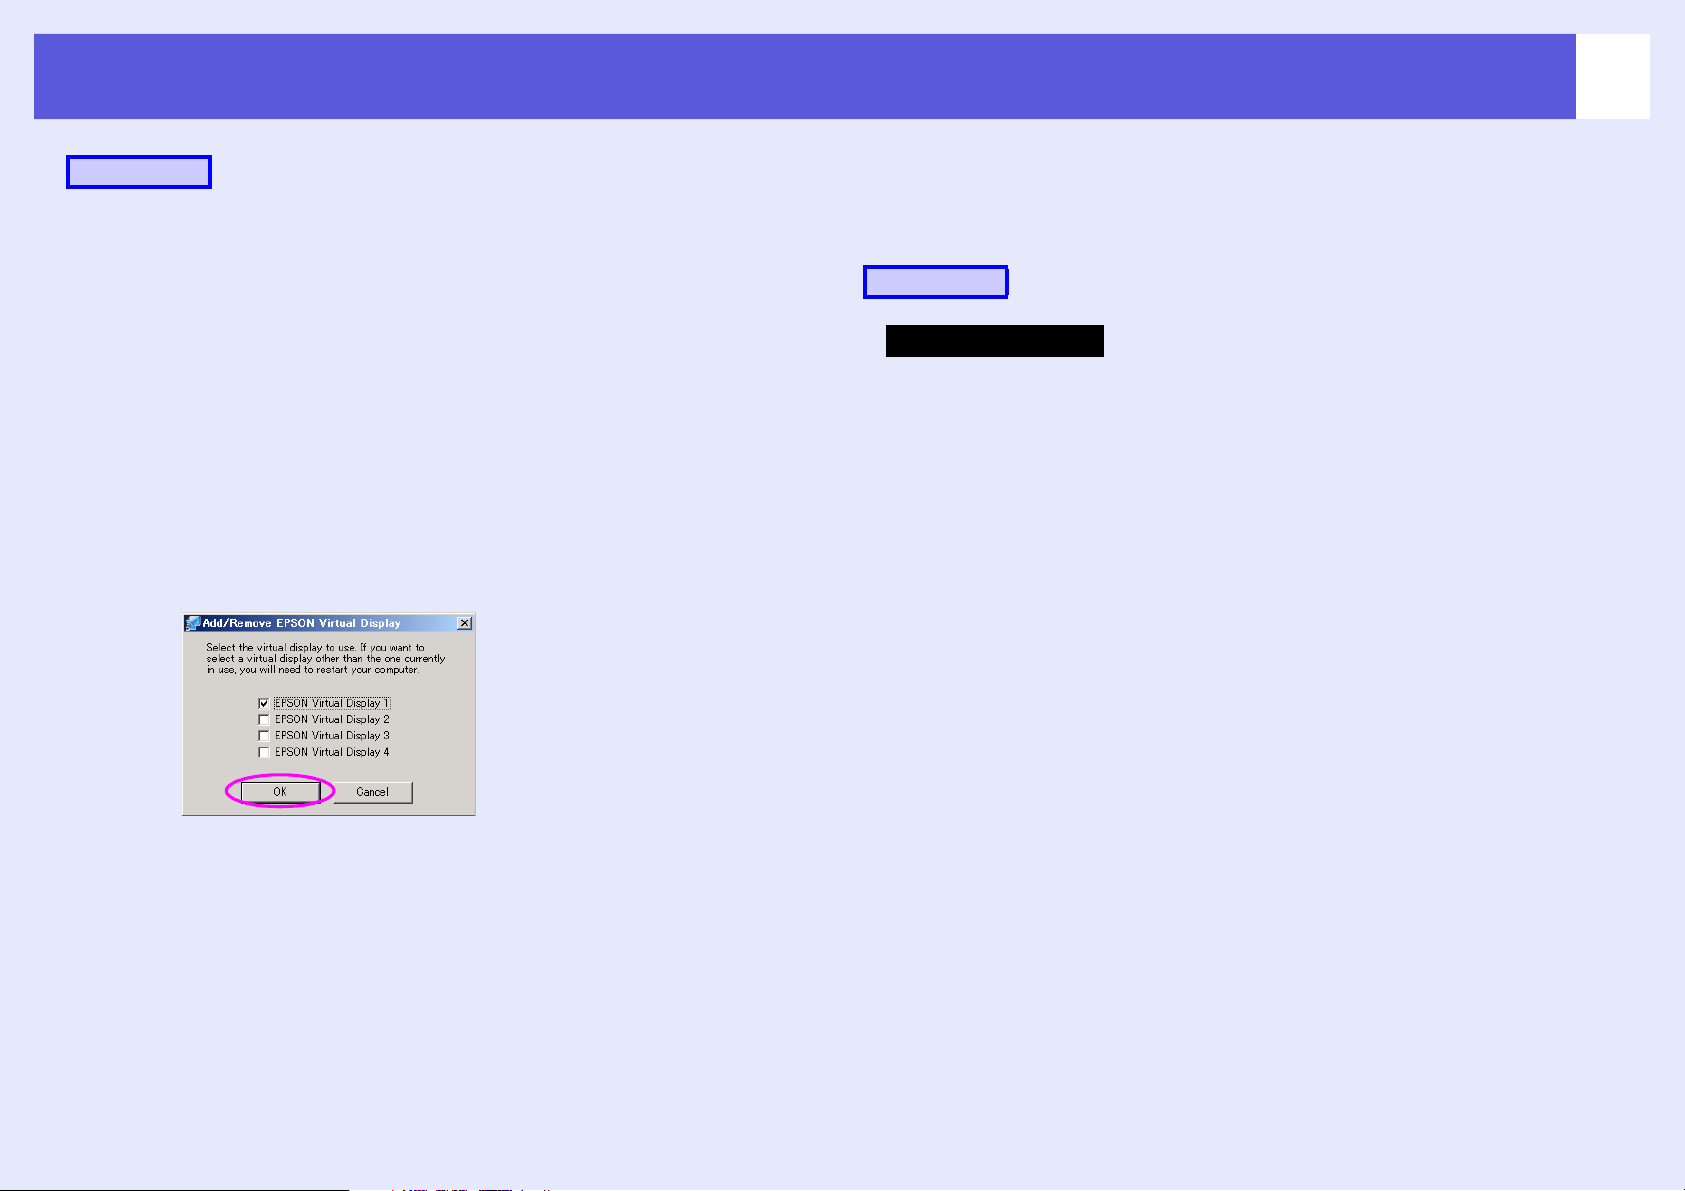
Projector" - "Add/Remove Epson Virtual Display".
The "Add/Remove Epson Virtual Display" screen is displayed.
Select the virtual display you want to use.
Up to four monitors can be added. In this case, a single virtual
display is to be used, so select one. 3When, for example, using
three projectors, such that you have to set multiple virtual displays,
only select as many displays as is necessary.
Any one of the displays can be selected.
Click "OK".
f Arrange the virtual display
After starting EMP NS Connection, set up the virtual displays as
described below (for Macintosh, go to s p.26).
Procedure
For Windows
A
Select "Start" - "Programs" (or "All Programs") "EPSON Projector" - "EMP NS Connection".
EMP NS Connection starts.
When you click "OK", the drivers for the virtual display are
enabled. At this point, it is normal for the display to flicker. Wait
for the "Add/Remove Epson Virtual Display" screen to close.
Using Multi-Screen Display
24
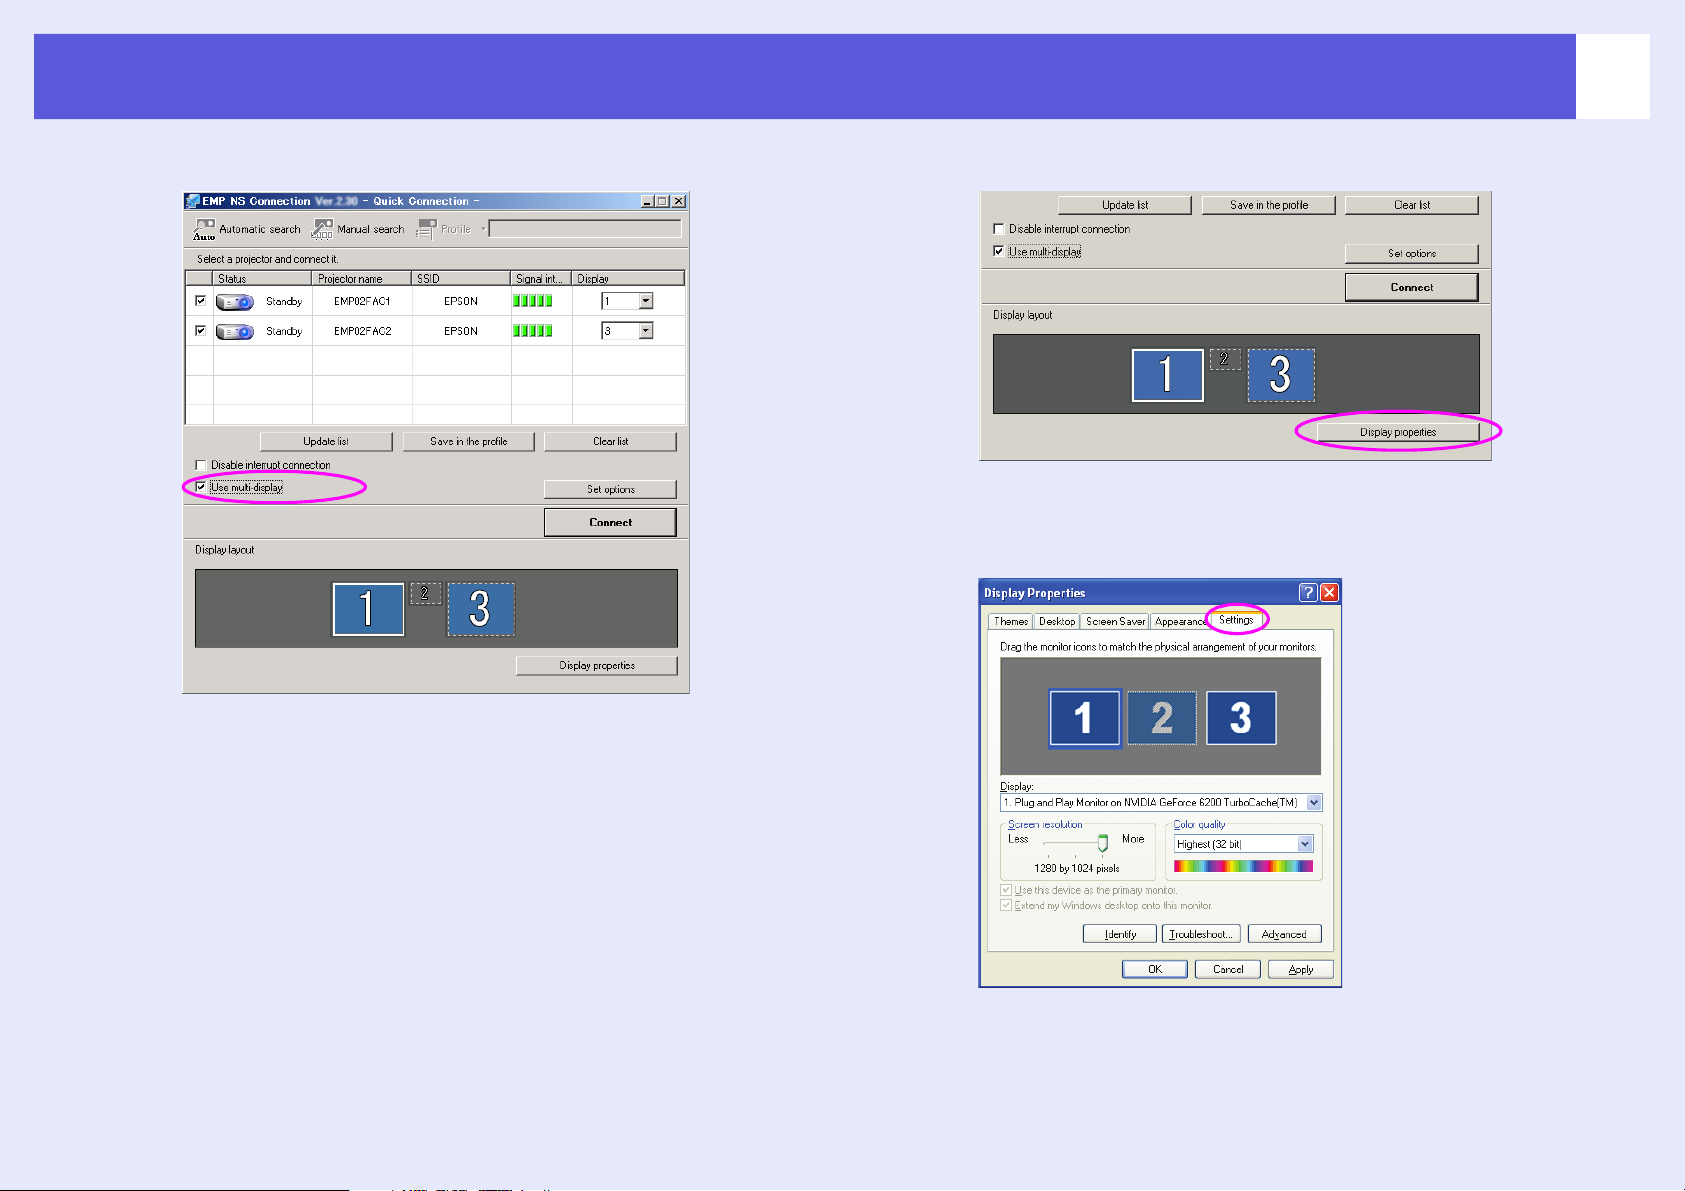
B
Select the "Use multi-display" check box.
"Display layout" and "Display properties" are added at the bottom
of the screen.
C
D
Click "Display properties".
The "Display Properties" screen will be displayed.
Click the "Settings" tab.
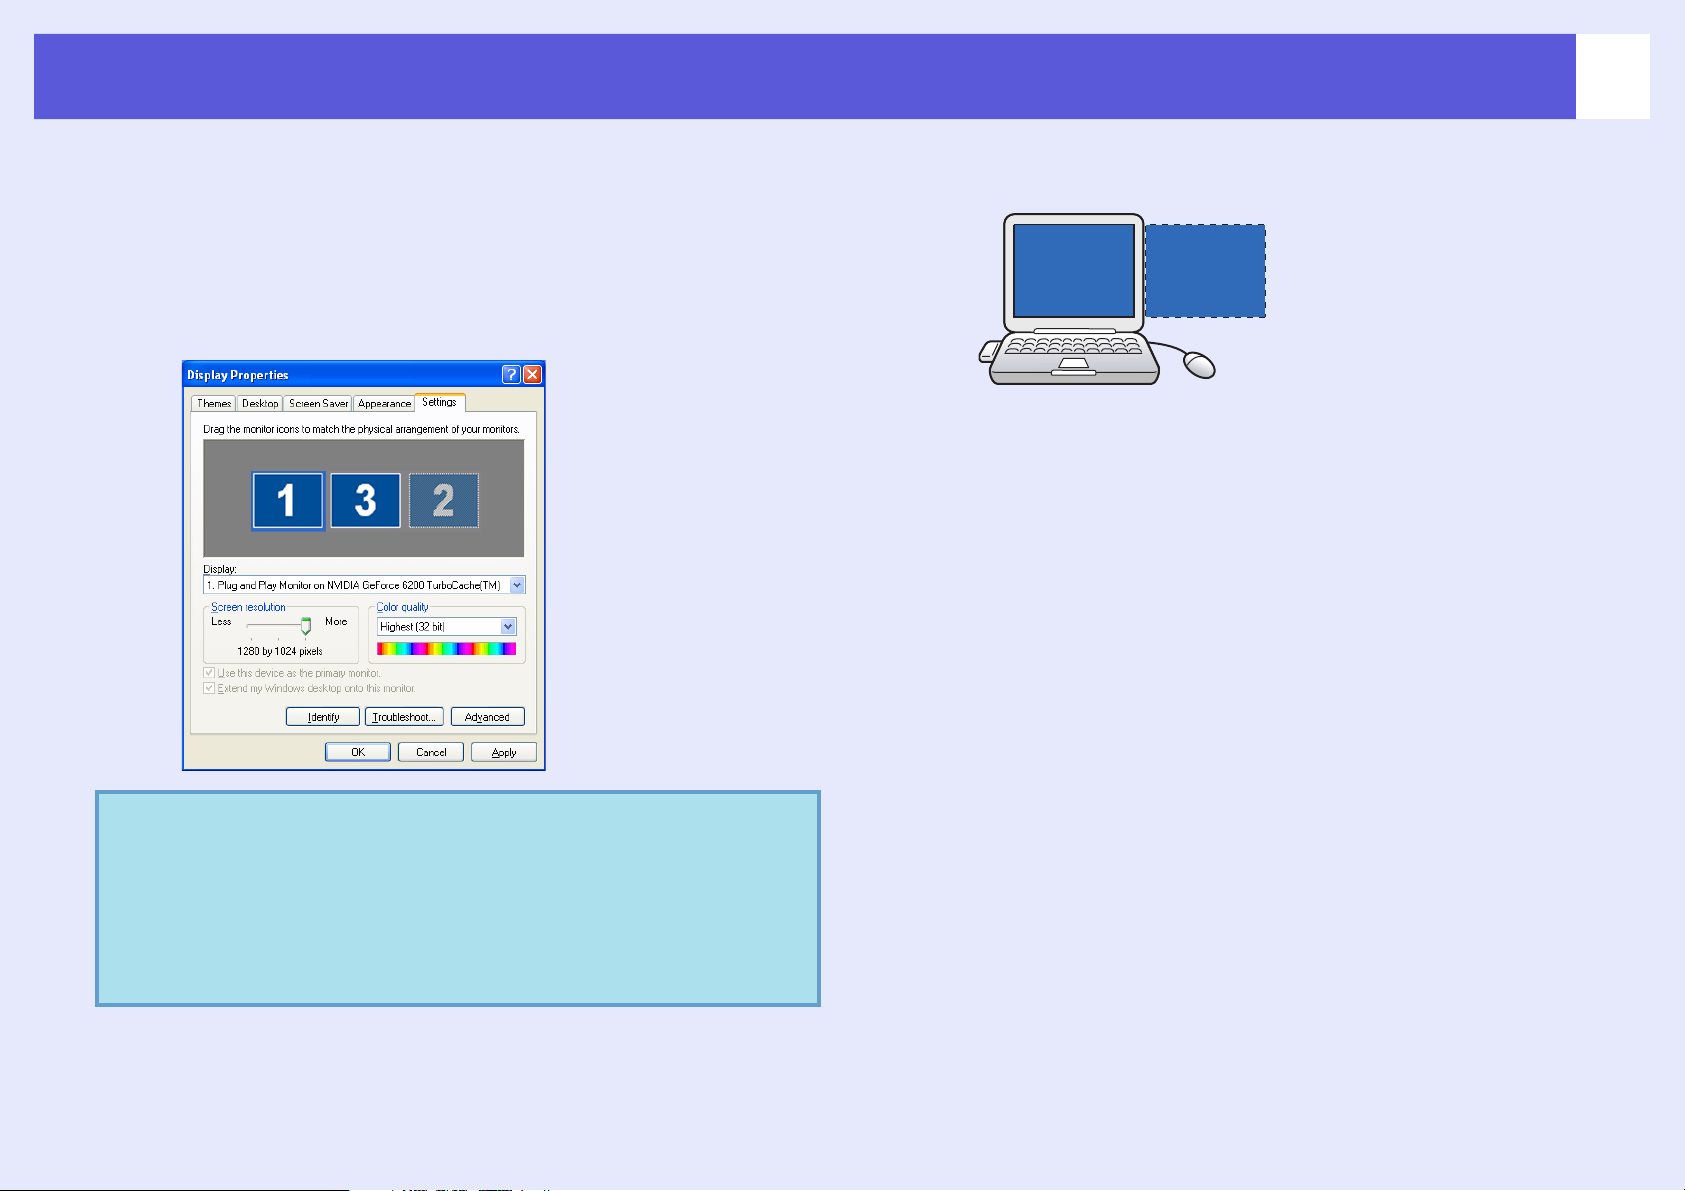
Using Multi-Screen Display
25
E
Drag the displayed monitor icon and place it where
desired.
Here, the actual monitor (1) is placed on the left, while the virtual
monitor (3) is placed on the right.
When the PC has multiple display output terminals, the numbers
assigned to the virtual terminals will be sequential to those of the
physical terminals.
F
When the monitor icon appears as follows, a virtual display is
connected.
31
Click the "OK" button. The "Display Properties"
screen closes.
Go to s p.28.
q
• When an external monitor is connected as a secondary
monitor, the image for that screen cannot be projected.
• Depending on the hardware, the number of the secondary
monitor may be other than "2". When the monitor icon is
displayed on the screen, click the icon and confirm that
the monitor type shown under "Display" is other than
"secondary".
Using Multi-Screen Display
26
For Macintosh
A
B
Start EMP NS Connection.
Double-click the "Applications" folder of the hard
drive volume in which EMP NS Connection is
installed, and then double-click the EMP NS
Connection icon. EMP NS Connection starts.
Select "Advanced Connection Mode" and then perform startup.
The "Advanced Connection Mode" screen is displayed.
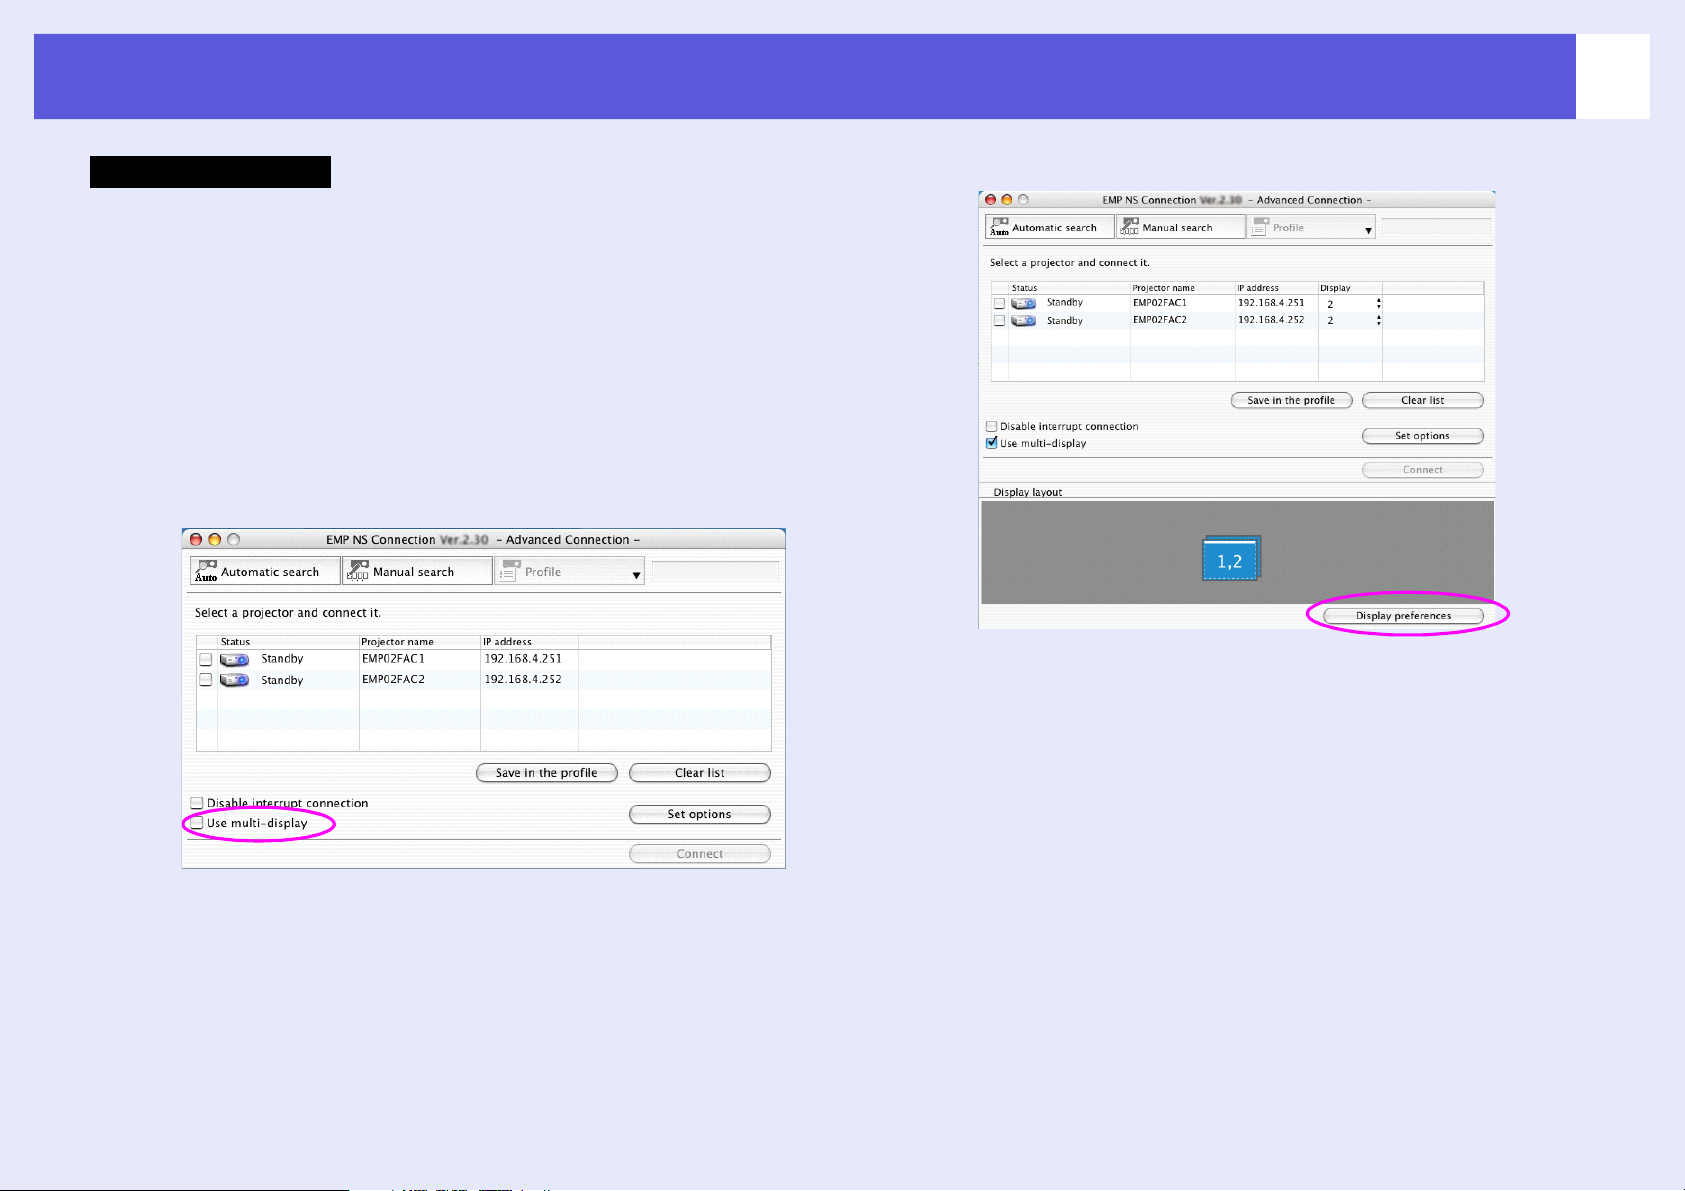
Select the "Use multi-display" check box.
C
Click "Display preferences".
The display setting screen is displayed.
"Display layout" and "Display preferences" are added at the bottom
of the screen.
Using Multi-Screen Display
27
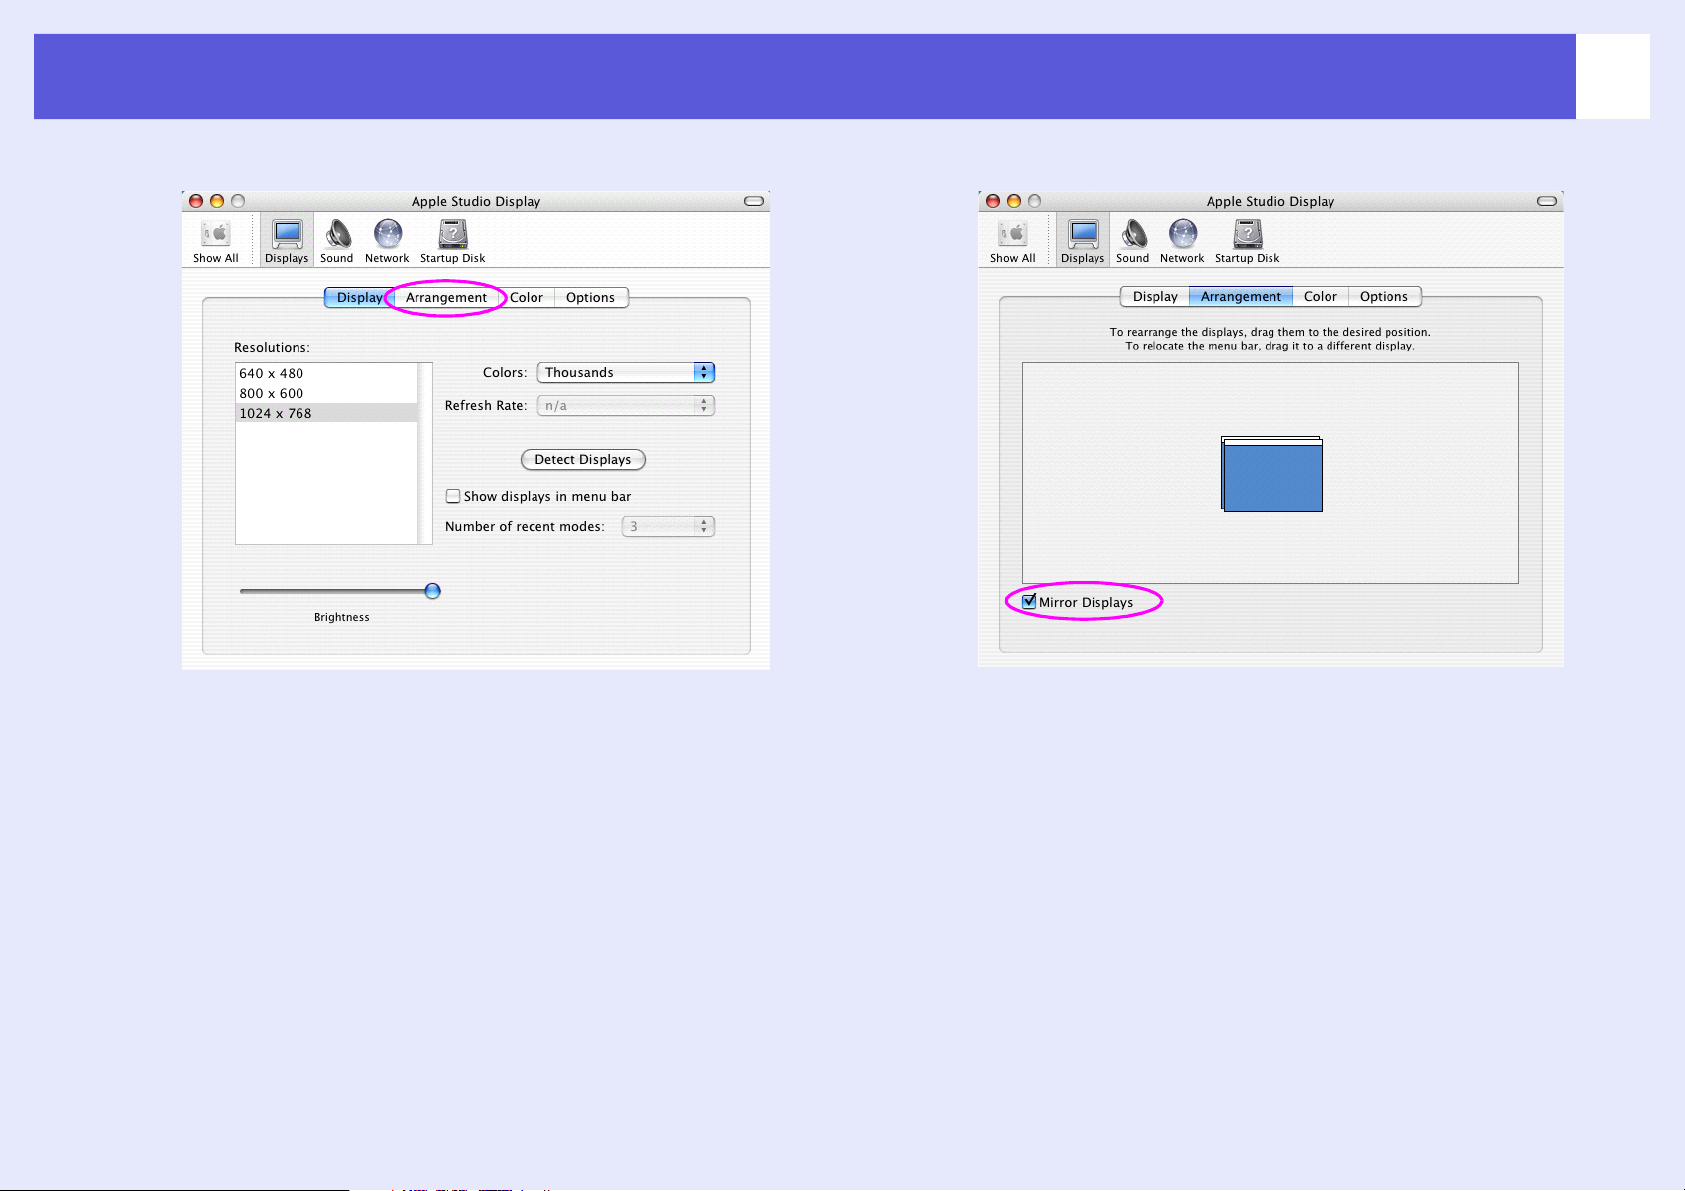
D
Click "Arrangement".
E
De-select "Mirror Displays".
Using Multi-Screen Display
28
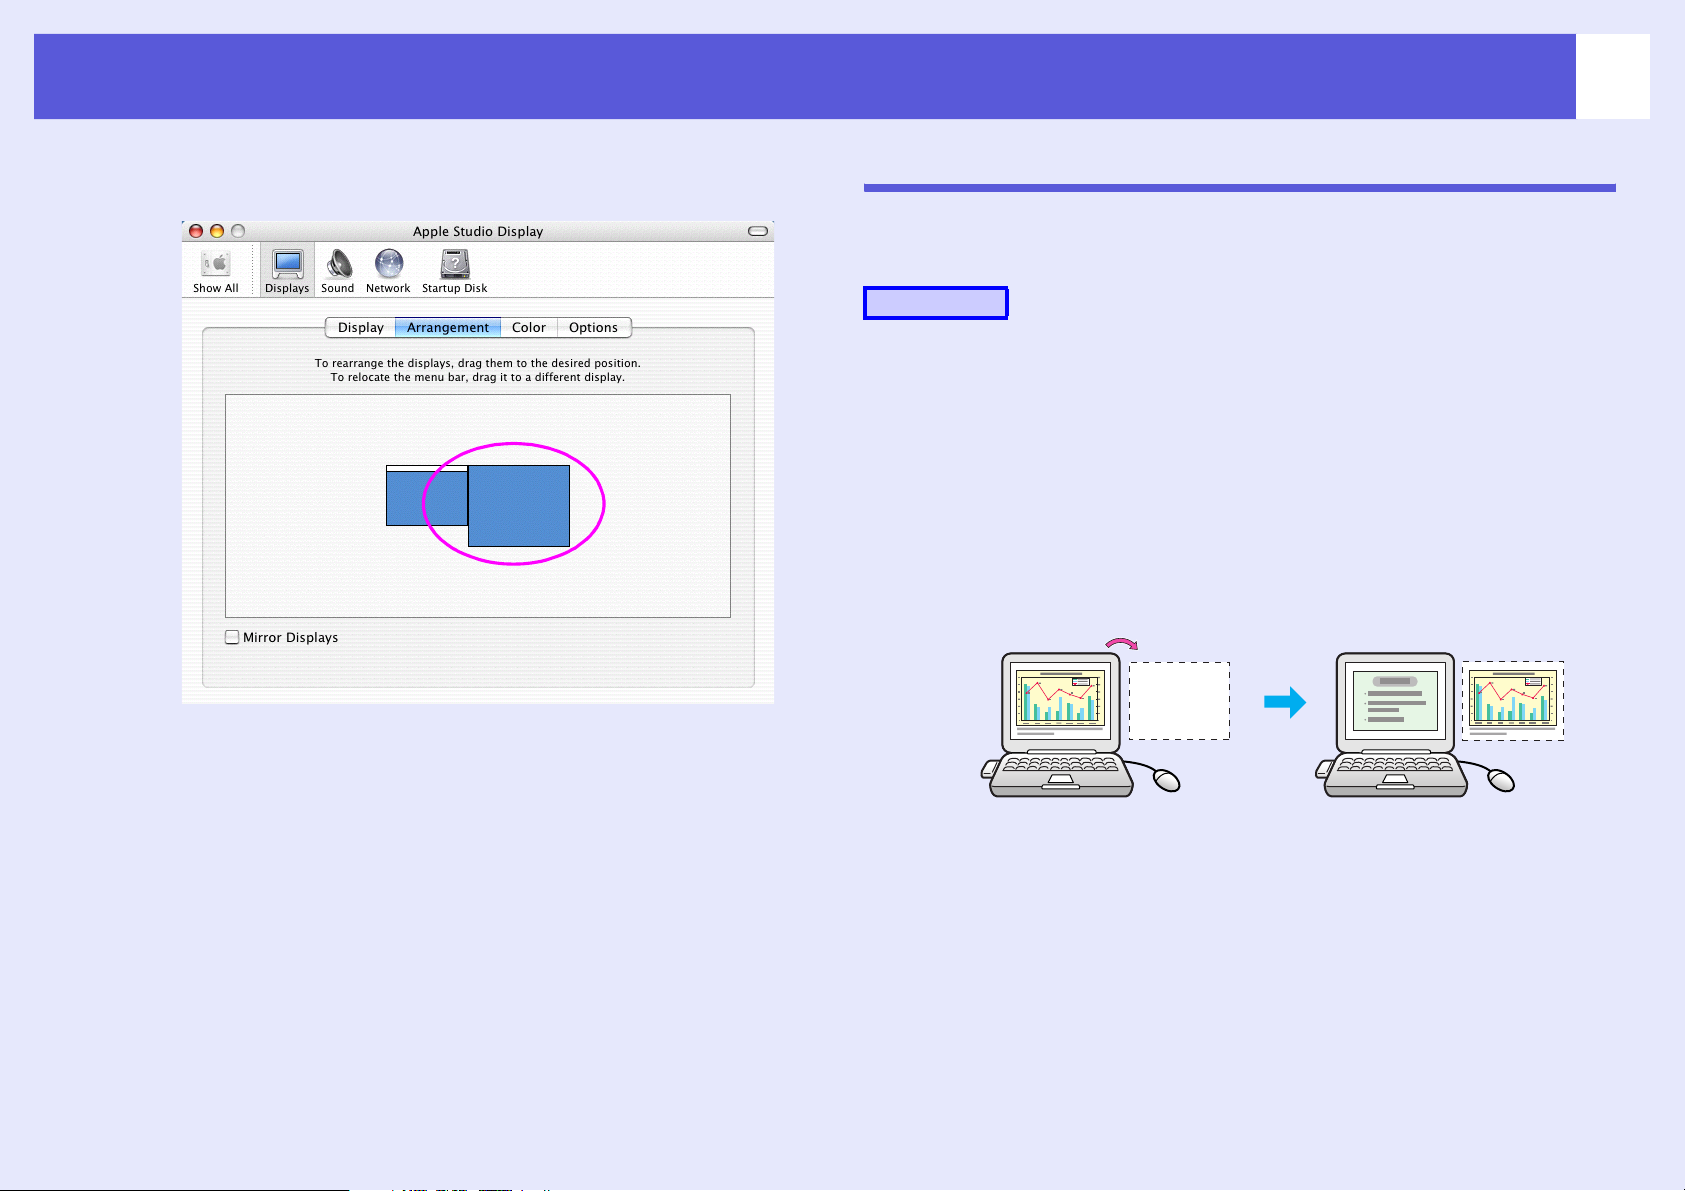
F
Drag the displayed monitor icon and place it where
desired.
Allocating the image to be projected
The following explains how to allocate the computer image using
Arrangement example 1. s p.21
Procedure
A
B
Open the file to be projected.
Start the PowerPoint and Excel files.
Drag the window to the desired virtual display
monitor, and allocate it where the image is to be
projected.
Drag the Excel window to the right until it cannot be seen. As a
result, the PowerPoint window appears on the actual monitor, while
the Excel window appears on the virtual display on the right.
G
Close the display setting screen.
Using Multi-Screen Display
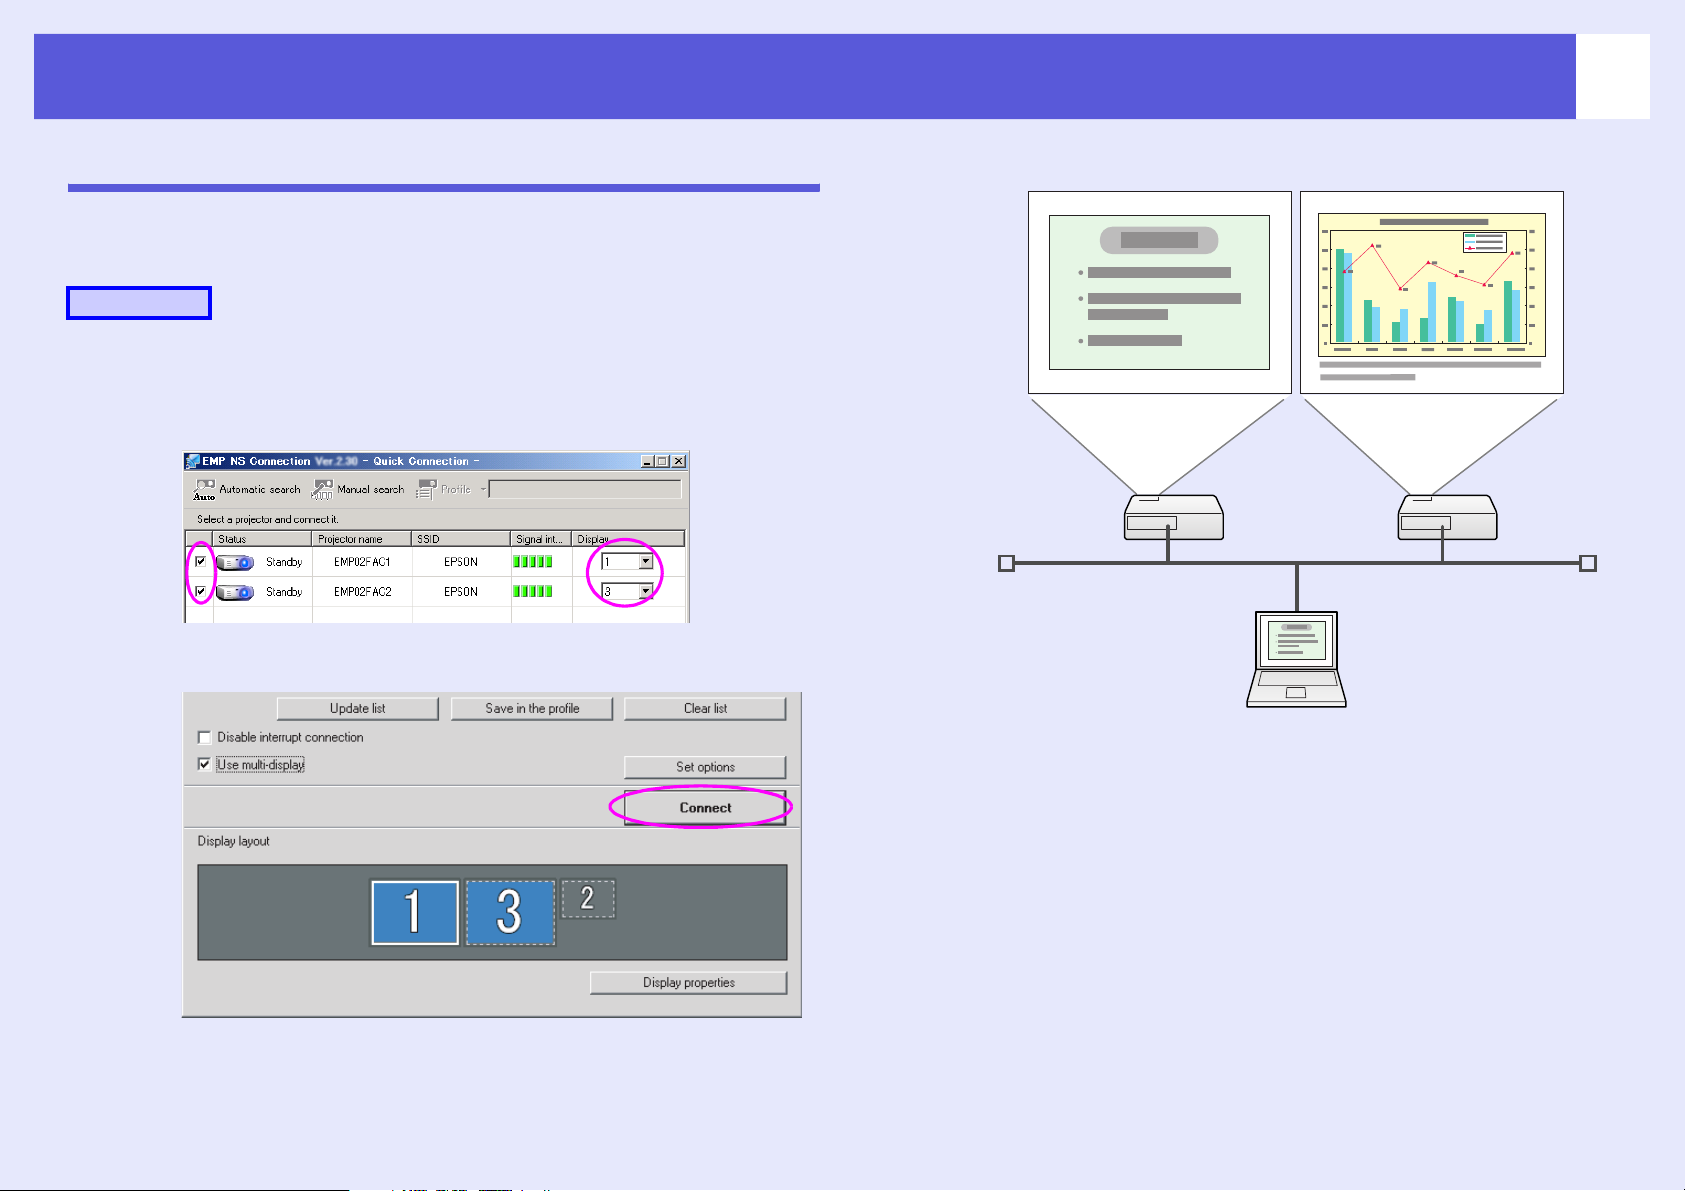
29
The allocated image is projected
The following explains how to allocate the computer image using
Arrangement example 1. s p.21
Procedure
A
B
Select the number of the virtual display to allocate
to "Display", and set which image to be projected
from which projector.
Click "Connect".
The image allocated to each projector is projected.
In a Windows environment, you cannot view the image being sent
to a virtual display on the computer. To adjust the image on the
virtual display, you must do so while viewing the projected image.
To perform mouse-based operations on the virtual display, move
the mouse pointer in the direction of the virtual display, such that
the pointer appears on the virtual display.

Using Multi-Screen Display
30
C
q
To terminate multi-screen display, click
"Disconnect" on the EMP NS Connection toolbar.
• In a Windows environment, if the virtual display driver has
been enabled such that the mouse pointer can be moved
outside the limits of the screen, there may be occasions
when you lose track of the location of the pointer. When
you are not using a virtual display, clear the check mark
against the under "Add/Remove EPSON Virtual Display",
such that the mouse pointer cannot be moved outside the
limits of the screen. To subsequently use multi-screen
display again, again place a check mark against the
required display under "Add/Remove EPSON Virtual
Display".
s
To clear a check mark, see the following.
• You can adjust each projector's color tone. See your
User’s Guide for more information.
p.22
 Loading...