

Page 1

PowerLite® 1830
Network and PC Free Operation Guide
Page 2

Contents
2
Introduction
Making Effective Use of Your Projector . . . . . . . . . . . . . . . . . . . . . . . . . 6
Various Screen Transfers by Network Connection (EasyMP Network
Projection) . . . . . . . . . . . . . . . . . . . . . . . . . . . . . . . . . . . . . . . . . . . . . . . . . . . . . . . . . . . . . . 6
Monitor, Configure, and Control the Projector from a Remote Location . . . 6
Projecting Directly from Saved JPEG Images on a USB Device (Slideshow) . 6
Connect a USB Cable to Your Computer and Project Images from the
Computer Screen (USB Display) . . . . . . . . . . . . . . . . . . . . . . . . . . . . . . . . . . . . . . . . . . 7
Installing the Software . . . . . . . . . . . . . . . . . . . . . . . . . . . . . . . . . . . . . . . . 8
Software Supplied. . . . . . . . . . . . . . . . . . . . . . . . . . . . . . . . . . . . . . . . . . . . . . . . . . . . . . . 8
Installing. . . . . . . . . . . . . . . . . . . . . . . . . . . . . . . . . . . . . . . . . . . . . . . . . . . . . . . . . . . . . . . . 8
Connecting with EasyMP Network Projection
EasyMP Network Projection Summary. . . . . . . . . . . . . . . . . . . . . . . . . 11
Main Functions of the EasyMP Network Projection . . . . . . . . . . . . . . . . . . . . . . 11
Connecting in Advanced Connection Mode . . . . . . . . . . . . . . . . . . . . . . . . . . . . . 11
Steps for connecting . . . . . . . . . . . . . . . . . . . . . . . . . . . . . . . . . . . . . . . . . . . . . . . . . 11
Preparing to Connect. . . . . . . . . . . . . . . . . . . . . . . . . . . . . . . . . . . . . . . . . 13
Preparing the Computer. . . . . . . . . . . . . . . . . . . . . . . . . . . . . . . . . . . . . . . . . . . . . . . . 13
For Windows. . . . . . . . . . . . . . . . . . . . . . . . . . . . . . . . . . . . . . . . . . . . . . . . . . . . . . . . 13
For Macintosh . . . . . . . . . . . . . . . . . . . . . . . . . . . . . . . . . . . . . . . . . . . . . . . . . . . . . . 13
EasyMP Network Projection Useful Functions
Projecting Only a PowerPoint Slide Show (Presentation Mode) . . 21
Using Multi-Screen Display . . . . . . . . . . . . . . . . . . . . . . . . . . . . . . . . . . . 22
Example of Adjusting the Virtual Display . . . . . . . . . . . . . . . . . . . . . . . . . . . . . . . . 23
Procedure Before Using the Multi-screen Display Function. . . . . . . . . . . . . . . 24
Setting the Virtual Display . . . . . . . . . . . . . . . . . . . . . . . . . . . . . . . . . . . . . . . . . . . . . . 24
Enable the virtual display driver (Windows only) . . . . . . . . . . . . . . . . . . . . . . 24
Adjusting the Virtual Display . . . . . . . . . . . . . . . . . . . . . . . . . . . . . . . . . . . . . . . . . 25
Allocating the Image to be Projected . . . . . . . . . . . . . . . . . . . . . . . . . . . . . . . . . . . 28
Projecting the Allocated Images . . . . . . . . . . . . . . . . . . . . . . . . . . . . . . . . . . . . . . . . 29
Connecting to a Projector on a Different Sub-net
Connecting to a Projector on a Different Subnet. . . . . . . . . . . . . . . . 32
Searching by Specifying the IP Address and Projector name . . . . 33
Performing a Search with a Profile. . . . . . . . . . . . . . . . . . . . . . . . . . . . . 34
Making a Profile . . . . . . . . . . . . . . . . . . . . . . . . . . . . . . . . . . . . . . . . . . . . . . . . . . . . . . . . 34
Searching by Specifying a Profile . . . . . . . . . . . . . . . . . . . . . . . . . . . . . . . . . . . . . . . 35
Managing a Profile . . . . . . . . . . . . . . . . . . . . . . . . . . . . . . . . . . . . . . . . . . . . . . . . . . . . . 36
Connecting to a Projector on a Network and Projecting. . . . . . . . . 14
Operating the Projector . . . . . . . . . . . . . . . . . . . . . . . . . . . . . . . . . . . . . . . . . . . . . . . . 14
Operating the Computer . . . . . . . . . . . . . . . . . . . . . . . . . . . . . . . . . . . . . . . . . . . . . . . 14
Using the Connection Screen . . . . . . . . . . . . . . . . . . . . . . . . . . . . . . . . . . . . . . . . . . . 15
Using the Toolbar . . . . . . . . . . . . . . . . . . . . . . . . . . . . . . . . . . . . . . . . . . . . . . . . . . . . . . 17
Page 3

3
Setting the EasyMP Network Projection Operation
Using Set options . . . . . . . . . . . . . . . . . . . . . . . . . . . . . . . . . . . . . . . . . . . . 39
Setting Each Item . . . . . . . . . . . . . . . . . . . . . . . . . . . . . . . . . . . . . . . . . . . . . . . . . . . . . . 39
General settings tab . . . . . . . . . . . . . . . . . . . . . . . . . . . . . . . . . . . . . . . . . . . . . . . . . 39
Adjust performance tab . . . . . . . . . . . . . . . . . . . . . . . . . . . . . . . . . . . . . . . . . . . . . . 40
Audio Output tab . . . . . . . . . . . . . . . . . . . . . . . . . . . . . . . . . . . . . . . . . . . . . . . . . . . . 41
Using a Computer to Set Up, Monitor and Control
Projectors
Changing Settings Using a Web Browser (Web Control). . . . . . . . . 43
Displaying Web Control . . . . . . . . . . . . . . . . . . . . . . . . . . . . . . . . . . . . . . . . . . . . . . . . 43
Entering the IP address of the projector. . . . . . . . . . . . . . . . . . . . . . . . . . . . . . . 43
Projector Setup . . . . . . . . . . . . . . . . . . . . . . . . . . . . . . . . . . . . . . . . . . . . . . . . . . . . . . . . 43
Items in the Configuration menu that cannot be set by
the web browser. . . . . . . . . . . . . . . . . . . . . . . . . . . . . . . . . . . . . . . . . . . . . . . . . . . . . 43
Items that can only be set in the Web browser . . . . . . . . . . . . . . . . . . . . . . . . 44
Using the Mail Notification Function to Report Problems . . . . . . . 45
Management Using SNMP . . . . . . . . . . . . . . . . . . . . . . . . . . . . . . . . . . . . 46
Slideshow Basic Operations. . . . . . . . . . . . . . . . . . . . . . . . . . . . . . . . . . . 49
Starting and Closing Slideshow . . . . . . . . . . . . . . . . . . . . . . . . . . . . . . . . . . . . . . . . . 49
Starting Slideshow . . . . . . . . . . . . . . . . . . . . . . . . . . . . . . . . . . . . . . . . . . . . . . . . . . . 49
Closing Slideshow . . . . . . . . . . . . . . . . . . . . . . . . . . . . . . . . . . . . . . . . . . . . . . . . . . . 49
Slideshow Basic Operations. . . . . . . . . . . . . . . . . . . . . . . . . . . . . . . . . . . . . . . . . . . . . 49
Rotating the Image . . . . . . . . . . . . . . . . . . . . . . . . . . . . . . . . . . . . . . . . . . . . . . . . . . . . . 50
Projecting Image Files . . . . . . . . . . . . . . . . . . . . . . . . . . . . . . . . . . . . . . . . 52
Projecting Images . . . . . . . . . . . . . . . . . . . . . . . . . . . . . . . . . . . . . . . . . . . . . . . . . . . . . . 52
Projecting all Image Files in a Folder in Sequence (Slideshow) . . . . . . . . . . . 53
Display Setting for Image Files and Operation Settings
for Slideshow . . . . . . . . . . . . . . . . . . . . . . . . . . . . . . . . . . . . . . . . . . . . . . . . 54
Appendix
Connection Limitations. . . . . . . . . . . . . . . . . . . . . . . . . . . . . . . . . . . . . . . 56
Supported Resolutions . . . . . . . . . . . . . . . . . . . . . . . . . . . . . . . . . . . . . . . . . . . . . . . . . 56
Display Color. . . . . . . . . . . . . . . . . . . . . . . . . . . . . . . . . . . . . . . . . . . . . . . . . . . . . . . . . . . 56
Number of Connections . . . . . . . . . . . . . . . . . . . . . . . . . . . . . . . . . . . . . . . . . . . . . . . . 56
Others . . . . . . . . . . . . . . . . . . . . . . . . . . . . . . . . . . . . . . . . . . . . . . . . . . . . . . . . . . . . . . . . . 56
When Using Windows Vista . . . . . . . . . . . . . . . . . . . . . . . . . . . . . . . . . . . . . . . . . . . . . 57
Limitations when projecting from Windows Photo Gallery . . . . . . . . . . . . 57
Limitations in Windows Aero . . . . . . . . . . . . . . . . . . . . . . . . . . . . . . . . . . . . . . . . . 57
Presentations Using Slideshow
Files that can be Projected Using Slideshow . . . . . . . . . . . . . . . . . . . 48
Specifications for Files that can be Projected Using Slideshow . . . . . . . . . . . 48
Slideshow Examples. . . . . . . . . . . . . . . . . . . . . . . . . . . . . . . . . . . . . . . . . . . . . . . . . . . . 48
Projecting images and movies stored on USB storage and so on . . . . . . . 48
Troubleshooting . . . . . . . . . . . . . . . . . . . . . . . . . . . . . . . . . . . . . . . . . . . . . 58
Problems Concerning Network Functions . . . . . . . . . . . . . . . . . . . . . . . . . . . . . . . 59
Cannot connect using EasyMP Network Projection. . . . . . . . . . . . . . . . . . . . 59
When connected using EasyMP Network Projection,
a connection cannot be made from another computer. . . . . . . . . . . . . . . . 59
The projector is not found when EasyMP Network Projection
is started. . . . . . . . . . . . . . . . . . . . . . . . . . . . . . . . . . . . . . . . . . . . . . . . . . . . . . . . . . . . . 59
Page 4

Cannot connect in Advanced Connection Mode . . . . . . . . . . . . . . . . . . . . . . 60
The Slide Show does not display when the multi-screen
display function is used.. . . . . . . . . . . . . . . . . . . . . . . . . . . . . . . . . . . . . . . . . . . . . . 60
Applications are not displayed from the computer when
the multi-screen display function is used. . . . . . . . . . . . . . . . . . . . . . . . . . . . . . 61
The mouse cursor is not displayed on the computer screen. . . . . . . . . . . . 61
When connected using EasyMP Network Projection, the image
does not display or is slow to appear. . . . . . . . . . . . . . . . . . . . . . . . . . . . . . . . . . 61
When connected using EasyMP Network Projection, a
PowerPoint Slide Show does not start.. . . . . . . . . . . . . . . . . . . . . . . . . . . . . . . . 61
When connected using EasyMP Network Projection,
the screen does not refresh in an Office application. . . . . . . . . . . . . . . . . . . 62
Error message when starting up EasyMP Network Projection . . . . . . . . . . 62
Problems Concerning Monitoring and Control . . . . . . . . . . . . . . . . . . . . . . . . . . 63
Mail is not sent even if a problem occurs in the projector. . . . . . . . . . . . . . 63
Glossary . . . . . . . . . . . . . . . . . . . . . . . . . . . . . . . . . . . . . . . . . . . . . . . . . . . . . 65
4
General Notes . . . . . . . . . . . . . . . . . . . . . . . . . . . . . . . . . . . . . . . . . . . . . . . 66
Copyright Notice . . . . . . . . . . . . . . . . . . . . . . . . . . . . . . . . . . . . . . . . . . . . . . . . . . . . . . . 66
Trademarks . . . . . . . . . . . . . . . . . . . . . . . . . . . . . . . . . . . . . . . . . . . . . . . . . . . . . . . . . . . . 66
Page 5

Introduction
This chapter provides information on functions that allow you to use your projector more effectively.
Page 6
Making Effective Use of Your Projector
6
Making Effective Use of Your Projector
This projector is equipped with many useful functions to improve
usability. As well as a computer cable, you can connect using various
other interfaces such as a USB cable, a USB storage device, or a LAN
connection. This allows for a wide range of image input sources
depending on your usage environment.
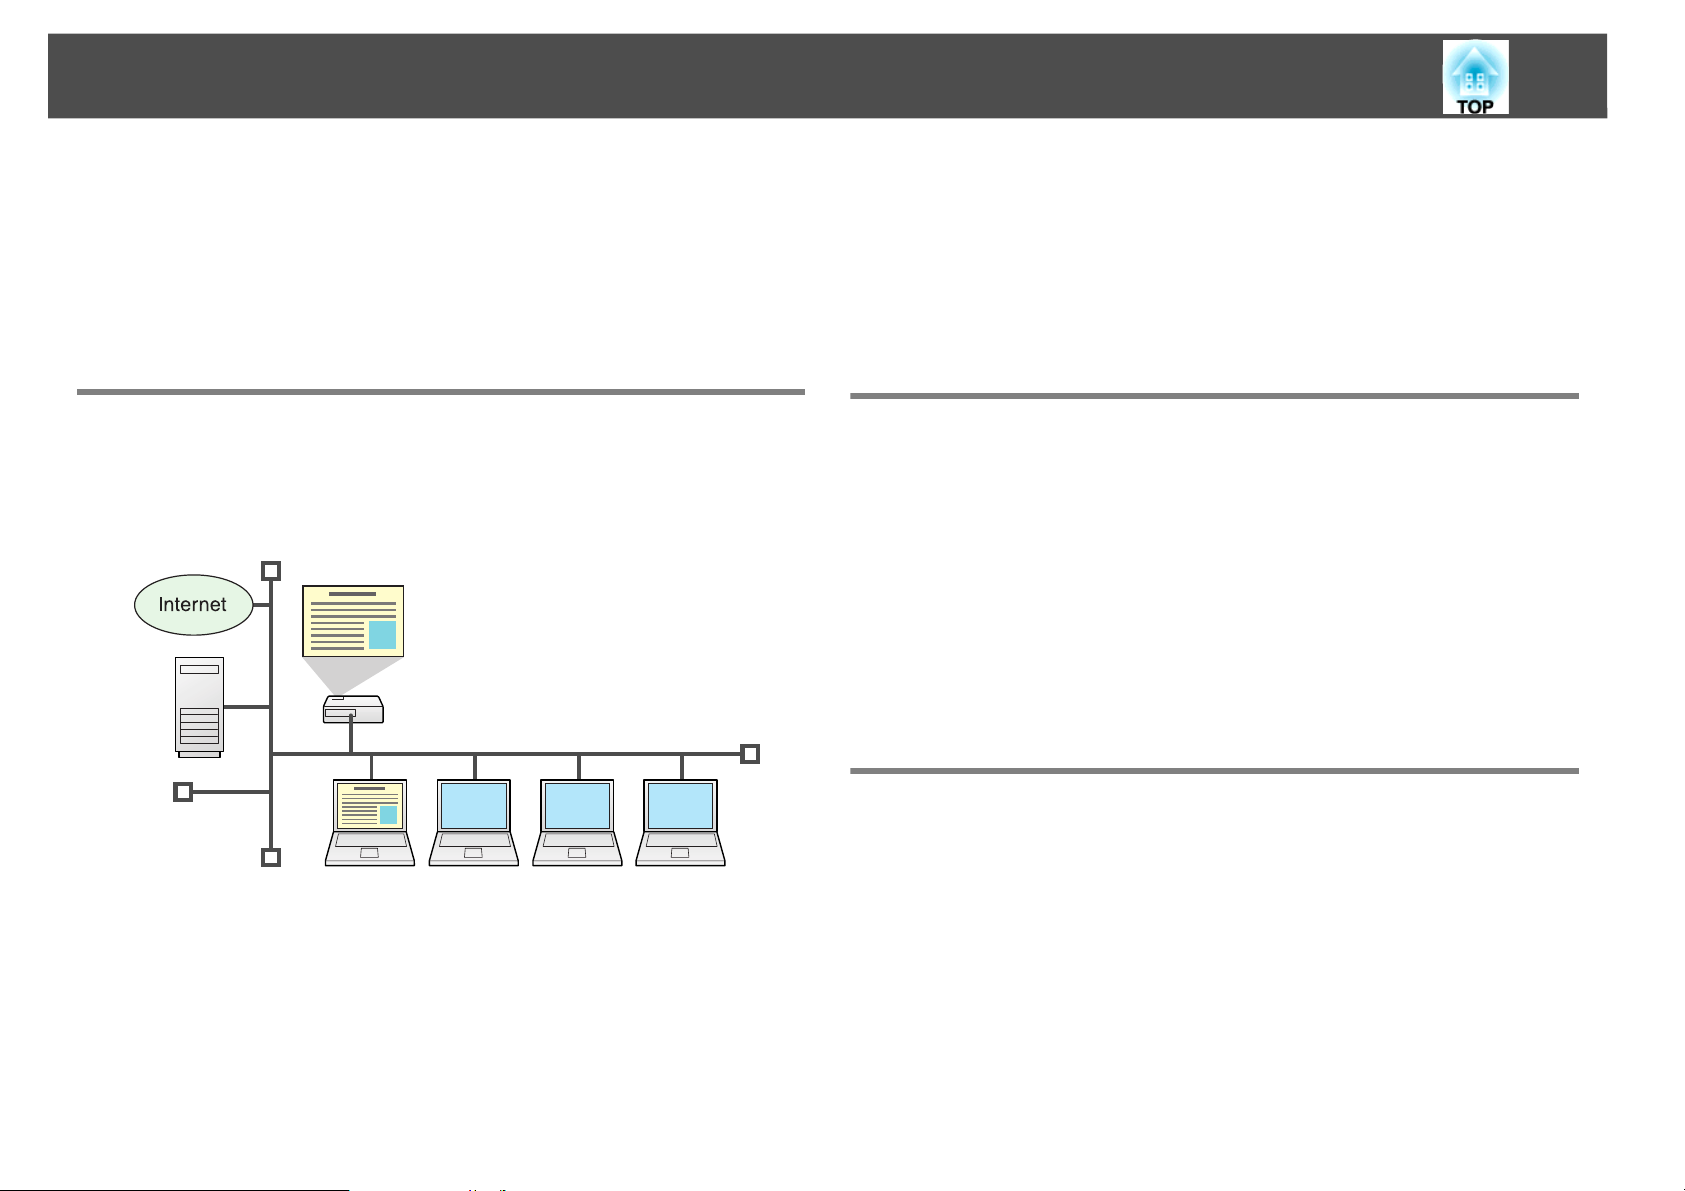
Various Screen Transfers by Network Connection (EasyMP Network Projection)
You can hold efficient meetings and presentations by connecting the
projector to a network.
Various screen transfer functions
• Distribution function s p.11
• Switching function s p.11
• Multi-screen display s p.22
• Presentation Mode s p.21
Monitor, Configure, and Control the Projector from a Remote Location
The following convenient functions collectively manage projectors in
various conference rooms.
• Receive an e-mail notification if a problem occurs s p.45
• Monitor and detect problems from SNMP Manager on the
networks p.46
• Set and control the projector by using a standard computer Web
browser s p.43
Smooth progress
If the projector is connected to a network, you can share the projector
from computers on the network. When projecting data from different
computers during a meeting or presentation, you can progress smoothly
without changing the signal cable between each computer.
Even a distance between the projector and the computer does not cause
any problems.
Projecting Directly from Saved JPEG Images on a USB Device (Slideshow)
By connecting a digital camera compatible with USB memory or USB
mass storage devices to the projector, you can project JPEG images
stored on the USB device as a Slideshow.s p.47
Page 7

Making Effective Use of Your Projector
Connect a USB Cable to Your Computer and Project Images from the Computer Screen (USB Display)
By simply using the supplied USB cable to connect to a Windows
computer, you can project images from the computer.
7
Page 8

Installing the Software
8
Installing the Software
You can find the software for using the projector effectively on the
supplied "EPSON Projector Software for Meeting & Monitoring"
CD-ROM. Install the software on the computer you are using.
The Slideshow and USB Display functions are already built-in to the
projector. They can be used as they are without being installed from the
CD-ROM.
Software Supplied
You can find the following software on the "EPSON Projector Software
for Meeting & Monitoring" CD-ROM.
• EasyMP Network Projection
Software for sending computer screen images to a projector via a
network connection.
• EasyMP Monitor
Software that lists the current status of Epson projectors connected to
the network, and monitors and controls those projectors. You can
collectively manage multiple projectors by using EasyMP Monitor. For
details on using EasyMP Monitor, see the "EasyMP Monitor Operation
Guide".
Check the system requirements for each software application from
Software Requirements in the "User's Guide" supplied with the projector.
Installing
• When you using the following OS, you must have administrator
authority to install EasyMP Network Projection.
• Windows 2000 • Windows XP • Windows Vista
• When you using the following OS, you must have administrator
authority to install EasyMP Monitor.
• Windows 2000 • Windows NT4.0
• Windows XP • Windows Vista
• Make sure that you close all running applications before starting
installation.
• When the language selected for the installation varies from that of the
OS being used, the screens may not be displayed correctly.
CAUTION
• For current users of EMP NS Connection software
The EasyMP Network Projection software that came on your new projector
software CD-ROM provides updated networking features and is
backward-compatible with existing networks running Epson projectors. To use your
new projector on the network, you must uninstall EMP NS Connection and install
EasyMP Network Projection software as described in this manual.
• For current users of EMP Monitor software
The Easy Management® EasyMP Monitor software that came on your new projector
software CD-ROM provides updated network monitoring features. To monitor
your new projector on the network, you must uninstall EMP Monitor and install
EasyMP Monitor. First save a copy of your current setting information data file,
EMPMonitor.dat, in a separate folder. This will retain your current registered
projector settings. Then uninstall EMP Monitor and install EasyMP Monitor as
described in the EasyMP Monitor Operation Guide. After installation, replace the
new EMPMonitor.dat file with your saved copy.
Make sure you check the following points before starting installation.
Page 9

Installing the Software
9
Procedure
For Windows
A Turn on your computer.
B Insert the "EPSON Projector Software for Meeting &
Monitoring" CD-ROM into the computer.
The installer starts automatically.
C Click "Easy Install".
To select software and install it individually, select Custom Install.
To change the language in which the software is displayed, click
Language.
D Check the applications to be installed, and then click
"Install".
E When the License Agreement screen is displayed, click "Yes".
F When the Add-Remove EPSON Virtual Display screen is
displayed, click "OK".
A Turn on your computer.
B Insert the "EPSON Projector Software for Meeting &
Monitoring" CD-ROM into the computer.
C Double-click the "Installer for Mac OS X" icon in the EPSON
window.
Installation starts.
D Click "Exit" to complete the installation.
q
• When installation does not start automatically (Windows only)
Select Start - Run, and in the Run dialog box, type the letter for your
CD-ROM drive followed by :\EPsetup.exe and then click OK.
• Uninstalling
For Windows
Select Start - Settings - Control Panel - Add-Remove Programs or Add or
Remove Programs and then remove EasyMP Network Projection.
For Macintosh
From Applications, delete the EasyMP Network Projection folder.
To use Multi-screen display you need to set up EPSON
Virtual Display. If you do not want to set it up now, you can do so
later.s p.23
G Click "Exit" to complete the installation.
When EasyMP Monitor is selected, installation begins.
For Macintosh
EasyMP Monitor is not compatible with Macintosh computers.
Page 10

Connecting with EasyMP Network Projection
This section explains how to connect the computer and the projector via a network, and the procedure for projecting images from your computer's screen
with the projector.
Page 11
EasyMP Network Projection Summary
11
EasyMP Network Projection Summary
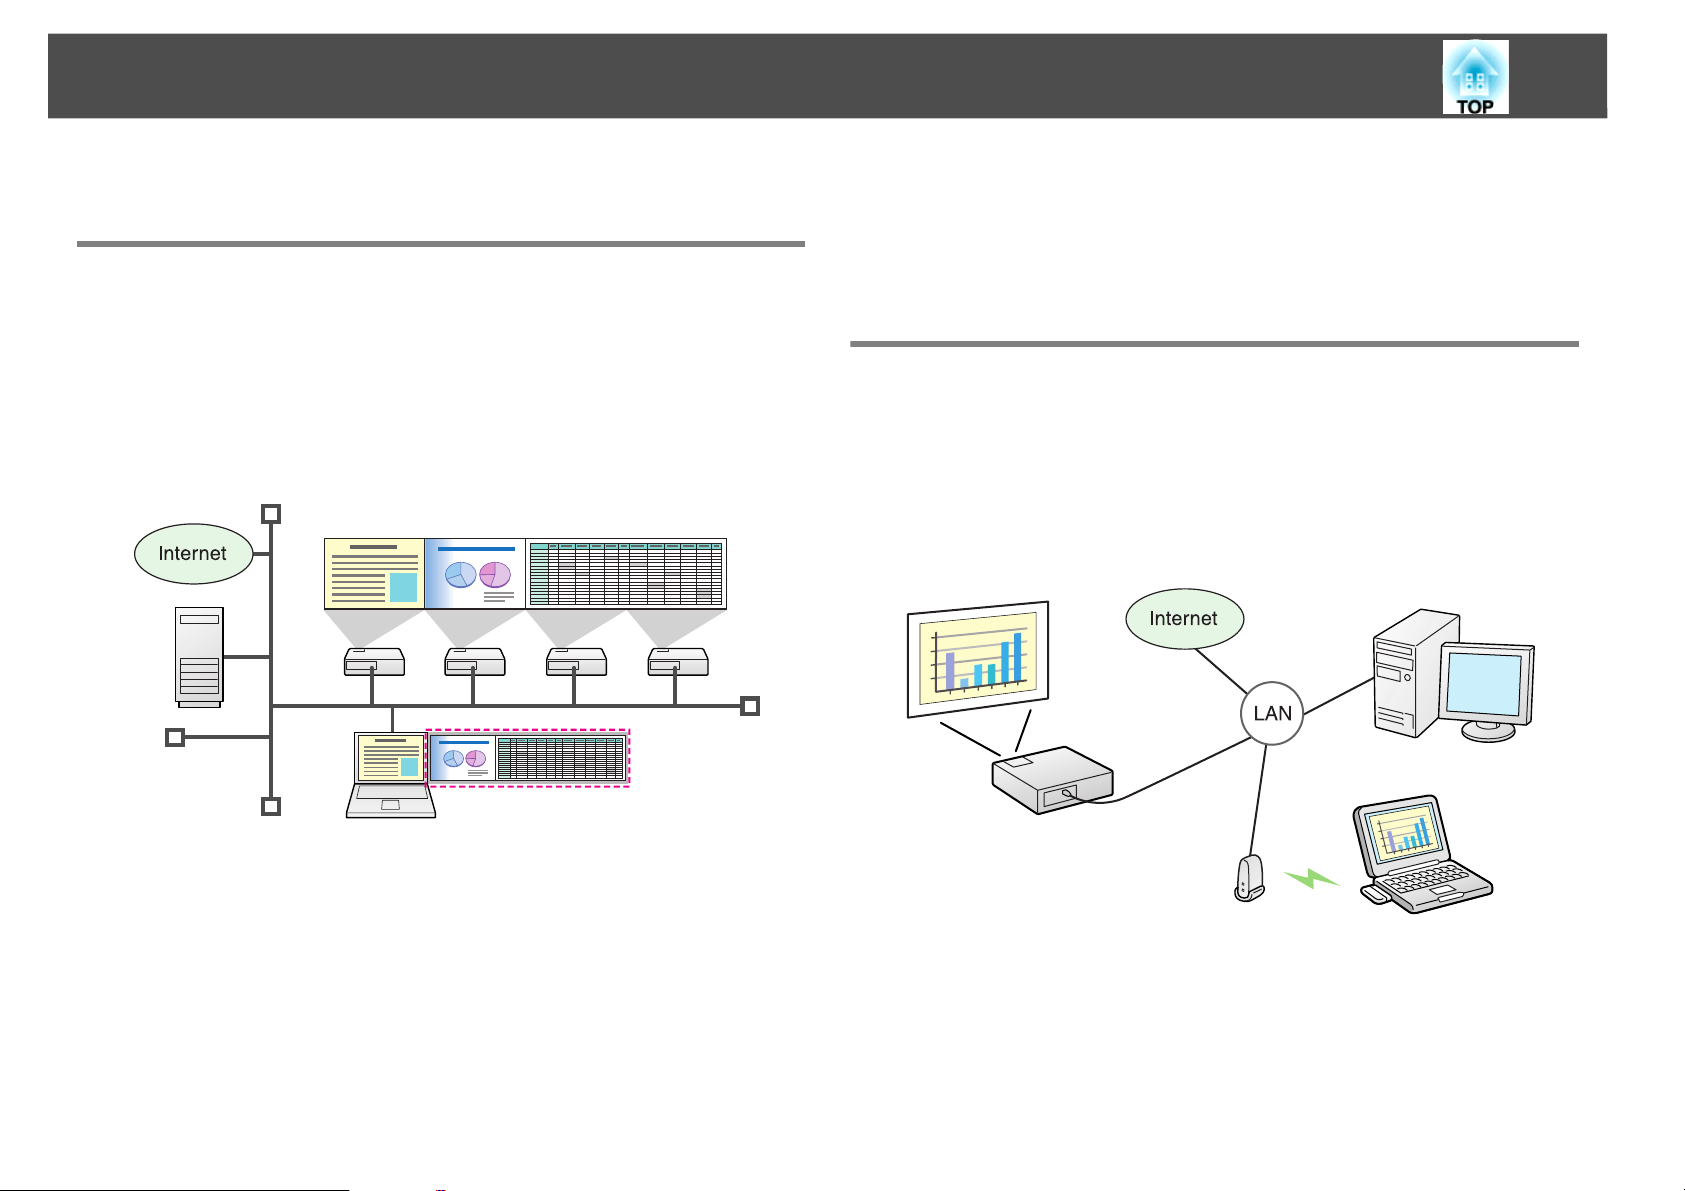
Main Functions of the EasyMP Network Projection
You can make meetings and presentations by using the following
convenient functions.
• Multi-screen display s p.22
You can project different images from up to four projectors from one
computer, allowing you to project landscape images such as
spreadsheets and so on as one continuous image.
• Switching function
By using the meeting switching function, if EasyMP Network
Projection is installed on all of the computers, the presenters can take
turns and project their own images without changing cables.
Connecting in Advanced Connection Mode
To connect the computer and the projector via a network with EasyMP
Network Projection, connect in Advanced Connection Mode. Advanced
Connection Mode is an infrastructure connection, and connects to an
existing network system via a network cable. When connecting to a
network, connect the projector to the network hub with a commercially
available LAN cable.
• Presentation Mode s p.21
This function can project a PowerPoint Slide Show running on a
computer. You can give stylish presentations by projecting a black
screen while making preparations and so on, and when not performing
a Slide Show.
• Distribution function
The screen being displayed by a remote computer can be
simultaneously displayed by up to four projectors on the same network.
Steps for connecting
Use the following steps to connect and project in EasyMP Network
Projection Advanced Connection Mode.
Page 12

EasyMP Network Projection Summary
You need to perform steps 1 to 4 only the first time you connect.
1. Install EasyMP Network Projection on the computer to be connected.
s p.8
*
Make network settings on the computer and put it into network
2.
connection status. s p.13
3. Enable the Wired LAN adapter in "Port Configurations". s See your
computer documentation.
4. Make network settings on the projector and put it into network
connection status.
12
5. Start EasyMP Network Projection on the computer and connect with
the projector. s p.14
* When the computer you are using is normally connected to the network,
you do not need to make network settings on the computer.
Page 13
Preparing to Connect
Preparing to Connect
Use the following procedure to prepare the computer and the projector
for connection.
Preparing the Computer
For Windows
Make network settings for the computer by using the utility software
supplied with the LAN adapter. For more information on the utility
software, see the User's Guide supplied with your LAN adapter.
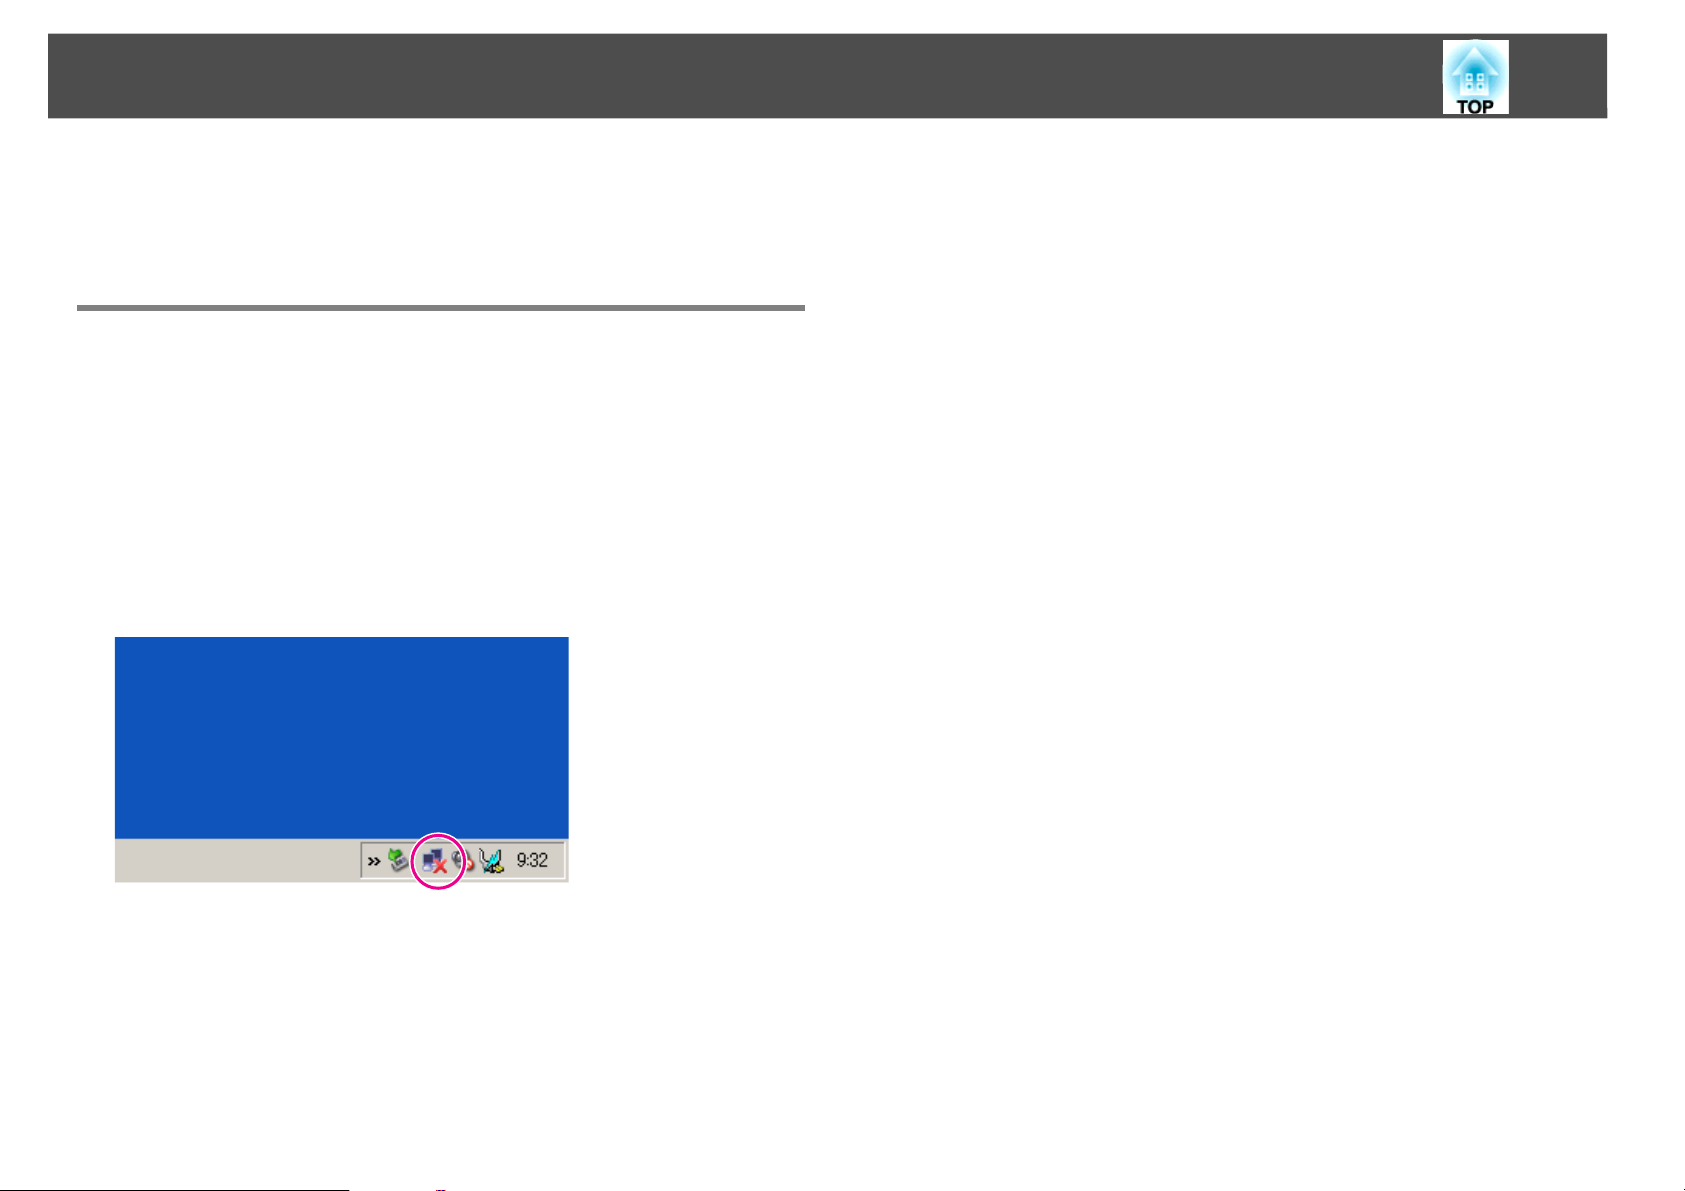
For example, as shown in the following illustration, when a red cross (^)
is displayed over the network icon on the taskbar, you cannot connect to
the projector.
13
For Macintosh
Set the network port and communication status. For more details on
setting the communication status, see the User’s Guides for your
computer or the AirPort card.
Page 14
Connecting to a Projector on a Network and Projecting
Connecting to a Projector on a Network and Projecting
Operating the Computer
14
Operating the Projector
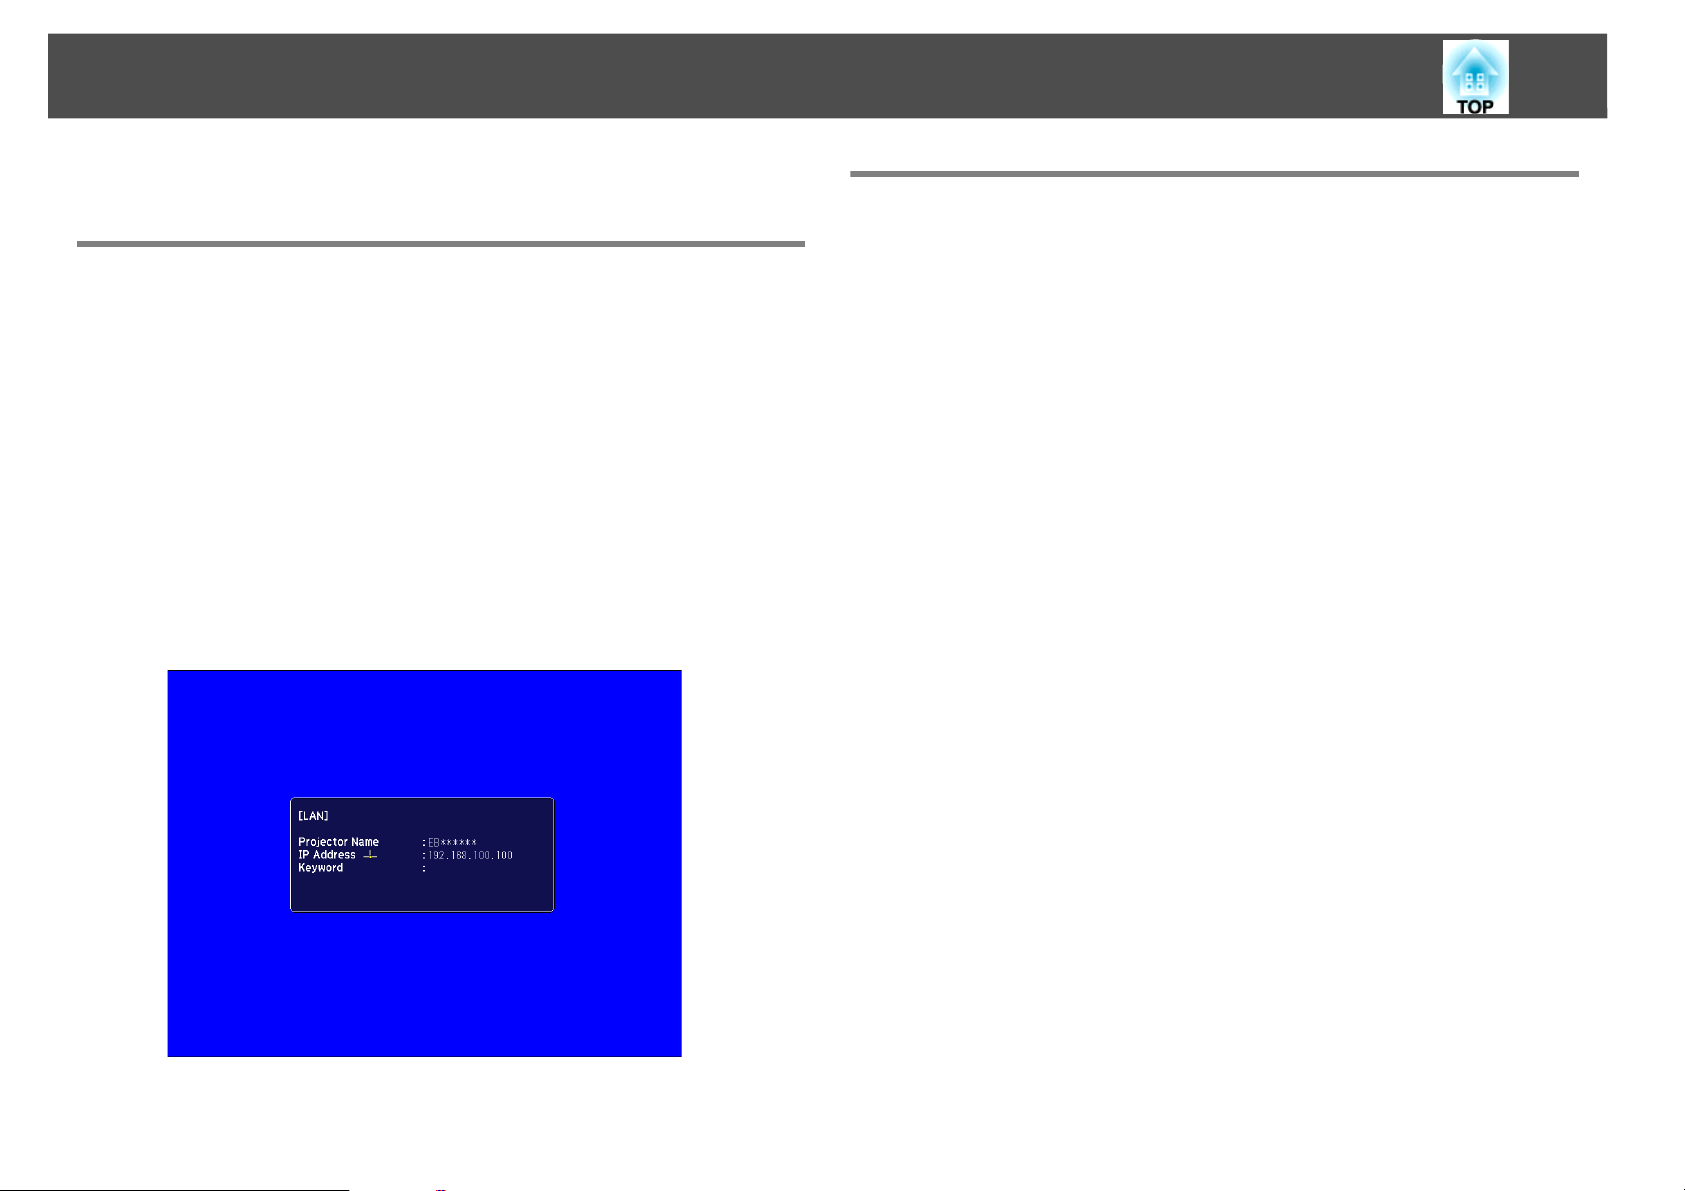
Before connecting, put the projector into connection standby status.
Make sure the projector network settings are complete, and the projector
is connected to network equipment such as a network hub via a
commercially available network cable.
Procedure
A Press the [t] button on the remote control to turn the power
on.
B Press the LAN button on the Remote Control.
The LAN standby screen is displayed.
In the following explanations, unless otherwise noted, Windows screen
shots are used. You see the same screens even when using Macintosh.
Procedure
A Start EasyMP Network Projection.
For Windows
Select Start - Programs (or All Programs) - EPSON Projector EasyMP Network Projection.
For Macintosh
Double-click the Applications folder of the hard drive volume in
which EasyMP Network Projection is installed, and then double-click the EasyMP Network Projection icon.
B Select "Advanced Connection Mode" and then click "OK".*
The projector search results are displayed. Because this projector
always connects using Advanced Connection Mode, Set the select-
ed Connection Mode as the default mode for future connections
is always selected.
* Cannot connect to the projector in Quick Connection Mode.
C Select the projector you want to connect to, and then click
"Connect".
If the projector you want to connect to is not displayed in the search
results, click the Automatic search button. The search takes about
30 seconds.
For details on the connection screen, see "Using the Connection
Screen".s p.15
Page 15
Connecting to a Projector on a Network and Projecting
15
D When Projector keyword is set to "On" from the projector,
the keyword entry screen is displayed. Enter the keyword
displayed on the LAN standby screen, and then click "OK".
When the connection is complete, the computer screen is projected. The following EasyMP Network Projection toolbar is displayed
on the computer screen. You can use this toolbar to operate the
projector and make settings, and to disconnect the network connection. For details on using the toolbar, see "Using the
Toolbar".s p.17
q
When connecting from another computer, such as when changing
presenters, start EasyMP Network Projection from the computer you want
to connect. The computer that is currently connected is disconnected, and
the projector is then connected with the computer that is trying to connect
now.
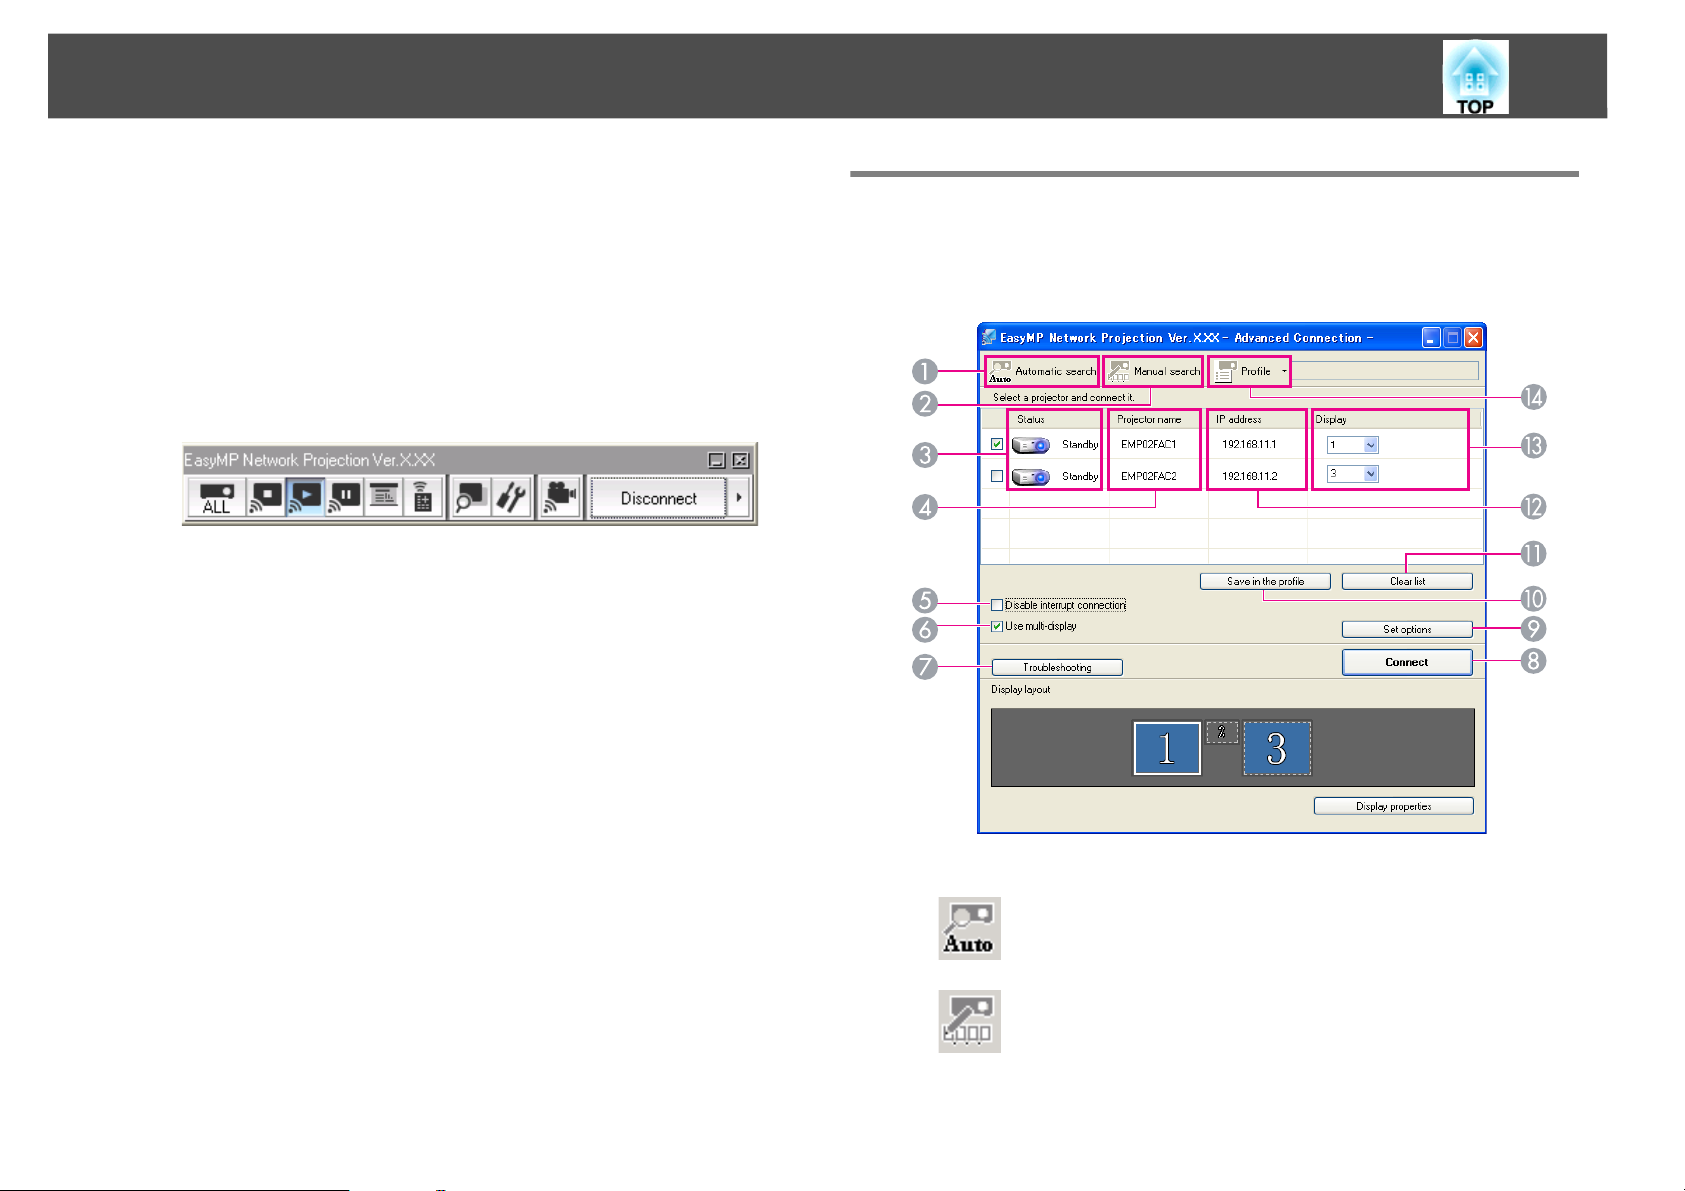
Using the Connection Screen
Start EasyMP Network Projection to display the following screen. The
operation of each button or item is described in the following table.
1 Automatic search
You can search for available projectors on the network system
that the computer is connected to.
2 Manual search
You can search for a projector based on a specified IP address
or projector name.
Page 16
Connecting to a Projector on a Network and Projecting
16
3 Status
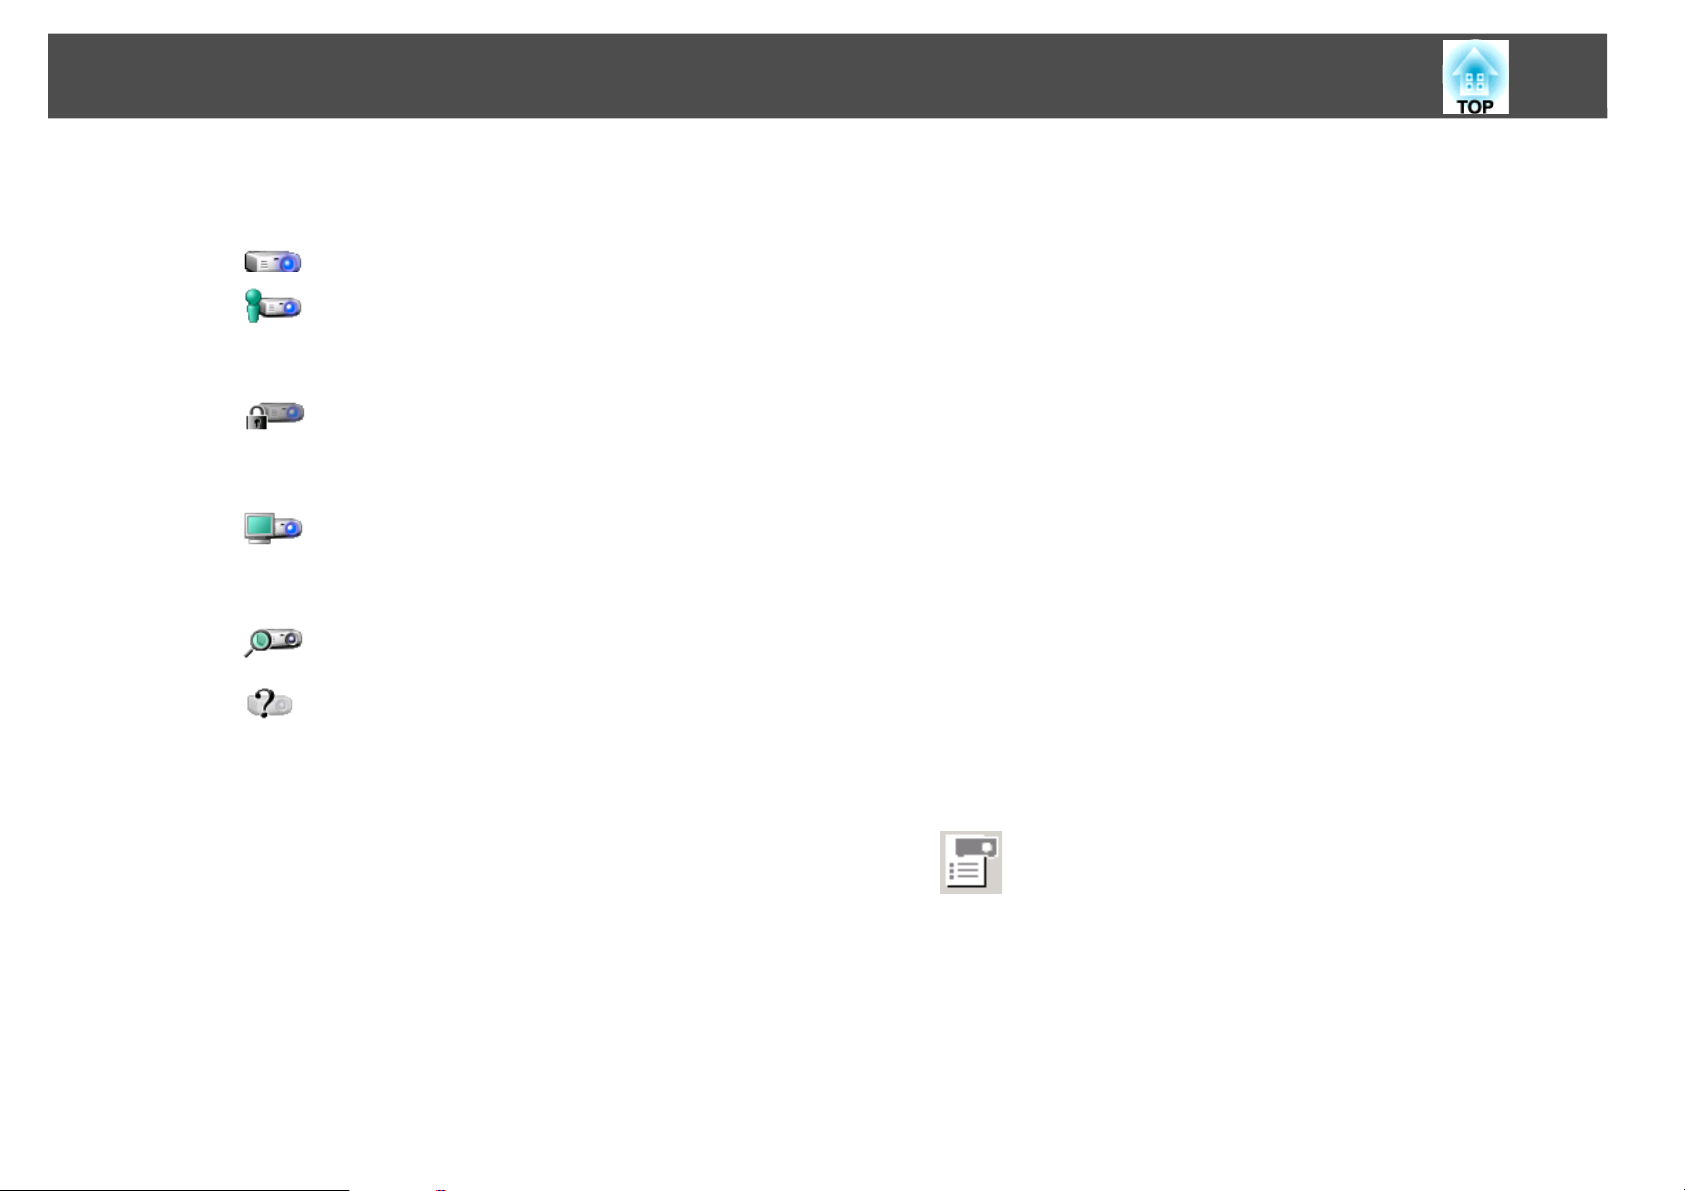
The following six icons indicate the status of the detected projectors.
Standby Select for connecting.
Busy Select for connecting. When you click
Connect, the computer currently
connected is disconnected and your
computer is connected.
Busy (Disable
interrupt
connection)
Currently in
use by
another
application
Searching Displayed while running Manual
Not found. Displayed when a projector cannot be
4 Projector name
The projector's name is displayed.
5 Disable interrupt connection
Check the box to prevent an interrupt connection by other computers
while connected to the selected projector.
6 Use multi-display
Cannot be selected. Disable
interrupt connection is set on
another computer which is already
connected.
The projector's Configuration Menu is
open. You can select it after closing
the Configuration menu and running
the search again.
search or Profile.
found as a result of Manual search or
Profile.
7 Troubleshooting
If there is a problem and you cannot have a connection, press this
button to open the EasyMP Network Projection Troubleshooting
screen.
8 Connect
Connect to the projector you selected from the search results list.
When a connection is made with a projector, a toolbar is displayed.
9 Set options
You can make general setting options such as the processing method
when starting up EasyMP Network Projection. For details, see Set
options s p.39
10 Save in the profile
Saves the results of a search for projectors on the network as a
Profile.s p.34
11 Clear list
Deletes all search results.
12 IP address
The projector's IP address is displayed.
13 Display
Select the number displayed (when Use multi-display is selected). s
p.29
14 Profile
You can search for a projector on the network using a Profile
saved using Save in the profile.s p.34
Check the box to use the Multi-screen display function. When this is
selected, Display layout and Display properties are displayed at the
bottom of the screen.s p.22
Page 17
Connecting to a Projector on a Network and Projecting
17
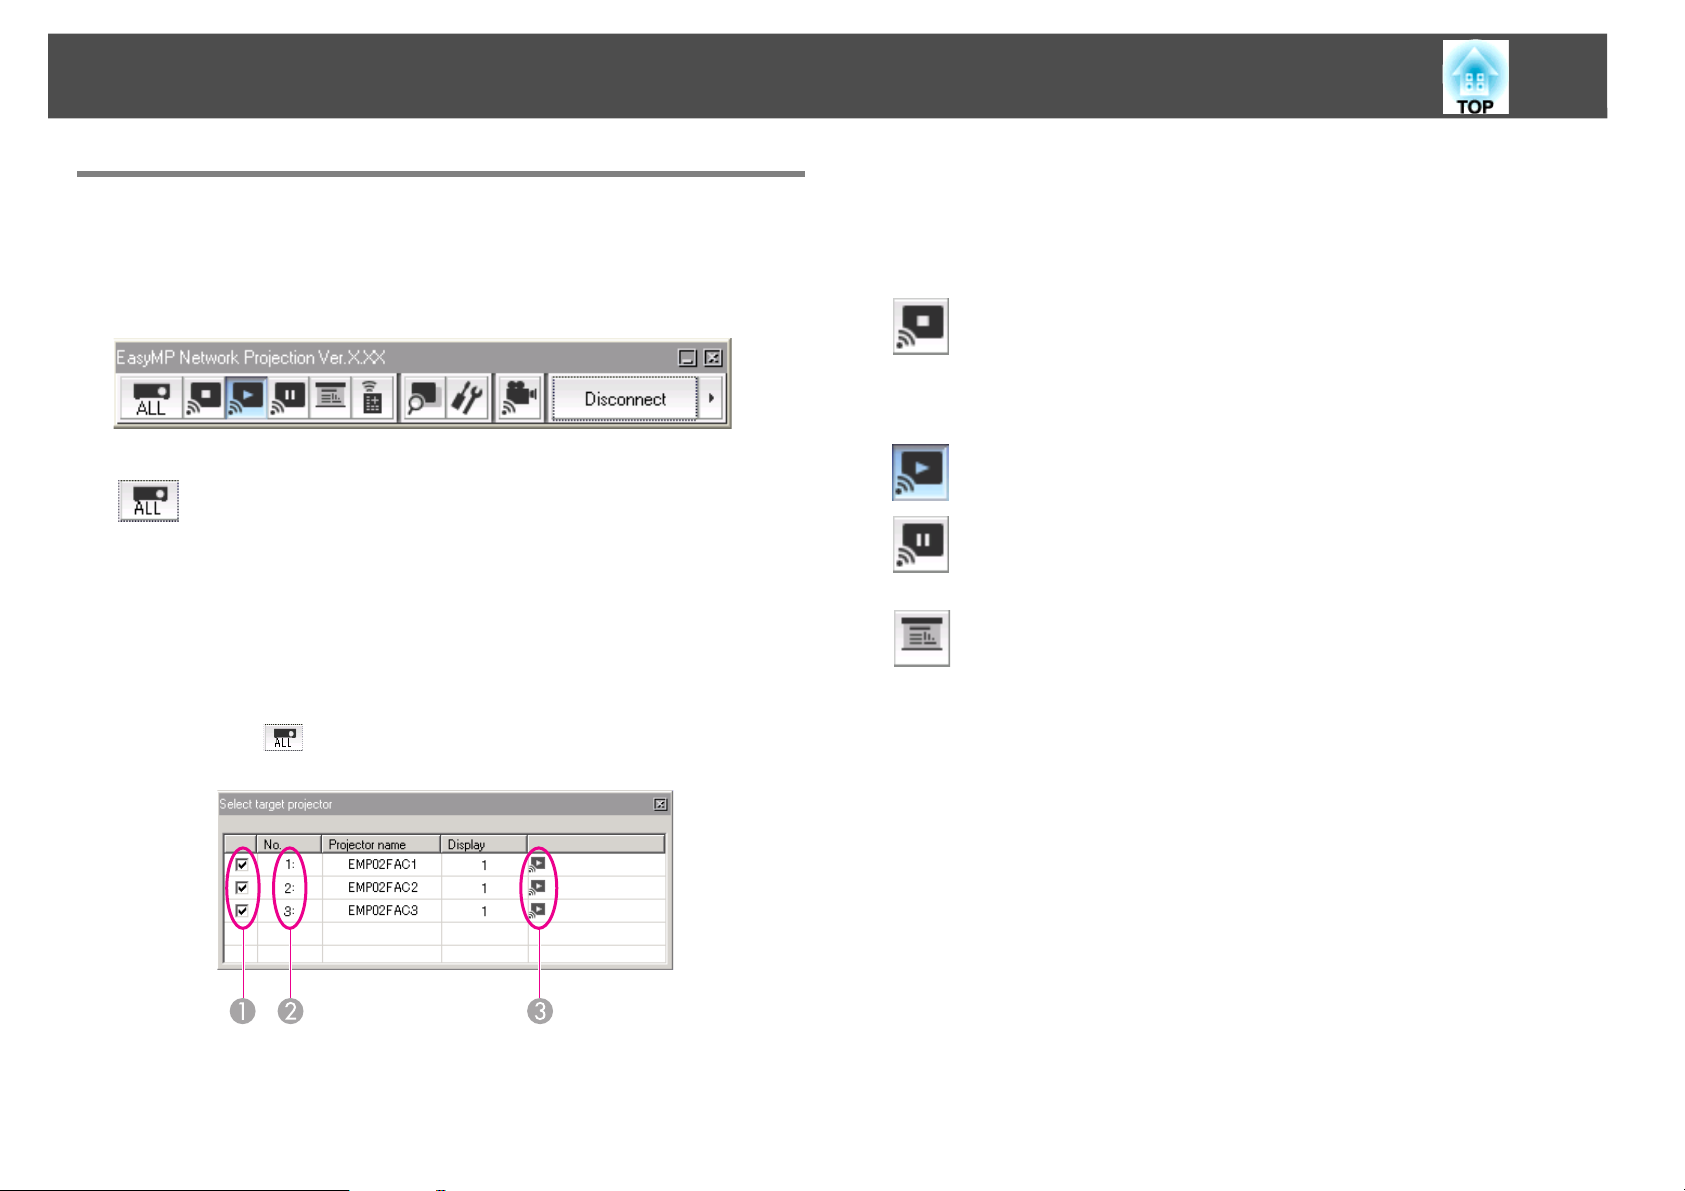
Using the Toolbar
The toolbar is displayed on the computer screen after EasyMP Network
Projection starts and a connection is made with the projector. You can
use this toolbar to operate and make settings for the projector.
Select target projector
Click to limit the projectors operated from the toolbar when
projecting from multiple projectors using the distribution
function or Multi-screen display. The indication below the
icon shows the projectors that can be controlled.
ALL indicates that all of the connected projectors can be
controlled.
For example, when "1, 3" is displayed, projectors No. 1 and
No. 3 can be controlled.
Click to display the following screen.
2 Indicates the No. of an allocated projector. This No.
indicates the No. of the projector that you can control
from the toolbar.
3 Indicates the status of the projector.
Stop
Stops projection while connected to the projector. A black
screen is projected while stopped. Audio does not stop. To
stop the audio, or to display a User's Logo while projection is
stopped, use A/V Mute.
Show
Releases Stop or Pause.
Pause
Pauses projected images while connecting to the projector.
Audio does not Pause.
Presentation Mode
Each time this is clicked, Presentation Mode switches
between enabled/disabled. s p.21
1 Select the projector to be controlled.
Page 18

Connecting to a Projector on a Network and Projecting
18
Projector control
While the projector is connected to the network, the
projector's A/V Mute, Switch PC source and Switch video
source functions can be controlled from both the Remote
Control and the projector's Control panel.
Click to display the following toolbar.
A/V Mute
The same function as the A/V Mute button on
the Remote Control.
Switch PC source
The Source alternates between Computer1,
Computer2, USB Display, USB, and LAN each
time you click.
Switch video source
Screen Preview
Displays the multi-screen preview screen.
Click to display a preview with the settings you have
made. Click the displays to enlarge each Screen Preview to
full-screen.
Set options
Transmission performance during the transfer of computer
images can be adjusted.s p.39
Movie Sending Mode
Not enabled on this projector. The message "The connected
projectors do not support Movie Sending." is displayed.
Disconnect
Disconnects the connection to the projector.
The Source alternates between S-Video and
Video each time you click.S-Video does not
switch if the cable is not connected.
Page 19
Connecting to a Projector on a Network and Projecting
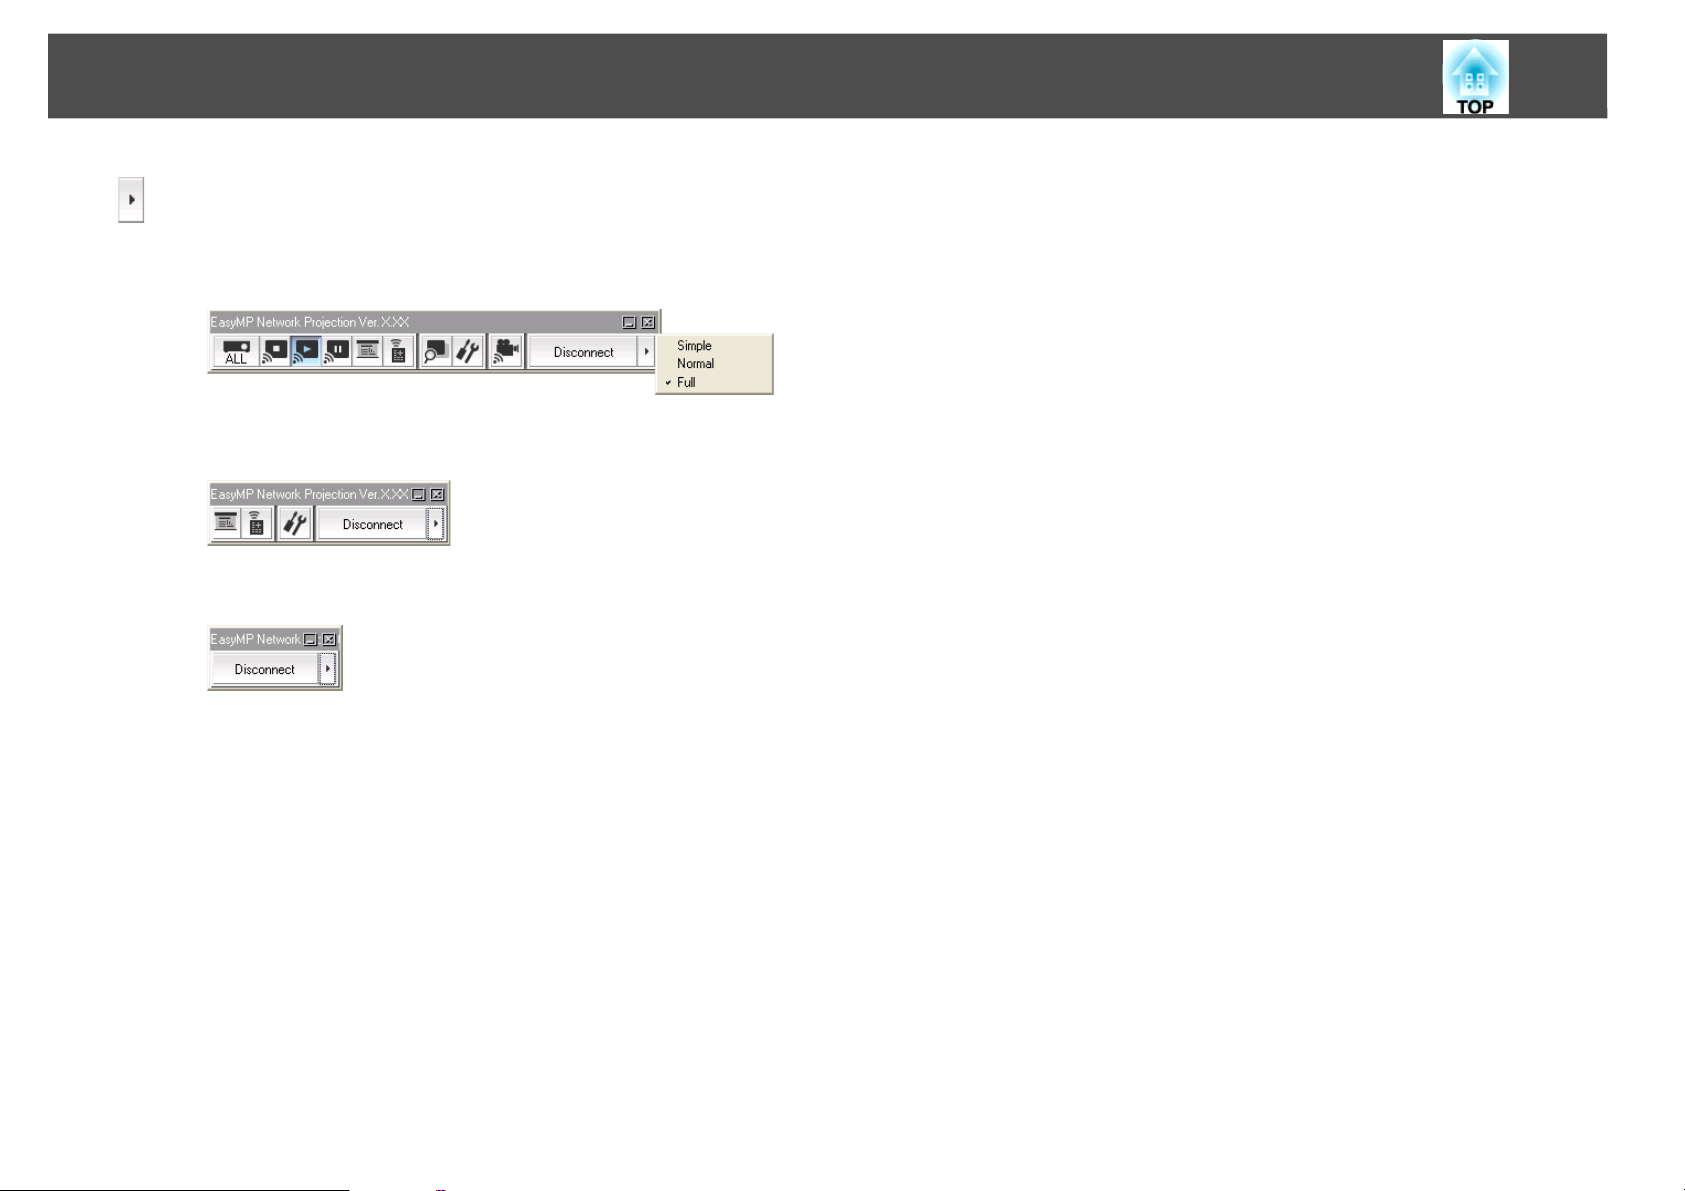
Switch toolbardisplay
The toolbar display is switched as follows. The toolbar display
remains as is until switched again.
Full
Normal
Simple
19
Page 20

EasyMP Network Projection Useful Functions
This chapter explains those functions that may be useful in a meeting or presentation, such as the function which allows you to send images to multiple
projectors from a single computer (Multi-Screen Display).
Page 21

Projecting Only a PowerPoint Slide Show (Presentation Mode)
Projecting Only a PowerPoint Slide Show (Presentation Mode)
In Presentation Mode, the images are only displayed when performing a
PowerPoint Slide Show on a computer. When you stop Slide Show, the
projector displays a black screen. This is useful when you only want to
display the Slide Show.
In addition to PowerPoint, Keynote is compatible with Presentation
Mode for Macintosh.
Procedure
A If necessary, select another projector to be
controlled.s p.17
B Click the button on the toolbar.
Presentation Mode begins.
C Click the button again to exit Presentation Mode.
21
Page 22

Using Multi-Screen Display
Using Multi-Screen Display
Multi-screen display mode allows you to project different images from multiple projectors that are connected to a single computer.
With Windows, multiple virtual display drivers can be set in the computer, and each image can be projected by the projector. This function is not available
with Windows Vista due to restrictions in the Windows Vista specifications.
For Macintosh, an external monitor must be connected to the computer to enable the function. While the following explanation refers to virtual display,
for Macintosh the operation relates to the screens displayed on the physically connected monitor.
22
1Actual monitor image
2 Image of virtual display1
3 Image of virtual display2
Page 23

Using Multi-Screen Display
23
Example of Adjusting the Virtual Display
By arranging the virtual display allocation, you can project only the
image that you want to show or project different images from left to right
in a presentation.
Arrangement example 1
2
Image of virtual
display
Arrangement example 2
Excel file
1
Actual monitor
image
PowerPoint file
1
Actual monitor
image
2
Image of virtual
display
PowerPoint file presenter tools
Slide Show using a PowerPoint file
Page 24

Using Multi-Screen Display
24
Procedure Before Using the Multi-screen Display Function
1. Setting the Virtual Display s p.24
In a Windows environment, enable the virtual display driver as
necessary. And, for both Windows and Macintosh, set up the virtual
display arrangement.
2. Allocating the image to be projected s p.28
Open the file to be projected, and then move the screen to the virtual
display according to the actual projection arrangement.
3. Projecting the allocated images s p.29
Allocate a virtual display number to a projector that is connected
through the network, and then start projection.
Setting the Virtual Display
This section explains the virtual display for arrangement example 1.
s p.23
Procedure
A Start Windows on the computer, then select "Start" -
"Programs" (or "All Programs") - "EPSON Projector" "Add-Remove EPSON Virtual Display".
The Add-Remove EPSON Virtual Display screen is displayed.
B Select the virtual display you want to use.
Up to four monitors can be added. In this example, a single virtual
display is to be used. When setting multiple virtual displays, select
as many displays as is necessary.
Any one of the displays can be selected.
C Click "OK".
Enable the virtual display driver (Windows only)
Enable the virtual display driver. Those users listed below do not have to
perform this operation. Go to procedure s "Adjusting the Virtual
Display" p.25.
• Those users who have enabled virtual displays installing EasyMP
Network Projection.
• For Macintosh users.
When you click OK, the drivers for the virtual display are enabled.
At this point, it is normal for the display to flicker. Wait for the
Add-Remove EPSON Virtual Display screen to close.
Page 25

Using Multi-Screen Display
25
Adjusting the Virtual Display
After starting EasyMP Network Projection, the setup of the virtual
displays varies between Windows and Macintosh. The procedures are
explained separately below.
Procedure
For Windows
A Select "Start" - "Programs" (or "All Programs") - "EPSON
Projector" - "EasyMP Network Projection" to start EasyMP
Network Projection.
B Select the "Use multi-display" check box.
Display layout and Display properties are added at the bottom of
the screen.
Page 26

Using Multi-Screen Display
26
C Click "Display properties".
The Display Properties screen is displayed.
D Click the "Settings" tab.
E Drag the displayed monitor icon and place it where desired.
Here, the actual monitor (1) is placed on the left, while the virtual
monitor (3) is placed on the right.
When the computer has multiple display output terminals, the
numbers assigned to the virtual terminals will be sequential to
those of the physical terminals.
q
• When an external monitor is connected as a secondary monitor, the image
for that screen cannot be projected.
• Depending on the hardware, the number of the secondary monitor may be
other than "2". When the monitor icon is displayed on the screen, click the
icon and confirm that the monitor type shown under "Display" is other
than "secondary".
Page 27

Using Multi-Screen Display
27
• For Screen Resolution settings, see the following.s p.56
When the monitor icon is arranged, a virtual display is connected
as the image like below.
31
F Click the "OK" button. The Display Properties screen closes.
Up to this point, the virtual display layout has been fixed.
Allocate the projecting images next.s p.28
For Macintosh
A Start EasyMP Network Projection. Double-click the
Applications folder of the hard drive volume in which
EasyMP Network Projection is installed, and then
double-click the EasyMP Network Projection icon.
B Select the "Use multi-display" check box.
Display layout and Display preferences are added at the bottom of
the screen.
C Click "Display preferences".
Select Advanced Connection Mode and then perform startup.
The display setting screen is displayed.
Page 28

Using Multi-Screen Display
28
D Click "Arrangement".
E Clear "Mirror Displays".
F Drag the displayed monitor icon and place it where desired.
G Close the display setting screen.
Up to this point, the screen layout has been fixed.
Allocating the Image to be Projected
This section explains the virtual display for arrangement example 1.
s p.23
Procedure
A Open the file to be projected.
Start the PowerPoint and Excel files.
Page 29

Using Multi-Screen Display
B Drag the window to the desired virtual display monitor, and
allocate it where the image is to be projected.
Drag the Excel window to the right until it cannot be seen. As a result, the PowerPoint window appears on the actual monitor, while
the Excel window appears on the virtual display on the right.
Projecting the Allocated Images
This section explains the virtual display for arrangement example 1.
s p.23
29
Procedure
A Select the number of the virtual displayg to allocate on the
"Display", and set which image to be projected from which
projector.
Page 30

Using Multi-Screen Display
30
B Click "Connect".
The image allocated to each projector is projected.
virtual display, you must do so while viewing the projected image.
To perform mouse-based operations on the virtual display, move
the mouse pointer in the direction of the virtual display, such that
the pointer appears on the virtual display.
C To terminate multi-screen display, click "Disconnect" on the
toolbar.
q
• In a Windows environment, if the virtual display driver has been enabled
such that the mouse pointer can be moved outside the limits of the screen,
there may be occasions when you lose track of the location of the pointer.
When you are not using a virtual display, clear the check mark against the
virtual display under Add-Remove EPSON Virtual Display, so that the
mouse pointer cannot be moved outside the limits of the screen. To
subsequently use multi-display again, place a check mark against the
required display under Add-Remove EPSON Virtual Display.
To clear a check mark, see the following.s p.24
• You can adjust each projector's color tone.
In a Windows environment, you cannot view the image being sent
to a virtual display on the computer. To adjust the image on the
Page 31

Connecting to a Projector on a Different Sub-net
This chapter explains how to connect a computer to a projector on a different sub-net via a Wired LAN access point on an existing network system.
Page 32

Connecting to a Projector on a Different Subnet
Connecting to a Projector on a Different Subnet
By default, this application only searches for projectors on the same
subnet as the computer. Therefore, even if you perform a search for
projectors on the network, ones on a different subnet will not be found.
You can, however, identify and connect to a projector on a different
subnet as follows:
• Specify either an IP address or Projector Name and perform a search.
The IP Address can be input directly. Also, provided the Projector
name to be connected has been registered on the DNS server, you can
perform a search simply by inputting that Projector name.s p.33
• Performing a search based on a Profile
Once you have performed a search for a projector on a different subnet
by specifying either an IP Address or a Projector name, you can save
the search as a Profile with an easy-to-remember name, and then use
that Profile whenever you subsequently want to search for a projector
on a different subnet.s p.34
32
Page 33

Searching by Specifying the IP Address and Projector name
33
Searching by Specifying the IP Address and Projector name
In the following explanations, unless otherwise noted, Windows screen
shots are used.
You see a similar screen even when using Macintosh.
Procedure
A Click "Manual search" on the EasyMP Network Projection
projector selection screen.
B Enter the IP address or the Projector name for the projector
you want to connect to, and click "OK".
The search results are displayed on the EasyMP Network Projection projector selection screen.
Provided the target projector has been identified, select that projector, and then click Connect to establish a connection.
When you will always be using that projector, save the search as a
Profile, so that you do not have to specify the relevant details every
time you perform a search. s p.34
Page 34

Performing a Search with a Profile
Performing a Search with a Profile
You can save a search for a frequently used projector as a Profile. A
Profile is a file containing all of the information pertaining to a given
projector, such as the Projector name and its IP address. By specifying
the profile each time you perform a search, there is no need to enter the
IP Address or Projector name. For example, by creating a group of
Profile for each place where a projector is setup and managing them with
folders, the target projector can be found quickly.
34
Making a Profile
Profile is made by saving search results.
For details on how to edit a previously saved Profile, see the following
section. s p.36
Procedure
A When the projector is displayed on the EasyMP Network
Projection projector selection screen, click "Save in the
profile".
1Building A 5Floor 1
2Building B 6Floor 2
3Building C 7Floor 3
4Building D
This section explains how to create and edit a Profile.
The Save in the profile screen is displayed.
Page 35

Performing a Search with a Profile
B Enter a Profile name and then click "Add".
35
Projector information is registered in the Profile.
If you have previously saved a Profile, you are prompted to confirm
whether it can be overwritten. To save a Profile with a different
name, select Save as. If you have created a folder for a Profile, the
following screens are displayed. After entering the Profile name
and selecting the Save in destination, click Add.
For Windows
q
For details on how to create a folder for a Profile, see the following
section.s p.36
Searching by Specifying a Profile
You can search by specifying the Profile you created.
For Macintosh
Page 36

Performing a Search with a Profile
36
Procedure
A Click "Profile" on the EasyMP Network Projection projector
selection screen.
If no Profile is registered, you cannot select Profile.
Managing a Profile
You can change the name and the hierarchical structure of the Profile.
Procedure
A Click "Set options" on the EasyMP Network Projection main
screen.
The Set options screen is displayed.
B Click "Edit profile".
B From the menu that is displayed, select the projector you
want to connect to.
The search results are displayed on the EasyMP Network Projection projector selection screen.
Provided the target projector has been identified, select that projector, and then click Connect to establish a connection.
The Edit profile screen is displayed.
Page 37

Performing a Search with a Profile
37
C Edit the contents registered in the Profile.
Profile
Item Function
Copy
Delete
Rename
Create folder
Export
Import
Information on selected profile
Item Function
Projector name,
IP address
You can copy the Profile. The copied Profile is
saved in the same folder as the original with the
same name.
You can delete the Profile and the folder.
You can display the Rename dialog box and
rename the folder or the Profile. You can enter
up to 32 characters in the Rename dialog box.
You can create a new folder.
You can Export a Profile, as well as Import and
use a Profile.
Used when you want to read and use an
exported Profile.
You can display the projector information
registered in the Profile.
1:Indicates a folder.
2:Indicates a Profile.
Profile
Item Function
Profile
You can display the registered Profile. You can
manage it by creating a folder. You can change
the order of the Profile or the folder by dragging
& dropping.
Delete
D Click "OK".
Saves your edits and closes the Edit profile screen.
You can delete the information for the selected
projector. When all projector information is
deleted, the profile is also deleted.
Page 38

Setting the EasyMP Network Projection Operation
You can make setting options such as the processing method when EasyMP Network Projection starts.
Page 39

Using Set options
Using Set options
You can make setting options such as the processing method when
EasyMP Network Projection starts.
Call Set options from the EasyMP Network Projection main screen.
Procedure
A Click "Set options" on the EasyMP Network Projection main
screen.
39
Setting Each Item
Set each item from the General settings tab and the Adjust performance
tab.
General settings tab
The Set options screen is displayed.
B Set each of the items.
Confirm the details of the set items in the next step. When you have
made all the necessary settings, click OK to close the Set options
screen.
Use full-screen video
transfer
Encrypt communications
Because this projector does not support
the movie sending function, this setting
item is disabled.
Select to Encrypt and transmit data. Even
if data is intercepted, it cannot be
decrypted.
Page 40

Using Set options
40
Display Connection Mode
Selection window on
startup
Search method on startup
Edit profile
Switch LAN
Restore Defaults
Set whether or not the Quick Connection
Mode/Advanced Connection Mode
screen is displayed when EasyMP
Network Projection starts. Because this
projector always starts in Advanced
Connection Mode, clear this checkbox.
Select from the following projector
search methods executed when EasyMP
Network Projection is started.
Automatic search on startup
Specify search method after startup
Search with the last network
configuration
The Edit profile dialog box is
displayed.s p.36
Windows only
The Switch Network Adapter dialog box is
displayed. This is used when it is
necessary to switch the network adapter
to be used for a search when a computer
has multiple adapters.
By default, all of the network adapters are
used to perform a search. When a Wired
LAN is always used as the connection
method, select a Wired LAN adapter.
You can reset all adjustment values on
the General settings tab to their default
settings, except for Edit profile and
Switch LAN.
Adjust performance tab
Performance adjustment
slider
Transfer layered window
The performance can be set to Fast,
Normal, and Fine.
Set to Fast when movie projections are
interrupted.
Windows only (excluding Windows Vista)
Set whether or not to transfer a layered
window.
The layered window is in use when
contents such as messages displayed on
the computer are not projected by the
projector. Select this checkbox to project
contents such as messages that use the
layered window.
Clear this checkbox if you do not want the
mouse pointer to flicker on the screen.
Page 41

Using Set options
41
Restore Defaults
q
When you click on the toolbar, only the Adjust performance tab is
displayed.
You can reset all adjustment values for the
Adjust performance tab functions to their
default settings.
Audio Output tab
Because this projector does not support the audio sending function,
settings on the Audio Output tab are disabled.
Page 42

Using a Computer to Set Up, Monitor and Control Projectors
This chapter explains how to use a computer that is connected to the network to change projector settings and to control the projector.
Page 43

Changing Settings Using a Web Browser (Web Control)
43
Changing Settings Using a Web Browser (Web Control)
You can set up and control the projector from a computer by using the
Web browser of a computer that is connected to the projector via a
network. Setup and control operations can be performed remotely if this
function is used. In addition, since you can use the computer’s keyboard,
entering characters required for setup is easier.
Use Microsoft Internet Explorer 6.0 or later as the Web browser. If using
a Macintosh, you can also use Safari. If, however, you are using Safari
under Mac OS X 10.2.8, some of the Web control radio buttons may not
display properly.
q
Setup and control with a Web browser are possible if Network On is set
from the Extended menu of the projector's Configuration Menu, even if
the projector is in Standby Mode (when the power is off).
Displaying Web Control
Use the following procedure to display Web Control.
q
If your Web browser is set up to connect via a proxy server, Web Control
cannot be displayed. To use Web Control, you need to make network
connection settings with a device other than a proxy server.
B Enter the IP address of the projector in the address input box
of the Web browser, and press the [Enter] key on the
computer's keyboard.
Web Control is displayed.
When Web Control Password is set in the Network menu from the
projector's Configuration Menu, enter the Password. Enter the
characters set for the Web Control Password.
Projector Setup
You can set items that are usually set in the projector's Configuration
Menu. The contents set are reflected in the Configuration Menu. There
are also items that can only be set in the Web browser.
Items in the Configuration menu that cannot be set by the
web browser
All items in the Configuration Menu can be set with the exception of the
following items.
• Settings Menu - Pointer Shape
Entering the IP address of the projector
Web Control can be opened by specifying the IP address of the projector
as follows when using Advanced Connection Mode.
Procedure
A Start the Web browser on the computer.
• Settings Menu - Test Pattern
• Settings Menu - User Button
• Extended Menu - registering User's Logo
• Extended Menu - Language
• Extended Menu - Operation - High Altitude Mode
• Extended Menu - Operation - Lens Cover Timer
• Reset Menu - Reset All, and Reset Lamp Hours
The items available on each menu are the same as the Configuration
Menu of the projector.
Page 44

Changing Settings Using a Web Browser (Web Control)
Items that can only be set in the Web browser
The following items can only be set in a Web browser.
• SNMP Community Name
• Monitor Password
44
Page 45

Using the Mail Notification Function to Report Problems
Using the Mail Notification Function to Report Problems
By setting the Mail Notification function from the projector's
Configuration Menu, notification messages will be sent to the preset
email addresses when a problem or warning occurs with a projector. This
will enable the operator to be notified of problems with projectors even at
locations away from the projectors.
45
q
• Up to a maximum of three notification destinations (Addresses) can be
recorded, and notification messages can be sent to all three destinations at
once.
• If a projector develops a critical problem and suddenly stops working, it
may not be able to send a message notifying an operator of the problem.
• Monitoring is possible if Network On is set from the Extended menu of the
projector's Configuration Menu, even if the projector is in Standby Mode
(when the power is off).
Page 46

Management Using SNMP
Management Using SNMP
By setting SNMP from the projector's Configuration Menu, notification
messages are sent to preset e-mail addresses when a problem or warning
occurs with a projector. This is useful when controlling projectors
collectively at a point distant from them.
46
q
• SNMP should be managed by a network administrator or someone who is
familiar with the network.
• To use the SNMP function to monitor the projector, you need to install the
SNMP manager program on your computer.
• Up to two destination IP addresses can be saved.
Page 47

Presentations Using Slideshow
This chapter explains how to project image files stored on USB devices directly from the projector as a Slideshow.
Page 48

Files that can be Projected Using Slideshow
Files that can be Projected Using Slideshow
You can use Slideshow to directly project files stored in USB storage
devices and digital cameras that are connected to the projector.
48
Slideshow Examples
q
USB storage devices that incorporate security functions sometimes cannot
be used.
Specifications for Files that can be Projected Using Slideshow
Type File Type
Still
image
q
• When using a USB hard disk, we recommend using an AC adapter power
supply.
(Extension)
.jpg The following cannot be projected.
Notes
- CMYK color mode formats
- Progressive formats
- Images with a resolution greater than 8192 x
8192
- Files with the extension ".jpeg"
Normally, the image may not be projected
clearly if compression is set too high.
Projecting images and movies stored on USB storage and
so on
Example 1: Prepare multiple images and project them continuously
(Slideshow)s p.53
Example 2: Select image files one at a time and projects p.52
• The projector does not support media formatted on some file systems. If you
have trouble when projecting, use media formatted under Windows.
• Format the media using the FAT16/32 file system.
Page 49

Slideshow Basic Operations
49
Slideshow Basic Operations
Slideshow lets you play back and project image files stored on USB
storage devices and digital cameras.
This section explains the basic operations for Slideshow.
Although the following steps are explained based on the Remote Control,
you can perform the same operations from the projector’s Control panel.
Starting and Closing Slideshow
Starting Slideshow
Procedure
A Switch the projected image to USB.
B Connect the USB storage device or digital camera to the
projector.
Slideshow starts and the file list screen is displayed.
• When the following screen (Select drive screen) is displayed, press the
[ ][ ][ ][ ] buttons to select the drive you want to use, and
then press the Enter button.
• To display the Select drive screen, position the cursor on Select drive in the
top half of the file list screen, and then press the Enter button.
Slideshow Basic Operations
The following describes the procedures for playing images using
Slideshow, and projection operations.
Closing Slideshow
Procedure
To close Slideshow, disconnect the USB device from the USB(TypeA) port on the projector. For digital cameras, hard disks, and so
on, turn off the power to the device and then disconnect.
q
• You can also connect a memory card to the projector by loading it in a USB
card reader. However, some card readers may not be compatible.
Page 50

Slideshow Basic Operations
50
Procedure
A Use the [ ][ ][ ][ ] buttons to position the cursor
on the file or folder you want to access.
1Cursor
• JPEG files are displayed as thumbnails (file contents are displayed
as small images).
• Depending on the JPEG file, a thumbnail may not be displayed.
In this case, a file icon is displayed.
q
If all files and folders cannot be displayed at the same time in the current
window, press the Page (Down) button on the remote control or position
the cursor on Next page at the bottom of the screen and press the Enter
button.
To return to the previous screen, press the Page (Up) button on the remote
control or position the cursor on Previous page at the top of the screen and
press the Enter button.
B Press Enter.
The selected image is displayed.
When a folder is selected, the files in the selected folder are displayed. Select Back to Top on the screen that opened and press the
Enter button to return to the previous screen.
Rotating the Image
You can rotate JPEG images in 90° increments when playing them. The
rotating function is also available during the Slideshow.
Rotate JPEG images in the following way.
Procedure
A Play images in JPEG format, or perform a Slideshow.
To play JPEG images s p.52
To play Slideshow s p.53
Page 51

Slideshow Basic Operations
B While projecting a JPEG image, press the [ ] or the
[ ] button.
51
Page 52

Projecting Image Files
52
Projecting Image Files
Image files stored on a USB storage device or image files from a digital
camera can be projected as a Slideshow by either of the following two
methods.
• Projecting selected image files
This is a function for projecting single files.
• Projecting image files in a folder one at a time (Slideshow)
This function projects the files in a folder in order, one file at a time.
Caution:
Do not disconnect the USB storage device while it is being accessed. Slideshow may not
operate correctly.
Although the following steps are explained based on the Remote Control,
you can perform the same operations from the projector’s Control panel.
Projecting Images
Procedure
B Use the [ ][ ][ ][ ] buttons to position the cursor
on the image file to be projected.
1Image file
C Press Enter.
The image starts to play back.
A Start Slideshow.s p.49
The file list screen is displayed.
Page 53

Projecting Image Files
53
D Press the Return button to return to the file list screen.
Projecting all Image Files in a Folder in Sequence (Slideshow)
You can project the image files in a folder in sequence, one at a time. This
function is called Slideshow. Perform the Slideshow by the following
procedure.
q
To change files automatically when you run Slideshow, set the Screen
switching time in the Slideshow Option menu to anything other than No.
The default setting is No.s p.54
Procedure
A Start Slideshow.s p.49
The file list screen is displayed.
B Use the [ ][ ][ ][ ] buttons to position the cursor
over the folder for the Slideshow that you want to run and
press Enter.
q
If the Screen switching time setting on the Option screen has been set to
No, the files will not change automatically when you Play Slideshow. Press
the Enter button or the Page (Down) button on the Remote Control to
continue to the next file.
C Select Slideshow from the file list screen, and then press the
Enter button.
The Slideshow starts and the image files in the folder are automatically projected in sequence, one at a time.
When the last file is projected, the file list is displayed again automatically. If you set Continuous Play to On in the Option window,
projection will start from the beginning again when the end is
reached.s p.54
You can proceed to the next screen, return to the previous screen,
or stop playback during the projection of a Slideshow.
Page 54

Display Setting for Image Files and Operation Settings for Slideshow
54
Display Setting for Image Files and Operation Settings for Slideshow
You can set the file display order and Slideshow operations on the
Option screen.
Procedure
A Press the [ ][ ][ ][ ] buttons to position the
cursor over the folder where you want to set display
conditions and press the Return button. Select "Option"
from the sub menu displayed, then press the Enter button.
B When the following Option screen is displayed, set each of
the items.
Enable settings by positioning the cursor on the target item and
pressing the Enter button.
Details of the items are given below.
Continuous
Play
Screen
switching
time
You can determine whether to repeat the
Slideshow.
You can set the time for a single file to be
displayed in Play Slideshow. You can set a time
between No (0) and 60 Seconds. When you set No
seconds, auto play is disabled.
C Use the [ ][ ][ ][ ] buttons to position the cursor
over "OK" and press Enter.
The settings are applied.
If you do not want to apply the settings, position the cursor on
Cancel and press the Enter button.
Display order
You can set the order of the files to be displayed.
You can select sorting of the files into either Name
order or Date order.
Page 55

Appendix
Page 56

Connection Limitations
Connection Limitations
When projecting computer images while running EasyMP Network
Projection, the following restrictions apply. Confirm these points.
56
Display Color
The number of colors for computer screens that can be projected.
Windows Macintosh
Supported Resolutions
The following computer screen resolutions can be projected. You cannot
connect to a computer with a resolution greater than UXGA.
• VGA (640x480)
• SVGA (800x600)
• XGA (1024x768)
• SXGA (1280x960)
• SXGA (1280x1024)
• SXGA+ (1400x1050)
• WXGA (1280x768)
• WXGA (1280x800)
• WXGA+ (1440x900)
• UXGA (1600x1200)
* Supported resolutions when multi-screen display function is on.
If a computer with a special screen size is used where the ratio of height
and width is not represented, a screen resolution closest to the width is
selected from the list of 10 above.
In this case, in wide screen the horizontal margins are projected, in
narrow screen the empty vertical margins are black.
*
*
*
*
16-bit color About 32,000 colors (16-bit)
32-bit color About 16.7 million colors (32-bit)
The operational guarantee for multi-screen display is 16-bit and 32-bit
color.
Number of Connections
You can connect up to four projectors to one computer and project
simultaneously.
You cannot connect multiple computers to one projector
simultaneously.
Others
• Audio is not transmitted.
• When videos are played back, they do not play back as smoothly as
when displayed on the computer.
• Applications that use part of DirectX functions may not be displayed
correctly.(Windows only)
• Cannot project full screen MS-DOS prompts.(Windows only)
• There are times when the image on the computer screen and the image
projected by the projector may not match exactly.
Page 57

Connection Limitations
57
When Using Windows Vista
Note the following points when using EasyMP Network Projection with
a computer running Windows Vista.
Limitations when projecting from Windows Photo Gallery
Note the following two limitations when launching Windows Photo
Gallery when EasyMP Network Projection is running.
• Slide Show is played back in simple mode when projecting from
Windows Photo Gallery.
Because the toolbar is not displayed, you cannot make changes while
playing a Theme (effects), regardless of the Windows Experience Index
rating.
Once simple mode has started, you cannot change modes while
Windows Photo Gallery is running even if you close EasyMP Network
Projection. Restart Windows Photo Gallery.
• You cannot play movies.
• A few minutes after you connect a computer to the projector over a
network with EasyMP Network Projection, the following message is
displayed.
It is recommended that you select Keep the current color scheme, and
don't show this message again. This selection is enabled until the
computer is restarted.
Limitations in Windows Aero
Note the following two limitations when the window design for your
computer is Windows Aero.
• The layered window is projected regardless of Transfer layered window
from Set options in EasyMP Network Projection.
For example, when Transfer layered window for the EasyMP Network
Projection toolbar is disabled, it is not projected even if it is displayed
on the computer screen, however the toolbar is projected.
Page 58

Troubleshooting
Troubleshooting
If any of the following problems occur, refer to the pages given for each
problem.
Problems concerning network functions
"Cannot connect using EasyMP Network Projection" s p.59
"When connected using EasyMP Network Projection, a connection
cannot be made from another computer." s p.59
"The projector is not found when EasyMP Network Projection is
started." s p.59
"Cannot connect in Advanced Connection Mode" s p.60
"The Slide Show does not display when the multi-screen display
function is used." s p.60
"Applications are not displayed from the computer when the
multi-screen display function is used." s p.61
"The mouse cursor is not displayed on the computer screen." s p.61
58
"When connected using EasyMP Network Projection, the image does
not display or is slow to appear." s p.61
"When connected using EasyMP Network Projection, a PowerPoint Slide
Show does not start." s p.61
"When connected using EasyMP Network Projection, the screen does
not refresh in an Office application." s p.62
"Error message when starting up EasyMP Network Projection" s p.62
Problems concerning monitoring and control
"Mail is not sent even if a problem
occurs in the projector." s p.63
Page 59

Troubleshooting
Problems Concerning Network Functions
Cannot connect using EasyMP Network Projection
Check the message on the screen and then apply the following countermeasures.
Error Messages Remedy
59
The application version used is not supported. Install the
latest version of the application on your computer.
Install the current version of EasyMP Network Projection from the EPSON Projector Software for
Meeting & Monitoring CD-ROM supplied with the projector.
When connected using EasyMP Network Projection, a connection cannot be made from another computer.
Check Remedy
Did the presenter leave the conference room without
cutting off the network connection?
With EasyMP Network Projection, the connection with the computer that was previously connected
can be cut off when another computer tries to connect with the projector, and it connects with the
computer that is trying to connect.
Therefore, when a Projector keyword is not set for the projector, or if you know the Projector keyword,
you can cut off the current connection and, if you perform a connection operation, you can connect
to the projector.
When a Projector keyword is set for the projector, if you do not know the Projector keyword, restart
the projector and reconnect.
The projector is not found when EasyMP Network Projection is started.
Check Remedy
Is the Network Configuration screen from the
Configuration menu displayed on the projector?
When the Network Configuration screen is displayed on the projector, network connection for
EasyMP Network Projection is disabled. Close network settings on the projector, and return to the
LAN standby screen.
Are the computer's LAN card and the built-in LAN function
available?
Check that LAN is valid by checking Control Panel - System - Hardware in the device manager and so
on.
Page 60

Troubleshooting
60
Check Remedy
Was the network adapter used selected correctly with
EasyMP Network Projection?
Is the firewall turned off, or has the firewall been
registered as an exception?
Is the network cable connected correctly? Check that the network cable is connected correctly. Reconnect it if it is not connected or not
If the computer has multiple LAN environments, it cannot connect unless the network adapter is
selected correctly. When using a computer running Windows, start EasyMP Network Projection, and
select the network adapter you are using from Set options - Switch LAN.s p.39
When you do not wish to turn off the firewall or register the firewall as an exception, make the
necessary settings to open the ports.
The ports used by EasyMP Network Projection are "3620", "3621", and "3629".
connected properly.
Cannot connect in Advanced Connection Mode
Check Remedy
Are the connection denial functions, such as MAC Address
restrictions and port restrictions, set correctly at the
access point?
Are the IP address, the Subnet Mask, and the Gateway
Address for the access point and the projector set
correctly?
Are the access point and the projector's subnet different? Select Manual search from EasyMP Network Projection, specify the IP address, and connect.
Set the projector to allow connections from the access point.
When not using a DHCP, adjust each setting.
s p.33
The Slide Show does not display when the multi-screen display function is used.
Check Remedy
Are you using PowerPoint 2002 or an earlier version?
For Windows
To set and use two or more virtual displays, use PowerPoint 2003 or later, or limit the number of
virtual displays to one before displaying the Slide Show.
Page 61

Troubleshooting
Applications are not displayed from the computer when the multi-screen display function is used.
Check Remedy
61
Is another application running on the virtual display?
For Windows
When EPSON Virtual Display is installed, another application sometimes runs on the virtual display. In
this case, set EPSON Virtual Display to "Off" in "Screen properties".
The mouse cursor is not displayed on the computer screen.
Check Remedy
Is EPSON Virtual Display installed?
For Windows
The mouse cursor was moved onto the virtual display. When the virtual display checkbox is cleared
on the Add-Remove EPSON Virtual Display screen, the mouse pointer returns to the screen display
area.
When connected using EasyMP Network Projection, the image does not display or is slow to appear.
Check Remedy
Did you try to play back movies with Media Player or try to
operate the screen saver preview?
Have you enabled DHCP? When DHCP is set to On in Advanced Connection Mode or Wired LAN connection, if an available
Depending on the computer, the movie playback screen in Media Player may not be displayed, and
the screen saver preview may not be displayed normally.
DHCP server is not found, it takes time to enter LAN standby status.
When connected using EasyMP Network Projection, a PowerPoint Slide Show does not start.
Check Remedy
Was EasyMP Network Projection started while PowerPoint
was running?
For Windows
When connecting with EasyMP Network Projection, make sure you close PowerPoint first. Slide Show
might not run if connecting while PowerPoint is running.
Page 62

Troubleshooting
When connected using EasyMP Network Projection, the screen does not refresh in an Office application.
Check Remedy
Is the mouse moved continuously? When you stop moving the mouse cursor, the screen is updated. If the screen does not update
quickly, stop moving the mouse cursor.
Error message when starting up EasyMP Network Projection
Error Messages Remedy
Connection to the projector failed. Try to connect again. If it still does not connect, check the network settings on the computer and the
network settings for the projector.
For details on the network settings to be made on the projector, see
62
The keyword does not match. Re-enter the keyword
displayed on the projector screen.
The selected projector is busy. Do you want to continue
the connection process?
EasyMP Network Projection initialization failed. Restart EasyMP Network Projection. If the message still appears, uninstall and then reinstall EasyMP
Connection failed due to keyword mismatch. When connecting to a projector for which a Projector keyword has been set, the wrong Projector
Check the Projector keyword displayed on the LAN standby screen, and enter the Projector keyword.
You tried to connect to a projector that is connected to another computer.
When the Yes button is clicked, it connects to the projector. The connection between the projector
and the other computer is cut off.
When the No button is clicked, it does not connect to the projector.
The connection between the projector and the other computer is maintained.
Network Projection.
s p.8
keyword is entered.
Check the Projector keyword that is displayed on the projector's connection standby screen. After the
connection is disconnected and then reconnected, enter the Projector keyword on the keyword entry
screen that is displayed.
s p.14
Page 63

Troubleshooting
Error Messages Remedy
Network adapter information could not be obtained. Check the following point.
Is a network adapter installed on the computer?
Is the driver for the network adapter used installed on the computer?
After checking, restart the computer and connect again.
If you still cannot connect, check the following.
Check the network settings on the computer and the network settings on the projector.
63
One or more connected projectors do not support
resolutions greater than SXGA. Reduce the screen
resolution and reconnect.
One or more projectors are not responding. You cannot connect to multiple projectors simultaneously. Check the network settings on the
Enter the keyword displayed on the projector screen. Check the Projector keyword displayed on the LAN standby screen, and enter the Projector keyword.
Cannot start this application while EPSON USB Display is
running.
Cannot connect to the projector using this version of
EasyMP Network Projection. Install the latest version of
EasyMP Network Projection.
A connected Epson projector does not support the selected computer screen resolution. Change the
computer screen resolution to SXGA (1280x1024) or less.
computer and the network settings on the projector.
Close USB Display and then start EasyMP Network Projection.
This message is displayed when connecting to the projector with EMP NS Connection. To connect,
install the current version of EasyMP Network Projection from the EPSON Projector Software for
Meeting & Monitoring CD-ROM supplied with the projector.
Problems Concerning Monitoring and Control
Mail is not sent even if a problem occurs in the projector.
Check Remedy
Is the network connect setting correct? Check the projector's network settings.
Is Standby Mode set to Network On? To use the Mail Notification function when the projector is in standby, set Network On in Standby
Mode from the Configuration Menu.
Page 64

Troubleshooting
64
Check Remedy
Did a fatal abnormality occur and the projector come to a
sudden stop?
Is power being supplied to the projector? Check that there has not been a local power failure or that the circuit breaker for the electrical outlet
Is the network cable connected correctly? Check that the network cable is connected correctly. Reconnect it if it is not connected or not
When the projector comes to a sudden stop, mail cannot be sent.
If, after checking the projector, the abnormal state continues, contact Epson.
of the projector has not been tripped.
connected properly.
Page 65

Glossary
Glossary
This section briefly explains the difficult terms that are not explained in the text of this guide. For details, refer to other commercially available publications.
65
MAC Address
SVGA
SXGA
UXGA
VGA
XGA
Virtual Display
An abbreviation of Media Access Control. The MAC Address is an ID number unique to each network adapter. A unique number
is assigned to each network adapter, and data is transmitted between network adapters based on this identification.
A type of video signal with a resolution of 800 (horizontal) ^ 600 (vertical) dots that is used by IBM PC/AT-compatible computers.
A type of video signal with a resolution of 1,280 (horizontal) ^ 1,024 (vertical) dots that is used by IBM PC/AT-compatible
computers.
A type of video signal with a resolution of 1,600 (horizontal) ^ 1,200 (vertical) dots that is used by IBM PC/AT-compatible
computers.
A type of video signal with a resolution of 640 (horizontal) ^ 480 (vertical) dots that is used by IBM PC/AT-compatible computers.
A type of video signal with a resolution of 1,024 (horizontal) ^ 768 (vertical) dots that is used by IBM PC/AT-compatible
computers.
The screen for one computer is output to multiple displays. A large virtual screen can be created by using multiple displays.
Page 66

General Notes
66
General Notes
Copyright Notice
All rights reserved. No part of this publication may be reproduced, stored
in a retrieval system, or transmitted in any form or by any means,
electronic, mechanical, photocopying, recording, or otherwise, without
the prior written permission of Seiko Epson Corporation. No patent
liability is assumed with respect to the use of the information contained
herein. Neither is any liability assumed for damages resulting from the
use of the information contained herein.
Neither Seiko Epson Corporation nor its affiliates shall be liable to the
purchaser of this product or third parties for damages, losses, costs, or
expenses incurred by the purchaser or third parties as a result of:
accident, misuse, or abuse of this product or unauthorized modifications,
repairs, or alterations to this product, or (excluding the U.S.) failure to
strictly comply with Seiko Epson Corporation's operating and
maintenance instructions.
Seiko Epson Corporation shall not be liable against any damages or
problems arising from the use of any options or any consumable
products other than those designated as Original Epson Products or
Epson Approved Products by Seiko Epson Corporation.
IBM, DOS/V, and XGA are trademarks or registered trademarks of
International Business Machines Corporation.
Macintosh, Mac, and iMac are trademarks of Apple Inc.
Windows, WindowsNT, Windows Vista, and PowerPoint are trademarks or
registered trademarks of Microsoft Corporation in the United States.
Other product names used herein are also for identification purposes only
and may be trademarks of their respective owners. Epson disclaims any and
all rights in those marks.
Software Copyright:
This product uses free software as well as software to which this company
holds the rights.
Z 2009 Epson America, Inc.
CPD-27639
This information is subject to change without notice.
Illustrations in this guide may differ from the actual projector.
Trademarks
Windows Vista and the Windows logo are trademarks of the Microsoft
group of companies.
 Loading...