

Page 1
Using PictureMate
With a Computer
Page 2
Installing Software and Connecting PictureMate
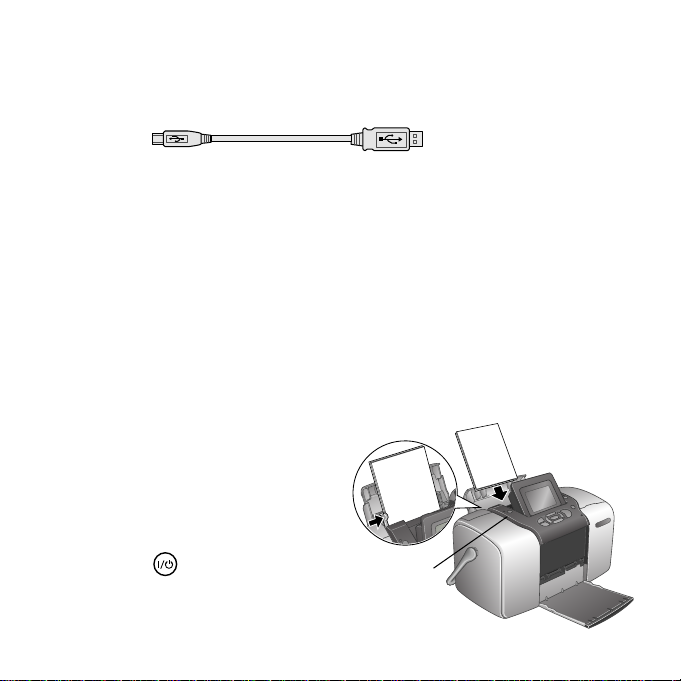
To connect PictureMate® Deluxe Viewer Edition, you’ll need this cable:
Type A to B
USB cable
If you don’t have a USB cable, you can buy one from your local computer
dealer or from Epson.
®
See the inside back cover for details.
When you’re ready to start, see the section for your computer system:
■ For Windows,
■ For Macintosh,
®
see below.
®
see page 9.
Installing PictureMate for Windows
First make sure PictureMate is NOT CONNECTED to your computer,
and REMOVE your memory card, if it’s inserted. Then:
1. Load a sheet of PictureMate
Photo Paper, glossy side up,
against the right edge of the
paper feeder. Slide the edge guide
against the paper and open the
output tray.
2. Press the
on PictureMate.
3. Turn on your computer.
On button to turn
On button
1
Page 3
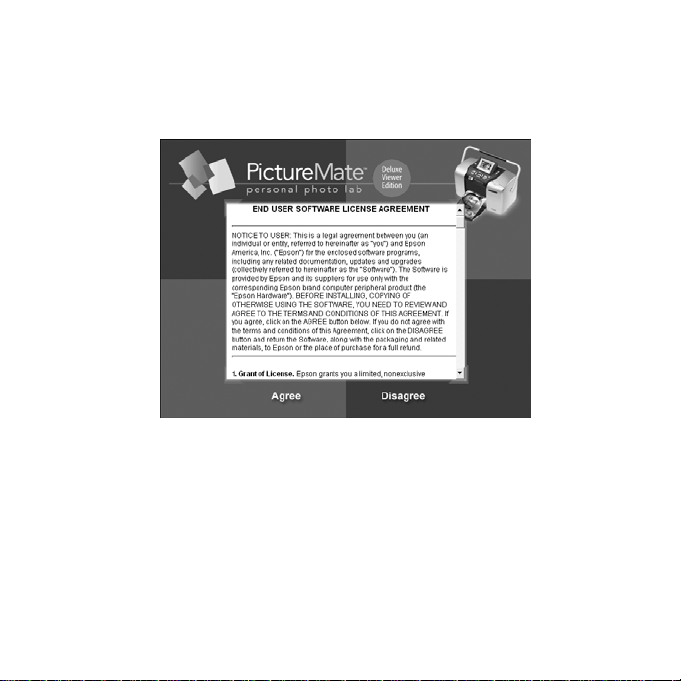
4. Wait a minute for your computer to start up, then insert the
PictureMate CD in your CD-ROM or DVD drive.
After a moment, you see this screen:
5. Read the license agreement and click
2
Agree.
Page 4
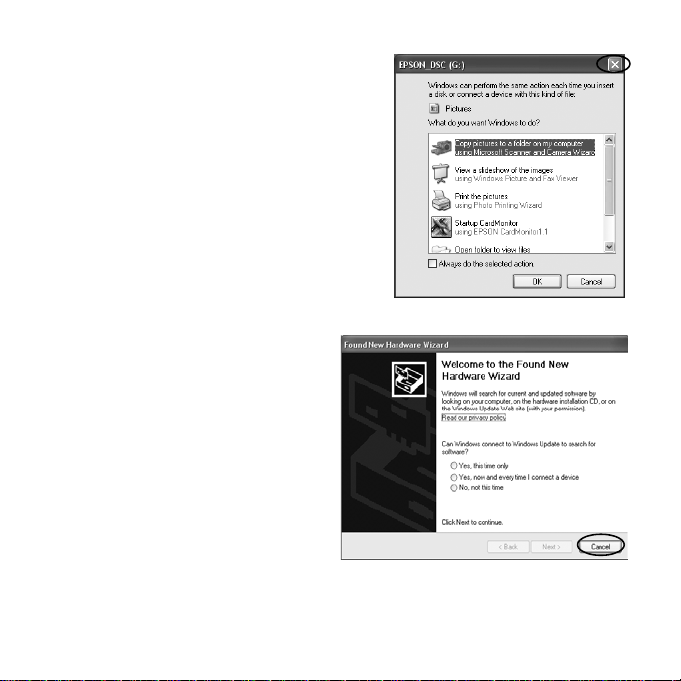
Note:
If you see a screen like this,
remove your memory card
from PictureMate and click the
X in the upper right corner to
close the screen, if necessary.
Note:
If you see a New Hardware
Found message at the bottom
of your screen, click the
the box to close it.
If you see a screen like this,
click Cancel and disconnect
PictureMate from your
computer. Then turn off your
computer and begin again at
step 3.
X in
3
Page 5
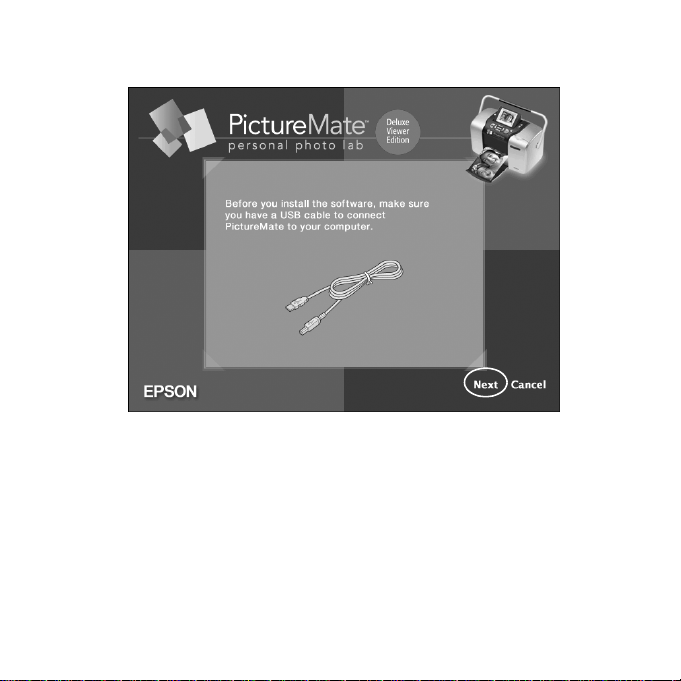
6. When you see this screen, click Next to begin installing your software.
4
Page 6
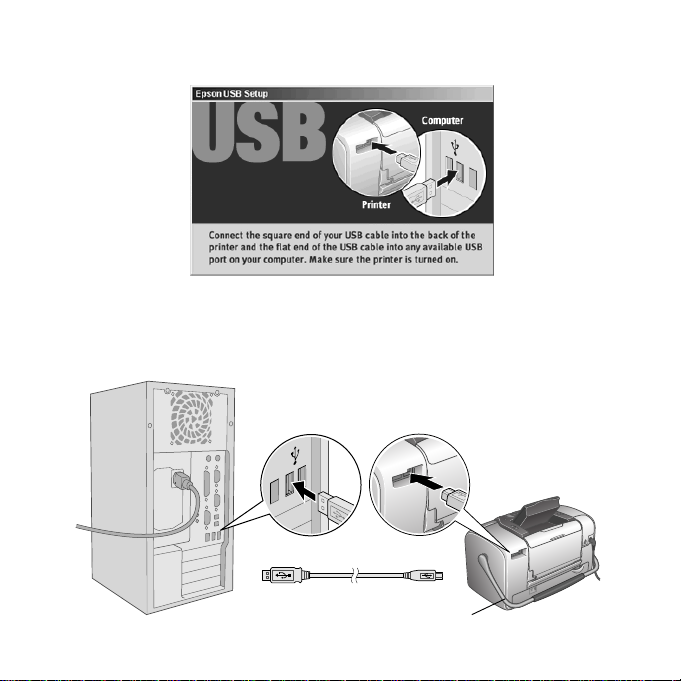
After a few minutes, you see this screen:
y
7. Make sure PictureMate is turned on, then connect the square end of
your USB cable to the
USB port on the back of PictureMate. Connect
the flat end of the USB cable to any USB port on your computer.
Make sure the handle is
all the wa
down in back
5
Page 7

8. If you see a prompt to restart your computer, click No.
9. When you see this screen, click
No if you have another printer for
non-photo printing.
If PictureMate is your only printer, and you only print photos, click
Yes.
If you see a message about printing a test page, click
printing finishes, click
Next to install additional software.
Continue with the instructions in the next section.
6
OK to print. When
Page 8

Installing Additional Software for Windows
1. When you see this screen, you can install additional photo software:
2. Click
Epson Software Film Factory, then click Install on the next
screen and follow the on-screen instructions.
Note:
If you are asked if you want to install QuickTime,
on-screen instructions; you don’t need a registration number. Also
uncheck the boxes for launching QuickTime and Film Factory
of their installations.
7
®
click Yes and follow the
™
at the end
Page 9

3. Close any open windows to return to the Optional Software
installation.
4. Click
Epson PhotoCenter Link, then click Add Icon on the next
screen and follow the on-screen instructions.
5. When you’re done installing software, click
Exit. The registration screen
appears.
6. Follow the on-screen instructions to register PictureMate.
7. Remove and store your PictureMate CD.
8. Restart your computer.
Note:
If you have any problems installing the PictureMate software, see page 16.
You’re ready to print your photos! Insert your memory card or open your
photo file on your computer, as described in the on-screen User’s Guide.
Double-click the
PictureMate Deluxe User’s Guide icon on your screen
to open the User’s Guide.
8
Page 10

Installing PictureMate for Macintosh
1. If you inserted a memory card, remove it from PictureMate.
2. Connect the square end of your USB cable to the
of PictureMate. Then connect the flat end of the USB cable to any open
USB port on your Macintosh.
USB port on the back
3. Press the
On button to turn on PictureMate.
4. Turn on your Macintosh and wait a minute for it to start up.
5. Insert the PictureMate CD in your CD-ROM or DVD drive.
Note:
If you have any problems installing the PictureMate software, see
page 16.
9
Page 11

6. Double-click the Epson CD icon to open it, then double-click
Epson. After a moment, you see this screen:
7. Read the license agreement and click
10
Agree.
Page 12

You see the Install Menu:
8. Click
Install Printer Driver and Utilities. Follow the on-screen
instructions to install several programs.
You’ll need to enter your password, accept license agreements, and click
Quit several times as you install.
9. Continue with the instructions in the next section to install additional
software.
11
Page 13

Installing Additional Software for Macintosh
1. When you return to the Install Menu, click Install Optional Software.
You see this menu:
2. Click
Epson Software Film Factory, then click Install on the next
screen and follow the on-screen instructions.
3. Click
Epson PhotoCenter Link, then click Add Icon on the next
screen and follow the on-screen instructions.
4. When you return to the Optional Software menu shown above, click
Back.
12
Page 14

5. At the Install Menu, click Install Printer Manual to install your
on-screen User’s Guide.
6. When you’re done installing software, click
Exit. The registration screen
appears.
7. Follow the on-screen instructions to register PictureMate.
8. Remove and store your PictureMate CD.
After you finish installing software, you must select PictureMate as your
Macintosh printer. Follow the instructions below.
Selecting Your Printer in Mac OS X
1. Open the Applications folder, then open the Utilities folder and
double-click
Center (OS X 10.2.x).
Note:
If you see this screen,
click Add and go to step 3.
If you see this screen,
OK and go to step 3.
click
Printer Setup Utility (OS X 10.3.x) or Print
13
Page 15

2. If PictureMate Deluxe appears in the Printer List, click PictureMate
Deluxe
and click Add.
If it doesn’t appear, make sure PictureMate is turned on and connected
to your Macintosh, then click
Add. You see a new screen:
3. If it isn’t already selected at
the top of the screen, choose
EPSON USB.
4. Click
PictureMate Deluxe,
then click the
Add button.
You see the Printer List with
PictureMate Deluxe added:
5. Close the Printer Setup
Utility or Print Center.
6. Remove and store your
PictureMate CD.
14
Page 16

You’re ready to print your photos! Insert your memory card or open your
photo file on your computer, as described in the on-screen User’s Guide.
Double-click the
PictureMate Deluxe User’s Guide icon on your screen
to open the User’s Guide.
15
Page 17

Help With Software Installation Problems
If you have problems installing the software, try these suggestions:
■ Carefully follow the instructions on the Start Here sheet and in this
booklet. Don’t connect PictureMate to the computer until you are
instructed to. Then connect the USB cable securely at both ends.
■ Close your other programs, including any screen savers and virus
protection software, and install the PictureMate software again.
■ If you’re installing the software for Windows, make sure Windows 98,
Me, 2000, or XP was preinstalled on your system. The USB Printer
Device Driver may not install correctly if you’ve upgraded from
Windows 95.
■ In Mac OS X, if you don’t see PictureMate Deluxe in the Format for
menu under Page Setup, you may need to set up PictureMate in the
Printer Setup Utility or Print Center. See page 13 for instructions.
■ If you’re printing over a network, see your on-screen User’s Guide.
Epson and PictureMate are registered trademarks of Seiko Epson Corporation.
Epson Store and Epson PhotoCenter are service marks and Epson Software is a trademark of
Epson America, Inc.
General Notice: Other product names used herein are for identification purposes only and may
be trademarks of their respective owners. Epson disclaims any and all rights in those marks.
© 2005 Epson America, Inc. 3/05 CPD-19430
16
Page 18

Follow These Easy Steps
To use PictureMate®with your computer, you’ll need to:
Install the software on your computer
from the PictureMate CD.
Follow the steps in this booklet.
Connect PictureMate to your computer.
The steps here tell you how and when
to connect.
View the on-screen
Click PictureMate Deluxe User’s Guide
right on your computer screen for steps on
using PictureMate with your computer. It’s
your comprehensive guide to PictureMate.
User’s Guide
.
Page 19

Where To Get Help
If you need additional help with PictureMate, see “Where To Get
Help” in the Using PictureMate Without a Computer book.
PictureMate Accessories
You can purchase a PictureMate Print Pack
(with PictureMate Photo Paper and a
PictureMate Photo Cartridge), a USB cable,
the PictureMate rechargeable battery, a
PictureMate carrying case, and other
PictureMate accessories. Visit your local
retailer or go to the Epson Store
www.epsonstore.com (U.S. sales only).
In Canada, please call (800) 463-7766 for
dealer referral.
For PictureMate information, special
offers, and related accessories, visit
www.MyPictureMate.com
SM
at
 Loading...