

Epson Stylus RX600, Stylus 1280, Stylus 2000P, Stylus 2200, Stylus 780 Parts User Manual
...Page 1

PRINT Image Matching II Plug-in
for Adobe Photoshop and Adobe Photoshop Elements
PRINT Image Matching™ (P.I.M.)-enabled digital cameras embed information in
digital photo files to maximize the image quality of the print—including a wider
range of colors and enhancements set in the camera itself. PRINT Image Matching
technology ensures that P.I.M.-enabled digital cameras and printers work together
perfectly to consistently and easily create the best possible prints. The P.I.M. II
Plug-in for Adobe® Photoshop® allows you to retain the PRINT Image Matching
image quality when you import files from your P.I.M.-enabled or Exif Print-enabled
digital camera.
Note: Results will vary among camera makes and models.
For more information about PRINT Image Matching, including a complete list of
P.I.M.-enabled camera models and software titles, visit the web site at
www.printimagematching.com.
This guide tells you how to import and print your PRINT Image Matching and Exif
Print images in Adobe Photoshop and Photoshop Elements in the following sections:
■ What Is New About P.I.M. II
■ How Does P.I.M. II Work in Adobe Photoshop? . . . . . . . . . . . . . . page 3
■ Importing a P.I.M. Image . . . . . . . . . . . . . . . . . . . . . . . . . . . . . . . page 3
■ Printing a P.I.M. Image . . . . . . . . . . . . . . . . . . . . . . . . . . . . . . . . . page 5
■ Printing in Photoshop 7.0, CS, and Photoshop Elements
. . . . . . . . . . . . . . . . . . . . . . . . . . . . page 2
(Windows) . . . . . . . . . . . . . . . . . . . . . . . . . . . . . . . . . . . . . . . . page 5
■ Printing in Photoshop 7.0, CS, and Photoshop Elements
(Macintosh) . . . . . . . . . . . . . . . . . . . . . . . . . . . . . . . . . . . . . . . page 8
■ Printing in Photoshop 6.0 . . . . . . . . . . . . . . . . . . . . . . . . . . . page 11
■ Uninstalling the Plug-in . . . . . . . . . . . . . . . . . . . . . . . . . . . . . . . page 12
1
Page 2

What Is New About P.I.M. II
While keeping all the great aspects of PRINT Image Matching, the P.I.M. II Plug-in
has been updated to include the following new features:
■ Additional enhancements to PRINT Image Matching technology including noise
reduction, custom settings, and more
■ Support for the TIFF file format in addition to standard JPEG files
■ Support of all digital camera models that are P.I.M.-, P.I.M. II-, or Exif
Print-enabled
The P.I.M. II Plug-in works with Adobe Photoshop 6.0, 7.0, CS, and Photoshop
Elements 1.0, 2.0, and 3.0. To use the P.I.M. II Plug-in, you also need to use the ICC
profiles for your printer. In Windows,® the profiles are installed along with the plug-in
itself; on the Macintosh,® they are automatically installed with the printer driver.
The following printers currently support PRINT Image Matching II, PRINT Image
Matching, and Exif Print with this P.I.M. II Plug-in:
■ Epson Stylus
■ Epson Stylus Photo R300/R300M ■ Epson Stylus Photo 890
■ Epson Stylus Photo R320 ■ Epson Stylus Photo 900
■ Epson Stylus Photo R800 ■ Epson Stylus Photo 925
■ Epson Stylus Photo RX500 ■ Epson Stylus Photo 960
■ Epson Stylus Photo RX600 ■ Epson Stylus Photo 1280
■ Epson Stylus Photo 780 ■ Epson Stylus Photo 2000P*
■ Epson Stylus Photo 785EPX ■ Epson Stylus Photo 2200
■ Epson Stylus Photo 820 ■ PictureMate
®
Photo R200 ■ Epson Stylus Photo 825
™
by Epson
* This printer only supports PRINT Image Matching through this Adobe Photoshop P.I.M.
II Plug-in. It is not P.I.M.-enabled for other programs.
For an up-to-date list of P.I.M.-enabled products, visit
www.printimagematching.com.
2
Page 3

How Does P.I.M. II Work in Adobe Photoshop?
Adobe Photoshop does not retain the PRINT Image Matching or Exif Print
information separately in the header file when you import your P.I.M. or Exif Print
image. Instead, it creates a profile by converting the information into the file and
embedding a color space called EPSON RGB 2001. This profile supports all the
PRINT Image Matching color advantages and enhancements.
You can crop, rotate, resize, work with layers, use filters, and even make selective color
adjustments to the P.I.M. II image while retaining P.I.M. II quality. However, you
will lose the P.I.M. II enhancements if you apply global color adjustments to your
image (such as Auto Levels, Auto Contrast, Auto Color, etc.).
If you try to use your new Adobe Photoshop file in another P.I.M.-enabled software
program, it will not be recognized as a P.I.M. image. If you want to keep the P.I.M.
header information intact for use in other P.I.M.-enabled programs, keep the original
file. Do not use the Save command on your original file.
Instead, use the Save As command and rename it to save a new file. The new file will
not contain P.I.M. header information but will still retain P.I.M. image quality. If you
overwrite your original file you will lose all PRINT Image Matching and Exif Print
header information.
Importing a P.I.M. Image
Follow these steps to import a P.I.M. image into Adobe Photoshop 6.0, 7.0, CS, or
Photoshop Elements 1.0, 2.0, or 3.0.
Note: If you’re using Photoshop Elements, you need to change your color settings
before importing a P.I.M. image. Open the Edit menu or Photoshop menu (Mac OS X)
and select Color Settings. Choose Full Color Management or Full color
management - optimized for Print and click OK.
Some of the illustrations below show Macintosh screens. Your screens will look
different if you’re using Windows, but you’ll choose the same settings.
3
Page 4

1. Open the File menu and select
Import > PRINT Image Matching
. You see a window like this:
II
2. Locate the folder where your P.I.M.
or Exif Print images are stored.
In Windows, you see a list of all
JPEG and Tiff files stored in the
folder. On a Macintosh, you see only
files that are P.I.M. and Exif Print
files.
3. Select the file you want to import.
4. To display a preview of the P.I.M. II
or Exif Print effects for the selected
image, check the
Image Preview box.
5. Choose an Import option:
■ PRINT Image Matching II enables the greatest range of image
enhancements/effects. It also supports the EPSON RGB expanded color
space, which is required for PRINT Image Matching prints. This setting is
available for all P.I.M. images.
■ Exif Print enables Exif 2.2 effects and allows an expanded color space. This
option does not use P.I.M. settings. This setting is only available for files that
contain Exif Print data.
6. Click the Open button. Your image opens.
Note: If you see this Embedded Profile Mismatch
warning, select Use the embedded profile and
click OK. If you see a similar warning with no
options, click OK.
7. You can select and open additional P.I.M. or
Exif Print images, or click
file
window. (If you don’t want the window to remain on the screen after you
Cancel to close the Open PRINT Image Matching II
open a file, uncheck Import Consecutively.)
4
Page 5

Note: To keep the P.I.M. header information intact for use in other P.I.M.-enabled
programs, keep the original file. Do not use the
original file.
Save command to save your
Instead, before you start working with your file in Photoshop, use the
command and rename it to save a new file. The new file will not contain P.I.M.
header information but will still retain P.I.M. image quality. If you overwrite your
original file you will lose all PRINT Image Matching or Exif Print header
information.
Save As
Printing a P.I.M. Image
PRINT Image Matching images are converted into the EPSON RGB 2001 color
space. To retain the P.I.M. quality and enhancements, make sure you don’t change
the color space. Follow the steps in one of the sections below, depending on the
program and operating system you’re using.
Printing in Photoshop 7.0, CS, and Photoshop Elements (Windows)
1. From the File menu, select Print Preview, Print with Preview. (Choose Print if
you are using Photoshop Elements 3.0.) Then click Show More Options and
select Color Management. You see a screen like this:
Make sure
this source
is selected
Select the
profile for
your printer
and paper
5
Page 6

2. In the Source Space box, make sure EPSON RGB 2001 is selected.
3. In the Print Space box, select the profile for your printer and the paper you’re
using. Select Perceptual for the Intent.
4. Click Print.
5. Click Setup, then select your printer and click the Properties or Preferences
button. You see your printer Properties or Preferences window:
.
Select your paper
Select your paper
Click Advanced
Click Custom, then Advanced
6. Under Media Type (or Type), select the paper you’re printing on.
7. Click the Advanced button. (If you don’t see an Advanced button, click
Custom, then click Advanced.)
6
Page 7

You see the Advanced settings:
Select ICM, then select No Color Adjustment
Select No Color Adjustment
8. In the Color Management box, select No Color Adjustment and click OK. (If
you don’t see No Color Adjustment, click ICM, then click Off (Not Color
Adjustment)
or No Color Adjustment.)
9. Continue clicking OK to print your photo.
7
Page 8

Printing in Photoshop 7.0, CS, and Photoshop Elements (Macintosh)
1. Open the File menu and select Print Preview or Print with Preview. (Choose
Print if you are using Photoshop Elements 3.0.) Then click Show More
Options
Make sure
this source
is selected
and select Color Management. You see a window like this:
Select the
profile for
your printer
and paper
2. In the Source Space box, make sure EPSON RGB 2001 is selected.
3. In the Print Space box, select the profile for your printer and the paper you’re
using. Select
Perceptual for the Intent.
4. Click Print.
8
Page 9
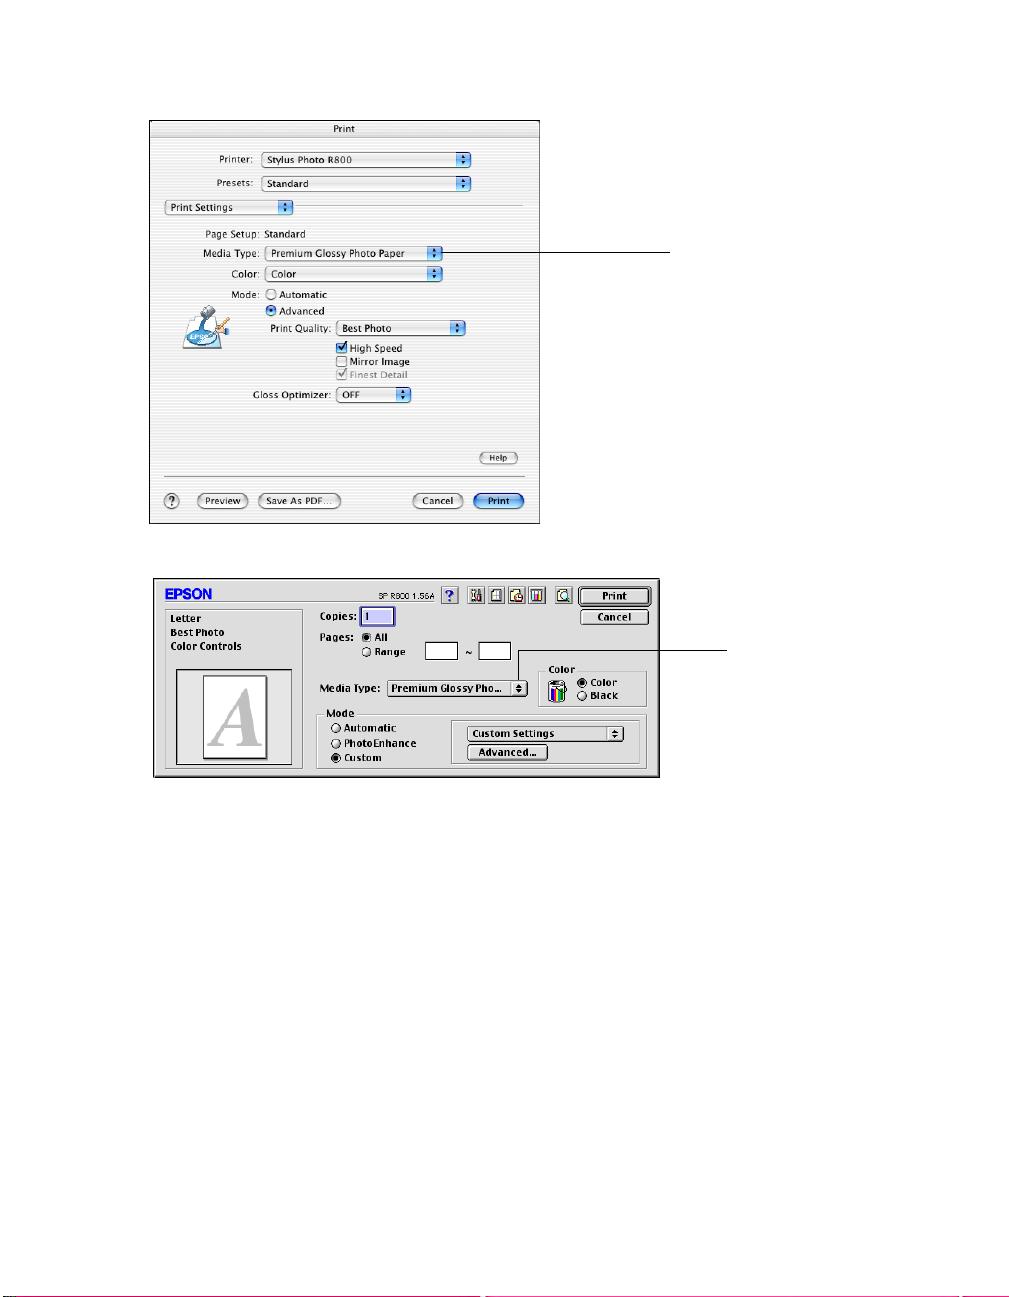
You see your Print window:
.
Mac OS X
Select your paper
Select your paper
Mac OS 9
5. Under Media Type, select the paper you’re printing on.
6. In Mac OS X, choose Color Management to show the Color Management
settings.
In Mac OS 9.x, click
Custom in the Mode box, then click the Advanced
button.
9
Page 10

You see the Color Management or Advanced settings:
Select Off (No Color Adjustment)
Select Off (No Color Adjustment)
Mac OS 9
Mac OS X
7. Under Color Management, select Off (No Color Adjustment). Click OK if
necessary.
8. Click Print to print your photo.
10
Page 11

Printing in Photoshop 6.0
1. Open the File menu and select Print. You see a window like the following
(Mac OS 9 is shown, but the screen in Windows has the same settings):
Select your
paper
Make sure this
source is selected
Select the profile for your printer and paper
2. In the Source Space box, make sure Document: EPSON RGB 2001 is selected.
3. In the Print Space box, select the profile for your printer and the paper you’re
printing on. Select Perceptual for the Intent.
Note: If you’re using Windows, click Setup, then select your printer and click
Properties or Preferences.
You see your printer Properties or Preferences window.
4. In Windows, click the Advanced button. (If you don’t see an Advanced button,
Custom, then click Advanced.)
click
In Mac OS 9.x, click Custom in the Mode box, then click the Advanced
button.
5. In the Color Management box, select No Color Adjustment and click OK. (If
you don’t see
Adjustment)
No Color Adjustment, click ICM, then click Off (Not Color
or No Color Adjustment.)
6. Continue clicking OK (Windows) or click Print (Macintosh) to print your photo.
11
Page 12

Uninstalling the Plug-in
If you need to uninstall the P.I.M. II Plug-in, follow the instructions below.
Macintosh
Delete the PRINT Image Matching II file from the Plug-Ins\Import-Export folder
in your Adobe Photoshop or Adobe Photoshop Elements program folder.
Windows
1. Click Start, (Settings), Control Panel.
2. Select Add or Remove Programs or double-click Add/Remove Programs.
3. Select P.I.M. II Plug-In from the list and click Change/Remove or
Add/Remove.
4. Select Remove P.I.M. II Plug-In and click Finish.
5. Follow the on-screen instructions to uninstall the plug-in.
PRINT Image Matching II. Copyright 2003 Seiko Epson Corporation. All rights reserved. PRINT Image
Matching and the PRINT Image Matching logo are trademarks and Epson, Epson Stylus, and PictureMate are
registered trademarks of Seiko Epson Corporation.
General Notice: Other product names used herein are for identification purposes only and may be trademarks of
their respective owners. Epson disclaims any and all rights in those marks.
PRINT Image Matching is a term for the print command that is embedded in the header file of the image created
by a digital camera. It contains color setting and image parameter information.
© 2004 Epson America, Inc. 10/04
12
 Loading...