

Page 1
Get to know your PictureMate
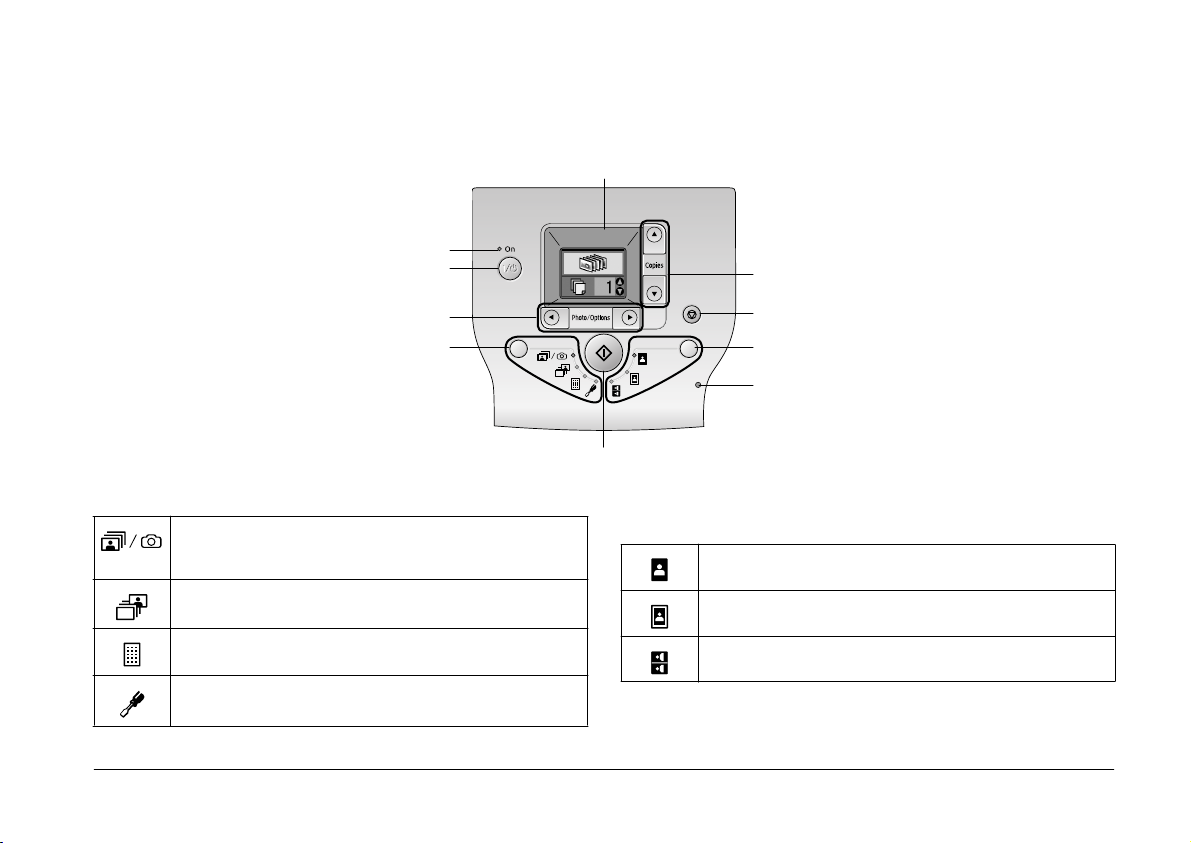
Control Panel
Power light
On button
LCD panel
Copies button
Photo/Options button
Mode button
Start button
Cancel button
Layout button
Memory card light
Pressing the Mode button will change the following options. Pressing the Layout button will change the following layout
options.
Print all the photos, print photos pre-selected in your digital
camera when DPOF information is stored on the memory
card, or print directly from a digital camera.
Print selected photos.
Print an index of all the photos.
Display setup and maintenance options.
Print without margins.
Print with margins.
Pri nt 2 per shee t with out ma rgi ns.
i
Page 2
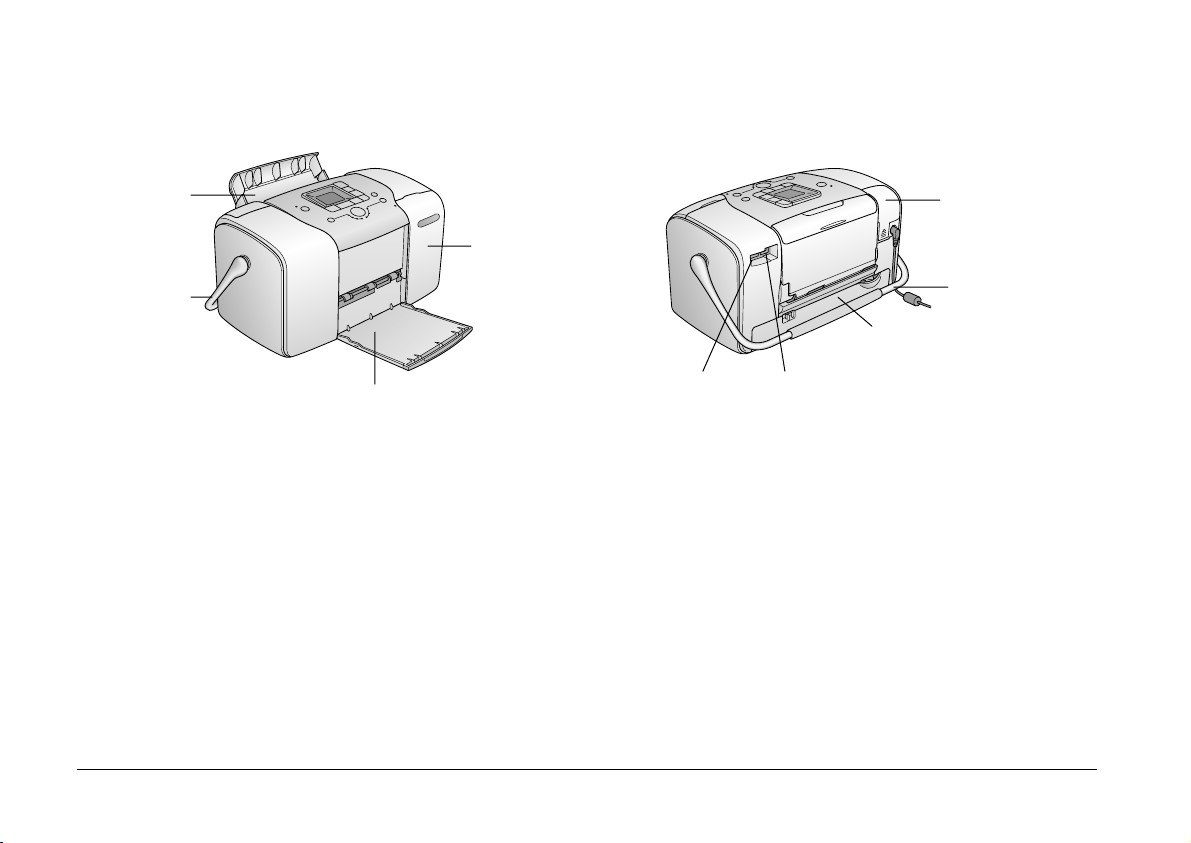
Printer Parts
Paper
support
Handle
Output tra y
Memory c ard
slot cover
Cartridge
compartment cover
EXT/IF (USB) port USB port for computer
Battery cover
Power ca ble
ii
Page 3

Contents
Safety Instructions
Important Safety Instructions. . . . . . . . . . . . . . . . . . . . . . . .1
Warnings, Cautions, and Notes . . . . . . . . . . . . . . . . . . . . . .8
Welcome!
A Quick Introduction to the Digital Photography Process9
Supported Photo Formats . . . . . . . . . . . . . . . . . . . . . . . . . .11
Where to Find Information . . . . . . . . . . . . . . . . . . . . . . . . .11
Preparing to Print
Loading Paper. . . . . . . . . . . . . . . . . . . . . . . . . . . . . . . . . . . .12
Paper Handling Instructions . . . . . . . . . . . . . . . . . . . . . . .13
Inserting Your Memory Card. . . . . . . . . . . . . . . . . . . . . . .14
Basic Photo Printing
Printing All Photos. . . . . . . . . . . . . . . . . . . . . . . . . . . . . . . .16
Printing Selected Photos . . . . . . . . . . . . . . . . . . . . . . . . . . .16
Printing an Index . . . . . . . . . . . . . . . . . . . . . . . . . . . . . . . . .17
Printing Camera-Selected DPOF Photos. . . . . . . . . . . . . .17
Printi ng Options
Printing Photos in Black and White or Sepia . . . . . . . . . 18
Fixing Your Photos . . . . . . . . . . . . . . . . . . . . . . . . . . . . . . . 18
Adding the Date or Time . . . . . . . . . . . . . . . . . . . . . . . . . . 19
Resetting the printing options. . . . . . . . . . . . . . . . . . . . . . 21
Saving Your Photos to an External Device (Backup)
Printi ng From an External Device
Printing From an External Drive. . . . . . . . . . . . . . . . . . . . 24
Printing From a PictBridge-Enabled Camera . . . . . . . . . 25
Printing From a Bluetooth Device . . . . . . . . . . . . . . . . . . 26
Replacing the Photo Cartridge
Checking the Photo Cartridge Status (Ink Level). . . . . . 32
Replacing the Photo Cartridge . . . . . . . . . . . . . . . . . . . . . 33
Taking PictureMate With You
iii
Page 4

Maintaining PictureMate
Checking the Print Head Nozzles . . . . . . . . . . . . . . . . . . . 39
Cleaning the Print Head . . . . . . . . . . . . . . . . . . . . . . . . . . . 40
Aligning the Print Head . . . . . . . . . . . . . . . . . . . . . . . . . . . 41
Cleaning Pic tureMat e . . . . . . . . . . . . . . . . . . . . . . . . . . . . . 42
Troubleshooting
Error/Warning Messages . . . . . . . . . . . . . . . . . . . . . . . . . . 43
Printer Power Problems . . . . . . . . . . . . . . . . . . . . . . . . . . . 43
Print and Noise Problems. . . . . . . . . . . . . . . . . . . . . . . . . . 44
Photo Quality Problems . . . . . . . . . . . . . . . . . . . . . . . . . . .45
Problems With Paper Feeding . . . . . . . . . . . . . . . . . . . . .46
Miscellaneous Printout Problems . . . . . . . . . . . . . . . . . . .47
Contacting Customer Support
Regional Customer Services. . . . . . . . . . . . . . . . . . . . . . . . 48
Technical Support Web Si te . . . . . . . . . . . . . . . . . . . . . . . . 48
Options and Consumable Products
Options . . . . . . . . . . . . . . . . . . . . . . . . . . . . . . . . . . . . . . . . . 49
Consumable Products . . . . . . . . . . . . . . . . . . . . . . . . . . . . . 49
Using the Optional Battery. . . . . . . . . . . . . . . . . . . . . . . . . 50
Index
Panel Icon List
Printer Specifications
iv
Page 5

Photo Printer
®
No part of this publication may be reproduced, stored in a retrieval
system, or transmitted in any form or by any means, electronic,
mechanical, photocopying, recording, or otherwise, without the prior
written permission of Seiko Epson Corporation. The information
contai ned he rein i s desi gned onl y for use with this E pson p rinter. Epso n
is not responsible for any use of this information as applied to other
printers.
Neither Seiko Epson Corporation nor its affiliates shall be liable to the
purchaser of this product or third parties for damages, losses, costs, or
expenses incurred by the purchaser or third parties as a result of
accident, misuse, or abuse of this product or unauthorized
modifications, repairs, or alterations to this product, or (excluding the
U.S.) failure to strictly comply with Seiko Epson Corporation's
operating and maintenance instructions.
Seiko Epson Corporation shall not be liable for any damages or
problems arising from the use of any options or any consumable
products other than those designated as Original Epson Products or
Epson Approved Products by Seiko Epson Corporation.
Seiko Epson Corporation shall not be held liable for any damage
resulting from electromagne tic interference that occurs from the use of
any interface cables other than those designated as Epson Approved
Products by Seiko Epson Corporation.
®
EPSON
of Seiko Epson Corporation.
PRINT Image Matching™ and the PRINT Image Matching logo are
trademarks of Seiko Epson Corporation.
is a registered trademark and PictureMate™ is a trademark
Copyright © 2001 Seiko Epson Corporation. All rights reserved.
USB DIRECT-PRINT™ and the USB DIRECT-PRINT logo are
trademarks of Seiko Epson Corporation.
Copyright © 2002 Seiko Epson Corporation. All rights reserved.
Microsoft® and Windows® are registered trademarks of Microsoft
Corporation.
Apple® and Macintosh® are registered trademarks of Apple Computer,
Inc.
DPOF™ is a trademark of CANON INC., Eastman Kodak Company,
Fuji Photo Film Co., Ltd. and Matsushita Electric Industrial Co., Ltd.
The BLUETOOTH™ trademarks are owned by Bluetooth SIG, Inc.,
U.S.A. and licensed to Seiko Epson Corporation.
Zip® is a registered trademark of Iomega Corporation.
SD™ is a trademark.
Memory stick, Memory Stick Duo, Memory Stick PRO, and Memory
Stick PRO Duo are trademarks of Sony Corporation.
xD-Picture Card™ is a trademark of Fuji Photo Film Co.,Ltd.
General Notice: Other product names used herein are for identification
purposes only and may be trademarks of their respective owners. Epson
disclaims any and all rights in those marks.
Copyright © 2005 Seiko Epson Corporation. All rights reserved.
v
Page 6

vi
Page 7

Safety Instructions
Important Safety Instructions
Read all of the instructions in this section before using
your pri nter. Also, b e sure to follow all warn ings and
instructions marked on the printer.
When choosing a place for the printer
Observe the following when choosing a place for the
printer:
❏ Place the printer on a flat, stable surface that
extends beyond the base of the printer in all
directions. If you place the printer by the wall,
leave more than 10 cm between the back of the
printer and the wall. The printer will not operate
properly if it is tilted at an angle.
❏ When storing or transporting the printer, do not
tilt it, stand it on its side, or turn it upside down.
Otherwise, ink may leak from the cartridge.
❏ Leave enough space in front of the printer for the
paper to be fully ejected.
❏ Avoid places subject to rapid changes in
temperature and humidity. Also, k eep the printer
and the AC adapter away from direct sunlight,
strong light, water, or heat sources.
❏ Do not leave the printer in a place subject to high
temperature, such as in a car. Also, keep the
printer away from direct sunlight, strong light,
and heat sources. Otherwise, the printer may be
damaged or ink may leak.
❏ Avoid places subject to dust, shock, or vibration.
❏ Leave enough room around the printer to allow
for sufficient ventilation.
❏ Place the AC adapter near a wall outlet wher e the
plug can be easily unplugged.
❏ Do not place or store the printer, the AC adapter,
or the optional battery outdoors.
Safety Instructions 1
Page 8

When setting up your printer
Observe the following when setting up the printer:
❏ Do not block or cover the vents and openings in
the printer.
❏ Power supply cords should be placed to avoid
abrasions, cuts, fraying, crimping, and kinking.
Do no t place objects on t op of power -supply cords
and do not allow the AC adapter or power-supply
c or ds t o b e s t ep pe d o n or ru n o ve r. Be p ar ti cu la rl y
careful to keep all power-supply cords straight at
the ends and the points where they enter and
leave the AC adapter.
❏ Use only the power-supply cords that comes with
this product. Use of another cor d may result in fire
or electrical shock, or injury.
❏ The AC adapter model A361H i s designed for use
with the printer with which it was included. Do
not attempt to use it with other electronic devices
unless specified.
❏ Use only the type of power source indicated on
the AC adapter's label, and always supply power
directly from a standard domestic electrical outlet
with the AC power cord that meets the relevant
local safety standards.
❏ Avoid using outlets on the same circuit as
photocopiers or air control systems that regularly
switch on and off.
❏ Avoid using electrical outlets controlled by wall
switches or automatic timers.
❏ Keep the entire computer system away from
potential sources of electromagn etic interference,
such as loudspeakers or t he base units of c ordless
telephones.
❏ Do not use a damaged or frayed power cord, AC
adapter, and the optional battery.
❏ If you use an extension cord with the printer,
make sure that the total ampere rating of the
devices plugged into the extension cord does not
exceed the cord’s ampere rating. Also, make sure
that the t otal ampere rating of all d evices plugged
into the wall outlet does not exceed the wall
outlet’s ampere rating.
2 Safety Instructions
Page 9

❏ Never disassemble, modify, or attempt to repair
the AC adapter, power cord, printer, and options
by yourself except as specifically explained in the
printer's guides.
❏ Unplug the printer and the AC adapter, remove
the optional battery from the printer, and refer
se rvicing to quali fied se rvice pers onnel under the
following conditions:
The power cord or plug is damaged; liquid has
entered the printer, the AC adapter, or the
optional battery; the printer, the AC adapter or
the optional battery has been dropped or the
casing damaged; the printer, the AC adapter or
the optional battery does not operate normally or
exhibits a di stinct change i n perfo rmance. (Do not
adjust controls that are not covered by the
operating instructions.)
❏ Do not use with wet hands.
❏ If you plan to use the AC adapter in Germany, the
building installation must be protected by a10 or
16 amp circuit breaker to provide adequate
short-circuit protection and over-current
protection for this printer.
For United Kingdom, Singapore, and Hong Kong
users
❏ Replace fuses only with fuses of the correct size
and rating.
Safety requirements
Mains plug:
Use a 3-pin mains plug that is registered with the
Safety Authority.
Flexible cord:
Use a double insulated flexible cord that is certified*
to the relevant IEC or BS standards.
Appliance connector:
Use an appliance connector certified* to the relevant
IEC or BS Standards.
* certified by member of IECEE CB Scheme.
For United Kingdom users
The following safety information applies to the AC
adapter.
❏ Warning: Refer to the rating plate for the voltage
and check that the appliance voltage corresponds
to the supply voltage.
Safety Instructions 3
Page 10

❏ Important: The wires in the mains lead fitted to
this appliance are coloured in accordance with
following code: Blue - Neutral, Brown - Live
If you have to fit a plug:
❏ As the colours of the mains lead of the appliance
may not match the coloured markings used to
identify the terminals in a plug, please observe the
following:
The blue wire must be connected to the terminal
in the plug marked with the letter N.
❏ Do not insert objects through the slots in the
printer.
❏ Take care not to spill liquid on the printer and the
AC adapter.
❏ Do not put your hand inside the printer or touch
the photo cartridge during printing.
❏ Always turn the printer off using the d On
button. Do not unplug the printer or turn off the
power to the outlet until the power light goes out.
The brown wire must be connected to the t erminal
in the plug marked with the letter L.
❏ If damage occurs to the pl ug, replace the cord set
or consult a qualified electrician.
When using the printer
Observe the following when using the printer:
❏ If you use the printer in places where the use of
electronic devices is limited, such as in airplanes
or hospitals, follow all instructions in those
places.
4 Safety Instructions
❏ Before tr ansporting the prin ter, make su re tha t the
photo cartridge is in place.
❏ Leave th e photo c artridge instal led. Removing t he
cartridge can dehydrate the print head and may
prevent the printer from printing.
When using a memory card
❏ Use only memory cards compatible with the
printer. Refer to Inserting Your Memory Cards.
Page 11

When using LCD
When using the optional battery
❏ The LCD panel contains a few small bright or dark
spots. These are normal and do not mean that the
LCD monitor is damaged in any way.
❏ Only use a dry, soft cloth to clean the LCD panel.
Do not use liquid or chemical cleansers.
❏ If the LCD panel on your printer's control panel
is damaged, contact your dealer. If the liquid
crystal solution gets on your hands, wash them
thoroughly with soap and water. If the liquid
crystal solution gets into your eyes, flush them
immediately with water. If discomfort or vision
problems re main after a thorough f lushing, see a
doctor immediately.
When using the optional Bluetooth Photo
Print Adapter
Refer to the Bluetooth Photo Print Adapter's
documentation for the safety instructions.
❏ If battery acid gets into your eyes or on your skin,
immediately rinse the affected area thoroughly
with water and seek medical treatment. If a
battery is swallowed, seek medical treatment
immediately.
❏ Use only an Epson Li-ion battery model EU-112
for this printer according to the directions in the
user documentation. Replacing the battery with
an incorrect model may cause an explosion.
❏ Use only AC adapter model A361H to charge the
battery and operate the printer.
❏ Do not charge or use the battery with devices
other than the specified product. Using the
battery with other devices may damage the
battery or other devices, or may cause an
explosion.
❏ To protect against short circuits, do not remove
the outside case of the battery.
❏ Do not handle the battery with wet hands or use
them near water.
Safety Instructions 5
Page 12

❏ Do not expose the battery to water or high
humidity.
❏ Do not solder wires or terminals directly to the
battery.
❏ Do not drop, puncture, disassemble, mutilate, or
short-circuit the battery.
❏ Do not place the battery near or into fire or water.
❏ Do not use the battery that is leaking or damaged
in any way.
❏ Do not charge the battery on devices except this
printer.
❏ Do not charge the battery near open flame or in
very hot locations.
❏ Keep the battery away from heat sources.
❏ Do not l eave the battery in a vehicle to prevent the
battery from overheating.
❏ Do not insert objects into any openings as they
may touch dangerous voltage points or
short-circuit components.
❏ Prevent the batter y from coming into contact with
metal objects that could short-circuit it, such as
coins or keys.
❏ Do not touch battery terminals.
❏ Keep the battery away from open flame if they
leak or smell strange.
❏ If overheating, discoloration, or deformation
occur, remove the battery f rom t he pri nter and do
not use it.
❏ Charge the batter y befo re using it if it has not been
used for a long period.
When storing the optional battery
❏ When not using the printer for a long period of
time, remove the battery from the printer and
store them separately to avoid over-discharging
the battery.
❏ Do not store t he battery where the temperature o r
humidity is very high.
❏ Store the battery out of children’s reach.
6 Safety Instructions
Page 13

When disposing of the optional battery
Before disposing of the battery, make sure you
discharge them completely.
Warning:
❏ Do not dispose of batteries as ordinary refuse.
w
Instead, dispose of them in a collection or
recycle box in accordance with local laws.
❏ Do not incinerate or dispose of the battery in
fire.
For European users:
Do no t dispose of batteries as or dinary refuse. Instead,
dispose of them in a recycle box in accordance with
local laws.
When handling photo cartridges
Observe the following when handling photo
cartridges:
❏ Do not shake photo cartridge after removing it
from the bag; this can cause leakage.
❏ Do not remove or tear the label on the cartridge;
this can cause leakage.
❏ Do not use a photo cartridge beyond the date
printed on the cartridge carton: otherwise, it may
result in reduced print quality. For best results,
use up the photo cartridge within six months of
installing it .
❏ Do not dismantle photo cartridges or try to refill
them. This could damage the print head.
❏ After bringing a photo cartridge inside from a
cold storage site, allow it to warm up at room
temperature for at least three hours before using
it.
❏ Store photo cartridges in a cool, dark place.
❏ The IC chip on the photo cartridge retains a
variety of cart ridge-related information, such as
the amount of ink remaining, so that the cartridge
may be removed and reinstalled freely. However,
each time the cartridge is inserted, some ink is
consumed because the printer automatically
performs a reliability check.
Safety Instructions 7
Page 14

❏ Store each photo cartridge so that the bottom of
its packaging faces down.
Warnings, Cautions, and Notes
ENERGY STAR
The International
Program is a voluntary partnership with the computer
and office equipment industry to promote the
introduction of energy-efficient personal computers,
monitors, printers, fax machines, copiers, scanners,
and multifunction devices in an effort to reduce air
pollution caused by power generation. Their
standards and logos are uniform among participat ing
nations.
®
Compliance
As an ENERGY STAR® Partner,
Epson has determined that this
product meet s the
guidelines for energy efficiency.
ENERGY STAR
®
ENERGY STAR
Office Equipment
Warnings
w
must be followed carefully to avoid bodily injury.
®
Cautions
c
must be observed to avoid damage to your
equipment.
Notes
contain important information and useful tips on the
operation of your printer.
8 Safety Instructions
Page 15
Welcome!
PictureMate™ is your easy-to-use, personal photo lab.
Just insert a digital camera memory card and you’re
ready to print brilliant p hotos. Because PictureMate is
light and portable, you can print whenever and
wherever you take pictures.
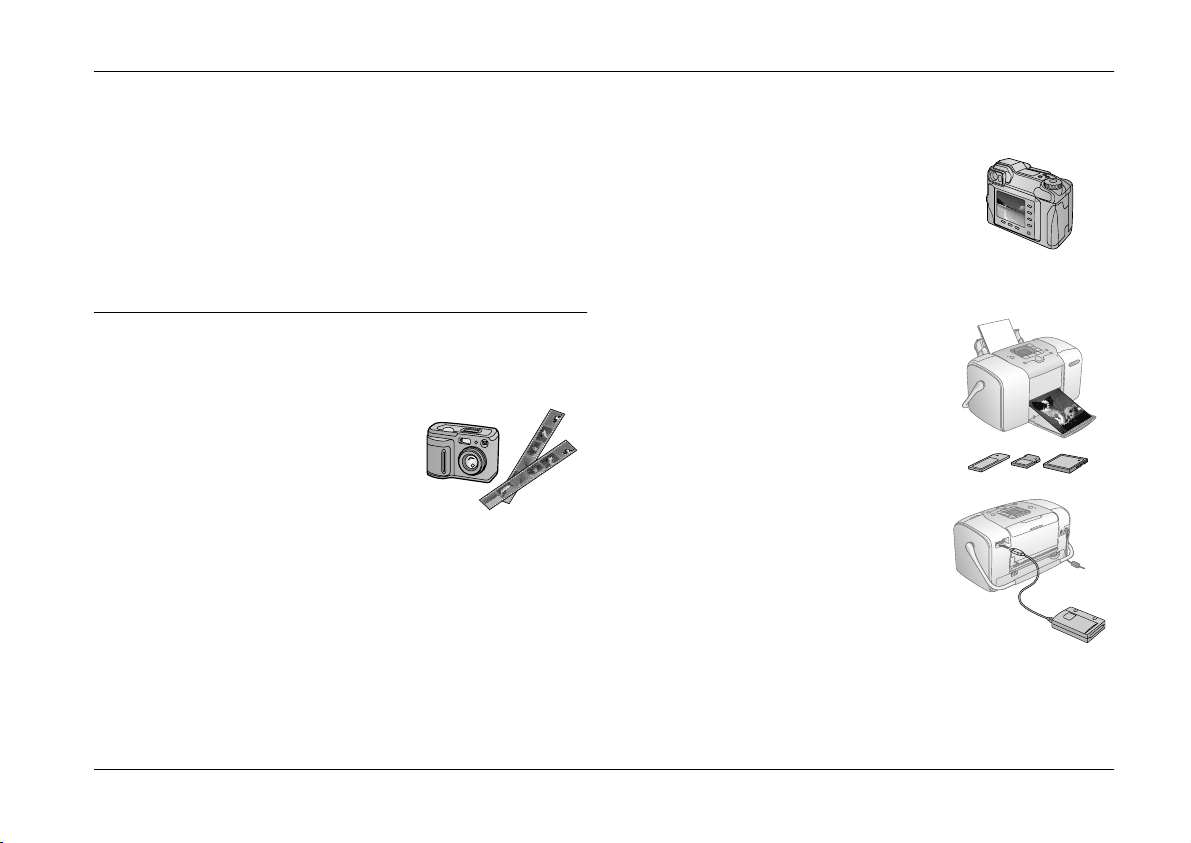
A Quick Introduction to the Digital
Photography Process
With film cameras, the process
was simple; buy film, take
pictures, leave the film at the
photo lab, and come back later
for your photos and negatives.
Since you had negatives, you
could take them back later if
you wanted reprints.
The digital process is simple too, and it gives you
complete control. Just follow these basic steps:
1. Review and Delete
After you finish taking your
photos, review them on your
digital camera’s screen. Delete
the photos you don’t want to
print or keep.
2. Print
Insert your camera’s memory
card in PictureMate, choose
your photos, and print.
3. Save
To preserve your digital photo
files (just like film negatives),
save them to a CD or your
computer. Then you can reprint
them any time.
Welcome! 9
Page 16
4. Clear the Memory Card
Af ter you save your photo files, delete them fro m your
memory card so you have room for more photos.
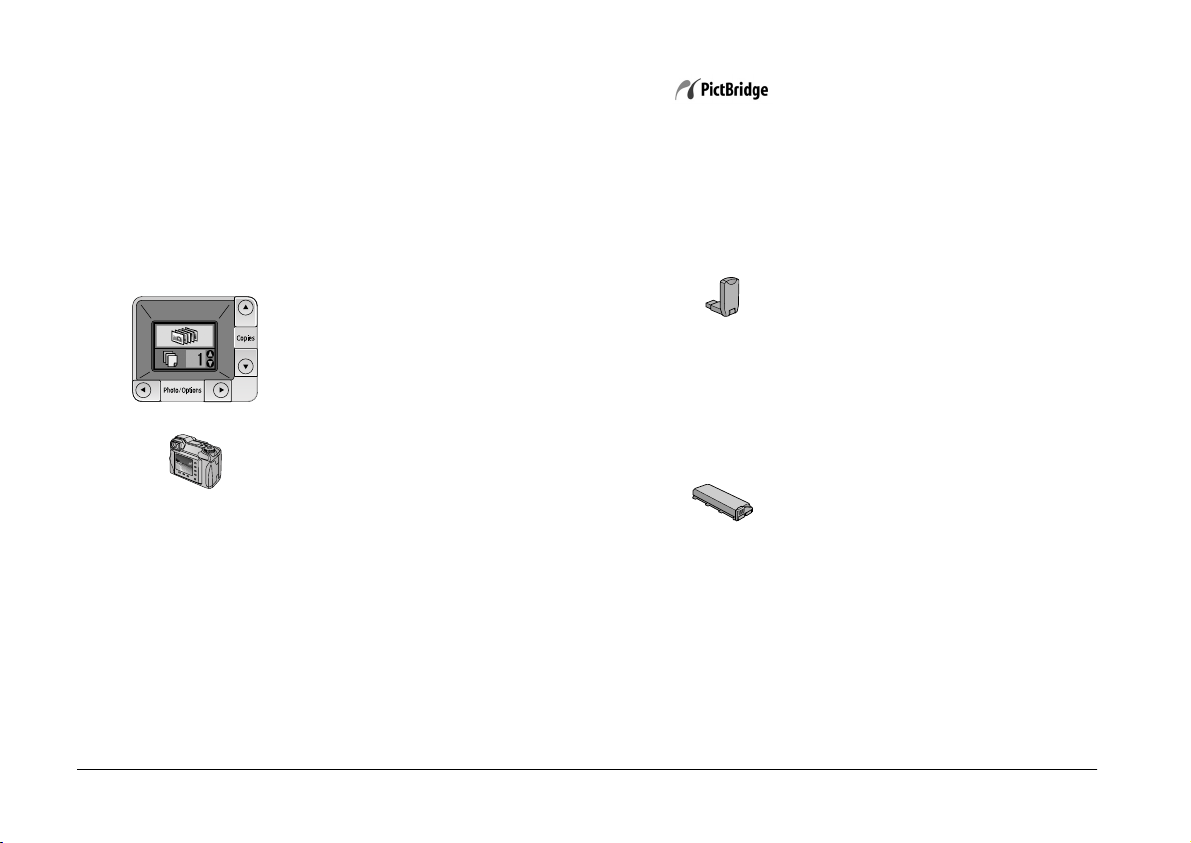
Special Features
Printing with your PictureMate becomes even easier
with these special features:
From the PictureMate LCD panel,
you can pr int all you r phot os or you
can select just the ones you want.
See “Basic Photo Printing” on page
16.
LCD panel
If your camera supports DPOF
(Digital Print Order Format), you
DPOF
can pre -sele ct wh ich ph otos to pr int
while the memory card is still in
your camera. Then, when you
insert the card into PictureMate, it
know s whi ch photos yo u chose. See
“Printing Camera-Selected DPOF
Photos” on page 17.
If you have a PictBridge
®
- or USB
DP (USB Direct Print)-enabled
camera, you can connect the
camera to PictureMate and control
printing right from your camera.
See “Printing From a
PictBridge-Enabled Camera” on
page 25.
If you have a Bluetooth
®
-enabled
PDA, mobile phone, or computer,
you can send photos wirelessly to
PictureMate for printing. You just
need the optional Epson
®
Blueto oth Photo Print Adapter. See
“Printing From a Bluetooth
Device” on page 26.
If you want to print in other places
without convenient electrical
outlets, you can buy the optional
PictureMate battery. See “Options
and Consumable Products” on
page 49.
10 Welcome!
Page 17
Note:
PictureMate also supports P.I.M. (PRINT Image
Matching ™) image en hancement standard that is built into
many cameras. To see if your camera is P.I.M.-enabled, see
your camera's documentation.
Where to Find Information
Unpacking and setting up
See your Start Here to unpack, set
up, and use your PictureMate.
Supported Photo Formats
JPEG TI FF
Make sure your photos meet these requirements for
printing with your PictureMate:
❏ JPEG files or uncompressed TIFF files only
❏ Resolutions ranging from 80 × 80 to 4600 × 4600
pixels
PictureMa te recognizes and prin ts the first 999 photos
on your memory card.
Start Here
Printing and changing settings
Basic Operation Guide (this book)
explains how to print photos
directly from your camera’s
Basic Operation
Guide
memory card. It also covers how to
print from other devices, replace
the PictureMate Photo Cartridge,
take care of PictureMate, and
troubleshoot problems.
Using your PictureMate with a computer
The on-screen User's Guide on the
CD provides comprehensive
information and instructions for
using PictureMate with a
computer.
Welcome! 11
Page 18
Preparing to Print
Befo re you can print, you need to loa d paper and i nsert
your memory card in PictureMate.
Loading Paper
Follow these steps to load PictureMate Photo Paper:
Caution:
Do not load plain paper; this may damage
c
PictureMate.
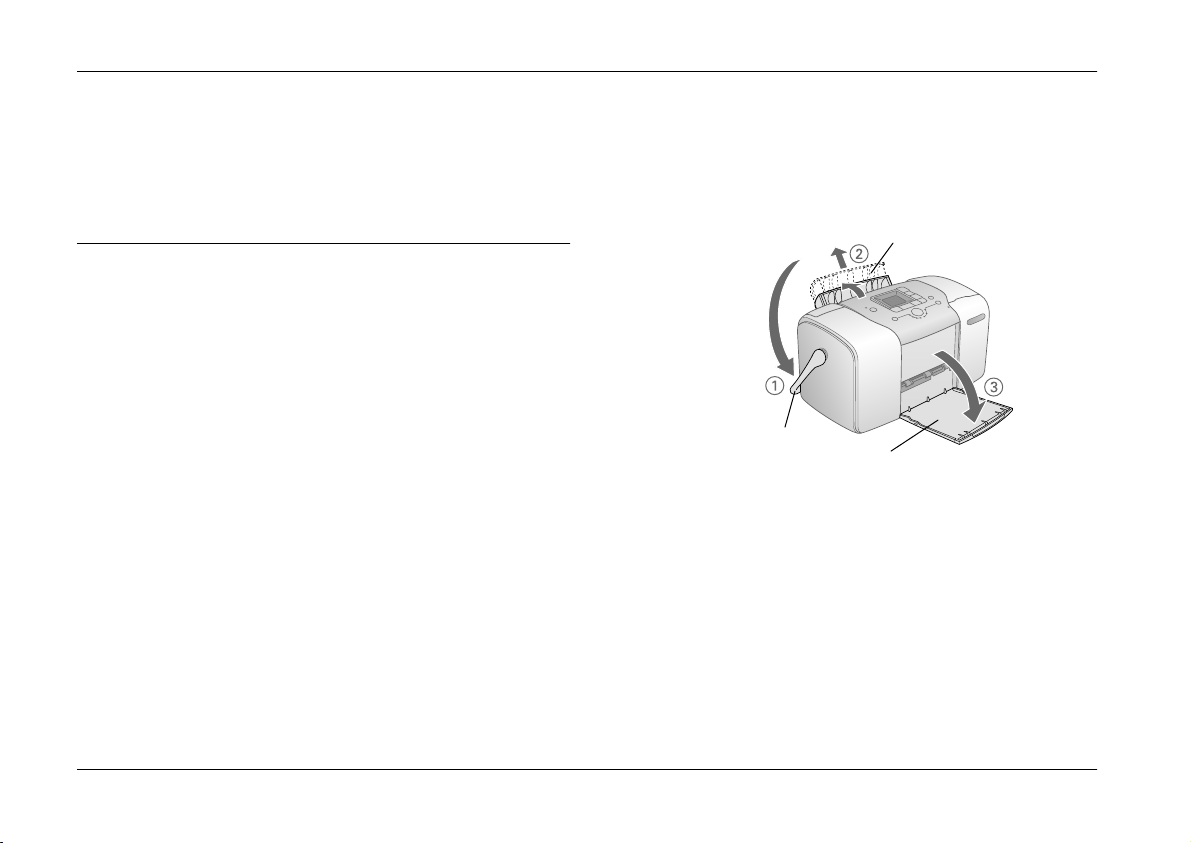
1. Move the handle to the back and down. Then
open the paper support and output tray.
paper support
handle
output tray
Note:
Keep the handle all the way down when printing, to
allow paper to feed through.
12 Preparing to Print
Page 19
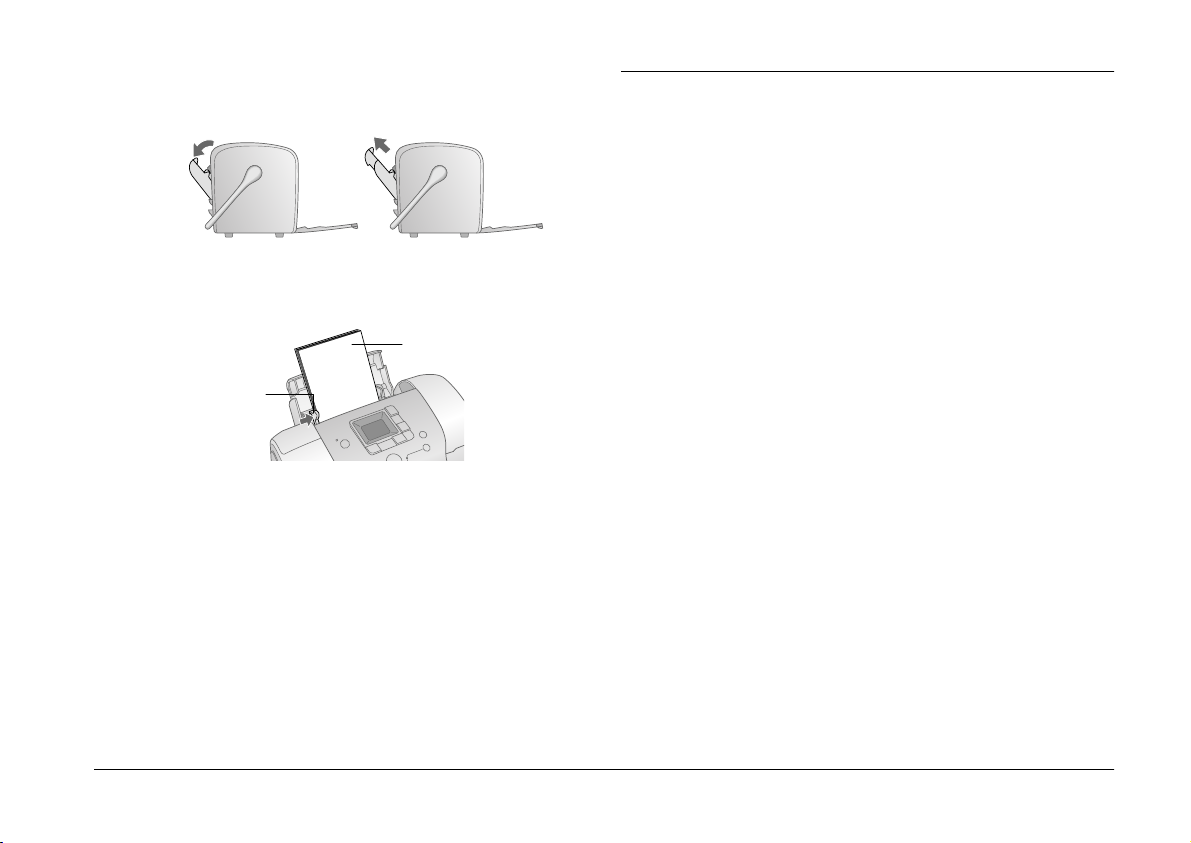
2. Slide the top part of the paper support up gent ly
until it clicks into place.
3. Place your paper against the right edge, with the
glossy side up.
Load glossy side up
Edge guide
Note:
Make sure paper is glossy side up to prevent smearing.
4. Slide the left edge guide against the paper. Make
sure it is snug, but not so tight that paper can’t
move.
Note:
When you need more paper, order a PictureMate
PicturePack. See “Consumable Products” on page 49 for
more information.
Paper Handling Instructions
When storing printouts
❏ Do not touch the printed side or stack your
printouts until the ink is dry.
❏ To avoid scratching the image, be sure not to rub
the printed side of the paper. If the printed side is
rubbed too strongly, ink may come off the paper.
❏ Do not stack printouts with the image sides
touching.
❏ Do not stack printouts and conventional film
photographs with the image sides touching.
❏ If you stack printouts, place a sheet of plain paper
or other absorbent paper between the individual
prints.
When storing unused paper
Return any unused paper to the original package, and
store it away from extreme temperatures, high
humidity, and bright lights.
Preparing to Print 13
Page 20
When displaying printouts
❏ When displaying your printouts indoors, Epson
recommends placing your printouts in glass
frames to preserve the colors in your image.
❏ Avoid displaying your printouts outdoors or in a
place exposed to direct sunlight to prevent fading.
Note:
For best results, allow your prints to dry thoroughly for 24
hours before framing.
Inserting Your Memory Card
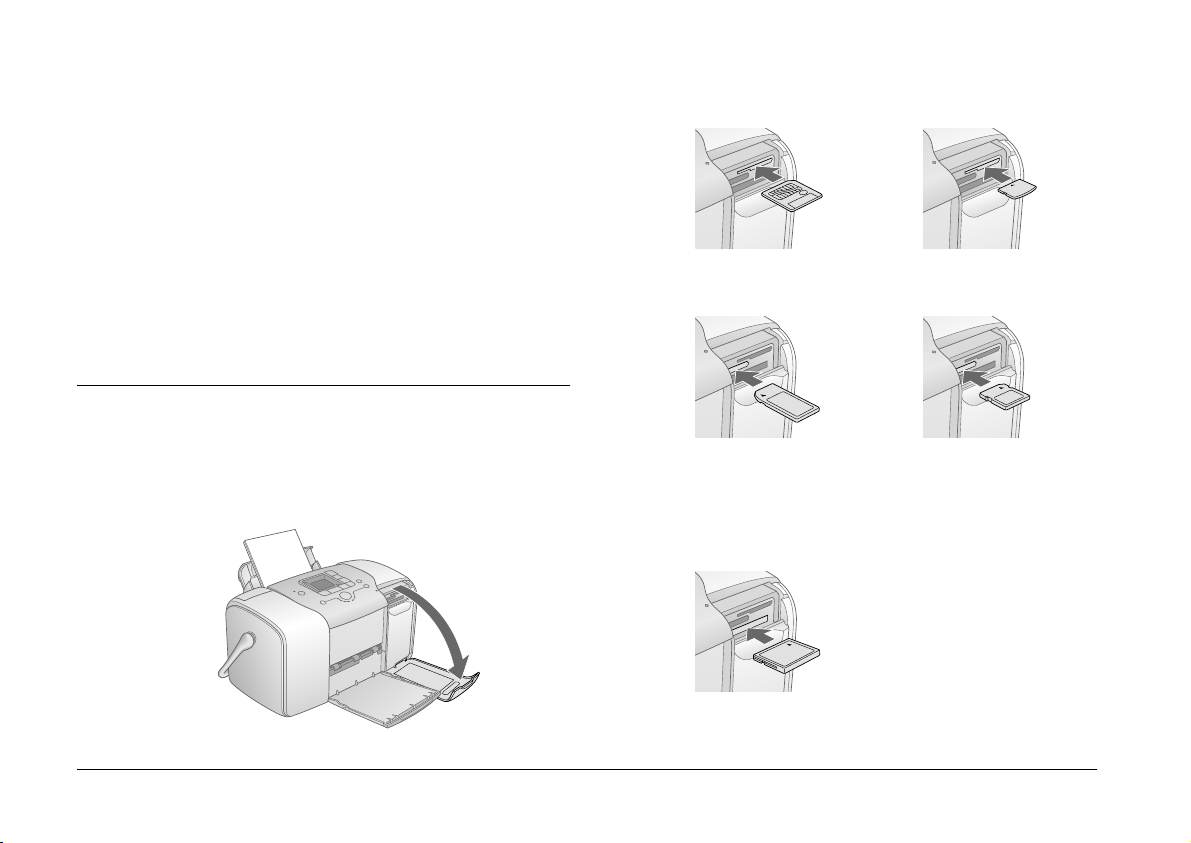
3. Insert the memory card into the correct slot, as
shown in the illustration.
Top:
SmartMedia™
Middle:
xD-Picture Card™
xD-Picture Card™ Type M
1. Press the d On button to turn on PictureMate.
2. Open the memory card cover.
14 Preparing to Print
Sony Memory Stick
Memory Stick Duo™ *
Memory Stick PRO™
Memory Stick PRO Duo™
MagicGate™ Memory Stick
MagicGate Memory Stick Duo™ *
Bottom:
Microdrive™
®
CompactFlash
(Type I + II)
®
*
SD (Secure Digital)
miniSD™ card **
MMC™ (Multi Medi aCard™)
*Requires Memory Stick
Duo ad apter
** Requires miniSD adapter
Page 21

Push the card in carefully until it stops (it won’t
go in all the way).
Insert just one card at a time.
When it is in, the memory card light comes on.
Memory
card light
4. Close the memory card cover.
Now you can choose photos and layouts for printing
from the LCD panel. See “Basic Photo Printing” on
page 16.
Removing Your Memory Card
When you are ready to remove a memory card, make
sure the memory card light is not flashing, then pull
the card straight out of the slot.
Caution:
c
Do not remove a card while the memory card light
is flashing; you may lose photos on your card.
Preparing to Print 15
Page 22

Basic Photo Printing
Printing All Photos
4
1. Press the Mode button to select f/e.
2. Press the u or d button to select the number of
copies.
3. Press the Layout button to select the layout.
4. Press the x Start button to start printing.
31
Note:
If there is DPOF in formation on the memor y car d and f/e
is selected, PictureMate goes to DPOF print mode. See
“Printing Camera-Selected DPOF Photos” on page 17 for
details. To print all of the photos on the memory card, press
2
the y Cancel button and follow the steps above.
Printing Selected Photos
3
2
6
1
1. Press the Mode button to select j.
5
16 Basic Photo Printing
Page 23

2. Press the l or r button to select the photo you
want to print.
Printing Camera-Selected DPOF Photos
3. Press the u or d button to select the number of
copies.
4. Repeat steps 2 and 3 for additional photos.
5. Press the Layout button to select the layout.
6. Press the x Start button to start printing.
Printing an Index
1
2
1. Press the Mode button to select n.
2. Press the x Start button to start printing.
If your camera supports DPOF (Digit al Print Order
Fo r ma t), yo u c a n u se it to pr e- se lect w hi ch p ho to s and
how many copies you want to print. See your camera’s
ma n ua l t o ch oo s e p ho t os fo r p rin t in g w ith D PO F, th e n
insert your memory card in PictureMate. PictureMate
automatically reads your pre-sele cted photos.
1. Load paper and a memory card that contains
DPOF data. The screen below appears on the LCD
panel.
2. Press the Layout button to select the layout.
3. Press the x Start button to start printing.
Note:
If you want to print all of the photos on the memory card,
press the y Cancel button. See “Printing All Photos” on
page 16.
Basic Photo Printing 17
Page 24

Printing Options
Printing Photos in Black and White or
Sepia
You can print your photo in black and white or in a
sepia tone without changing the original photo.
Note:
A sepia print has a brownish tone, for an old-fashioned photo
look.
1. Press the Mode button to select
2. Pres s the l or r button to select Color Effect, then
press the x Start button.
q.
3. Press the u or d button to select color, black and
white, or sepia, th ese are indicated by the c olor of
the icon, then press the x Start button.
4. See “Basic Photo Printing” on page 16 and print
using the mode you want.
Fixing Your Photos
PictureMate lets you correct the color and improve the
image quality of your photos without using a
computer.
❏ If your camera supports PRINT Image Matching,
you can use the printer’s P.I.M. setting to
automatically adjust your photos for the best
results.
18 Prin ting Options
Page 25

❏ If your camera doesn’t support PRINT Image
Matching, you can use PhotoEnhance to make
adjustments for the type of environment in which
your photos were taken.
Note:
These set tings aff ect only your prin ted pictures. They d o not
change your original image files.
1. Press the Mode button to select
2. Press the l or r button to select Auto Correct,
then press the x Start button.
q.
❏ PhotoEnhance - Use this if a print does not look
good; for example, this may correct images that
are too dark, too bright, or backlit.
❏ OFF - Prints photos as they are or bypasses P.I.M.
data.
❏ P.I.M. - PictureMate chooses this setting
automatically if it detects P.I.M. information
saved in your camera’s digital files. This
information helps ensure an accurate image
reproduction.
4. See “Basic Photo Printing” on page 16 and print
using the mode you want.
Adding the Date or Time
3. Pres s the u or d button to select one of the options,
then press the x Start button.
You can add the date and/or time your photo was
originally taken to the bottom right corner of your
print.
1. Press the Mode button to select
Printing Options 19
q.
Page 26

2. To print the date, press the l or r button to select
Date Stamp, then press the x Start button.
4. To print the time, press the l or r button to select
Time Stamp, then press the x Start button.
3. Pres s the u or d button to select one of the options,
then press the x Start button.
❏ None (default, turns off the date stamp)
❏ yyyy.mm.dd (2005.09.01)
❏ mmm.dd.yyyy (Sep.01.2005)
❏ dd.mmm.yyyy (01.Sep.2005)
20 Prin ting Options
5. Press the u or d button to sel ect one of the optio ns,
then press the x Start button.
❏ None (default, turns off the time stamp)
❏ 12-hour system(03:00 for 3 pm)
❏ 24-hour system(15:00 for 3 pm)
6. See “Basic Photo Printing” on page 16 and print
using the mode you want.
Page 27

Resetting the printing options
You can reset the printing options to the original,
default settings.
1. Press the Mode button to select
2. Press the y Cancel button. The t hree lights next to
the l ayout icons flash a nd the printing options are
reset.
q.
Printing Options 21
Page 28

Saving Your Photos to an External Device (Backup)
You can save your photo files to one of the following
devices by connecting the device directly to
PictureMate:
❏ CD-R/RW drive (CD-R/DVD-R media only)
❏ MO drive
®
❏ Iomega
❏ Flash memory (thumb) drive
Note:
Epson cannot guarantee the compatibility of any drives.
1. Make sure PictureMate is on.
2. Insert your memory card into PictureMate.
3. If you are using a CD-R/RW drive or Zip drive,
plug it into an electrical outlet if required.
4. Connect the drive to PictureMate.
Zip® disk (100, 250, or 750MB)
❏ Fo r a C D-R /R W , M O o r Z ip dr iv e, co n ne ct its
USB cable to the EXT/IF port on the back of
PictureMate. Then insert a CD-R/DVD-R,
MO or Zip disk in the drive.
❏ For a flash memory drive, plug it into the
EXT/IF port on the back of PictureMate.
22 Saving Your Photos to an External Device (Backup)
Page 29

5. Press the Mode button to select q.
6. Press the l or r button to select Backup , then
press the x Start button.
Note:
❏ If your media is not formatted, the screen below
appears. Press the x Start button to format.
❏ If you see an error message, see “Error Display”
on page 59.
7. When you see the screen below, press the x Start
button to start backup.
8. When you see the screen below, press the x Start
button to finish.
Caution
Do not remove the drive or memory card while the
c
photos are being saved, or you may lose photos on
your card or drive. If you need to stop the backup,
press the y Cancel button.
You can save photos multiple times to the same disk
or drive until it is full. Each time you save photos on
the same disk or drive, they are saved in a new folder.
The first folder is named 001, the second folder is
named 002, and so on. If you save on a CD-R/DVD-R,
PictureMate names the CD-R/DVD-R Photo.
Saving Your Photos to an External Device (Backup) 23
Page 30

Printing From an External Device
PictureMate can print stored photos on a device such
as an external hard drive, a Bluetooth-enabled device,
or a digital camera.
Printing From an External Drive
If you saved your photos to a CD, DVD, MO, Zip disk,
or flash memory (thumb) drive, you can connect the
drive to t he back of PictureMate an d print just like you
do when you insert a memory card.
You can also print photos fro m a CD that y ou get from
a photo processing lab. (Images should be in JPEG file
format. Some CDs may not work.)
1. Make sure PictureMate is on.
2. Make sure there are no memory cards in
PictureMate’s memory card slots. The memory
card light should be off.
Note:
If a memory card is inserted, the printer will read
photos from the card, not from an external drive.
3. If PictureMate is connected to a computer,
disconnect it or turn off the computer.
4. Connect your CD, MO or Zip drive’s USB cable,
or plug your flash memory drive into the EXT/IF
port on the back of PictureMate.
24 Printing From an External Device
Page 31

5. For a CD, MO or Zip drive, insert a CD/DVD, MO
or Zip disk with photos into the drive.
If you used PictureMate to save photos on the
same CD-R/DVD-R, MO, Zip disk, or flash
memory drive more than once, it will have
multiple folders. You see this screen:
Press the u or d button to choose the folder where
your photos are stored, then press the x Start
button. The most recently saved folder has the
largest number.
6. Follo w the sa me procedure a s when p rinting from
a memory car d to perform pri nting. See “Basic
Photo Printing” on page 16.
Printing From a PictBridge-Enabled
Camera
You can connect your PictBridge- or USB DP-enabled
digital camera to the back of PictureMate and use the
camera to control printing. (See your digital camera's
documentation to see if it supports the PictBridge
standard or USB DP.)
1. Make sure PictureMate is on.
2. Make sure there are no memory cards in
PictureMate’s slots. The memory card light
should be off.
Note:
If a memory card is inserted, the printer will read
photos from the card, not from a camera.
3. Use the printer’s control panel to adjust the print
settings. (For example Layout, Color Effect, and
Auto Correct)
Printing From an External Device 25
Page 32

4. Connect your camera’s USB cable to your camera
and the EXT/IF port on the back of PictureMate.
5. Use the digital camera to select the photo you
want to print. Be sure to make the desired print
settings on the digital camera because the digital
camera settings generally take precedence over
the print settings of PictureMate. See your digital
camera's documentation for information on more
detailed settings.
Printing From a Bluetooth Device
About the Bluetooth Photo Print Adapter
The optional Bluetooth Photo Print Adapter is a
wireless communication module used to print from
digital cameras and other devices with Bluetooth
wireless technology without cables when connected
to the printer.
6. Print from the digital camera.
26 Printing From an External Device
Up to 10 m
Page 33

Note:
❏ While this product complies with the Bluetooth
Specification, it is not guaranteed to work with all
devices enabled with Bluetooth wireless technology.
❏ The communication range of this product is
approximately 10 meters; however, this may vary
depending on conditions including obstacles between
devices; signal quality; magnetic fields; static
electricity and electromagnetic interference; software;
operating system; reception sensitivity; and antenna
performance.
Available Profile
Basic Printing Profile (BPP)
Basic Imaging Profile (BIP)
Hardcopy Cable Replacement Profile (HCRP)
Object Push Profile (OPP)
Connecting and Disconnecting the
Bluetooth Photo Print Adapter
Connecting
1. Insert the Adapt er connector into the EXT/I F port
as shown below.
Caution:
Do not connect this product while the printer
c
is operating. Doing so may cause the printer to
malfunction.
2. The Adapter’s light comes on for one second. If
the LED does not tu rn on, d isconnec t the Adapter
from the printer, then reconnect it.
Printing From an External Device 27
Page 34

Disconnecting
Remove the Adapter’s connector from the EXT/IF
port as shown below.
Caution:
c
❏ Do not remove this product while
communicating with another device.
❏ Do not disconnect this product while the
printer is operating. Doing so may cause the
printer to malfunction.
❏ Do not remove this product by pulling on its
upper section. Doing so may damage the
product.
Bluetooth Settings
Use the LCD panel on the printer to make settings for
Bluetooth wireless communication.
& See “Making set tings” on page 29
Outline of settings
Setting Choices Description
printer
name-(number)
(Default = 1)
Bluetooth D evice
Name
If m ult iple print ers
enabled with
Bluetooth are in the
same communication
range, distinguish them
by assigning each
number f rom 0 thro ugh
9.
To make the Device
Name setting take
effect, turn the printer
off and then back on.
28 Printing From an External Device
Page 35

Bluetooth
Communication
Mode
Bluetooth
Encryption
Public This mode allows
Private This mode prevents
Pa iring T his mod e requi res t hat
ON/OFF
(Default = OFF)
devices enabled with
Bluetooth to freely
discover th e printer
and print.
unknown devices from
discoverin g the printer.
To print in Private
mode, first search for
the printer once in
Public mode. After your
device has discovered
the printer in Public
mode once, it will
subsequently be able
to communicate with
and print from it in
Private mode.
the four-digit Passkey
be entered into a
device before it can
communicate with
and print from the
printer.
Select ON to encrypt
communication.
Encryption requires
that the four-digit
Passkey be entered
into a device before it
can co mmunicate
with and print from the
printer.
Any four-digit
number
(Default = 0000)
Bluetooth
Passkey
Set at the factory
(Example)
11-11-11-11-11-11
Bluetooth D evice
Addres s
The Passkey setting
allows you to set the
four-digit Passkey that
must be entered into a
devi ce before printing
if Pairin g i s s el ected as
the BT Comm. Mode or
if BT Encryption is ON.
Displays the unique
Bluetooth Device
Address of the printer.
Making settings
1. Connect the Bluetooth Photo Print Adapter to
your printer.
& See “Connecting and Disconnecting the
Bluetooth Photo Print Adapter” on page 27
Caution:
Be sure that the printer is not operating before
c
con nectin g thi s produ ct. O therwis e, t he p rinte r
may malfunction.
2. Press the Mode button to select
q.
Printing From an External Device 29
Page 36

3. Press the l or r button to select the desired
bluetooth option.
4. Change the settings of each item. See “Outline of
settings” on page 28 for information about
Bluetooth settings.
The Bluetooth Passkey Setting (PIN Code Set)
If you select Pai ring a s the BT Comm. Mode or ON as
the BT Encryption setting, the Passkey must be
entered into a Blue toot h wireless-capable device
before it can communicate with and print from the
printer. The default Passkey is 0000.
3. Press the u or d button to select a number for the
digit, then press the l or r button to change the
digit.
4. Select numbers for the other digits in the same
manner, then press the x Start button to activate
the Passkey.
To change the Passkey, follow the instructions below.
1. Press the Mode button to select
2. Press the l or r button to select Passkey, then
press the x Start button.
q.
30 Printing From an External Device
Printing
1. Make sure the Bluetooth Photo Print Adapter is
connected to PictureMate and Bluetooth settings
have been made. For details on connecting the
Bluetooth Photo Print Adapter, see “Connecting
and Disconnecting the Bluetooth Photo Print
Adapter” on pag e 27. See “Bluetooth S ettings” on
page 28 to set the Bluetooth settings.
2. Use the PictureMate’s control panel to adjust the
print settings. (For example Layout, Color Ef fect,
and Auto Correct)
Page 37

3. Print the data from your Bluetooth enabled
device.
Note:
The settings available may vary among Bluetooth
wireless-capable devices. For more information, refer to
your device’s documentation.
For more information about printing from Bluetooth
wireless-capable mobile phones, digital still cameras,
digital video cameras, PDAs, mobile PCs and other
Bluetooth wireless-capable device, refer to the
documentation for both the device and the printer.
Printing From an External Device 31
Page 38

Replacing the Photo Cartridge
Checking the Photo Cartridge Status
(Ink Level)
When the photo cartridge is low on ink, you see this
icon in the upper-left corner of the LCD screen.
Ink low
You can check the approximate ink level in your photo
cartridge at any time.
1. Press the Mode button to select
q.
2. Press the l or r button to select Chec k Ink Leve ls ,
then press the x Start button.
3. You see a screen showing the approximate ink
level in your photo cartridge. Press the x Start
button to close the screen.
32 Replacing the Photo Cartridge
Page 39

Replacing the Photo Cartridge
PictureMa te uses photo cartridge equipped with an IC
chip. The IC chip accurately monitors the amount of
ink, so even if it is removed and later reinserted, all of
its ink can be used. However, some ink is consumed
each time the cartridge is inserted because
PictureMate automatically checks reliability.
Warning:
w
Keep photo cartridges out of the reach of children.
Do not allow children to drink from or handle the
cartridges.
Caution:
❏ Epson recommends the use of genuine Epson
c
photo cartridges. Epson warranties do not
cover damage to your printer caused by the use
of photo cartridges not manufactured by Epson.
❏ Leave the old cartridge installed in the printer
until you have obtained a replacement;
otherwise, ink remaining in the print head
nozzles may dry out.
❏ Do not refill photo cartridges. The printer
calculates the amount of ink remaining using
an IC chip on the photo cartridge. Even if the
cartridge is refilled, the amount of ink
remaining will not be recalculated by the IC
chip an d the amount o f ink available for use will
not change.
Note:
In addition to the ink used during an image printing, ink is
consumed d uring the print head cleaning operation, dur ing
the self-cleaning cycle which is performed when the printer
is turned on, and during ink charging when the photo
cartridge is installed in the printer.
For more information about photo cartridges.
& See “When handling photo cartridges” on page 7
Replacing the Photo Cartridge 33
Page 40

1. Make sure that PictureMate is on, but not
printing.
Note:
Check the ink status.
& See “Checking the Photo Cartridge Status (Ink
Level)” on page 32
2. Check that the screen below is displayed on the
LCD panel. Th is screen is not displayed if there is
some ink left.
3. Close the paper support.
4. Move the handle to the upright position.
5. Open the cartridge compartment cover on the
back of PictureMate.
34 Replacing the Photo Cartridge
Page 41

6. Set the cartridge lock lever in the Re lease
position by sliding the lever to the right, then
down and to the left. The photo cartridge will be
ejected about halfway out of the holder. Pull the
cartridge out of PictureMate and dispose of it
properly.
Note:
❏ Do not take the used cartridge apart or try to refill
it. Do not shake the used photo cartridge;
otherwise, it may leak.
❏ The photo cartridge must be replaced when any
one of the c olors is dep leted. The rate tha t a specific
color of ink is consumed depends on the images
printed.
7. Remove the replacement photo cartridge from its
package.
Caution:
❏ Do not touch the green IC chip on the
c
bottom of the cartridge. This can damage
the photo cartridge.
Do not touch this part.
❏ If you remove the photo cartridge for later
use, be sure to protect the ink supply ports
from dirt and dust; store it in the same
environment as the printer. Note that
there is a valve in the ink supply ports,
making covers or plugs unne cessary, but
care is needed to prevent the ink from
staining items that the cartridge touches.
Do not touch the ink supply ports or
surrounding area.
❏ Be sure to always install a photo cartridge
into the pri nter imme diately followin g the
removal of the current photo cartridge. If
a photo cartridge is not installed promptly,
the print head may dry out, rendering it
unable to print.
Replacing the Photo Cartridge 35
Page 42

8. Place the cartridge properly into the cartridge
holder, then push it in until you feel resistance
and hear the cartridge faintly click into place.
Note:
Aft er instal ling the cartridge, mak e sure the sides of th e
cartridge are even. If either side of the cartridge sticks
out, push the side of the cartridge until it clicks.
9. Set the lever to the Lock position by sliding it in
the direction shown.
10. Close the cartridge compartment cover.
Note:
If you cannot close the cartridge compartment cover, the
photo cartridge is not installed correctly. Go back to the Step
6 and eject the photo cartridge. Then install the photo
cartridge again.
11. Move the handle all the way down.
36 Replacing the Photo Cartridge
Page 43

Taking PictureMate With You
PictureMate’s handle makes it easy to carry short
distances. If your PictureMate is going to travel a
longer distance, you should pack it carefully to protect
it from getting damaged.
Caution:
c
Keep PictureMate out of the sun and don’t leave it
in yo ur car or ot her location wher e it can get too hot.
1. If PictureMate is on, turn it off.
2. Wait until the LCD screen goes blank, then
unplug the power cord from the electrical outlet.
3. R emove pa per from the paper suppo rt and output
tray.
4. Push down the top of the paper support and close
it against PictureMate. Then close the output tray.
5. Disconnect the power cord and any connected
USB cable from the back of PictureMate.
6. Pack PictureMate along with its power cord and
AC adapter in the box that PictureMate came.
Taking PictureMate With You 37
Page 44

Caution:
Make sur e the photo cartridge is installe d before
c
transporting. Don’t place PictureMate on its
side or upside down, or ink may leak.
Note:
If your prints don’t look as good after PictureMate has
be en move d, try a ligni ng the pr int head. See “A ligning
the Print Head” on page 41.
38 Taking PictureMate With You
Page 45

Maintaining PictureMate
Checking the Print Head Nozzles
If you find that the printout is unexpectedly faint or
that dots are missing, you may be able to identify the
problem by checking the print head nozzles.
1. Make sure that PictureMate is turned on and no
warnings or errors are displayed on the LCD
panel.
2. Load a sheet of paper. See “Loading Paper” on
page 12.
3. Press the Mode button to select
4. Press the l or r button to select Check Ink
Nozzles.
q.
5. Press the x Start button to print the nozzle check
pattern.
6. The nozzle check pattern is printed out. See the
following illustration.
The printer will print a nozzle check pattern. Below
are sample printouts.
Okay
Needs Cleaning
The above sample may be shown in black and white, but the
actual test prints in color (Black, Cyan, Magenta and Yellow).
If the nozzle check page does not print satisfactorily
(for example, if any segment of the printed lines is
missing), there is a problem with the printer. This
could be a clogged ink nozzle or a misaligned print
head.
See “Cleaning the Print Head” on page 40.
Maintaining PictureMate 39
Page 46

Cleaning the Print Head
If your print quality is not as good as it used to be, if
y ou r p ho t os are l ig ht or fa i nt , o r y ou a re m is si ng c olo rs
in your prints, your print head nozzles may be
clogged.
Note:
❏ Print head cleaning consumes some ink. To avoid
wasting ink, clean the print head only if print quality
declines; for example, if the printout is blurry or the
color is incorrect or missing.
❏ Use the Nozzle Check function first to confirm that the
print head needs to be cleaned. This saves ink.
❏ If a message on the LCD screen tells you that the
cartridge is empty or low on ink, you cannot clean the
print head. You must first replace the photo cartridge.
3. Press the l or r button to select Clean Print
Head.
4. Press the x Start button to start cleaning the print
head.
5. The processing icon appears on the screen while
cleaning is in progress.
1. Make sure that PictureMate is turned on and no
warnings or errors are displayed on the LCD
panel.
2. Press the Mode button to select
q.
40 Maintaining PictureMate
6. When cleaning finishes, print a nozzle check
pattern to check the results. See “Checking the
Print Head Nozzles” on page 39.
Page 47

Aligning the Print Head
If yo u have moved PictureMate and print qualit y is
not as good as it was before—for example, you see
misaligned vertical lines or light or dark horizontal
banding—you may need to align the print head.
1. Make sure that PictureMate is turned on and no
warnings or errors are displayed on the LCD
panel.
2. Load a sheet of photo paper. See “Loading Paper”
on page 12.
3. Press the Mode button to select
4. Press the l or r button to select Align Print Head.
5. Press the x Start button to print the alignment
pattern.
q.
6. The following alignment sheet is printed.
7. Look at the alignment p attern in each set and f ind
the patch which is most evenly printed, with no
noticeable streaks or lines.
8. Press the u or d button to highlight the number
for the best pattern (1 to 9).
9. Press the x Start button to exit the alignment
screen.
Maintaining PictureMate 41
Page 48

Cleaning PictureMate
To keep PictureMate operating at its best, clean it
thoroughly several times a year as follows.
1. Turn off PictureMate and unplug the power cord.
Caution:
❏ Never use alcohol or thinner to clean the
c
printer, as these chemicals can damage the
components as well as the case.
❏ Be careful not to get water on the printer
mechanism or electronic components.
2. Remove any paper from the pape r support.
3. Use a soft brush to carefully clean away all dust
and dirt from the paper support.
4. If the outer case or the inside of the paper support
is dirty, wipe it with a soft, clean cloth dampened
with mild detergent. Keep the output tray closed
to prevent water from getting inside.
42 Maintaining PictureMate
❏ Do not use a hard or abrasive brush.
❏ Do not spray the inside of the printer with
lubricants. Unsuitable oils can damage the
mechanism. Contact your dealer or a qualified
service person if lubrication is needed.
Page 49

Troubleshooting
The solutions herein are for problems when printing
directly from a memory card.
Error/Warning Messages
You can identify many common printer problems
using the display on your printer’s LCD panel. See
“Panel Icon List” on page 59.
Printer Power Problems
LCD panel is off
❏ Press the d On button to make sure that the
printer is on.
❏ Turn o ff the printer and make sure that the power
cord is securely plugged in.
❏ Make sure that your outlet works and is not
controlled by a wall switch or timer.
❏ If you are using the optional battery, it may be
empty, or it may not be installed all the way into
the compartment. See “Charging the battery” on
page 51 for instructions on charging the battery.
See “Installing the battery” on page 50 for
instructions on installing the battery.
LCD panel came on and then went out
The printer’s voltage may not match the outlet rating.
Turn off the printer and unplug it immediately. Then,
check the printer labels.
Caution:
c
If the voltage does not match, DO NOT PLUG
YOUR PRINTER BACK IN. Contact your dealer.
Power light came on and then went out
If you are using the optional battery, it may be empty,
or it may not be in stalled all the way into the
compartment. See “Charging the battery” on page 51
for instructions on charging the battery. See
“Installing the battery” on page 50 for instructions on
installing the battery.
Troubleshooting 43
Page 50

Print and Noise Problems
PictureMate makes an unexpected noise after you
install a photo cartridge.
❏ Make sure paper is not jammed and is loaded
correctly so it can feed into PictureMate. Make
sure the handle is not resting on the paper. See
“Loading Paper” on page 12 for paper loading
instructions.
The first time you install the photo cartridge,
PictureMate will charge its print head for about three
and a half minutes. Wait until charging finishes before
you turn it off, or it may charge improperly and use
more ink the next time you turn it on.
Your PictureMate makes an unexpected noise when
you turn it on or after it has been sitting for awhile.
PictureMate is performing routine maintenance.
PictureMate sounds as though it is printing, but
nothing prints.
❏ PictureMate may be preparing to print.
❏ Make sure the print head no zzles are not clogged.
To clean the print head, see “Cleaning the Print
Head” on page 40.
❏ PictureMate won’t work properly if it’s tilted or
at an angle. Place it on a flat, stable surface that
extends beyond the printer base in all directions.
44 Troubleshooting
Your memory card does not work correctly.
❏ Make sure you are using a compatible memory
card. See “Inserting Your Memory Card” on page
14.
❏ Make sure only one card is inserted at a time.
PictureMate does not read from multiple cards at
once.
❏ Photos must be in JPEG or Uncompressed TIFF
format and taken with a DCF-compliant camera.
❏ PictureMate can recognize and print the first 999
photos on your memory card.
Page 51

Photo Quality Problems
❏ Use the PictureMate Photo Paper to ensure proper
saturation, absorption of ink, and quality.
You see banding (light lines) in your prints.
❏ The print head nozzles may need cleaning; see
“Cleaning the Print Head” on page 40.
❏ Make sure the glossy side of the paper is face up.
❏ The photo cartridge may need replacing. To
replace the cartridge, see “Replacing the Photo
Cartridge” on page 33.
❏ The print head may need aligning; see “Aligning
the Print Head” on page 41.
Your printout is blurry or smeared.
❏ Make sure you load paper with the glossy side
face up.
❏ Make sure your paper isn’t damp or curled, or
loaded face down (the glossy side should be face
up). If it’s damp or curled, load a new stack of
paper.
Your printout is faint or has gaps in the image.
❏ The print head may need aligning; see “Aligning
the Print Head” on page 41.
❏ The print head nozzles may need cleaning; see
“Cleaning the Print Head” on page 40 for
instructions.
❏ The photo cartridge may be old or low on ink. To
replace the photo cartridge, see “Replacing the
Photo Cartridge” on page 33.
Troubleshooting 45
Page 52

❏ Make sure your paper isn’t damaged, old, dirty,
or loaded face down. If it is, reload a new stack of
paper with the glossy side up.
Colors in your photo are wrong or missing.
❏ Make sure the paper support is pulled up, all the
way out, and is not leaning on the handle. The
handle should be all the way down in back of
PictureMate. Make sure the handle is not resting
on the paper. See “Loading Paper” on page 12.
❏ Make sure the Color Effect setting is set to Color
for color photos. See “Printing Photos in Black and
White or Sepia” on page 18.
❏ The print head nozzles may need cleaning; see
“Cleaning the Print Head” on page 40.
❏ The photo cartridge may be old or low on ink. To
replace the cartridge, see “Replacing the Photo
Cartridge” on page 33.
Problems With Paper Feeding
Paper doesn’t eject fully or is wrinkled.
If it’s wrinkled when it ejects, the paper may be damp
or too thin.
Paper doesn’t feed correctly or jams in the printer.
46 Troubleshooting
❏ If paper doesn’t feed, remove it from the paper
support, reload it against the right edge, then slide
the left edge guide against the paper (but not too
tightly).
❏ If multiple pages feed at once, remove the paper
from the paper support, separate the sheets, and
carefully reload it.
❏ If paper jams, remove the paper, then press the x
Start button to clear the jam.
❏ Load paper glossy side up. Load up to a
maximum of 20 sheets. Place the paper against the
right edge and slide the e dge guide against it, but
not so tight that paper can’t move.
❏ Don’t load plain paper; this may damage
PictureMate.
❏ Make sure you are using available paper for this
printer (see “Consumable Products” on page 49).
Store paper flat to help prevent curling.
Page 53

Miscellaneous Printout Problems
The printer prints blank pages.
The print head may need cleaning. See “Cleaning the
Print Head” on page 40.
The borders or layout are incorrect.
❏ Check your Layout setting to see if it is correct.
See “Basic Photo Printing” on page 16.
❏ I f y ou h av e a b or der o n o n e s id e o f yo u r p ho to bu t
not the other, make sure the paper is positioned
correctly in the paper support, all the way to the
right. Slide the edge guide against the paper.
❏ If the subject of your photo is very close to the
edge of the image, you may want to select Border
as the Layout setting. T his prevents the a utomatic
enlargement of your photo (to eliminate the
borders) which may be causing part of your image
to be cut off.
The wrong photo is printed.
❏ If y ou r c am era s up po rts D PO F, you ca n p re -se l ec t
photos so Pict ureMate will print only the ones
you want. See “Printing Camera-Selected DPOF
Photos” on page 17.
❏ If your camera is PictBridge- or USB DP-en abled,
you can connect it to PictureMate and control
printi ng from your camera. See “Printing From a
PictBridge-Enabled Camera” on page 25.
Troubleshooting 47
Page 54

Contacting Customer Support
Regional Customer Services
If your Epson product is not operating properly and
you cannot solve the problem using the
troubleshooting information in your product
documentation, contact customer support services for
assistance. Check your Pan- European Warranty
Document for information on how to contact EPSON
Customer support.
They will be able to help you much more quickly if
you give them the following information:
❏ Product serial number
(The serial number label is usually on the back of
the product.)
❏ Product model
❏ Product software version
(Click About, Version Info, or similar button in
the product software.)
❏ Brand and model of your computer
❏ Your computer operating system name and
version
❏ Names and versions of the software applications
you normally use with your product
Note:
For m ore inf ormation on Contactin g Custom er Suppor t, see
the Online User's G uide inclu ded in the software CD-ROM
Technical Support Web Site
Go to http://www.epson.com and select the Support
section of your local EPSON web site for the latest
drivers, FAQs, manuals and other downloadables.
Epson's Technical Support Web Site provides help
with problems that cannot be solved using the
troubleshooting information in your printer
documentation. If you have a Web browser and can
connect to the Internet, access the site at:
http://support.epson.net/
48 Contacting Customer Support
Page 55

Options and Consumable Products
Options
Bluetooth Photo Print Adapter
Bluetooth unit C12C824✽✽✽
Note:
The asterisk is a substitute for the last digit of the product
number, which varies by location.
& See “Printing From a Bluetooth Device” on page 26
Lithium Ion Battery
An optional rechargeable battery means you can use
PictureMate without the AC adapter.
Lithium Ion Battery C12C83107✽
Note:
The asterisk is a substitute for the last digit of the product
number, which varies by location.
For details on using the optional battery, see “Using
the Optional Battery” on page 50.
Consumable Products
The following photo cartridge and Epson special
paper are available for PictureMate.
PictureMate P icturePack
(PictureMate Photo Cartri dge and PictureMate
Photo Paper)
PictureMate Photo Cartridge T573
EPSON Premium Glossy Photo Paper 10 × 15 cm
(4 × 6in.)
EPSON Pr emium Semig lo ss Photo Pap er 10
× 6in.)
cm (4
Note:
❏ The availability of special paper varies by location.
❏ Please check your local EPSON customer support
website where to buy or visit your local dealer.
& See “Contacting Customer Support” on page 48
× 15
T5730
S041692
S041730
S041750
S041925
Options and Consumable Products 49
Page 56

Using the Optional Battery
Note:
❏ Install the battery aft er installing the first photo
cartridge and after ink charging is finished.
❏ You cannot save data on the memory card to an
external device when using the battery. Connect the
AC adapter to PictureMate when you save data.
❏ When you copy data on a computer to your memory
card, confirm that there is enough p ower in th e batter y.
If the battery runs out, saving is canceled, and
corrupted data may remain on the memory card.
For safety instructions for the battery, see “When
using the optional battery” on page 5.
Installing the battery
Follow the steps below to install the battery.
1. Make sure that PictureMate is turned off.
3. Open the battery cover.
4. Insert the battery into the compartment in the
direction shown below until it is fixed in place.
2. Unplug the AC adapter from the printer.
50 Options and Consumable Products
Page 57

Note:
Push the battery all the way into the compartment so
that it locks into place as shown below.
3. Move down the battery latch and pull out it.
lock
5. Close the battery cover.
Removing the battery
1. Make sure that PictureMate is turned off.
2. Open the battery cover.
4. Close the battery cover.
Charging the battery
After installing the battery, charge the battery using
the AC adapter.
1. Make sure that the battery is installed.
2. Connect the power cord and AC adapter, then
plug in PictureMate.
When PictureMate is off, the power light blinks
during charging. When the battery is fully
charged, the power light turns off.
Options and Consumable Products 51
Page 58

W he n Pi ct ure Ma t e is on d ur in g ch a rg ing, i co n
blinks on the LCD panel. When the battery is fully
charged, icon appears.
Note:
The batte ry may not be c harged correc tly if the temp erature
of the operation is not guaranteed.
Checking the battery status
Battery performance
Charging Time Approx. 2 hours at maximum
Continuous Print Time Approx. 90 minutes
Number of Prints Approx. 50 sheets (4 × 6 in.) *
* When printing from a Memory Stick with a fully charged, fresh
battery, at room temperature. The number of sheets varies
depending on the memory card, data size, and other conditio ns.
The battery status is always displayed at the top left
corner of the LCD panel.
Icon Status
Sufficient battery power
When the icon is yellow, battery power is low.
When the icon is red, battery power is almost empty.
Battery power is running out.
Battery is charging.
Ba tte ry is fully cha rged.
52 Options and Consumable Products
Auto Power Off
When the battery is used to power PictureMate,
PictureMate will automatically turn off to save battery
power if it is idle for about 15 minutes.
Note:
When a memory card is inserted and PictureMate is
connected to a computer, it will not turn off automatically.
Page 59

Printer Specifications
Printer Electrical
Dimensions Storage
Width: 256 mm (10.0 inches)
Depth: 154 mm (6.1 inches)
Height: 167 mm (6.6 inches)
Printing
Width: 256 mm (10.0 inches)
Depth: 305 mm (12.0 inches)
Height: 167 mm (6.6 inches)
Printable area Border printing: 3 mm margin for all
sides of paper
Borderless printing: 0 mm marg in
Paper tray capacity 20 sheets
Weight 2.7 kg (6.0 lb) without battery and
photo cartridge
Rating
Printer
AC adapter
operated
Input DC 20 V, 1.6 A DC14.4 V, 1.4 A
Optional battery
operated
AC Ad apter
Model A361H
Input AC100-240 V, 50-60 Hz, 0.8-0.4 A, 42 W
Output DC 20 V, 1.68 A
Printer Specifications 53
Page 60

Printer Operated by AC Adapter
Environmental
Power
consumption
usi ng AC
ada pter
Input current using AC
adapter (Continuous
prin ting)
Continuous
printing
Sleep
mode
Stand-by
mode
When not charging
an optional battery
AC
100-120V
Input
Approx.
11.0 W
Approx.
4.0 W
Approx.
0.7 W
0.3 A 0.2 A 0.7 A 0.4 A
AC
220-240 V
Input
Approx.
11.5 W
Approx.
4.5 W
Approx.
1.0 W
When charging an
optional battery
AC
100-120 V
Input
Approx.
30 W
Approx.
22 W
Approx.
22 W
AC
220-240 V
Input
Approx.
30 W
Approx.
23 W
Approx.
23 W
Temperature Operation:
10 to 35°C (50 to 95°F)
Storage:
-20 to 60°C (-4 to 140°F)
1 month at 40°C (104°F)
120 hours at 60°C (140°F)
Humidity Operation:*
20 to 80% RH
Storage:*
5 to 85% RH
* Wit hout condens ati on
54 Prin ter Specifications
Page 61

Built-in card slots
Card Slots CF Type II card
slot
SmartMedia
card slot
Memory Stick/
Memory Stick
PRO ca rd slot
SD/
MMC card slot
xD-Pic ture
Card Sl ot
Compatible with “CF+ and
Compac tFl ash
Spe cific atio n 1 .4”
Compat ible with
“SmartMedia St anda rd
2003”
Compat ible with “Memory
Stick Standard version 1.3”
Compat ible with “Memory
Stick Standard Memory
Stick PRO Format
Specifications version 1.0”
Compatible with “SD
Memory Card
Spe cif icat ions / P ART1 .
Physical Layer Specification
Version 1.0”
Compat ible with
“Mul tiMedi aCard
Standard”
Compat ible with
“xD- Picture Card ™ Card
Spe cific atio n V ers io n 1 .20
Type M”
Compatible
memory
cards
Voltage
Requirements
* Maximum capacity is 128 MB.
** Adapter required.
CompactFlash
SmartMedia*
Memory Stick*
Memory Stick PRO
Memory Stick Duo**
Memory Stick PRO Duo**
MagicGate Memory Stick*
MagicGate Memory Stick Duo**
Microdrive
SD (Secure Digital) Card
MultiMediaCard
miniSD ca rd**
xD-Picture Card
xD-Picture Card Type M
3.3 V
3.3 V/5 V Combined use
Maximum current is 500 mA
Printer Specifications 55
Page 62

Photo Cartridge
Standards and Approvals
PictureMate Photo Cartridge (T573)
Color Blac k, Cyan, Magent a and Yel low
Cartridge life Within 6 months of opening the package, at
25°C (77°F)
Temperature Storage:
-20 to 40°C (-4 to 104°F)
1 month at 40°C (104°F)
Freezing:*
-11°C (12.2°F)
* Ink thaws and is usable after approximately 3 hours at 25°C (77°F).
External Storage Devices
Connectivity Universal Serial Bus Specifications Revision 1.1*
Bit rate: 12 Mbps (Full speed device)
Connector type: USB Series A
Data Encoding: NRZI
Recommended cable length: Less than 1.8
meters
* Not all USB devices are supported. Contact your region al
customer su pport for d etails.
Printer
Euro pean model:
EMC EMC Directive 89/336/EEC
EN 55022 Class B
EN 55024
AC Adapter
Euro pean model:
Safety Low Voltage Directive 72/23/EEC
EN60950-1
EMC EMC Directive 89/336/EEC
EN55024
EN61000-3-2
EN61000-3-3
56 Prin ter Specifications
Page 63

Index
A
Align Print Head, 41
All ph otos, 16
Auto correct photo, 18
B
Backup photos, 22
Battery
buying, 49
using, 50 to 52
Black and white printing, 18
Blank pages, 47
Bluetooth, 26, 49
Blurry prints, 45
C
Camera
printing from, 25
selected photos (DPOF), 17
Care of PictureMate, 39
Carrying PictureMate, 37
CD
printing from, 24 to 25
saving files, 22
Cell phone
printing from, 26
Charging ink, 44
Cleaning
printer, 42
print head, 39
Clogged nozzles, 39
Color
effect, 18
problems, 46
Consumables, 49
Copying photos, 22
D
Date Stamp, 20
Device
external, 24 to 26
DPOF (Digital Print Order Format), 17
E
Edge guide, 13
Error messages, 59
External device
printing from, 24 to 25
saving files, 22
F
Faint images, 45
File formats, 11
Fix photo, 18
Flash memory drive
printing from, 24 to 25
saving files, 22
Folder, 24 to 25
G
Gaps in image, 45
I
Image
formats, 11
quality, 45 to 46
Incorrect colors, 46
Index sheet, 17
Ink, see Photo cartridge
J
Jams
paper, 46
JPEG, 11
L
Layout button, 16
LCD screen
messages, 43, 59
M
Maintenance, 39
Manuals, 11
Index 57
Page 64

Margins
incorrect, 47
Memory card
adapter, 14
compatibility, 14, 55
inserting, 14
problems, 43, 44
removing, 15
Memory Stick, 14
Microdrive, 14
MiniSD card, 14
Missing colors, 46
MMC (MultiMediaCard), 14
Mode button, 16
N
Noise
PictureMate, 44
Nozzle check, 39
Nozzle cleaning, 40
O
On button, 14
Output tray, 12
P
Packing PictureMate, 37
Paper
buying types, 49
feeding problems, 46
jam, 46
tray, 12
PDA
printing from, 26
Photo
formats, 11
quality, 45 to 46
Photo cartridge
buying, 49
ink level, 32
replacing, 33 to 36
safety instructions, 7
PhotoEnhance, 19
PictBridge, 10, 25
PictureMate PicturePack, 49
PIM (PRINT Image Matching), 11, 18
Power cable, 37
Problems
memory card, 44
missing colors, 46
paper feeding, 46
paper jam, 46
print quality, 45 to 46
Q
Quality, 45 to 46
R
Removing
memory card, 15
photo cartridge, 33
Resolution, 11
S
Saving photo files, 22
SD (Secure Digital) card, 14
sepia, 18
Setup problems, 44
SmartMedia card, 14
Smears, 45
T
Technical support, 48
Thumb drive
printing from, 24 to 25
saving files to, 22
TIFF, 11
Time Stamp, 20
Transporting PictureMate, 37
Troubleshooting, 43 to 47
U
USB cable, 24 to 26, 37
USB DP (USB Direct Print), 10, 25
User’s Guide, 11
X
xD Picture Card, 14
Z
Zip disk
printing from, 24 to 25
saving files to, 22
58 Index
Page 65

Panel Icon List
Printer errors and conditions are displayed with
image icons and numerical codes.
Error Display
Display Mea ning
Ink out.
Replace the photo cartridge with a
new one.
& See “Replacing the Photo
Cartridge” on page 33
Paper out.
Load Paper. Then press the x Start
button to continue or the y Cancel
button to cancel.
& See “Loading Paper” on page 12
Paper is jammed.
Clear paper jam, then press the
x Start button.
& See “Problems With Paper
Feeding” on page 46
Displ ay Meaning
Not enough ink to perform the head
cleaning.
Replace the photo cartridge with a
new one.
& See “Replacing the Photo
Cartrid ge” on page 33
Bluetooth module error.
Dis conn ect the Ad apter, th en
reconnect to the printer.
& See “Connecting and
Disconnect ing the Bluetooth Photo
Print Adapter” on page 27
External device is not connected or
medi a is not inserted.
Connect an external device or insert
media.
Insufficient space on the external
device.
Use an external device w ith sufficient
space.
Panel Icon List 59
Page 66

Display Mea ning
No memory card is inserted.
Insert a mem ory card.
PC connected.
Disconnect a PC from the printer.
Displ ay Meaning
Photo cartridge cannot be
recognized.
Reinstall the photo cartridge. The
genuine EPSON photo cartridge
(T573) is recommende d for
replaceme nt.
The battery is empty.
Connect the AC adapter.
60 Panel Icon List
Cartridge compartment cover is
open.
Close the cartridge com partment
cover.
Photo cartridge is not inserted.
Install the photo cartridge.
Waste ink pad in the photo cartridge
is saturated.
Replace the photo cartridge with a
new one.
& See “Replacing the Photo
Cartridge” on page 33
The battery temperatu re is abnor mal.
Turn the power off, then wait until the
battery temperature decreases.
The battery is defective.
Replace the battery with a new one.
& See “Using the Optional Battery”
on page 50
Mechanical error.
Call f or service.
& See “Contacting Customer
Support” on page 48
Page 67

Display Mea ning
Warning Display
Display Mea ning
Waste ink pad in the printer is
saturated.
Call for service.
& See “Contacting Customer
Support” on page 48
Waste in k pad almost full.
Call for service.
& See “Contacting Customer
Support” on page 48
Displ ay Meaning
Memory card error.
Remove the memor y card, then
insert a compa tible memory card.
& See “Inserting Your Memory Card”
on page 14
Cannot recognize the external
device.
Check connection .
Error in the data.
The print results may not be perfect.
Check the data.
Temperature inside the printer is too
high.
Move the printer to the shade or a
cool place.
No photo data on the memory card.
Remove the memory card, then
check the data on the memory card.
& See “Supported Photo Formats” on
page 11
The data is n ot supported.
Check the data.
The image is too larg e to print wi th
Bluetooth.
Print the data from a memory card or
computer.
Panel Icon List 61
Page 68

Display Mea ning
The image is too complex to p rint with
Bluetooth.
Check the data.
Icon List
Display Mea ning
Ink is low.
& See “C hecking the ba ttery status” o n pag e 52 for the
battery icons.
Information
Display Mea ning
No memory card .
Displ ay Meaning
PictBridge Camera connected.
USB Direct Print Camera connected.
PC connected
AC adapter not connected.
Connect the AC adapter to install
the first photo cartridge.
62 Panel Icon List
Page 69

Print Mode Display Setup/Utilities Mode Display
Display Mea ning
Print all photos
& See “Printing All Photos” on page
16
Print an index
& See “Printing an Index” on page 17
Print DPOF photos.
& See “Printing Camera-Selected
DPOF Photos” on page 17
Displ ay Meaning
Check ink lev els.
Press the x Start button to enter this
mode.
& See “Checking the Photo
Cartrid ge Status (Ink Level )” on pa ge
32.
Clean print head.
Press the x Start button to enter this
mode.
& See “Cleaning the Print Head” on
page 40.
Check ink nozzles.
Press the x Start button to enter this
mode.
& See “Checking the Print Head
Nozzles” on page 39.
Align Print Head.
Press the x Start button to enter this
mode.
& See “Aligning the Prin t Head” on
page 41.
Panel Icon List 63
Page 70

Display Mea ning
Color effect.
Press the x St ar t butt on t o enter th is
mode.
& See “Printing Photos in Black and
White or Sepia” on page 18.
Auto correct.
Press the x St ar t butt on t o enter th is
mode.
& See “Fixi ng Your Photos” on page
18.
Date stam p.
Press the x St ar t butt on t o enter th is
mode.
& See “Adding the Date or Time” on
page 19.
Time stamp.
Press the x St ar t butt on t o enter th is
mode.
& See “Adding the Date or Time” on
page 19.
Backup.
Press the x St ar t butt on t o enter th is
mode.
& See “Saving Your Photos to an
External Device (Backup)” on page
22
Displ ay Meaning
Select folder.
Press the x Start button to enter this
mode.
Appears only when an external
device is connected.
& See “Printing From an External
Drive” on page 2 4.
See “Bluetooth Settings” on page 2 8 on the menus tha t
appear when the optional Bluetooth Photo Print
Adapter is connected.
64 Panel Icon List
 Loading...