

Page 1
Page 2

Contents
PictureMate User’s Guide 6
Getting to Know Your PictureMate 7
Loading Paper 8
Supported Paper Types 9
Printing From Your Computer 10
Printing From a Windows Computer 10
Printing From a Macintosh Computer 13
Printing Photos Using Film Factory 18
Opening Your Photos in Film Factory 18
Printing Your Photos in Film Factory 20
Copying Photos to Your Computer 22
Compatible Memory Cards 23
Photo Image File Requirements 23
Inserting Your Memory Card and Copying Photos 24
Configuring PhotoStarter 27
Configuring CardMonitor 28
Preparing to Remove a Memory Card 28
Saving Your Photos to an External CD-R/RW, Zip, or Flash Memory Drive 29
Storing and Displaying Your Printed Photos 31
Storing Your Prints 31
Displaying Your Prints 31
Storing Unused Paper 32
Printing Without a Computer 34
Compatible Memory Cards 34
Photo Image File Requirements 35
Inserting Your Memory Card 36
Printing a Proof Sheet from the PictureMate Print Wizard 37
1
Page 3

Printing All Your Photos From the PictureMate Print Wizard 38
Printing Some of Your Photos From the PictureMate Print Wizard 39
Viewing the PictureMate Main Menu 40
Selecting the Photos You Want to Print 41
Setting the Number of Copies in the Main Menu 46
Choosing a Layout 47
Confirming and Printing 47
Doing More With Your Prints 48
Adjusting Printer Settings 54
Printing From a PictBridge-enabled Digital Camera 57
Printing From an External CD, Zip Disk, or Flash Memory Drive 58
Printing Wirelessly From a Bluetooth Device 60
Printing With Bluetooth 61
Choosing Bluetooth Settings 62
Replacing the Photo Cartridge 65
Checking Your Cartridge Status (Ink Level) 65
Buying a PictureMate Print Pack 70
2
Removing the Used Photo Cartridge 71
Inserting the New Photo Cartridge 73
Taking PictureMate With You 76
Cleaning PictureMate 77
Improving Print Quality 78
Cleaning the Print Head Directly from PictureMate 78
Aligning the Print Head Directly From PictureMate 80
Checking the Print Quality Using the Computer 81
Cleaning the Print Head Using the Computer 82
Aligning the Print Head Using the Computer 84
Solving Problems 87
Control Panel Messages 87
Running a Printer Check 89
Page 4

Software Installation Problems 90
Printing Problems 91
Memory Card Problems 92
Print Quality Problems 93
Problems With Paper Feeding 94
Miscellaneous Printout Problems 95
Where To Get Help 97
Uninstalling PictureMate Software 98
Uninstalling From a Windows Computer 98
Uninstalling From a Macintosh Using OS X 99
Uninstalling From a Macintosh Using OS 9 99
Setting Up Network Printing 100
Windows XP and 2000 101
Windows Me and 98 103
Macintosh OS X 10.2.x - 10.3.x 105
Macintosh OS 9 106
System Requirements 109
Windows System Requirements 109
Macintosh System Requirements 109
Important Safety Instructions 111
PictureMate Safety Instructions 111
Photo Cartridge Safety Instructions 112
PictureMate Screen (LCD) Safety Instructions 113
Specifications 115
Printing 115
Paper 115
Photo Cartridge 116
Mechanical 117
Electrical 118
Environmental 119
3
Page 5

AC Adapter 119
Built-in Card Slots 120
External Storage Devices 120
Standards and Approvals 121
Notices 123
How many photos will I get from a PictureMate Print Pack? 123
PictureMate Print Pack Satisfaction Guarantee: 124
Copyright Notice 124
A Note Concerning Responsible Use of Copyrighted Materials 125
Trademarks 125
4
Page 6

5
Page 7

PictureMate User’s Guide
This User’s Guide tells you how to print from PictureMate,
TM
print from a computer,
troubleshoot PictureMate, save your photos, and more. See these documents for
additional information:
■ To set up your PictureMate, see the Start Here sheet.
■ For a handy, portable reference to printing without a computer, see the Using
PictureMate Without a Computer book.
■ To install software for using PictureMate with your computer, see the Using
PictureMate With a Computer booklet packed with your PictureMate software
CD.
Please follow these guidelines when reading these instructions:
Warnings must be followed carefully to avoid bodily injury.
Cautions must be observed to avoid damage to your equipment.
Notes contain important information about PictureMate.
Tips contain additional hints for better printing.
6
Page 8
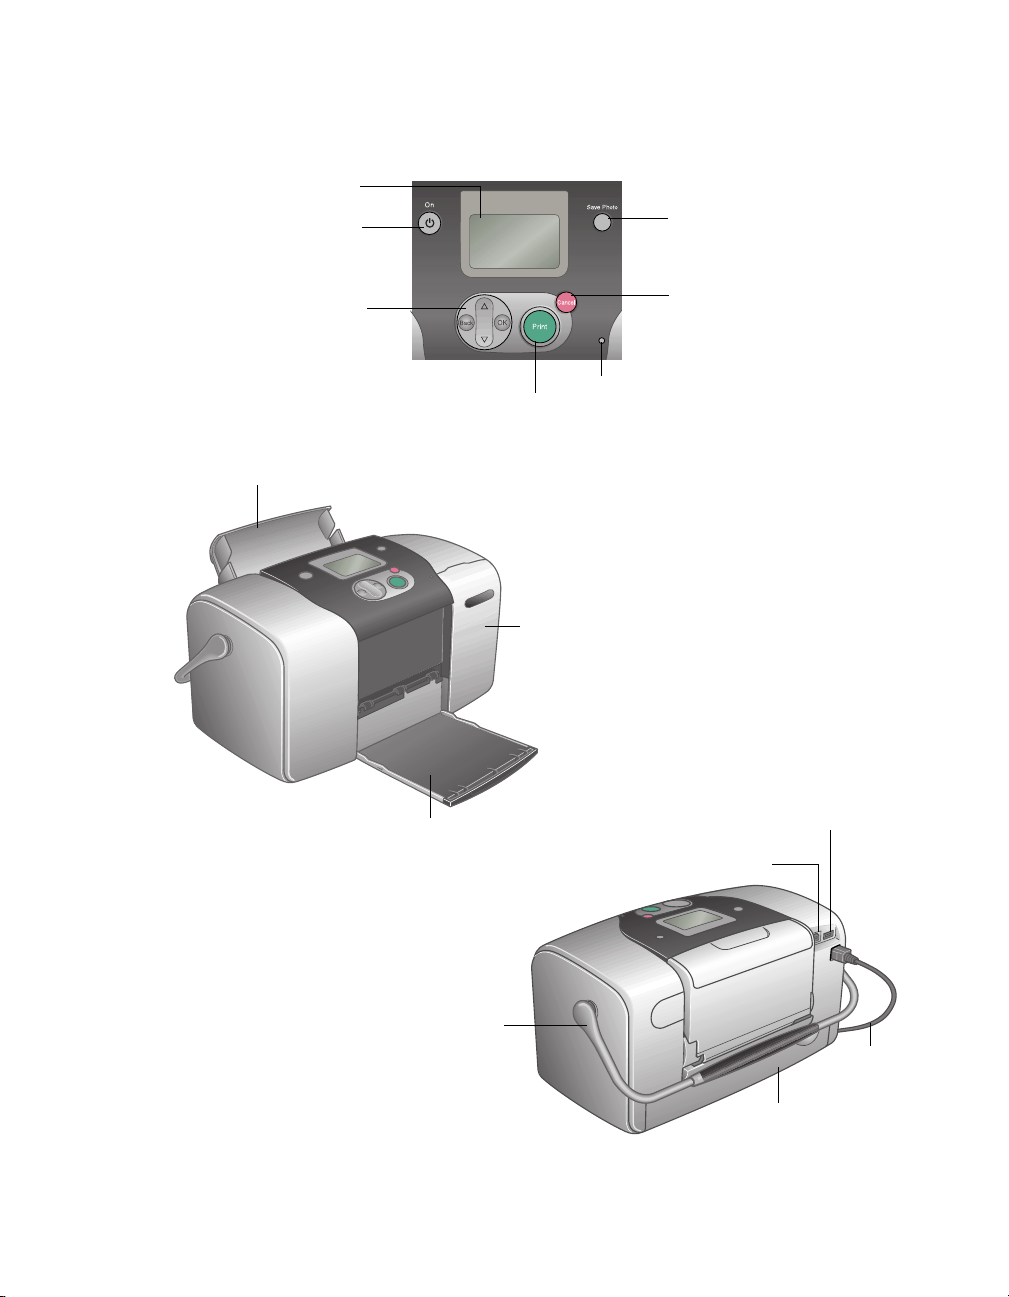
Getting to Know Your PictureMate
LCD menu
screen
Turn PictureMate
on or off
Save your photos to an
external drive (CD-R, Zip
disk, or thumb drive)
Use these buttons
to move through
menu options
Paper support
(load photo paper here)
Output tray
(catches printed
photos)
Click to print
Memory card light
(flashes when reading
card; on when card is in
printer)
Memory card
door
USB port for computer
Go back or stop
printing
USB port for PictBridge
cameras, external drives, or
optional Bluetooth
TM
adapter
Handle
Power
cable
Cartridge door
7
Page 9
Loading Paper
1. Open the output tray.
Open and pull up
paper support
Load
glossy side
up
Move
handle all
the way
down
Open output tray
Note: Keep the PictureMate handle to the back, under the paper feeder and all
the way down, to allow paper to feed through.
8
2. Open the paper support.
3. Pull up the top of the paper support.
4. Place your PictureMate Photo Paper against the right edge, with the glossy side
up.
Caution: Don’t load plain paper, this may cause damage to PictureMate.
Note: Load a maximum of 20 sheets at one time. If you are printing more than 20
photos, PictureMate will prompt you when it is time to load more paper. Make
sure paper is glossy side up to prevent smearing. For best results, don’t touch the
glossy surface of the paper.
Page 10
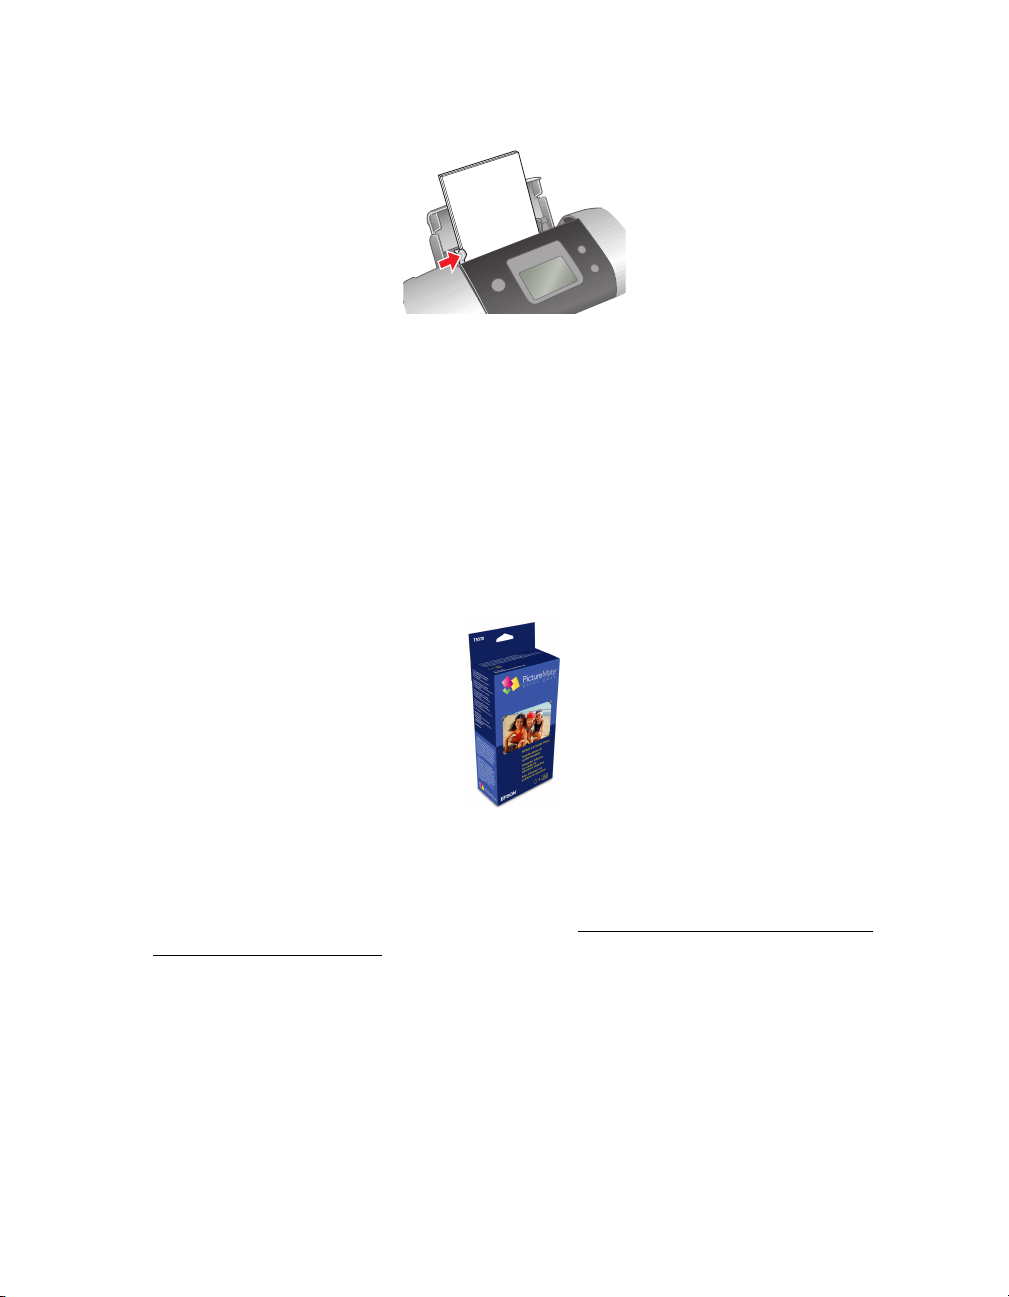
5. Slide the edge guide snug against the paper, but not so tight that the paper is bent.
Note: Always keep unused paper in the original package and store it flat to
prevent curling.
Supported Paper Types
PictureMate supports the following paper type:
PictureMate Photo Paper: 100 sheets are included in the PictureMate Print Pack
(part# T5570) along with a PictureMate Photo Cartridge.
Note: If you are out of PictureMate Photo Paper, but do not see the replace
cartridge message, you can still print. In this case, PictureMate Photo Paper from
a new Print Pack or Epson Premium Glossy Photo Paper, Borderless 4 × 6 inches
(part# S041727 - 100 sheets) may be used. See How many photos will I get from
a PictureMate Print Pack?.
9
Page 11
Printing From Your Computer
When you print from your computer, you can edit, enhance, and organize your
photos, using your photo software, such as Adobe
Before you start, make sure your PictureMate software is installed as described in the
Using PictureMate With a Computer booklet.
Follow the instructions for your computer:
■ Printing From a Windows Computer
■ Printing From a Macintosh Computer
Tip: If your digital camera supports PRINT Image MatchingTM (P.I.M. or P.I.M. II)
or Exif Print, you can use these technologies to ensure the most accurate
reproduction of your photographs. See Printing Photos Using Film Factory
Printing From a Windows Computer
®
Photoshop.®
.
You can print your photos from imaging applications in Windows.
®
1. Open your photo in your program.
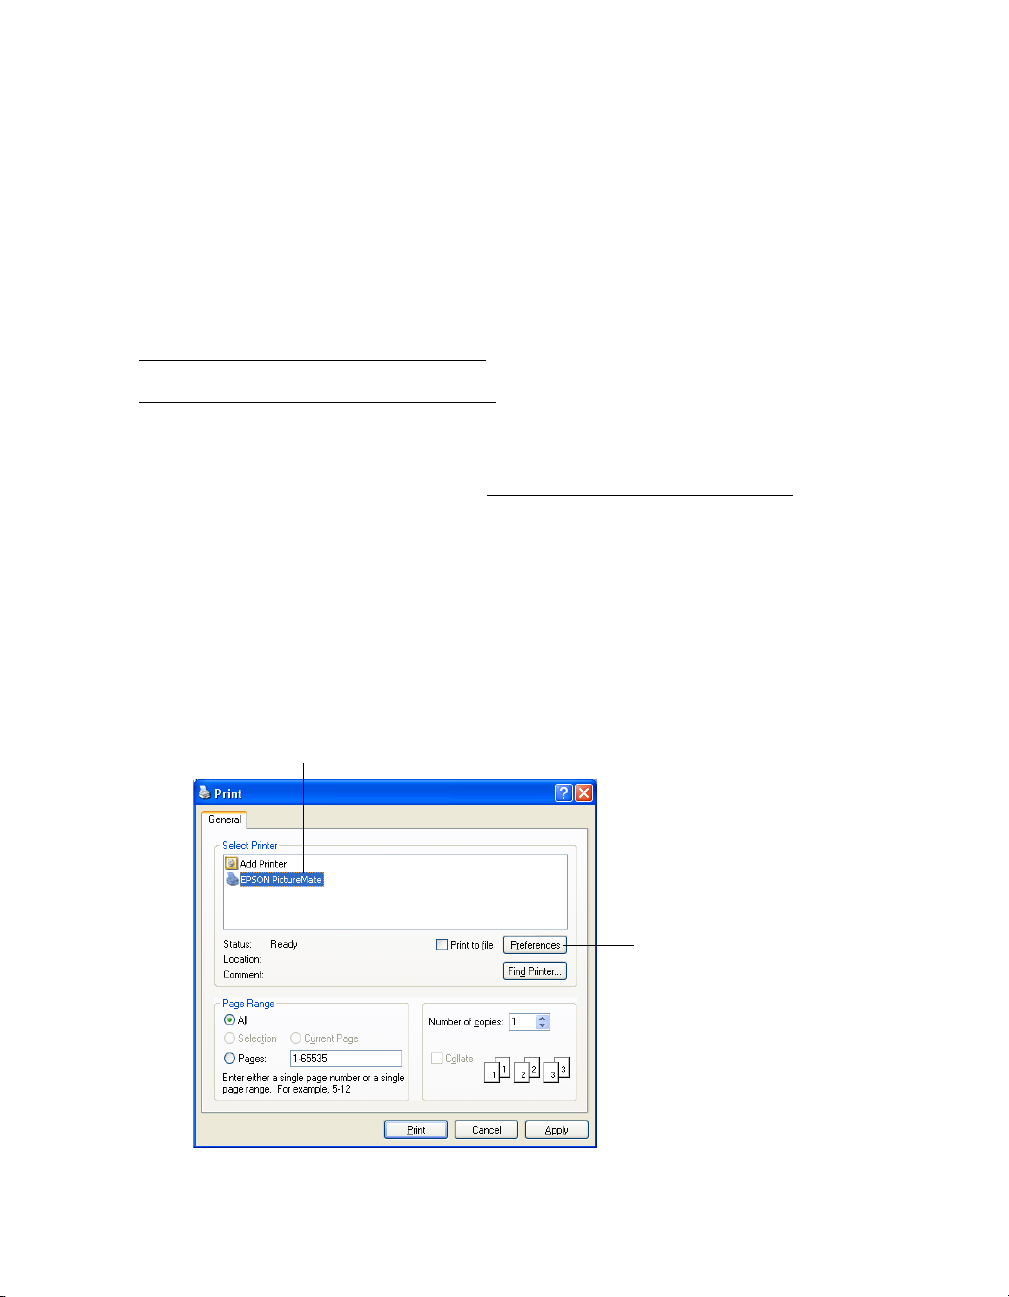
2. From the File menu, click Print. You see a Print window like this one:
Select EPSON PictureMate here
Click here to open
your PictureMate
software
10
Page 12

3. Make sure EPSON PictureMate is selected.
4. Click the Preferences or Properties button. (If you see a Setup, Printer, or
Options button, click it. Then click Preferences or Properties on the next
screen.)
You see the Printing Preferences or Properties window:
5. You can do the following:
■ Select Borderless to print a photo without any borders or choose Borders to
print with a white border all around.
■ If your photo is longer than it is wide, select Portrait orientation; if it is wider
than it is long, select Landscape.
■ If you want to adjust your photo colors, you can change the Color Option.
Select Auto Correction to automatically adjust colors, Sepia to change the
colors to brown for an old-fashioned look,
photo to a black and white one, or
No Correction to leave the photo to print
Black & White to change a color
with no adjustment.
■ If your photo was taken with a digital camera, select Digital Camera
Correction
to minimize common digital flaws.
11
Page 13
■ To bring out the fine details of a particularly intricate photo, select Enhance
Fine Details
Tip: For more information about printer settings, click the ? or Help button.
(printing may be slower).
6. Click OK.
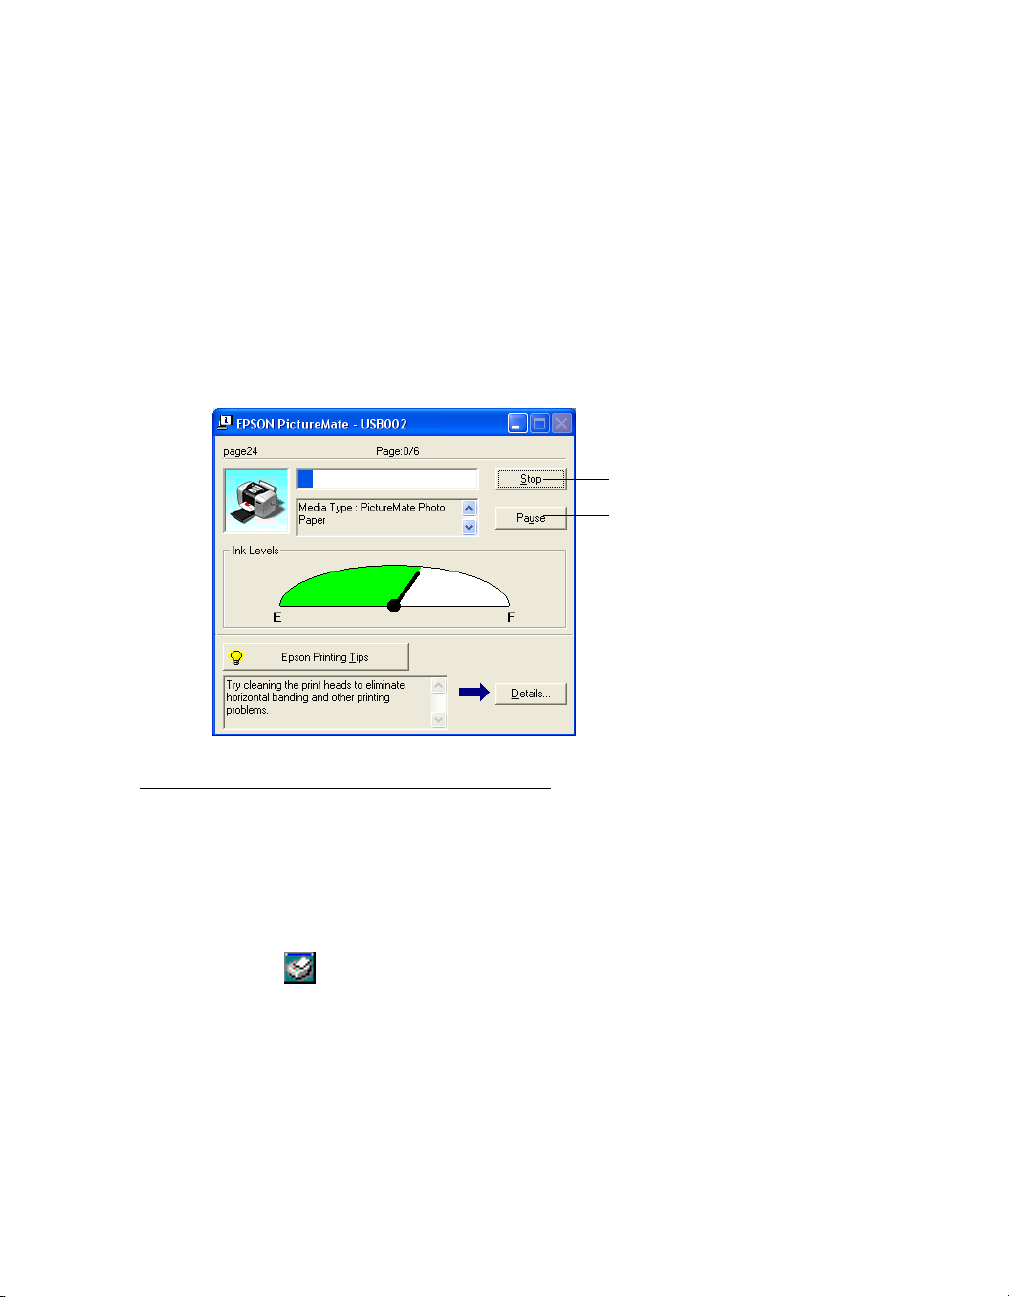
7. At the Print window, click OK or Print to start printing.
During printing, this window appears and shows the progress of your print job. You
can use the buttons to cancel, pause, or resume printing. You can also see how much
ink you have left.
Click to cancel printing
Click to pause or
resume printing
12
See Storing and Displaying Your Printed Photos
for steps on properly storing your
printed photos.
Selecting Default Settings
Your printer settings only apply to the program you’re currently using. If you want,
you can change the Windows default printer settings for all your programs.
1. Right-click the printer icon in the lower right corner of your screen (taskbar).
2. Select Printer Settings. You see the Printing Preference or Properties window.
3. Select the default settings you want to be the default for all your applications, then
OK.
click
You can still change the printer settings in your individual programs whenever you
print.
Page 14
Printing From a Macintosh Computer
Follow the steps below for the operating system you are printing from:
■ Macintosh OS X
■ Macintosh OS 9
Macintosh OS X
If you’re printing from an OS X compatible application, follow the steps below to
print a photo. (If you’re using an application that’s compatible only with Macintosh®
Classic mode, follow the steps in Macintosh OS 9 instead.)
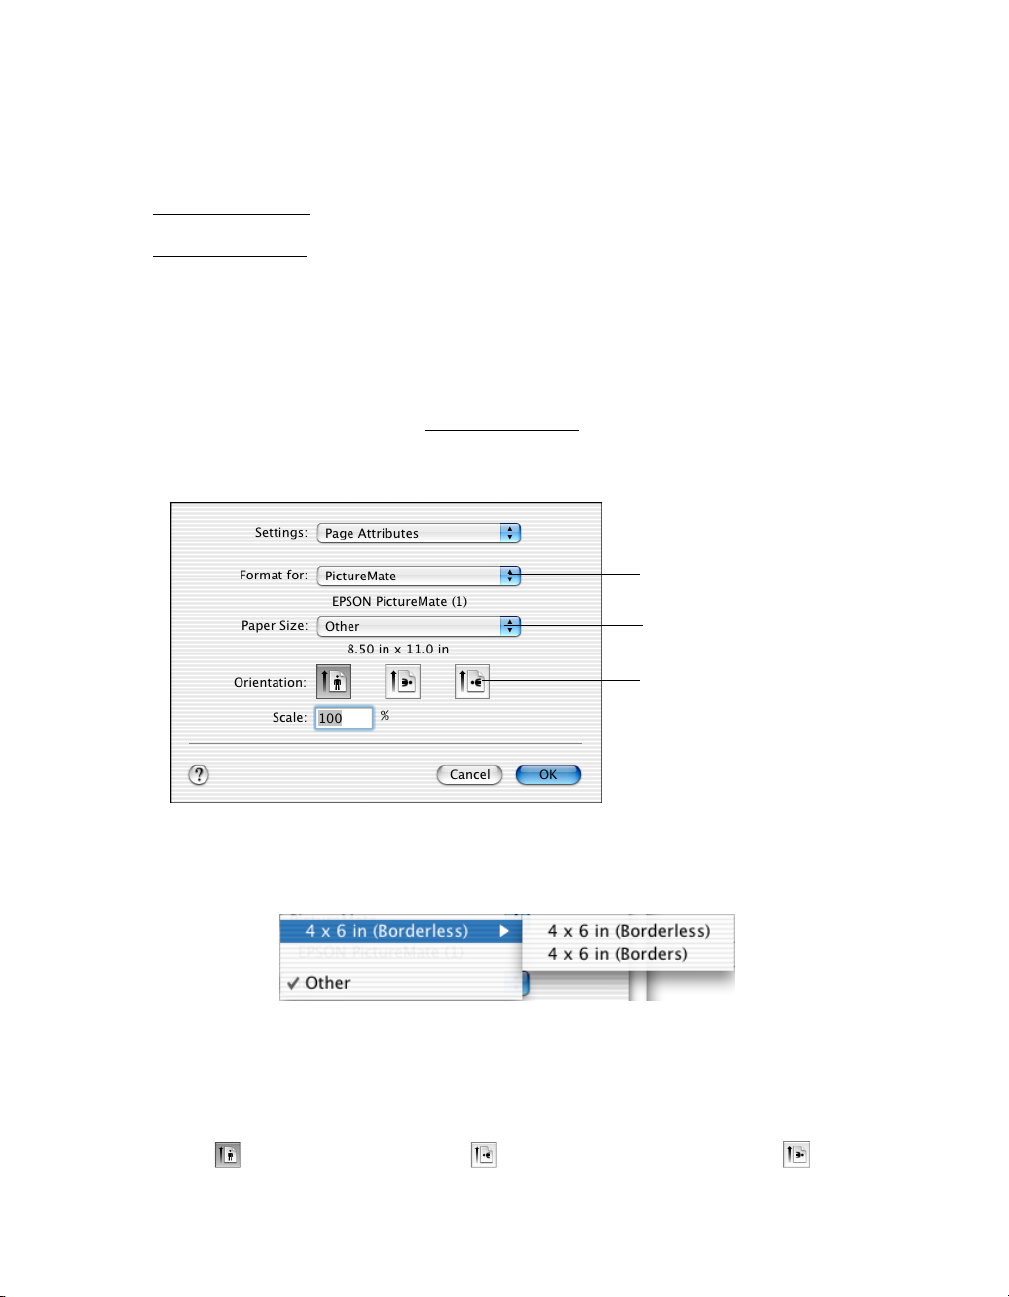
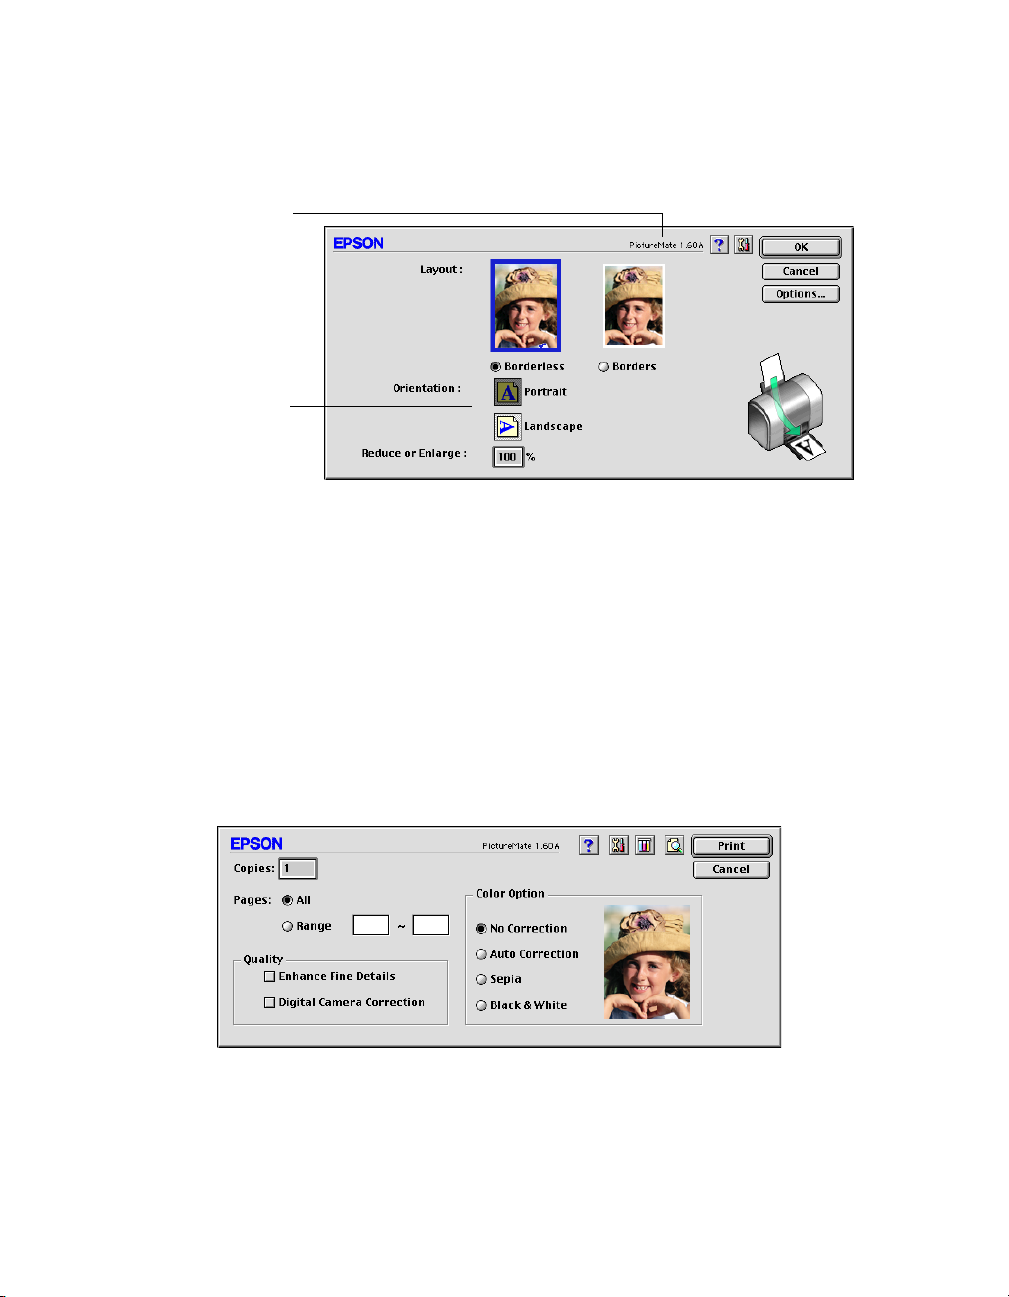
1. From the File menu, select Page Setup. You see this menu:
Select PictureMate
Select 4 × 6 in (Borderless)
or 4 × 6 in (Borders)
Select the Orientation
setting
2. Open the Paper Size menu and place your cursor on a 4 × 6 in option. You see
these extended options:
4 × 6 in (Borderless) to print without any borders.
Select
Select 4 × 6 in (Borders) to print with a white border all around.
3. Select the direction you want your photo to print as the Orientation setting.
Select for vertical orientation, for horizontal facing right, or for
horizontal facing left.
13
Page 15
4. When you’re finished with the Page Setup settings, click OK.
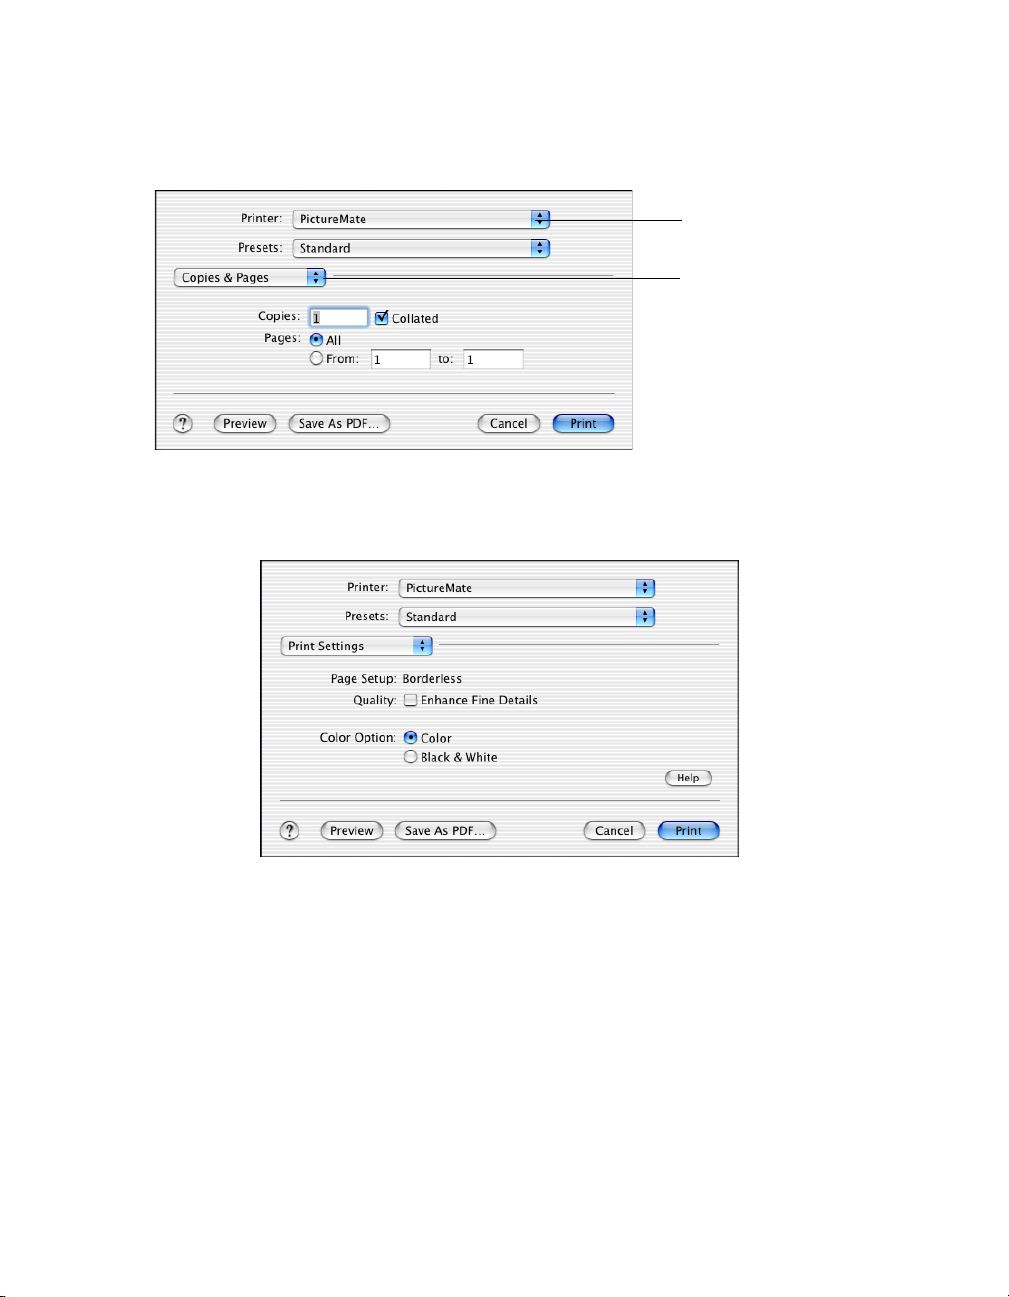
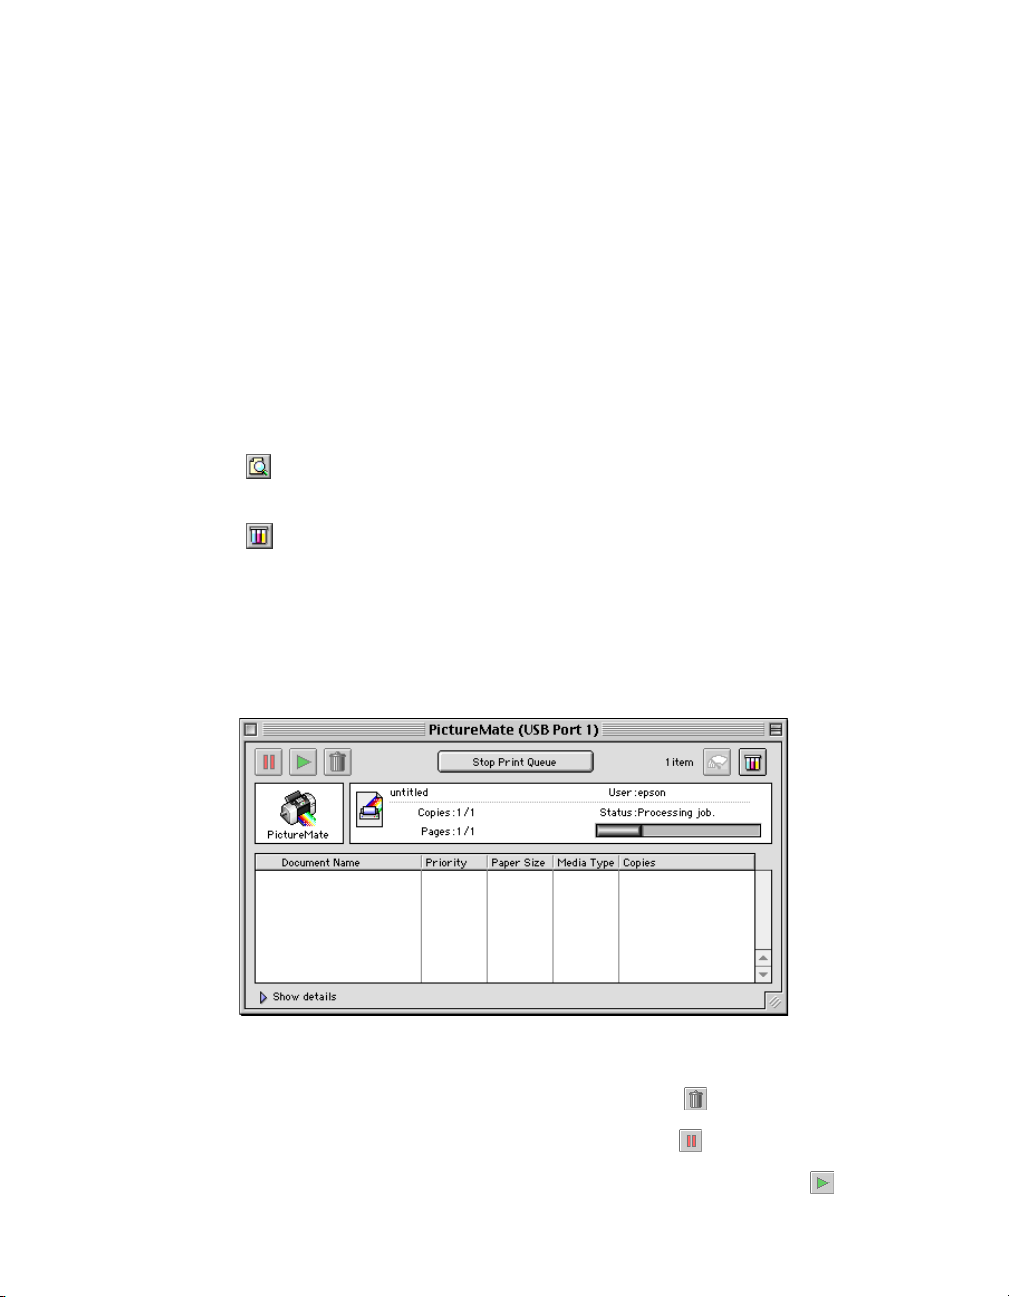
5. Select Print from the File menu. You see a screen like this:
Select PictureMate
Click here and select
Print Settings
6. Select
options
Print Settings from the pop-up menu. (In iPhoto,
to see the pop-up menu.) You see your printing options:
™
click Advanced
7. Select your print settings as follows:
■ To bring out the fine details in your photo, select Enhance Fine Details
(printing may be slower).
■ To print your photo in color, select Color; to print it in black and white,
select
Black & White.
14
Tip: For more information about printer settings, click Help.
8. You can also choose these options in the pop-up menu:
■ Copies & Pages, to select the number of copies or a page range
Page 16
■ Layout, to select page layout options
■ Output Options, to save your print job as a PDF file
■ Summary, to view a list of all your selections
9. Click Print.
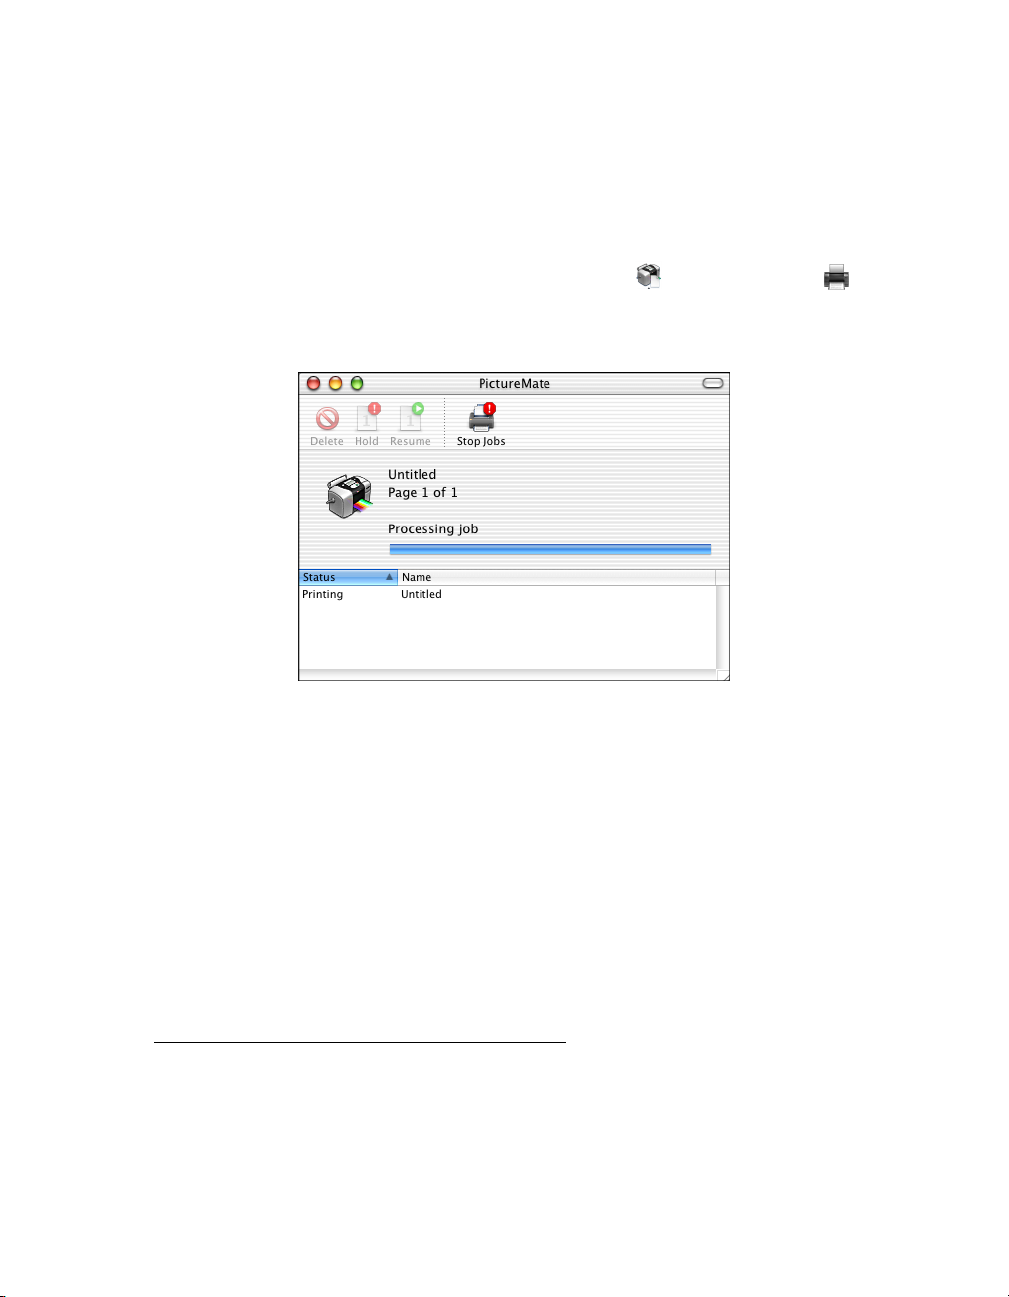
10. To monitor the progress of your print job, click the PictureMate or Print
Center
icon when it appears in the dock. If you clicked the Print Center icon,
double-click PictureMate. You see a screen like this:
11. From this window, you can do one of the following:
■ To cancel printing, click the print job, then click Delete
■ To pause printing, click the print job, then click Hold
■ To resume printing, click a print job marked “Hold” and click Resume
■ If multiple print jobs are listed and you want one to print before the other(s),
select the job and click the Status arrow to move it up.
12. When you’re finished, choose File > Quit in the PictureMate or Print Center
window.
See Storing and Displaying Your Printed Photos
for steps on properly storing your
printed photos.
15
Page 17
Macintosh OS 9
1. From the File menu, select Page Setup. You see the following:
Make sure you see
PictureMate
Select the
orientation of
your photo
2. Make sure PictureMate is selected. If not, you need to select it in the Chooser.
3. Select these print settings:
■ Select Borderless to print a photo without any borders or choose Borders to
print with a white border all around.
■ If your photo is longer than it is wide, select Portrait orientation; if it is wider
than it is long, select Landscape.
16
4. Click OK.
5. From the File menu, select Print. You see a window like the following:
6. Select the following print settings:
Page 18
■ If you want to adjust your photo colors, you can change the Color Option.
Select
Auto Correction to automatically adjust colors, or Sepia to change
the colors to brown for an old-fashioned look, or Black & White to change a
color photo to a black and white one.
■ To bring out the fine details in your photo, select Enhance Fine Details
(printing may be slower).
■ If your photo was taken with a digital camera, select Digital Camera
Correction
Tip: For more information about printer settings, click the ? button.
to minimize common digital flaws.
7. You can also do the following:
■ Click to change the Print button to Preview. You can then click it to
preview your printout.
■ Click to check your ink levels.
8. Click Print to start printing.
9. If you turned on background printing, you can open the EPSON MonitorIV
window by selecting it in the Application menu in the upper-right corner of your
screen.
10. Monitor the progress of your print job or do one of the following:
■ To cancel printing, click the print job, then click the icon.
■ To pause printing, click the print job, then click the icon.
■ To resume printing, click a print job marked “Hold” and click the icon.
17
Page 19
■ To check your ink levels, click .
Note: If you’re not using background printing and you need to cancel printing,
hold down the J key and press the . (period) key.
See Storing and Displaying Your Printed Photos for steps on properly storing your
printed photos.
Printing Photos Using Film Factory
You can use Film FactoryTM to organize, retouch, and print your photos. Follow the
steps in these sections:
■ Opening Your Photos in Film Factory
■ Printing Your Photos in Film Factory
Make sure you installed Film Factory as described in the Using PictureMate With a
Computer booklet.
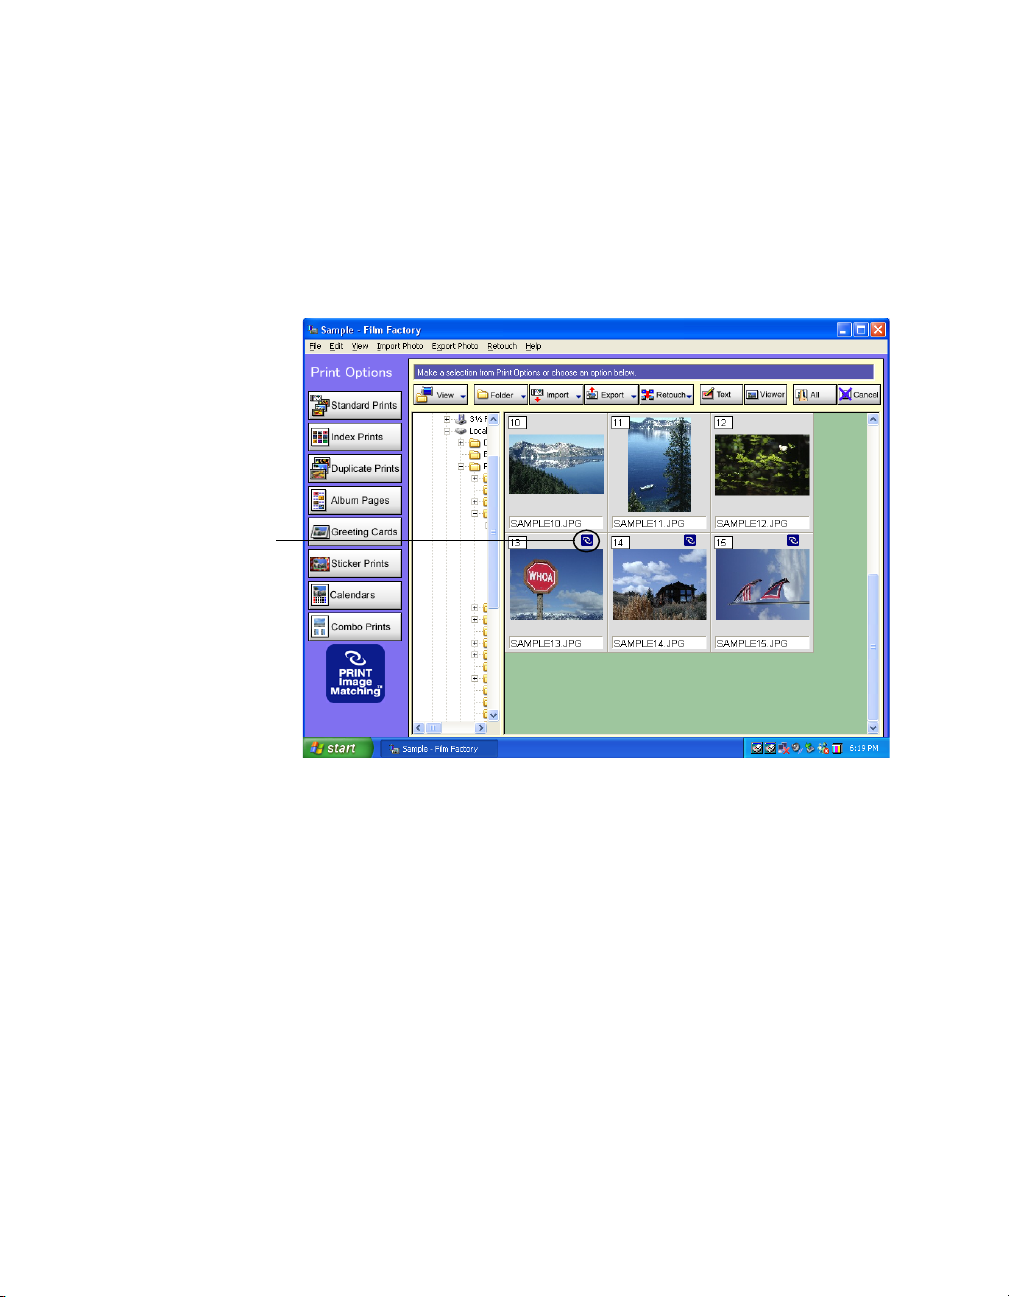
Opening Your Photos in Film Factory
18
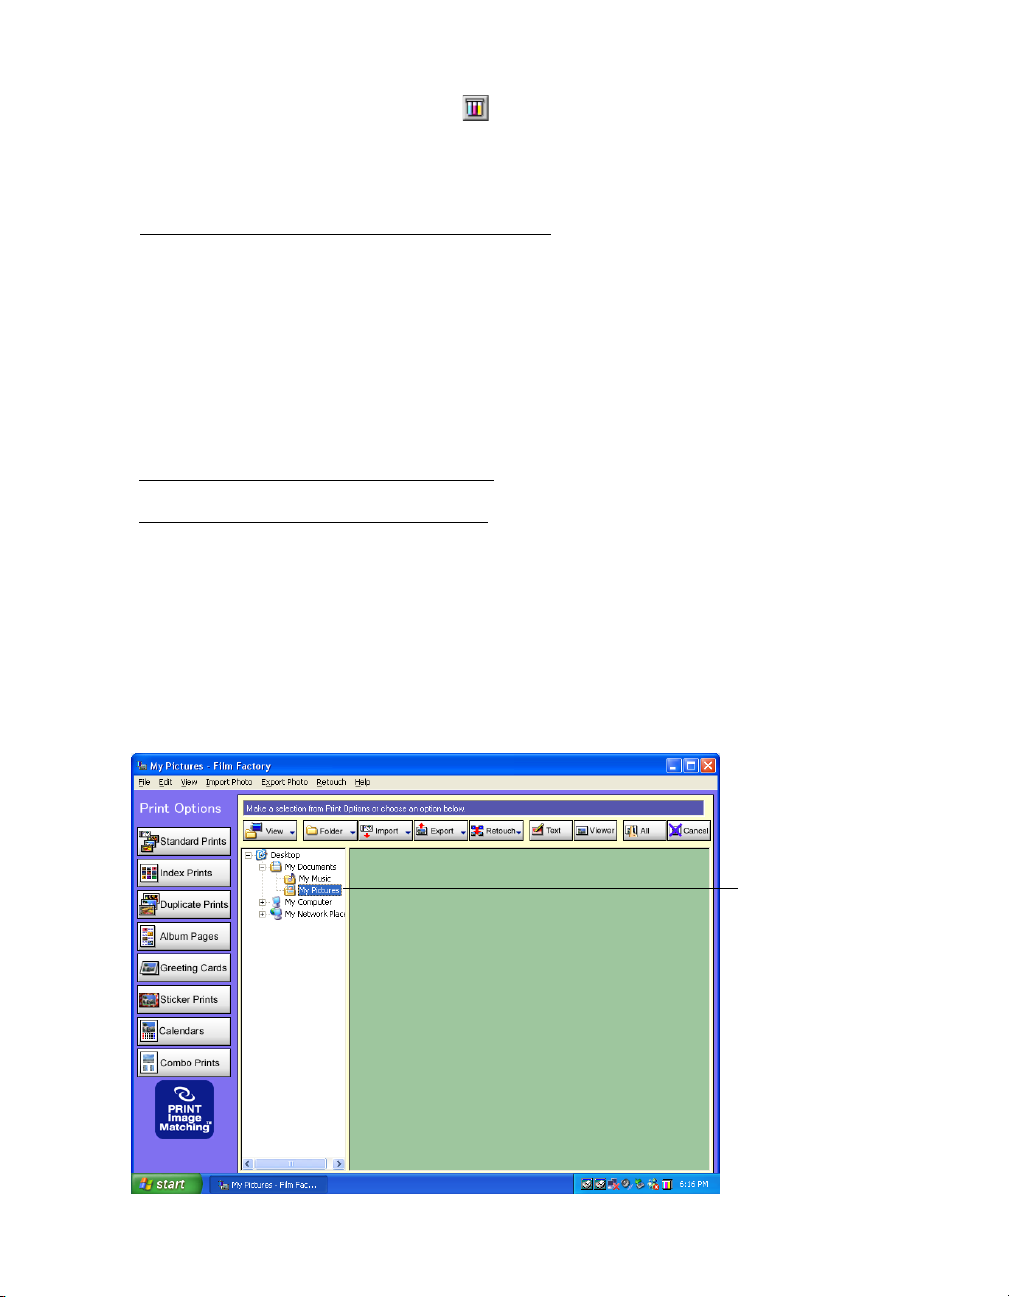
1. Start Film Factory. You see the main Film Factory screen:
Select the folder
containing your
photos
Page 20
Note: If you need help with Film Factory, select it from the Help menu or check
the on-screen Getting Started Guide that was installed with Film Factory.
2. Select the folder on your computer that contains your photos. Thumbnails of
your photos appear on the screen.
Note: Film Factory can open these file types: JPEG, PICT, BMP, TIF, FPX (read
only), PNG, GIF (read only), MacPaint, Photoshop, QuickTime,
PRINT Image
Matching photos
are marked here
Note: If your digital camera supports P.I.M. (PRINT Image Matching), special
print information for accurate image reproduction and color correction is included
with your photo. Film Factory uses this information automatically when printing
your photos.
®
SGI and Targa.
You can also import a photo into Film Factory from a disk, card, or scanner. See
the on-screen Getting Started Guide that was installed with Film Factory for
instructions.
3. To select a photo for printing, click its thumbnail on the screen. The thumbnail is
highlighted.
19
Page 21
4. Click Standard Prints on the left side of the screen. You see three buttons:
Note: You can also select other print options on the left side of the screen. But
don’t choose Greeting Cards, Stickers or Calendars; PictureMate doesn’t support
these options because they work only with larger paper sizes. If you have another
printer that supports larger paper sizes, you can use it with these print options.
Printing Your Photos in Film Factory
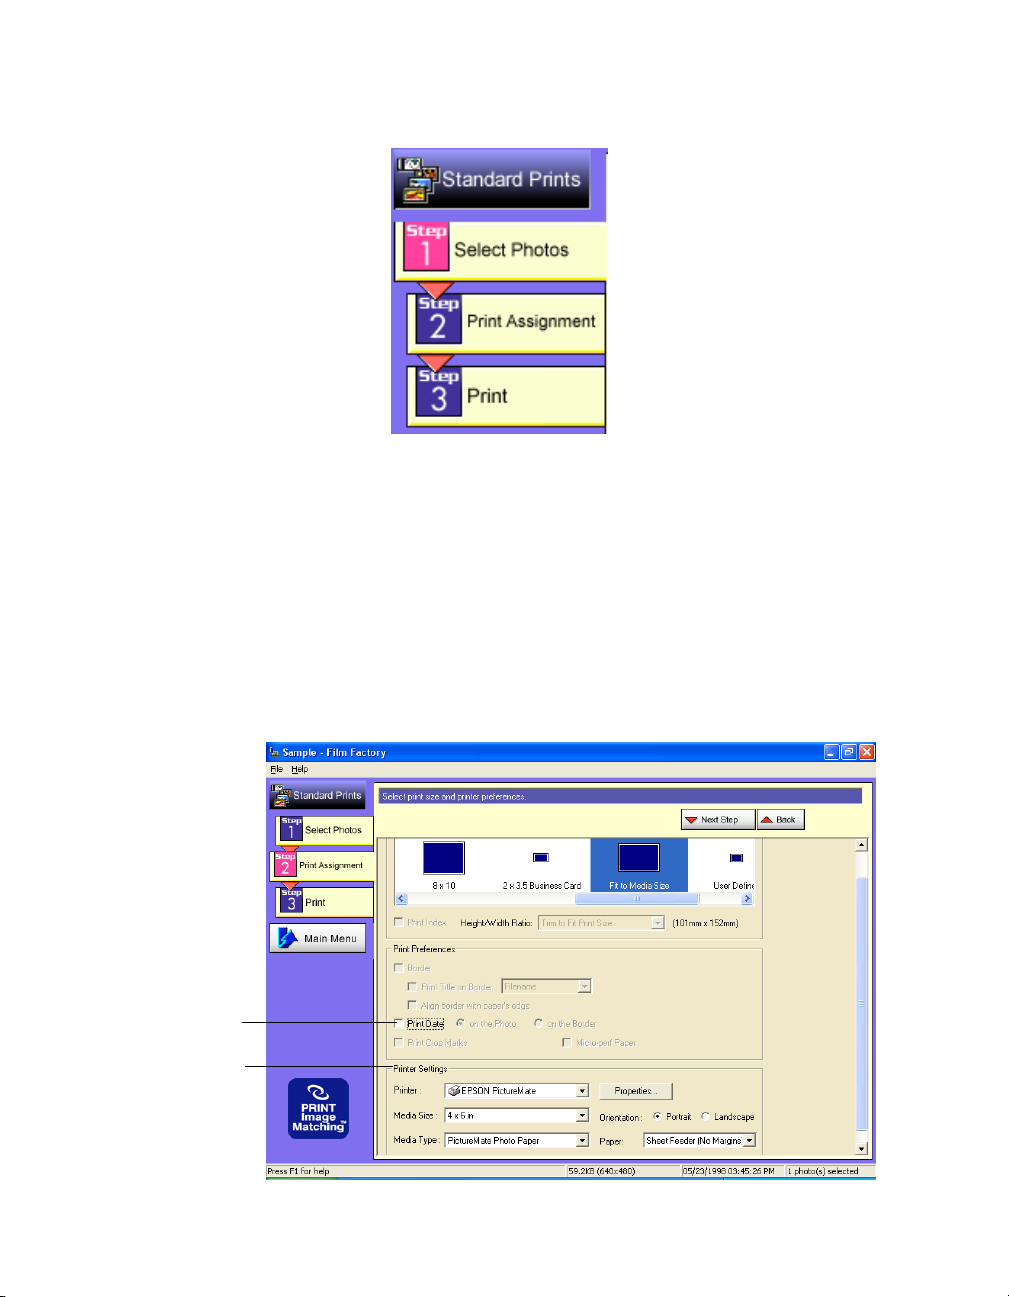
1. When you’re ready to print, click the Print Assignment button. You see this
screen:
20
Click to print
the date with
your photo
Select your
printer settings
here
Page 22
2. To print the current date with your photo, click the Print Date box.
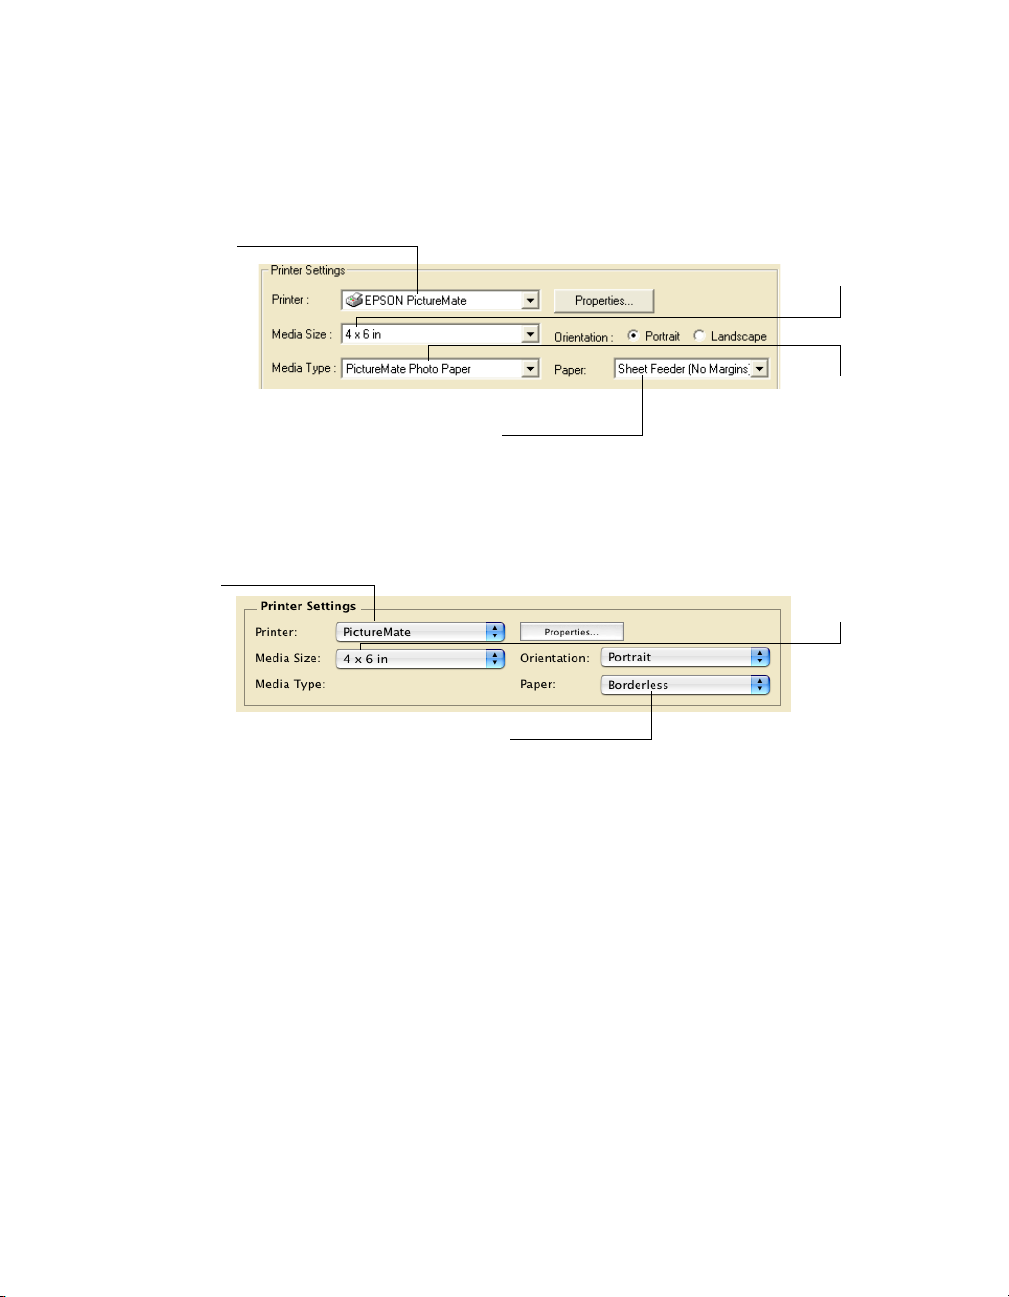
3. Windows and Macintosh 9.x: Select these options in the Printer Settings box at
the bottom of the screen, in this order:
1 Make sure PictureMate
is selected
2 Select Sheet Feeder or
Sheet Feeder (No Margins) for borderless printing
3 Select
4 × 6 in
4 Select the
Media Type
Macintosh OS X: Select these options in the Printer Settings box at the bottom of
the screen, in this order:
1 Make sure PictureMate
is selected
3 Select
4 × 6 in
2 Select Borderless for normal photos or Borders if
you want to print an edge around your photos
21
Page 23
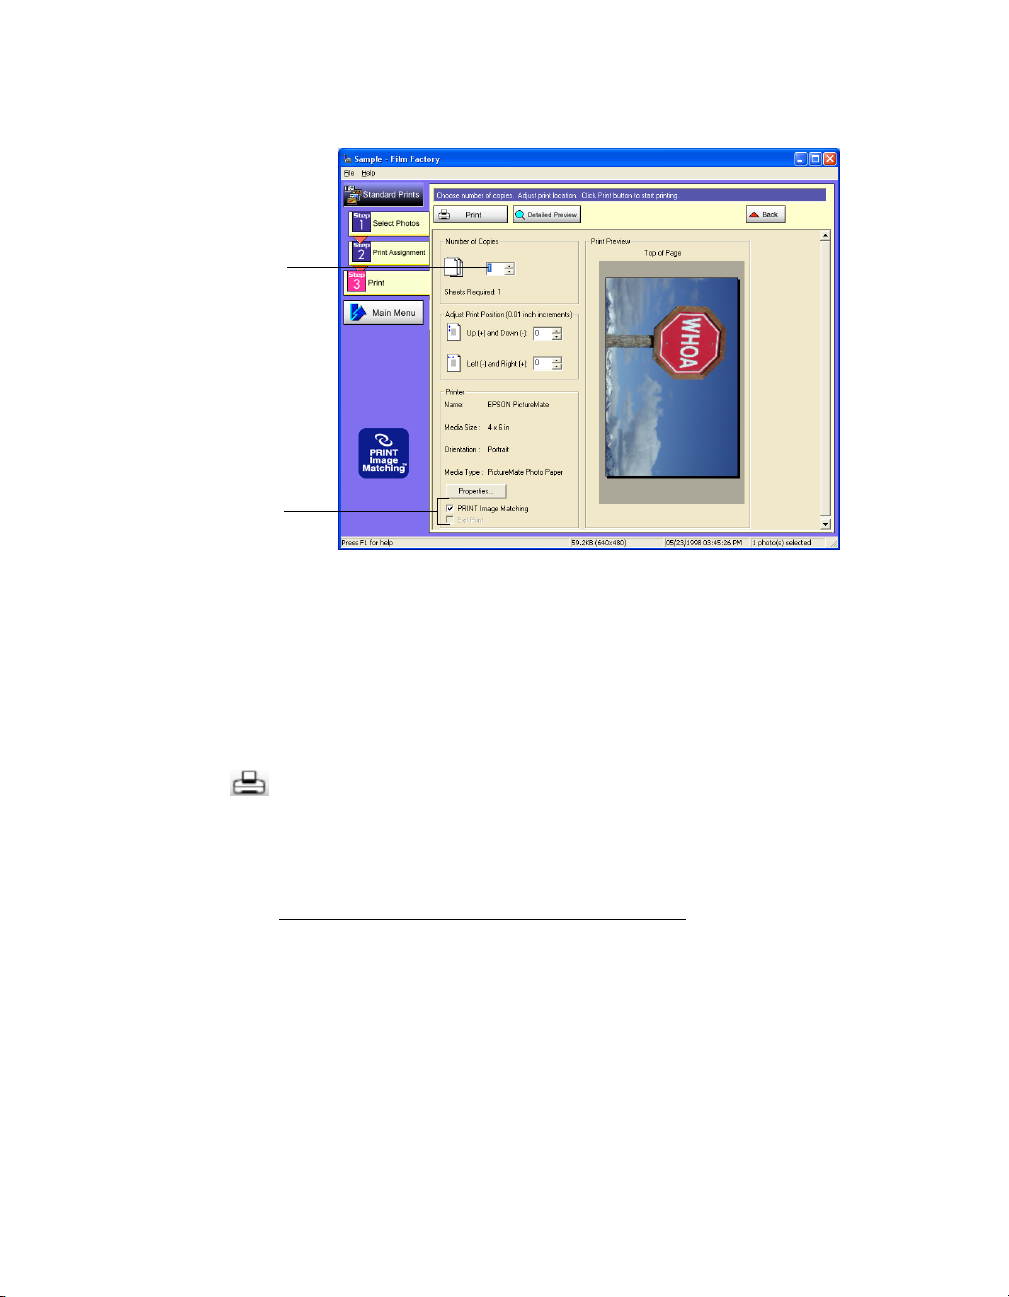
4. Click the Print button on the left side of the screen. You see more options:
Select the
number of copies
you want to print
Leave these
boxes checked
for the best
printed output
using P.I.M.
and/or Exif Print
data, if available
5. If your photo doesn’t look right in the preview, click the
Back button to change
your settings. (Click the Detailed Preview button for a closer look.)
6. Select the number of copies you want to print.
Note: Leave the PRINT Image Matching and/or Exif Print box checked for the
best results when printing photos containing P.I.M. and/or Exif Print data.
7. Click the Print button at the top of the screen.
■ Windows: Your pictures are printed.
■ Macintosh: You see the Print window; click Print. Your pictures are printed.
Follow the steps in Storing and Displaying Your Printed Photos to properly store your
printed photos.
Copying Photos to Your Computer
If you’ve taken digital photos with your camera, you can insert the memory card into
a PictureMate memory card slot and copy the photos to your computer. You can
access the contents of the card just like any drive on your computer.
22
Follow the steps in these sections:
Page 24

■ Compatible Memory Cards
■ Photo Image File Requirements
■ Inserting Your Memory Card and Copying Photos
■ Configuring PhotoStarter
■ Preparing to Remove a Memory Card
Compatible Memory Cards
You can insert any of these types of memory cards into PictureMate:
■ CompactFlash
■ Microdrive
■ SD (Secure Digital)
■ miniSD
■ MMC
■ xD Picture Card
■ Sony Memory Stick
■ Memory Stick Duo
■ Memory Stick PRO
■ Memory Stick PRO Duo
■ MagicGate
■ MagicGate Memory Stick Duo
■ SmartMedia
TM
TM
TM
TM
(requires miniSD adapter)
(MultiMediaCard™)
TM
®
TM
(requires Memory Stick Duo Adapter)
TM
TM
(requires Memory Stick Duo Adapter)
TM
Memory Stick
TM
TM
(requires Memory Stick Duo Adapter)
Photo Image File Requirements
Make sure the photo image files on your memory card meet these requirements:
■ JPEG files or uncompressed Tiff files only
■ Resolutions ranging from 120 × 120 to 4600 × 4600 pixels
23
Page 25
Your PictureMate recognizes and prints the first 999 photos on your memory card.
Note: PictureMate supports P.I.M. (PRINT Image Matching) and Exif Print image
enhancement features. See your camera manual to see if these features are
included on your camera.
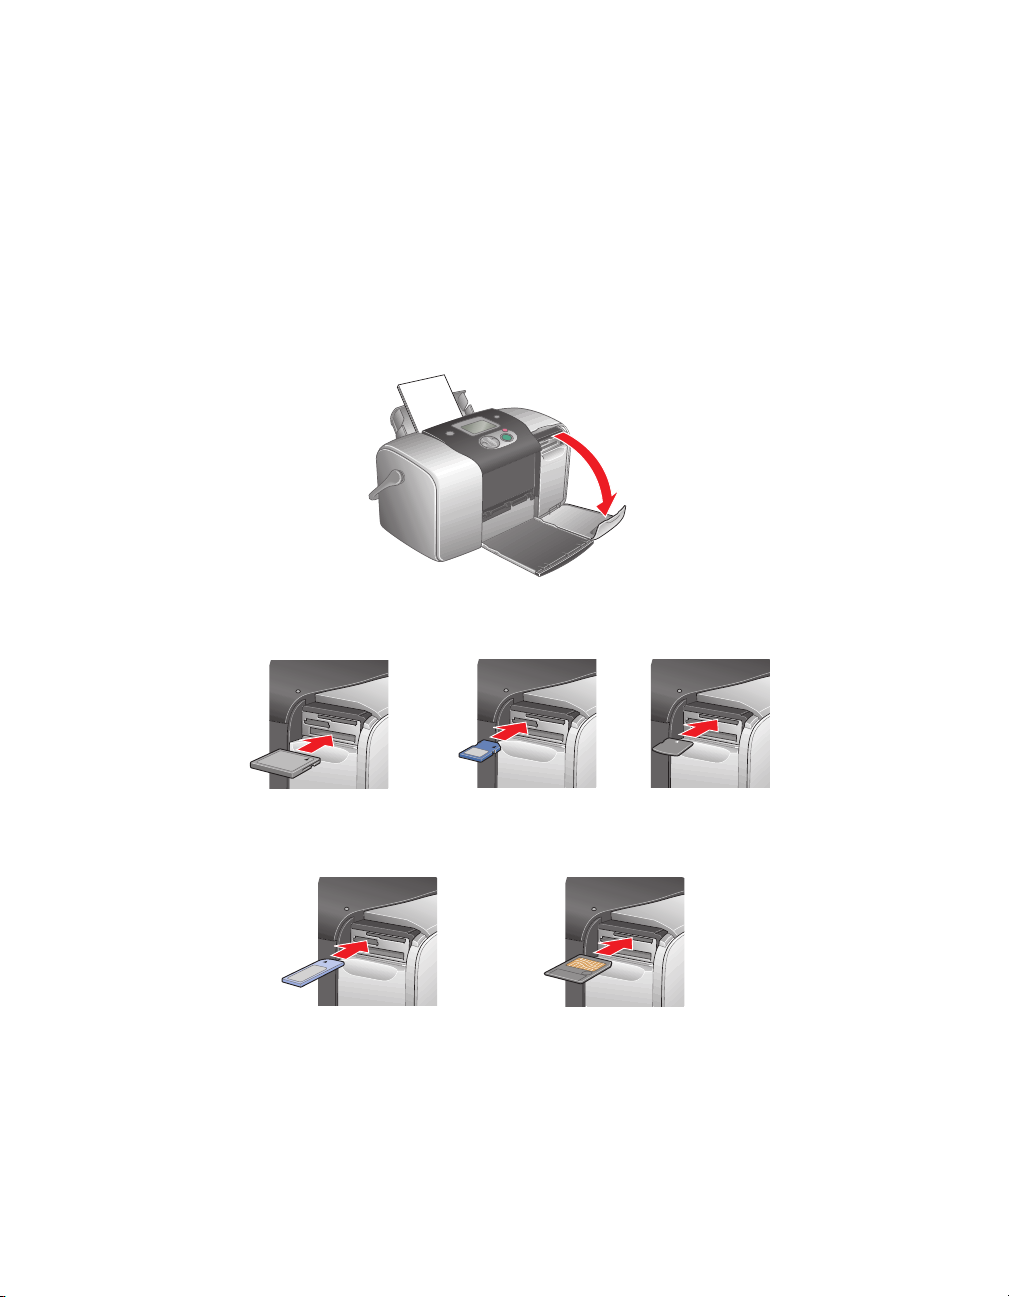
Inserting Your Memory Card and Copying Photos
1. Make sure PictureMate is on, then flip down the memory card door.
2. Insert the memory card into its slot, as shown.
24
CompactFlash or
Microdrive
(bottom)
Memory Stick
(middle)
SD (Secure Digital), or
MMC (MultiMediaCard)
(middle)
SmartMedia
(top)
xD Picture Card
(top)
Page 26
3. Push the card in until it stops (it won’t go in all the way). When the card is in, the
card light comes on.
Card
light
4. Close the memory card door.
Note: Insert just one card at a time. PictureMate can’t read multiple cards at once
and you may not be able to tell which card PictureMate is taking the images from.
5. What happens with your photos when your computer detects them depends on
the type of system you have:
Caution: If you access the card from your computer and delete files from the
card, add files to the card, or format the card, the card may not work correctly
with your camera and PictureMate may not be able to read the files on the card.
Always format cards and delete pictures using your camera. Do not copy files to
the card from your computer.
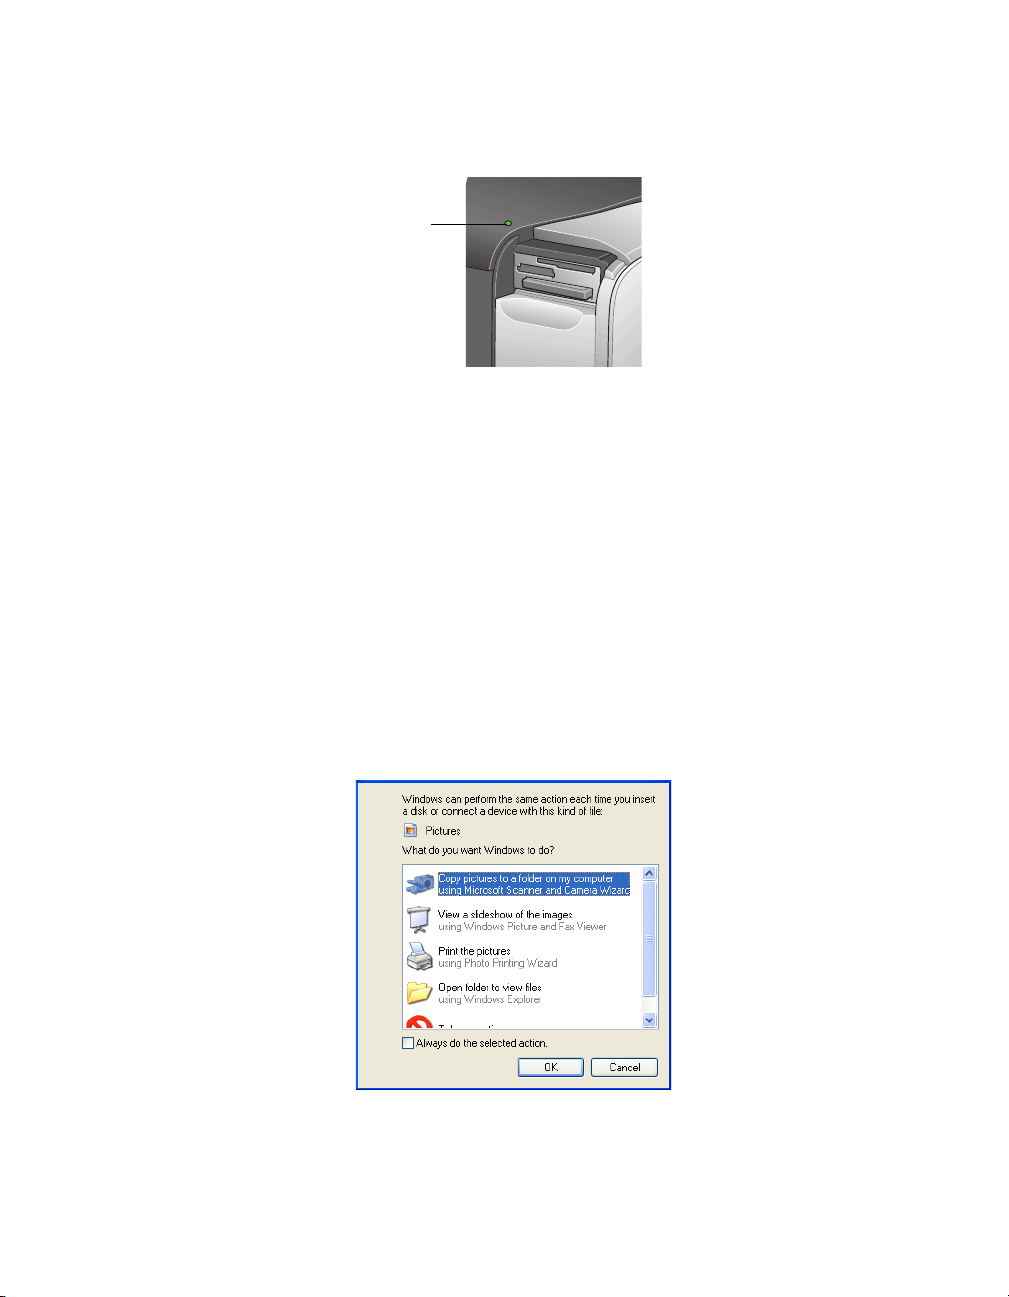
■
In Windows XP, you see a screen like this:
Note: If you don’t see this screen, remove your memory card from
PictureMate and insert it again.
25
Page 27
You can choose any of the options to copy, view, or print your photos.
To copy photos to your computer, select Copy pictures to a folder on my
computer
and click OK. Follow the on-screen instructions to select a folder
for your photos and copy them. Then go to step 6.
■ In Windows 2000, Me, or 98, PhotoStarter opens and automatically copies
your photos to the
Photos folder on your desktop. If this is the first time
you’ve inserted a memory card, you see the message below instead. Follow the
instructions in Configuring PhotoStarter
Note: With Windows 2000, make sure you’ve installed Service Pack 4 or
later or the CardMonitor utility won’t launch when you insert a memory card.
■
On a Macintosh, a drive icon appears on your desktop (the drive name is
to respond to the message.
determined by your digital camera). You can open the drive and copy your
photos to your computer.
26
If you have iPhoto and you have it set to open when a digital camera is
connected, it opens when you insert a memory card. Click the Import button
to copy photos to your Macintosh. See iPhoto Help for more information.
If you don’t have iPhoto, you need to set up Image Capture to use Epson
CardMonitor as described in Configuring CardMonitor
.
6. When you’re done copying photos, carefully prepare your computer before
removing your memory card, as described in Preparing to Remove a Memory
Card.
Page 28
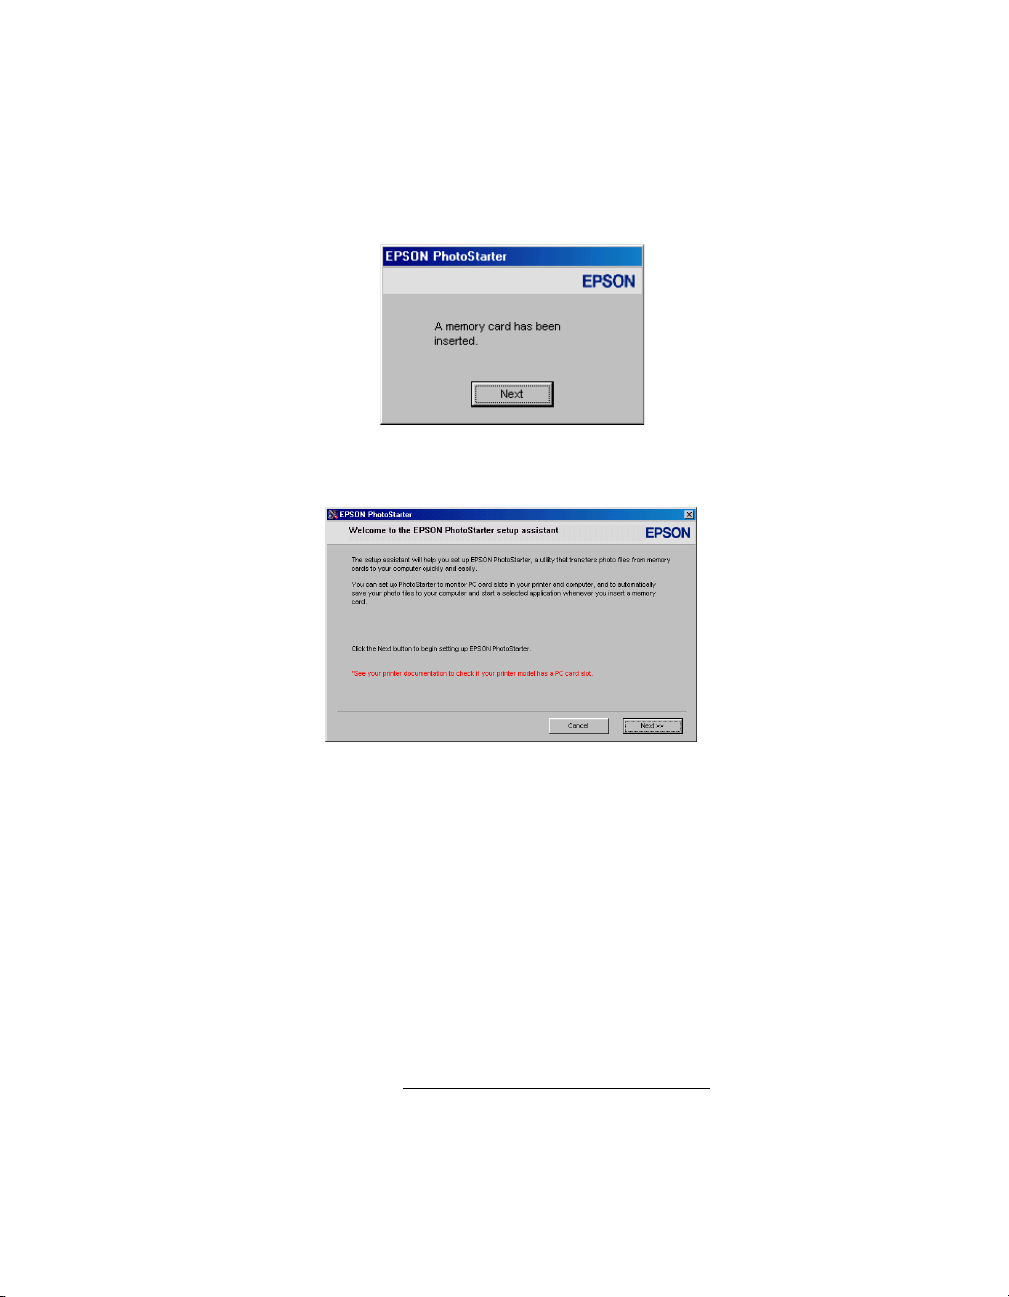
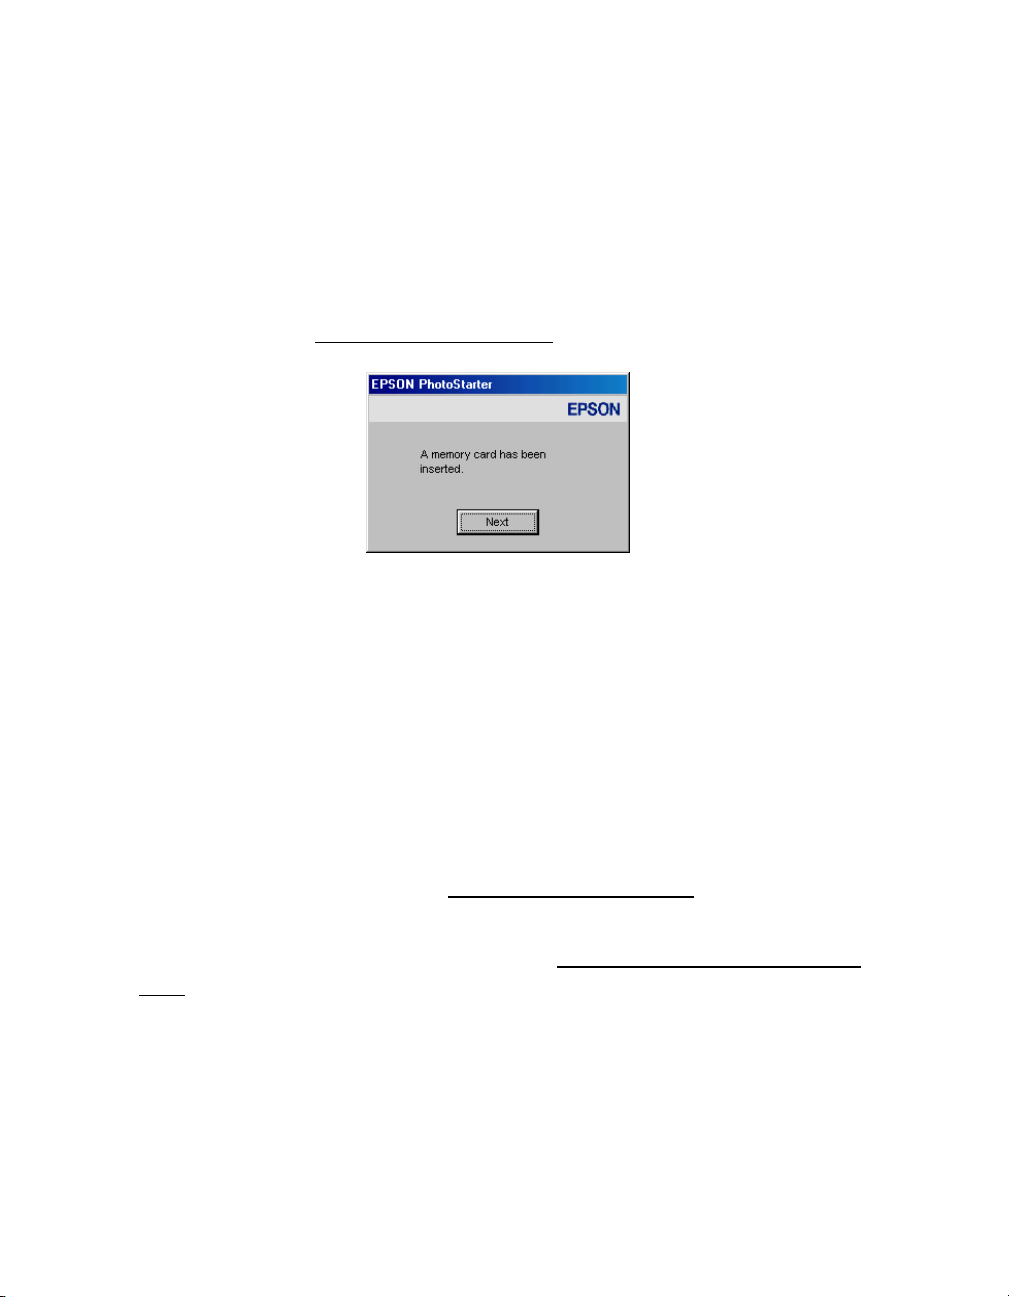
Configuring PhotoStarter
Follow these steps to set up PhotoStarter to copy photos to your computer:
1. When you see this message, click Next.
The PhotoStarter setup assistant opens:
2. Click
Next again. The setup assistant asks you a series of questions about how you
want PhotoStarter to work.
The default settings cause the following to occur whenever you insert a memory
card:
■ PhotoStarter copies your pictures to the Photos folder on your desktop.
■ The pictures are stored in folders by date.
■ Film Factory opens automatically.
Tip: Film Factory lets you view, modify, and print photos quickly and easily. For
instructions on using it, see Printing Photos Using Film Factory
.
3. Change any of the settings you want, then click Next. When you see the
Confirmation window, click End.
27
Page 29

You can go back and change settings at any time by opening PhotoStarter:
■ In Windows, click Start, point to Programs (or All Programs), Film Factory,
and click
Change Settings.
■ On a Macintosh, open the EPSON PhotoStarter folder, then double-click
EPSON PhotoStarter. Open the Tools menu and choose Change Settings.
EPSON PhotoStarter3.0. Open the Settings menu and choose
Configuring CardMonitor
Follow these steps to configure Epson CardMonitor in the Macintosh OS X Image
Capture utility:
1. Open the Applications folder and double-click Image Capture.
2. Open the Image Capture menu and select Preferences.
3. From the Camera Preferences list, select Other. A new Applications folder opens.
4. Open the Epson CardMonitor folder, select Epson CardMonitor, and click the
Open button.
5. Close the Image Capture utility. CardMonitor will now open automatically when
you insert a memory card. Follow the on-screen instructions.
28
Preparing to Remove a Memory Card
Once you’re finished copying photos from your memory card, follow the steps below
to remove it. Be sure to remove any cards before unplugging the USB cable from
PictureMate.
Caution: Do not eject a card while the card light is flashing, or without performing
the steps described below, or you may lose data on the card. Be sure your
memory card has been removed before unplugging the USB cable.
1. Depending on your operating system, you may need to do one of the following:
■ If you’re using Windows XP or 2000, click the Unplug or Eject
Hardware
In Windows XP, click Safely Remove USB Mass Storage Device.
In Windows 2000, click
icon on the taskbar.
Stop USB Mass Storage Device.
Page 30
■ For Windows 98 or Me, make sure the card light on PictureMate is not
flashing.
■ On a Macintosh, drag the memory card icon from your desktop to the trash.
2. To remove a card, pull it straight out of the PictureMate slot.
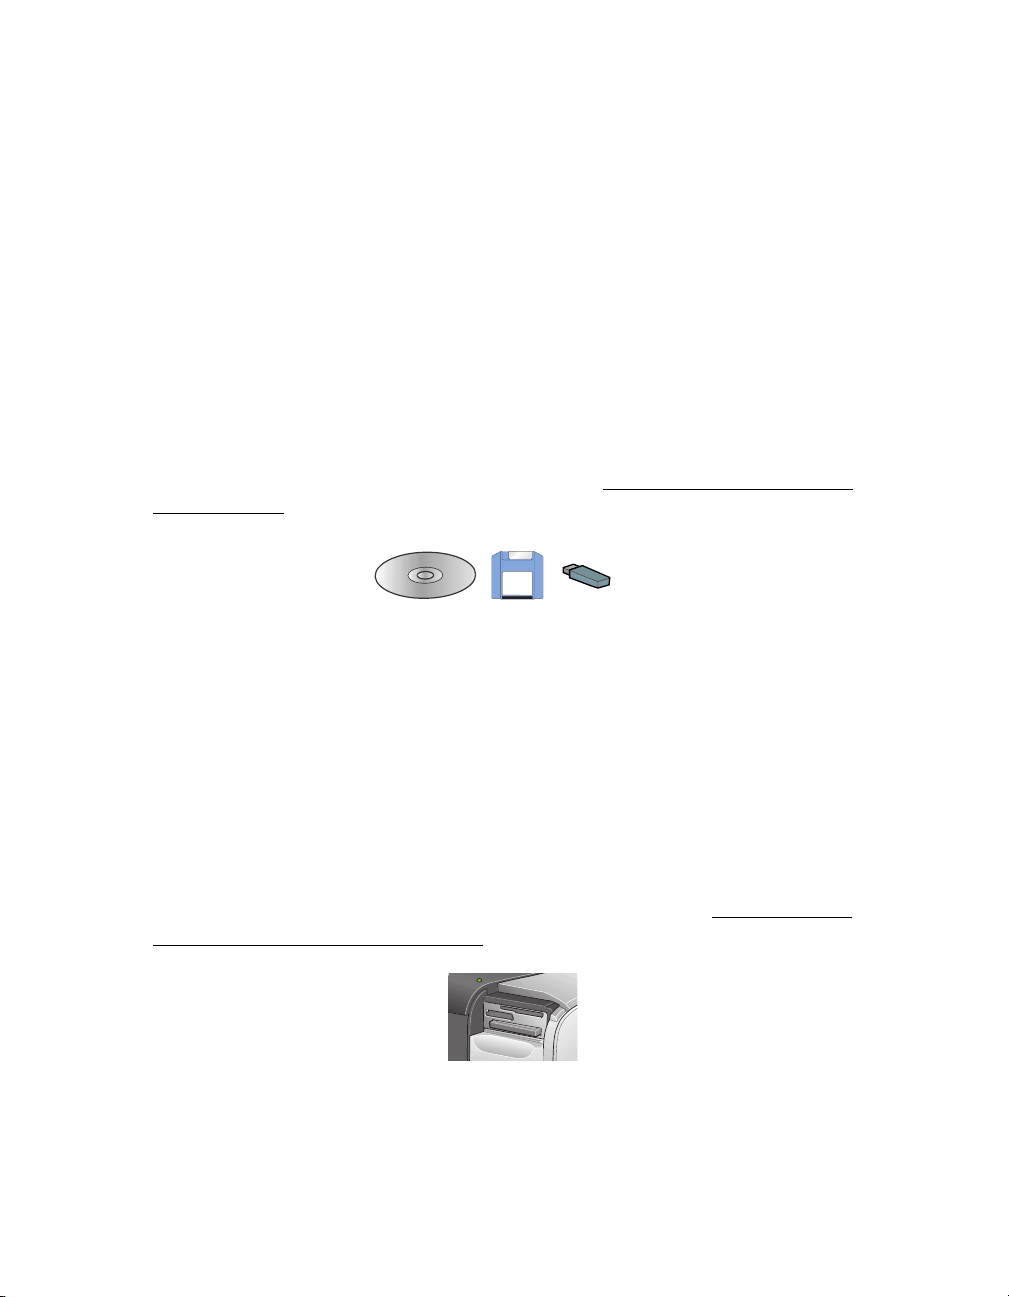
Saving Your Photos to an External CD-R/RW, Zip, or Flash Memory Drive
You can use your PictureMate to save photo files from your memory card onto a
CD-R/RW (CD-R media only), Iomega® Zip® disk, or flash memory (thumb) drive.
Note: To save your photos on your computer, see Storing and Displaying Your
Printed Photos.
This gives you an extra backup copy so you can delete the photo files from your
camera’s memory card and take more photos. With your backup, you can print your
photos later, share them with a friend, or copy them onto a computer.
Tip: It’s a good idea to have multiple backups of your photos, in case your
computer’s hard drive crashes or your photo files are deleted from your camera’s
memory card.
Note: Epson cannot guarantee the compatibility of any drives. If you’re not sure
about your drive, try connecting it.
1. Make sure the memory card is inserted in your printer. (See Inserting Your
Memory Card and Copying Photos.)
2. If you are using a CD-R/RW drive or Zip drive, plug it into an electrical outlet.
3. Connect the drive to PictureMate:
29
Page 31

■ For a CD-R/RW or Zip drive, connect your drive’s USB cable to the EXT/IF
port on the back of your PictureMate. Insert a CD-R or Zip disk in the drive.
■ For a flash memory drive, plug it into the EXT/IF port on the back of
PictureMate.
Note: PictureMate checks to make sure there is enough free space for your
photos. If not, insert a new CD-R or Zip disk, or a clear off space or connect a
different thumb drive.
30
If you insert a blank CD-R in the drive before inserting a memory card in
PictureMate, you see an error message. Eject your CD-R to clear the error, insert
your memory card, then re-insert your CD-R.
4. Press the Save Photo button on PictureMate to begin saving your photos.
5. When you see this message, press OK.
6. When you see the
Beginning backup confirmation, press OK.
Page 32

7. When your photos are saved, you see the following screen. Press OK.
Caution: Don’t remove the drive or memory card while the photos are being
saved, or you may lose photos on your card or drive. If you need to stop the
backup, press the Cancel button.
You can save photos multiple times to the same disk or drive until it is full. Each time
you save photos on the same disk or drive, they are saved in a new folder. The first
folder is named 001, the second folder is named 002, etc. If you save on a CD-R,
PictureMate names the CD-R Photo.
Storing and Displaying Your Printed Photos
Photos printed on PictureMate Photo Paper are beautiful, long lasting images. Follow
these guidelines to make sure they will look great for generations.
Storing Your Prints
■ To avoid scratches or smudging, do not rub the printed side of the photo.
■ If you stack photos, do not stack them with the printed sides touching.
Displaying Your Prints
■ To ensure prints will last as long as possible, store them in glass frames or photo
albums.
■ Keep prints out of direct sunlight to prevent fading.
■ Let prints sit for 24 hours before framing.
31
Page 33

Storing Unused Paper
Return unused paper to the original package. Store paper away from extreme
temperatures, high humidity, and bright light.
32
Page 34

33
Page 35

Printing Without a Computer
PictureMate lets you print photos quickly and easily without a computer. Just insert
your digital camera’s memory card, choose settings from the control panel, and press
Print.
For details, see these sections:
■ Compatible Memory Cards
■ Photo Image File Requirements
■ Inserting Your Memory Card
■ Printing a Proof Sheet from the PictureMate Print Wizard
■ Printing All Your Photos From the PictureMate Print Wizard
■ Printing Some of Your Photos From the PictureMate Print Wizard
■ Selecting the Photos You Want to Print
■ Setting the Number of Copies in the Main Menu
■ Choosing a Layout
■ Confirming and Printing
34
■ Doing More With Your Prints
■ Adjusting Printer Settings
Note: If you have a camera that supports the PictBridge standard, you can
connect the camera’s USB cable directly to PictureMate and control printing from
your camera. See Printing From a PictBridge-enabled Digital Camera
.
Compatible Memory Cards
You can insert any of these types of memory cards into PictureMate:
■ CompactFlash
■ Microdrive
■ SD (Secure Digital)
■ miniSD
TM
TM
TM
(requires miniSD adapter)
Page 36

■ MMC
TM
(MultiMediaCard™)
■ xD Picture Card
■ Sony Memory Stick
■ Memory Stick Duo
■ Memory Stick PRO
■ Memory Stick PRO Duo
■ MagicGate
■ MagicGate Memory Stick Duo
■ SmartMedia
TM
®
TM
TM
TM
Memory Stick
TM
(requires Memory Stick Duo Adapter)
TM
(requires Memory Stick Duo Adapter)
TM
(requires Memory Stick Duo Adapter)
Photo Image File Requirements
Make sure the photo image files on your memory card meet these requirements:
■ JPEG files or uncompressed Tiff files only
■ Resolutions ranging from 120 × 120 to 4600 × 4600 pixels
Your PictureMate recognizes and prints the first 999 photos on your memory card.
Note: PictureMate supports P.I.M. (PRINT Image Matching) and Exif Print image
enhancement features. See your camera manual to see if these features are
included on your camera.
All digital cameras create JPEG files. See your digital camera manual for details.
35
Page 37

Inserting Your Memory Card
1. Make sure PictureMate is on, then flip down the memory card door.
2. Insert the memory card into one of the three slots, as shown.
CompactFlash or
Microdrive
(bottom)
Memory Stick
(middle)
SD (Secure Digital), or
MMC (MultiMediaCard)
(middle)
SmartMedia
(top)
xD Picture Card
(top)
3. Push the card in until it stops (it won’t go in all the way). When the card is in, the
card light comes on.
Card light
36
Page 38

4. Close the memory card door.
Note: Insert just one card at a time. PictureMate can’t read multiple cards at
once.
Removing Your Memory Card
To remove a card, pull it straight out of the PictureMate slot.
Caution: Do not remove a card while the card light is flashing, or you may lose
data on the card.
Printing a Proof Sheet from the PictureMate Print Wizard
A proof sheet shows small, thumbnail images of all the photos on your memory card.
The proof sheet shows the photo numbers you will need when choosing photos for
printing. (The numbers might not match the numbers that you see in your camera.)
Note: If you don’t see the PictureMate Print Wizard, remove and reinsert your
memory card. If it still does not appear, see Turning the PictureMate Print Wizard
Off or On for instructions on turning it on.
When you insert the memory card, you see the PictureMate Print Wizard with this
message:
Note: If you have a large number of photos on your memory card and you want to
print a proof sheet with some photos instead of all of them; see Selecting the
Photos You Want to Print to choose photos, then see Choosing a Layout to select
the Proof Sheet layout.
1. Press Print to print your proof sheet.
37
Page 39

Press Cancel if you have already printed a proof sheet for the photos currently on
your card or if you want to print all your photos and don’t need to see a proof
sheet. (To make sure you know which photos are on your card, you should print a
proof sheet if you have taken new photos or deleted photos since the last time you
inserted your card in PictureMate.)
Note: Your proof sheet includes up to 20 photos per sheet. It might print on
several sheets of paper, depending on the number of photos on your card.
2. Look at your proof sheet and choose the photo numbers for the photos you want
to print, then continue with Printing All Your Photos From the PictureMate
Print Wizard, Printing Some of Your Photos From the PictureMate Print Wizard,
or Selecting the Photos You Want to Print to select and print your photos.
38
Printing All Your Photos From the PictureMate Print Wizard
After you print the proof sheet or cancel it, you see this screen; press Print to start
printing all your individual, 4 × 6-inch photos.
Note: If your card has more than 20 photos, you will need to reload paper while
printing. Load a maximum of 20 sheets at a time. When you see the message
“Try loading paper again,” load more paper and press OK to continue printing. If
you need to cancel printing, press Cancel.
When printing is complete, you see the Main Menu. To learn more about the Main
Menu, see Viewing the PictureMate Main Menu
.
Page 40

Tip: To start the PictureMate Wizard again, remove and re-insert your card (see
Inserting Your Memory Card
).
Printing Some of Your Photos From the PictureMate Print Wizard
To print one or several of your photos, follow these steps:
1. After you print the proof sheet, or cancel it in the PictureMate Print Wizard, you
see this screen; press OK.
2. Press or to highlight the number of the photo you want to print (use the
proof sheet to find photo numbers), then press OK to choose it.
Tip: Hold down or to scroll quickly.
3. Press or to choose the number of copies to print for that photo (up to 10),
then press OK.
4. Repeat steps 2 and 3 for each additional photo you want to print.
The screen shows the selected photos and the number of copies for each. (You
may need to press or to scroll and see all your selected photos.)
39
Page 41

If you chose the wrong photo, you can deselect it. Highlight the selected photo
and press
OK to uncheck it. If you need to change the number of copies, press OK
twice and change the number as described in step 3.
5. When you’re done selecting photos, press Print.
You see this screen:
6. Confirm your photo selections (press or to scroll and see all your selected
photos), then press Print again to start printing.
Note: If the print confirmation is off, you will not see the screen above and only
need to press
details.)
Print once. (See Turning Print Confirmation Off or On for
Load a maximum of 20 sheets at a time. If you print more than 20 photos,
PictureMate will prompt you to reload paper while printing. When you see the
message “Try loading paper again,” load more paper and press OK to continue
printing. If you need to cancel printing, press Cancel.
40
When printing is complete, you see the Main Menu. To learn more about the Main
Menu, see Viewing the PictureMate Main Menu.
Tip: To start the PictureMate Print Wizard again, remove and re-insert your card,
(see Inserting Your Memory Card
).
Viewing the PictureMate Main Menu
PictureMate’s Main Menu offers flexibility in choosing the photos you want and how
to print them. For example, you can choose page layouts such as wallet photos or
photos with borders.
Main Menu
Page 42

Tip: You can also crop your photos, print in black and white or sepia, or add the
time or date. (See Doing More With Your Prints
.)
If the PictureMate Print Wizard is on the screen, press Cancel twice. The Main
Menu appears, as shown above.
You will also see the Main Menu after you finish printing from the PictureMate Print
Wizard.
When no card is inserted in PictureMate, you see the Main Menu.
Tip: To turn off the PictureMate Print Wizard and see the Main Menu only, see
Turning the PictureMate Print Wizard Off or On
.
Selecting the Photos You Want to Print
The Select Photo option on PictureMate lets you decide how to choose photos to
print:
Make sure your memory card is inserted in PictureMate and the Main Menu is on the
LCD screen, then follow the steps in the appropriate section:
All Photos: print all the photos on your card
One Photo
Several Photos
copies for each
Range of Photos
photos 7 through 12) on your card
Camera-selected DPOF Photos
pre-selected in your digital camera using DPOF (appears by default
and available when photos have been selected with DPOF only)
: print just one photo
: select several photos by number, with one or more
: choose a sequence of photos (for example,
: print a set of photos that you
41
Page 43

All Photos
1. Press or to highlight Select Photo, then press OK.
2. Press or to highlight All Photos, then press OK.
3. Go to Setting the Number of Copies in the Main Menu to continue.
One Photo
1. Press or to highlight Select Photo, then press OK.
42
2. Press or to highlight One Photo, then press OK.
3. Press or to highlight the photo you want to print, then press
Tip: Hold down or to scroll quickly.
OK.
Page 44

You see the selected photo on the Main Menu:
4. Go to Setting the Number of Copies in the Main Menu
to continue.
Several Photos
You can choose any photos on your card to print.
1. Press or to choose Select Photo, then press OK.
2. Press or to highlight Several, then press OK.
3. Press or to highlight the photo number, then press OK to choose it.
Tip: Hold down or to scroll quickly.
4. Press or to choose the number of copies to print for that photo (up to 10),
then press
OK.
43
Page 45

5. Repeat steps 3 and 4 for each additional photo. The screen shows selected photos
and a number of copies for each. (You may need to press or to scroll and see
all your selected photos.)
Note: If you chose the wrong photo, you can deselect it. Highlight the selected
photo and press OK to uncheck it. If you need to change the number of copies,
press OK twice and change the number as described in step 3.
6. When you’re done, press Back. You see the Main Menu with Several selected.
7. Go to Choosing a Layout to continue.
Range of Photos
44
A range of photos is a sequence of photos (for example, photos 7 through 12).
Choosing a range is convenient because you don’t have to choose each individual
photo. Look at the photo numbers on your proof sheet to determine the first and last
numbers in the range, then follow these steps:
1. Press or to highlight
2. Press or to highlight
Select Photo, then press OK.
Range, then press OK.
Page 46

3. Press or to choose the first photo under From. Then press OK.
Tip: Hold down or to scroll quickly.
4. Press or to choose the last photo under To. Then press OK.
5. Go to Setting the Number of Copies in the Main Menu to continue.
Camera-selected DPOF Photos
If your camera supports DPOF (Digital Print Order Format), you can use it to
pre-select which photos you want to print and how many copies.
See your camera’s manual to choose photos for printing with DPOF, then insert your
memory card in PictureMate. PictureMate automatically reads which photos you have
selected and how many copies to print for each one.
If you have chosen photos from your camera, DPOF is selected as the Select Photo
option by default.
Just press Print to print your DPOF photos.
If DPOF is selected and you want to choose photos to print, press or to
highlight
Select Photo, press OK, then choose a different option.
45
Page 47

If DPOF has been deselected and you want to select it again, follow these steps:
1. On the Main Menu, press or to highlight Select Photo, then press OK.
2. Press or to highlight
DPOF, then press OK.
The photos that you chose from your camera to print are automatically selected,
including the number of copies.
Setting the Number of Copies in the Main Menu
You can print from 1 to 100 copies. Keep in mind that if you are printing all photos
or a range of photos, the number of copies applies to every photo.
Note: If you are printing Several photos, you already chose the number of copies
for each photo, so the Copies setting can’t be changed from the Main Menu. You
can choose up to 10 copies per photo when printing Several.
If you are printing DPOF photos, the number of copies is selected from your
camera and the Copies setting can’t be changed.
1. After selecting photos on the Main Menu, press or to highlight Copies,
then press
OK.
46
Page 48

2. Press or to highlight the number of copies you want to print for each photo
(
1 - 100), then press OK.
3. Continue with Choosing a Layout to choose a layout for your photos.
Choosing a Layout
1. On the Main Menu, press or to choose Layout, then press OK.
2. Press or to highlight the layout setting you want for your photo(s), then
press OK.
You have four choices:
Borderless Proof Sheet
Border Wallet
3. Continue with Confirming and Printing
to print your photos.
Confirming and Printing
Once you have made all the basic print settings, you are ready to print.
47
Page 49

Before printing, you may want to select other options for your photos. See Doing
More With Your Prints for details.
1. Press Print.
2. Confirm your photo selections (press or to scroll and see all your selected
photos)
■ If the list is okay, press Print again to print your photo(s).
■ To make changes, press Cancel to go back.
Note: If the Print Confirmation is off, you will not see the screen above and only
need to press Print once. (See Turning Print Confirmation Off or On
Load a maximum of 20 sheets at a time. If you print more than 20 photos,
PictureMate will prompt you when you need to reload paper. When you see the
message “Try loading paper again,” load more paper and press OK to continue
printing.
for details.)
48
PictureMate retains the settings you made after it is done printing. You can reset your
PictureMate to its original default settings; see Resetting PictureMate Print Settings.
Doing More With Your Prints
After you have made the basic print settings, you can use these additional settings to
refine your print(s):
Printing Photos in Black and White or Sepia
Cropping Your Photo
Page 50

Automatically Fixing Photo Appearance
Adding the Date or Time
All of these features are available under More Options on PictureMate’s Main Menu.
Note: The features described in this section do not affect or replace the original
digital photo file; they customize only the print(s) that you make at that one time.
These settings do not appear in the Print Confirmation screen.
Printing Photos in Black and White or Sepia
You can print your photo in black and white or sepia tone, without changing the
original photo.
Note: A sepia print has a brownish tone, for an old-fashioned photo look.
1. On the Main Menu, press or to highlight More Options, then press OK.
2. Press or to highlight Color Effects, then press OK.
3. Press or to choose Black and White or Sepia, then press OK.
4. Continue with Confirming and Printing
to print your photos.
49
Page 51

Note: This setting remains in effect for all photos until you press and hold Cancel
for 3 seconds or turn your PictureMate off.
Cropping Your Photo
If you want to print only part of a photo, you can crop it to leave out the part you
don’t want. Choose one photo to crop at a time. (See One Photo
Photo
from the Main Menu.) First you will print a template sheet for the photo
showing different cropping areas; then you will select the one you want to print from
that template. If you already have a reference template, you can skip to step 5.
1. On the Main Menu, press or to highlight More Options, then press OK.
2. Press or to highlight Print Crop Template, then press OK.
to choose One
50
3. Press Print to print the template.
Tip: The crop areas do not change, so you can print the template once and use it
as a reference for all your photos.
Your photo prints with a preview of the different cropping areas.
crop number
Page 52

4. Choose the number for the area you want to print.
5. Press or to highlight Crop, then press OK.
6. Press or to highlight the number you chose from the template, then press
OK.
7. Confirm the crop number you have selected.
8. Continue with Confirming and Printing to print your photo.
Note: This setting remains in effect for all photos until you press and hold Cancel
for 3 seconds or turn your PictureMate off.
Automatically Fixing Photo Appearance
Your PictureMate can automatically enhance or fix the appearance of your prints.
1. On the Main Menu, press or to highlight More Options, then press OK.
51
Page 53

2. Press or to highlight Auto Correct, then press OK.
3. Press or to choose one of the options.
■ Enhance - automatically adjusts photos using P.I.M. or Exif Print features in
your digital photos (see your camera manual to see if it supports these
features). This option is automatically selected if your photo contains P.I.M.
or Exif Print information.
■ Fix - use this if the photo you printed looks bad; corrects images that are too
dark or too bright.
■ None - turns off enhancements (default setting when the photo has no P.I.M.
or Exif Print information).
52
4. Press OK.
5. Continue with Confirming and Printing to print your photos.
Note: This setting remains in effect for all photos until you press and hold Cancel
for 3 seconds or turn your PictureMate off.
Adding the Date or Time
You can add the date and/or time your picture was originally taken to your photo
when you print.
1. On the Main Menu, press or to highlight
More Options, then press OK.
Page 54

2. To print the date, press or to highlight Date Stamp, then press OK.
3. Press or to choose a setting:
■ None (default; turns off the date stamp)
■ yyyy.mmm.dd (2004.May.09)
■ mmm.dd.yyyy (May.09.2004)
■ dd.mmm.yyyy (09.May.2004)
4. Press OK.
5. To print the time, press or to highlight Time Stamp, then press OK.
6. Press or to choose a setting:
■ None (default; turns off the time stamp)
■ 12-hour (03:00 for 3 pm)
■ 24-hour (15:00 for 3 pm)
7. Press OK.
8. Press Print.
53
Page 55

9. Continue with Confirming and Printing to print your photos.
Note: This setting remains in effect for all photos until you press and hold Cancel
for 3 seconds or turn your PictureMate off.
Adjusting Printer Settings
You can adjust these settings on your PictureMate:
■ Resetting PictureMate Print Settings
■ Turning the PictureMate Print Wizard Off or On
■ Turning Print Confirmation Off or On
■ Adjusting the LCD Screen Contrast
Resetting PictureMate Print Settings
You can reset the PictureMate print settings (such as layout, color effect, or crop
settings) to the original, default settings. This won’t affect LCD contrast, print
confirmation, or PictureMate Wizard settings.
54
1. Press and hold Cancel for 3 seconds.
You see this screen:
2. Press
OK to reset all the print settings.
Note: PictureMate also resets its default settings when you turn it off and back
on.
Page 56

Turning the PictureMate Print Wizard Off or On
When you first insert a memory card, the PictureMate Print Wizard guides you to
print a proof sheet, then to print some or all of your photos.
You may turn this feature off and print directly from the Main Menu all the time, or
if you turned the PictureMate Print Wizard off and you want to use it, you can turn it
back on.
Note: If you usually print all the photos on your memory card, turn off the
PictureMate Print Wizard. Then whenever you insert your memory card, you can
print all your photos by just pressing Print.
1. On the Main Menu, press or to highlight More Options, then press OK.
2. Press or to highlight Print Wizard, then press OK.
3. Press or to choose
On or Off, then press OK.
Turning Print Confirmation Off or On
The Print Confirmation screen lets you make one last check of your photo selections
before you print. You can turn this feature off (or back on).
55
Page 57

When the Print Confirmation is On, you see a screen like this that lets you check
settings before printing:
When the Print Confirmation is Off, the printer prints without a final confirmation
screen.
1. On the Main Menu, press or to highlight
2. Press or to highlight Print Confirmation, then press OK.
3. Press or to choose On or Off, then press OK.
More Options, then press OK.
Adjusting the LCD Screen Contrast
1. On the Main Menu, press or to highlight More Options, then press OK.
56
Page 58

2. Press or to highlight Maintenance, then press OK.
3. Press or to highlight
4. When you see this message, press OK to continue.
5. Press or to adjust the contrast, then press OK.
LCD Contrast, then press OK.
Printing From a PictBridge-enabled Digital Camera
You can connect your PictBridge-enabled digital camera to the back of PictureMate
and use the camera to control printing. (See your camera’s documentation to see if it
supports the PictBridge standard.)
1. Make sure there are no memory cards in PictureMate’s memory card slots. The
card light should be off.
Note: If a memory card is inserted, the printer will read photos from the card, not
from a camera.
57
Page 59

2. Connect your camera’s USB cable to the port on the back of PictureMate.
3. Use your camera’s controls to print photos on PictureMate. See your camera
documentation for instructions.
Printing From an External CD, Zip Disk, or Flash Memory Drive
If you saved your photos to a CD, Zip disk, or flash memory (thumb) drive (see
Saving Your Photos to an External CD-R/RW, Zip, or Flash Memory Drive), you can
connect the drive to the back of PictureMate and print just like you do when you
insert a memory card.
58
Tip: You can also print photos from a CD with pictures that you get from a photo
processing lab. (Photos must be in JPEG format. Some CDs may not be
supported.)
1. Make sure there are no memory cards in PictureMate’s memory card slots. The
card light should be off.
Note: If a memory card is inserted, the printer will read photos from the card, not
from an external drive. Remove the memory card to print photos on the drive.
2. If PictureMate is connected to a computer, disconnect it or turn the computer off.
Page 60

3. Connect your CD or Zip drive’s USB cable to the port on the back of
PictureMate, or plug your flash memory drive into the USB port on the back of
PictureMate.
4. For a CD or Zip drive, insert a CD or Zip disk with photos into the drive.
If you used PictureMate to save photos on the same CD-R, Zip disk, or flash
memory drive more than once, it will have multiple folders. You see this message:
Press or to choose the folder where your photos are stored, then press
OK.
(The most recently saved folder has the largest number.)
5. PictureMate counts the photos on your drive, then shows one of the following
messages:
■ If you see this message, go to Printing a Proof Sheet from the PictureMate
Print Wizard and follow the instructions there to print your photos from the
PictureMate Wizard.
59
Page 61

■ If you see this screen, see Viewing the PictureMate Main Menu to learn more
about printing from the Main Menu.
Printing Wirelessly From a Bluetooth Device
To send and print photos wirelessly from Bluetooth-enabled devices, such as digital
still cameras, digital video cameras, PDAs, mobile phones, and computers, you can
use the optional Bluetooth Photo Print Adapter, available from Epson.
The Epson Bluetooth Photo Print Adapter (part# C12C824142) is available from
your local retailer or the Epson Store
site at www.epsonstore.com (U.S. sales only). In Canada, please call (800) 463-7766
for dealer referral.
Note: While PictureMate complies with the Bluetooth specification, it is not
guaranteed to work with all devices enabled with Bluetooth wireless technology.
SM
at (800) 873-7766, or you can visit our web
60
The communication range of this product is approximately 33 feet (10 meters);
however, this may vary depending on conditions, including obstacles between devices,
signal quality, magnetic fields, static electricity and electromagnetic interference,
software, operating system, reception sensitivity, and antenna performance.
The following profiles are available: Basic Imaging Profile (BIP), Hardcopy Cable
Replacement Profile (HCRP), and Object Push Profile (OPP).
Caution: Do not remove the adapter while it is communicating with another
device or while PictureMate is printing (while the blue light is flashing). Doing so
may cause PictureMate to malfunction.
See these sections for information:
■ Printing With Bluetooth
■ Disconnecting the Bluetooth Photo Print Adapter
■ Choosing Bluetooth Settings
Page 62

Printing With Bluetooth
1. Make sure PictureMate is on but not printing.
Caution: Do not connect the Bluetooth Photo Print adapter while PictureMate is
printing; this may cause PictureMate to malfunction.
2. Fold up the top of the Bluetooth Photo Print Adapter.
3. Plug the adapter into the USB port on the back.
Note: The Bluetooth Photo Print adapter light comes on for one second. If the
light does not turn on, disconnect the adapter, then reconnect it.
4. Make sure you are within about 30 feet of PictureMate, then select the photo you
want to print from your Bluetooth device and send it to PictureMate as follows:
■ For Windows, send photos directly to PictureMate with your Bluetooth file
sharing program. See the documentation included with your computer’s
Bluetooth adapter for details on setting up Bluetooth file sharing and sending
files.
■ For a Macintosh with Mac OS X 10.2 or later, double-click the Bluetooth
File Exchange utility in your
Utilities folder. Then follow the on-screen steps
to choose a photo file, discover your printer, and send the photo.
■ For cell phones and PDAs, see your product’s documentation for instructions
on setting up Bluetooth file sharing and sending files.
Printing starts automatically.
61
Page 63

Note: To print from a device with encryption, to use pairing, to use a passkey, or
to adjust Bluetooth settings, see Choosing Bluetooth Settings
.
Disconnecting the Bluetooth Photo Print Adapter
Make sure PictureMate isn’t printing, then pull the adapter out from the USB
connector, as shown.
Caution: Do not remove the adapter when the blue light is flashing; this may
cause PictureMate to malfunction.
Choosing Bluetooth Settings
If necessary, use the PictureMate buttons to choose settings for Bluetooth wireless
communication. You may need to enter a passkey for PictureMate, or turn on
encryption, depending on the settings for the Bluetooth-enabled device from which
you want to print.
62
1. Press the button on PictureMate to choose More Options and press OK.
2. Press the button to see the Bluetooth options:
Page 64

3. Choose settings in the Bluetooth option menus listed below.
Option Settings Description
BT Device Name PictureMate-(number)
(Default = 0)
BT Comm. Mode Discoverable This mode allows
Not discoverable This mode prevents unknown
Pairing (Bonding) This mode requires that a
If multiple Bluetooth-enabled
printers are in the same
communication range, you can
distinguish them by assigning
each a unique number (from 0
through 9). To make the Device
Name Setting take effect, turn
PictureMate off and then back on.
Bluetooth-enabled devices to
freely discover PictureMate and
send print jobs.
devices from discovering the
printer. To print in this mode, first
search for PictureMate once in
Discoverable mode. After your
device has discovered
PictureMate, it will subsequently
be able to communicate with and
print from it in this mode.
four-digit Passkey be entered into
a device before it can
communicate with and print from
PictureMate.
BT Encryption On/Off
(Default = Off)
Select On to encrypt
communication. Encryption
requires that a four-digit Passkey
be entered into a device before it
can communicate with and print
from PictureMate.
63
Page 65

Option Settings Description
BT Passkey Any four-digit number
(Default = 0000)
Bluetooth PIN
BT Device Address Set at the factory
(Example)
11-11-11-11-11-11
The Passkey Setting allows you to
set the four-digit Passkey that
must be entered into a device
before printing if Pairing (Bonding)
is selected as the Communication
Mode or if Encryption is On.
Displays the unique Bluetooth
Device Address of PictureMate.
64
Page 66

Replacing the Photo Cartridge
Your PictureMate will let you know when the photo cartridge is low or expended.
When the photo cartridge is low, it’s a good idea to get a new PictureMate Print Pack,
which includes a new PictureMate Photo Cartridge (ink) and 100 sheets of
PictureMate Photo Paper. Visit www.MyPictureMate.com for more information.
When PictureMate’s photo cartridge is expended, you see this message on its LCD
screen:
Tip: If you see this message while printing, you can still replace the photo
cartridge and continue the current print job. Just replace it without turning off and
unplugging PictureMate.
You can check the ink level at any time (see Checking Your Cartridge Status (Ink
Level)).
Caution: Do not refill the photo cartridge. This could result in damage to
PictureMate from ink spills.
When the photo cartridge needs to be replaced and you are out of paper, see these
sections:
■ Buying a PictureMate Print Pack
■ Removing the Used Photo Cartridge
■ Inserting the New Photo Cartridge
Checking Your Cartridge Status (Ink Level)
You can check the approximate level of ink in your photo cartridge on the
PictureMate LCD screen or with your computer software. Go to the appropriate
section:
■ PictureMate LCD Screen
■ PictureMate Status Monitor for Windows
65
Page 67

■ PictureMate Status Monitor for Macintosh OS X
■ PictureMate Status Monitor for Macintosh OS 9
PictureMate LCD Screen
1. On the Main Menu, press or to highlight More Options, then press OK.
2. Press or to highlight Maintenance, then press OK.
3. Press or to highlight Cartridge Status, then press OK.
66
4. You see a screen with the approximate ink level in your photo cartridge. Press OK
to close the screen.
Note: If the status (ink level) is down to only one bar, you should buy a new
PictureMate Print Pack. See Buying a PictureMate Print Pack
for details.
Page 68

PictureMate Status Monitor for Windows
You can check the amount of ink remaining in the photo cartridge using
EPSON Status Monitor 3 or the progress meter.
Open EPSON Status Monitor 3 in one of the following ways.
■ Double-click the printer icon on your Windows taskbar.
■ Open the printer software (see Printing From a Windows Computer for
instructions), click the Maintenance tab, then click the EPSON Status
Monitor 3
A screen displays the remaining amount of ink.
button.
67
Page 69

The progress meter dialog box appears automatically when you send a print job to
the printer. You can check the remaining amount of ink from this dialog box.
PictureMate Status Monitor for Macintosh OS X
1. Double-click Macintosh HD (the default hard disk name), double-click the
Applications folder, then double-click the EPSON Printer Utility icon. The
Printer List window appears.
68
2. Select PictureMate, then click OK. The EPSON Printer Utility dialog box
appears.
Page 70

3. Click the EPSON StatusMonitor button. The EPSON StatusMonitor window
appears, showing the approximate amount of ink left in the photo cartridge.
4. Close the Epson Printer Utility.
PictureMate Status Monitor for Macintosh OS 9
1. Access the Print or Page Setup dialog box (see Printing From a Macintosh
Computer for instructions).
2. Click the utility icon button, then click the EPSON StatusMonitor button
in the Utility dialog box.
69
Page 71

The EPSON StatusMonitor window appears, showing the approximate amount
of ink left in the photo cartridge.
Buying a PictureMate Print Pack
The PictureMate Print Pack (part# T5570) has everything you need to print in one
box: 100 sheets of PictureMate Photo Paper and a new PictureMate Photo Cartridge.
70
Note: If you are out of PictureMate Photo Paper, but do not see the Replace
cartridge message, you can still print. Use Epson Premium Glossy Photo Paper,
Borderless 4 × 6 inches (part# S041727).
You can buy a Print Pack wherever PictureMate is sold or from retailers that sell
printer supplies.
Page 72

You can also buy the Print Pack from the Epson Store at (800) 873-7766 or visit
www.epsonstore.com (U.S. sales only). In Canada, please call (800) 463-7766 for
dealer referral.
Note: Use your photo cartridge within six months of installing it and before the
expiration date on the package.
Visit www.MyPictureMate.com for information about PictureMate, special offers,
and accessories.
Removing the Used Photo Cartridge
Make sure you have a new PictureMate photo cartridge before you begin. Once you
start replacing a cartridge, you must complete all the steps in one session.
Tip: If you see the Replace cartridge message while printing, you can still
replace the photo cartridge and continue the current print job. Just replace it
without turning off and unplugging PictureMate.
Caution: Do not refill the photo cartridge. This could result in damage to
PictureMate from ink spills.
1. If PictureMate is on, press the On button to turn it off.
2. Wait until the LCD screen goes blank, then disconnect the power cable and USB
cable (if connected).
71
Page 73

3. Flip the handle over to the front.
4. Open the cartridge door.
5. Move the lever to the
releases the cartridge.
Release position by sliding it in the direction shown. This
72
Page 74

6. Carefully pull out the cartridge and dispose of it properly.
Warning: Keep ink cartridges out of the reach of children and do not drink the ink.
If ink gets on your hands, wash them thoroughly with soap and water. If ink gets
in your eyes, flush them thoroughly with water. If discomfort or vision problems
continue after flushing, see a doctor immediately.
Inserting the New Photo Cartridge
1. Shake the cartridge four or five times while it is still in its package. Then unwrap
the cartridge.
Caution: Don’t touch the circuit board. Install the photo cartridge immediately
after you remove it from its package. If you leave a cartridge unpacked for a long
time before using it, normal printing may not be possible.
2. Make sure the lever is in the Release position.
73
Page 75

3. Slide the cartridge straight into the slot, label side up, until it is fully inserted.
Push in both sides evenly to make sure it is not crooked.
If either side is sticking out, remove the cartridge and reinsert it so the cartridge is
straight.
74
Crooked Straight
Page 76

4. Move the lever right to the Lock position. If it does not lock in place, the
cartridge is crooked; you need to push in whichever side is sticking out too far.
(See step 3.
Caution: If the cartridge is not inserted correctly, ink may leak out.
)
5. Close the cartridge door. Make sure it is completely closed.
6. Move the handle over to the back.
7. Reconnect the power cord. If you’re using a computer or external drive, reconnect
the USB cable to PictureMate.
8. Turn PictureMate back on.
75
Page 77

When PictureMate recognizes the new photo cartridge, it starts charging the ink
and you see an ink charging message. When charging is complete, you can begin
printing again.
Taking PictureMate With You
PictureMate’s handle makes it easy to carry short distances. If PictureMate is going to
travel a longer distance, you should pack it carefully to protect it from getting
damaged.
Caution: Keep PictureMate out of the sun and don’t leave it in your car or other
location where it can get too hot.
1. If PictureMate is on, press the On button to turn it off.
2. Wait until the LCD screen goes blank, then unplug the power cord from the
electrical outlet.
76
3. Remove paper from the paper support and output tray.
4. Push down the top of the paper support and close it against PictureMate. Then
close the output tray.
Page 78

5. Disconnect the power cord and any connected USB cable from the back of
PictureMate.
6. Pack both the PictureMate and its power cable in the box that PictureMate came
in, or in the optional Carrying Case.
Caution: Make sure the photo cartridge is installed before transporting. Don’t
place PictureMate on its side or upside down, or ink may leak.
Note: If your prints don’t look as good after PictureMate
aligning the print head. See Aligning the Print Head Directly From PictureMate
Tip: You can order an optional PictureMate Carrying Case (part# ARC1B) from the
Epson Store at (800) 873-7766 or visit www.epsonstore.com (U.S. sales only). In
Canada, please call (800) 463-7766 for dealer referral.
has been moved, try
.
Cleaning PictureMate
To keep PictureMate working at its best, you should clean it several times a year.
Follow these steps:
1. Turn off PictureMate, unplug the power cord, and disconnect any USB cables or
drives.
2. Remove all paper, then use a soft brush to clean any dust or dirt from the paper
feeder.
3. Clean the PictureMate exterior with a soft, damp cloth.
4. Use a soft, dry cloth to clean the PictureMate screen. Do not use liquid or
chemical cleaners on it.
77
Page 79

Caution: Never use a hard or abrasive brush, or alcohol or thinner for cleaning;
they can damage the components and case.
Don’t get water on the components and don’t spray lubricants or oils inside
PictureMate.
Improving Print Quality
If your print quality is not as good as it used to be, if your photos are too light or faint,
or if you are missing colors in your prints, you may need to clean the PictureMate
print head. You can check to see if your print head needs cleaning before you actually
clean it. If you see misaligned vertical lines or dark or light banding, you may need to
align the print head.
Follow the steps in these sections to clean or align the print head using the
PictureMate buttons or the PictureMate software on your computer:
■ Cleaning the Print Head Directly from PictureMate
■ Aligning the Print Head Directly From PictureMate
■ Checking the Print Quality Using the Computer
78
■ Cleaning the Print Head Using the Computer
■ Aligning the Print Head Using the Computer
Cleaning the Print Head Directly from PictureMate
If your print quality is not as good as it used to be, your PictureMate’s print head
nozzles may be clogged. Follow these steps to clean the print head.
1. On the Main Menu, press or to highlight
More Options, then press OK.
Page 80

2. Press or to highlight Maintenance, then press OK.
3. Press or to highlight
Clean Print Head, then press OK.
4. When you see this message, press OK to begin cleaning the print head.
The cleaning takes about 40 seconds, during which the message Cleaning print
head. Please wait
Caution: Never turn off PictureMate while it is cleaning its print head, unless it
hasn’t moved or made noise for more than 5 minutes.
. appears on the screen and PictureMate makes some noise.
5. When cleaning is complete, you see a message asking if you want to print a nozzle
check pattern. If you want to check to see if the nozzles are clean, load a sheet of
photo paper (see Loading Paper), then press OK to print the nozzle check.
If you don’t want to print a nozzle check, press
Cancel to go back to the
PictureMate Main Menu.
6. Check the pattern to see if there are any gaps in the lines.
Each staggered line should be solid, with no gaps, as shown.
79
Page 81

If you see any gaps (as shown below), you need to clean the print head again.
7. If there are gaps, press OK to clean the print head again. If there are no gaps, press
Cancel to go back to the PictureMate Main Menu.
If you don’t see any improvement after cleaning three or four times, refer to
Solving Problems.
You can also turn PictureMate off and wait overnight—this allows any dried ink
to soften—and then try cleaning the print head again.
Aligning the Print Head Directly From PictureMate
If you have moved PictureMate and the print quality is not the same as it was
before—for example, if you see misaligned vertical lines or dark or light horizontal
banding—you may need to align the print head.
1. Make sure a sheet of photo paper is loaded (see Loading Paper).
80
2. On the Main Menu, press or to highlight More Options, then press OK.
3. Press or to highlight Maintenance, then press OK.
4. Press or to highlight
Align Print Head, then press OK.
Page 82

5. Press the Print button when you see the next message.
6. When the pattern prints, look at the print and see which line pattern is the
straightest. (You may need to use a magnifying glass.)
Example of
straightest
line pattern
7. Press or to highlight the number for the best pattern in set #1 (1 to 15),
then press
OK.
8. Press or to highlight the number for the best pattern in set #2 (1 to 15),
then press OK.
9. Press OK to exit the alignment screen. The Main Menu appears.
Checking the Print Quality Using the Computer
You can check PictureMate’s print quality from your computer and clean the print
head, if necessary.
1. Make sure PictureMate is connected to your computer and turned on but not
printing.
2. Make sure a sheet of photo paper is loaded (see Loading Paper).
3. Windows: Right-click the printer icon on your taskbar (in the lower right
corner of your screen). Select Nozzle Check.
81
Page 83

Macintosh OS X: Open the Applications folder and select EPSON Printer
Utility
Check
. Select PictureMate in the printer list, click OK, and select Nozzle
.
Macintosh OS 9: Open the File menu and choose Page Setup or Print. Click
the utility button, then click the
Nozzle Check button.
4. Follow the instructions on the screen to print a nozzle check pattern:
The nozzle check pattern prints. Each staggered line should be solid, with no gaps,
as shown.
If you see any gaps (as shown below), you need to clean the print head. See
Cleaning the Print Head Using the Computer
.
82
Cleaning the Print Head Using the Computer
If your print quality is not as good as it used to be, your PictureMate’s print head
nozzles may be clogged. Follow these steps to clean the print head.
1. Make sure PictureMate is connected to your computer and turned on but not
printing.
2. Windows: Right-click the printer icon on your taskbar (in the lower right
corner of your screen). Select Head Cleaning.
Macintosh OS X: Open the Applications folder and select EPSON Printer
Utility
Cleaning
Macintosh OS 9: Open the
the utility button, then click the Head Cleaning button.
. Select PictureMate in the printer list, click OK, and select Head
.
File menu and choose Page Setup or Print. Click
Page 84

3. Follow the instructions on the screen to clean the print head.
Cleaning takes about 40 seconds. PictureMate makes some noise and its screen
displays progress messages.
Caution: Never turn off PictureMate while it is cleaning its print head, unless it
hasn’t moved or made noise for more than 5 minutes.
4. When cleaning is finished, make sure paper is loaded, then do the following:
Windows: Click Print nozzle check pattern. Then click Print.
Macintosh: Click Confirmation, then click Next.
The nozzle check pattern prints (see Examining the Nozzle Check Pattern for
details).
5. If the nozzle check pattern has no gaps, click
Finish.
If the pattern has gaps, click Clean to clean the print head again.
If you don’t see any improvement after cleaning three or four times, refer to
Solving Problems
.
You can also turn PictureMate off and wait overnight—this allows any dried ink
to soften—and then try cleaning the print head again.
83
Page 85

Examining the Nozzle Check Pattern
Examine the nozzle check pattern you printed. Each staggered line should be solid,
with no gaps, as shown.
■ If your printout looks okay, you’re done.
■ If you see any gaps (as shown below), clean the print head again.
Aligning the Print Head Using the Computer
If your printouts contain misaligned vertical lines, or you see light or dark horizontal
banding, you may need to align the print head.
1. Make sure PictureMate is connected to your computer, and turned on but not
printing.
84
2. Load several sheets of PictureMate Photo Paper.
3. Windows: Right-click the printer icon on your taskbar (in the lower right
corner of your screen). Select Print Head Alignment.
Macintosh OS X: Open the
Utility
Alignment.
. Select PictureMate in the printer list, click OK, and select Print Head
Applications folder and select EPSON Printer
Macintosh OS 9: From the File menu, select Page Setup or Print. Click the
utility button, then click the
Print Head Alignment button.
Page 86

4. Follow the instructions on the screen to print a test page. You see a window like
this one:
5. On the test page, select the square without any visible bands. You may need to use
a magnifying glass. Select one square for each pattern (1 and 2).
6. Enter the number of the best square in each pattern in the corresponding boxes on
the screen. Then click
Finish.
If you can’t find a square without visible bands, choose the one that looks the best.
Then click Realignment to print another test page and repeat this step.
85
Page 87

86
Page 88

Solving Problems
There are several ways to diagnose problems:
■ To identify the most common problems, check for Control Panel Messages.
■ If your PictureMate is connected to your computer and you’re not sure whether
the problem is coming from PictureMate or the computer, run a printer check as
described in Running a Printer Check
For solutions to specific problems, see these sections:
■ Software Installation Problems
■ Printing Problems
■ Memory Card Problems
■ Print Quality Problems
■ Problems With Paper Feeding
■ Miscellaneous Printout Problems
If you need to uninstall and then reinstall your software to solve your problem, see
Uninstalling PictureMate Software.
.
If the solutions here don’t solve your problem, see Where To Get Help.
Control Panel Messages
If your PictureMate has any problems, you can check the PictureMate screen for a
message. If you see one of these messages, here’s what to do:
Message What to Do
Purchase a PictureMate Print Pack and replace the photo
cartridge with a new one. If the cartridge is new, check
to make sure it is inserted correctly. See Replacing the
Photo Cartridge.
87
Page 89

Message What to Do
Load or remove and reload paper in the paper support,
and press the OK button to clear this message.
PictureMate resumes printing. See Loading Paper
instructions.
Carefully pull out the jammed paper, then reload paper
and continue printing or try printing again. Don’t load
wrinkled sheets or plain paper. See Paper doesn’t feed
correctly or jams inside PictureMate. if your PictureMate
is having frequent jams.
The cartridge door is not closed completely. Close the
cartridge door on the back of PictureMate. Make sure
both sides click in and close.
Reinstall a genuine PictureMate photo cartridge from the
PictureMate Print Pack. See Replacing the Photo
Cartridge.
for
88
PictureMate has a hardware error that may require
service. Contact Epson as described in Where To Get
Help.
Use a compatible memory card. Format your card with
your camera, not a computer. See the card types you can
use in Compatible Memory Cards
card may not be supported. See Photo Image File
Requirements.
Disconnect the Bluetooth Photo Print adapter, then
reconnect it to PictureMate. See Disconnecting the
Bluetooth Photo Print Adapter.
. The file types on the
Page 90

Message What to Do
Press the On button to turn PictureMate off. Wait a
few seconds, then turn it on again. If the error does not
clear, see Where To Get Help
.
Running a Printer Check
You may need to run a printer check to see if a problem comes from PictureMate
itself or some other source.
1. If PictureMate is connected to your computer or other USB device, make sure
they are both turned off. Then disconnect the USB cable from PictureMate.
2. On the Main Menu, press or to highlight More Options, then press OK.
3. Press or to highlight Maintenance, then press OK.
4. Press or to highlight
Nozzle Check, then press OK.
5. When you see this message, press the Print button.
89
Page 91

6. PictureMate prints a page showing a nozzle check pattern. (If the pattern has gaps,
you need to clean the print head; see Improving Print Quality
■ If the check page printed, the problem isn’t with PictureMate. It may be your
.)
memory card, software settings, interface cable, or computer, or your software
may not be installed correctly. Try the suggestions in Software Installation
Problems and Memory Card Problems.
■ If the check page did not print, PictureMate may have a problem. Try the
suggestions in Printing Problems.
■ If nothing works, contact your dealer or Epson as described in Where To Get
Help.
7. After examining the check page, remember to turn off PictureMate and reconnect
its cable to your computer, if desired.
Software Installation Problems
You’re having problems installing the PictureMate software.
■ Carefully follow the installation instructions in the Using PictureMate With a
Computer booklet. Do not connect PictureMate to the computer until you are
instructed to connect it. Then connect the USB cable securely to the PictureMate
and the computer. Also make sure your system meets the requirements listed in
System Requirements.
90
■ Close your other programs, including any screen savers and virus protection
software, and install the software again.
■ If your PictureMate icon doesn’t appear in the Macintosh OS 9 Chooser, you
may have too many items in the Chooser. Delete any unused items and check the
Chooser again.
■ If you are using Macintosh OS X and you do not see PictureMate listed in the
Format for menu under Page Setup, you may need to set up PictureMate in Print
Center or the Printer Setup Utility. See the Using PictureMate With a Computer
booklet for instructions.
■ For Windows 2000, if you see an error message or your software doesn’t install
correctly, you may not have software installation privileges. Contact your System
Administrator.
Page 92

■ Make sure Windows 98 SE, Me, 2000, or XP was preinstalled on your system.
The USB Printer Device Driver may not install correctly if you’ve upgraded from
Windows 95.
■ Make sure the USB Controller is working properly in Device Manager. See your
Windows help system for details. If it’s not working, contact your computer
manufacturer.
■ If you’re printing over a network, see Setting Up Network Printing for
instructions on configuring your PictureMate software for use on a network.
Printing Problems
PictureMate is on, but nothing prints.
■ If you’re printing from your computer, make sure the USB cable is connected
securely at both ends and that the cable meets the requirements in System
Requirements.
■ If you’re printing from your computer, check to see if PictureMate is causing the
problem, as described in Running a Printer Check. If the check page prints, make
sure your software is installed correctly.
■ If you’re printing on a network, see Setting Up Network Printing for instructions
on configuring your PictureMate software for use on a network.
PictureMate sounds as though it is printing, but nothing prints.
■ Make sure the print head nozzles are not clogged. To clean the print head, see
Improving Print Quality
■ PictureMate won’t operate properly if it’s tilted or at an angle. Place it on a flat,
.
stable surface that extends beyond the base in all directions.
PictureMate makes noise when you turn it on or after it has been sitting for
awhile.
PictureMate is performing routine maintenance.
91
Page 93

Printing is too slow.
Because of PictureMate’s high print quality, it may take a little while to print your
photos. If you are printing from a computer, check the requirements in System
Requirements. If you’re printing a high-resolution image, you need more than the
minimum requirements listed. You may also need to:
■ Clear space on your hard drive or run a defragmentation utility.
■ Close open programs that you’re not using.
■ Increase your system’s memory (RAM).
For the fastest printing, try these tips:
■ Choose Black & White if your photo doesn’t include color.
■ If PictureMate is connected to a USB hub, disconnect any USB devices that
you’re not using.
Memory Card Problems
■ Make sure only one card is inserted at a time.
■ PictureMate recognizes and can print the first 999 photos on a memory card.
92
■ Make sure photos are in JPEG or uncompressed Tiff format and taken with a
DCF-compliant digital camera.
■ Make sure you follow the instructions in the Using PictureMate With a Computer
booklet to install the software, including the card utilities: Card Monitor and
PhotoStarter.
■ Check your PhotoStarter settings. See Configuring PhotoStarter for instructions.
■ If you access the card from your computer and delete files, the card may not work
correctly with your camera. Always delete pictures using your camera.
■ If you’re using Windows XP, you may need to install your Windows storage
device driver. See your Windows help for more information.
Page 94

Print Quality Problems
You see banding (light lines).
■ The print head may need cleaning; see Cleaning the Print Head Directly from
PictureMate or Cleaning the Print Head Using the Computer for instructions.
■ Make sure the glossy, printable side of the paper is face up.
■ The photo cartridge may need replacing. See Replacing the Photo Cartridge for
instructions.
■ The print head may need alignment; see Aligning the Print Head Directly From
PictureMate or Aligning the Print Head Using the Computer for instructions.
Your photo is blurry or smeared.
■ Use PictureMate Photo Paper from the PictureMate Print Pack to ensure proper
saturation and absorption of ink.
■ Make sure you load paper with the glossy, printable side face up.
■ Make sure your paper isn’t damp or curled, or loaded face down (the printable
side should be face up). If it’s damp or curled, reload a new stack of paper.
■ The print head may need alignment; see Aligning the Print Head Directly From
PictureMate or Aligning the Print Head Using the Computer for instructions.
■ Remove each sheet from the output tray after printing.
Your photo is grainy.
■ The print head may need alignment; see Aligning the Print Head Directly From
PictureMate or Aligning the Print Head Using the Computer for instructions.
■ You may need to increase the image resolution or print it in a smaller size; see
your software documentation.
Your photo is faint or has gaps in the image.
■ The print head may need cleaning; see Cleaning the Print Head Directly from
PictureMate or Cleaning the Print Head Using the Computer for instructions.
93
Page 95

■ The photo cartridge may be old or low on ink. See Replacing the Photo Cartridge
for instructions on replacing it.
■ Make sure your paper isn’t damaged, old, dirty, or loaded face down. If it is,
reload a new stack of paper with the glossy, printable side up.
Colors in your photo are incorrect or missing.
■ Make sure your software is set for color printing and the Ink setting is set to Color
for color images.
■ The print head may need cleaning; see Cleaning the Print Head Directly from
PictureMate or Cleaning the Print Head Using the Computer for instructions.
■ The photo cartridge may be old or low on ink. See Replacing the Photo Cartridge
for instructions on replacing it.
■ Colors may change slightly after drying. Wait for 24 hours and check your photo
again to see if the colors look right.
■ If you are printing without a computer, check the PictureMate LCD screen
settings to make sure the Filter setting is not set to Sepia or Black and White.
See Printing Photos in Black and White or Sepia.
94
Problems With Paper Feeding
Paper doesn’t feed correctly or jams inside PictureMate.
■ Make sure the paper support is pulled up.
■ Make sure the handle is not resting on the paper.
■ Make sure the paper support is all the way back and it is not resting on the handle.
The handle should be all the way down in the back of PictureMate.
■ If paper doesn’t feed, remove it from the paper feeder, reload it against the right
edge, then slide the left edge guide against the paper.
■ If multiple pages feed at once, remove the paper from the feeder, separate the
sheets, and carefully reload it.
■ If paper jams, remove paper, then press the OK button to clear the message.
If your paper loads incorrectly or jams frequently:
Page 96

■ Use new paper, loaded printable side up. Don’t load paper above the arrow mark
on the left edge guide. Load a maximum of 20 sheets.
■ Place the paper against the right edge and slide the left edge guide against it, but
not too tight.
■ Store paper flat to prevent curling.
■ Don’t load plain paper, this can damage PictureMate.
Miscellaneous Printout Problems
PictureMate prints blank pages.
■ Make sure PictureMate is selected, or is the active printer in the Print Center or
Macintosh Chooser.
■ The print head may need cleaning; see Cleaning the Print Head Directly from
PictureMate or Cleaning the Print Head Using the Computer for instructions.
The margins are incorrect.
■ If you have a border on one side of your photo but not on the other, make sure
the paper is positioned correctly in the feeder, all the way to the right. Slide the
left edge guide against the paper.
■ If you are printing without a computer, make sure the Crop setting is set to Off.
See Cropping Your Photo for instructions. Also check your Layout setting. See
Choosing a Layout for instructions.
■ If the subject of your photo is very close to the edge of the image, you may want to
select Border as the Layout setting. This prevents the automatic enlargement of
your photo (to eliminate the borders) which may be causing part of your image to
be cut off.
Image size or position is incorrect.
■ Make sure paper and layout options in your printer software settings (on the
computer) or on the PictureMate Main Menu (printing without a computer) are
set correctly.
95
Page 97

■ Your photo size may not match the width/height proportions (aspect ratio) of the
paper size or layout you’re using. Photos may be cropped to fit the paper and
layout.
The wrong photo is printed.
The photo numbering on the proof sheet may not match the numbering in your
camera.
■ If you’re printing without a computer, first print a proof sheet to identify your
photos by number. If you deleted photos from your card or took new photos, you
may need to print a new proof sheet. See Printing a Proof Sheet from the
PictureMate Print Wizard.
■ If your camera supports DPOF, you can pre-select photos so PictureMate knows
exactly what to print. See Camera-selected DPOF Photos for more information.
■ If your camera is PictBridge-enabled, you can connect it to PictureMate and
control printing from the camera. See Printing From a PictBridge-enabled Digital
Camera for details.
Too many copies are printing.
96
Make sure that the Copies option in your software (printing from computer) or on
the PictureMate Main Menu (printing without computer) is not set for multiple
copies.
Page 98

Where To Get Help
Epson provides technical assistance 24 hours a day through the electronic support
services and automated telephone services listed below:
Service Access
World Wide Web From the Internet, you can reach Epson Support at
http://support.epson.com. At this site, you can download
drivers and other files, look at product documentation, access
troubleshooting information, and receive technical advice
through e-mail.
You can learn more about PictureMate by visiting
www.MyPictureMate.com. At this site, you can find
information about PictureMate, support, special offers, and
accessories.
Automated
Telephone Services
A variety of automated help services are available 24 hours a
day, seven days a week. To use these services, you must have
a touch tone telephone and call (800) 922-8911. Your Epson
SoundAdvice
PictureMate in SoundAdvice.
SM
code is 70540. Use this code to quickly select
To speak to a technical support representative, dial:
■ U.S.: (562) 276-7282, 6 AM to 8 PM, Pacific Time, Monday through Friday and
7 AM to 4 PM, Saturday.
■ Canada: (905) 709-2567, 6 AM to 6 PM, Pacific Time, Monday through Friday.
Toll or long distance charges may apply.
Before you call, please have the following information ready:
■ Product name (PictureMate)
■ Product serial number (located on the back of PictureMate)
■ Proof of purchase (such as a store receipt) and date of purchase
■ Computer configuration
■ Description of the problem
97
Page 99

You can purchase a PictureMate Print Pack with PictureMate Photo Paper and a
photo cartridge, and other PictureMate accessories from the Epson Store at
(800) 873-7766 or visit www.epsonstore.com (U.S. sales only). In Canada, please call
(800) 463-7766 for dealer referral.
Uninstalling PictureMate Software
You may need to uninstall and then reinstall your PictureMate software on your
computer. This may be necessary when you upgrade your operating system, for
example. However, you don’t need to uninstall Film Factory or this on-screen User’s
Guide. Follow the steps in these sections:
■ Uninstalling From a Windows Computer
■ Uninstalling From a Macintosh Using OS X
■ Uninstalling From a Macintosh Using OS 9
Note: Do not turn off or disconnect PictureMate while you are uninstalling the
software.
98
Uninstalling From a Windows Computer
1. Double-click My Computer (Windows XP: click Start > My Computer), then
double-click the Control Panel icon.
2. Double-click Add/Remove Programs.
3. Click PictureMate Printer Software in the program list and click the
Add/Remove button (Change/Remove button on Windows 2000 and XP).
4. In the next window, make sure your
and click OK. Then follow the on-screen instructions.
5. In Windows 98 or Me, click
EPSON USB Printer Devices in the program list
and click the Add/Remove button.
If you are using Windows XP or 2000, go to step 9.
6. When you see the prompt asking if you want to reboot, click No.
7. Click EPSON PhotoStarter3.0 in the program list and click the Add/Remove
button. Then follow the on-screen instructions.
EPSON PictureMate printer icon is selected
Page 100

8. Click EPSON CardMonitor in the program list and click the Add/Remove
button. Then follow the on-screen instructions.
9. Restart your computer when you’re done.
When you are ready to reinstall the PictureMate software, follow the instructions for
your operating system in your Using PictureMate With a Computer book.
Note: Remember that you don’t need to reinstall Film Factory or on-screen
User’s Guide, and you won’t see the license agreement.
Uninstalling From a Macintosh Using OS X
Follow these steps to uninstall Epson PhotoStarter and Card Monitor, and your
PictureMate driver:
1. Open your Applications folder.
2. Drag the EPSON Card Monitor and EPSON PhotoStarter3 for X folders to
the trash.
3. Open the Utilities folder (in the Applications folder).
4. Double-click the Printer Setup Utility or Print Center icon.
5. Select PictureMate and click Delete.
6. Close Printer Setup Utility or Print Center.
When you are ready to reinstall the PictureMate software, follow the instructions for
your operating system in your Using PictureMate With a Computer booklet.
Note: Remember that you don’t need to reinstall Film Factory or your on-screen
User’s Guide, and you won’t see the license agreement.
Uninstalling From a Macintosh Using OS 9
1. Close all applications.
2. Insert the PictureMate software CD-ROM.
3. In the Epson window, scroll down and double-click the Drivers folder.
4. Double-click the
English folder, then double-click the OS 9 folder.
99
 Loading...