

Page 1

®
Service Manual
Color Image Scanner
EPSON Perfection 1250/1250 PHOTO
TM-PERF1250
Printed in U.S.A.
Page 2

Page 3

EPSON
Perfection 1250/1250 PHOTO Color Flatbed Scanner
Service Manual
Page 4

EPSON Perfection 1250/1250 PHOTO
Copyright Notice
2001 Epson America, Inc.
3480 Kilroy Airport Way, Long Beach CA, 90806-2469
All rights reserved. No part of this publication may be reproduced,
stored in a retrieval system, or transmitted in any form or by any means,
electronic, mechanical, photocopying, recording, or otherwise, without
the written permission of Epson America, Inc.
Epson America, Inc., assumes no liability for damages resulting from
the use of the information contained herein. While every precaution has
been taken in the preparation of this book, Epson America, Inc.
assumes no responsibility for errors and omissions.
Neither Epson America, Inc., nor its affiliates shall be liable to the
purchaser of this product or third parties for damages, losses, costs, or
expenses incurred by the purchaser or third parties as a result of:
accident, misuse, or abuse of this product or unauthorized
modifications, repairs, or alterations to this product.
Epson America, Inc. shall not be liable for any damages or problems
arising from the use of any options or any consumable products other
than those designated as Original EPSON-Approved Products by Seiko
Epson Corporation.
Trademark Information
EPSON® and ESC/P® are registered trademarks of Seiko Epson.
Epson Connection
General Notice: Other product names used herein are for identification
purposes only and may be trademarks of their respective companies.
EPSON disclaims any and all rights in those marks.
is a service mark of Epson America, Inc.
SM
4
Page 5

EPSON Perfection 1250/1250 PHOTO
FCC Compliance Statement for American Users
This equipment has been tested and found to comply with the limits for
a Class B digital device, pursuant to Part 15 of the FCC Rules. These
limits are designed to provide reasonable protection against harmful
interference in a residential installation. This equipment generates,
uses, and can radiate radio frequency energy and, if not installed and
used in accordance with the instructions, may cause harmful
interference to radio and television reception.
However, there is no guarantee that interference will not occur in a
particular installation. If this equipment does cause interference to radio
and television reception, which can be determined by turning the
equipment on and off, the user is encouraged to try to correct the
interface by one or more of the following measures:
! Reorient or relocate the receiving antenna.
! Increase the separation between the equipment and receiver.
! Connect the equipment into an outlet on a circuit different from that
to which the receiver is connected.
! Consult the dealer or an experienced radio/television technician
for help.
Warning
The connection of a non-shielded equipment interface cable to this
equipment will invalidate the FCC Certification of this device and may
cause interference levels that exceed the limits established by the FCC
for this equipment. It is the responsibility of the user to obtain and use a
shielded equipment interface cable with this device. If this equipment
has more than one interface connector, do not leave cables connected
to unused interfaces.
Changes or modifications not expressly approved by the manufacturer
could void the user’s authority to operate the printer.
For Canadian Users
This Class B digital apparatus meets all requirements of the Canadian
Interface-Causing Equipment Regulations.
Cet appareil numérique de la classe B respecte toutes les exigences du
Règlement sur le materiel brouilleur du Canada.
5
Page 6

EPSON Perfection 1250/1250 PHOTO
Guide to Using This Manual
Symbols Used in This Manual
Before servicing the EPSON Perfection 1250/1250 PHOTO, read the
precautions on the following page. Then turn to one of these chapters:
Chapter 1. Product Basics
Lists the main features of the product and describes basic
control panel operations.
Chapter 2. Technical Overview
Explains how the product works.
Chapter 3. Troubleshooting
Tells how to identify and correct common problems.
Chapter 4. Disassembly and Assembly
Provides step-by-step instructions for disassembling the
product.
Chapter 5. Maintenance
Describes routine maintenance procedures.
Chapter 6. Appendix
Provides additional information for reference:
" Detailed specifications
DANGER
C A U T I O N
R E A S S E M B L Y
TIP
Warnings
or death.
Cautions
scanner.
Reassembly
reassembly.
TIP
must be followed to avoid personal injury
must be followed to avoid damaging the
notes provide helpful information for
notes provide helpful tips for reassembly.
" Connector diagram and pin assignments
" Electrical diagrams
" Parts list
" Exploded diagrams
6
Page 7

EPSON Perfection 1250/1250 PHOTO
General Precautions
DANGER
" When servicing, unplug the scanner from the
power outlet and disconnect any attached devices.
" Never touch the primary parts of the power supply
when the scanner is plugged in. The scanner’s
primary circuitry remains live whenever it is
plugged in.
" No work should be performed on the unit by
persons unfamiliar with basic safety measures
familiar to trained electronics technicians.
" When performing testing or troubleshooting
procedures in this manual, do not connect the unit
to a power source until instructed to do so. When
the power supply cable must be connected, use
extreme caution in working on the power supply
board and other electronic components.
C A U T I O N
" Repairs on EPSON products should be performed
only by an EPSON-certified repair technician.
" Make certain that the source voltage is the same
as the rated voltage listed on the serial number/
rating plate. If the EPSON product has a primary
AC rating different from the available power
source, do not connect it to the power source.
" Always verify that the EPSON product has been
disconnected from the power source before
removing or replacing circuit boards and other
components.
" To protect sensitive microprocessors and
circuitry, use static discharge equipment, such as
anti-static wrist straps, when accessing internal
components.
" Always replace malfunctioning components with
EPSON components. Introduction of secondsource ICs or other non-approved components
may damage the product and void any applicable
EPSON warranty.
7
Page 8

EPSON Perfection 1250/1250 PHOTO
8
Page 9

EPSON Perfection 1250/1250 PHOTO
Contents
Chapter 1 Product Basics
Features ...................................................................................................... 13
Control Panel ............................................................................................... 13
Chapter 2 Technical Overview
Basic Operation ........................................................................................... 17
Carriage Assembly ................................................................................. 17
Carriage Mechanism .............................................................................. 18
Control Circuit Overview .............................................................................. 19
Chapter 3 Troubleshooting
Overview ...................................................................................................... 23
Error Processing .......................................................................................... 23
Scanner Self-Diagnostics ............................................................................ 24
Unit-Level Troubleshooting .......................................................................... 24
Chapter 4 Disassembly & Assembly
Overview ...................................................................................................... 29
Required Tools ....................................................................................... 29
Screws .................................................................................................... 30
Disassembly Procedures ............................................................................. 30
Carriage Lock Release ........................................................................... 30
Document Cover .................................................................................... 31
Upper Cover Removal ............................................................................ 31
Carriage Assembly Removal .................................................................. 32
Motor CR/Timing Belt Removal .............................................................. 34
Main Circuit Board Removal ................................................................... 35
Control Panel Board Removal ................................................................ 36
Chapter 5 Maintenance
Overview ..................................................................................................... 41
Lubrication .............................................................................................. 41
Chapter 6 Appendix
Specifications .............................................................................................. 45
Basic specifications ................................................................................ 45
Basic TPU specifications ........................................................................ 46
Electrical specifications .......................................................................... 46
Resistance to electrical noise ................................................................. 47
Operating environment ........................................................................... 47
Reliability ................................................................................................ 47
Documents ............................................................................................. 47
Interface Specifications ............................................................................... 48
USB Interface ......................................................................................... 48
Control Codes ............................................................................................. 49
Scanner Connection Diagram ................................................................ 49
Connector Summary .............................................................................. 50
Connector Pin Assignments ................................................................... 50
Circuit Diagram ............................................................................................ 52
Parts List and Exploded Diagrams .............................................................. 55
9
Page 10

EPSON Perfection 1250/1250 PHOTO
10
Page 11

PRODUCT BASICS
CHAPTER
1
Page 12

Page 13

EPSON Perfection 1250/1250 PHOTO Product Basics
1.1 Features
There are two EPSON Perfection 1250 models: the 1250 and the 1250
PHOTO. The Perfection 1250 PHOTO ships with a TPU (transparency unit) as
a standard feature. Both models are flat-bed color image scanners capable of
scanning up to A4 size documents (maximum scan area: 8.5
The scanner’s features include:
High resolution
!
Optical resolution up to 1200 dpi
(1200 dpi in the main scan direction, 2400 dpi in the sub-scan direction)
!
Maximum effective pixels:
10,200
!
Output resolution:
50 to 4800 dpi
×
14,040
Compact and lightweight
!
The world's thinnest 1200 dpi CCD scanner.
High-speed scanning
!
At 1200 dpi, the scanner performs at the following speeds:
Table 1-1. Scan Speed
×
11.7 inch).
1.2 Control Panel
The control panel includes four buttons, as shown below:
Photo Print button
Start button
Figure 1-1. Control Panel buttons
Buttons
The four buttons (Start, Photo Print, Scan to E-mail, Scan to Web) on the
control panel can be used in conjunction with the scanner software to make
scanning very easy.
!
Start
Starts EPSON Smart Panel (button function can be reassigned).
Scan to E-mail button
Scan to Web button
Monochrome (B&W) Approx. 12 msec per line
256 Grayscale Approx. 36 msec per line
Full Color Approx. 36 msec per line
Command level
!
ESC/I-D2
Setting Speed
!
Photo Print
Starts Photo Print, scans and prints the document.
!
Scan to E-mail
The document is scanned in Full Auto mode and the image file is
automatically attached to an e-mail message.
!
Scan to Web
Sends the image to the EPSON Photo Sharing web site.
13
Page 14

EPSON Perfection 1250/1250 PHOTO Product Basics
Indicator Lights
!
Ready (green)
Lit when the scanner is ready to receive commands. Flashes when data is
sent to or from the host computer.
!
Error (red)
Lit when an error occurs.
14
Page 15

TECHNICAL OVERVIEW
CHAPTER
2
Page 16

Page 17

EPSON Perfection 1250/1250 PHOTO Technical Overview
#
2.1 Basic Operation
This chapter describes the basic operation of the Perfection 1250/1250
PHOTO engine.
Mirror and lens mechanism
The light that illuminates the document being scanned is reflected to the
mirror and lens mechanism inside the carriage unit. The CCD sensor
separates R, G and B components.
2.1.1 Carriage Assembly
The carriage assembly consists of a CCD sensor circuit board, an inverter
circuit board, a lamp (light source), and a mirror and lens mechanism.
Lamp
CCD sensor circuit board
Figure 2-1. Carriage Assembly Structure
Front
Rear
Inverter circuit board
CCD sensor
Front
Scanning
direction
Mirror 1
CCD sensor
CCD
Rear
Document
Lamp
Lens
Figure 2-2. Mirror and Lens Mechanism
Mirror 3
Mirror 4
Mirror 2
#
CCD sensor circuit board
This board consists of color CCD line sensors (independent R, G and B)
and circuits for controlling them.
#
Inverter circuit board
This board boosts the power supply voltage to +24 V DC and converts it
from direct current to alternating current in order to drive the lamp (coldcathode fluorescent lamp).
#
Lamp
A cold-cathode fluorescent lamp is used as the light source.
17
Page 18
EPSON Perfection 1250/1250 PHOTO Technical Overview
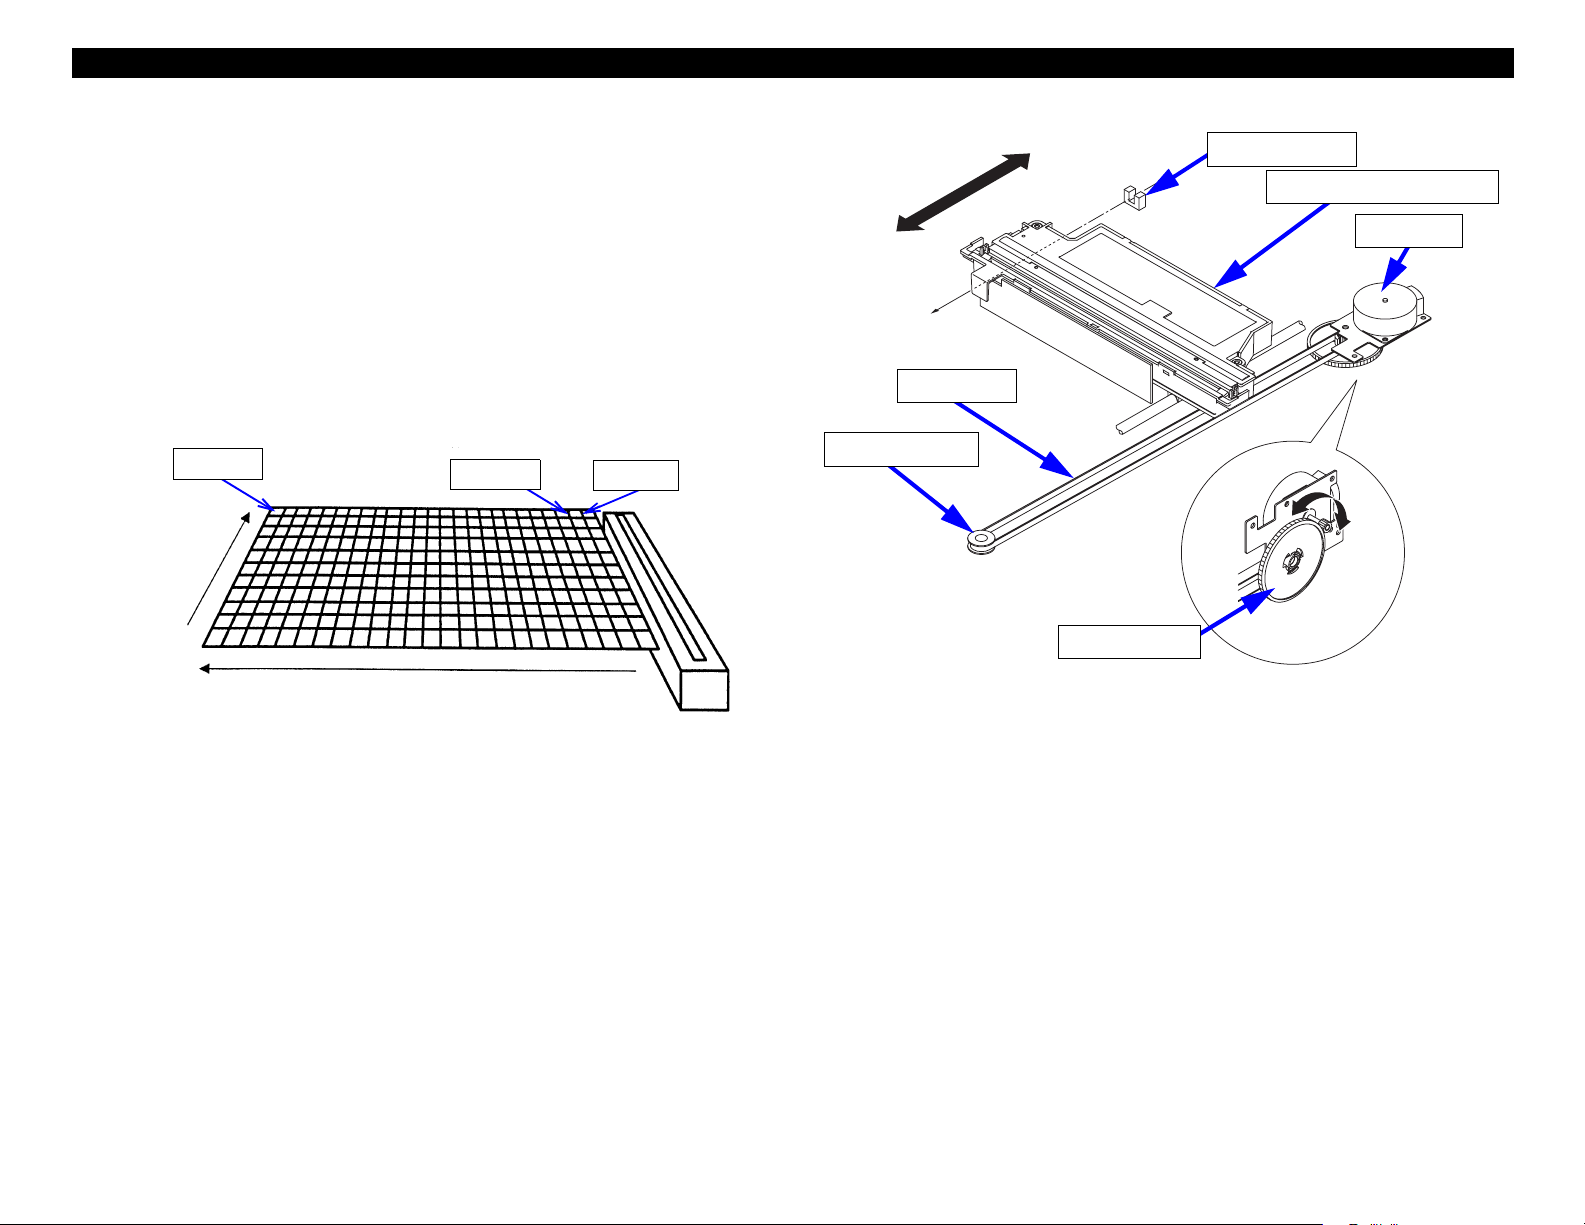
2.1.2 Carriage Mechanism
To generate an image, the document is scanned in the main scanning direction
(single line scan) by the CCD sensor, and then in the sub-scanning direction
(multiple line scan) by the carriage assembly as shown in Figure 2-3.
The color CCD sensor can only scan a single line in the main scanning
direction (which runs parallel to the carriage assembly direction). In order to
scan the second and subsequent lines in the sub-scanning direction, the CCD
sensor is moved by the carriage unit. Scanned data is then sent to the control
circuit board. When line
processed at the same time, so that scanning is continuously carried out.
1 pixel
Main scanning
direction
n
is being scanned, the image data for line
Document
Sub-scanning direction
(from carriage movement)
2nd line
1st line
Scanner head
n-1
is
(carriage)
Front
Timing belt
Driven Pulley
Rear
Drive Pulley
CR HP sensor
Carriage Assembly
Figure 2-4. Carriage Operation
CR Motor
Figure 2-3. Carriage Movement
The carriage assembly slides along the guide rail in the sub-scanning direction.
This movement is powered by the CR motor via the drive pulley to the timing
belt which is secured to the carriage unit. The scanning starting position is
determined by the CR HP sensor, which is located on the control circuit board.
18
Page 19

EPSON Perfection 1250/1250 PHOTO Technical Overview
2.2 Control Circuit Overview
The scanner uses a single-chip, 16-bit bus CPU (IC16) which has a
transmission frequency of 20 MHz. Input image signal correction, image
processing and CCD sensor control are controlled by the ASIC (IC10). Table
2-1 describes each of the main ICs function.
Table 2-1. Description of Main ICs
IC Location Function
T224162B-35J IC1 DRAM 256 x 16bit
NM24C02M8X IC2 Reset IC
ILX555K IC4 CCD
ASIC : Manages the following
• CCD control
• Image processing
• USB 1.1 Interface
LM9833 IC5
• Stepping motor control
• Input image signal correction
• General-purpose I/O
• Programmable frequency divider
• Buffer control
NJM78M120LA-TE1 IC7 Regulator
PC1 RPI-576 CR home position sensor
SW1.2.3.4 CARBON SWITCH Push Switch
LED
LED1 SML-020MLT
Ready : Green
Error : Red
19
Page 20

EPSON Perfection 1250/1250 PHOTO Technical Overview
MAIN
Figure 2-5. Control Circuit Block Diagram
20
Page 21

TROUBLESHOOTING
CHAPTER
3
Page 22

Page 23

EPSON Perfection 1250/1250 PHOTO Troubleshooting
3.1 Overview
Follow these steps to troubleshoot the scanner:
1. Run a scan through the user interface and note which indicator lights are
on. Then determine their meaning in Scanner Self-Diagnostics
page 24, and try the remedy provided.
2. If that doesn’t work, see Unit-Level Troubleshooting
on page 24.
on
3.2 Error Processing
Fatal errors
!
Cause
• Blown bulb (illumination is low)
• Carriage does not return to home position
• Other Scanner malfunction
!
Process
• Lamp turns off and operation stops
• A status Bit 7 is set
!
Display
• LED lights red
!
Reset
After removing the cause of the error:
• Turn the power back on
• Disconnect and then re-connect the USB cable
• Send ESC @
!
Receivable commands
[ESC F, ESC f, ESC @]
23
Page 24

EPSON Perfection 1250/1250 PHOTO Troubleshooting
3.3 Scanner Self-Diagnostics
When an error occurs, the scanner uses its Error and Ready indicator lights to
display the type of error.
See the table below to determine the type of error:
Table 3-1. LED Indicators and Error Type
Red LED Error Type
On
Remedy: Turn the power off and back on, send an initializtion command (ESC
@), and disconnect then reconnect the USB cable. If the light remains red,
continue with the Unit-Level Troubleshooting section.
Acceptable commands: ESC F, ESC f, ESC @
"
Blown lamp
"
Carriage does not return to the home
position
"
Other scanner malfunction
3.4 Unit-Level Troubleshooting
Refer to one of these sections to solve scanner problems:
! Scanner Doesn’t Initialize
! Carriage Doesn’t Move on page 25
! Carriage Operates But an Error Occurs on page 25
! Lamp Does Not Come On on page 25
! Image Isn’t Scanned Clearly on page 25
! Scanner Doesn’t Receive Data From Computer on page 26
! Optional TPU Doesn’t Operate on page 26
on page 25
24
Page 25

EPSON Perfection 1250/1250 PHOTO Troubleshooting
SCANNER DOESN’T INITIALIZE
When the scanner is powered up and connected to a computer with the driver
installed, the Operate light (LED) should come on, the carriage should move
briefly to the right and then return to home position. If you don’t see this, check
the following:
1. Make sure all connectors, especially on the power supply board, are
secure.
2. If all connectors are secure, go to the following section.
CARRIAGE DOESN’T MOVE
If the carriage does not move at all when connected to a computer with the
driver installed, check the following:
1. Make sure that CN4 is connected to the main board.
2. With software installed and after starting a scan, check that the carriage
slides smoothly. If it catches or fails to move smoothly, replace it.
3. Check the carriage motor for a possible short circuit or open in one of its
coils. Disconnect CN5 and check resistance:
"
between pins 1 and 3: 18.4 ohms
"
between pins 2 and 4: 18.4 ohms
Replace the motor if defective.
4. If you can’t find any other problems, replace the main board.
CARRIAGE OPERATES BUT AN ERROR OCCURS
If the carriage operates but the scanner detects an error:
1. If the upper case has been removed, reinstall it.
2. If the error still occurs, replace the main board.
LAMP DOES NOT COME ON
If the fluorescent lamp doesn’t come on, check the following:
1. Check all connections to make sure they’re secure.
2. The lamp or inverter board may be worn out. Replace the CR assembly.
3. If the lamp still doesn’t come on, replace the main board.
IMAGE ISN’T SCANNED CLEARLY
If the image appears blurry, out of focus, or has other problems, check the
following:
1. Check the document glass. Clean it if necessary with a soft, dry cloth. You
can also use a neutral cleaning agent, then wipe it dry.
2. Check the lamp; it may be dirty or darkened in some areas. Clean or
replace as needed.
3. Check the mirror in the carriage unit; clean it if needed.
4. If the scanner’s parts are clean and you still don’t get a good image,
replace the main board and retest.
5. After eliminating all other possibilities, there may be an optical problem in
the carriage, mirror unit, or CCD sensor unit. In that case, replace the
entire scanner mechanism.
25
Page 26

EPSON Perfection 1250/1250 PHOTO Troubleshooting
SCANNER DOESN’T RECEIVE DATA FROM COMPUTER
If the scanner doesn’t seem to receive data, check the following:
1. Make sure the USB controller is enabled. To do so:
a. Start Windows.
b. Select My Computer, click the right mouse button and choose
Properties.
c. Click Device Manager and make sure Universal Serial Bus Controller is
enabled.
2. The TWAIN driver user interface is not installed correctly. Try removing it
through the Add/Remove Programs icon in the Windows Control Panel,
then reinstall it.
3. The USB cable may be defective. Try replacing it.
4. If all other possibilites are eliminated, try replacing the main board.
OPTIONAL TPU DOESN’T OPERATE
If the optional TPU doesn’t operate, check the following:
1. Make sure CN6 is properly connected to the main board.
2. Check to see if the TPU is receiving power. Check the voltage of the lamp.
It should be 24 volts. Check the voltage of the sensor circuit. It should be 5
volts. Replace the TPU as necessary.
3. Replace the main board if the TPU still doesn’t operate.
26
Page 27

DISASSEMBLY & ASSEMBLY
CHAPTER
4
Page 28

Page 29

EPSON Perfection 1250/1250 PHOTO Disassembly and Assembly
4.1 Overview
Follow the steps in this chapter to disassemble and assemble the scanner.
Unless otherwise noted, you can reassemble the scanner by following the
disassembly steps in reverse.
DANGER
C A U T I O N
The scanner directions referred to in the disassembly procedures are as
follows.
" Unplug the scanner from the AC power outlet before
servicing.
" Wear gloves and use an anti-static device such as a wrist
strap when servicing the scanner.
" Perform servicing only on flat, stable surfaces.
" Use only the specified tools when servicing the scanner.
4.1.1 Required Tools
Use the following tools when servicing the scanner:
Table 4-1. Tool List
Description Availablity
Phillips Screwdrivers
(No. 1 and No. 2)
Flat-tipped screwdriver commercially available
Needlenose pliers commercially available
Tweezers commercially available
Loctite™ (screw lock fluid) commercially available
commercially available
Figure 4-1. Direction Definitions
29
Page 30

EPSON Perfection 1250/1250 PHOTO Disassembly and Assembly
4.1.2 Screws
See the tables below if you’ve forgotten where to put a particular screw.
Screws are referred to by number throughout the disassembly instructions.
Table 4-2. Screw Name Abbreviations
Abbreviation Screw Name
CBP P-type cross-head binding screw
CBB B-type cross-head binding screw
Table 4-3. List of Screw Types
No. Specification Shape
1 CBP(M3x8)
2 CBB(M2.5x12)
4.2 Disassembly Procedures
This section describes the disassembly and removal procedures for each
major component of the scanner.
4.2.1 Carriage Lock Release
1. Disconnect the power cable from the scanner.
2. Make sure the carriage lock at the rear of the scanner is in the released
position.
Locked Position Released Position
Figure 4-2. Carriage Lock Position
C A U T I O N
Before relocking the carriage to transport the scanner,
make sure that the carriage is in the home position.
30
Page 31

EPSON Perfection 1250/1250 PHOTO Disassembly and Assembly
4.2.2 Document Cover
1. Open the document cover.
2. Holding it by its edges, lift the document cover straight up to remove it.
Document Cover
Figure 4-3. Document Cover Removal
4.2.3 Upper Cover Removal
Preparation:
"
Remove the document cover as described in the previous section.
"
Move the carriage lock to the locked position as described in Carriage
Lock Release
1. Remove two screws (CBP, M3x8) from the rear of the scanner.
2. Disengage the six hooks at the left and right of the cover (use a flat-tipped
screwdriver or similar tool to work the cover upward), then lift the back of
the upper cover and push it forward to remove it.
C A U T I O N
" When removing the upper cover, make sure that the
" The edges of the metal shields are sharp, so be careful
on page 30.
hooks are fully disengaged and that the tabs do not get
broken.
during disassembly and reassembly.
Figure 4-4. Document Cover Removal
CBP (M3x8) screws
Figure 4-5. Upper Cover Removal - Remove Rear Screws
31
Page 32

EPSON Perfection 1250/1250 PHOTO Disassembly and Assembly
Hooks
Figure 4-6. Upper Cover Removal - Disengage Hooks
4.2.4 Carriage Assembly Removal
Preparation:
"
Remove the document cover as described in Document Cover on
page 31.
"
Release the carriage as described in Carriage Lock Release on
page 30.
1. Remove one screw (CBB, M2.5x12), and then remove the driven pulley to
loosen the timing belt.
2. Remove the CR Shaft from the holder.
3. Remove the timing belt from the carriage assembly.
4. Disconnect the white ribbon cable from the main circuit board.
CBB (M2.5x12) screw
CR Shaft
Holder
Figure 4-7. View With Upper Cover Removed
Pulley
Figure 4-8. Carriage Assembly Removal (1)
32
Page 33

EPSON Perfection 1250/1250 PHOTO Disassembly and Assembly
Figure 4-9. Carriage Assembly Removal (2)
R E A S S E M B L Y
C A U T I O N
When attaching the timing belt to the carriage assembly,
Loctite screw lock should be used.
When applying the Loctite screw lock, turn the carriage
assembly upside down so that the Loctite screw lock does
not get onto any other parts.
FFC
Loctite
Screw lock
Figure 4-10. Timing Belt Removal
Figure 4-11. Remove FFC from Main Circuit Board
33
Page 34

EPSON Perfection 1250/1250 PHOTO Disassembly and Assembly
4.2.5 Motor CR/Timing Belt Removal
Preparation:
"
Remove the document cover as described in Document Cover on
page 31.
"
Remove the upper cover as described in Upper Cover Removal on
page 31.
"
Release the carriage as described in Carriage Lock Release on
page 30.
"
Remove the carriage assembly as described in Carriage Assembly
Removal
Connector
on page 32.
CR Motor Unit
1. Remove two screws (CBP, M3x8) securing the main board shield plate,
and then remove the main circuit board shield plate.
2. Remove three screws (CBP, M3x8) securing the CR motor unit.
3. Disconnect the CR motor unit cable from the main circuit board connector
(CN5), and then remove the CR motor unit.
CBP (M3x8) screws
Shield Plate
CBP (M3x8) screws
Figure 4-13. Motor CR Unit Removal
4. Remove the timing belt from the CR motor unit.
5. Remove the E-ring of the drive pulley.
6. Remove the drive pulley.
Figure 4-12. Main Circuit Board Shield Plate Removal
34
Page 35

EPSON Perfection 1250/1250 PHOTO Disassembly and Assembly
4.2.6 Main Circuit Board Removal
Drive Pulley
Preparation:
"
Remove the document cover as described in Document Cover on
page 31.
"
Remove the upper cover as described in Upper Cover Removal on
page 31.
"
Release the carriage as described in Carriage Lock Release on
page 30.
1. Gently slide the carriage assembly forward until the main circuit board
shield plate can be seen.
E-Ring
Timing Belt
Figure 4-14. Timing Belt Removal
Timing Belt
E-Ring
2. Remove two screws (CBP, M3x8) securing the main circuit board shield
plate, and then remove it.
3. Disconnect the cables from the CR motor connector (CN5), carriage ribbon
cable connector (CN4) and control panel connector (CN3).
4. Remove the main circuit board.
Carriage Assembly
CBP (M3x8) screws
Drive Pulley
Figure 4-16. Main Circuit Board Removal
Figure 4-15. CR Motor Unit
35
Page 36

EPSON Perfection 1250/1250 PHOTO Disassembly and Assembly
Carriage Cable
Connector
CR Motor Connector
Control Panel
Connector
Figure 4-17. Main Circuit Board Removal
4.2.7 Control Panel Board Removal
Preparation:
"
Remove the document cover as described in Document Cover on
page 31.
"
Remove the upper cover as described in Upper Cover Removal on
page 31.
1. Disconnect the cable from CN1, disengage the two hooks, and then
remove the control panel board.
Hooks
Control Panel Board
Figure 4-18. Control Panel Board Removal
36
Page 37

EPSON Perfection 1250/1250 PHOTO Disassembly and Assembly
Control Panel Board
Connector
Figure 4-19. Control Panel Board Removal
37
Page 38

EPSON Perfection 1250/1250 PHOTO Disassembly and Assembly
38
Page 39

MAINTENANCE
CHAPTER
5
Page 40

Page 41

EPSON Perfection 1250/1250 PHOTO Maintenance
5.1 Overview
Perform cleaning when dirt is noticeable or affects the quality of scanned
images.
!
Document Glass
Clean with a soft, dry cloth. If necessary, you may use a neutral detergent,
and then wipe it dry.
!
Outer Case
Clean with a slightly moistened cloth. To remove stubborn stains, use a
neutral detergent.
C A U T I O N
5.1.1 Lubrication
You need to lubricate the carriage assembly if you have replaced it or it begins
making abnormal noise. Refer to the following tables for recommended grease
type and application points.
Never use organic solvents such as thinner or benzene to
clean the scanner.
Table 5-2. Lubrication Points
Figure Lubrication Points Lubrication
5-1 Drive pulley shaft G-26 (1.0x3mm)
5-2 Tensioning pulley shaft G-26 (1.0x3mm)
5-3 CR shaft G-26 (1.0x3mm)
C A U T I O N
Excessive lubrication may cause damage to the carriage
mechanism.
Table 5-1. Recommended Grease
Grease Type Contents Part Number Availability
EPSON product;
G-26 40g B702600001
not commerically
available
Drive Pulley Shaft
Figure 5-1. Lubrication Point
41
Page 42

EPSON Perfection 1250/1250 PHOTO Maintenance
Tensioning Pully Shaft
Figure 5-2. Lubrication Point
CR Shaft
Figure 5-3. Lubrication Point
42
Page 43

APPENDIX
CHAPTER
6
Page 44

Page 45

EPSON Perfection 1250/1250 PHOTO Appendix
6.1 Specifications
This chapter provides additional information that may be useful when servicing
the scanner.
6.1.1 Basic specifications
Type Desktop color image scanner
Scanning method Fixed bed document scanning with movable
scanning head
Image scanning device Color CCD line sensors (3-line type)
Scanning area A4 (US Letter)
Max. effective area 8.5" x 11.7" (216 mm x 297 mm)
Max. effective resolution 10,200 x 14,040 dots (1200 dpi)
Resolution Main: 1200 dpi
Sub: 2400 dpi
Output resolution
Gradations All pixels/all colors: 16-bit (input)
Color separation method Color CCD
Scanning speed Black & White: Approx. 12 msec./line
50 – 4800 dpi
(setting in units of 1 dpi possible)
7200 dpi, 9600 dpi
1-bit or 8-bit (output)
256 grayscale: Approx. 36 msec./line
Full color: Approx. 36 msec./line
(A4, 1200 dpi, high-speed scanning, not
including data transmission time)
Size 10.9” (W) x 17.2” (D) x 2.6” (H)
278 (W) x 438 (D) x 67 (H) mm
Weight Approx. 5.5 pounds (2.5 kg)
Image processing functions
"
Gamma correction User-defined correction table setting
"
Image output data 8-bit or 1-bit
Interface USB (B connector - 1 receptacle)
Light source White cold-cathode fluorescent lamp
Power switch None
Indicator LEDs Two-color LEDs
Option TPU
Scanning time PC (A4 size using a Pentium-3, 550 MHz,
256 MB or more PC)
600 dpi: 175 seconds or less
1200 dpi: 800 seconds or less
Operating Systems • Windows 98
• Windows 2000 Pro
• Windows ME
• Macintosh System 8.5 or higher (with standard USB
port)
• Post-release support is planned for MAC OS X and
Windows XP
Hub The device must be connected to a tier 1 hub.
Command level ESC/I-D2
45
Page 46

EPSON Perfection 1250/1250 PHOTO Appendix
6.1.2 Basic TPU specifications
Light source White cold-cathode fluorescent lamp
Max. scanning area 1.4” x 1.4” (36 mm x 36 mm)
Document sizes 35 mm strip film (positive, negative)
35 mm slides (positive, negative)
10.9 inches
(278mm)
Figure 6-1. Scanner Dimensions
17.2 inches
(438mm)
2.6 inches
(67mm)
Dimensions 3.4” (W) x 5.7” (D) x 2.2” (H)
88 (W) x 145 (D) x 56 (H) mm
Weight Approx. 0.66 pounds (0.3 kg)
6.1.3 Electrical specifications
Scanner electrical characteristics
"
Rated input voltage 15.2 V DC
"
Rated power Operation: Approx.18 W
Standby: Approx. 5 W
Energy saving mode: Approx.10 W
"
Rated input current 1.2 A/15.2 V DC
AC adapter electrical characteristics
"
Power supply voltage Rated: 100 V AC ± 10%
"
Rated input current 0.4 A
"
Power supply frequency Rated: 50/60 Hz (49.5-60.5 Hz)
"
Rated output voltage 15.2 V DC
"
Rated output current 1.2 A
"
Insulation resistance 10 MΩ or higher at 500 V DC
(between AC line and chassis)
"
Dielectric resistance 1200 V AC for 1 minute
(between AC line and chassis)
46
Page 47

EPSON Perfection 1250/1250 PHOTO Appendix
TPU electrical characteristics
"
Rated input voltage 15 V DC
"
Rated power supply Operation: Average 4 W
Standby: Average 0 W
"
Rated input current 0.3 A
6.1.4 Resistance to electrical noise
Static electricity Panel No errors at 10 kV or less
No damage at 15 kV or less
Metallic parts No errors at 7 kV or less
No damage at 15 kV or less
Test conditions Constants: 150 Ω, 150 pF
Voltage 3 – 15 kV
Cycles 120
6.1.5 Operating environment
Temperature Operation: 41°F – 95°F (5°C – 35°C)
Storage: -13°F – 140°F (-25°C – 60°C)
6.1.7 Documents
Reflective documents Smooth surfaced documents
Transparent documents Negative and positive films can be scanned
using the separate transparency unit
Humidity Operation: 10% – 80% (no condensation)
Storage: 10% – 85% (no condensation)
6.1.6 Reliability
Main unit MCBF carriage oscillation10,000 cycles
Main unit light source MTTF 5000 hours
TPU Light source MTTF5000 hours
47
Page 48

EPSON Perfection 1250/1250 PHOTO Appendix
6.2 Interface Specifications
This scanner is equipped with a standard USB interface as described below.
6.2.1 USB Interface
The scanner has the following configuration specifications.
.
Max. packet size or end point 0: 8 bytes
Device
Configuration
Interface 0
End point 1
Vendor ID: 0x04B8
Product ID: 0x010F
No. of connectors: 1
Interfaces supported: 1
Characteristics
• Self-powering
• Remote
• Wake-up function not yet supported
• Bus power consumption: 2 mA
Alternate setting values: None
No. of end points: 3
Interrupt IN transfer
Max. packet size: 1 byte
Connector B receptacle x 1
Figure 6-2. B Receptacle Pin Layout
Pin No. Signal
1VCC
2 –Data
3+Data
4GND
End point 2
End point 3
String descriptor
Bulk In transfer
Max. packet size: 64 bytes
Bulk out transfer
Max. packet size: 64 bytes
Manufacturer's name: "EPSON"
Product name: "Perfection 1250/1250 PHOTO"
Electrical specifications Conforms to high-speed (12 Mbps) mode
specifications in the Universal Serial Bus
specifications Revision 1.1
48
Page 49

EPSON Perfection 1250/1250 PHOTO Appendix
6.3 Control Codes
The command level for this scanner is ESC/I-D2. The commands supported by
the scanner are shown in the following table.
Table 6-1. Control Codes
Category Command Name Code
ID request ESC I
ID2 request ESC i
Executable
commands
Data form setting
Correction
processing
Auxiliary, other
Control
Status request ESC F
Expansion status request ESC f
Scanning start ESC G
Pushbutton status request ESC !
Data format setting ESC D i
Resolution setting ESC R n1 n2
Scanning area setting ESC A n1 n2 n3 n4
Color setting ESC C i
Gamma correction setting ESC Z i
Gamma correction table
setting
Threshold value setting ESC t i
Scanning mode ESC g i
Initialization ESC @
Option control ESC e i
Line counter setting ESC d i
Normal result ACK
Error result NACK
Scanning stop CAN
Header STX
ESC z i d[256]
6.3.1 Scanner Connection Diagram
The scanner connection diagram is shown below.
(Main Board)
4
Figure 6-3. Connection Diagram
4
49
Page 50

EPSON Perfection 1250/1250 PHOTO Appendix
6.3.2 Connector Summary
Connectors used in the scanner are listed below. For their pin assignments,
refer to the tables listed in the right-hand column.
Table 6-2. Connector Summary
Board Connector Function No. of Pins
CN1 AC input 2 6-3
CN2 USB connector 6 6-4
Main circuit board
CCD circuit board
Inverter circuit
board
CN3 Panel circuit board 7 6-5
CN4 CCD circuit board 23 6-6
CN5 CR motor 5 6-7
CN6 TPU 7 6-8
CN1 Main circuit board 23 6-3
CN2 Inverter circuit board 2 6-9
CN1 CCD circuit board 2 6-9
CN2 Lamp 2 6-10
Ref.
Table
Table 6-4. Main Circuit Board CN2
Pin No. Signal I/O
1VCC I
2 –Data I/O
3+Data I/O
4GND —
Table 6-5. Main Circuit Board CN3
Pin No. Signal I/O
15V O
2 GREEN O
3RED O
4Push–SW1 I
5Push–SW2 I
6Push–SW3 I
7Push–SW4 I
Panel circuit board CN1 Main circuit board 7 6-5
6.3.3 Connector Pin Assignments
The pin assignments for circuit board connectors are shown in the following
tables.
Table 6-3. Main Circuit Board CN1
Pin No. Signal I/O
1 +15VDC I
2GND —
Table 6-6. Main Circuit Board CN4
Pin No. Signal I/O
1+15V O
2GND —
3B# I
4B I
5A# I
6A I
7GND —
8 SENSEB O
9 SENSEA O
50
Page 51

EPSON Perfection 1250/1250 PHOTO Appendix
Pin No. Signal I/O
10 HP O
11 +15V O
12 PM–SW4 O
13 PM–SW3 O
14 PM–SW2 O
15 PM–SW1 O
16 +5V O
17 DETECT O
18 OP–LED I
19 ERR–LED I
20 GND —
21 +Data I/O
22 –Data I/O
23 TPU I
Table 6-7. Main Circuit Board CN5
Table 6-8. Main Circuit Board CN6
Pin No. Signal I/O
1+15V O
2 TPU_DETECT I
3NC —
4GND —
Table 6-9. CCD Circuit Board CN2
Pin No. Signal I/O
1+LSV O
2GND —
Table 6-10. Inverter Circuit Board CN2
Pin No. Signal I/O
1+25V O
2INV–GND —
Pin No. Signal I/O
1MOTB# O
2MOTA# O
3MOTB O
4MOTA O
5+15V O
51
Page 52

EPSON Perfection 1250/1250 PHOTO Appendix
6.4 Circuit Diagram
The following pages show the circuit diagrams for the scanner's control circuits.
"
Main (interface) Board
"
CCD Board
52
Page 53

EPSON Perfection 1250/1250 PHOTO Appendix
Figure 6-4. Main (interface) Board
53
Page 54

EPSON Perfection 1250/1250 PHOTO Appendix
Figure 6-5. CCD Board
54
Page 55

EPSON Perfection 1250/1250 PHOTO Appendix
6.5 Parts List and Exploded Diagrams
Table 6-11. Parts List
Part No. Part Name
100 MAT,COVER,DOCUMENT
101 HOUSING,LOWER
102 COVER,DOCUMENT
103 LOCK,CARRIAGE
104 FOOT
105 DOUBLE SIDED TAPE,305X10
106 LOGO PLATE 10X40;C
107 HOUSING ASSY,UPPER;ASP
200 BOARD ASSY.,I/F
201 BOARD ASSY.,PNL
202 HARNESS,IF-PNL
CN4 CONNECTOR
D1 SCHOTTKY BARRIER DIODE
FLS1 CHOKE COIL
Table 6-11. Parts List
Part No. Part Name
503 PULLEY,DRIVE
504 PULLEY,DRIVEN
505 SHIELD,BASE
506 SHIELD,VERTICAL
507 SHIELD,BASE,BOARD
508 SHIELD,REAR
509 SHIELD,FRONT
510 HOLDER ASSY.,MOTOR
511 CR MOTOR
512 CARRIAGE ASSY.
01 INDIVIDUAL CARTON BOX,FOR AMERICA
02 PAD,SCANNER,FRONT
03 PAD,SCANNER,REAR
800 TPU ASSY
801 35MM FILM STRIP HOLDER
802 35MM SLIDE HOLDER
IC4 IC
Q2 TRANSISTOR
Q3 TRANSISTOR
Q4 TRANSISTOR
400 POWER CABLE
401 AC ADAPTER
500 SHAFT,CR
501 TIMING BELT
502 TORSION SPRING,47
55
Page 56

EPSON Perfection 1250/1250 PHOTO Appendix
102
106
The parts to which no reference number
is assigned will not be available as
after-sale service parts.
201
509
107
101
104
202
506
504
105
508
100
200
507
108
505
103
108
500
511
510
501
502
GT-7200U/PERFECTION 1250 No.01
503
513
400
512
401
Rev.01 10328
Figure 6-6. Exploded Diagram (1)
56
Page 57

EPSON Perfection 1250/1250 PHOTO Appendix
The parts to which no reference number
is assigned will not be available as
after-sale service parts.
03
01
GT-7200U/PERFECTION 1250 No.02 Rev.01 10328
Figure 6-7. Exploded Diagram (2)
02
57
Page 58

EPSON Perfection 1250/1250 PHOTO Appendix
800
801
802
PERFECTION 1250 PHOTO No.03
Figure 6-8. Exploded Diagram (3)
Rev.01 10328
58
 Loading...