

Page 1
Guía de instalación
Guia de configuração
Para ver información detallada y las recomendaciones de seguridad, consulte el Manual del usuario (instalado junto con el software).
Para obter informações detalhadas e recomendações de segurança, consulte o Manual do usuário (instalado com o software).
For detailed information and safety recommendations, see the User's Guide (installed with the software).
Pour des renseignements détaillés et les recommandations concernant la sécurité, consultez le Guide de l'utilisateur (installé avec le logiciel).
Setup Guide
Guide d'installation
1
2
Quite toda la cinta y los materiales de empaque. En algunos modelos, no se suministra
un cable por separado.
Remova cuidadosamente todos os materiais de proteção
da impressora. Alguns modelos não vêm com um cabo
separado.
Remove all tape and packing materials. Separate cord not
provided for some models.
Enlevez tous les rubans et matériaux d'emballage. Il n’y a
pas de cordon séparé dans le cas de certains modèles.
Inserte la perilla de papel.
Encaixe o botão giratório.
Insert the paper knob.
Insérez le bouton du papier.
Inserte el cartucho de cinta hasta que encaje en su lugar. Guíe la cinta entre el cabezal
de impresión y la guía de la cinta.
Insira o cartucho de fita até que um clique indique que está posicionado. Passe a fita
entre cabeçote de impressão e a guia da fita.
Insert ribbon cartridge until it clicks in place. Guide ribbon between print head and ribbon
guide.
Insérez la cartouche-ruban jusqu’à ce qu’elle s’enclenche en position. Acheminez le
ruban entre la tête d’impression et le guide-ruban.
Vuelva a colocar la cubierta de la impresora y ciérrela.
Recoloque a tampa da impressora e feche-a.
Replace the printer cover and close it.
Reposez le capot de l’imprimante et fermez-le.
Acople el soporte del cable USB a la parte trasera de la impresora; después levántelp.
Encaixe o suporte para o cabo USB na parte traseira da impressora, conforme
indicado e, em seguida, levante-o.
Attach USB cable holder to back of the printer; then lift it up.
Fixez le porte-câble USB à l’arrière de l’imprimante, puis relevez-le.
PRECAUCIÓN: El soporte no es una manija. No lo use para mover la impresora.
CUIDADO: O suporte não é uma alça. Não o use para mover a impressora.
CAUTION: The holder is not a handle. Do not use it to move printer.
MISE EN GARDE : Le porte-câble n'est pas une poignée. Ne vous en servez pas
pour déplacer l'imprimante.
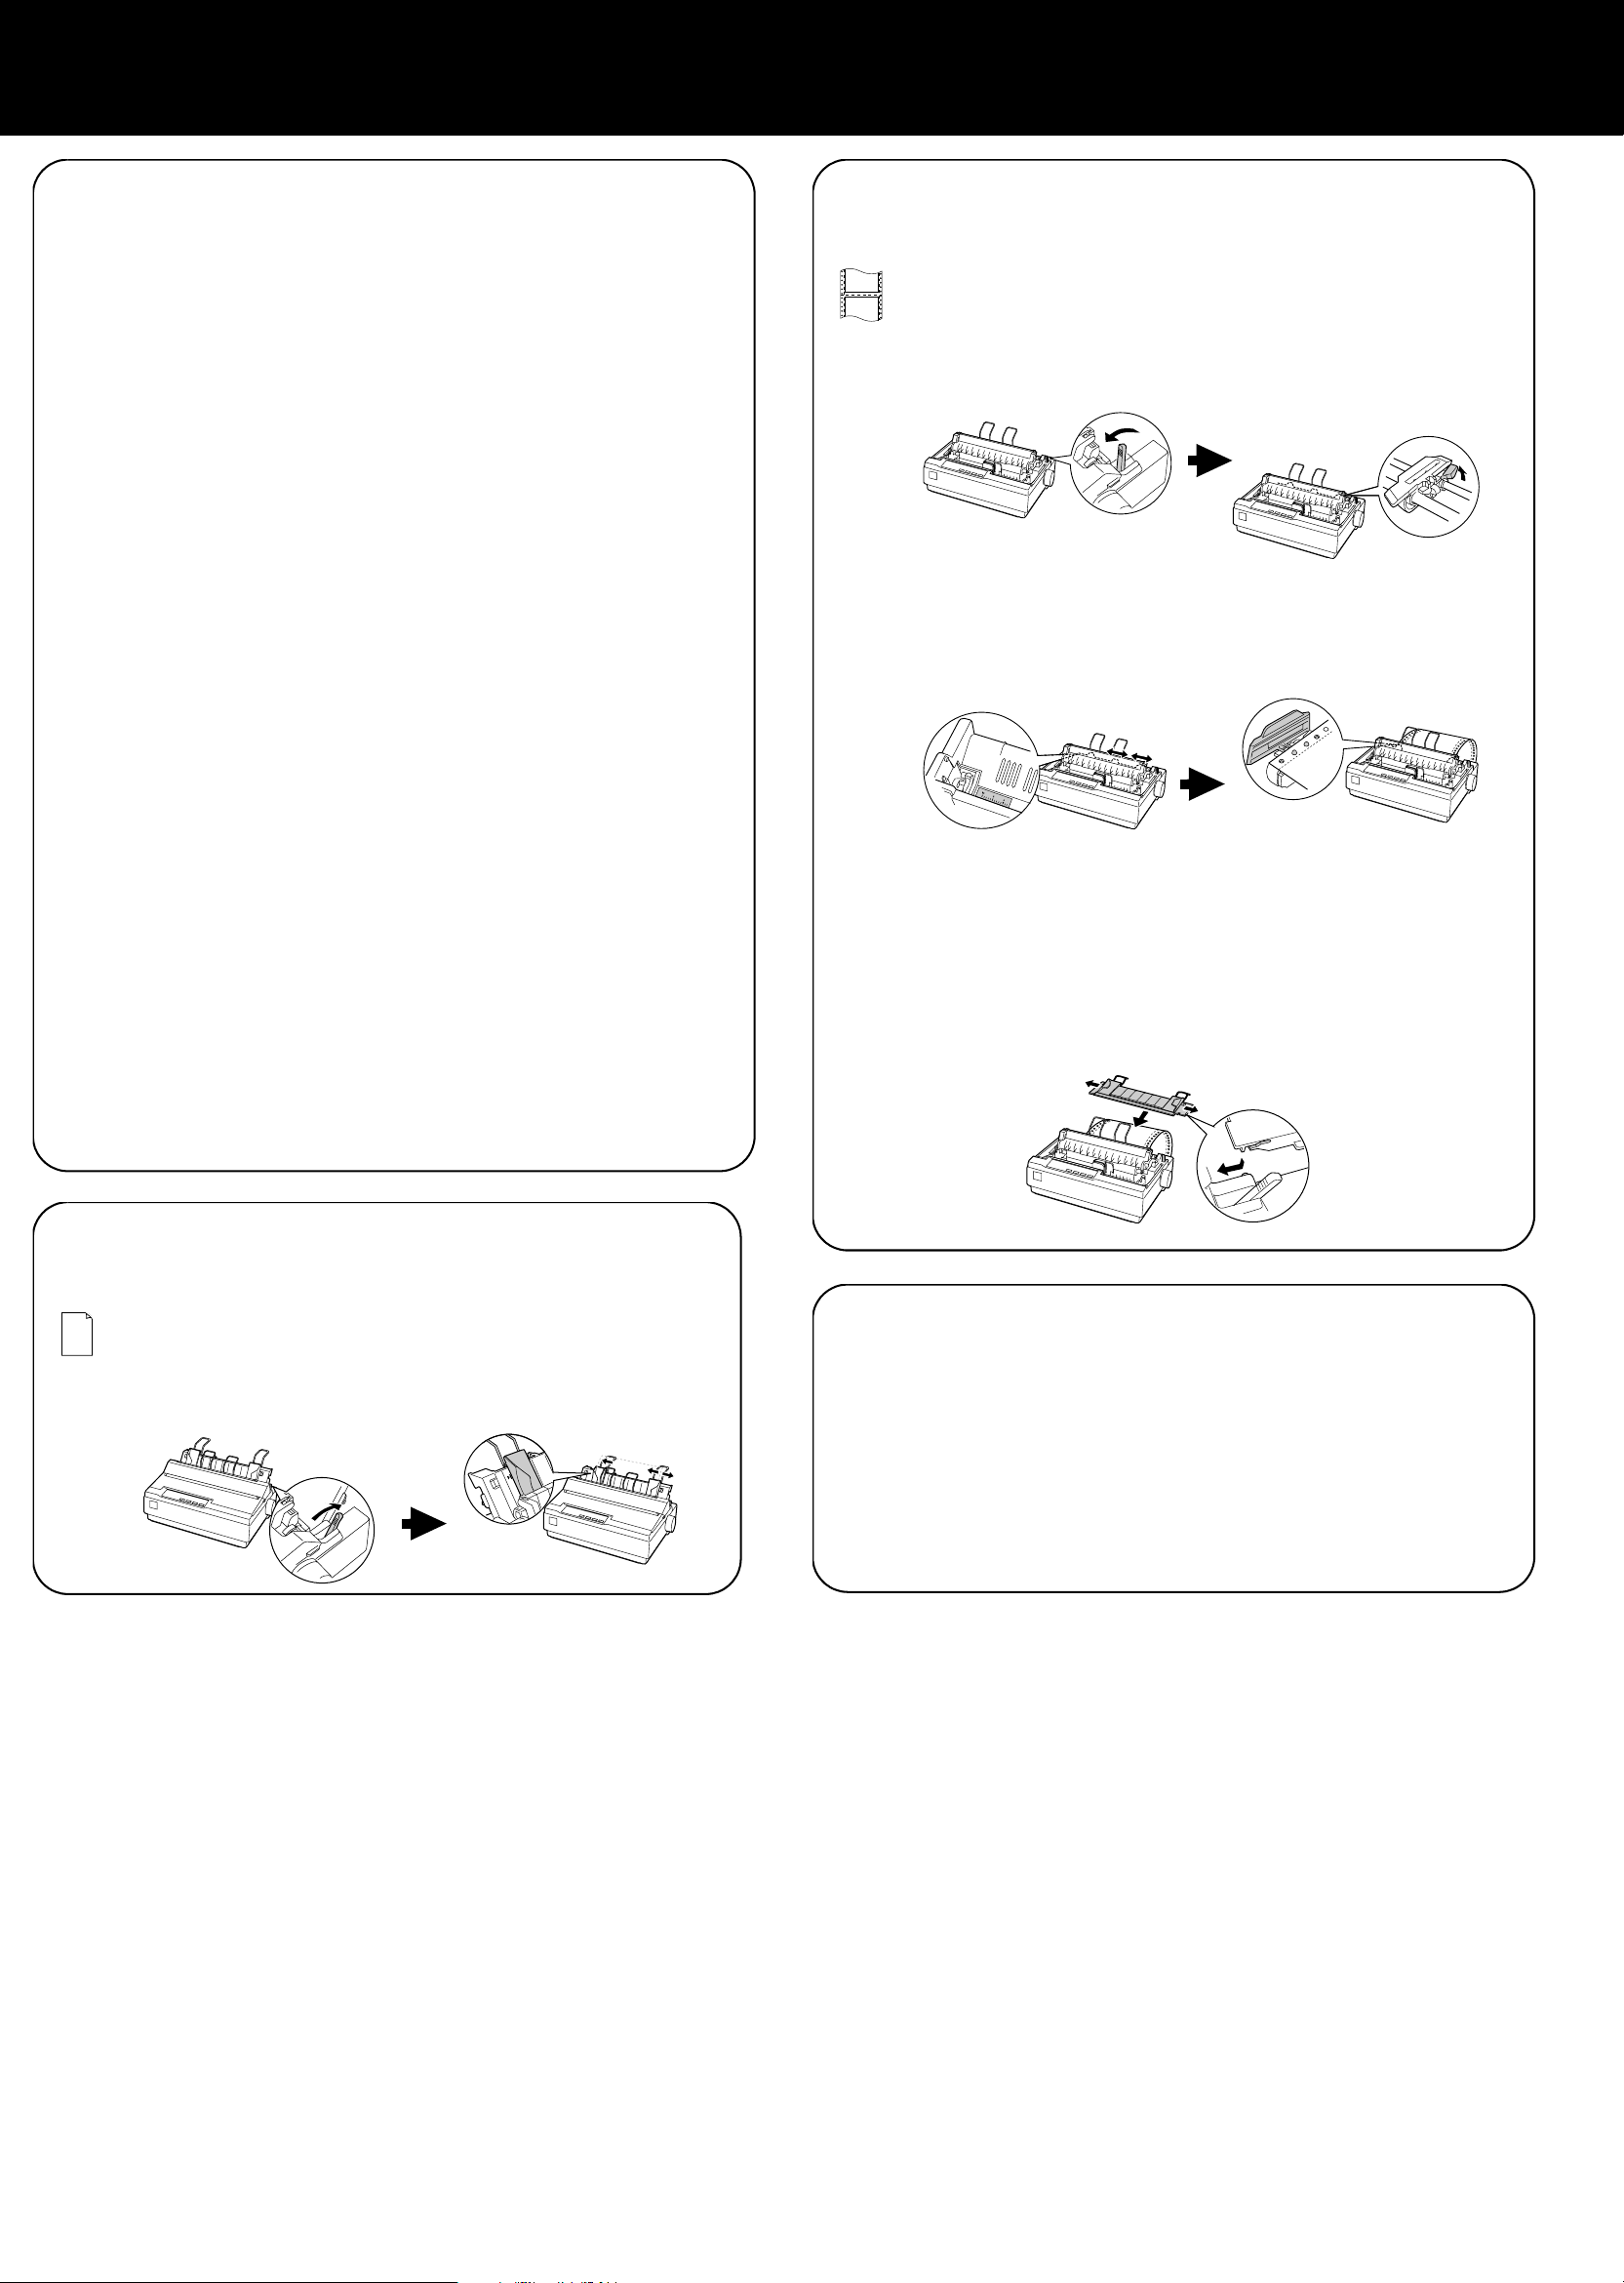
Acople la guía de papel, levántela y trábela en su lugar. Después, acople los soportes del
papel.
Encaixe a guia do papel, alinhando os entalhes em cada lado com as guias da
impressora. Levante a guia do papel e empurre-a um pouco para dentro da impressora
para travá-la no lugar. Encaixe os suportes para papel.
Attach paper guide, lift it up, and lock in place. Then, attach paper supports.
Montez le guide-papier, relevez-le et verrouillez-le en position. Montez ensuite les
supports à papier.
4
5
Conecte el cable de alimetnación a la impresora y a una toma de corriente eléctrica con
puesta a tierra.
Conecte o cabo de alimentação à impressoa e a uma tomada elétrica aterrada.
Connect power cord to printer and to a grounded electrical outlet.
Branchez le cordon d’alimentation à l’imprimante et à une prise électrique mise à la terre.
Conecte la impresora a una computadora.
Conecte a impressora ao computador.
Connect printer to computer.
Raccordez l’imprimante à l’ordinateur.
PRECAUCIÓN: Los conectores del cable de interfaz sólo tienen una orientación
correcta. Cerciórese de que la orientación al conector sea la correcta.
CUIDADO: Os conectores do cabo de interface só têm uma orientação correta.
Certifique-se de que o conector está no sentido correto.
CAUTION: The interface cable connectors have only one correct orientation. Make
sure the orientation of the connector is correct before inserting it into the appropriate port.
MISE EN GARDE : Les connecteurs du câble d'interface ne peuvent être orientés
que d’une seule manière. Vérifiez que le connecteur est correctement orienté.
3
Quite la cubierta de la impresora. Gire el botoncillo en la cinta.
Retire a tampa da impressora. Gire o botão da fita.
Remove the printer cover. Turn knob on the ribbon.
Enlevez le capot de l’imprimante. Tournez le bouton sur le ruban.
USB
RS-232C
(serial)
(série)
IEEE1284
(parallel)
(parallèle)
Page 2
6
Apague la impresora. Instale el software de la impresora que se encuentra en el
CD-ROM y siga las instrucciones en la pantalla. Después, encienda la impresora.
Desligue a impressora. Instale o software da impressora, que se encontra no CD-ROM, e
siga as instruções na tela. Em seguida, ligue a impressora.
Turn printer off. Install printer software on CD-ROM, and follow onscreen instructions.
Then, turn printer on.
Éteignez l’imprimante. Installez le logiciel de l’imprimante (CD-ROM) et suivez les
consignes qui s’affichent à l’écran. Allumez ensuite l’imprimante.
Nota: ❏ Si aparece otro diálogo utilitario de configuración de una impresora
Epson, haga un clic en Retry (Volver a Tratar) y configure el puerto en
forma manual.
❏ La instalación del software de impresora para Windows XP, 2000,
o Windows NT 4.0 puede requerir privilegios de administrador.
Si tienen problemas, pregúntele a su administrador.
❏ Se puede necesitar el CD de Windows al instalar el software de la
impresora. Si es así, siga las instrucciones en pantalla e inserte el CD
de Windows.
Observação: ❏ Se aparecer um outro diálogo de utilitário de configuração de
impressora Epson, clique em Retry (Tentar novamente) e configure a
porta manualmente.
❏ A instalação do software da impressora com o Windows XP, 2000, ou
Windows NT 4.0 pode exigir privilégios de administrador. Se tiver
algum problema, fale com o seu administrador.
❏ O CD do Windows pode ser necessário quando você instalar o
software da impressora. Se o sistema pedir, siga as instruções na
tela e insira o CD do Windows.
8
Apague la impresora; quite la cubierta de la impresora y la guía del papel. Tire de la
palanca de liberación de papel hacia delante y destrabe los dientes del tractor.
Desligue a impressora, retire a tampa da impressora e a guia do papel. Puxe a alavanca
de liberação de papel para a frente e destrave as rodas dentadas de tração.
Turn off printer; remove printer cover and paper guide. Pull paper release lever forward,
and unlock tractor sprockets.
Éteignez l'imprimante, puis enlevez le capot de l'imprimante et le guide-papier. Tirez
la manette de dégagement du papier vers l’avant et déverrouillez les pignons
d'entraînement.
Deslice la rueda dentada a la marca 0 y trábela.
Deslize a roda dentada para a marca de 0 e trave-a.
Slide left sprocket to 0 mark and lock it.
Faites glisser le pignon gauche jusqu’au repère 0 et verrouillez-le.
7
Note: ❏ If another Epson printer setup utility dialog appears, click Retry, and
configure the port manually.
❏ Installing printer software for Windows XP, 2000, or Windows NT 4.0
may require administrator privileges. If you have problems, ask your
administrator.
❏ The Windows CD may be required when you install printer software.
If prompted, follow on-screen instructions and insert the
Windows CD.
Remarque : ❏ Si la boîte de dialogue qui s'affiche concerne l'utilitaire d'installation
d'une autre imprimante Epson, cliquez sur Retry (Réessayer) et
configurez le port manuellement.
❏ L'installation du logiciel d'imprimante sous Windows XP, 2000 ou
Windows NT 4.0 peut nécessiter des privilèges d'administrateur. En
cas de problèmes, adressez-vous à votre administrateur.
❏ Le CD de Windows peut être nécessaire lors de l’installation du
logiciel de l’imprimante. Si cela vous est demandé, suivez les
consignes données à l’écran et insérez le CD de Windows.
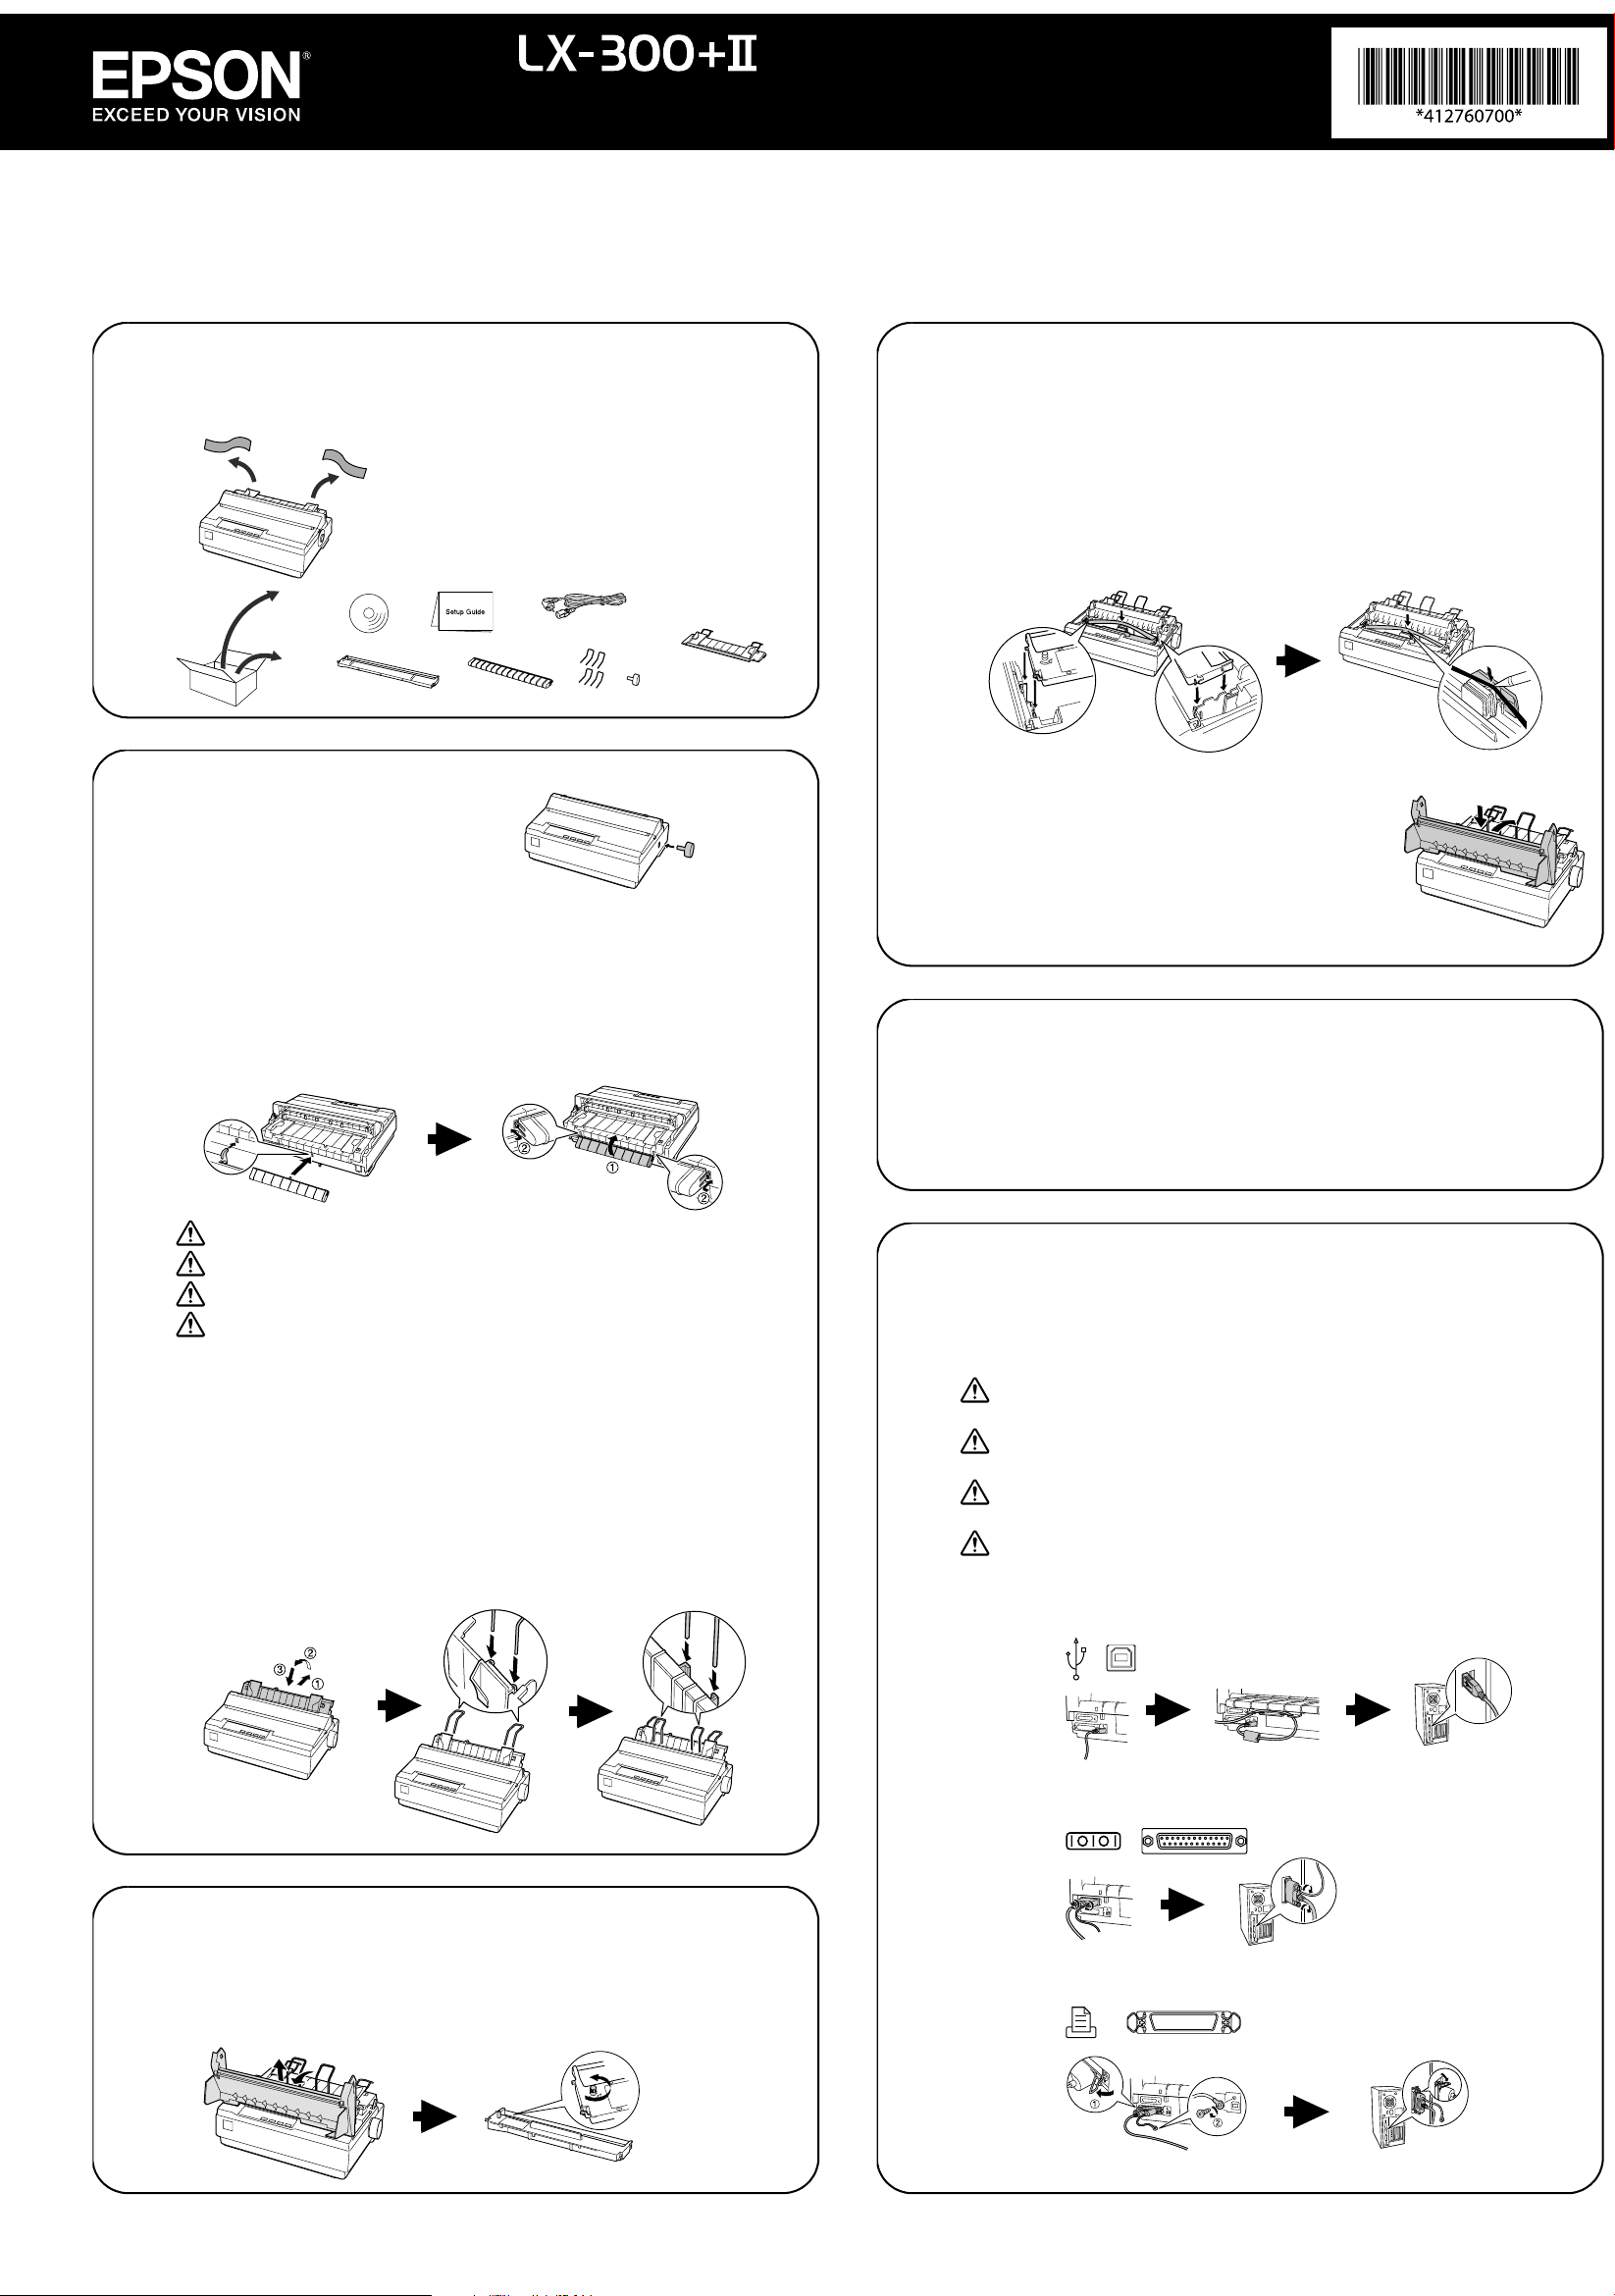
Empuje la palanca de liberación de papel hacia atrás. Deslice la guía del borde
izquierdo hasta la marca de la guía. Ajuste la guía del borde derecho.
Empurre a alavanca de liberação de papel para trás. Desliza a guia de borda esquerda
até a marca de guia. Ajuste a guia de borda direita.
Push paper release lever back. Slide the left edge guide to guide mark. Adjust the right
edge guide.
Poussez la manette de dégagement du papier vers l’arrière. Faites glisser le guide de
bord gauche jusqu’au repère de guidage. Réglez le guide de bord droit.
9
Cierre las cubiertas de las ruedas dentadas. Deslice la rueda dentada derecha y trábela
en su lugar. Vuelva a colocar la guía de papel y la cubierta de la impresora.
Feche as coberturas das rodas dentadas. Deslize a roda dentada da direita e trave-a.
Recoloque a guia do papel e a tampa da impressora.
Close sprocket covers. Slide right sprocket and lock in place. Replace paper guide and
printer cover.
Fermez les couvercles de pignon. Faites glisser le pignon droit et verrouillez-le en
position. Reposez le guide-papier et le capot de l’imprimante.
Para más información, consulte el Manual del usuario instalado con el CD o la página
Web: global.latin.epson.com (seleccione Soporte y seleccione la impresora).
Para obter mais informações, consulte o Manual do usuário, instalado a partir do CD ou
do web site: epson.com (selecione o país, selecione Drivers & Suporte, selecione a
impressora).
For more information, see User’s Guide installed from CD or Web site: epson.com (select
country, select Drivers & Support, select printer).
Pour plus de renseignements, reportez-vous au guide de l’utilisateur installé à partir du
CD ou du site internet : epson.com (sélectionnez le pays, sélectionnez Drivers & Support
[Pilotes et assistance], puis sélectionnez l’imprimante) (site Web présenté en anglais
seulement).
Declaration of Conformity
According to 47CFR, Part 2 and 15 for Class B Personal Computers and Peripherals; and/or CPU
Boards and Power Supplies used with Class B Personal Computers:
We: Epson America, Inc.
Located at MS 3-13
Declare under sole responsibility that the product identified herein, complies with 47CFR Part 2 and 15
of the FCC rules as a Class B digital device. Each product marketed is identical to the representative
unit tested and found to be compliant with the standards. Records maintained continue to reflect the
equipment being produced can be expected to be within the variation accepted, due to quantity
production and testing on a statistical basis as required by 47CFR §2.909. Operation is subject to the
following two conditions: (1) this device may not cause harmful interference, and (2) this device must
accept any interference received, including interference that may cause undesired operation.
Trade Name: Epson
Type of Product: Dot Matrix Printer
Model: P170B
3840 Kilroy Airport Way
Long Beach, CA 90806-2469
Telephone: (562) 981-3840
FCC Compliance Statement for United States Users
This equipment has been tested and found to comply with the limits for a Class B digital device,
pursuant to Part 15 of the FCC Rules. These limits are designed to provide reasonable protection
against harmful interference in a residential installation. This equipment generates, uses, and can
radiate radio frequency energy and, if not installed and used in accordance with the instructions, may
cause harmful interference to radio or television reception. However, there is no guarantee that
interference will not occur in a particular installation. If this equipment does cause interference to
radio and television reception, which can be determined by turning the equipment off and on, the
user is encouraged to try to correct the interference by one or more of the following measures.
• Reorient or relocate the receiving antenna.
• Increase the separation between the equipment and receiver.
• Connect the equipment into an outlet on a circuit different from that to which the receiver is
connected.
• Consult the dealer or an experienced radio/TV technician for help.
WARNING
The connection of a non-shielded equipment interface cable to this equipment will invalidate the FCC
Certification of this device and may cause interference levels which exceed the limits established by
the FCC for this equipment. It is the responsibility of the user to obtain and use a shielded equipment
interface cable with this device. If this equipment has more than one interface connector, do not leave
cables connected to unused interfaces.
Changes or modifications not expressly approved by the manufacturer could void the user’s authority
to operate the equipment.
For Canadian users
This Class B digital apparatus meets all requirements of the Canadian Interface Causing Equipment
Regulations.
Cet appareil numérique de la classe B respecte toutes les exigences du Règlement sur le matériel
brouileur du Canada.
Epson America, Inc., Limited Warranty
This product is covered by a limited warranty. Please visit http://files.support.epson.com/pdf/
sdwarranty/sdwarranty.pdf to see its terms.
No part of this publication may be reproduced, stored in a retrieval system, or transmitted in any form or by any
means, electronic, mechanical, photocopying, recording, or otherwise, without the prior written permission of Seiko
Epson Corporation. No patent liability is assumed with respect to use of the information contained herein. Neither is
any liability assumed for damages resulting from the use of the information contained herein. Neither Seiko Epson
Corporation nor its affiliates shall be liable to the purchaser of this product or third parties for damages, losses,
costs, or expenses incurred by the purchaser or third parties as a result of accident, misuse, or abuse of this product
or unauthorized modifications, repairs, or alterations to this product, or (excluding the U.S.) failure to strictly comply
with Seiko Epson Corporation’s operating and maintenance instructions. Seiko Epson Corporation and its affiliates
shall not be liable against any damages or problems arising from the use of any options or of any consumable
products other than those designated as Original Epson Products or Epson Approved Products by Seiko Epson
Corporation.
Microsoft, Windows, and Windows NT are registered trademarks of Microsoft Corporation in the United States and/or
other countries.
EPSON is a registered trademark of Seiko Epson Corporation in the U.S. and other countries.
Copyright 2014 Seiko Epson Corporation. All rights reserved. CPD-41399
Printed in XXXXXX
Page 3

Instrucciones de seguridad
Lea todas las instrucciones de seguridad antes de utilizar la impresora. Además, siga los avisos e
instrucciones indicadas en la propia impresora.
Símbolo de precaución con piezas calientes
Se coloca este símbolo en el cabezal y en otras piezas para indicar que pueden estar
K
calientes. Nunca toque dichas piezas inmediatamente después de haber utilizado el
equipo. Déjelas enfriar algunos minutos antes de tocarlas.
Instrucciones de seguridad importantes
• No coloque la impresora sobre una superficie inestable ni cerca de un radiador o fuente de
calefacción.
• Coloque la impresora sobre una superficie plana. El equipo no funcionará correctamente si está
inclinado o en ángulo.
• No tape ni obstruya las ranuras y aberturas de la carcasa de la impresora, ni introduzca objetos
en las ranuras.
• Utilice exclusivamente el tipo de fuente de corriente indicado en la etiqueta de la impresora.
• Conecte todos los equipos a tomas de corriente con derivación a tierra. No use tomas de
corriente que se hallen en el mismo circuito que fotocopiadoras o sistemas de aire
acondicionado que se enciendan y apaguen periódicamente.
• No utilice cables deteriorados ni deshilachados.
• Si utiliza un cable de extensión con la impresora, compruebe que el total de amperios de todos
los dispositivos conectados al cable de extensión no sea superior al total de amperios de dicho
cable. Además, compruebe que el amperaje total de todos los dispositivos conectados a la toma
eléctrica no supere el amperaje máximo de dicha toma.
• Desconecte la impresora antes de limpiarla y utilice siempre sólo un pedazo de paño húmedo.
• No derrame líquidos sobre la impresora.
• Excepto cuando se indique específicamente en este manual, no intente reparar la impresora
usted mismo.
• Desconecte la impresora y póngase en contacto con un servicio técnico oficial ante las siguientes
situaciones: si el cable de alimentación o el enchufe están dañados; si ha penetrado líquido en la
impresora; si la impresora ha sufrido una caída o si la carcasa ha resultado dañado; si no
funciona normalmente o muestra un cambio significativo en su rendimiento.
• Ajuste solamente los controles indicados en las instrucciones de funcionamiento.
Declaración de conformidad con FCC para usuarios
de Estados Unidos
Este equipo ha sido probado y se ha determinado que cumple con los límites establecidos para un
dispositivo digital de Clase B, según el Apartado15 de las Reglamentaciones de la FCC. Estos
límites se han concebido para proporcionar una protección razonable ante interferencias
perjudiciales en las instalaciones residenciales. Este equipo genera, utiliza y puede emitir energía
de radiofrecuencia y, si no se instala y utiliza siguiendo las instrucciones, puede producir
interferencias perjudiciales en la recepción de radio y televisión. Sin embargo, no se puede
garantizar que no se produzcan interferencias en ciertas una instalación en particular. Si este
equipo ocasiona interferencias en la recepción de radio y televisión, lo cual puede determinarse
encendiendo y apagando el equipo, el usuario debe tratar de corregir la situación tomando una o
más de las medidas siguientes.
• Cambie la orientación o la ubicación de la antena receptora.
• Aumente la separación entre el equipo y el receptor.
• Conecte el equipo a una toma eléctrica situada en un circuito distinto a aquél en que está
enchufado el receptor.
• Solicite ayuda a un técnico experimentado de radio/TV.
ADVERTENCIA
La conexión de un cable de interfaz sin blindar a este equipo anulará la Certificación de la FCC de
este dispositivo y puede causar niveles de interferencia superiores a los límites establecidos por la
FCC para este equipo. Es responsabilidad del usuario obtener y utilizar un cable de interfaz
blindado con este aparato. Si este equipo tiene más de un conector de interfaz, no deje conectados
los cables a las interfaces que no se utilicen.
Las modificaciones no aprobadas expresamente por el fabricante pueden anular la autorización del
usuario para operar el equipo.
Declaración de conformidad
Según 47CFR, Partes 2 y 15 para computadoras personales y periféricas de Clase B; y/o Paneles
CPU y Suministros eléctricos utilizados con las computadoras personales de Clase B:
Nosotros:
Con domicilio social en:
Declaramos bajo nuestra única responsabilidad que el producto aquí identificado cumple con
47CFR Partes 2 y 15 de las normas FCC como dispositivo digital de Clase B. Cada producto
comercializado es idéntico a la unidad representativa analizada y para la cual se certificó el
cumplimiento de las normas. Los registros que se mantienen de forma continua para indicar el
equipo que se está produciendo está dentro del límite de variación aceptado en relación a la
cantidad de producción y se ha comprobado según bases estadísticas tal y como lo exige, tal y como
lo exige la 47CFR §2.909. El funcionamiento está sujeto a las dos condiciones siguientes: (1) este
dispositivo no causa interferencia peligrosa y, (2) este dispositivo debe de aceptar cualquier
interferencia recibida, incluyendo aquella que pudiera causar un funcionamiento no deseado.
Nombre comercial: Epson
Tipo de producto: Impresora matricial de agujas
Modelo: P170B
Garantía limitada de productos Epson
1. Garantía limitada de productos Epson
Los productos Epson tienen garantía contra defectos de fabricación y el malfuncionamiento de los
materiales utilizados para la fabricación de los mismos siempre y cuando las fallas ocurran bajo las
condiciones de uso y manejo detalladas en la documentación del producto. Así mismo, la garantía
cubrirá únicamente el periodo especificado en la sección “Cobertura de garantía limitada Epson”,
la cual toma efecto a partir de la fecha de entrega del producto al comprador por parte de Epson o
algún distribuidor autorizado Epson (vea “Lista de subsidiarias y oficinas Epson en Latinoamérica”),
en el país donde compró el producto Epson.
Epson también garantiza que los consumibles (cartuchos de tinta, tóner y baterías) incluidos con el
producto se comportarán de acuerdo con las especificaciones siempre y cuando se utilicen antes de
que expire la garantía de los mismos.
Epson America, Inc.
MS 3-13
3840 Kilroy Airport Way
Long Beach, CA 90806-2469
Teléfono: (562) 981-3840
2. Alcance de la garantía
Si Epson recibiera aviso de algún defecto en el producto durante el periodo de garantía, podrá, a su
discreción, reparar o reemplazar el producto defectuoso sin costo para el cliente. En el caso de
reemplazo, el producto sustituido pasará a ser propiedad de Epson. El producto que servirá de
reemplazo podrá ser nuevo o previamente reparado de acuerdo con los estándares de calidad
Epson y gozará del remanente de la garantía del producto original.
La presente garantía no incluye compensación o indemnización alguna causada por las fallas de
funcionamiento del producto Epson. En cualquier caso, la responsabilidad máxima de Epson para
con el cliente quedará limitada al precio de compra pagado a Epson o al distribuidor de venta
autorizado.
Epson no proporciona ninguna garantía al software no fabricado por Epson aún cuando el software
se entregue con productos Epson. El software estará amparado bajo la garantía del fabricante del
mismo, tal y como lo señale la documentación que el fabricante adjunte.
3. Limitaciones y exclusiones
La garantía no será válida en los siguientes casos:
3.1 Cuando los números de serie del producto hayan sido alterados o retirados.
3.2 Cuando el producto Epson haya sufrido modificaciones no autorizadas, se le haya dado un
uso incorrecto, o si el producto fue utilizado o almacenado sin respetar las especificaciones
ambientales del mismo.
3.3
Cuando el producto haya sufrido daños directamente relacionados con el
consumibles no originales, rellenados o reentintados, así como el uso de tipos de papel
inapropiados para las especificacionesdel producto.
3.4 Cuando el producto sufra daños debido al transporte inadecuado del mismo. (En caso de que
el empaque, instalación, mantenimiento y el desplazamiento del producto sean deficientes o
negligentes).
3.5 Cuando se produzcan daños al producto causados por desastres naturales o provocados
(incendios, inundaciones, tormentas eléctricas, terremotos, etc.), fluctuaciones de corriente
eléctrica o interacción del producto Epson con productos de otras marcas y fabricantes.
3.6 Cuando se detecte que el producto fue desarmado total o parcialmente, o sufrió algún intento
de reparación fuera de los Centros Autorizados de Servicio Epson.
3.7 Cuando se produzcan derrames de sustancias en el producto.
3.8 Cuando se descubra que las piezas plásticas exteriores hayan sido rayadas o maltratadas.
3.9 Cuando los daños al producto hayan sido causados por pruebas, instalación, mantenimiento o
ajustes inapropiados.
La garantía no incluye accesorios (tapas, fundas y bandejas) o el reabastecimiento de suministros y
consumibles (cartuchos de tinta, tóner, cintas entintadas, baterías, cilindros fotosensibles, perillas,
cabezales de impresión y lámparas), los cuales, por su naturaleza, deben ser adquiridos
regularmente a través de los canales de venta autorizados.
4. Obtención del servicio de garantía
Se recomienda consultar la documentación incluida con el producto para verificar que los ajustes
del mismo estén correctamente configurados y ejecutar regularmente las pruebas y diagnósticos
indicados. Así mismo, Epson recomienda el uso de suministros, accesorios y consumibles
originales Epson para garantizar el óptimo funcionamiento del producto.
Para acceder al servicio de garantía, el cliente puede acudir a cualquiera de los Centros
Autorizados de Servicio Epson de su país con una copia de su factura de compra, o llamar a los
Centros de Asistencia Técnica Epson (vea la lista por países, más adelante).
En el caso de que el cliente llame, deberá proporcionar los números de modelo y serie del producto,
además de los datos del lugar y la fecha de compra (la garantía es únicamente válida en el país de
compra).
En el caso de que no exista un Centro Autorizado de Servicio cercano a su localidad, por favor
comuníquese con el Centro de Asistencia Técnica para que uno de nuestros representantes le
indique dónde obtener servicio calificado.
5. Responsabilidades del cliente
El cliente es responsable por la seguridad de cualquier información confidencial y de su propiedad,
así como de mantener copias de todos los archivos para poder restablecerlos en el caso de fallas.
Cualquier actividad relacionada con la reinstalación del software que se entregó originalmente con
el producto será facturada al cliente de acuerdo a las tarifas en vigor del Centro de Servicio Epson.
Estos cargos y tarifas aplicarán también si la falla es causada por defectos de programas de
software que sean propiedad del cliente o por la entrada de algún virus informático.
Para obtener servicio a domicilio o en el lugar donde se utiliza y/o almacena el producto, el cliente
deberá proporcionar acceso directo al producto, espacio de trabajo adecuado, instalaciones
eléctricas, acceso a los recursos necesarios para la instalación, reparación o mantenimiento y
seguridad para la integridad del personal de Epson y sus herramientas de trabajo.
uso
de accesorios y/o
Cobertura de garantía limitada Epson
Producto Modelo Duración Condiciones
Impresora matricial de 9 agujas LX-300+II Un año Centro de servicio
Servicio de asistencia técnica
Epson ofrece asistencia técnica mediante servicios electrónicos y telefónicos. Antes de llamar a
Epson, consulte los manuales incluidos con su producto. Si no encuentra una solución a su
problema, visite la página de Internet de Epson: global.latin.epson.com.
Centros de asistencia técnica
País Número de teléfono País Número de teléfono
Argentina (54 11) 5167-0300
Bolivia* 800-100-116 Nicaragua* 00-1-800-226-0368
Chile (56 2) 2484-3400 Panamá* 00-800-052-1376
Colombia
Bogotá
Ecuador* 1-800-000-044 República
El Salvador* 800-6570
Guatemala* 1-800-835-0358 Uruguay 00040-5210067
Honduras** 800-0122
* Para llamar desde teléfonos móviles a estos números gratuitos, póngase en contacto con su operador telefónico local.
** Marque los primeros 7 dígitos, espere el mensaje de respuesta y luego ingrese el código NIP.
Si su país no se encuentra en la lista anterior, comuníquese con la empresa que le vendió
el producto.
A través de Internet usted puede obtener información y ayuda en línea para todos los productos
Epson. Registre su equipo Epson en nuestra página de Internet, en global.latin.epson.com/
Soporte, luego seleccione Registre su producto.
0800-288-37766
018000-915235
(57 1) 523-5000
Código NIP: 8320
México
México, D.F.
Paraguay 009-800-521-0019
Perú
Lima
Dominicana*
Venezuela (58 212) 240-1111
01-800-087-1080
(52 55) 1323-2052
0800-10-126
(51 1) 418-0210Costa Rica 800-377-6627
1-888-760-0068
Page 4

Soporte y servicio de garantía extendida
En algunos países, Epson le ofrece la posibilidad de ampliar la cobertura de la garantía original de
sus productos. Pueden obtenerse detalles a través de los Centros de asistencia técnica.
Lista de subsidiarias y oficinas Epson en Latinoamérica
Epson Argentina S.A.
Avenida Belgrano 964/970
(1092), Buenos Aires,
Argentina
Tel: (54 11) 5167-0300
Fax: (54 11) 5167-0333
Epson Chile, S.A.
La Concepción 322
Providencia, Santiago, Chile
Tel: (56 2) 2484-3400
Fax: (56 2) 2484-3413
Epson Colombia, Ltda.
Calle 100 No. 21-64, piso 7
Bogotá, Colombia
Tel: (57 1) 523-5000
Fax: (57 1) 523-4180
Epson Costa Rica, S.A
102 Avenida Escazú
Torre 1, Piso 4, Suite 401/402
Escazú, San José
Costa Rica
Tel: (506) 2588-7855
Fax: (506) 2588-7888
Epson México, S.A. de C.V.
Blvd. Manuel Ávila Camacho
389, Edificio 1 Conjunto
Legaria Col. Irrigación, C.P
11500 México, D.F.
Tel: (52 55) 1323-2000
Fax: (52 55)1323-2183
Epson Perú, S.A.
Av. Canaval y Moreyra 590
San Isidro, Lima 27, Perú
Tel: (51 1) 418-0210
Fax: (51 1) 418-0220
Epson Venezuela, S.A.
Calle 4 con Calle 11-1
La Urbina Sur
Caracas, Venezuela
Tel: (58 212) 240-1111
Fax: (58 212) 240-1128
Instruções de segurança
Símbolo de alerta de peças quentes
Este símbolo se encontra no cabeçote de impressão e em outras peças para
K
indicar que elas podem estar quentes. Nunca toque nessas peças logo após
usar a impressora. Deixe-as esfriar por uns minutos antes de tocá-las.
Instruções de segurança importantes
Leia todas estas instruções de segurança antes de usar a impressora. Além disso, siga os avisos e
instruções marcados na impressora.
• Não coloque a impressora em uma superfície instável ou próxima a um aquecedor de ambiente
ou fonte de calor.
• Coloque a impressora em uma superfície plana. Ela não funcionará corretamente se estiver
inclinada ou em ângulo.
• Não bloqueie ou cubra as aberturas no corpo da impressora e não insira objetos nos buracos.
• Use somente o tipo de fonte de energia indicada na etiqueta da impressora.
• Conecte todo o equipamento em tomadas devidamente aterradas. Evite usar tomadas que
estejam no mesmo circuito que fotocopiadoras ou sistemas de ar condicionado que ligam e
desligam regularmente.
• Não use um cabo de eletricidade que esteja danificado ou descascado.
• Se usar uma extensão com a impressora, certifique-se de que a amperagem total de todos os
dispositivos conectados à extensão não exceda a amperagem dela. Além disso, certifique-se de
que a amperagem total dos componentes conectados à tomada de parede não exceda a
amperagem da tomada.
• Desconecte a impressora antes de limpá-la e sempre a limpe usando apenas um pano úmido.
• Não derrame líquidos na impressora.
• Com exceção do que foi especificamente explicado neste manual, Não tente reparar a
impressora por conta própria.
• Desconecte a impressora e procure um técnico qualificado sob as seguintes condições: se o cabo
de eletricidade ou o plugue estiverem danificados, se algum líquido for derramado dentro da
impressora, se a impressora cair ou o seu gabinete for danificado, se a impressora não funcionar
normalmente ou exibir uma diferença notável de desempenho.
• Ajuste somente os controles discutidos nas instruções de uso.
Declaração de conformidade com a FCC
Para usuários nos Estados Unidos
Este equipamento foi testado e declarado de acordo com os limites de dispositivos digitais Classe B,
conforme a Parte 15 das Normas da FCC. Esses limites foram projetados para oferecer uma
proteção razoável contra interferências prejudiciais em instalações residenciais. Este equipamento
gera, usa e pode emitir energia de radiofreqüência e, se não for instalado e utilizado de acordo com
as instruções, poderá causar interferências prejudiciais aos sinais de recepção de rádio e televisão.
Entretanto, não existem garantias de que não ocorrerão interferências em instalações específicas. Se
este equipamento causar interferências à recepção de rádio e televisão, o que pode ser verificado
ligando-se e desligando-se o equipamento, o usuário será aconselhado a tentar corrigir o problema
por meio de um ou mais dos seguintes procedimentos:
• Reorientar ou reposicionar a antena de recepção.
• Ampliar a distância entre o equipamento e o receptor.
• Conectar o equipamento a uma tomada de um circuito diferente daquela à qual o receptor está
conectado.
• Consultar seu representante ou um técnico de rádio/TV experiente para obter ajuda.
ADVERTÊNCIA
A conexão de um cabo de interface não blindado a este equipamento invalidará a Certificação da
FCC do dispositivo e poderá causar níveis de interferência que excedam os limites estabelecidos
pela FCC para o mesmo. É responsabilidade do usuário obter um cabo de interface de equipamento
blindado e usá-lo com este dispositivo. Caso o equipamento disponha de mais de um conector de
interface, não deixe cabos conectados às interfaces não usadas. Alterações ou modificações não
aprovadas expressamente pelo fabricante poderão anular a autoridade do usuário para utilizar o
equipamento.
Declaração de conformidade
De acordo com a norma 47CFR, Partes 2 e 15 sobre computadores pessoais e periféricos Classe B e/
ou placas de CPU e fontes de alimentação usadas com computadores pessoais Classe B:
Nós:
Situados em:
Declaramos sob nossa responsabilidade exclusiva que os produtos aqui identificados atendem às
exigências da 47CFR, Partes 2 e 15 das Normas da FCC para dispositivos digitais Classe B. Todos os
produtos comercializados são idênticos à unidade testada e atendem aos padrões estabelecidos. Os
registros mantidos continuam a mostrar que os produtos que estão sendo produzidos devem
responder ao intervalo de variação aceitável devido à produção em série e testes estatísticos conforme
determinado pela 47CFR §2.909. O uso do produto está sujeito às duas condições a seguir: (1) este
dispositivo pode não causar interferência prejudicial e (2) este dispositivo deve aceitar qualquer
interferência recebida, incluindo aquela que possa causar funcionamento não desejado.
Nome comercial: Epson
Tipo de produto: Impressora matricial
Modelo: P170B
Epson America, Inc.
MS 3-13
3840 Kilroy Airport Way
Long Beach, CA 90806-2469
Telefone: (562) 981-3840
Suporte técnico ao cliente
A Epson do Brasil disponibiliza aos seus clientes e usuários dos seus produtos vários canais de
comunicação para a obtenção de suporte técnico, informações sobre produtos e serviços.
Para o download de drivers, manuais de usuário, consulta sobre garantia e demais informações
técnicas consulte a nossa página de Internet no endereço global.latin.epson.com/br no link do
Suporte Técnico.
Caso haja a necessidade de alguma informação complementar, localização de Centro de Serviço
Autorizado, ou serviço não disponível na Internet, chame pelo telefone 4003-0376 (capitais e áreas
metropolitanas) ou 0800-880-0094 (outras áreas).
Ganhe tempo e economize dinheiro! Chame o Suporte Técnico da Epson.
A maioria das dificuldades de uso dos equipamentos é possível resolver pelo telefone. Evite
deslocamentos desnecessários, equipamento parado em fila de espera de assistência técnica.
Certificado de garantia
Este certificado de garantia é a sua segurança de ter adquirido um produto Epson comercializado
através dos Distribuidores Oficiais designados pela EPSON DO BRASIL LTDA. Este documento é
imprescindível para o exercício da garantia em todo o território nacional através do Centro de
Serviço Autorizado Epson.
TERMO DE GARANTIA LIMITADA
A EPSON DO BRASIL IND. E COM. LTDA, doravante designada “EDB”, garante, nos termos aqui
definidos, os produtos Epson comercializados em todo território nacional através de seus
Distribuidores e Revendas Oficiais.
A responsabilidade da EDB abrange, através de suas empresas credenciadas, a reparação do
produto, substituição de partes e peças defeituosas e reparo de vícios de qualidade que o torne
impróprio ou inadequado ao uso, utilizando-se sempre de peças que mantenham as especificações
originais.
São considerados suprimentos: cartucho de tinta, toner, cartucho de fita, feltros absorventes e
lâmpadas.
A responsabilidade da EDB não abrange danos ao produto causados por:
a. Operação em desacordo com as condições especificadas na documentação do produto, incluindo
a utilização em ciclos de trabalhos acima da capacidade do equipamento.
b. Inabilidade no uso ou uso indevido.
c. Uso de rede elétrica em desacordo com a voltagem nominal do equipamento ou instalação
inadequada.
d. Transporte ou estocagem indevidos ou inadequados.
e. Danos decorrentes de acidentes, quedas, fatos da natureza ou transporte em embalagem
inadequada.
f. Modificações não autorizadas pelo fabricante, número de série rasurado ou ausente.
g. Serviços de manutenção realizados por pessoa física ou por empresas não credenciadas.
h. Uso de suprimentos genuínos Epson com data de validade vencida ou reprocessados ou uso de
suprimentos não-originais Epson.
i. Uso de acessórios ou peças fora de especificações técnicas equivalentes aos dos produtos
genuínos Epson, que sejam considerados defeituosos ou inadequados ao produto.
j. Ausência de cartuchos instalados nas impressoras jato de tinta, ainda que vazios.
No caso de perda da garantia por um dos motivos citados neste certificado o reparo do
equipamento estará sujeito a um orçamento prévio com taxa de reprovação de orçamento por parte
de nossa rede de Centros de Serviço Autorizado*. A presente garantia limitada é válida pelo prazo
de 1 (um) ano, sendo (90 dias de garantia legal, mais 275 dias de garantia adicional do fabricante)
para cobertura de defeitos de fabricação, exceto para itens de consumo (suprimentos) ou desgaste
natural no decorrer da utilização do produto, tais como: cartucho de fita, cartucho de tinta, toner,
feltros absorventes, lâmpadas e outros itens de reposição que contam com garantia de 30 (trinta)
dias. Esses prazos começam a ser contados sempre a partir da data de emissão da nota fiscal da
primeira aquisição do produto. No caso de troca do produto, como uma alternativa à sua
reparação, o período da garantia do produto substituto será de no mínimo 90 dias (garantia legal)
ou do saldo da garantia adicional remanescente do produto substituído.
Esta garantia não cobre perdas e danos, lucros cessantes, manutenção de caráter preventivo ou
qualquer perda resultante do uso ou da incapacidade de uso do produto, nem o custo de reparação
ou substituição de qualquer outro bem que seja danificado.
O direito de garantia pode ser exercido diretamente em qualquer Centro de Serviço Autorizado*
Epson, devendo o usuário encaminhar o produto acompanhado da nota fiscal de venda e o
presente Certificado de Garantia, sendo de sua responsabilidade as despesas de transporte e
seguro.
Não existe nenhuma outra garantia além da expressa neste documento. Nenhum distribuidor,
revendedor ou pessoa física tem o direito de estender ou modificar a presente garantia oferecida
pela EDB. Fica reservado à EDB o direito de cancelamento desta garantia, no caso de constatação
do descumprimento de quaisquer desses termos.
EPSON DO BRASIL LTDA.
Suporte Técnico: para capitais e regiões metropolitanas: 4003-0376
e demais localidades: 0800-880-0094 ou pelo site: global.latin.epson.com/br
Etiqueta do Produto:
Modelo:
N° de Série:
Revenda:
Tel:
Atenção: A apresentação da nota fiscal de venda e deste certificado é indispensável para o
atendimento em garantia. Aconselhamos o uso da embalagem original para transporte do referido
equipamento.
(*) Vide lista de Centros de Serviço Autorizados no site global.latin.epson.com/br
 Loading...