

Page 1
LW-700
Quick Start Guide
Guide rapide
Page 2

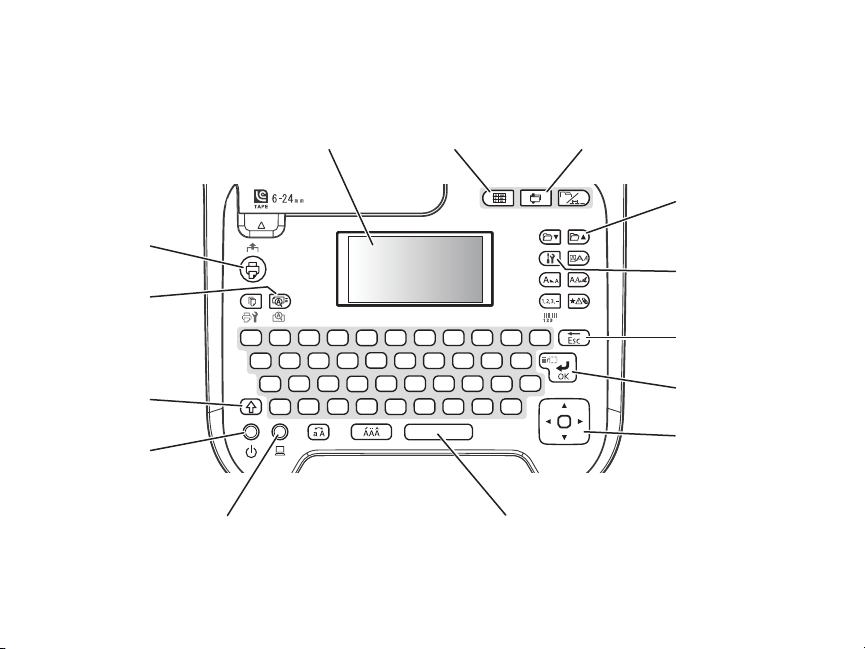
Print and cut
Preview
Display
Create equipment
management label Create cable label
Save/Create
new label
Change language
and other settings
Backspace/Cancel
Shift
Turn on/off
Select/Enter
Navigate
Connect to computer (PC link) Add a space
Page 3
Créer une étiquette
Affichage
Imprimer et
découper
Afficher un
aperçu
Touche
majuscule
Allumer/
éteindre
Connecter à l’ordinateur (PC link) Barre d’espacement
d’identification de
l’équipement Créer une étiquette pour câbles
Sauvegarder/créer
une nouvelle
étiquette
Modifier la langue
ou d’autres
paramètres
Espace arrière/
annuler
Sélectionner/
saisir
Naviguer
Page 4

Contents
English
Getting Started. . . . . . . . . . . . . . . . . . . . . . . . . . . . . . 3
Unpacking . . . . . . . . . . . . . . . . . . . . . . . . . . . . . . . . 4
Plugging in. . . . . . . . . . . . . . . . . . . . . . . . . . . . . . . . 4
Installing batteries. . . . . . . . . . . . . . . . . . . . . . . . . 5
Inserting and removing tape cartridges . . . . 6
Turning the printer on and off . . . . . . . . . . . . . 7
Using the display . . . . . . . . . . . . . . . . . . . . . . . . . . 8
Changing the language and
other preferences . . . . . . . . . . . . . . . . . . . . . . . . . 8
Creating Labels Using the Keyboard . . . . . . . 9
Entering text . . . . . . . . . . . . . . . . . . . . . . . . . . . . . . 9
Saving labels . . . . . . . . . . . . . . . . . . . . . . . . . . . . . 10
Deleting labels . . . . . . . . . . . . . . . . . . . . . . . . . . . 10
Enhancing Your Labels. . . . . . . . . . . . . . . . . . . . . 10
Adding symbols . . . . . . . . . . . . . . . . . . . . . . . . . . 10
Adding frames . . . . . . . . . . . . . . . . . . . . . . . . . . . 11
Symbols . . . . . . . . . . . . . . . . . . . . . . . . . . . . . . . . . 12
Frames. . . . . . . . . . . . . . . . . . . . . . . . . . . . . . . . . . . 16
Changing the font size. . . . . . . . . . . . . . . . . . . . 18
Changing the font. . . . . . . . . . . . . . . . . . . . . . . . 18
Adding punctuation. . . . . . . . . . . . . . . . . . . . . . 19
Adding letters with accent marks . . . . . . . . . 19
Printing Labels . . . . . . . . . . . . . . . . . . . . . . . . . . . . . 19
Specialty Labels . . . . . . . . . . . . . . . . . . . . . . . . . . . . 20
Equipment management labels. . . . . . . . . . . 20
Barcode labels . . . . . . . . . . . . . . . . . . . . . . . . . . . 21
Wrap and flag labels for cables. . . . . . . . . . . . 22
Printed Ribbons . . . . . . . . . . . . . . . . . . . . . . . . . . . . 23
Favor bags . . . . . . . . . . . . . . . . . . . . . . . . . . . . . . . 23
Hair bows or ponytail holders. . . . . . . . . . . . . 24
Ornaments with ribbon hangers . . . . . . . . . . 25
Greeting cards . . . . . . . . . . . . . . . . . . . . . . . . . . . 26
Using the Label Editor Software . . . . . . . . . . . 27
Installing the software . . . . . . . . . . . . . . . . . . . . 27
Connecting to your computer . . . . . . . . . . . . 28
Creating labels using Windows . . . . . . . . . . . 29
Creating labels using Mac OS X . . . . . . . . . . . 30
Applying Labels . . . . . . . . . . . . . . . . . . . . . . . . . . . . 31
Applying iron-on labels. . . . . . . . . . . . . . . . . . . 32
Contents | 1
Page 5

Solving Problems . . . . . . . . . . . . . . . . . . . . . . . . . . 34
Error messages . . . . . . . . . . . . . . . . . . . . . . . . . . . 34
Resetting the printer . . . . . . . . . . . . . . . . . . . . . 35
Epson Technical Support . . . . . . . . . . . . . . . . . . 35
Recycling . . . . . . . . . . . . . . . . . . . . . . . . . . . . . . . . 36
Purchase supplies and accessories . . . . . . . . 36
Registration . . . . . . . . . . . . . . . . . . . . . . . . . . . . . . . . 36
Notices . . . . . . . . . . . . . . . . . . . . . . . . . . . . . . . . . . . . . 36
About printed labels. . . . . . . . . . . . . . . . . . . . . . 36
Declaration of conformity . . . . . . . . . . . . . . . . 37
Epson America, Inc. limited warranty. . . . . . 37
Trademarks . . . . . . . . . . . . . . . . . . . . . . . . . . . . . . 40
2 | Contents
Page 6

Getting Started
Your Label Wor ksTM LW-700 lets you create
labels for any purpose, as well as decorative
stickers and personalized ribbons.
Here are some of the things you can do with
your LabelWorks printer:
■ Manage equipment and cables using
text and barcodes.
■ Link to online content using QR codes.
■ Create professional-looking file labels
and address labels.
■ Organize stuff in your kitchen, bathroom,
and every room of your house.
■ Create iron-on labels for clothing,
uniforms, backpacks, and other cloth
items.
■ Print custom ribbons for party favors,
gifts, hair decorations, and more.
■ Produce glow-in-the-dark labels for light
switches, electrical panels, and children’s
rooms.
■ Create custom labels to help you identify
hazards, emergency supplies, and
warning instructions.
You can print all of these labels and many
more using the printer with or without a
computer.
By installing the software and connecting
the printer to your computer, you can do
even more, for example:
■ Incorporate your own logos, fonts, and
other graphics, including photographs.
■ Import your address book to print
mailing labels for all your holiday cards
(Windows only).
Getting Started | 3
Page 7
For more information and instructions on
using all the features of the LabelWorks
printer and software, see the online User’s
Guide at epson.com/support/lw700 (US) or
epson.ca/support/lw700 (Canada).
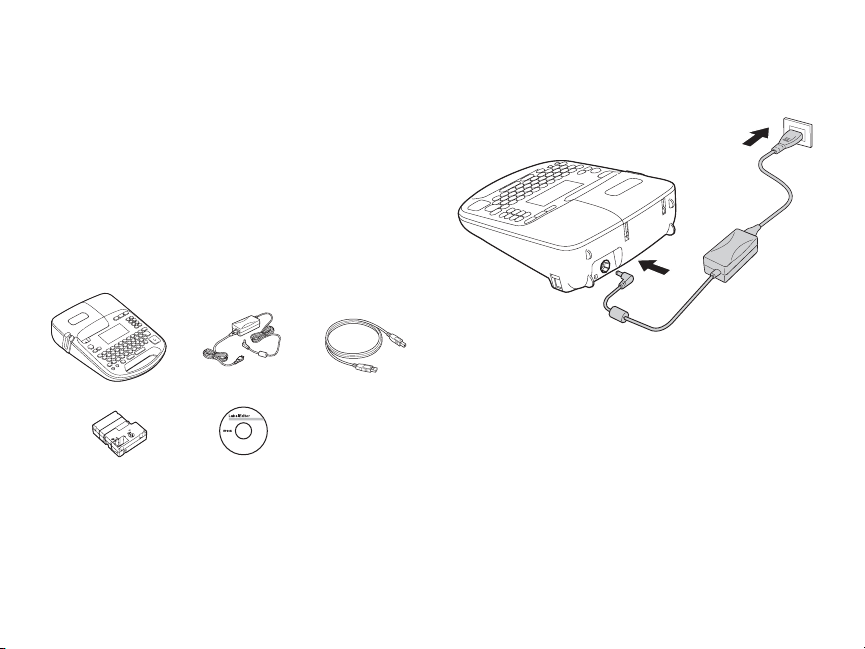
Unpacking
Your LabelWorks printer includes the
following items:
Plugging in
Connect the AC adapter as shown:
Printer
Sample tape
cartridge
AC adapter
Label Editor software
DVD for Windows®
USB cable
Instead of the AC adapter, you can also use 6
alkaline AA batteries (not included).
4 | Getting Started
Page 8
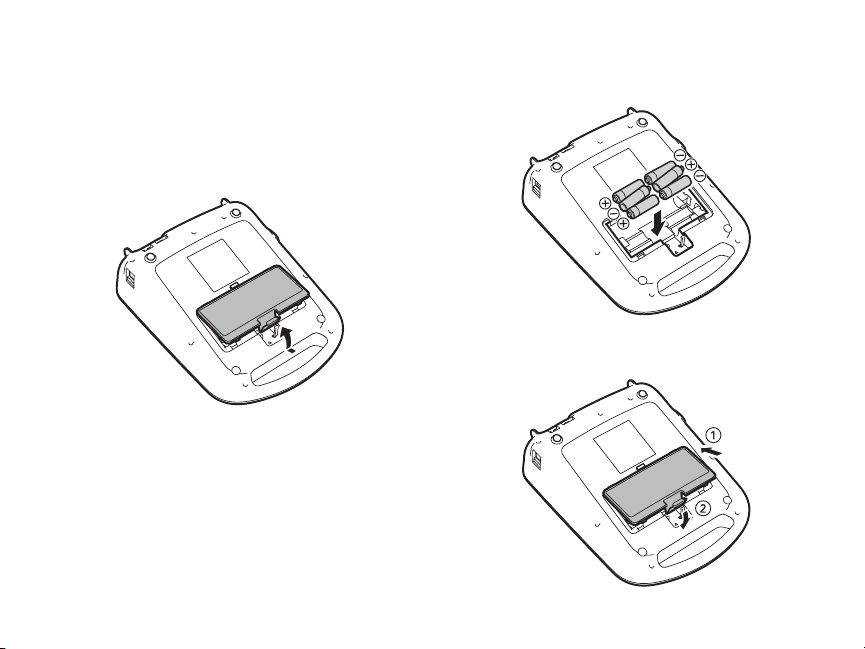
Installing batteries
You can use batteries instead of the AC
adapter when you are not near a power
source.
1. Press the tab and open the battery cover.
2. Insert 6 AA alkaline batteries, positioning
the + and - ends as shown.
3. Replace the battery cover.
Getting Started | 5
Page 9
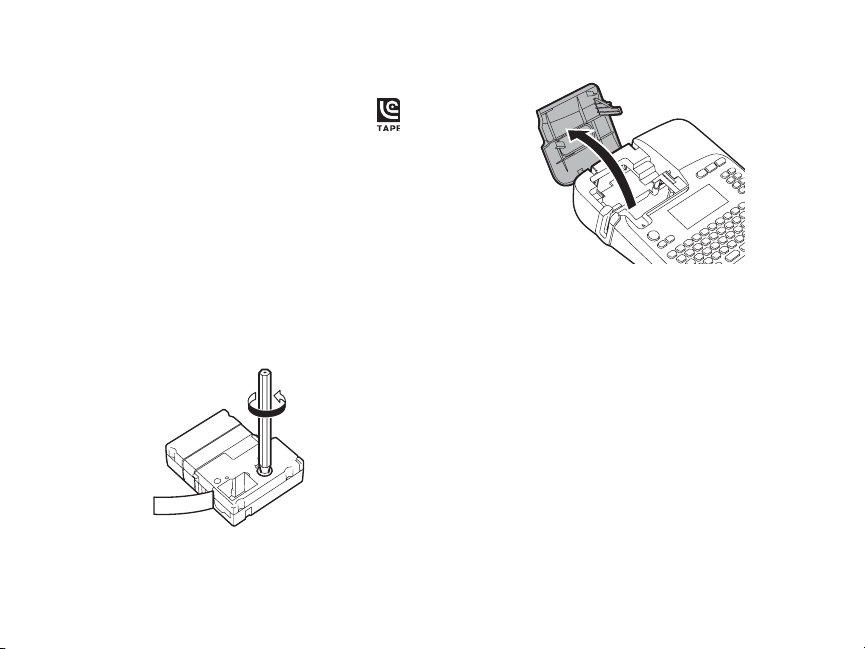
Inserting and removing tape cartridges
Use only tape cartridges with this mark: .
You can use LabelWorks tapes with widths
ranging from 1/4 inch (6 mm) to 1 inch (24
mm).
See the list on the back cover, or go to
epson.com/labelworks (U.S.) or
epson.ca/labelworks (Canada).
1. Remove any slack from the tape using a
pencil or pen.
6 | Getting Started
2. Lift up the tape cover.
3. Insert the cartridge and press it down
firmly until it snaps into place.
Page 10

4. Make sure the end of the tape slides into
the ejection slot.
Turning the printer on and off
Make sure the AC adapter is connected or
batteries are installed.
5. Close the tape cover.
To remove a tape cartridge, open the cover,
grasp the sides of the tape, then lift it out of
the printer.
■ Press the
P power button to turn on the
printer.
The display lights up.
■ When you are finished using the printer,
press the
P power button to turn it off.
You se e a Powering Off message on the
display. Whatever characters you entered
are saved in the printer.
Caution: Do not unplug the printer until the
display turns off.
Getting Started | 7
Page 11
Note: The printer turns off automatically (and
saves your work) if it is not used within 5
minutes. When connected to your computer, it
turns off if it is not used within one hour.
Changing the language and other preferences
You can adjust language and measurement
units, as well as other preference settings.
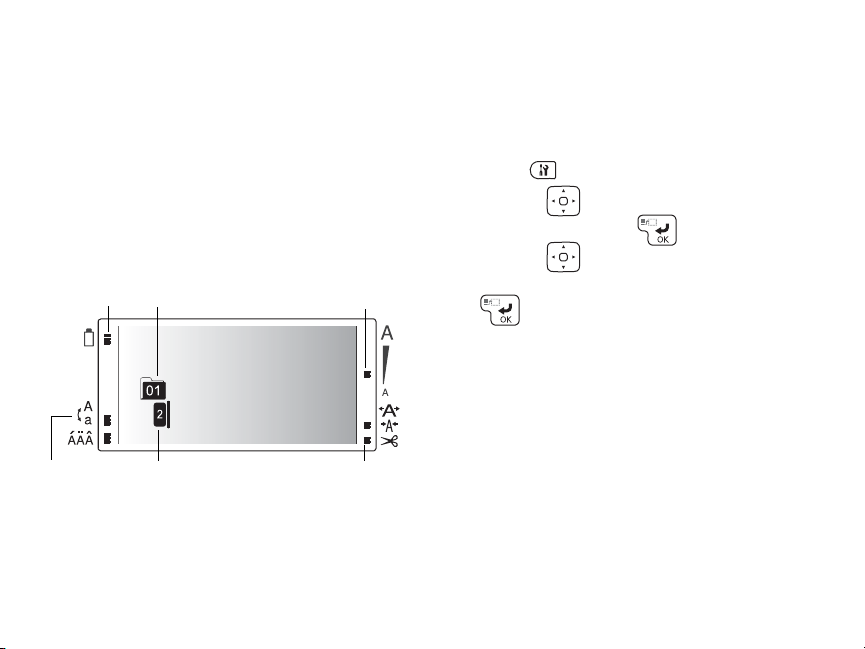
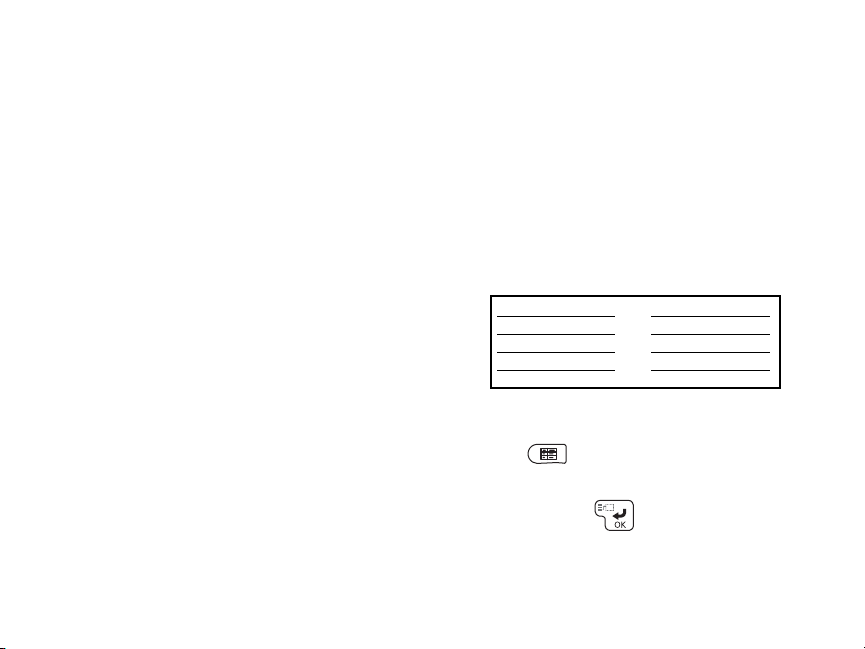
Using the display
The display shows your label text and a
preview of the printed label, as well as
indicating features you are using:
Battery
Current label
level
number
Use of upper
case or
lower case
8 | Getting Started
Current lin e
number
Current
font size
Use of Auto
cut setting
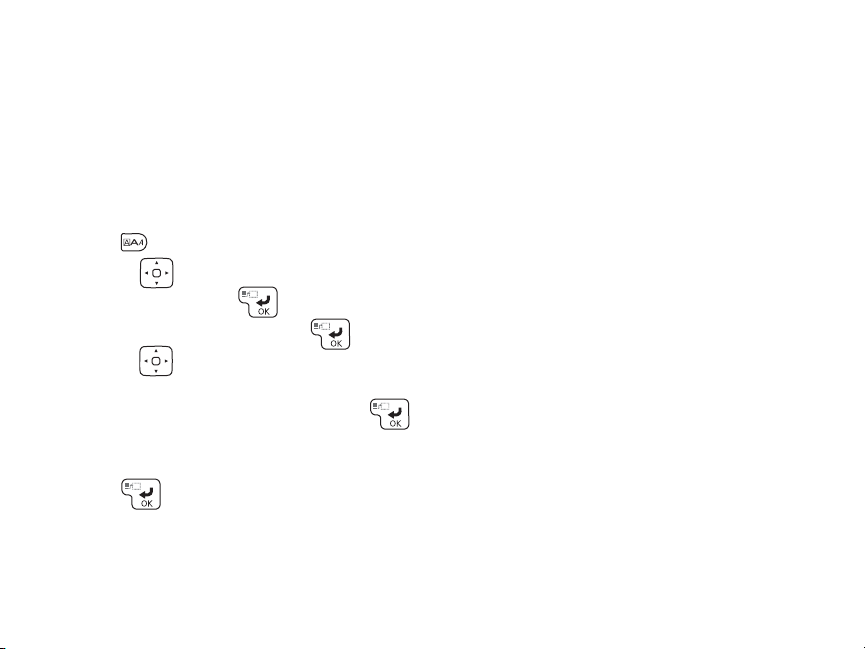
1. Press .
2. Use the button to highlight a
setting, then press to select it.
3. Use the button to highlight the
language or option you want, then press
to select it.
Page 12
Creating Labels Using the Keyboard
Enter text to begin creating your label. After
you’re done, you can save the label and
begin creating another one.
Note: For instructions on creating special
format labels, see page 20. The Label Editor
software includes many more templates and
label designs. For more information, see
page 27 and the online User’s Guide.
Entering text
Use the built-in keyboard to enter letters and
numbers.
■ Press to use uppercase for all letters,
or + character for a single letter.
■ Press to delete the previous
character or line or go back one step.
■ Press to start a new line. The line
number is indicated on the display.
As you enter text, a preview appears at
the top of the display.
Note: You can print up to 8 lines of text,
depending on the label format and tape
width. If you try to exceed the maximum,
you will see an error message.
■ To see a more detailed preview, press
.
■ Press + to start a new block of
text. This lets you change the style of an
individual block. The following example
shows two blocks of text on the display
and on a printed label:
Block 1
Block 2
Block 1 Block 2
Creating Labels Using the Keyboard | 9
Page 13
Saving labels
You can store up to 100 saved labels at a
time.
After you finish creating your first label, press
to create another label. The label
number appears on the display along with
other information. Your first label is
automatically saved.
Deleting labels
1. Press or to select a label for
deletion.
2. Press + . You see a message
asking if you want to delete all the text.
3. Press to delete, or press if you
change your mind.
10 | Enhancing Your Labels
Enhancing Your Labels
You can add symbols or frames to your labels
and select from a variety of fonts.
Note: You can also add shading, backgrounds,
and many other special features to your labels.
For instructions, see the online User’s Guide.
Adding symbols
You can add symbols for safety, household
items, special occasions, and more.
1. Press .
2. Use the button to scroll through the
categories, then press to select the
one you want.
3. Use the button to highlight a
symbol, then press to select it.
You can choose from the symbols beginning
on page 12.
Page 14
The Label Editor software includes
additional symbols and allows you to import
your own graphics and logos.
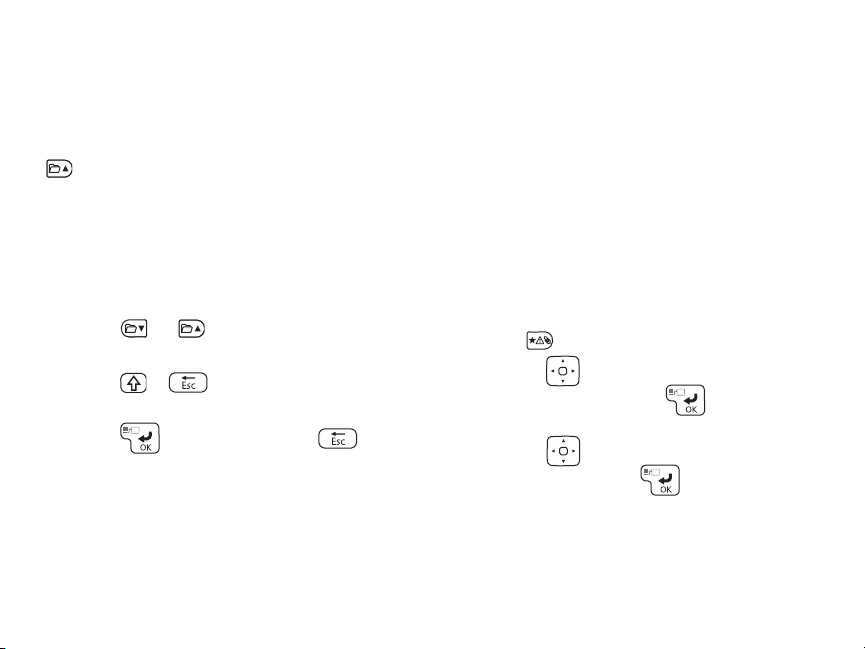
Adding frames
Frames include borders and symbols that are
tailored for a variety of uses and occasions.
1. Press .
2. Use the button to highlight Frame
& Table, then press to select it.
3. Highlight Frame, then press .
4. Use the button to scroll through the
frames or enter the frame number to
jump directly to a frame, then press
to select the frame you want to use.
5. Select Whole label or This block, then
press .
You can choose from the frames beginning
on page 16.
Enhancing Your Labels | 11
Page 15
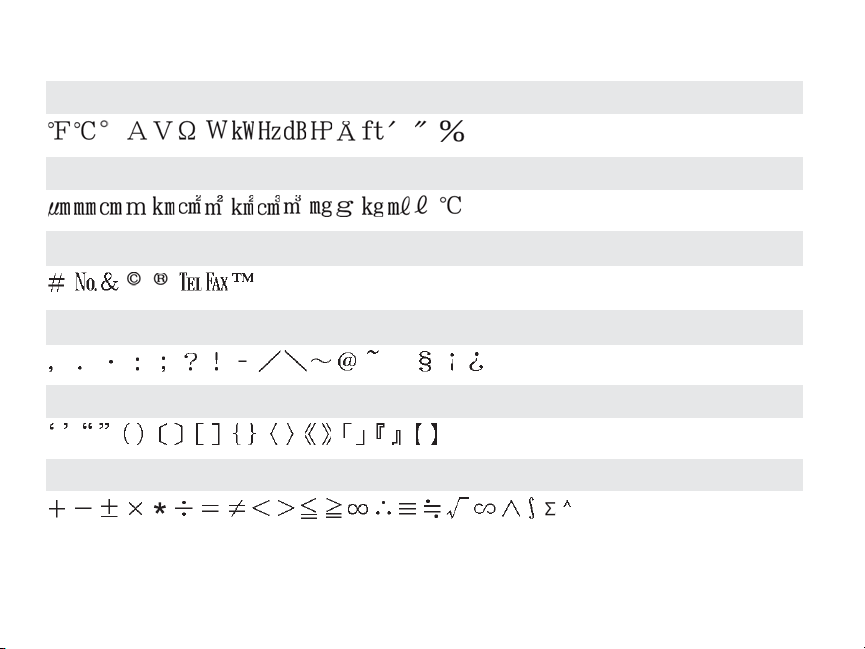
Symbols
Measurement
Metric
Abbreviation
Punctuation
Parentheses
Math
12 | Enhancing Your Labels
Page 16
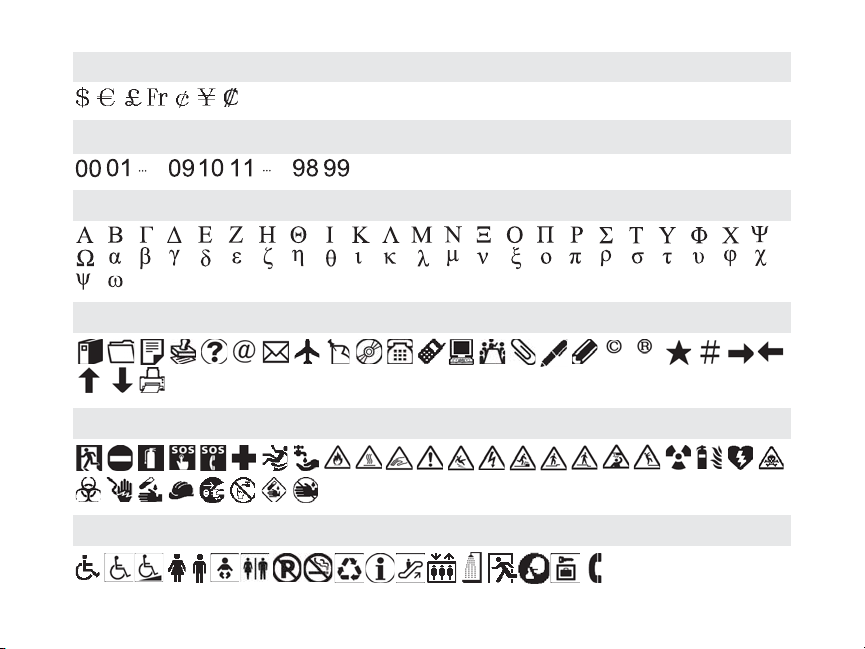
Currency
DoubleFigure
Greek
Oce
Safety
Facility
Enhancing Your Labels | 13
Page 17
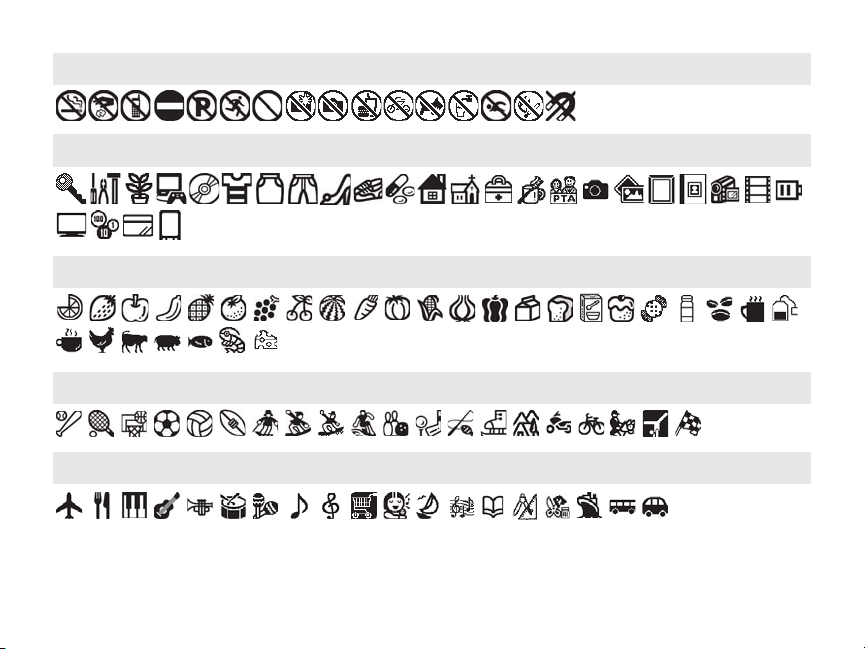
Prohibition
Household
Food
Sports
Activity
14 | Enhancing Your Labels
Page 18
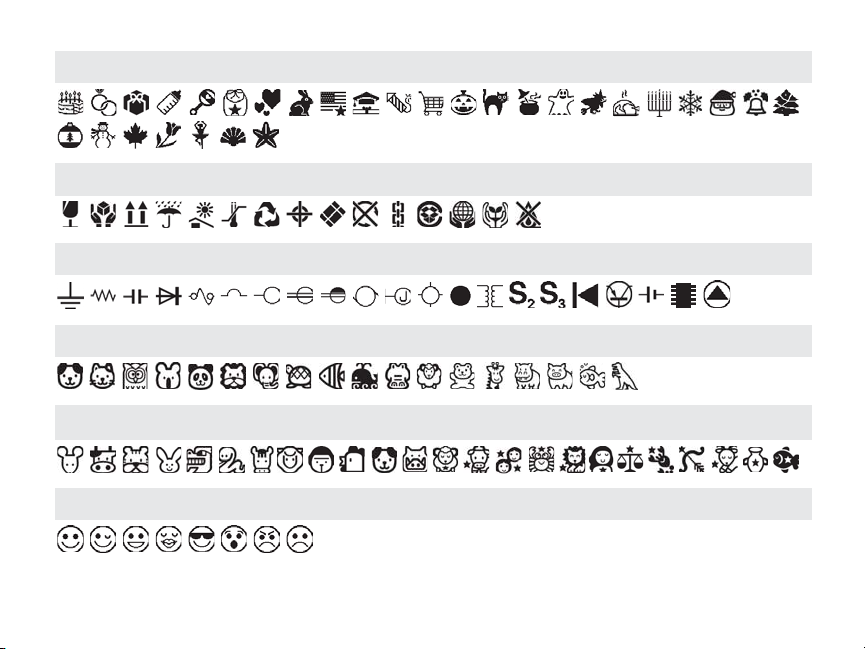
Occasion
Shipping
Electrical
Animals
Zodiac
Emoticons
Enhancing Your Labels | 15
Page 19
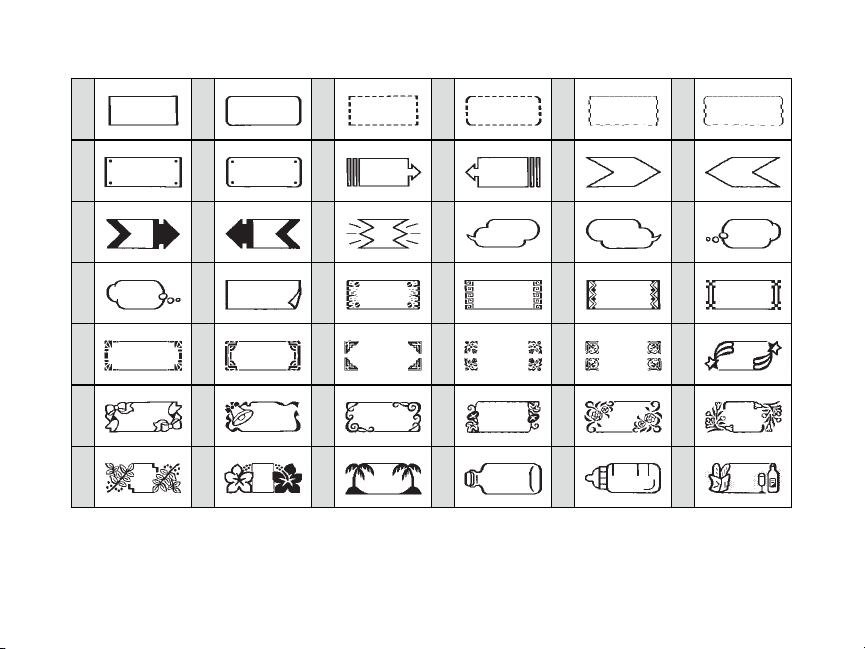
Frames
1 2 3 4 5 6
7 8 9 10 11 12
13 14 15 16 17 18
19 20 21 22 23 24
25 26 27 28 29 30
31 32 33 34 35 36
37 38 39 40 41 42
16 | Enhancing Your Labels
Page 20

43 44 45 46 47 48
49 50 51 52 53 54
55 56 57 58 59 60
61 62 63 64 65 66
67 68 69 70 71 72
73 74 75 76 77 78
79 80 81 82 83 84
85 86 87
Enhancing Your Labels | 17
Page 21
Changing the font size
You can change the size of the letters,
numbers, and symbols on your label.
■ To change the size of all the text on your
label, press repeatedly until you see
the size you want to use.
You see a description of the number of
lines on your label and squares
representing the text.
■ To change the size of specific lines or
blocks of text, press , select Font size,
then select the number of lines in your
label and the options you want to use.
When the display returns to your label
preview, you see your text in the size you
have selected.
18 | Enhancing Your Labels
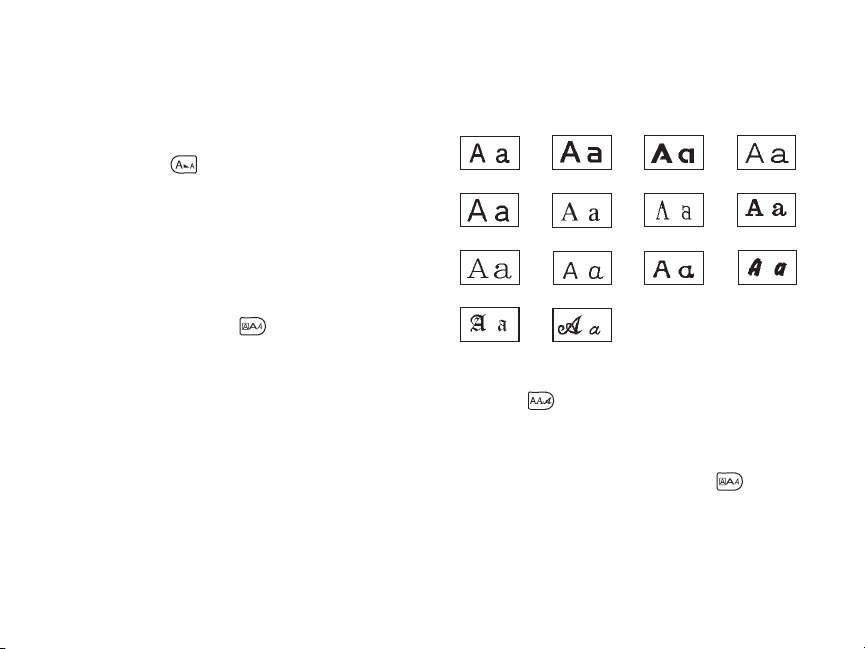
Changing the font
You can choose from the following fonts:
SansS.
B.Gothic
Mincho
CB
SansS.HG
Roman
Gyosho
ScriptPL
■ To change the font for the entire label,
press repeatedly until you see the
font you want.
■ To change the font of specific characters,
lines, or blocks of text, press , select
Font , then select the font and option
you want to use.
SansS.ST
US Roman
Reisho
Gothic
CL Roman
BR
Page 22
Adding punctuation
Besides the basic punctuation shown on the
keyboard and in the symbols library, you can
select from additional punctuation marks.
■ Press repeatedly until you see the
mark you want, then press .
■ Press + repeatedly to scroll
through even more punctuation marks.
Adding letters with accent marks
You can choose from a list of accented
letters.
1. Enter the letter that needs an accent
mark.
2. Press . A list of options appears on
the display (for example, ÀÁÂ).
3. Use the button to highlight an item,
then press to select it.
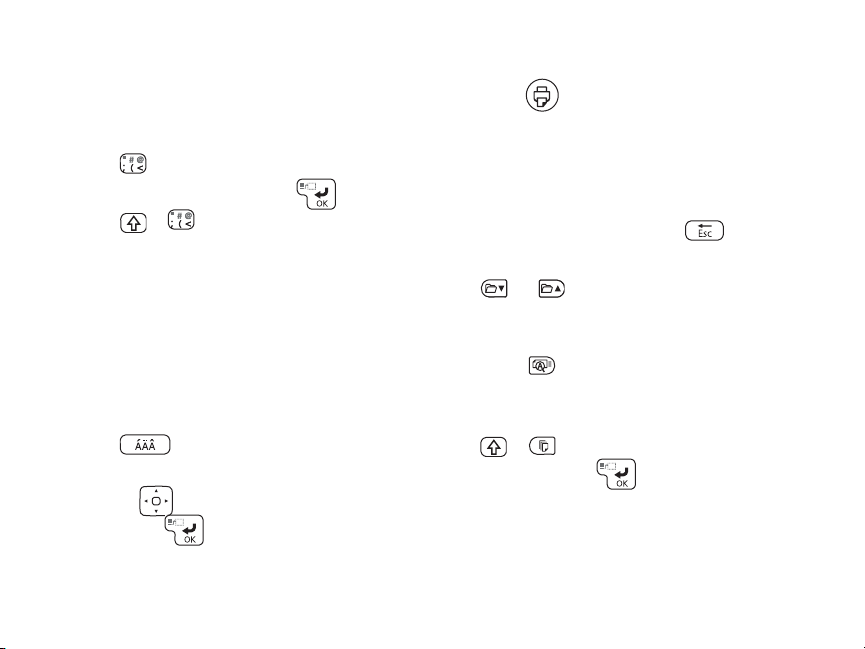
Printing Labels
■ Press to print and cut the current
label.
The width and approximate length of the
label and the number of copies shows on
the display while the label prints.
■ To cancel printing, press .
■ To select a saved label for printing, press
or until you see the one you
want.
■ To preview your label before printing,
press . The label design scrolls across
the display.
■ To turn off the Auto Cut setting, press
+, select Auto Cut, then select
Off and press .
Printing Labels | 19
Page 23
Specialty Labels
You can use custom label formats and tapes
for equipment management, cables, iron-on
labels, custom ribbons, and other
applications. See the online User’s Guide for
instructions on using all the specialty
formats available.
Following are some applications for special
label formats and tapes:
■ Label file folders with specialty folder tab
tapes
■ Label your cables and wires .
■ Use flag labels to identify key rings
■ Use reflective labels on bike helmets,
bikes, skateboards, or other gear
■ Use glow-in-the-dark labels to locate
light switches or circuit breakers in the
dark.
20 | Specialty Labels
■ Use iron-on tape to label children’s
clothing
■ Create custom ribbons to personalize
crafts and gifts
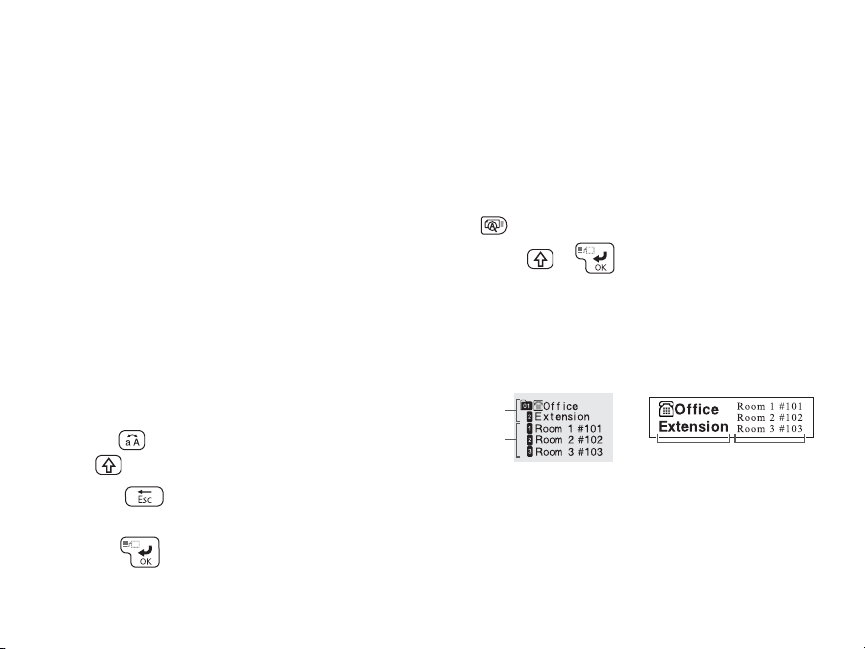
Equipment management labels
The equipment management label format
provides two columns of 4 lines each and
default text, for example:
P r o du c t N a me
A d m i n N o .
Da te
D e p a r t m e n t
You can modify the default text as necessary.
1. Press .
2. When you see Overwrite text on the
display, press .
The display shows a preview of the left
block of text, which has 4 lines.
PC
KDB-01001
1 / 1 5 / 2 0 1 4
M a r k e t i n g
Page 24
Below the preview, the display shows the
fourth line of the left block and the first
line of the right block.
3. Use the button to locate and edit
the existing text (left block) or add text to
the 4 lines in the right block.
4. When you are finished editing the label,
press to print.
Barcode labels
LabelWorks can create barcode labels in a
variety of formats. These barcodes can be
used for inventory management and asset
tagging.
The following barcode formats are available:
EAN-8, EAN-13, CODE128, CODE39, QR
CODE, ITF, CODABAR, UPC-A, UPC-E.
1. Press + .
2. Use the button to highlight a
barcode format, then press to select
it.
3. Select the Width, Ratio, and other
settings. The settings differ depending
on the type of barcode.
4. Enter the code using the numbers on the
keyboard.
5. When you’re ready, press to print.
The following barcode settings can be
modified:
Width: Adjusts the space between the bars
of the barcode.
Ratio: Adjusts the width of the wide bars in
the barcode (2, 2.5, or 3 thin bar widths).
Check Digit: Determines whether a check
digit is included in the barcode (for error
correction). If selected, the check digit will
be previewed on the display.
Specialty Labels | 21
Page 25
Note: For more information about labels with
barcodes and QR codes, see the online User’s
Guide.
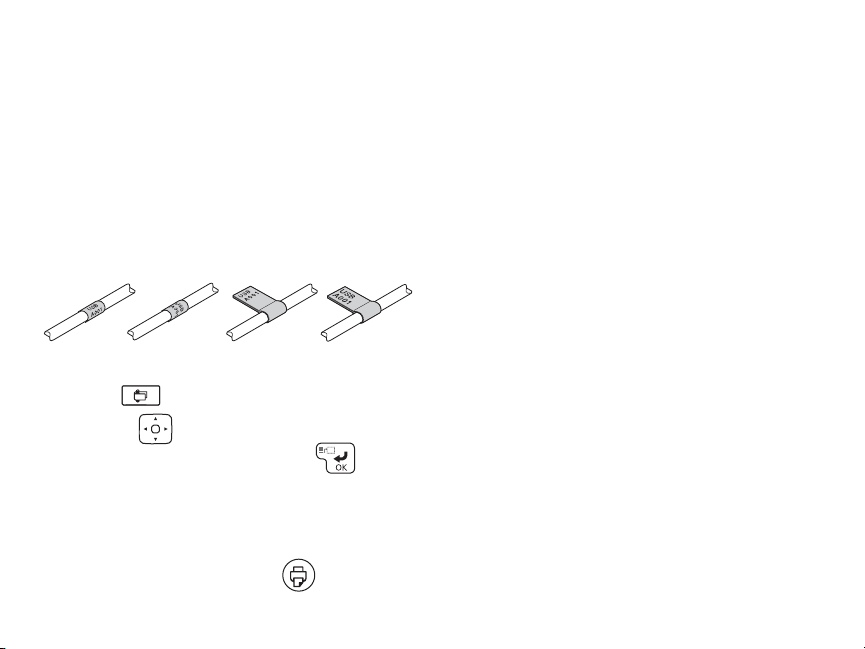
Wrap and flag labels for cables
Use wrapped labels for tight spaces or when
only a short identifier is necessary. Flag
labels provide a larger surface for multiple
lines of text.
Wrap: V
Wrap: H
1. Press .
2. Use the button to highlight the type
of label you want, then press to
select it.
3. Select the length of the label.
4. Enter the label text.
5. When you’re ready, press to print.
22 | Specialty Labels
Flag: V
Flag: H
Cable label tips
■ When adhering a flag label to the cable,
loop the label around the cord loosely
and stick the ends of the label together,
then move inwards toward the cable.
This makes it easier to align the ends.
■ If space is limited, use narrower tapes
(such as 9 mm and 6 mm widths).
■ For small cables (1-2 mm), use a flag label
to increase readability.
■ For wrap labels, repeat a single line of
text on multiple lines to improve
readability.
■ Use multiple wrap labels on a single cord
to include more information.
■ Include a wrap label on both ends of the
cable.
■ Do not use a regularly printed label
(lengthwise) as a wrap label — bending
Page 26

the cord will eventually cause the label to
detach from the cord.
■ Use reflective labels in dark locations
where visibility is limited.
■ Try using specialty cable wrap tape
(LC-6WBC9)
Printed Ribbons
The Label Editor software makes it easy to
print creative ribbon designs and even
import your own graphics to match party
themes and corporate logos. For more
information, see the online User’s Guide.
You can use personalized ribbons for
hundreds of decoration and gift projects.
This section includes a few ideas to get you
started.
Personalized ribbons provide the perfect
accent on gifts and decorations for all
occasions, for example:
■ Party favors
■ Wedding and baby showers
■ Flower arrangements
■ Bakery gifts
■ Hair decorations
■ Toy s
Favor bags
Make customized favor bags for wedding or
baby showers, holidays, birthdays, and other
special occasions. You can add symbols or a
frame on the ribbon to match the party’s
theme.
Printed Ribbons | 23
Page 27
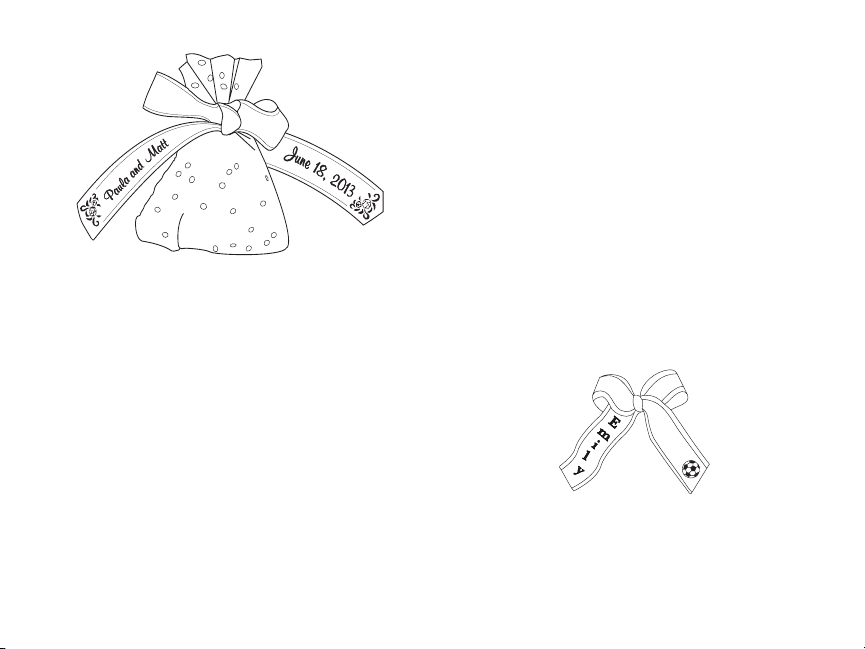
1. Create your ribbon.
For weddings and showers, enter the
couple’s names, add spaces, then insert
the wedding date. Add an appropriate
frame.
Tip: Press the spacebar to add blank spaces
between printed areas. Using a larger font
will make the ribbon longer.
2. Print your ribbon design.
3. Cut a 12-inch circle of tulle, cellophane,
or other lightweight material.
24 | Printed Ribbons
4. Drop a small amount of candy in the
center of the circle.
5. Wrap the material around the candy, and
use your printed ribbon to tie it together
with a knot or bow. Make sure you twist
the ribbon when you tie it so you can see
the printed design on both ends.
Hair bows or ponytail holders
Print personalized hair decorations for your
favorite little girl or matching ponytail
holders for the whole team.
1. Enter the text and symbols.
Page 28

If you need a longer ribbon, add spaces
or repeat the text and symbols.
Tip: If you turn off the Auto Cut setting, you
can use the Print copies feature to create a
repeated design (by pressing ). For more
information, see the online User’s Guide.
2. Print your ribbon.
3. Tie the ribbon around an elastic ponytail
holder. Or, tie a bow and glue it to a
plastic hair clip.
Make sure you twist the ribbon when
tying it so you can see the printed design
on both ends.
Ornaments with ribbon hangers
Printed ribbon makes a perfect Christmas
ornament hanger.
1. To add length to one end of the ribbon
(unprinted), press + , then select
Tape feed. Repeat this process to add
more length to the end of the ribbon.
2. Create your ribbon design with vertical
text and symbols.
Tip: Press and select Vertical.
3. Make sure you add enough spaces at the
end of the ribbon so that you can loop it
through the ornament hook.
4. Print your ribbon.
5. Thread the ribbon through the ornament
hook and tie the ends together as shown.
6. Hang your ornament on the tree.
Printed Ribbons | 25
Page 29

26 | Printed Ribbons
Greeting cards
Add ribbon embellishments to personalize a
ready-made card or create your own card.
1. Enter the text and symbols for your
greeting.
2. Print the ribbon or ribbons.
3. Trim the ribbons if necessary, then glue
them to the card.
Page 30

Using the Label Editor Software
The Label Editor software lets you create
hundreds of label designs quickly and easily.
For more information on using the software,
see the online User’s Guide.
Note: Use of the software is optional.
Installing the software
For Windows, you can use the DVD that
came with your LabelWorks printer to install
the Label Editor software.
For Mac OS X, you can download the
software from epson.com/support/lw700
(U.S.) or epson.ca/support/lw700 (Canada).
You can also download the Label Editor Lite
software for Mac OS X from the Apple App
Store.
Before you install the software, make sure
you have the USB cable that came with the
printer.
1. Insert the DVD and follow the
instructions on the screen.
2. When you are prompted to connect the
printer to your computer, connect it
using the USB cable, as described on
page 28.
Using the Label Editor Software | 27
Page 31

Connecting to your computer
1. After you install the software (or during
the installation process, if prompted),
connect the printer to your computer as
shown:
28 | Using the Label Editor Software
2. Once the printer is connected and the
software is installed, press the PC link
button:
PC online flashes on the display, and the
LabelWorks keyboard is disabled.
If you want to use the LabelWorks
keyboard while the printer is connected
to your computer, press the PC link
button again.
Page 32

Creating labels using Windows
Once your LabelWorks printer is connected
to your computer, you can use the Label
Editor software to design your labels or
ribbons.
1. Double-click the Label Editor icon. You
see the New/Open screen:
2. Select Horizontal Text, then click OK.
You see a blank label on the main Label
Editor screen.
3. Enter text in the label, then click outside
the label. You see your text on the label,
for example:
Font name box
Symbol
Border
icon
icon
Using the Label Editor Software | 29
Print
icon
Page 33

■ To add a frame, click the Border icon
and select a border, then click OK.
Adjust the size and position of the
border, then click outside the label.
■ To add a symbol, click the Symbol
icon and select a symbol from one of
the 17 categories, then click OK. Click
the location where you want the
symbol to appear.
■ To change the font and size, select the
text box, then use the Font Name and
Font Size selection boxes. You can use
any font installed on your computer.
4. When you’re ready to print, click the
Print icon. Click Printer Settings to
choose additional options. Select the
number of copies, then click OK to print.
Note: The Label Editor software includes many
additional features and label formatting
options. See the online User’s Guide for more
information.
30 | Using the Label Editor Software
Creating labels using Mac OS X
Once your LabelWorks printer is connected
to your Mac, you can use the Label Editor
Lite software to design your labels.
1. Start the Label Editor Lite application.
You see a screen like this:
Label design icons
Print icon
Page 34

2. Enter text in the area at the bottom of the
screen. You see a preview of the font and
size at the top of the screen.
■ To in sert an image, date, border, or QR
code, click the icons on the screen.
■ To change the font or size, use the
drop-down menus at the bottom of
the screen. You can use any font
installed on your computer.
3. When you’re ready to print, click the Print
icon. Select the number of copies and
any other settings you want, then click
Print.
Note: For more information on using Label
Editor Lite, see the online User’s Guide.
Applying Labels
For most labels, attachment is a simple
process, as described below.
For information on applying iron-on labels,
see the section on the right.
1. Peel off the backing.
2. Place the label on the desired surface
and press it down firmly.
Applying Labels | 31
Page 35

Applying iron-on labels
You can attach labels to the following types
of fabric:
■ 100% cotton
■ 100% linen
■ 100% polyester
■ Cotton/polyester blends
■ Fabrics with a flat, smooth surface
Do not use textured fabrics such as terry
cloth, corduroy, or flannel; roughly woven
fabrics; fabrics with a rough surface such as
denim; waterproof fabrics; or fabrics which
require a cool iron.
32 | Applying Labels
Attaching your labels
Press the entire label firmly, avoid the steam
vents, and do not use a press cloth.
1. Set your iron to 284–320 °F (140–160 °C),
without steam.
2. Make sure the area where you want to
attach the label doesn’t have any
wrinkles.
3. Place the label in the desired location
with the printed side up.
4. Gently press the iron down on one end of
the label to temporarily attach it in place.
5. Press the iron firmly
down on the entire label,
holding the iron still for
about 10 to 15 seconds.
To make sure the label
adheres securely, repeat
this step 3 or 4 times.
Page 36

Iron-on label usage tips
■ Labels are made from non-toxic
materials; however, attached labels are
stiff, and may rub or scratch the skin if
direct contact occurs.
■ Labels are dry-cleanable and machine
washable.
■ Keep the label length short (up to about
half the width of the iron soleplate).
Labels that are too long may be difficult
to attach or may look distorted due to
the expansion and contraction of the
fabric.
■ Trimming the corners of the label before
attaching it will prevent it from peeling
easily.
■ If a label does peel, it can be re-attached
by ironing; however, it may not adhere as
securely to the fabric.
■ When attaching a label to fabric that may
be frequently washed or dry-cleaned, it is
recommended that the label be sewn on.
■ When using a steam iron, turn the steam
off when ironing on the label.
■ Once a label is attached, it cannot be
easily removed.
■ Never clean the labels with chemicals or
solvents such as benzine, thinner, or
alcohol. Otherwise, the print on the label
may become faint or distorted.
■ If labels are exposed to direct sunlight for
long periods of time, yellowing may
occur.
■ Labels do not adhere to non-fabric
materials such as paper or leather.
■ When using bleach or spot detergent,
make sure you test it in advance.
Applying Labels | 33
Page 37

Solving Problems
If you have a problem with your LabelWorks,
check the display for error messages. See the
online User’s Guide for additional
troubleshooting suggestions.
Error messages
Message Explanation
Insert tape Turn the power off and install a
Check tape
cartridge
Check battery
Change alkaline
34 | Solving Problems
tape cartridge.
An incompatible tape cartridge
has been installed. Check the tape
cartridge.
The batteries may be running out
or installed incorrectly, nonalkaline batteries are being used
with alkaline batteries, or old and
new batteries are being used
together. Turn the power off and
replace batteries with new ones,
or use the AC adapter. Make sure
new batteries are installed
correctly.
Too many lines You have exceeded the maximum
No more
sequence No. !
Tex t is too lon g.
Continue?
Insert 24 mm
tape!
Load wider tape Unable to print on the current
Printing length
too long!
No more barcode! Only one barcode can be added to
QR CODE too big! Do one of the following: use a
Overheated! The print head is too hot. Turn the
number of lines. Delete the lines
indicated.
Sequence numbers have already
been set. You can only enter one
sequence per label.
Entered text is too long for the
specified label length. Press
to confirm and continue printing.
The label length will be adjusted
automatically.
The label design can only be
printed on 24 mm (1-inch) wide
tape.
tape. Use a wider tape.
Shorten the label text.
a label.
wider tape, reduce the text or cell
size, or lower the ECC (error
correction) level.
power off and take out the tape
cartridge. Allow the print head to
cool before trying to print again.
Page 38

Cover open!
Powering off.
Motor error! An error occurred in the motor
If you open the rear cover while
the power is on, this message
displays and the power turns off
automatically. Always turn the
power off before opening the rear
cover.
operation. Turn the power off,
then turn it back on. If the same
message appears, turn the power
off again and contact Epson for
technical support.
Resetting the printer
The printer may stop functioning due to
static electricity or other causes. If your
printer does not function normally (for
example, the power doesn’t turn on/off or
the display is distorted), reset the printer by
following the procedure below.
Warning: Resetting your printer will erase all
saved labels and formatting and return your
printer to default settings.
1. Press the P power button to turn the
printer off.
2. Press and hold + , and press
P.
3. When a message appears, press (to
cancel, press any other button).
The printer will be reset.
Epson Technical Support
Visit epson.com/support (U.S.) or epson.ca/
support (Canada) where you can view
manuals, get FAQs, or e-mail Epson.
To speak with a support specialist, call:
(562) 276-7245 (U.S.) or (905) 709-2567
(Canada), 6
through Friday, and 7
Days and hours of support are subject to
change without notice. Toll or long distance
charges may apply.
AM to 8 PM, Pacific Time, Monday
AM to 4 PM, Saturday.
Epson Technical Support | 35
Page 39

Recycling
Epson offers a recycling program for end of
life products. Please go to epson.com/
recycle (U.S.) or epson.ca/recycle (Canada)
for information on how to return your
products for proper disposal.
Purchase supplies and accessories
Epson offers a wide array of tapes for
multiple uses.
You can purchase tape cartridges and
accessories at:
epson.com/labelworks (U.S. sales) or
epson.ca/labelworks (Canadian sales).
You can also purchase supplies from an
Epson authorized reseller. To find the nearest
one, call 800-GO-EPSON (800-463-7766).
36 | Registration
Registration
To receive special offers and updates on new
tapes, make sure you register your
LabelWorks printer.
Go to epson.com/labelworks (U.S.) or
epson.ca/labelworks (Canada) and select
Product Registration.
Notices
About printed labels
Attached labels and adhesive are affected by the type of
surface and by environmental conditions such as
humidity and heat. Labels may peel off, curl, or fade;
printed characters may fade; color may be left behind
after removing the label; adhesive may become stuck to
the attached surface.
Epson is not responsible for any damage or loss caused
by labels or adhesive.
Page 40

Declaration of conformity
According to 47CFR, Part 2 and 15, Class B Personal
Computers and Peripherals; and/or CPU Boards and
Power Supplies used with Class B Personal Computers
We: Epson America, Inc.
Located at: 3840 Kilroy Airport Way,
MS 3-13, Long Beach, CA 90806
Telephone: (562) 981-3840
Declare under sole responsibility that the product
identified herein, complies with 47CFR Part 2 and 15 of
the FCC rules as a Class B digital device. Each product
marketed, is identical to the representative unit tested
and found to be compliant with the standards. Records
maintained continue to reflect the equipment being
produced can be expected to be within the variation
accepted, due to quantity production and testing on a
statistical basis as required by 47CFR §2.909. Operation
is subject to the following two conditions: (1) this device
may not cause harmful interference, and (2) this device
must accept any interference received, including
interference that may cause undesired operation.
Trade Name: Epson
Type of Product: Label printer
Model: LW-700
Epson America, Inc. limited warranty
What Is Covered: Epson America, Inc. (“Epson”)
warrants to the original retail purchaser that the Epson
label-printing device and its consumables and
accessories covered by this limited warranty statement
(each, a “product”), if purchased and operated only in
the United States, Canada, or Puerto Rico, will be free
from defects in workmanship and materials for a period
of one (1) year from the date of original purchase, in the
case of the label-printing device, and for a period of
thirty (30) days for mechanical defect from the date of
original purchase, in the case of its consumables or
accessories. Consumables include label and tape rolls
and cassettes. Accessories include an AC adapter. For
warranty service, you must provide proof of the date of
original purchase.
What Epson Will Do To Correct Problems: Should
your Epson product prove defective during the
warranty period, please call the Epson Connection at
(562) 276-7245 (U.S. and Puerto Rico) or (905) 709-2567
(Canada) for warranty repair instructions and return
authorization. An Epson service technician will provide
telephone diagnostic service to determine whether the
product requires service. If service is needed, Epson will,
Notices | 37
Page 41

at its option, exchange or repair the product without
charge for parts or labor. If Epson authorizes an
exchange for the defective unit, Epson will ship a
replacement product to you, freight prepaid, so long as
you use an address in the United States, Canada, or
Puerto Rico. Shipments to other locations will be made
freight collect. You are responsible for securely
packaging the defective unit and returning it to Epson
within five (5) working days of receipt of the
replacement. Epson requires a debit or a credit card
number to secure the cost of the replacement product
in the event that you fail to return the defective one. If
Epson authorizes repair instead of exchange, Epson will
direct you to send your product to Epson or its
authorized service center, where the product will be
repaired and sent back to you. You are responsible for
packing the product and for all costs to and from the
Epson authorized service center. When warranty service
involves the exchange of the product or a part, the item
replaced becomes Epson property. The replacement
product or part may be new or refurbished to the Epson
standard of quality, and, at Epson’s option, may be
another model of like kind and quality. Exchange
products and parts assume the remaining warranty
period of your original product covered by this limited
warranty.
38 | Notices
What This Warranty Does Not Cover: This warranty
covers only normal use in the United States, Canada, or
Puerto Rico. Using this product for continuous
production or similar high duty purposes is not
considered normal use; damage, maintenance or
service from such use will not be covered under this
warranty. This warranty is not transferable. This
warranty does not cover damage to the Epson product
caused by parts or supplies not manufactured,
distributed or certified by Epson. This warranty does not
cover third party parts, components, or peripheral
devices added to the Epson product after its shipment
from Epson, e.g., dealer or user-added boards or
components. Epson is not responsible for warranty
service should the Epson label or logo or the rating label
or serial number be removed or should the product fail
to be properly maintained or fail to function properly as
a result of misuse, abuse, improper installation, neglect,
improper shipping, damage caused by disasters such as
fire, flood, and lightning, improper electrical current,
software problems, interaction with non-Epson
products, or service other than by an Epson Authorized
Servicer. If a claimed defect cannot be identified or
reproduced, you will be held responsible for the costs
incurred.
Page 42

DISCLAIMER OF WARRANTIES: THE WARRANTY AND
REMEDY PROVIDED ABOVE ARE EXCLUSIVE AND IN LIEU
OF ALL OTHER EXPRESSED OR IMPLIED WARRANTIES
INCLUDING, BUT NOT LIMITED TO, THE IMPLIED
WARRANTIES OF MERCHANTABILITY, FITNESS FOR A
PARTICULAR PURPOSE AND NON-INFRINGEMENT.
UNLESS STATED HEREIN, ANY STATEMENTS OR
REPRESENTATION MADE BY ANY OTHER PERSON OR
FIRM ARE VOID.
Remedies: Your exclusive remedy and Epson’s entire
liability for a material breach of this Agreement will be
limited to a refund of the price paid for the Epson
products covered by this Agreement. Any action for
breach of warranty must be brought within 3 months of
the expiration date of the warranty. Epson is not liable
for performance delays or for nonperformance due to
causes beyond its reasonable control. Except as
provided in this written warranty, neither Epson nor its
affiliates shall be liable for any loss, inconvenience, or
damage, including direct, special, incidental or
consequential damages, including lost profits, cost of
substitute equipment, downtime, claims of third
parties, including customers, or injury to property,
resulting from the use or inability to use the Epson
products, whether resulting from a breach of warranty
or any other legal theory. Some jurisdictions do not
allow limits on warranties or remedies for breach in
certain transactions. In such jurisdictions, the limits in
this paragraph and the preceding paragraph may not
apply.
In Canada, warranties include both warranties and
conditions.
Arbitration, Governing Laws: Any disputes arising out
of this Agreement will be settled by arbitration to be
conducted in Los Angeles, California, in accordance
with the commercial Arbitration Rules of the American
Arbitration Association, and judgment upon the award
rendered by the arbitrator(s) may be entered in any
court having jurisdiction thereof. This Agreement shall
be construed in accordance with the laws of the State of
California, except this arbitration clause which shall be
construed in accordance with the Federal Arbitration
Act.
To find the Epson Authorized Reseller nearest you, visit
our website at: epson.com.
To find the Epson Customer Care Center nearest you,
visit epson.com/support.
You can also write to:
Epson America, Inc., P.O. Box 93012, Long Beach, CA
90809-3012
Notices | 39
Page 43

Trademarks
EPSON is a registered trademark, EPSON Exceed Your
Vision is a registered logomark, and LabelWorks and LC
TAPE are trademarks of Seiko Epson Corporation. Epson
Connection is a service mark of Epson America, Inc.
Mac and Mac OS are trademarks of Apple Inc.,
registered in the U.S. and other countries.
General Notice: Other product names used herein are
for identification purposes only and may be trademarks
of their respective owners. Epson disclaims any and all
rights in those marks.
This information is subject to change without notice.
© 2013 Epson America, Inc., 10/13 CPD-40106
40 | Notices
Page 44

Table des matières
Français
Pour commencer. . . . . . . . . . . . . . . . . . . . . . . . . . . 43
Déballage . . . . . . . . . . . . . . . . . . . . . . . . . . . . . . . . 44
Branchement de l’imprimante . . . . . . . . . . . . 45
Installation des piles. . . . . . . . . . . . . . . . . . . . . . 45
Retrait et installation des cartouches
de ruban d’étiquettes . . . . . . . . . . . . . . . . . . . . 46
Mise sous tension/hors tension de
l’imprimante . . . . . . . . . . . . . . . . . . . . . . . . . . . . . 47
Informations affichées sur l’écran . . . . . . . . . 48
Modification de la langue et autres
préférences . . . . . . . . . . . . . . . . . . . . . . . . . . . . . . 48
Création d’étiquettes à l’aide du clavier . . . 49
Saisie de texte. . . . . . . . . . . . . . . . . . . . . . . . . . . . 49
Enregistrement des étiquettes . . . . . . . . . . . . 50
Suppression des étiquettes . . . . . . . . . . . . . . . 50
Ajout d’effets stylistiques . . . . . . . . . . . . . . . . . . 50
Ajout de symboles . . . . . . . . . . . . . . . . . . . . . . . 51
Ajout de cadres . . . . . . . . . . . . . . . . . . . . . . . . . . 51
Symboles . . . . . . . . . . . . . . . . . . . . . . . . . . . . . . . . 52
Cadres . . . . . . . . . . . . . . . . . . . . . . . . . . . . . . . . . . . 56
Modification de la taille de la police de
caractère. . . . . . . . . . . . . . . . . . . . . . . . . . . . . . . . . 58
Modification de la police de caractère. . . . . 58
Ajout de signes de ponctuation. . . . . . . . . . . 59
Ajout d’accents. . . . . . . . . . . . . . . . . . . . . . . . . . . 59
Impression d’étiquettes. . . . . . . . . . . . . . . . . . . . 59
Étiquettes spécialisées . . . . . . . . . . . . . . . . . . . . . 60
Étiquettes d’identification
de l’équipement. . . . . . . . . . . . . . . . . . . . . . . . . . 61
Étiquettes de code à barres . . . . . . . . . . . . . . . 61
Étiquettes enroulées et étiquettes drapeau
pour câbles . . . . . . . . . . . . . . . . . . . . . . . . . . . . . . 62
Rubans personnalisés . . . . . . . . . . . . . . . . . . . . . . 64
Sacs cadeaux pour invités . . . . . . . . . . . . . . . . 64
Boucles pour cheveux ou rubans pour queue
de cheval . . . . . . . . . . . . . . . . . . . . . . . . . . . . . . . . 66
Ornements avec support en ruban . . . . . . . . 66
Cartes de souhaits. . . . . . . . . . . . . . . . . . . . . . . . 68
Table des matières | 41
Page 45

Utilisation du logiciel Label Editor. . . . . . . . . 68
Installation du logiciel . . . . . . . . . . . . . . . . . . . . 68
Connexion à l’ordinateur . . . . . . . . . . . . . . . . . 69
Création d’étiquettes sous Windows . . . . . . 70
Création d’étiquettes sous Mac OS X . . . . . . 72
Application des étiquettes. . . . . . . . . . . . . . . . . 73
Application des étiquettes
thermocollantes. . . . . . . . . . . . . . . . . . . . . . . . . . 74
Résolution des problèmes . . . . . . . . . . . . . . . . . 76
Messages d’erreur . . . . . . . . . . . . . . . . . . . . . . . . 76
Réinitialisation de l’imprimante . . . . . . . . . . . 78
Soutien technique Epson . . . . . . . . . . . . . . . . . . 78
Recyclage . . . . . . . . . . . . . . . . . . . . . . . . . . . . . . . . 79
Achat de consommables et d’accessoires . 79
Enregistrement du produit . . . . . . . . . . . . . . . . 79
Avis . . . . . . . . . . . . . . . . . . . . . . . . . . . . . . . . . . . . . . . . . 80
À propos des étiquettes imprimées . . . . . . . 80
Déclaration de conformité . . . . . . . . . . . . . . . . 80
Garantie limitée d’Epson America, Inc. . . . . 81
Marques de commerce . . . . . . . . . . . . . . . . . . . 83
42 | Table des matières
Page 46

Pour commencer
Votre imprimante LabelWorksMC LW- 700 vou s
permet de créer des étiquettes en tout
genre, ainsi que des autocollants décoratifs
et des rubans personnalisés.
Voici quelques exemples de projets que vous
pouvez accomplir avec votre imprimante
LabelWorks :
■ Créer un système de gestion de
l’équipement et des câbles à l’aide de
texte et de codes à barres.
■ Créer des codes QR liant vers du contenu
en ligne.
■ Créer des étiquettes pour onglets et des
étiquettes d’adresse professionnelles.
■ Organiser vos articles de cuisine, de salle
de bain ou de toute autre pièce dans
votre maison.
■ Créer des étiquettes thermocollantes
pour des vêtements, des uniformes, des
sacs à dos et d’autres articles en tissu.
■ Imprimer des rubans personnalisés pour
des cadeaux pour invités, des cadeaux,
des décorations pour coiffures, et plus.
■ Créer des étiquettes luminescentes pour
les interrupteurs muraux, les panneaux
électriques et les chambres d’enfant.
■ Créer des étiquettes personnalisées pour
vous aider à identifier des zones
dangereuses, des trousses d’urgence et
des instructions importantes.
Vous pouvez imprimer toutes ces étiquettes
et bien plus grâce à l’imprimante, avec ou
sans l’aide d’un ordinateur.
Si vous installez le logiciel et que vous
connectez l’imprimante à votre ordinateur,
vous aurez accès à plus d’options, par
exemple :
Pour commencer | 43
Page 47

■ Incorporer vos propres logos, polices de
caractère et autres graphismes, incluant
des photos.
■ Importer votre carnet d’adresses afin
d’imprimer des étiquettes d’adresse pour
toutes vos cartes des fêtes (Windows
seulement).
Pour plus d’informations et d’autres
instructions sur la façon d’utiliser toutes les
fonctions de l’imprimante et du logiciel
LabelWorks, consultez le Guide de l’utilisateur
en ligne à l’adresse epson.com/support/
lw700 (É.-U.) ou epson.ca/support/lw700fr
(Canada).
44 | Pour commencer
Déballage
Votre imprimante LabelWorks comprend les
éléments suivants :
Imprimante
Cartouche de
ruban d’étiquettes
(échantillon)
Adaptateur
secteur
DVD du logiciel Label
Editor pour Windows®
Vous pouvez aussi utiliser 6 piles alcalines AA
(non incluses) au lieu de l’adaptateur
secteur.
Câble USB
Page 48

Branchement de l’imprimante
Branchez l’adaptateur secteur comme
illustré ci-dessous :
Installation des piles
Vous pouvez utiliser des piles au lieu de
l’adaptateur secteur lorsque vous n’avez pas
accès à une source d’électricité.
1. Appuyez sur la languette et ouvrez le
couvercle des piles.
2. Insérez 6 piles alcalines AA en positionnant
les bornes + et – comme illustré.
Pour commencer | 45
Page 49

3. Replacez le couvercle des piles.
1. Resserrez la bobine du ruban d’étiquettes
à l’aide d’un crayon ou d’un stylo.
Retrait et installation des cartouches de ruban d’étiquettes
N’utilisez que des cartouches de ruban
d’étiquettes arborant ce symbole : .
Vous pouvez utiliser des rubans d’étiquettes
LabelWorks d’une largeur variant entre
1/4po (6 mm) et 1po (24 mm).
Consultez la liste au verso de ce guide, ou
visitez le site epson.com/labelworks (É.-U.)
ou epson.ca/labelworks (Canada).
46 | Pour commencer
2. Soulevez le couvercle du logement à
ruban d’étiquettes.
Page 50

3. Insérez la cartouche et appuyez
fermement sur celle-ci jusqu’à ce qu’elle
s’enclenche dans le logement.
4. Assurez-vous que l’extrémité du ruban
d’étiquettes pénètre dans la fente
d’éjection.
Pour retirer une cartouche de ruban
d’étiquettes, ouvrez le couvercle, agrippez
les côtés de la cartouche, puis retirez-la de
l’imprimante.
Mise sous tension/hors tension de l’imprimante
Assurez-vous que l’adaptateur secteur est
branché ou que les piles sont installées.
5. Fermez le couvercle du logement.
■ Appuyez sur le bouton
pour allumer l’imprimante.
L’écran s’allume.
P d’alimentation
Pour commencer | 47
Page 51

■ Lorsque vous avez terminé d’utiliser
l’imprimante, appuyez sur le bouton
P
d’alimentation pour l’éteindre.
Le message Mise hors tens. apparaît sur
l’écran. Tous les caractères que vous avez
saisis seront enregistrés dans
l’imprimante.
Mise en garde : Ne débranchez pas
l’imprimante avant que l’écran ne se
soit éteint.
Remarque : L’imprimante s’éteint
automatiquement (et enregistre votre travail)
après 5 minutes d’inactivité. Lorsqu’elle est
connectée à votre ordinateur, elle s’éteint après
1 heure d’inactivité.
Informations affichées sur l’écran
L’écran affiche le texte de votre étiquette et
un aperçu de l’étiquette imprimée, ainsi que
les fonctions que vous utilisez :
48 | Pour commencer
Niveau de
la pile
Utilisation de
la majuscule
ou de la
minuscule
Numéro de
l’étiquette actuelle
Numéro de la
ligne actuelle
Taille de la
police actuelle
Utilisation du
paramètre
Coupe auto
Modification de la langue et autres préférences
Vous pouvez modifier la langue et les unités
de mesure, ainsi que d’autres paramètres de
préférence.
1. Appuyez sur .
2. Utilisez le bouton pour mettre un
paramètre en surbrillance, puis appuyez
sur pour le sélectionner.
Page 52

3. Utilisez le bouton pour mettre une
langue ou une option désirée en
surbrillance, puis appuyez sur pour
la sélectionner.
Création d’étiquettes à l’aide du clavier
Saisissez du texte pour commencer la
création de votre étiquette. Une fois que
vous avez terminé, vous pouvez enregistrer
votre étiquette et en créer une autre.
Remarque : Pour des instructions sur la façon
de créer des étiquettes de formats spéciaux,
consultez la page 60. Le logiciel Label Editor
comprend plusieurs autres modèles et motifs
d’étiquette. Pour plus d’informations, consultez
la page 68 et le Guide de l’utilisateur en ligne.
Saisie de texte
Utilisez le clavier intégré pour saisir des
lettres et des chiffres.
■ Appuyez sur pour basculer aux lettres
majuscules, ou sur + un caractère
pour saisir une seule majuscule.
■ Appuyez sur pour supprimer le
caractère ou la ligne précédente, ou pour
revenir à l’étape précédente.
■ Appuyez sur pour commencer une
nouvelle ligne. Le numéro de la ligne est
indiqué à l’écran.
Alors que vous saisissez du texte, un
aperçu s’affichera dans le haut de l’écran.
Remarque : Vous pouvez imprimer jusqu’à 8
lignes de texte selon le format de l’étiquette
et la largeur du ruban d’étiquettes. Si vous
tentez de dépasser le maximum de lignes, un
message d’erreur s’affichera.
■ Pour voir un aperçu plus détaillé,
appuyez sur .
Création d’étiquettes à l’aide du clavier | 49
Page 53

■ Appuyez sur + pour
commencer un nouveau bloc de texte.
Vous pourrez ainsi changer le style de
chaque bloc individuel. L’exemple
suivant montre deux blocs de texte sur
l’écran et sur une étiquette imprimée.
Bloc 1
Bloc 2
Bloc 1 Bloc 2
Suppression des étiquettes
1. Appuyez sur le bouton ou pour
sélectionner une étiquette à supprimer.
2. Appuyez sur + . Un message
vous demandera si vous souhaitez
supprimer tout le texte.
3. Appuyez sur pour confirmer, ou
appuyez sur si vous changez d’avis.
Enregistrement des étiquettes
Vous pouvez stocker jusqu’à 100 étiquettes
enregistrées en même temps.
Après avoir terminé la création de votre
première étiquette, appuyez sur pour
créer une autre étiquette. Le numéro de
l’étiquette ainsi que d’autres informations
s’afficheront à l’écran. Votre première
étiquette sera enregistrée automatiquement.
50 | Ajout d’effets stylistiques
Ajout d’effets stylistiques
Vous pouvez ajouter des symboles ou des
cadres sur vos étiquettes et sélectionner
parmi une variété de polices de caractère.
Remarque : Vous pouvez aussi ajouter de
l’ombrage, des arrière-plans et plusieurs autres
options spéciales sur vos étiquettes. Pour des
instructions à ce sujet, consultez le Guide de
l’utilisateur en ligne.
Page 54

Ajout de symboles
Vous pouvez ajouter des symboles sur le
thème de la sécurité, des articles ménagers,
des occasions spéciales, et plus.
Ajout de cadres
Les cadres comprennent des bordures et
des symboles conçus pour une variété
d’utilisations et d’occasions.
1. Appuyez sur .
2. Utilisez le bouton pour faire défiler
les catégories, puis appuyez sur
pour sélectionner celle de votre choix.
3. Utilisez le bouton pour mettre un
symbole en surbrillance, puis appuyez
sur pour le sélectionner.
Consultez la page 52 et suivantes pour voir
une liste des symboles disponibles.
Le logiciel Label Editor inclut des symboles
additionnels et vous permet d’importer vos
propres graphismes et logos.
1. Appuyez sur .
2. Utilisez le bouton pour mettre en
surbrillance le menu Cadre&Tableau,
puis appuyez sur pour l’ouvrir.
3. Mettez l’option Cadre en surbrillance et
appuyez sur .
4. Utilisez le bouton pour faire défiler
les cadres ou saisissez le numéro du
cadre pour sauter directement à ce cadre,
puis appuyez sur pour sélectionner
celui de votre choix.
5. Sélectionnez Étiq. entière ou Ce bloc,
puis appuyez sur .
Consultez la page 56 et suivantes pour voir
une liste des cadres disponibles.
Ajout d’effets stylistiques | 51
Page 55

Symboles
Mesure
Métrique
Abréviations
Ponctuation
Parenthèses
Maths
52 | Ajout d’effets stylistiques
Page 56

Devise
Chif. doubles
Grec
Bureau
Sécurité
Commerces
Ajout d’effets stylistiques | 53
Page 57

Interdiction
Maison
Alimentation
Sports
Activité
54 | Ajout d’effets stylistiques
Page 58

Occasion
Livraison
Électrique
Animaux
Zodiaque
Émoticônes
Ajout d’effets stylistiques | 55
Page 59

Cadres
1 2 3 4 5 6
7 8 9 10 11 12
13 14 15 16 17 18
19 20 21 22 23 24
25 26 27 28 29 30
31 32 33 34 35 36
37 38 39 40 41 42
56 | Ajout d’effets stylistiques
Page 60

43 44 45 46 47 48
49 50 51 52 53 54
55 56 57 58 59 60
61 62 63 64 65 66
67 68 69 70 71 72
73 74 75 76 77 78
79 80 81 82 83 84
85 86 87
Ajout d’effets stylistiques | 57
Page 61

Modification de la taille de la police de caractère
Vous pouvez changer la taille des lettres, des
chiffres et des symboles sur votre étiquette.
Modification de la police de caractère
Vous pouvez choisir parmi les polices de
caractère suivantes :
■ Pour changer la taille du texte complet
sur votre étiquette, appuyez sur à
répétition jusqu’à ce que la taille des
caractères vous plaise.
Une description du nombre de lignes de
votre étiquette et des carrés représentant
le texte s’afficheront.
■ Pour modifier la taille de lignes ou de
blocs de texte spécifiques, appuyez sur
, sélectionnez Taille pol, puis
sélectionnez le nombre de lignes sur
votre étiquette et les options que vous
voulez utiliser.
Lorsque l’écran revient à l’aperçu de votre
étiquette, le texte s’affichera dans la taille
sélectionnée.
58 | Ajout d’effets stylistiques
SansS.
B.Gothic
Mincho
CB
SansS.HG
Roman
Gyosho
ScriptPL
SansS.ST
US Roman
Reisho
Gothic
CL Roman
BR
■ Pour changer la police de votre étiquette
en entier, appuyez sur à répétition
jusqu’à ce que la police affichée vous
plaise.
■ Pour modifier la police de caractères,
lignes ou blocs de texte spécifiques,
Page 62

appuyez sur , sélectionnez Police,
puis sélectionnez la police de caractère
et l’option que vous voulez utiliser.
Ajout de signes de ponctuation
En plus des signes de ponctuation de base
situés sur le clavier et dans la collection de
symboles, vous pouvez utiliser des signes de
ponctuation additionnels.
■ Appuyez sur à répétition jusqu’à ce
que le signe de ponctuation que vous
souhaitez utiliser s’affiche, puis appuyez
sur .
■ Appuyez sur + à répétition pour
accéder à d’autres signes de ponctuation.
Ajout d’accents
Vous pouvez choisir parmi une liste de
lettres accentuées.
1. Saisissez la lettre qui nécessite un accent.
2. Appuyez sur . Une liste d’options
apparaîtra à l’écran (par exemple, ÀÁÂ).
3. Utilisez le bouton pour mettre une
lettre accentuée en surbrillance, puis
appuyez sur pour la sélectionner.
Impression d’étiquettes
■ Appuyez sur pour imprimer et
découper l’étiquette actuelle.
La largeur et la longueur approximatives
de l’étiquette ainsi que le nombre de
copies s’afficheront à l’écran lorsque
l’étiquette est en cours d’impression.
■ Pour annuler l’impression, appuyez sur
.
■ Pour sélectionner une étiquette
enregistrée à des fins d’impression,
appuyez sur ou jusqu’à ce que
l’étiquette désirée s’affiche.
Impression d’étiquettes | 59
Page 63

■ Pour un aperçu de votre étiquette avant
l’impression, appuyez sur . L’étiquette
défilera à l’écran.
■ Pour désactiver le paramètre Coupe auto,
appuyez sur + , sélectionnez
Coupe auto, puis sélectionnez
Désactivé et appuyez sur .
Étiquettes spécialisées
Vous pouvez utiliser des formats d’étiquettes
et des rubans d’étiquettes spécialement
conçus pour l’identification d’équipement et
de câbles, la création d’étiquettes
thermocollantes et de rubans personnalisés,
et bien plus. Consultez le Guide de
l’utilisateur en ligne pour obtenir des
instructions sur tous les formats spécialisés
disponibles.
60 | Étiquettes spécialisées
Voici quelques exemples d’utilisation de
formats d’étiquettes et de rubans
d’étiquettes spécialisés :
■ Identifier des dossiers avec des rubans
d’étiquettes spécialement conçus pour
les onglets.
■ Identifier des câbles ou des fils.
■ Identifier des trousseaux de clés à l’aide
d’étiquettes drapeau.
■ Utiliser des étiquettes réfléchissantes sur
les casques de vélo, les vélos, les
planches à rouler ou autres équipements.
■ Utiliser des étiquettes luminescentes
pour localiser les interrupteurs muraux
ou les disjoncteurs dans le noir.
■ Utiliser des étiquettes thermocollantes
sur les vêtements des enfants.
■ Créer des rubans décoratifs pour
personnaliser des créations et des
cadeaux.
Page 64

Étiquettes d’identification de l’équipement
L’étiquette d’identification de l’équipement
permet de créer deux colonnes de 4 lignes
chacune et du texte par défaut, par exemple :
N o m d u p r o d u it
N o d ’ a d m i n
Da te
D é p a r t e m e n t
PC
KDB-01001
15/01/2014
M ar k et i ng
ligne du bloc de texte de droite
s’afficheront sous l’aperçu.
3. Utilisez le bouton pour sélectionner
et modifier le texte existant (bloc de
gauche) ou pour ajouter du texte dans
les 4 lignes du bloc de droite.
4. Lorsque vous avez terminé de modifier
l’étiquette, appuyez sur pour
l’imprimer.
Vous pouvez modifier le texte par défaut
selon vos besoins.
1. Appuyez sur .
2. Lorsque le message Remplacer txt
s’affiche à l’écran, appuyez sur .
Un aperçu du bloc de texte de gauche,
qui comprend 4 lignes, s’affichera à
l’écran.
La quatrième ligne provenant du bloc de
texte de gauche ainsi que la première
Étiquettes de code à barres
L’imprimante LabelWorks peut créer des
étiquettes de code à barres dans une variété
de formats. Ces codes à barres peuvent être
utilisés pour la gestion et le marquage de
l’inventaire.
Voici les formats de code à barres
disponibles : EAN-8, EAN-13, CODE128,
CODE39, QR CODE, ITF, CODABAR, UPC-A,
UPC-E.
Étiquettes spécialisées | 61
Page 65

1. Appuyez sur + .
2. Utilisez le bouton pour mettre un
format de code à barres en surbrillance,
puis appuyez sur pour le
sélectionner.
3. Sélectionnez la Largeur, la Proportion
et d’autres paramètres. Les paramètres
varieront selon le type de code à barres
choisi.
4. Saisissez le code à l’aide des chiffres du
clavier.
5. Lorsque vous êtes prêt à imprimer,
appuyez sur .
Vous pouvez modifier les paramètres du
code à barres suivants :
Largeur : Ajuste l’espace entre les barres du
code à barres.
Proportion : Ajuste la largeur des barres
larges du code à barres (l’équivalent de la
largeur de 2, 2,5 ou 3 barres minces).
62 | Étiquettes spécialisées
Chiffre de vérif : Détermine si un chiffre de
vérification est inclus dans le code à barres
(pour la correction d’erreurs). Si ce
paramètre est sélectionné, le chiffre de
vérification sera affiché dans l’aperçu.
Remarque : Pour plus d’informations
concernant les étiquettes de code à barres et de
codes QR, consultez le Guide de l’utilisateur en
ligne.
Étiquettes enroulées et étiquettes drapeau pour câbles
Utilisez les étiquettes enroulées pour les
endroits étroits ou lorsque l’identification
nécessaire est courte. Les étiquettes drapeau
offrent une surface plus large pour
accommoder de multiples lignes de texte.
Enr. : V
Enr. : H
Drap : V
Drap : H
Page 66

1. Appuyez sur .
2. Utilisez le bouton pour mettre le
type d’étiquette désiré en surbrillance,
puis appuyez sur pour le
sélectionner.
3. Sélectionnez la longueur de l’étiquette.
4. Saisissez le texte de l’étiquette.
5. Lorsque vous êtes prêt à imprimer,
appuyez sur .
Conseils concernant les étiquettes pour
câbles
■ Lorsque vous apposez une étiquette
drapeau, enroulez-la autour du câble de
façon relâchée et collez les deux
extrémités de l’étiquette ensemble, puis
appuyez sur les deux côtés du reste de
l’étiquette jusqu’à la base du câble. Ainsi,
il vous sera plus facile d’aligner les
extrémités.
■ Si vous manquez d’espace, utilisez des
rubans à étiquettes plus étroits (d’une
largeur de 9 mm ou 6 mm, par exemple).
■ Pour les câbles minces (1-2 mm), utilisez
une étiquette drapeau afin d’augmenter
la lisibilité.
■ Pour les étiquettes enroulées, répétez
une ligne de texte sur plusieurs lignes
afin d’augmenter la lisibilité.
■ Utilisez plusieurs étiquettes enroulées
sur un seul câble pour inclure plus
d’informations.
■ Apposez une étiquette enroulée aux
deux extrémités du câble.
■ N’utilisez pas une étiquette de longueur
standard en tant qu’étiquette enroulée :
l’étiquette se détachera progressivement
du câble à mesure que vous le pliez.
Étiquettes spécialisées | 63
Page 67

■ Utilisez des étiquettes luminescentes
dans des endroits sombres où la visibilité
est réduite.
■ Essayez d’utiliser des rubans d’étiquettes
enroulées spécialement conçus pour les
câbles (LC-6WBC9).
Rubans personnalisés
Les rubans personnalisés sont parfaits pour
les emballages-cadeaux ou pour décorer en
toute occasion, par exemple :
Le logiciel Label Editor vous permet
d’imprimer aisément des motifs de ruban
créatifs ou même d’importer vos propres
logos corporatifs et graphismes
correspondants au thème de votre fête. Pour
plus d’informations, consultez le Guide de
l’utilisateur en ligne.
Vous pouvez utiliser des rubans
personnalisés dans des centaines de projets
décoratifs ou de cadeaux. Cette section
comprend quelques exemples pour vous
inspirer.
■ Cadeaux pour invités
■ Mariage et réception-cadeau pour bébé
■ Arrangements floraux
■ Paniers-cadeaux
■ Décorations pour coiffures
■ Jouets
64 | Rubans personnalisés
Sacs cadeaux pour invités
Créez des sacs cadeaux personnalisés pour
un mariage, une réception-cadeau pour
bébé, une fête, un anniversaire ou d’autres
Page 68

occasions spéciales. Vous pouvez ajouter des
symboles ou des cadres qui correspondent
au thème de votre fête sur vos rubans.
1. Créez votre ruban.
Pour un mariage ou une réception-
cadeau, inscrivez le nom du couple,
ajoutez des espaces, puis inscrivez la date
du mariage. Ajoutez un cadre approprié.
Astuce : Appuyez sur la barre d’espacement
pour ajouter des espaces entre les zones
imprimées. Le ruban sera plus long si vous
utilisez une police de caractère plus large.
2. Imprimez votre ruban.
3. Découpez un cercle de 12 po (30 cm) de
diamètre de tulle, de cellophane ou d’un
autre type de matériel léger.
4. Placez une petite quantité de bonbons
au centre du cercle.
5. Enveloppez les bonbons avec le matériel
et utilisez votre ruban pour attacher
l’extrémité avec un nœud ou une boucle.
Assurez-vous de faire pivoter le ruban
lorsque vous l’attachez afin que le motif
imprimé soit visible sur les deux
extrémités.
Rubans personnalisés | 65
Page 69

Boucles pour cheveux ou rubans pour queue de cheval
Imprimez des accessoires pour coiffure
personnalisés à offrir à votre fille ou des
rubans pour queue de cheval identiques
pour tous les membres d’une même équipe.
(en appuyant sur
d’informations, consultez le Guide de
l’utilisateur en ligne.
). Pour plus
2. Imprimez votre ruban.
3. Attachez le ruban autour d’un élastique
pour queue de cheval. Ou encore, formez
une boucle et collez-la sur une barrette
de plastique.
Assurez-vous de faire pivoter le ruban
lorsque vous l’attachez afin que le motif
imprimé soit visible sur les deux
extrémités.
1. Saisissez du texte et des symboles.
Si vous avez besoin d’un ruban plus long,
ajoutez des espaces ou copiez le même
texte et les mêmes symboles plusieurs
fois.
Astuce : Si vous désactivez l’option Coupe
auto, vous pouvez utiliser la fonction Impr.
copies pour créer un motif récurrent
66 | Rubans personnalisés
Ornements avec support en ruban
Un ruban imprimé est un support idéal pour
les boules de Noël.
1. Pour allonger l’une des extrémités du
ruban (sans imprimer), appuyez sur +
, puis sélectionnez Alim. ruban.
Répétez cette procédure pour allonger
l’extrémité du ruban.
Page 70

2. Créez le motif de votre ruban en ajoutant
du texte et des symboles verticaux.
Astuce : Appuyez sur et sélectionnez
Vertical.
3. Assurez-vous de laisser assez d’espace au
centre du ruban afin que vous puissiez
l’enfiler dans le crochet de la boule de
Noël.
4. Imprimez votre ruban.
5. Enfilez le ruban dans le crochet de la
boule de Noël et attachez les extrémités
comme illustré.
6. Accrochez votre boule de Noël dans le
sapin.
Rubans personnalisés | 67
Page 71

Cartes de souhaits
Ajoutez des rubans pour décorer et
personnaliser des cartes de souhaits
préfabriquées ou créez vos propres cartes.
1. Saisissez du texte et des symboles pour
votre carte de souhaits.
2. Imprimez votre ou vos rubans.
3. Coupez l’extrémité des rubans si
nécessaire, puis collez-les sur votre carte.
68 | Utilisation du logiciel Label Editor
Utilisation du logiciel Label Editor
Le logiciel Label Editor vous permet de
créer des centaines de motifs d’étiquette
rapidement et facilement. Pour plus
d’informations sur la façon d’utiliser le
logiciel, consultez le Guide de l’utilisateur
en ligne.
Remarque : L’utilisation du logiciel est
optionnelle.
Installation du logiciel
Sous Windows, vous pouvez utiliser le DVD
inclus avec votre imprimante LabelWorks
afin d’installer le logiciel Label Editor.
Sous Mac OS X, vous pouvez télécharger le
logiciel à l’adresse
epson.com/support/lw700 (É.-U.) ou
epson.ca/support/lw700fr (Canada).
Page 72

Vous pouvez aussi télécharger le logiciel
Label Editor Lite pour Mac OS X depuis l’App
Store d’Apple.
Remarque : Le logiciel Label Editor Lite est
disponible seulement en anglais pour Mac.
Avant d’installer le logiciel, ayez le câble USB
inclus avec l’imprimante sous la main.
1. Insérez le DVD et suivez les instructions à
l’écran.
2. Lorsqu’un message vous invitant à
connecter l’imprimante à votre
ordinateur apparaît, branchez-la à l’aide
du câble USB, tel que décrit à la page 69.
Connexion à l’ordinateur
1. Après avoir installé le logiciel (ou durant
l’installation, si vous y êtes invité),
branchez l’imprimante à votre ordinateur
comme illustré :
Utilisation du logiciel Label Editor | 69
Page 73

2. Une fois que l’imprimante est branchée
et que le logiciel est installé, appuyez sur
le bouton PC link :
PC connecté clignotera à l’écran, et le
clavier LabelWorks sera désactivé.
Si vous voulez utiliser le clavier
LabelWorks alors que l’imprimante est
connectée à votre ordinateur, appuyez
sur le bouton PC link à nouveau.
70 | Utilisation du logiciel Label Editor
Création d’étiquettes sous Windows
Lorsque votre imprimante LabelWorks est
connectée à votre ordinateur, vous pouvez
utiliser le logiciel Label Editor pour concevoir
vos étiquettes ou vos rubans.
1. Double-cliquez sur l’icône Label Editor.
L’écran Nouveau/Ouvrir s’affichera :
Page 74

2. Sélectionnez Texte horizontal, puis
cliquez sur OK. Une étiquette vide
s’affichera sur l’écran principal de Label
Editor.
3. Saisissez le texte de l’étiquette, puis
cliquez à l’extérieur de la zone de
l’étiquette. Le texte apparaîtra sur
l’étiquette, comme illustré :
Menu déroulant
de la police
Icône
Bordure
Icône
Symbole
Icône
Imprimer
■ Pour ajouter une bordure, cliquez sur
l’icône Bordure et sélectionnez une
bordure, puis cliquez sur OK. Ajustez
la taille et la position de la bordure,
puis cliquez à l’extérieur de la zone de
l’étiquette.
■ Pour ajouter un symbole, cliquez sur
l’icône Symbole et sélectionnez un
symbole parmi l’une des 17
catégories, puis cliquez sur OK.
Cliquez sur l’endroit où vous
souhaitez placer le symbole.
■ Pour changer la police de caractère et
la taille de la police, sélectionnez la
zone de texte, puis utilisez les menus
déroulants Nom de la police et Taille
de la police. Vous pouvez utiliser
toute police de caractère installée sur
votre ordinateur.
4. Lorsque vous êtes prêt à imprimer,
appuyez sur l’icône Imprimer. Cliquez
sur Paramètres de l’imprimante pour
Utilisation du logiciel Label Editor | 71
Page 75

choisir des options additionnelles.
Sélectionnez le nombre de copies, puis
cliquez sur OK pour imprimer.
Remarque : Le logiciel Label Editor comprend
plusieurs fonctions et formats d’étiquettes
additionnels. Pour plus d’informations,
consultez le Guide de l’utilisateur en ligne.
Création d’étiquettes sous Mac OS X
Lorsque votre imprimante LabelWorks est
connectée à votre Mac, vous pouvez utiliser
le logiciel Label Editor Lite pour concevoir
vos étiquettes (logiciel disponible en anglais
seulement pour Mac).
72 | Utilisation du logiciel Label Editor
1. Démarrez l’application Label Editor Lite.
Un écran comme celui-ci s’affichera :
Icônes de création
de l’étiquette
Icône
Imprimer
2. Saisissez du texte dans la zone située au
bas de l’écran. Un aperçu de la police de
caractère et de la taille de la police
apparaîtra dans le haut de l’écran.
Page 76

■ Pour insérer une image, une date, une
bordure ou un code QR, cliquez sur
les icônes correspondantes à l’écran.
■ Pour modifier la police ou la taille de
la police, utilisez les menus
déroulants au bas de l’écran. Vous
pouvez utiliser toute police de
caractère installée sur votre
ordinateur.
3. Lorsque vous êtes prêt à imprimer,
appuyez sur l’icône d’impression.
Sélectionnez le nombre de copies et tout
autre paramètre désiré, puis cliquez sur
Imprimer.
Remarque : Pour plus d’informations sur la
façon d’utiliser Label Editor Lite, consultez le
Guide de l’utilisateur en ligne.
Application des étiquettes
Pour la plupart des étiquettes, le procédé
d’application est simple, comme indiqué
ci-dessous.
Pour des instructions sur la façon d’apposer
les étiquettes thermocollantes, consultez la
section à droite.
1. Retirez la pellicule protectrice.
2. Placez l’étiquette sur la surface désirée et
frottez-la fermement.
Application des étiquettes | 73
Page 77

Application des étiquettes thermocollantes
Vous pouvez appliquer les étiquettes sur les
types de tissu suivants :
■ 100 % coton
■ 100 % lin
■ 100 % polyester
■ Mélanges coton/polyester
■ Tissus à surface plate et lisse
N’appliquez pas l’étiquette sur des tissus
texturés comme la ratine de coton, le velours
côtelé ou la flanelle; sur des tissus tissés
grossièrement; sur des tissus à surface rude
comme le denim; sur des tissus
imperméables; ou sur des tissus nécessitant
un repassage à basse température.
74 | Application des étiquettes
Application des étiquettes
Appuyez fermement sur l’étiquette entière,
évitez les évents à vapeur et n’utilisez pas de
pattemouille (linge mouillé placé sur le tissu
pour limiter la chaleur).
1. Réglez votre fer à repasser entre 284 et
320 °F (140 et 160 °C), sans vapeur.
2. Assurez-vous que l’endroit où vous
souhaitez appliquer l’étiquette ne
présente aucun pli.
3. Placez l’étiquette à l’endroit désiré, face
imprimée vers le haut.
4. Appuyez doucement le fer à repasser sur
l’une des extrémités de l’étiquette pour la
fixer en place temporairement.
Page 78

5. Appuyez le fer à repasser
fermement sur
l’étiquette en entier et
tenez-le en place
pendant environ 10 à 15
secondes. Pour vous
assurer que l’étiquette
est bien collée, répétez cette procédure
3ou 4 fois.
Conseils d’utilisation des étiquettes
thermocollantes
■ Les étiquettes sont fabriquées avec des
matériaux non toxiques. Cependant, les
étiquettes appliquées deviennent rigides
et pourraient frotter ou égratigner la
peau si un contact direct se produit.
■ Les étiquettes peuvent être nettoyées à
sec et lavées à la machine.
■ Ne créez pas d’étiquettes trop longues
(au maximum la moitié de la longueur de
la semelle du fer à repasser). Les
étiquettes trop longues pourraient être
difficiles à appliquer ou pourraient être
déformées par l’expansion et la
contraction du tissu.
■ Coupez les coins de l’étiquette avant de
l’appliquer pour éviter qu’elle ne se
détache trop facilement.
■ Si une étiquette se détache, elle peut être
réappliquée avec le fer à repasser.
Cependant, elle risque de ne pas adhérer
aussi bien au tissu.
■ Lorsque vous appliquez une étiquette à
un tissu qui sera lavé ou nettoyé à sec
régulièrement, il est recommandé de la
coudre en place.
■ Si vous utilisez un fer à vapeur, désactivez
la vapeur lorsque vous appliquez
l’étiquette.
■ Une fois appliquée, l’étiquette ne pourra
pas être facilement détachée.
Application des étiquettes | 75
Page 79

■ Ne nettoyez jamais les étiquettes avec
des produits chimiques ou des solvants
comme la benzine, un diluant ou de
l’alcool. Sinon, les symboles et lettres
imprimés sur l’étiquette risquent de
s’effacer ou de se déformer.
■ Les étiquettes exposées à la lumière
directe du soleil pendant de longues
périodes de temps risquent de jaunir.
■ Les étiquettes n’adhèrent pas à des
matériaux qui ne sont pas des tissus,
comme le papier ou le cuir.
■ Avant d’utiliser de l’eau de Javel ou un
détachant, assurez-vous de tester le
produit.
76 | Résolution des problèmes
Résolution des problèmes
En cas de problème avec votre imprimante
LabelWorks, vérifiez si un message d’erreur
apparaît à l’écran. Pour d’autres suggestions
de dépannage, consultez le Guide de
l’utilisateur en ligne.
Messages d’erreur
Message Explication
Pas de ruban Éteignez l’imprimante et installez
Vérif cartouche Une cartouche de ruban
une cartouche de ruban
d’étiquettes.
d’étiquettes incompatible a été
installée. Vérifiez la cartouche du
ruban d’étiquettes.
Page 80

Vérif. batterie
Changer piles
Trop de lignes Vous avez excédé le nombre
Les piles sont faibles ou installées
incorrectement, des piles non
alcalines sont utilisées avec des
piles alcalines, ou des piles neuves
sont utilisées avec de vieilles piles.
Éteignez l’imprimante et
remplacez les piles avec des piles
neuves, ou utilisez l’adaptateur
secteur. Si les piles déjà installées
sont neuves, assurez-vous qu’elles
sont installées correctement.
maximal de lignes permis.
Supprimez les lignes indiquées.
Plus de n° de
séquence !
Tex te tro p long
Continuer ?
Le numéro de séquence a déjà été
configuré. Configurez un numéro
de séquence à la fois.
Le texte que vous avez saisi est
trop long pour la longueur
spécifiée de l’étiquette. Appuyez
sur pour confirmer et
continuer l’impression. La
longueur de l’étiquette sera
ajustée automatiquement.
Insér. ruban 24 mm Le motif de l’étiquette ne peut
être imprimé que sur un ruban
d’étiquettes de 24 mm (1 po).
Rub trop étroit L’impression sur le ruban
d’étiquettes actuel est impossible.
Utilisez un ruban d’étiquettes plus
large.
Impression trop
longue !
Plus c-bar! Un seul code à barres peut être
QRCODE trop
long
Raccourcissez le texte de
l’étiquette.
ajouté à l’étiquette.
Essayez l’une des solutions
suivantes : utilisez un ruban
d’étiquettes plus large, réduisez la
longueur du texte ou la grosseur
de la cellule, ou réduisez le niveau
de correction d’erreur
(Niv.correction).
Surchauffe ! La tête d’impression surchauffe.
Éteignez l’imprimante et retirez la
cartouche du ruban d’étiquettes.
Attendez que la tête d’impression
refroidisse avant d’essayer
d’imprimer à nouveau.
Couvercle ouvert
Mise hors tens.
Si vous ouvrez le couvercle arrière
alors que l’imprimante est
allumée, ce message apparaîtra et
l’imprimante s’éteindra
automatiquement. Éteignez
toujours l’imprimante avant
d’ouvrir le couvercle arrière.
Résolution des problèmes | 77
Page 81

Erreur de moteur Une erreur de moteur s’est
produite. Éteignez l’imprimante,
puis rallumez-la. Si ce message
s’affiche à nouveau, éteignez
l’imprimante et contactez Epson
pour obtenir du soutien
technique.
Réinitialisation de l’imprimante
De l’électricité statique ou d’autres causes
pourraient provoquer le dysfonctionnement
de l’imprimante. Si votre imprimante ne
fonctionne pas normalement (par exemple,
si l’imprimante ne s’allume/s’éteint pas ou
si l’affichage est déformé), réinitialisez
l’imprimante en suivant la procédure
ci-dessous.
Avertissement : Le processus de réinitialisation
de l’imprimante effacera vos étiquettes et
motifs enregistrés et reconfigurera votre
imprimante aux paramètres d’usine.
1. Appuyez sur le bouton P d’alimentation
pour éteindre l’imprimante.
78 | Soutien technique Epson
2. Appuyez et maintenez enfoncé +
, puis appuyez sur
P.
3. Lorsqu’un message s’affiche, appuyez sur
(pour annuler, appuyez sur
n’importe quel autre bouton).
L’imprimante sera réinitialisée.
Soutien technique Epson
Visitez le site Web www.epson.ca et cliquez
sur Français. Pour télécharger les pilotes,
cliquez sur Pilotes et soutien. Pour contacter
Epson par courriel, veuillez cliquer sur
Soutien par courriel. Ensuite, suivez les
instructions à l’écran.
Pour contacter un spécialiste du soutien
technique, composez le numéro suivant :
(562) 276-7245 (É.-U.) ou (905) 709-2567
(Canada), de 6 h à 20 h, heure du Pacifique, du
lundi au vendredi, et de 7 h à 16 h le samedi.
Page 82

Les jours et les heures de service peuvent
changer sans préavis. Des frais d’interurbain
peuvent s’appliquer.
epson.com/labelworks (ventes aux É.-U.)
ou epson.ca/labelworks (ventes au Canada)
(site Web présenté en anglais seulement).
Recyclage
Epson offre un programme de recyclage des
produits en fin de vie. Veuillez consulter le
site Web epson.com/recycle (É.-U.) ou
epson.ca/recycle (Canada) pour obtenir des
informations sur la façon de retourner votre
produit pour une élimination appropriée.
Achat de consommables et d’accessoires
Epson offre une grande variété de rubans
d’étiquettes conçus pour différents usages.
Vous pouvez acheter des cartouches de
ruban d’étiquettes et des accessoires sur le
site :
Vous pouvez également vous procurer
d’autres fournitures auprès d’un revendeur
Epson autorisé. Composez le 1 800 463-7766
pour obtenir les coordonnées du revendeur
le plus proche.
Enregistrement du produit
Pour recevoir des offres spéciales et des
nouvelles concernant de nouveaux rubans
d’étiquettes, enregistrez votre imprimante
LabelWorks.
Visitez le site epson.com/labelworks (É.-U.)
ou epson.ca/labelworks (Canada) et
sélectionnez Product Registration
(Enregistrement du produit).
Enregistrement du produit | 79
Page 83

Avis
À propos des étiquettes imprimées
Les étiquettes appliquées et l’adhésif utilisé sont
affectés par le type de surface et les conditions
environnementales telles que l’humidité et la chaleur.
Les étiquettes pourraient décoller, se retrousser ou
s’estomper; les caractères imprimés pourraient
s’estomper; de la couleur pourrait demeurer sur la
surface après avoir retiré l’étiquette, l’adhésif pourrait
laisser un résidu sur la surface.
Epson décline toute responsabilité en cas de
dommages ou de pertes causés par les étiquettes ou
l’adhésif.
Déclaration de conformité
Selon la norme 47CFR, parties 2 et 15 régissant, les
ordinateurs personnels et périphériques de classe B, et/
ou les unités centrales et les dispositifs d’alimentation
électrique utilisés avec les ordinateurs personnels de
classe B.
80 | Avis
Nous : Epson America, Inc.
Situés à : 3840 Kilroy Airport Way
MS 3-13, Long Beach, CA 90806
Téléphone : 1 (562) 981-3840
Nous déclarons sous notre seule et unique
responsabilité que le produit identifié dans la présente
est conforme à la norme 47CFR, parties 2 et 15, des
règles FCC régissant les dispositifs numériques de classe
B. Chaque produit commercialisé est identique à
l’appareil représentatif testé et jugé conforme aux
normes. Les dossiers indiquent que l’équipement
produit se situe dans les limites acceptables, du fait de
la production en quantité et des essais statistiques
réalisés, conformément au règlement 47CFR, alinéa
2.909. L’utilisation de l’appareil doit s’effectuer selon
deux conditions : 1) cet appareil ne doit pas provoquer
d’interférences néfastes, et 2) cet appareil doit tolérer
les interférences reçues, y compris celles qui risquent de
provoquer un fonctionnement indésirable.
Nom commercial : Epson
Type de produit : Imprimante d’étiquettes
Modèle : LW-700
Page 84

Garantie limitée d’Epson America, Inc.
Ce que couvre la garantie : Epson America, Inc.
(« Epson ») garantit à l’acheteur d’origine au détail
que l’appareil d’impression d’étiquettes Epson et ses
consommables et accessoires couverts par la présente
garantie limitée (individuellement, un « produit »), s’ils
sont achetés et utilisés au Canada, aux États-Unis ou à
Puerto Rico, seront exempts de défaut de fabrication et
de vice matériel durant une période d’un (1) an à
compter de la date d’achat d’origine, dans le cas de
l’appareil d’impression d’étiquettes, et durant une
période de trente (30) jours pour les vices matériaux à
compter de la date d’achat d’origine, dans le cas de ses
consommables et accessoires. Les consommables
incluent les rouleaux et cartouches d’étiquettes et de
rubans d’étiquettes. Les accessoires incluent un
adaptateur secteur. Pour toute intervention au titre de
la garantie, vous devez fournir une preuve de la date
d’achat d’origine.
Ce que fera Epson pour remédier aux problèmes : Si,
durant la période de garantie, le produit Epson s’avère
défectueux, veuillez communiquer avec Epson
Connection au 905 709-2567 (Canada) ou 562 276-7245
(É.-U. ou Puerto Rico) pour obtenir des instructions
concernant les réparations sous garantie et une
autorisation de retour de la marchandise. Un technicien
Epson réalisera un diagnostic téléphonique pour
déterminer si le produit a besoin d’être réparé. Si le
produit a besoin d’être réparé, Epson peut, selon son
choix, le remplacer ou le réparer, sans frais de pièces ni
de m ain- d’œu vre. S i Eps on au toris e le r empl acement du
produit défectueux, on vous enverra un produit de
remplacement, en port payé si vous avez une adresse
au Canada, aux États-Unis ou à Puerto Rico. Les
livraisons vers d’autres destinations s’effectueront en
port payable à l’arrivée. Il vous incombe d’emballer
correctement le produit défectueux et de le retourner à
Epson dans un délai de cinq (5) jours ouvrables après
avoir reçu le produit de remplacement. Epson vous
demandera un numéro de carte de crédit ou de débit
pour couvrir le coût du produit de remplacement au cas
où vous ne retourneriez pas le produit défectueux. Pour
une réparation du produit au lieu d’un échange, Epson
vous demandera de lui envoyer ce dernier directement
ou à son centre de service autorisé qui réparera le
produit et vous le renverra. Vous avez la responsabilité
d’emballer le produit et devez défrayer les coûts
d’expédition vers et depuis le centre de service autorisé
Epson. Lorsqu’une intervention au titre de la garantie
nécessite l’échange du produit ou d’une pièce, l’article
remplacé devient propriété d’Epson. Le produit ou la
Avis | 81
Page 85

pièce de rechange pourront être neufs ou avoir été
remis à neuf selon les normes de qualité d’Epson et, au
choix d’Epson, le produit de remplacement peut être un
autre modèle de type et de qualité semblables. Les
produits et pièces remplacés sont couverts pour la
période de garantie restante du produit d’origine
couvert par la présente garantie limitée.
Éléments non couverts par la garantie : Cette
garantie ne s’applique qu’au Canada, aux États-Unis ou
à Puerto Rico dans le contexte d’une utilisation normale.
L’utilisation de ce produit à des fins de production
continue ou à d’autres fins semblables n’est pas
considérée une utilisation normale; tout dommage,
entretien ou besoin de réparations découlant d’une
telle utilisation n’est pas couvert par la présente
garantie. Cette garantie n’est pas transférable. Elle ne
s’applique pas aux dommages subis par le produit
Epson du fait de l’utilisation de pièces ou fournitures qui
ne sont pas fabriquées, distribuées ni homologuées par
Epson. Sont notamment exclus de la garantie : les
pièces et composants ou périphériques fabriqués par
des tiers et ajoutés au produit Epson après son
expédition par Epson, par exemple des cartes ou
composants ajoutés par l’utilisateur ou le revendeur.
Epson ne sera pas tenu d’effectuer d’intervention au
titre de la garantie lorsque l’étiquette ou le logo Epson,
le numéro de série ou la plaque signalétique ont été
82 | Avis
enlevés du produit; si le produit n’est pas correctement
entretenu ou ne fonctionne pas correctement du fait
d’une utilisation inadéquate ou abusive, d’une
installation incorrecte, d’une négligence, d’avaries lors
du transport, de dommages causés par des désastres
tels un incendie, une inondation ou la foudre, d’une
surtension électrique, de problèmes logiciels, d’une
interaction avec des produits d’une autre marque
qu’Epson ou d’une intervention effectuée par un tiers
autre qu’un réparateur Epson agréé. Si une anomalie
signalée ne peut être décelée ni reproduite, les frais
engagés seront à votre charge.
STIPULATION D’EXONÉRATION DE GARANTIES : CE QUI
PRÉCÈDE CONSTITUE LA SEULE GARANTIE ET EXCLUT
TOUTE AUTRE GARANTIE, EXPRESSE OU IMPLICITE, Y
COMPRIS, MAIS SANS S’Y LIMITER, TOUTE GARANTIE
IMPLICITE DE QUALITÉ MARCHANDE, D’APTITUDE À
UNE FIN PARTICULIÈRE OU DE NON-VIOLATION DE
DROITS. SAUF DISPOSITIONS CONTRAIRES, TOUTE
DÉCLARATION OU GARANTIE FAITE PAR UNE AUTRE
PERSONNE OU SOCIÉTÉ EST NULLE.
Recours : Votre recours exclusif et l’entière
responsabilité d’Epson en cas de violation substantielle
de cette entente seront limités à un remboursement du
prix payé pour les produits Epson couverts par la
présente entente. Toute action au titre de la garantie
Page 86

doit intervenir dans les 3 mois à compter de la date
d’expiration de la garantie. Epson ne sera pas tenu
responsable des retards ou des périodes de nonfonctionnement en raison de causes indépendantes de
sa volonté. Sauf dispositions contraires dans la présente
garantie écrite, Epson et ses filiales ne peuvent être
tenus responsables des pertes, inconvénients ou
dommages, incluant des dommages directs,
particuliers, consécutifs ou indirects, incluant la perte de
bénéfices, les coûts de l’équipement de substitution, le
temps d’arrêt, les réclamations des tiers, incluant les
clients, ou les dommages matériels résultant de
l’utilisation ou de l’impossibilité d’utiliser les produits
Epson, qu’elle soit causée par une violation de la
garantie ou toute autre théorie juridique. Certaines
juridictions n’autorisent pas de limitations sur les
garanties ou les recours pour violation dans certaines
transactions. Dans de telles juridictions, les limites
indiquées dans ce paragraphe et dans le paragraphe
précédent pourraient ne pas s’appliquer.
Au Canada, les garanties englobent les garanties et les
conditions.
Arbitrage, lois applicables : Tout litige découlant de
cette Entente sera réglé par arbitrage à Los Angeles,
Californie, É.-U., conformément aux règles d’arbitrage
commerciales de l’American Arbitration Association, et
la décision rendue lors de l’arbitrage pourra faire l’objet
d’un jugement par tout tribunal compétent. La présente
Entente s’interprète conformément aux lois de l’État de
la Californie, à l’exception de cette clause d’arbitrage,
qui sera interprétée conformément au Federal
Arbitration Act.
Pour obtenir les coordonnées du revendeur Epson le
plus près de vous, visitez notre site Web à l’adresse :
epson.ca.
Pour obtenir les coordonnées du centre de service
après-vente Epson le plus près de vous, visitez
epson.ca/support.
Ou encore, écrivez-nous à l’adresse :
Epson America, Inc., P.O. Box 93012, Long Beach, CA
90809-3012, É.-U.
Marques de commerce
EPSON est une marque de commerce déposée, EPSON
Exceed Your Vision est un logotype déposé, et
LabelWorks et LC TAPE sont des marques de commerce
de Seiko Epson Corporation. Epson Connection est une
marque de service d’Epson America, Inc.
Avis | 83
Page 87

Mac et Mac OS sont des marques de commerce d’Apple
Inc., enregistrées aux États-Unis et dans d’autres pays.
Avis général : Les autres noms de produit utilisés dans le
présent document sont donnés uniquement à titre
d’identification et peuvent être des noms de marque de
leur propriétaire respectif. Epson renonce à tous les
droits associés à ces marques.
L’information contenue dans le présent document peut
être modifiée sans préavis.
© 2013 Epson America, Inc., 10/13 CPD-40106
84 | Avis
Page 88

*412577900*
*412577900*
LabelWorks tapes are available at epson.com/labelworks
Des rubans d’étiquettes LabelWorks sont disponibles sur le site epson.ca/labelworks
1
Tape/Ruban d’étiquettes
Standard labels/Classique X X X X X
Ribbon/Ruban X
Iron-on/Thermocollant X X
Clear/Transparent X X X
Metallic/Métallique X X
Fluorescent/Fluorescent X
Glow-in-the-dark/Luminescent X X
Strong adhesive/Puissant adhésif X X X
Reflective/Réfléchissant X X
Pearlized/Nacré X
Folder tab/Pour onglets X X
Cable wrap/Pour câbles X
/4 inch/po
(6 mm)
3
/8 inch/po
(9 mm)
1
/2 inch/po
(12 mm)
3
/4 inch/po
(18 mm)
Pays d’impression : XXXXX
1 inch/po
(24 mm)
CPD-40106
Printed in XXXXX
 Loading...