

Page 1
LabelWorks LW-700
User's Guide
Page 2

Page 3

Contents
LabelWorks LW-700 User's Guide ............................................................................................................. 9
Introduction to Your LabelWorks Printer ................................................................................................ 10
Setting Up the Printer................................................................................................................................ 16
Creating Labels Using the Keyboard....................................................................................................... 23
Product Box Contents ........................................................................................................................ 10
Notations Used in the Documentation................................................................................................ 10
Label Printer Part Locations............................................................................................................... 11
Label Printer Parts......................................................................................................................... 11
Label Printer Parts - Keyboard ...................................................................................................... 13
Label Printer Parts - Display.......................................................................................................... 14
Connecting the AC Adapter................................................................................................................ 16
Installing Batteries.............................................................................................................................. 17
Inserting and Removing Tape Cartridges........................................................................................... 18
Turning the Printer On and Off ........................................................................................................... 21
Changing Language and Other Preferences...................................................................................... 22
Adjusting the Preview......................................................................................................................... 22
Entering Text ..................................................................................................................................... 23
Saving Labels .................................................................................................................................... 24
Deleting Labels .................................................................................................................................. 24
Adding Symbols................................................................................................................................. 24
Available Symbols......................................................................................................................... 25
Adding Frames................................................................................................................................... 26
Available Frames........................................................................................................................... 28
Adding Tables.................................................................................................................................... 29
Changing Font Size............................................................................................................................ 30
Changing the Label Font Size ....................................................................................................... 30
Changing the Font Size Using the Edit Menu................................................................................ 30
Changing the Label Font.................................................................................................................... 31
Adding Punctuation............................................................................................................................ 32
Adding Accented Letters.................................................................................................................... 32
3
Page 4

Changing Label Format Settings........................................................................................................ 33
Label Format Settings ................................................................................................................... 33
Creating Special Format Labels Using the Keyboard ............................................................................ 37
Creating a Sequence of Labels.......................................................................................................... 37
Creating Barcode Labels.................................................................................................................... 38
Creating QR Code Labels .................................................................................................................. 38
Creating Folder Tab Labels................................................................................................................ 40
Creating Patch Panel Labels.............................................................................................................. 40
Cable Labels...................................................................................................................................... 41
Creating Cable Labels................................................................................................................... 42
Creating Equipment Management Labels.......................................................................................... 42
Printing Labels Using the Built-In Keyboard........................................................................................... 44
Previewing Labels ............................................................................................................................. 44
Printing and Cutting Labels ............................................................................................................... 44
Printing Multiple Copies of a Label..................................................................................................... 45
Printing Mirror Image Labels .............................................................................................................. 45
Printing Without Cutting...................................................................................................................... 45
Feeding and Cutting the Tape............................................................................................................ 46
Adjusting Print Density....................................................................................................................... 46
Using the Printer With Your Computer.................................................................................................... 47
Connecting the Printer to Your Computer........................................................................................... 47
Using Label Editor for Windows ......................................................................................................... 48
Getting Started With Label Editor .................................................................................................. 48
Installing Label Editor................................................................................................................ 48
Starting Label Editor ................................................................................................................. 48
Label Editor Main Window ........................................................................................................ 50
Label Editor Toolbars................................................................................................................ 51
Designing Labels With Label Editor............................................................................................... 53
Creating a Basic Label in Label Editor ...................................................................................... 54
Setting Default Preferences in Label Editor .............................................................................. 57
Working With Blocks in Label Editor ......................................................................................... 57
Adding Borders in Label Editor ................................................................................................. 59
Inserting Images in Label Editor................................................................................................ 60
4
Page 5

Inserting Symbols in Label Editor.............................................................................................. 61
Inserting Barcodes in Label Editor............................................................................................ 62
Inserting QR Codes in Label Editor........................................................................................... 64
Inserting Tables in Label Editor................................................................................................. 66
Inserting the Date and Time in Label Editor.............................................................................. 67
Inserting a Background Pattern in Label Editor......................................................................... 68
Inserting Lines and Shapes in Label Editor............................................................................... 71
Inserting Text Art in Label Editor............................................................................................... 73
Editing Layout in Label Editor ................................................................................................... 74
Editing Text Design in Label Editor........................................................................................... 76
Creating Special Format Labels Using Label Editor ...................................................................... 76
Creating Labels from Imported Data in Label Editor ................................................................. 77
Creating Ribbons With Repeated Patterns in Label Editor........................................................ 80
Creating Equipment Management Labels in Label Editor......................................................... 82
Using the Label Editor Catalog ................................................................................................. 84
Creating Numbered Label Sequences in Label Editor .............................................................. 85
Printing Labels With Label Editor................................................................................................... 87
Printing Labels in Label Editor .................................................................................................. 88
Label Editor Printer Settings ..................................................................................................... 90
Print-Paste Printing in Label Editor........................................................................................... 92
Using Label Editor Lite for OS X......................................................................................................... 95
Getting Started With Label Editor Lite............................................................................................ 95
Installing Label Editor Lite......................................................................................................... 95
Starting Label Editor Lite........................................................................................................... 96
Label Editor Lite Main Window.................................................................................................. 97
Designing Labels With Label Editor Lite........................................................................................ 98
Setting Default Preferences in Label Editor Lite........................................................................ 98
Creating a Basic Label in Label Editor Lite.............................................................................. 100
Formatting Text in Label Editor Lite ........................................................................................ 101
Inserting Images in Label Editor Lite....................................................................................... 102
Inserting the Date and Time in Label Editor Lite...................................................................... 103
Adding Borders in Label Editor Lite......................................................................................... 103
Inserting QR Codes in Label Editor Lite.................................................................................. 104
5
Page 6

Using the Label Editor Lite Wizard.......................................................................................... 105
Feeding and Cutting the Tape in Label Editor Lite....................................................................... 106
Printing Labels With Label Editor Lite.......................................................................................... 107
Applying Your Labels.............................................................................................................................. 108
Applying Standard Labels ................................................................................................................ 108
Iron-on Labels.................................................................................................................................. 109
Applying Iron-on Labels............................................................................................................... 109
Iron-on Label Tips........................................................................................................................ 110
Cleaning the Printer ................................................................................................................................ 112
Cleaning the Outside of the Printer................................................................................................... 112
Cleaning the Print Head ................................................................................................................... 112
Solving Problems.................................................................................................................................... 114
Checking for Software Updates........................................................................................................ 114
Product Error Messages................................................................................................................... 114
Resetting the Printer......................................................................................................................... 116
Solutions When the Display Is Blank................................................................................................ 116
Solutions When the Printer Does Not Print....................................................................................... 116
Solutions to Computer Printing Problems......................................................................................... 117
Solutions When Print Quality Is Poor................................................................................................ 117
Solutions to Tape Cutting Problems................................................................................................. 118
Solutions to Problems With Saved Labels........................................................................................ 118
Solutions to Problems Attaching Labels........................................................................................... 119
Solutions to Problems With Iron-on Labels....................................................................................... 119
Where to Get Help............................................................................................................................ 119
Technical Specifications ........................................................................................................................ 121
Label Editor Software System Requirements................................................................................... 121
Label Editor Lite Software System Requirements............................................................................ 121
Label Printer Specifications.............................................................................................................. 122
Label Printer Power Supply Specifications....................................................................................... 123
Notices ..................................................................................................................................................... 124
Important Safety Instructions............................................................................................................ 124
General Label Printer Safety Instructions.................................................................................... 124
6
Page 7

Tape Cartridge Safety Instructions.............................................................................................. 125
AC Adapter Safety Instructions.................................................................................................... 126
Battery Safety Instructions........................................................................................................... 126
FCC Compliance Statement............................................................................................................. 127
Trademarks...................................................................................................................................... 128
Copyright Notice............................................................................................................................... 128
Copyright Attribution.................................................................................................................... 129
7
Page 8

Page 9

LabelWorks LW-700 User's Guide
Welcome to the LabelWorks LW-700 User's Guide.
9
Page 10
Introduction to Your LabelWorks Printer
See these sections to learn more about your label printer and this manual.
Product Box Contents
Notations Used in the Documentation
Label Printer Part Locations
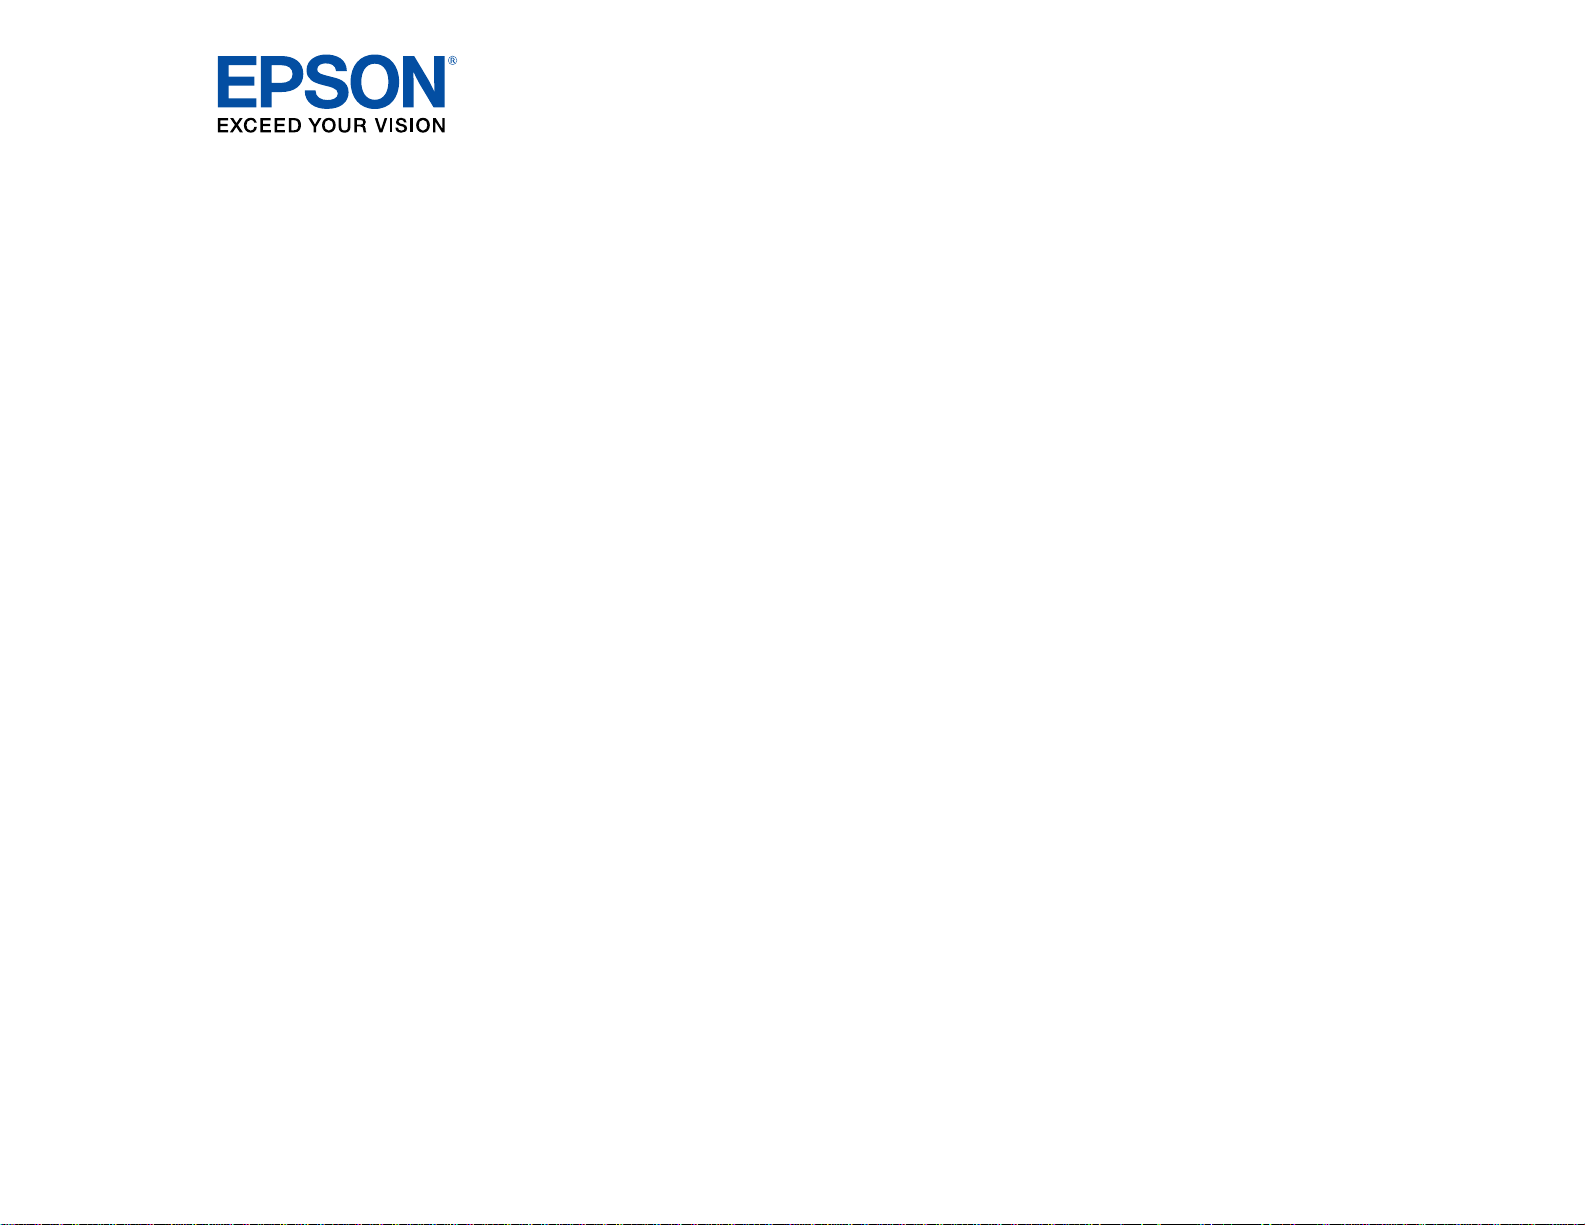
Product Box Contents
Make sure your label printer box included all of these parts:
1 Printer
2 AC adapter
3 USB cable
4 Sample tape cartridge
5 Label Editor software DVD for Windows
Parent topic: Introduction to Your LabelWorks Printer
Notations Used in the Documentation
Follow the guidelines in these notations as you read your documentation:
• Warnings must be followed carefully to avoid bodily injury.
10
Page 11
• Cautions must be observed to avoid damage to your equipment.
• Notes contain important information about your label printer.
• Tips contain additional label printing information.
Parent topic: Introduction to Your LabelWorks Printer
Label Printer Part Locations
Check the part illustrations to learn about the parts on your label printer.
Label Printer Parts
Label Printer Parts - Keyboard
Label Printer Parts - Display
Parent topic: Introduction to Your LabelWorks Printer
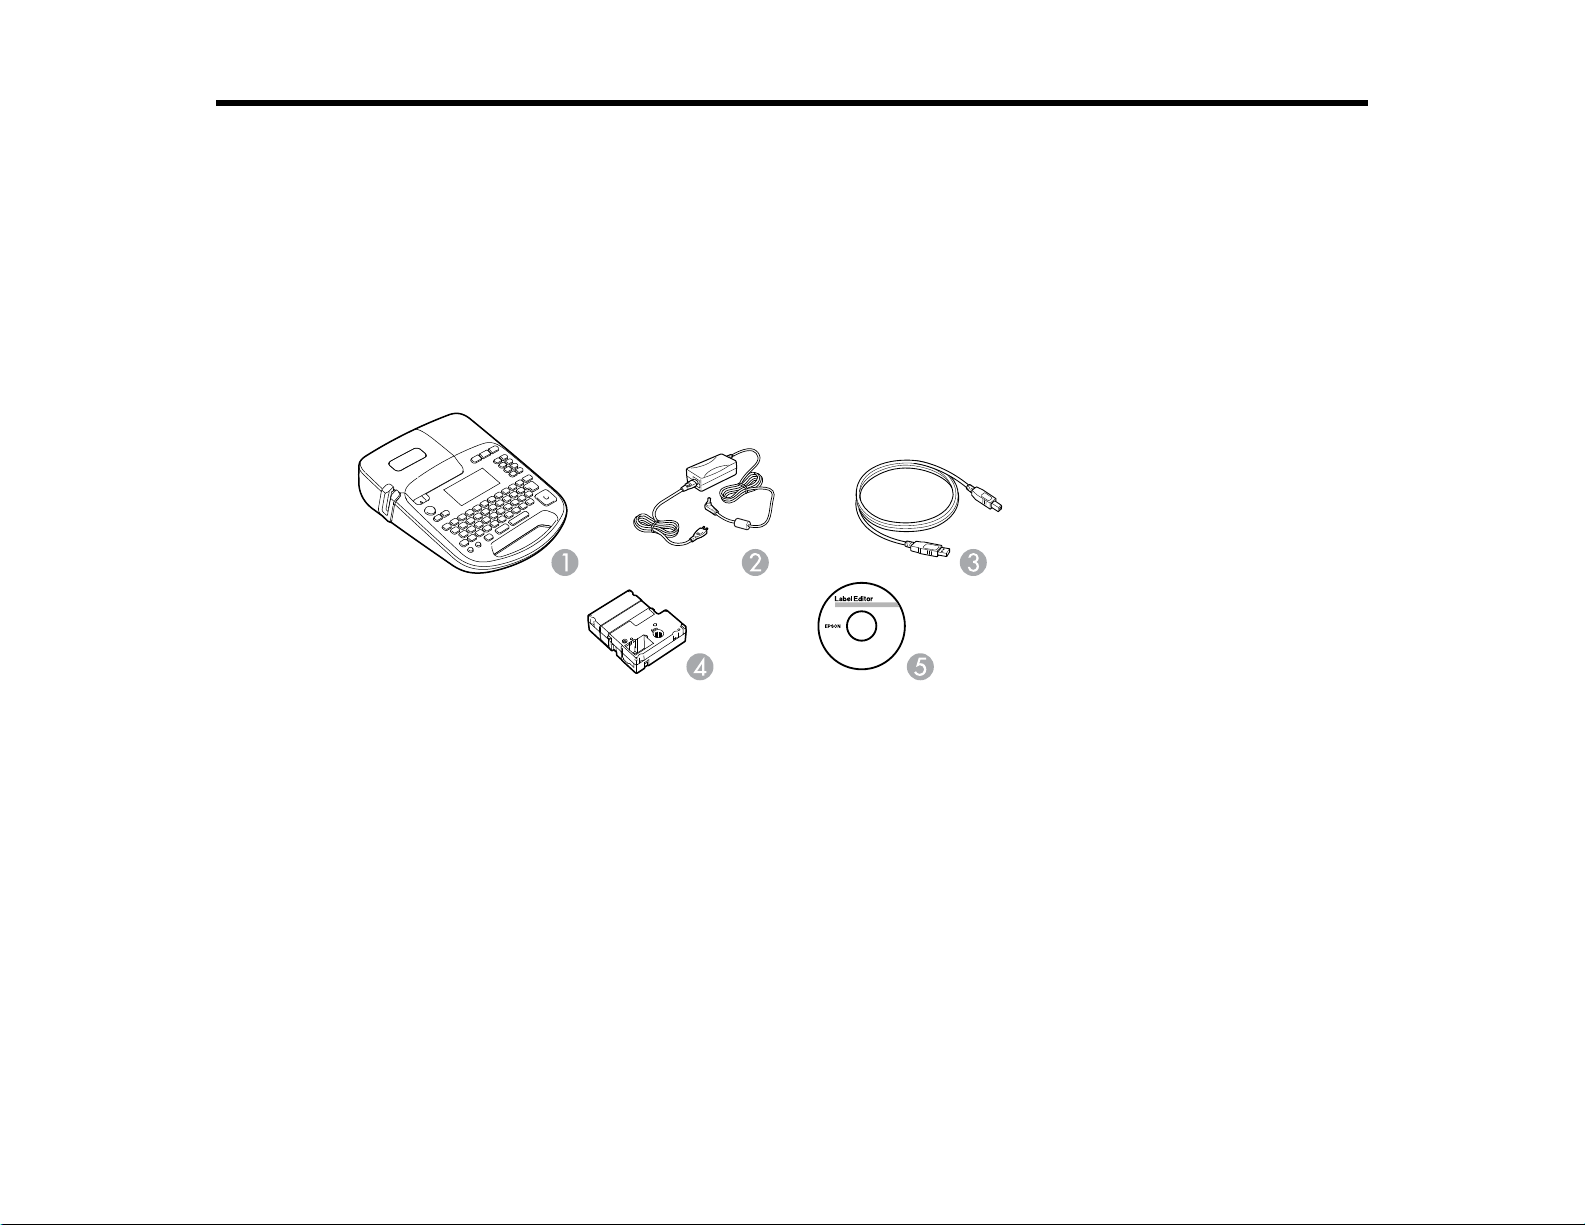
Label Printer Parts
Top
1 Tape cover
2 Tape ejection slot
11
Page 12
3 Display
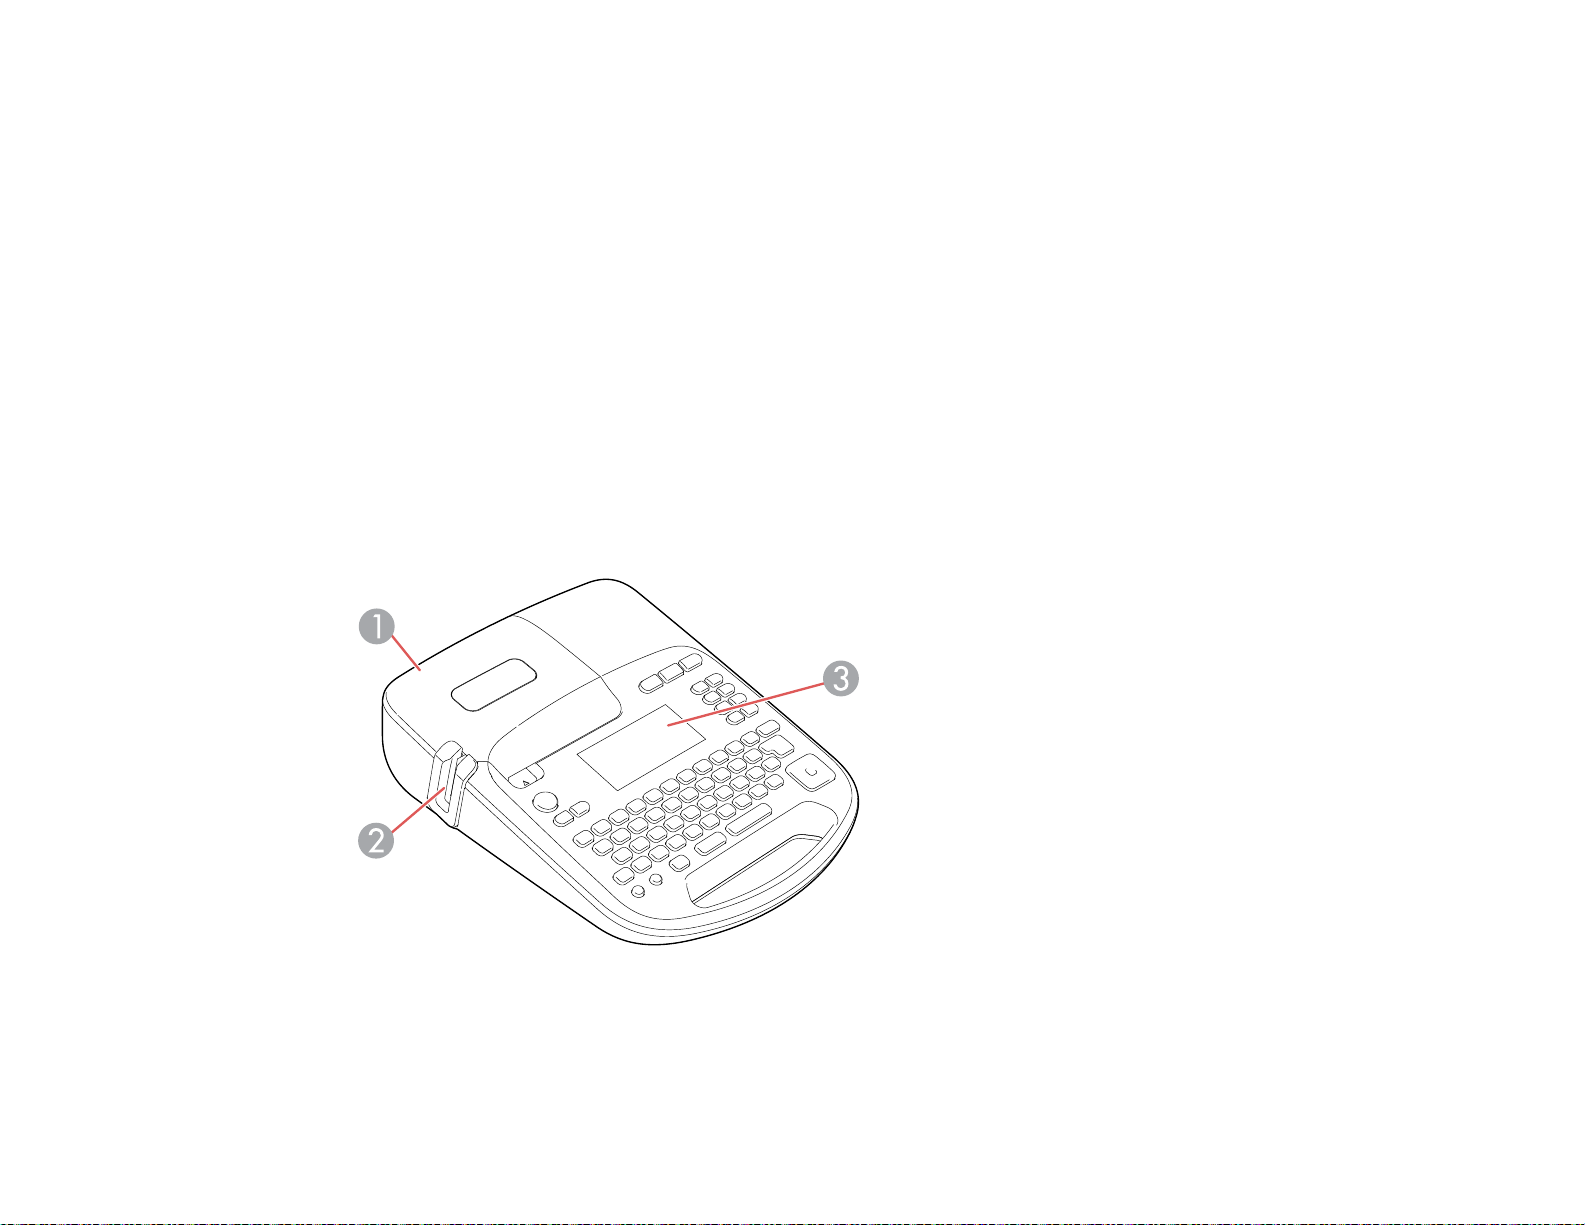
Connectors
1 USB port
2 AC adapter port
Parent topic: Label Printer Part Locations
12
Page 13
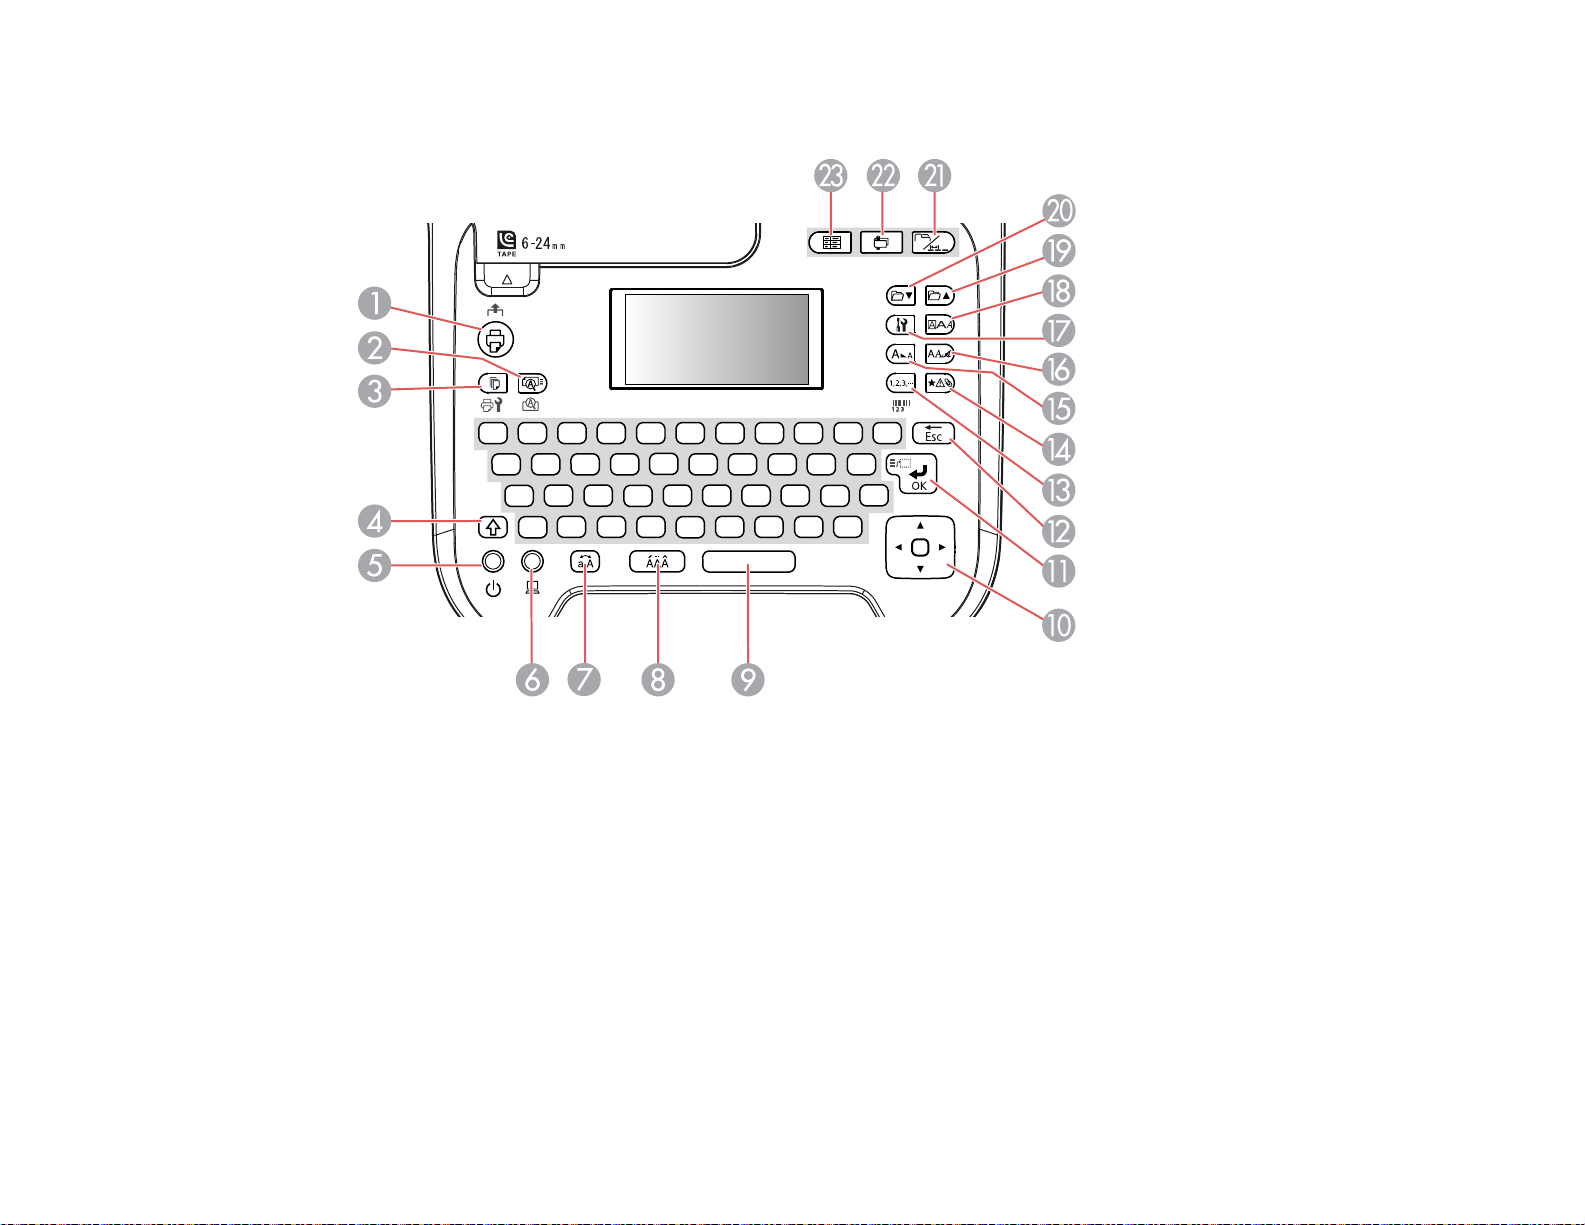
Label Printer Parts - Keyboard
1 Print and cut
2 Print multiple copies or mirror image labels
3 Preview current label
4 Shift
5 Turn printer on/off
6 Connect to computer (PC link)
7 Caps lock
8 Add an accented letter
9 Spacebar
13
Page 14
10 Navigate
11 Select, Enter, or OK
12 Backspace, Cancel, or Escape
13 Add sequence numbers, barcode, or QR code
14 Add symbols
15 Select font size
16 Select font
17 Select language and other preferences
18 Open Edit menu to add frames or other special features
19 Save or create new label, or select a saved label
20 Select a saved label
21 Create a folder tab label
22 Create a cable label
23 Create an equipment management label
Parent topic: Label Printer Part Locations
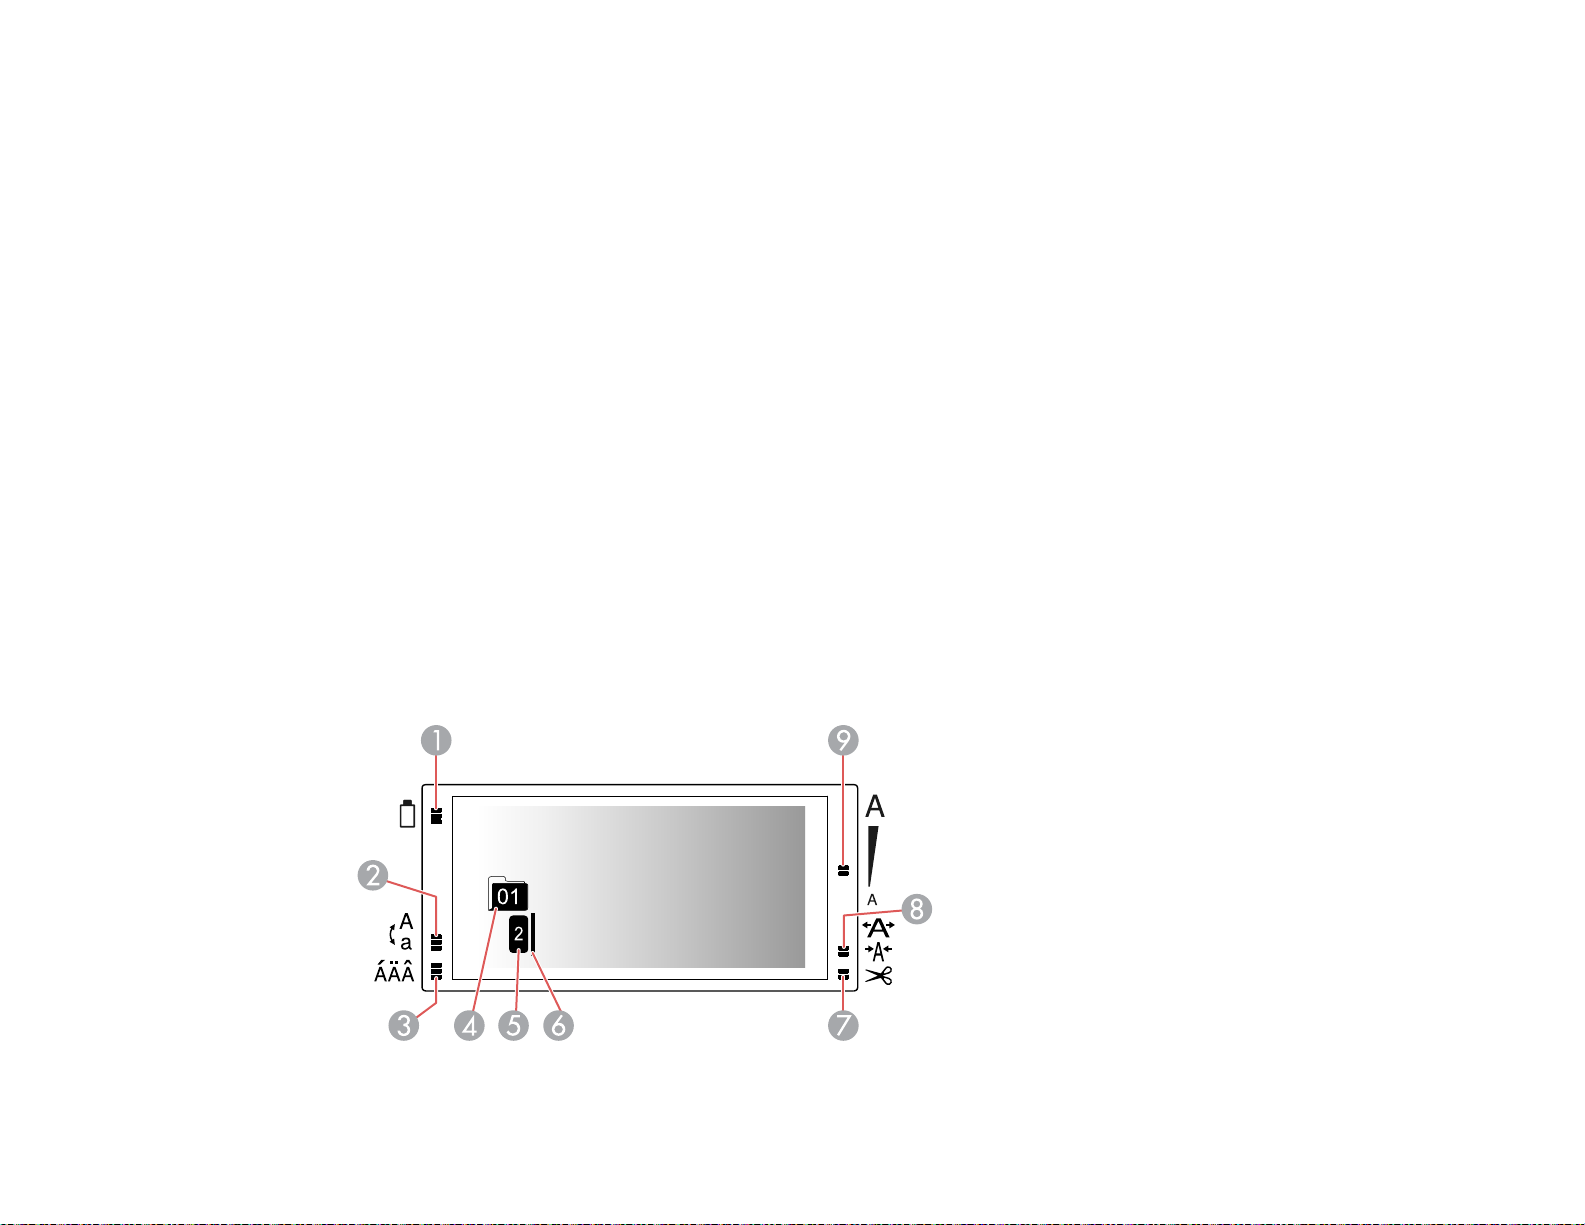
Label Printer Parts - Display
14
Page 15

1 Battery level
2 Use of upper or lower case
3 Flashes to indicate accent mark selection
4 Current label number
5 Current line number
6 Cursor
7 Use of Auto cut setting
8 Use of customized font width
9 Current font size
Parent topic: Label Printer Part Locations
15
Page 16
Setting Up the Printer
Follow the instructions in these sections to set up your label printer.
Connecting the AC Adapter
Installing Batteries
Inserting and Removing Tape Cartridges
Turning the Printer On and Off
Changing Language and Other Preferences
Adjusting the Preview
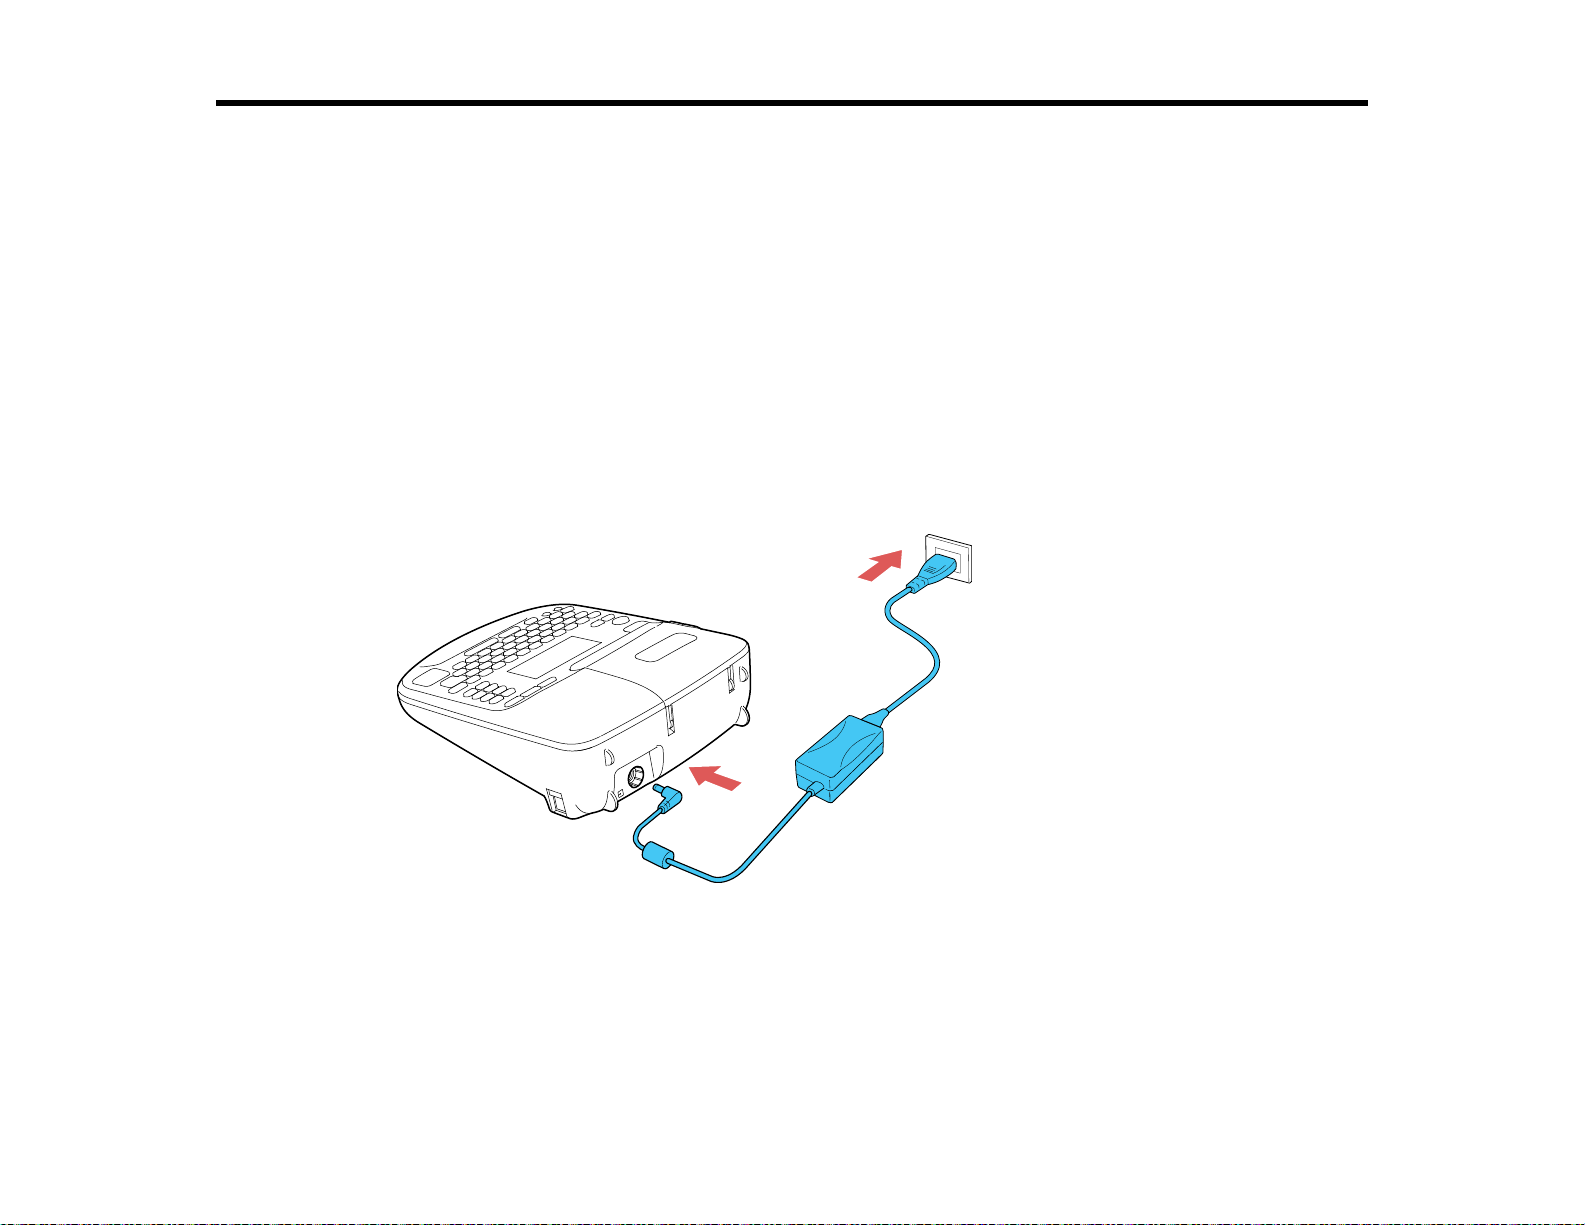
Connecting the AC Adapter
Use the AC adapter to power the printer without batteries.
1. Connect the adapter to the printer's AC adapter port.
2. Plug the other end of the adapter into an electrical outlet
Parent topic: Setting Up the Printer
16
Page 17
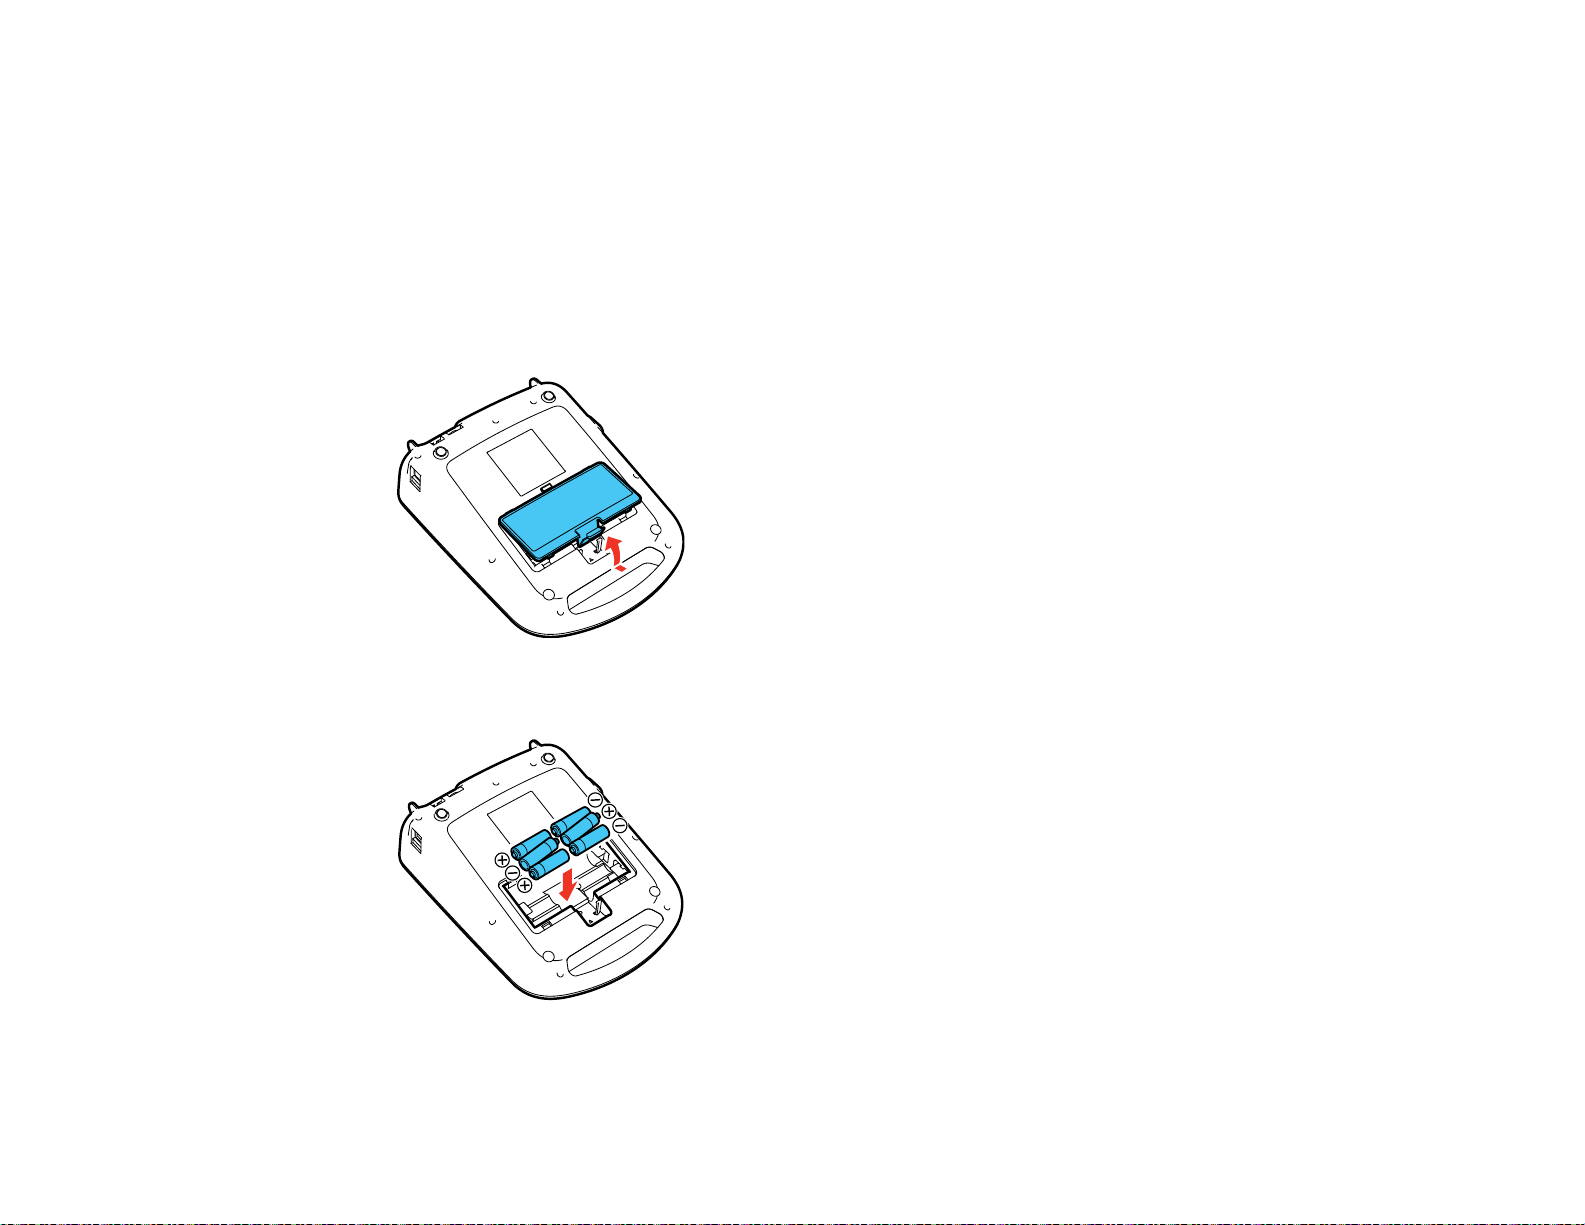
Installing Batteries
You can use batteries instead of the AC adapter when you are not near a power source. The printer
requires 6 AA alkaline batteries.
Caution: Make sure the power is off before you install batteries.
Note: Batteries are not included.
1. Press the tab and open the battery cover.
2. Insert the batteries with the + and – ends facing as shown.
17
Page 18
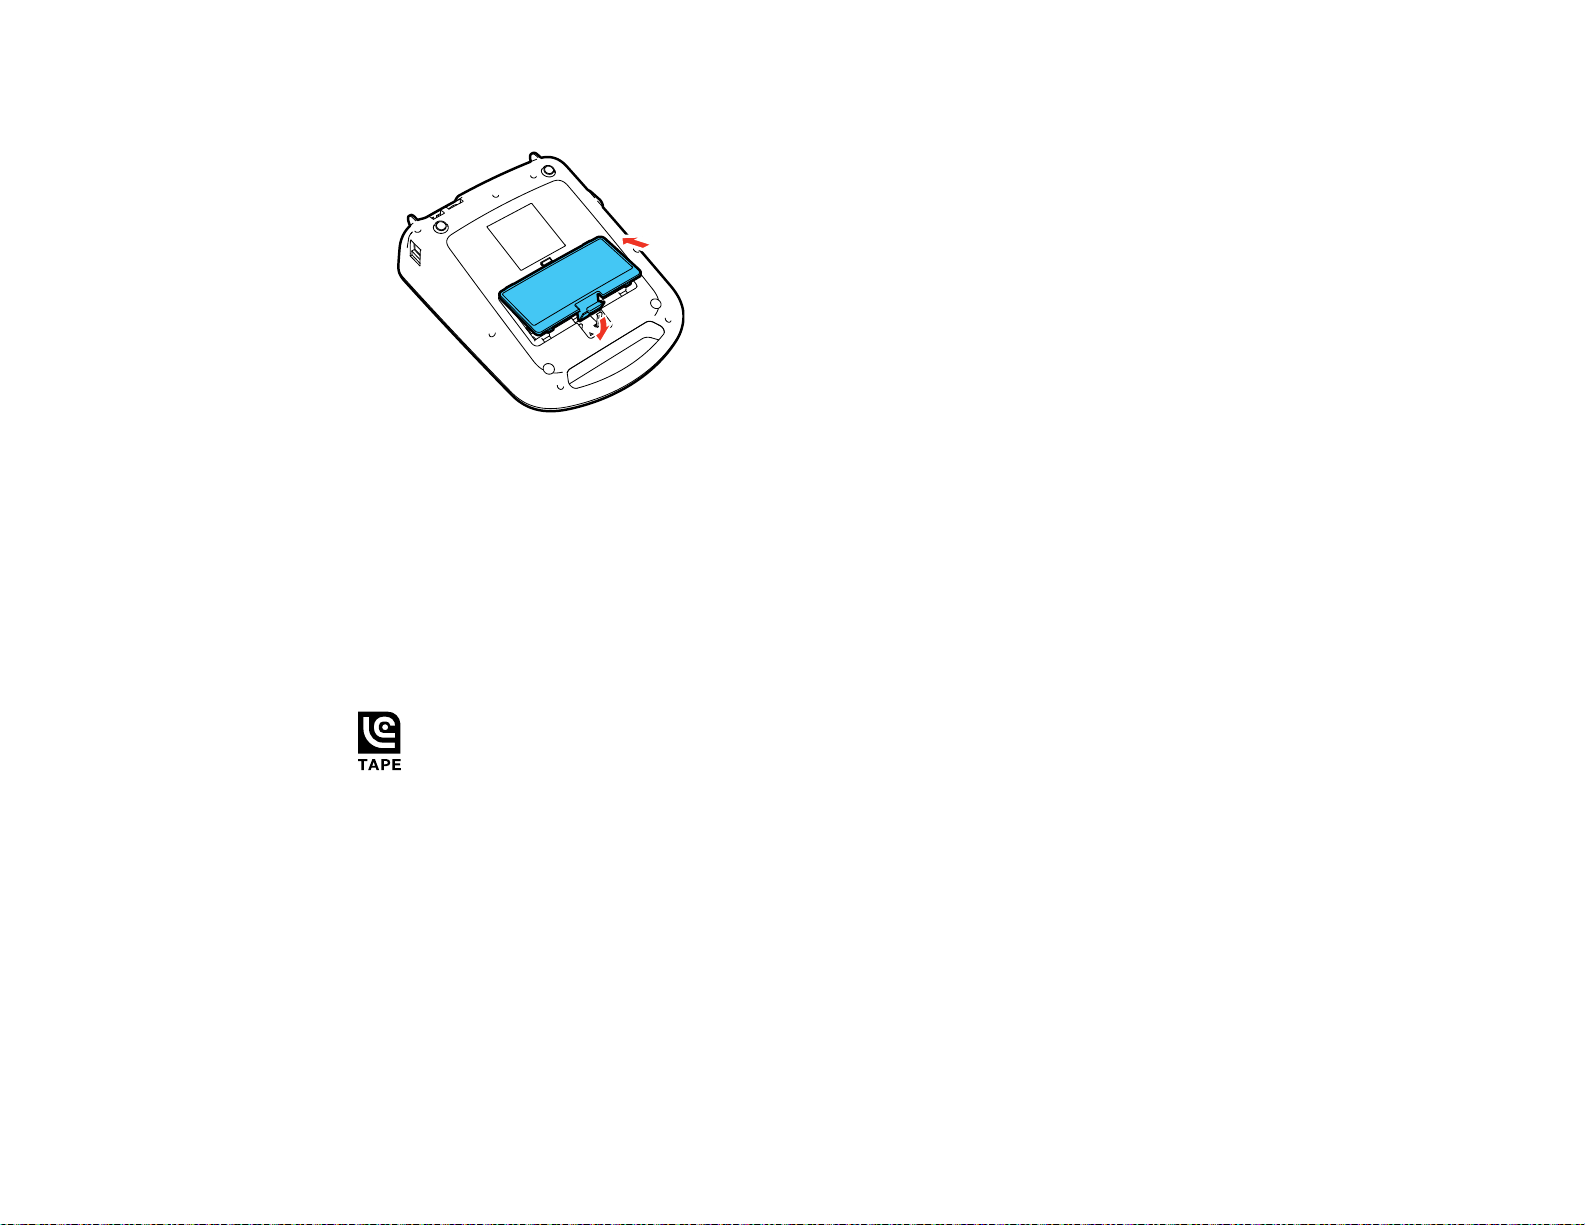
3. Replace the battery cover.
Parent topic: Setting Up the Printer
Inserting and Removing Tape Cartridges
You can use LabelWorks tapes with widths ranging from 0.25 inch (6 mm) to 1 inch (24 mm).
Note: Width measurements in inches are approximate.
Use only tape cartridges with this mark:
For a complete list of available tape cartridges, go to epson.com/labelworks (U.S.) or
epson.ca/labelworks (Canada).
1. Make sure the power is off before you install or remove a tape cartridge.
18
Page 19
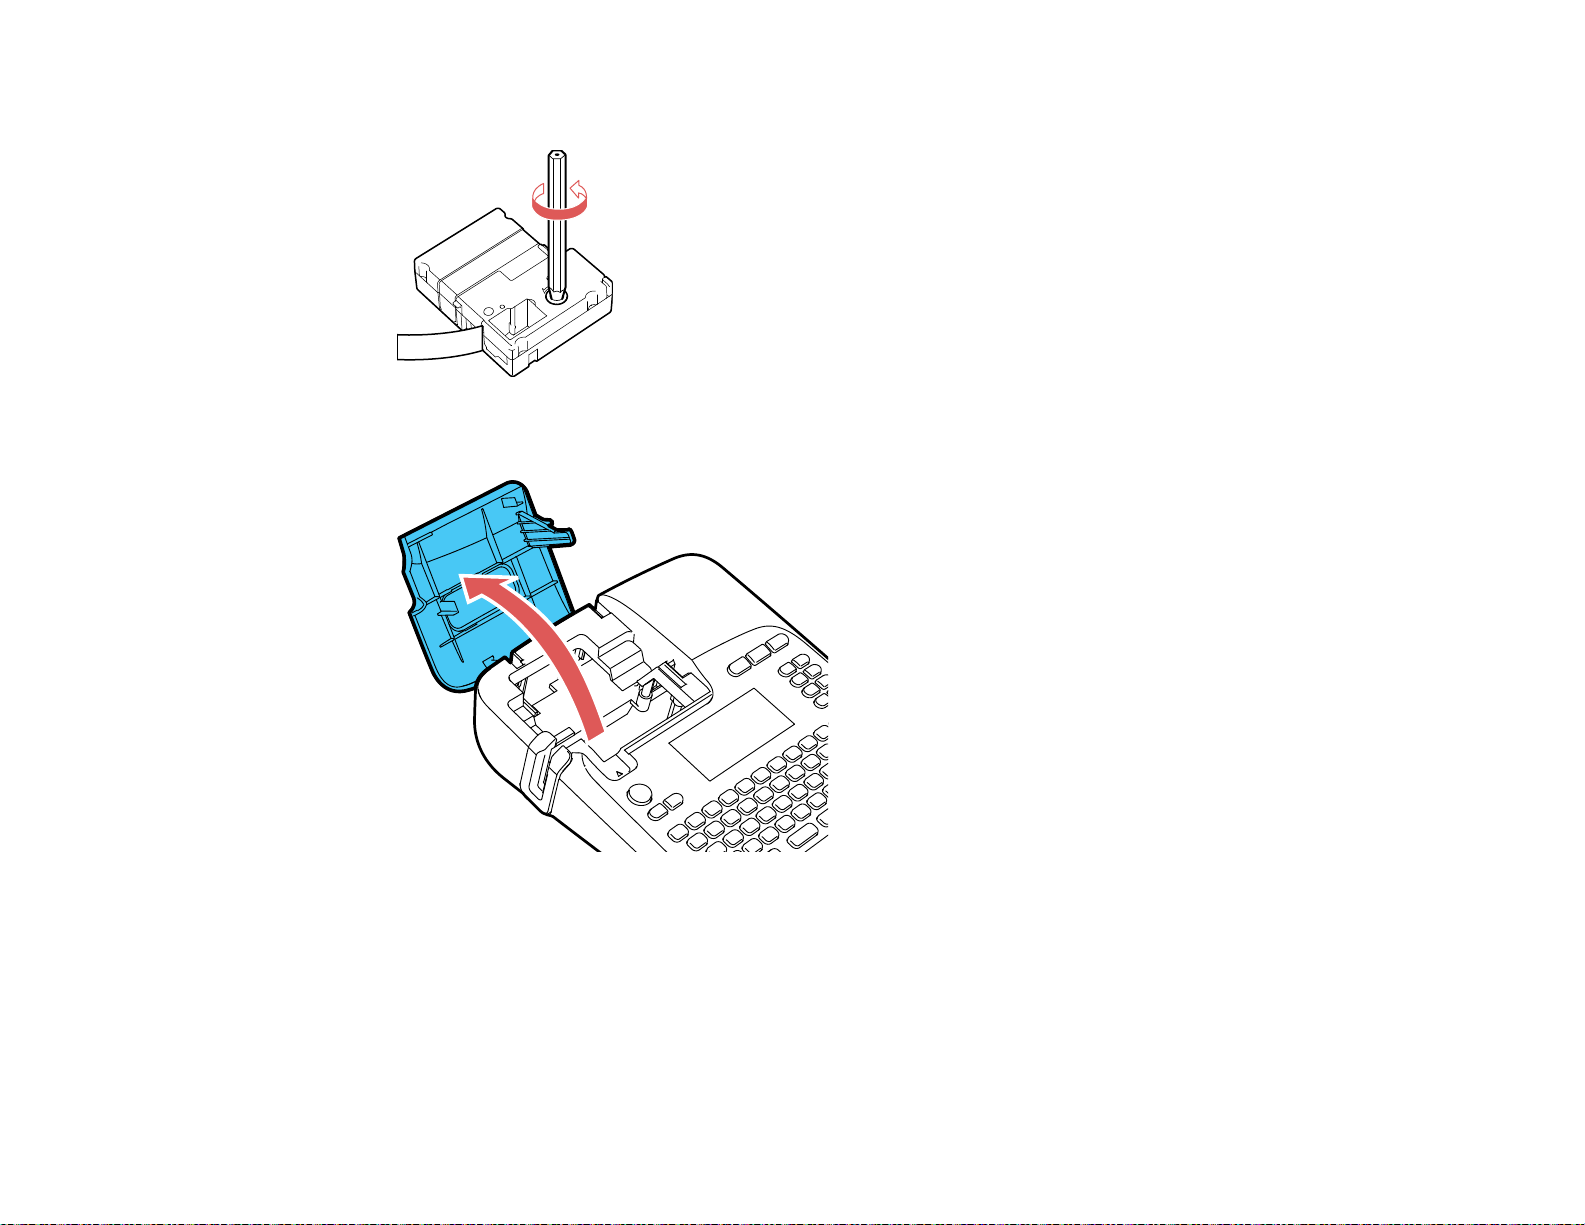
2. Remove any slack from the tape using a pencil or pen.
3. Lift up the tape cover.
19
Page 20
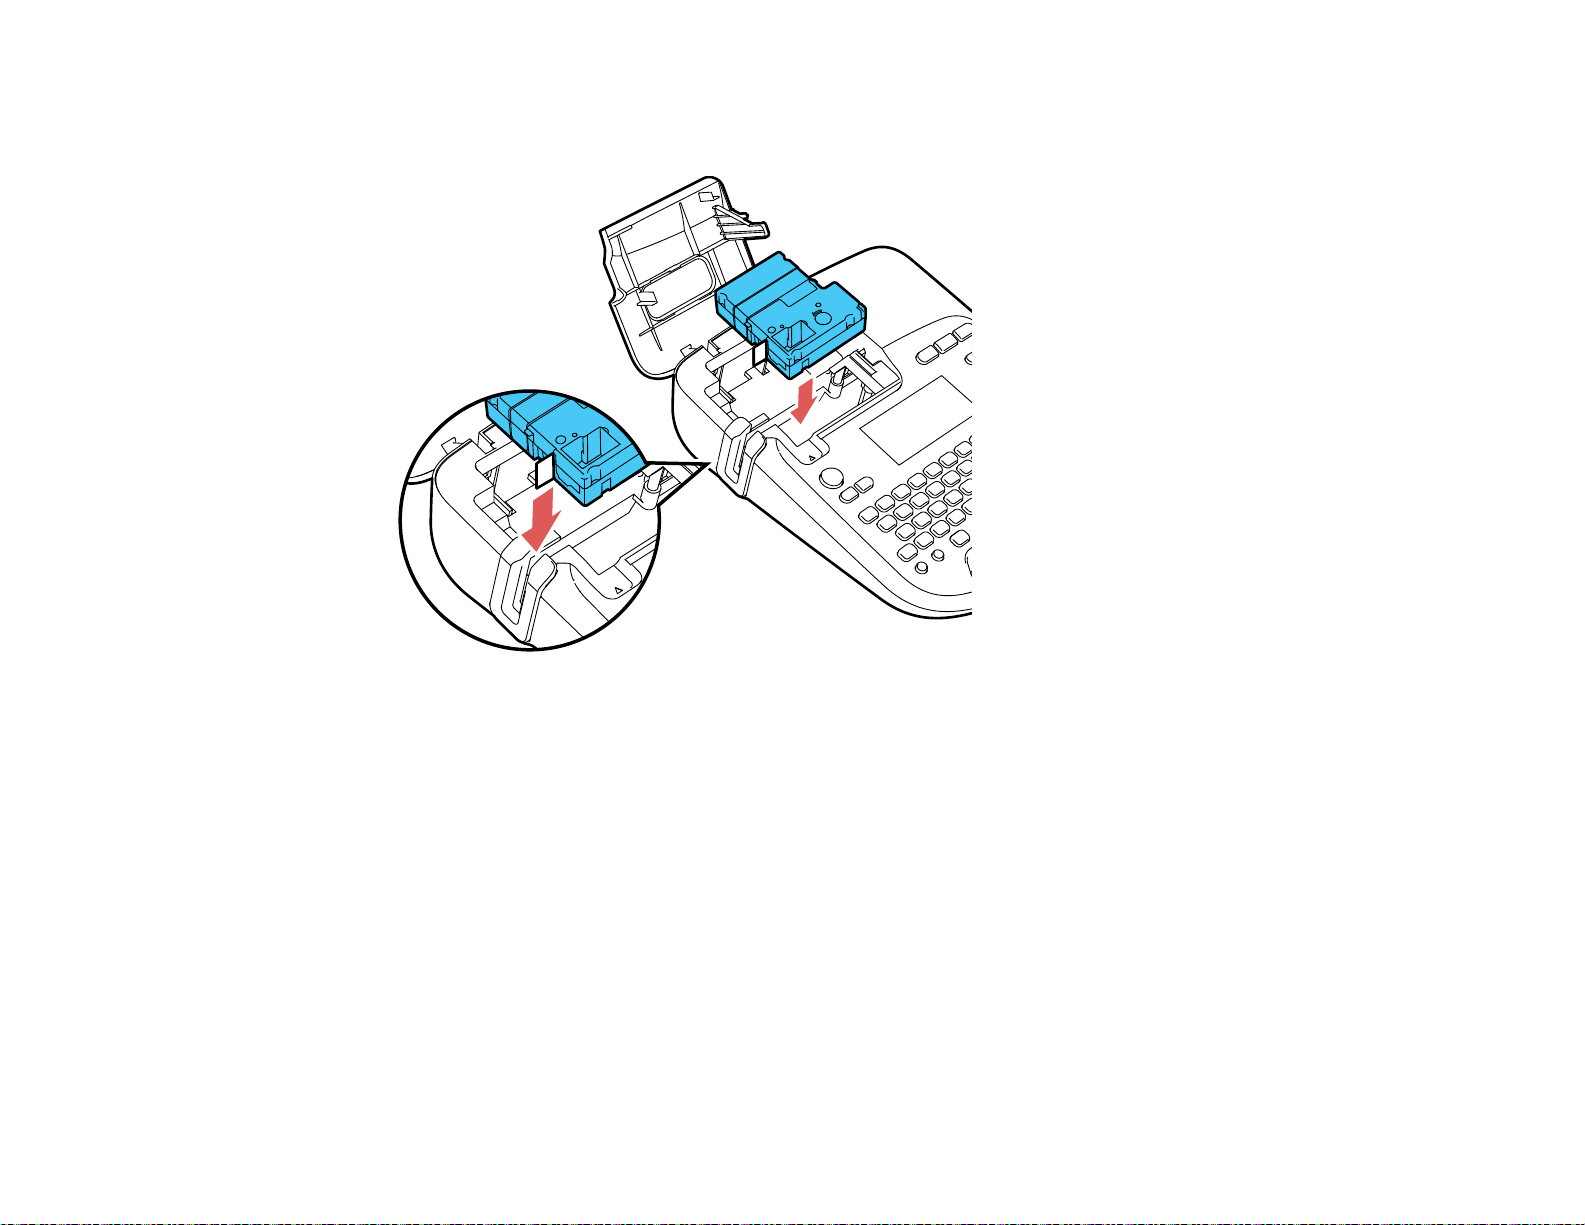
4. Insert the cartridge as shown and press it down firmly until it snaps into place. Make sure the end of
the tape slides into the ejection slot.
20
Page 21

5. Close the tape cover.
To remove a tape cartridge, open the cover, grasp the sides of the tape, and lift it out of the printer.
Parent topic: Setting Up the Printer
Turning the Printer On and Off
Make sure the AC adapter is connected or batteries are installed.
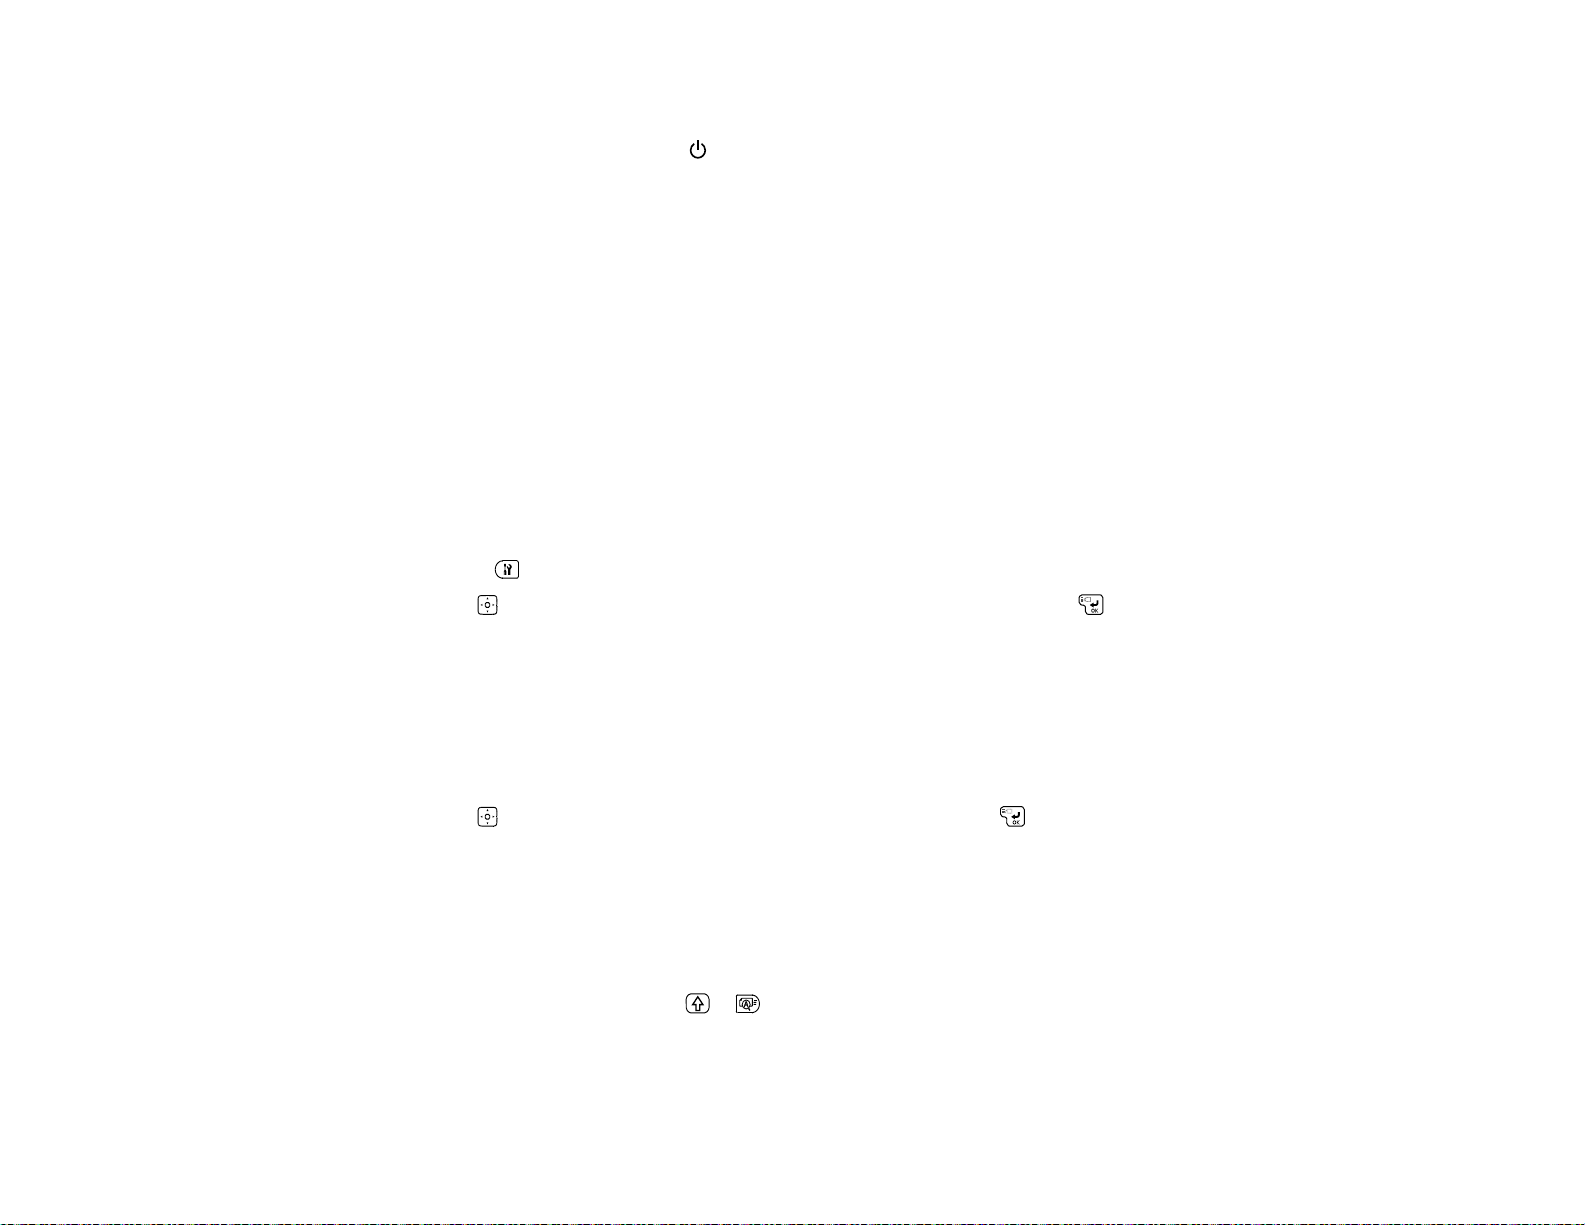
• To turn on the printer, press the power button.
21
Page 22
The display lights up.
• To turn off the printer, press the power button.
You see a Powering Off message on the display and your work is saved automatically.
Caution: Do not unplug the printer until the display turns off.
The printer turns off automatically (and saves your work) if it is not used within 5 minutes. When PC link
is in use, the printer turns off if it is not used within one hour.
Parent topic: Setting Up the Printer
Related tasks
Installing Batteries
Connecting the AC Adapter
Changing Language and Other Preferences
You can adjust the language and other preferences in the way your label printer works.
1. Press the key.
2. Use the key to highlight any of the following settings, then press the keyto select it:
• Contrast
• Backlight
• Battery type
• Language
• inch:cm
3. Use the key to highlight the option you want, then press the keytoselectit.
Parent topic: Setting Up the Printer
Adjusting the Preview
By default, the display shows a preview of your formatted label and its dimensions. You can turn off the
preview if you want to see more lines of text on the display (for multi-line labels).
To change the preview, press the + keys.
You can toggle between the two views as necessary.
Parent topic: Setting Up the Printer
22
Page 23
Creating Labels Using the Keyboard
You can use the built-in keyboard to design and create a variety of labels.
Entering Text
Saving Labels
Deleting Labels
Adding Symbols
Adding Frames
Adding Tables
Changing Font Size
Changing the Label Font
Adding Punctuation
Adding Accented Letters
Changing Label Format Settings
Entering Text
You can use the built-in keyboard to enter letters, numbers, and other characters.
• To type an uppercase letter, press the key + the letter.
• To use all uppercase letters, press the key, then type your text.
• To start a new line, press the key.
The line number appears on the display.
Note: You can print up to 8 lines of text, depending on the label format and tape width. If you try to
exceed the maximum, an error message appears.
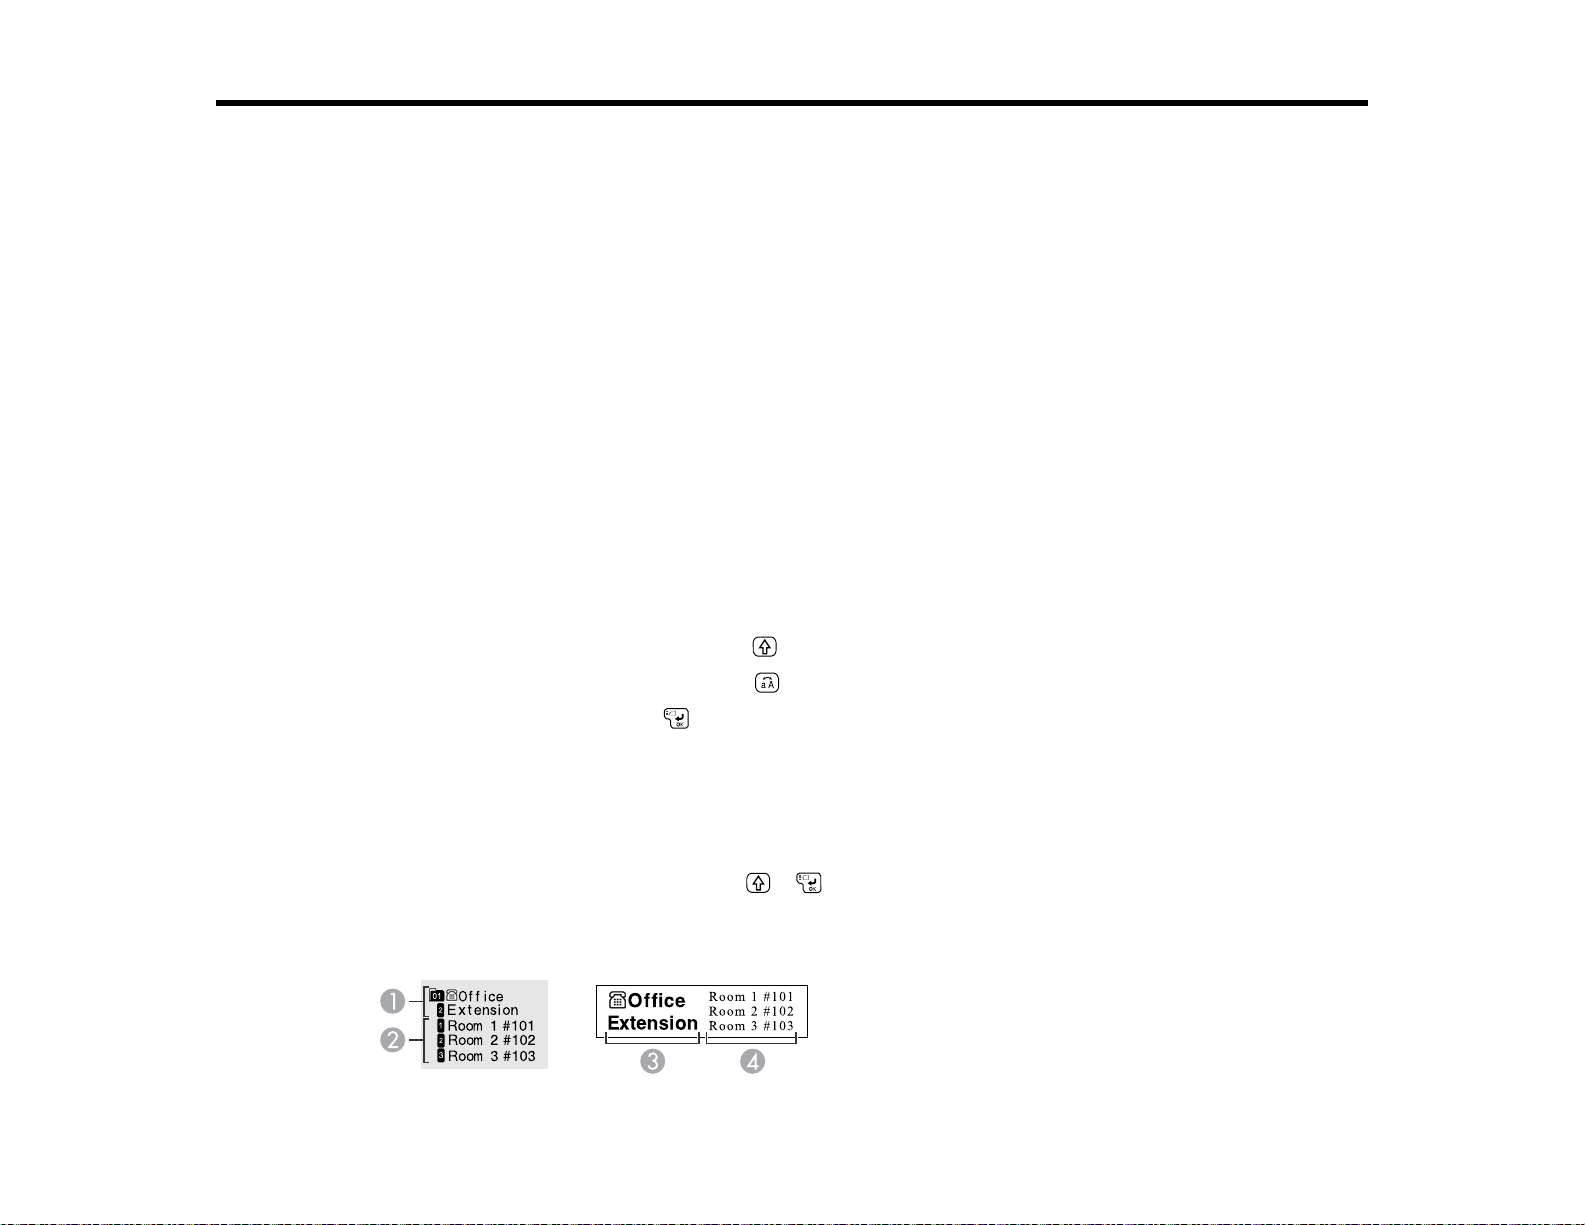
• To start a new block of text, press the + keys.
Text blocks allow you to apply styles to one block at a time. The following example shows two blocks
of text on the display and on a printed label:
23
Page 24
1 Block 1 on the display
2 Block 2 on the display
3 Block 1 printed
4 Block 2 printed
• To delete the previous character or line, press the key.
• To view a detailed preview of your label, press the key.
Parent topic: Creating Labels Using the Keyboard
Related tasks
Changing Label Format Settings
Saving Labels
You can store up to 100 saved labels at a time.
To save your label, press the key. The label you created is saved, and you are ready to create
another one.
Parent topic: Creating Labels Using the Keyboard
Deleting Labels
Each label you create is numbered. If you delete a saved label, you can reuse its number to create a new
label.
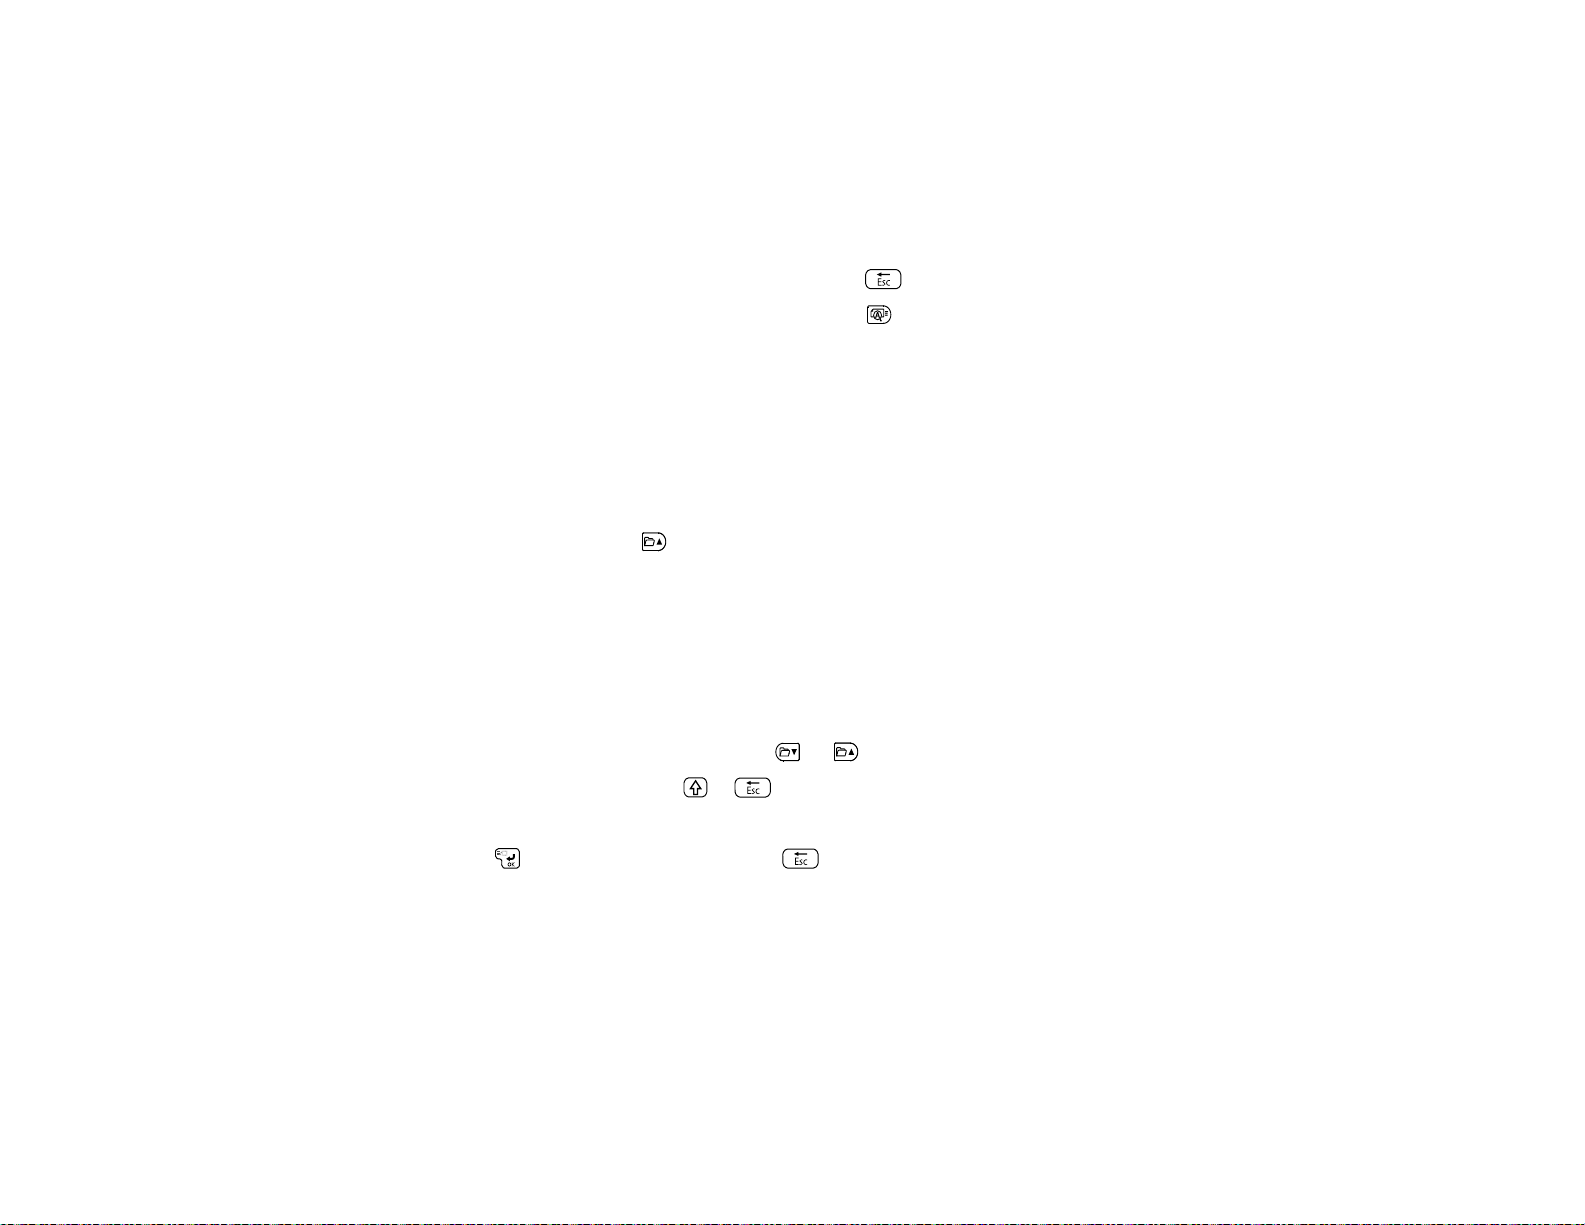
1. To select a label for deletion, press the or key until you see the label you want.
2. To delete the label, press the + keys.
You see a message asking if you want to delete all the text.
3. Press the key to delete, or press the key if you change your mind.
Parent topic: Creating Labels Using the Keyboard
Adding Symbols
You can select from a variety of graphic symbols to incorporate into your labels.
Note: The Label Editor and Label Editor Lite software include additional symbols and allow you to import
your own graphics and logos.
24
Page 25
1. To add a symbol, press the key.
You see a list of symbol categories on the display.
2. Use the key to scroll through the list of categories, then press the key to select the one you
want.
The symbols appear on the display.
3. Use the key to highlight the symbol you want and press the key.
Available Symbols
Parent topic: Creating Labels Using the Keyboard
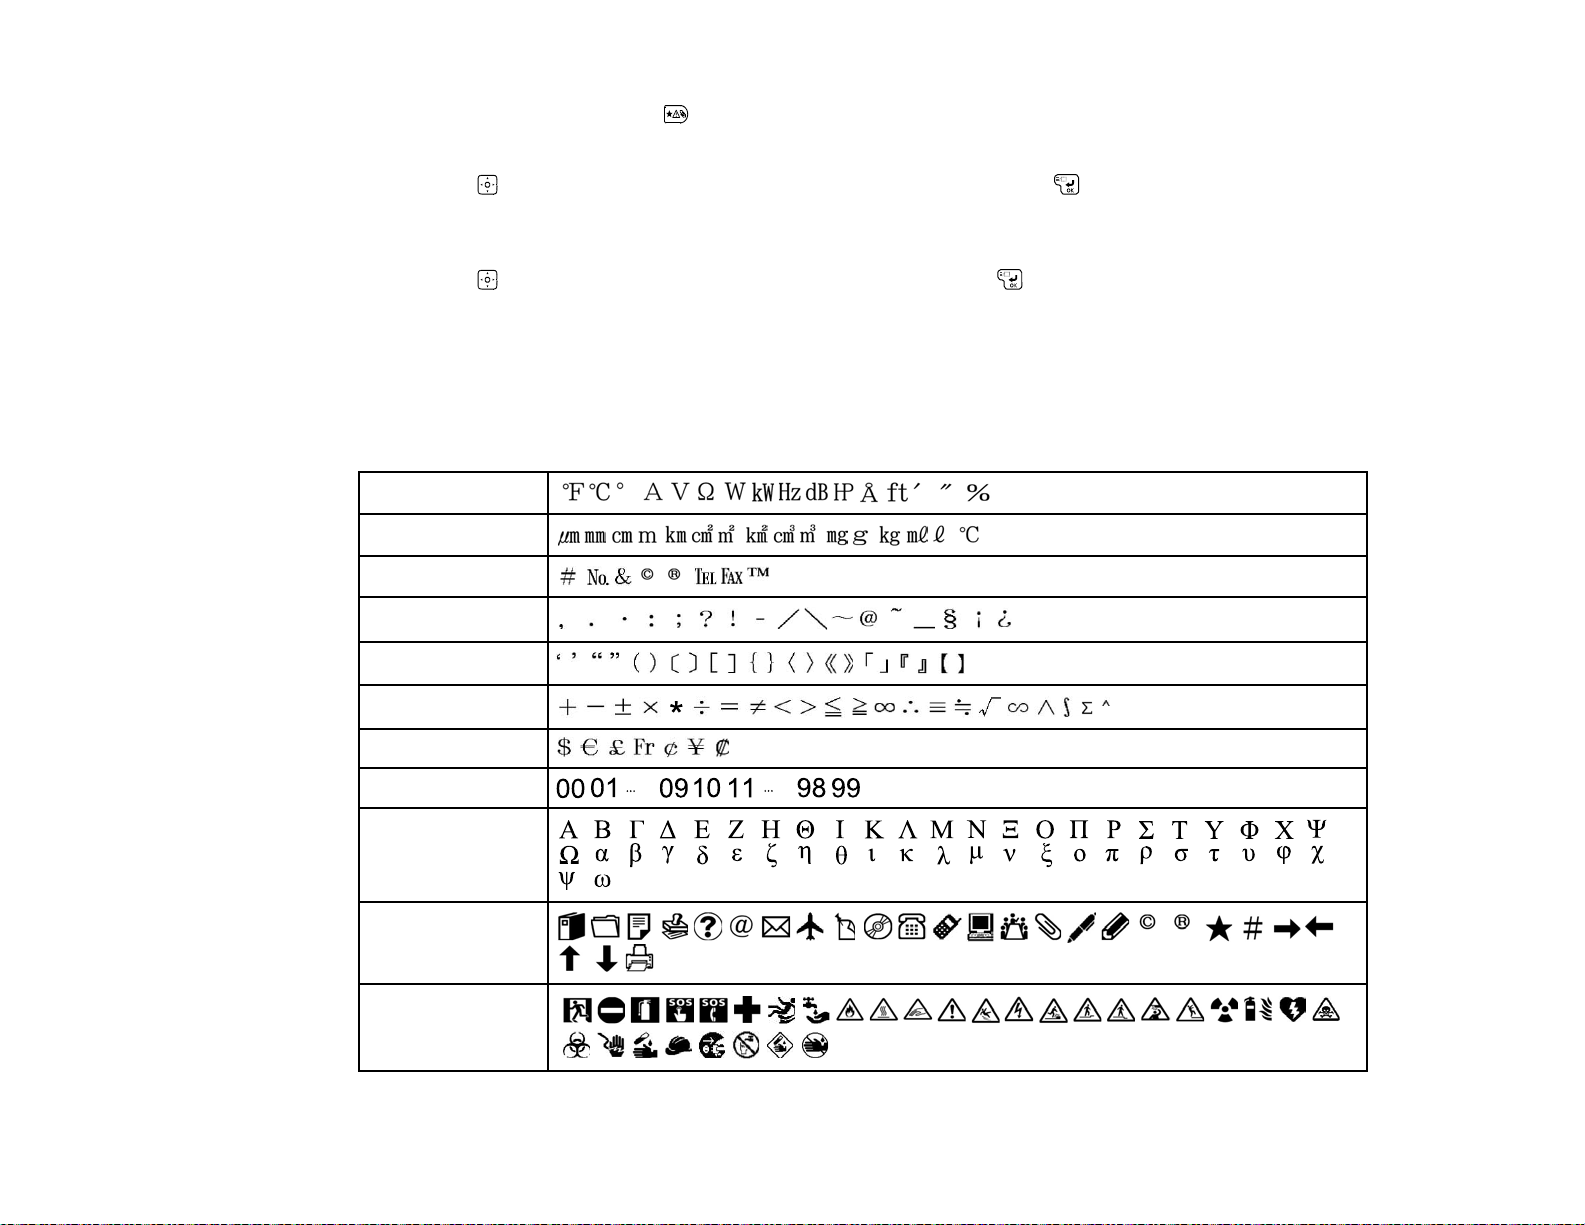
Available Symbols
You can select from these symbols:
Measurement
Metric
Abbreviation
Punctuation
Parentheses
Math
Currency
Doublefigure
Greek
Office
Safety
25
Page 26
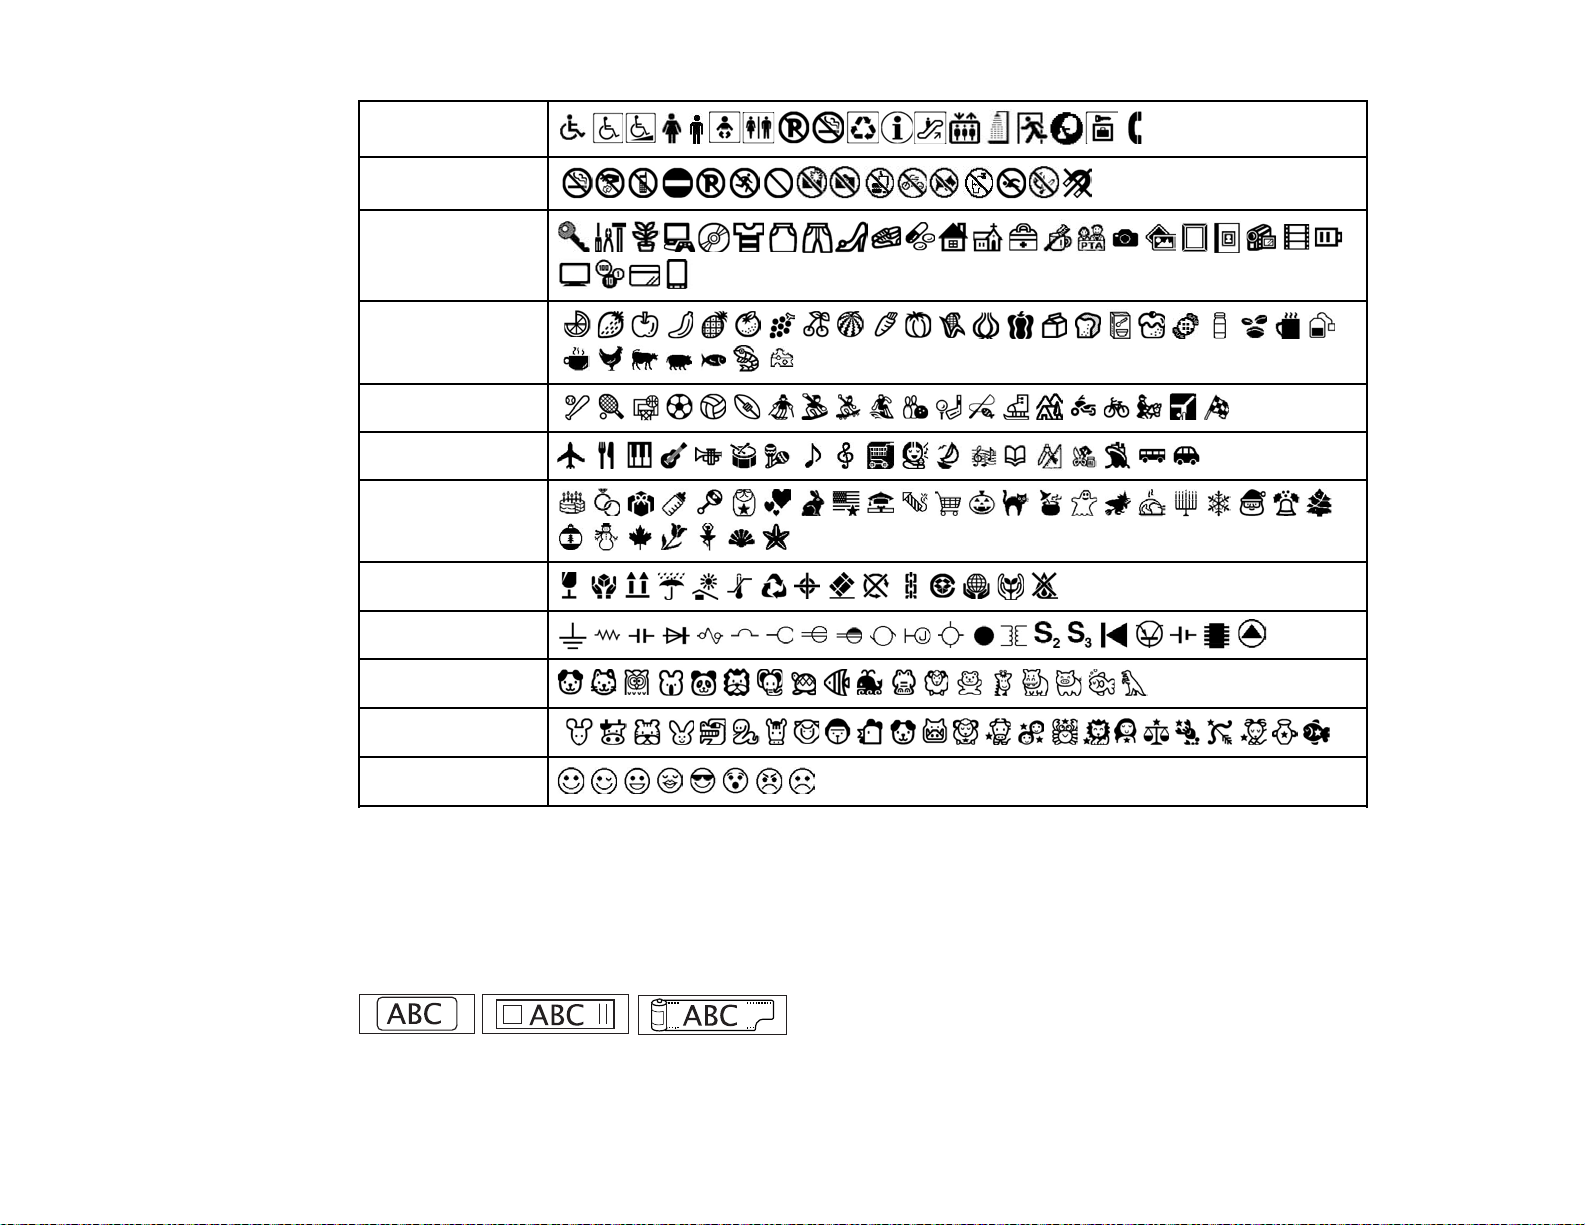
Facility
Prohibition
Household
Food
Sports
Activity
Occasion
Shipping
Electrical
Animals
Zodiac
Emoticons
Parent topic: Adding Symbols
Adding Frames
You can add frames to your labels, ranging from simple rectangles to graphic borders incorporating
images for special occasions and activities. You can add a frame to a block of text, or to the whole label.
26
Page 27
1. To add a frame, press the key.
You see the Edit menu on the display.
2. Use the key to highlight Frame & Table and press the key.
3. Highlight Frame and press the key.
You see the frames on the display.
4. Use the key to highlight the number of the frame you want, or enter the frame number to jump
directly to a frame.
5. Press the key to select the frame you want.
6. Highlight Whole label or This block and press the key.
Note: You can add a frame either before or after adding the text to your label, but the frame will not
appear on the preview until you add text.
Available Frames
Parent topic: Creating Labels Using the Keyboard
Related references
Label Format Settings
27
Page 28
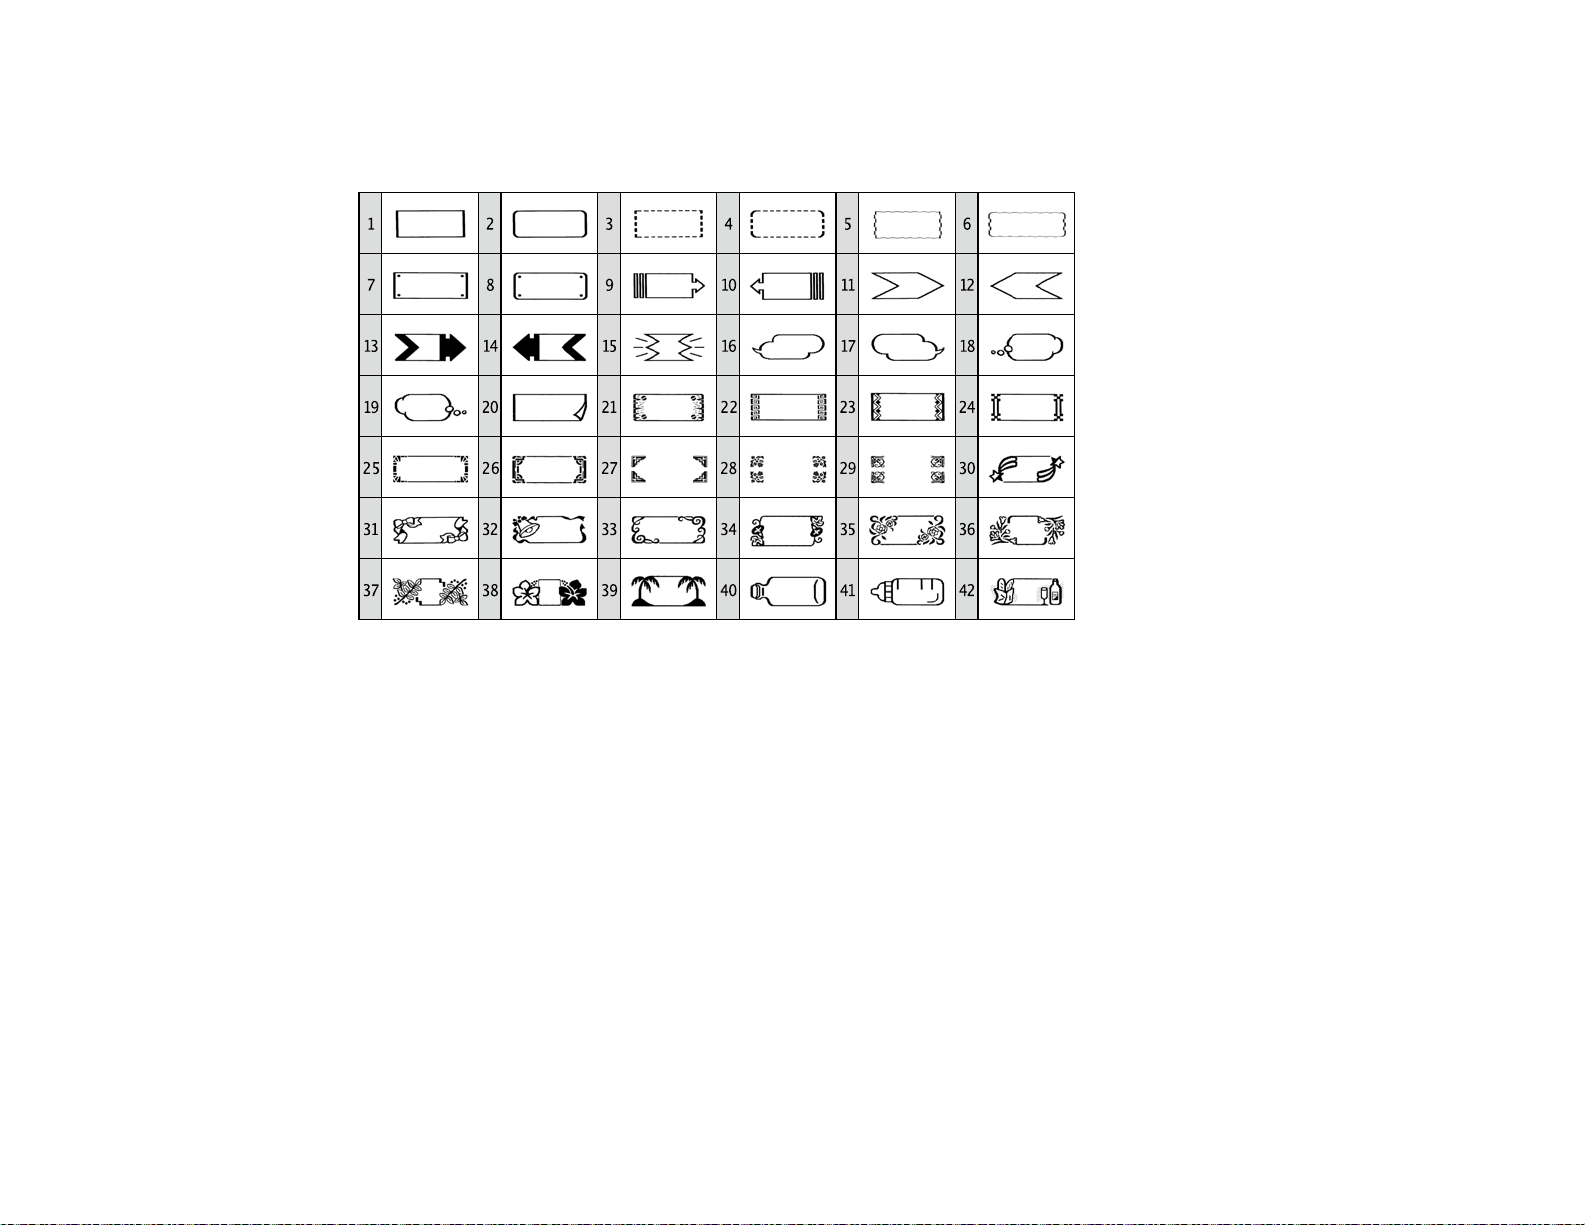
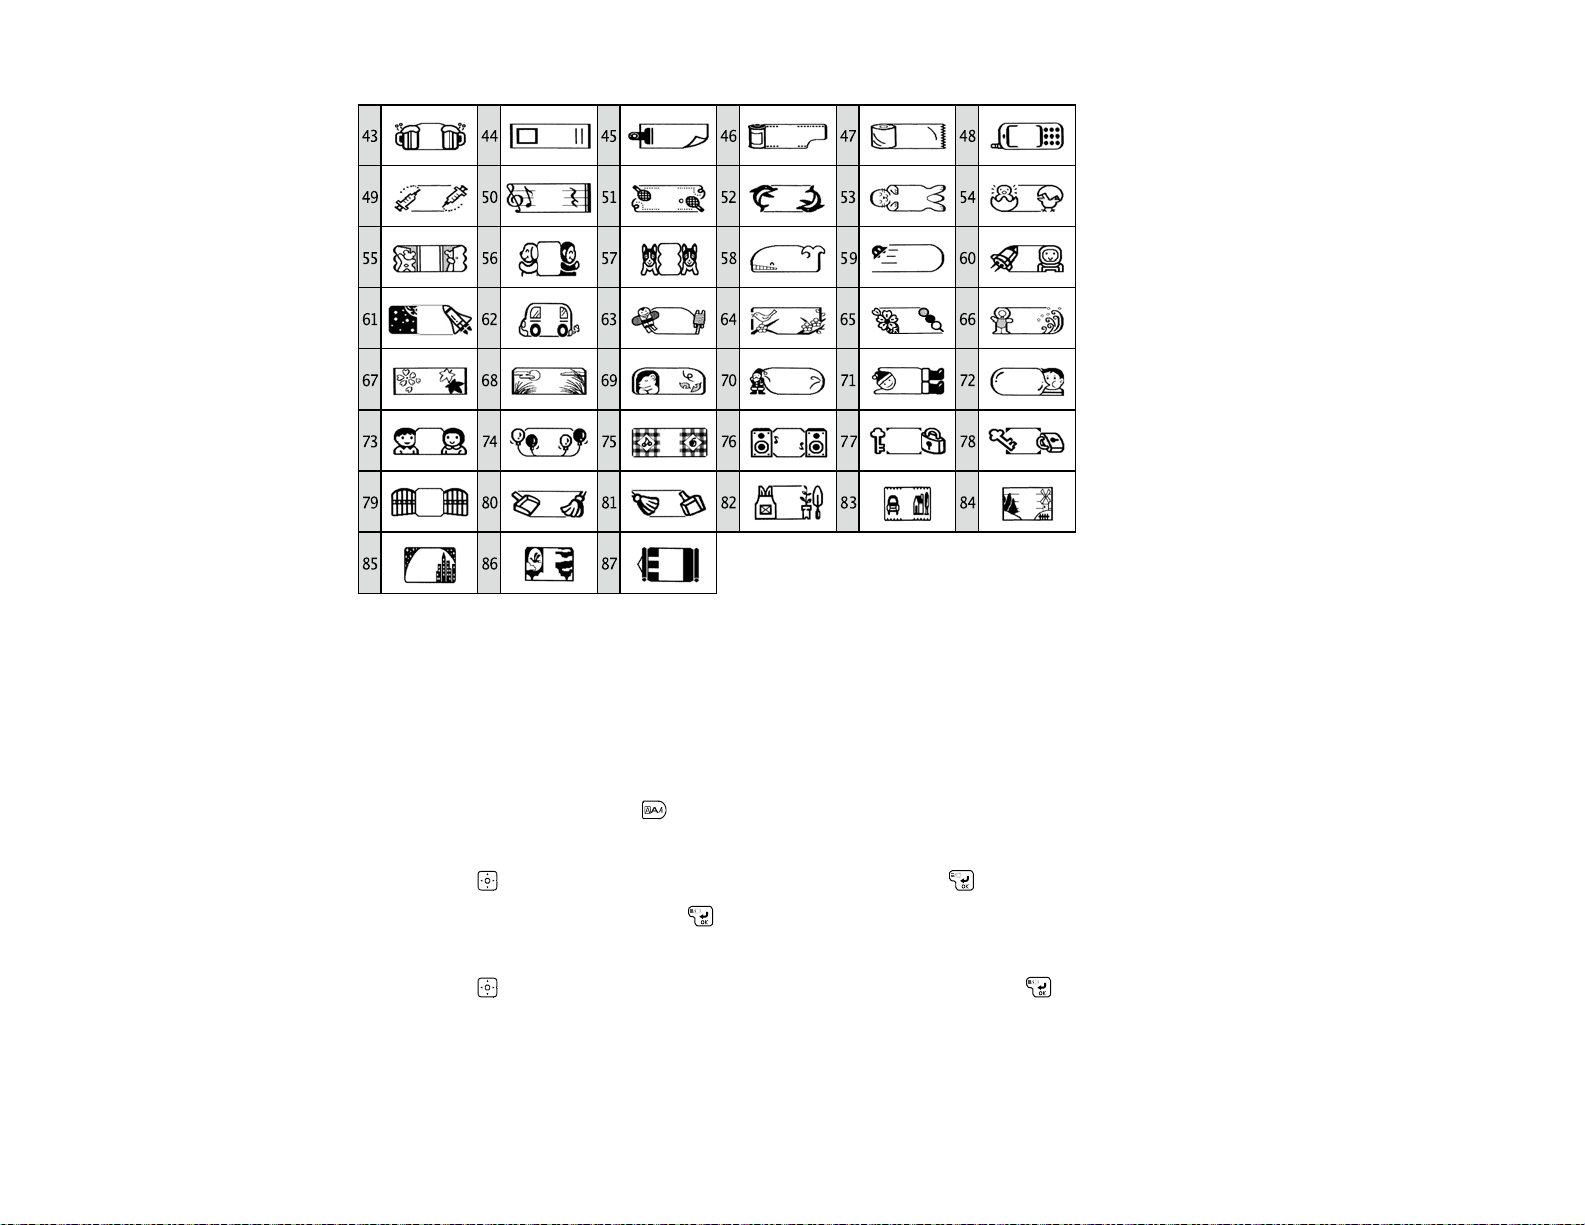
Available Frames
You can select from these frames:
28
Page 29
Parent topic: Adding Frames
Adding Tables
You can add tables containing up to 8 rows (depending on the width of the tape you are using). You can
add as many columns as necessary to each table.
1. To add a table, press the key.
You see the Edit menu on the display.
2. Use the key to highlight Frame & Table and press the key.
3. Highlight Table and press the key.
You see several table styles to choose from.
4. Use the key to highlight the table style you want and press the key.
29
Page 30
5. Highlight Whole label or This block, depending on how you want to use the table and press the
key.
Note: If you select This block, you can add more than one table to a label.
6. To add a new row to the table, press the key.
7. To add a new column to the table, press the + keys.
Parent topic: Creating Labels Using the Keyboard
Related references
Label Format Settings
Changing Font Size
You can change the size of the letters, numbers, and symbols on your labels. You can use either the
key to quickly format a simple label, or the key for more control over the size of individual lines or
text blocks.
Changing the Label Font Size
Changing the Font Size Using the Edit Menu
Parent topic: Creating Labels Using the Keyboard
Changing the Label Font Size
You can quickly change the size of the font on your label.
1. Press the key.
You see a description of the number of lines on your label and squares representing the text.
2. Press the key repeatedly until you see the size you want to use.
When the display returns to your label preview, you see your text in the size you have selected.
Parent topic: Changing Font Size
Changing the Font Size Using the Edit Menu
You can use the Edit menu to change the font size for each line or block of text on your label.
1. Press the key.
You see the Edit menu on the display.
2. Use the key to highlight Font size and press the key.
30
Page 31

3. Select the number of lines of text on your label (or a setting that represents the font size you want to
use).
Note: To restore the previous settings, select Equal.
You see a list of the size configurations available, with squares representing the text.
4. Select the size configuration you want to use.
5. Select whether you want to apply the design to the whole label or the current block.
Parent topic: Changing Font Size
Related references
Label Format Settings
Changing the Label Font
You can change the font for your label as a whole, or for specific characters, lines, or blocks of text. You
can choose from the following fonts:
• To change the font for the entire label, press the key. Continue pressing the key to see the various
fonts available.
When the display returns to your label preview, you see your text in the font you have selected.
31
Page 32

• To change the font for a specific character, line, or block of text, press the key. Select Font, select
the font you want, and select how to apply the font.
Note: To apply the font to a specific character or word, place the cursor in front of the word or
character before you press the key.
When the display returns to your label preview, you see your text in the font or fonts you have
selected.
Parent topic: Creating Labels Using the Keyboard
Adding Punctuation
You can add many of the most common punctuation marks by simply typing them in using the keyboard.
For the punctuation marks shown in blue on the keys, hold down the key while you press the key for
the mark you want.
• To enter punctuation marks such as semicolons or parentheses, press the key. Press the key
repeatedly until you see the mark you want on the display.
• To enter additional punctuation, such as quotation marks or the @ symbol, hold down the key
while you press the key. Press the key repeatedly until you see the mark you want.
Note: Punctuation marks are also available through the Symbol menu, accessed by pressing the
key.
Parent topic: Creating Labels Using the Keyboard
Related tasks
Adding Symbols
Adding Accented Letters
You can choose from a variety of accent marks.
1. Enter the lowercase or uppercase letter that needs an accent mark.
2. Press the key.
You see a series of accents on the letter you entered.
3. Use the key to highlight the accented letter you want and press the key.
The accented letter appears on your displayed label.
32
Page 33

Parent topic: Creating Labels Using the Keyboard
Changing Label Format Settings
You can press the key to access the Edit menu, which lets you change various format settings. Some
settings affect the entire label, and others can be applied to individual characters, lines, or blocks.
1. Place the cursor in the specific line or block, or to the left of the individual character or characters
you want to format.
2. Press the key.
You see the Edit menu.
3. Use the key to scroll through the list of settings and press the key to select the one you want.
You see the available options for that setting.
4. Use the key to highlight the option you want and press the key to select it.
5. If you see Area? on the display, use the key to highlight one of the following and press the
key:
• Character
• Whole label
• This line
• This block
You see the selected formatting on the label preview.
Label Format Settings
Parent topic: Creating Labels Using the Keyboard
Label Format Settings
Settings on the Edit menu let you customize various aspects of label formatting.
33
Page 34

Setting Options Description
Length Auto Sets the length of the label
1 to 15 inches Auto: adjusts the length based
on the label content
Frame & Table Table Adds tables or frames to a label
Off
Frame
Margins Minimum Sets the left and right margins of
Short
Middle
Long
Tape width /3
Tape width
the label
Tape width /3: sets margins
equal to one third of the tape
width
Tape width: sets margins equal
to the width of the tape
Layout Left Adjusts the alignment of multi-
Center
line labels
Justify
Right
Style Outline Appliesoutline or shadow effects
Normal
Shadow
S + O
to individual characters, lines,
blocks, or entire labels
S + O: applies shadow and
outline formatting to individual
characters, lines, blocks, or
entire labels
Char. spacing None Adjusts the space between
Narrow
Normal
Wide
individual characters or all
characters in a line, block, or
entire label
If you turn the Proportional
setting off, the space between
characters is much wider
34
Page 35

Setting Options Description
Border & Line Strikeout Applies strikeout, underlining,
Underline
None
Border
Round brdr
borders, or shading to individual
characters, lines, blocks, or
entire labels
The Brdr mesh and Round
mesh settings apply shading and
a rectangular or round border
Shading
Brdr mesh
Round mesh
Char. Width Smaller Adjusts the width or size of
Small
Narrow
individual characters or all
characters in a line, block, or
entire label
Normal
Wide
Background None Applies various background
1 Wave
patterns to the entire label
2 Diamond
3 Flower
4 Cards
5 Arabesq.
6 Mesh
7 Dotted
Bold & Italic Italic Appliesbold or italic formatting to
Normal
Bold
B + I
individual characters, lines,
blocks, or entire labels
B + I: applies bold and italic
formatting to individual
characters, lines, blocks, or
entire labels
35
Page 36

Setting Options Description
Vertical* On Changes the text orientation to
Off
vertical for one block or the entire
label
Font size Equal Adjusts the font size for a block of
1 Line
text or the entire label
2 Lines
3 Lines
4 Lines
5-8 Lines
Font Various fonts available Selects the font for individual
characters, lines, blocks, or
entire labels
* When adding 2-digit numbers to a vertical label, select Doublefigure using the key.
Parent topic: Changing Label Format Settings
36
Page 37

Creating Special Format Labels Using the Keyboard
Follow the instructions in these sections to create special format labels using the built-in keyboard.
Creating a Sequence of Labels
Creating Barcode Labels
Creating QR Code Labels
Creating Folder Tab Labels
Creating Patch Panel Labels
Cable Labels
Creating Equipment Management Labels
Creating a Sequence of Labels
You can create a sequence of labels with automatically generated numbers or letters of the alphabet.
1. Press the key.
You see Sequence Number on the display and a Start prompt.
2. Enter the number or letter to use as the starting point of the sequence. You can enter any number up
to 99, or any letter to begin an alphabetic sequence.
3. Select the number of times you want to repeat an item in the sequence. For example, if you want to
print the same label twice before the sequence number is increased, select 2 times.
For numeric sequences, you see Seq. two-digits on the display.
4. Select On if you want to use 2-digit numbers, or Off if not.
Note: If you select Off, the sequence restarts after you reach the number 9.
5. Type the text of your label. To add a space between the sequence number and the text, press the
spacebar.
You see the text and the current sequence number on the display.
As you print your labels, the sequence number (or letter) increases, and the current number is shown on
the display. The sequence is saved, even after you turn off the printer.
Parent topic: Creating Special Format Labels Using the Keyboard
37
Page 38

Creating Barcode Labels
You can create labels with a variety of barcode types for inventory management and asset tagging.
1. Press the + keys.
2. Use the key to highlight one of the following barcode types and press the key:
• EAN-8
• EAN-13
• CODE128
• CODE39
• ITF
• CODABAR
• UPC-A
• UPC-E
3. Select the width and press the key.
4. If necessary, select the following and press the key:
• Ratio
• Check Digit
5. Enter the numeric code and press the key.
Parent topic: Creating Special Format Labels Using the Keyboard
Creating QR Code Labels
You can create labels with a QR code for many purposes, such as linking to URLs, file storage services,
or social media applications. One-inch (24 mm) wide black-on-white tape is recommended for the fastest
QR code recognition.
38
Page 39

Note: When embedding content from social media applications, consider your privacy settings. When
embedding content from file storage services, check the sharing settings to ensure that other people can
view the content.
1. Press the + keys.
2. Select QR CODE and press the key.
3. Select the Symbol Size and press the key.
Note: Medium and Large size codes require at least 3/4 inch (18 mm) tape.
4. Select the ECC Level (Error Checking and Correction Level) and press the key.
Note: Higher ECC Level settings restrict the amount of text you can enter. For most QR codes, 7%
is recommended.
5. Enter the text for the code and press the key.
Note: For URLs, consider using a URL shortening service to reduce the complexity of the QR code.
6. For multi-line entries such as addresses, select Line break and enter the next line of text.
7. When the text is complete, select Finish? and press the key.
If you see QR CODE too big! on the display, you need to press the key and start over. Try selecting
a smaller Symbol Size and shortening the text.
Parent topic: Creating Special Format Labels Using the Keyboard
39
Page 40

Creating Folder Tab Labels
Folder tab labels can be folded to display the text on two sides of the label.
Note: One-inch (24 mm) wide tape or special folder tab tape is recommended for folder tab labels.
1. Press the key.
2. Select one of the following and press the key:
• Tab:V to print a vertical label
• Tab:H to print a horizontal label
3. Select the length of the label and press the key.
4. Enter the text for the label.
Parent topic: Creating Special Format Labels Using the Keyboard
Creating Patch Panel Labels
Patch panel labels are a convenient way to identify various ports on equipment such as routers or
switches. You can create one label with multiple segments, one for each port.
40
Page 41

1. Press the key.
2. Select Panel and press the key.
3. Select the length of the segments, or select Auto to have the length vary by the label text.
4. Press the key.
5. Enter the text, pressing the key after each segment.
Parent topic: Creating Special Format Labels Using the Keyboard
Cable Labels
You can create flag and wrapped labels to identify cords and cables. For best results, use special cable
wrap tapes or strong adhesive tapes for labelling cables.
Flag labels provide a large surface for multiple lines of text. A vertical line marks the center of the flag to
help you wrap the cable evenly.
Wrapped labels are useful for tight spaces where flags are too large or only a short identifier is
necessary. Do not use a regularly printed label (lengthwise) as a wrapped label; bending the cord may
cause the label to detach from the cord.
1 Wrap:V (vertical)
2 Wrap:H (horizontal)
3 Flag:V (vertical)
4 Flag:H (horizontal)
Keep this information in mind when creating cable labels:
• Use reflective tape for labels that will be used in dark locations.
• For small cables, use flag labels to increase readability.
41
Page 42

• Include a label on both ends of the cable.
• When adhering a flag label to the cable, loop the label around the cord loosely and stick the ends of
the label together, then move inward toward the cable. This makes it easier to align the ends.
• If space for a flag label is limited, use narrower tapes, such as 3/8 inch (9mm) and 1/4 inch (6mm).
• Use multiple wrapped labels on a single cord to include more information.
Creating Cable Labels
Parent topic: Creating Special Format Labels Using the Keyboard
Creating Cable Labels
Two styles of cable labels are available: flag and wrapped. You can use either horizontal or vertical text
on both label styles.
1. Press the key.
2. Select one of the following and press the key:
• Wrap:V
• Wrap:H
• Flag:V
• Flag:H
3. Select the length of the label, or select Auto to have the length vary by the label text.
4. Press the key.
5. Enter the text for your label.
Parent topic: Cable Labels
Creating Equipment Management Labels
The equipment management label format provides a 4-line, 2-column table with default text. You can
modify the defaults as necessary.
42
Page 43

1. Press the key.
You see Overwrite text? on the display.
2. Press the key.
You see a preview of the left block of text on the display (4 lines). Below the preview, you see the
fourth line of the left block and the first line of the right block.
3. Use the key to locate and edit the existing text (left block) and to add text to the 4 lines in the right
block.
Parent topic: Creating Special Format Labels Using the Keyboard
Related tasks
Entering Text
43
Page 44

Printing Labels Using the Built-In Keyboard
Follow the instructions in these sections to print using your label printer keyboard.
Previewing Labels
Printing and Cutting Labels
Printing Multiple Copies of a Label
Printing Mirror Image Labels
Printing Without Cutting
Feeding and Cutting the Tape
Adjusting Print Density
Previewing Labels
Before you print, it is a good idea to view a detailed preview of your label.
• To preview your label, press the key.
You see your label design scroll across the display.
• To pause the preview, press and hold the spacebar or the key.
• To exit the preview, press the or key.
Note: Printed labels may be slightly different from their preview images.
Parent topic: Printing Labels Using the Built-In Keyboard
Printing and Cutting Labels
You can print a label after creating it, or select a saved label for printing.
Caution: Do not put your fingers in the tape ejection slot, and do not pull on the label while it is printing.
• To print and cut the current label, press the button.
The width and approximate length of the label and the number of copies appear on the display during
printing.
Note: Depending on the type of label and other settings, a small length of tape may be fed and cut
before printing.
44
Page 45

• To cancel printing, press the key.
• To select a saved label for printing, press the or key until you see the label you want.
Note: Printed labels may be slightly different from their preview images.
Parent topic: Printing Labels Using the Built-In Keyboard
Printing Multiple Copies of a Label
You can select the number of labels you want to print, or print labels continuously until you decide to
stop.
1. Press the key.
2. Use the key to highlight Print copies and press the .
3. Use the key to highlight one of the following and press the key:
• Set number to print up to 99 copies of your label or design
• Until stopped to print continuously until you press any key
4. Use the key to highlight Start print? and press the key to start printing.
Parent topic: Printing Labels Using the Built-In Keyboard
Printing Mirror Image Labels
You can create mirror image labels, which are designed to be printed on clear tape and used on a
transparent surface.
1. Press the key.
2. Use the key to highlight Mirror print and press the key.
3. Use the key to highlight On and press the key.
4. Use the key to highlight Start print? and press the key to start printing.
Parent topic: Printing Labels Using the Built-In Keyboard
Printing Without Cutting
You can turn off the Auto Cut setting to print without cutting. This allows you to print a series of labels
and cut them manually, or print a long ribbon with a repeated pattern.
1. Press the + keys.
45
Page 46

2. Use the key to highlight Auto cut and press the key.
3. Use the key to highlight Off and press the key.
4. Do one of the following:
• To print a long ribbon with a repeated pattern (or multiple copies of the same label), press the
key and select Print copies.
• To print a single label, press the button.
5. To remove the labels or ribbon, cut it with scissors, or press the key + the button and select
Feed and cut.
Parent topic: Printing Labels Using the Built-In Keyboard
Feeding and Cutting the Tape
You can feed the tape to add length to a label or ribbon design. You can also feed and cut a label or
ribbon that has been printed without cutting.
1. Press the key + the button.
2. Use the key to highlight one of the following settings and press the key:
• Tape feed
• Feed and cut
Parent topic: Printing Labels Using the Built-In Keyboard
Adjusting Print Density
If your labels are printing too dark or too light, you can adjust the print density.
1. Press the + keys.
2. Use the key to highlight Print density and press the key.
3. Do one of the following:
• To make the print lighter, select one of the – settings.
• To make the print darker, select one of the + settings.
4. Try printing again to make sure the density is adjusted as desired.
Parent topic: Printing Labels Using the Built-In Keyboard
46
Page 47

Using the Printer With Your Computer
Follow the instructions in these sections to use the label printer with your computer.
Connecting the Printer to Your Computer
Using Label Editor for Windows
Using Label Editor Lite for OS X
Connecting the Printer to Your Computer
To use the software with your LabelWorks printer, you need to connect the printer to your computer with
the included USB cable.
1. After you install the software (or during the Label Editor installation process, if prompted), connect
the USB cable to the printer and your computer.
2. Press the PC link button.
PC online flashes on the display and the printer's keyboard is disabled.
Note: To use the keyboard while the printer is connected to your computer, press the PC link button
again.
Parent topic: Using the Printer With Your Computer
Related tasks
Installing Label Editor
47
Page 48

Installing Label Editor Lite
Using Label Editor for Windows
The Label Editor software makes it easy to create labels and ribbons using your Windows computer, as
described in these sections.
Getting Started With Label Editor
Designing Labels With Label Editor
Creating Special Format Labels Using Label Editor
Printing Labels With Label Editor
Parent topic: Using the Printer With Your Computer
Getting Started With Label Editor
Follow the instructions in these sections to get started using Label Editor for Windows.
Installing Label Editor
Starting Label Editor
Label Editor Main Window
Label Editor Toolbars
Parent topic: Using Label Editor for Windows
Installing Label Editor
Install the Label Editor software using the DVD that came with your label printer. If your computer does
not have a DVD drive, you can download the software from Epson's support website. Visit the driver
download site (U.S. downloads or Canadian downloads).
1. Insert the DVD and follow the instructions on the screen to install both the application and the driver.
2. When you are prompted to connect the printer to your computer, connect it using the included USB
cable.
Parent topic: Getting Started With Label Editor
Related tasks
Connecting the Printer to Your Computer
Starting Label Editor
After you have installed the Label Editor software and connected the printer to your computer, you can
start using Label Editor.
48
Page 49

1. Double-click the Label Editor icon on your Windows Desktop.
You see this window:
Note: If you want to go directly to the main screen when you start Label Editor, check Do Not
Display This Dialog at Startup.
2. Select your printer and tape width, if necessary.
3. Do one of the following and click OK (or click Cancel to go straight to the main Label Editor screen):
• To start with a blank label, select Horizontal Text.
• To create labels with text from a spreadsheet or other file, select Import (Horizontal Text).
• To start with a ready-made label from the catalog, select Label Catalog.
• To create an equipment management label or QR code label, select one of the Shortcut options.
• To open a previously created label, select Open File and locate the file on your computer, or
select View History and select from a list of existing labels.
Parent topic: Getting Started With Label Editor
49
Page 50

Label Editor Main Window
1 Operation guide bar
2 Edit toolbar
3 Text toolbar
4 Font box
5 Green handle
6 Label area (The red line indicates the area that will be printed.)
7 Workspace (You can temporarily move a block to this area outside the label.)
8 Font size box
9 Layout toolbar
10 Standard toolbar
Parent topic: Getting Started With Label Editor
50
Page 51

Label Editor Toolbars
The toolbars on the main window provide easy access to the main features of Label Editor.
Edit toolbar
Select a block for editing
Draw a line or shape on your label
Click the arrow next to the icon to see the available shapes, including polygons, stars, freehand
lines, and Bézier curves
Open a window that lets you design a table to insert on your label
Open a window that lets you design a ribbon with repeated text or graphic elements, to be printed
on ribbon tape
Standard toolbar
Resize the selected block to fill the label area
Cut the selected block
Delete the selected block
Copy the selected block
Paste data from the clipboard
Undo the last action
51
Page 52

Redo the last undo action
Open the properties window for the selected block
Feed the tape
Feed and cut the tape
Layout toolbar
Rotate the selected block 90° counterclockwise
Rotate the selected block 90° clockwise
Center the selected block vertically on the label
Center the selected block horizontally on the label
Evenly distribute multiple blocks horizontally
Evenly distribute multiple blocks vertically
Align the selected block at the beginning of the label
Align the selected block at the end of the label
52
Page 53

Text toolbar
Make the selected text bold
Make the selected text italic
Underline the selected text
Reverse the selected text and background (change black text on white background to white on
black)
Change the text style
Click the arrow next to the icon to select outlining and other special effects
Align the text with the left side of the block
Align the text in the center of the block
Align the text with the right side of the block
Justify the text so it is spaced evenly in the block
Change the text direction from horizontal to vertical by clicking the arrow next to the icon
Resize the text box to fit the contents
Resize the text to fill the text box
Parent topic: Getting Started With Label Editor
Designing Labels With Label Editor
Follow the instructions in these sections to design a variety of labels and ribbons.
Creating a Basic Label in Label Editor
53
Page 54

Setting Default Preferences in Label Editor
Working With Blocks in Label Editor
Adding Borders in Label Editor
Inserting Images in Label Editor
Inserting Symbols in Label Editor
Inserting Barcodes in Label Editor
Inserting QR Codes in Label Editor
Inserting Tables in Label Editor
Inserting the Date and Time in Label Editor
Inserting a Background Pattern in Label Editor
Inserting Lines and Shapes in Label Editor
Inserting Text Art in Label Editor
Editing Layout in Label Editor
Editing Text Design in Label Editor
Parent topic: Using Label Editor for Windows
Creating a Basic Label in Label Editor
You can easily create a label with text and graphics and print it on your label printer.
1. Start Label Editor, select Horizontal Text, and click OK.
54
Page 55

You see a blank label on the main Label Editor screen:
2. Enter text in the label, then click outside the label.
You see your text on the label surrounded by a red line with green handles like this:
55
Page 56

3. To change the font and size, select the text box and select the font name and font size from the
selection boxes. (You can use any font installed on your computer.)
4. To save your label, click the Save icon, enter a file name, and click Save.
5. When you are ready to print, click the Print icon.
You see a window like this:
6. Select the number of labels you want in the Copies box.
7. Click OK to print.
Parent topic: Designing Labels With Label Editor
Related tasks
Editing Text Design in Label Editor
56
Page 57

Editing Layout in Label Editor
Setting Default Preferences in Label Editor
You can define default settings for the Label Editor screen, text formatting and printing options, and other
features.
1. Open the Settings menu and select Preferences.
You see a window like this:
2. Select any of the tabs to display the available options.
3. Select the options you want to use as default settings.
4. To select colors, click the Color bar and select from the color chart that appears.
5. When you finish selecting default preferences, click OK.
Note: Some settings take effect immediately, some are applied to the next object you create, and
others are applied the next time you start Label Editor.
Parent topic: Designing Labels With Label Editor
Working With Blocks in Label Editor
Every element that you can add to a label is a block. You can format individual blocks of text or other
elements such as graphic symbols, dates, and tables.
1. To add a text block to a label, click the Text icon.
2. Begin typing anywhere on the workspace.
57
Page 58

Your text appears as you type it in.
3. To select the text block you have typed, click outside the text.
Green handles appear around the text block:
4. Do any of the following:
• To move the block, simply click and drag it as desired. You can add multiple blocks to a label by
dragging them to the right of an existing block on the label area. The label automatically expands
to accommodate the new block.
• To add text to an existing text block, click the Text icon, click within the block, and type in the text.
• To format the text block, click the block to select it and use any of the tools on the text toolbar or
the font selection boxes. You can also click the Properties icon to open a window with
formatting options.
• To resize the text block, click the block to display the green handles. Click and drag one of the
handles on the left or right side to the size you want.
Parent topic: Designing Labels With Label Editor
Related tasks
Editing Layout in Label Editor
58
Page 59

Adding Borders in Label Editor
You can select from a variety of borders for your labels and ribbons.
1. Enter the text for your label.
2. Click the Border icon.
You see this window:
3. Select the border you want and click OK.
The border appears on your label.
4. Do the following to adjust the size of the border and position of the text, if necessary:
• To make the border wider, click and drag on the right side of the border. The white label area
expands as you drag the border.
• To adjust the position of the text, click and drag the text block.
5. When you are finished, click OK.
Parent topic: Designing Labels With Label Editor
59
Page 60

Related tasks
Working With Blocks in Label Editor
Inserting Images in Label Editor
You can add your own logos, photos, or graphics to your labels and ribbons.
1. Click the Image icon.
2. Locate and select the file you want to use on your computer and click Open.
You see an outline of your image block.
Note: Color photos or other images appear in black and white only.
3. Drag the block where you want the image to appear, and click the block to display it on your label.
4. Adjust the size and position of the image and text.
5. To adjust the image format if necessary, double-click the image.
You see a window like this:
6. Select any of the tabs to display the available options.
7. Select the options you want.
60
Page 61

8. When you are finished, click OK.
Parent topic: Designing Labels With Label Editor
Related tasks
Working With Blocks in Label Editor
Inserting Symbols in Label Editor
You can select from a variety of ready-made graphic symbols to use in your labels and ribbons.
1. Click the Symbol icon.
You see this window:
2. Use the arrows at the top of the window to scroll through the available categories. Use the scroll bar
on the right to scroll through the available symbols in each category.
3. Select the symbol you want and click OK.
You see the outline of the symbol block on the screen.
4. Drag the block where you want it to appear on your label, and click the block to display the symbol.
61
Page 62

5. Adjust the size and position of the symbol and text.
6. To adjust the symbol format, if necessary, double-click the symbol.
You see this window:
7. Select any of the tabs to display the available options.
8. Select the options you want.
9. When you are finished, click OK.
Parent topic: Designing Labels With Label Editor
Related tasks
Working With Blocks in Label Editor
Inserting Barcodes in Label Editor
You can create labels with a variety of barcode types for inventory management and asset tagging, such
as this one:
62
Page 63

1. Click the Barcode icon.
You see this window:
2. Select the type of barcode you want to create.
3. To include the code number beneath the barcode, select the Display text checkbox.
4. Enter the code number for your barcode in the Code box.
5. Enter the barcode size, positioning, and font information as necessary, and click OK.
You see a message about adding margins on the sides of your barcode.
Note: If you do not want to see this message, select the Display tab on the Barcode window and
uncheck Message On.
6. Click OK.
You see the outline of your barcode block.
7. Drag the block where you want your barcode to appear, then click the block to display it on your
label.
63
Page 64

Parent topic: Designing Labels With Label Editor
Related tasks
Working With Blocks in Label Editor
Inserting QR Codes in Label Editor
You can create labels with a QR code for many purposes, such as linking to URLs, file storage services,
or social media applications. One-inch (24 mm) wide black-on-white tape is recommended for the fastest
QR code recognition.
Note: When embedding content from social media applications, consider your privacy settings. When
embedding content from file storage services, check the sharing settings to ensure that other people can
view the content.
1. Click the QR Code icon.
64
Page 65

You see this window:
2. Select the type of QR code you want to create.
3. Enter the URL or other text in the Code box.
4. Select the Error Correction Level and Symbol Size options as necessary, and click OK.
Note: Small or Medium Symbol Size settings are recommended.
You see a message about adding margins around the QR code.
Note: If you do not want to see this message, select the Display tab on the Barcode window and
deselect the Message On checkbox.
5. Click OK.
You see the outline of your QR code block.
6. Drag the block where you want your QR code to appear, then click the block to display it on your
label.
65
Page 66

Parent topic: Designing Labels With Label Editor
Related tasks
Working With Blocks in Label Editor
Inserting Tables in Label Editor
You can add customized tables to your labels.
1. Click the Table icon.
You see this window:
2. Select the table settings you want to use and click OK.
The table appears on your label.
3. To resize the table, click and drag one of the green dots to the size you want.
4. To format the table, select it and click the Properties icon.
66
Page 67

You see a window like this:
5. Select any of the tabs to display the available options.
6. Select the options you want.
7. When you are finished, click OK.
Parent topic: Designing Labels With Label Editor
Related tasks
Working With Blocks in Label Editor
Inserting the Date and Time in Label Editor
You can add the date and/or time to your labels and have it automatically updated.
1. Open the Insert menu and select Date and Time.
67
Page 68

You see this window:
2. Select the date, update method, and display format options you want to use.
3. Select any of the tabs to display additional text formatting options.
4. Select the options you want.
5. Click OK.
You see the outline of your date block.
6. Drag the block where you want the date and/or time to appear, then click the block to display it on
your label.
7. If you need to adjust the size, click and drag one of the green handles.
Parent topic: Designing Labels With Label Editor
Related tasks
Working With Blocks in Label Editor
Editing Text Design in Label Editor
Inserting a Background Pattern in Label Editor
You can select from several background patterns for your labels and ribbons, or create your own graphic
or text background.
Note: All background elements print in light gray.
68
Page 69

1. Open the Insert menu and select Background Pattern.
You see this window:
2. Do one of the following:
• Select one of the available background patterns.
69
Page 70

• To create your own pattern, click Original Background Pattern, and click New. You see this
window:
Use the tools to design your pattern and click OK. Once you have designed a pattern, Label Editor
saves it with the ready-made background patterns so you can use it again.
70
Page 71

• To create a text background pattern, click Text Background Pattern. You see this window:
Enter the text for your background, then select the Font, Style, and Size options you want to use.
3. Click OK.
You see your background pattern on the Label Editor main screen.
Parent topic: Designing Labels With Label Editor
Inserting Lines and Shapes in Label Editor
You can add graphics to your labels and ribbons using a variety of lines and shapes.
1. Click the arrow next to the Straight Line icon.
You see this window:
71
Page 72

2. Click the line or shape you want to draw.
Note: If you select the regular polygon shape, you can choose a polygon (and set the number of
sides) or a star (and set the number and ratio of points).
3. Click on your label on the screen.
Your cursor turns into a pencil.
4. Drag the pencil to draw your line or shape.
Note: For some lines, you need to click to anchor the line segment, then double-click to finish the
line.
5. To format the line or shape, double-click it.
You see a window like this:
Note: The available options vary depending on the line or shape you select.
72
Page 73

6. Select any of the tabs to display the available options.
7. Select the options you want.
8. When you are finished, click OK.
Parent topic: Designing Labels With Label Editor
Related tasks
Working With Blocks in Label Editor
Inserting Text Art in Label Editor
You can add curves or other special effects to text on your labels and ribbons.
1. Open the Insert menu and select Text Art.
You see this window:
2. Enter the text for the art, then select the Font, Size, Style, and Text Alignment options you want to
use.
3. Click the Shape tab.
73
Page 74

You see this window:
4. Select the curve and transformation options you want to use.
You see a preview of your text art in the window.
5. Click the Decoration tab.
6. Select any Fill, Border, and Reverse settings you want to use.
7. Click OK.
You see the outline of your text art block.
8. Drag the block where you want the text art to appear, then click the block to display it on your label.
Parent topic: Designing Labels With Label Editor
Related tasks
Working With Blocks in Label Editor
Editing Layout in Label Editor
You can rearrange and adjust the layout of the blocks of text and other elements on your labels.
1. To edit the layout of a block, click the Edit block icon, and click the block on the Label Editor main
screen.
Note: To select more than one block, press and hold the Shift key on your computer keyboard while
you click the blocks (or choose Select All from the Edit menu).
You see green handles around the selected block.
74
Page 75

2. Open the Layout menu.
3. Do any of the following.
• To reposition overlapping blocks, click Block Order and select any of the available options.
• To flip a block horizontally or vertically, click Flip and select one of the options.
• To rotate a block, click Rotate and select one of the options.
• To align one or more blocks, click Align and select one of the options.
• To reposition a block interactively, click Set Position, select one of the options, click OK, and click
on the label where you want to position the block.
• To reposition multiple blocks interactively, click Arrange Blocks, select one of the options, click
OK, and click one of the blocks.
• To restore the original aspect ratio of an image, click Revert to Default Ratios.
Note: You can also use the icons on the Layout toolbar to perform many of the same functions.
Parent topic: Designing Labels With Label Editor
75
Page 76

Related tasks
Working With Blocks in Label Editor
Editing Text Design in Label Editor
You can use the Text Settings window to apply more text formatting options to your label than those
available in the Text toolbar or Text menu.
1. Click a text block on the Label Editor main screen to select it.
You see green handles around the selected block.
2. Click the Properties icon.
You see this window:
3. Select any of the tabs to display the available options.
4. Select the options you want.
You see a preview of the text in the window.
5. When you finish selecting text settings, click OK.
Parent topic: Designing Labels With Label Editor
Creating Special Format Labels Using Label Editor
Follow the instructions in these sections to create special format labels using Label Editor.
Creating Labels from Imported Data in Label Editor
Creating Ribbons With Repeated Patterns in Label Editor
76
Page 77

Creating Equipment Management Labels in Label Editor
Using the Label Editor Catalog
Creating Numbered Label Sequences in Label Editor
Parent topic: Using Label Editor for Windows
Creating Labels from Imported Data in Label Editor
You can create a series of labels using the data from one or more spreadsheet columns. This lets you
quickly create address labels from your entire address book, for example.
The following file formats are supported: .csv, .txt, .xls, .xlxs, and .xlsm.
Note: To use .xls, .xlxs, or .xlsm file formats, you must have Microsoft Excel installed on your computer.
1. On the New/Open screen, select Import(Horizontal text) and click OK.
You see this window:
2. Click Load Import Data, select the file you want to import, and click Open.
3. Select Overwrite Current Data and choose a data sheet, if necessary.
77
Page 78

You see a Layout window and a Data window side by side:
4. Click the Import icon.
You see a window like this:
5. Select one of the columns that you want to import and click OK.
You see the outline of an import frame.
78
Page 79

6. Drag the frame where you want the data to appear on your label.
You see the data from the current row on the label layout:
7. Repeat steps 5 and 6 until all the data you want to import appears on the label.
8. Adjust the size and position of the import frames as necessary.
9. To save your label project, click the Save icon, enter a file name, and click Save.
10. To select specific rows to print, click the checkbox to the right of the row number in the Data window.
A green check mark appears next to the row number.
Note: You can select a row in the Data window and see a preview of your label in the Layout
window.
11. Click the Print icon.
79
Page 80

You see a window like this:
12. Select the number of labels you want in the Copies box.
13. Select the options you want in the Data Importing section.
14. Click OK to print your labels.
Parent topic: Creating Special Format Labels Using Label Editor
Creating Ribbons With Repeated Patterns in Label Editor
You can easily create ribbons with repeated patterns of text and graphics. Load ribbon tape in your label
printer before you print.
Note: For best results, turn off the auto cutter and use scissors to cut the ribbon.
80
Page 81

1. Enter the text for your label. You can use normal text or text art for curved or transformed text.
2. Select the font and size for the text.
3. Add symbols, images, or a border, if desired.
4. Click the Ribbon icon.
You see this window:
5. Enter the length of the ribbon and interval between each repeated block.
6. Click OK.
You see a preview of your ribbon design.
Parent topic: Creating Special Format Labels Using Label Editor
Related tasks
Inserting Images in Label Editor
Inserting Symbols in Label Editor
Adding Borders in Label Editor
81
Page 82

Printing Labels in Label Editor
Creating Equipment Management Labels in Label Editor
You can select from several templates for equipment management labels and modify the templates as
necessary. You can create a series of equipment management labels by entering the text manually or by
importing it from a file.
1. On the New/Open screen, select Equipment Management and click OK.
You see this window:
2. Scroll down to view the available templates, select the one you want to use, and click OK.
82
Page 83

You see a window like this:
3. Do one of the following:
• Select Data Entry, enter the text for each field, and click OK.
• Select Data Importing (for Multiple Labels), click Reference, and select the data file you want to
use. Follow the instructions for importing data.
You see a screen like this:
83
Page 84

4. Do any of the following:
• To edit the default field labels, double-click each text block and enter the text you want.
• To format the text you entered, double-click it on the layout window.
• To create additional labels using the same template, enter the text in the Data window. After you
complete each row, a blank row appears below it.
5. To save your label project, click the Save icon, enter a file name, and click Save.
6. Click the Print icon.
7. Select the number of copies and any other settings you want.
8. Click OK to print your labels.
Parent topic: Creating Special Format Labels Using Label Editor
Related tasks
Creating Labels from Imported Data in Label Editor
Printing Labels in Label Editor
Using the Label Editor Catalog
Label Editor includes a catalog containing a variety of ready-made labels. You can print the existing
labels or customize them as necessary.
1. From the New/Open screen, select Label Catalog, and click OK.
You see this window:
84
Page 85

2. Select a category on the left, then scroll through the label images to select the one you want.
Note: To limit your selection to the tape width you are using, click the arrow under Tape Width and
select the width.
3. To edit a selected label, click Edit.
You see the label on the Label Editor screen. You can use any of the available editing tools to edit
the label blocks.
4. To print a selected label, click Print.
5. Select the number of copies and any other settings you want.
6. Click OK to print.
Parent topic: Creating Special Format Labels Using Label Editor
Related tasks
Editing Text Design in Label Editor
Editing Layout in Label Editor
Printing Labels in Label Editor
Creating Numbered Label Sequences in Label Editor
You can create copies of a label that are automatically numbered in sequence using numerals or letters
of the alphabet.
1. Create the text for your label.
2. Open the Insert menu and select Alphanumeric Sequence.
85
Page 86

You see this window:
3. Select Numerals or Alphabetic Value as the Attributes option.
4. Enter one or more # symbols as the Format option to represent the number of digits you want in your
sequence.
5. For Initial Value, enter the starting number or letter for your sequence.
6. For Increment, enter the value to add for each subsequent label. To create a decreasing sequence,
enter a minus number.
7. For Repetition, enter the number of times to repeat an item in the sequence. To specify a maximum
or minimum value for your sequence, select the Max (min) checkbox and enter the value.
8. Select the Font, Size, Text Position, and Style options as necessary for the sequence.
9. Click OK.
You see the outline of your sequence number block on the Label Editor main screen.
10. Drag the sequence block where you want the number to appear, then click to display it on your label.
11. If you need to adjust the size, click and drag one of the green handles.
86
Page 87

12. To save your label project, click the Save icon, enter a file name, and click Save.
13. Click the Print icon.
You see a window like this:
14. Select the number of copies of each label you want to print.
15. Select the Paginate with Alphanumeric Sequence checkbox.
16. Click OK to print.
Parent topic: Creating Special Format Labels Using Label Editor
Printing Labels With Label Editor
Follow the instructions in these sections to print using Label Editor.
87
Page 88

Printing Labels in Label Editor
Label Editor Printer Settings
Print-Paste Printing in Label Editor
Parent topic: Using Label Editor for Windows
Printing Labels in Label Editor
When you have finished designing a label, you are ready to print.
1. Click the Print icon.
You see a window like this:
2. Select the number of copies.
88
Page 89

3. If you are printing a numbered sequence of labels, select the Paginate with Alphanumeric
Sequence checkbox.
4. If you are printing a series of labels with imported data, select the options you want in the Data
Importing section.
5. To turn off collation when printing multiple copies of labels with imported data, select the Print Order
checkbox in the Import section.
6. If you are using Print-Paste Printing, select the Set Print Range checkbox, then select the sections
you want to print.
7. To turn off collation when printing multiple copies with Print-Paste Printing, select the Print Order
checkbox in the Print-Paste Printing section.
8. To select additional printing options, click Printer Settings.
You see this window:
9. Select any of the tabs to display the available options.
89
Page 90

10. Select the options you want.
11. Click OK to close the window.
12. Click OK to print.
Parent topic: Printing Labels With Label Editor
Related references
Label Editor Printer Settings
Label Editor Printer Settings
The Printer Settings options let you adjust many label features as you print, including the orientation of
text and mirror printing.
Setting Options Description
Paper tab
90
Page 91

Setting Options Description
Tape Width Various widths available Sets the width of the loaded tape
Get Tape Width: detects the
width of the loaded tape
automatically
Orientation Vertical Sets the orientation of the label
Horizontal
text
Print Setting Mirror Print SelectYes for mirror-image
printing on clear labels for use on
transparent surfaces
Graphics tab
Resolution 180 dpi Sets the print quality
automatically
Dithering Rough Sets the method for printing
Fine
Line Art
BW
imported images
BW: lets you set the threshold for
turning grayscale images into
black and white
Concentration –3 to +3 Decreases or increases the print
density
Options tab
Cut Setting Cut each label Sets how the label is cut
Cut after job Cut each label: cuts each label
Don't cut
as it is printed
Cut after job: prints multiple
labels in a print job without
cutting
Don't cut: prints all labels
without cutting, so you can cut
them manually
91
Page 92

Setting Options Description
View Setting Display tape width Displays selected information
Unit mm(mm) Selects the units of measurement
Utilities tab
Feed and Cut Select to feed, or feed and cut labels, or to restart the printer driver
Feed
Printer Drivers Restart
Parent topic: Printing Labels With Label Editor
Print-Paste Printing in Label Editor
You can create labels from imported data and select individual data fields or columns to print on
separate labels. For example, instead of including the item name, code, and price on one label, you can
create three separate labels, one for each item. This is called print-paste printing in Label Editor.
1. Create or open a label project with imported data.
You see a label with the layout you have selected.
confirmation message before printing
Print Preview
inches(in)
used in Label Editor
2. Select the layout window.
3. Click the arrow under Print-Paste Printing(Multiply) on the left side of the screen.
4. Select the number of labels you want to create from each existing label.
92
Page 93

You see an expanded area on the layout window, like this:
5. Drag the import frames from the original label to the additional labels in the display window.
You see your individual print-paste labels, like this:
6. Click the Print icon.
93
Page 94

You see a window like this:
7. Select the Set Print Range checkbox in the Print-Paste Printing section.
8. Select the individual labels you want to print.
9. To turn off collation when printing multiple copies, select the Print Order checkbox in the Print-Paste
Printing section.
10. Select additional print options as necessary.
11. Click OK to print.
Parent topic: Printing Labels With Label Editor
Related references
Label Editor Printer Settings
94
Page 95

Using Label Editor Lite for OS X
The Label Editor Lite software makes it easy to create labels using a Mac, as described in these
sections.
Note: This software is available in English only.
Getting Started With Label Editor Lite
Designing Labels With Label Editor Lite
Feeding and Cutting the Tape in Label Editor Lite
Printing Labels With Label Editor Lite
Parent topic: Using the Printer With Your Computer
Getting Started With Label Editor Lite
Follow the instructions in these sections to get started using Label Editor Lite for OS X.
Installing Label Editor Lite
Starting Label Editor Lite
Label Editor Lite Main Window
Parent topic: Using Label Editor Lite for OS X
Installing Label Editor Lite
Install the Label Editor Lite software from the App Store. If you can not access the App Store, you can
download the software from Epson's support website.
1. Open the App Store.
2. Enter Epson Label Editor Lite in the search field and press the button.
3. Click Epson Label Editor Lite in the list of apps.
4. Click Free.
The button name changes to Install App.
5. Click Install App.
6. Download the printer driver from Epson's support website and install it. Visit the driver download site
(U.S. downloads or Canadian downloads).
Label Editor Lite installs on your Mac.
Parent topic: Getting Started With Label Editor Lite
95
Page 96

Starting Label Editor Lite
After you have installed the Label Editor Lite software and connected the printer to your computer, you
can start using Label Editor Lite.
1. Choose Applications > Label Editor Lite.
You see the main screen:
Parent topic: Getting Started With Label Editor Lite
Related tasks
Connecting the Printer to Your Computer
96
Page 97

Label Editor Lite Main Window
1 Label preview area
2 File area
3 History area
4 Insert area
5 Text editing area
6 Font settings area
7 Tape length settings area
8 Tape width settings area
9 Printing area
10 Zoom area
97
Page 98

Parent topic: Getting Started With Label Editor Lite
Designing Labels With Label Editor Lite
Follow the instructions in these sections to design a variety of label and ribbon types.
Setting Default Preferences in Label Editor Lite
Creating a Basic Label in Label Editor Lite
Formatting Text in Label Editor Lite
Inserting Images in Label Editor Lite
Inserting the Date and Time in Label Editor Lite
Adding Borders in Label Editor Lite
Inserting QR Codes in Label Editor Lite
Using the Label Editor Lite Wizard
Parent topic: Using Label Editor Lite for OS X
Setting Default Preferences in Label Editor Lite
You can define default settings for the Label Editor Lite screen, text formatting and printing options, and
other features.
1. Open the Epson Label Editor Lite menu and select Preferences.
98
Page 99

You see a window like this:
2. Select the options you want to use as default settings.
Note: The settings are applied to the next object you create.
3. Click OK.
4. Click OK again.
You return to the main window.
99
Page 100

Parent topic: Designing Labels With Label Editor Lite
Creating a Basic Label in Label Editor Lite
You can easily create a label with text and graphics and print it on your label printer.
1. Start Label Editor Lite.
You see the main Label Editor Lite screen:
2. Select the printer and tape width.
3. Enter the text for your label in the text field.
The text appears in the text editing area and the label preview area.
100
 Loading...