

Page 1

LW-600P
Quick Start Guide
Guide rapide
Page 2
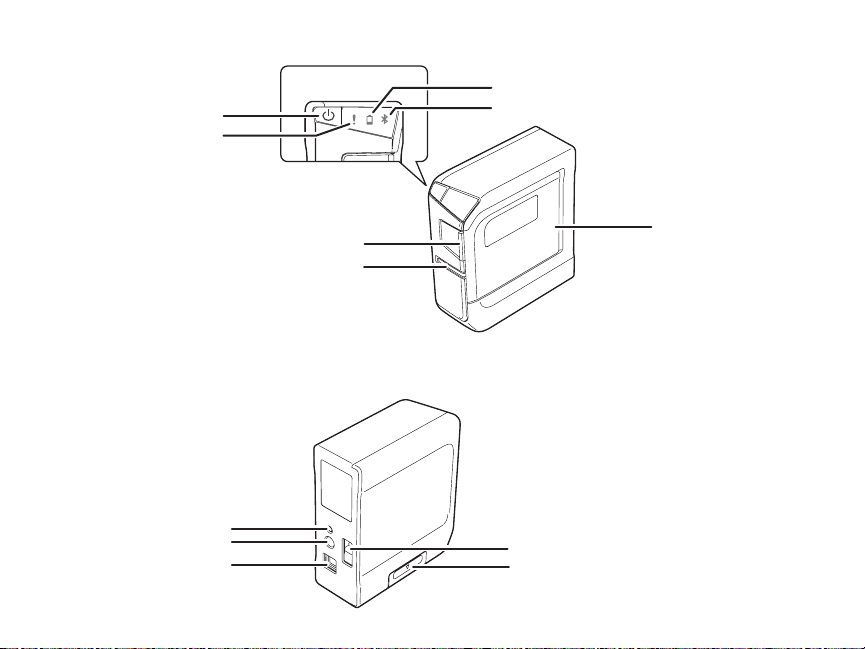
Front
Power button
Error light
Battery light
Bluetooth light
Back
Bluetooth button
Power port
USB port
Tape cover tab
Tape ejection slot
Tape cover
Security cable attachment point
Battery cover
Page 3

Contents
English
Getting Started. . . . . . . . . . . . . . . . . . . . . . . . . . . . . . 3
Unpacking . . . . . . . . . . . . . . . . . . . . . . . . . . . . . . . . 4
Plugging in. . . . . . . . . . . . . . . . . . . . . . . . . . . . . . . . 4
Installing batteries. . . . . . . . . . . . . . . . . . . . . . . . . 4
Inserting and removing tape cartridges . . . . 5
Turning the printer on or off . . . . . . . . . . . . . . . 7
Installing Software . . . . . . . . . . . . . . . . . . . . . . . . . . 7
Installing software on Windows® or Mac. . . . 7
Installing the Epson iLabel app on
a mobile device . . . . . . . . . . . . . . . . . . . . . . . . . . . 8
Connecting to a mobile device using
Bluetooth . . . . . . . . . . . . . . . . . . . . . . . . . . . . . . . . . 8
Using the Label Editor Software . . . . . . . . . . . 10
Creating labels in Windows . . . . . . . . . . . . . . . 10
Creating labels in Mac OS X . . . . . . . . . . . . . . . 12
Printing labels. . . . . . . . . . . . . . . . . . . . . . . . . . . . 13
Canceling a print job . . . . . . . . . . . . . . . . . . . . . 13
Special Labels . . . . . . . . . . . . . . . . . . . . . . . . . . . . . . 13
QR and barcode labels. . . . . . . . . . . . . . . . . . . . 14
Equipment management labels. . . . . . . . . . . 15
Wrap and flag labels for cables. . . . . . . . . . . . 16
Printed Ribbons . . . . . . . . . . . . . . . . . . . . . . . . . . . . 17
Favor bags . . . . . . . . . . . . . . . . . . . . . . . . . . . . . . . 18
Hair bows or ponytail holders. . . . . . . . . . . . . 19
Ornaments with ribbon hangers . . . . . . . . . . 19
Greeting cards . . . . . . . . . . . . . . . . . . . . . . . . . . . 20
Applying Labels . . . . . . . . . . . . . . . . . . . . . . . . . . . . 20
Cleaning the Printer. . . . . . . . . . . . . . . . . . . . . . . . 21
Printer . . . . . . . . . . . . . . . . . . . . . . . . . . . . . . . . . . . 21
Print head. . . . . . . . . . . . . . . . . . . . . . . . . . . . . . . . 21
Solving Problems . . . . . . . . . . . . . . . . . . . . . . . . . . 21
Status lights. . . . . . . . . . . . . . . . . . . . . . . . . . . . . . 22
Other problems . . . . . . . . . . . . . . . . . . . . . . . . . . 22
Epson Technical Support . . . . . . . . . . . . . . . . . . 24
Recycling . . . . . . . . . . . . . . . . . . . . . . . . . . . . . . . . 24
Purchase supplies and accessories . . . . . . . . 24
Registration . . . . . . . . . . . . . . . . . . . . . . . . . . . . . . . . 25
Contents | 1
Page 4

Notices . . . . . . . . . . . . . . . . . . . . . . . . . . . . . . . . . . . . . 25
About printed labels. . . . . . . . . . . . . . . . . . . . . . 25
Bluetooth Safety and Specifications. . . . . . . 25
Declaration of conformity . . . . . . . . . . . . . . . . 27
Epson America, Inc. Limited Warranty . . . . . 27
Trademarks . . . . . . . . . . . . . . . . . . . . . . . . . . . . . . 30
2 | Contents
Page 5

Getting Started
Your LabelWorks™ LW-600P lets you create
labels for any purpose, as well as decorative
stickers and personalized ribbons.
Here are some of the things you can do with
your LabelWorks printer:
■ Manage equipment using text and
barcodes.
■ Create unique, “hand drawn” labels using
your smart device.
■ Label cables for easy organization.
■ Add a QR code for supplemental
information.
■ Create professional-looking file and
address labels.
■ Organize drawers and cabinets in your
kitchen, bathroom, and every room of
your house.
■ Create iron-on labels for clothing,
uniforms, backpacks, and other cloth
items.
■ Print custom ribbons for party favors,
gifts, hair decorations, and ornaments.
■ Produce glow-in-the-dark labels for light
switches and electrical panels.
■ Create custom labels to help you identify
hazards, emergency supplies, and
warning instructions.
■ Import your address book to print
mailing labels for all your holiday cards.
■ Incorporate your own logos, fonts, and
other graphics, including photographs.
For more information and instructions on
using all the features of the LabelWorks
printer and software, see the online User’s
Guide at epson.com/support/lw600p.
Getting Started | 3
Page 6
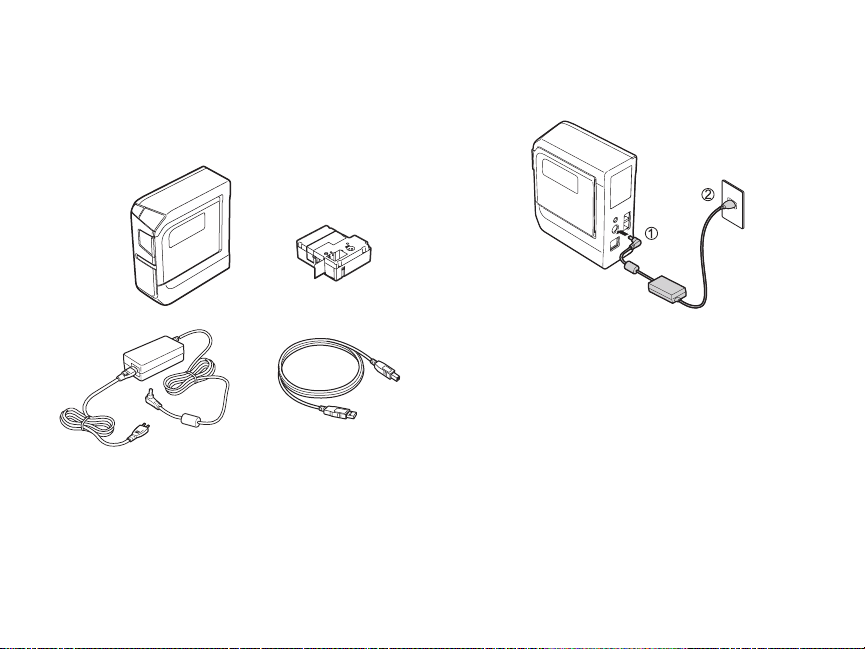
Unpacking
Your LabelWorks printer includes the
following items:
Printer
Sample
tape cartridge
AC Adapter
4 | Getting Started
USB cable
Plugging in
Connect the AC adapter as shown:
Note: Instead of an AC adapter, you can also use
6 AA alkaline batteries (not included).
Installing batteries
You can use batteries instead of an AC
adapter when you are not near a power
source.
Page 7
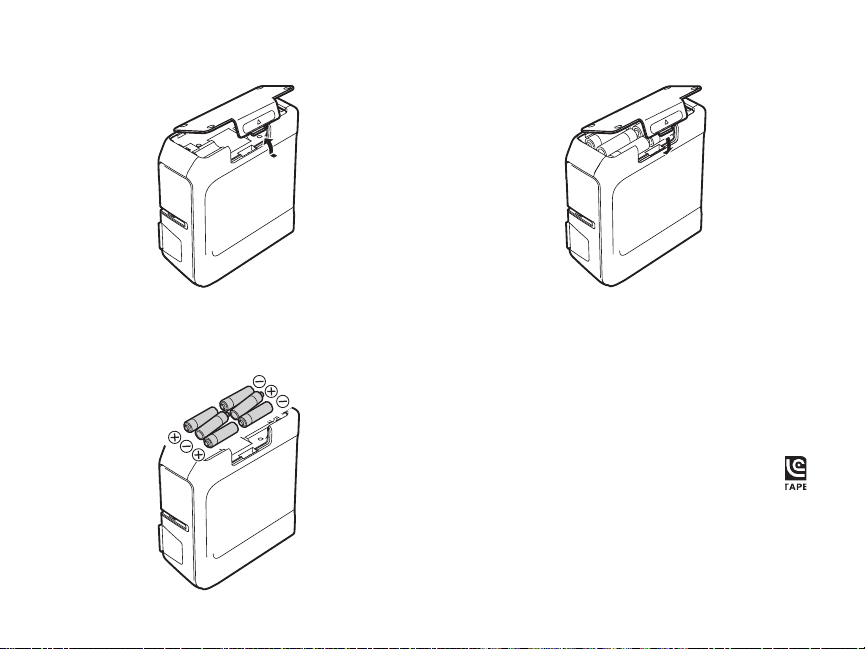
1. Open the battery cover.
3. Replace the battery cover.
2. Insert 6 AA alkaline batteries, positioning
the + and - ends as shown.
Inserting and removing tape cartridges
You can use any LabelWorks LC tape, with
widths ranging from ~1/4 inch (6 mm) to
~1 inch (24 mm).
Use only label cartridges with this mark: .
See the list on the back cover, or go to
epson.com/labelworks or epson.ca/
labelworks.
Getting Started | 5
Page 8
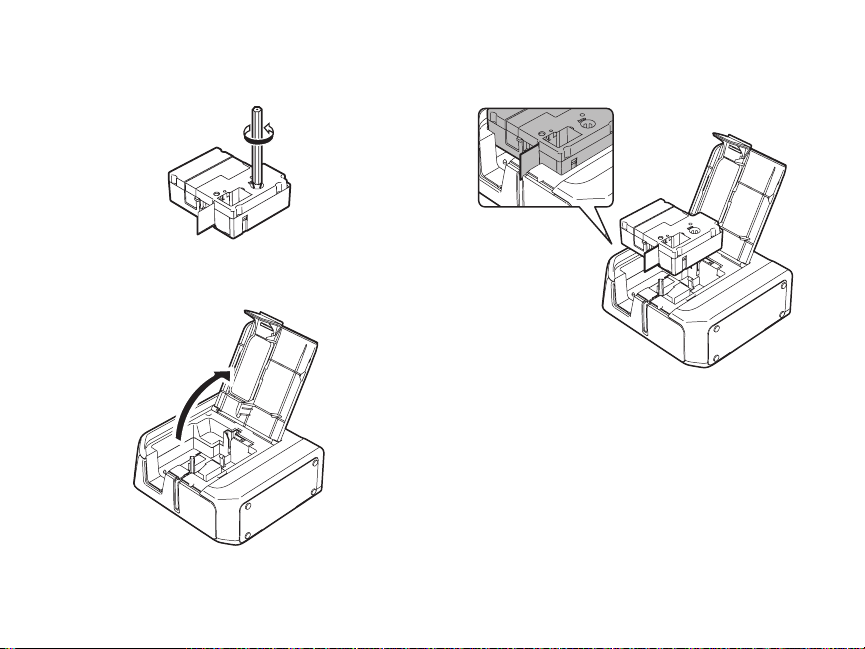
1. Remove any slack from the tape using a
pen or a pencil.
2. Open the tape cover.
6 | Getting Started
3. Insert the cartridge and press it down
firmly until it snaps into place.
4. Slide the end of the tape into the ejection
slot.
5. Close the tape cover.
To remove a tape cartridge, open the cover,
grasp the sides of the cartridge and lift it out
of the printer.
Page 9
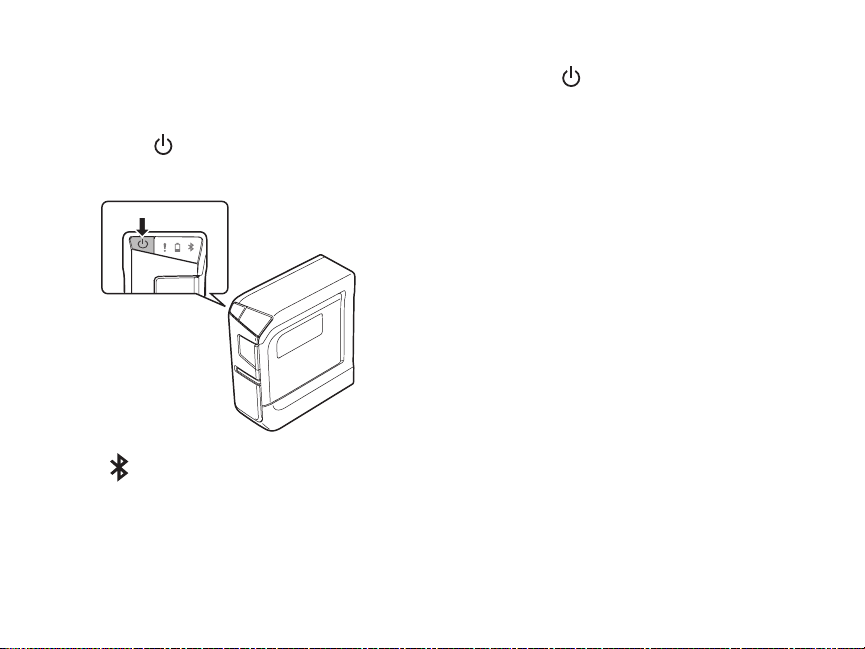
Turning the printer on or off
Make sure the AC adapter is connected or
batteries are installed.
■ Press the button to turn on the
printer.
The light turns on.
Note: The Bluetooth® light flashes at
different intervals depending on the
Bluetooth status; see “Status lights” on
page 22.
■ When you are finished using the printer,
press the button to turn it off.
Note: The printer turns off automatically if it
is not used within 8 hours on AC power or 20
minutes on battery power.
Installing Software
Installing software on Windows® or Mac
Download the software from:
epson.com/support/lw600p
You can also download the Label Editor Lite
software for Mac OS X from the Apple App
Store.
Make sure you have the USB cable that came
with the printer. Do not connect the printer
before installing the software.
Installing Software | 7
Page 10
Note: Be sure to install the printer driver when
installing the software.
1. Double-click the software installer you
downloaded. Follow the on-screen
instructions.
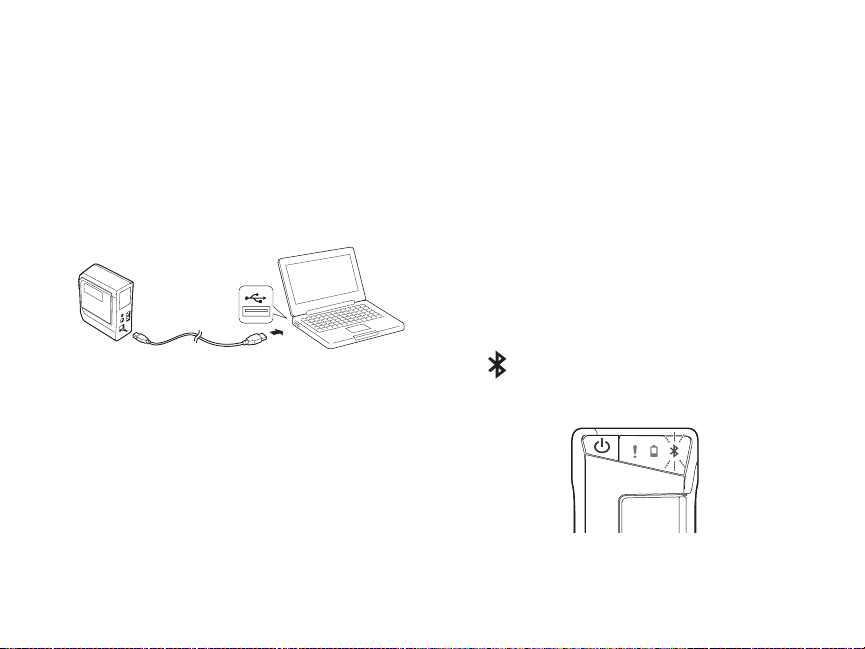
2. When the prompted, connect the printer
to your computer as shown:
3. Turn the printer on.
4. When the installation finishes, restart
your computer.
8 | Installing Software
Installing the Epson iLabel app on a mobile device
Download the Epson® iLabel app from the
Google Play™ Store or the App Store.
Connecting to a mobile device using Bluetooth
You must install the Epson iLabel app before
connecting to the printer.
Check that Bluetooth is enabled on the
printer before connecting.
The light pulses when Bluetooth is
enabled.
Page 11
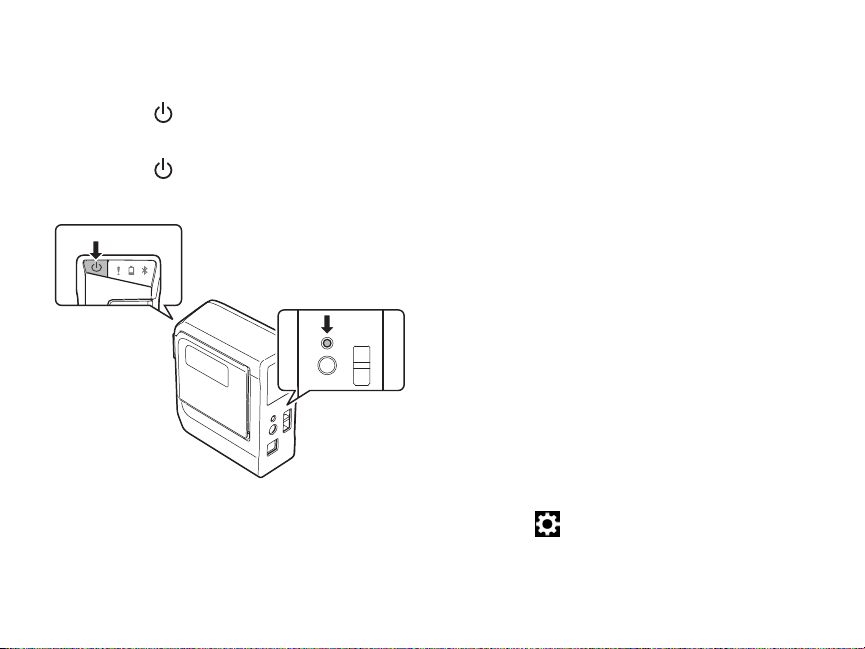
If Bluetooth is disabled, enable it by
following the steps below:
1. Press the button to turn off the
printer.
2. Press the button and the Bluetooth
button at the same time.
3. Pair your device to the printer. Follow the
instructions for your device’s operating
system below.
Android™
1. Turn on the mobile device.
2. Go to Settings > Wireless & Network
and turn on Bluetooth.
3. Select Search for devices.
Wait while your device scans for the
printer.
The printer is displayed when scanning
has finished.
4. Select the printer.
Pairing is complete when the printer is
listed under Paired Devices.
Note: The Bluetooth icon in the status bar
does not change after pairing is complete,
nor does the connection status display on
the Bluetooth settings screen.
5. Open iLabel.
6. Select .
7. Select Printer.
Installing Software | 9
Page 12

8. Select LW-600P.
The printer is ready to use when you see
on the main screen of iLabel.
iOS
1. Turn on the mobile device.
Go to Settings > Bluetooth and turn on
Bluetooth.
Wait while your device scans for the
printer.
2. When printer is displayed under Devices,
select the printer.
Pairing is complete when the Bluetooth light
on the printer is lit.
10 | Using the Label Editor Software
Using the Label Editor Software
The Label Editor software lets you create
hundreds of label designs quickly and easily.
For more information on using the software,
see the online User’s Guide.
Creating labels in Windows
Once your LabelWorks printer is connected
to your computer, you can use the Label
Editor software to design your labels or
ribbons.
Page 13
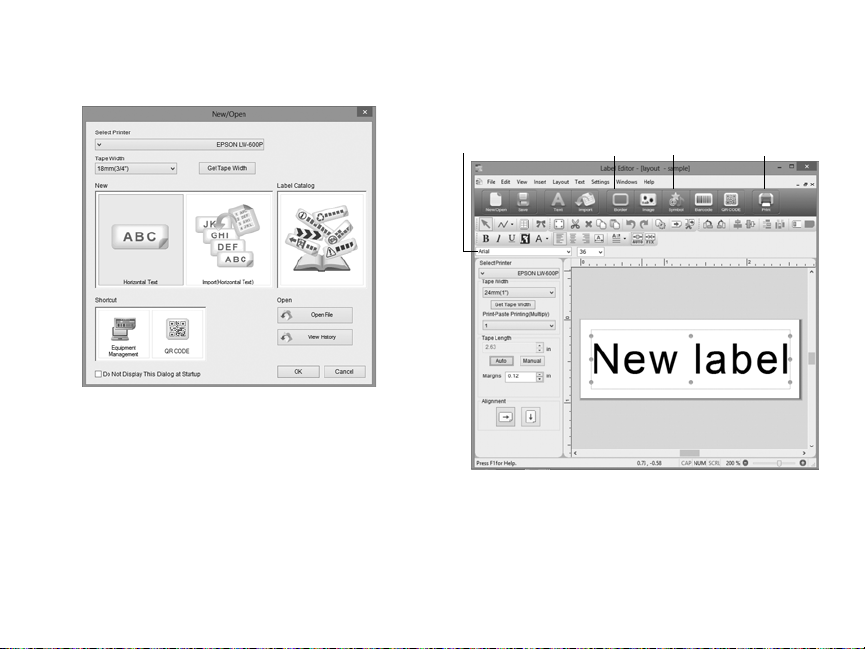
1. Double-click the Label Editor icon. You
see the New/Open screen:
2. Select Horizontal Text, then click OK.
You see a blank label on the main Label
Editor screen.
3. Enter text in the label, then click outside
the label. You see your text on the label,
for example:
Font name box
Border
icon
Symbol
icon
Print
icon
■ To add a frame, click the Border icon
and select a border, then click OK.
Adjust the size and position of the
border, then click outside the label.
Using the Label Editor Software | 11
Page 14
■ To add a symbol, click the Symbol
icon and select a symbol from one of
the categories, then click OK. Click
the location where you want the
symbol to appear.
■ To change the font and size, select the
text box, then use the Font Name and
Font Size selection boxes. You can use
any font installed on your computer.
4. When you’re ready to print, click the
Print icon. Click Printer Settings to
choose additional options. Select the
number of copies, then click OK to print.
Note: The Label Editor software includes many
additional features and label formatting
options. See the online User’s Guide for more
information.
Creating labels in Mac OS X
Once your LabelWorks printer is connected
to your Mac, you can use the Label Editor
Lite software to design your labels or
ribbons.
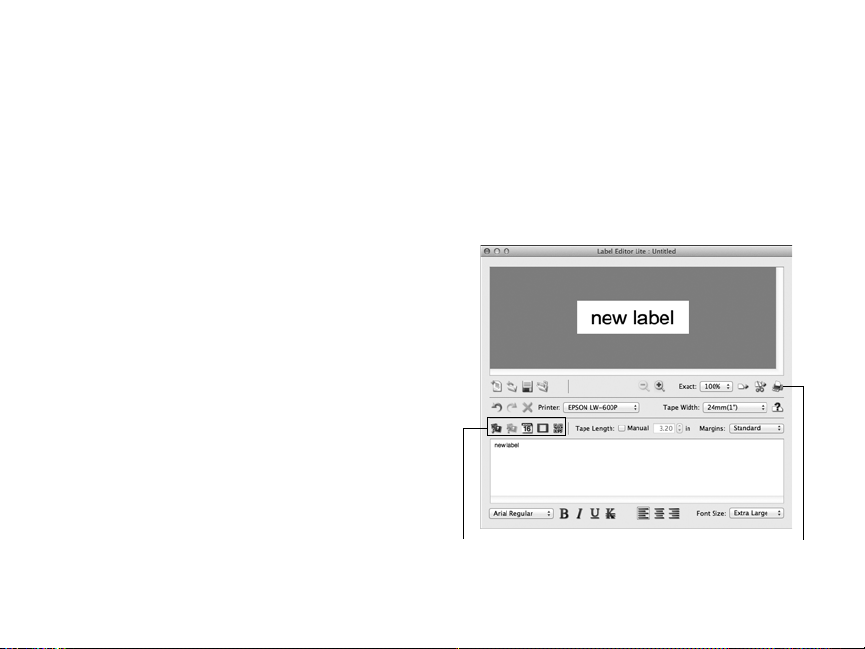
1. Start the Label Editor Lite software. You
see a screen like this:
12 | Using the Label Editor Software
Label design icons
Print icon
Page 15

2. Enter text in the area at the bottom of the
screen. You see a preview of the font and
size at the top of the screen.
■ To in sert an imag e, date, bo rder, or QR
code, click the icons on the screen.
■ To change the font or size, use the
drop-down menu at the bottom of
the screen. You can use any font
installed on your computer.
3. When you’re ready to print, click the Print
icon. Select the number of copies and
any other settings you want, then click
Print.
Note: For more information on using Label
Editor Lite, see the online User’s Guide.
Printing labels
1. Click Print.
2. Confirm the printer and number of
copies and click OK.
3. Confirm the tape width and click OK.
The label prints.
Canceling a print job
To cancel a print job, press the Cancel
button in your software or press the
button.
Special Labels
You can use custom label formats for
equipment management, cables, and other
applications, including barcode labels. See
the online User’s Guide for instructions on
using all the special formats available.
Special Labels | 13
Page 16
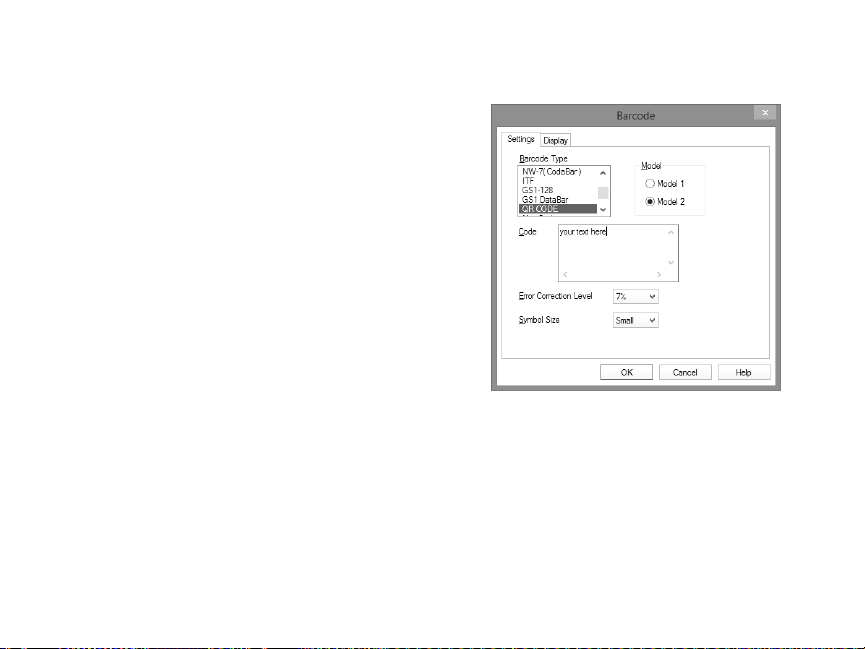
QR and barcode labels
The Label Editor software can create barcode
labels in a variety of formats. These barcodes
can be used for inventory management and
asset tagging.
The following barcode formats are available:
EAN-8, EAN-13, CODE128, CODE39, QR
CODE, ITF, CODABAR, UPC-A, UPC-E.
Note: Epson recommends the 1-inch wide tape
for printing QR codes and barcodes.
1. Click Barcode or QR code.
14 | Special Labels
2. Enter the data in the Code field and click
OK.
3. Click the location where you want to
place the barcode.
4. Click outside of the label to set the
barcode in place.
5. Click Print.
Page 17
QR code creation tips
■ QR code recognition is the fastest when
using the widest tape available
(1 inch [24 mm]).
■ QR recognition is faster when using
fewer characters; consider using a URL
shortening service to reduce the
complexity of your QR code.
■ While QR codes can be read across a
variety of tape types and colors, black
print on white tape usually results in the
fastest recognition times.
■ Be sure you leave a margin around the
QR code; text or graphics too close to the
QR code may interfere with reading.
■ When embedding content from most
social media applications, consider your
privacy settings.
■ When embedding content from file
storage services, check the sharing
settings to ensure other people can view
the content.
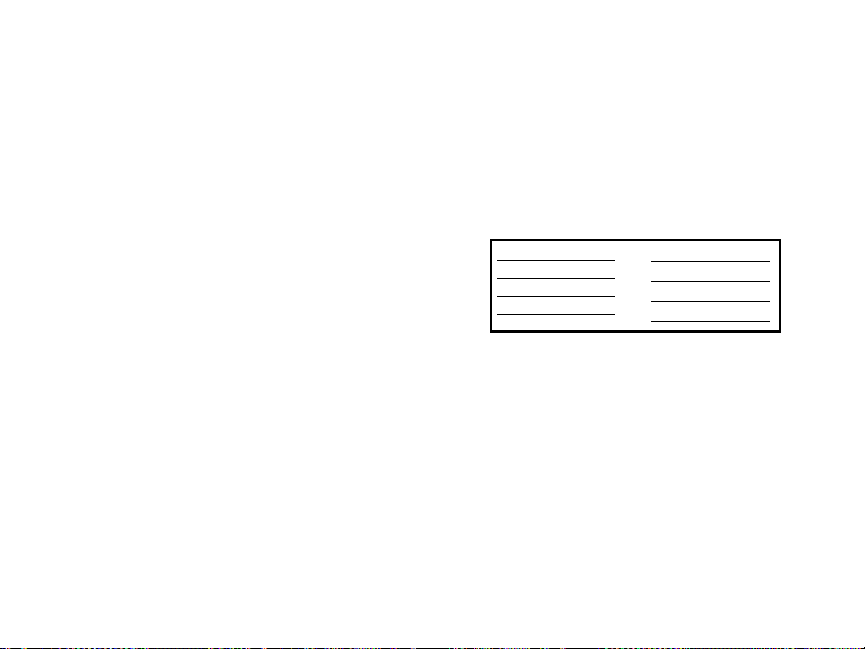
Equipment management labels
The Label Editor software provides several
equipment management templates for
making labels, for example:
P r o d u c t N a m e
A d m i n N o .
Da te
D e p a r t m e n t
You can modify the default text as needed.
1. In the New/Open screen, select
Equipment Management, and click OK.
2. Select a template and click OK.
3. Fill the fields in the Data Entry section
and click OK.
P C
K D B - 0 1 0 0 1
1 / 1 5 / 2 0 1 4
M a r k e t i n g
Special Labels | 15
Page 18
Note: You can import a spreadsheet and use
the data to fill the template. See the online
User’s Guide for details.
4. Check the font and character size. Make
sure all the text and graphics fit on the
label.
5. Click Print.
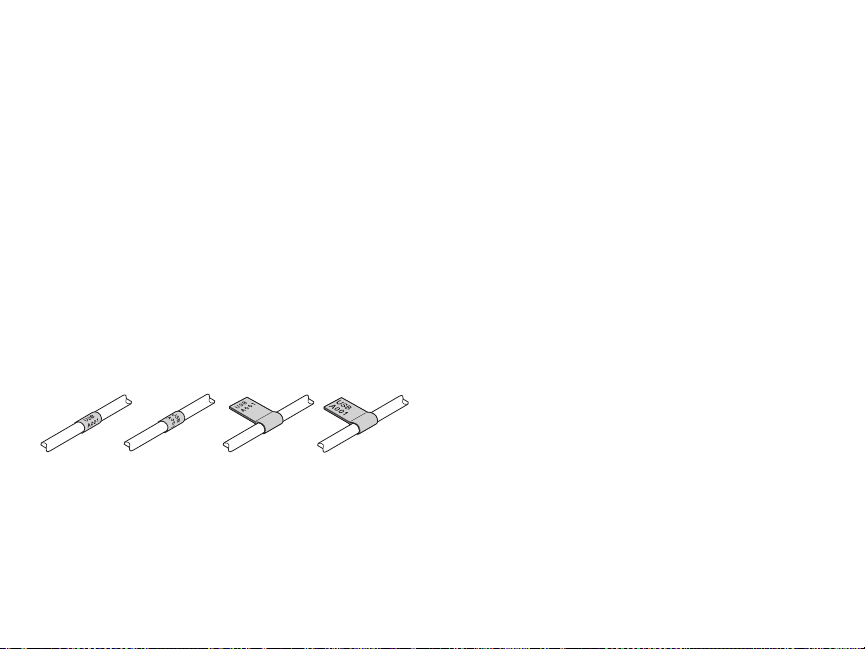
Wrap and flag labels for cables
Wrapped labels are useful for tight spaces or
when only a short identifier is necessary.
Flag labels provide a larger surface for
multiple lines of text.
Wrap: V
Wrap: H
Flag: V
1. If the label is vertical, select Vertical
Alignment.
2. Set the length of the label.
16 | Special Labels
Flag: H
3. Enter the label text.
4. Print the label.
Cable label tips
■ When labeling cables with a flag label,
set a specific length for the label. If you
use the “Auto” feature, the printed label
may be too short causing the text to
wrap around the cable, making it difficult
to read.
■ When adhering the flag label to the
cable, loop the label around the cord
loosely and stick the ends of the label
together, then move inwards toward the
cable. This makes it easier to align the
ends.
■ Add an extra inch or more to your flag
label to allow enough blank label to wrap
around the cord.
■ If space is limited, use narrower tapes
(such as 9 mm and 6 mm widths).
Page 19

■ For small cables (1-2 mm), use a flag label
to increase readability.
■ For wrap labels, repeat a single line of
text on multiple lines to improve
readability.
■ Use multiple wrap labels on a single cord
to include more information.
■ Include a wrap label on both ends of the
cable.
■ Do not use a regularly printed label
(lengthwise) as a wrap label — bending
the cord will eventually cause the label to
detach from the cord.
■ Use reflective labels in dark locations
where visibility is limited.
Printed Ribbons
Personalized ribbons provide the perfect
accent on gifts and decorations for all
occasions, for example:
■ Party favors
■ Wedding and baby showers
■ Flower arrangements
■ Bakery gifts
■ Hair decorations
■ Toy s
The Label Editor software makes it easy to
print creative ribbon designs and even
import your own graphics to match party
themes and corporate logos. For more
information, see the online User’s Guide.
You can use personalized ribbons for
hundreds of decoration and gift projects.
This section includes a few ideas to get you
started.
Printed Ribbons | 17
Page 20
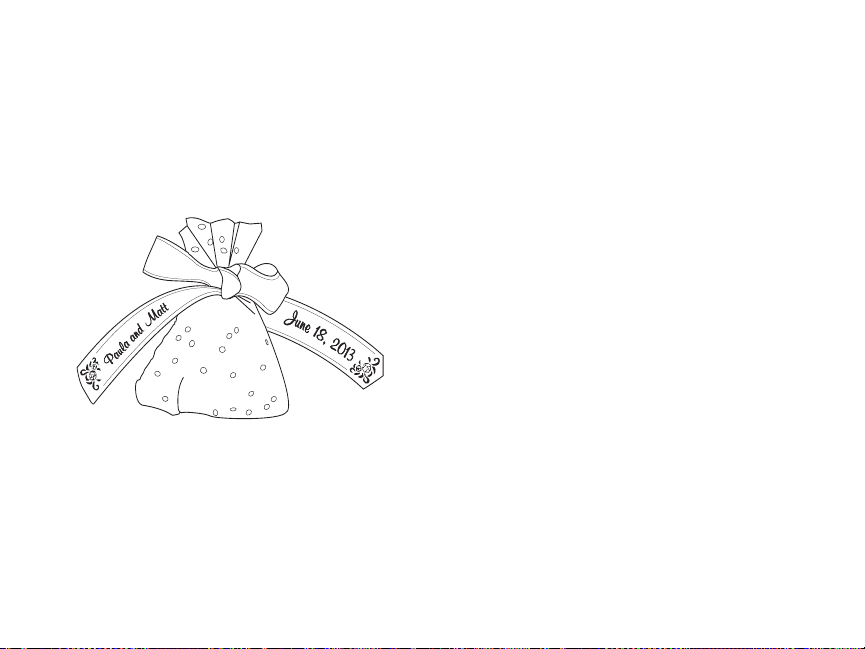
Favor bags
Make customized favor bags for wedding or
baby showers, holidays, birthdays, and other
special occasions. You can add symbols or a
frame on the ribbon to match the party’s
theme.
1. Create your ribbon.
For weddings and showers, enter the
couple’s names, add spaces, then insert
the wedding date. Add an appropriate
frame.
18 | Printed Ribbons
2. Print your ribbon design.
3. Cut a 12-inch circle of tulle, cellophane,
or other lightweight material.
4. Drop a small amount of candy in the
center of the circle.
5. Wrap the material around the candy, and
use your printed ribbon to tie it together
with a knot or bow. Make sure you twist
the ribbon when you tie it so you can see
the printed design on both ends.
Page 21
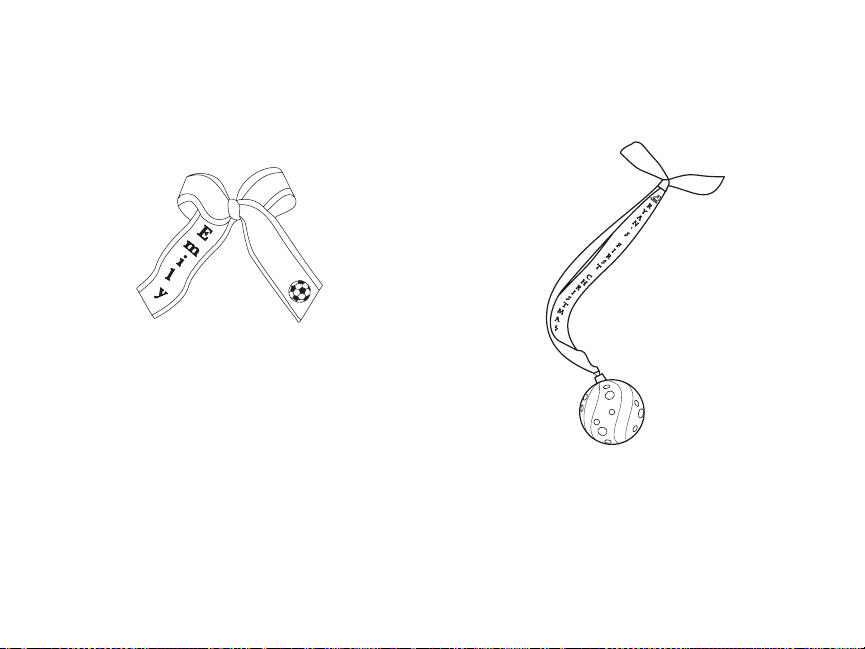
Hair bows or ponytail holders
Print personalized hair decorations for your
favorite little girl or matching ponytail
holders for the whole team.
1. Enter the text and symbols.
2. Print your ribbon.
3. Tie the ribbon around an elastic ponytail
holder. Or, tie a bow and glue it to a hair
clip.
Make sure you twist the ribbon when
tying it so you can see the printed design
on both ends.
Ornaments with ribbon hangers
Printed ribbon makes a perfect Christmas
ornament hanger.
1. Set the length of your label.
2. Create your ribbon design with vertical
text and symbols.
Printed Ribbons | 19
Page 22

3. Make sure you add enough spaces at the
end of the ribbon so that you can loop it
through the ornament hook.
4. Print your ribbon.
5. Thread the ribbon through the ornament
hook and tie the ends together as shown.
6. Hang your ornament on the tree.
Greeting cards
Add ribbon embellishments to personalize a
ready-made card or create your own card.
20 | Applying Labels
1. Enter the text and symbols for your
greeting.
2. Print the ribbon or ribbons.
3. Trim the ribbons if necessary, then glue
them to the card.
Applying Labels
For most labels, attachment is a simple
process, as described below.
For information on applying iron-on labels,
see the next section.
1. Peel off the backing.
Page 23

2. Place the label on the desired surface
and press it down firmly.
Cleaning the Printer
Caution: Always turn the printer off before
cleaning.
1. Open the tape cover.
2. Clean the print head.
Printer
Wipe the printer with a soft, dry cloth. Never
use solvents or chemicals such as benzene,
paint thinner, or alcohol.
Print head
If streaks or smears appear on printouts, use
a cotton swab or similar materials to wipe
the dirt off of the print head.
3. Close the tape cover.
Solving Problems
If you have a problem with your LabelWorks
printer, check the LabelWorks software for
error messages. See the online User’s Guide
for additional troubleshooting suggestions.
Cleaning the Printer | 21
Page 24

Status lights Other problems
Error Battery
Light Condition Printer status
Pulsing Bluetooth enabled
On Bluetooth connection
Flashing quickly Performing operation
Flashing (once
every 5 seconds)
On Low batteries; replace
Flashing quickly Replace batteries
Flashing quickly Printer error. Check the
22 | Solving Problems
Bluetooth
established
su ch a s pr int in g or lab el
cutting
Bluetooth disabled
batteries soon.
message displayed on
the connected device.
Printer does not turn on
■ Check that the power cable is connected
properly, or that batteries have been
properly inserted. If the printer still does
not turn on, contact Epson.
■ Check your computer monitor or mobile
device for any messages.
Unable to establish a Bluetooth
connection (pairing)
■ Check if the printer’s light is pulsing. If
not, enable Bluetooth on the printer and
try pairing with the printer again. See
“Connecting to a mobile device using
Bluetooth” on page 8.
■ Check if the printer is communicating
with another mobile device. The printer
can only communicate with one device
at a time.
Page 25

■ Check your mobile device for any
messages.
Bluetooth connection was interrupted
while pairing
■ Check to see if the printer’s light is
pulsing. If it is not, enable Bluetooth on
the printer and try pairing the printer
again. See “Connecting to a mobile
device using Bluetooth” on page 8.
■ If the printer is connected to a computer
with a USB cable, it won’t be able to
communicate using Bluetooth. Unplug
the printer’s USB connection, then try
pairing the printer again.
■ Check your mobile device for any
messages.
■ Check that the USB cable is connected
correctly, the tape cartridge is installed
correctly, and that the cover is closed.
■ Make sure your printer is selected in your
printing software.
■ The printer driver may not be installed
correctly if the computer was not
restarted after installing the driver.
Reinstall the printer driver.
Text does not print properly
Check that the tape cartridge is installed
correctly.
Lines appear on printed labels
The print head is dirty. Clean the print head.
See “Cleaning the Printer” on page 21.
Printer does not print
■ Check your computer monitor or mobile
device for any messages.
Labels are not cut automatically
Windows only: Make sure the Cut Settings is
set to Cut each label.
Solving Problems | 23
Page 26

Epson Technical Support
Visit epson.com/support (U.S.) or
epson.ca/support (Canada) where you can
view manuals, get FAQs, or e-mail Epson.
To speak with a support specialist, call:
U.S.: (562) 276-7245, 6
Time, Monday through Friday, and 7
4
PM, Saturday.
Canada: (905) 709-2567, 6
Time, Monday through Friday, and 7
4
PM, Saturday.
AM to 8 PM, Pacific
AM to
AM to 8 PM, Pacific
AM to
Recycling
Epson offers a recycling program for end of
life products. Please go to epson.com/
recycle for information on how to return
your products for proper disposal.
Purchase supplies and accessories
Epson offers a wide array of tapes for
multiple uses. You can purchase tape
cartridges and accessories at:
epson.com/labelworks (U.S. sales) or
epson.ca/labelworks (Canadian sales).
Days and hours of support are subject to
change without notice. Toll or long distance
charges may apply.
24 | Epson Technical Support
You can also purchase supplies from an
Epson authorized reseller. To find the nearest
one, call 800-GO-EPSON (800-463-7766).
Page 27

Registration
To receive special offers and updates on new
tapes, make sure you register your
LabelWorks printer.
Go to epson.com/labelworks (U.S.) or
epson.ca/labelworks (Canada) and select
Product Registration.
Notices
About printed labels
Attached labels and adhesive are affected by the type of
surface and by environmental conditions such as
humidity and heat. Labels may peel off, curl, or fade;
printed characters may fade; color may be left behind
after removing the label; adhesive may become stuck to
the attached surface.
Epson is not responsible for any damage or loss caused
by labels or adhesive.
Bluetooth Safety and Specifications
Manufacture: Fujitsu Component Limited
Type: MBH7BTZ42
This document provides safety instructions and
describes the specifications. Read this document
carefully before use to ensure your safety and product
performance.
U.S.
Contains FCC ID: SQK-MBH7BTZXXC2
This device complies with Part 15 of the FCC Rules.
Operation is subject to the following two conditions: (1)
This device may not cause harmful interference, and (2)
this device must accept any interference received,
including interference that may cause undesired
operation.
This equipment has been tested and found to comply
with the limits for a Class B digital device, pursuant to
Part 15 of the FCC Rules. These limits are designed to
provide reasonable protection against harmful
interference in a residential installation. This equipment
generates, uses and can radiate radio frequency energy
and, if not installed and used in accordance with the
instructions, may cause harmful interference to radio
Registration | 25
Page 28

communications. However, there is no guarantee that
interference will not occur in a particular installation. If
this equipment does cause harmful interference to
radio or television reception, which can be determined
by turning the equipment off and on, the user is
encouraged to try to correct the interference by one of
the following measures:
■ Reorient or relocate the receiving antenna.
■ Increase the separation between the equipment
and receiver.
■ Connect the equipment into an outlet on a circuit
different from that to which the receiver is
connected.
■ Consult the dealer or an experienced radio/TV
technician for help.
An AC adaptor with a ferrite core must be used for RF
interference suppression.
Warning: The connection of a non-shielded
equipment interface cable to this equipment will
invalidate the FCC Certification or Declaration of
this device and may cause interference levels which
exceed the limits established by the FCC for this
equipment. It is the responsibility of the user to
obtain and use a shielded equipment interface cable
with this device. If this equipment has more than
26 | Notices
one interface connector, do not leave cables
connected to unused interfaces. Changes or
modifications not expressly approved by the party
responsible for compliance could void the user’s
authority to operate this equipment.
This transmitter must not be co-located or operating in
conjunction with any other antenna or transmitter.
Radiation Exposure Statement:
This equipment complies with FCC radiation exposure
limits set forth for an uncontrolled environment. This
equipment should be installed and operated with
minimum distance 7.8 inches (20 cm) between the
radiator and your body.
Industry Canada (IC) Notices
Contains IC: 337L-MBH7BTZXXC2
This Class B digital apparatus complies with Canadian
ICES-003.
This device complies with RSS-210 of the Industry
Canada Rules. Operation is subject to the following two
conditions: (1) This device may not cause harmful
interference, and (2) this device must accept any
interference received, including interference that may
cause undesired operation.
Page 29

Radiation Exposure Statement:
This equipment complies with IC radiation exposure
limits set forth for an uncontrolled environment. This
equipment should be installed and operated with
minimum distance 20 cm between the radiator and
your body.
Declaration of conformity
According to 47CFR, Part 2 and 15, Class B Personal
Computers and Peripherals; and/or CPU Boards and
Power Supplies used with Class B Personal Computers
We: Epson America, Inc.
Located at: 3840 Kilroy Airport Way,
MS 3-13, Long Beach, CA 90806
Telephone: (562) 981-3840
Declare under sole responsibility that the product
identified herein, complies with 47CFR Part 2 and 15 of
the FCC rules as a Class B digital device. Each product
marketed, is identical to the representative unit tested
and found to be compliant with the standards. Records
maintained continue to reflect the equipment being
produced can be expected to be within the variation
accepted, due to quantity production and testing on a
statistical basis as required by 47CFR §2.909. Operation
is subject to the following two conditions: (1) this device
may not cause harmful interference, and (2) this device
must accept any interference received, including
interference that may cause undesired operation.
Trade Name: Epson
Type of Product: Label printer
Model: LW-600P
Epson America, Inc. Limited Warran ty
What Is Covered: Epson America, Inc. (“Epson”)
warrants to the original retail purchaser that the Epson
label-printing device and its consumables and
accessories covered by this limited warranty statement
(each, a “product”), if purchased and operated only in
the United States, Canada, or Puerto Rico, will be free
from defects in workmanship and materials for a period
of one (1) year from the date of original purchase, in the
case of the label-printing device, and for a period of
thirty (30) days for mechanical defect from the date of
original purchase, in the case of its consumables or
accessories. Consumables include label and tape rolls
and cassettes. Accessories include an AC adaptor. For
warranty service, you must provide proof of the date of
original purchase.
Notices | 27
Page 30

What Epson Will Do To Correct Problems: Should
your Epson product prove defective during the
warranty period, please call the Epson Connection at
(562) 276-7245 (U.S. and Puerto Rico) or (905) 709-2567
(Canada) for warranty repair instructions and return
authorization. An Epson service technician will provide
telephone diagnostic service to determine whether the
product requires service. If service is needed, Epson will,
at its option, exchange or repair the product without
charge for parts or labor. If Epson authorizes an
exchange for the defective unit, Epson will ship a
replacement product to you, freight prepaid, so long as
you use an address in the United States, Canada, or
Puerto Rico. Shipments to other locations will be made
freight collect. You are responsible for securely
packaging the defective unit and returning it to Epson
within five (5) working days of receipt of the
replacement. Epson requires a debit or a credit card
number to secure the cost of the replacement product
in the event that you fail to return the defective one. If
Epson authorizes repair instead of exchange, Epson will
direct you to send your product to Epson or its
authorized service center, where the product will be
repaired and sent back to you. You are responsible for
packing the product and for all costs to and from the
Epson authorized service center. When warranty service
involves the exchange of the product or a part, the item
28 | Notices
replaced becomes Epson property. The replacement
product or part may be new or refurbished to the Epson
standard of quality, and, at Epson's option, may be
another model of like kind and quality. Exchange
products and parts assume the remaining warranty
period of your original product covered by this limited
warranty.
What This Warranty Does Not Cover: This warranty
covers only normal use in the United States, Canada, or
Puerto Rico. Using this product for continuous
production or similar high duty purposes is not
considered normal use; damage, maintenance or
service from such use will not be covered under this
warranty. This warranty is not transferable. This
warranty does not cover damage to the Epson product
caused by parts or supplies not manufactured,
distributed or certified by Epson. This warranty does not
cover third party parts, components, or peripheral
devices added to the Epson product after its shipment
from Epson, e.g., dealer or user-added boards or
components. Epson is not responsible for warranty
service should the Epson label or logo or the rating label
or serial number be removed or should the product fail
to be properly maintained or fail to function properly as
a result of misuse, abuse, improper installation, neglect,
Page 31

improper shipping, damage caused by disasters such as
fire, flood, and lightning, improper electrical current,
software problems, interaction with non-Epson
products, or service other than by an Epson Authorized
Servicer. If a claimed defect cannot be identified or
reproduced, you will be held responsible for the costs
incurred.
DISCLAIMER OF WARRANTIES: THE WARRANTY AND
REMEDY PROVIDED ABOVE ARE EXCLUSIVE AND IN LIEU
OF ALL OTHER EXPRESSED OR IMPLIED WARRANTIES
INCLUDING, BUT NOT LIMITED TO, THE IMPLIED
WARRANTIES OF MERCHANTABILITY, FITNESS FOR A
PARTICULAR PURPOSE AND NON-INFRINGEMENT.
UNLESS STATED HEREIN, ANY STATEMENTS OR
REPRESENTATION MADE BY ANY OTHER PERSON OR
FIRM ARE VOID.
Remedies: Your exclusive remedy and Epson’s entire
liability for a material breach of this Agreement will be
limited to a refund of the price paid for the EPSON
products covered by this Agreement. Any action for
breach of warranty must be brought within 3 months of
the expiration date of the warranty. Epson is not liable
for performance delays or for nonperformance due to
causes beyond its reasonable control. Except as
provided in this written warranty, neither Epson nor its
affiliates shall be liable for any loss, inconvenience, or
damage, including direct, special, incidental or
consequential damages, including lost profits, cost of
substitute equipment, downtime, claims of third
parties, including customers, or injury to property,
resulting from the use or inability to use the Epson
products, whether resulting from a breach of warranty
or any other legal theory. Some jurisdictions do not
allow limits on warranties or remedies for breach in
certain transactions. In such jurisdictions, the limits in
this paragraph and the preceding paragraph may not
apply.
In Canada, warranties include both warranties and
conditions.
Arbitration, Governing Laws: Any disputes arising out
of this Agreement will be settled by arbitration to be
conducted in Los Angeles, California, in accordance
with the commercial Arbitration Rules of the American
Arbitration Association, and judgment upon the award
rendered by the arbitrator(s) may be entered in any
court having jurisdiction thereof. This Agreement shall
be construed in accordance with the laws of the State of
California, except this arbitration clause which shall be
construed in accordance with the Federal Arbitration
Act.
To find the Epson Authorized Reseller nearest you, visit
our website at: epson.com.
Notices | 29
Page 32

To find the Epson Customer Care Center nearest you,
visit epson.com/support.
You can also write to: Epson America, Inc., P.O. Box
93012, Long Beach, CA 90809-3012
Trademarks
EPSON is a registered trademark, EPSON Exceed Your
Vision is a registered logomark, and LabelWorks and LC
TAPE are trademarks of Seiko Epson Corporation. Epson
Connection is a service mark of Epson America, Inc.
Mac and Mac OS are trademarks of Apple Inc.,
registered in the U.S. and other countries.
Google Play and Android are trademarks of Google Inc.
General Notice: Other product names used herein are
for identification purposes only and may be trademarks
of their respective owners. Epson disclaims any and all
rights in those marks.
This information is subject to change without notice.
© 2013 Epson America, Inc., 10/13
30 | Notices
Page 33

Table des matières
Français
Pour commencer. . . . . . . . . . . . . . . . . . . . . . . . . . . 33
Déballage . . . . . . . . . . . . . . . . . . . . . . . . . . . . . . . . 34
Branchement de l’imprimante . . . . . . . . . . . . 35
Installation des piles. . . . . . . . . . . . . . . . . . . . . . 35
Retrait et installation des cartouches
de ruban d’étiquettes . . . . . . . . . . . . . . . . . . . . 36
Mise sous tension ou hors tension de
l’imprimante . . . . . . . . . . . . . . . . . . . . . . . . . . . . . 38
Installation du logiciel . . . . . . . . . . . . . . . . . . . . . 39
Installation du logiciel sous
Windows® ou Mac . . . . . . . . . . . . . . . . . . . . . . . . 39
Installation de l’application Epson
iLabel sur un appareil mobile . . . . . . . . . . . . . 39
Connexion à un appareil mobile
via Bluetooth. . . . . . . . . . . . . . . . . . . . . . . . . . . . . 40
Utilisation du logiciel Label Editor. . . . . . . . . 42
Création d’étiquettes sous Windows . . . . . . 42
Création d’étiquettes sous Mac OS X . . . . . . 44
Impression d’étiquettes . . . . . . . . . . . . . . . . . . 45
Annulation de l’impression . . . . . . . . . . . . . . . 45
Étiquettes spéciales . . . . . . . . . . . . . . . . . . . . . . . . 45
Étiquettes de code QR et de code
à barres . . . . . . . . . . . . . . . . . . . . . . . . . . . . . . . . . . 46
Étiquettes d’identification de
l’équipement. . . . . . . . . . . . . . . . . . . . . . . . . . . . . 47
Étiquettes enroulées et étiquettes
drapeau pour câbles. . . . . . . . . . . . . . . . . . . . . . 48
Rubans personnalisés . . . . . . . . . . . . . . . . . . . . . . 50
Sacs cadeaux pour invités . . . . . . . . . . . . . . . . 50
Boucles pour cheveux ou rubans
pour queue de cheval . . . . . . . . . . . . . . . . . . . . 51
Ornements avec support en ruban . . . . . . . . 52
Cartes de souhaits. . . . . . . . . . . . . . . . . . . . . . . . 53
Application des étiquettes. . . . . . . . . . . . . . . . . 53
Nettoyage de l’imprimante . . . . . . . . . . . . . . . . 54
Imprimante . . . . . . . . . . . . . . . . . . . . . . . . . . . . . . 54
Tête d’impression . . . . . . . . . . . . . . . . . . . . . . . . 54
Résolution des problèmes . . . . . . . . . . . . . . . . . 54
Témoins d’état . . . . . . . . . . . . . . . . . . . . . . . . . . . 55
Autres problèmes . . . . . . . . . . . . . . . . . . . . . . . . 55
Table des matières | 31
Page 34

Soutien technique Epson . . . . . . . . . . . . . . . . . . 57
Recyclage . . . . . . . . . . . . . . . . . . . . . . . . . . . . . . . . 58
Achat de consommables et
d’accessoires . . . . . . . . . . . . . . . . . . . . . . . . . . . . . 58
Enregistrement du produit . . . . . . . . . . . . . . . . 58
Avis . . . . . . . . . . . . . . . . . . . . . . . . . . . . . . . . . . . . . . . . . 59
À propos des étiquettes imprimées . . . . . . . 59
Consignes de sécurité et
caractéristiques du module Bluetooth. . . . . 59
Déclaration de conformité . . . . . . . . . . . . . . . . 61
Garantie limitée d’Epson America, Inc. . . . . 61
Marques de commerce . . . . . . . . . . . . . . . . . . . 64
32 | Table des matières
Page 35

Pour commencer
Votre imprimante LabelWorksMC LW-600P
vous permet de créer des étiquettes en tout
genre, ainsi que des autocollants décoratifs
et des rubans personnalisés.
Voici quelques exemples de projets que vous
pouvez accomplir avec votre imprimante
LabelWorks:
■ Créer un système de gestion de
l’équipement à l’aide de texte et de codes
à barres.
■ Créer d’uniques étiquettes « dessinées à
la main » à l’aide de votre appareil
intelligent.
■ Étiqueter des câbles pour faciliter
l’organisation.
■ Ajouter un code QR contenant des
informations supplémentaires.
■ Créer des étiquettes pour onglets et des
étiquettes d’adresse professionnelles.
■ Organiser vos tiroirs et vos armoires dans
la cuisine, la salle de bain ou toute autre
pièce de votre maison.
■ Créer des étiquettes thermocollantes
pour des vêtements, des uniformes, des
sacs à dos et d’autres articles en tissu.
■ Imprimer des rubans personnalisés pour
des fêtes à thème, des cadeaux, des
coiffures et des ornements.
■ Créer des étiquettes luminescentes pour
les interrupteurs muraux et les panneaux
électriques.
■ Créer des étiquettes personnalisées pour
vous aider à identifier des zones
dangereuses, des trousses d’urgence et
des instructions importantes.
Pour commencer | 33
Page 36

■ Importer votre carnet d’adresses afin
d’imprimer des étiquettes d’adresse pour
toutes vos cartes des fêtes.
■ Incorporer vos propres logos, polices de
caractère et autres graphismes, incluant
des photos.
Pour plus d’informations et d’autres
instructions sur la façon d’utiliser toutes les
fonctions de l’imprimante et du logiciel
LabelWorks, consultez le Guide de l’utilisateur
en ligne à l’adresse epson.com/support/
lw600p (États-Unis) ou epson.ca/support/
lw600pfr (Canada).
Déballage
Votre imprimante LabelWorks comprend les
éléments suivants :
Imprimante Cartouche de ruban
d’étiquettes
(échantillon)
34 | Pour commencer
Adaptateur secteur
Câble USB
Page 37

Branchement de l’imprimante
Branchez l’adaptateur secteur tel qu’illustré :
1. Ouvrez le couvercle des piles.
Remarque : Au lieu d’un adaptateur secteur,
vous pouvez aussi utiliser 6 piles alcalines AA
(non incluses).
Installation des piles
Vous pouvez utiliser des piles au lieu d’un
adaptateur secteur lorsque vous n’avez pas
accès à une source d’électricité.
2. Insérez 6 piles alcalines AA en positionnant
les bornes + et – comme illustré.
Pour commencer | 35
Page 38

3. Replacez le couvercle des piles.
Retrait et installation des
cartouches de ruban d’étiquettes
Vous pouvez utiliser n’importe quel ruban
d’étiquettes LabelWorks LC d’une largeur
variant entre ~1/4 po (6 mm) et ~1 po (24 mm).
N’utilisez que des cartouches de ruban
d’étiquettes arborant ce symbole : .
36 | Pour commencer
Consultez la liste au verso de ce guide, ou
visitez le site epson.com/labelworks ou
epson.ca/labelworks (site Web présenté en
anglais seulement).
1. Resserrez la bobine du ruban d’étiquettes
à l’aide d’un crayon ou d’un stylo.
Page 39

2. Ouvrez le couvercle du logement du
ruban d’étiquettes.
3. Insérez la cartouche et appuyez
fermement sur celle-ci jusqu’à ce qu’elle
s’enclenche dans le logement.
4. Insérez l’extrémité du ruban d’étiquettes
dans la fente d’éjection.
5. Fermez le couvercle du logement.
Pour commencer | 37
Page 40

Pour retirer une cartouche de ruban
d’étiquettes, ouvrez le couvercle, agrippez
les côtés de la cartouche et retirez-la de
l’imprimante.
Mise sous tension ou hors tension de
l’imprimante
Assurez-vous que l’adaptateur secteur est
branché ou que les piles sont installées.
■ Appuyez sur le bouton pour allumer
l’imprimante.
38 | Pour commencer
Le témoin s’allume.
Remarque : Le témoin Bluetooth®
clignotera à différents intervalles selon
l’état du signal Bluetooth; consultez la
section « Témoins d’état » à la page 55 pour
plus de détails.
■ Lorsque vous avez terminé d’utiliser
l’imprimante, appuyez sur le bouton
pour l’éteindre.
Remarque : L’imprimante s’éteint
automatiquement après 8 heures
d’inactivité lorsqu’elle est branchée avec
un adaptateur secteur, ou 20 minutes
d’inactivité lorsqu’elle fonctionne avec
des piles.
Page 41

Installation du logiciel
Installation du logiciel sous
Windows® ou Mac
Téléchargez le logiciel sur le site :
epson.com/support/lw600p (États-Unis)
ou epson.ca/support/lw600pfr (Canada).
Vous pouvez aussi télécharger le logiciel
Label Editor Lite pour Mac OS X depuis l’App
Store d’Apple.
Remarque : Le logiciel Label Editor Lite est
disponible seulement en anglais pour Mac.
Ayez le câble USB inclus avec l’imprimante
sous la main. Ne connectez pas l’imprimante
avant d’avoir installé le logiciel.
Remarque : Assurez-vous d’installer le pilote de
l’imprimante lorsque vous installez le logiciel.
1. Double-cliquez sur l’installateur du
logiciel que vous avez téléchargé. Suivez
les instructions à l’écran.
2. Lorsque vous y êtes invité, connectez
l’imprimante à votre ordinateur comme
illustré :
3. Allumez l’imprimante.
4. Lorsque l’installation est terminée,
redémarrez votre ordinateur.
Installation de l’application Epson
iLabel sur un appareil mobile
Téléchargez l’application Epson® iLabel dans
le Google Play
MC
Store ou l’App Store.
Installation du logiciel | 39
Page 42

Connexion à un appareil mobile via
Bluetooth
Vous devez installer l’application Epson
iLabel avant de connecter l’imprimante.
Vérifiez que l’option Bluetooth est activée
sur l’imprimante avant d’établir la
connexion.
Le témoin clignote lorsque l’option
Bluetooth est activée.
Si l’option Bluetooth est désactivée, activezla en suivant les étapes ci-dessous :
1. Appuyez sur le bouton pour éteindre
l’imprimante.
40 | Installation du logiciel
2. Appuyez sur le bouton et le bouton
Bluetooth en même temps.
3. Couplez votre appareil avec
l’imprimante. Suivez les instructions
suivantes selon le système d’exploitation
de votre appareil.
Android
MC
1. Allumez l’appareil mobile.
Page 43

2. Accédez à Paramètres > SANS FIL ET
RÉSEAUX et activez l’option Bluetooth.
3. Sélectionnez RECHERCHER APPAREILS.
Attendez que votre appareil ait terminé
de chercher l’imprimante.
L’imprimante s’affichera à l’écran une fois
la recherche terminée.
4. Sélectionnez l’imprimante.
Le couplage est terminé lorsque
l’imprimante apparaît dans la liste des
PÉRIPHÉRIQUES ASSOCIÉS.
Remarque : L’icône Bluetooth dans la
barre d’état et l’affichage de l’état de la
connexion à l’écran des paramètres
Bluetooth ne changeront pas une fois
le couplage terminé.
5. Ouvrez iLabel.
6. Sélectionnez .
7. Sélectionnez Imprimante.
8. Sélectionnez LW- 60 0P.
Lorsque apparaît à l’écran
principal d’iLabel, l’imprimante est prête à
être utilisée.
iOS
1. Allumez l’appareil mobile.
2. Accédez à Réglages > Bluetooth et
activez l’option Bluetooth.
Attendez que votre appareil ait terminé
de chercher l’imprimante.
3. Lorsque l’imprimante apparaît sous
APPAREILS, sélectionnez-la.
Le couplage est terminé lorsque le témoin
Bluetooth de l’imprimante s’allume.
Installation du logiciel | 41
Page 44

Utilisation du logiciel Label Editor
Le logiciel Label Editor vous permet de créer
des centaines de motifs d’étiquette
rapidement et facilement. Pour plus
d’informations sur la façon d’utiliser le logiciel,
consultez le Guide de l’utilisateur en ligne.
Création d’étiquettes sous Windows
Lorsque votre imprimante LabelWorks est
connectée à votre ordinateur, vous pouvez
utiliser le logiciel Label Editor pour concevoir
vos étiquettes ou vos rubans.
42 | Utilisation du logiciel Label Editor
1. Double-cliquez sur l’icône Label Editor.
L’écran Nouveau/Ouvrir s’affichera :
2. Sélectionnez Texte horizontal, puis
cliquez sur OK. Une étiquette vide
s’affichera sur l’écran principal de Label
Editor.
3. Saisissez le texte de l’étiquette, puis
cliquez à l’extérieur de la zone de
Page 45

l’étiquette. Le texte apparaîtra sur
l’étiquette, comme illustré :
Menu déroulant
de la police
Icône
Bordure
Icône
Symbole
Icône
Imprimer
■ Pour ajouter une bordure, cliquez sur
l’icône Bordure et sélectionnez une
bordure, puis cliquez sur OK. Ajustez
la taille et la position de la bordure,
puis cliquez à l’extérieur de la zone de
l’étiquette.
■ Pour ajouter un symbole, cliquez sur
l’icône Symbole et sélectionnez un
symbole parmi l’une des catégories,
puis cliquez sur OK. Cliquez sur
l’endroit où vous souhaitez placer le
symbole.
■ Pour changer la police de caractère et
la taille de la police, sélectionnez la
zone de texte, puis utilisez les menus
déroulants Nom de la police et Taille
de la police. Vous pouvez utiliser
toute police de caractère installée sur
votre ordinateur.
4. Lorsque vous êtes prêt à imprimer,
appuyez sur l’icône Imprimer. Cliquez
sur Paramètres de l’imprimante pour
choisir des options additionnelles.
Sélectionnez le nombre de copies, puis
cliquez sur OK pour imprimer.
Utilisation du logiciel Label Editor | 43
Page 46

Remarque : Le logiciel Label Editor comprend
plusieurs fonctions et formats d’étiquettes
additionnels. Pour plus d’informations,
consultez le Guide de l’utilisateur en ligne.
Création d’étiquettes sous Mac OS X
Lorsque votre imprimante LabelWorks est
connectée à votre Mac, vous pouvez utiliser
le logiciel Label Editor Lite pour concevoir
vos étiquettes ou vos rubans (logiciel
disponible en anglais seulement pour Mac).
1. Démarrez le logiciel Label Editor Lite. Un
écran comme celui-ci s’affichera :
44 | Utilisation du logiciel Label Editor
Icônes de création de
l’étiquette
Icône
Imprimer
2. Saisissez du texte dans la zone située au
bas de l’écran. Un aperçu de la police de
caractère et de la taille de la police
apparaîtra dans le haut de l’écran.
Page 47

■ Pour insérer une image, une date, une
bordure ou un code QR, cliquez sur
les icônes correspondantes à l’écran.
■ Pour modifier la police ou la taille de
la police, utilisez les menus
déroulants au bas de l’écran. Vous
pouvez utiliser toute police de
caractère installée sur votre
ordinateur.
3. Lorsque vous êtes prêt à imprimer,
appuyez sur l’icône Imprimer.
Sélectionnez le nombre de copies et tout
autre paramètre désiré, puis cliquez sur
Imprimer.
Remarque : Pour plus d’informations sur la
façon d’utiliser Label Editor Lite, consultez le
Guide de l’utilisateur en ligne.
Impression d’étiquettes
1. Cliquez sur Imprimer.
2. Confirmez l’imprimante à utiliser et le
nombre de copies, puis cliquez sur OK.
3. Confirmez la largeur du ruban
d’étiquettes et cliquez sur OK.
L’étiquette s’imprimera.
Annulation de l’impression
Pour annuler l’impression, appuyez sur le
bouton Annuler de votre logiciel ou
appuyez sur le bouton .
Étiquettes spéciales
Vous pouvez utiliser des formats d’étiquettes
spécialement conçus pour l’identification de
l’équipement ou de câbles, et pour d’autres
applications incluant la création d’étiquettes
de code à barres. Consultez le Guide de
l’utilisateur en ligne pour obtenir des
instructions sur tous les formats spéciaux
disponibles.
Étiquettes spéciales | 45
Page 48

Étiquettes de code QR et de code à
barres
Le logiciel Label Editor peut créer des
étiquettes de code à barres dans une variété
de formats. Ces codes à barres peuvent être
utilisés pour la gestion et le marquage de
l’inventaire.
Voici les formats de code à barres
disponibles : EAN-8, EAN-13, CODE128,
CODE39, QR CODE, ITF, CODABAR, UPC-A,
UPC-E.
Remarque : Epson recommande l’utilisation
de ruban d’étiquettes d’une largeur de 1 po
(24 mm) pour imprimer des codes QR et des
codes à barres.
1. Cliquez sur Code-barres ou QR code.
46 | Étiquettes spéciales
2. Saisissez les données dans le champ
Code et cliquez sur OK.
3. Cliquez sur l’endroit où vous souhaitez
placer le code à barres.
4. Cliquez à l’extérieur de la zone de
l’étiquette pour fixer l’emplacement du
code à barres.
5. Cliquez sur Imprimer.
Page 49

Conseils concernant la création de
codes QR
■ La reconnaissance des codes QR est plus
rapide lorsque les codes sont imprimés
sur les rubans d’étiquettes les plus larges
(1 po [24 mm]).
■ La reconnaissance des codes QR est plus
rapide lorsque vous utilisez moins de
caractères; il est recommandé d’utiliser un
service de raccourcissement d’URL pour
réduire la complexité de votre code QR.
■ Bien que les codes QR peuvent être lus
sur une variété de types de ruban
d’étiquettes et de couleurs, l’impression
noire sur du ruban d’étiquettes blanc est
associée au temps de reconnaissance le
plus rapide.
■ Assurez-vous de laisser une marge autour
du code QR : du texte ou des graphismes
trop près du code QR pourraient interférer
avec la lecture du code.
■ Lorsque vous intégrez du contenu
provenant de la plupart des médias
sociaux, prenez compte de vos
paramètres de confidentialité.
■ Lorsque vous intégrez du contenu
provenant de services de stockage de
fichiers, vérifiez les paramètres de partage
afin de vous assurer que les utilisateurs
peuvent accéder au contenu désiré.
Étiquettes d’identification de
l’équipement
Le logiciel Label Editor offre plusieurs
modèles d’étiquettes pour l’identification de
l’équipement, par exemple :
Nom du
p r o d u i t
N o d ’ ad m i n
Da te
D é p a r t e m e n t
PC
KDB-01001
15/01/2014
M a r k e t i n g
Étiquettes spéciales | 47
Page 50

Vous pouvez modifier le texte par défaut
selon vos besoins.
1. À l’écran Nouveau/Ouvrir, sélectionnez
Gestion de l’équipement, et cliquez
sur OK.
2. Sélectionnez le modèle souhaité et
cliquez sur OK.
3. Remplissez les champs de la section
Saisie de données et cliquez sur OK.
Remarque : Vous pouvez importer une
feuille de calcul et utiliser les données qui
s’y trouvent pour remplir le modèle. Pour
des détails, consultez le Guide de l’utilisateur
en ligne.
4. Vérifiez la police de caractère et la taille
de la police. Assurez-vous que le texte et
les graphismes apparaissent
correctement sur l’étiquette.
5. Cliquez sur Imprimer.
48 | Étiquettes spéciales
Étiquettes enroulées et étiquettes
drapeau pour câbles
Les étiquettes enroulées sont idéales pour
les endroits étroits ou lorsque l’identification
nécessaire est courte. Les étiquettes drapeau
offrent une surface plus large pour
accommoder de multiples lignes de texte.
Enr. : V
Enr. : H
Drap : V
1. Si l’étiquette doit être placée à la
verticale, sélectionnez Alignement
vertical.
2. Sélectionnez la longueur de l’étiquette.
3. Saisissez le texte de l’étiquette.
4. Imprimez l’étiquette.
Drap : H
Page 51

Conseils concernant les étiquettes pour
câbles
■ Lorsque vous identifiez des câbles avec
des étiquettes drapeau, réglez une
longueur d’étiquette spécifique. Si vous
utilisez la fonction « Auto », l’étiquette
pourrait être trop courte et le texte
pourrait s’enrouler autour du câble, ce
qui rendrait la lecture difficile.
■ Lorsque vous apposez une étiquette
drapeau, enroulez-la autour du câble
de façon relâchée et collez les deux
extrémités de l’étiquette ensemble, puis
appuyez sur les deux côtés du reste de
l’étiquette jusqu’à la base du câble. Ainsi,
il vous sera plus facile d’aligner les
extrémités.
■ Ajoutez 1 po (25,4 mm) ou plus à votre
étiquette drapeau afin d’allouer assez
d’étiquette vierge pour envelopper le
câble.
■ Si vous manquez d’espace, utilisez des
rubans à étiquettes plus étroits (d’une
largeur de 9 mm ou 6 mm, par exemple).
■ Pour les câbles minces (1-2 mm), utilisez
une étiquette drapeau afin d’augmenter
la lisibilité.
■ Pour les étiquettes enroulées, répétez
une ligne de texte sur plusieurs lignes
afin d’augmenter la lisibilité.
■ Utilisez plusieurs étiquettes enroulées
sur un seul câble pour inclure plus
d’informations.
■ Apposez une étiquette enroulée aux
deux extrémités du câble.
■ N’utilisez pas une étiquette de longueur
standard en tant qu’étiquette enroulée :
l’étiquette se détachera progressivement
du câble à mesure que vous le pliez.
■ Utilisez des étiquettes luminescentes
dans des endroits sombres où la visibilité
est réduite.
Étiquettes spéciales | 49
Page 52

Rubans personnalisés
Les rubans personnalisés sont parfaits pour
les emballages-cadeaux ou pour décorer en
toute occasion, par exemple :
Vous pouvez utiliser des rubans personnalisés
dans des centaines de projets décoratifs ou
de cadeaux. Cette section comprend
quelques exemples pour vous inspirer.
■ Cadeaux pour invités
■ Mariage et réception-cadeau pour bébé
■ Arrangements floraux
■ Paniers-cadeaux
■ Décorations pour coiffures
■ Jouets
Le logiciel Label Editor vous permet
d’imprimer aisément des motifs de ruban
créatifs ou même d’importer vos propres
logos corporatifs et graphismes
correspondants au thème de votre fête. Pour
plus d’informations, consultez le Guide de
l’utilisateur en ligne.
50 | Rubans personnalisés
Sacs cadeaux pour invités
Créez des sacs cadeaux personnalisés pour
un mariage, une réception-cadeau pour
bébé, une fête, un anniversaire ou d’autres
occasions spéciales. Vous pouvez ajouter des
symboles ou des cadres qui correspondent
au thème de votre fête sur vos rubans.
Page 53

1. Créez votre ruban.
Pour un mariage ou une réception-
cadeau, inscrivez le nom du couple,
ajoutez des espaces, puis inscrivez la date
du mariage. Ajoutez un cadre approprié.
2. Imprimez votre ruban.
3. Découpez un cercle de 12 po (30 cm) de
diamètre de tulle, de cellophane ou d’un
autre type de matériel léger.
4. Placez une petite quantité de bonbons
au centre du cercle.
5. Enveloppez les bonbons avec le matériel
et utilisez votre ruban pour attacher
l’extrémité avec un nœud ou une boucle.
Assurez-vous de faire pivoter le ruban
lorsque vous l’attachez afin que le motif
imprimé soit visible sur les deux
extrémités.
Boucles pour cheveux ou rubans
pour queue de cheval
Imprimez des accessoires pour coiffure
personnalisés à offrir à votre fille ou des
rubans pour queue de cheval identiques
pour tous les membres d’une même équipe.
1. Saisissez du texte et des symboles.
2. Imprimez votre ruban.
3. Attachez le ruban autour d’un élastique
pour queue de cheval. Ou encore, formez
une boucle et collez-la sur une barrette.
Rubans personnalisés | 51
Page 54

Assurez-vous de faire pivoter le ruban
lorsque vous l’attachez afin que le motif
imprimé soit visible sur les deux
extrémités.
Ornements avec support en ruban
Un ruban imprimé est un support idéal pour
les ornements.
52 | Rubans personnalisés
1. Sélectionnez la longueur de votre
étiquette.
2. Créez le motif de votre ruban en ajoutant
du texte et des symboles verticaux.
3. Assurez-vous de laisser assez d’espace au
centre du ruban afin que vous puissiez
l’enfiler dans le crochet de l’ornement.
4. Imprimez votre ruban.
5. Enfilez le ruban dans le crochet de
l’ornement et attachez les extrémités
comme illustré.
6. Accrochez votre ornement dans le sapin.
Page 55

Cartes de souhaits
Ajoutez des rubans pour décorer et
personnaliser des cartes de souhaits
préfabriquées ou créez vos propres cartes.
1. Saisissez du texte et des symboles pour
votre carte de souhaits.
2. Imprimez votre ou vos rubans.
3. Coupez l’extrémité des rubans si
nécessaire, puis collez-les sur votre carte.
Application des étiquettes
Pour la plupart des étiquettes, le procédé
d’application est simple, comme indiqué
ci-dessous.
Pour des instructions sur la façon d’apposer
les étiquettes thermocollantes, consultez la
prochaine section.
1. Retirez la pellicule protectrice.
2. Placez l’étiquette sur la surface désirée et
frottez-la fermement.
Application des étiquettes | 53
Page 56

Nettoyage de l’imprimante
Mise en garde : Éteignez toujours l’imprimante
avant de la nettoyer.
Imprimante
Essuyez l’imprimante avec chiffon doux et
sec. N’utilisez jamais de solvants ou de
produits chimiques comme la benzine, du
diluant à peinture ou de l’alcool.
Tête d’impression
Si des traces ou des bavures d’encre
apparaissent sur les étiquettes imprimées,
utilisez un coton-tige ou tout autre outil
similaire pour essuyer la saleté sur la tête
d’impression.
1. Ouvrez le couvercle du logement du
ruban d’étiquette.
54 | Nettoyage de l’imprimante
2. Nettoyez la tête d’impression.
3. Fermez le couvercle du logement.
Résolution des problèmes
En cas de problème avec votre imprimante
LabelWorks, vérifiez si un message d’erreur
apparaît dans le logiciel LabelWorks. Pour
d’autres suggestions de dépannage,
consultez le Guide de l’utilisateur en ligne.
Page 57

Témoins d’état
Erreur Pile
Témoin Problème État de l’imprimante
Clignote Bluetooth activé
Allumé Connexion Bluetooth
Clignote
rapidement
Clignote (intervalle
de 5 secondes)
Allumé Piles faibles; remplacez
Clignote
rapidement
Bluetooth
établie
Opération en cours
(p. ex. : impression,
découpage d’étiquette)
Bluetooth désactivé
les piles bientôt.
Remplacez les piles.
Clignote
rapidement
Erreur d’imprimante.
Vérifiez le message
affiché sur l’appareil
connecté.
Autres problèmes
L’imprimante ne s’allume pas
■ Vérifiez si le cordon d’alimentation est
branché correctement ou si les piles
ont été insérées correctement. Si
l’imprimante ne s’allume toujours pas,
communiquez avec Epson.
■ Vérifiez si un message apparaît à l’écran
de votre ordinateur ou de votre appareil
mobile.
Impossible d’établir une connexion
Bluetooth (couplage)
■ Vérifiez si le témoin de l’imprimante
clignote. S’il ne clignote pas, activez
l’option Bluetooth sur l’imprimante et
essayez d’effectuer le couplage avec
Résolution des problèmes | 55
Page 58

l’imprimante à nouveau. Consultez la
section « Connexion à un appareil mobile
via Bluetooth » à la page 40.
■ Vérifiez si l’imprimante communique
avec un autre appareil mobile.
L’imprimante ne peut communiquer
qu’avec un appareil à la fois.
■ Vérifiez si un message apparaît sur votre
appareil mobile.
La connexion Bluetooth s’est
interrompue lors du couplage
■ Vérifiez si le témoin de l’imprimante
clignote. S’il ne clignote pas, activez
l’option Bluetooth sur l’imprimante et
essayez d’effectuer le couplage avec
l’imprimante à nouveau. Consultez la
section « Connexion à un appareil mobile
via Bluetooth » à la page 40.
■ Si l’imprimante est connectée à un
ordinateur via un câble USB, elle ne
pourra pas communiquer à l’aide du
56 | Résolution des problèmes
signal Bluetooth. Débranchez le câble
USB de l’imprimante et essayez
d’effectuer le couplage à nouveau.
■ Vérifiez si un message apparaît sur votre
appareil mobile.
L’imprimante n’imprime pas
■ Vérifiez si un message apparaît à l’écran
de votre ordinateur ou de votre appareil
mobile.
■ Vérifiez si le câble USB est branché
correctement, si la cartouche du ruban
d’étiquettes est installée correctement,
et si le couvercle du logement est bien
fermé.
■ Assurez-vous que votre imprimante est
bien sélectionnée dans votre logiciel
d’impression.
■ Si vous n’avez pas redémarré l’ordinateur
après avoir installé le pilote de
l’imprimante, ce dernier a peut-être été
Page 59

mal installé. Réinstallez le pilote de
l’imprimante.
Le texte ne s’imprime pas correctement
Vérifiez si la cartouche du ruban d’étiquettes
est installée correctement.
Des lignes apparaissent sur les étiquettes
imprimées
La tête d’impression est sale. Nettoyez la
tête d’impression. Consultez la section
« Nettoyage de l’imprimante » à la page 54.
Les étiquettes ne sont pas découpées
automatiquement
Sous Windows uniquement : Assurez-vous
que le paramètre Réglage de coupe est réglé
sur Couper chaque étiquette.
Soutien technique Epson
Visitez le site Web www.epson.ca et cliquez
sur Français. Pour télécharger les pilotes,
cliquez sur Pilotes et soutien. Pour contacter
Epson par courriel, veuillez cliquer sur
Soutien par courriel. Ensuite, suivez les
instructions à l’écran.
Pour contacter un spécialiste du soutien
technique, composez le numéro suivant :
É.-U. : (562) 276-7245, de 6 h à 20 h, heure du
Pacifique, du lundi au vendredi, et de 7 h à
16 h le samedi.
Canada : (905) 709-2567, de 6 h à 20 h, heure
du Pacifique, du lundi au vendredi, et de 7 h
à 16 h le samedi.
Les jours et les heures de service peuvent
changer sans préavis. Des frais d’interurbain
peuvent s’appliquer.
Soutien technique Epson | 57
Page 60

Recyclage
Epson offre un programme de recyclage des
produits en fin de vie. Veuillez consulter le
site epson.com/recycle pour obtenir des
informations sur la façon de retourner votre
produit pour une élimination appropriée.
Vous pouvez également vous procurer
d’autres fournitures auprès d’un revendeur
Epson autorisé. Composez le 1 800 463-7766
pour obtenir les coordonnées du revendeur
le plus proche.
Achat de consommables et
d’accessoires
Epson offre une grande variété de rubans
d’étiquettes conçus pour différents usages.
Vous pouvez acheter des cartouches de
ruban d’étiquettes et des accessoires sur
le site :
epson.com/labelworks (ventes aux É.-U.)
ou epson.ca/labelworks (ventes au
Canada).
58 | Enregistrement du produit
Enregistrement du produit
Pour recevoir des offres spéciales et des
nouvelles concernant de nouveaux rubans
d’étiquettes, enregistrez votre imprimante
LabelWorks.
Visitez le site epson.com/labelworks (É.-U.)
ou epson.ca/labelworks (Canada) et
sélectionnez Product Registration
(Enregistrement du produit).
Page 61

Avis
À propos des étiquettes imprimées
Les étiquettes appliquées et l’adhésif utilisé sont
affectés par le type de surface et les conditions
environnementales telles que l’humidité et la chaleur.
Les étiquettes pourraient décoller, se retrousser ou
s’estomper; les caractères imprimés pourraient
s’estomper; de la couleur pourrait demeurer sur la
surface après avoir retiré l’étiquette, l’adhésif pourrait
laisser un résidu sur la surface.
Epson décline toute responsabilité en cas de
dommages ou de pertes causés par les étiquettes
ou l’adhésif.
Consignes de sécurité et
caractéristiques du module
Bluetooth
Manufacture : Fujitsu Component Limited
Type : MBH7BTZ42
Ce document contient des consignes de sécurité et une
description des caractéristiques. Lisez attentivement ce
document avant l’utilisation pour assurer votre sécurité
et pour le rendement optimal du produit.
É.-U. :
Contient FCC ID : SQK-MBH7BTZXXC2
Cet appareil est conforme à la partie 15 de la
réglementation FCC. L’utilisation est soumise aux deux
conditions suivantes : 1) Cet appareil ne doit pas
provoquer d’interférences néfastes, et 2) cet appareil
doit tolérer les interférences reçues, y compris celles qui
risquent de provoquer un fonctionnement indésirable.
À l’issue des tests dont il a fait l’objet, cet appareil a été
déclaré conforme aux normes des appareils numériques
de classe B, conformément à la partie 15 de la
réglementation FCC. Ces normes sont destinées à
assurer un niveau de protection adéquat contre les
interférences néfastes dans les installations
résidentielles. Cet appareil produit, utilise et peut
émettre des fréquences radioélectriques et, s’il n’est pas
installé ou utilisé conformément aux directives, peut
brouiller les communications radio. Toutefois, il est
impossible de garantir qu’aucune interférence ne se
produira dans une installation particulière. Si cet
équipement brouille la réception des ondes radio et
Avis | 59
Page 62

télévisuelles, ce que vous pouvez déterminer en
éteignant et en rallumant l’équipement, nous vous
encourageons à prendre l’une des mesures correctives
suivantes :
■ Réorientez ou déplacez l’antenne.
■ Éloignez l’appareil du récepteur.
■ Branchez l’appareil à une autre prise ou sur un autre
circuit que celui du récepteur.
■ Demandez conseil au revendeur de l’appareil ou à
un technicien radio/télévision expérimenté.
Un adaptateur secteur avec tore de ferrite doit être
utilisé pour éliminer les interférences RF.
Avertissement : Le branchement d’un câble
d’interface non blindé à ce matériel entraînera
l’annulation de l’homologation FCC de cet appareil
et risque de causer des interférences dépassant les
limites établies par la FCC pour ce matériel. Il
incombe à l’utilisateur de se procurer et d’utiliser un
câble d’interface blindé avec cet appareil. Si le
matériel est doté de plusieurs connecteurs
d’interface, évitez de connecter des câbles à des
interfaces inutilisées. Toute modification non
expressément autorisée par le fabricant peut
annuler la permission d’utilisation du matériel.
60 | Avis
Cet émetteur ne doit pas être installé au même endroit
qu’une autre antenne ou un autre émetteur ou utilisé
conjointement à une autre antenne ou un autre
émetteur.
Déclaration d’exposition à la radiation :
Cet équipement est conforme aux limites de radiation
de la FCC indiquées pour un environnement non
contrôlé. Cet équipement doit être installé et utilisé
avec une distance minimale de 7,8 po (20 cm) entre
l’élément rayonnant et votre corps.
Avis d’Industries Canada (IC)
Contient IC : 337L-MBH7BTZXXCZ
Cet appareil numérique de la classe B est conforme à la
norme canadienne NMB-003.
Cet appareil est conforme à la norme RSS-210
d’Industrie Canada. L’utilisation est soumise aux deux
conditions suivantes : 1) cet appareil ne doit pas
provoquer d’interférences néfastes, et 2) cet appareil
doit tolérer les interférences reçues, y compris celles qui
risquent de provoquer un fonctionnement indésirable.
Déclaration d’exposition aux radiations :
Page 63

Cet équipement est conforme aux limites de radiation
d’IC indiquées pour un environnement non contrôlé.
Cet équipement doit être installé et utilisé avec une
distance minimale de 20 cm entre l’élément rayonnant
et votre corps.
Déclaration de conformité
Selon la norme 47CFR, parties 2 et 15 régissant, les
ordinateurs personnels et périphériques de classe B, et/
ou les unités centrales et les dispositifs d’alimentation
électrique utilisés avec les ordinateurs personnels de
classe B.
Nous : Epson America, Inc.
Situés à : 3840 Kilroy Airport Way,
MS 3-13, Long Beach, CA 90806
Téléphone : 1 (562) 981-3840
Nous déclarons sous notre seule et unique
responsabilité que le produit identifié dans la présente
est conforme à la norme 47CFR, parties 2 et 15, des
règles FCC régissant les dispositifs numériques de
classe B. Chaque produit commercialisé est identique
à l’appareil représentatif testé et jugé conforme aux
normes. Les dossiers indiquent que l’équipement
produit se situe dans les limites acceptables, du fait de
la production en quantité et des essais statistiques
réalisés, conformément au règlement 47CFR, alinéa
2.909. L’utilisation est soumise aux deux conditions
suivantes : 1) cet appareil ne doit pas provoquer
d’interférences néfastes, et 2) cet appareil doit tolérer
les interférences reçues, y compris celles qui risquent
de provoquer un fonctionnement indésirable.
Nom commercial : Epson
Type de produit : Imprimante d’étiquettes
Modèle : LW-600P
Garantie limitée d’Epson America, Inc.
Éléments couverts par la garantie : Epson America,
Inc. (« Epson ») garantit à l’acheteur d’origine au détail
que l’appareil d’impression d’étiquettes Epson et ses
consommables et accessoires couverts par la présente
garantie limitée (individuellement, un « produit »), s’ils
sont achetés et utilisés au Canada, aux États-Unis ou à
Puerto Rico, seront exempts de défaut de fabrication et
de vice matériel durant une période d’un (1) an à
compter de la date d’achat d’origine, dans le cas de
l’appareil d’impression d’étiquettes, et durant une
période de trente (30) jours pour les vices matériaux à
compter de la date d’achat d’origine, dans le cas de ses
consommables et accessoires. Les consommables
Avis | 61
Page 64

incluent les rouleaux et cartouches d’étiquettes et de
rubans d’étiquettes. Les accessoires incluent un
adaptateur secteur. Pour toute intervention au titre de
la garantie, vous devez fournir une preuve de la date
d’achat d’origine.
Ce que fera Epson pour remédier aux problèmes : Si,
durant la période de garantie, le produit Epson s’avère
défectueux, veuillez communiquer avec Epson
Connection au 905 709-2567 (Canada) ou 562 276-7245
(É.-U. ou Puerto Rico) pour obtenir des instructions
concernant les réparations sous garantie et une
autorisation de retour de la marchandise. Un technicien
Epson réalisera un diagnostic téléphonique pour
déterminer si le produit a besoin d’être réparé. Si le
produit a besoin d’être réparé, Epson peut, selon son
choix, le remplacer ou le réparer, sans frais de pièces ni
de main-d’œuvre. Si Epson autorise le remplacement du
produit défectueux, on vous enverra un produit de
remplacement, en port payé si vous avez une adresse
au Canada, aux États-Unis ou à Puerto Rico. Les
livraisons vers d’autres destinations s’effectueront en
port payable à l’arrivée. Il vous incombe d’emballer
correctement le produit défectueux et de le retourner à
Epson dans un délai de cinq (5) jours ouvrables après
avoir reçu le produit de remplacement. Epson vous
demandera un numéro de carte de crédit ou de débit
pour couvrir le coût du produit de remplacement au cas
62 | Avis
où vous ne retourneriez pas le produit défectueux. Pour
une réparation du produit au lieu d’un échange, Epson
vous demandera de lui envoyer ce dernier directement
ou à son centre de service autorisé qui réparera le
produit et vous le renverra. Vous avez la responsabilité
d’emballer le produit et devez défrayer les coûts
d’expédition vers et depuis le centre de service autorisé
Epson. Lorsqu’une intervention au titre de la garantie
nécessite l’échange du produit ou d’une pièce, l’article
remplacé devient propriété d’Epson. Le produit ou la
pièce de remplacement pourra être neuf ou remis à
neuf selon les normes de qualité d’Epson et, au choix
d’Epson, pourra être un autre modèle de même type et
qualité. Les produits et pièces remplacés sont couverts
pour la période de garantie restante du produit
d’origine couvert par la présente garantie limitée.
Éléments non couverts par la garantie : Cette
garantie ne s’applique qu’au Canada, aux États-Unis ou
à Puerto Rico dans le contexte d’une utilisation normale.
L’utilisation de ce produit à des fins de production
continue ou à d’autres fins semblables n’est pas
considérée une utilisation normale; tout dommage,
entretien ou besoin de réparations découlant d’une
telle utilisation n’est pas couvert par la présente
garantie. Cette garantie n’est pas transférable. Elle ne
s’applique pas aux dommages subis par le produit
Epson du fait de l’utilisation de pièces ou fournitures qui
Page 65

ne sont pas fabriquées, distribuées ni homologuées par
Epson. Sont notamment exclus de la garantie : les
pièces et composants ou périphériques fabriqués par
des tiers et ajoutés au produit Epson après son
expédition par Epson, par exemple des cartes ou
composants ajoutés par l’utilisateur ou le revendeur.
Epson ne sera pas tenu d’effectuer d’intervention au
titre de la garantie lorsque l’étiquette ou le logo Epson,
le numéro de série ou la plaque signalétique ont été
enlevés du produit; si le produit n’est pas correctement
entretenu ou ne fonctionne pas correctement du fait
d’une utilisation inadéquate ou abusive, d’une
installation incorrecte, d’une négligence, d’avaries lors
du transport, de dommages causés par des désastres
tels un incendie, une inondation ou la foudre, d’une
surtension électrique, de problèmes logiciels, d’une
interaction avec des produits d’une autre marque
qu’Epson ou d’une intervention effectuée par un tiers
autre qu’un réparateur Epson agréé. Si une anomalie
signalée ne peut être décelée ni reproduite, les frais
engagés seront à votre charge.
STIPULATION D’EXONÉRATION DE GARANTIES : CE QUI
PRÉCÈDE CONSTITUE LA SEULE GARANTIE ET EXCLUT
TOUTE AUTRE GARANTIE, EXPRESSE OU IMPLICITE, Y
COMPRIS, MAIS SANS S’Y LIMITER, TOUTE GARANTIE
IMPLICITE DE QUALITÉ MARCHANDE, D’APTITUDE À
UNE FIN PARTICULIÈRE OU DE NON-VIOLATION DE
DROITS. SAUF DISPOSITIONS CONTRAIRES, TOUTE
DÉCLARATION OU GARANTIE FAITE PAR UNE AUTRE
PERSONNE OU SOCIÉTÉ EST NULLE.
Recours : Votre recours exclusif et l’entière
responsabilité d’Epson en cas de violation substantielle
de cette entente seront limités à un remboursement du
prix payé pour les produits Epson couverts par la
présente entente. Toute action au titre de la garantie
doit intervenir dans les 3 mois à compter de la date
d’expiration de la garantie. Epson ne sera pas tenu
responsable des retards ou des périodes de nonfonctionnement en raison de causes indépendantes de
sa volonté. Sauf dispositions contraires dans la présente
garantie écrite, Epson et ses filiales ne peuvent être
tenus responsables des pertes, inconvénients ou
dommages, incluant des dommages directs,
particuliers, consécutifs ou indirects, incluant la perte de
bénéfices, les coûts de l’équipement de substitution, le
temps d’arrêt, les réclamations des tiers, incluant les
clients, ou les dommages matériels résultant de
l’utilisation ou de l’impossibilité d’utiliser les produits
Epson, qu’elle soit causée par une violation de la
garantie ou toute autre théorie juridique. Certaines
juridictions n’autorisent pas de limitations sur les
garanties ou les recours pour violation dans certaines
Avis | 63
Page 66

transactions. Dans de telles juridictions, les limites
indiquées dans ce paragraphe et dans le paragraphe
précédent pourraient ne pas s’appliquer.
Au Canada, les garanties englobent les garanties et les
conditions.
Arbitrage, lois applicables : Tout litige découlant de
cette Entente sera réglé par arbitrage à Los Angeles,
Californie, É.-U., conformément aux règles d’arbitrage
commerciales de l’American Arbitration Association, et
la décision rendue lors de l’arbitrage pourra faire l’objet
d’un jugement par tout tribunal compétent. La présente
Entente s’interprète conformément aux lois de l’État de
la Californie, à l’exception de cette clause d’arbitrage,
qui sera interprétée conformément au Federal
Arbitration Act.
Pour obtenir les coordonnées du revendeur Epson le
plus près de vous, visitez notre site Web à l’adresse :
epson.ca.
Pour obtenir les coordonnées du centre de service
après-vente Epson le plus près de votre domicile, visitez
epson.ca/support.
Ou encore, écrivez-nous à l’adresse : Epson America,
Inc., P.O. Box 93012, Long Beach, CA 90809-3012, É.-U.
64 | Avis
Marques de commerce
EPSON est une marque de commerce déposée, EPSON
Exceed Your Vision est un logotype déposé, et
LabelWorks et LC TAPE sont des marques de commerce
de Seiko Epson Corporation. Epson Connection est une
marque de service d’Epson America, Inc.
Mac et Mac OS sont des marques de commerce d’Apple
Inc., enregistrées aux États-Unis et dans d’autres pays.
Google Play et Android sont des marques de commerce
de Google Inc.
Avis général : Les autres noms de produit utilisés dans le
présent document sont donnés uniquement à titre
d’identification et peuvent être des noms de marque de
leur propriétaire respectif. Epson renonce à tous les
droits associés à ces marques.
L’information contenue dans le présent document peut
être modifiée sans préavis.
© 2013 Epson America, Inc., 10/13
CPD-40107
Page 67

Avant
Bouton d’alimentation
Témoin d’erreur
Témoin de la pile
Témoin Bluetooth
Languette du couvercle du logement
Fente d’éjection du ruban d’étiquettes
Arrière
Bouton Bluetooth
Port d’alimentation
Port USB
Couvercle du
logement du ruban
d’étiquettes
Point de fixation du câble de sécurité
Couvercle de la pile
Page 68

LC-4WBN9 LC-6WBN9
LC-5TBN9 LC-6TBN9
LC-5WBN9
LC-5TKN9
LC-5TWN9
LC-5SBE9
Standard
Classique
Strong Adhesive
Puissant adhésif
Clear
Transparent
LC-6WBC9
Cable Wrap
Pour câbles
½ inch/po
(12 mm)
¾ inch/po
(18 mm)
1 inch/po
(24 mm)
LC-4BWV9
LC-4NWT5
LC-4WBW9 LC-4YBW9 LC-5WBW9 LC-5YBW9 LC-6YBW9
LC-5RBW9
LC-5BKP9
*412553700*
*412553700*
A full selection of LabelWorks tapes are available at
epson.com/labelworks
Une sélection complète de rubans d’étiquettes LabelWorks
est disponible sur le site epson.ca/labelworks
CPD-40107
Printed in XXXXX
Pays d’impression : XXXXX
 Loading...