

Page 1

®
24-Pin Dot Matrix Printer
Quick Reference
Guide
Read your
User's Gui de
first for
complete instructions, and then
use this guide any time you want
to quickly find information about
the topics on the right.
Contents
Loading Continuous Paper Onto the Front
Push Tractor. . . . . . . . . . . . . . . . . . . . . . . . . . . 2
Loading Continuous Paper Onto the Rear
Push Tractor. . . . . . . . . . . . . . . . . . . . . . . . . . . 4
Removing the Printed Document From
the Push Tractor . . . . . . . . . . . . . . . . . . . . . . . 6
Removing Continuous Paper With Labels. . . . 7
Replacing the Ribbon Cartridge . . . . . . . . . . . 8
Clearing Paper Jams . . . . . . . . . . . . . . . . . . . . . 14
If Your Printer Stops Printing Unexpectedly . . . 16
EPSON is a registered trademark of SEIKO EPSON CORPORATION. Other product names used herein
are for identification purposes only and may be trademarks of their respective owners. EPSON disclaims
any and all rights in those marks.
4009593
xxx-00
Page 2
Loading Continuous Paper Onto the Front Push Tractor
To load continuous paper onto the front push tractor, follow these steps:
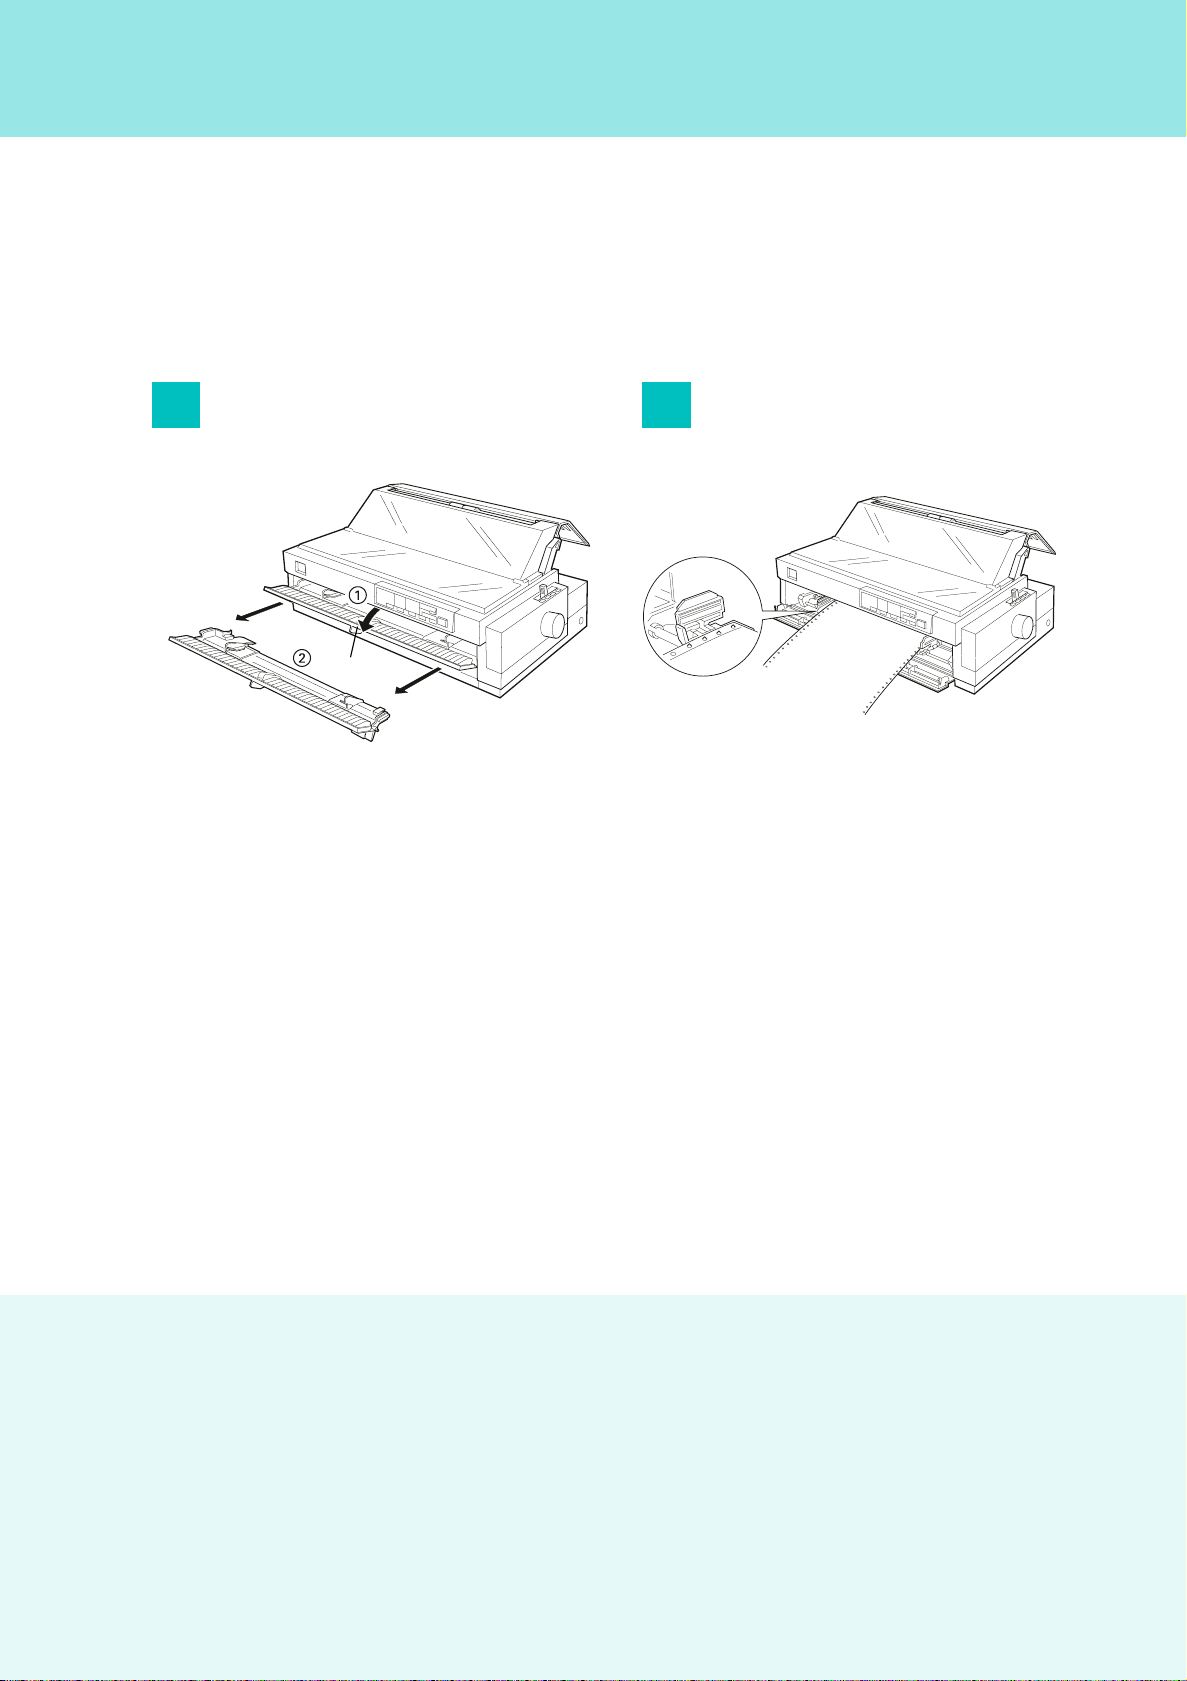
1
tab
Open the front paper guide by pulling
the tab at the center of it, and then
remove the guide by grasping bo th
sides and pulling it straight out of the
printer.
2
Open both sprocket covers, and fit the
first four holes of the paper, printable
side up, over the tractor pins. Then
close the sprocket covers.
Note:
Load continuous paper that has a clean, s traight
edge to avoid paper jams.
To remove any paper from the paper
Q
path, press the
printer feeds the paper into the standby
position, where you can remove the
paper from the printer.
2
Load/Eject
button. The
If you load continuous paper of a
Q
different size or thickness, you need to
adjust the position of the sprockets or
change the paper thickness lever setting.
See Chapter 2 of the
instructions.
User’s Guide
for
Page 3
3 4
Loading Continuous Pape r Onto the Front Push Tractor
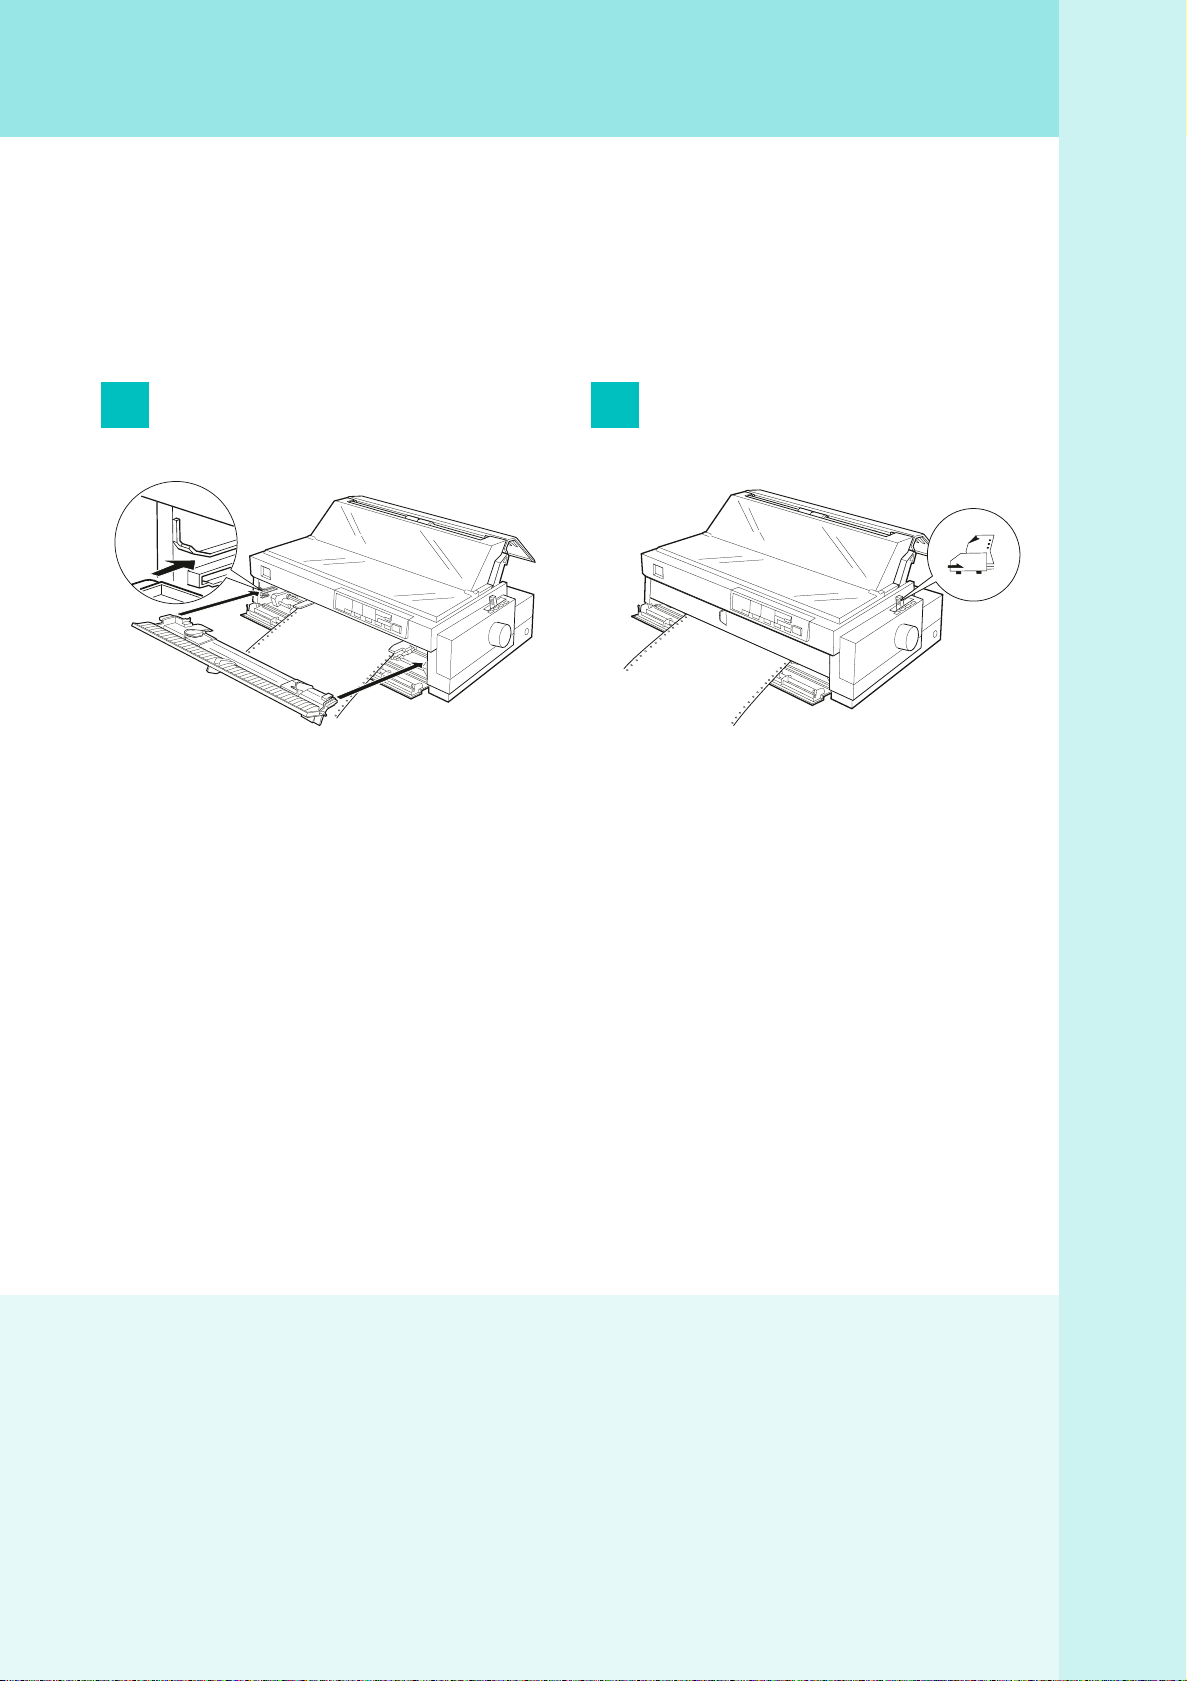
Attach the front paper guide by
inserting it into the slots in the printer
as shown.
When you load continuous paper with
Q
labels, make sure that the auto tear-off
mode is off before you star t to print. If
you feed continuous labels backward,
the labels may come off the backing sheet
and jam the printer.
Close the front paper guide, and make
sure the paper release lever is set to the
front push tractor position.
Note:
Always close the printer cover before pr inting.
The printer does not p rint when the cover is open.
To turn off the auto tear-off mode, enter
the printer’s default-setting mode. See
Chapter 5 of the
instructions.
User’s Guide
for
3
Page 4
Loading Continuous Paper Onto the Rear Push Tractor
To load continuous paper onto the rear push tractor, follow the step s be low.
Caution:
c
Do not load continuous paper with labels onto the rear push tractor; the labels may come off the
backing sheet and jam the printer.
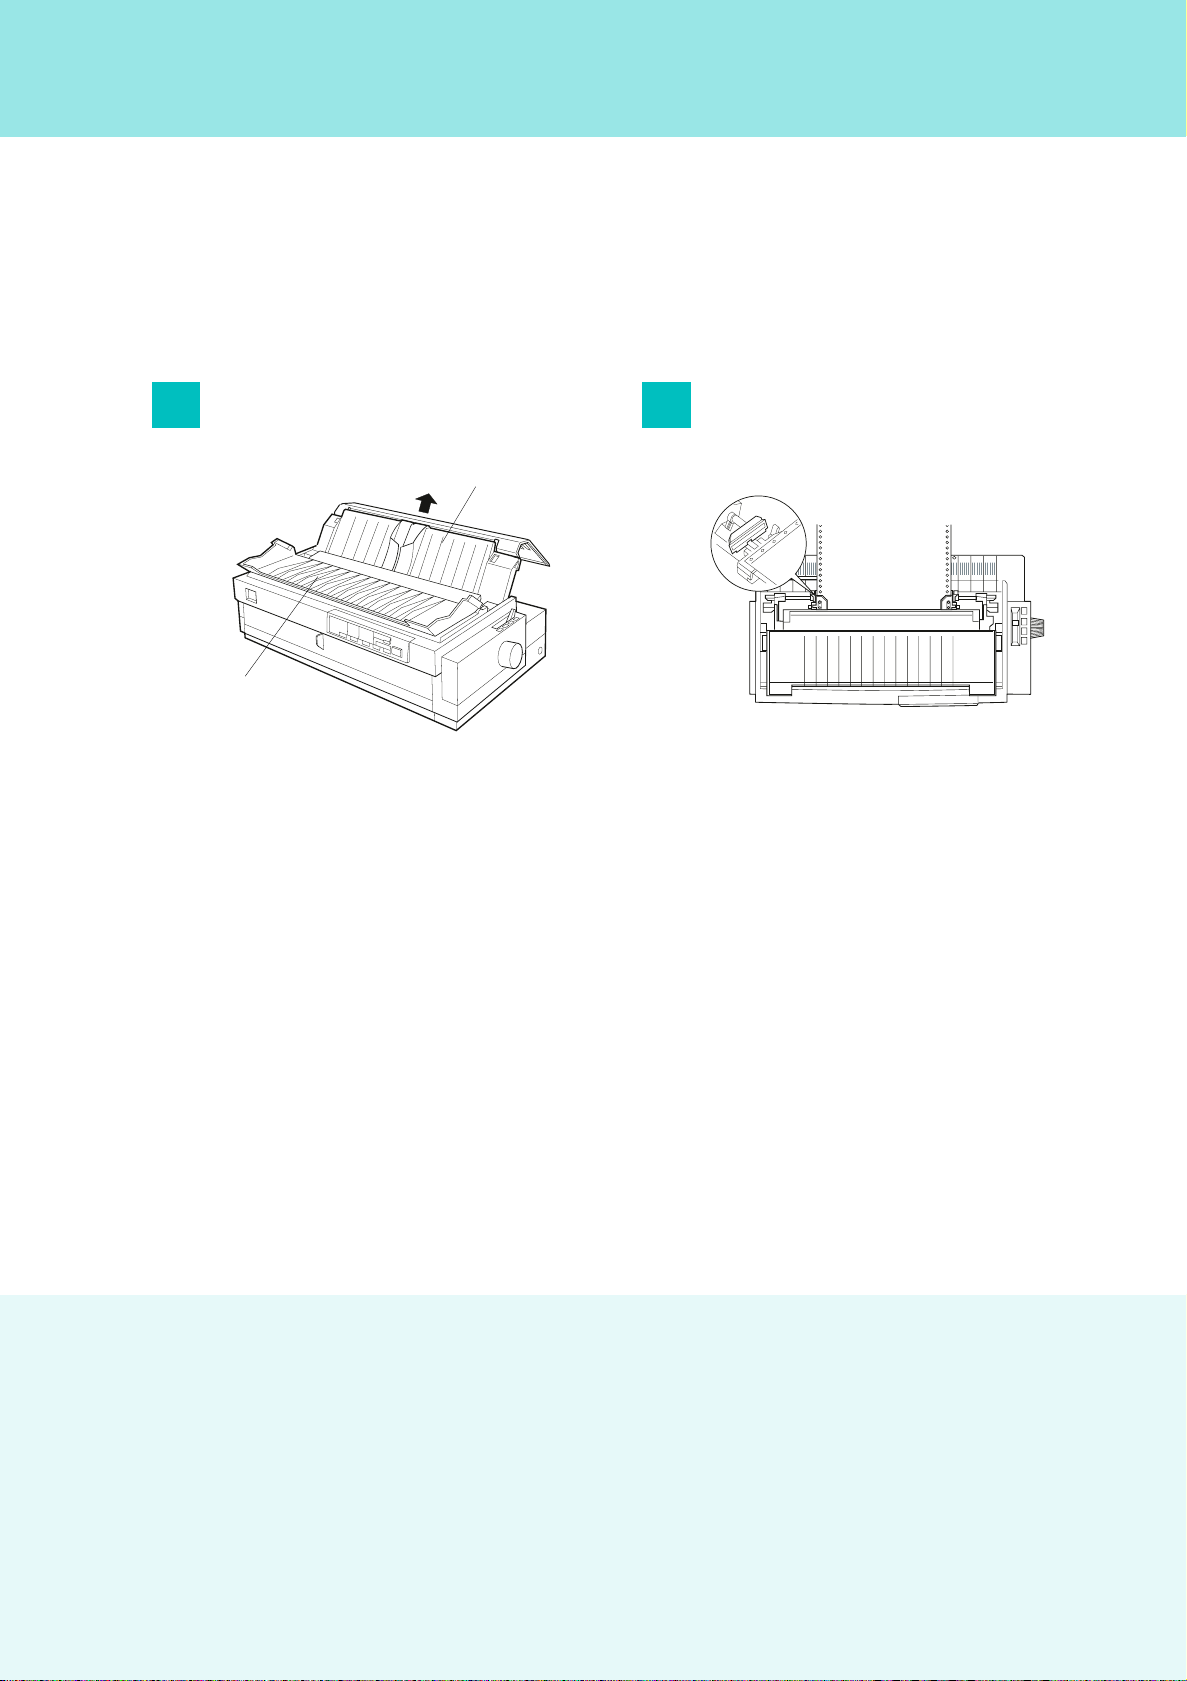
1
paper guide cover
Open the paper guide cover and
remove the paper guide.
2
paper guide
Open both sprocket covers, and fit the
first four holes of the paper, printable
side down, over the tractor pins. Then
close the sprocket covers.
Note:
Load continuous paper that has a clean, s traight
edge to avoid paper jams.
To remove paper from the pap er path,
Q
press th e
printer feeds the paper to the standby
position, where you can remove the
paper from the printer.
4
Load/Eject
button. The
If you load co ntinuous paper which is a
Q
different size or thickness, you need to
adjust the position of the sprocket units
or change the paper thickness lever
setting. See Chapter 2 of the
for instructions.
User’s Guide
Page 5
3 4
Loading Continuous P ap e r Onto the Rear Push Tractor
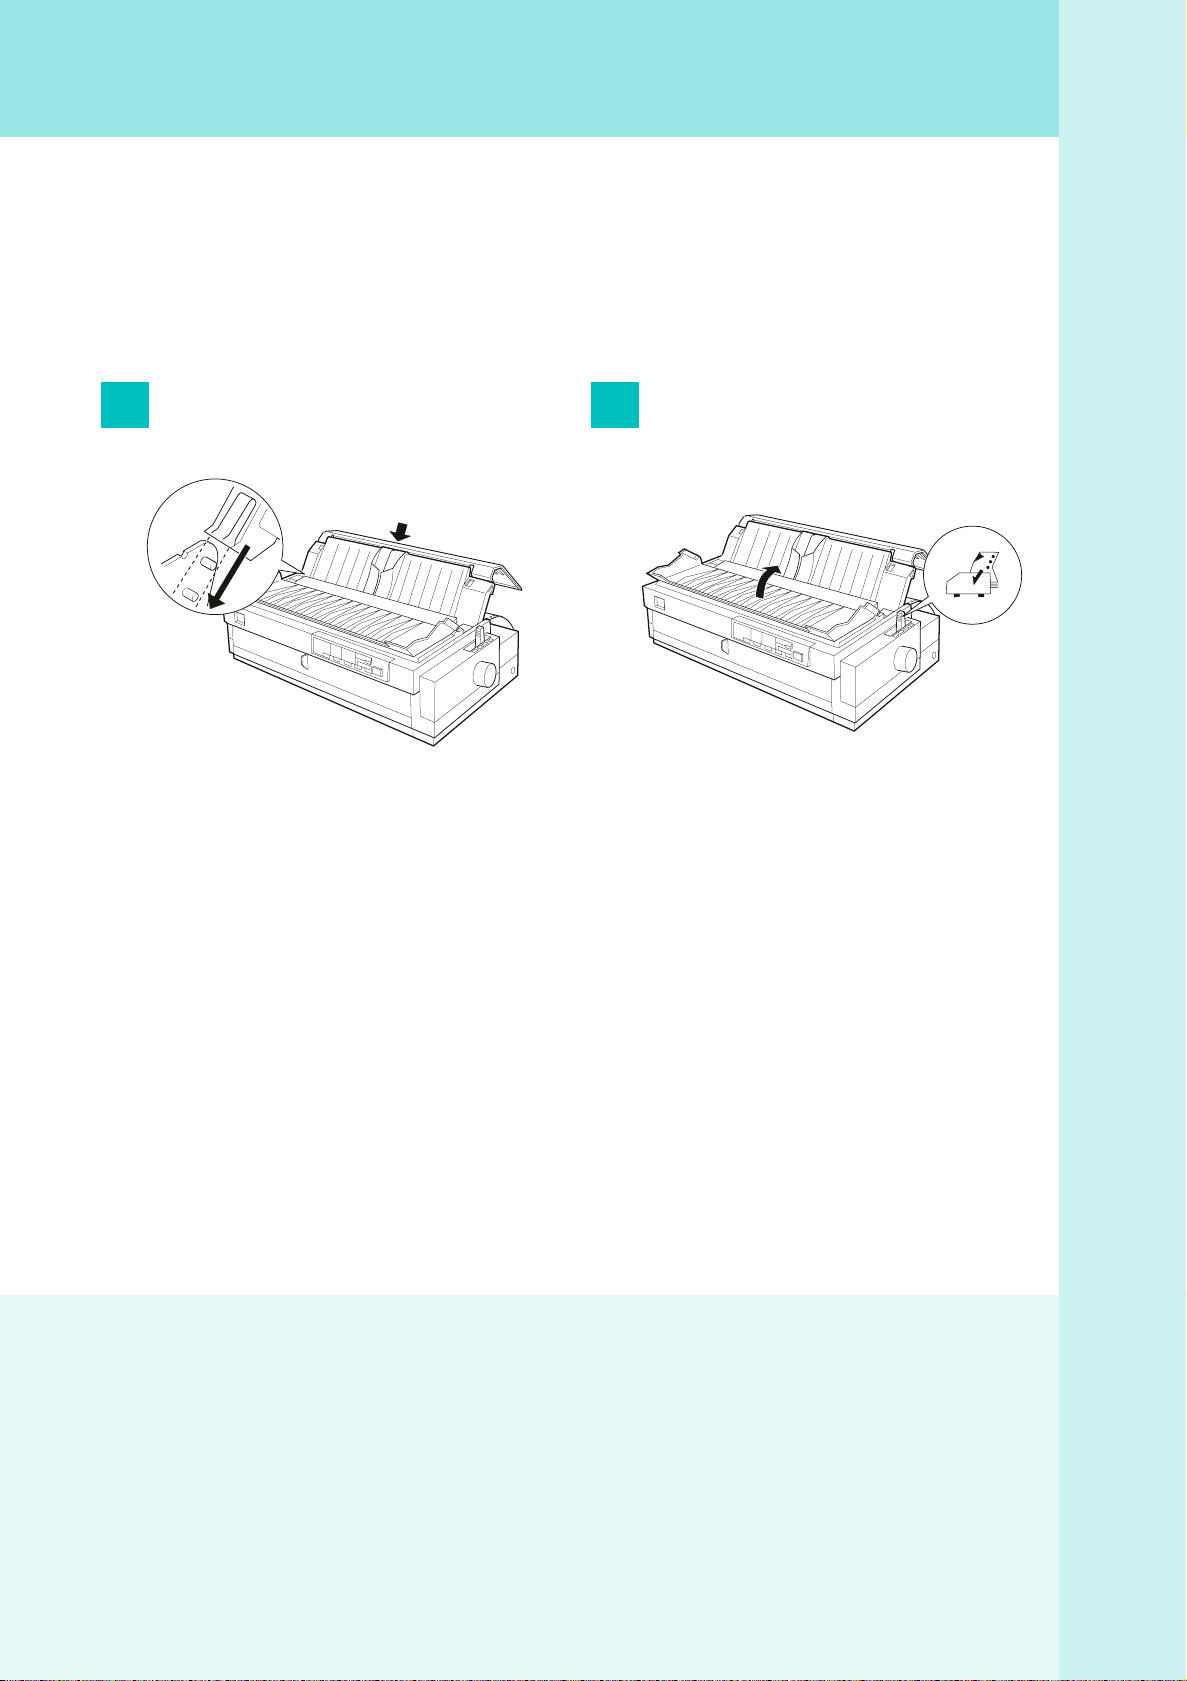
Attach the paper guide. Close the paper guide cover, and make
sure the paper release lever is set to the
rear push tractor position.
Note:
Always close the printer cover before pr inting.
The printer does not p rint when the cover is open.
5
Page 6

Removing the Printed Document From the Push Tractor
To remove the printed document from the front or rear push tractor, follow the steps below. To
remove continuous paper from the pull tractor, see Chapter 2 of the
1
Make sure the Tear Off/Bin lights are
flashing. (You may need to press the
Tear Off/Bin
Off/Bin lights are flashing, your paper
is in the tear-off position.
button.) When the Tear
User’s Guide
.
2
from the front push tractor
Open the paper guide cover, and tear off the printed document
using the printer’s tear-off edge.
from the rear push tractor
When you resume printing, the printer
Q
automatically feeds the paper backward
to the top-of-form position, and starts
printing.
6
To feed the continuous paper backwar d
Q
from the tear-off position to the standby
position, press the
Load/Eject
button.
Page 7

Removing Co ntinuous Paper W ith Labels
To avoid peeling labe ls off the backing sheet and jam ming the printer, follow the steps below when
you remove continuous paper with labels from the front push tractor.
1
Make sure that the printer finishes
printing. You may need to press the
Pause
(When the printer is paused, the Pause
light is on.)
button to stop printing.
Removing Conti nuo us Paper With Labe ls
Removing the Printed Document From the Push Tractor
2
Tear off the fresh supply of continuous
labels at the perforation nearest the
paper entry slot.
3
Hold down the
remaining labels from the printer.
Caution:
When printing on labels, never press the
c
Load/Eject
When fed backward, labels can easily come
off the backing sheet and cause a paper
jam.
or
button to eject the
LF/FF
Tear Off/Bin
button.
7
Page 8

Replacing the Ribbo n Cartridge
To replace the ribbon cartridge, follow the steps below.
Warning:
w
You will need to move the print head by hand to replace the ribbon cartridge. If you have just
used the printer, the print head may be hot; let it cool for a few minutes before touching it.
1
Press the
the printer. The printer is off wh en the
surface of the
with the button protectors as shown.
Caution:
c
Moving the print head while the printer
is on may damage the printer.
Operate
button to turn off
Operate
button is even
3
Open the paper guide cover. Then lift
the printer cover by its back edge and
pull it straight up and off the printer.
2
Unplug the printer from the electrical
outlet.
8
Page 9

4 5
Replacing the Ribbon Cartridge
Make sure the print head is not hot; if
it is, let it cool for a few minu tes before
touching it. Then slid e the print head to
the ribbon installatio n position (the
indented portion of the paper tension
unit) by hand.
When you use the pull tractor, you can
Q
replace the ribbon cartridge even though
the print head is not in the r ibbon
installation position .
Grasp the used ribbon cartridge and
pull it up and out of the printer.
9
Page 10

Replacing the Ribbo n Cartridge
6
ribbon-tightening knob
separator
Remove the separator from the new
ribbon cartridge and discard it. Then
turn the ribbon-tightening kn ob in the
direction of the arrow to remove any
slack in the ribbon.
7
Hold the cartridge with the ribbontightening knob up. Fit the two notches
nearest you (➀) over the small pegs on
each side of the printer as shown. Then
lay the cartridge flat so that the other
notches (➁) fit over the corresponding
pegs.
10
Page 11

8 9
Replacing the Ribbon Cartridge
Gently press down the cartridge until
both ends click into place.
Lift the cartridge’s ribbon guide (➀)
and insert it firmly ove r the metal pins
behind the print head (➁). Make su re
the ribbon is no t twisted or creased and
that it is in place behind the print head.
Then press down the ribbon guide until
it clicks into place.
10
Turn the ribbo n-tightening kn ob in the
direction of the arrow to remove any
slack in the ribbon.
11
Page 12

Replacing the Ribbo n Cartridge
11 12
Slide the print head fro m side to side to
make sure it moves smoothly.
Replace the printer cover and close the
paper guide cover.
12
Page 13

Ribbon Cartridge
Your printer uses EPSON black ribbon cartridge S015086.
Replacing the Ribbon Cartridge
When printing becomes faint, you need to replace the ribbon cartrid ge. Genuine EPSON
ribbon cartridges are d esigned and manufactured to wo r k properly with your EPSON
printer. They ensure proper operation and long life of the print head and other printer
parts.
13
Page 14

Clearing Paper Jams
To clear a paper jam, follow these steps:
1
Press the
the printer.
Operate
button to turn off
2
If an ejected single sheet of paper is
stuck on the paper guide, remove it.
3
4
If continuous pape r is jammed in the
printer, tear off the fre sh supply at the
perforation nearest the paper entry
slot.
Remove the printer cover. If
continuous paper from the rear slot is
jammed, also remove the paper guide.
14
Page 15

5 6
Clearing Paper Jams
Attach the paper guide, if necessary.
7
Turn the knob on the right side of the
printer away from you to eject the
paper in the printe r. Remove any
remaining pieces of paper.
Caution:
c
Turn the knob only when the printer is off.
Otherwise, you may damage the printer
or lose the top-of-form position or tear-off
position.
Replace the printer cover and close the
paper guide cover.
8
Press the
the printer. Make sure the Paper Out
and Pause lights are off.
Operate
button to turn on
15
Page 16

If Your Printer Stops Printing Unexpectedly...
Check the printer’s control panel lights and follow the appropriate instructions belo w. For more
information, see Chapter 7 of your
Cause Solution
User’s Guide
.
The printer stops printing and the Pause light is on.
The printer is paused. Press the
Pause
button to resume printing.
The print er cover is open. Close th e printer cov er, then press the
resume printing.
You moved the paper release lever while
paper from another paper source is
currently in the paper path.
Move the paper release lever back to the appropriate
position and p ress the
Load/Eject
button to feed the paper
out of the paper path. Then set the lever to the position you
want to use. Press the
Pause
button to turn off the Pause
light, if necessary.*
*If you are using the pull tractor, see your
User’s Guide
The Paper Out and Pause lights are on.
Cause Solution
No paper is loaded in the selected paper
source or paper is not loaded correctly.
Load paper in the printer, then press the
turn off the Pause light, if necessary.
Paper is jammed in the printer. See ”Clearing Pape r Ja m s” or page 14.
Pause
Pause
button to
for instructions.
button to
The Paper Out light is flashing and the Pause light is on.
Cause Solution
Contin uous p aper is not f ed to the st andby
positi on.
Tear off the printed document at the perforation; then press
Load/Eject
the
standby position. Press the
button. The printer feeds the p ap er to the
Pause
button to turn off the
Pause light.
A single sheet of paper is not fully ejected. Press the
the
Load/Eject
Pause
button to turn off the Pause light, if necessary.
button t o eject th e sheet. Then press
Paper is jammed in the printer. See ”Clearing Pape r Ja m s” or page 14.
Printed in Japan 98.xx.xx
 Loading...