

Page 1
Page 2
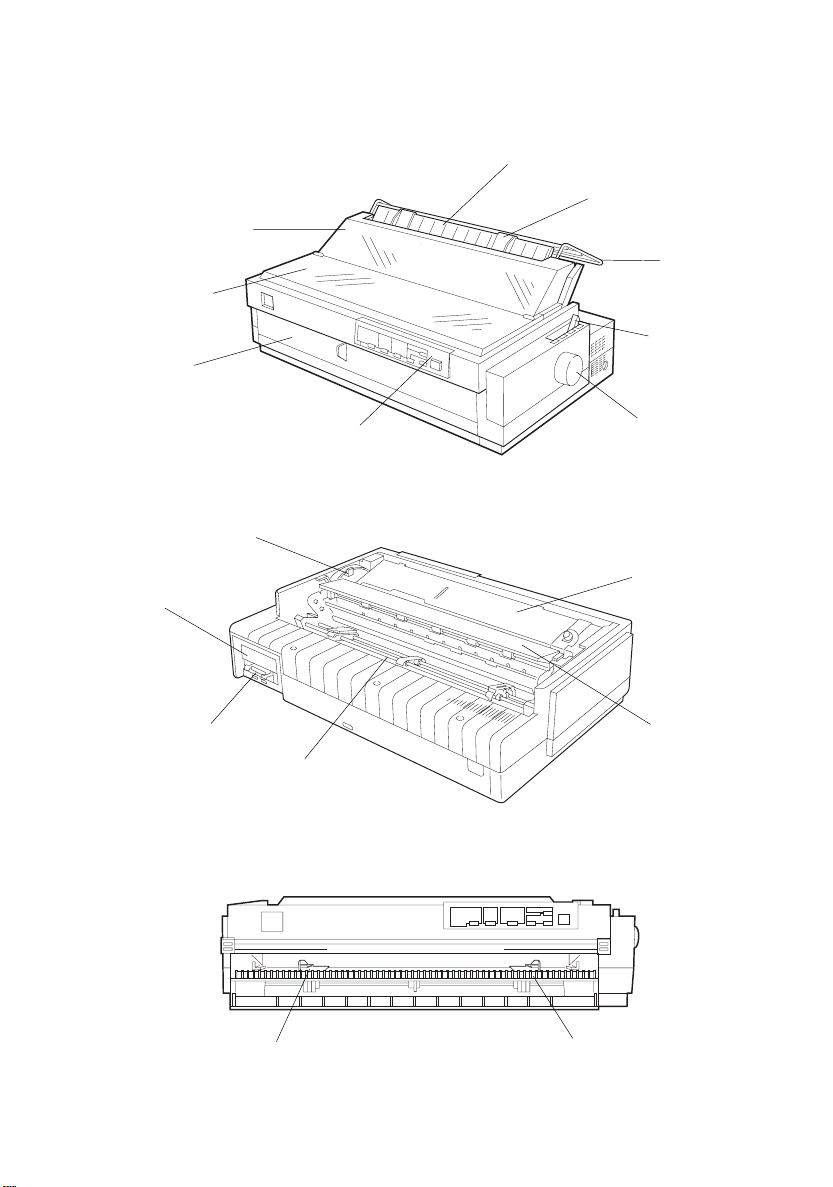
Printer Parts
paper path guide
printer cover
front paper guide
paper guide
edge guide
paper
separator
paper release
lever
paper thickness
lever
shield plate
parallel interface
control panel
tractor
knob
ribbon cartridge
paper tension
unit
front edge guide
front paper guide
Page 3

®
EPSON
24-Pin Dot Matrix Printer
LQ-2170
All rights reserved. No part of this publication may be reproduced, stored in a retrieval
system, or transmitted in any form or by any means, electronic, mechanical, photocopying,
recording, or otherwise, without the prior written permission of Seiko Epson Corporation.
No patent liability is assumed with respect to the use of the information contained herein.
Neither is any liability assumed for damages resulting from the use of the information
contained herein.
Neither Seiko Epson Corporation nor its affiliates shall be liable to the purchaser of this
product or third parties for damages, losses, costs, or expenses incurred by purchaser or
third parties as a result of: accident, misuse, or abuse of this product or unauthorized
modifications, repairs, or alterations to this product.
Seiko Epson Corporation and its affiliates shall not be liable against any damages or
problems arising from the use of any options or any consumable products other than those
designated as Original EPSON Products or EPSON Approved Products by Seiko Epson
Corporation.
EPSON and EPSON ESC/P are registered trademarks and EPSON ESC/P 2 is a trademark
of Seiko Epson Corporation.
EPSON Conn ection is a service mark of Epson America, Inc.
General Notice: Other product names used herein are for identification purposes only and may be
trademar ks of their respective companies.
Copyright © 1996 by Seiko Epson Corporation, Nagano, Japan.
User’s Guide
Page 4

FCC Compliance Statement
For United States Users
This equipment has been tested and found to comply with the limits for a Class B digital
device, pursuant to Part 15 of the FCC Rules. These limits are designed to provide
reasonable protection against harmful interference in a residential installation. This
equipment generates, uses and can radiate radio f r equency energy and, if not installed and
used in accordance with the instructions, may cause harmful interference to radio or
television reception. However, there is no guarantee that interference will not occur in a
particular installation. If this equipment does cause interference to radio and television
reception, which can be determined by turning the equipment off and on, the user is
encouraged to try to correct the interference by one or more of the following measures.
❏ Reorient or relocate the receiving antenna
❏ Increase the separation between the equi pm ent and receiver
❏ Connect the equipment into an outlet on a circuit different from that to which the
receive r is connected
❏ Consult the dealer or an experienced radio/TV technician for help.
WARNING
The connection of a non-sh ielded equipment interface cable to this equi pment will
invalid ate the FCC Certificatio n of this device and may cau se interfe r e nce levels which
exceed the limits established by the FCC for this eq uipm ent. It is the respo nsibility of the
user to obtain an d use a shielded equipment interface cab le with this device. If this
equipment has mor e th an o ne interface connecto r , do not leave cables co n nected to unused
interfaces.
Changes or modifications not expressly approved by the manufacturer could void the
user’s autho r ity to operate the equipmen t.
For Canadian Users
This Class B digital appa r atus m eets all requiremen ts o f the Canadian Interfe renceCausing Equipment Regulations.
Cet appareil numerique de la classe B res pecte toutes les exig ences du Reglement sur le
materiel brouilleur du Canada.
ii
Page 5

Declaration of Conformity
Accordi ng to ISO/IEC Gui de 22 and EN 45014
Manufacturer: SEIKO EPSON CORPORATION
Address: 3-5, Owa 3-chome, Suwa-shi,
Nagano-ken 39 2 Japan
Representative: EPSON EUROPE B.V.
Address: Prof. J. H. Bavinc klaan 5 1183 AT Ams te lveen
The Netherlands
Declares that the Product:
Product Name: Dot Matrix Printer
Type Name: LQ-21 70
Model: P910A
Conforms to the foll owing Directive(s ) and Norm(s):
Directive 89/ 336/EEC:
EN 55022 Class B
EN 50082-1
IEC 801-2
IEC 801-3
IEC 801-4
Directive 73/ 23/EEC:
EN 60950
Directive 90/ 384/EEC:
EN 45501
August 1995
M. Hamamoto
President of EPSON EURO PE B.V.
iii
Page 6

Where to Get Help for
United States Users
EPSON pro v ides customer su pp ort and service through a nationw i de
network of Aut horized E PSON Cus t omer Car e Ce nters.
EPSON also provides the following support services in the U.S. and
Canada throu gh t he EPSON Connection at (800) 922-8911:
Technical assist ance with the installat io n, co nfi guration, and
❏
operation of EPSON products
Assistance in lo cating your nearest Autho riz ed EPSON Resell er or
❏
Customer Care Center
Customer Relations
❏
EPSON technical information library fax service
❏
Product liter at ure on current and new products
❏
You can purchas e ribbons, supplie s, parts, do cu m ent at io n, and
accessories f or yo ur EPSON pr odu ct s f rom EPSON Acc essories at
(800) 873-7766 (U. S. sales only). In Canada, call (80 0) BU Y - EPSON for
sales locations.
iv
Page 7

CompuServe® online support
If you have a modem , the fas te st way to acc e ss helpful tips, spe cif ic at ion s ,
drivers, application notes, and bulletins is through the Epson Am erica
Forum on CompuServe.
If you are not current ly a member of Com pu Serve, you are eligible for a
free introductor y m e m ber ship as an owner of an EP SON product. Thi s
membershi p entitles you to:
An introductor y $15 credit on CompuServe
❏
Your own user ID and passw or d
❏
A complimentary subscription to Comp uSe rv e Maga zine,
❏
CompuServ e’s monthly publ ication.
To take advantage of this of fer, call (800) 848-8199 in the United States
and Canada and ask for representat iv e #529. In other countries, call
(614) 529-1611 or yo ur local Compu Serve access number.
If you are already a CompuServe member, simply type GO EPSON at the
menu prompt to rea ch the Ep so n A m erica Forum.
For United Kingdom Users
Use of options
Epson (UK) Limite d shall not be liable again st any damages or problems
arising from the use o f any options or consum able products other tha n
those designated as Ori ginal Epson Produc ts or Ep son Approved
Products by Epson (UK) Limited.
v
Page 8

Safety information
Warning:
This ap pliance must be earthed. Refer to rating p late for v oltage and check tha t
the appliance volta ge corresponds to the supply vol tage.
Impo rt a n t :
The wires in the mains lead fitted to this appliance are coloured in accordance
with the following code:
Green and yel lo w - Earth
Blue - Neutral
Brown - Live
As the colours of the w ires in the mains lead of this appliance m ay not
correspond wit h t he co lo ured markings identifying the term inals in your
plug, proceed as follows:
The green and yellow wi re must be connected to the terminal in the
❏
plug which is marked with the letter E or with the earth symbol (
or coloured green or green and yellow.
The blue wire mu st be co nnected to the terminal in the plug m arked
❏
with the letter N or coloured black.
The brown wire must be connected t o the term inal in the plug
❏
marked with the letter L or coloured red.
)
G
If damage oc curs to the plug, replace the cord set or consult a qualified
electrician .
Replace fuses only with a fuse of the correct size and rating.
vi
Page 9

Important Safety Instructions
Before using yo ur p rint er, read the follow ing sa fety instructions to make
sure you use the printer saf ely and effectively.
Turn off and unplug the printer before cleaning. Clean with a damp
❏
cloth only. Do not spil l liquid on the printer.
Do not place the pr int er on an unstable surface or near a radiator or
❏
heat register.
Do not block or cover the op enings in the printer’s cabine t. Do not
❏
insert objects thr ou gh the slots.
Use only the type of power source indicated on the printer’s label.
❏
Connect all equip m ent to properly grounded power outlets. Avoid
❏
using outle ts on t he sam e circuit as pho tocopiers or air c ontro l
systems that regu larly switch on and off.
Do not let the power cord become damaged or frayed.
❏
If you use an extension cord with the printer, make sure the total
❏
ampere rating of the devices plugged into the extension cord does not
exceed the cords ampere rating. Also, make sure the total of all
devices plugged into the wall outlet does not exceed 15 amperes.
Except as specifically explained in this guide, do not attempt to
❏
service the printer yourself.
Unplug the printer and refer servicing to qualified service personnel
❏
under the following conditions:
If the power cord or plug is dam aged; if liquid has entered the printer; if
the printer has been dropped or the cabinet damaged; if the printer
does not operate norm ally or exhibits a distin ct cha nge in
performan ce. A djust only those controls that are co v ered by the
operating instruc ti ons .
vii
Page 10

viii
Page 11

Contents
Introduction
Options . . . . . . . . . . . . . . . . . . . . . . . . . . . . . . . . . . 0-2
How to Use This Manual . . . . . . . . . . . . . . . . . . . . . . . . 0-3
Warnings, Cautions, and Notes . . . . . . . . . . . . . . . . . . . . 0-4
Chapter 1
Choosing a Place for the Printer . . . . . . . . . . . . . . . . . . . . 1-2
Unpacking the Printer . . . . . . . . . . . . . . . . . . . . . . . . . . 1-4
Installing the Ribbon Cartridge . . . . . . . . . . . . . . . . . . . . 1-5
Plugging in the Printer . . . . . . . . . . . . . . . . . . . . . . . . . 1-10
Running the Self Test . . . . . . . . . . . . . . . . . . . . . . . . . . 1-10
Connecting the Printer to Your Computer . . . . . . . . . . . . . . 1-14
Installing the Printer Driver . . . . . . . . . . . . . . . . . . . . . . 1-1 5
For Microsoft Windows users . . . . . . . . . . . . . . . . . . 1-15
For DOS program users . . . . . . . . . . . . . . . . . . . . . . 1-21
DOS printer utilities . . . . . . . . . . . . . . . . . . . . . . . . 1-21
Setting Up the Printer
ix
Page 12

Chapter 2
Selecting the Paper Feeding Method . . . . . . . . . . . . . . . . . 2-2
Setting the paper release lever . . . . . . . . . . . . . . . . . . 2-2
Using Single Sheets . . . . . . . . . . . . . . . . . . . . . . . . . . . 2-3
Loading single sheets from the top . . . . . . . . . . . . . . . 2-3
Loading single sheets from the front . . . . . . . . . . . . . . 2-6
Using Continuous Paper . . . . . . . . . . . . . . . . . . . . . . . . 2-8
Selecting the tractor position and paper path . . . . . . . . . 2-8
Changing tractor positions . . . . . . . . . . . . . . . . . . . . 2-9
Loading the front push tractor . . . . . . . . . . . . . . . . . . 2-12
Loading the rear push tractor . . . . . . . . . . . . . . . . . . 2-15
Loading the pull tractor . . . . . . . . . . . . . . . . . . . . . 2-19
Loading the push/pull tractor . . . . . . . . . . . . . . . . . . 2-22
Removing paper from the tractor . . . . . . . . . . . . . . . . 2-23
Switching Between Continuous Paper and Single Sheets . . . . . 2-24
Switching to single sheets . . . . . . . . . . . . . . . . . . . . 2-24
Switching to continuous paper . . . . . . . . . . . . . . . . . 2-25
Printing on Special Paper . . . . . . . . . . . . . . . . . . . . . . . 2-25
Adjusting the paper thickness lever . . . . . . . . . . . . . . . 2-26
Multipart forms . . . . . . . . . . . . . . . . . . . . . . . . . . 2-27
Labels . . . . . . . . . . . . . . . . . . . . . . . . . . . . . . . . 2-28
Envelopes . . . . . . . . . . . . . . . . . . . . . . . . . . . . . 2-29
Postcards . . . . . . . . . . . . . . . . . . . . . . . . . . . . . . 2-29
Roll paper . . . . . . . . . . . . . . . . . . . . . . . . . . . . . 2-29
Paper Ha ndling
x
Page 13

Chapter 3
Control Panel . . . . . . . . . . . . . . . . . . . . . . . . . . . . . . . 3-2
Lights . . . . . . . . . . . . . . . . . . . . . . . . . . . . . . . . 3-2
Buttons . . . . . . . . . . . . . . . . . . . . . . . . . . . . . . . 3-4
Other control panel features . . . . . . . . . . . . . . . . . . . 3-6
Changing the Default Settings . . . . . . . . . . . . . . . . . . . . . 3-7
Selecting an instruction sheet language . . . . . . . . . . . . . 3-7
Selecting items and changing settings . . . . . . . . . . . . . . 3-7
Default setting item functions . . . . . . . . . . . . . . . . . . 3-9
Micro Adjust . . . . . . . . . . . . . . . . . . . . . . . . . . . . . . . 3-13
Tear-Off . . . . . . . . . . . . . . . . . . . . . . . . . . . . . . . . . . 3-15
Using auto tear-off mode . . . . . . . . . . . . . . . . . . . . . 3-16
Using the Tear Off/Bin button . . . . . . . . . . . . . . . . . . 3-17
Bi-d Adjustment . . . . . . . . . . . . . . . . . . . . . . . . . . . . . 3-17
Barcode Printing . . . . . . . . . . . . . . . . . . . . . . . . . . . . . 3-18
Using the Printer
Chapter 4
Cut-Sheet Feeders . . . . . . . . . . . . . . . . . . . . . . . . . . . . 4-2
Installing the high capacity cut-sheet feeder . . . . . . . . . . 4-2
Loading paper with the high capacity cut-sheet feeder . . . . 4-4
Assembling the double bin cut-shee t fee de r . . . . . . . . . . 4-6
Switching between contin uous paper and the cut-sheet
Selecting single-sheets, postcards, or envelopes . . . . . . . . 4-7
Pull Tractor . . . . . . . . . . . . . . . . . . . . . . . . . . . . . . . . 4-8
Loading paper with the push tractor and the optional pull
Roll Paper Holder . . . . . . . . . . . . . . . . . . . . . . . . . . . . 4-9
Interface Cards . . . . . . . . . . . . . . . . . . . . . . . . . . . . . . 4-12
Installing an interfac e ca rd . . . . . . . . . . . . . . . . . . . . 4-12
The C82305
Using Printer Options
feeder . . . . . . . . . . . . . . . . . . . . . . . . . . . . . . . 4-6
tractor . . . . . . . . . . . . . . . . . . . . . . . . . . . . . . . 4-8
✽
or C82306✽ serial interface card . . . . . . . . . 4-14
xi
Page 14

Chapter 5
Cleaning the Printer . . . . . . . . . . . . . . . . . . . . . . . . . . 5-2
Replacing the Ribbon . . . . . . . . . . . . . . . . . . . . . . . . . . 5-3
Transporting the Printer . . . . . . . . . . . . . . . . . . . . . . . . 5-4
Maintenance and Transportation
Chapter 6
Power Supply . . . . . . . . . . . . . . . . . . . . . . . . . . . . . . 6-2
Power is not being supplied . . . . . . . . . . . . . . . . . . . 6-2
Printing . . . . . . . . . . . . . . . . . . . . . . . . . . . . . . . . . . 6-3
The printer does not print . . . . . . . . . . . . . . . . . . . . 6-3
The print is faint or uneven . . . . . . . . . . . . . . . . . . . 6-4
Dots are missing in printed characters or graphics . . . . . . 6-5
Printed characters are not what you expect . . . . . . . . . . 6-5
The print position is not what you expect . . . . . . . . . . . 6-6
Paper Handling . . . . . . . . . . . . . . . . . . . . . . . . . . . . . 6-7
Single sheets do not feed properly . . . . . . . . . . . . . . . 6-7
Continuous paper does not feed properly . . . . . . . . . . . 6-8
Options . . . . . . . . . . . . . . . . . . . . . . . . . . . . . . . . . . 6-10
The paper does not feed properly with th e cut-s h eet feeder . 6-10
Continuous paper does not feed pr oper ly when us in g
Troubleshooting
the pull tractor with the push tractor . . . . . . . . . . . . . 6-12
xii
Page 15

Appendix
Specifications, Command Summary, and
Character Tables
Printer Specifications . . . . . . . . . . . . . . . . . . . . . . . . . . A-2
Printing . . . . . . . . . . . . . . . . . . . . . . . . . . . . . . . A-2
Paper . . . . . . . . . . . . . . . . . . . . . . . . . . . . . . . . A-4
Paper alignment . . . . . . . . . . . . . . . . . . . . . . . . . . A-7
Printable area . . . . . . . . . . . . . . . . . . . . . . . . . . . . A-8
Mechanical . . . . . . . . . . . . . . . . . . . . . . . . . . . . . A-9
Electrical . . . . . . . . . . . . . . . . . . . . . . . . . . . . . . A-10
Environmental . . . . . . . . . . . . . . . . . . . . . . . . . . . A-11
Safety approvals . . . . . . . . . . . . . . . . . . . . . . . . . . A-11
CE marking . . . . . . . . . . . . . . . . . . . . . . . . . . . . . A-12
Interface specifications . . . . . . . . . . . . . . . . . . . . . . A-12
Using Commands . . . . . . . . . . . . . . . . . . . . . . . . . . . . A-17
Sending printer commands . . . . . . . . . . . . . . . . . . . . A-17
Using the command summary . . . . . . . . . . . . . . . . . . A-17
Commands Arranged by Topic . . . . . . . . . . . . . . . . . . . . A-18
General operation . . . . . . . . . . . . . . . . . . . . . . . . . A-18
Paper feeding . . . . . . . . . . . . . . . . . . . . . . . . . . . . A-18
Page format . . . . . . . . . . . . . . . . . . . . . . . . . . . . . A-19
Print position motion . . . . . . . . . . . . . . . . . . . . . . . A-20
Font selection . . . . . . . . . . . . . . . . . . . . . . . . . . . . A-21
Font enhancement . . . . . . . . . . . . . . . . . . . . . . . . . A-23
Character handling . . . . . . . . . . . . . . . . . . . . . . . . A-24
Spacing . . . . . . . . . . . . . . . . . . . . . . . . . . . . . . . A-27
Graphics . . . . . . . . . . . . . . . . . . . . . . . . . . . . . . A-27
Bit image . . . . . . . . . . . . . . . . . . . . . . . . . . . . . . A-28
Barcode . . . . . . . . . . . . . . . . . . . . . . . . . . . . . . . A-29
Character Tables . . . . . . . . . . . . . . . . . . . . . . . . . . . . . A-32
International Character Sets . . . . . . . . . . . . . . . . . . . A-32
Graphics Character Tables . . . . . . . . . . . . . . . . . . . . A-32
Index
xiii
Page 16

xiv
Page 17

Introduction
Your new EPSON® 24-pin dot matrix printer combine s a compac t
design and high performance with a wide range of features
offering the high-quality printing and ease of operation you have
come to expect from EPSON printers. Your printer provides the
following:
❏ High speed draft mode printing of up to 440 characte rs at
10 cpi
❏ Easy paper handling, featur in g automatic single sheet and
continuous paper loading from the front paper slot
❏ Eight barcode fon ts and four scalable fonts are available, as
well as one draft an d nine letter quality bit-map font s
❏ Multipart forms printing of one original plus up to four copies
❏ A convenient control panel t h at allo ws direc t s elec tio n of font s
❏ Support of advanced EPSON ESC/P 2 commands and IBM
2390/2391 plu s emulation
❏ Large printable area; 68 line s with A4 size paper
❏ Software utilities, including a printe r driver an d a re mote
control panel utility, that let you make printer settings quickly
and easily
Introductio n
®
1
Page 18

Options
The following options are available for your print er :
❏ Cut-sheet feed er (Hig h c apac i t y , C80673
C80674
envelopes without reload ing. Yo u can cr eat e a double bin
cut-sheet feeder by combining the high capacity and second
bin feeders.
❏ Pull tractor unit (C80032
tractor, improves printing accur acy, wh ic h is es pec ially usef ul
for printing on multipart form s.
❏ Roll paper holder (#8310) allows you to use your printer with
8.5-inch roll paper like that used w ith te lex machines.
❏ Interface cards are available to su pplement the pr inte r’s
built-in parallel interface.
✽
) automatically feeds up to 150 sheets of paper or 25
✽
), when combined with the s tand ar d
✽
; Second bin,
2
Introduction
Page 19

How to Use This Manua l
This manual provides fully illustrated, step-by-step inst ructions
for setting up and operating your printer.
Chapter 1 contains information on unpacking, setting up, testing,
and connecting the printer. Be sure to read this chapter first.
Chapters 2 and 3 include important information on paper
handling and day-to-day operation of your printer.
Chapter 4 ex plain s h ow to use optional accessories with your
printer.
Chapter 5 provides maintenan ce in formation, including
transp ortation guideli nes.
Chapte r 6 c o n tains troublesh ooting tips. If the prin te r does no t
operate properly or the prin ted r esult s are n ot what you expe ct ,
see this chapter for a list of problems and solution s.
The appendix lists the printer’s specifications, comman d s, an d
character tables.
At the end of t h e m a nual you’ll find an index.
Introductio n
3
Page 20

Warnings, Cautions, an d Notes
This guide uses the following conventions:
Warning
s must be followed to avoid bodily injury.
w
Cautions
must be observed to avoid damage to your equipment.
c
Notes
contain important information and useful tips on the operation of
your printer.
4
Introduction
Page 21

Chapter 1
Setting Up the Printer
Choosing a Place for the Printer . . . . . . . . . . . . . . . . . . . . 1-2
Unpacking the Printer . . . . . . . . . . . . . . . . . . . . . . . . . . 1-4
Installing the Ribbon Cartridge . . . . . . . . . . . . . . . . . . . . 1-5
Plugging in the Printer . . . . . . . . . . . . . . . . . . . . . . . . . 1-10
Running the Self Test . . . . . . . . . . . . . . . . . . . . . . . . . . 1-10
Connecting the Printer to Your Computer . . . . . . . . . . . . . . 1-14
Installing the Printer Driver . . . . . . . . . . . . . . . . . . . . . . 1-15
For Microsoft Windows users . . . . . . . . . . . . . . . . . . . . 1-15
For DOS program users . . . . . . . . . . . . . . . . . . . . . . . 1-21
DOS printer utilities . . . . . . . . . . . . . . . . . . . . . . . . . 1-21
1
Setting Up the Printer
1-1
Page 22

Choosing a Place for the Printer
When selecting a place to set up your printer, be sure to follow
these guidelines:
Place the printer on a flat, stable surface, close enough to
❏
the computer for the interface cable to reach it.
Leave adequate room around the printer for easy operation
❏
and maintenan ce.
Avoid locations that are subject to direct sunlight, excessive
❏
heat, moisture, or dust.
Use a properly grounded electrical outlet; do not use an
❏
adapter plug.
Place the printer where you can easily unplug the power
❏
cord.
Avoid electrical outlets controlled by wall switches or
❏
automatic timers. Accidental disruption of power can erase
information in the memory of your printer or computer.
Avoid outlets on the same circuit as large motors or other
❏
appliances that can cause voltage fluctuations.
1-2
Keep the entire computer system away from poten tial
❏
sources of electromagnetic interference, such as
loudspeakers or the base units of cordless telephones.
Setting Up the Printer
Page 23

If you plan to use a printer stand, follow these guidelines:
Use a stand that supports at least 26 kg (57.8 lbs).
❏
Never use a stand that tilts the printer at an angle of more
❏
than 15 degrees from horizontal. If you install a cut-sheet
feeder, the stand must keep your printer level.
If you plan to load continuous paper through the bottom of
❏
the printer, choose a stand that provides an unobstructed
paper path.
Position your printer’s power cord and interface cable so
❏
they do not interfere with paper feeding. If possible, secure
the cables to a leg of the printer stand.
Align the paper stack so that the paper feeds straight into
❏
the tractor’s sprocket units.
Setting Up the Printer
1-3
Page 24
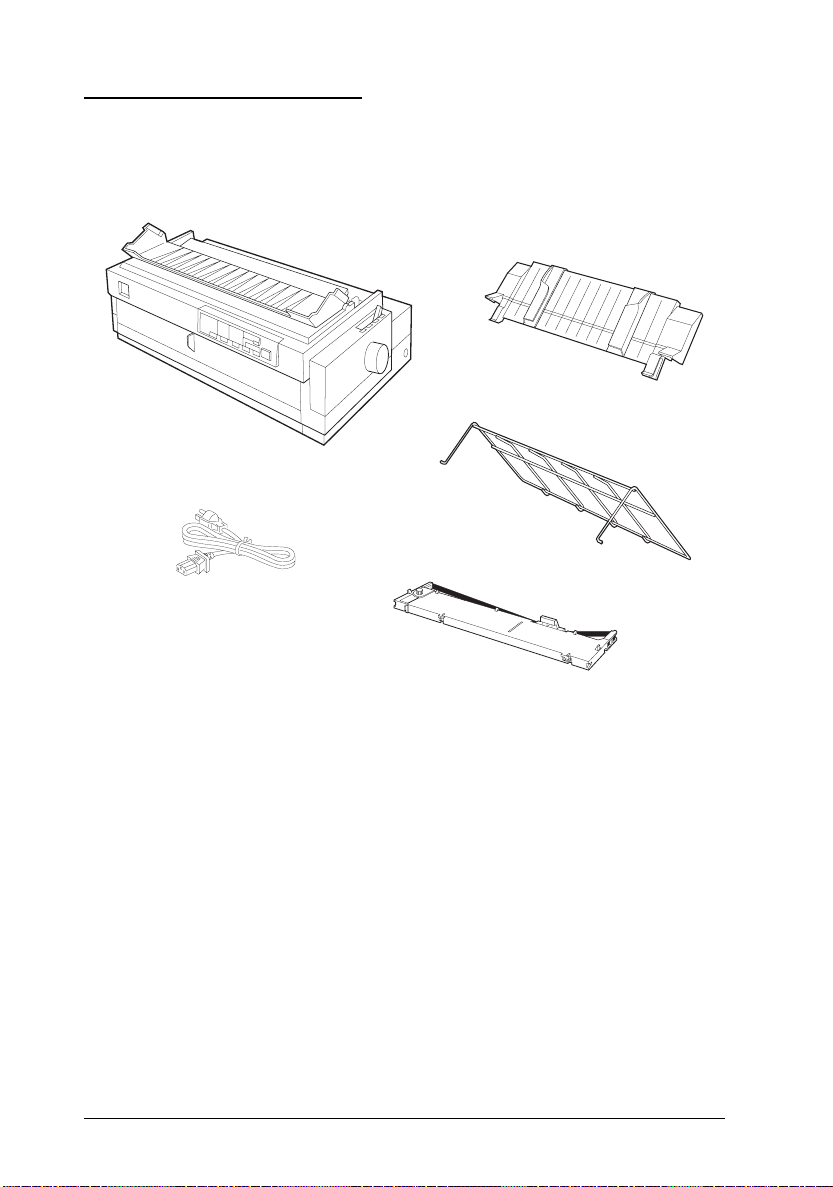
Unpac king the Printer
Your printer box should include an EPSON printer driver disk and
the following items:
paper guide
printer
paper separator
power cord
(230 V version o nly)
ribbon cartridge
Note:
In some locations the power cord may be permanently attached to the
printer.
Keep the packing materials in case you need to transport your
printer.
1-4
Caution
There are several versions of the printer designed for different
c
voltages, and it is not possible to adjust the printer for use at
another voltage. If the label on the back of the printer does not
show the correct voltage for your country, contact your dealer.
Setting Up the Printer
:
Page 25
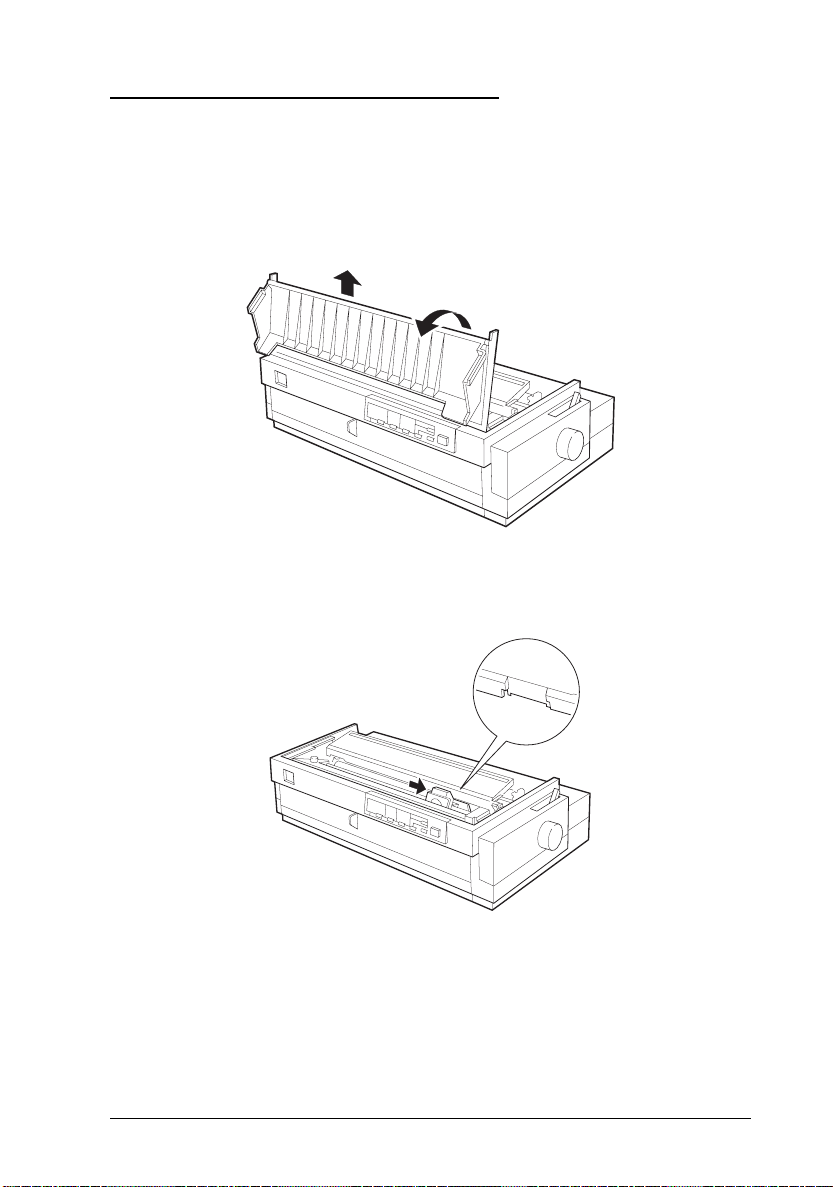
Installing the Ribbon Cartridge
Before installing the ribbon cart ridge, make sure that the power
cord is not plugged into an electrical outlet.
1. Li ft the pri nte r cover up and off.
2. Slide the print head to the ribbon installation position (th e
indented portion of the paper tension unit.)
w
Warning:
Never move the print head while the printer is turned on; this can
damage the pr inter. Also, the print head may beco m e ho t du ring
use. Always let it cool before you touch it.
Setting Up the Printer
1-5
Page 26
3. Remove the plastic separator fr om the middle of the r ibbon
cartridge and discard the separator.
4. Hold the cartridge with the ribbon-tightening knob facing you.
Place the bott om e dge of th e cartridge int o th e printer so that
the notch on each en d of the c artr id g e fit s over the small peg
on each side of the printer .
5. Lay the cartridge flat and press gently until it clicks into place on
both ends.
1-6
Setting Up the Printer
Page 27
6. Lift the ribbon guide and insert it firmly over the metal pins
behind the print head. Press down on the guide until it clicks
into place. Make sure the ribbon is not twisted or c rease d and
that it is in place behind the print head . Turn t he
ribbon-tightening knob to remove any slack in the ribbon.
➁
➀
7. Slide the print head from side to side to make sur e it moves
smoothl y.
Setting Up the Printer
1-7
Page 28
8. Replace the printer cover by first inserting th e fr ont tabs into the
slots near the front of the prin te r; then lower it into place.
9. Attach the paper guide by sliding the slots on the bottom of the
paper guide over the pegs behind the paper tension unit.
1-8
Setting Up the Printer
Page 29
10. Insert the paper separator into the paper guide.
11. Lift the paper path guide and rest it against the paper guide.
Note:
Always close the printer cover before printing. The printer stops printing
when the cover is open.
Setting Up the Printer
1-9
Page 30

Plugging in the Printer
1. Make sure the printer is turned off.
2. Check the label on the back of the printer to make sure the
voltage matches that of y our elec tric al ou t let.
Caution:
If the rated vo ltage a n d yo u r outlet voltage do not m a tch,
c
contact your dealer for assistance. Do not plug in the power
cord.
3. If the power cord is not attached to the printer, connect the
appropriate end to the AC inlet on the printer’s rear panel.
4. Plug the power cord into a properly grounded elec tric al outle t.
Running the Self Test
You can run a self test on the printer in letter q uality or dra ft
mode, with either continuous paper or single sheets. You can load
the pa p er from the rear, f r ont, top, or bottom . The following steps
describe how to run the test on single-sheet paper, loaded from the
top. See Chapter 2 for mor e information on pape r han d lin g .
1-10
Setting Up the Printer
Page 31

The printer prints the self test in the currently selected font.
1. Make sure the printer is turned off and the paper path guide is
open.
2. Move the paper release lever to the s in gle-sheet position.
3. For the letter quality test, hold down the
while you turn on the printer. For draf t pri nting , hold down
the
button while you turn on the printer.
LF/FF
Load/Eject
Setting Up the Printer
button
1-11
Page 32

4. Move the left edge guide until it locks in place next to the arrow
guide mark. Then adjust the right edge guide to match the
width of your paper.
1-13new
Caution:
Run the self test u s i n g pa pe r at least 360 mm (14 inc he s)
c
wide; otherwise, the print head prints directly on the platen.
5. Lift the paper path guide and rest it against the paper guide.
1-12
Setting Up the Printer
Page 33

6. Insert a sheet of paper between the ed ge guid es until it meets
resistance. Make sure you adjust the edge guides to match the
width of your paper. After a few seconds, the printer feeds the
paper to the loading position and begins printin g the se lf test.
Note:
Always close the printer cover before printing. The printer stops
printing when the cover is open.
7. To stop the self test temporarily, press the
8. To end the self test, press the
printer. Here is part of a typical self test:
Pause
button, then turn off the
Setting Up the Printer
Pause
button.
1-13
Page 34

Connecting the Printer to Your Computer
If the self test printed correctly, you are ready to connect your
printer to the computer. Use a 36-pin cable to connect your
computer to your printer’ s built-in parallel interface. Follow these
steps:
1. Make sure both the printer and computer are turned off; then
plug the cable connector securely into the printer’s parallel
interface connec tor. Sq ueeze the wire clips together until they
lock in place on either side of the connector.
Note:
If your cable has a ground wire, connect it to the ground connector
beneath the interface connector.
2. Plug the other end of the cable into the c omput er . (If ther e is a
ground wire at the computer end of the cable, attach it to the
ground connector at the back of the computer.)
1-14
Setting Up the Printer
Page 35

Installing the Printer Driver
The EPSON printer driver is software that helps you take full
advantage of your printer’s capabilities.
The EPSON printer driver disk that came with your printer
includes the driver softwar e as well as tw o utilities to help you
control the printer through DOS.
For Microsoft Windows users
Before you install the driver, make a backup copy of your driver
disk. If you are running Windows 3.1, follow the steps in the next
section to install the printer driver. If you are running Windows
95, see page 1-16 for instruct ion s.
Installing the driver for Windows 3.1 users
Follow these steps to install the printer drive r for W in dows 3.1:
1. Make sure Windows is running.
2. Insert the EPSON driver disk into drive A (or B, depending on
your computer).
3. From the File menu, choose
4. Type
5. Select
A: SETUP
LQ-2170 ESC/P 2
Continue
6. Click
The LQ-2170 print er driver is now installed on y our co mpu te r.
Windows will now u se the L Q-2170 as the default print er .
If you need to change the default printer or port assignment, use
the Printers utility in the Control Panel group.
OK
(or
B: SETUP
as the Printer Model and click
. The printer driver is installed automat ica lly.
.
.
Run
); then click OK.
Setting Up the Printer
1-15
Page 36

Installing the driver for Windows 95 users
Follow these steps to install the printer driver using the Window s
95 plug-and-play capabilities:
Note:
To install the driver using the Windows 95 plug-and-play capabilities,
your compu ter’s parallel port must b e an IE EE-1284 (ECP or EPP
compatible) bidirectional parallel port. See your computer documentation
for more information.
1. Make sure plain paper is loaded in the printer and th e printer is
connected to the computer’s parallel port . (The paper is used
to perform a test prin t in step 11.)
2. Turn off your printer an d co mpu ter, if necessary .
3. Turn on the printer first; then turn on the compu ter. Your
computer begins loading Windows 95.
4. If you defined a password, ente r it at the prompt. You se e th e
New Hardware Found screen.
Note:
If you do not see the New Hardware Found screen, please follow the
procedure under “Installing the driver while running Windows 95”
on page 1-18 instead.
5. Make sure your printer model name is displayed on the screen.
1-16
Then click the
manufacturer
Note:
The next time you turn on your computer after installing the driver,
Windows 95 may display the New Hardware Found screen again. In
this case, click the
. This screen does not appear again.
OK
Setting Up the Printer
Driver from disk provided by hardwar e
button. Do not select any of the other buttons.
Do not install a drive r
radio button; then click
Page 37

6. Click OK. You see the Install From Disk screen.
7. Insert the Windows printe r dr iver d isk in a disk driv e.
8. If you inserted the disk in drive A, click
the drive let ter in the Copy manufacturer’s files from box and
click
9. At the next screen you can type a unique name for the printer in
the Printer name box. We recommend that you keep the model
name as shown. The program will copy the files to your hard
disk and add an icon to the Printers fold er using the pr inte r
name you assign.
To use the p rinter as the d e fault printer f or Windows 95
applications, select
10. Click the
11. In the next screen, select
12. Click the
13. Choose
printed correctly. If it did not print correctly, choose
follow the direction s on the scre en .
To access the driver, see “Ch eck ing the prin te r driver se ttings,”
page 1-19.
.
OK
. (No is the default setting.)
Yes
button.
Next
to print a test page.
YES
button.
Finish
in the test page confirmation dialog if the page
Yes
. Othe rwise, change
OK
No
and
Setting Up the Printer
1-17
Page 38

Installing the driver while running Windows 95
Follow these steps to install the printer drive r for W in dows 95.
1. In the Desktop window, double-click the
2. Double-click the
3. Double-click the
4. Click the
5. Select the
click the
6. Click the
7. Insert the floppy disk containing the dr iver into your computer’s
floppy disk drive.
8. Type
9. Select your printer’ s nam e in the dialog box, then click the
button.
10. Select the port you want to use with this printer.
11. Click the
Next
Local printer
Next
Have Disk
A: WIN95
Next
Printers
Add Printer
button.
button.
(or
button.
folder.
or
Network printer
button.
B: WIN95
icon.
); then click OK.
My Computer
radio button. Then
icon.
Next
12. Select the
setting.
13. Click the
14. Click the
15. Click
16. In the dialog box that appears, choose
1-18
Finish
printed satisfactorily. If it didn’t print satisfactorily, choose
and follow the d ir e c tions that appear on you r sc r een .
No
Setting Up the Printer
or No radio button to make the default printer
Yes
button.
Next
radio button to print a test page.
Yes
.
if the test page
Yes
Page 39

Checking the printer driver settings
Before you start printing, you should make sure that the driver
settings match your document re quirements. While many
Windows applications overr id e the prin te r settings ma de with t he
driver, some do not.
Be sur e to check th e following:
Resolution The printing resolution in dots per
❏
inch (dpi).
Paper size The size of the paper loaded in the
❏
printer.
Orientation The direction of printing on the page
❏
(portrait or landscape).
Paper source Tractor, manual feed, or sheet feeder.
❏
For Windows 3.1 users
Follow these steps to select the appropria te settin gs:
1. In the Main window, double-click the
2. Double-click the
3. Make sure your printer is highlighted, and click the
button i n the Pr i n t S etup menu.
4. Select the paper size you have loaded in the printer fr om the
Paper Size list. If you don’t see your paper size in the list, use
the arrows on the right to scroll through the list. The diagram
on the screen changes according to the paper size you select.
5. Select
6. Select the resolution you desire.
Portrait
screen changes according to the orientation you select.
Printers
or
Landscape
icon.
orientation. The diagram on the
Control Panel
Setting Up the Printer
icon.
Setup
1-19
Page 40

7. Select the paper source.
8. Click
You can control intensity by clicking the arrow to darker or lighter.
You can control dithering by choosing
Line Art
Options
.
to open the opt i on men u .
None, Coarse, Fine
For Windows 95 users
Follow these steps to select the appropria te settin gs:
1. In the Desktop window, click the
2. Select
3. Right-click on your printer icon.
4. Choose
5. Click on the Paper tab, and select the paper size you have loade d
6. Select
Settings
Properties
in the printer from the Paper size list. If you don’t see your
paper size, scroll through the list, and select the cor rect size.
The diagram on the screen ch anges according to the paper size
you select.
Portrait
screen changes according to the orientation you select.
; then click
. The driver tab menus appear.
or
Landscape
Printers
orientation. The diagram on the
Start
.
button.
, or
7. Select the paper source.
8. Select the resolution you desire on
9. Make any other settings you wish, and click
finished.
1-20
Setting Up the Printer
the Graphics m
when you are
OK
enu.
Page 41

For DOS program users
Most DO S software progra ms include drive r s for EPSON ESC/P 2
printers. Also, DOS programs require you to select from a list of
printers to install the print er driver. If the LQ-2170 is not includ ed
in the list, contact your softwar e ma n u fac turer to see if th er e is an
updated driver available or selec t the first printe r available from
the list below.
LQ-1070/1070+
LQ-870/1170
LQ-850+/1050+
LQ-850/1050
LQ-510/550/1010
LQ-200
LQ-500
LQ-860+/1060+
LQ-2550
LQ-2500
LQ-800/1000
LQ-1500
See your DOS program’s documentation for instructions on
selecting the printer driver.
DOS printer utilities
Your printer comes with the EPSON Remote! and EPSON
Calibration utilities. You can use EPSON Remote! to make setting
changes from your computer instead of using the printer’s control
panel. Also, you can use EPSON Calibration to properly align
your printout.
Setting Up the Printer
1-21
Page 42

Installing the printer utilities
To install the utilities, follow these steps:
1. Insert the floppy disk containing the printer utilities into your
compu ter’s disk drive.
2. From the DOS prompt, type
.
Enter
3. In the screen that appears, select your printer’ s name in the
Printer Model window and press
as the default directory. You may change the directory or use
the default.
4. Press
directory on drive C (or to the directory you specified in
step 3).
. All the necessary files are copied to the EPU T IL
Enter
A:SETUP
(or
B:SETUP
. C:\EPUTIL appears
Enter
Using the EPSON printer utilities
To use your EPSON utilities, follow these steps:
1. From the DOS prompt, change th e c urren t directory to th e C
drive.
2. To use the EPSON Remote! utility, type
. To use the EPSON Calibration utility, type
Enter
and press
3. Follow the instructions on the screen to use either utility.
Enter
.
PRNSET
); then press
and pre ss
CALIBRAT
1-22
Setting Up the Printer
Page 43

Chapter 2
Paper Handling
Selecting the Paper Feeding Method . . . . . . . . . . . . . . . . . 2-2
Setting the paper release lever . . . . . . . . . . . . . . . . . . . 2-2
Using Single Sheets . . . . . . . . . . . . . . . . . . . . . . . . . . . 2-3
Loading single sheets from the top . . . . . . . . . . . . . . . . . 2-3
Loading single sheets from the front . . . . . . . . . . . . . . . . 2-6
Using Continuous Paper . . . . . . . . . . . . . . . . . . . . . . . . 2-8
Selecting the tractor position and paper path . . . . . . . . . . . 2-8
Changing tractor positions . . . . . . . . . . . . . . . . . . . . . 2-9
Loading the front push tractor . . . . . . . . . . . . . . . . . . . 2-12
Loading the rear push tractor . . . . . . . . . . . . . . . . . . . . 2-15
Loading the pull tractor . . . . . . . . . . . . . . . . . . . . . . . 2-19
Loading the push/pull tractor . . . . . . . . . . . . . . . . . . . 2-22
Removing paper from the tractor . . . . . . . . . . . . . . . . . . 2-23
Switching Between Continuous Paper and Single Sheets . . . . . . 2-24
Switching to single sheets . . . . . . . . . . . . . . . . . . . . . . 2-24
Switching to continuous paper . . . . . . . . . . . . . . . . . . . 2-25
2
Printing on Special Paper . . . . . . . . . . . . . . . . . . . . . . . . 2-25
Adjusting the paper thickness lever . . . . . . . . . . . . . . . . 2-26
Multipart forms . . . . . . . . . . . . . . . . . . . . . . . . . . . . 2-27
Labels . . . . . . . . . . . . . . . . . . . . . . . . . . . . . . . . . . 2-28
Envelopes . . . . . . . . . . . . . . . . . . . . . . . . . . . . . . . 2-29
Postcards . . . . . . . . . . . . . . . . . . . . . . . . . . . . . . . . 2-29
Roll paper . . . . . . . . . . . . . . . . . . . . . . . . . . . . . . . 2-29
Paper Handling
2-1
Page 44

Selecting the Paper Feeding Method
The printer can accommodate almost any type of paper with front,
rear, and bottom paper slots p lu s a trac to r that ca n be moun t ed in
two different positions—front and top.
This chapt er expl ains the variou s methods of pa p er ha n dlin g an d
includes recommendations on the feeding methods best suited to
your specific needs.
Setting the paper release lever
First you need to set the paper release lever for the type of paper
and feeding method you want to use. The paper release lever has
four positions, with icons indicating the type of paper and paper
path for each position.
PULL
2-2
Paper Handling
Page 45

Single-sheet position—for all single sheets (including
envelopes and postcards) , whether loaded from
front, top, the optional cut-sheet feeders, or the roll
paper holder.
Front push and front push/pull tractor position—for
continuou s paper when the tractor unit is installed
in the front.
Rear push and rear push/pull tractor position—for
continuou s paper when the tractor unit is installed
in the rear.
Pull tractor posi tion—for continuous paper when
the tractor unit is installed on the top. In this case,
you can load paper from the front , rear, or bottom.
Using Single Sheets
You can print on single sh eets of paper from 101 to 420 mm (4.0 to
16.5 inches) wide. You c an load sing le sheets from either the top or
front of the printe r.
Loading single sheets from the top
1. Move the paper release lever to the single-sheet position. Make sure
the paper guide is installed and the paper path guide is open.
Paper Handling
2-3
Page 46

2. Turn on the printer. Slide the left edge guide until it stops next to
the arrow on the paper guide. Then adjust the right edge
guide to match the width of your paper.
3. Lift the paper path guide and rest it against the paper guide.
2-7new
2-4
Paper Handling
Page 47
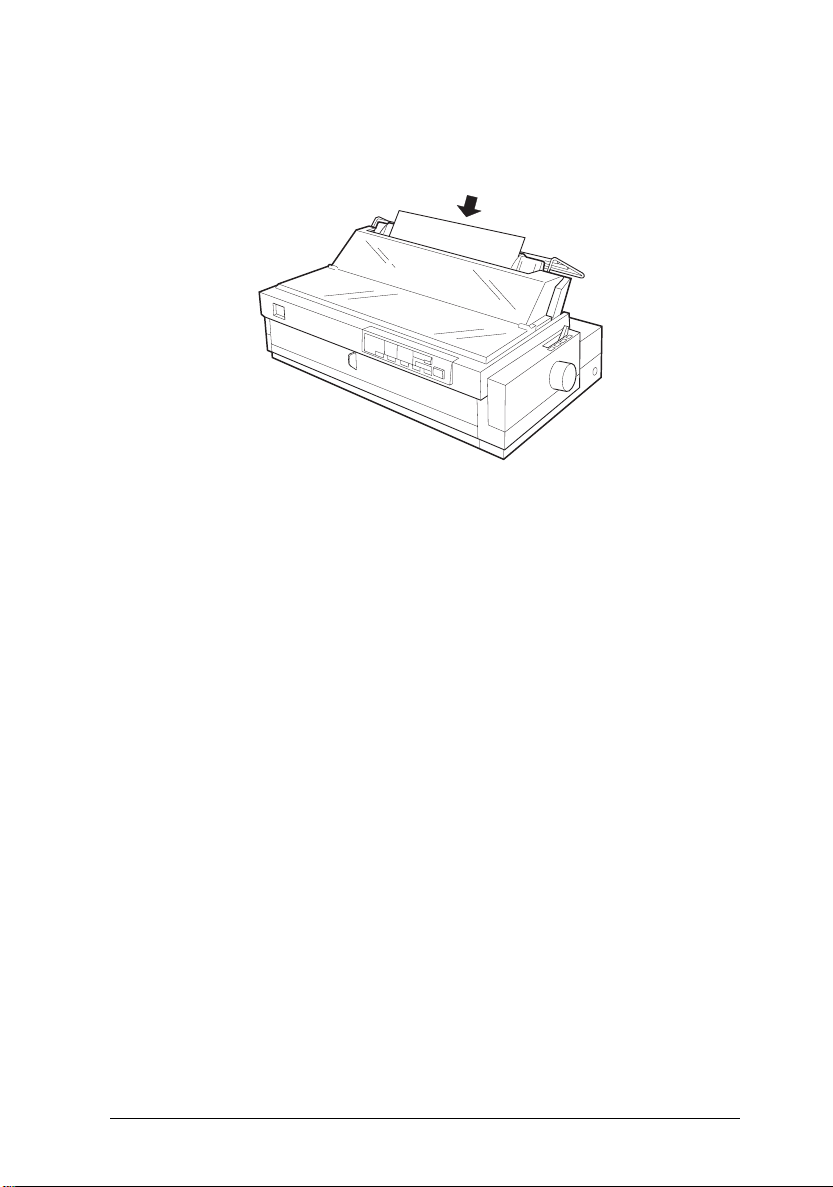
4. Insert the paper firmly between the edge guides until it meets
resistance. After a few seconds, the printer advances the paper
to the loading position. You are now rea dy t o print.
Note:
Always close the pr inte r co ve r befo r e prin ting. The printer stop s prin ting
when the cover is open.
Caution
Do not use the knob on the right side of the printer except to clear
c
paper jams when the printer is off. Otherwise, you may damage
the printer or cause it to lose the top-of-form position.
If the platen tur ns but the printer doesn’t load the p aper,
completely remove the paper and re-insert it more firmly.
To eject the paper, press the
:
Load/Eject
button.
Paper Handling
2-5
Page 48

Loading single sheets from the front
1. Move the paper release lever to the single-sheet position and
open the front cover. Make sure the paper path guide rests
against the paper guide.
2. Turn on the printer.
3. Position the left edge guide as shown below. (Printing starts at
the arrow mark.) See the Appendix for more information on
the left margin position.
2-6
Paper Handling
Page 49

4. While aligning the paper’s left and right edges with the edge
guides, insert the paper firmly until it meets resistance. After a
few seconds, the printer loads the paper to the loading
position. You are now ready to print.
Note:
Always close the pr inte r cover before printing . T he pr inte r st ops printing
when the cover is open.
Caution
Do not use the knob on the right side of the printer except to clear
c
paper jams when the printer is off. Otherwise, you may damage
the printer or cause it to lose the top-of-form position.
If the platen tur ns but the printer doesn’t load the p aper,
completely remove the paper and re-insert it more firmly.
To eject the paper, press the
:
Load/Eject
button.
Paper Handling
2-7
Page 50

Using Continuous Paper
The printer’s paper-handling system allow s you to load
continuous paper through the front, rear, or bottom.
You can print on continuou s pa per from 101 to 406 mm (4 to 16
inches) wide.
To print on continuous paper, you need to install the tractor unit
in the front or pull position. Be sure you set the paper release lever
correctly.
Note:
The rear push tractor cannot be removed.
Selecting the tractor position and paper path
The table below lists the different way to feed continuous paper.
Always set the paper release lever to the position indicated for the
paper feed method you are using.
Tracto r
position
Front push
tractor and
front push/pull
Rear push
tractor and
rear push/pull
Pull tract o r
2-8
Paper Handling
Paper release
lever position Paper paths
Page 51

Make sure you align your paper supply with the paper loaded in
the trac tor so the paper fee ds smoothly int o the printe r .
If you feed paper through the bottom paper slot, use a printer
stand that has a large enough opening for paper to feed from the
bottom without obstruction.
Changing tractor positions
You can use the removable tractor unit as either a fr ont push
tractor or a pull tractor; you just change the tractor position
according to your paper feeding method.
Note:
The rear push tractor cannot be removed.
Using the front push tractor position
Before installing the tractor in the front position, you need to
remove it from its c u rrent position (t op ) b y p re ssing the tractor’s
lock tabs while you lift it off the printer.
1. Make sure the printer is turned off.
Paper Handling
2-9
Page 52

2. Open the front paper guide and remove it by grasping the fins
on both sides and pulling it straight out of the printer.
front paper guide
Note:
When loading multipart forms that are bound on only one side by
line gluing, always use the rear push tractor. This type of form
cannot be fed from the fro n t pus h tr ac to r.
3. Push the tractor into the prin ter’s mounting sl ot a s shown be l ow .
You are now ready to load co nt inu ous pap er wit h the fron t
push tr actor.
2-10
To remove the tractor unit, press its lock tabs, tilt it forward, and
lift it out of the printer.
Paper Handling
Page 53

Using the pull tractor position
Before installing the tractor in the top position, you need to
remove it from its c u rr en t p os i ti on (fr on t) by pressing t he t ractor’s
lock tabs while you lift it off the printer.
1. Make sure the printer is turned off.
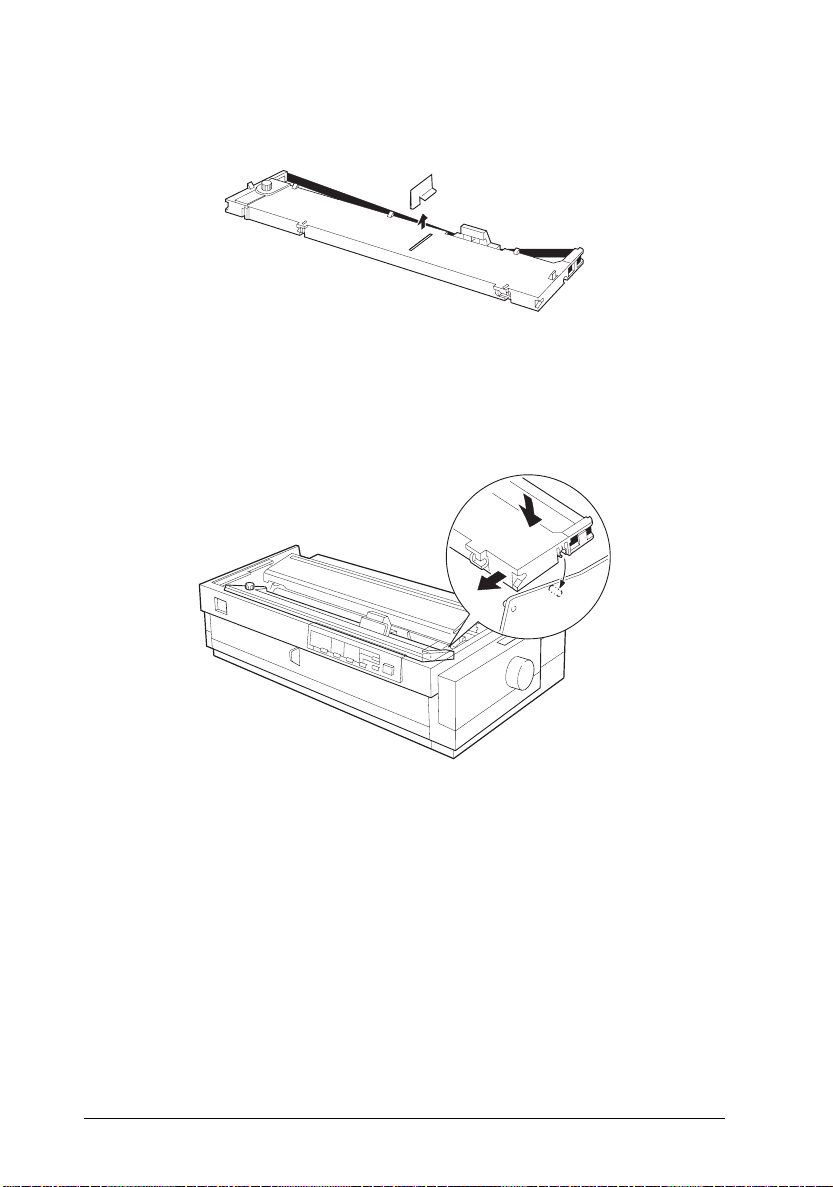
2. Lift the printer cover and paper guide up and off the print er.
3. Grasp both ends of the clear plastic paper-tension unit, raise the
front of the unit, and lift it off the printer.
Note:
Check the paper thickness lever position to ensure that it wasn’t moved
during pull tractor installation. See “Adjusting the paper thickness
lever” later in this chapter for the correct lever position.
:
Paper Handling
2-11
w
Warning
Never move the print head while the printer is turned on; this can
damage the printer. Also, if you just used the printer, the print
head may be hot. Let it cool for a few minutes before touching it.
Page 54

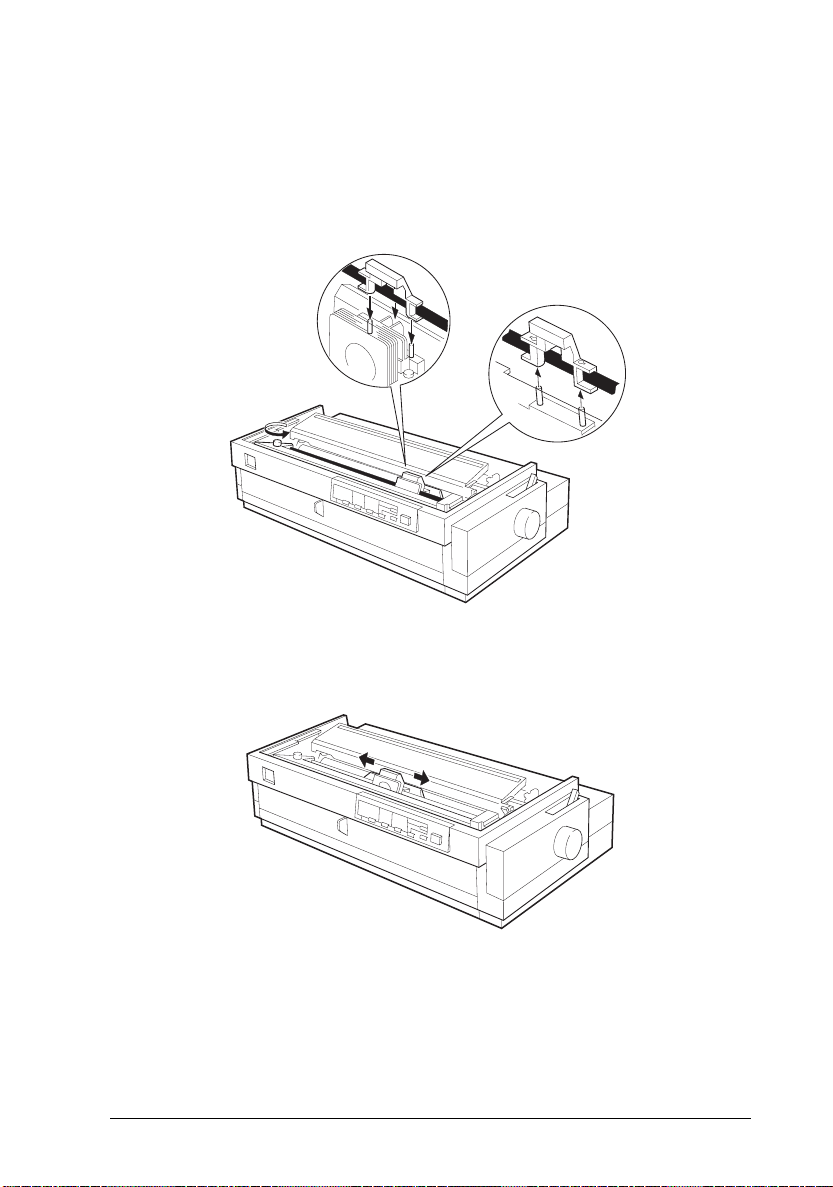
4. Push the tractor into the p rin ter’s mounting slot a s shown below.
To remove the tractor unit, hold down its lock tabs, tilt it back, and
lift it off the printer.
Loading the front push tractor
1. Make sure the printer is turned off.
2. Remove the front paper guid e as shown below. Make sur e the
tractor is in the front m ou nting slot and the pap e r re l e ase lever
is set to the fro n t pu sh tractor pos iti on.
2-12
Paper Handling
Page 55

3. Release the sprockets by pushing the sprocket locks backward.
4. Position the left sprocket as shown below. (Printing s tarts at the
arrow mark.) See the Appendix for more information on the
left margin position.
5. Lock the sprocket in place. Then slide the right sprocket to match
the width of your paper, but do not lock it.
Paper Handling
2-13
Page 56

6. Make sure your paper has a clean, straight edge. Then open the
sprocket covers and fit the holes of the pape r ov e r the tractor
pins.
7. Close the sprocket covers.
8. Slide the right sprocket to remove any slack in the paper; then
lock it in place.
9. Attach the front paper gui de.
10. Slide the left and right edge guides to the center of the paper
exit path.
2-14
Paper Handling
Page 57

11. Turn on the printer. When the printer receives data, it
automatically loads the paper before printing.
Note:
❏
Always close the printer cover before printing. The printer stops
printing when the cover is open.
❏
You can also advance the paper to the loading position by
pressing the
❏
Advance the paper behind the printer guide as shown below.
Make sure the paper path guide rests against the paper guide.
Caution:
Do not use the knob on the right side of the printer except to clear
c
paper jams when the printer is off. Otherwise, you may damage
the printer or cause it to lose the top-of-form position.
Load /Eject
button.
Loading the rear push tractor
1. Make sure the printer is turned off.
2. Remove the printer cover and paper guide.
Paper Handling
2-15
Page 58

3. Make sure the paper release lever is set to the rear push tractor
position.
4. Release the sprockets by pushing the sprocket locks forward.
2-16
Paper Handling
Page 59

5. Slide the left sprocket to the left margin of the paper using the
scale on the printer as shown below. (Printing starts at th e “0”
mark. See the Appendix for more information on the left
margin position.) Then slide the right sprocket to match the
width of your paper, but do not lock it.
15
10
5
0
-5
6. Make sure your paper has a clean, straight edge. Then open the
sprocket covers and fit the holes of the pape r ov e r the tractor
pins.
7. Close the sprocket covers.
Paper Handling
2-17
Page 60

8. Slide the right sprocket to remove any slack in the paper; then
lock it in place.
9. Attach the printer c ove r and paper gui de .
Note:
Advance the paper behind the printer guide as shown below. Make
sure the paper path guide rests against the paper guide.
10. Slide the left and right edge guides to the center of the paper
guide.
11. Turn on the printer. When the printer receives data, it
automatically loads the paper before printing.
Note:
❏
Always close the printer cover before printing. The printer stops
printing when the cover is open.
❏
c
2-18
You can also advance the paper to the loading position by
pressing the
Caution:
Do not use the knob on the right side of the printer except to clear
paper jams when the printer is off. Otherwise, you may damage
the printer or cause it to lose the top-of-form position.
Paper Handling
Load /Eject
button.
Page 61

Loading the pull tractor
1. Make sure the printer is turned off.
2. Remove the printer cover and paper guide.
3. Make sure the tractor is in the pull tractor position and the paper
release lever is set to the pull tractor position.
4. Release the sprockets by pushing the sprocket locks forward.
Paper Handling
2-19
Page 62

5. Slide the left sprocket to the left margin of the paper using the
scale at the rear of the tracto r as a guid e. (P rint ing s tar ts at t he
“0” mark. See the Appendix for more infor mat ion on the left
margin position.) Then slide the right sprocket to match the
width of your paper, but do not lock it.
6. Make sure your paper has a clean, straight edge. Open the
sprocket covers and insert paper from either the top, rear, or
bottom paper slot. Then fit the holes of the paper over the
tractor pins.
7. Close the sprocket covers.
8. Slide the right sprocket to remove any slack in the paper; then
lock it in place.
2-20
Paper Handling
Page 63

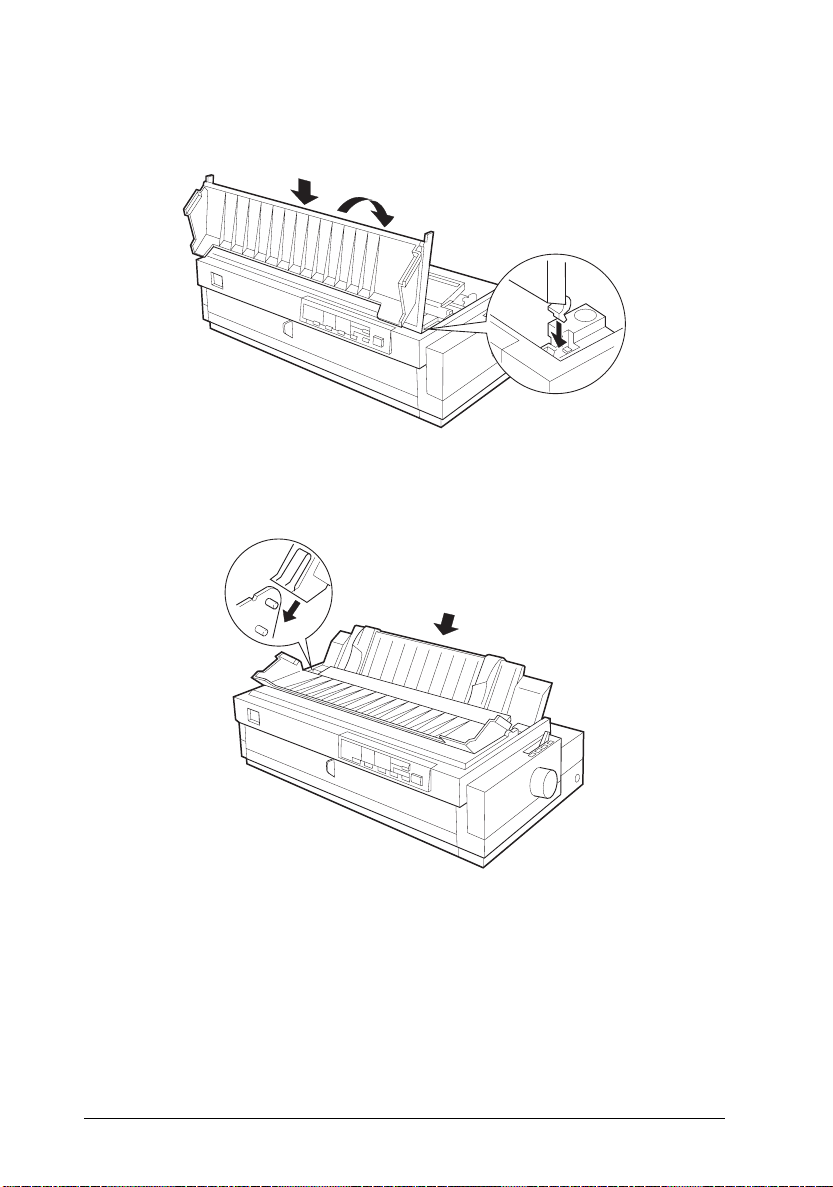
9. Attach the printer c ove r and paper gui de .
Note:
Advance the paper behind the printer guide as shown below. Make
sure the paper path guide rests against the paper guide.
10. Slide the left and right edge guides to the center of the paper
guide.
11. Turn on the printer. When the printer receives data, it
automatically loads the paper before printing.
Note:
❏
Always close the printer cover before printing. The printer stops
printing when the cover is open.
❏
You can also advance the paper to the loading position by
pressing the
Load /Eject
button.
c
Caution:
Do not use the knob on the right side of the printer except to clear
paper jams when the printer is off. Otherwise, you may damage
the printer or cause it to lose the top-of-form position.
Paper Handling
2-21
Page 64

Loading the push/pull tractor
To use the push and pull tractors in combination, you must first
purchase the optional pull tr ac to r. See Ch apter 4 for more
information on printer options.
Note:
The standard rear push tractor cannot be removed.
To load paper in the tractor, follo w th e se ste p s :
1. Make sure the tractor is in the push/pull tractor position and the
paper release lever is set to either the front push or rear push
tractor positi on.
2. Load paper in the front or rear push trac to r as des cr ibed in the
previous sections.
3. Push the
4. Fit the p a p e r to th e p u l l tractor’s sprocket as described in the
previous section.
5. Move the paper release lever to the pull tractor position, and use
micro adjust (described in the next chapter) to remove any
slack in the paper.
6. Move the paper release lever back t o the push tractor position.
7. Attach the paper guide and printer cover.
2-22
Paper Handling
LF/FF
button to advance the paper to the next page.
2-36new
Page 65

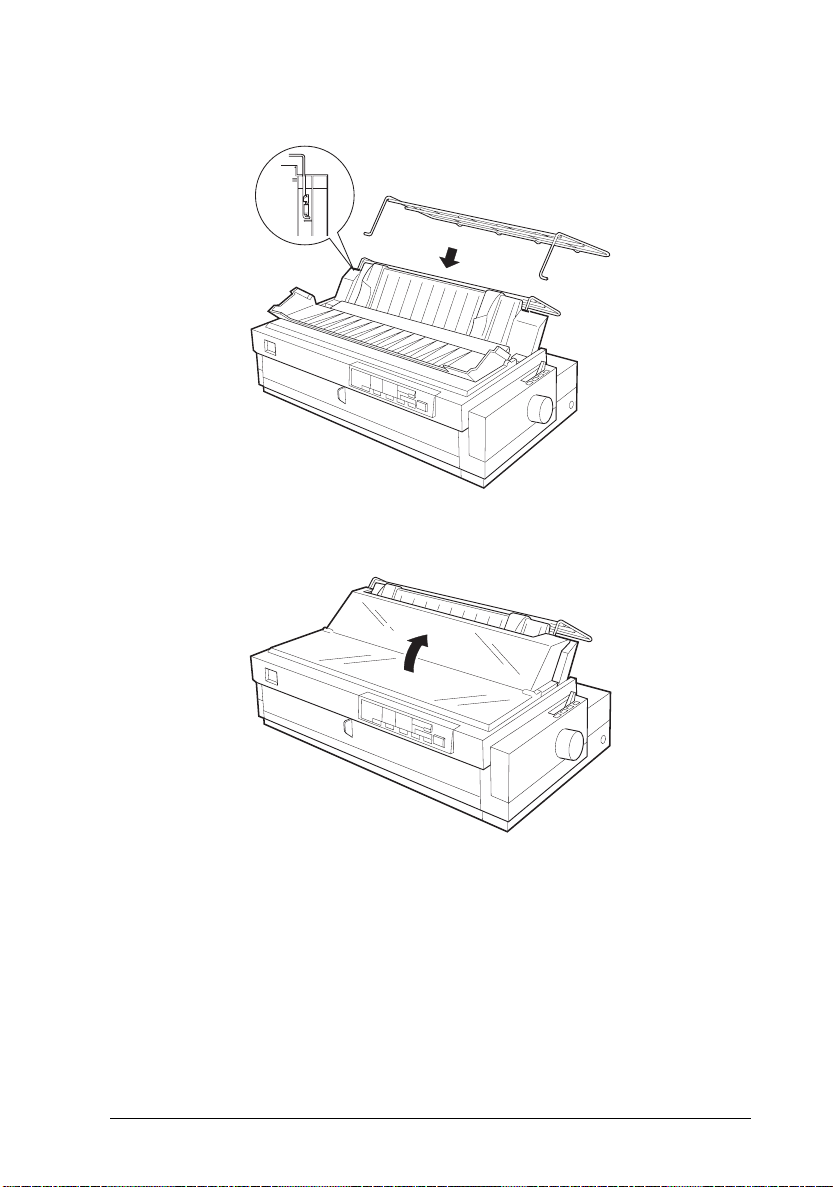
8. Slid e th e lef t an d ri gh t ed g e g uid es to th e ce n te r of t he p a per gui d e.
9. Raise the paper path guide and rest it against the paper guide.
Caution:
Do not use the knob on the right side of the printer except to clear
c
paper jams when the printer is off. Otherwise, you may damage
the printer or cause it to lose the top-of-form position.
Note:
❏
Always close the printer cover before printing. The printer stops
printing when the cover is open.
❏
Advance the paper behind the printer guide as shown below.
Make sure the paper path guide rests against the paper guide.
Removing paper from the tractor
1. To remove continuous paper, press the
the paper’s perforation to th e te a r- of f edge of the pr in te r cover.
Note:
If the page perforation is not properly aligned with the tear-off edge,
you can adjust the tear-off position using micro adjust. See Chapter
3.
2. Tear off the paper.
3. Press the
backward out of the printer and into the standby position.
Load/Eject
button to f e ed the continuous paper
Tear Off/Bin
Paper Handling
button to feed
2-23
Page 66

button. Reverse feeding several pages at a time may
c
Caution:
Make sure you tear off your printed document before pressing the
Load/Eject
cause a paper jam.
Switching Between Continuous Paper and Single
Sheets
When using the push tr ac tor in the fron t or rear p osit ion , you can
easily switch between continuous and single-sheet printing
without removing the paper.
Switching to single sheets
To switch from continuous paper to single sheets, follow these
steps:
1. If any printed sheets remain in the printer, press the
Tear Off/Bin
position.
2. Tear off the printed pages.
button to advance the paper to the tear-o ff
Caution:
❏
c
3. Press the
4. Move the paper release lever to the single-sheet position.
5. Adjust the edge guides to match the width of your paper.
2-24
Always tear off paper before back-feeding paper through
the printer; back-feeding too many sheets can cause a
paper jam.
❏
Never back-feed labels. Labels can easily come off their
backing and jam the printer.
Load/Eject
paper backward to the standby position. The paper is still
attached to the push tr a ctor but is no lon g e r in the pa p e r path.
Paper Handling
button. The printer feeds the continuous
Page 67

You can now load single sheets as described in “Using Sin gle
Sheets,” earlier in this chapter.
Switching to continuous paper
To switch from single sheets back to continuous paper, follow
these steps:
1. If a single sheet is in the paper path, press the
button to e ject it.
2. Move the paper release lever to the push or pull tractor position.
The printer advances the continuous paper to the loading position
when it receives data.
Load/Eject
Printing on Special Paper
In addition to printing on single sheets and continuous paper,
your printer can print on a wide variety of other paper types, such
as envelopes, labels, postcards, roll paper, and multipart forms.
Before printing on special types of paper, you need to change the
paper thickness setting.
Caution:
❏
c
When printing on labels or multipart forms, make sure
that your software settings keep the printing entirely
within the printable area.
❏
Always return the paper thickness lever to position 0
when you return to printing on ordinary paper.
Paper Handling
2-25
Page 68

Adjusting the paper thickness lever
Set the paper thickness lever to match the thickness of your paper
according to the table below.
-
1
0
1
2
3
4
5
6
7
Paper type Lever position
Thin pape r 0 or 1
Ordinary paper (single sheets or contin uous) 0
Multipart forms (carbonless)
2 sheets (original + 1 copy)
3 sheets (original + 2 copies)
4 sheets (original + 3 copies)
5 sheets (original + 4 copies)
1
2
3
5
Labels, Postcards 2
Envelopes 2 to 6
Note:
❏
When operating your printer under low temperature conditions
(5°C or less), set the lever one position lower to improve print
quality.
❏
When operating your printer under high temperature conditions
(35°C or more), set the lever one position higher to improve print
quality.
2-26
Paper Handling
Page 69

Multipart forms
Your printer can print on both single-sheet and continuous
multipart forms. You can load single-sheet multipart forms in both
the front and top paper slot s. You can load continuous mult ip art
forms from the front , rear, an d bottom.
Note:
Use only carbonless multipart forms.
You can use multipart forms of up to five parts, including the
original. Make sure you set the paper thickness lever to the proper
position.
You load multipart form s the same w ay as s i ngle s heets or
continuous paper. For best results with continuous multipart
forms, you should use the tractor installed in the pull tractor
position and load paper fr om either the front or rear trac to r. Wh en
you load paper from the front, you must use the optional pull
tractor because the rear push tractor cannot be removed.
For details, see “Using Single Sheets” or “Loading Continuous
Paper,” earlier in this chapter. Also be sure to set the loading
position as described in “Micro Adjust” in Chapter 3.
c
Caution:
❏
When printing multipart forms, make sure the printing
stays entirely within the printable area of the forms. (For
more information on the printable area, see the Appendix.)
❏
Use multipart forms only under normal operating
conditions.
❏
When loading single-sheet multipart forms that are bound
at the top by line gluing, always use the top paper path. (If
you plan to print on forms that are joined at either the top
or side by line gluing, use the front paper path.)
❏
Load multipart forms that are free of wrinkles and waves.
Paper Handling
2-27
Page 70

Labels
When selecting labels for printing, always choose the type
mounted on a continuous backing sheet with sprocket holes for
use with a tractor. Do not try to print labels as single sheets
because the shiny backing sheet does not feed properly.
Load labels from either the front or botto m (n ot rear) pa per slo ts
with the tractor in the pull tractor position. You load them the
same way that you load continuous paper, except you set the
paper thickness lever to position 2. See “Using Continuous Paper”
earlier in this chapter for details.
Caution:
c
❏
Never feed labels backward with the
Off/Bin
jam the printer.
❏
Since labels are especially sensitive to temperature and
humidity, use them only under normal operating
conditions.
❏
Do not leave labels loaded in the printer between jobs; they
curl around the platen and may jam when you resume
printing.
buttons. Labels can easily peel off the backing and
Load/Eject
or
Tear
2-28
❏
To remove labels from the paper path after you finish
printing, first tear off the labels at a point before the paper
slot. Then use the
labels out of the printer.
Paper Handling
LF/F F
button to advance the remaining
Page 71

Envelopes
You can load envelopes only from the top paper slot, following
the guidelines below:
Always set the paper thickness lever to position 2 to 6 to
❏
match the thickness of the envelope.
Always feed an envelope by pushing the wide edge into
❏
the printer until it meets resistance.
Caution:
❏
c
Use envelopes only under normal operating conditions.
❏
Printing on the edge of an envelope can damage the print
head. Make sure the printing stays entirely within the
printable area of the envelopes. See the Appendix for
details.
Postcards
You can load postcards from the front and top paper slots. Load
cards only under normal operating conditions. Set the Card mode
using the
button description s in Ch apter 3 for more infor mat ion .
Tear Off/Bin
button. See the
Tear Off/Bin
light and
Note:
❏
When the length of the card is less than 14.8 cm (5.8 inches), use
the top paper slot. See the Appendix for details.
❏
Use postcards only under normal operating conditions.
Roll paper
Load roll paper from the top paper slot. See “Roll paper holder” in
Chapter 4 for more informatio n.
Paper Handling
2-29
Page 72

2-30
Paper Handling
Page 73

Chapter 3
Using the Printer
Control Panel . . . . . . . . . . . . . . . . . . . . . . . . . . . . . . . 3-2
Lights . . . . . . . . . . . . . . . . . . . . . . . . . . . . . . . . . . 3-2
Buttons . . . . . . . . . . . . . . . . . . . . . . . . . . . . . . . . . 3-4
Other control panel features . . . . . . . . . . . . . . . . . . . . . 3-6
Changing the Default Settings . . . . . . . . . . . . . . . . . . . . . 3-7
Selecting an instruction sheet language . . . . . . . . . . . . . . 3-7
Selecting items and changing settings . . . . . . . . . . . . . . . 3-7
Default setting item functions . . . . . . . . . . . . . . . . . . . . 3-9
Micro Adjust . . . . . . . . . . . . . . . . . . . . . . . . . . . . . . . 3-13
Tear-Off . . . . . . . . . . . . . . . . . . . . . . . . . . . . . . . . . . 3-15
Using auto tear-off mode . . . . . . . . . . . . . . . . . . . . . . 3-16
Using the Tear Off/Bin butto n . . . . . . . . . . . . . . . . . . . 3-17
Bi-d Adjustment . . . . . . . . . . . . . . . . . . . . . . . . . . . . . 3-17
Barcode Printing . . . . . . . . . . . . . . . . . . . . . . . . . . . . . 3-18
3
Using the Printer
3-1
Page 74

This chapter covers basic operation of your printer, including the
control panel lights and buttons, the printer’s default settings, and
other functi on s.
Control Panel
The indicator lights on the control panel let you monitor the
current status of the printer, and the buttons let you control many
printer settings.
Lights
Draft
Roman
Sansserif
Courier
Prestige
Script
Others
Font Pitch Tear Off/Bin
10 cpi
12 cpi
15 cpi
17 cpi
20 cpi
PS
Tear Off
Bin 1
Bin 2
Card
Micro Adjust 3sec
LF/FF Load/Eject
Pause
3-1new
Paper Out
Operate
Paper Out
(red)
On when the printer runs out of paper or paper is jammed.
Pause
(orange)
On when the printer is not ready to print data, paper is out or
jammed, or the cover is open. The
press the
Pause
button to p au se printing. The
Pause
light is off, unless you
Pause
when the micro adjust function is enabled or the print head is too
hot.
3-2
Using the Printer
light flashes
Page 75

Tear Off/Bin
Tear Off/Bin
The
(two lights, green)
selection status is displayed by two lights:
Tear off position
Bin 1
Bin 2
Card
= Flashing, = On, = Off
* Both lights are off when continuous paper is not in the tear-off position.
* You can print postcards in Card mode.
Font
(three lights, green)
The font selection status is displayed by three font lights on the
control panel:
Draft
Roman
Sans Serif
Courier
Prestige
Script
Others
= On, = Off
* Others means the font selected in the Default Setting mode.
Using the Printer
3-3
Page 76

Pitch
(three lights, green)
The pitch selection status is displayed by three pitch lights:
10 cpi
12 cpi
15 cpi
17 cpi
20 cpi
PS (Proportional spacing)
= On, = Off
Note:
All of the lights above a re o n when a fatal error occurs.
Buttons
Operate
Press this button to turn the printer on or off.
Pause
Press this button to temporarily stop printing and to resume
printing. Holding it down for at least 3 seconds when the printer
is in the standby mode enables the micro adjust func tio n. Pressing
it again disables this function. See “Micro Adjust” later in this
chapter for details.
Load/Eject
Press this button to load single-sheet or continuous paper to the
loading position. However, the printer normally loads paper
automatically. If single-sheet paper is already in the loading
position, use this button to eject the sheet. If continuous paper is
in the loading or tear-off position, press this button to feed it
backward to the standby position.
3-4
Using the Printer
Page 77

LF/FF
(line feed/form feed)
Press this button briefly to feed the paper forward one line. Hold
the button down to eject a single sheet of paper or advanc e
continuous paper to the top of the next page. You can also use this
button to load a single sheet of paper from the cut -sheet feeder or
to feed continuous paper from the standby position to the loading
position.
Tear Off/Bin
Pressing this bu tton mo ves a page to th e te ar-off position, and
pressing it again moves the next page to the top-of-feed position.
When cut sheets are used, pressing it selects the cut-sheet feed bin
number. Use the Card mode (Bin 1 selected) to print on postcards.
Font
Press this button to select one of the following fonts:
Draft, Roman, Sans Serif, Courier, Prestige, Script, or Other*
* ”Other” means the font selected in the Default Setting mode.
Pitch
Press this button to select one of the following pitches:
10 cpi, 12 cpi, 15 cpi, 17 cpi, 20 c pi, or prop ortion al sp acing (PS).
Note:
The typestyle samples on the control panel are meant as guides only;
actual printed results may differ slightly.
Using the Printer
3-5
Page 78

Other control panel features
The control panel also gives you to access to several other
functi ons. To activate the functions listed b el o w, turn on the
printer while pressing one of buttons, as follows:
Load/Eject
LF/FF
Pitch
Load/Eject
Pause
and
LF/F F
Performs a letter quality self test.
See Chapter 1 for details.
Performs a draft self t est. See
Chapter 1 for details .
Activates the Default Setting mode.
See “Changing the Default Settings”
in this chapter.
Prints a data dump. All the input
data are printed as hexadecimal
numbers and corresponding
characters. See “Problems and
Solutions” in Chap t er 6.
Starts the Bi-d adjustmen t. See “B i-d
Adjustment” in this chapter.
3-6
Using the Printer
Page 79

Changing the Default Settings
The default settings control many basic functions of the printer.
While you can control many of these functions through your
software or printer driver, you may sometimes need to change a
default setting from the printer’s control panel through the Default
Setting mode.
To enter Default Setting mode, hold down the
turning on the printer. The printer prints an instruction sheet.
Follow the instructions on this sheet, and in this section, to change
settings using the Default Setting mode.
Pitch
button while
Selecting an instruction sheet language
Follow these steps to select the language in which you want to
print the rest of the Default Setting mode instructions:
1. Press the
language you want to select.
2. Press the
3. Press the
Pitch
button until the
Tear Off/Bin
Font
button to print out the instruction.
button to save your selection.
Pitch
lights indicate the
Selecting items and changing settings
Follow the steps below to select items and change their settings.
The available items and settings are listed on the instruction sheet
and in the table on the next page.
1. Press the
you want to change.
2. Press the
for that item is indicated by the
lights.
Pitch
button until the
Tear Off/Bin
Pitch
lights indicate the item
button until the setting you want to use
Tear Off/Bin
Using the Printer
and
Pause
3-7
Page 80

3. Repeat steps 1 and 2 for any addit ion al items you want to
change. Each time you press the
Tear Off/Bin
button, the
printer saves the settings you selected.
4. When you finish changing the settings, turn off the printer.
The following table lists the items you can change and their
available settings. Each item is described in the following section.
Item Settings
Character table Standard model:
Italic, PC 437, PC 850, PC 860, PC 863,
PC 865, PC 861, BRASCII, Abicomp,
ISO Latin 1, Roman 8
All other models:
Italic, PC 437, PC 437 Greek, PC 850,
PC 852, PC 853, PC 855, PC 857,
PC 864, PC 866, PC 869,
ISO Latin 1T, ISO 8859-7, MAZOWIA,
Code MJK, Bulgaria, Estonia, PC774,
ISO Latin 2, PC 866 LAT.
Internat ional character set for
Italic table
Font *1 OCR-B, Orator, Orator-S, Script C,
Page length for front tractor 3, 3.5, 4, 5.5, 6, 7, 8, 8.5, 11, 70/6, 12,
Page length for rear tractor 3, 3.5, 4, 5.5, 6, 7, 8, 8.5, 11, 70/6, 12,
High speed draft On, Off
Print direction Auto, Bi-d., Uni-d.
Software ESC/P 2, IBM 2391 plus
Interface mode Auto, Parallel I/F, Option I/F
Auto interface wait time 10 sec., 30 sec.
Input buffer On, Off
Italic U.S.A, Italic France,
Italic Germany, Italic U.K.,
Italic Denmark, Italic Sweden, Italic
Italy, Italic Spain
Roman T, Sans Serif H
14, 17 inches
14, 17 inches
3-8
Using the Printer
Page 81

Item Settings
Skip-over-perfo ration On, Off
Auto tear off On, Off
Auto line feed On, Off
Auto CR *2 On, Off
AGM *2 On, Off
0 slash On, Off
Buzzer On, Off
Roll paper On, Off
*1 One of the fonts selected in the Default Setting mode corresponds to
Other on the control panel. The following fonts are not selected in the
Default Setting mode: Draft, Roman, Sans Serif, Courier, Prestige, and
Script.
*2 These settings are effective when IBM2391 Plus emulation is selected.
Default setting item functions
This section describes each of the default setting item functions.
Character tabl e
Your printer has 11 stand ar d c hara ct er tables as well as tables for
20 other countries. See the App en d ix for character samp les.
International character set for Italic table
You can change 8 characters in the Italic chara cter table to su it
your printing needs. Since these characters are often used in oth er
languages, they are named after cou ntries an d are referred to as
international character sets . See the Appen dix for char ac ter
samples.
Using the Printer
3-9
Page 82

Font
You can select 6 fonts in D efault Sett ing mo de. The following fonts
are indicated on the control panel and can’t be selected by default
settings: Draft , Roman , San s Seri f, Cour ier, Pres tige, an d Scr i pt.
Page length f or front and rear tractor
For pap e r f ed through the fr on t or rear tractor, you can set the
page length to one of the following : 3, 3.5, 4, 5. 5, 6, 7, 8, 8. 5, 11,
70/6, 12, 14, or 17 inch es.
High speed draft
When you select high speed draft, the printer can print up to 440
cps (characters per secon d ) at 10 cpi in draft mode. If you select
normal speed draft, it prints up to 330 cps at 10 cp i in dra ft mode.
Print direction
You can select auto print direction, unidirectional printing, or
bidirectional printing. Printing is normally bidirectional; however,
unidirectional printing allows for precise vertical printing
alignment.
Software
When you select ESC/P 2, the printer operates in the EPSON
ESC/P 2 mode. Wh en you select IB M, th e print er emulates an IBM
printer.
Interface mode
The printer has two interfaces: parallel and Type-B (option al).
You can choose par allel, optional, or au tom atic for the interf ac e
mode.
3-10
Using the Printer
Page 83

Auto interface wait time
The printer determines which interface is receiving data and
switches to that interface until the end of the print job (when no
data is received from the selected interfac e for the amoun t of time
specified). You can specify ei th e r 1 0 se c onds or 30 seconds.
Input buffer
The input buffer stores data sent from your computer. The input
buffer can store up to 64KB of data, so you can free your computer
for other tasks while the printer prints. When the buffer is off, the
buffer can store no data, so the computer must wait for the printer
to print each character before sending the next.
Skip ov er perf oration
This feature is available only when continuous paper is selected.
When you turn on this feature, the printer provides a one-inch
(25.4 mm) margin between the last line printed on one page and
the first line printed on the next page. Because most application
programs set their own top and bottom margins, you should use
this feature only if your program does not provide them.
Auto tear-off
When you use continuous paper with the front or rear push
tractor, this fe ature advanc e s th e p a p e r perforation to the te ar-off
position, where you can then easily tear off the printed page.
When the printer again receives data, it automatically ad va nces
the paper to the top-of-form position and starts printing, so you
can use all of the next sheet. When auto tear- off is dis abled (off) ,
you must per fo rm the tear-o f f function manual l y by pre ssing the
Tear Off/Bin
information.
button. See “Tear Off” later in this chapter for more
Using the Printer
3-11
Page 84

Auto line feed
When auto line feed is on, the printer accompanies each carria ge
return (CR) code received with a line feed (LF) code.
Auto carriage return
When the auto carriage return feature is on, each line feed (LF)
code or ESC J (
carriage return (CR) code and the printer moves the next print
position to the left margin. When this feature is off, you must send
the CR code after the line feed code to move the print position to
the left margin. This feature is available in IBM emulation mode
only.
/180-inch line feed) code is accompa nied by a
n
Alternate Graphic Mode (AGM)
When AGM is on, the printer can use some advanced graphics
commands like those available in ESC/P2 mode. When you select
IBM 2390/2391 mod e, this set ting is av ailable. The d efault setting
is off.
0 slash
The zero character has a slash (0) when this setting is on; it has no
slash (0) when the setting is off. This allows you to easily
distinguish between an u pp ercase “O” character and a zero.
Buzzer (Beep)
The printer beeps when some errors occur. See “Troubleshooting”
in Chapter 6 for more informat ion.
Roll paper
When you turn on this mode, roll paper is not recognized as
single-sheet paper even if the paper release lever is set to the
single-sheet position. This means that the paper is not ejected and
advanced forwar d to the next pag e with th e
3-12
Using the Printer
LF/FF
button.
Page 85

Micro Adjust
The micro adjust feat u re allow s you t o mov e paper for ward or
backward in 1/360-in c h increment s. You c an use this fea tur e to
adjust the loading an d tear -off positions.
This section explains how to use micro adju st. See the next section
for information on adjusting the tear-off pos ition.
The loading position is the position of t he paper aft er it has been
automatically loaded by the printer. If your printing appears too
high or low on the page, change the loading position with the
micro adjust feat ure as follow s:
1. Make sure the printer is turned on. If necessary, lift the printer
cover up so you can see the paper position.
2. Load either continuous or single-sh eet paper. (Load continuous
paper by pressing the
Load/Eject
button.)
3. Hold down the
light starts flashing.
Pause
button for three seconds. The
Using the Printer
Pause
3-13
Page 86

4. Press the
down on the page, or press the
loading position up on the page.
For continuous paper, mark a point 6.5 mm above the perforation
and position the pa pe r as sh own . This g ives you an 8.5 mm
margin.
Load/Eject
6.5 mm
8.5 mm
[↑] button to move the loading position
LF/FF
[↓] button to move the
3-6anew
margi3
Note:
❏
❏
3-14
The printer has a minimum and maximum loading position. If
you try to advance the loading position beyond these limits, the
printer beeps and the paper stops moving.
When the paper reaches the factory-set loading position, the
printer beeps and paper feeding pauses briefly. Use the factory
setting as a reference point when adjusting the loading position.
Using the Printer
Page 87

5. Press the
micro adjust mode.
Note:
For both cut sheet and continuous paper, the printer remembers this new
position even after it has been turned off and back on.
Pause
button o r sen d data to the printe r to leave the
Tear-Off
After you have finished printing, you can use the tear-off feature
to advance continuous paper on the push tractor to the tear-off
edge of the printer. You can then easily tear off printed sheets.
When y o u re sume printing , the printer auto m a tically feeds paper
back to the loading position so you can save paper that would
normally be lost between documents.
You can use the tear-off featu re in two way s : by sett ing the default
setting to select auto tear-off mode, or by pressing the
Tear Off/Bin
If the perforation between pages is not aligned with the tear-off
edge, you can adjust the tear-off position using the micro adjust
feature as described in the previous section.
button on the control panel.
c
Caution:
❏
Never use the tear-off feature to reverse-feed labels; they
may come off their backing and jam the printer.
❏
Never reverse-feed continuous paper when using the pull
tractor; the paper could come off the pull tractor and jam
the printer.
Using the Printer
3-15
Page 88

Using auto tear-off mode
When you select the auto tear-o ff mod e d efau lt setting , the printer
advances continuo u s paper to the tea r-o ff pos i tion wh en you
finish printing.
The printer advances paper to the tear-off position only when the
printer receives a full page of d at a or a fo rm- feed com man d and
no more data is received for three seconds.
Select tear-off using the Default Setting mode as descr ibed earlier
in this chapte r. Also make sure the page le ng th for continuo us
paper is selected correctly in the Default Setting mode. Be sure
you tur n o ff th e p ri nter to ex i t from the Default S e tting mode, and
then turn it on again.
1. Print on continuous paper loaded on the front or rear push
tractor (as described in Chapter 2). When you finis h printin g,
the printer advances the perforation of the final printed page
to the tear-off position.
2. Tear off all printed pages.
3. When you resume printing, the printer automatically feeds the
paper back to the loading position and begins printing. If the
perforation does not meet the tear-off ed ge, you can ad just the
tear-off position usin g the micro adjust featu re as des cr ibed in
the previous section.
You can leave auto tear-o ff mod e on even wh en you are using
single sheets because the mode is disabled when you move the
paper release lever to the single-sheet position.
Note:
Don’t turn on the auto tear-off mode when using the pull tractor. Set
auto tear-off mode to of f in the Defau l t S etting mode, or avoid touching
Tear Off/Bin
the
3-16
Using the Printer
button when using the pull tractor.
Page 89

Using the Tear Off/Bin button
Whether or not the printer is in auto tear-off mode, y ou ca n use
Tear Off/Bin
the
tear-off position by following the steps below:
button to a d vance continuou s paper to the
1. Make sure printing has finished. Then press the
button until the two lights on the control panel start flashing.
The printer advances the paper to the tear-off edge.
2. Tear off all printed pages. If the perforation is not aligned with
the tear-off edge, adjust the tear-off position using the micro
adjust feature. See “Mic ro Adjus t, ” ear lier in this ch apter .
3. When you resume printing, the printer feeds the paper back
to the loading position and begins p rinting. (You can also
manually feed the paper back to the loading position by
pressing the
Tear Off/Bin
button.)
Tear Off/Bin
Bi-d Adjustment
When using bidirectional printing, you may notice that the lines in
your printout are not properly aligned. To correct this problem,
use the printer’s Bi-d Adjustment mode as follows:
1. Make sure continuous paper is loaded in the printer.
2. Hold down the
instructions for adjusting Bi-d alignment are printed, along
with the first set of alignment patterns.
Pause
button while you turn on the printer. The
3. Follow the instructions on the printout.
4. After completing Bi-d adjustment, turn off the p ri n te r.
Using the Printer
3-17
Page 90

Barcode Printing
Your printer has powerful barcode printing capabilities and
includes the following resident barcode fonts: EAN-13, EAN-8,
Interleaved 2 of 5, U PC-A, UPC-E, Code 39, Cod e 128, and
POSTNET. See the App en dix for more infor mat ion abou t the
Barcode Print command.
3-18
Using the Printer
Page 91

Chapter 4
Using Printer Options
Cut-Sheet Feeders . . . . . . . . . . . . . . . . . . . . . . . . . . . . 4-2
Installing the high capacity cut-sheet feeder . . . . . . . . . . . 4-2
Loading paper with the high capacity cut-sheet feeder . . . . . 4-4
Assembling the double bin cut-sheet feeder . . . . . . . . . . . . 4-6
Switching between continuous paper and the cut-sheet
feeder . . . . . . . . . . . . . . . . . . . . . . . . . . . . . . . 4-6
Selecting single-sheets, postcards, or envelopes . . . . . . . . . 4-7
Pull Tractor . . . . . . . . . . . . . . . . . . . . . . . . . . . . . . . . 4-8
Loading pape r with the push tr ac to r and the optiona l pull
tractor . . . . . . . . . . . . . . . . . . . . . . . . . . . . . . . 4-8
Roll Paper Holder . . . . . . . . . . . . . . . . . . . . . . . . . . . . 4-9
Interface Cards . . . . . . . . . . . . . . . . . . . . . . . . . . . . . . 4-12
Installing an interface card . . . . . . . . . . . . . . . . . . . . . . 4-12
The C82305
✽
or C82306✽ serial interface card . . . . . . . . . . 4-14
Using Printer Options
4
4-1
Page 92

This chapter describes how to use o pt ional equipment with your
printer, including cut-sheet feeders, a pull tractor, a roll paper
holder, and interface cards .
Cut-Sheet Feeders
Two cut-sheet feeders are available for use wi th your printer.
Printer model High capacity (Bin 1) Second bin (Bin 2)
LQ-2170 C80673✽ C80674✽
The asterisk (✽) is a substitute for the last digit, which varies by country.
Contact your local EPSON dealer for the part number in your country.
By connecting both cut-sheet feeders, you can operate them as a
double bin cut-sheet feeder. This allows you to load two different
types of paper. See “A ssemblin g the double bin cut-sheet feeder”
later in this chapter.
Before you install your cut-sheet feeder, assemble it by following
the instructions in the manual that comes with it.
Note:
The second bin cut-sheet feeder can only be used in combination with the
high capacity cut-sheet feeder.
Installing the high capacity cut-sheet feeder
1. Make sure the printer is turned off.
2. Remove the paper guide and the printer cover.
4-2
Using Printer Opti o n s
Page 93

3. If the standard tractor is installed in the pull tractor position,
remove it. If the optional pull tractor is installed, remove it. In
either case, make sure the paper tension unit is not installed.
Note:
Store the paper guid e an d o ptional pull tract or in a safe place; you
will need them if you remove the cut-sheet feeder.
4. Move the printer head to the ribbon installation position.
Warning:
w
5. Hold the cut-sheet feeder in both hands and press back the latc h
levers on each side. Fit the notches in the cut-sheet feeder over
the mounting posts on the printer. Release the latch levers and
lower the cut-sheet feeder until it rests on the printer.
Never move the print head while the printer is turned on;
this can dama ge the prin te r. Al so, the print he a d may become
hot during use. Always let it cool before you touch it.
6. Insert the cable into the connector as shown above.
7. Replace the printer cover.
You are now ready to load paper with your cut-sheet feeder . To
remove the cut-sheet feeder, reverse the steps above.
Using Printer Options
4-3
Page 94

Loading paper with the high capacity cut-sheet feeder
Load paper using the high capacity cut-sheet feeder as follows:
1. Turn off the printer.
2. Push down the center support. Slide the left paper guide so it is
aligned with the arrow mark on the back side of the center
support. Next, slide the right paper guide to match the width
of your paper. Slide the paper stacker midway between the
paper guides.
3. Pull the paper-set levers all the way forward until the paper
guides retract and lock open to allow for paper loading.
4-4
Using Printer Opti o n s
Page 95

4. Fan a stack of paper (up to 150 sheets); then tap t he s ide an d
bottom of the stack on a fla t sur fac e to even it up.
Caution:
c
5. Insert the paper along the left paper guide.
6. Adjust the position of the right paper guide so that it matches
your paper’s width. Make sure the position of the guide allows
the paper to move up and down freely.
7. Push back the paper-set levers to clamp the paper against the
guide roll e rs.
8. Lift up the center support and select single sheet or continuous
paper by moving the paper selection lever as shown below.
Do not use labels in the cut-sheet feeder.
Note:
When the cut-sheet feeder is installed, you can still load single sheets
using the top paper guide or the front paper slot.
The cut-sheet feeder loads paper when you send data to the
printer (as long as the
paper by pressing the
Pause
Load/Eject
light is not on). You can also load
button.
Using Printer Options
4-5
Page 96

Assembling the double bin cut-sheet feeder
You can connect the high capacity cut-sheet feeder to the second
bin cut-sheet feeder to create a double bin cut-sheet feeder. See the
cut-sheet feeder option manu als for more infor mat ion .
You cannot use the second bin feeder without the high capacity
feeder.
1. Install the assembled double bin cut-sheet feeder on the printer.
See “Installing the high capacity cut-sheet feeder” in the
previous section.
2. Select the bin number by pressing the
light of the currently selected bin comes on.
Tear Off/Bin
button. The
Note:
You may be able to specify the bin number using your application
programs. See your software manuals for details.
Switching between continuous paper and the
cut-sheet feeder
You can easily switch between continuous paper and cut-sheet
feeder operation without removing the continuous paper .
Switching to continuous paper
1. If any single sheets are in the paper path, press the
button to e ject them.
2. Move the p a p er release lever to the p u sh tractor p osi t i on.
3. Move the paper selection lever to the continuous paper position.
Note:
When you print several pages of continuous paper, guide the paper over
the center support a n d o ut the back of the printer, as it prin ts.
Load/Eject
4-6
Using Printer Opti o n s
Page 97

Switching to the cut-sheet feeder
1. If any printed continuous paper remains in the printer, press the
Tear Off/Bin
position.
2. Tear off the printed pages.
button to advance the paper to the tear-o ff
3. Press the
backward to the standby position. The paper is still attached
to the push trac to r b u t is no longe r in the paper path .
4. Move the printer’s paper release lever to the single-sheet
position.
5. Move the cut-sheet feeder’s paper selection lever to the
single-sheet position.
Load/Eject
button. The printer feeds the paper
Selecting single-sheets, postcards, or envelopes
You can select either single-sheet paper, postcards, or envelopes
using the lever on the first bin. You’ll see the icons next to the
lever. Move the lever to the proper position before loading your
paper.
Using Printer Options
4-7
Page 98

Pull Tractor
The optional pull tractor (C80 032✽) provides optimu m c on tin uou s
paper handling. (The asterisk (
the product number, which varies by country.)
The pull tractor is especially useful with continuous multipart
forms. For best results, use the optional pull tractor along with
your standard trac to r i nstalle d in the front push tr actor positi o n .
See Chapter 2 for instructions.
Note:
You cannot remove the rear push tractor. When you load continuous
paper from the fron t pa pe r path with the pull tract or on top, you can
install the opti ona l pu ll tractor in the pull tracto r po siti on.
Loading paper with the push tractor and the optional
pull tractor
1. Make sure the printer is turned off and the st an da rd trac tor is
instal le d in the push tractor positi on .
2. Remove the paper tension unit by lifting it up and off the printer.
✽
) is a substitute for the last digit of
3. Install the optional pull tractor in the pull tractor position as
descri b e d in ”U si ng the p u l l tra ctor posit i on” in Chapter 2.
Note:
The optional pull tractor cannot be installed in the rear push tractor
position.
4. Make sure that the paper release lever is in the push tractor
position.
5. Loa d the pape r in the push trac tor as describ e d in Cha pter 2.
6. Press the
4-8
Using Printer Opti o n s
LF/FF
button to a d vance the paper to th e next page.
Page 99

7. Fit the pa p e r to th e p u l l tr a ctor’s sprocket .
8. Move the paper release lever to the pull tractor position and use
micro adjust, des cr ibed in Chapt er 3, to remove any slack in
the paper.
9. Move the paper release lever back t o the push tractor position.
10. Attach the paper guide and printer cover. Raise the paper path
guide and re st it agai nst the paper guide .
Note:
When you are using more than one continuous paper source, guide the
paper over the pape r guide and feed it out the back o f the pr inter, as it
prints.
Caution:
Do not use the knob on the right side of the printer except to clear
c
paper jams when the printer is off. Otherwise, you may damage
the printer or cause it to lose the top-of-form position.
Roll Paper Holder
The optional roll paper holder (#8310) allows you to use your
printer with 8.5-inch roll paper like that used with telex machines.
Before you use roll paper, set the default setting of roll paper to
on. See “Changing the Default Settings” in Chapter 3 for details.
To use the roll paper holder, follow the steps below.
Note:
This option is not available in all countries.
1. Turn off the printer and make sure the paper release lever is at
the single-sheet position.
Using Printer Options
4-9
Page 100

2. Position the roll paper holder beneath the printer as shown
below. Fit the two holes in the base onto the two positioning
pegs on th e bo ttom of the p ri n te r.
Caution:
Be careful to avoid dropping the roll paper holder when
c
lifting the printe r. O n ly th e pri nte r’s weight hol ds it in pl a ce .
3. Cut the leading edge of the roll paper straight across. Slide the
roll paper holder shaft through the center of the paper roll.
4. Set the shaft and paper roll onto the roll paper holder so that
paper feeds from the bottom of the roll.
4-10
Using Printer Options
 Loading...