

Page 1

®
24-pin Dot Matrix Printer
User’s Guide
This manual is divided into two sections: English and Spanish. The
English section begins after this page. The Spanish section begins
approximately at the middle of the manual.
Este manual está dividido en dos secciones: Inglés y Español. El
manual en español comienza aproximadamente a la mitad del libro. El
manual en inglés comienza después de esta página.
Page 2

All rights reserved. No part of this publication may be reproduced, stored in a retrieval system, or
transmitted in any form or by any means, electronic, mechanical, photocopying, recording, or
otherwise, without the prior written permission of Seiko Epson Corporation. The information
contained herein is designed only for use with this Epson printer. Epson is not responsible for any
use of this information as applied to other printers.
Neither Seiko Epson Corporation nor its affiliates shall be liable to the purchaser of this
product or third parties for damages, losses, costs, or expenses incurred by the purchaser or
third parties as a result of: accident, misuse, or abuse of this product or unauthorized
modifications, repairs, or alterations to this product, or (excluding the U.S.) failure to strictly
comply with Seiko Epson Corporation’s operating and maintenance instructions.
Seiko Epson Corporation shall not be liable for any damages or problems arising from the
use of any options or any consumable products other than those designated as Original
Epson Products or Epson Approved Products by Seiko Epson Corporation.
Epson and Epson ESC/P are registered trademarks of Seiko Epson Corporation.
Epson Store, Epson Connection, and SoundAdvice are service marks of Epson America, Inc.
General Notice: Other product names used herein are for identification purposes only and may be
trademarks of their respective owners. Epson disclaims any and all rights in those marks.
© 2004 Epson America, Inc. 1/04 4047824-00
CPD-17641
2
Page 3

Contents
Introduction
Options . . . . . . . . . . . . . . . . . . . . . . . . . . . . . . . . . . . . . . . . . . . . . . . . . . . 5
Chapter 1 -
Unpacking the Printer. . . . . . . . . . . . . . . . . . . . . . . . . . . . . . . . . . . . . . . 7
Choosing a Place for the Printer . . . . . . . . . . . . . . . . . . . . . . . . . . . . . . 7
Assembling the Printer . . . . . . . . . . . . . . . . . . . . . . . . . . . . . . . . . . . . . . 8
Connecting the Printer to Your Computer . . . . . . . . . . . . . . . . . . . . 11
Installing the Printer Software. . . . . . . . . . . . . . . . . . . . . . . . . . . . . . . 12
For DOS programs . . . . . . . . . . . . . . . . . . . . . . . . . . . . . . . . . . . . 15
Installing and Using the Online Reference Guide . . . . . . . . . . . . . . 15
Installing the Remote Configuration Manager . . . . . . . . . . . . . . . . . 15
Chapter 2 -
Setting the Paper Release Lever . . . . . . . . . . . . . . . . . . . . . . . . . . . . . 17
Adjusting the Paper-Thickness Setting . . . . . . . . . . . . . . . . . . . . . . . 18
Loading Continuous Paper with the Front Push Tractor . . . . . . . . 19
Loading Continuous Paper with the Rear Push Tractor . . . . . . . . . 21
Loading Continuous Paper with the Pull Tractor . . . . . . . . . . . . . . 23
Removing paper from the pull tractor . . . . . . . . . . . . . . . . . . . 26
Loading Single Sheets with the Paper Guide . . . . . . . . . . . . . . . . . . 26
Loading Special Papers. . . . . . . . . . . . . . . . . . . . . . . . . . . . . . . . . . . . . 28
Continuous multipart forms. . . . . . . . . . . . . . . . . . . . . . . . . . . . 28
Single-sheet multipart forms . . . . . . . . . . . . . . . . . . . . . . . . . . . 28
Labels . . . . . . . . . . . . . . . . . . . . . . . . . . . . . . . . . . . . . . . . . . . . . . . 28
Envelopes. . . . . . . . . . . . . . . . . . . . . . . . . . . . . . . . . . . . . . . . . . . . 30
Postcards . . . . . . . . . . . . . . . . . . . . . . . . . . . . . . . . . . . . . . . . . . . . 30
Using the Micro Adjust Function . . . . . . . . . . . . . . . . . . . . . . . . . . . . 31
Adjusting the tear-off position . . . . . . . . . . . . . . . . . . . . . . . . . . 31
Adjusting the top-of-form position . . . . . . . . . . . . . . . . . . . . . . 33
Setting Up the Printer
Paper Handling
3
Page 4

Chapter 3 - Using the Control Panel
Buttons and Lights . . . . . . . . . . . . . . . . . . . . . . . . . . . . . . . . . . . . . . . . . 35
Selecting a Font and Pitch . . . . . . . . . . . . . . . . . . . . . . . . . . . . . . . . . . . 37
Changing the Printer’s Default Settings . . . . . . . . . . . . . . . . . . . . . . . 38
Default-setting mode . . . . . . . . . . . . . . . . . . . . . . . . . . . . . . . . . . 39
Chapter 4 -
Using the Error Indicators. . . . . . . . . . . . . . . . . . . . . . . . . . . . . . . . . . . 41
Clearing Paper Jams. . . . . . . . . . . . . . . . . . . . . . . . . . . . . . . . . . . . . . . . 42
Printing a Self Test . . . . . . . . . . . . . . . . . . . . . . . . . . . . . . . . . . . . . . . . . 43
Where To Get Help . . . . . . . . . . . . . . . . . . . . . . . . . . . . . . . . . . . . . . . . 44
Chapter 5 -
Safety Instructions . . . . . . . . . . . . . . . . . . . . . . . . . . . . . . . . . . . . . . . . . 45
Hot Parts Caution Symbol . . . . . . . . . . . . . . . . . . . . . . . . . . . . . . 45
Important Safety Instructions . . . . . . . . . . . . . . . . . . . . . . . . . . . 45
ENERGY STAR Compliance. . . . . . . . . . . . . . . . . . . . . . . . . . . . . . . . . 46
FCC Compliance Statement for United States Users . . . . . . . . . . . . 46
WARNING . . . . . . . . . . . . . . . . . . . . . . . . . . . . . . . . . . . . . . . . . . . 46
For Canadian users . . . . . . . . . . . . . . . . . . . . . . . . . . . . . . . . . . . . 46
Declaration of Conformity . . . . . . . . . . . . . . . . . . . . . . . . . . . . . . . . . . 47
EPSON AMERICA, INC., LIMITED WARRANTY. . . . . . . . . . . . . . 47
Troubleshooting
Product Information
4
Page 5

Introduction
This manual covers the following basic information to get you started
using your Epson
❏ Setting Up the Printer
❏ Paper Handling
❏ Using the Control Panel
❏ Troubleshooting
❏ Product Information
Although most of the illustrations in this manual show the LQ-590, the
instructions apply to both the LQ-590 and the LQ-2090.
Warnings must be followed carefully to avoid bodily injury.
®
printer:
w
Cautions must be observed to prevent damaging your equipment.
c
Notes contain important information and useful tips about using your printer.
For detailed information about your printer, refer to the online
Reference Guide. It describes all the printer’s functions, optional products,
printer software, troubleshooting, and technical specifications. See
“Installing and Using the Online Reference Guide” on page 15.
If you have questions about using your printer software, you can use the
online help, which is installed automatically when you install the printer
software.
Options
By adding options such as a cut-sheet feeder or roll paper holder, you can
further expand your printer’s capabilities. Optional interface cards are
also available to supplement your printer’s built-in interfaces. (See the
Reference Guide for more information.)
You can purchase ribbon cartridges, paper, manuals, and accessories
from the Epson Store
(U.S. sales only). In Canada, please call (800) 463-7766 for dealer referral.
SM
at (800) 873-7766, or visit www.epsonstore.com
Introduction 5
Page 6

6 Introduction
Page 7
Chapter 1
Setting Up the Printer
This chapter describes how to unpack and set up your printer.
Unpacking the Printer
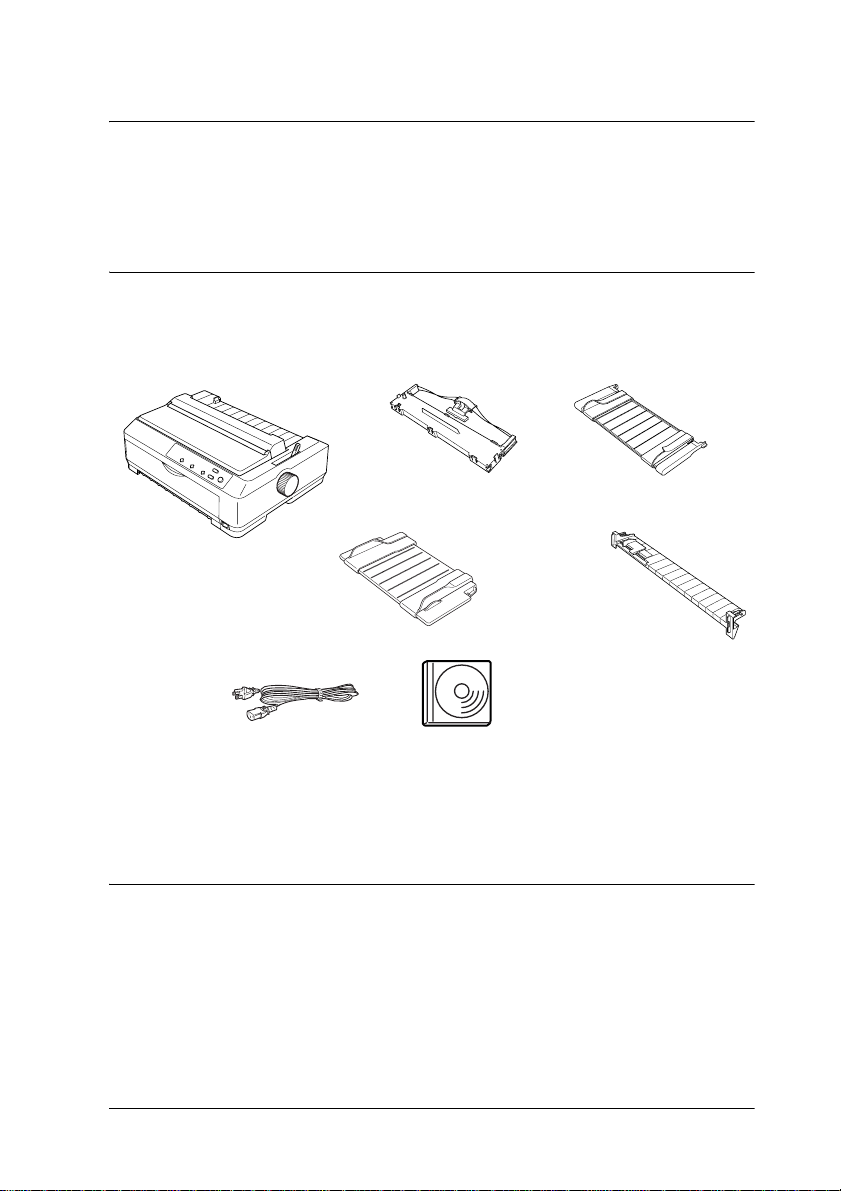
Make sure you have the following items.
Ribbon cartridge
Printer
Front sheet
guide (LQ-590 only)
Power cord
Printer software
Follow the directions on the Notice Sheet to remove the protective
materials before you turn on the printer. Save all packing and protective
materials in case you need to ship the printer in the future.
Paper guide
Front paper guide
(LQ-2090 only)
Choosing a Place for the Printer
❏ Place the printer on a flat, stable surface. The printer will not operate
properly if it is tilted or placed at an angle.
❏ Avoid using or storing the printer in places subject to rapid changes
in temperature and humidity. Keep it away from direct sunlight,
strong light, heat sources, or excessive moisture or dust.
Setting Up the Printer 7
Page 8
❏ Place the printer near a wall outlet where you can easily unplug the
power cord. Position the power cord and interface cable so they do
not interfere with paper feeding.
Note for French-speaking users:
Placez l’imprimante près d’une prise de courant où la fiche peut être
débranchée facilement.
❏ Avoid electrical outlets controlled by wall switches or automatic
timers. An interruption in power can erase information in the
memory of your printer or computer. Also avoid outlets on the same
circuit as large motors or other appliances that can cause voltage
fluctuations.
❏ Use a grounded power outlet; do not use an adapter plug.
Assembling the Printer
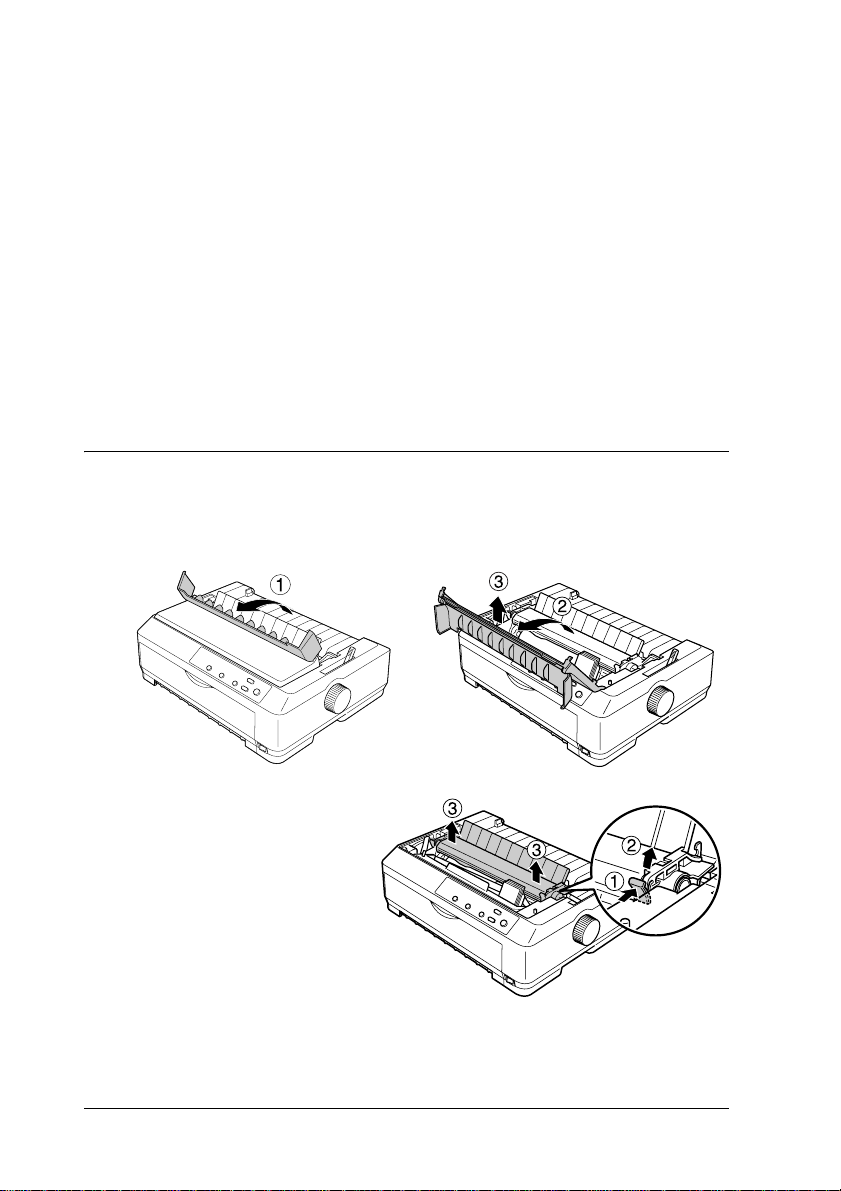
1. Make sure the printer is turned off and unplugged. Then open the
printer cover and pull it up to remove it.
2. Remove the paper tension
unit by pressing the tabs
on each side and pulling it
up.
8 Setting Up the Printer
Page 9
3. Use your hand to slide the
print head to the middle of
the printer.
4. Remove the new ribbon
cartridge from the package.
Ribbon guide
The black plastic ribbon guide
is held in place on top of the
cartridge with a small tab. To
release it, hold the sides of the
ribbon guide and gently
disconnect it. (Do not remove
the ribbon guide from the
ribbon, however.)
5. Hold the ribbon cartridge by its handle and insert it into the printer
at an angle, as shown below; then press down on both sides of the
cartridge to fit the plastic hooks into the printer slots. You should
hear it click into place.
Setting Up the Printer 9
Page 10

6. Slide the ribbon
guide into the print
head until it clicks in
place. Be careful not
to twist or crease the
ribbon.
Turn the
ribbon-tightening
knob to help feed the
ribbon into place.
7. Reinstall the paper
tension unit by
lowering it onto the
printer’s mounting
pegs. Then press down
on both ends until it
clicks into place.
8. To replace the printer
cover, insert the front
tabs into the slots on
the printer and lower
the cover into place.
Then push it down
until it clicks.
9. Make sure the top part
of the cover is folded
forward, as shown.
Then attach the paper
guide.
10 Setting Up the Printer
Page 11
Note:
When printing, you can use the paper guide only when the tractor is installed in
the front or rear push position.
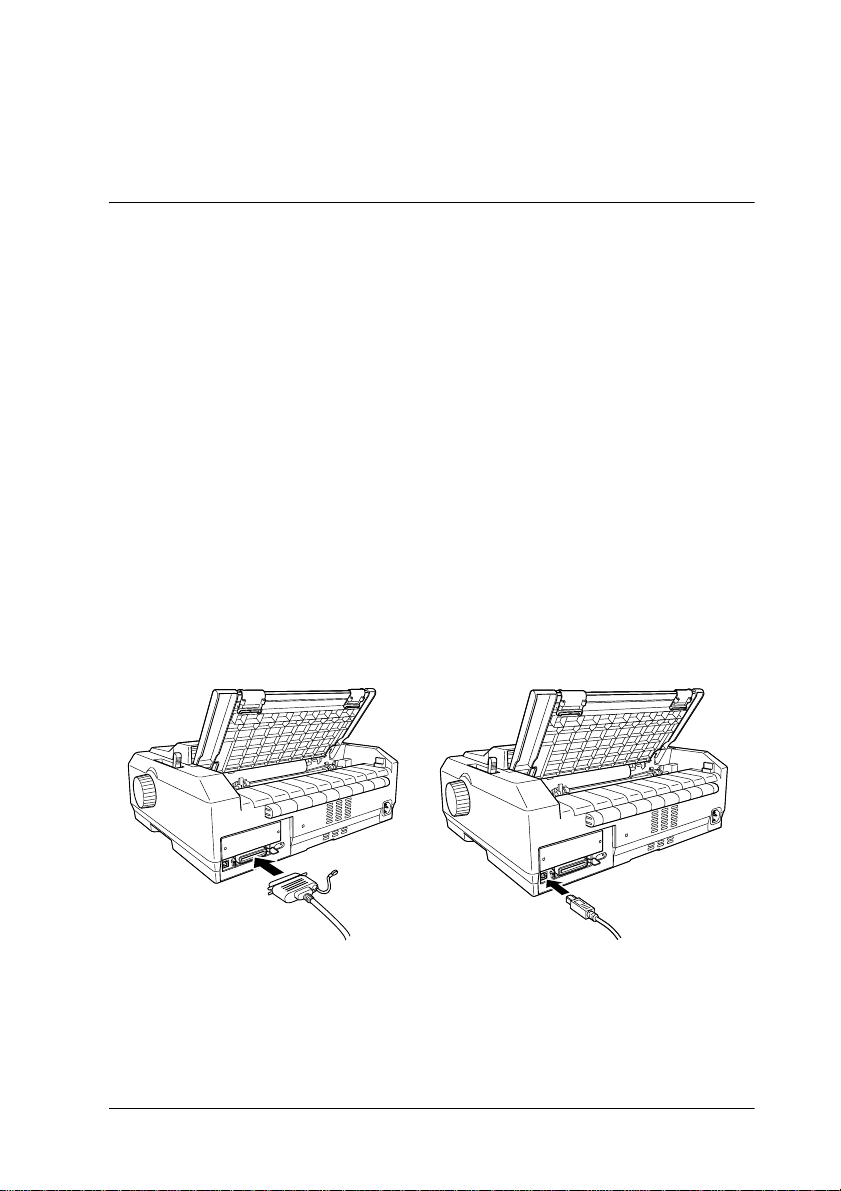
Connecting the Printer to Your Computer
Your printer is equipped with both an IEEE-1284-compatible parallel
interface and a USB (Universal Serial Bus) interface. It also includes a
Type-B optional interface slot in case your computer requires a different
type of printer interface. (See the Reference Guide if you need to install an
interface card.)
Note:
You can connect cables to both interfaces; the printer switches automatically to
the appropriate interface when it receives data.
To connect your computer to your printer’s built-in parallel interface,
you need a shielded, twisted-pair parallel cable with a 36-pin Centronics
compatible connector for the printer. To connect the printer to a USB
port, you need a standard, shielded USB cable.
1. Make sure both the printer and computer are turned off, then
connect the parallel or USB cable to the printer.
Parallel USB
2. Connect the other end to your computer.
®
Setting Up the Printer 11
Page 12
Caution:
c
There are several models of the printer designed for different voltages, and
it is not possible to adjust the printer for use with another voltage. If the
label on the back of the printer does not show the correct voltage for your
country, contact your dealer.
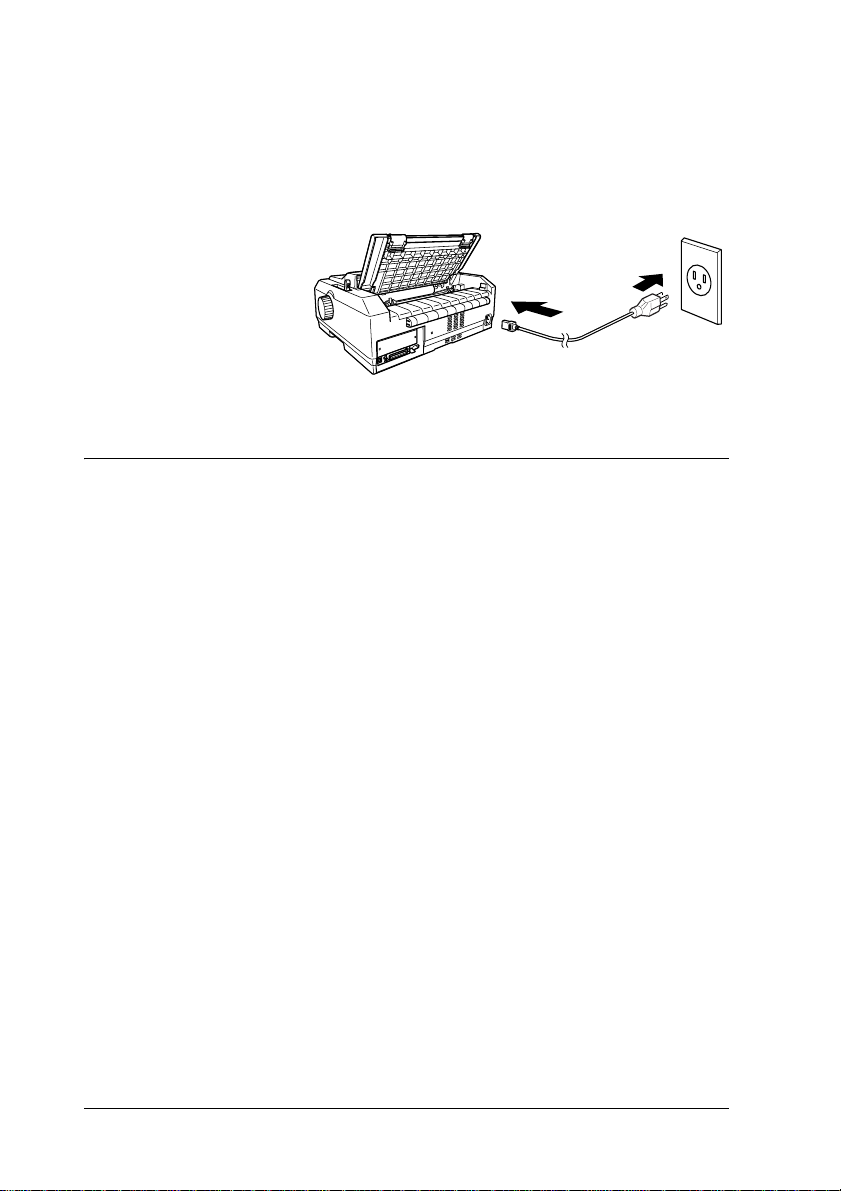
3. Plug the power
cord into the AC
inlet on the back
of the printer and
plug the other end
into a properly
grounded
electrical outlet.
Installing the Printer Software
After you connect the printer to your computer, you need to install the
Epson printer software on the CD-ROM shipped with your printer. The
printer driver is the software that runs, or “drives,” your printer. With it,
you can select printer settings such as print quality, resolution, and paper
size.
The printer software supports Windows
and includes Epson Status Monitor 3 (which displays printer status
information and notifies you of printer errors). See the Reference Guide for
more information.
®
95, 98, Me, 2000, XP, or NT 4.0,
Note:
❏ Installing the printer software for Windows 2000, XP, or NT may require
administrator privileges. If you have problems, ask your administrator for
more information.
❏ If the New Hardware Found screen or any other wizard appears when you
turn on your computer, click
❏ If the Digital Signature Not Found screen appears, click
No, you must reinstall the printer driver.
The printer software CD-ROM also includes the Epson Remote
Configuration Manager, which lets you change the printer’s default
settings. See “Installing the Remote Configuration Manager” on page 15.
Cancel.
Yes. If you click
12 Setting Up the Printer
Page 13
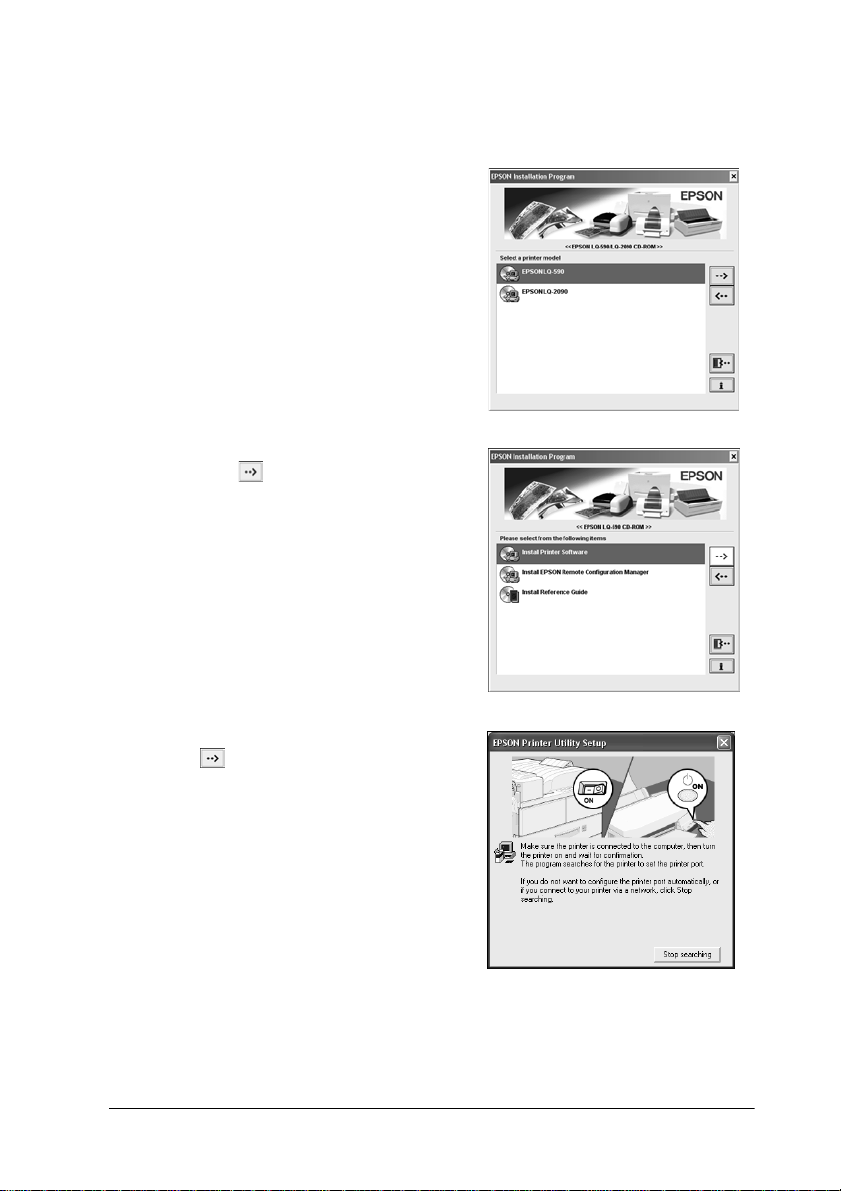
Follow these steps to install the printer software:
1. Make sure Windows is running and the printer is turned off.
2. Insert the printer software
CD-ROM into the CD-ROM or
DVD drive. After a moment
the Installation screen appears:
If it does not, double-click
Setup.exe on the CD-ROM.
3. Select your printer model
and click . You see this
window:
4. Select
Install Printer Software and
click . You see the software
license agreement.
5. Read the agreement and click
Accept. The installation starts
and you see this window:
Setting Up the Printer 13
Page 14

6. Turn on your printer, then wait for the software to be installed. (This
may take a few minutes.)
If you are prompted to insert the Windows CD-ROM, go to step 7.
Otherwise, follow any instructions on the screen until the
installation is complete and you see the Installation screen again.
Then turn to page 15 and follow the instructions to install the
Reference Guide and the Remote Configuration Manager utility.
7. If the installation asks for the Windows CD-ROM, insert the disk in
the CD-ROM drive and click
OK. When the Windows installation
screen appears, close the screen to continue with the driver
installation.
Note:
If you see a message that the drive is not accessible, click
Cancel and try
again.
8. Click
9. Select the appropriate file in the folder and click
Browse and select the path for the printer driver. Then click
OK and follow the on-screen instructions.
OK.
10. When prompted, insert the printer software CD-ROM and click
Browse to select the correct path.
Note:
❏ If you see a message that the drive is not accessible, click
Cancel and
try again.
❏ If a “System Error” message appears, click
Cancel.
❏ If you are using Windows NT, you do not need to specify a path.
❏ If you are using Windows 98, the Printer Utility Setup may start. If it
does, follow the instructions on the screen.
11. When the installation is complete, see page 15 to install the
Reference Guide and the Remote Configuration Manager utility.
14 Setting Up the Printer
Page 15
For DOS programs
To control the printer from DOS application programs, you need to select
the printer you are using or another available printer from the printer list
in your application. Choose the Epson printer at the appropriate step in
the installation or setup procedure. If the list in your application does not
include your printer, choose the first available printer from the following
list.
For the LQ-590 For the LQ-2090
LQ-580 / LQ-570e LQ-200 LQ-2080 / 2180 LQ-200
LQ-300+ LQ-500 LQ-2070 / 2170 LQ-500
LQ-300 LQ-860+ LQ-1070 / 1070+ LQ-860+ / 1060+
LQ-870 LQ-2550 LQ-870 / 1170 LQ-2550
LQ-570 / 570+ LQ-2500 LQ-850+ / 1050+ LQ-2500
LQ-850+ LQ-800 LQ-850 / 1050 LQ-800 / 1000
LQ-850 LQ-1500 LQ-510 / 550 / 1010 LQ-1500
LQ-510 / 550
Installing and Using the Online Reference Guide
To install the Reference Guide on your hard disk, select Install Reference
on the Installation screen and click . The manual is copied and
Guide
an
LQ590-2090 Reference Guide icon appears on your desktop.
To open the Reference Guide, double-click the
icon on your desktop. You can also click Start > Programs
Guide
(or
All Programs) > EPSON > LQ590-2090 Reference Guide, and click
Reference Guide.
LQ590-2090 Reference
Installing the Remote Configuration Manager
The Epson Remote Configuration Manager provides an easy way to
change your printer’s default settings in Windows. Follow these steps to
install it on your computer in Windows 95, 98, Me, 2000, XP, or NT:
1. Select
Install EPSON Remote Configuration Manager on the
Installation screen and click .
Setting Up the Printer 15
Page 16

2. When you see the InstallShield window, click
After a moment, you see
this screen:
Yes.
3. Click
Next and follow
the instructions on the
screen.
4. When the installation is complete, click
Finish. (If a window remains
on the screen, close it so you can see the final installation screen.)
The Remote Configuration Manager is installed on the computer in its
own folder, along with an uninstall option and the online User’s Guide,
which describes how to use the program.
To start the program, select
Configuration Mgr
Manager
.
, and then click Epson Remote Configuration
To open the manual, select
Configuration Mgr
Manager User’s Guide
, and then click Epson Remote Configuration
Programs (or All Programs) > Epson Remote
Programs (or All Programs) > Epson Remote
.
Note:
If you are using Windows 2000 or XP and the printer is connected to the parallel
port, Remote Configuration Manager may not work. In this case, do one of the
following:
❏ Before running the program, set the printer driver to the LPT2 port. Then
use Remote Configuration Manager to check or change the default settings
as desired. After you finish using the program, remember to return the
setting to LPT1.
❏ Connect the printer to the USB port instead.
16 Setting Up the Printer
Page 17

Chapter 2
Paper Handling
This chapter covers some important instructions you need to load and
use paper in your printer. For complete paper handling information, see
the Reference Guide.
Setting the Paper Release Lever
Before you start printing,
be sure to set the paper
release lever to indicate
the paper source you
want to use, as described
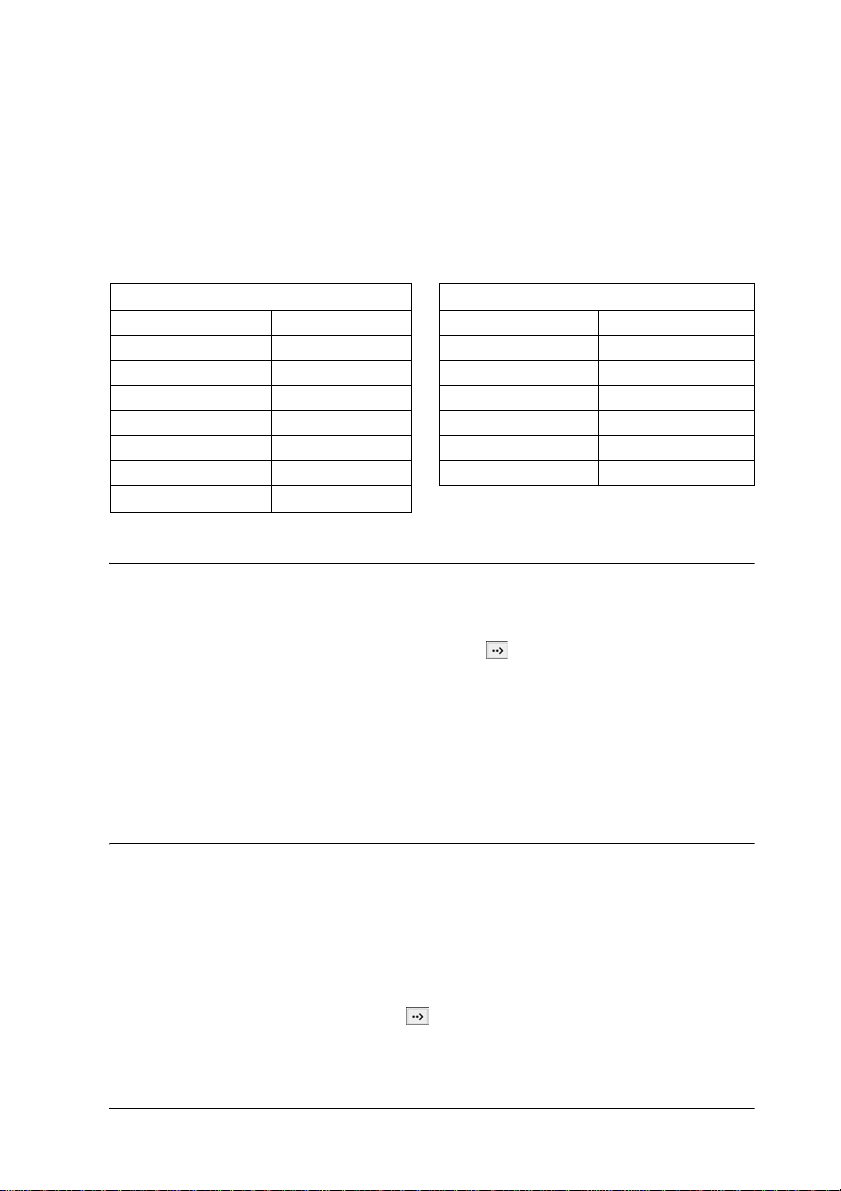
in the table below.
Lever position Description
Single-sheet position
For loading single-sheet paper from the top or front slot.
Rear push tractor position
For loading continuous paper with the tractor installed in the
rear push position or when using the rear push and pull tractors
in combination.
Front push tractor position
For loading continuous paper with the tractor installed in the
front push position or when using the front push and pull tractors
in combination.
Pull tractor position
For loading continuous paper from the tractor installed on top
of the printer in the pull position. You can load paper in the
front, rear, or bottom slot.
Paper Handling 17
Page 18

Adjusting the Paper-Thickness Setting
Before you start printing, make sure the paper-thickness setting is correct
for the type of paper you are using.
Turn the printer off and
open the printer cover.
The paper-thickness lever
is located on the left side of
the printer. The numbers
next to the lever indicate
the thickness setting.
Select the correct setting according to this table:
Paper type Lever position
Plain paper (single sheets or continuous paper) 0
Carbonless multipart forms with:
2 parts (original + 1 copy)
3 parts (original + 2 copies)
4 parts (original + 3 copies)
5 parts (original + 4 copies)
Continuous paper with labels 2
Postcards 2
Envelopes:
Airmail No.6
Airmail No.10
Plain
Bond 20 lb
Bond 24 lb
1
2
3
5
3
3
4
4
6
Note:
When the temperature is 41 °F (5 °C) or lower, or 95 °F (35 °C) or higher, set the
paper-thickness lever one position higher to improve print quality.
18 Paper Handling
Page 19

Loading Continuous Paper with the
Front Push Tractor
1. Make sure the printer is
turned off. Then open the
front cover and make sure
the tractor is installed in the
front push position. (You
may need to move it from
the rear push or pull
position.)
2. If you have the LQ-2090,
remove the sub cover from
the front cover. (If it is
difficult to remove, you can
temporarily remove the front
cover and then separate the
sub cover from it.)
Be sure to reattach the sub
cover when you want to
print from a different paper
source.
3. Set the paper release lever to the front push tractor position.
Also set the paper-thickness lever to the proper position for
your paper’s thickness. See “Adjusting the Paper-Thickness
Setting” on page 18 for instructions.
4. Release the left and
right sprockets by
pushing the blue
lock levers
backward.
Paper Handling 19
Page 20

5. Slide the left sprocket
approximately
0.5 inch (12 mm)
from the far left
position and pull the
blue lever forward to
lock it in place. Then
slide the right
10
5
0
sprocket to match the
width of your paper,
but do not lock it.
6. Remove the front cover by
pulling it straight down.
7. Make sure your paper has a clean, straight edge. Then open both
sprocket covers and fit the first four holes of the paper, with the
printable side up, over the tractor pins.
8. Close the sprocket covers.
9. Slide the right sprocket to remove any slack in the paper; then lock it
in place by pushing the sprocket lock down.
20 Paper Handling
Page 21

10. Attach the front cover with
the continuous paper
positioned as shown.
11. Make sure the paper guide is
lying flat on the printer and
slide the edge guides to the
middle of the paper guide.
12. Turn on the printer. When the printer receives data, it automatically
loads the paper and starts printing.
If the first line on your page appears too high or low, you can change its
position using the Micro Adjust function as described on page 33.
Additionally, when using the push tractor, it is a good idea to set the
Auto tear-off function in the Default Setting mode to On. See page 38
for more information.
Caution:
c
Never use the knob to adjust the top-of-form position; this may damage the
printer or cause it to lose the top-of-form position.
Loading Continuous Paper with the
Rear Push Tractor
1. Make sure the printer is turned off, the tractor is installed in the rear
push position, and the paper guide is removed. (You may need to
move the tractor from the front push or pull position.)
2. Set the paper release lever to the rear push tractor position.
3. Release the left and right
sprockets by pulling the
blue sprocket lock levers
forward.
Paper Handling 21
Page 22

4. Slide the left sprocket
approximately 0.5 inch
(12 mm) from the far
left position and push
the blue lever back to
lock it in place. Then
slide the right sprocket
to match the width of
your paper, but do not
lock it.
The triangle mark on top of the printer indicates the point furthest to
the left where printing can begin.
5. Make sure your paper
has a clean, straight
edge. Then open both
sprocket covers and fit
the first four holes of
the paper, with the
printable side down,
over the tractor pins.
6. Close the sprocket covers. Then slide the right sprocket to remove
any slack in the paper and lock it in place by pushing the blue lock
lever down.
7. Attach the paper guide and lay it flat on the printer. Slide the edge
guides to the middle of the paper guide.
8. Turn on the printer. When the printer receives data, it automatically
loads the paper and starts printing.
If the first line on your page appears too high or low, change its position
with the Micro Adjust function. (See page 33.)
Caution:
c
Never use the knob to adjust the top-of-form position; this may damage the
printer or cause it to lose the top-of-form position.
22 Paper Handling
Page 23

Loading Continuous Paper with the Pull Tractor
1. Make sure the printer is turned off, and the printer cover is
removed. Also make sure the tractor is installed in the pull position
and the paper guide is lying flat on the printer. (You may need to
move the tractor from the rear push or front push position.)
2. Set the paper release lever to the pull tractor position.
3. Release the
sprockets by
pulling the
sprocket lock
levers forward.
4. Slide the left
sprocket
approximately
0.5 inch (12 mm)
from the far left
position and push
the lever back to
lock it in place.
Edge guides
Then slide the
right sprocket to
match the width of
your paper, but do
not lock it.
Slide the edge guides to the center.
5. Make sure your paper has a clean, straight edge. Then open the
sprocket covers.
Note:
Make sure the printer is off before you insert the paper in the paper slot.
If you insert the paper while the printer is on, a paper jam may occur.
Paper Handling 23
Page 24

6. Insert the paper into the front or bottom paper slot as shown below
until it emerges between the platen and the ribbon guide. Then pull
up the paper until the perforation between the first and second
pages is even with the top of the printer’s ribbon.
Front slot
Before you load paper in the
front slot, remove the front
cover. Then load paper with
the printable side facing up.
Bottom slot
Load paper in the bottom
slot with the printable side
facing up.
7. Fit four holes of the paper over the tractor pins
on both sprockets. Then close the sprocket
covers.
8. Slide the right sprocket to remove any slack in the paper, then lock it
in place.
9. Slide the edge guides to the center.
24 Paper Handling
Page 25

10. If you load paper in the
front slot, reattach the front
cover.
If you have the LQ-2090,
remove the sub cover from
the front cover before
replacing the front cover. Be
sure to reattach the sub cover
when you want to print from
a different paper source.
11. Turn on the printer.
12. Remove any slack in the paper by pressing the LF/FF button.
When the printer receives data, it will start printing at the current
position without advancing the paper. If necessary, adjust the top of
form position using the Micro Adjust function (see page 33).
Caution:
c
Never use the knob to adjust the top-of-form position; this may
damage the printer or cause it to lose the top-of-form position.
13. Attach the printer cover by inserting the front tabs into the slots,
then lowering the cover into place. Close the paper guide cover.
14. Send a print job to the
printer. The printer starts
printing from the
top-of-form position.
After you finish printing,
open the paper guide
cover and tear off the
printed document at the
perforation nearest the
paper exit slot.
Paper Handling 25
Page 26

Removing paper from the pull tractor
1. After you finish printing,
tear off the paper supply at
the perforation nearest the
paper entry slot.
2. To feed paper forward and eject it, hold down the
Caution:
c
Never press the
using the pull tractor; the paper could come off the pull tractor and
jam in the printer.
Load/Eject or Tear Off/Bin button when you are
LF/FF button.
Loading Single Sheets with the Paper Guide
You can load ordinary single
sheets and envelopes one at a time
from the top of the printer using
the paper guide. The paper can be
up to 10.1 inches (257 mm) wide
on the LQ-590 and 16.5 inches
(420 mm) wide on the LQ-2090.
To load single-sheet multipart
forms, use the front paper entry
slot with the front sheet guide
(LQ-590) or the front paper guide
(LQ-2090) installed. For more
information, see the Reference Guide.
Caution:
c
Do not load multipart forms, carbon paper, or labels in the paper guide.
26 Paper Handling
Page 27

1. Make sure the paper guide is in the upright position. Then set the
paper-thickness lever to 0 if you are using ordinary single-sheet
paper. (If you are using envelopes, see “Envelopes” on page 30.)
2. Move the paper release lever to the single-sheet position.
3. Turn on the printer, if necessary.
4. Slide the left edge guide
until it locks in place next
to the triangle mark on the
paper guide. Next adjust
the right edge guide to
match the width of your
paper.
5. Load a sheet of paper with
the printable side down and
slide it down between the edge
guides until it meets
resistance. The printer feeds
the paper automatically and is
ready to print.
If the first printed line on your page appears too high or low, you can use
the Micro Adjust function to adjust the top-of-form position. See page 33
for more information.
Paper Handling 27
Page 28

Loading Special Papers
Follow the guidelines in this section when loading single-sheet multipart
forms, labels, envelopes, and postcards.
Continuous multipart forms
Except for adjusting the paper-thickness lever, you load continuous
multipart forms the same way as ordinary continuous paper.
Note:
❏ Be sure the multipart forms do not exceed 0.015 inch (0.39 mm) in
thickness.
❏ Do not load paper that is curled or has been folded.
❏ Thick paper, such as a multipart form with five parts, requires a straight
paper path to avoid paper jams. Load thick paper in the front or bottom
slots.
Single-sheet multipart forms
To load single-sheet multipart forms, use the front paper entry slot with
the optional front paper guide or front sheet guide installed. Thick paper,
such as a multipart form with five parts, requires a straight paper path to
avoid paper jams. For more information, see the Reference Guide.
Labels
When printing on labels, use only the type of labels that are mounted on
continuous backing sheets with sprocket holes for use with a tractor
feeder. Do not try to print on single sheets of labels because the printer
may not feed labels on a shiny backing sheet properly.
Thick paper, such as continuous paper with labels, requires a straight or
almost straight paper path. You can load labels in the front (to the pull
tractor) or bottom (pull tractor) paper slot.
The loading procedure for continuous paper with labels is the same as
that for ordinary continuous paper, except you must set the
paper-thickness lever to 2 before printing.
28 Paper Handling
Page 29

Note:
❏ It is best to load continuous paper with labels on the pull tractor. Do not
load labels on the rear or front push tractor.
❏ Do not load continuous paper with labels from the rear paper slot. Because
the rear paper path is curved, labels may come off their backing sheets
inside the printer and cause a paper jam.
❏ Do not load paper that is curled or has been folded.
❏ Never feed labels backward using the
When fed backward, labels can easily peel off the backing sheet and cause a
paper jam.
❏ Because labels are sensitive to temperature and humidity, use them only
under normal operating conditions:
Load/Eject or Tear Off/Bin button.
Temperature
Humidity
❏ Do not leave labels loaded in the printer between jobs; they may curl
around the platen and jam when you resume printing.
59 to 77 °F (15 to 25 °C)
30 to 60% RH
Removing continuous paper with labels
To prevent labels from peeling off the backing sheet and jamming the
printer, follow these steps to remove continuous paper with labels from
the printer:
1. Tear off the fresh supply of
continuous labels at the
perforation nearest the paper
entry slot.
2. Hold down the
printer.
Caution:
c
Never feed labels backward using the
When fed backward, labels can easily come off the backing sheet and cause a
paper jam.
LF/FF button to eject the remaining labels from the
Load/Eject or Tear Off/Bin button.
Paper Handling 29
Page 30

Envelopes
You can feed envelopes one at a time using the paper guide, or you can
load multiple envelopes using the optional high-capacity cut-sheet
feeder (bin 1 of the double-bin cut-sheet feeder).
Before loading envelopes, set the paper-thickness lever to position 3, 4, or
6, depending on the thickness of the envelopes. See page 18 for more
information.
To load single envelopes, follow
the instructions under “Loading
Single Sheets with the Paper
Guide” on page 26. Be sure to
place the envelope printable side
down and insert the top edge of
the envelope into the printer first.
To load multiple envelopes, see
the Reference Guide.
Note:
❏ The print head must not print past the left or right edge of the envelope or
other thick paper. Make sure your application program prints entirely
within the printable area of your envelope. See “Printer Specifications” in
the Reference Guide for more information on the printable area of
envelopes.
❏ If you are using No. 6 envelopes, make sure the left edge guide is aligned
with the arrow on the paper guide.
Postcards
You can feed postcards one at a time using the paper guide, or you can
load multiple cards using the optional high-capacity cut-sheet feeder
(bin 1 of the double-bin cut-sheet feeder). The cards can be loaded only in
the front or rear paper slot.
Before loading postcards, set the paper-thickness lever to position 2 and
set the paper release lever to the single-sheet position.
30 Paper Handling
Page 31

To load a single card, follow the
instructions in “Loading Single
Sheets with the Paper Guide” on
page 26. To load multiple cards,
see the Reference Guide.
Note:
❏ When you are loading
postcards long edge first,
always load them in the top
slot.
❏ When loading A6 size cards,
always load them long edge
first.
❏ Before printing, turn on the card mode by pressing the
button several times until the left Tear Off/Bin light is on.
Tear Off/Bin
Using the Micro Adjust Function
The Micro Adjust function allows you to move the paper forward or
backward in 1/180-inch (0.141 mm) increments to adjust the tear-off and
top-of-form positions.
Adjusting the tear-off position
If your paper’s perforation is not aligned with the tear-off edge, you can
use the Micro Adjust function to move the perforation to the tear-off
position, as described below. Your tear-off position setting remains in
effect until you change it, even if you turn off the printer.
Caution:
c
Never use the knob to adjust the tear-off position; this may damage the
printer or cause it to lose the tear-off position.
Paper Handling 31
Page 32

1. You may need to press
the
Tear Off/Bin button to
advance the paper to the
tear-off position. Make
sure the Tear Off/Bin
lights are flashing (the
paper is at the current
tear-off position).
2. Hold down the
Pause
button for about three
seconds. The Pause light
begins flashing and the
printer enters Micro
Adjust mode.
3. Open the paper guide cover, then press the
paper backward, or press the
Load/Eject U button to feed paper
LF/FF D button to feed
forward, until the paper perforation is aligned with the tear-off edge
of the printer cover.
Tear-off edge of the printer cover
Paper perforation
Note:
The printer has a minimum and a maximum tear-off position. If you try to
adjust the tear-off position beyond these limits, the printer beeps and stops
moving the paper.
4. Tear off the printed pages.
5. Press the Pause button to turn off Micro Adjust mode.
When you resume printing, the printer automatically feeds the paper
back to the top-of-form position and begins printing.
32 Paper Handling
Page 33

Adjusting the top-of-form position
The top-of-form position is the position on the page where the printer
starts printing. If your printing appears too high or low on the page, you
can use the Micro Adjust function to adjust the top-of-form position, as
described below. Your top-of-form position setting remains in effect until
you change it, even if you turn off the printer.
Caution:
c
Never use the knob to adjust the top-of-form position; this may damage the
printer or cause it to lose the top-of-form position.
1. Make sure the printer is turned on.
2. Load paper. (If the tractor is in a push position, press the
button to advance continuous paper to the current top-of-form
position.) If necessary, lift the printer cover so you can see the paper
position.
3. Hold down the Pause button for three seconds. The Pause light
flashes and the printer enters Micro Adjust mode.
4. Press the
page, or press the
position down on the page.
LF/FF D button to move the top-of-form position up on the
Load/Eject U button to move the top-of-form
Load/Eject
5. Press the
Pause button to exit Micro Adjust mode.
Paper Handling 33
Page 34

Note:
❏ The printer has a minimum and a maximum top-of-form position. If
you try to adjust it beyond these limits, the printer beeps and stops
moving the paper.
❏ When the paper reaches the default top-of-form position, the printer
beeps and stops moving the paper briefly. You can use this setting as a
reference point when adjusting the position.
❏ The top margin setting selected in some software overrides the
top-of-form position setting you make with the Micro Adjust function.
34 Paper Handling
Page 35

Chapter 3
Using the Control Panel
This chapter describes the buttons and lights on the control panel, plus:
❏ Selecting a font and pitch
❏ Changing the printer’s default settings
Buttons and Lights
6711
123 458 910
Button/Light Function
1Font (Item
button
Font lights Indicate which font is selected.
2Reset (Font and
Pitch) buttons
3Pitch (Item
button
Pitch lights Indicate which pitch is selected.
D)
U)
Selects one of the fonts. See “Selecting a Font and
Pitch” on page 37.
In default setting mode, Item
When you press both the Font and Pitch buttons
simultaneously, the printer clears the buffer and restores
its default settings.
Selects one of the pitch settings. See “Selecting a Font
and Pitch” on page 37.
In default setting mode, Item
menu.
D selects the next menu.
U selects the previous
Using the Control Panel 35
Page 36

4Tear Off/Bin
(Set) button
Tear Off/Bin
lights
5 Menu buttons When you press the Pitch (Item
Menu lights When the printer is in default setting mode, both menu
6Load/Eject
button
7 Micro Adjust When you hold down the Pause button for three
8 LF/FF button Feeds paper line by line when pressed quickly.
9 Pause button Stops printing temporarily, and resumes printing when
10 Pause light On when the printer is paused.
11 Paper Out light On when no paper is loaded in the selected paper
Feeds continuous paper forward to the tear-off position.
Feeds continuous paper backward from the
tear-off position to the top-of-form position.
Selects a cut-sheet feeder bin when it is installed.
In default setting mode, selects a value.
Both flash when continuous paper is in the tear-off
position.
Both off when continuous paper is not in the tear-off
position or when bin 1 of the optional cut-sheet feeder
is selected.
Left light is on when Card mode is selected.
Right light is on when bin 2 of the optional cut-sheet
feeder is selected.
U) and Tear Off/Bin (Set)
buttons at the same time, the printer enters or exits
default setting mode. See “Changing the Printer’s
Default Settings” on page 38.
lights are on.
Loads a single sheet of paper.
Ejects a single sheet of paper.
Loads continuous paper from the standby position.
Feeds continuous paper backward to the standby
position if a sheet is loaded.
seconds, the printer enters Micro Adjust mode. In this
mode, you can press the LF/FF
buttons to adjust the top-of-form or tear-off position.
See “Using the Micro Adjust Function” on page 31.
Ejects a single sheet or advances continuous paper to
the next top-of-form position when held down.
pressed again.
When held down for three seconds, enters Micro Adjust
mode. When pressed again, exits Micro Adjust mode.
Flashes when the printer is in Micro Adjust mode.
source or paper is not loaded correctly.
Flashes when paper has not been fully ejected or paper
is jammed.
D and Load/Eject U
36 Using the Control Panel
Page 37

Selecting a Font and Pitch
Usually, you use your application program to select the font and pitch
you want to use in a document. However, you can select one of the
printer’s fonts (in different pitches) with the buttons on the printer’s
control panel, as described below. (The settings you make in application
programs usually override settings you make from the printer’s control
panel.) The pitches available depend on the font you select:
Font Pitch
HSD 10, 12, 15, 17, 20
Draft 10, 12, 15, 17, 20, PS*
Roman 10, 12, 15, 17, 20, PS*
Sans Serif 10, 12, 15, 17, 20, PS*
Courier 10, 12, 15, 17, 20
Prestige 10, 12, 17, 20
Script 10, 12, 17, 20
Others 10, 12, 15, 17, 20, PS*
* Proportional spacing
Note:
You can select other fonts in addition to the seven fonts on the control panel by
selecting
more information about the
Others. See “Changing the Printer’s Default Settings” on page 38 for
Font setting.
1. Make sure that the printer is not printing. If it is, press the
button to stop printing. Then press the
Font button until the three
Font lights indicate the desired font.
NNO
NON
NOO
ONN
ONO
O = On, N = Off, F = Flashing
HSD
Draft
Roman
Sans Serif
Courier
OON
OOO
NNF
Prestige
Script
Others
Using the Control Panel 37
Pause
Page 38

2. Press the
Pitch button until the three Pitch lights indicate the desired
pitch. (The pitches available depend on which font you select.)
NNO
NON
NOO
ONN
ONO
OOO
O = On, N = Off
10 cpi
12 cpi
15 cpi
17 cpi
20 cpi
PS
Changing the Printer’s Default Settings
While you can often change the printer’s settings through your software
or printer driver, you may sometimes need to change one or more of the
printer’s default settings. There are two ways to do this:
❏ Using the Epson Remote Configuration Manager on the printer
software CD-ROM. (See page 15.)
❏ Using the printer’s control panel default-setting mode.
For instructions on using the Remote Configuration Manager, see the
online Remote Configuration Manager User’s Guide on the CD-ROM. To use
the control panel, see below. For detailed information about default
settings, see the Reference Guide. The following table shows the options
available for each printer setting.
Setting Options (default in bold)
Page length for front
tractor
Page length for rear
tractor
Skip over perforation Off, On
Auto tear-off Off, On
Auto line feed Off, On
Print direction Bi-D, Uni-D
Length in inches: 3, 3.5, 4, 5.5, 6, 7, 8, 8.5, 11, 70/6, 12,
14, 17
Length in inches: 3, 3.5, 4, 5.5, 6, 7, 8, 8.5, 11, 70/6, 12,
14, 17
38 Using the Control Panel
Page 39

Setting Options (default in bold)
Software ESC/P, IBM PPDS
0 slash 0,
I/F (interface) mode Auto, Parallel, USB, Option
Auto I/F wait time 10 seconds, 30 seconds
Parallel I/F bidirectional
mode
Packet mode Auto, Off
Auto CR (available in IBM
PPDS emulation mode)
A.G.M. (IBM PPDS);
available in IBM PPDS
emulation mode
Character table Italic, PC 437, PC 850, PC 860, PC 863, PC 865, PC 861,
International character
set for italic table
Font OCR-B, Orator, Orator-S, Script C, Roman T, Sans serif H
Manual feed wait time 1 second, 1.5 seconds, 2 seconds, 3 seconds
Buzzer Off, On
Roll paper Off, On
IBM character table Table 2, Table1
Low-noise mode Off, On
Off, On
Off, On
Off, On
BRASCII, Abicomp, Roman 8, ISO Latin 1, PC 858,
ISO 8859-15
Italic U.S.A., Italic France, Italic Germany, Italic U.K.,
Italic Denmark 1, Italic Sweden, Italic Italy, Italic Spain 1
Default-setting mode
Follow the steps below to enter default-setting mode. If single-sheet
paper is loaded, you’ll need to load a new sheet each time the printer
ejects a printed page.
1. Make sure the printer is on and paper is loaded. Then press the
Menu buttons (ItemU and Set) until the printer beeps and both the
Menu lights turn on.
The printer enters default-setting mode and prints a line showing
which language is currently selected for printing the instructions.
(The selected language is underlined.)
Using the Control Panel 39
Page 40

2. If you want a different language, press the
ItemD button until the
printout shows the language you want underlined.
3. Press the
Set button to accept the language. The printer prints a line
asking if you want to print all the current settings.
4. To print a list of all the current settings, press the Set button. The
printer prints all the settings and then the first setting again. Go to
step 5.
To go through the settings one at a time, press the
ItemD or ItemU
button. The printer prints the first setting and its current value.
5. Press the
Set button to scroll through the options for the selected
setting until you see the one you want.
Press the
ItemD or ItemU button to select the next or previous
setting you want to change.
6. Repeat step 5 for any other settings you want to change.
7. When you finish, press the
Menu buttons again to exit
default-setting mode.
Your new settings become the printer’s defaults.
40 Using the Control Panel
Page 41

Chapter 4
Troubleshooting
This chapter explains the error indicators and describes how to clear
paper jams and print a self test. For more troubleshooting information,
see your Reference Guide. If you cannot resolve the problem using the
information in the manuals, see “Where To Get Help” on page 44.
Using the Error Indicators
Use the following table to diagnose printer errors.
Light status Beep
pattern
O Paper Out
••• No paper is loaded in the selected paper source.
O Pause
••• The paper is not loaded correctly.
Problem
Solution
Load paper in the printer or select a different paper
source; the Paper Out light goes off. Then press the
Pause button; the Pause light goes off and the
printer starts printing.
Remove your paper and reload it correctly. See
Chapter 2 or the Reference Guide.
O Pause ••• The paper release lever is set to the wrong position.
Set the paper release lever to the position for the
paper source you want to use. If paper from
another paper source is currently in the paper path,
press the Load/Eject button to eject the paper;
then move the paper release lever to the desired
position.
F Paper Out
O Pause
••• A single sheet of paper is not fully ejected.
Press the Load/Eject button to eject the sheet.
••• Continuous paper is not fed to the standby position.
Tear off printed page at the perforation; then press
Load/Eject to feed paper to the standby position.
••• Paper is jammed in the printer.
To clear the paper jam, see page 42.
Troubleshooting 41
Page 42

Light status Beep
pattern
F Pause — The print head is overheated.
F Paper Out
F Pause
F Tear Off/Bin
F
F F F Font light
F F F Pitch light
O = On, F = Flashing
••• = Three beeps, ••••• = Five beeps
••••• An unknown or serious printer error has occurred.
Problem
Solution
Wait a few minutes; the printer resumes printing
automatically once the print head cools.
Turn off the printer and leave it off for several
minutes; then turn on the printer again.
Clearing Paper Jams
1. Turn off the printer and open the printer cover.
2. If continuous paper is jammed in the printer, tear off the fresh
supply at the perforation nearest the paper entry slot.
3. Turn the knob on the left side of the printer counterclockwise to
remove the paper in the printer and any torn pieces of paper.
Caution:
c
Use the knob on the left side of the printer to clear paper jams only
when the printer is off. Otherwise, you may damage the printer or
change the top-of-form or tear-off position.
4. If the paper is stuck where the printer ejects it, gently pull the paper
out of the printer.
5. Close the printer cover and turn on the printer. Make sure the
Paper Out light is not flashing and the Pause light is off.
42 Troubleshooting
Page 43

Printing a Self Test
Running the printer’s self test helps you determine whether the printer
or the computer is causing the problem. If the self test results are
satisfactory, the printer is working properly and the problem probably
results from your printer driver settings, application settings, computer,
or interface cable. (Be sure to use a shielded interface cable.)
If the self test does not print properly, there is a problem with the printer.
See the Reference Guide for possible causes and solutions to the problem.
You can print the self test using either single sheets or continuous paper
of at least the following width:
Paper type LQ-590 LQ-2090
Continuous paper (including
perforated border)
Single sheet A4 or letter size A3 landscape
1. Make sure paper is loaded and the printer is turned off.
2. To run the test using the Draft font, turn on the printer while
holding down the
near letter-quality fonts, hold down the
you turn on the printer. Either self test can help you determine the
source of your printing problem; however, the draft self test prints
faster than the near letter-quality test.
After a few seconds, the printer loads the paper automatically and
begins printing the self test. A series of characters is printed.
9.5 inches
(241 mm)
LF/FF button. To run the test using the printer’s
14.8 inches
(376 mm)
Load/Eject button while
Note:
To temporarily stop the self test, press the Pause button. To resume the
test, press the Pause button again.
3. To end the self test, press the Pause button to stop printing. If paper
remains in the printer, press the Load/Eject button to eject the
printed page. Then turn off the printer.
Caution:
c
Do not turn off the printer while it is printing the self test. Always press
the
Pause button to stop printing and the Load/Eject button to eject the
printed page before you turn off the printer.
Troubleshooting 43
Page 44

Where To Get Help
If your Epson printer is not operating properly and you cannot solve the
problem using the troubleshooting information, see the contact
information below. Epson provides technical assistance 24 hours a day
through the electronic support services and automated telephone
services listed below.
Service Access
World Wide Web From the Internet, you can reach Epson Support at
Automated
Telephone Services
To speak to a technical support representative, dial:
http://support.epson.com. At this site, you can download
drivers and other files, look at product documentation,
access troubleshooting information, and receive technical
advice through e-mail.
A variety of automated help services are available 24 hours
a day, seven days a week. To use these services, you must
have a touch tone telephone and call (800) 922-8911. Use
one of the following Epson SoundAdvice
to quickly select your printer in SoundAdvice: 70525 (for the
LQ-590) or 70530 (for the LQ-2090).
SM
Express Codes
❏ U.S.: (562) 276-4322, 6
AM to 6 PM, Pacific Time, Monday through
Friday.
❏ Canada: (905) 709-2170, 6
AM to 6 PM, Pacific Time, Monday through
Friday.
Toll or long distance charges may apply. Before you call, please have the
following information ready:
❏ Product name (Epson LQ-590 or LQ-2090)
❏ Product serial number (located on the back of the printer)
❏ Proof of purchase (such as a store receipt) and date of purchase
❏ Computer configuration
❏ Description of the problem
You can purchase ribbon cartridges, paper, manuals, and accessories
from the Epson Store at (800) 873-7766, or visit www.epsonstore.com
(U.S. sales only). In Canada, please call (800) 463-7766 for dealer referral.
44 Troubleshooting
Page 45

Chapter 5
Product Information
Safety Instructions
Hot Parts Caution Symbol
This symbol is placed on the print head and other parts to indicate that
K
Important Safety Instructions
Read all of these safety instructions before using the printer. In addition, follow
all warnings and instructions marked on the printer itself.
❏ Do not place the printer on an unstable surface or near a radiator or heat
❏ Place the printer on a flat surface. It will not operate properly if it is tilted or
❏ Do not block or cover the slots and openings in the printer’s cabinet, and do
❏ Use only the type of power source indicated on the printer’s label.
❏ Connect all equipment to properly grounded electrical outlets. Avoid using
❏ Do not use a damaged or frayed power cord.
❏ If you use an extension cord with the printer, make sure the total ampere
❏ Unplug the printer before cleaning it, and always clean it with a damp cloth
❏ Do not spill liquid onto the printer.
❏ Except as specifically explained in the user documentation, do not attempt
❏ Unplug the printer and refer servicing to qualified service personnel under
❏ Adjust only those controls that are covered by the operating instructions.
they may be hot. Never touch those parts just after the printer has been
used. Let them cool for a few minutes before touching them.
source.
placed at an angle.
not insert objects through the slots.
outlets on the same circuit as photocopiers or air control systems that
regularly switch on and off.
rating of all devices plugged into the extension cord does not exceed the
cord’s ampere rating. Also, make sure the total ampere of all devices
plugged into the electrical outlet does not exceed the electrical outlet’s
ampere rating.
only.
to service the printer yourself.
the following conditions: if the power cord or plug is damaged, if liquid has
entered the printer, if the printer has been dropped or damaged, if it does
not operate normally or exhibits a distinct change in performance.
Product Information 45
Page 46

ENERGY STAR Compliance
As an ENERGY STAR
this product meets the ENERGY STAR guidelines for energy
efficiency. The International ENERGY STAR Office
Equipment program is a voluntary partnership with the
computer and office equipment industry to promote the
introduction of energy-efficient personal computers,
monitors, printers, fax machines, copiers, and scanners in an
effort to reduce air pollution caused by power generation.
®
Partner, Epson has determined that
FCC Compliance Statement for United States Users
This equipment has been tested and found to comply with the limits for a Class B
digital device, pursuant to Part 15 of the FCC Rules. These limits are designed to
provide reasonable protection against harmful interference in a residential
installation. This equipment generates, uses, and can radiate radio frequency
energy and, if not installed and used in accordance with the instructions, may
cause harmful interference to radio or television reception. However, there is no
guarantee that interference will not occur in a particular installation. If this
equipment does cause interference to radio and television reception, which can
be determined by turning the equipment off and on, the user is encouraged to try
to correct the interference by one or more of the following measures.
❏ Reorient or relocate the receiving antenna.
❏ Increase the separation between the equipment and receiver.
❏ Connect the equipment into an outlet on a circuit different from that to
which the receiver is connected.
❏ Consult the dealer or an experienced radio/TV technician for help.
WARNING
The connection of a non-shielded equipment interface cable to this equipment
will invalidate the FCC Certification of this device and may cause interference
levels which exceed the limits established by the FCC for this equipment. It is the
responsibility of the user to obtain and use a shielded equipment interface cable
with this device. If this equipment has more than one interface connector, do not
leave cables connected to unused interfaces.
Changes or modifications not expressly approved by the manufacturer could
void the user’s authority to operate the equipment.
For Canadian users
This Class B digital apparatus meets all requirements of the Canadian Interface
Causing Equipment Regulations.
Cet appareil numérique de la classe B respecte toutes les exigences du Règlement sur le
matériel brouileur du Canada.
46 Product Information
Page 47

Declaration of Conformity
According to 47CFR, Part 2 and 15 for Class B Personal Computers and
Peripherals; and/or CPU Boards and Power Supplies used with Class B Personal
Computers:
We:
Located at:
EPSON AMERICA, INC.
MS 3-13
3840 Kilroy Airport Way
Long Beach, CA 90806
Telephone: (562) 290-5254
Declare under sole responsibility that the product identified herein, complies
with 47CFR Part 2 and 15 of the FCC rules as a Class B digital device. Each
product marketed is identical to the representative unit tested and found to be
compliant with the standards. Records maintained continue to reflect the
equipment being produced can be expected to be within the variation accepted,
due to quantity production and testing on a statistical basis as required by
47CFR §2.909. Operation is subject to the following two conditions: (1) this device
may not cause harmful interference, and (2) this device must accept any
interference received, including interference that may cause undesired operation.
Trade Name: EPSON
Type of Product: Dot Matrix Printer
Model: P363A/P363U (LQ-590 120 V/LQ-590 UPS)
P364A/P364U (LQ-2090 120 V/LQ-2090 UPS)
EPSON AMERICA, INC., LIMITED WARRANTY
What Is Covered: Epson America, Inc. (“Epson”) warrants to the first end user customer of
the Epson product enclosed with this limited warranty statement that the product, if
purchased and used in the United States or Canada, conforms to the manufacturer’s
specifications and will be free from defects in workmanship and materials for a period of
three years from the date of original purchase. Epson also warrants that the consumable
ribbon enclosed with the product will perform to the manufacturer’s specified usage, which
usage may expire before the expiration of the limited warranty for the Epson product.
What Epson Will Do To Correct Problems: Should your Epson product prove defective
during the warranty period, please call the EPSON Connection
(905) 709-2170 (Canada) for warranty repair instructions and return authorization, if
required. Epson will, at its option, repair or replace on an exchange basis the defective unit,
without charge for parts or labor. When warranty service involves the exchange of the
product or of a part, the item replaced becomes Epson property. The exchanged product or
part may be new or previously repaired to the Epson standard of quality. Exchange or
replacement products or parts assume the remaining warranty period of the product covered
by this limited warranty. For warranty service, you must provide proof of the date of original
purchase.
SM
at (562) 276-4322 or
Product Information 47
Page 48

What This Warranty Does Not Cover: This warranty covers only normal consumer use in
the United States and Canada. This warranty is not transferable and will not apply to products
purchased from an end user. This warranty does not cover damage to the Epson printer
caused by parts and supplies not manufactured, distributed or certified by Epson. This
warranty does not cover ribbon or third party parts, components or peripheral devices added
to the Epson product after its shipment from Epson, e.g., dealer-added boards or chips. Epson
is not responsible for warranty service should the Epson label or logo or the rating label or
serial number be removed or should the product fail to be properly maintained or fail to
function properly as a result of misuse, abuse, improper installation, neglect, improper
shipping, damage caused by disasters such as fire, flood, and lightning, improper electrical
current, software problems, interaction with non-Epson products, or service other than by
an Epson Authorized Servicer. Packaging, postage, insurance and shipping costs incurred in
presenting your Epson product for warranty service are your responsibility. If a claimed
defect cannot be identified or reproduced in service, you will be held responsible for costs
incurred.
THE WARRANTY AND REMEDY PROVIDED ABOVE ARE EXCLUSIVE AND IN LIEU
OF ALL OTHER EXPRESS OR IMPLIED WARRANTIES INCLUDING, BUT NOT LIMITED
TO, THE IMPLIED WARRANTIES OF NONINFRINGEMENT, MERCHANTABILITY OR
FITNESS FOR A PARTICULAR PURPOSE. SOME LAWS DO NOT ALLOW THE
EXCLUSION OF IMPLIED WARRANTIES. IF THESE LAWS APPLY, THEN ALL EXPRESS
AND IMPLIED WARRANTIES ARE LIMITED TO THE WARRANTY PERIOD IDENTIFIED
ABOVE. UNLESS STATED HEREIN, ANY STATEM ENTS OR REPRESENTATIONS MADE
BY ANY OTHER PERSON OR FIRM ARE VOID. EXCEPT AS PROVIDED IN THIS
WRITTEN WARRANTY, NEITHER EPSON AMERICA, INC., NOR ITS AFFILIATES
SHALL BE LIABLE FOR ANY LOSS, INCONVENIENCE, OR DAMAGE, INCLUDING
DIRECT, SPECIAL, INCIDENTAL OR CONSEQUENTIAL DAMAGES, RESULTING FROM
THE USE OR INABILITY TO USE THE EPSON PRODUCT, WHETHER RESULTING FROM
BREACH OF WARRANTY OR ANY OTHER LEGAL THEORY. IF THE REMEDY ABOVE
FAILS, EPSON’S ENTIRE LIABILITY SHALL BE LIMITED TO A REFUND OF THE PRICE
PAID FOR THE EPSON PRODUCT COVERED BY THIS LIMITED WARRANTY.
In Canada, warranties include both warranties and conditions.
Some jurisdictions do not allow limitations on how long an implied warranty lasts and some
jurisdictions do not allow the exclusion or limitation of incidental or consequential damages,
so the above limitations and exclusions may not apply to you.
This warranty gives you specific legal rights, and you may also have other rights which vary
from jurisdiction to jurisdiction.
To locate an Authorized Epson Servicer near you, call the Epson Connection at (800) 922-8911
in the United States. In Canada, call (800) 463-7766. Or write to:
Epson America, Inc., P. O. Box 93012
Long Beach, CA 90809-3012
48 Product Information
 Loading...