

Page 1

Epson iProjection Operation Guide
(Windows/Mac)
Page 2

Page 3

Contents
Introduction to Epson iProjection.............................................................................................................. 7
Setting Up the Software for the First Time .............................................................................................. 14
Epson iProjection Features .................................................................................................................. 7
Connection to Various Devices........................................................................................................ 7
Four-Panel Display.......................................................................................................................... 8
Change Presenters and Projection Position .................................................................................... 9
Moderator Function ....................................................................................................................... 10
Screen Delivery and Thumbnail Display Function ......................................................................... 11
Easy Network Projection Using a USB Flash Drive (Windows Only) ............................................. 12
Installing the Software ........................................................................................................................ 14
Epson iProjection System Requirements ...................................................................................... 14
Epson iProjection Editions............................................................................................................. 16
Installing Epson iProjection (Windows).......................................................................................... 16
Installing Epson iProjection (Mac) ................................................................................................. 17
Selecting Projector Network Settings ................................................................................................. 17
Connection Methods for Various Network Environments .............................................................. 18
Recommended Wireless Environment for Multi PC Projection ...................................................... 20
Setting Up a Projector to Connect in Quick Connection Mode....................................................... 20
Setting Up a Projector to Connect in Advanced Connection Mode (Wireless) ............................... 21
Setting Up a Projector to Connect in Advanced Connection Mode (Wired) ................................... 23
Connecting to the Projector and Projecting Images .............................................................................. 25
Connection Methods .......................................................................................................................... 25
Connection Methods for Various Meeting Styles ........................................................................... 25
Connecting the Projector and a Computer Directly Using Wireless Communication ..................... 27
Connecting to the Projector from the Software over a Network System ........................................ 33
Selecting the Projector Search Method .............................................................................................. 37
Search Methods ............................................................................................................................ 38
Searching for Network Projectors Automatically............................................................................ 38
Searching for Network Projectors by Specifying an IP Address or Projector Name ....................... 39
Searching for Network Projectors Using a Profile .......................................................................... 41
3
Page 4

Profiles for Search .................................................................................................................... 41
Performing a Profile Search ...................................................................................................... 41
Registering a Profile.................................................................................................................. 43
Exporting a Profile..................................................................................................................... 45
Importing a Profile..................................................................................................................... 45
Sharing a Profile over a Network............................................................................................... 46
Controlling the Projected Display ....................................................................................................... 47
Screen Types for Projection Control.............................................................................................. 47
Operating the Projected Display Status......................................................................................... 49
Changing the Number of Projected Panels.................................................................................... 49
Changing the Presenter................................................................................................................. 51
Changing the Projection Position................................................................................................... 52
Disconnecting..................................................................................................................................... 53
Using Additional Functions...................................................................................................................... 56
Searching for Network Projectors Using a Shortcut ........................................................................... 56
Creating a Shortcut........................................................................................................................ 56
Connecting to Network Projector Using a USB Flash Drive (Windows Only) ..................................... 57
Creating a USB key on a USB Flash Drive (Windows Only) .......................................................... 57
Using a USB Key to Connect a Windows Computer ...................................................................... 58
Connecting to Multiple Projectors (Mirroring) ..................................................................................... 60
Outputting Audio from the Projector ................................................................................................... 61
Projecting Your Screen ...................................................................................................................... 62
Changing the Moderator..................................................................................................................... 63
Distributing the Projected Screen....................................................................................................... 65
Selecting the Participant's Screen to Project Using Thumbnails ........................................................ 66
Hiding the Projection Control Screen ................................................................................................. 67
Prohibiting Participant Operations...................................................................................................... 68
Controlling the Connection Bandwidth ............................................................................................... 69
Bandwidth Control Restrictions ..................................................................................................... 71
Solving Problems ...................................................................................................................................... 72
Solving Network Connection Problems .............................................................................................. 72
Solutions When You Cannot Connect Using Quick Connection Mode .......................................... 72
Solutions When You Cannot Connect Projectors Using Advanced Connection Mode (Wireless) . 73
4
Page 5

Solutions When You Cannot Connect Projectors Using Advanced Connection Mode (Wired)...... 75
Solving Problems During Projection................................................................................................... 77
Solutions When the Screen is Not Projected Properly................................................................... 77
Solutions When Audio is Not Played Properly ............................................................................... 78
Solutions When the Moderator Function Does Not Work .............................................................. 78
Solutions When the Projected Screen is Not Delivered ................................................................. 79
Error Messages List ........................................................................................................................... 79
Error Messages When Starting up Epson iProjection .................................................................... 79
Error Messages When Using a USB Key....................................................................................... 82
Error Messages When Searching for and Selecting Projectors ..................................................... 83
Error Messages When Projecting .................................................................................................. 84
Error Messages When Operating a Profile .................................................................................... 84
Error Messages When Using the Moderator Function ................................................................... 85
Error Messages When Distributing the Projected Screen.............................................................. 86
Event ID List ....................................................................................................................................... 86
Screen Summary ....................................................................................................................................... 89
Select Connection Mode Screen........................................................................................................ 90
Search Screen ................................................................................................................................... 91
Save Screen....................................................................................................................................... 94
Set options ......................................................................................................................................... 95
Set options - User Settings ............................................................................................................ 96
Set options - General settings ....................................................................................................... 97
Set options - Adjust performance ................................................................................................ 100
Set options - Audio Output........................................................................................................... 102
Set options - Deliver .................................................................................................................... 103
Toolbar............................................................................................................................................. 104
Projection Control Screen ................................................................................................................ 107
Thumbnail Screen ............................................................................................................................ 111
Viewer Screen.................................................................................................................................. 113
Appendix .................................................................................................................................................. 115
Updating and Uninstalling the Software ........................................................................................... 115
Getting the Latest Version of the Application ............................................................................... 115
Uninstalling Epson iProjection (Windows Vista/Windows 7/Windows 10) ................................... 115
5
Page 6

Uninstalling Epson iProjection (Windows 8.x) ............................................................................. 116
Uninstalling Epson iProjection (Mac) ........................................................................................... 116
Supported Resolutions and Colors................................................................................................... 116
Supported Resolutions ................................................................................................................ 117
Display Color ............................................................................................................................... 117
Limitations........................................................................................................................................ 118
Connection Limitations ................................................................................................................ 118
Limitations when Projecting from Windows Photo Gallery or Windows Live Photo Gallery ......... 119
Limitations in Windows Aero........................................................................................................ 119
Limitations when Projecting from Windows Media Center ........................................................... 120
Notices ............................................................................................................................................. 120
Copyright Notice.......................................................................................................................... 120
About Notations........................................................................................................................... 121
General Notice............................................................................................................................. 121
Copyright Attribution.................................................................................................................... 122
6
Page 7

Introduction to Epson iProjection
See the information here to learn more about Epson iProjection software.
Epson iProjection Features
Epson iProjection Features
Epson iProjection is software that allows you to hold interactive meetings or lessons by projecting
images from network projectors. You can use a variety of display options for your environment.
Connection to Various Devices
Four-Panel Display
Change Presenters and Projection Position
Moderator Function
Screen Delivery and Thumbnail Display Function
Easy Network Projection Using a USB Flash Drive (Windows Only)
Parent topic: Introduction to Epson iProjection
Connection to Various Devices
You can connect up to 50 devices to a projector simultaneously, such as computers, smartphones and
tablets using Epson iProjection. (Up to four devices can project at one time.)
7
Page 8
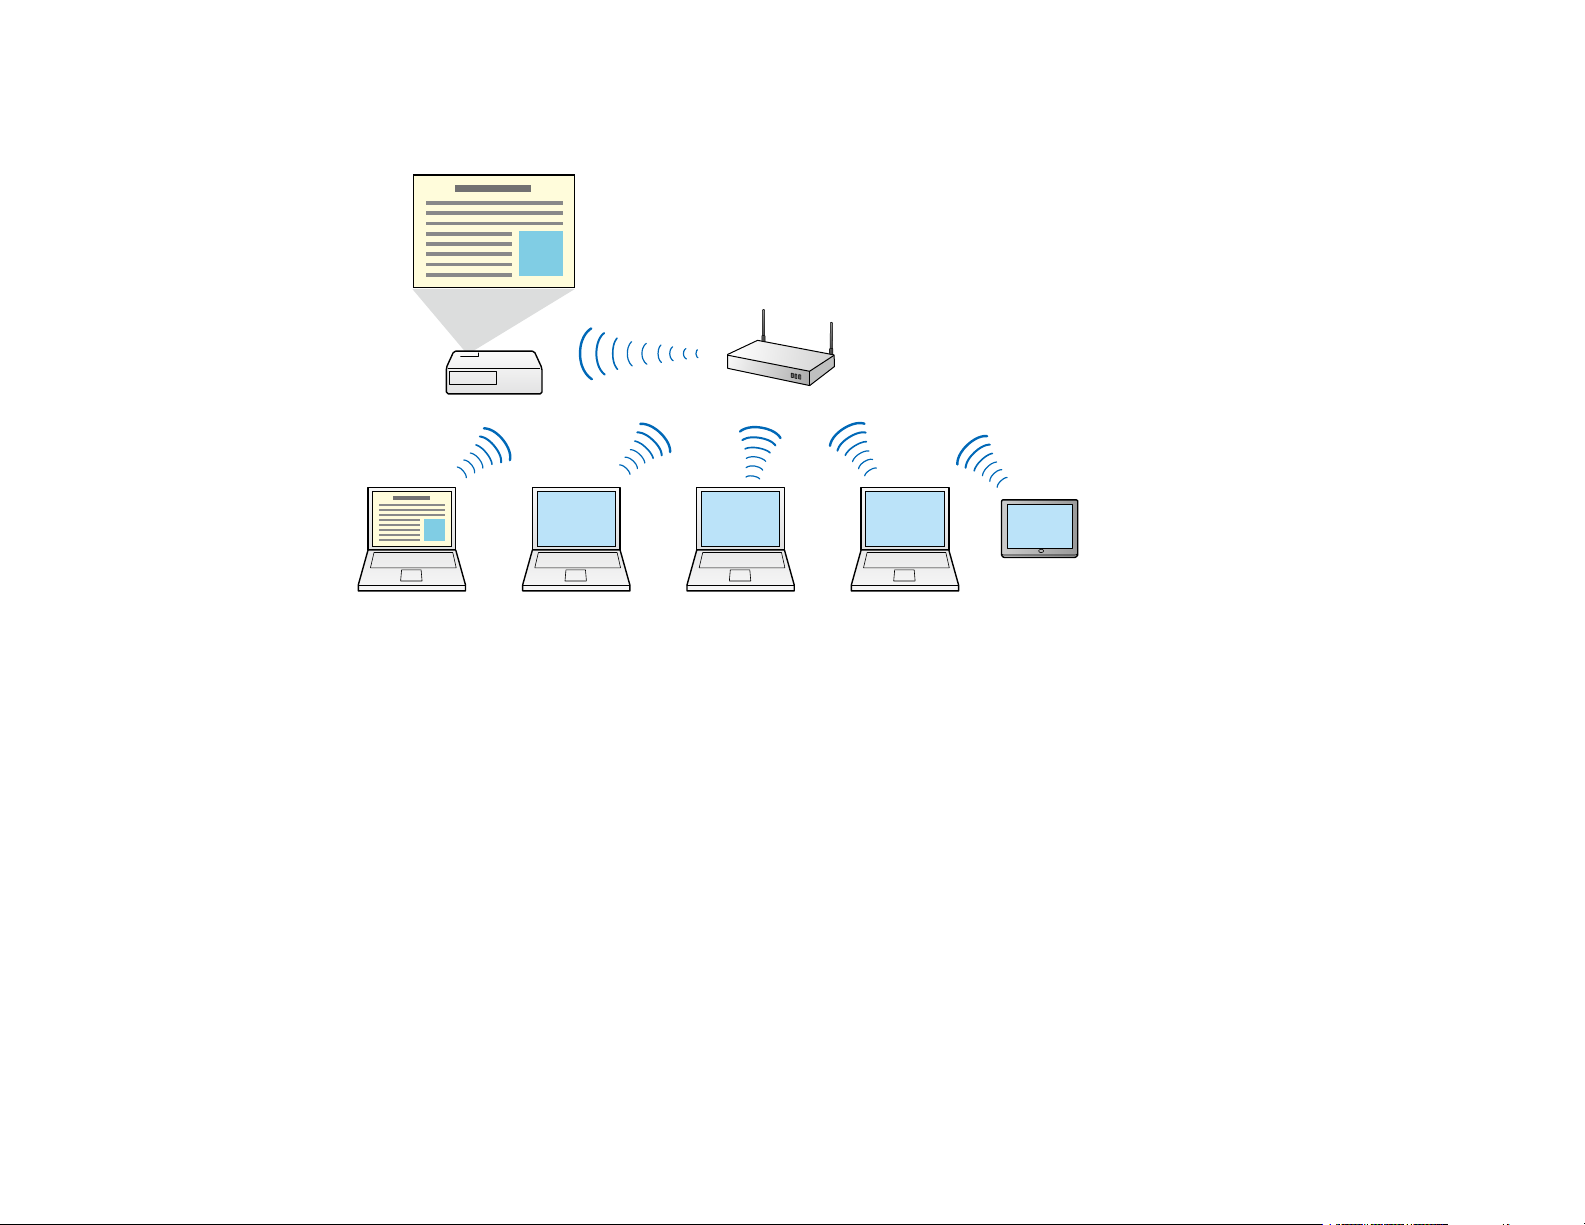
You can also hold remote meetings over a network by simultaneously projecting the same image on up
to four projectors on the network.
Parent topic: Epson iProjection Features
Related tasks
Connecting to Multiple Projectors (Mirroring)
Related topics
Connection Methods
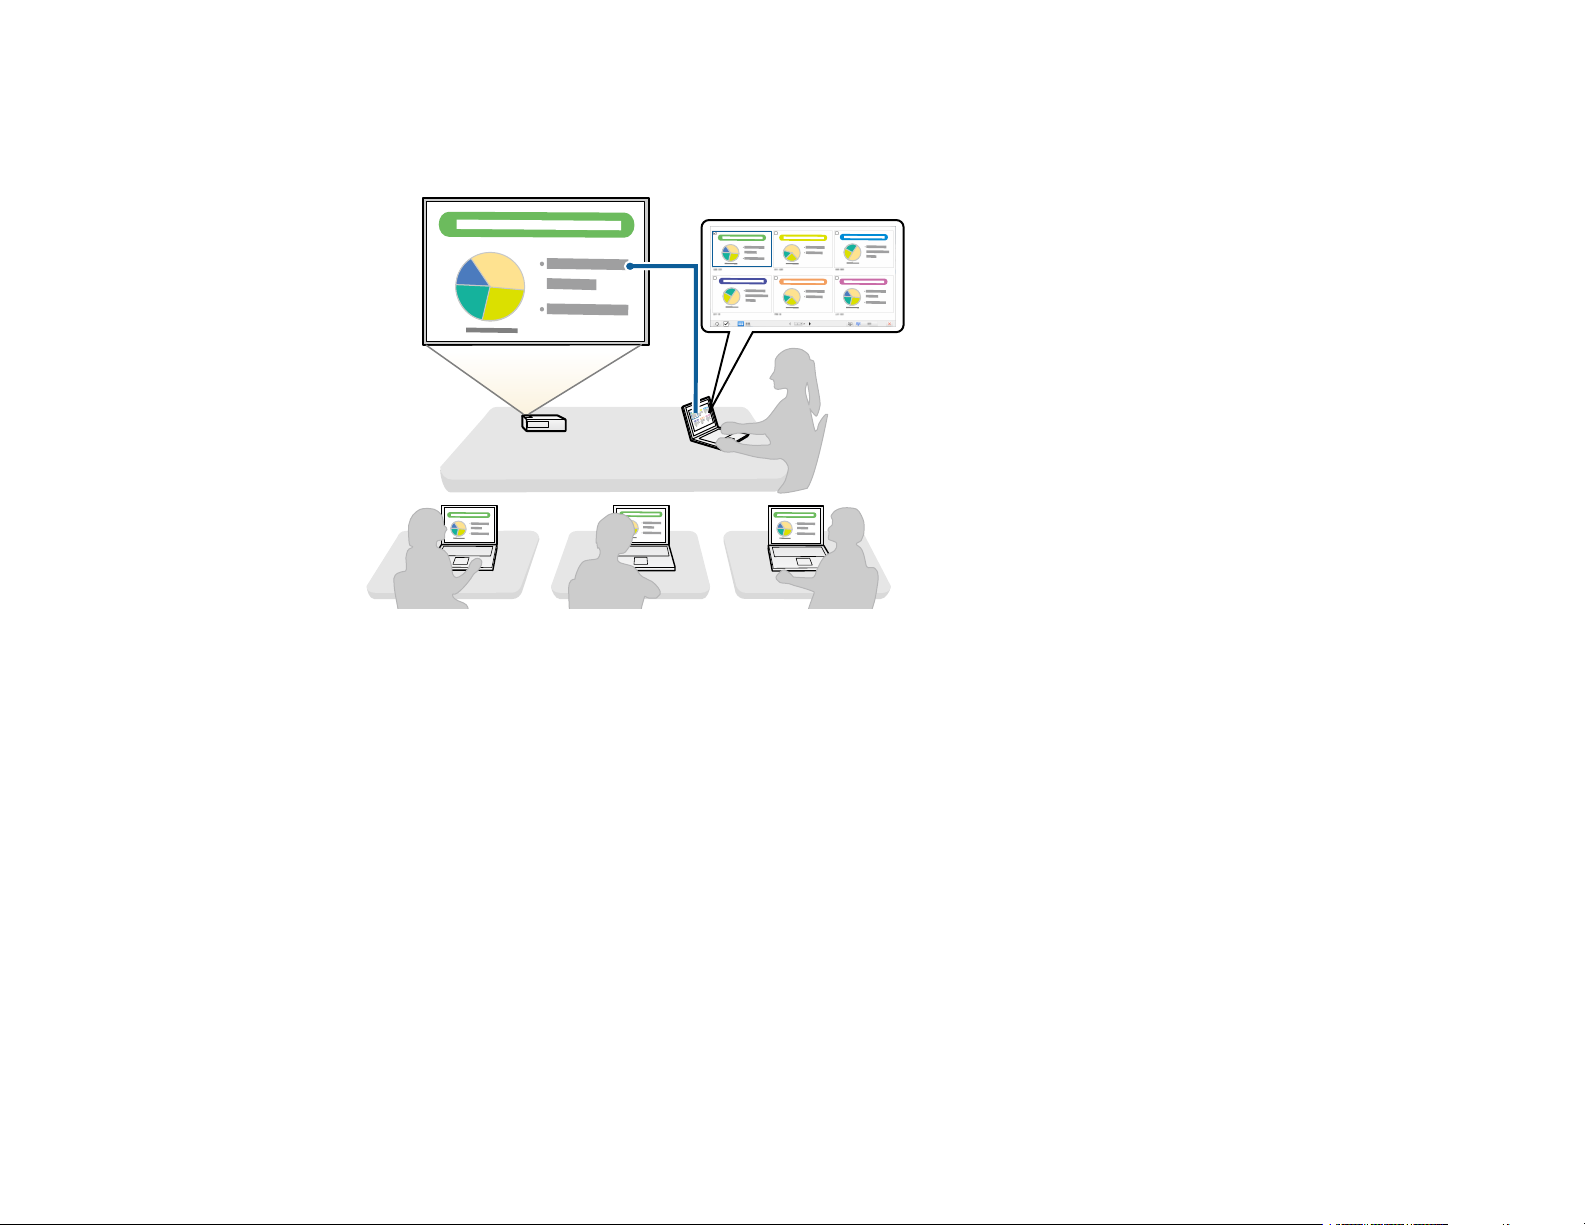
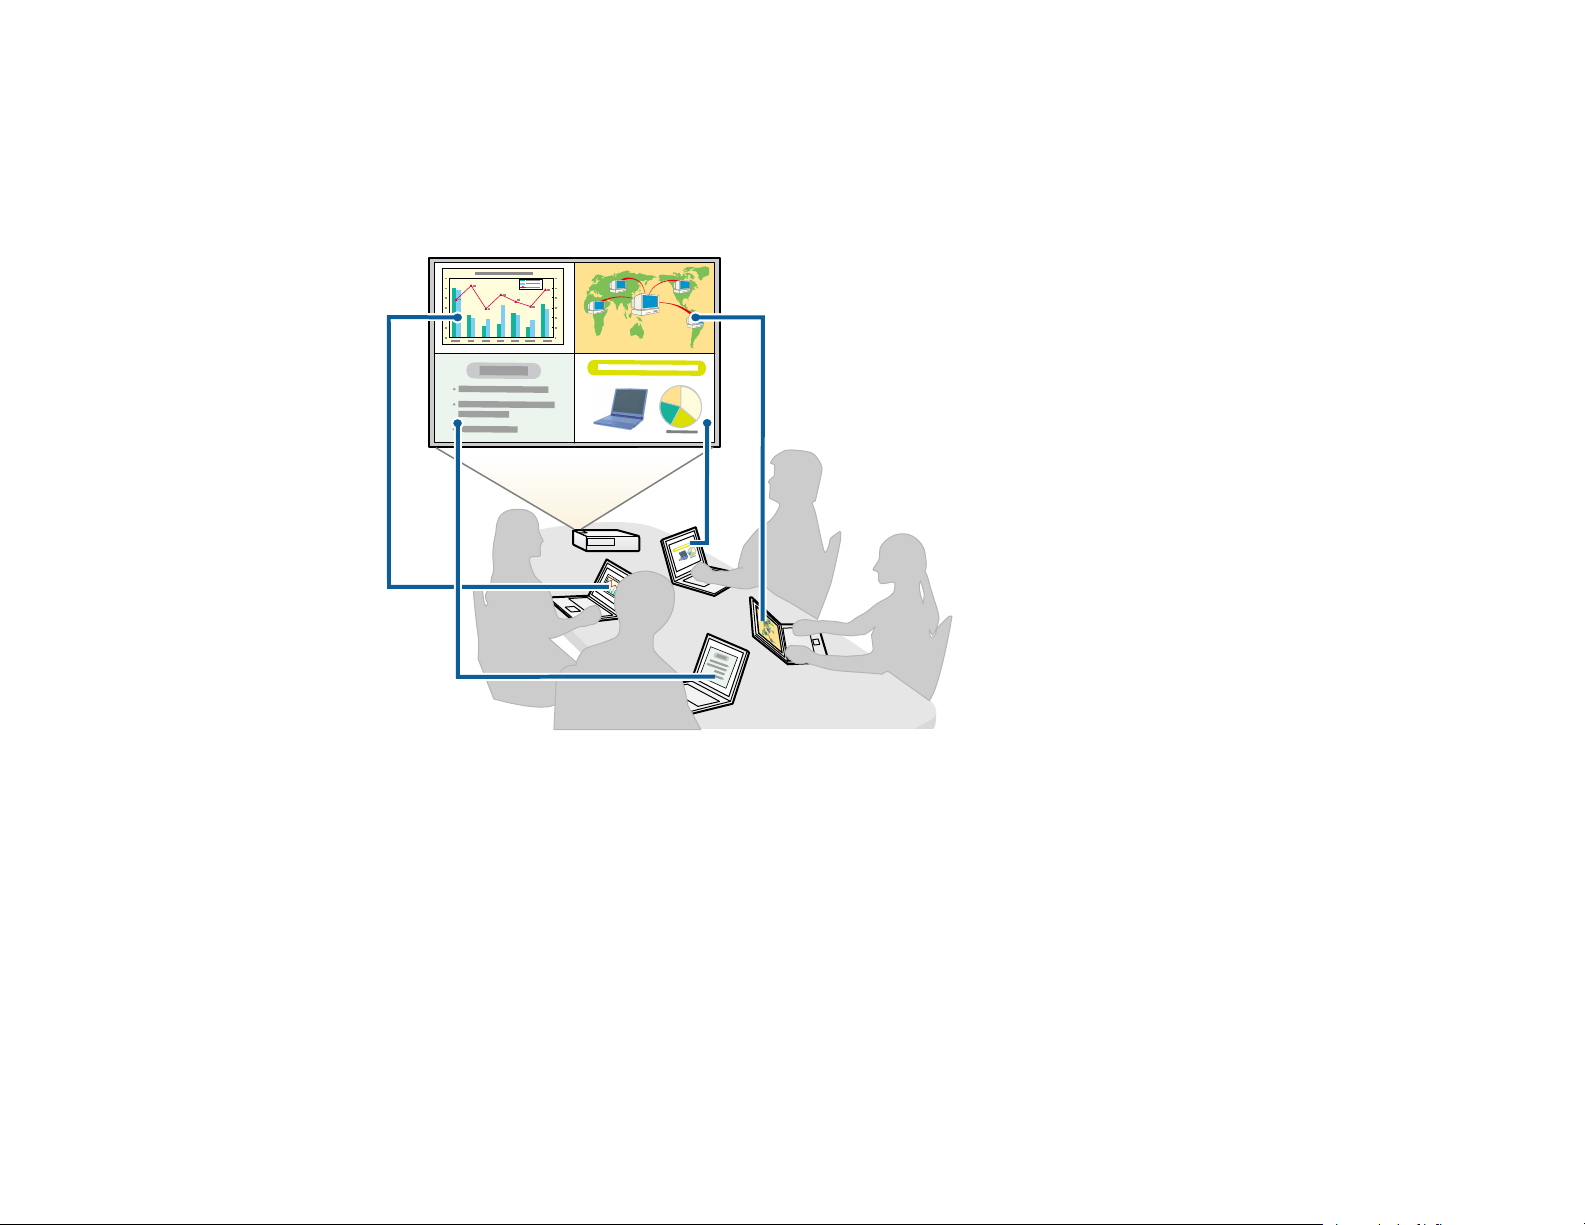
Four-Panel Display
You can simultaneously display up to four screens in separate projected panels, which is useful in both
business and educational environments.
8
Page 9
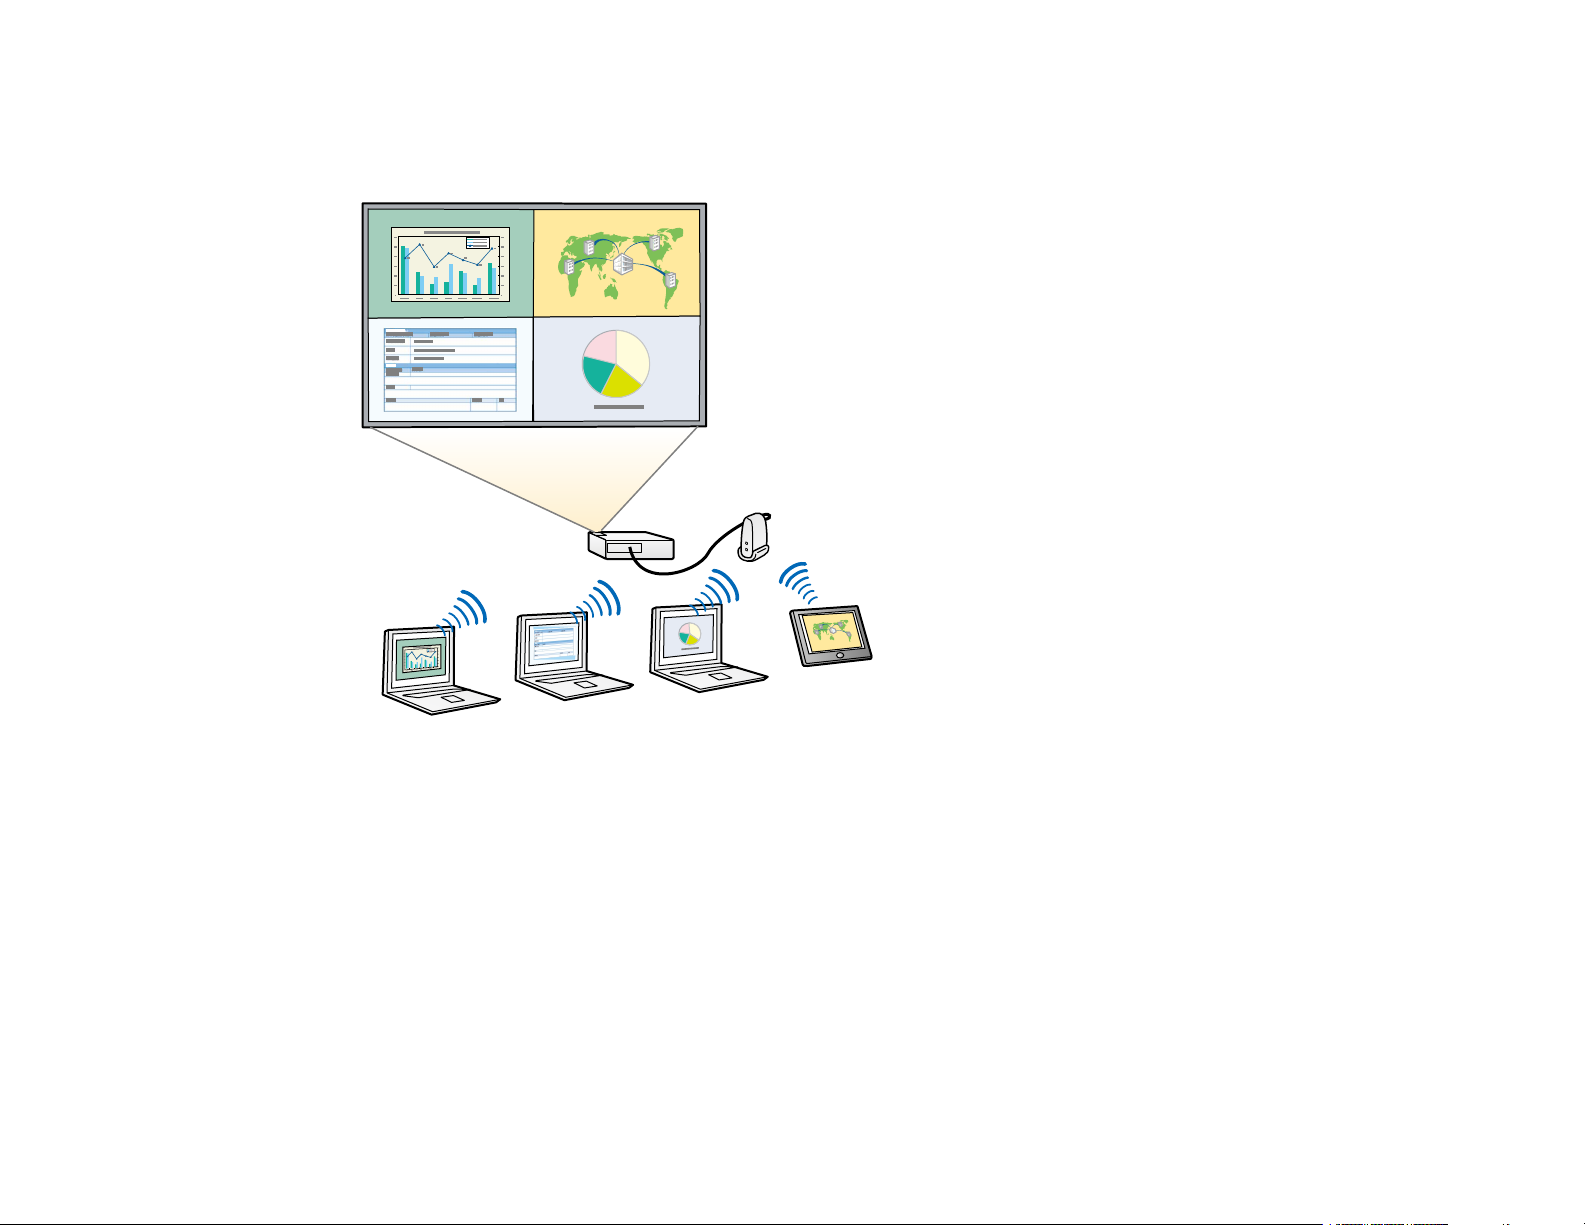
For example, you can compare and analyze data while simultaneously projecting screens from multiple
devices. In an educational environment, you can project lesson material on one part of the screen and
student answers on another to enhance the learning experience.
Parent topic: Epson iProjection Features
Related tasks
Changing the Number of Projected Panels
Change Presenters and Projection Position
Using Epson iProjection, you can easily change the screen being projected and the projection position
by simply dragging and dropping user names in panels on the projection control screen.
9
Page 10
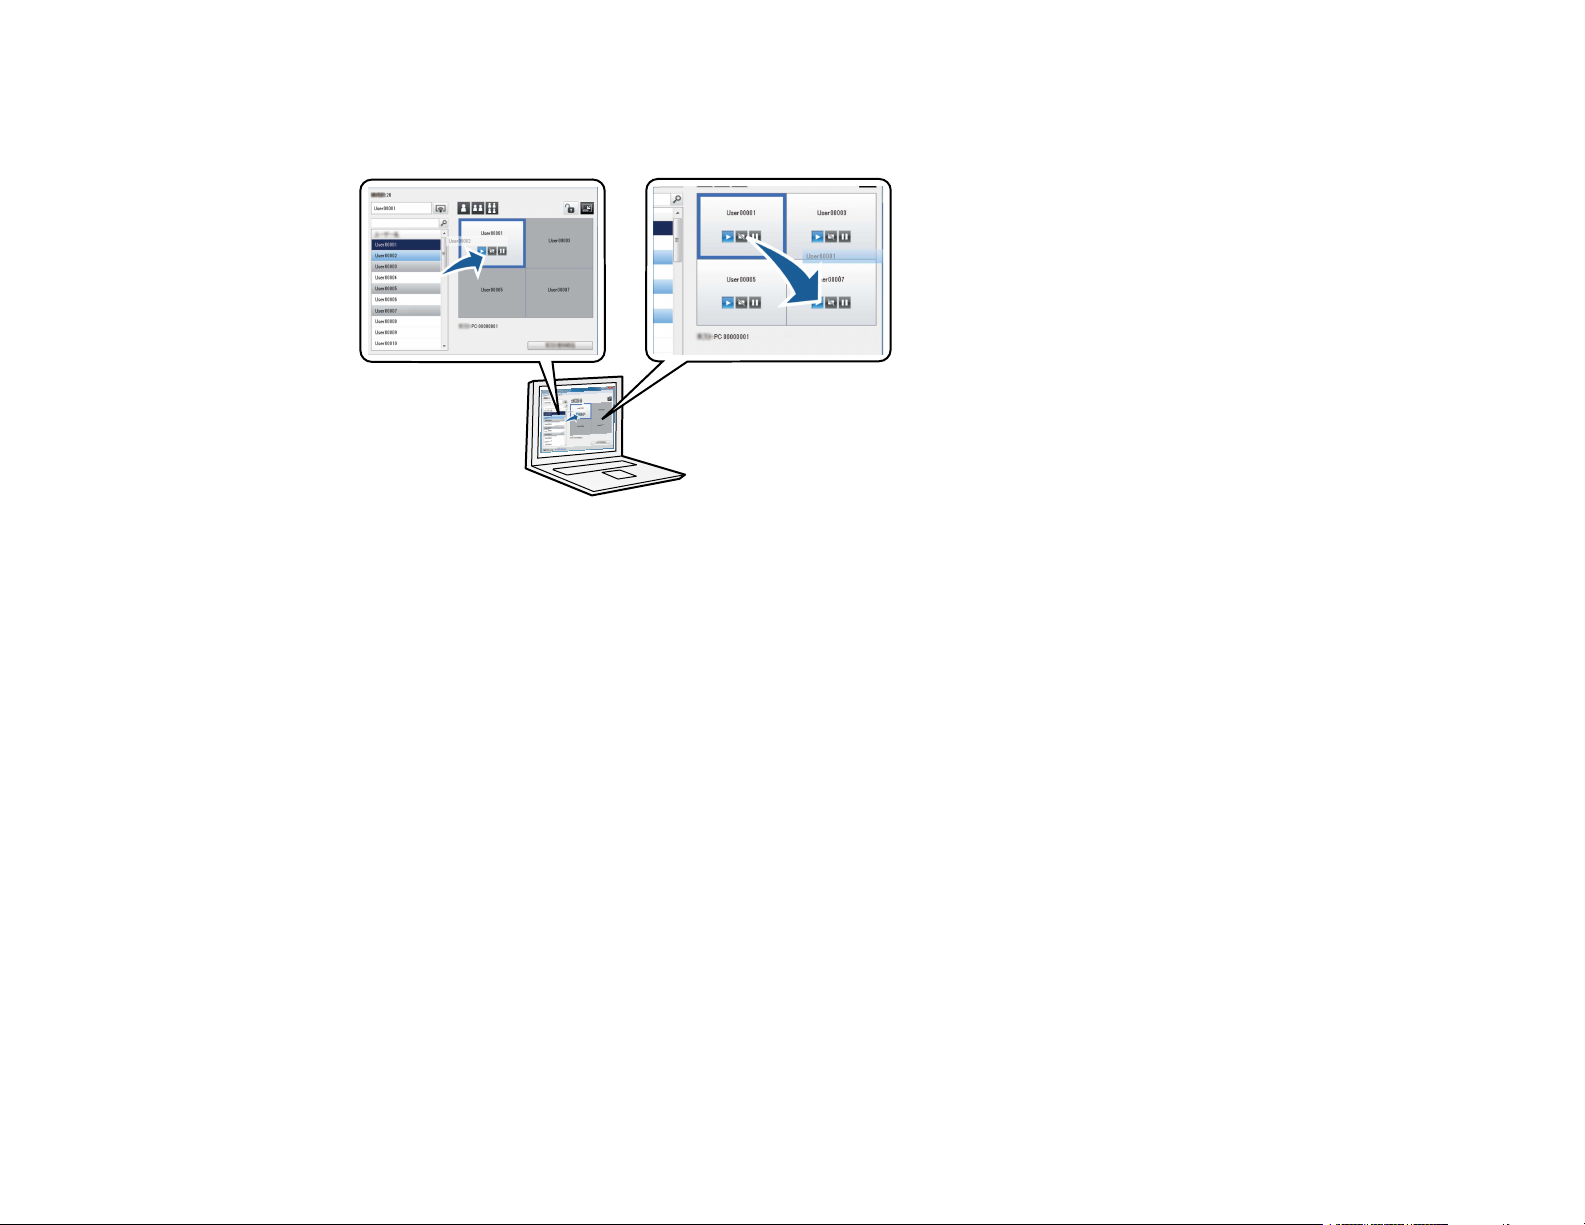
You can share the projector with other users on the same network without having to change cable
connections, allowing users to take turns giving presentations.
Note: The projection control screen is available only on the Standard Edition of the software.
Parent topic: Epson iProjection Features
Related tasks
Changing the Presenter
Changing the Projection Position
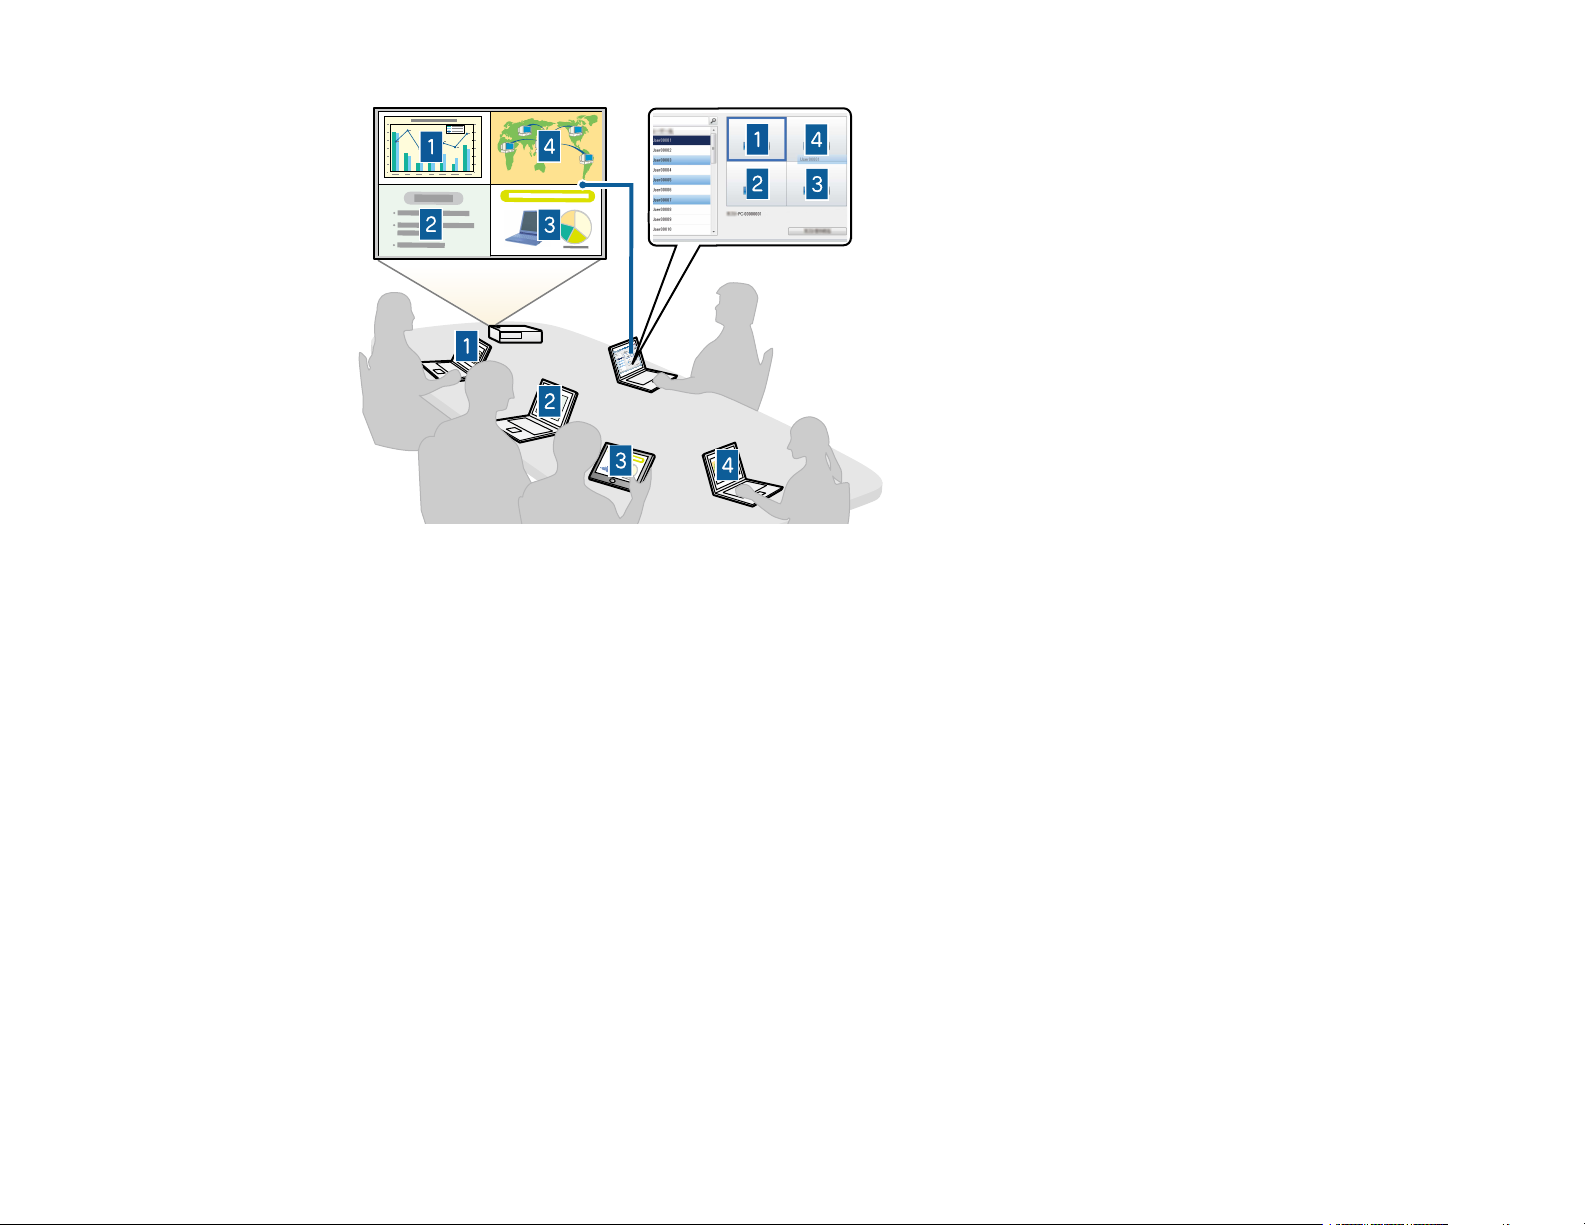
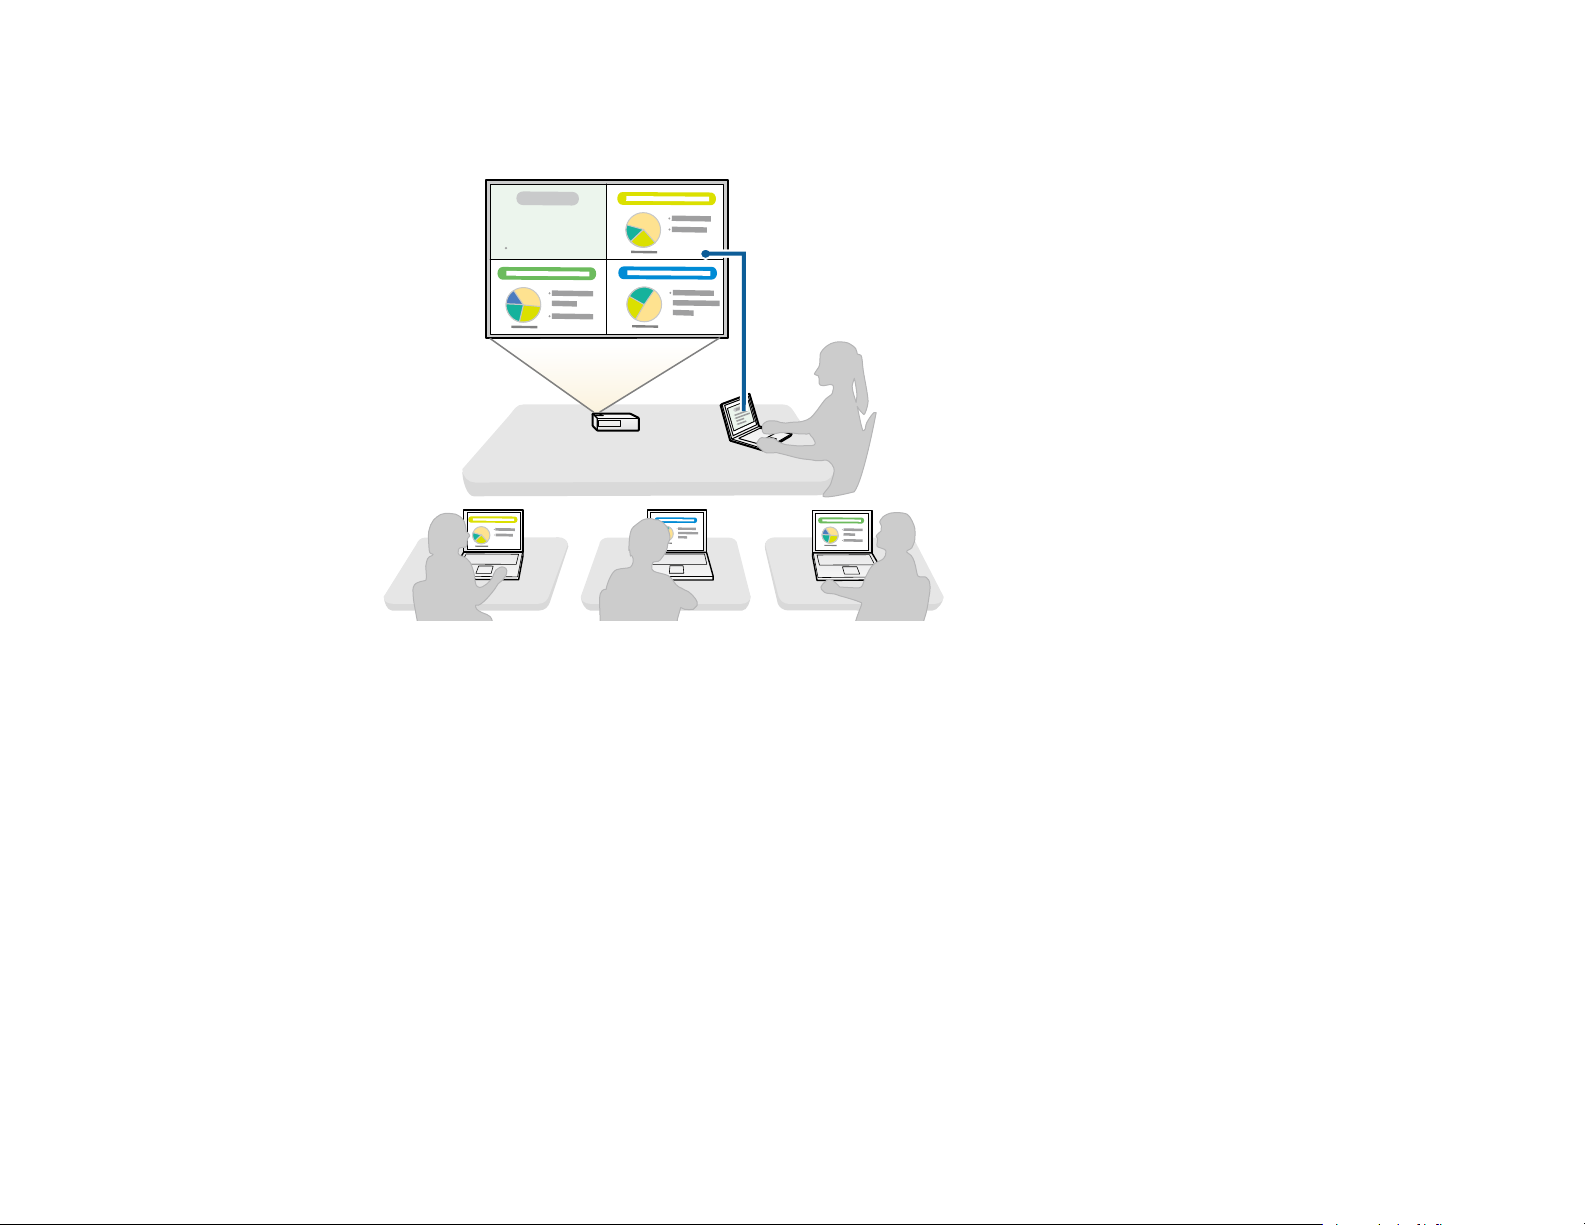
Moderator Function
When using the moderator function, only one person plays a role of moderator who can control the
projected display. This function is suitable for meetings in which one user is the moderator and the other
users are participants, and the moderator must control the projected display.
This can also be useful in a classroom environment where the moderator must control the lesson without
interruption.
10
Page 11
Note: This function is available only for supported models.
Parent topic: Epson iProjection Features
Related tasks
Changing the Moderator
Related topics
Connection Methods
Screen Delivery and Thumbnail Display Function
You can distribute the currently projected screen images to the participant's devices. The participants
can then add notes to the received images using drawing software, which the moderator can check as
11
Page 12
thumbnails. This feature is suitable for environments where the moderator wants to provide questions for
the participants to answer, and then select which answers or ideas to project in response.
Note: This function is available only for supported models.
Parent topic: Epson iProjection Features
Related tasks
Distributing the Projected Screen
Selecting the Participant's Screen to Project Using Thumbnails
Easy Network Projection Using a USB Flash Drive (Windows Only)
You can use a commercially available USB flash drive as a USB key to transfer the projector's network
information to a Windows computer. Creating the USB key allows you to quickly project images from the
network projector.
12
Page 13

When you change the presenter, you can switch the projected screen by inserting the USB key to a new
presenter's computer.
Note:
• This function is available only for supported models. See your projector User's Guide for more details.
• You cannot use the USB key as a projector's wireless LAN module.
Parent topic: Epson iProjection Features
Related topics
Connecting to Network Projector Using a USB Flash Drive (Windows Only)
13
Page 14

Setting Up the Software for the First Time
Follow these instructions before connecting a computer to the projector over a network.
Installing the Software
Selecting Projector Network Settings
Installing the Software
Install Epson iProjection from the EPSON Projector Software CD-ROM supplied with your projector (if
available) or by downloading it from the Epson Web site.
Note:
• If the language selected for the installation differs from the language of the operating system being
used, the screens may not display correctly.
• If EasyMP Multi PC Projection is already installed on your computer, uninstall it first and then install
Epson iProjection.
Epson iProjection System Requirements
Epson iProjection Editions
Installing Epson iProjection (Windows)
Installing Epson iProjection (Mac)
Parent topic: Setting Up the Software for the First Time
Related tasks
Getting the Latest Version of the Application
Epson iProjection System Requirements
Your computer must meet the following system requirements to use the Epson iProjection software.
14
Page 15

Requirement Windows Mac
Operating system Windows Vista
• Ultimate (32-bit)
• Enterprise (32-bit)
• Business (32-bit)
• Home Premium (32-bit)
• Home Basic (32-bit)
Windows 7
• Ultimate (32- and 64-bit)
• Enterprise (32- and 64-bit)
• Professional (32- and 64-bit)
• Home Premium (32- and 64-bit)
• Home Basic (32-bit)
• Starter (32-bit)
Windows 8
• Windows 8 (32- and 64-bit)
• Windows 8 Pro (32- and 64-bit)
• Windows 8 Enterprise (32- and 64-bit)
OS X
• 10.7.x (32- and 64-bit)
• 10.8.x (64-bit)
• 10.9.x (64-bit)
• 10.10.x (64-bit)
• 10.11.x (64-bit)
macOS
• 10.12.x (64-bit)
Windows 8.1
• Windows 8.1 (32- and 64-bit)
• Windows 8.1 Pro (32- and 64-bit)
• Windows 8.1 Enterprise (32- and 64bit)
Windows 10
• Windows 10 Home (32- and 64-bit)
• Windows 10 Pro (32- and 64-bit)
• Windows 10 Enterprise (32- and 64bit)
15
Page 16

Requirement Windows Mac
CPU Intel Core2Duo or faster
Memory 2GB or more
Hard disk space 50 MB or more
Display Resolution between 800 × 600 (SVGA) and 1920 × 1200 (WUXGA)
Note:
• Operation is not guaranteed for Windows Vista without any service packs installed, or Windows Vista
Service Pack 1.
• Operation is not guaranteed for Windows 7 without any service packs installed.
Parent topic: Installing the Software
Epson iProjection Editions
You can choose the software edition to install that suits your role in the projection environment.
• Standard Edition
(Intel Core i5 or faster recommended)
(4GB or more recommended)
16-bit color or greater (approximately 32,000 display colors)
You can use all functions of Epson iProjection.
You can control the projected image and also function as a moderator.
• Participant Edition
You can connect to the projector only as a participant of the moderator function and cannot control the
projected images.
Parent topic: Installing the Software
Installing Epson iProjection (Windows)
Install Epson iProjection on your computer.
Note: You need administrator authority to install the software.
16
Page 17

1. Turn on your computer.
2. Make sure all running applications are closed.
3. Do one of the following:
• Insert the EPSON Projector Software CD-ROM into the computer (if available) and continue with
these steps.
• If you downloaded the software from the Epson Web site, follow the on-screen instructions to
install the software.
The installer starts automatically.
4. If the installer does not start automatically, open the CD-ROM drive from My Computer (or
Computer), and then double-click iProjection_Inst.exe.
5. Follow the on-screen instructions to install.
Parent topic: Installing the Software
Installing Epson iProjection (Mac)
Install Epson iProjection on your computer.
1. Turn on your computer.
2. Make sure all running applications are closed.
3. Do one of the following:
• Insert the EPSON Projector Software CD-ROM into the computer (if available) and continue with
these steps.
• If you downloaded the software from the Epson Web site, follow the on-screen instructions to
install the software.
4. Double-click the iProjectionInstaller.pkg icon in the EPSON window.
Installation starts.
5. Follow the on-screen instructions to install.
Parent topic: Installing the Software
Selecting Projector Network Settings
Follow these instructions to select a connection method between a computer and the projector, and then
set up the projector.
Connection Methods for Various Network Environments
17
Page 18

Recommended Wireless Environment for Multi PC Projection
Setting Up a Projector to Connect in Quick Connection Mode
Setting Up a Projector to Connect in Advanced Connection Mode (Wireless)
Setting Up a Projector to Connect in Advanced Connection Mode (Wired)
Parent topic: Setting Up the Software for the First Time
Connection Methods for Various Network Environments
You can choose a connection mode to suit your network environment.
Check how the projector is connected to the network system (wireless or wired) and the communication
path from the computer to the projector.
Depending on your projector, some connection methods may not be available. See your projector User's
Guide for more details.
• To connect the projector to the computer directly using wireless communication: Use Quick
Connection Mode.
18
Page 19
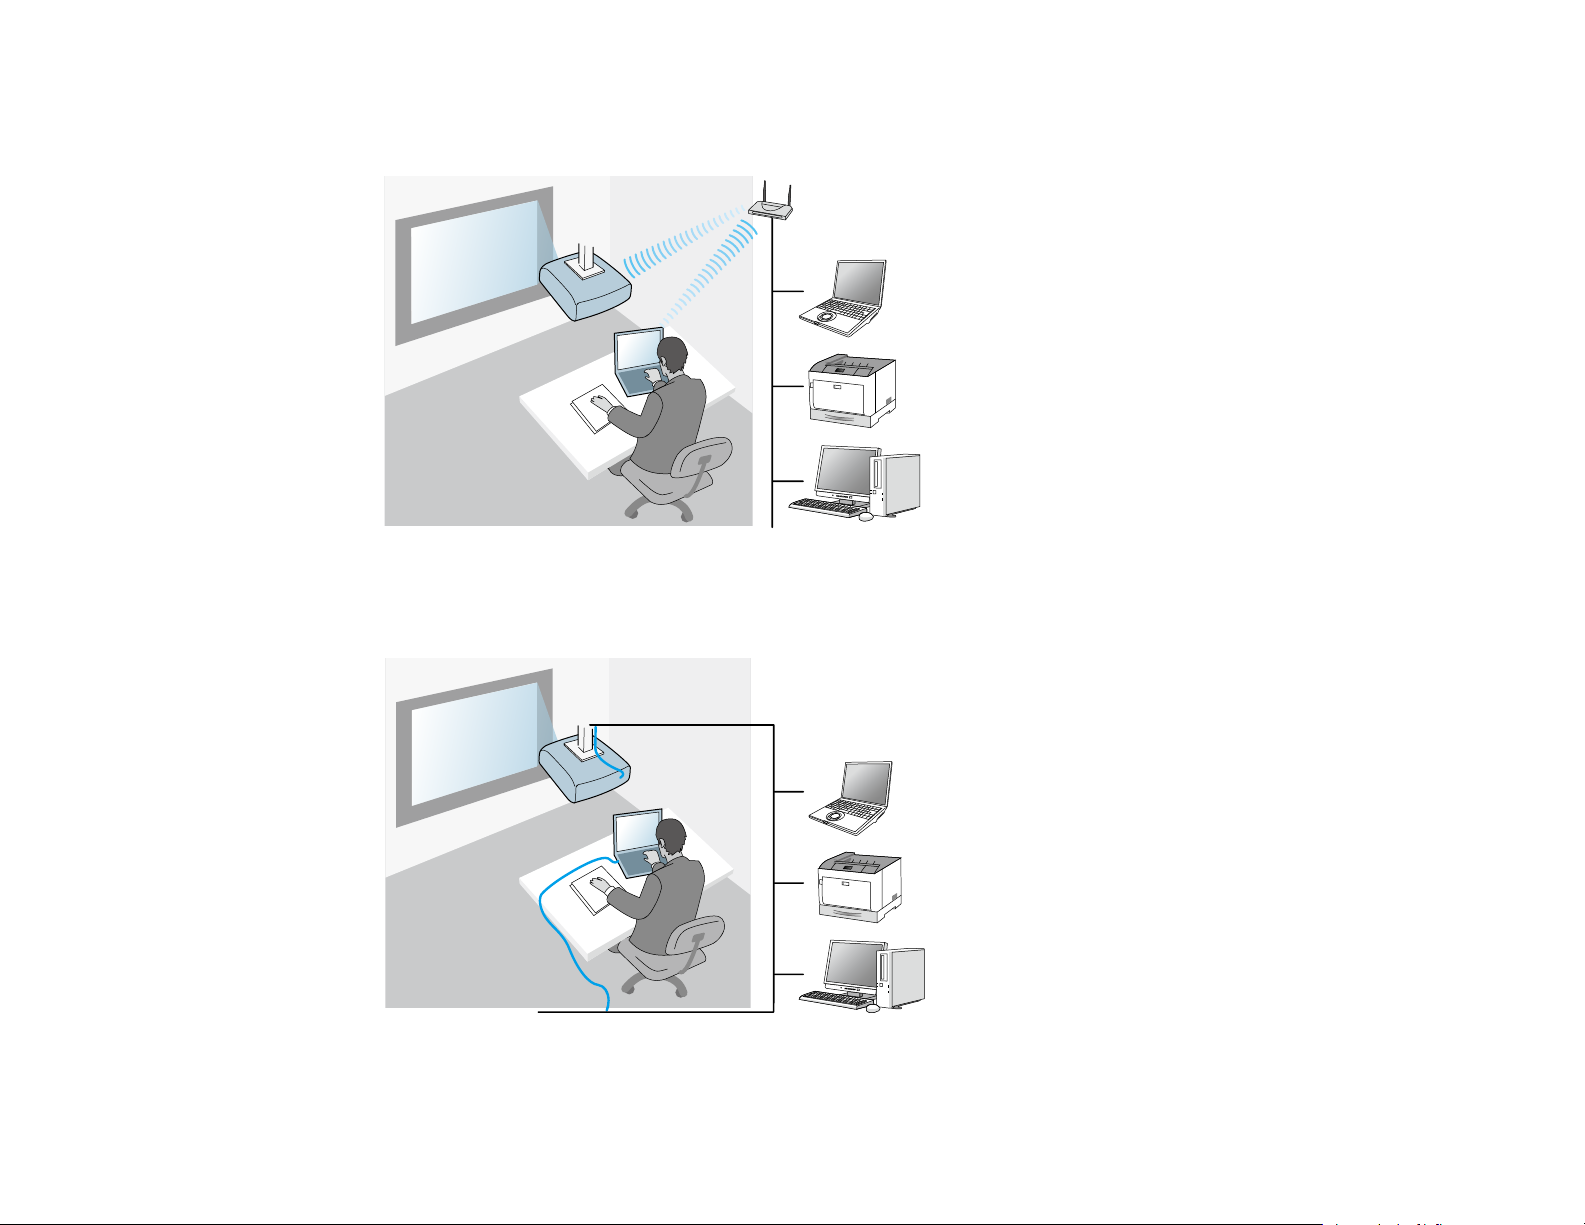
• To connect the projector to the computer using a wireless network system: Use Advanced
Connection Mode.
• To connect the projector to the computer using a wired network system: Use Advanced Connection
Mode.
Parent topic: Selecting Projector Network Settings
19
Page 20

Recommended Wireless Environment for Multi PC Projection
When you connect multiple devices to a projector using the Quick connection mode, we recommend
limiting the number of devices to six or less to maintain the projection performance. The number of
devices that can connect to a projector at the same time differs depending on the wireless
communication environment.
When you connect a projector to a wireless LAN and connect multiple devices wirelessly using the
Advanced connection mode, note the following recommendations.
• Set up multiple access points so that one of the access points can connect up to 10 or 20 devices. See
the access point manual for more information on the maximum number of devices that can be
connected.
• When you use multiple access points, assign a different channel to each access point, and use
different access points for the projector connection and the computer connection.
• Use a wireless LAN controller, if possible, to enhance the connection stability.
• Use an access point that supports 802.11n.
Contact your network administrator for help in setting up the wireless environment.
Note: If your projector supports a wired LAN connection, we recommend using a wired LAN connection
when you connect multiple devices to the projector.
Parent topic: Selecting Projector Network Settings
Setting Up a Projector to Connect in Quick Connection Mode
To connect a computer directly to the projector using wireless communication, you need to select
network settings on the computer and the projector.
1. Select the necessary settings to connect your computer to a wireless LAN. See the documentation
supplied with your computer for more details.
2. Install the wireless LAN unit in the projector, if necessary. See your projector User's Guide for
instructions.
3. Turn on the projector.
4. Press the Menu button on the remote control or the control panel, select the Network menu, and
select Network Configuration .
5. Select Wireless LAN.
20
Page 21
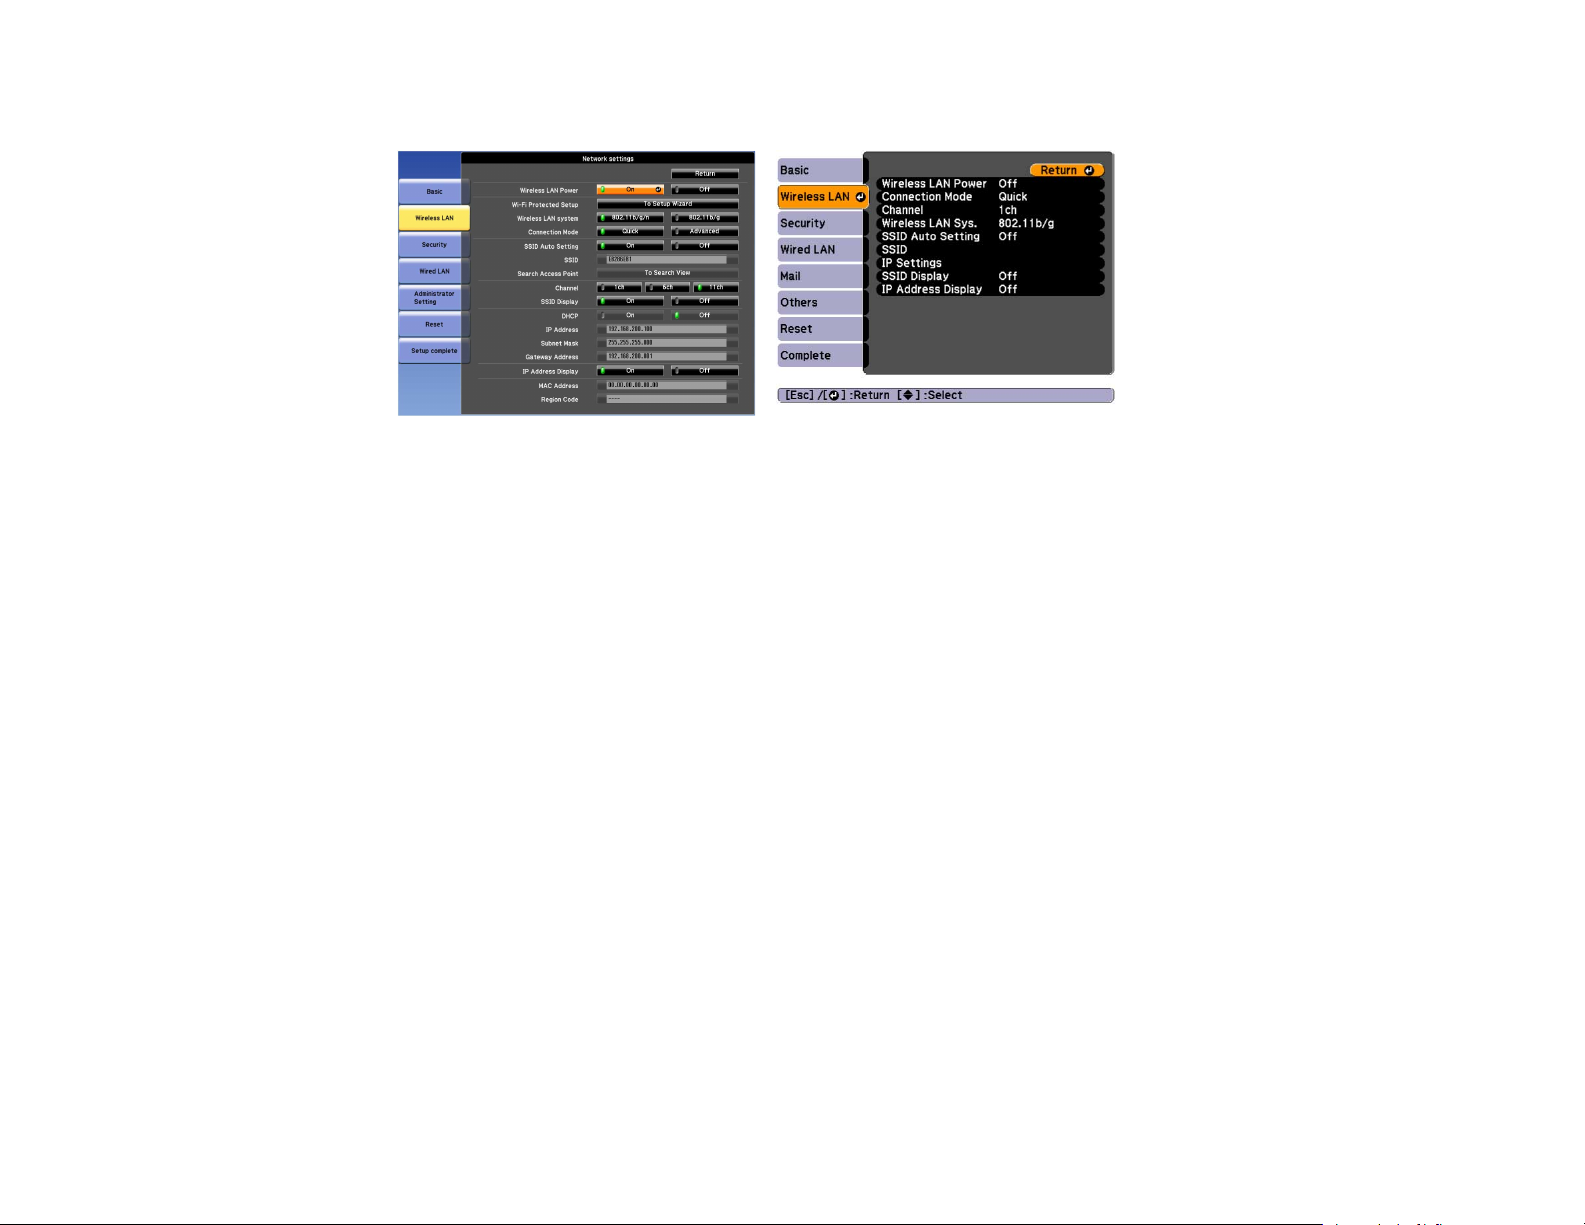
A screen like one of the following is displayed.
6. Turn on wireless LAN support.
Note: The necessary settings vary depending on your projector. See your projector User's Guide for
instructions.
7. Select Quick for Connection Mode.
8. Select other options as necessary for your network. See your projector User's Guide for instructions.
9. Select security settings on the Security menu as necessary for your network. Check with your
network administrator for more information on making the correct settings.
10. When you have finished making settings, select Setup Complete or Complete and follow the onscreen instructions to save your settings and exit the menus.
Parent topic: Selecting Projector Network Settings
Related tasks
Connecting the Projector and a Computer Directly Using Wireless Communication
Setting Up a Projector to Connect in Advanced Connection Mode (Wireless)
To connect a computer to the projector over a wireless LAN, you need to select network settings on the
computer and the projector.
1. Contact your network administrator and write down the settings for the access point, such as the
SSID and security settings.
21
Page 22
2. Connect the computer to the network.
Note: To set up a network connection, if necessary, see the documentation supplied with your
computer or network adapter.
3. Install the wireless LAN unit in the projector, if necessary. See your projector User's Guide for
instructions.
4. Turn on the projector.
5. Press the Menu button on the remote control or the control panel, select the Network menu, and
then select Network Configuration .
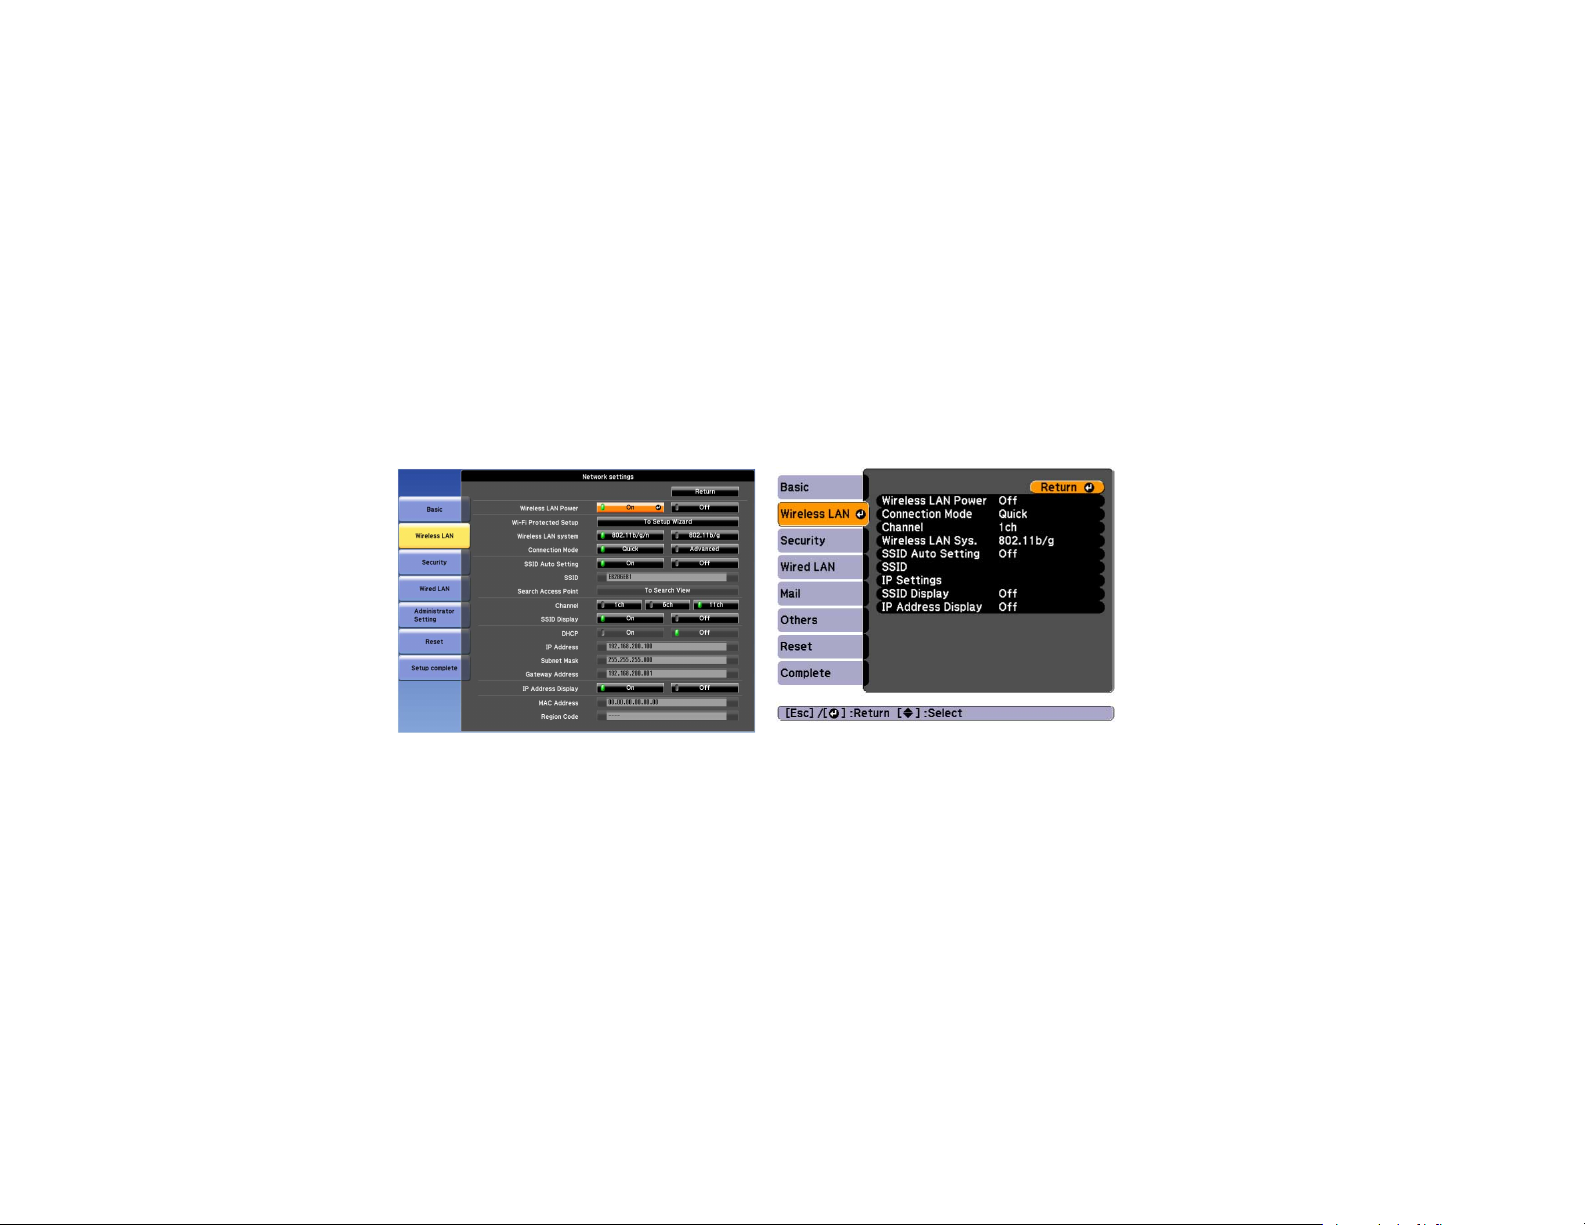
6. Select Wireless LAN.
A screen like one of the following is displayed.
7. Turn on wireless LAN support.
Note: The necessary settings vary depending on your projector. See your projector User's Guide for
instructions.
8. Select Advanced for Connection Mode.
9. Select other options as necessary for your network. See your projector User's Guide for instructions.
10. Select security settings on the Security menu as necessary for your network. Check with your
network administrator for more information on making the correct settings.
11. When you have finished making settings, select Setup Complete or Complete, and follow the onscreen instructions to save your settings and exit the menus.
22
Page 23

Parent topic: Selecting Projector Network Settings
Related tasks
Connecting to the Projector from the Software over a Network System
Setting Up a Projector to Connect in Advanced Connection Mode (Wired)
To connect a computer to the projector using a wired LAN, you need to select network settings on the
computer and the projector.
1. Contact your network administrator and check that DHCP is available under the current network
environment.
Note: If DHCP is not available, write down the following values that are available for your projector.
• IP Address
• Subnet Mask
• Gateway Address
2. Connect the computer to the network.
Note: To set up a network connection, if necessary, see the documentation supplied with your
computer or network adapter.
3. Connect a LAN cable to the projector.
4. Turn on the projector.
5. Press the Menu button on the remote control or the control panel, select the Network menu, and
select Network Configuration .
6. Select Wired LAN.
23
Page 24
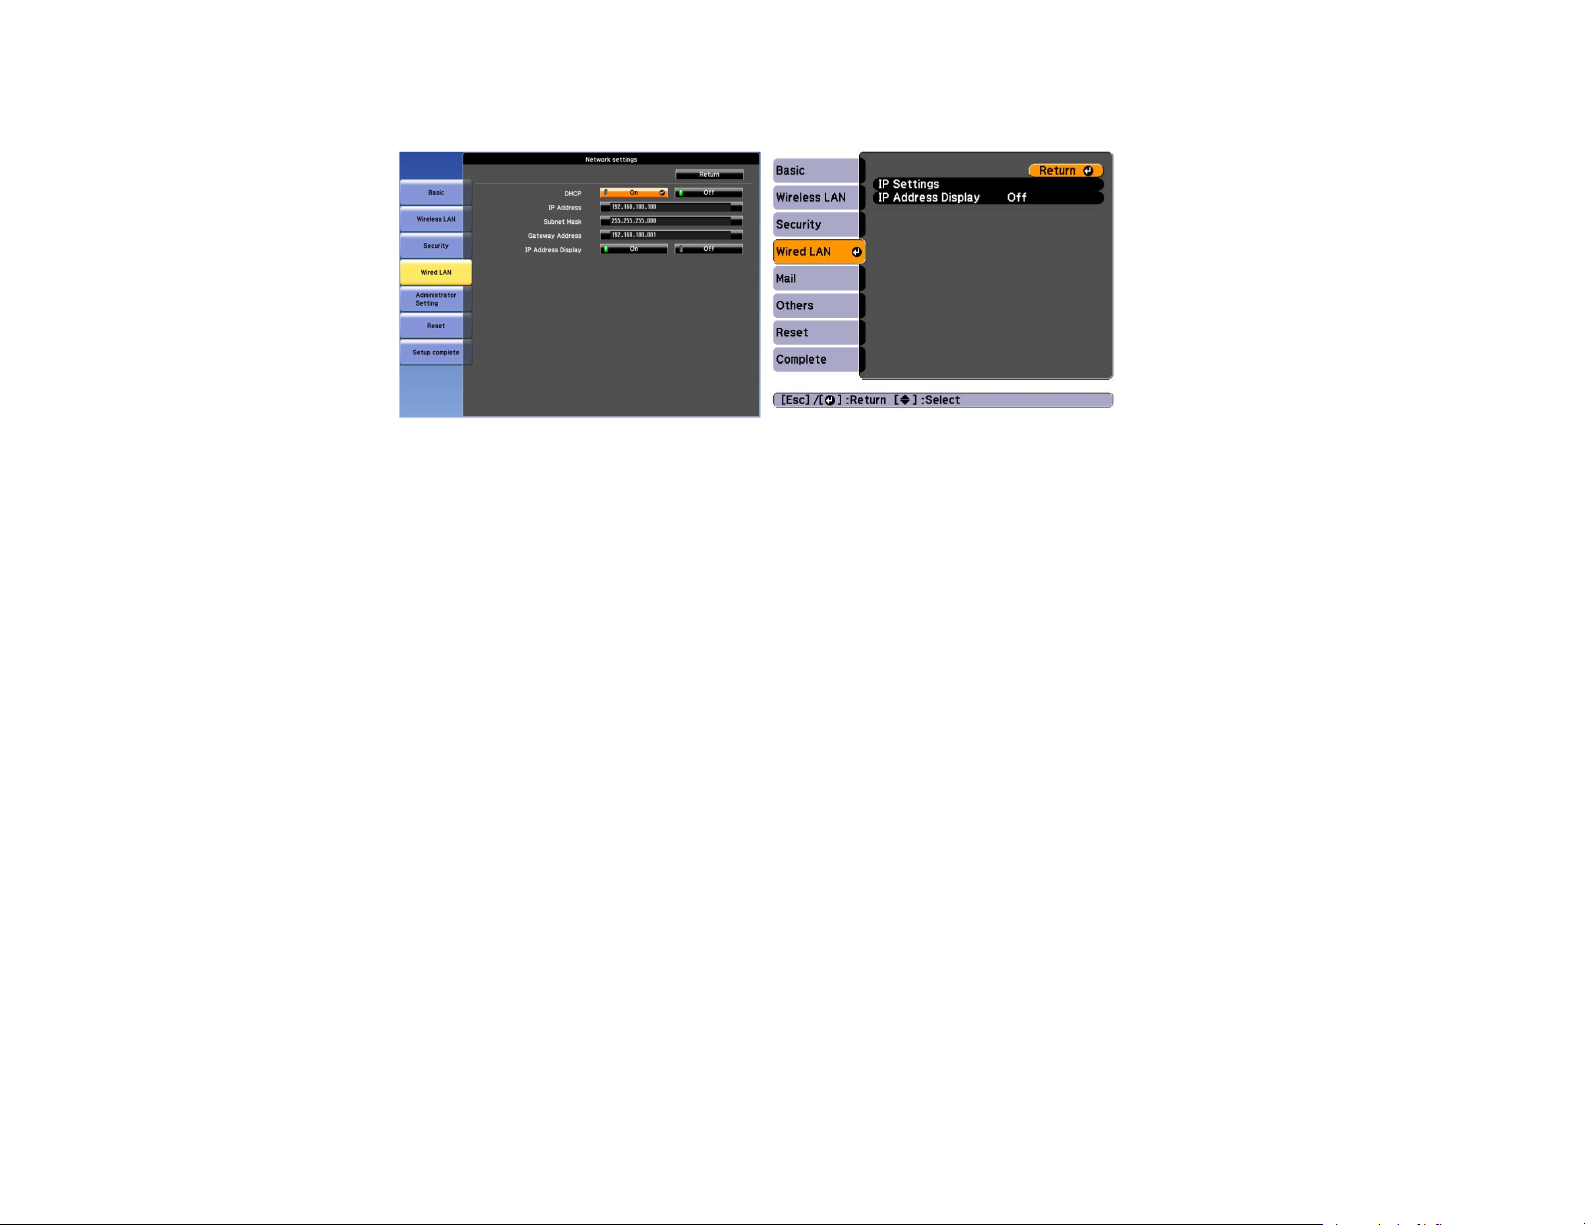
A screen like one of the following is displayed.
7. Select IP settings as necessary.
• DHCP is available: Set DHCP to On.
• DHCP is not available: Set DHCP to Off and enter the projector's IP Address, Subnet Mask, and
Gateway Address values as necessary.
8. When you have finished making settings, select Setup Complete or Complete, and follow the onscreen instructions to save your settings and exit the menus.
Parent topic: Selecting Projector Network Settings
Related tasks
Connecting to the Projector from the Software over a Network System
24
Page 25

Connecting to the Projector and Projecting Images
Follow these instructions to connect the computer and the projector over a network, and to project
images from your computer's screen using the projector.
Make sure you have already set up the software and selected a connection mode for the projector.
Connection Methods
Selecting the Projector Search Method
Controlling the Projected Display
Disconnecting
Related topics
Installing the Software
Selecting Projector Network Settings
Connection Methods
You can select a suitable method to connect the computer and the projector over a network depending
on your meeting style.
Connection Methods for Various Meeting Styles
Connecting the Projector and a Computer Directly Using Wireless Communication
Connecting to the Projector from the Software over a Network System
Parent topic: Connecting to the Projector and Projecting Images
Connection Methods for Various Meeting Styles
You can choose a connection method to suit the style of your meeting.
Decide how you want to hold your meeting. Depending on the connection method you selected, the
connection procedure differs.
25
Page 26
Note: Depending on your projector, some connection methods may not be available. See your projector
User's Guide for more details.
• All users can control the projected display and become presenters. (Holding discussions and
interacting with other users in a business environment.)
26
Page 27
• Only one user is the moderator and has full control over the meeting using the moderator function.
(Holding a class or lesson using the participants' computer screens in an educational environment.)
Note: To start a meeting using the moderator function, one user must connect to the projector as the
moderator and the other users must connect to the projector as participants.
Parent topic: Connection Methods
Related tasks
Changing the Moderator
Connecting to the Projector from the Software over a Network System
Connecting the Projector and a Computer Directly Using Wireless Communication
When your projector is set up as indicated below, you can connect the projector and a computer directly
using wireless communication to project the computer's screen.
• The wireless LAN unit is installed in the projector or the projector has built-in wireless LAN modules.
• The projector's connection method is set to Quick.
27
Page 28

Note:
• When you use the Participant Edition of the software, you must connect the projector and a
computer over a network system.
• When you connect the projector and a computer directly using wireless communication, the
connection between the computer and an access point is disconnected.
• Make sure you turn on your computer's wireless communication function.
1. Press the LAN button or Source Search button on the remote control to switch the input source to
LAN.
The LAN standby screen is projected.
2. Start Epson iProjection.
• Windows Vista and Windows 7: Click Start, select Programs (or All Programs), EPSON
Projector, Epson iProjection, and then click Epson iProjection Ver.X.XX.
• Windows 8 and Windows 8.1: Navigate to the Apps screen and select Epson iProjection
Ver.X.XX.
• Windows 10: Select Start, EPSON Projector, and then select Epson iProjection.
• Mac: Double-click Epson iProjection from the Applications folder.
Note: You can also create a shortcut and use it to start Epson iProjection and to automatically
search for saved projectors.
28
Page 29
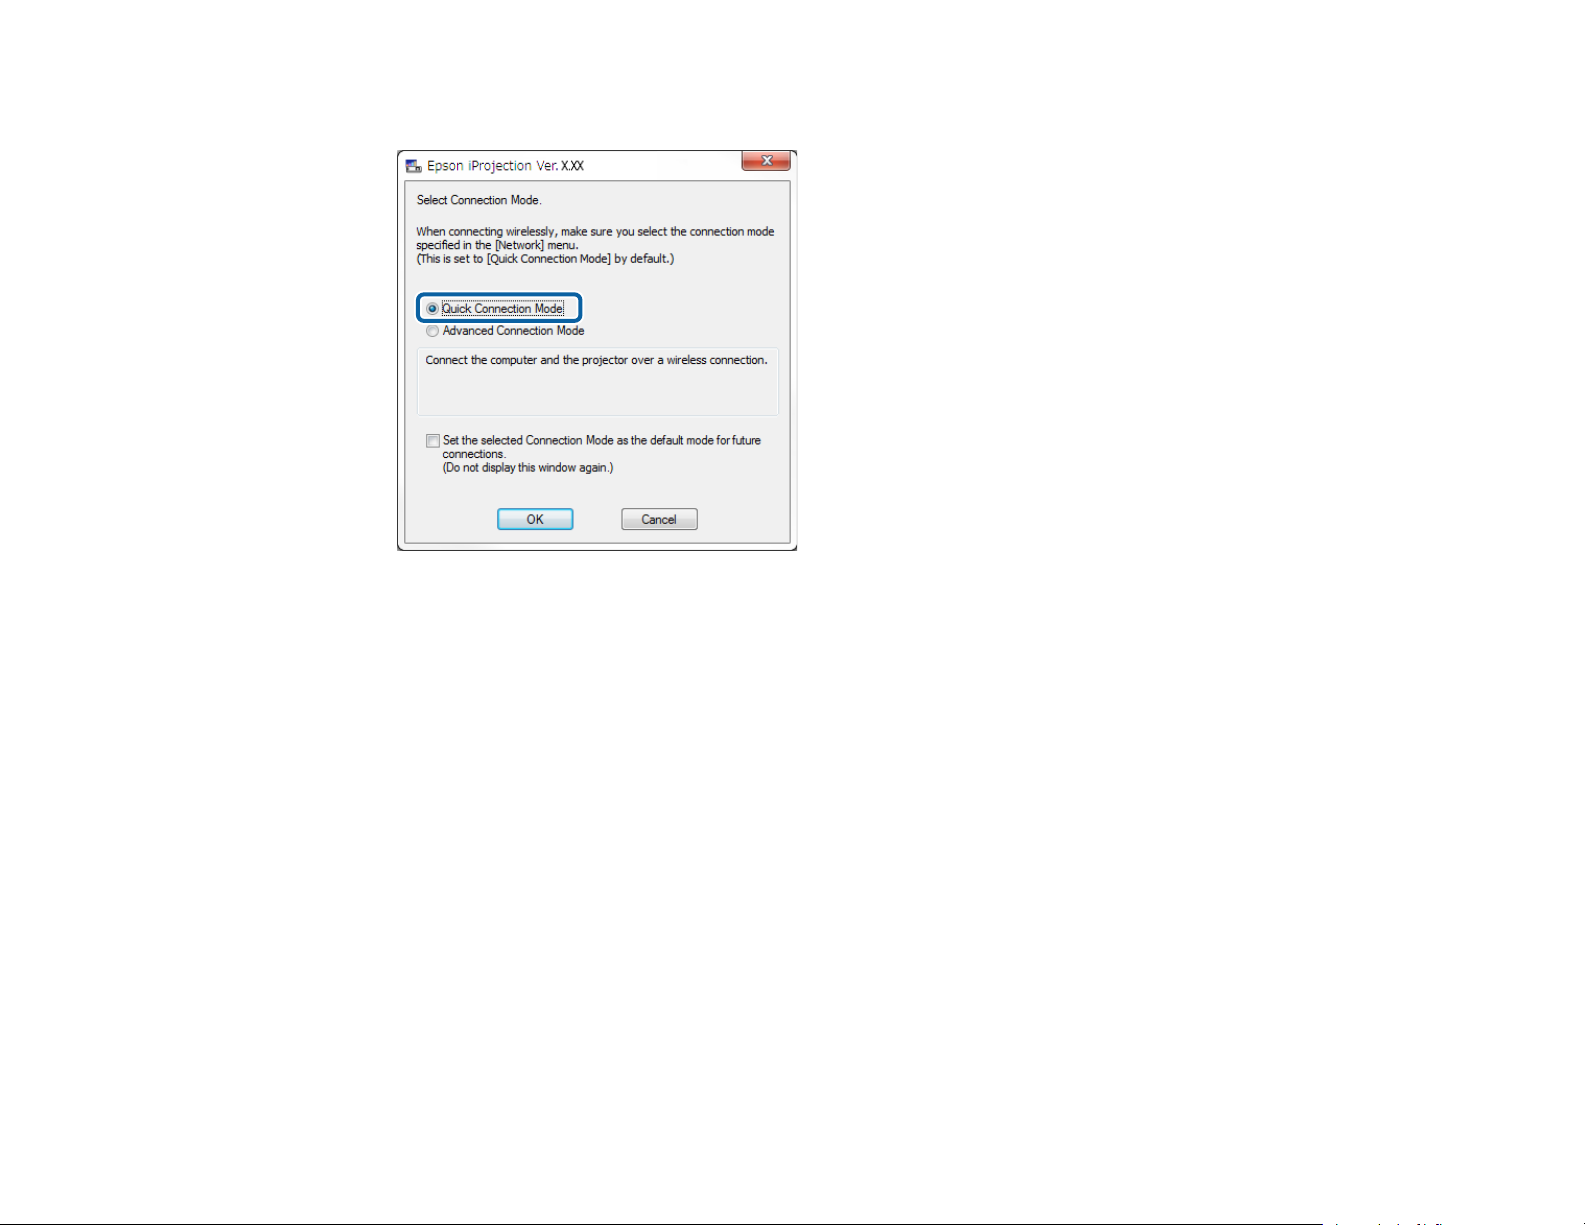
3. Select Quick Connection Mode, and then click OK.
4. Search for the projector using one of the following methods.
• Automatic Search: Searches for the projector automatically.
• Profile: Searches for the projector based on a previously saved profile.
The projector search results are displayed.
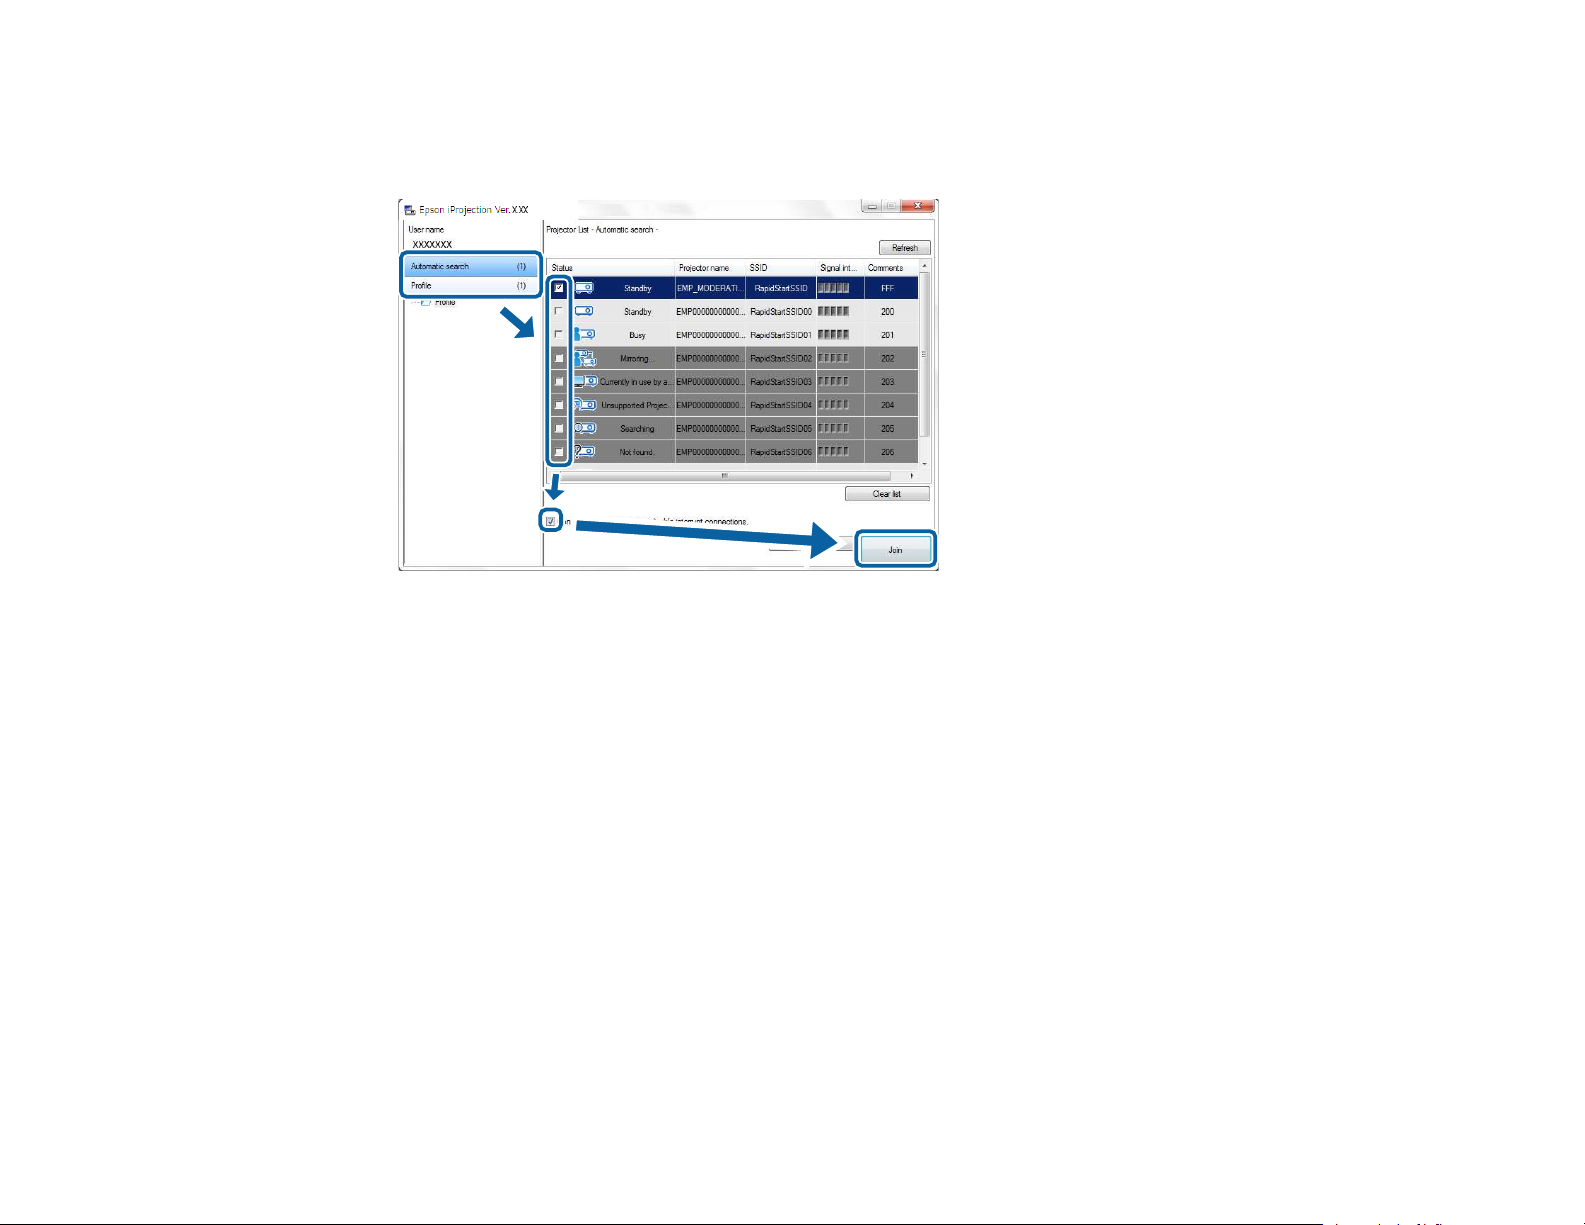
5. Select the projector you want to connect to from the Projector List, and then select one of the
following options.
• You want all users to be able to become participants in the moderator function: Make sure
Connect as a Moderator, or disable interrupt connections is not selected, and then click Join.
29
Page 30
• You are the moderator user and you do not want other users to be able to interrupt the moderator
presentation: Select Connect as a Moderator, or disable interrupt connections, and then click
Join.
Note:
• The moderator function is available only for supported models and is available only on the
Standard Edition of the software.
• When one user connects as a moderator, the moderator function turns on.
When the Projector Keyword is set to On or the Moderator Password is set in the projector
settings, the keyword entry screen is displayed.
6. Enter the Projector Keyword displayed on a screen, and then press OK.
30
Page 31

7. When the following dialog box is displayed, enter the passphrase set on the projector, and then click
Connect.
Note: If you select Save the passphrase and don't show this dialog box again, the projector's
SSID and passphrase are saved on the computer and this dialog box is not displayed the next time
you connect. You do not have to enter the passphrase again.
31
Page 32

If the projector's passphrase has not been changed from the default, the following dialog box is
displayed. Change the passphrase from the projector's Network menu.
When a connection is established, the computer screen is projected and the following toolbar is
displayed on the computer screen.
The computer screen for the user who connects first is projected in full screen mode. Users who connect
later can project their own screen by clicking the button on the toolbar or can control the projected
display from the projection control screen by clicking the button on the toolbar.
Note:
• When a connection is established, the input source for the projector automatically switches to the LAN
source if no other signal is being input. If the input source does not automatically switch to the LAN
source, press the LAN button or Source Search button on the remote control.
• The displayed toolbar varies depending on the connection method and the edition of the software.
32
Page 33

• When using the moderator function, only the moderator can control the projected display.
Parent topic: Connection Methods
Related tasks
Setting Up a Projector to Connect in Quick Connection Mode
Disconnecting
Related topics
Selecting the Projector Search Method
Controlling the Projected Display
Searching for Network Projectors Using a Shortcut
Connecting to the Projector from the Software over a Network System
When your projector is set up as indicated below, you can connect the projector and a computer over a
network by using Epson iProjection.
• The wireless LAN unit is installed if a projector does not have built-in wireless LAN modules (wireless
networks only).
• A LAN cable is connected to the projector (wired networks only).
• The projector's connection method is set to Advanced.
Note: Make sure you also connected a computer to the network.
1. Press the LAN button or Source Search button on the remote control to switch the input source to
LAN.
33
Page 34

The LAN standby screen is projected.
2. Start Epson iProjection.
• Windows Vista and Windows 7: Click Start, select Programs (or All Programs), EPSON
Projector, Epson iProjection, and then click Epson iProjection Ver.X.XX.
• Windows 8 and Windows 8.1: Navigate to the Apps screen and select Epson iProjection
Ver.X.XX.
• Windows 10: Select Start, EPSON Projector, and then select Epson iProjection.
• Mac: Double-click Epson iProjection from the Applications folder.
Note: You can also create a shortcut and use it to start Epson iProjection and to automatically
search for saved projectors.
34
Page 35

3. Select Advanced Connection Mode, and then click OK.
4. Search for the projector using one of the following methods.
• Automatic search: Searches for the projector automatically.
• Manual search: Searches for the projector based on a specified IP address or projector name.
• Profile: Searches for the projector based on a previously saved profile.
The projector search results are displayed.
5. Select the projector you want to connect to from the Projector List, and then select one of the
following options.
• You want all users to be able to become participants in the moderator function: Make sure
Connect as a Moderator, or disable interrupt connections is not selected, and then click Join.
35
Page 36

• You are the moderator user and you do not want other users to be able to interrupt the moderator
presentation: Select Connect as a Moderator, or disable interrupt connections, and then click
Join.
Note:
• The moderator function is available only for supported models and is available only on the
Standard Edition of the software.
• When one user connects as a moderator, the moderator function turns on.
When the Projector Keyword is set to On or the Moderator Password is set in the projector
settings, the keyword entry screen is displayed.
6. Enter the Projector Keyword displayed on a screen, and then press OK.
When a connection is established, the computer screen is projected and the following toolbar is
displayed on the computer screen.
36
Page 37

The computer screen for the user who connects first is projected in full screen mode. Users who connect
later can project their own screen by clicking the button on the toolbar or can control the projected
display from the projection control screen by clicking the button on the toolbar.
Note:
• When a connection is established, the input source for the projector automatically switches to the LAN
source if no other signal is being input. If the input source does not automatically switch to the LAN
source, press the LAN button or Source Search button on the remote control.
• The displayed toolbar varies depending on the connection method and the edition of the software.
• When using the moderator function, only the moderator can control the projected display.
Parent topic: Connection Methods
Related tasks
Setting Up a Projector to Connect in Advanced Connection Mode (Wireless)
Setting Up a Projector to Connect in Advanced Connection Mode (Wired)
Disconnecting
Related topics
Selecting the Projector Search Method
Controlling the Projected Display
Searching for Network Projectors Using a Shortcut
Selecting the Projector Search Method
You can select a suitable method to search for a projector depending on the status or location of the
projector you want to connect to.
Search Methods
Searching for Network Projectors Automatically
Searching for Network Projectors by Specifying an IP Address or Projector Name
Searching for Network Projectors Using a Profile
Parent topic: Connecting to the Projector and Projecting Images
37
Page 38

Search Methods
You can use one of the following methods to search for the projector you want to connect to. Choose the
best method depending on your environment.
• Searching for Network Projectors Automatically
You can automatically search for available projectors on the network.
Search results differ depending on the connection mode you use.
• Quick Connection Mode: Displays the SSID for available projectors.
• Advanced Connection Mode: Displays available projectors on the network. Searches are
performed only on the same subnet. Projectors on different subnets are not displayed in the search
results.
• Searching for Network Projectors by Specifying an IP Address or Projector Name
If the projector you want to connect to is not found automatically, you can search for the target
projector by specifying the IP address or a projector name. By specifying the IP address, you can also
search for the projector at remote locations on a different subnet.
• Searching for Network Projectors Using a Profile
You can save network projector information as a profile, and then specify the profile to search for the
same projector instead of providing projector details each time you search. By creating a group of
profiles for each place where a projector is setup and managing them with folders, the target projector
can be found quickly.
Parent topic: Selecting the Projector Search Method
Searching for Network Projectors Automatically
You can automatically search for available projectors on the network, and then project images by simply
selecting the projector.
38
Page 39

Click Automatic search on the search screen.
The search results are displayed.
When you click Refresh, the latest information is displayed.
If you cannot find any projectors, try one of the other search methods.
Parent topic: Selecting the Projector Search Method
Related concepts
Search Methods
Related tasks
Searching for Network Projectors by Specifying an IP Address or Projector Name
Related topics
Searching for Network Projectors Using a Profile
Searching for Network Projectors by Specifying an IP Address or Projector Name
If the projector you want to connect to is not found automatically, you can search for the target projector
by specifying the IP address or the projector name.
Note: Manual Search is available only in Advanced Connection Mode.
39
Page 40

1. Click Manual search on the search screen.
2. Enter the IP address or the projector name for the projector you want to connect to, and then click
Search.
40
Page 41

The search results are displayed.
Parent topic: Selecting the Projector Search Method
Searching for Network Projectors Using a Profile
You can save network projector information as a profile, and then search for the same projector using
the profile instead of specifying the projector details each time.
Profiles for Search
Performing a Profile Search
Registering a Profile
Exporting a Profile
Importing a Profile
Sharing a Profile over a Network
Parent topic: Selecting the Projector Search Method
Profiles for Search
You can save information for a network projector as a profile. A profile is a file containing all of the
projector's information, such as the projector name, IP address, and SSID. By using a profile, you can
easily search for saved projectors instead of providing projector details.
You can export the registered profile to create a backup, and then import it locally to easily search for
projectors on another computer. You can also share the exported profile over a network, allowing other
users to easily search for projectors.
Parent topic: Searching for Network Projectors Using a Profile
Performing a Profile Search
You can specify the profile to search for the saved projector instead of providing projector details each
time you search.
41
Page 42

1. Click Profile on the search screen.
2. Double-click the folder or the projector icon for the profile you want to use from the list.
The search results are displayed.
42
Page 43

Parent topic: Searching for Network Projectors Using a Profile
Related tasks
Registering a Profile
Registering a Profile
After searching for a projector, you can save the projector details as a profile using a memorable name
that you can search for easily later.
Note: You cannot register a profile under the Shared Profile folder on the search screen.
1. While the projectors are displayed on the search screen, perform one of the following operations.
• Register projectors displayed in the List of Connected Projectors: Click Register.
• Register a specific projector: Right-click the projector you want to register in the Projector List,
• Register all projectors found by the search: Right-click one of the projectors in the Projector List,
and then click Add Item to Profile.
and then click Add All to Profile.
The Save screen is displayed.
43
Page 44

2. Enter the Projector file name, and select the folder where you want to save the profile, and then
click OK.
The profile is registered and the projector information is saved in the profile.
Note:
• The folder structure can be six folders deep.
• Click Create New folder if you want to create a new folder.
• To register a specific projector, you can drag and drop the projector from the Projector List to the
folder under Profile.
• You can drag and drop profiles and folders to change the folder structure.
Parent topic: Searching for Network Projectors Using a Profile
44
Page 45

Exporting a Profile
You can export a profile and share it with other users allowing them to easily search for projectors and
join a meeting.
Note: You cannot export the profiles under the Shared Profile folder on the search screen.
1. On the search screen, right-click the folder containing the profile you want to share under Profile,
2. Select where you want to save the profile (.mplist), and then click Save.
The profile is exported.
Parent topic: Searching for Network Projectors Using a Profile
Related tasks
Registering a Profile
Importing a Profile
Sharing a Profile over a Network
Importing a Profile
You can locally import an exported profile and use it to easily search for projectors and join a meeting.
Note:
and then click Export.
The Save As screen is displayed.
• You can also import a profile (.plist) exported using EasyMP Network Projection.
• You cannot import profiles under the Shared Profile folder on the search screen.
• You cannot import profiles created in a different connection mode.
1. On the search screen, right-click the folder to which you want to import the profile under Profile, and
then click Import.
The Open screen is displayed.
2. Select the profile (.mplist), and then click Open.
The profile is imported locally.
Parent topic: Searching for Network Projectors Using a Profile
Related tasks
Exporting a Profile
45
Page 46

Sharing a Profile over a Network
You can share an exported profile with other users over a network so that any changed projector
information is easily updated. The shared profile is read and updated automatically when Epson
iProjection is started.
1. Place the profile (.mplist) in a shared network location such as a server.
2. Click Set options on the search screen.
The Set options screen is displayed.
3. Click the User Settings tab.
4. Enter the network location or URL to the shared profile (including the name of the profile) in Shared
Profile Name.
• For a file server (Windows only): \\xxxxx\xxxxx.mplist
• For a web server: http://xxxxx/xxxxx.mplist
46
Page 47

5. Click OK.
The shared profile is read and the Set options screen closes.
Note: The shared profile is read only and cannot be edited in Epson iProjection.
Parent topic: Searching for Network Projectors Using a Profile
Related tasks
Exporting a Profile
Controlling the Projected Display
Follow these instructions to use the toolbar and the projection control screen to control the screen being
projected.
Screen Types for Projection Control
Operating the Projected Display Status
Changing the Number of Projected Panels
Changing the Presenter
Changing the Projection Position
Parent topic: Connecting to the Projector and Projecting Images
Screen Types for Projection Control
You can choose the type of screen you use to control projected images to suit your situation. You can
switch the screen type by clicking the button on the toolbar or the button on the projection control
screen.
Note:
• The displayed toolbar and the projection control screen vary depending on the connection method and
the edition or your role of this software.
47
Page 48

• The projection control screen is available only on the Standard Edition of the software.
• Use the toolbar to display a wide image of the projected display and perform operations on the
projected image.
• Use the projection control screen to change the number of projected panels, presenters, or the
projection position.
Parent topic: Controlling the Projected Display
Related references
Toolbar
Projection Control Screen
48
Page 49

Operating the Projected Display Status
You can control the projected display while projecting your computer screen by starting, stopping, or
pausing the projected image.
Perform one of the following operations on the toolbar or the projection control screen.
• Show: Click the button.
The computer screen is projected as it is.
• Stop: Click the button.
The projected image stops. A black screen is projected while stopped.
• Pause: Click the button.
The projected image pauses. The paused image is projected, even if you make changes on the
computer screen.
Note:
• These buttons are not available for participants when using the moderator function.
• The moderator can also control the other users' projection using the projection control screen when
using the moderator function.
Parent topic: Controlling the Projected Display
Related references
Projection Control Screen
Changing the Number of Projected Panels
You can divide the projected display into a maximum of four panels. By changing the number of panels,
you can project screens from multiple devices at the same time, or project one computer screen in full
screen mode.
Note:
• This function is not available for participants when using the moderator function.
• You can also use the button to project your computer screen in full screen mode.
1. Click the button on the toolbar.
49
Page 50

The projection control screen is displayed.
2. Click the panel of the user to be projected in the projection area.
The selected panel is framed in blue.
3. Perform one of the following operations to change the number of available panels in the projection
area.
• Project one panel in full screen mode: Click the button.
• Split the projected display in two and projecting the selected panel and the adjacent right or left
panel: Click the button.
• Split the projected display in four and projecting the all four panels: Click the button.
The number of panels changes and the background color for panels being projected becomes white.
Note:
• You can also change the number of panels by right-clicking in the projection area. Right-click the
panel, and then select the number of total panels.
50
Page 51

• If there is no user in a white panel, a black screen is projected.
• The background color for panels not being projected is gray.
Parent topic: Controlling the Projected Display
Related references
Projection Control Screen
Changing the Presenter
You can change the presenter by dragging and dropping one of the connected user names in the list
onto a panel in the projection area.
Note: This function is not available for participants when using the moderator function.
1. Click the button on the toolbar.
The projection control screen is displayed.
2. Select the user names in the user list, and then drag and drop the user name onto a white panel in
the projection area.
51
Page 52

Note:
• The moderator can check the participant's device screens as thumbnails and select which user to
project. Click the button on the toolbar or the projection control screen.
• If you cannot find the user that you want to project in the user list, you can search for them using
the user search box.
• You can also right-click a user name in the user list to select the projection position.
• If there is no user in a white panel, a black screen is projected.
The selected user's computer screen is projected.
3. To finish projecting, drag and drop the user name from the projection area to the user list.
Note: You can also finish the selected user's projection by right-clicking the panel in the projection
area, and then clicking End Projection.
The background color of the user name in the user list is blue while their screen is projected. The
background color of the user name is gray when a user is in the panel but their screen is not being
projected.
Parent topic: Controlling the Projected Display
Related tasks
Changing the Projection Position
Selecting the Participant's Screen to Project Using Thumbnails
Changing the Projection Position
You can change the projection position by dragging and dropping the user name from one position to
another in the projection area.
Note: This function is not available for participants when using the moderator function.
1. Click the button on the toolbar.
The projection control screen is displayed.
52
Page 53

2. Select the user in the projection area, and then drag and drop the user name into another position.
The projection position is changed.
Note: When the or button is selected, you can drag and drop the user name in a gray panel to the
white panel to switch the image being projected. If you drag and drop the user name in a white panel to
the gray panel, the image for that user will not be projected.
Parent topic: Controlling the Projected Display
Related tasks
Changing the Number of Projected Panels
Disconnecting
You can disconnect one computer or all devices from the projector when you finish projecting.
1. Perform one of the following operations.
• Disconnect your computer and the projectors: Click the Leave button on the toolbar.
53
Page 54

The connection between your computer and the projectors is ended.
Note:
• When you are the moderator, the Disconnect All button is displayed on the toolbar instead of
this button.
• You can also disconnect by clicking Leave from the Disconnect menu on the projection control
screen.
• The moderator can disconnect other participants by right-clicking the selected user in the user
list, and then clicking Leave on the projection control screen when using the moderator
function.
• When the moderator leaves the meeting, the moderator function turns off.
• Disconnect all devices from the projectors: Click the button on the toolbar, and then click
Disconnect All from the Disconnect menu on the projection control screen.
54
Page 55

The connection between all devices and projectors participating in the meeting is ended.
Note: This function is not available for participants when using the moderator function.
The confirmation screen is displayed.
2. Click OK.
You are returned to the search screen.
Parent topic: Connecting to the Projector and Projecting Images
55
Page 56

Using Additional Functions
Follow these instructions to use additional Epson iProjection functions that may be useful during a
meeting.
Searching for Network Projectors Using a Shortcut
Connecting to Network Projector Using a USB Flash Drive (Windows Only)
Connecting to Multiple Projectors (Mirroring)
Outputting Audio from the Projector
Projecting Your Screen
Changing the Moderator
Distributing the Projected Screen
Selecting the Participant's Screen to Project Using Thumbnails
Hiding the Projection Control Screen
Prohibiting Participant Operations
Controlling the Connection Bandwidth
Related topics
Connection Methods
Selecting the Projector Search Method
Searching for Network Projectors Using a Shortcut
You can save network projector information as a shortcut, and then double-click it to start Epson
iProjection. This allows you to easily search for the same projectors instead of specifying the projector
details each time.
Creating a Shortcut
Parent topic: Using Additional Functions
Creating a Shortcut
After searching for a projector, you can save the projector details as a shortcut that you can use later. A
shortcut contains all of the projector's information, such as the projector name and IP address. Creating
a folder shortcut saves information for multiple projectors contained in the folder.
1. On the search screen, right-click the projector or folder from the Profile or Projector List, and then
click Create Shortcut.
The Save As screen is displayed.
56
Page 57

2. Select where you want to save the shortcut (.pme), and then click Save.
The shortcut is created and the projector information is saved in the shortcut.
Note:
• Double-clicking a shortcut (.pme), you can start Epson iProjection in the same mode as you created its
shortcut.
• When you use the Participant Edition of the software, use a shortcut file created in Advanced
Connection Mode.
• You can also select the projector or folder from the Profile or Projector List, and then drag and drop
to the location where you want to create the shortcut.
Parent topic: Searching for Network Projectors Using a Shortcut
Connecting to Network Projector Using a USB Flash Drive (Windows Only)
You can use a commercially available USB flash drive as a USB key to transfer the projector's network
information to a Windows computer. Creating the USB key allows you to quickly project images from the
network projector.
Creating a USB key on a USB Flash Drive (Windows Only)
Using a USB Key to Connect a Windows Computer
Parent topic: Using Additional Functions
Creating a USB key on a USB Flash Drive (Windows Only)
You can create a USB key on a commercially available USB flash drive so you can use it to connect to
your projector wirelessly.
Note: When creating a USB key, make sure you use a USB flash drive that meets the following
conditions.
• Formatted to FAT
• No security functions
We recommend deleting any files on the drive before creating a USB key.
1. Start USB Key Setup Tool.
• Windows Vista and Windows 7: Click Start, select Programs (or All Programs), EPSON
Projector, Epson iProjection, Tools, and then click USB Key Setup Tool.
57
Page 58

• Windows 8 and Windows 8.1: Navigate to the Apps screen and select USB Key Setup Tool.
• Windows 10: Select Start, EPSON Projector, Epson iProjection, Tools, and then select USB
Key Setup Tool.
2. Select the application type that starts when you insert the USB key to your computer.
3. Insert an empty USB flash drive directly to your computer's USB port.
4. Follow the on-screen instructions to create the USB key.
USB key creation begins and the software writes a file to the USB flash drive.
Caution: Do not remove the USB flash drive from the computer during USB key creation. If you
remove the drive, the USB key may not be created correctly. If USB key creation fails, create the
USB key again.
Note: If there are multiple USB flash drives connected to your computer, follow the on-screen
instructions to specify the drive for which you want to create a USB key.
5. Select Safely Remove Hardware in the Windows taskbar, and then remove the USB flash drive.
You can now use the USB flash drive as a USB key.
Parent topic: Connecting to Network Projector Using a USB Flash Drive (Windows Only)
Related concepts
Epson iProjection Editions
Using a USB Key to Connect a Windows Computer
After creating the USB key, you can quickly project images from the network projector. If you have
previously used the USB key, you can use the network projector by simply connecting the USB key to
your computer.
1. Make sure your projector is using one of the following network connections:
• The wireless LAN module is installed or built into your projector.
• A wired LAN cable is connected to your projector.
2. Turn on the projector.
3. Press the LAN button or Source Search button on the remote control to switch the input source to
LAN.
The LAN standby screen is projected.
58
Page 59

4. Verify that an SSID and IP address are displayed.
5. Insert the USB key into the projector's USB Type A port.
Note: The location of the USB Type A port varies depending on your projector. See your projector
User's Guide for more details.
You see a projected message that the network information update is complete.
6. Remove the USB key.
7. Insert the USB key into a USB port on your computer.
Note: In Windows Vista, if the AutoPlay window is displayed, select Run MPPLaunch.exe, then
select Allow.
8. Follow the on-screen instructions to install Epson iProjection.
Note:
• If the Windows Firewall message is displayed, click Yes to disable the firewall.
• You need administrator authority to install the software.
• If it is not installed automatically, double-click MPPLaunch.exe in the USB key.
After a few minutes, your computer image is displayed by the projector.
Note: If you want to switch the presentation to your computer, click the button on the toolbar.
9. When you have finished projecting wirelessly, select Safely Remove Hardware in the Windows
taskbar, and then remove the USB key from your computer.
Note:
• You can share the USB key with other users without disconnecting your computer. To do this,
deselect the Quit application when removing the USB key checkbox on the Set options
screen in Epson iProjection.
• You may need to restart your computer to reactivate your wireless LAN connection.
Parent topic: Connecting to Network Projector Using a USB Flash Drive (Windows Only)
59
Page 60

Connecting to Multiple Projectors (Mirroring)
Connecting to multiple projectors and projecting the same image is known as mirroring. You can perform
mirroring with up to four projectors.
Note:
• Mirroring is available only in Advanced Connection Mode.
• For best results, we recommend that you connect the projector to a wired LAN to perform mirroring.
60
Page 61

On the search screen, select up to four projectors you want to connect to, and then click Join.
A projector mirroring group is formed and the same image is projected from multiple projectors.
Note:
• When you select one projector from a projector mirroring group, all of the projectors in that group are
selected.
• When other users are already connected to a projector in a mirroring group, you can only select
another projector from the same mirroring group. You cannot select a projector that is not in a
mirroring group.
Parent topic: Using Additional Functions
Outputting Audio from the Projector
You can output audio from the projector only when one computer is connected to one projector, and you
are projecting in full screen mode.
1. Click Set options on the search screen.
The Set options screen is displayed.
2. Click the Audio Output tab.
61
Page 62

3. Select Output audio from the projector, and then click OK.
Note: When you select 256Kbps or 512Kbps as Use Bandwidth on the Adjust performance tab,
you cannot output audio from the projector and cannot select this setting.
The Set options screen closes.
Parent topic: Using Additional Functions
Related tasks
Projecting Your Screen
Controlling the Connection Bandwidth
Projecting Your Screen
You can project the computer screen in full screen mode without projecting any other users' screens.
1. On the search screen, select the projector you want to connect to, and then click Join.
62
Page 63

The toolbar is displayed.
2. Click the button.
Note:
• You can also use the button on the projection control screen.
• This button is not available for participants when using the moderator function.
Your computer screen is projected in full screen mode.
Parent topic: Using Additional Functions
Changing the Moderator
While using the moderator function, you can change the moderator when another user needs to control
the projected display.
Note: The moderator function is available only on the Standard Edition of the software.
1. On the search screen, select the projector you want to connect to, select Connect as a Moderator,
or disable interrupt connections, and then click Join.
The moderator function turns on and the toolbar is displayed.
2. Click the button on the toolbar.
The projection control screen is displayed.
63
Page 64

3. Click the Quit as Moderator button on the moderator's computer.
The confirmation screen is displayed.
4. Click OK.
The moderator function turns off.
64
Page 65

5. Click the Become Moderator button on the projection control screen on a different user's computer.
The confirmation screen is displayed.
6. Click OK.
The moderator function turns back on and the new moderator can control the projected display.
Parent topic: Using Additional Functions
Related concepts
Connection Methods for Various Meeting Styles
Distributing the Projected Screen
The moderator can distribute the currently projected screen images to the participant's devices.
1. Click the button on the toolbar or the projection control screen.
Note: You can also deliver a blank screen. Click the button on the toolbar, and then click Deliver
Blank Screen from the Tool menu.
65
Page 66

You see the confirmation screen.
2. Click Start.
The button and the button appear on the computer screen.
3. Click the button.
When the screen distribution succeeds, the moderator sees a completion message and the distributed
image automatically appears in the Viewer on the participant's devices.
Parent topic: Using Additional Functions
Related references
Viewer Screen
Selecting the Participant's Screen to Project Using Thumbnails
The moderator can check the participant's device screens as thumbnails and select which user to
project.
1. Click the button on the toolbar or the projection control screen.
The thumbnails screen is displayed.
2. Select up to 12 thumbnails you want to project.
• To update to the latest thumbnails, click the button.
66
Page 67

• To clear all selections, click . If you click this again, the previously selected thumbnails are
selected again.
• To switch the size and the number of thumbnails displayed on one page, click the or
button.
3. Click the button.
Note: When you select more than 5 thumbnails, the thumbnail selection screen appears. After
selecting up to 4 thumbnails, you must click the button again.
The selected thumbnails are projected. Click the button to close the thumbnails screen and return
to the toolbar or the projection control screen.
Parent topic: Using Additional Functions
Hiding the Projection Control Screen
You can hide the projection control screen from other users while projecting your computer screen. This
allows you to change the necessary settings without projecting the operation. The projected image
currently displayed is paused automatically when you switch the toolbar to the projection control screen.
Your computer screen is projected again when you return to the toolbar.
Note: This function is available only for the moderator when using the moderator function.
1. Click Set options on the search screen.
The Set options screen is displayed.
2. Click the General settings tab.
67
Page 68

3. Select Freeze projected screen when displaying Projection control screen, and then click OK.
The Set options screen closes. The operation on the projector control screen will not be projected next
time you use it.
Parent topic: Using Additional Functions
Prohibiting Participant Operations
The moderator can lock mouse operations on participant's devices so that the participant cannot change
the images being projected.
• Click the button on the projection control screen to lock the participant's mouse operations.
The button changes to the button on the projection control screen. The participants see the
icon to indicate that mouse operations are locked.
68
Page 69

• Click the button on the projection control screen to unlock the participant's mouse operations.
The button changes to the button on the projection control screen. The participants can
operate the mouse on their devices.
Parent topic: Using Additional Functions
Controlling the Connection Bandwidth
You can reduce the size of data transferred to the projector to decrease the network load. To do this, you
can control the connection bandwidth.
1. Click Set options on the search screen.
Set options screen appears.
2. Click the Adjust performance tab.
3. Select Projection Quality.
• Image Priority: Transfers projected image data with a low compression ratio to prioritize image
quality.
• Speed Priority: Compresses projected image data to increase transfer speed.
69
Page 70

4. Select the bandwidth you want to use as the Use Bandwidth setting.
When you select a narrower bandwidth, the projected image quality may decline but the network
load is reduced.
Note: If you do not need to output audio while controlling bandwidth, make sure you clear the
Output audio from the projector setting on the Audio Output tab. The bandwidth used for audio
can then be used for the image transfer to improve the image quality.
Bandwidth Control Restrictions
Parent topic: Using Additional Functions
70
Page 71

Bandwidth Control Restrictions
Note the following bandwidth limitations.
• When you limit the bandwidth, the image quality may decline due to the compression of the
transferred data.
• When you select 256Kbps or 512Kbps as Use Bandwidth on the Adjust Performance tab, you
cannot output audio from the projector. If you want to transfer audio, select the bandwidth to 1Mbps or
more.
• The bandwidth may momentarily exceed the value you selected because each value in the list is an
average value measured within 30 seconds.
• You can limit the bandwidth only of data you send. You cannot limit data that you receive, such as a
thumbnail.
Parent topic: Controlling the Connection Bandwidth
Related tasks
Outputting Audio from the Projector
71
Page 72

Solving Problems
See the following sections to check for solutions to problems you may have using Epson iProjection.
Solving Network Connection Problems
Solving Problems During Projection
Error Messages List
Event ID List
Solving Network Connection Problems
Try these solutions depending on your network environment.
Solutions When You Cannot Connect Using Quick Connection Mode
Solutions When You Cannot Connect Projectors Using Advanced Connection Mode (Wireless)
Solutions When You Cannot Connect Projectors Using Advanced Connection Mode (Wired)
Parent topic: Solving Problems
Solutions When You Cannot Connect Using Quick Connection Mode
When you cannot connect the computer and the projector using Quick Connection Mode, try the
following solutions.
• Check the status of the external devices used for the network connection or the environment in which
the network devices and the projector are located.
• Connect the specified wireless LAN unit to the projector securely. See your projector User's Guide
for more details.
• Check for any obstacles between the computer and projector, and change their position to improve
communication. Sometimes the indoor environment prevents the projector from being found in a
search.
• Set the radio strength for the network devices to the maximum.
• Check the projector's network settings.
• Set the Connection Mode setting to Quick.
• Turn on a wireless LAN.
• When you enable the security setting, set the same passphrase to the computer and the projector.
• Close network settings on the projector, and then return to the LAN standby screen.
72
Page 73

• Check the computer's network settings.
• If the wireless LAN adapter is not installed on your computer, install a wireless LAN card on your
computer.
• Enable the wireless LAN setting or AirPort on your computer.
• Check the software settings.
• Make sure you start the software in the connection mode that you set on the projector. If you cannot
select or change the connection mode, select Display Connection Mode Selection window on
startup on the General settings tab in the Set options screen. The select connection mode
screen is displayed after restarting the software.
Parent topic: Solving Network Connection Problems
Related references
Set options - General settings
Solutions When You Cannot Connect Projectors Using Advanced Connection Mode (Wireless)
When you cannot connect the computer and the projector using Advanced Connection Mode over a
wireless network, try the following solutions. If you cannot resolve the problem, contact your network
administrator.
• Check the status of the external devices used for the network connection or the environment in which
the network devices and the projector are located.
• Connect the specified wireless LAN unit to the projector securely. See your projector User's Guide
for more details.
• Check for any obstacles between the access point and the computer or projector, and change their
position to improve communication. Sometimes, indoor environments prevent the projector from
being found in a search.
• Make sure that the access point and the computer or projector are not too far apart. Move them
closer together and try to connect again.
• Check for interference from other equipment, such as a Bluetooth device or microwave. Move the
interfering device farther away or expand your wireless bandwidth.
• Set the radio strength for the network devices to the maximum.
• Set the IP address, the subnet mask, and the gateway address for the access point correctly.
• Make sure the wireless LAN system of the access point supports the projector's wireless LAN
system.
73
Page 74

• Check the projector's network settings.
• Set the Connection Mode setting to Advanced.
• Set the computer, the access point, and the projector to the same SSID.
• Set DHCP to Off. When DHCP is set to On, it may take some time to enter LAN standby status if an
available DHCP server is not found.
• Set the IP address, the subnet mask, and the gateway address for the projector correctly.
• Turn on a wireless LAN.
• Set the wireless LAN system to meet the standards supported by the access point.
• When you enable the security setting, set the same passphrase to the access point, the computer,
and the projector.
• Close network settings on the projector, and then return to the LAN standby screen.
• Check the computer's network settings.
• If the wireless LAN adapter is not installed on your computer, install a wireless LAN card on your
computer.
• Enable the wireless LAN setting or AirPort on your computer.
• Connect to the access point to which the projector is connected.
• Turn off the firewall. If you do not want to turn it off, register the firewall as an exception. Make the
necessary settings to open the ports. The ports used by this software are "3620", "3621", and
"3629".
• Check the access point settings.
• Set connection permission at the access point to allow projectors to connect if any functions that
block connections, such as MAC Address restrictions and port restrictions, are set to the access
point.
• Check the software settings.
• Select the network adapter you are using from Switch LAN on the Set options screen. If the
computer has multiple LAN environments, a connection cannot be established unless the network
adapter is selected correctly.
• If you cannot find the projector you want to connect to using Automatic search, select Manual
search to specify the IP address.
• Make sure you start the software in the connection mode that you set on the projector. If you cannot
select or change the connection mode, select Display Connection Mode Selection window on
74
Page 75

startup on the General settings tab in the Set options screen. The select connection mode
screen is displayed after restarting the software.
• Make sure the projector supports the Epson iProjection version being used. Install Epson
iProjection from the EPSON Projector Software CD-ROM supplied with the projector (if available) or
download it from the Epson Web site.
• Install the latest version of Epson iProjection on all computers. The maximum number of computer
connections and the availability of the moderator function varies depending on the projector model,
no matter which version of Epson iProjection you are using.
• When another user is already connected, you can only connect to projectors in the same mirroring
group as that selected by the other user. Select a projector from the same mirroring group as the
user who is already connected, or select a projector that is in standby status.
Parent topic: Solving Network Connection Problems
Related references
Set options - General settings
Related tasks
Searching for Network Projectors by Specifying an IP Address or Projector Name
Solutions When You Cannot Connect Projectors Using Advanced Connection Mode (Wired)
When you cannot connect the computer and the projector using Advanced Connection Mode over a
wired network, try the following solutions. If you cannot resolve the problem, contact your network
administrator.
• Check the status of the external devices used for the network connection or the environment in which
the network devices and the projector are located.
• Connect the network cable securely.
Note:
• Use a commercially available 100BASE-TX or 10BASE-T LAN cable.
• To prevent malfunctions, use a category 5 or higher shielded LAN cable.
• Check the projector's network settings.
• Set DHCP to Off. When DHCP is set to On, it may take some time to enter LAN standby status if an
available DHCP server is not found.
• Set the IP address, the subnet mask, and the gateway address for the projector correctly.
75
Page 76

• Close network settings on the projector, and then return to the LAN standby screen.
• Check the computer's network settings.
• Enable LAN settings on your computer.
Windows Vista: Check Control Panel > System and Maintenance > Device Manager.
Windows 7, Windows 8, Windows 8.1, and Windows 10: Check Control Panel > Hardware and
Sound > Device Manager.
• Turn off the firewall. If you do not want to turn it off, register the firewall as an exception. Make the
necessary settings to open the ports. The ports used by this software are "3620", "3621", and
"3629".
• Check the software settings.
• Select the network adapter you are using from Switch LAN on the Set options screen. If the
computer has multiple LAN environments, a connection cannot be established unless the network
adapter is selected correctly.
• If you cannot find the projector you want to connect to using Automatic search, select Manual
search to specify the IP address.
• Make sure you start the software in the connection mode that you set on the projector. If you cannot
select or change the connection mode, select Display Connection Mode Selection window on
startup on the General settings tab in the Set options screen. The select connection mode
screen is displayed after restarting the software.
• Make sure the projector supports the Epson iProjection version being used. Install Epson
iProjection from the EPSON Projector Software CD-ROM supplied with the projector (if available) or
download it from the Epson Web site.
• Install the latest version of Epson iProjection on all computers. The maximum number of computer
connections and the availability of the moderator function varies depending on the projector model,
no matter which version of Epson iProjection you are using.
• When another user is already connected, you can only connect to projectors in the same mirroring
group as that selected by the other user. Select a projector from the same mirroring group as the
user who is already connected, or select a projector that is in standby status.
Parent topic: Solving Network Connection Problems
Related references
Set options - General settings
Related tasks
Searching for Network Projectors by Specifying an IP Address or Projector Name
76
Page 77

Solving Problems During Projection
Try these solutions depending on your situation.
Solutions When the Screen is Not Projected Properly
Solutions When Audio is Not Played Properly
Solutions When the Moderator Function Does Not Work
Solutions When the Projected Screen is Not Delivered
Parent topic: Solving Problems
Solutions When the Screen is Not Projected Properly
If the screen is not projected or there are problems with the project images try the following solutions.
• If you are using a Microsoft Office application, stop moving the mouse pointer. If you move the mouse
pointer continuously, the screen may not be refreshed quickly.
• If the mouse pointer flickers, try the following solutions.
• Select Make the movement of the mouse pointer smooth on the General settings tab on the
Set options screen.
• Clear Transfer layered window on the Adjust performance tab on the Set options screen.
• The Media Player movie playback screen may not be projected depending on the computer.
• The screen saver preview may not be projected properly depending on the computer.
• Reduce the number of connected devices if the connection speed declines.
• For Mac, when playing back movies, start Epson iProjection first before starting playback. If Epson
iProjection is started during movie playback and the display screen resolution and color numbers are
changed, try moving the movie playback window, minimizing it, or resizing it and so on.
• When using a computer that does not meet the software requirements, images and audio for movies
may stop.
• When another user is the moderator, you cannot control your projected display. Change the
moderator or project the screen without a moderator.
Parent topic: Solving Problems During Projection
Related references
Set options - General settings
Set options - Adjust performance
77
Page 78

Related tasks
Changing the Moderator
Solutions When Audio is Not Played Properly
If there is no audio coming from the projector, try the following solutions.
• Audio can only be transferred to one projector. When multiple projectors are connected to one
computer, disconnect other projectors and try again.
• Select Output audio from the projector on the Audio Output tab on the Set options screen.
• You can only output the computer's audio from the projector when projecting one computer screen in
full screen mode.
• If the bandwidth is limited on the Adjust Performance tab on the Set options screen, try increasing
the connection bandwidth.
• If the volume for the computer is set to the minimum while the projector volume is set to the maximum,
the noise may be mixed. Turn up the computer's volume and turn down the projector's volume.
Parent topic: Solving Problems During Projection
Related references
Set options - Audio Output
Solutions When the Moderator Function Does Not Work
If the moderator function does not work properly, try the following solutions.
• Make sure you use the Standard Edition of the software. If you use the Participant Edition of the
software and need the moderator function, reinstall this software as necessary.
• Make sure your projector supports the moderator function. See the User's Guide supplied with the
projector for more details.
• When another user is the moderator, you cannot control your projected display. Change the
moderator.
• Make sure you select Connect as a Moderator, or disable interrupt connections when you connect
a projector.
Parent topic: Solving Problems During Projection
Related tasks
Changing the Moderator
78
Page 79

Solutions When the Projected Screen is Not Delivered
If the screen delivery function does not work properly, try the following solutions.
• Make sure your projector supports the screen delivery function. See the User's Guide supplied with
the projector for more details.
• Close running projector functions.
• Make sure the image being projected is not protected by copyrights.
Parent topic: Solving Problems During Projection
Related tasks
Distributing the Projected Screen
Error Messages List
When an error occurs, an error message is displayed on your computer screen. Check for your message
and follow the instructions here to clear the error.
Error Messages When Starting up Epson iProjection
Error Messages When Using a USB Key
Error Messages When Searching for and Selecting Projectors
Error Messages When Projecting
Error Messages When Operating a Profile
Error Messages When Using the Moderator Function
Error Messages When Distributing the Projected Screen
Parent topic: Solving Problems
Error Messages When Starting up Epson iProjection
Error Messages Remedy
This application is already running. Two instances of Epson iProjection have been
started.
79
Page 80

Error Messages Remedy
Cannot start this application because other
EPSON Projector software (Quick Wireless
Connection) is already running.
Close Quick Wireless Connection and then start
Epson iProjection.
To close Quick Wireless Connection, perform
Safely Remove Hardware from the icon on the
task bar to remove the Quick Wireless Connection
USB Key from the computer.
Cannot start this application because other
EPSON Projector software (USB Display) is
already running.
Close USB Display and then start Epson
iProjection.
Do one of the following to close USB Display:
• Windows: Disconnect the USB cable from the
projector.
• Mac: Select Disconnect from the USB Display
icon menu on the menu bar or Dock, and then
remove the USB cable.
Cannot start this application because other
EPSON Projector software (EasyMP Network
Close EasyMP Network Projection and then start
Epson iProjection.
Projection) is already running.
Cannot start this application because other
EPSON Projector software (USB Key Setup Tool)
Close the USB Key Setup Tool and then start
Epson iProjection.
is already running.
Epson iProjection initialization failed. Restart Epson iProjection. If the message is still
displayed, uninstall and then reinstall Epson
iProjection.
Cannot open the shortcut file. The shortcut file may be corrupted. Start Epson
iProjection, and then try searching for and
connecting to the projector again.
Cannot find the projector linked to the shortcut file.
Search again.
Check the following items.
• Open a shortcut file in the connection mode for
which you created the shortcut file.
• Open a shortcut file in Advanced Connection
Mode if you use the Participant Edition of the
software.
80
Page 81

Error Messages Remedy
Files are missing or invalid. Failed to start the
Uninstall and then reinstall Epson iProjection.
application. Reinstall/remove the application.
Network adapter information could not be
obtained.
Check the following items.
• A network adapter is installed on the computer.
• The driver for the network adapter being used is
installed on the computer.
• The network adapter is enabled.
After checking, restart the computer and then
restart Epson iProjection.
If you still cannot connect, check the network
settings on the computer and the network settings
on the projector.
Cannot start from the shortcut while projecting. Stop projecting and then start projection from the
shortcut. You cannot start projection from the
shortcut when you are already projecting using
Epson iProjection.
Cannot start from the shortcut while the Option
screen is displayed. Close the Option screen, and
The Set options screen is displayed. Close the
Set options screen.
then try opening the shortcut again.
The slide show will not begin until PowerPoint is
restarted.
Close PowerPoint, and then start the slide show
again.
Cannot be used with the current OS version.
Reinstall Epson iProjection.
Reinstall Epson iProjection.
Unable to start from the shortcut. A connection has
already been established with the projector.
Stop projecting and then start projection from the
shortcut. If the USB key is connected, remove the
USB key.
Parent topic: Error Messages List
Related tasks
Uninstalling Epson iProjection (Windows Vista/Windows 7/Windows 10)
Uninstalling Epson iProjection (Windows 8.x)
Uninstalling Epson iProjection (Mac)
81
Page 82

Installing Epson iProjection (Windows)
Installing Epson iProjection (Mac)
Error Messages When Using a USB Key
Error Messages Remedy
Unable to find connection information. Insert the
USB key.
Unable to find connection information. Insert the
USB key into the projector.
Unable to find a projector that can connect with
Quick Connection Mode.
Unable to find a projector that can connect with
Advanced Connection Mode.
Unable to use the USB key while the application is
running.
Unable to find a projector that can connect with
Participant Edition.
Files are missing or invalid. Failed to start the
application. Set up the USB key again.
Unable to set up the USB key. Files are missing or
invalid. Reinstall Epson iProjection.
Unable to set up the USB key. Reinsert the USB
memory device and start USB Key Setup Tool
again.
Insert the USB key securely into your computer.
Insert the USB key securely into the projector to
update the projector network information.
Close Epson iProjection and then insert the USB
key again.
Make sure the projector is connected to the
network using the Advanced connection mode,
and then update the projector network information
saved on the USB key.
Delete all files on the USB flash drive, and then
start the USB Key Setup Tool to create a USB key
again.
Unable to set up the USB key. Check the amount
of free space. Necessary free space: 150 MB
Administrator authority is required to run USB Key
Setup Tool.
Parent topic: Error Messages List
82
Run the USB Key Setup Tool as a user with
administrator authority.
Page 83

Related tasks
Creating a USB key on a USB Flash Drive (Windows Only)
Using a USB Key to Connect a Windows Computer
Error Messages When Searching for and Selecting Projectors
Error Messages Remedy
Cannot join. The maximum number of participants
has been exceeded.
The projector keyword does not match. Please try
again.
Connection failed due to projector keyword
mismatch.
The selected projector is mirroring another
projector.
One or more projectors are not responding. You cannot connect to multiple projectors
A network error occurred. Turn on your computer's wireless LAN, and then
Connection to the projector failed. Check if the projector you want to connect to is
The maximum number of devices are already
connected to the projector. Disconnect users and
projectors that are not projecting screens.
Check the Projector Keyword displayed on the
screen, and enter the Projector Keyword.
When another user is already connected, you can
only connect to the projectors in the same
mirroring group as that selected by the other user.
Select a projector from the same mirroring group,
or select a projector that is in standby status.
simultaneously. Check the network settings on the
computer and the network settings on the
projector.
try searching for the projector again. If you still
cannot connect to the projector, check the network
settings on the computer and the network settings
on the projector.
already connected to EasyMP Network Projection.
You cannot connect to a projector that is already
connected using EasyMP Network Projection.
Parent topic: Error Messages List
Related tasks
Uninstalling Epson iProjection (Windows Vista/Windows 7/Windows 10)
83
Page 84

Uninstalling Epson iProjection (Windows 8.x)
Uninstalling Epson iProjection (Mac)
Getting the Latest Version of the Application
Installing Epson iProjection (Windows)
Installing Epson iProjection (Mac)
Related topics
Supported Resolutions and Colors
Error Messages When Projecting
Error Messages Remedy
The projector has disconnected. An error may have occurred in the projector.
A network error occurred. Try connecting again. If you still cannot connect to
Parent topic: Error Messages List
Error Messages When Operating a Profile
Check the projector's indicator lights.
the projector, check the network settings on the
computer and the network settings on the
projector.
Error Messages Remedy
Enter max. 32 characters. The entered text exceeds 32 characters. Shorten
the name to 32 characters or less.
Enter a folder name. No folder name entered. Enter a folder name.
Folders should not be created more than 6 layers
deep.
There is already a folder named XXX in this folder. A folder with the same name already exists. Enter
There is already a file named XXX in this folder. A projector with the same name already exists.
84
The folder structure is deeper than six folders.
Create the new folder higher up in the folder
structure.
another folder name.
Enter another projector name.
Page 85

Error Messages Remedy
Cannot import. Format not supported by this
application.
Cannot import because the folder structure
exceeds six folders.
Cannot move because the folder structure
exceeds six folders.
Cannot copy because the folder structure exceeds
six folders.
Failed to open the file. The profile may be corrupted. Try importing the
Failed to save the file. Make sure you have access rights to the folder,
Cannot import certain items because the
connection modes differ.
Parent topic: Error Messages List
Related tasks
Registering a Profile
Importing a Profile
Check the profile you want to import. You cannot
import a profile when projector information has not
been registered, or when the profile is corrupt.
The folder structure cannot exceed six layers.
Import, move, or copy to a folder higher up in the
folder structure.
profile again.
and then try again.
Import a profile in the connection mode in which
you created a profile.
Error Messages When Using the Moderator Function
Error Messages Remedy
Cannot switch to moderator. You cannot become the moderator when another
user is the moderator. Ask the current moderator
to quit, and then try again.
Failed to switch to Moderator Mode Make sure another user is not the moderator, and
then try again.
The moderator function is not available. You have
been connected as a participant.
85
The projector you are connecting to does not
support the moderator function. To become the
moderator, change to a projector that supports the
moderator function.
Page 86

Parent topic: Error Messages List
Related tasks
Changing the Moderator
Error Messages When Distributing the Projected Screen
Error Messages Remedy
The projector is processing. Wait for a while, and
then try to deliver again.
Cannot deliver the image currently being
projected.
A network error occurred while delivering. Please
try again.
Cannot save the received file. Check the amount
of free space.
Cannot save the received file. Check the access
rights to the Save To folder.
Cannot save the received file. Check the folder
settings.
Parent topic: Error Messages List
Related tasks
Distributing the Projected Screen
Event ID List
When a connection error occurs, a number indicating the type of error is displayed as follows.
Event ID: 04xx
Close running projector functions, and then try
again.
Make sure the image being projected is not
protected by copyrights.
Make sure the moderator can connect to the
projector.
Make sure you have enough free space to save
the received images.
Check the location where the received image is
saved on the Deliver tab in the Set options
screen and make sure you have access rights to
the folder.
Check the numbers and then apply the following countermeasures. If you cannot resolve the problem,
contact your network administrator, or contact Epson as described in your projector User's Guide.
Event ID Cause Remedy
0432 Failed to startup the network software. Restart the projector.
0435
86
Page 87

Event ID Cause Remedy
0434 Network communication is unstable. Check the network communication status,
0481
and reconnect after waiting for a while.
0482
0433 Cannot play transferred images. Restart the network software.
0484 Communication was disconnected from the
computer.
04FE The network software ended unexpectedly. Check the status of network
communications. Restart the projector.
04FF A system error occurred in the projector. Restart the projector.
0891 Cannot find an access point with the same
SSID.
0892 The WPA/WPA2 authentication type does
not match.
Set the computer, the access point, and the
projector to the same SSID.
Check that the wireless LAN security
settings are correct.
0893 The WEP/TKIP/AES encryption type does
not match.
0894 Communication was disconnected because
the projector connected to an unauthorized
Contact your network administrator for more
information.
access point.
0898 Failed to acquire DHCP. Check the DHCP server to see if it is
operating correctly and check the LAN cable
to see if it is connected correctly. If you are
not using DHCP, set DHCP to Off.
0899 Other communication errors If restarting the projector or the network
software does not solve the problem,
contact Epson as described in your projector
User's Guide.
089A The EAP authentication type is not the
same.
089B EAP server authentication failed.
Check that the wireless LAN security
settings are correct. Also, check if the
certificate is installed correctly.
089C EAP client authentication failed.
089D Key exchange failed.
87
Page 88

Event ID Cause Remedy
0B01 The built-in storage could not be detected
correctly.
0BFF An error has occurred in the Whiteboard
function.
Parent topic: Solving Problems
Perform Delete All Internal Data. When the
internal storage is deleted correctly, plugin
the power cord for the projector and turn it
on. If it is not deleted correctly, contact
Epson as described in your projector User's
Guide.
Go to Extended > Whiteboard Settings >
Internal Storage.
Restart the projector.
88
Page 89

Screen Summary
See these sections for more information about the Epson iProjection screens.
Select Connection Mode Screen
Search Screen
Save Screen
Set options
Toolbar
Projection Control Screen
Thumbnail Screen
Viewer Screen
89
Page 90

Select Connection Mode Screen
When you start Epson iProjection, the select connection mode screen is displayed.
1 Select the connection mode.
2 Select to always connect using the selected connection mode.
Parent topic: Screen Summary
Related concepts
Connection Methods for Various Network Environments
90
Page 91

Search Screen
When you start Epson iProjection, the search screen is displayed.
1 User name Displays the user name displayed in the user list on the projection
control screen. You can edit the user name on the User Settings tab
on the Set options screen.
2 Automatic search Searches for projectors on the network to which the computer is
connected.
3 Manual search
(Advanced Connection
Mode only)
4 Profile Searches for projectors on the network by using the projector
5 Profile list Displays the registered profiles (projector information). When you
6 Set options Displays the Set options screen.
7 Join Connects to the selected projectors.
Searches for projectors on the network by specifying the projector's
IP address or projector name.
information saved previously.
double-click the profile, the projectors registered in the profile are
searched for on the network.
91
Page 92

8 List of Connected
Projectors (Advanced
Connection Mode only)
Displays information on the projectors selected from the Projector
List. Even if the search method is changed, the content of the List of
Connected Projectors remains the same.
9 Register (Advanced
Connection Mode only)
10 Connect as a
Moderator, or disable
interrupt connections.
Registers the projectors from the List of Connected Projectors to a
profile.
Connects to the selected projectors as the moderator and you can
prevent any other users from interrupting your connection (supported
models only).
The moderator function is available only on the Standard Edition of
the software.
11 Clear list Clears information displayed in the Projector List and the List of
Connected Projectors.
12 Projector List Displays a list of the projectors found on the network. You can then
select projectors to connect to. The search results for each search
method (Automatic search, Manual search, and Profile) are
displayed in separate lists.
• Status: See the description of projector status icons in the next
table.
• Projector name: Displays the projector's name.
• SSID (Quick Connection Mode only): Displays the projector's
SSID.
• Signal Intensity (Quick Connection Mode only): Displays the
signal intensity when a connection is made in Quick Connection
Mode. As the Signal intensity increases, so does the number of lit
indicators.
• IP address (Advanced Connection Mode only): Displays the
projector's IP address.
• Comments: Displays comments for the projector. You can edit the
comment by right-clicking the profile, and then clicking Property.
You can enter up to 32 characters.
13 Refresh Updates information in the Projector List.
14 Manual search box
(Advanced Connection
Mode only)
When using Manual search, enter the projector's IP address or the
projector name. Click the Search button to search for the specified
projector.
92
Page 93

Projector status icons in the Projector List are described in the following table.
Available. You can connect to the projector.
Standby
Available. Although other computers are connected to the projector, you can
also connect at the same time.
Busy
Available. You can connect to a group of projectors that are projecting the
same image (mirroring).
Mirroring...
Not available. The projector is displaying the network configuration screen or
is being used by other projector software.
Currently in use by
another application
Not available. A Manual search or Profile search is already being used to
search for the projector.
Searching
Not available. The specified projector could not be found using Manual
search or Profile search.
Not found.
Not available. The projector is not compatible with Epson iProjection.
Unsupported
Projectors
Available. Displayed when a projector with security settings enabled is found
in Quick Connection Mode.
Not acquired
Parent topic: Screen Summary
93
Page 94

A
C
D
B
Related tasks
Searching for Network Projectors Automatically
Searching for Network Projectors by Specifying an IP Address or Projector Name
Related topics
Searching for Network Projectors Using a Profile
Searching for Network Projectors Using a Shortcut
Set options
Save Screen
When you search for projectors and save information as a profile on the search screen, the Save screen
is displayed.
1 Projector file name Enter the projector file name.
94
Page 95

2 Save in Select the folder where you want to save the profile.
3 Create New folder Creates a new folder.
4 OK Registers the projector information in the profile.
Parent topic: Screen Summary
Related tasks
Registering a Profile
Set options
When you click Set options on the Epson iProjection search screen, the Set options screen is
displayed.
Note:
• You can also access Set options from the Tool menu on the projection control screen. When you
• The available settings vary depending on the edition of the software.
Set options - User Settings
Set options - General settings
Set options - Adjust performance
Set options - Audio Output
Set options - Deliver
access Set options from the projection control screen, the User Settings tab is not displayed.
Parent topic: Screen Summary
Related references
Search Screen
Toolbar
95
Page 96

Set options - User Settings
When you click the User Settings tab on the Set options screen, the following screen is displayed.
User name Enter the user name displayed in the user list on the projection
control screen. You can enter up to 32 characters. This setting is
synchronized with the setting on the search screen.
Shared Profile Name
(Advanced Connection Mode
only)
Delete (Advanced Connection
Mode only)
Enter the network location or URL of the shared profile (including the
name of the profile) as shown below.
• For a file server (Windows only): \\xxxxx\xxxxx.mplist
• For a web server: http://xxxxx/xxxxx.mplist
Deletes the input history for Manual search.
96
Page 97

Restore Defaults Resets all adjustment values for Set options to their default
Parent topic: Set options
Related references
Search Screen
Projection Control Screen
Related tasks
Searching for Network Projectors Automatically
Sharing a Profile over a Network
Set options - General settings
When you click the General settings tab on the Set options screen, the following screen is displayed.
settings, except for Switch LAN on the General settings tab.
97
Page 98

Encrypt communications Select to encrypt and transmit data. Even if data is intercepted, it
cannot be decrypted.
Display in high resolution
when dividing the projected
screen in two or four
Available only for projectors with a resolution of WUXGA (1920 ×
1200).
Select to display all divided screens in high resolution.
Clear this setting if displaying the image takes too long or is
interrupted.
Display Connection Mode
Selection window on startup
Select to display the Select Connection Mode screen each time the
software starts.
Clear this checkbox once you have settled on a regular startup
method.
Make the movement of the
mouse pointer smooth
Windows Vista/Windows 7 only
Select to prevent the mouse pointer from flickering when Transfer
layered window is selected on the Adjust performance tab. (If
Windows Aero is selected as the theme for Windows Vista and
Windows 7, this setting turns off Windows Aero.)
Freeze projected screen when
displaying Projection control
screen
Available only for the moderator when using the moderator function.
Select to hide the operations on the projection control screen from
other users while projecting your computer screen.
Use Easy Interactive Tools Windows only
Select to use Easy Interactive Tools with the software.
This setting is synchronized with Transfer layered window on the
Adjust performance tab.
Use Interactive Pen Select to use the interactive function over a network (supported
models only). You do not need to connect a computer to the
projector with a USB cable.
You can use the following devices at the same time.
• Windows: Two Easy Interactive Pens and six touch points
• Mac: One mouse
Quit application when
removing the USB key
Select to disconnect the computer when you remove the USB key
from your computer. Deselect this checkbox if you want to share the
USB key with other users without disconnecting your computer.
98
Page 99

Switch LAN Windows only
Use this setting if you need to switch the network adapter used to
perform a search when a computer has multiple adapters.
By default, all of the network adapters are used to perform a search.
Wireless LAN passphrase
setting files (Quick
Connection Mode only)
In Quick Connection Mode, SSIDs and passphrases are stored on
the computer when connecting to a projector with security settings
enabled. You can edit and delete the stored information.
Edit: Displays the wireless network management screen for the
computer.
Delete all: Deletes all the SSIDs and passphrases stored on the
computer.
Restore Defaults Resets all adjustment values for Set options to their default
settings, except for Switch LAN on the General settings tab.
Parent topic: Set options
Related tasks
Changing the Number of Projected Panels
Hiding the Projection Control Screen
99
Page 100

Set options - Adjust performance
When you click the Adjust performance tab on the Set options screen, the following screen is
displayed.
Projection Quality Sets the priority for projected image quality and transfer speed.
• Image Priority: Transfers projected image data with a low
compression ratio to prioritize image quality.
• Speed Priority: Compresses projected image data to increase
transfer speed.
Use Bandwidth Controls the bandwidth for the data transfer. When you select a
narrower bandwidth, the projected image quality may decline but the
network load is reduced.
100
 Loading...