

Page 1

Color Ink Jet Printer
Setup and Direct Printing Guide
4010389
XXX-00
Page 2

Color Ink Jet Printer
All rights reserved. No part of this publication may be reproduced, stored in a retrieval
system, or transmitted in any form or by any means, electronic, mechanical, photocopying,
recording, or otherwise, without the prior written permission of SEIKO EPSON
CORPORATIO N. The information contained h erein is designed only for use with th is EPSON
printer. EPSON is not responsible for any use of this information as applied to other printers.
Neither SEIKO EPSON CORPORATION nor its affiliates shall be liable to the purchaser of
this product or third parties for damages, losses, costs, or expenses incurred by the purchaser
or third parties as a result of: accident, misuse, or abuse of this product or unauthorized
modifications, repairs, or alterations to this product, or (excluding the U.S.) failure to strictly
comply with SEIKO EPSON CORPORATION's operating and maintenance instructions.
SEIKO EPSON C ORPORATION shall not be liable fo r any damages or problems arising from
the use of any options or any consumable products other than those designated as Original
EPSON Products or EPSON Approved Products by SEIKO EPSON CORPORATION.
EPSON and EPSON ESC/P are registered trademarks and ESC/P Raster is a trademark of
SEIKO EPSON CORPORATION.
Microsoft and Windows are registered trademarks of Microsoft Corporation.
General Notice: Other product names used herein are for identification purposes only and may be
trademarks of their respective owners. EPSON disclaims any and all rights in those marks.
Copyright © 2001 by SEIKO EPSON CORPORATION, Nagano, Japan.
Setup and Direct Printing Guide
Page 3

ii
Page 4

Contents
Safety Instructions
Important Safety Instructions. . . . . . . . . . . . . . . . . . . . . . . . . . . . . .1
A Few Precautions . . . . . . . . . . . . . . . . . . . . . . . . . . . . . . . . . . . . . . .2
When using the printer . . . . . . . . . . . . . . . . . . . . . . . . . . . . . 2
When handling the ink cartridges . . . . . . . . . . . . . . . . . . . . 3
When choosing a place for the printer. . . . . . . . . . . . . . . . . 3
Warnings, Cautions, and Notes. . . . . . . . . . . . . . . . . . . . . . . . . . . .4
Printer Parts and Functions
Chapter 1 Setting Up Your Printer
Direct Printing or Printing with a Computer. . . . . . . . . . . . . . . . .1-2
Attaching the Paper Support . . . . . . . . . . . . . . . . . . . . . . . . . . . . . .1-2
Plugging in the Printer . . . . . . . . . . . . . . . . . . . . . . . . . . . . . . . . . . .1-3
Installing the Ink Cartridges. . . . . . . . . . . . . . . . . . . . . . . . . . . . . . .1-3
Chapter 2 Direct Printing Introduction
What You Can Do with This Printer. . . . . . . . . . . . . . . . . . . . . . . .2-2
Available Paper . . . . . . . . . . . . . . . . . . . . . . . . . . . . . . . . . . . . . . . . .2-5
Plain paper (A4, A6, 4 x 6 inch). . . . . . . . . . . . . . . . . . . . . . . 2-5
EPSON special media. . . . . . . . . . . . . . . . . . . . . . . . . . . . . . . 2-5
Print area . . . . . . . . . . . . . . . . . . . . . . . . . . . . . . . . . . . . . . . . . 2-7
Making Settings on the Display. . . . . . . . . . . . . . . . . . . . . . . . . . . .2-8
Selecting the Input Switch . . . . . . . . . . . . . . . . . . . . . . . . . . . . . . . .2-12
iii
Page 5

Chapter 3 Printing Photo Directly with PC Cards
Loading Paper . . . . . . . . . . . . . . . . . . . . . . . . . . . . . . . . . . . . . . . . . .3-2
Loading A4 paper . . . . . . . . . . . . . . . . . . . . . . . . . . . . . . . . . . 3-2
Loading A6 paper . . . . . . . . . . . . . . . . . . . . . . . . . . . . . . . . . . 3-5
Loading EPSON Photo Paper (4 x 6 inch) . . . . . . . . . . . . . . 3-7
Loading PC Cards . . . . . . . . . . . . . . . . . . . . . . . . . . . . . . . . . . . . . . .3-10
Loadable storage media . . . . . . . . . . . . . . . . . . . . . . . . . . . . . 3-10
Loading PC cards . . . . . . . . . . . . . . . . . . . . . . . . . . . . . . . . . . 3-11
Ejecting PC cards. . . . . . . . . . . . . . . . . . . . . . . . . . . . . . . . . . . 3-12
Printing All Photographs on the PC Card . . . . . . . . . . . . . . . . . . .3-13
Printing Index Print. . . . . . . . . . . . . . . . . . . . . . . . . . . . . . . . . . . . . .3-16
Printing Selected Photos . . . . . . . . . . . . . . . . . . . . . . . . . . . . . . . . . .3-18
Printing a Selected Range of Photos . . . . . . . . . . . . . . . . . . . . . . . .3-20
Changing the Internal Settings. . . . . . . . . . . . . . . . . . . . . . . . . . . . .3-22
Restoring the Internal settings to default . . . . . . . . . . . . . . 3-24
Chapter 4 Using Filters and Frames
Printing Photos with Special Effects . . . . . . . . . . . . . . . . . . . . . . . .4-2
Printing Photos with Frames . . . . . . . . . . . . . . . . . . . . . . . . . . . . . .4-4
Printing a list of frames . . . . . . . . . . . . . . . . . . . . . . . . . . . . . 4-7
Chapter 5 Maintenance and Transportation
Replacing Ink Cartridges . . . . . . . . . . . . . . . . . . . . . . . . . . . . . . . . .5-2
Checking the Print Head Nozzles . . . . . . . . . . . . . . . . . . . . . . . . . .5-7
Cleaning the Print Head . . . . . . . . . . . . . . . . . . . . . . . . . . . . . . . . . .5-9
Aligning the Print Head . . . . . . . . . . . . . . . . . . . . . . . . . . . . . . . . . .5-10
Cleaning the Printer. . . . . . . . . . . . . . . . . . . . . . . . . . . . . . . . . . . . . .5-12
Transporting the Printer . . . . . . . . . . . . . . . . . . . . . . . . . . . . . . . . . .5-13
Chapter 6 Troubleshooting
Error Indicators . . . . . . . . . . . . . . . . . . . . . . . . . . . . . . . . . . . . . . . . .6-2
Unable to Print Photos . . . . . . . . . . . . . . . . . . . . . . . . . . . . . . . . . . .6-5
iv
Page 6

Check that power is ON. . . . . . . . . . . . . . . . . . . . . . . . . . . . . 6-5
Unable to start printing or make settings . . . . . . . . . . . . . . 6-5
Printing stops halfway . . . . . . . . . . . . . . . . . . . . . . . . . . . . . . 6-5
The Frame mode cannot be set . . . . . . . . . . . . . . . . . . . . . . . 6-6
Unable to print parts of a photograph. . . . . . . . . . . . . . . . . 6-6
Unable to print the selected photo . . . . . . . . . . . . . . . . . . . . 6-6
When Print Quality Declines . . . . . . . . . . . . . . . . . . . . . . . . . . . . . .6-6
Check if the print head is clogged . . . . . . . . . . . . . . . . . . . . 6-6
Check if the printer prints satisfactorily . . . . . . . . . . . . . . . 6-6
Check that the adjust lever is properly set . . . . . . . . . . . . . 6-7
Check if the ink has run out . . . . . . . . . . . . . . . . . . . . . . . . . 6-8
Where to Get Help . . . . . . . . . . . . . . . . . . . . . . . . . . . . . . . . . . . . . . .6-9
Chapter 7 For Use with a Computer
System Requirements . . . . . . . . . . . . . . . . . . . . . . . . . . . . . . . . . . . .7-2
For PCs . . . . . . . . . . . . . . . . . . . . . . . . . . . . . . . . . . . . . . . . . . . 7-2
For Macintosh computers . . . . . . . . . . . . . . . . . . . . . . . . . . . 7-2
Using the Printer with a PC . . . . . . . . . . . . . . . . . . . . . . . . . . . . . . .7-4
Connecting the printer . . . . . . . . . . . . . . . . . . . . . . . . . . . . . . 7-4
Installing the printer software. . . . . . . . . . . . . . . . . . . . . . . . 7-5
Using the Printer with a Macintosh. . . . . . . . . . . . . . . . . . . . . . . . .7-7
Connecting the printer . . . . . . . . . . . . . . . . . . . . . . . . . . . . . . 7-7
Installing the printer software. . . . . . . . . . . . . . . . . . . . . . . . 7-8
Selecting your printer in the Chooser . . . . . . . . . . . . . . . . . 7-10
Loading Paper . . . . . . . . . . . . . . . . . . . . . . . . . . . . . . . . . . . . . . . . . .7-12
Printing Your First Page for Windows . . . . . . . . . . . . . . . . . . . . . .7-15
Printing Your First Page for Macintosh . . . . . . . . . . . . . . . . . . . . .7-17
Appendix A Options and Consumable Products
Interface cables . . . . . . . . . . . . . . . . . . . . . . . . . . . . . . . . . . . . A-2
Ink cartridges. . . . . . . . . . . . . . . . . . . . . . . . . . . . . . . . . . . . . . A-2
EPSON special media. . . . . . . . . . . . . . . . . . . . . . . . . . . . . . . A-2
v
Page 7

Index
vi
Page 8

Safety Instructions
Important Safety Instructions
Read all of these instructions before using your printer. Also be
sure to follow all warnings and instructions marked on the
printer.
Do not block or cover the openings in the printer cabinet.
❏
Do not insert objects through the slots. Take care not to spill
❏
liquid on the printer.
Use only the type of power source indicated on the printer
❏
label.
Connect all equipment to properly grounded power outlets.
❏
Avoid using outlets on the same circuit as photocopiers or air
control systems that regularly switch on and off.
Avoid electrical outlets controlled by wall switches or
❏
automatic timers.
Keep the entire computer system away from potential sources
❏
of electromagnetic interference, such as loudspeakers or the
base units of cordless telephones.
Do not use a damaged or frayed power cord.
❏
If you use an extension cord with the printer, make sure the
❏
total ampere rating of the devices plugged into the extension
cord does not exceed the cord’s ampere rating. Also, make
sure the total ampere rating of all devices plugged into the
wall outlet does not exceed the wall outlet’s ampere rating.
Do not attempt to service the printer yourself.
❏
1
Page 9

Unplug the printer and refer servicing to qualified service
❏
personnel under the following conditions:
The power cord or plug is damaged; liquid has entered the
printer; the printer has been dropped or the cabinet damaged;
the printer does not operate normally or exhibits a distinct
change in performance.
If you plan to use the printer in Germany, observe the
❏
following:
To provide adequate short-circuit protection and overcurrent protection for this printer, the building installation
must be protected by a 16 Amp circuit breaker.
Bei Anschluß des Druckers an die Stromversorgung muß
sichergestellt werden, daß die Gebäudeinstallation mit einem
16 A-Überstromschalter abgesichert ist.
A Few Precautions
When using the printer
Do not put your hand inside the printer or touch the ink
❏
cartridges during printing.
Do not move the print head by hand; otherwise you may
❏
damage the printer.
Always turn the printer off using the
❏
this button is pressed, the Power light flashes briefly then goes
off. Do not unplug the printer or turn off the power to the
outlet until the Power light stops flashing.
Before transporting the printer, make sure the print head is in
❏
the home (far right) position and the ink cartridges are in
place.
2
P
Power
button. When
Page 10

When handling the ink cartridges
Keep ink cartridges out of the reach of children, and do not
❏
drink the ink.
If ink gets on your skin, wash it off with soap and water. If it
❏
gets in your eyes, flush them immediately with water.
Do not shake an ink cartridge; this can cause leakage.
❏
Install the ink cartridge immediately after removing it from
❏
its package. Leaving the cartridge unpacked for a long time
before use may result in reduced print quality.
Once you install an ink cartridge, do not open the clamp or
❏
remove the cartridge except to replace it with a new one. The
cartridge may become unusable otherwise.
Do not use an ink cartridge beyond the date printed on the
❏
cartridge carton. For best results, use up the ink cartridges
within six months of installing them.
Do not dismantle the ink cartridges or try to refill them. This
❏
could damage the print head.
When choosing a place for the printer
Place the printer on a flat, stable surface that is larger than the
❏
printer. The printer will not operate properly if it is tilted or
at an angle.
Avoid locations subject to rapid changes in temperature and
❏
humidity. Also keep it away from direct sunlight, strong light,
or heat sources.
Avoid locations subject to shocks and vibrations.
❏
3
Page 11

Place the printer near a wall outlet where the plug can be
❏
easily unplugged.
Note for French-speaking users:
Placez l’imprimante près d’une prise de contacte où la fiche peut être
débranchée facilement.
Warnings, Cautions, and Notes
Warnings
w
Cautions
c
Notes
of your printer.
contain important information and useful tips on the operation
must be followed carefully to avoid bodily injury.
must be observed to avoid damage to your equipment.
4
Page 12

Printer Parts and Functions
paper support extension
paper support
edge guides
sheet feeder
output tray extension
input switch
printer cover
output tray
volume
adjust lever
serial interface connector
parallel interface connector
power cord
5
Page 13

replacement position for ink cartridges
control panel, top
PC card slot
control panel, front
print head
ink cartridge clamps
Control panel, front
See the next page for information on the functions of the buttons
and lights.
6
Page 14
o
f
f
o
f
o
Buttons
Button Function
Turns the printer on and off.
P
Power
Loads or ejects paper if pressed and released within 2
E
Load/Eject
R
Maintenance
Lights
o
f
= on,
Light Status Printer Status
Power
o
Power
f
S
Paper
Check
S
Paper
Check
B
Black Ink
B
Black Ink
A
Color Ink
A
Color Ink
seconds.
Resumes printing if pressed and released after a paper
out error.
Moves the print head to the ink cartridge replacement
position if pressed for 3 seconds while the
A
Color ink light is flashing or on.
Returns the print head to its home position after Ink
cartridge replacement.
Performs print head cleaning if pressed for 3 seconds
when the
= flashing
Printer is on.
Receiving data, replacing an ink cartridge, charging
ink, or cleaning the print head.
Paper out. Load paper in the sheet feeder; then press
the
Paper jam. Take all the paper out of the feeder, and
reload the paper. If the light continues to flash, turn off
the printer and gently pull all the paper out of the printer.
Ink low. The black ink cartridge is nearly empty. Obtain
a black ink cartridge (S020093).
Ink out. The black ink cartridge is empty. Replace the
black ink cartridge (S020093).
Ink low. The color ink cartridge is nearly empty. Obtain
a color ink cartridge (S020110).
Ink out. The color ink cartridge is empty. Replace the
color ink cartridge (S020110).
B
Black Ink or
E
Load/Eject button to resume printing.
A
Color Ink light is off.
B
Black Ink or
7
Page 15
Control panel, top
Display:
Shows the items and settings you
change with the buttons on the front
control panel.
P
Type
A
P
E
Size
R
F
O
Layout
R
M
A
T
S
Photo No.
E
L
E
C
Copies
T
S
Quality
E
Enhancement
T
Menus
Size
Photo
Paper
A6
Index
Sticker
Photo No.
• • •
All Camera
• • •
Effect No.
Frame No.
• • •
Set No. • • • • •
High
Draft Super High
On Off
Change Settings
Super
Matte
4x6 A4
Crop
Marks
Plain
Paper
From
Copies
Menus button:
Move the cursor to the item you
want to set on the display.
Frame button:
Allows you to select the optional
frames and turn on or off the frame
print.
Change Settings buttons:
Change the settings for the
selected item on the display.
Filter button:
Allows you to select the filter
effects and turn on or off the filter
To
print.
Processing light:
Flashes while you are insertin g a PC
card in the printer’s card slot and
the printer is printing photos.
Frame
Select Photo
One
Quick Select
Processing • • •
Range
Index All
Quick Select buttons:
Print all photos stored in the PC card
with the All button.
Print the index of photos with the
Index button.
8
Filter
Start
Print
Cancel
Cancel button:
Cancels print operation and the
settings you have changed with
the buttons.
Start Print button:
Starts printing with the mode and
settings selected with the buttons.
While printing is in progress, you are
allowed to reserve the next print
job with the same size of paper
and the different print settings.
Select Photo buttons:
Print a photo selected with the
One button.
Print photos selected with the
Range button.
Page 16

Chapter 1
Setting Up Your Printer
Direct Printing or Printing with a Computer . . . . . . . . . . . . . . . . .1-2
Attaching the Paper Support . . . . . . . . . . . . . . . . . . . . . . . . . . . . . . .1-2
Plugging in the Printer . . . . . . . . . . . . . . . . . . . . . . . . . . . . . . . . . . . .1-3
Installing the Ink Cartridges . . . . . . . . . . . . . . . . . . . . . . . . . . . . . . .1-3
1
Setting Up Your Printer
1-1
Page 17
Direct Printing or Printing with a Computer
You can use this printer to print photos directly with a PC card or
with a computer. Set up the printer first, referring to this chapter.
For direct printing, see the rest of this guide to find information
about daily operation, maintenance, and troubleshooting.
When you want to print with a computer, connect the printer to
your computer and install the printer software as described in
Chapter 7, “For Use with a Computer”. For information about
daily use with the computer, see also the online
User’s Guide
Attaching the Paper Support
Insert the paper support into the slots at the rear of the printer.
.
1-2
Setting Up Your Printer
Page 18

Plugging in the Printer
1
1. Make sure that the printer is turned off. It is off when the
Power
panel.
2. Check the label on the back of the printer to make sure the
voltage required by the printer matches that of the electrical
outlet you will be plugging it into. Also, make sure that you
have the correct power cable for your power source.
button protrudes slightly from the surface of the control
P
Caution:
c
3. If the power cord is not attached to the printer, connect it to
the AC inlet on the back of the printer.
4. Plug the power cord into a properly grounded electrical
outlet.
It is not possible to change the printer's voltage. If the rated
voltage and your outlet voltage do not match, contact your
dealer for assistance. Do not plug in the power cord.
Installing the Ink Cartridges
Before installing the ink cartridges, note the following.
w
Warning:
The ink cartridges are self-contained units. Under ordinary use,
ink will not leak from a cartridge. If ink does get on your hands,
wash them thoroughly with soap and water. If ink gets into your
eyes, flush them immediately with water.
Setting Up Your Printer
1-3
Page 19
Note:
❏
Do not open the ink cartridge packages until just before you install
them, or the ink may dry up.
❏
Use the ink cartridges packed with your printer the first time you
install ink cartridges, otherwise the printer may not charge the ink
properly.
Install the ink cartridges as follows:
1. Lower the output tray; then open the printer cover.
2. Turn on the printer
The print head moves slightly to the left, which is the ink
cartridge replacement position. The
Black Ink and
B
the
Caution:
Do not move the print head by hand. Otherwise you may
c
damage the printer.
1-4
Setting Up Your Printer
.
C
A
olor Ink lights come on.
Power light flashes and
Page 20
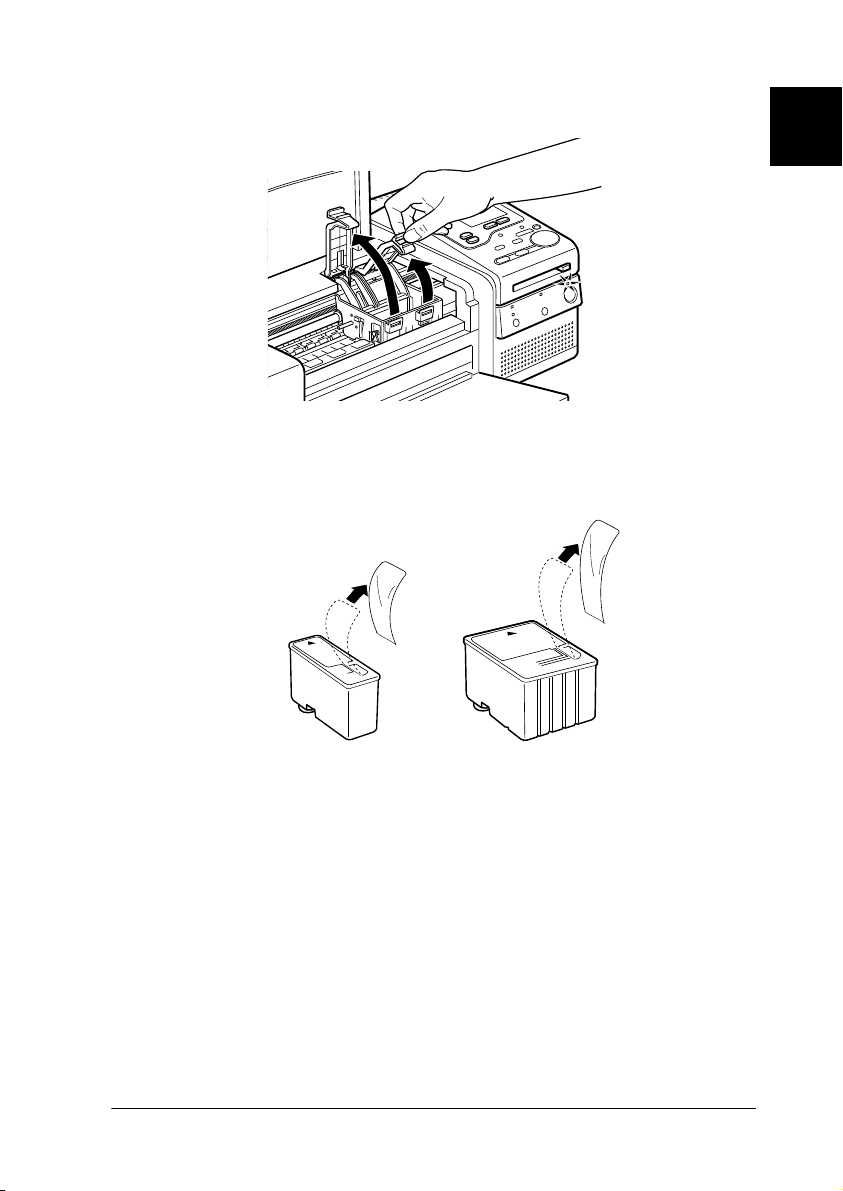
3. Lift up the ink cartridge clamps.
1
4. Open the ink cartridge packages that came with your printer.
Remove only the yellow tape seals from each cartridge.
c
Black ink cartridge Color ink cartridge
Caution:
❏
❏
❏
Remove the yellow tape seals from the cartridges before
installing them; otherwise the cartridges may become
unusable.
Do not remove the blue portion of the tape seals from the
cartridges; otherwise the cartridges may become clogged
and not print.
Do not remove the tape seals from the bottom of the
cartridges; otherwise, ink will leak.
Setting Up Your Printer
1-5
Page 21
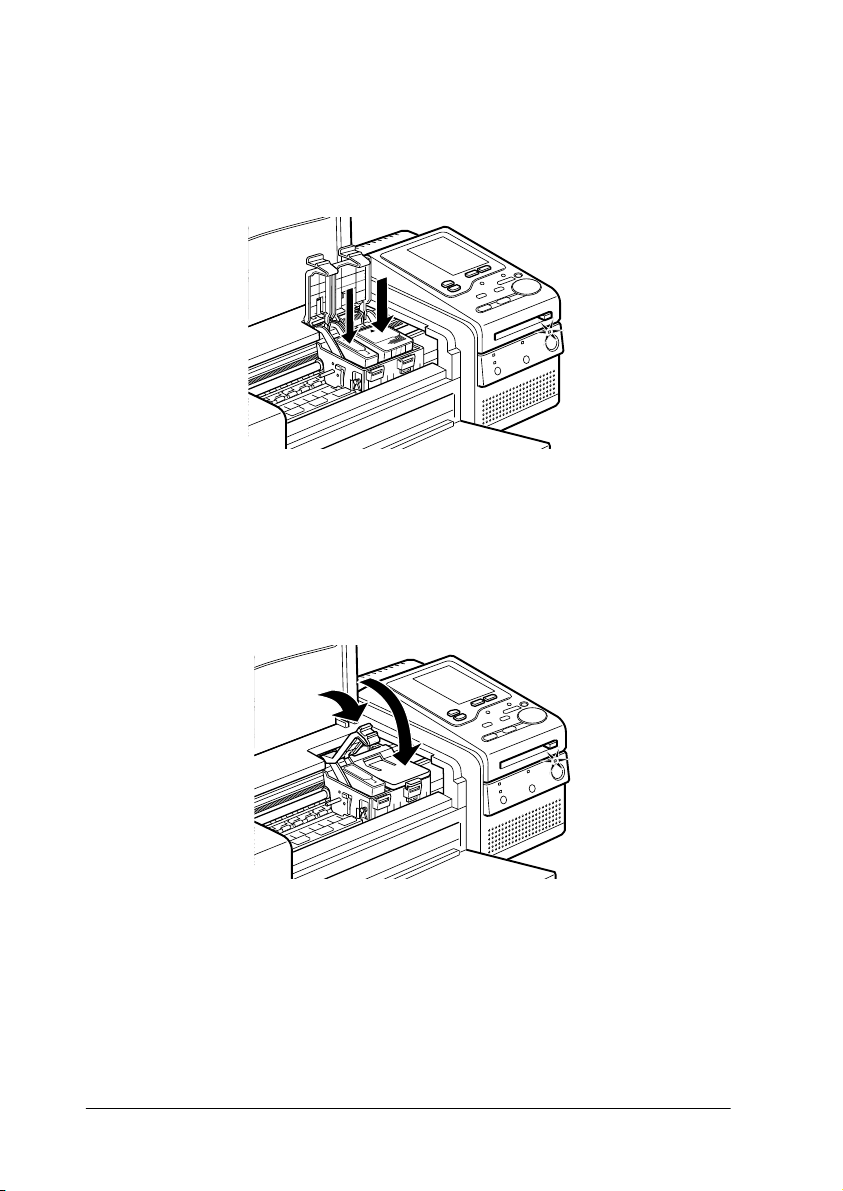
5. Place the cartridges gently into their holders with the labels
face-up. The color ink cartridge, which is larger, goes on the
right and the black goes on the left. Do not press down on the
cartridges.
Note:
Install both ink cartridges. If either of the cartridges is not installed,
the printer will not work.
6. Press the ink cartridge clamps down until they lock in place.
Caution:
Once you install the ink cartridges, do not open their clamps
c
again until you replace the ink cartridges. Otherwise, the
cartridges may become unusable.
1-6
Setting Up Your Printer
Page 22

7. Press the
print head and begins charging the ink delivery system.
The ink charging process may take about one minute to
complete, during which time the Power light flashes and the
printer produces a variety of mechanical sounds. These
sounds are normal. When the ink delivery system has been
charged, the print head returns to its home (far right) position.
Caution:
c
Never turn off the printer while the
R
Maintenance
button. The printer moves the
Power light is flashing.
1
8. Close the printer cover.
Now you are ready to print the photos you have taken with your
digital camera.
Setting Up Your Printer
1-7
Page 23

1-8
Setting Up Your Printer
Page 24

Chapter 2
Direct Printing Introduction
What You Can Do with This Printer. . . . . . . . . . . . . . . . . . . . . . . . . 2-2
Available Paper . . . . . . . . . . . . . . . . . . . . . . . . . . . . . . . . . . . . . . . . . .2-5
Plain paper (A4, A6, 4 x 6 inch) . . . . . . . . . . . . . . . . . . . . . . . .2-5
EPSON special media. . . . . . . . . . . . . . . . . . . . . . . . . . . . . . . . . 2-5
Print area . . . . . . . . . . . . . . . . . . . . . . . . . . . . . . . . . . . . . . . . . . .2-7
Making Settings on the Display. . . . . . . . . . . . . . . . . . . . . . . . . . . . .2-8
Selecting the Input Switch . . . . . . . . . . . . . . . . . . . . . . . . . . . . . . . . .2-12
2
Direct Printing Introduction
2-1
Page 25
What You Can Do with This Printer
This printer can print out photographs in the following types of
prints.
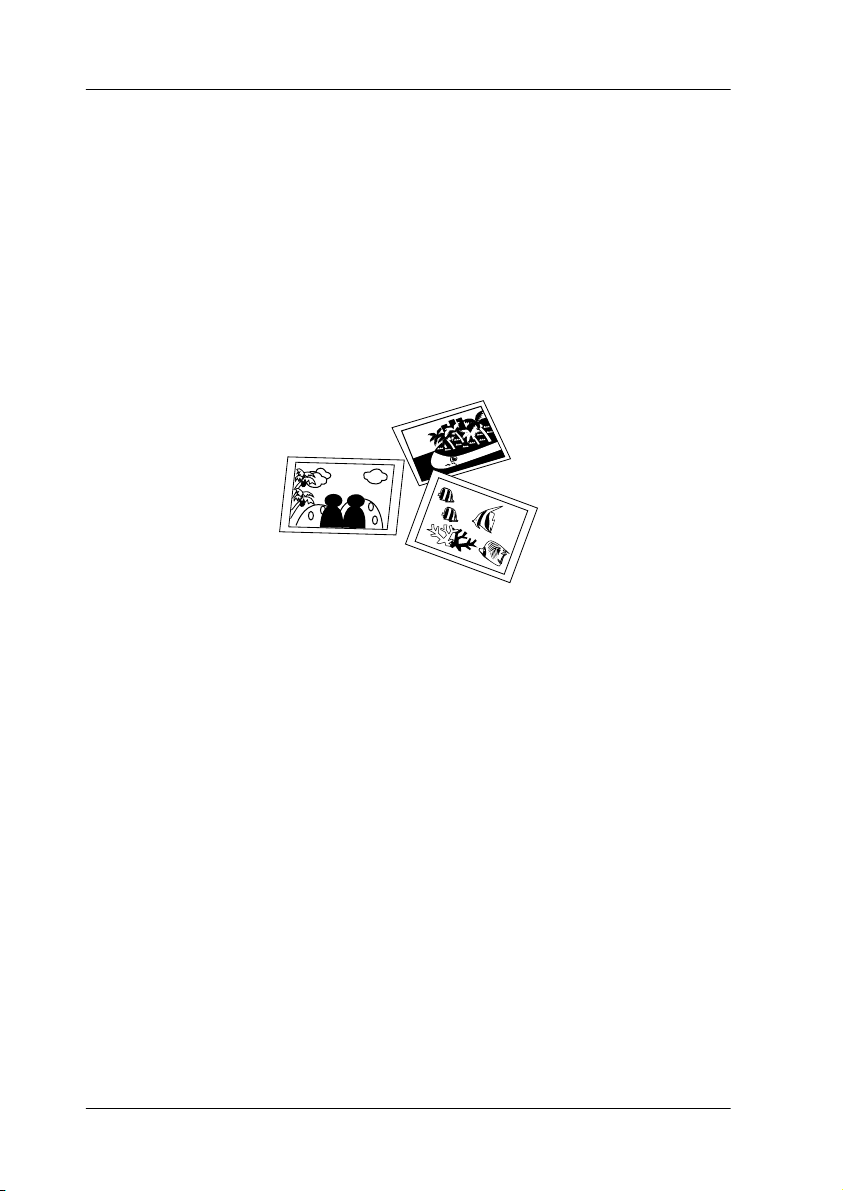
Photo prints
You can print photographs stored on your digital camera’s
removable media. This printer simply makes it quick and easy.
All you need to do is to load paper and a PC card in the printer,
make settings on the display, and press the
When you want to change settings for prints, see “Making
Settings on the Display” on page 2-8.
Start Print
button.
You can print all photos or select only some to print. See Chapter
3, “Printing Photo Directly with PC Cards”.
2-2
Direct Printing Introduction
Page 26
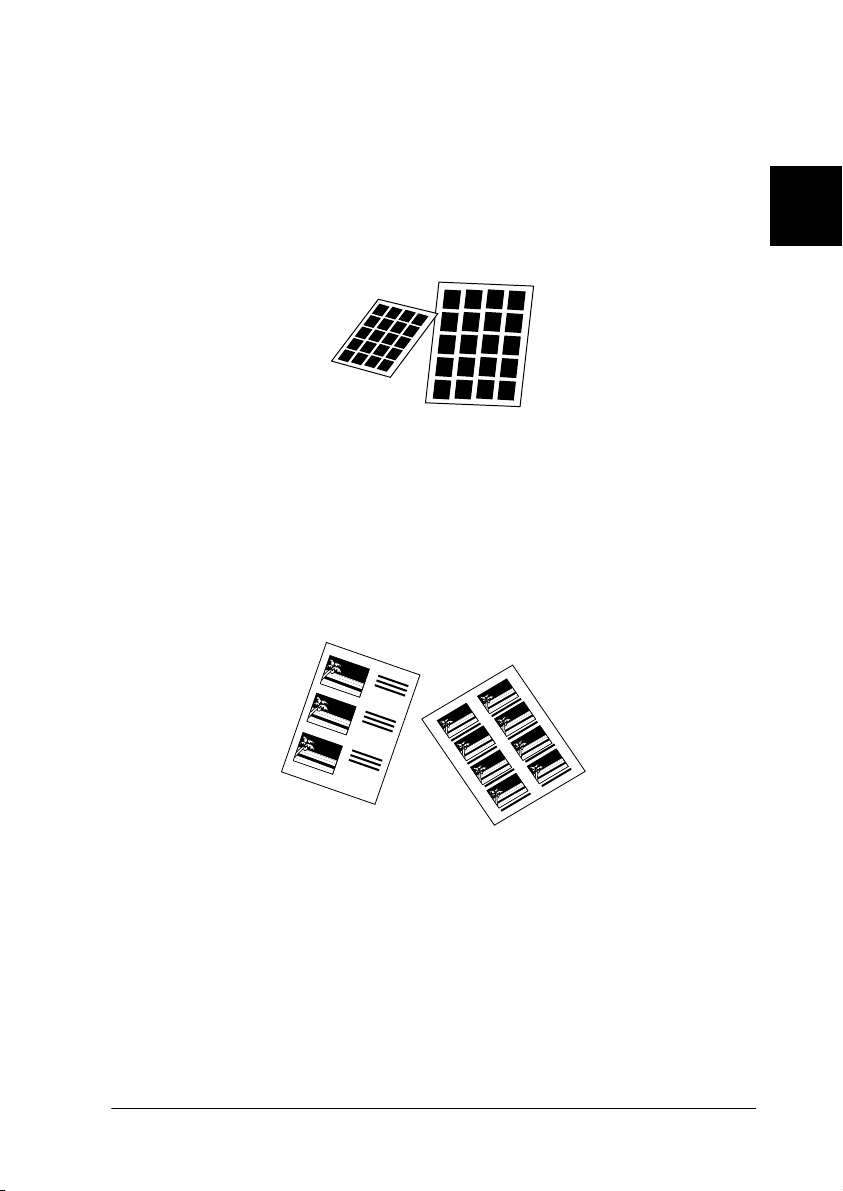
Index prints
All of your digital photographs on the PC card can be printed out
as an index on a single sheet of paper. This format is convenient
for checking the number of a specific photograph or creating a
table of contents for an album. See “Printing Index Print” on page
3-16.
Album prints
Photographs can be printed out in E or Card size on a single sheet
of A4 paper. You can write in the blank space around the
photographs and bind several pages together. You can easily
make your own album. See “Printing all photos on a single sheet”
on page 3-15.
2
Direct Printing Introduction
2-3
Page 27

Enlargements on A4 paper
With an A4 size sheet of paper, you can enlarge your favorite
photographs to size 2L or 4L.
Photo stickers
You can print 16 photo stickers. To make settings for stickers, see
“Making Settings on the Display” on page 2-8.
Note:
Using the optional PC card which includes colorful frames, you can print
out photographs inside your favorite frame. Contact your EPSON
dealer.
2-4
Direct Printing Introduction
Page 28

Available Paper
The type and quality of paper determines the finish of your prints.
Before use, be sure to read the following information and select
the correct paper for your needs. This printer can print out
photographs directly with PC cards in three sizes: 105 x 148 mm
(A6), 114 x 175 mm (4 x 6 inch) and 210 x 297 mm (A4).
Note:
❏
You should only use print media at normal room temperature and
humidity: 15 to 25°C (59 to 77°F) and 40 to 60%RH.
❏
Keep your fingers off the printable surface of the paper. Fingerprints
may deteriorate the print quality.
Plain paper (A4, A6, 4 x 6 inch)
When using the plain paper, note the following:
Use paper 64 to 90 g/m² in size and 0.08 to 0.11 in thickness.
❏
Load paper up to the arrow mark.
❏
2
EPSON special media
EPSON provides special paper that are formulated for the ink
used on EPSON ink jet printers. EPSON recommends you to use
media distributed by EPSON to ensure high-quality results.
Before loading special paper distributed by EPSON, read the
instruction sheets packed with your special media first and keep
the following in mind.
The following table lists available media type and size when you
print directly from the PC cards. Find the best choice for your
printing needs.
Direct Printing Introduction
2-5
Page 29
Note:
❏
When printing images through a computer, you can use more
various media types and sizes using the printer software for IP-100
packed with your printer. See online
User’s Guide
for more
information.
❏
The availability of special media varies by country.
Caution:
c
Use EPSON special paper under normal room environment
(temperature and humidity) to obtain best results.
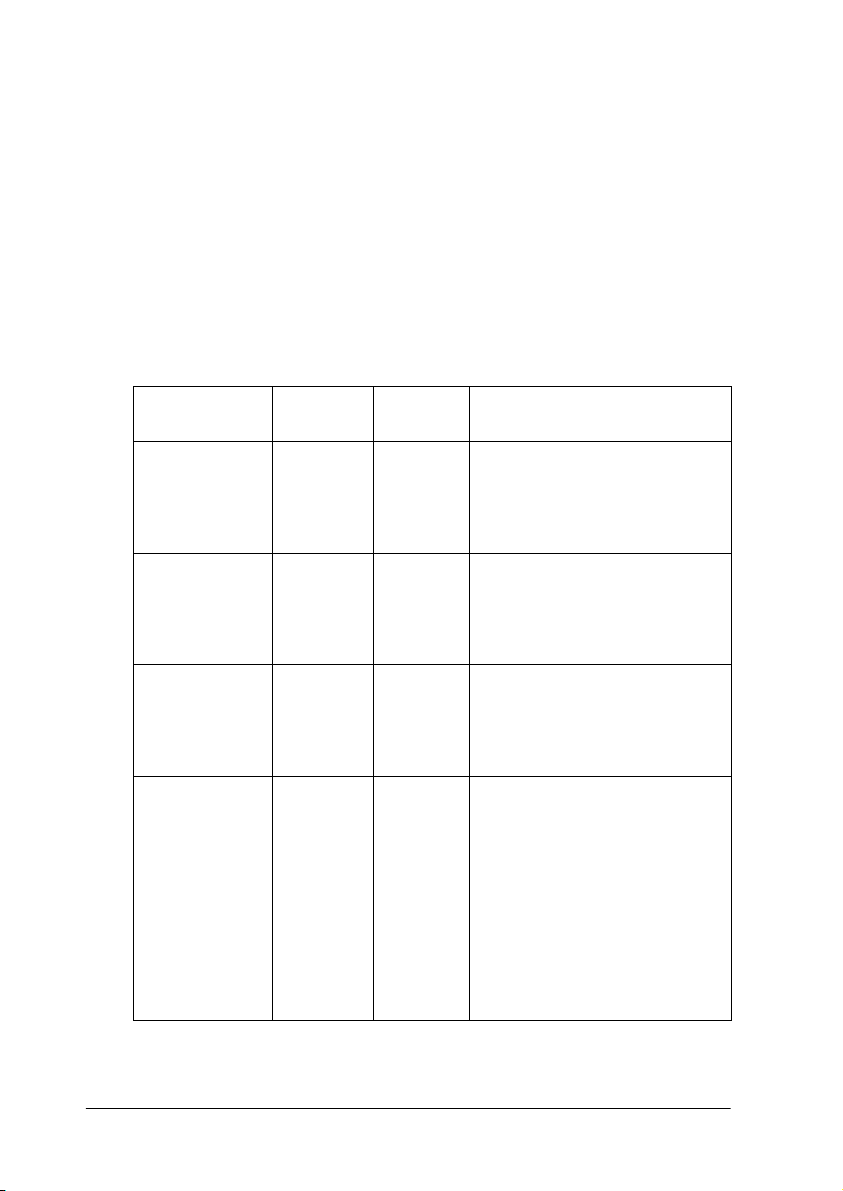
Media names Size
EPSON 360 dpi
Ink Jet Paper
Photo Quality
Ink Jet Paper
Photo Quality
Glossy Paper
Photo Paper A4
available
A4 S041059
A4 S041061
A4 S041126 This media gives you the
4x6 inch
Product
code
S041025
S041026
S041140
S041134
Characteristics
This media is best suited for
printing handouts of business
presentations that contain
color images, and drafts of
your most important printouts.
This media provides you with
high quality printing at
reasonable cost. It is best
suited for printing photo
images.
highest quality printouts at
moderate printing costs. The
glossy surface provides you
with a photo-like finish.
This media gives you the
highest quality printouts at
moderate printing costs. The
glossy surface provides you
with a photo-like finish. 4 x 6
inch EPSON Photo Paper is
perforated around the
margins so you can trim your
printed images to look like
photographs. See “Loading
EPSON Photo Paper (4 x 6
inch)” on page 3-7.
2-6
Direct Printing Introduction
Page 30

Media names Size
available
Product
code
Characteristics
EPSON Photo
Quality Self
Adhesive
Sheet
EPSON Photo
Stickers 16
EPSON Photo
Quality Ink Jet
Card
A4 S041106 Allows you to cut to any shape
you want after printing and
peel off your printout and stick
it on most surfaces.
A6 S041144 This media is divided into 16
small stickers, and you can
peel off your printout and stick
on most surfaces.
A6 S041054 This size of photo quality ink jet
cards enables you to mail you
family and friends impressive
greeting cards.
About the cleaning sheet
The Cleaning Sheet packaged with some special types of paper
cannot be used with the paper feeding mechanism of this printer.
Forcing it into the printer can adversely affect the paper feeding
mechanism.
Precautions on paper storage
Store paper flat where it is not exposed to high temperature,
❏
high humidity, and direct sunlight.
2
Do not let the paper get wet.
❏
Keep unused paper in its original packaging and store it in a
❏
cool, dry place to avoid a decline in quality.
Print area
The print area size varies depending on the Paper Size and
FORMAT Layout setting on the display. See “Making Settings on
the Display” on page 2-8.
Direct Printing Introduction
2-7
Page 31

Making Settings on the Display
This section explains the PAPER, FORMAT, SELECT, and SET
settings on the display.
P
1
2
3
4
5
6
7
8
A
P
E
R
F
O
R
M
A
T
S
E
L
E
C
T
S
E
T
Type
Size
Layout
Photo No.
Copies
Quality
Enhancement
Size
Photo
Paper
4x6
A6
All
Copies
High
On
When selecting the All mode
1. Type
This item is for selecting the type of paper to print on.
Photo Paper: Print on EPSON Photo Paper.
Ink Jet Paper: Print on EPSON Photo Quality Ink Jet Card,
EPSON 360 dpi Ink Jet Paper, or EPSON Photo
Quality Glossy Paper.
Plain Paper: Print on plain paper.
Note:
When you select
Sticker
for FORMAT Layout, you cannot select
PAPER Type.
2. Size
This item is for selecting the size of paper to print on.
A6: Print on A6 paper. (105 x 148 mm)
2-8
Direct Printing Introduction
Page 32

4x6: Print on 4 x 6 inch paper. (114 x 175 mm)
A4: Print on A4 paper. (210 x 297 mm)
3. Layout
This item is for selecting the layout of the photoprint. The settings
available depend on the size of paper selected.
Note:
When you press the
Index
button, the index symbol appears on the
display.
: Print a photograph across the entire print area
of the selected paper.
: Print a photograph on the top half of an A4 size
sheet of paper.
: Print a photograph twice or two different
photographs on a single sheet of A4 paper.
: Print a photograph four times or four different
photographs on a single sheet of A4 paper.
: Print a photograph three times or three
different photographs on a single sheet of A4
paper.
2
: Print a photograph eight times or eight
different photographs on a single sheet of A4
paper.
: Print on EPSON Photo Stickers 16.
Crop
Marks
: Print crop marks to tear off photos. This setting
is available only when you select A4 for Size
and
4 x 6, L
Index
: When you press the
, or
Card
for Layout.
button, the index
Index
simbol appears.
Direct Printing Introduction
2-9
Page 33

4. Size
The FORMAT Size setting is automatically selected depending on
the PAPER Size and FORMAT Layout settings.
FORMAT
Size
4 L N /A N /A F u ll s iz e
2L N/A N/A 2 images*
4 x6 N / A F u ll s iz e
LFull size
EFull size
Card Top half
A6 4x6 A4
Approx.
131 x 93 mm
Approx.
114 x 78 mm
Approx.
93 x 59 mm
PAPER Size
Approx.
158.4 x 107.6 mm
Fu ll si ze
Approx.
131 x 93 mm
Top half
Approx.
107.6 x 78 mm
Top half
Approx.
93 x 59 mm
Approx.
258 x 182 mm
Approx.
182 x 131 mm
2 images*
Approx.
156 x 106 mm
4 images*
Approx.
131 x 93 mm
3 im ag es
Approx.
114 x 78 mm
8 images*
Approx.
93 x 59 mm
Sticker 16
* Crop Marks setting is available.
2-10
Direct Printing Introduction
images
Approx.
27 x 20 mm
N/A N/A
Page 34

Note:
❏
The print area sizes noted above specify the size of a single image.
❏
The print area size for EPSON Photo Stickers 16 or 4 x 6 Photo
Paper is the size before peeling off or removing the perforated
margines. After peeling off or removing the perforated margins the
size of the printed image is slightly smaller.
❏
When you set the Trimming setting to 1 (no trimming), the Print
area size varies depending on the digital camera you use.
For information on the trimming setting, see “Changing the
Internal Settings” on page 3-22.
5. Photo No.
The total number (1 – 199) of photographs on the PC card is
indicated when the printer is in the All, Camera, or Index mode.
In the One Frame mode, the selected photo number is indicated.
In the Range mode, the first photo number is indicated.
Note:
In the All, Camera, or Index mode, if the loaded PC card has more than
199 photographs in it, “199” flashes next to Photo No. on the display.
2
6. Copies
This item is for specifying the number (1 – 100) of copies to print
out. In the Range mode, the last photo number is indicated.
Note:
In the One Frame mode, the maximum number of copies that can be
specified differs depending on the maximum number of photographs that
can be laid out on a single sheet of paper.
Example) Layout size "E": 3, 6, 9, 12, 15 ...
Layout size "Card": 8, 16, 24, 36, 32, 40 ...
Direct Printing Introduction
2-11
Page 35

7. Quality
This item is for selecting the quality of photoprint.
Note:
The Quality settings are available depending on the PAPER Type
settings.
High: Prints with a good balance between speed,
quality, and cost.
Draft: Prints fast, saving ink. This setting is good for
draft-printing.
Super High: Prints slow but with the highest quality.
8. Enhancement
This item turns image enhancement on or off.
On : The image imported from the PC card is automatically
enhanced. Printing requires more time, but an image
that has unsuitable contrast, saturation, and color
balance is enhanced to ensure high picture quality.
Off: Enhancement is off.
Selecting the Input Switch
Note:
You cannot use the photo printing function at the same time you are
using the printer with a Macintosh. Select the proper setting with the
Input
switch and then print.
Printing photos with a PC card
When using a PC card to print photos taken with a digital camera,
set the
2-12
Direct Printing Introduction
switch to INT.
Input
Page 36

1. Turn the printer off and open the side cover.
2. Set the
3. Turn the printer on.
Printing from the Macintosh
To connect to a Macintosh computer and print, set the
switch to EXT.
1. Turn the printer off and open the side cover.
2. Set the
switch to INT.
Input
switch to EXT.
Input
2
Input
3. Turn the printer on.
Direct Printing Introduction
2-13
Page 37

2-14
Direct Printing Introduction3Printing Photo Directly with PC Cards
Page 38

Chapter 3
Printing Photo Directly with PC Cards
Loading Paper . . . . . . . . . . . . . . . . . . . . . . . . . . . . . . . . . . . . . . . . . . . 3-2
Loading A4 paper. . . . . . . . . . . . . . . . . . . . . . . . . . . . . . . . . . . .3-2
Loading A6 paper. . . . . . . . . . . . . . . . . . . . . . . . . . . . . . . . . . . .3-5
Loading EPSON Photo Paper (4 x 6 inch). . . . . . . . . . . . . . . .3-7
Loading PC Cards . . . . . . . . . . . . . . . . . . . . . . . . . . . . . . . . . . . . . . . .3-10
Loadable storage media. . . . . . . . . . . . . . . . . . . . . . . . . . . . . . . 3-10
Loading PC cards . . . . . . . . . . . . . . . . . . . . . . . . . . . . . . . . . . . . 3-11
Ejecting PC cards . . . . . . . . . . . . . . . . . . . . . . . . . . . . . . . . . . . .3-12
Printing All Photographs on the PC Card . . . . . . . . . . . . . . . . . . . .3-13
Printing Index Print. . . . . . . . . . . . . . . . . . . . . . . . . . . . . . . . . . . . . . .3-16
Printing Selected Photos. . . . . . . . . . . . . . . . . . . . . . . . . . . . . . . . . . .3-18
Printing a Selected Range of Photos . . . . . . . . . . . . . . . . . . . . . . . . .3-20
Changing the Internal Settings . . . . . . . . . . . . . . . . . . . . . . . . . . . . .3-22
Restoring the Internal settings to default . . . . . . . . . . . . . . . .3-24
3-1
Page 39

Loading Paper
Loading A4 paper
When you load A4 size plain paper and the following EPSON
special media, follow the steps below.
Note:
Read the instruction sheets packed with your EPSON special media
before loading paper.
EPSON 360 dpi Ink Jet Paper
EPSON Photo Quality Ink Jet Paper
EPSON Photo Paper
EPSON Photo Quality Glossy Paper
EPSON Photo Quality Self Adhesive Sheet
1. Pull out the paper support.
3-2
Printing Photo Directly with PC Cards
Page 40

2. Lower the output tray and slide out the extension.
Pressing the part of the output tray will release it from the
printer.
3. Fan a stack of paper; then tap it on a flat surface to even the
edges.
3
Printing Photo Directly with PC Cards
3-3
Page 41

4. With the print side up, load the paper resting it against the
right edge guide and slide it into the sheet feeder.
If the support sheet is necessary, set the sheet first. See the
table below.
Some media such as
support sheet
glossy films and
transparencies have the
corner cut as shown in the
illustration to identify the
correct loading direction.
3-4
Paper Max. sheets Print side Support*
Plain paper Up to
EPSON 360 dpi
Ink Jet Paper
EPSON Photo
Quality Ink Jet
Paper
EPSON Photo
Paper
EPSON Photo
Quality Glossy
Paper
EPSON Photo
Quality Self
Adhesive
Sheet
* Use Loading Support Sheet is packaged with your EPSON special paper.
d
mark — Not
d
mark Whiter side Not
Up to
20 sheets
including
support sheet
1 sheet at a
time
Glossier side Required
See instruction
sheet packed
with the paper
sheet
required
required
Not
required
Printing Photo Directly with PC Cards
Page 42

5. Slide the left edge guide against the paper.
Note:
Set the left edge guide flush against the paper or the paper will not
be properly fed into the printer.
Loading A6 paper
When you load A6 size plain paper and the following EPSON
special media, follow the steps below.
3
Note:
Read the instruction sheets packed with your EPSON special media
before loading paper.
EPSON Photo Quality Ink Jet Card
EPSON Photo Stickers 16*
* Before loading Photo Stickers 16, also see “Loading EPSON Photo Stickers 16”
on page 3-7.
Printing Photo Directly with PC Cards
3-5
Page 43

1. Shuffle the paper several times and flatten them as shown
below.
2. With the print side up, set the paper against the right edge
guide and slide it into the sheet feeder.
If the support sheet is necessary, set the sheet first. See the
table below.
printable side
3-6
Cards Max. sheets Support sheet*
EPSON Photo Quality Ink
Jet Card
EPSON Photo Stickers 16 1 sheet at a time Required
* Use Loading Support Sheet is packaged with your EPSON special paper.
30 sheets including the
support sheet
Required
Printing Photo Directly with PC Cards
Page 44

3. Slide the left edge guide against the edge of the paper.
Note:
Set the left edge guide flush against the paper or the paper will not
be properly fed into the printer.
Loading EPSON Photo Stickers 16
To load photo sticker sheets in the printer, set the Loading
Support Sheet included in the sticker package into the sheet feeder
first. Then, load one sheet at a time in the feeder with the print
side up and the cut corner to the upper right side.
Loading EPSON Photo Paper (4 x 6 inch)
EPSON Photo Paper (S041134) is perforated around the margins
so you can trim your printed images to look like 4
152 mm) photographs. Note the following when using this paper.
6 inch (102
×
3
×
Printing Photo Directly with PC Cards
3-7
Page 45

Load the paper printable side up with the perforated margins
❏
positioned as shown in the illustration.
loading position
Use flat, undamaged paper. If the paper or the Loading
❏
Support Sheet is curled, flatten it before loading to avoid
paper feeding problems.
Always place the included Loading Support Sheet under the
❏
stack of Photo Paper, but do not print on it.
❏
❏
3-8
You can load up to 19 sheets of Photo Paper into the sheet
feeder.
Select
Photo Paper
for PAPER Type and
for PAPER Size
4X6
on the display.
Printing Photo Directly with PC Cards
Page 46

Note:
The outside edge of your image might be cut off when you remove
the perforated margins.
17 mm (0.67 in.)
6 mm (0.24 in.)
3 mm (0.12 in.)
3 mm 6 mm
Cut or tear the paper at the perforation only after printing. Do
❏
trimmed size
printed image size
not cut, tear, or fold the paper before printing.
3
Printing Photo Directly with PC Cards
3-9
Page 47

Loading PC Cards
Loadable storage media
Digital photographs are stored either in the digital camera
memory or in a card-type memory which can be loaded and
unloaded from the camera. The latter is referred to as “storage
media.” Storage media applicable to this printer are shown below.
PC card (PCMCIA Type II)
CompactFlash card SmartMedia
Note:
❏
❏
❏
❏
3-10
For SmartMedia or CompactFlash cards, load the media into a PC
card adapter before loading it into the printer slot.
Use the PC card adapter for CompactFlash packed with your printer.
The PC card adapter for SmartMedia is available on the market.
Some storage media and PC card adapters are not compatible with
IP-100. Contact your EPSON dealer for detailed information on the
availability of the storage media and PC card adapters.
Printing Photo Directly with PC Cards
Page 48

Loading PC cards
Load the PC card into the PC card slot as follows:
1. Insert the storage media into the PC card adapter.
For CompactFlash cards
3
For SmartMedia
2. Load the PC card into the printer’s card slot.
Load the card with the
Caution:
c
Slide the PC card horizontally into the slot with the insert
mark up. Forcing the card into the slot any other way can
damage the printer and/or card.
Printing Photo Directly with PC Cards
mark up.
u
3-11
Page 49

Processing • • •
Ejecting PC cards
1. Check that the Processing light is not on or flashing.
Caution:
Do not eject PC cards or turn off power to the printer while
c
the printer is processing (reading or writing) data. Data can
be lost.
2. Press the button as shown to eject the PC card.
3-12
Caution:
Do not remove or insert the CompactFlash or SmartMedia
c
card while the PC card adapter is in the slot. Data can be lost.
Printing Photo Directly with PC Cards
Page 50

3. The PC card will pop out far enough for you to pull it out.
Printing All Photographs on the PC Card
All of the photographs on the PC card can be printed out in a
specified number of copies. This is the default mode when a PC
card is loaded into the printer.
Note:
Before starting printing, set paper and a PC card containing digital
photographs in the printer.
See “Loading Paper” on page 3-2.
See “Loading PC Cards” on page 3-10.
3
1. Press the
button to select the All mode.
All
The All light turns on and
the display.
appears next to Photo No. on
All
S
E
L
E
C
T
Photo No.
Copies
All
Copies
Printing Photo Directly with PC Cards
3-13
Page 51

Note:
As soon as you load the PC card, if the All light starts flashing and
Camera
appears next to Photo No., the Photo No., Copies, and
other settings are already set on the camera side. For more
information, see “Printing with the camera’s settings” on page 3-15.
2. Press the
Change Settings
button to set the number of copies
you want to print.
3. Press the
Menus
S
Photo No.
E
L
E
C
Copies
T
buttons until the cursor moves to the item
All Camera
you want to set.
P
Type
A
P
E
Size
R
When selecting paper size
Photo
Paper
A6
4x6
Note:
The Size setting in the PAPER menu determines what Layout
setting in the FORMAT menu is available, so you should always
make the Size setting first.
4. Press the
Change Settings
buttons to make the settings.
Copies
3-14
For details on the settings, see “Making Settings on the
Display” on page 2-8.
P
Type
A
P
E
Size
R
When selecting paper size
Photo
Paper
A6
4x6
Note:
Photo No. setting in the SELECT menu is not available.
Printing Photo Directly with PC Cards
Page 52

5. Press the
When you make the above settings, the photos will be printed
one by one on the paper. If you want to print all the photos
on a single sheet, see “Printing all photos on a single sheet”
on page 3-15.
Start Print
button.
To stop printing
To stop printing in progress, press the
Cancel
button.
Printing all photos on a single sheet
Y ou c an ma ke a lb um - re ad y pr in t s. Lo ad a n A 4 s i ze sh e et of p ap er ,
and select A4 for PAPER Size and either
or
Card
details on settings, see “Making Settings on the Display” on page
2-8.
for Layout. Then, press the
2L/4x6
Start Print
,
L
button. For
Printing with the camera’s settings
It is possible to print photos by setting Photo No. and (the number
of) Copies on the camera side in advance. In this Camera mode,
the All light flashes and
the display as soon as you load the PC card into the printer’s card
slot. Simply pressing the
details on the Camera mode, see the user’s manual for your digital
camera.
Camera
Start Print
appears next to Photo No. on
button starts printing. For
3
,
,
E
Printing Photo Directly with PC Cards
3-15
Page 53

Printing Index Print
All photographs on a PC card can be printed out as an index on
a single sheet of paper in the specified number of copies. The
Index mode is subdivided into super high and draft modes.
Note:
Before starting printing, set paper and a PC card containing digital
photographs in the printer.
See “Loading Paper” on page 3-2.
See “Loading PC Cards” on page 3-10.
1. Press the
button once or twice to select the Index print
Index
mode; Draft Index mode or Normal Index mode.
When Draft Index mode is selected, the Index light will be
flashing and Draft will be shown next to Quality on the
display. When Normal mode is selected, the Index light will
be on and High or Super High will be shown on the display.
You can select High or Super High for the Quality setting.
E
C
Copies
T
Quality
2. Press the
Change Settings
S
E
Enhancement
T
button to set the number of copies
Draft
you want to print.
3. Press the
Menus
buttons until the cursor moves to the item
you want to set.
Note:
❏
The Layout setting in the FORMAT menu and Print No. in the
SELECT menu are not available to be selected.
Copies
3-16
Printing Photo Directly with PC Cards
Page 54

❏
Quality and Enhanced settings are changeable only when the
Normal Index mode is selected.
4. Press the
Change Settings
P
Type
A
P
E
Size
R
When selecting paper size
buttons to make settings.
Photo
Paper
A6
4x6
For details on the settings, see “Making Settings on the
Display” on page 2-8.
5. Press the
Start Print
button.
P
Type
A
P
E
Size
R
When selecting paper size
Photo
Paper
A6
4x6
All photographs on the PC card are printed out as an index
on a single sheet of paper in the specified number of copies.
Using the Draft Index mode
The Draft Index mode allows fast printing, so that you can check
the photo numbers in the PC card quickly.
3
Using the Normal Index mode
In the Normal Index mode you can select
High
Quality. Use the Normal Index mode for your album.
Printing Photo Directly with PC Cards
or
Super High
for
3-17
Page 55

Printing Selected Photos
It is possible to select one specific photograph from the PC card
and print it out in a specified number of copies.
When you want to print with a different photo in the same PC
card continuously, see “Printing continuously different photos”
on page 3-20.
Note:
Before starting printing, put some paper and a PC card containing
digital photographs in the printer.
See “Loading Paper” on page 3-2.
See “Loading PC Cards” on page 3-10.
1. Press the
button to select the One Frame mode.
One
The One light turns on.
One
2. Press the
Change Settings
buttons to select the photo
number.
S
E
L
E
C
T
Photo No.
Copies
Photo No.• • •
Note:
This printer sorts photos in chronological order. The photo numbers
may be different from the storage numbers in the digital camera.
Print the index in advance to see the correct photo number.
Copies
3-18
Printing Photo Directly with PC Cards
Page 56

3. Press the
you want to set.
Menus
buttons until the cursor moves to the item
P
Type
A
P
E
Size
R
When selecting paper size
Photo
Paper
A6
4x6
Note:
The Size setting in the PAPER menu determines what Layout
setting in the FORMAT menu is available, so you should always
make the Size setting first.
4. Press the
Change Settings
buttons to make the settings.
For details on the settings, see “Making Settings on the
Display” on page 2-8.
5. Press the
Start Print
button.
P
Type
A
P
E
Size
R
When selecting paper size
Photo
Paper
A6
4x6
The selected photograph is printed out.
3
Printing a selected photograph multiple times on a single
sheet
Load an A4 size sheet of paper, and select A4 for PAPER Size and
either
the
Start Print
2L/4x6
,
,
L
, or
E
Card
for Layout. Then, press
button. For details on settings, see “Making Settings
on the Display” on page 2-8.
Printing Photo Directly with PC Cards
3-19
Page 57

Printing continuously different photos
To print different photos in the same PC card continuously, follow
the instructions below.
Load the same size paper as before.
❏
While printing, repeat steps 2 to 5 as described on page 3-18.
❏
Printing a Selected Range of Photos
It is possible to select a continuous range of photographs on the
PC card and print them one after another.
Note:
Before starting printing, put some paper and a PC card containing
digital photographs in the printer.
See “Loading Paper” on page 3-2.
See “Loading PC Cards” on page 3-10.
1. Press the
Range
button to select the Range mode.
The Range light turns on.
Range
2. Make sure that the cursor is positioned at the Photo No.
setting in the SELECT menu, then press the
Change Settings
buttons to select the photo number for the From.
Photo No.• • •
3-20
S
Photo No.
E
L
E
C
Copies
T
Printing Photo Directly with PC Cards
From
To
Page 58

3. Press the
press the
number for the To.
Menus
button to move the cursor to Copies, then
Change Settings
buttons to select the photo
S
E
L
E
C
T
Photo No.
Copies
Photo No.• • •
Note:
This printer sorts photos in chronological order. The photo numbers
may be different from the storage numbers in the digital camera.
Print the index in advance to see the correct photo numbers.
4. Press the
Menus
buttons until the cursor moves to the item
you want to set.
Note:
The Copies setting in the SELECT menu is not available.
5. Press the
Change Settings
P
Type
A
P
E
Size
R
When selecting paper size
buttons to make the settings.
Photo
Paper
A6
4x6
From
To
3
For details on specific items, see “Making Settings on the
Display” on page 2-8.
P
Type
A
P
E
Size
R
When selecting paper size
Photo
Paper
A6
4x6
Printing Photo Directly with PC Cards
3-21
Page 59

6. Press the
Start Print
button.
The photographs in the selected range are printed out one
after another.
Printing the selected range of photographs on a single sheet
Load an A4 size sheet of paper, and select A4 for PAPER Size and
either
the
Start Print
2L/4x6
,
,
L
, or
E
Card
for Layout. Then, press
button. For details on settings, see “Making Settings
on the Display” on page 2-8.
Changing the Internal Settings
You can change the internal settings to trim photo images, print
an index with printing date and time, adjust the print start
position, and turn the voice guidance on or off.
Follow these steps to change the internal settings:
1. Press the
2. Press the
3-22
Frame
and
buttons at the same time to enter
Filter
the Internal Settings mode.
The Frame and Filter lights begin flashing and the
Set No.
Printing Photo Directly with PC Cards
appear on the display. The cursor is at
Change Settings
No. Item
1Trimming
2 Index date and time
3 Print start position, vertical
4 Print start position, horizontal
5 Voice guidance
buttons to select the item number.
No.
No.
and
Page 60

3. Press the
Menus
buttons until the cursor moves to Set No.
next to Copies on the display.
4. Press the
Change Settings
buttons to change the setting for
the selected item. For details about the settings, see the table
below.
No. Item Set No. Setting
1 Trimming 0 Trims the photo image to fit in
1 Reduces the photo image to fit
Note:
If the horizontal to vertical ratio of the photo size exceeds
2 : 1, the printer prints it with no trimming, regardless of the
Trimming setting.
2Index
date and
time
3Print start
position,
vertical
0 Prints the index with printing
1 Prints the index without printing
-5 to 5 Adjusts the vertical print start
the print area of the paper.
in the print area without
trimming.
date and time.
date and time.
position in 0.5 mm increments:
max. 2.5 mm. Select negative
values to move the position up
or positive values to move it
down.
This setting is valid only for A4
and stickers.
3
4Print start
position,
horizontal
-5 to 5 Adjusts the horizontal print start
position in 0.5 mm increments:
max. 2.5 mm. Select negative
values to move the position left
or positive values to move it
right.
This setting is valid only for A4
and stickers (EPSON Photo
Stickers 16).
Printing Photo Directly with PC Cards
3-23
Page 61

No. Item Set No. Setting
5Voice
guidance
0 Helps you with voice guidance
as well as the button operation
sound.
1 Helps you only with the button
operation sound.
Note:
❏
When you press the
Cancel
button in the Internal Settings
mode, the changed settings are all ignored, and the last settings
are valid.
❏
When you press any buttons other than the
button, or turn off the printer while making the Internal
settings, the printer will save the settings you made and exit the
Internal Settings mode.
5. Press the
Start Print
button.
The Frame and Filter lights turn off. The changed settings are
retained even after the printer is turned off.
Restoring the Internal settings to default
Change Settings
Enter the Internal Settings mode pressing the
buttons at the same time, then hold down the
six seconds or more until you hear a sound.
3-24
Printing Photo Directly with PC Cards
Frame
Cancel
and
Filters
button for
Page 62

Chapter 4
Using Filters and Frames
Printing Photos with Special Effects . . . . . . . . . . . . . . . . . . . . . . . . . 4-2
Printing Photos with Frames . . . . . . . . . . . . . . . . . . . . . . . . . . . . . . .4-4
Printing a list of frames . . . . . . . . . . . . . . . . . . . . . . . . . . . . . . .4-7
4
Using Filters and Frames
4-1
Page 63

Printing Photos with Special Effects
You can manually adjust the image of your photographs.
1. Press the
Filter
button.
The Filter light starts flashing and
Photo No. on the display.
Note:
❏
Pressing the
Filter
button allows you to select the effects and
turn the mode on and off.
❏
2. Press the
For effect samples, see
Filter
The
button does not work in the Draft Index mode.
Change Settings
Filters Guide
appears next to
• • •
S
E
L
E
C
T
Photo No.
Copies
Effect No.
Effect No.
buttons to select an Effect No.
.
S
Photo No.
E
L
E
C
Copies
T
Effect No.
• • •
4-2
Using Filters and Frames
Page 64

No. Effect No. Effect
0 Off 17 Monotone yellow–green
1 High contrast 18 Monotone yellow
2 Darker 19 Monotone brown
3 Slightly darker 20 Monotone pink
4 Slightly brighter 21 Monotone orange
5 Brighter 22 Monotone red
6 Sharp 23 Monotone purple
7 Sharper 24 Art color–punk
8 Vivid 25 Art color–metal
9 More vivid 26 Art color–earth
10 Sepia 27 Cooler colors
11 Monochrome 28 Warmer colors
4
12 Cooler
monochrome
13 Warmer
monochrome
14 Monotone blue 31 Narrower aspect
15 Monotone sky blue 32 Wider aspect
16 Monotone green 33 Digital color noise
For portrait orientation:
No. 31 makes images wider.
No. 32 makes images narrower.
29 Lighter skin tone
30 Darker skin tone
reduction
Note:
❏
The selected Effect No. is retained until the printer is turned off.
❏
If you press any buttons other than the
Change Settings
buttons while selecting the Effect No., the current number
becomes valid and the printer turns on the Effect mode.
Using Filters and Frames
4-3
Page 65

3. Press the
The Filter light turns on to indicate the Effect mode is on.
Note:
If you press the
the current Effect No. being retained.
4. Load paper and print photos as described in Chapter 3,
“Printing Photo Directly with PC Cards”.
Printer prints photos with the selected effect.
Note:
In the Effect mode, you cannot set Quality.
button again.
Filter
Cancel
button, the Effect mode is turned off with
Turning off the Effect mode
Press the
No. to 0.
button to turn off the Effect light or set the Effect
Filter
Printing Photos with Frames
With the optional PC card including colorful frames, photographs
can be printed out as miniature stickers inside colorful frames.
Note:
This option is not available in some districts. Contact your EPSON
dealer.
To print photos with the frames included in the optional PC card,
you may need A6 size paper divided into 16 small stickers. You
can use EPSON Photo Stickers 16 (S041144).
4-4
Using Filters and Frames
Page 66

1. Load the optional PC card which includes colorful frames into
the printer’s card slot.
The Frame light automatically starts flashing and
appears next to Copies on the display.
If you do not see
Frame
Frame No.
, press the
S
Photo No.
E
L
E
C
Copies
T
Frame
Frame No.• • •
button.
Note:
Pressing the
Frame
button allows you to select frames and turn the
mode on and off.
Frame No.
4
2. Press the
Change Settings
buttons to select your favorite
frame No.
For information on the frames and their No. , see instructions
packed with your option, or print a list of frames as described
in “Printing a list of frames” on page 4-7.
S
Photo No.
E
L
E
C
Copies
T
Frame No.• • •
Using Filters and Frames
4-5
Page 67

Note:
❏
The selected Frame No. is retained until the printer is turned off.
❏
If you press any buttons other than the
buttons while selecting the Frame No., the current number
becomes valid and the printer turns on the Frame mode.
3. Press the
The Frame light turns on to indicate the Frame mode is on.
Note:
❏
❏
4. Eject the optional PC card you inserted in step 1 from the
printer’s card slot and load the PC card with the stored
photograph.
5. Load A6 size paper divided into 16 small stickers.
6. Select the photo No. you want to print with the selected
frames and print it.
Frame
Type, Size, and Layout are automatically changed to the Sticker
mode.
If you press the
with the Frame No. being retained.
button again.
Cancel
button, the Frame mode is turned off
Change Settings
4-6
Note:
If photos are not printed within the stickers, adjust the print start
position. For detailes, see “Changing the Internal Settings” on page
3-22.
Using Filters and Frames
Page 68

Printing a list of frames
You can print the list of frames stored in the optional PC card
which includes frames.
1. Load the optional PC card including colorful frames in the
card slot.
2. Set A6 paper in the sheet feeder.
3. Press the
The Index and Frame lights start flashing.
4. Press the
All frames on the card are printed out. (Multiple selection is
not possible.)
button.
Index
Start Print
button.
4
Using Filters and Frames
4-7
Page 69

4-8
Using Filters and Frames
Page 70

Chapter 5
Maintenance and Transportation
Replacing Ink Cartridges . . . . . . . . . . . . . . . . . . . . . . . . . . . . . . . . . .5-2
Checking the Print Head Nozzles. . . . . . . . . . . . . . . . . . . . . . . . . . .5-7
Cleaning the Print Head . . . . . . . . . . . . . . . . . . . . . . . . . . . . . . . . . . .5-9
Aligning the Print Head . . . . . . . . . . . . . . . . . . . . . . . . . . . . . . . . . . .5-10
Cleaning the Printer . . . . . . . . . . . . . . . . . . . . . . . . . . . . . . . . . . . . . .5-12
Transporting the Printer. . . . . . . . . . . . . . . . . . . . . . . . . . . . . . . . . . . 5-13
5
Maintenance and Transportation
5-1
Page 71

Replacing Ink Cartridges
The printer’s indicator lights will inform you when it is time to
obtain a replacement ink cartridge and when it is time to replace
an empty cartridge.
This table describes the status of the lights on your printer and
the actions you need to take.
o
c
Note:
If the ink runs out, you cannot continue printing until you replace it,
even though the other ink cartridge still contains ink.
f
= on,
= flashing
Lights Action
f B
o B
f A
o A
Caution:
❏
EPSON recommends the use of genuine EPSON ink
cartridges. Other products not manufactured by EPSON
may cause damage to your printer not be covered by
EPSON's warranties.
❏
Leave the old cartridge installed in the printer until you have
obtained a replacement. Otherwise, ink remaining in the
print head nozzles may dry out.
Obtain a replacement black ink cartridge
(S020093).
Replace the empty black ink cartridge.
Obtain a replacement color ink cartridge
(S020110).
Replace the empty color ink cartridge.
5-2
Maintenance and Transportation
Page 72

To replace an ink cartridge using the printer’s control panel,
follow these steps.
1. Make sure the printer is on. The Power light should be on, but
not flashing. (Determine which cartridge needs to be replaced
as indicated by the
2. Lower the output tray at the front of the printer, then open
the printer cover.
Black Ink and
B
Color Ink light.)
A
3. Hold down the
until the print head moves left slightly to the cartridge
replacement position and the Power light begins flashing.
Caution:
c
Note:
If you press the
the
cleaning the print head.
Do not move the print head by hand. Always use the
Maintenance
damage the printer.
B
Black Ink and
R
Maintenance
button to move it. Otherwise you may
R
Maintenance
A
Color Ink lights are off, the printer starts
button for three seconds
button for three seconds when
R
5
Maintenance and Transportation
5-3
Page 73

4. Lift up the clamp that holds the cartridge you want to replace
as far as it will go. The cartridge will rise partly out of the
cartridge holder.
The illustration shows color
ink replacement. To replace
black ink, lift up only the
smaller clamp on the left.
Caution:
Once you open the ink cartridge clamp, the ink cartridge
c
becomes unusable and cannot be reinstalled even if ink
remains.
5. Lift the cartridge out of the printer and dispose of it properly.
Do not take the used cartridge apart or try to refill it.
Warning:
If ink gets on your hands, wash them thoroughly with soap
w
and water. If ink gets into your eyes, flush them immediately
with water.
5-4
Maintenance and Transportation
Page 74

6. Remove the ink cartridge from its protective bag. Next,
remove only the yellow tape seal from the cartridge.
Black ink cartridge Color ink cartridge
Caution:
❏
c
7. Place the ink cartridge gently into the cartridge holder with
the label on the cartridge face up. Do not press down on the
cartridge.
You must remove the yellow tape seal from the cartridge.
Leaving the tape on when you install the cartridge will
permanently damage it.
❏
Do not remove the blue portion of the tape seal from the
top of the cartridge; otherwise, the cartridge may become
clogged and cannot print.
❏
Do not remove the tape seal from the bottom of the
cartridge; otherwise, ink will leak.
The illustration shows color
ink replacement. To replace
black ink, install the smaller
cartridge on the left.
5
Maintenance and Transportation
5-5
Page 75

8. Press the ink cartridge clamp down until it locks in place.
The illustration shows color
ink replacement. To
replace black ink, press
down the smaller clamp on
the left.
Caution:
Once you install the cartridges, do not open their clamps
c
again until you replace the ink cartridges. Otherwise, the
cartridges may become unusable.
9. Press the
print head and begins charging the ink delivery system. This
process takes about 1 minute to complete. When the ink
charging process is finished, the printer returns the print head
to its home position and the Power light stops flashing.
c
10. Close the printer cover.
5-6
Maintenance and Transportation
R
Caution:
The Power light continues to flash while the printer performs
the ink charging operation. Never turn off the printer while
this light is flashing. Doing so can result in incomplete
charging of ink.
Maintenance
button. The printer moves the
Page 76

Checking the Print Head Nozzles
If you find that the printed image is unexpectedly faint or dots in
the printed image are missing, you may be able to solve these
problems by checking the print head nozzles with the printer’s
control panel buttons.
Note:
You can also check the print head nozzles from your computer with the
Nozzle Check utility in the printer software.
1. Load A4 or wider paper in the sheet feeder.
2. Hold down the
button until the printer is turned on and the print head starts
moving. Then release both buttons.
E
Load/Eject
button and press the
P
Power
5
Maintenance and Transportation
5-7
Page 77

The printer prints a nozzle check pattern. Here is a typical
printout:
The above sample is in black and white, but the actual test prints in color
(CMYK).
3. Press the
P
Power
button to turn off the printer after it
finishes printing the nozzle check pattern.
If the nozzle check page does not print satisfactorily, for
example, if any segment of the printed lines is missing, there
is a problem with the printer. This could be a clogged ink
nozzle or a misaligned print head. See the next section for
details on cleaning the print head. For information on aligning
the print head, see “Aligning the Print Head” on page 5-10.
5-8
Maintenance and Transportation
Page 78

Cleaning the Print Head
If you find that the printed image is unexpectedly faint or dots in
the printed image are missing, you may be able to solve these
problems by cleaning the print head with the printer’s control
panel button, which ensures that the nozzles are delivering ink
properly.
Note:
❏
Print head cleaning uses both color and black ink. To avoid wasting
ink, clean the print head only if print quality declines.
❏
Check the print head nozzles to confirm that the print head needs to
be cleaned. This saves ink.
5
❏
When the
cannot clean the print head. Replace the appropriate ink cartridge
first.
❏
You can also clean the print head from your computer with the Head
Cleaning utility in the printer software.
B
Black Ink or
A
Color Ink light is flashing or on, you
1. Make sure that the Power light is on and that both the
Ink and
2. Hold down the
The printer starts cleaning the print head and the Power light
begins flashing. Print head cleaning takes about one minute
to complete.
Note:
If the
clean the head, and this operation will start the ink cartridge
replacement procedure. If you do not want to replace an ink cartridge
at this time, press the
print head to its home position.
Color Ink lights are off.
A
R
Maintenance
B
Black Ink or
A
Color Ink light is flashing or on, you cannot
R
button for three seconds.
Maintenance
Maintenance and Transportation
button to return the
Black
B
5-9
Page 79

Caution:
Never turn off the printer while the Power light is flashing.
c
Doing so may damage the printer.
3. When the Power light stops flashing, print a few lines from a
document to confirm that the head is clean and to reset the
cleaning cycle.
If print quality hasn’t improved after repeating this procedure
four or five times, one or both of your ink cartridges may be old
or damaged and may need to be replaced. To replace an ink
cartridge before it is empty, see “Replacing an Old or Damaged
Ink Cartridge” in the online
If the print quality still has not improved after replacing the ink
cartridges, contact your dealer.
User’s Guide
.
Aligning the Print Head
If you notice a misalignment of vertical lines, you may be able to
solve this problem with the printer’s control panel buttons.
Note:
You can also align the print head from your computer using the Print
Head Alignment utility in your printer software.
Follow these steps to align the print head with the buttons:
1. Hold down the
to turn the printer on. After the All and Index lights begin
flashing, release the
5-10
Maintenance and Transportation
button and press the
Index
button.
Index
P
Power
button
Page 80

2. Press the
Change Settings
button to select 10 next to Photo
No. on the display.
S
Photo No.
E
L
E
C
Copies
T
3. Load A4 or wider paper in the sheet feeder.
4. Press the
Start Print
button to print the alignment sheet.
5. Find the number of the correctly aligned lines. If all alignment
patterns are incorrect, choose the best one.
6. Press the
Menus
button until the cursor moves to Copies on
the display.
S
Photo No.
E
L
E
C
Copies
T
7. Press the
Change Settings
buttons to select the number you
find for the correctly aligned lines.
5
S
Photo No.
E
L
E
C
Copies
T
Maintenance and Transportation
5-11
Page 81

8. Press the
After the print head alignment is set, the number next to
Copies changes to 0 automatically.
9. Press the
If you could not find the best alignment pattern at step 5, repeat
the procedures from step 3 until you obtain the best result.
Start Print
P
Power
button.
button to turn the printer off.
Cleaning the Printer
To keep your printer operating at its best, you should clean it
thoroughly several times a year.
1. Make sure the printer is turned off and all the printer’s lights
are off. Then unplug the power cord.
2. Remove any paper from the sheet feeder.
3. Use a soft brush to carefully clean away all dust and dirt.
4. If the outer case or the inside of the sheet feeder is dirty, clean
it with a soft, clean cloth dampened with mild detergent. Keep
the printer cover closed to prevent water from getting inside.
5. If the inside of the printer accidentally gets soiled with ink,
wipe it off with a damp cloth.
Warning:
w
5-12
Be careful not to touch the gears inside the printer.
Maintenance and Transportation
Page 82

Caution:
❏
c
Never use alcohols or thinners to clean the printer; these
chemicals can damage the components as well as the case.
❏
Be careful not to get water on the printer mechanism or
electronic components.
❏
Do not use a hard or abrasive brush.
❏
Do not spray the inside of the printer with lubricants;
unsuitable oils can damage the mechanism. Contact your
dealer or a qualified service person if lubrication is needed.
Transporting the Printer
If you need to transport your printer some distance, carefully
repack it using the original box and packing materials as follows:
1. Open the printer cover and make sure that the print head is
in the home (far right) position. If not, turn on the printer and
wait until the print head returns to the home position. Turn
off the printer and then close the printer cover.
Caution:
c
2. Unplug the power cord from the electrical outlet; then
disconnect the interface cable from the printer.
3. Remove the paper from the sheet feeder and remove the paper
support.
4. Push in the output extension tray, and then raise the output
tray.
Leave the ink cartridges installed when you transport the
printer. Removing the cartridges during transport can
damage the printer.
5
5. Attach the protective materials to the printer.
Maintenance and Transportation
5-13
Page 83

6. Repack the printer and power cord in the original box.
7. Keep the printer level during transport.
5-14
Maintenance and Transportation
Page 84

Chapter 6
Troubleshooting
Error Indicators . . . . . . . . . . . . . . . . . . . . . . . . . . . . . . . . . . . . . . . . . . 6-2
Unable to Print Photos . . . . . . . . . . . . . . . . . . . . . . . . . . . . . . . . . . . . 6-5
Check that power is ON . . . . . . . . . . . . . . . . . . . . . . . . . . . . . . 6-5
Unable to start printing or make settings . . . . . . . . . . . . . . . .6-5
Printing stops halfway. . . . . . . . . . . . . . . . . . . . . . . . . . . . . . . .6-5
The Frame mode cannot be set . . . . . . . . . . . . . . . . . . . . . . . . . 6-6
Unable to print parts of a photograph. . . . . . . . . . . . . . . . . . .6-6
Unable to print the selected photo. . . . . . . . . . . . . . . . . . . . . . 6-6
When Print Quality Declines . . . . . . . . . . . . . . . . . . . . . . . . . . . . . . .6-6
Check if the print head is clogged . . . . . . . . . . . . . . . . . . . . . .6-6
Check if the printer prints satisfactorily . . . . . . . . . . . . . . . . .6-6
Check that the adjust lever is properly set . . . . . . . . . . . . . . .6-7
Check if the ink has run out . . . . . . . . . . . . . . . . . . . . . . . . . . .6-8
Where to Get Help. . . . . . . . . . . . . . . . . . . . . . . . . . . . . . . . . . . . . . . .6-9
6
Troubleshooting
6-1
Page 85

Error Indicators
You can identify many common printer problems with the lights
on your printer’s control panel. If your printer stops working and
the lights are on or flashing, use the following table of panel light
patterns to diagnose the problem, then follow the recommended
corrective measures.
o
n
= on,
Lights Problem and Solution
o S
f S
= off,
f
= flashing
Paper Out
No paper is loaded in
the printer.
The paper is not
loaded correctly.
Paper Jam
Paper has jammed in
the printer.
n B
n A
Load paper in the sheet
feeder; then press the
Eject button to turn this light
off. The printer resumes
printing.
Remove and reload the
paper; then press the
Eject button to turn this light
off.
Take all the paper out of the
feeder, and reload the paper;
then press the
button to turn this light off. If
the light continues to flash,
turn off the printer and gently
pull all the paper out of the
printer. If it tears and pieces
remain inside the printer,
open the printer cover and
remove the pieces of paper.
Turn on the printer and try
again.
E
Load/
E
Load/
E
Load/Eject
6-2
f B
Troubleshooting
Ink Low (black ink cartridge)
The black ink c artridge
is nearly empty.
Obtain a replacement black
ink cartridge (S020093).
Page 86

Lights Problem and Solution
Ink Out (black ink cartridge)
o B
f A
o A
Power
f
f S
o B
o A
The black ink cartrid ge
is empty.
Ink Low (color ink cartridge)
The color ink cartridge
is nearly empty.
Ink Out (color ink cartridge)
The color ink cartridge
is empty.
Carriage Error
The print head
carriage is caught by
jammed paper or
other foreign material
and cannot return to
the home position.
Replace the black ink
cartridge with a new one
(S020093). See “Replacing Ink
Cartridges” on page 5-2.
Obtain a replacement color
ink cartridge (S020110).
Replace the color ink
cartridge with a new one
(S020110). See “Replacing Ink
Cartridges” on page 5-2.
Turn the printer off. After a few
seconds, turn it on again. T he
printer will eject any jammed
paper.
If the paper is not ejected,
turn off the printer. Open the
printer cover and remo ve any
paper from the paper pa th by
hand.
If the error is not cleared,
contact your dealer.
6
Power
f
f S
f B
f A
Unknown Printer Error
An unknown printer
error has occurred.
Turn the printer off, and after
a few seconds, turn it on
again. If the error is not
cleared, contact your dealer.
Troubleshooting
6-3
Page 87

Display
indication
Error Action
Printer internal
adjustments.
System error. Turn the printer off. After a
The Input switch is
not properly set.
The black ink
cartridge is not
installed or it is
empty.
The color ink
cartridge is not
installed or it is
empty.
Paper has
jammed inside
the printer or it is
not loaded.
Turn the printer off. After a
few seconds, turn it on again.
If the error is not cleared,
contact your dealer.
few seconds, turn it on again.
If the error is not cleared,
contact your dealer.
Turn the printer off and set the
Input switch to the INT side.
Turn the printer on and try
printing a photograph.
Install a cartridge or replace
the old one with a new one
(S020093).
See “Replacing Ink
Cartridges” on page 5-2.
Install a cartridge or replace
the old one with a new one
(S020110).
See “Replacing Ink
Cartridges” on page 5-2.
Open the printer cover and
remove the jammed paper.
Load the paper properly in
the sheet feeder and press
E
Load/Eject button.
the
6-4
Troubleshooting
Paper has
jammed inside
the printer.
The ink cartridge
is not installed
properly.
Open the printer cover and
remove the jammed paper.
Check the ink cartridge and
install it properly.
See “Replacing Ink
Cartridges” on page 5-2.
Page 88

Unable to Print Photos
Note:
If you encounrer problems while using the printer with your computer,
see “Problem Solver” in the Online Guide.
Check that power is ON
Check that the power card is plugged into the electrical outlet.
Unable to start printing or make settings
Check that the PC card is properly loaded in the printer’s card
slot.
Check that the PC card has data in it.
Check if any error code is displayed.
The error code is displayed when ink runs out, when there is no
paper, or when a paper jam occurs.
See “Error Indicators” on page 6-2.
Check if the error code “E3” is displayed.
Photographs cannot be printed out if the
EXT side. Set the
on again.
See “Selecting the Input Switch” on page 2-12.
switch to INT and turn the printer off and
Input
switch is set to the
Input
6
Printing stops halfway
Check if the PC card was ejected during processing or while the
light was flashing.
Load the PC card into the printer’s card slot and print again.
Troubleshooting
6-5
Page 89

The Frame mode cannot be set
Check that the PC card containing the frame data has been
properly inserted in the printer’s card slot.
Unable to print parts of a photograph
Check the Trimming setting.
When Trimming is set, the photograph is trimmed to fit in the
print area. For details, see “Changing the Internal Settings” on
page 3-22.
Unable to print the selected photo
Print the index and check the correct photo number.
When Print Quality Declines
Check if the print head is clogged
Print a nozzle check pattern. See “Checking the Print Head
Nozzles” on page 5-7. Check that pattern prints satisfactorily.
If any segment of the printed lines is missing or if nothing is
printed out, clean the print head.
See “Cleaning the Print Head” on page 5-9.
Check if the printer prints satisfactorily
Check if colors do not appear in printouts or if white lines appear.
This happens when the print head is clogged.
See “Cleaning the Print Head” on page 5-9.
6-6
Troubleshooting
Page 90

Check that the adjust lever is properly set
If ink smears on thick paper, set the adjust lever to the + position.
1. Open the printer’s side cover.
2. Slide the adjust lever to the + position.
6
Note:
After printing on thick paper, be sure to return the adjust lever to
the 0 position. If you print on paper of normal thickness in the +
position, the image will print faintly.
Troubleshooting
6-7
Page 91

Check if the ink has run out
To check the amount of ink remaining in the cartridge, follow the
steps below:
1. Hold down the
2. Press the
the ink cartridge to check.
1 : Black
2 : Color
10 : Print Head Alignment (For details, see “Aligning the
Change Settings
Print Head” on page 5-10.)
button while the printer is turned on.
Index
buttons and select the number of
6-8
The percentage of ink remaining in the cartridge is displayed
next to Copies. To return the printer back to the normal
working state, turn the printer off and on.
Note:
To change an ink cartridge, see “Replacing Ink Cartridges” on page
5-2.
Troubleshooting
Page 92

Where to Get Help
If your printer is not operating properly and you cannot solve the
problem using the troubleshooting information in your printer
documentation, contact customer support services for assistance.
We will be able to help you much more quickly if you give us the
following information:
Serial number of your printer
(The serial number label is on the back of the printer.)
Printer model
Brand and model of your computer
Printer software version
(Click
Windows version you are using
Software application(s) you normally use with your printer
and their version number(s)
About
in your printer driver.)
6
For United Kingdom and the Republic of Ireland Users
If you purchased your printer in the UK or in the Republic of
Ireland, EPSON (UK) Limited provides a range of customer
services and technical support.
World Wide Web
If you can connect to the Internet and have a Web browser, you
can access our Web site at
will find information on the latest EPSON products, software
drivers, online user guides, and answers to frequently asked
questions.
http://www.epson.co.uk
Troubleshooting
. Here you
6-9
Page 93

Faxon EPSON
Contact Faxon EPSON Faxback Service for support information,
including troubleshooting tips, switch settings, and driver
information.
To use Faxon EPSON, call 01442 227332 in the UK or 0044 1442
227332 from the Republic of Ireland using a touch-tone phone.
You will be asked to follow a simple routine to register your
document request. Once you have entered your telephone and fax
numbers, Faxon EPSON will fax a copy of the document catalogue
to your fax machine.
When you have found the documents that you need in the
catalogue, call Faxon EPSON again and enter the document ID
numbers. The documents will be faxed to you automatically.
Bulletin Board Service for the latest drivers and utilities
You can call the EPSON Bulletin Board Service on 01442 227479
in the UK or 0044 1442 227479 from the Republic of Ireland. No
membership is required. Make sure that your communications
software is set to 8 data bits, 1 stop bit, no parity bit, ANSI terminal
mode emulation, and a modem speed of up to 28.8 Kbps.
Downloading protocols supported include Xmodem, Ymodem
and Zmodem. See the documentation that came with your
communications software and modem for more information.
When you first connect to the Bulletin Board Service, you will be
asked for your name, company name, phone number and a
password (which you can invent yourself).
6-10
Troubleshooting
Page 94

Customer and Warranty Support
Our Customer and Warranty Support teams can be contacted by
calling 0870 163 7766 in the UK or 0044 0870 163 7766 from the
Republic of Ireland. They can provide the following services:
Technical information on installing, configuring, and
❏
operating your EPSON products
Arranging for faulty EPSON products to be repaired within
❏
the warranty period
A full list of EPSON Customer and Warranty Support services is
available on the technical support section of our World Wide Web
pages at
EPSON Faxback service in document number 5085.
http://www.epson.co.uk/support/
and on Faxon
Pre-Sales Enquiry Desk
The Enquiry Desk team can be contacted by calling 0800 220546
in the UK or 1 800 409132 from the Republic of Ireland, by faxing
01442 227271 in the UK or 0044 1442 227271 from the Republic of
Ireland, and via Email at
the following information:
info@epson.co.uk
. They can provide
6
Pre-Sales information and literature on new EPSON products
❏
(also available via our World Wide Web site at
http://www.epson.co.uk
Where to purchase genuine EPSON consumables,
❏
accessories, and options
)
Troubleshooting
6-11
Page 95

For Australian Users
EPSON Australia wishes to provide you with a high level of
Customer Service. As well as the user’s guide, we provide the
following sources for obtaining information:
EPSON FAXBACK
EPSON FAXBACK will fax you the latest specifications and
pricing for most EPSON products offered in Australia. There is
also technical information, including details of the latest software
and drivers available. Phone (02) 9903 9075 and the system will
guide you through a number of choices before faxing the
information to your fax machine.
EPSON Bulletin Board System
This is where you can download the latest software and drivers.
Visit the BBS to check out the latest versions. If you have a modem,
phone (02) 9417 5090.
Internet URL http://www.epson.com.au
Access the EPSON Australia World Wide Web pages. Worth
taking your modem here for the occasional surf! You can get the
same information as offered on the EPSON FAXBACK and the
EPSON Bulletin Board plus more.
Your dealer
Don’t forget that your dealer can often help identify and resolve
problems. The dealer should always be the first called for advice
on problems. They can often solve problems quickly and easily as
well as give you advice on the next step to take.
6-12
Troubleshooting
Page 96

EPSON Helpdesk
EPSON Helpdesk is provided as a final backup to make sure our
clients have access to advice. Operators on the Helpdesk can aid
you in diagnosing hardware and software problems. They can
also advise you on the latest EPSON products and where the
nearest dealer or service agent is located. Many types of queries
are answered here.
The Helpdesk numbers are:
Phone: (02) 9903 9040
Fax: (02) 9903 9189
We encourage you to have all the relevant information on hand
when you ring. The more information you prepare, the faster we
can help solve the problem. This information includes the
for your EPSON product, type of computer, operating
Guide
system, application programs, and any other information you feel
is required.
For Singapore Users
Contact the telephone and fax numbers below:
User’s
6
Phone: (065) 337-7911
Fax: (065) 334-1185
For Hong Kong Users
To obtain technical support as well as other after-sales services,
users are welcome to contact EPSON Hong Kong Limited.
Internet home page
EPSON Hong Kong has established a local home page in both
Chinese and English on the Internet to provide users with the
following information:
Troubleshooting
6-13
Page 97

Product information
❏
Answers to Frequently Asked Questions (FAQs)
❏
Latest versions of EPSON printer drivers
❏
Users can access our World Wide Web home page at:
http://www.epson.com.hk
Electronic bulletin board system
An electronic bulletin board system (BBS) is also available to
obtain printer information and the latest versions of printer
drivers. You can logon to the following number for the BBS
service:
BBS: (852) 2827-4244
Technical Support Hotline
You can also contact our technical staff at the following telephone
and fax numbers:
Phone: (852) 2585-4399
Fax: (852) 2827-4383
For Philippines Users
To obtain technical support as well as other after sales services,
users are welcome to contact the EPSON Philippines
Representative Office at the telephone and fax numbers below:
Phone: (632) 813-6552
Fax: (632) 813-6545
BBS: (632) 814-0595
6-14
Troubleshooting
Page 98

Chapter 7
For Use with a Computer
System Requirements . . . . . . . . . . . . . . . . . . . . . . . . . . . . . . . . . . . . .7-2
For PCs . . . . . . . . . . . . . . . . . . . . . . . . . . . . . . . . . . . . . . . . . . . . .7-2
For Macintosh computers . . . . . . . . . . . . . . . . . . . . . . . . . . . . .7-2
Using the Printer with a PC . . . . . . . . . . . . . . . . . . . . . . . . . . . . . . . . 7-4
Connecting the printer. . . . . . . . . . . . . . . . . . . . . . . . . . . . . . . .7-4
Installing the printer software . . . . . . . . . . . . . . . . . . . . . . . . .7-5
Using the Printer with a Macintosh . . . . . . . . . . . . . . . . . . . . . . . . .7-7
Connecting the printer. . . . . . . . . . . . . . . . . . . . . . . . . . . . . . . .7-7
Installing the printer software . . . . . . . . . . . . . . . . . . . . . . . . .7-8
Selecting your printer in the Chooser . . . . . . . . . . . . . . . . . . .7-10
Loading Paper . . . . . . . . . . . . . . . . . . . . . . . . . . . . . . . . . . . . . . . . . . .7-12
Printing Your First Page for Windows. . . . . . . . . . . . . . . . . . . . . . .7-15
Printing Your First Page for Macintosh . . . . . . . . . . . . . . . . . . . . . .7-17
7
For Use with a Computer
7-1
Page 99

System Requirements
For PCs
To use your printer, you need Microsoft®, Windows® 95,
®
Windows
98, or Windows® NT 4.0, and a shielded, twisted-pair
parallel cable.
Your computer should also meet the following system
requirements:
Minimum system Recommended system
i486/25 MHz for Windows 95 and NT 4.0
i486/66 MHz for Windows 98
16MB RAM 32MB RAM or more for
10MB hard disk space for Windows 95 and 98
20MB for Windows NT 4.0
VGA monitor VGA or better monitor
Pentium or higher
processor
Windows 95 and 98,
64MB or more for
Windows NT 4.0
50MB or more free disk
space for Windows 95
and 98
100MB or more for
Windows NT 4.0
Your computer dealer can help you update your system if it does
not meet these requirements.
For Macintosh computers
To use this printer, your Apple® Macintosh® must meet the
following system requirements. You also need a standard Apple
System Peripheral-8 cable (8-pin mini-circular connector).
7-2
For Use with a Computer
Page 100

Applicable computer models (as of April 1, 1998)
Macintosh LC475, LC575, LC630
Macintosh Quadra Series
Macintosh Centris Series
Macintosh PowerBook™ Series
(PowerBook 190, 520, 540, 550 or later)
Macintosh PowerBook Duo 280, 2300C/100
Macintosh Performa 475, 575, 588, 630, 5210 or later
Power Macintosh Series
Environment
Minimum system Recommended system
System 7.5.1 System 7.6 or later
5MB of available memory
10MB of available
memory when
background printing is
turned on.
12MB or more of available memory
21MB or more of available memory when
background printing is turned on.
Note:
❏
The amount of available memory varies according to the number and
kind of applications that are open. To see how much memory is
available, choose
refer to the memory size (listed in kilobytes) under “Largest Unused
Block” (1,024K=1MB).
❏
The memory requirements above are for printing on Letter size
About This Macintosh
from the Apple menu and
paper. These requirements may vary depending on the size of the
paper, the type of application you are using, and the complexity of
the document you want to print.
In addition to these system and memory requirements, you also
need 10MB of free hard disk space to install your printer software.
To print, you need extra hard disk space amounting to about
double the size of the file you want to print.
7
For Use with a Computer
7-3
 Loading...