

Page 1
Epson
CART
Epson Mobile Cart for Epson Ultra Short Throw Projectors - Assembly Guide
470/475W/475Wi/480/480i/485W/485Wi
For assistance, please contact us:
Epson_CART_2012_A
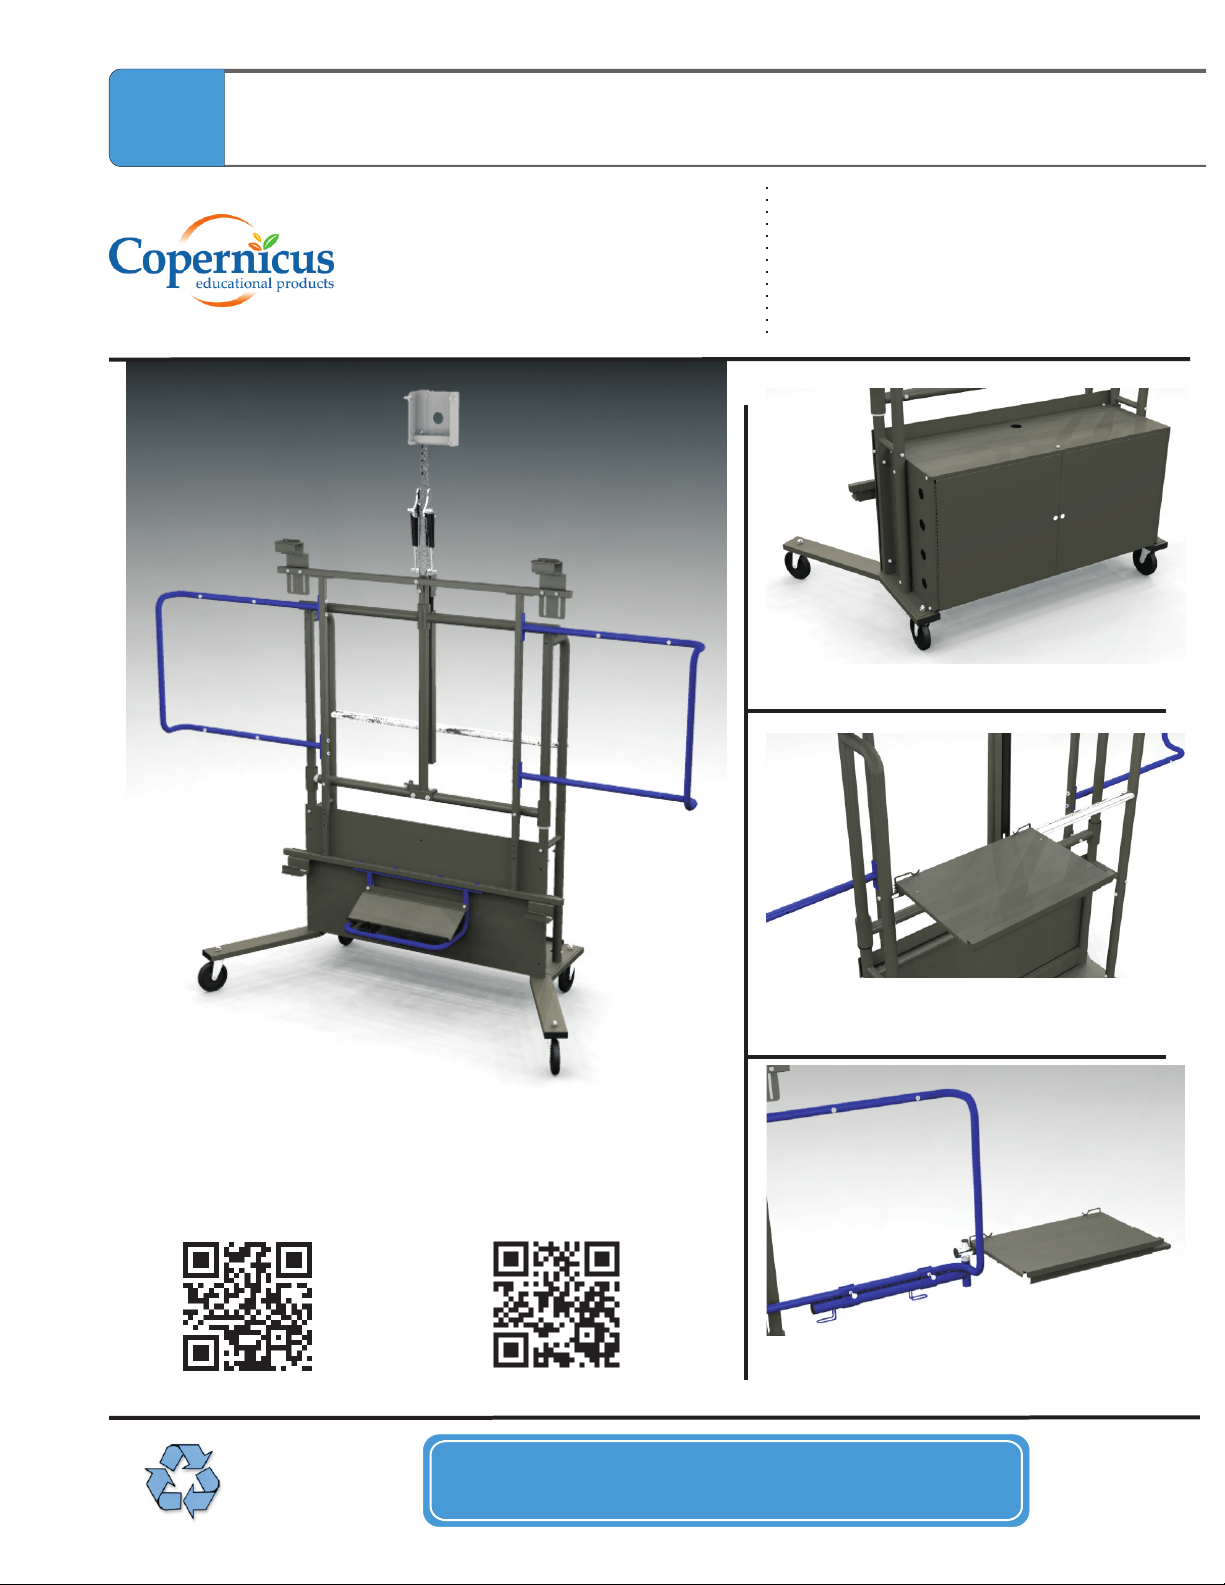
This Assembly Guide provides instructions
to build the Epson Mobile Cart for Epson
Ultra Short Throw Projectors.
1-800-267-8494
Email info@copernicused.com
Have your packing slip ready for reference
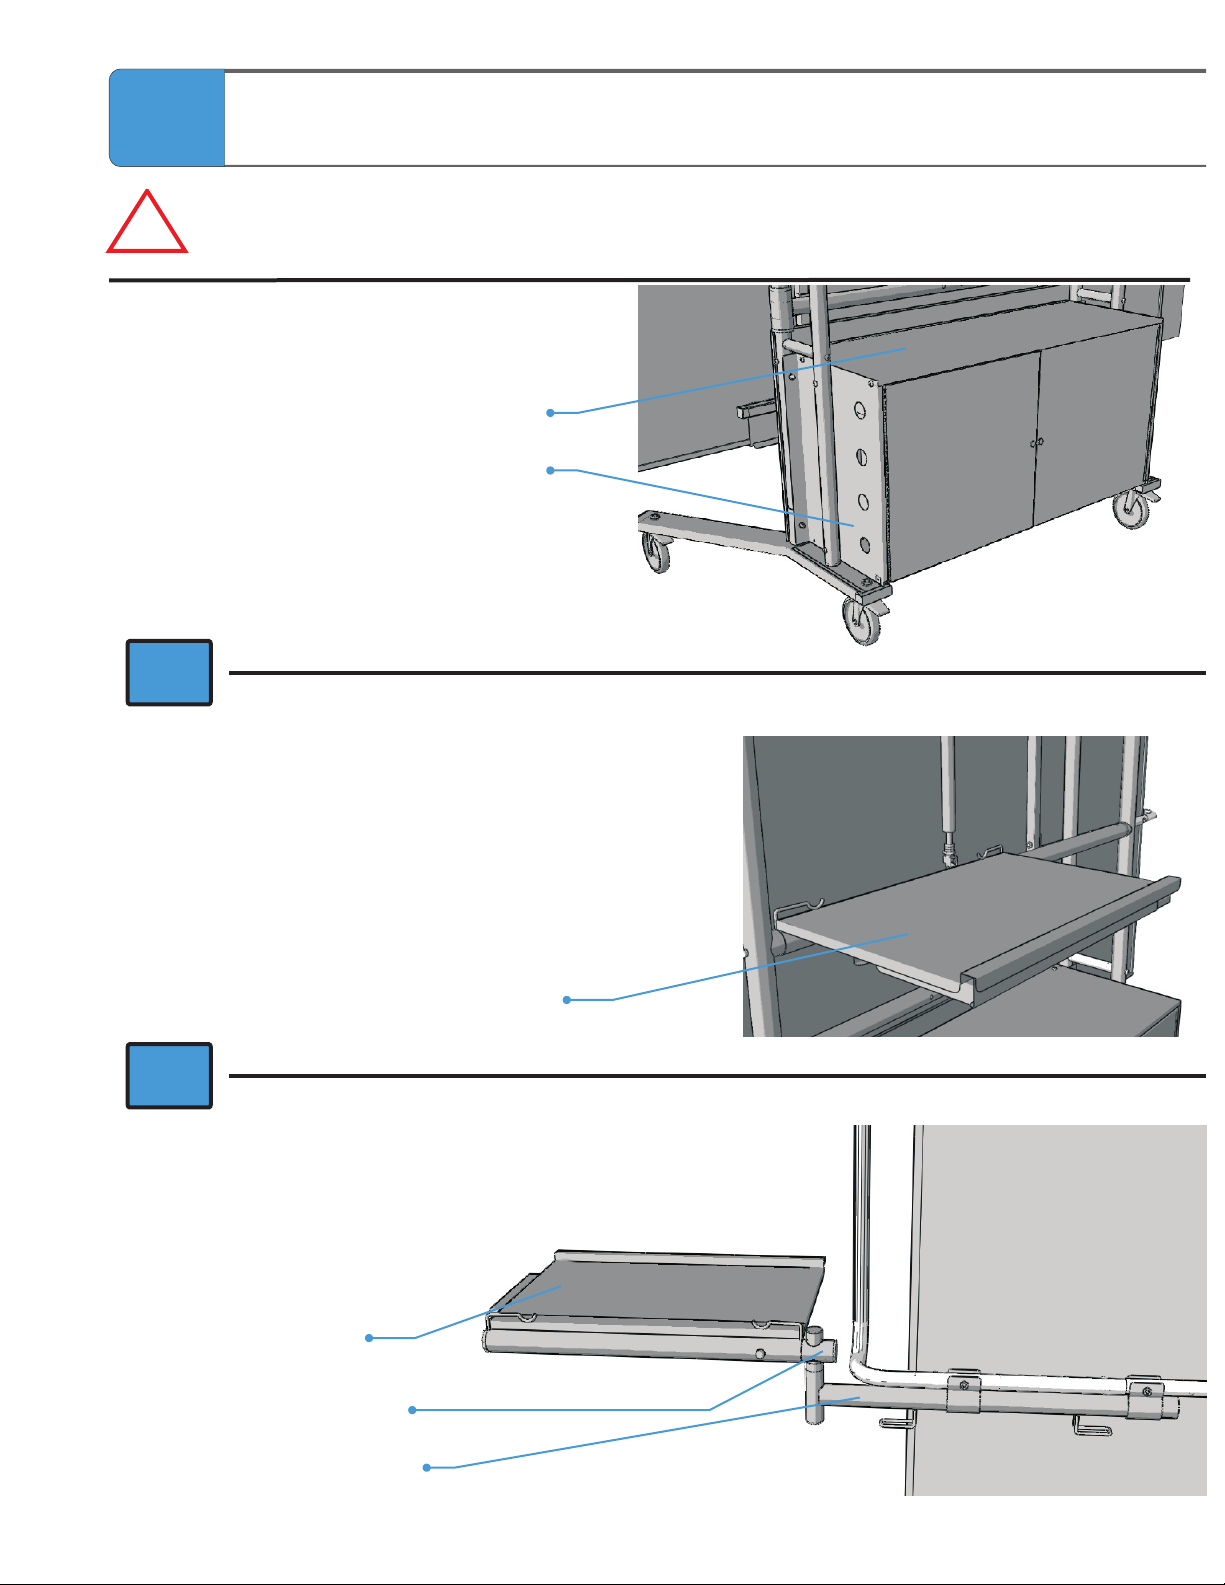
Base Frame
(CEPCART1 or 2)
Check out some of our
other great products!
Need Tech Support?
Have a Question?
Optional (CEPCART3)Lock Box
Optional
Keyboard Tray
Rear Laptop &
(CEPCART4)
Please Recycle
Email our Tech Support Service
Optional (CEPCART5)Side Laptop
PLEASE KEEP THIS GUIDE WITH THE PRODUCT
Epson_CART - Version 2012_A - May 8 2012 - Copernicus Educational Products Inc.
Page 2

Epson
CART
Epson Mobile Cart for Epson Ultra Short Throw Projectors - Assembly Guide
470/475W/475Wi/480/480i/485W/485Wi
For assistance, please contact us:
Epson_CART_2012_A
This Assembly Guide provides instructions
to build the Epson Mobile Cart for Epson
Ultra Short Throw Projectors.
1-800-267-8494
Email info@copernicused.com
Have your packing slip ready for reference
Table of Contents
Tips for Assembly................................................................................................3
Frequently Asked Questions...............................................................................4
Part Lists.............................................................................................................5
Assemble the Base Frame (CEPCART1 or 2)...................................................10
Assemble the Optional Rear Laptop Arm (CEPCART4).....................................19
Assemble the Optional Keyboard Tray (CEPCART4).........................................25
Assemble the Optional Side Laptop Arm (CEPCART5)......................................27, 28, 44
Installing Stop Bolt..............................................................................................38
Assemble the Optional Lock Box (CEPCART3)..................................................40
Setting up the Projector for Use..........................................................................47
Routing Cables on the Unit.................................................................................48
Tips for Use.........................................................................................................49,50
Care & Maintenance............................................................................................51
3
Year
Frame
Warranty
Validate Your Warranty
To validate your three year frame warranty, submit the ON-LINE form at www.copernicused.com
Enter a drawing to win a Copernicus Product for your classroom at the same time!
Epson_CART - Version 2012_A - May 8 2012 - Copernicus Educational Products Inc.
2
Page 3
Tips for Assembly
Watch for These Helpful Symbols
This symbol denotes a 2- or 3- Person Task. For safety, please ensure that there are the
suggested number of people working on steps displaying this symbol.
Watch for this symbol throughout the Assembly Guide. Wherever you see it, pay close
attention. The symbol denotes a step needing extra attention to ensure it is done
correctly.
The star symbol highlights an advisory note.
Before You Begin
Lay out and identify all of the included parts.
The hardware has been packed according to step.
Read the assembly guide over once to familiarize yourself with them.
Please note that in its unassembled state, this product contains parts that can be
hazardous to small children. This product should be assembled by an adult.
!
2-Person Task
!
3-Person Task
As You Assemble the Unit
Follow the steps in sequence.
Before beginning each step, find the part(s) that you need for that step.
Pay attention to the labels on the parts; they are there to help direct you at certain stages.
The title of each step states what you will be doing. Review the text and the pictures as you
build the unit.
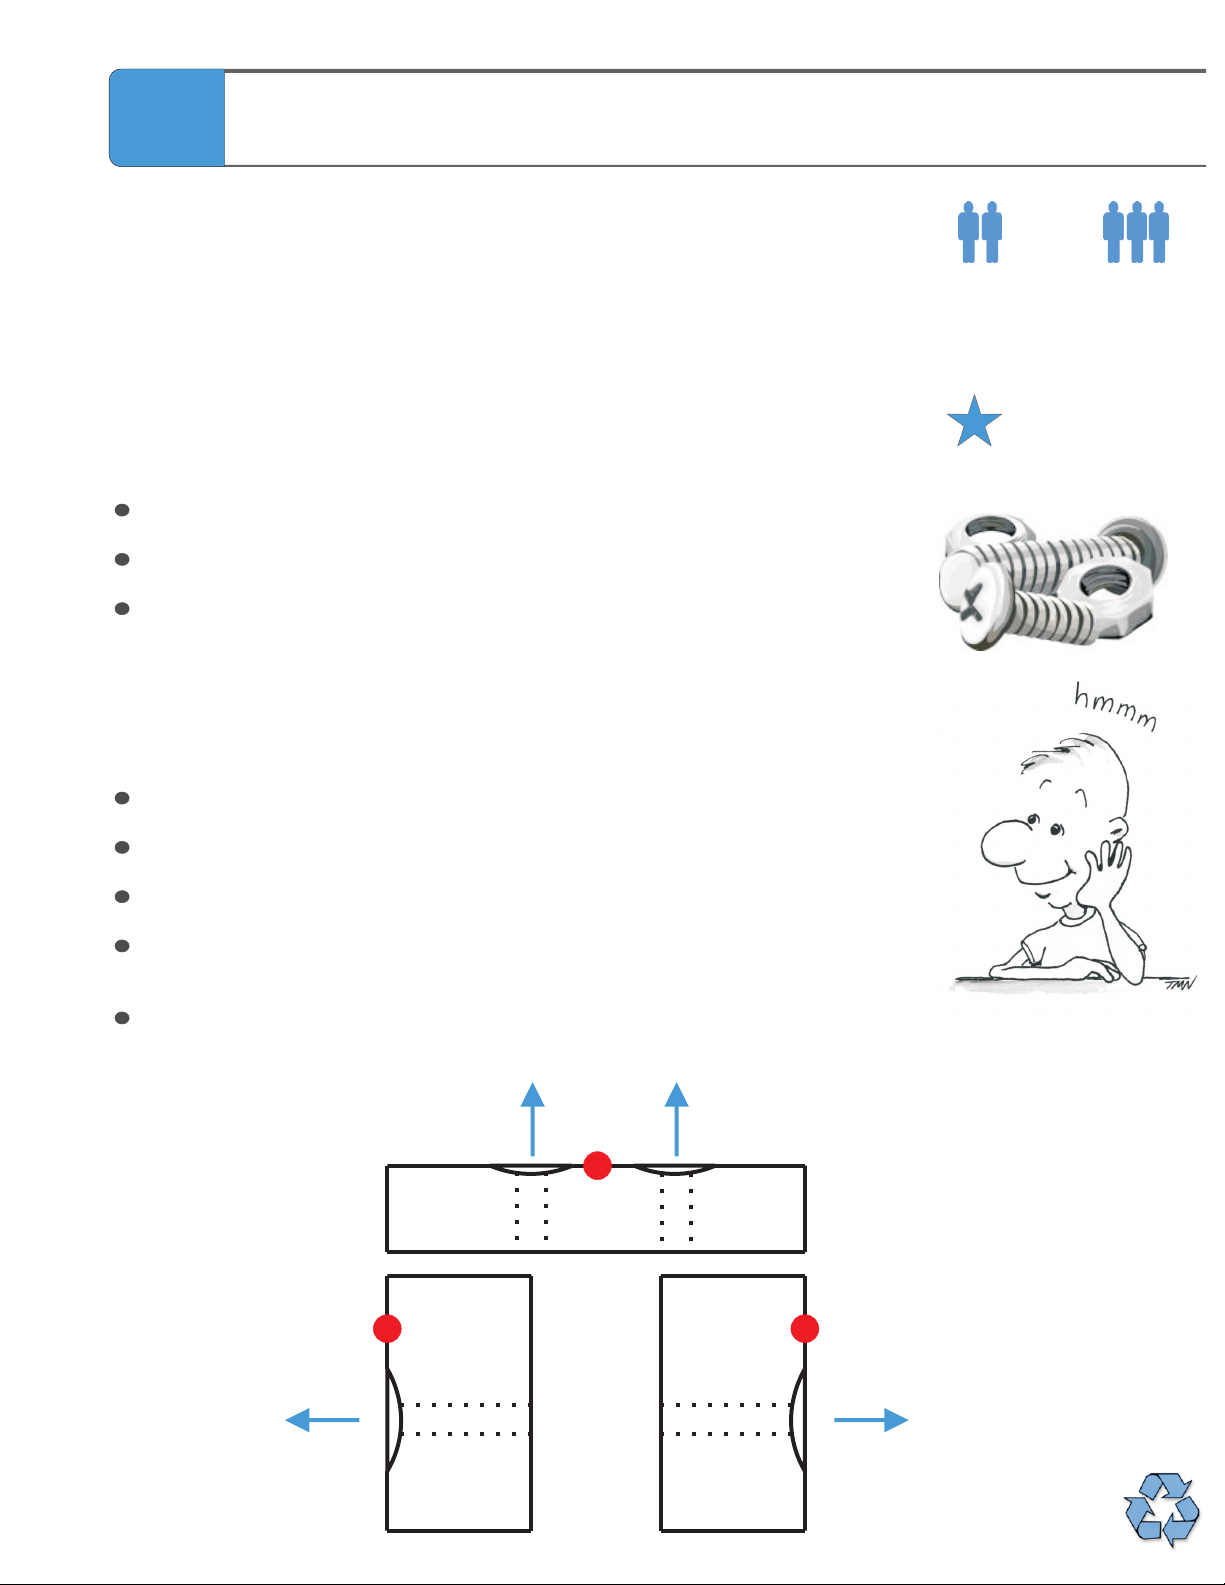
Some holes have indented the tubing. These holes are marked with a red dot sticker.
Anywhere there is an indent or red dot sticker, it should face towards the outside of the unit.
See image below:
Epson_CART - Version 2012_A - May 8 2012 - Copernicus Educational Products Inc.
Hole indents should
always be to the outside
!
Page 4
Customer Service - FAQ’s
For parts and other issues regarding the frame:
missing
- The height adjust system is not working.
- The gas cylinders are not working properly.
- I lost the key to my lock box.
Please call Copernicus Customer Service,
1-800-267-8494. Monday - Friday 8:00am - 4:30 pm EST.
My interactive board isn’t working, who should I call?
Please call the reseller that you bought the product from first (reseller information
can be found on your packing slip).
where we will be happy to help.
?
?
?
Need Tech Support?
Have a Question?
My projector isn’t working, who should I call?
Please call the reseller that you bought the product from first (reseller information
can be found on your packing slip), OR please call Epson Customer Service at:
United States 562-276-4394 or Canada 905-709-3839.
Dear Educator,
Thank you for purchasing one of our products.
I hope the assembly of your Epson Mobile Cart went well.
If you have any questions, or concerns, or ideas for how we can improve, please call us at 1-800-267-8494,
where someone will be happy to help.
Enjoy using your new product, and happy teaching,
Jim Phillips
President
Email our Tech
Support Service
Quality schools are the
result of quality teachers
going above and beyond
the call of duty.
VICKI CARUANA
A liberal education is at
the heart of a civil society,
and at the heart of a
liberal education is the act
of teaching.
A. BARTLETT GIAMATTI
Epson_CART - Version 2012_A - May 8 2012 - Copernicus Educational Products Inc.
My idea of education is
to unsettle the minds of
the young and inflame
their intellects.
ROBERT MAYNARD
Develop a passion for
learning. If you do, you
will never cease to grow.
ANTHONY J. D’ANGELO
HUTCHINS
Page 5

Epson
CART
Epson Mobile Cart for Epson Ultra Short Throw Projectors - Assembly Guide
Please note that in its unassembled state, this product contains parts
WARNING
!
that can be hazardous to small children. This product should be
assembled by an adult.
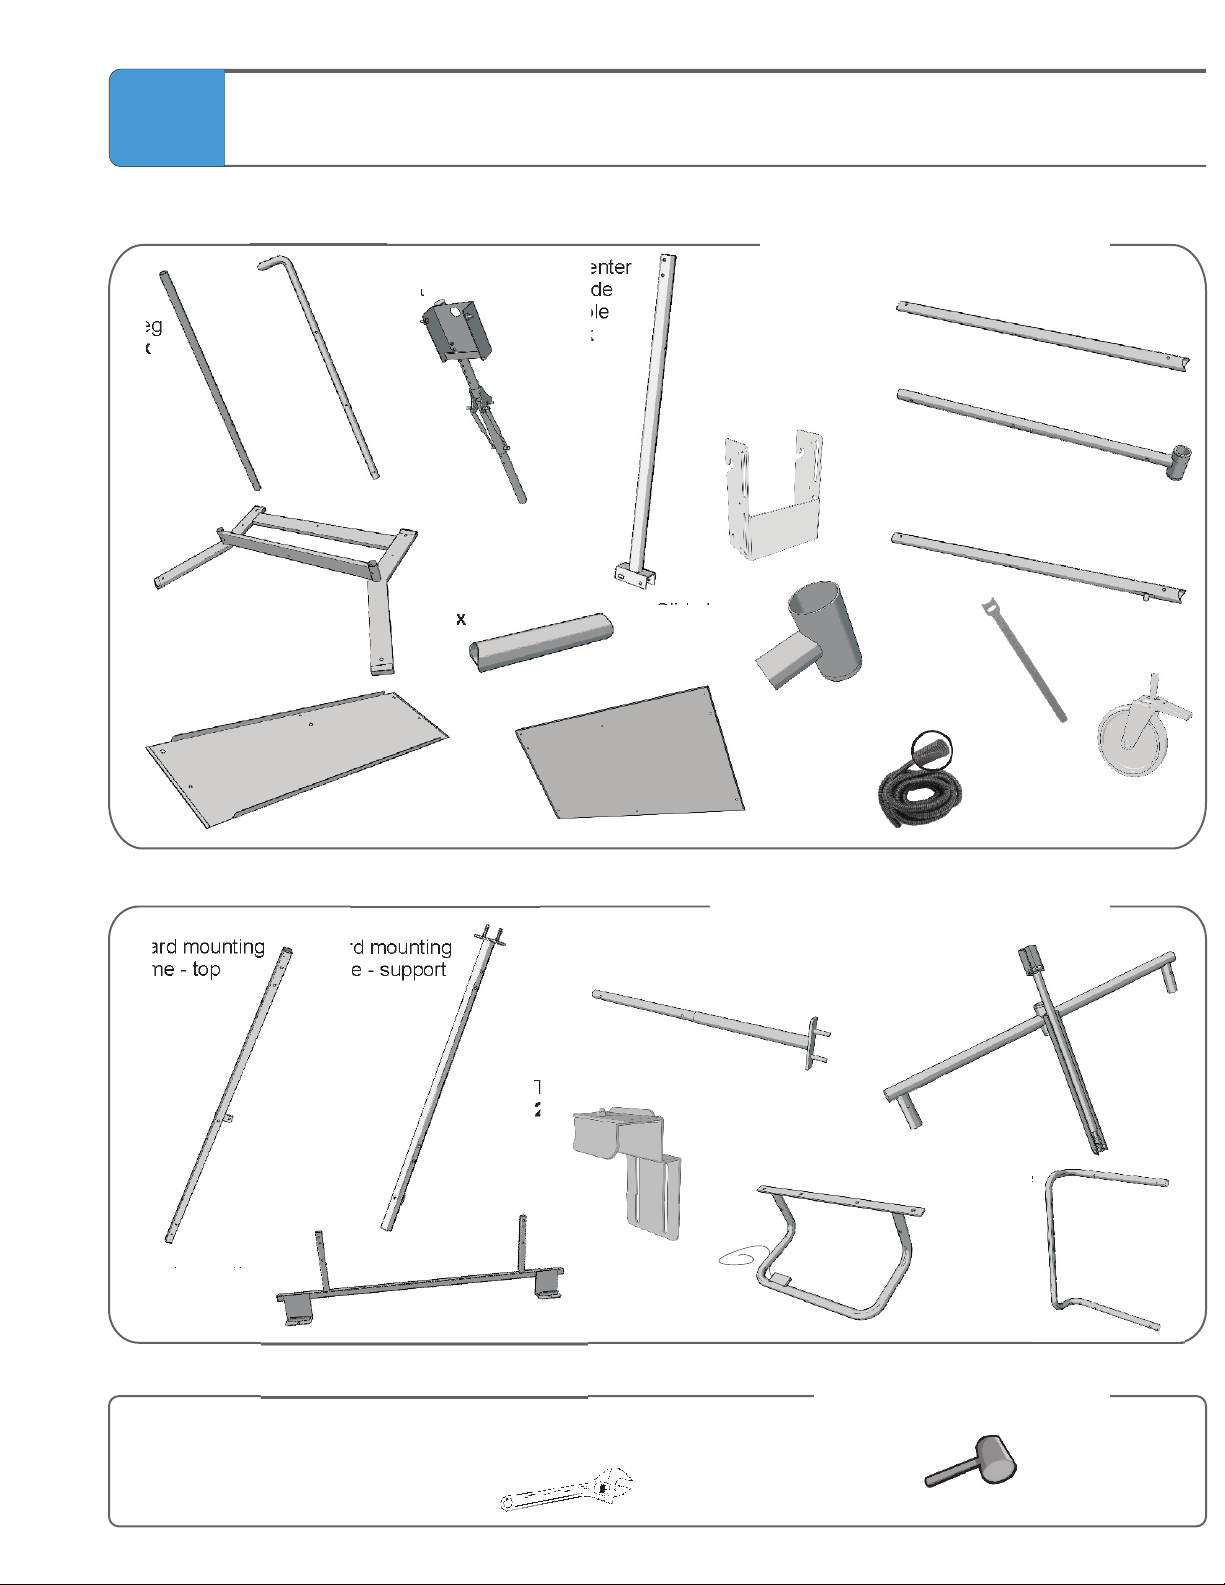
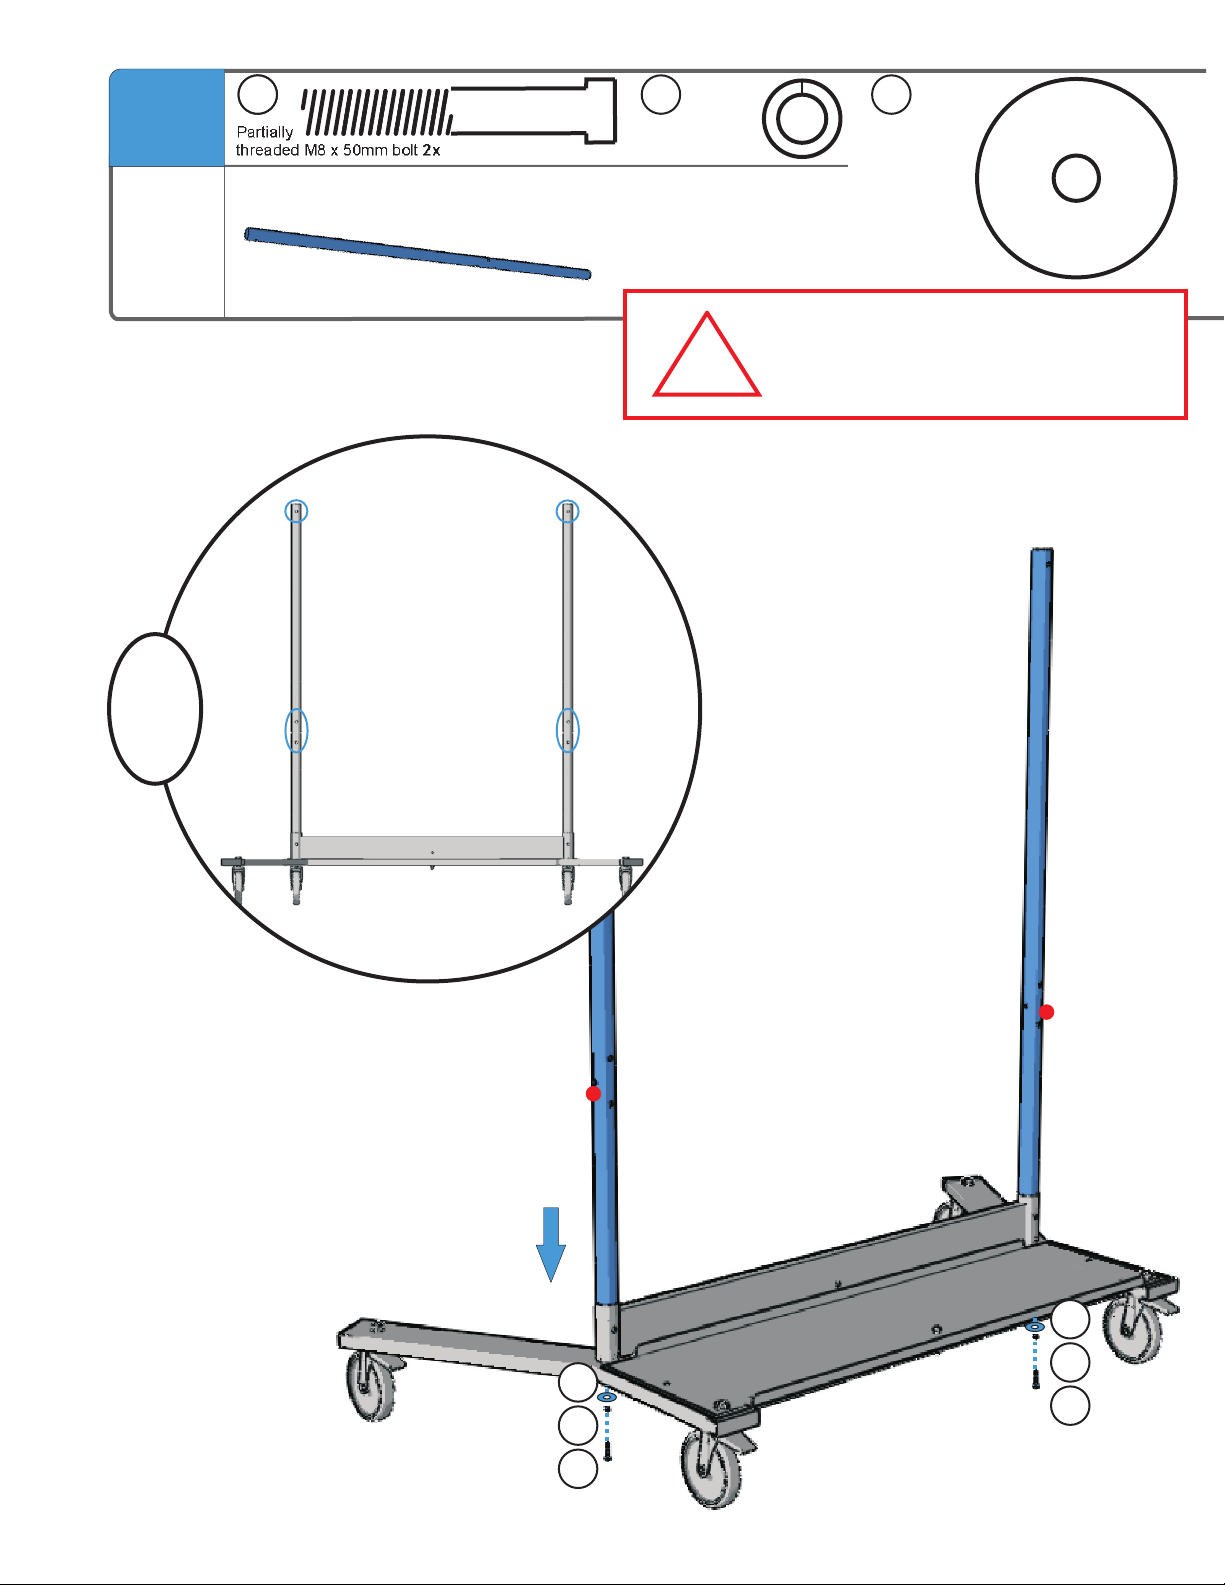
Base Frame (CEPCART1 or 2)
470/475W/475Wi/480/480i/485W/485Wi
Projector arm support (1)
Upper frame pre-assembly
(1)
Protective handle (2)
Handle insert (4)
Back support (2)
Short stretcher (2)
Support stretcher - grey (1)
Not Shown:
Adapter Plate (1)
Bottom cover (1)
Leg (2)
Support stretcher
with spring clips (1)
Slide handle (1)
Board mounting frame
- bottom (1)
Lift handle (1)
Base (1)
Board mounting
frame - top (1)
Top clamp (2)
Board mounting
frame - supports
(2)
Center slide
pole (1)
Frame slide
(1)
4” swivel total
lock caster (4)
Epson_CART - Version 2012_A - May 8 2012 - Copernicus Educational Products Inc.
Front cover
(1)
5
Page 6
Epson
CART
!
Epson Mobile Cart for Epson Ultra Short Throw Projectors - Assembly Guide
Please note that in its unassembled state, this product contains parts
WARNING
that can be hazardous to small children. This product should be
assembled by an adult.
Optional Lock Box
(CEPCART3)
Lock box top
(1)
Lock box side
with door
(2)
1 left, 1 right
OR
470/475W/475Wi/480/480i/485W/485Wi
Optional Rear Laptop Arm
& Keyboard Tray
(CEPCART4)
Laptop tray
(1)
OR
Optional Side Laptop Arm
(CEPCART5)
Laptop tray
(1)
Laptop rotation
arm (1)
Laptop extension
arm (1)
Epson_CART - Version 2012_A - May 8 2012 - Copernicus Educational Products Inc.
6
Page 7
Epson
CART
Epson Mobile Cart - Base Frame
Before beginning, you should have:
Center
slide
pole
1x
Leg
2x
Base
1x
Bottom cover
1x
Back
support
2x
Projector arm
support
1x
Short stretcher
2x
Front cover
1x
Adapter
Plate
1x
Slide handle
1x
Hardware on following page.
Contents - Box 1 - CEPCART0
Support stretcher
- grey
1x
Slide frame
1x
Support stretcher with spring clips
- chrome
1x
Velcro®
strap
12x
Board mounting
frame - top
1x
Board mounting
frame - bottom
1x
Board mounting
frame - support
2x
Handle
insert
4x
Top clamp
2x
Split black
wire loom
1x
4” swivel
total lock caster
4x
Contents - Box 2 - CEPCART1 or 2
Upper frame
pre-assembly
1x
Lift handle
1x
Protective
handle
2x
Wrenches (2 of Each): 10mm, 13mm, 17mm, 19mm
OR Two adjustable wrenches
Epson_CART - Version 2012_A - May 8 2012 - Copernicus Educational Products Inc.
Additional Tools Required
Rubber mallet
7
Page 8
Epson
CART
Epson Mobile Cart - Base Frame
In Box 1
Before beginning, you should have:
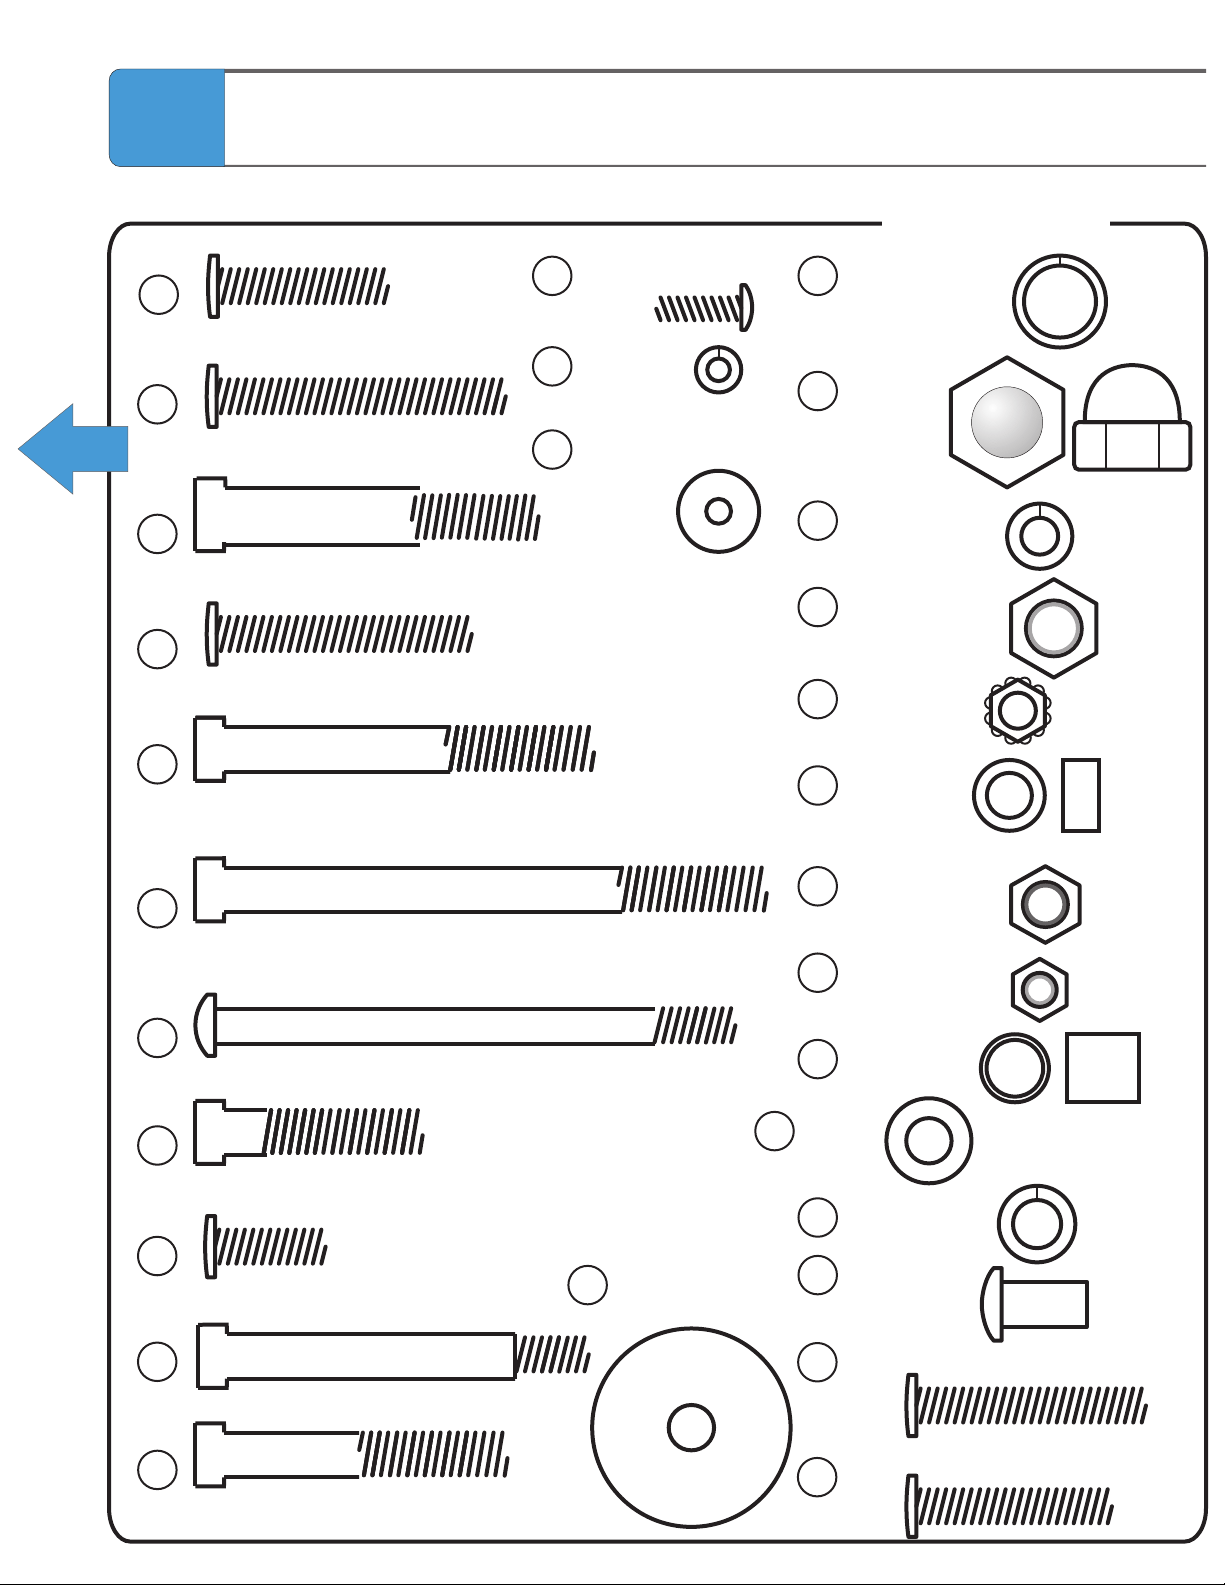
A
M6 x 30mm bolt
1x
B
M6 x 50mm bolt
11x
C
Partially threaded M10 x 55mm bolt
2x
D
M6 x 45mm bolt
1x
E
Partially threaded M8 x 65mm bolt
1x
F
Partially threaded M8 x 95mm bolt
1x
G
M6 x 90mm bolt
2x
H
Partially threaded M8 x 35mm bolt
8x
I
M6 x 19mm Bolt
10x
J
M8 x 50mm Shoulder Bolt
1x
used only in special instances
DD
EE
FF
M4 x 16mm bolt
6x
M4 lock
washer 6x
9/16” x 11/64” flat
washer 6x
M8 extra large
Y
flat washer
4x
U
M13 lock washer
L
4x
M13 acorn
M
nut 4x
M6 lock washer
N
12x
M10 lock nut
O
with plastic insert
4x
M6 keps nut
P
3x
Small spacer
Q
1x
M8 lock nut
R
with plastic insert
18x
M6 lock nut
S
with plastic insert
3x
Large spacer
T
4x
M8 flat
washer
16x
M8 lock washer
V
12x
M6 barrel nut
W
12x
M6 x 40mm bolt
X
2x
Hardware - Box 1
front
front
side
side
K
Partially threaded M8 x 50mm bolt
4x
Epson_CART - Version 2012_A - May 8 2012 - Copernicus Educational Products Inc.
M6 x 35mm bolt
BB
2x
Page 9
Epson
CART
Epson Mobile Cart - Options
Before beginning, you should have:
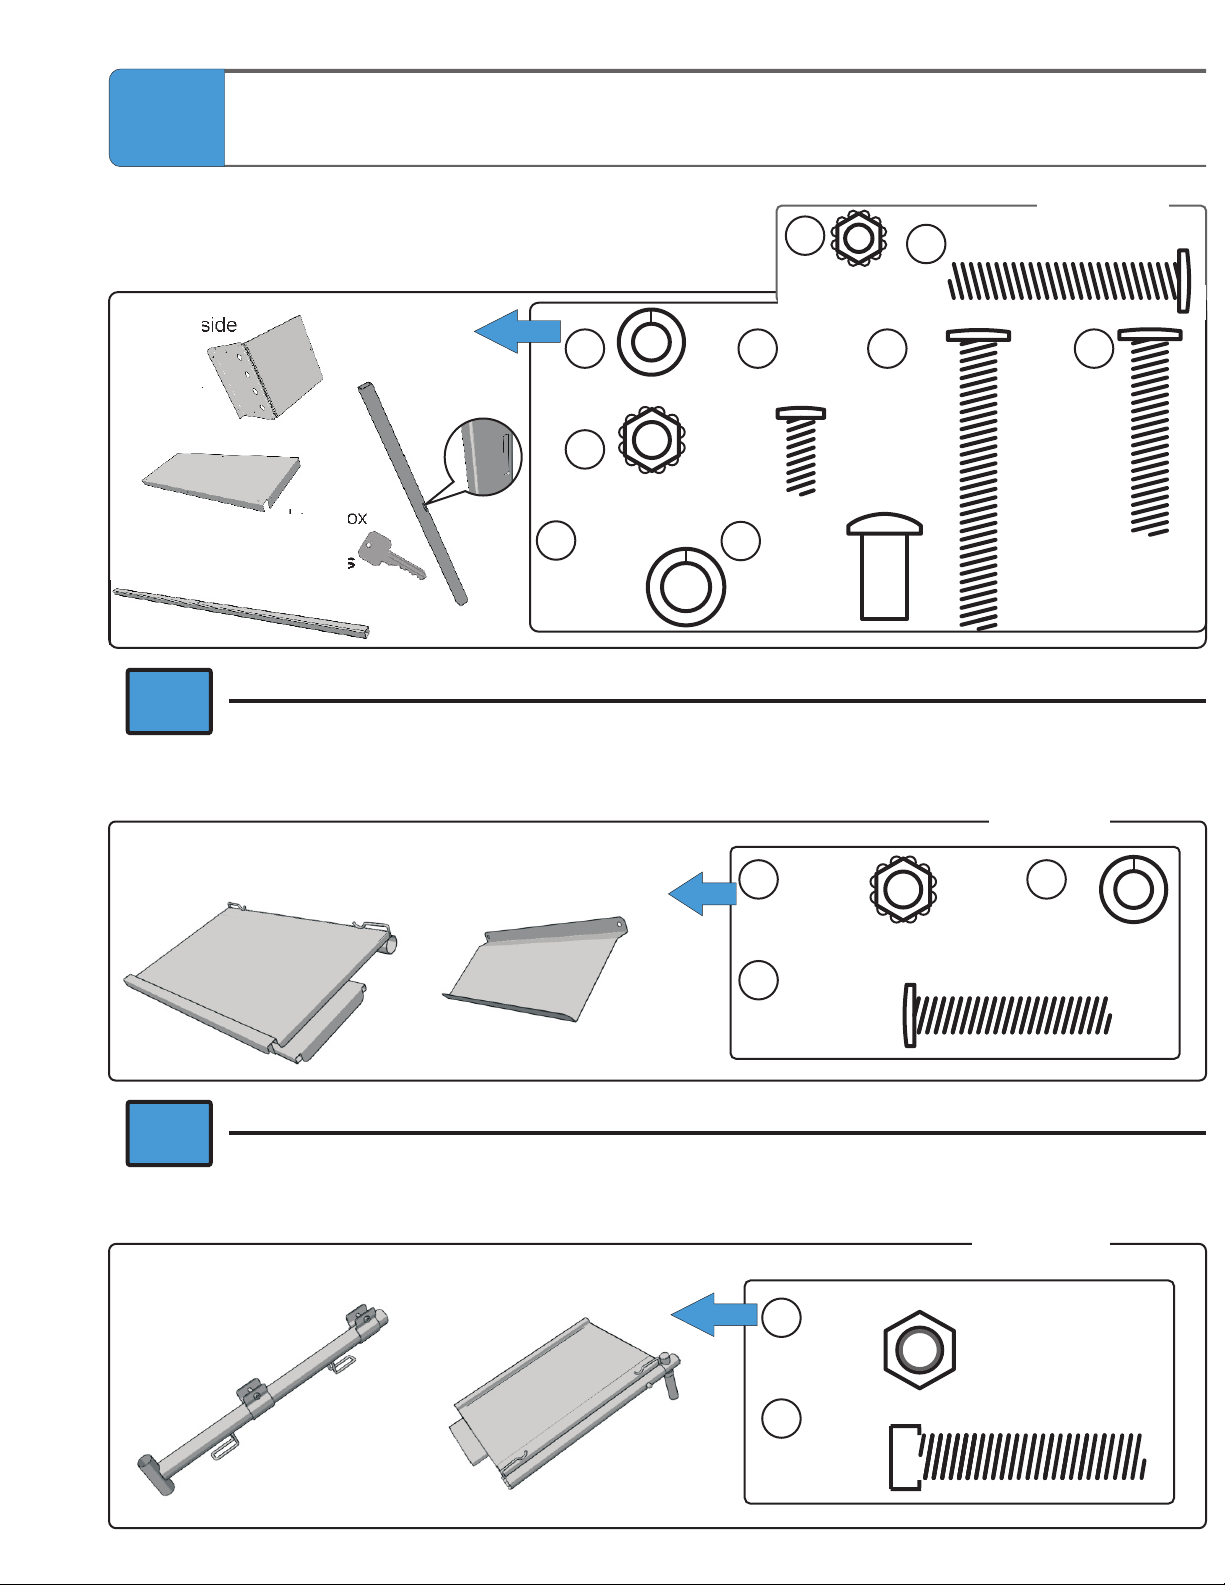
Optional Lock Box (CEPCART3)
Lock box side
with door
2x
1 left, 1 right
Lock box top
1x
Lock box
stretcher 1
1x
OR
Lock box
stretcher 2
1x
Lock box
key
2x sets
N
M6 lock washer
4x
P
M6 keps nut
7x
M8 lock
V
washer
4x
AA
M5 keps
nut 4x
Z B
M5 x 13mm
bolt
4x
M6
W
barrel nut
4x
M6 x 40mm bolt 2x
X
M6 x
50mm
bolt
7x
Contents
BB
M6 x
35mm
bolt
2x
Optional Rear Laptop Arm & Keyboard Tray (CEPCART4)
Contents
Rear laptop tray
1x
Keyboard tray
1x
P
M6 keps nut
2x
N
M6 lock
washer
2x
BB
M6 x 35mm bolt
2x
OR
Optional Side Laptop Arm (CEPCART5)
Contents
Laptop extension
arm
1x
Side laptop tray
1x
R
M8 lock nut
2x
CC
M8 x 40mm
bolt 2x
Epson_CART - Version 2012_A - May 8 2012 - Copernicus Educational Products Inc.
9
Page 10
Actual Size:
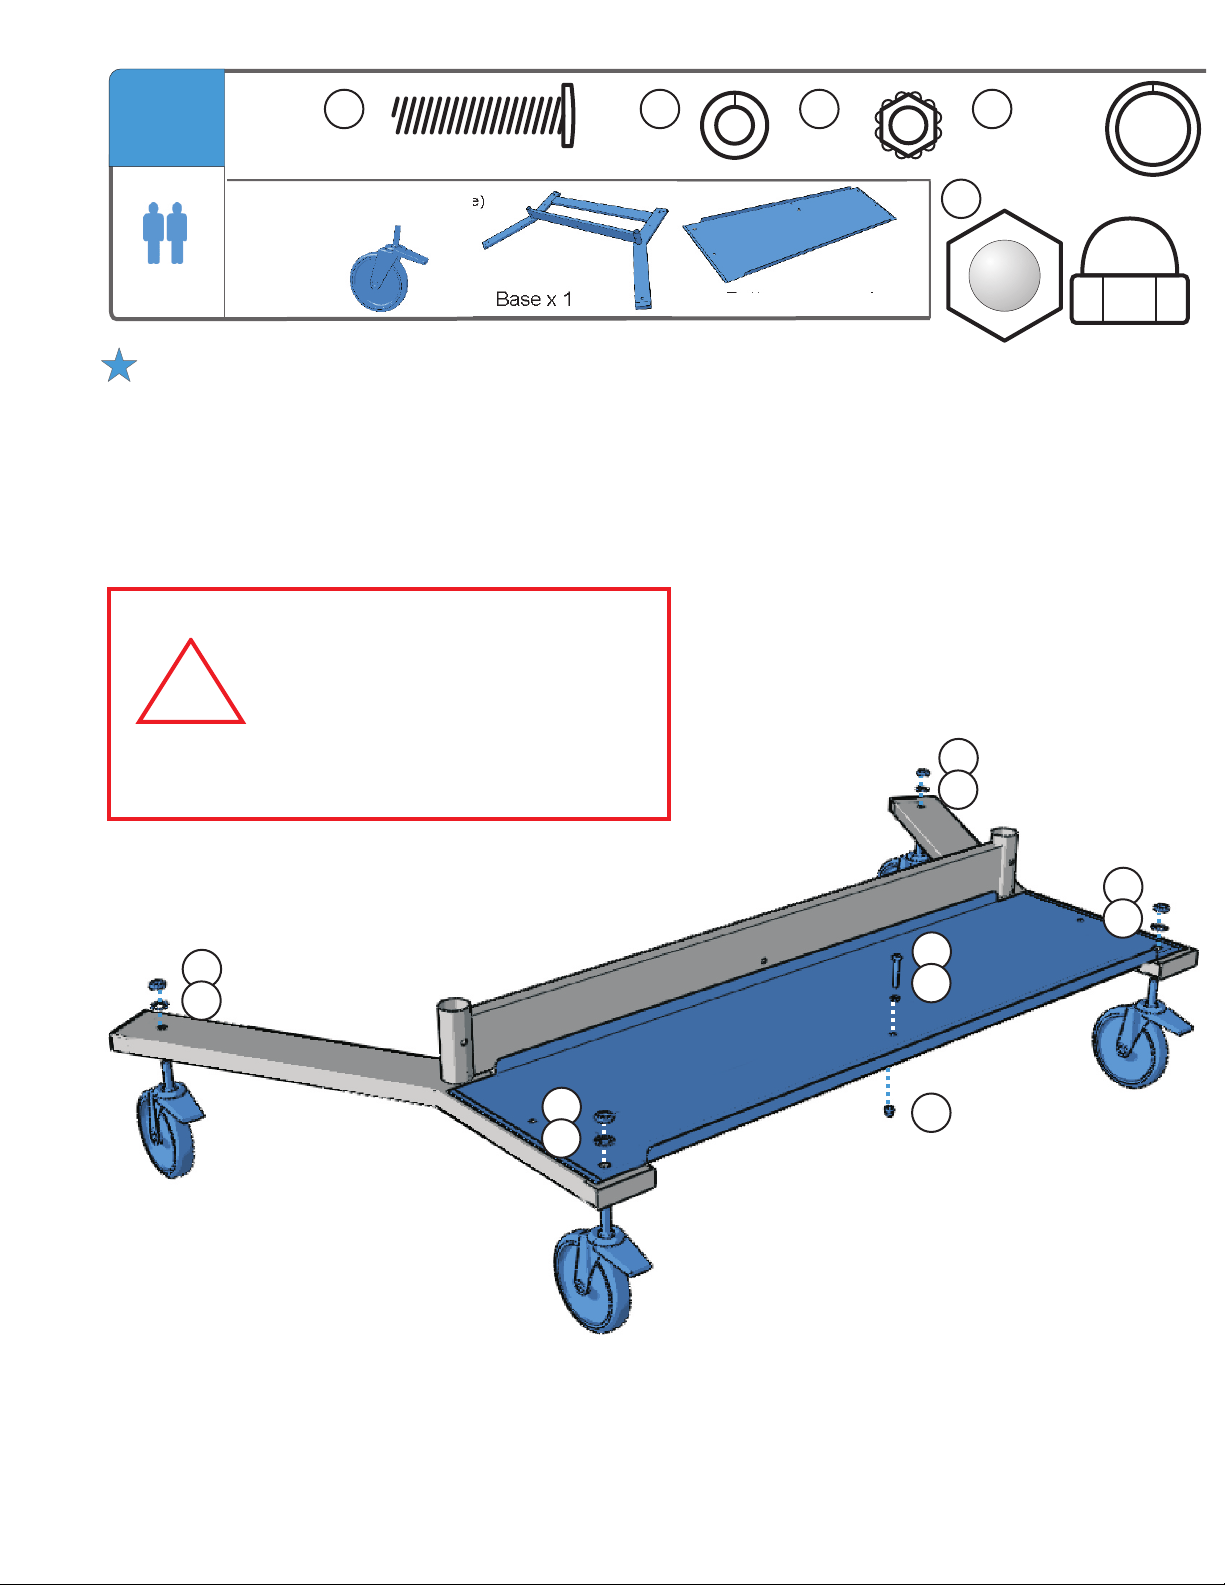
1
2-Person Task
A
M6 x 30mm bolt
1x
You will need: (not to scale)
Caster x 4
N
M6 lock
washer 1x
Base x 1 Bottom cover x 1
P
M6 keps
nut 1x
Do not tighten any fasteners, unless instructed.
This will help with the assembly of your unit.
Install Casters & Bottom Cover
Lock casters first.
WARNING
Be careful not to pinch your fingers
!
when locking the casters.
To avoid property damage or bodily
injury please ensure casters are
locked before proceeding with
assembly.
L
M13 lock washer
4x
M13 acorn nut 4x
M
M
L
M
L
M
L
M
L
A
N
P
Epson_CART - Version 2012_A - May 8 2012 - Copernicus Educational Products Inc.
10
Page 11
K
K
2
Partially
threaded M8 x 50mm bolt 2x
You will need: (not to scale)
Leg x 2
Attach Legs to Base
V
M8 lock washer
2x
!
Y
M8 extra large
flat washer
2x
CAUTION
Maximum recommended weight on
bottom shelf - 50 lbs.
!
Ensure legs are aligned the
correct way when looking from the
front or back of the unit.
Hole indents should
always be to the outside
of the unit.
Y
V
K
Epson_CART - Version 2012_A - May 8 2012 - Copernicus Educational Products Inc.
Y
V
K
11
Page 12
Actual Size:
3
B
M6 x 50mm bolt
2x
You will need: (not to scale)
Support stretcher (grey) x 1
Install Support Stretcher
N
M6 lock washer
2x
B
N
N
B
Epson_CART - Version 2012_A - May 8 2012 - Copernicus Educational Products Inc.
12
Page 13
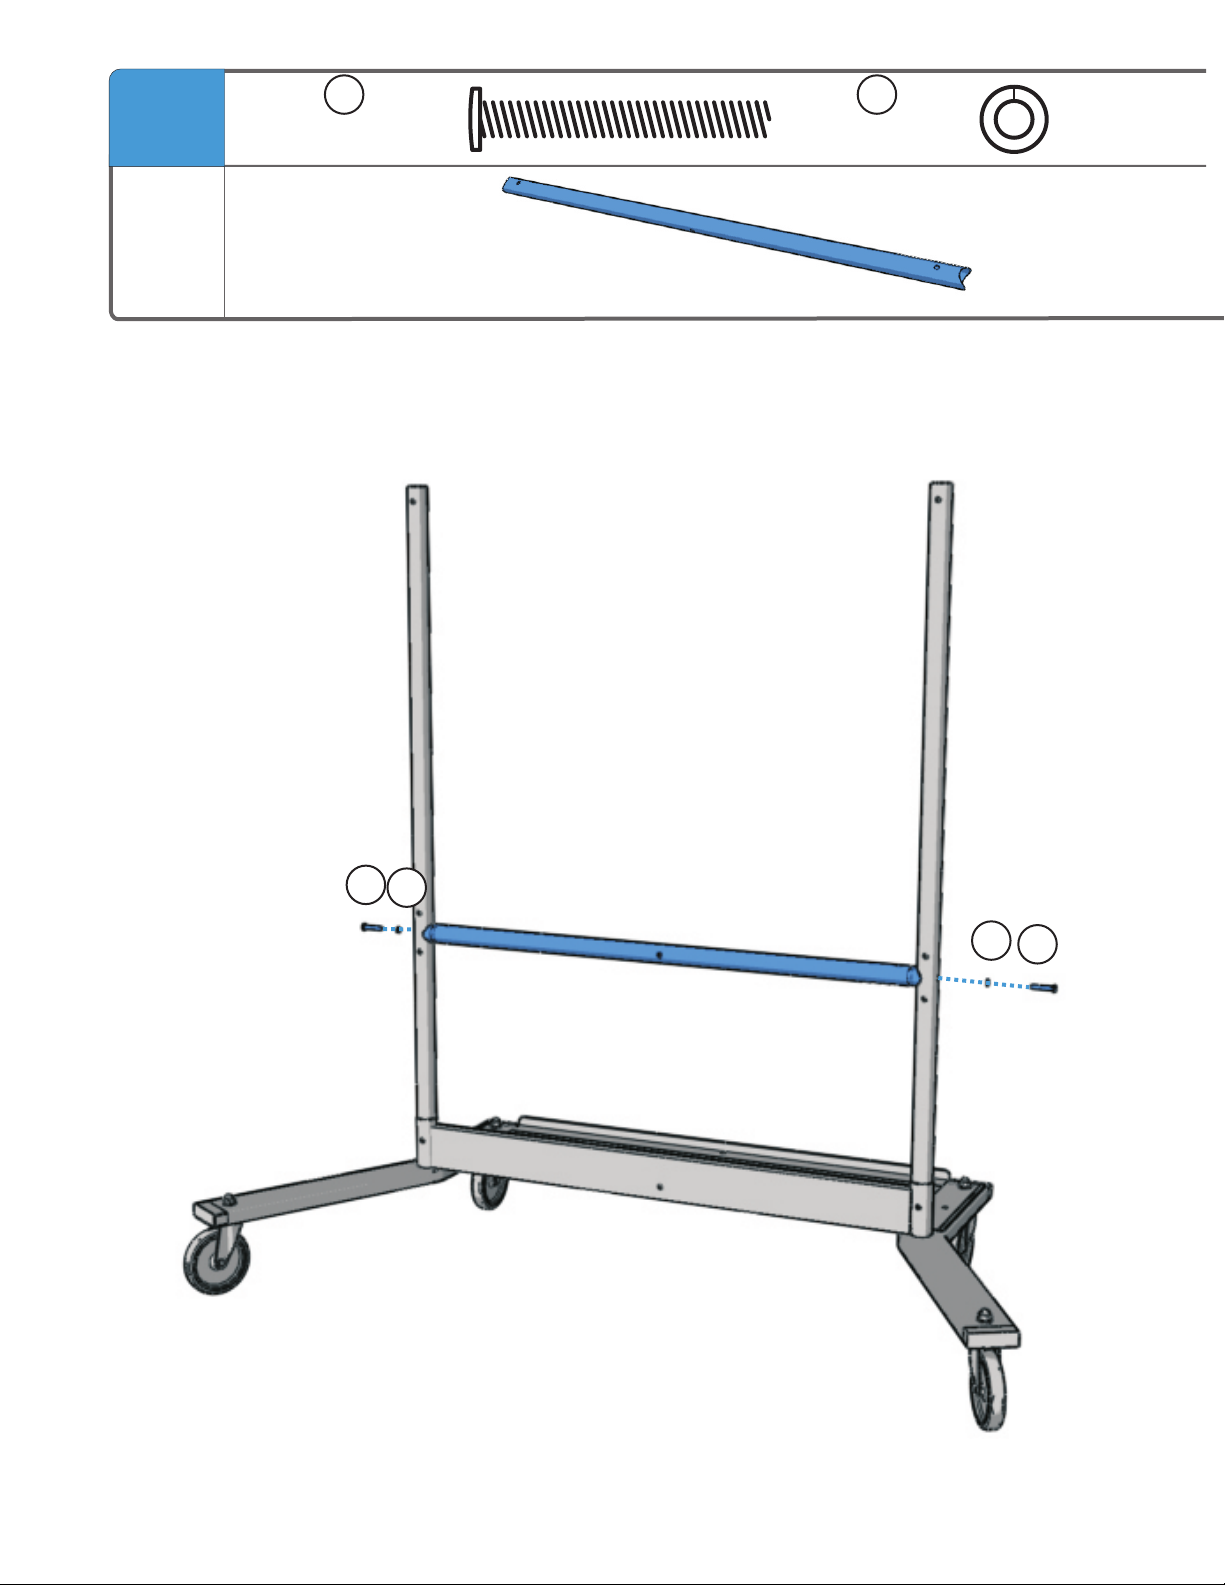
4
You will need: (not to scale)
2-Person Task
Slide handle x 1
Install Slide Frame & Slide Handle
Slide frame x 1
Insert slide handle in end of slide frame.
1
Ensure slide handle is on the
left side of the unit.
Insert assembly over the legs.
2
Ensure both sides have a
black plastic bushing in the
top.
!
Please Note:
Sliding parts are lubricated with a Petroleum
based jelly to ensure smooth movement when
adjusting the height.
Epson_CART - Version 2012_A - May 8 2012 - Copernicus Educational Products Inc.
13
Page 14
Actual Size:
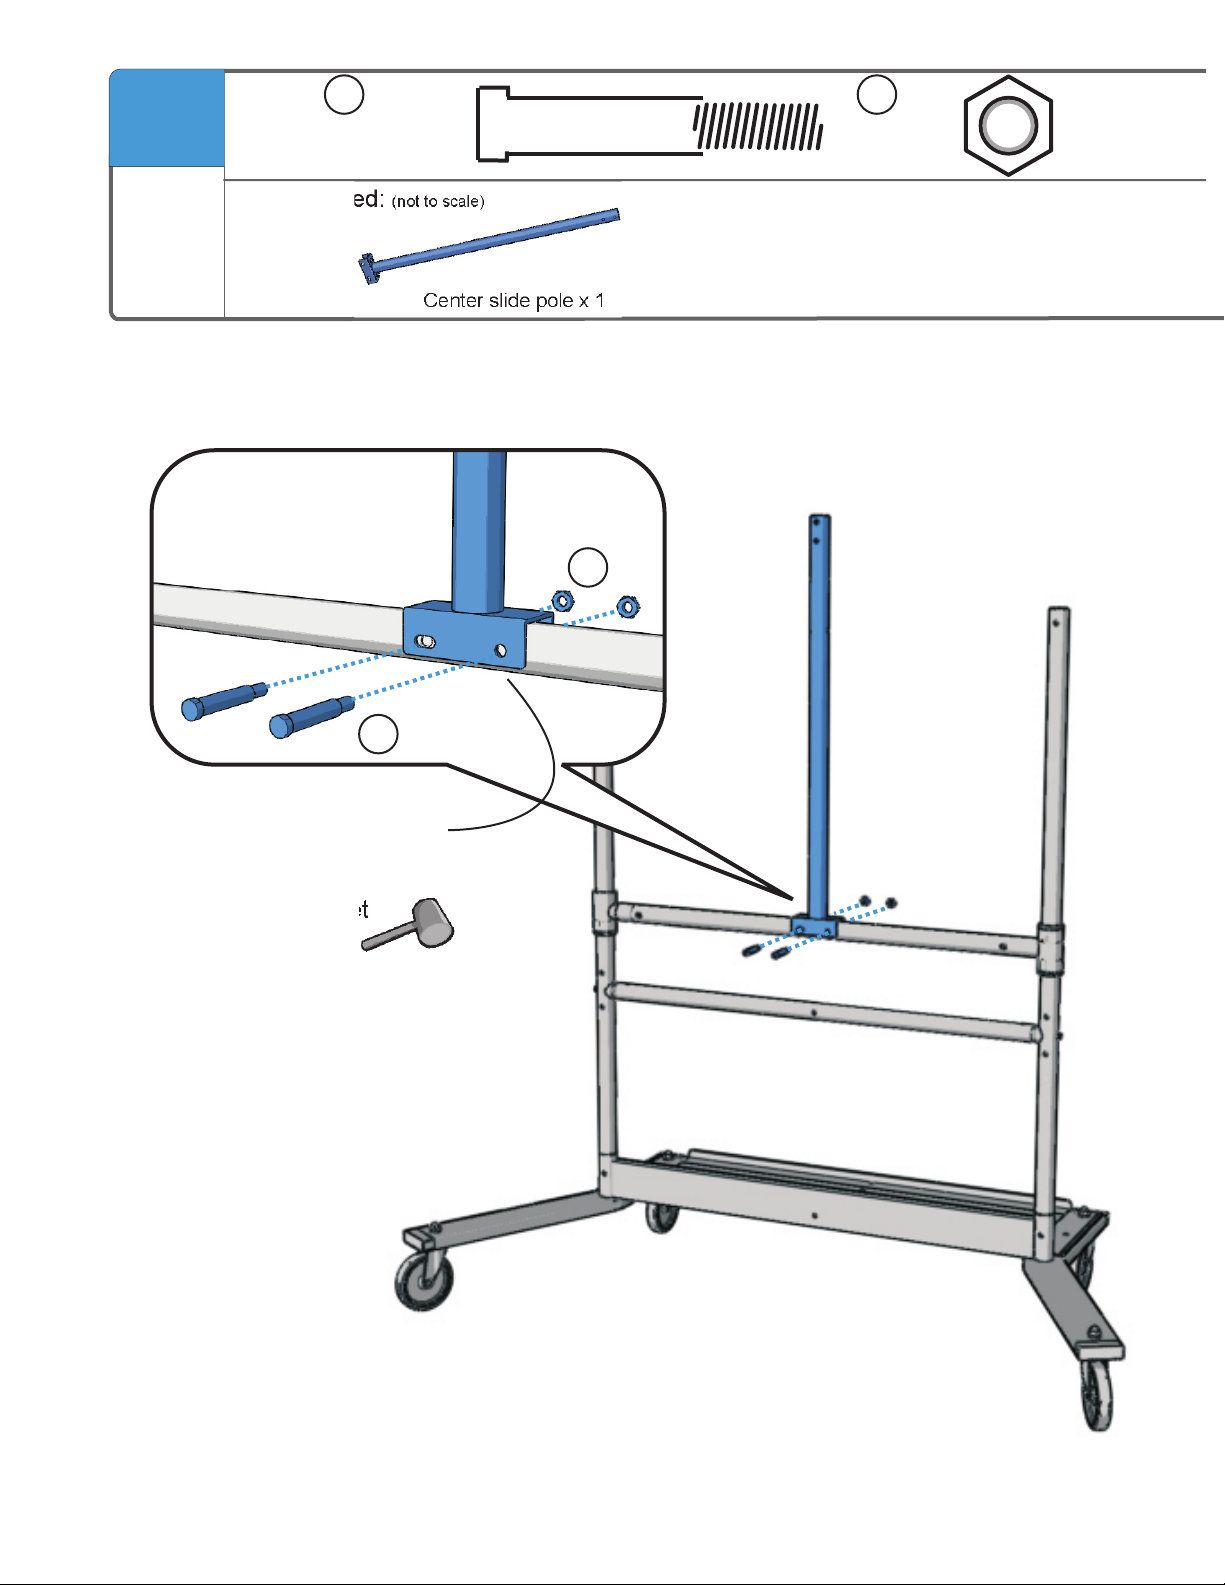
5
C
Partially threaded
M10 x 55mm bolt
2x
You will need: (not to scale)
Install Center Slide Pole
O
M10 lock nut
2x
Center slide pole x 1
O
C
Install bolt in circular hole first,
and then in oblong hole.
Tap in with rubber mallet
if necessary.
Epson_CART - Version 2012_A - May 8 2012 - Copernicus Educational Products Inc.
14
Page 15
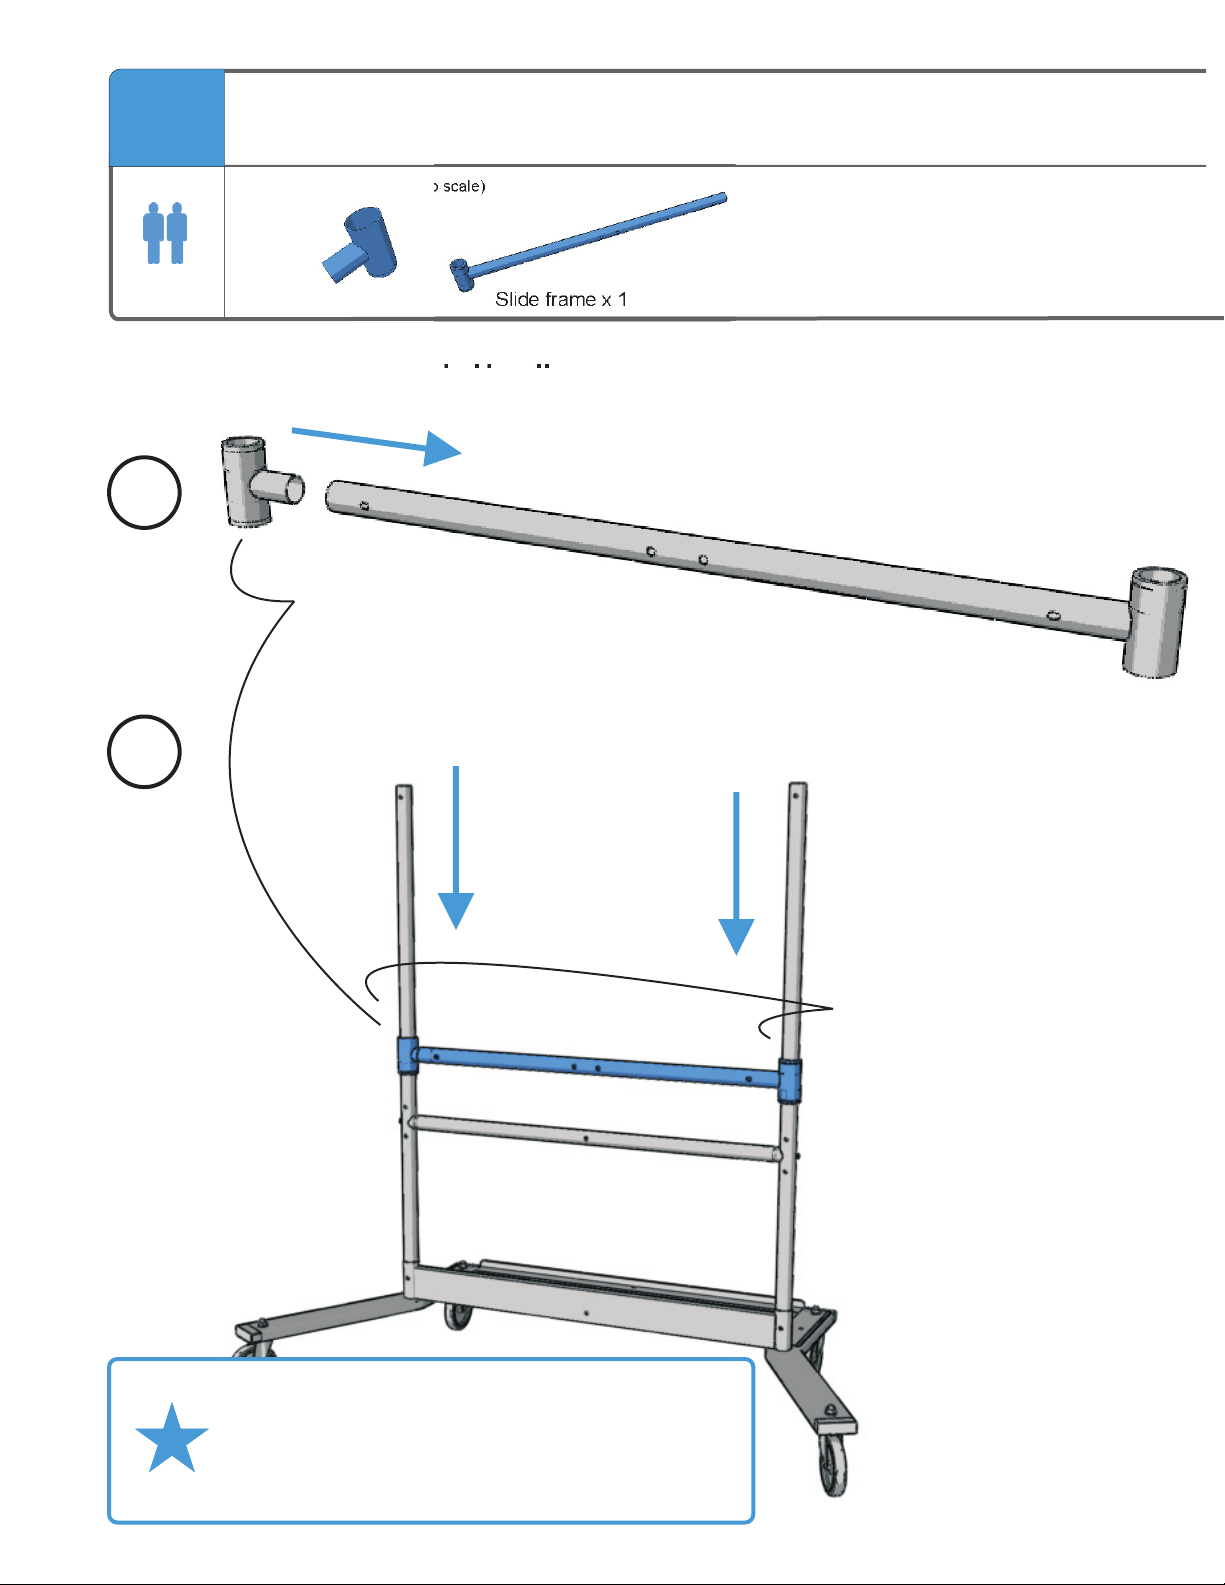
6
Bolt from Extra
hardware bag 1x
You will need: (not to scale)
2-Person Task
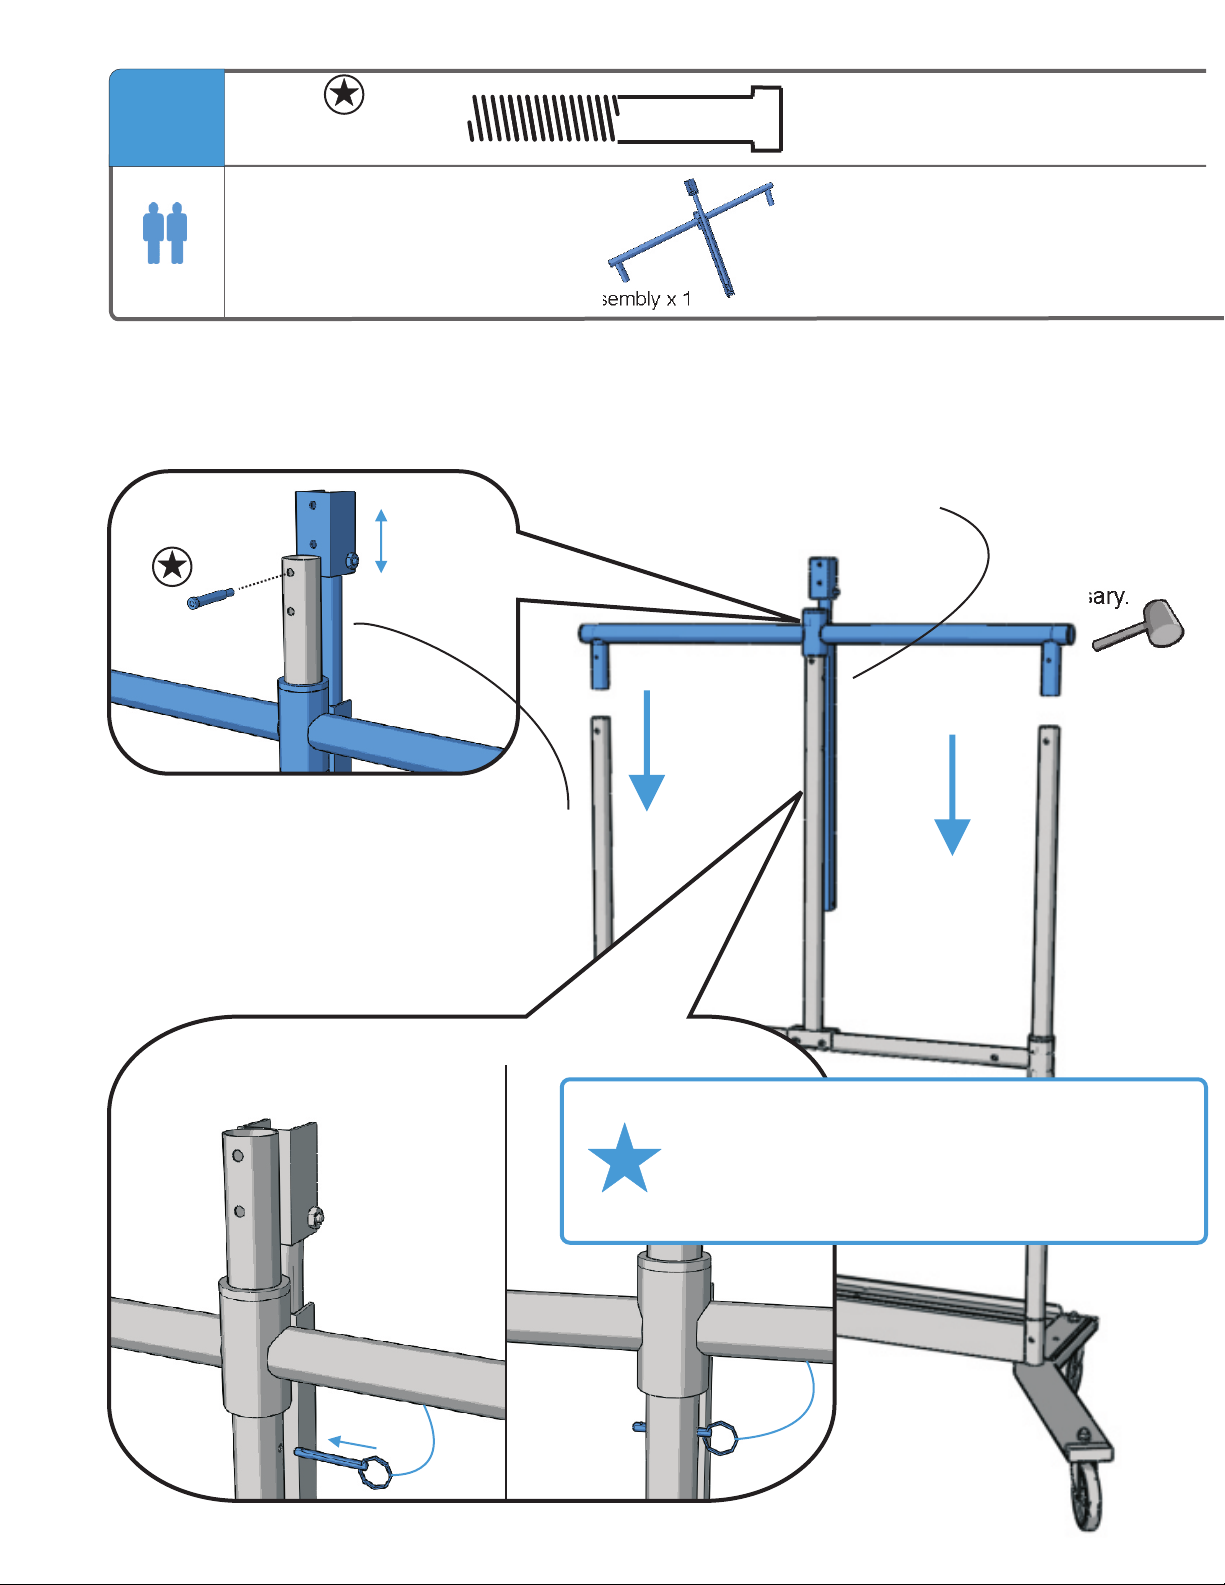
Install Upper Frame
Upper frame pre-assembly x 1
Insert upper frame into the legs, ensuring that the center
slides over the center slide pole.
Pull frame up
to align holes
Tap in with rubber
mallet
if necessary.
Use a spare bolt or Velcro® Strap (included)
to secure the upper frame to the
center slide pole until the top
is fastened.
Insert detent pin (attached to upper frame)
in hole.
Please Note:
Sliding parts are lubricated with a Petroleum
based jelly to ensure smooth movement when
adjusting the height.
Epson_CART - Version 2012_A - May 8 2012 - Copernicus Educational Products Inc.
15
Page 16
7A
B
M6 x 50mm bolt 3x
D
M6 x 45mm bolt 3x
X
M6 x 40mm bolt 2x
You will need: (not to scale)
V
M8 lock washer
4x
Short stretcher x 2 Front cover x 1
W
M6 barrel nut
4x
Install Front Cover & Short Stretchers
If you plan to install the optional Lock Box,
BB
M6 x 35mm bolt 2x
Small
spacer 1x
N
M6 lock
washer 2x
skip this step and proceed to Step 7B for instructions.
B
N
P
BB
V
Item Q - spacer
sits between front cover
W
and base assembly tubing
Q
Q
M6 keps nut
2x
P
front
V
V
side
W
W
B
BB
X
Front
N
B
D
B
X
N
BB
V
V
W
W
X
V
P
W
Rear
Epson_CART - Version 2012_A - May 8 2012 - Copernicus Educational Products Inc.
16
Page 17

7B
Actual Size:
B
M6 x 50mm
bolt 2x
N
M6 lock
washer 2x
P
M6 keps
nut 1x
You will need: (not to scale)
D
Short stretcher x 2 Front cover x 1
Install Front Cover & Short Stretchers
If you plan to install the optional Lock Box
M6 x 45mm
bolt 1x
Item Q - spacer
sits between front cover
and base assembly tubing
Q
Q
Small
spacer 1x
front
side
B
N
D
B
P
Rear
N
Front
Epson_CART - Version 2012_A - May 8 2012 - Copernicus Educational Products Inc.
17
Page 18

K
8
K
Partially
threaded M8 x 50mm bolt 2x
V
M8 lock
washer 2x
N
M6 lock
washer 4x
You will need: (not to scale)
Back supports x 2
B
M6 x 50mm bolt
4x
Install Back Supports & Secure Short Stretchers
Y
M8 extra large
flat washer
2x
N
B
B
N
Y
V
K
Epson_CART - Version 2012_A - May 8 2012 - Copernicus Educational Products Inc.
B
N
Hole indents should
always be to the outside
of the unit.
18
Page 19

9
Actual Size:
B
M6 x 50mm
bolt 2x
N
M6 lock washer
2x
You will need: (not to scale)
2-Person Task
Support stretcher with spring clips (chrome) x 1
Install Rear Support Stretcher
N
B
Laptop tray x 1
B
N
You will need: (not to scale)Option
Ensure spring clip
is turned towards the
inside of the unit.
OR
If you plan to install the optional Rear Laptop Arm
Laptop tray can be installed on
1
Slide laptop tray assembly
onto support stretcher
until the spring clips pop
through the laptop tray
assembly.
either the left or right hand side.
B
2
N
CAUTION
!
Maximum recommended weight
on rear laptop arm - 20 lbs.
B
N
Epson_CART - Version 2012_A - May 8 2012 - Copernicus Educational Products Inc.
19
Page 20

10
Actual Size:
R
M8 lock
nut 4x
You will need: (not to scale)
Board mounting frame - top x 1
Board mounting frame - support x 2
Install Board Mounting Frame - Top & Projector Arm Support
R
LEAVE VERY LOOSE
1
R
Ensure tabs are all on one side.
Epson_CART - Version 2012_A - May 8 2012 - Copernicus Educational Products Inc.
20
Page 21

11
2-Person Task
F
Partially threaded M8
x 95mm bolt 1x
You will need: (not to scale)
Projector arm support x 1
R
M8 lock
nut 2x
E
Partially
threaded
M8 x 65mm bolt 1x
Install Board Mounting Frame - Top & Projector Arm Support
2
Slide projector
Note orientation
of arm - ensure
it is toward the
front.
arm support
into center
slide pole.
T
T
Large
spacer 2x
front
Side View
F
side
You must remove
the temporary bolt
and detent pin to
install the arm support.
3
Ensure frame is level
before tightening!
!
Rear
Spacer
item T
R
R
Insert bolts through the
projector support arm, shock bracket
and board mounting frame - top.
Tap in with a rubber mallet if necessary.
T
F
R
R
E
E
Front
!
Ensure welded nuts
are facing
toward the front.
F
T
E
T
R
T
E
Epson_CART - Version 2012_A - May 8 2012 - Copernicus Educational Products Inc.
21
Page 22

You will need: (not to scale)
Board mounting frame - bottom x 1
Determine Your Board Frame Position
The board mounting frame is adjustable to
allow for the use of different sizes of boards.
Use this table to determine which hole
you should use.
Epson Projector Arm
ModelProjector
Epson 470/480
470/480
475W/485W
475W/485W
475WI/485WI
480I
475WI/485WI
475WI/485WI
Copernicus 77” WB
Copernicus 77” WB
Egan 90” WB
Egan 96” WB
Board
Smart 680
Smart 880
Smart 685
Smart 885
Board
Frame
H
F
F
F
G
H
E
C
Hole A
Hole B
Hole C
Hole D
Hole E
Hole F
Hole G
Hole H
Distance (X)
Hole Distance (X)
A
B
C
D
E
F
G
H
8.25”
7.25”
6.25”
5.25”
4.25”
3.25”
2.25”
1.25”
Tip for verifying your
hole position.
Board Frame
(Shown installed in Hole H)
Epson_CART - Version 2012_A - May 8 2012 - Copernicus Educational Products Inc.
22
Page 23

12
M6 x 90mm bolt
G
2x
S
M6 lock nut
2x
T
Large spacer
2x
front
side
You will need: (not to scale)
Board mounting frame - bottom x 1
Install Board Mounting Frame - Bottom
Using the hole you selected on the
previous page, slide the bottom mount
frame into the top mount frame
and fasten through your
chosen hole and through
the sliding frame as
shown.
Tap in with rubber
mallet if necessary.
Work from side
to side as you
tap it in.
!!
G
U
M8 flat washer
2x
Side
Spacer item T
U
T
S
!
S
U
G
T
TIGHTEN
4 positions
TIGHTEN!
Epson_CART - Version 2012_A - May 8 2012 - Copernicus Educational Products Inc.
23
Page 24

Actual Size:
13
Partially threaded
M8 x 35mm bolt 4x
You will need: (not to scale)
Install Lift Handle
H
R
M8 lock nut
4x
Lift handle x 1
R
H
TIGHTEN!
Epson_CART - Version 2012_A - May 8 2012 - Copernicus Educational Products Inc.
24
Page 25

14
Actual Size:
BB
M6 x 35mm
bolt 2x
P
M6 keps nut
2x
N
M6 lock washer
2x
You will need: (not to scale)
Keyboard tray x 1
Install O Keyboard Trayptional
Skip this step if you are not installing a keyboard tray.
BB
N
P
Epson_CART - Version 2012_A - May 8 2012 - Copernicus Educational Products Inc.
25
Page 26

15A
Actual Size:
You will need: (not to scale)
R
M8 lock nut
8x
I
M6 x 19mm
bolt 8x
V
M8 lock washer
8x
W
M6 barrel nut
8x
Protective handle x 2
Handle insert x 4
Install Protective Handles
If you plan to install the optional Side Laptop Arm,
skip this step and proceed to step 15B for instructions.
1
R
R
2
3
I
V
W
TIGHTEN!
Epson_CART - Version 2012_A - May 8 2012 - Copernicus Educational Products Inc.
26
Page 27

15B
Actual Size:
You will need: (not to scale)
Protective handle x 2 Handle insert x 4
R
M8 lock nut
8x
I
M6 x 19mm
bolt 6x
V
M8 lock washer
6x
Install Protective Handles for Use With a Side Laptop Arm
If you plan to install the optional Side Laptop Arm
W
M6 barrel nut
6x
1
3
2
R
R
TIGHTEN!
I
V
W
Do not secure handle on the lower right side
(from Front) of the unit. This is where your side laptop
!
arm will be installed.
Epson_CART - Version 2012_A - May 8 2012 - Copernicus Educational Products Inc.
27
Page 28

Actual Size:
16
You will need: (not to scale)
CC
M8 x 40mm bolt
2x
Side laptop extension arm x 1
R
M8 lock nut
2x
Install Optional Side Laptop Arm
Skip this step if you are not installing the side laptop arm.
TIGHTEN!
R
R
CC
CC
Epson_CART - Version 2012_A - May 8 2012 - Copernicus Educational Products Inc.
28
Page 29

17
WARNING
WARNING
Maximum recommended weight
3-Person Task
Position Board on Mounting Frame
Lift board onto the bottom mounting frame, resting it on the bottom brackets.
!
!
To avoid property damage or
on bottom shelf - 50 lbs.
bodily injury, please hold the board
securely until fastened.
Ensure the board is centered on the frame:
equal distance
Epson_CART - Version 2012_A - May 8 2012 - Copernicus Educational Products Inc.
equal distance
One person should
hold the top of the board
until it is secured (next step).
Loosen nut and slide bracket until
it is flush with the board.
Once it is flush, re-tighten the nut in place.
29
Page 30
18
Actual Size:
You will need: (not to scale)
H
Partially threaded M8 x
35mm bolt 4x
Top clamps x 2
U
M8 flat washer
4x
Secure Top of Board
Position top clamp around top
1
frame of board.
Do not
over tighten!
Over tightening
may crush
frame
2
3
U
H
Loosen nut and slide bracket until
it is flush with the board.
Once it is flush, re-tighten the nut in place.
Epson_CART - Version 2012_A - May 8 2012 - Copernicus Educational Products Inc.
U
H
30
Page 31

19
Adjust Projector Arm Height
Install using the bottom two holes on the post. All
the supported projector and board combinations
will use these same post holes.
Epson Projector Arm
ModelProjector Board
Epson 470/480
470/480
475W/485W
475W/485W
475WI/485WI
480I
475WI/485WI
475WI/485WI
DO NOT fold projector
arm until the projector
!
has been installed.
Smart 680
Smart 880
Smart 685
Smart 885
Copernicus 77” WB
Copernicus 77” WB
Egan 90” WB
Egan 96” WB
PA Post
Holes
1,2
1,2
1,2
1,2
1,2
1,2
1,2
1,2
7
6
5
4
3
2
1
TIGHTEN BOLTS NOW!
Epson_CART - Version 2012_A - May 8 2012 - Copernicus Educational Products Inc.
31
Page 32

20.1
You will need: (not to scale)
Adapter Plate x 1 Epson Projector Arm x 1
Install Projector Arm Adapter Plate
1
2
Remove four screws and washers. Keep for later step.
Slide on the Projector Arm Adapter Plate. Line up slots on the arm with plate.
Hold the two
mount
pieces
together
so that the
slots in
each align.
Make sure hexagonal screw is in place.
Epson_CART - Version 2012_A - May 8 2012 - Copernicus Educational Products Inc.
32
Page 33

20.2
3
Actual Size:
U
M8 flat washer
4x
DD
M4 x 16mm bolt
6x
EE FF
M4 lock washer
6x
9/16” x 11/64” flat
washer 6x
While holding the two mount pieces together and holding in place the hexagonal shaft,
install the four screws you kept, along with the added washer. Do not fully tighten.
D
4
Install six short screws, lock washers and flat washers. Do not tighten the 6 screws
all the way until after you mount the arm on the Projector Support Arm that was included
with your Cart or Wall Mount.
C
B
A
Epson_CART - Version 2012_A - May 8 2012 - Copernicus Educational Products Inc.
33
Page 34

Actual Size:
21
You will need: (not to scale)
2-Person Task
Epson Projector Arm with Adapter Plate x 1
O
M10 lock nut
2x
Attach Projector Arm to Unit
TIGHTEN
U
M8 flat washer
2x
N
M6 lock washer
2x
I
M6 x 19mm bolt
2x
these nuts!
O
I
N
U
U
N
O
Hook adapter plate over studs on
projector arm. Hold arm in position.
WARNING
WARNING
Maximum recommended weight
!
!
I
Gas cylinders are under pressure.
on bottom shelf - 50 lbs.
To avoid property damage or bodily
injury, please use caution when
folding the arm.
Rotate adapter plate into position and secure.
Please refer to the installation guide included with your Epson projector for instructions on
how to install the projector on the adapter plate and on how to adjust the projector for use.
Epson_CART - Version 2012_A - May 8 2012 - Copernicus Educational Products Inc.
34
Page 35

22
Remove Slide Plate
Remove the two screws.
Keep your hardware
for the next step.
Epson_CART - Version 2012_A - May 8 2012 - Copernicus Educational Products Inc.
35
Page 36

23
You will need: {not included} (not to scale)
Epson projector x 1
PowerLite 470, 480, 480i, 475W, 485W, 475W 485Wii,
Attach Slide Plate to Projector
Attach the Slide Plate to the projector.
Front
Board Side
Use the hardware supplied
with your projector
Back
Epson_CART - Version 2012_A - May 8 2012 - Copernicus Educational Products Inc.
36
Page 37

24
Attach Projector to Projector Arm
Use the hardware supplied
with your projector
Epson_CART - Version 2012_A - May 8 2012 - Copernicus Educational Products Inc.
37
Page 38

Actual Size:
S
J
2-Person Task
All the projector and board combinations listed in this assembly guide require a stop bolt to be
installed.
This bolt is intended to fit tight. You may need to tap
the bolt in using a rubber mallet.
J
M8 x 50mm shoulder
bolt 1x
!
used only in special instances
Install Stop Bolt
S
M6 lock nut
1x
Epson_CART - Version 2012_A - May 8 2012 - Copernicus Educational Products Inc.
38
Page 39

Folding the Projector Arm
!
!
WARNING
WARNING
Maximum recommended weight
Gas cylinders are under pressure.
on bottom shelf - 50 lbs.
To avoid property damage or bodily
injury, please use caution when
folding the arm.
Epson_CART - Version 2012_A - May 8 2012 - Copernicus Educational Products Inc.
39
Page 40

Actual Size:
25
You will need: (not to scale)
Install O Lock Box Sidesptional
X
M6 x 40mm bolt
2x
Lock box side with door x 2
1 left, 1 right
V
M8 lock washer
4x
BB
W
M6 barrel nut
4x
M6 x 35mm bolt 2x
D
BB
X
V
V
V
W
W
W
!
CAUTION
Maximum recommended weight in
lock box - 50 lbs.
Epson_CART - Version 2012_A - May 8 2012 - Copernicus Educational Products Inc.
40
Page 41

Actual Size:
26
You will need: (not to scale)
Install O Lock Box Topptional
B
M6 x 50mm
bolt 3x
P
M6 keps nut
3x
Lock box top x 1
Position the lock box top around the support stretcher,
with the sheet metal tab between the stretcher and
the front cover. Side tabs on the top fit inside of the box sides
It is easiest to fit the edges towards the back (doors) of the unit
between the doors first, and then push the front side into place.
B
P
Looking from the
underside
B
Hardware item B
bolts from the front
through the front cover,
box top and stretcher.
Ensure side tabs on the top fit
inside of the box sides.
!
P
P
!
Epson_CART - Version 2012_A - May 8 2012 - Copernicus Educational Products Inc.
Maximum recommended weight in
lock box - 50 lbs.
Image shown with door
removed for clarity
CAUTION
41
Page 42

27
Actual Size:
B
M6 x 50mm
bolt 4x
P
M6 keps
nut 4x
Secure Lock Box Sides & Top Optional
Secure on the inside
using hardware item “P”.
B
Z
M5 x 13mm bolt
4x
P
AA
M5 keps
nut 4x
Secure on the inside
using hardware item “AA”.
Z
AA
!
Epson_CART - Version 2012_A - May 8 2012 - Copernicus Educational Products Inc.
Maximum recommended weight in
lock box - 50 lbs.
CAUTION
42
Page 43

Actual Size:
28
You will need: (not to scale)
Install Lock Box StretchersOptional
1
BB
M6 x 35mm bolt
4x
Lock box stretcher 1 x 1 Lock box stretcher 2 x 1
N
M6 lock washer
4x
Image shown with door
removed for clarity
Ensure hole in stretcher
is pointing upwards.
N
BB
BB
2
Ensure that the cutout
detail for the lock is
oriented to the outside
of the lock box.
Ensure the arrow
is pointing down.
N
!
CAUTION
Maximum recommended weight in
lock box - 50 lbs.
BB
N
Epson_CART - Version 2012_A - May 8 2012 - Copernicus Educational Products Inc.
N
BB
43
Page 44

29
You will need: (not to scale)
Laptop tray x 1
Install Side Laptop Tray Optional
Slide laptop tray onto side laptop extension arm.
CAUTION
!
Maximum recommended weight
on side laptop tray - 20 lbs.
TIGHTEN ALL FASTENERS ON THE UNIT!
Epson_CART - Version 2012_A - May 8 2012 - Copernicus Educational Products Inc.
44
Page 45

30
Install Release Cable
!
WARNING
Gas Cylinder is under pressure.
To avoid property damage or bodily
injury, please ensure unit is fully
assembled before adjusting the
height.
SNAP
Hook the bottom of
the cable into the
catch on the
cylinder, and then
snap the body of
cable into the fitting
on the cylinder.
MAKE SURE IT
SNAPS INTO PLACE!
IT IS A VERY TIGHT
SNAP FIT!
Release cable runs up behind the
board from the front of the unit.
Front
TIGHTEN ALL FASTENERS ON THE UNIT!
Epson_CART - Version 2012_A - May 8 2012 - Copernicus Educational Products Inc.
45
Page 46

31
TIGHTEN ALL FASTENERS ON THE UNIT!
Release Height Stop Pin
To allow height adjustment of the unit, pull
the detent pin out of the locator hole.
At any time, replace the pin in the hole to stop
the unit from adjusting in height.
!
Pull pin out of hole.
WARNING
Gas Cylinder is under pressure.
To avoid property damage or bodily
injury, please ensure unit is fully
assembled before adjusting the
height.
Epson_CART - Version 2012_A - May 8 2012 - Copernicus Educational Products Inc.
46
Page 47

Setting Up the Projector for Use
Please refer to the Epson installation guide
included with your projector for details on setting
up the projector and
aligning the projector for use.
Epson_CART - Version 2012_A - May 8 2012 - Copernicus Educational Products Inc.
47
Page 48

You will need: (not to scale)
Split black
wire loom
1x
Black one-wrap
Velcro® strap
12x
Routing Cables Through the Cart
VGA cable & power projector cord run through the
projector setting plate. Plug both cords into the side of the
projector - VGA cord plugs into ‘Computer 1’ source.
At the back of the projector setting plate, feed the two cables through
the hole. Hold the cables together and wrap the split black wire loom
around the cables, containing the length of them within the loom.
Following the diagram below, route the loom appropriately.
Secure in multiple locations with Velcro® straps.
Lift board to highest position
before securing any Velcro® straps
VGA cable
(provided with projector )
V
Projector power cable (provided with projector)
PP
V
PP
!
V
PP
Wiring through the
optional Lock Box:
Epson_CART - Version 2012_A - May 8 2012 - Copernicus Educational Products Inc.
48
Page 49

Tips for Use of the Side Laptop Arm
Folding the Arm Away:
Always fold the laptop arm away before moving the unit.
1 2 3
Push in spring
button to rotate
tray down.
Rotate tray behind unit. Folded tray.
Routing Cables Along the Arm: Sliding Mouse Tray:
Use the wire hooks on the arm to wrap extra
cabling around, keeping them neat & tidy.
The mouse tray slides to the left or
the right of the laptop tray.
Epson_CART - Version 2012_A - May 8 2012 - Copernicus Educational Products Inc.
49
Page 50

Tips for Use of the Rear Laptop Arm & Keyboard Tray
Folding the Tray Down:
Always fold the laptop tray down before moving the unit.
1 2
Push in spring button to fold tray. Folded tray.
3
Keyboard Tray:
Use the tray on the front of the unit for a keyboard
- no need to walk to the back of the unit!
Sliding Mouse Tray:
The mouse tray slides to
the left or the right
of the laptop tray.
Tip for Reducing Image Shaking:
Lock the FRONT casters and unlock the BACK casters
to reduce the amount of image shaking.
Epson_CART - Version 2012_A - May 8 2012 - Copernicus Educational Products Inc.
50
Page 51
Care & Maintenance
How to care for your Height Adjustable Mobile Cart
The cart is made for indoor use only
l
Cleaning: wipe with dry or damp cloth and use mild soap only if necessary.
l
Verify that the gas lift is working properly: the lift is in good condition if you can raise the board to
l
maximum height using a small amount of your own force to assist it, and lower it back down by
applying a light pressure on the handle. Please call Copernicus if your gas lift needs
maintenance.
Perform bushing lubrication yearly. See instructions below.
l
Lubricate Laptop Arm joints as needed. See instructions below.
l
For care of the board and projector please refer to the manufacturer's instructions.
l
Bushing Lubrication Instructions
1) Lower the unit to its lowest position.
2) Apply a generous bead of Petroleum Jelly all around the top of each bushing, pressing some in
the gap between the frame and bushing.
There are bushings on either side of the unit [A and B] and in the center [C].
3) Raise the board to its highest position.
4) Repeat the application of Petroleum Jelly on the bottom of the slide guide that has two
bushings [B].
5) Lower the unit back down to lowest position.
A B C
Apply
Petroleum
Jelly
Side Laptop Arm Lubrication Instructions
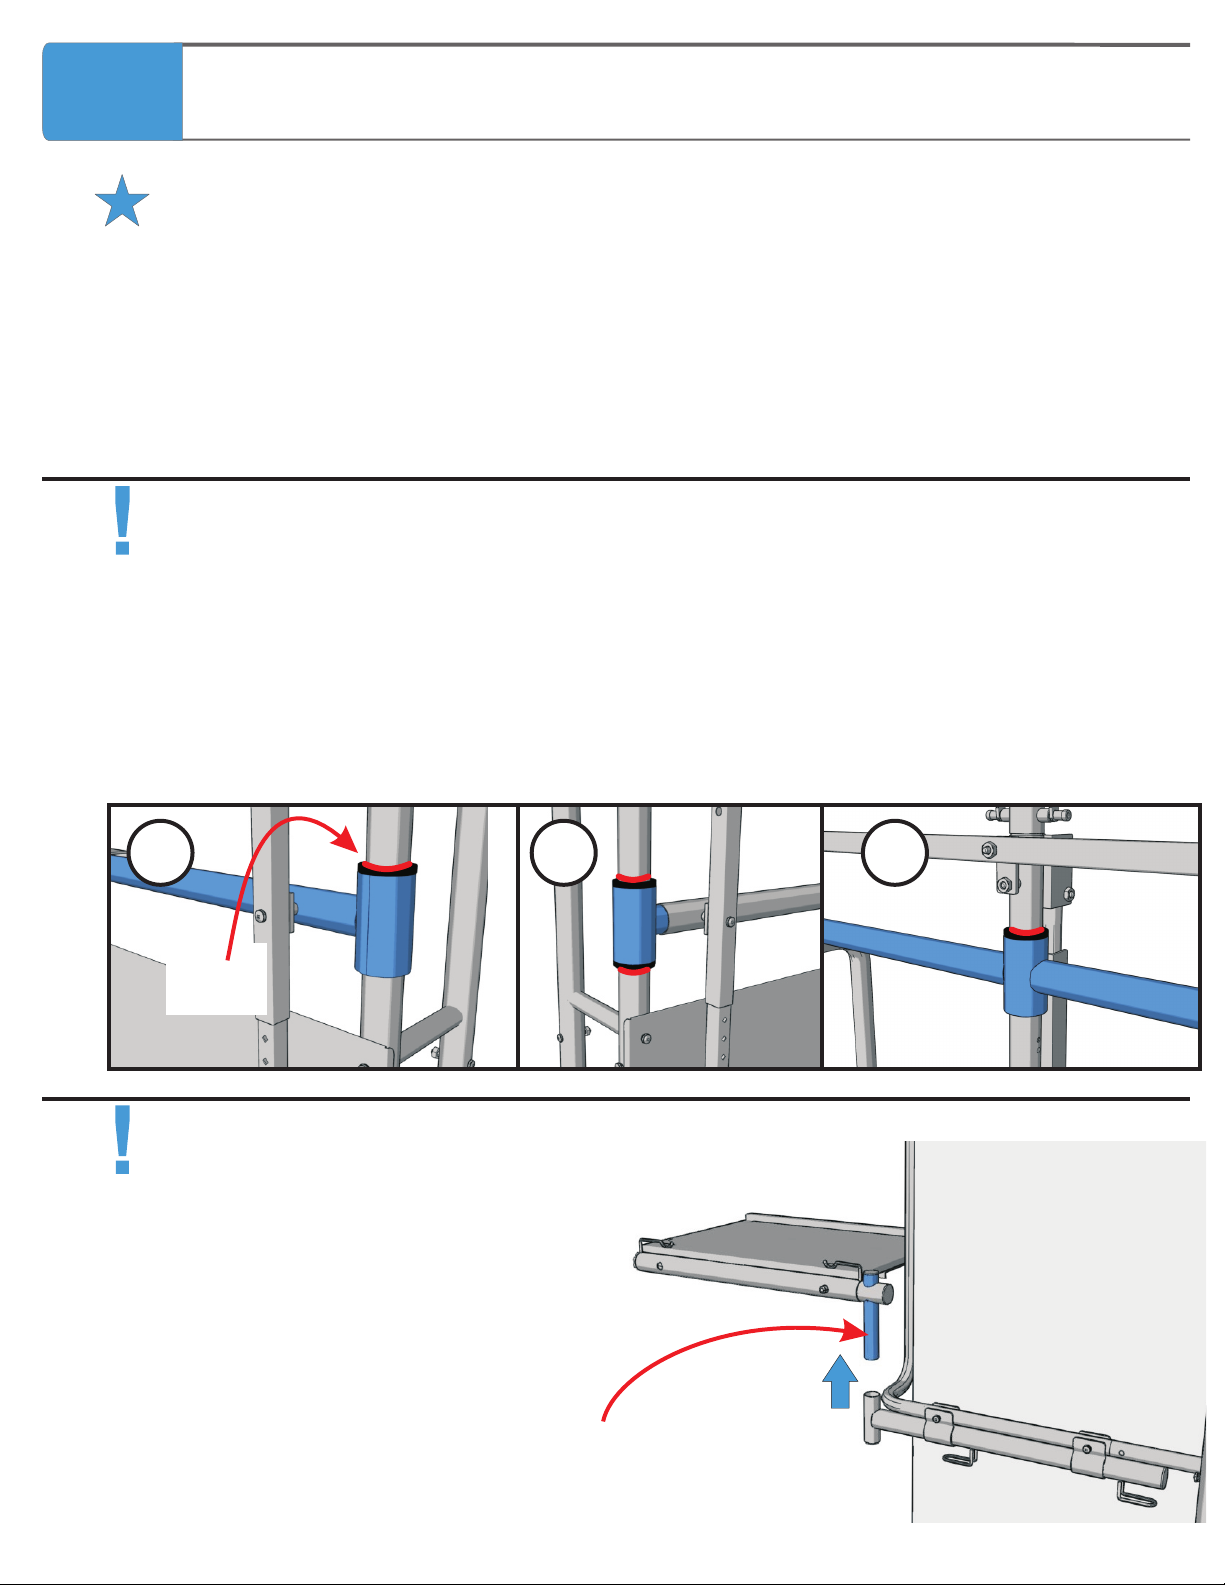
1) Remove arm by lifting it up vertically.
2) Apply Petroleum Jelly all around the connector.
3) Install arm back onto the connection.
Apply
Petroleum
Jelly
Epson_CART - Version 2012_A - May 8 2012 - Copernicus Educational Products Inc.
51
 Loading...