

Page 1
®
9-Pin Dot Matrix Printer
Quick Refere nce
Guide
Read your
User's Guide
first for
complete instructions, and then
use this guide any time you want
to quickly find information about
the topics on the right.
Contents
Loading Continuous Paper Onto the Rear
Push Tractor. . . . . . . . . . . . . . . . . . . . . . . . . . . 2
Loading Continuous Paper Onto the Front
Push Tractor. . . . . . . . . . . . . . . . . . . . . . . . . . . 4
Removing the Printed Document From
the Push Tractor . . . . . . . . . . . . . . . . . . . . . . . 6
Removing Continuous Paper With Labels. . . . 7
Replacing the Ribbon Cartridge . . . . . . . . . . . 8
Clearing Paper Jams . . . . . . . . . . . . . . . . . . . . . 13
If Your Printer Stops Printing Unexpectedly . . . 16
EPSON is a registered trademark of SEIKO EPSON COR PORATI ON . Other produc t names used here in
are for identification purposes only and may be trademarks of their respective owners. EPSON disclaims
any and all rights in those mar ks .
Copyright © 1998 by SEIKO EPSON CORPO RATION, Nagano, Japan
Printed inJapan
4010002
C01-00
Page 2
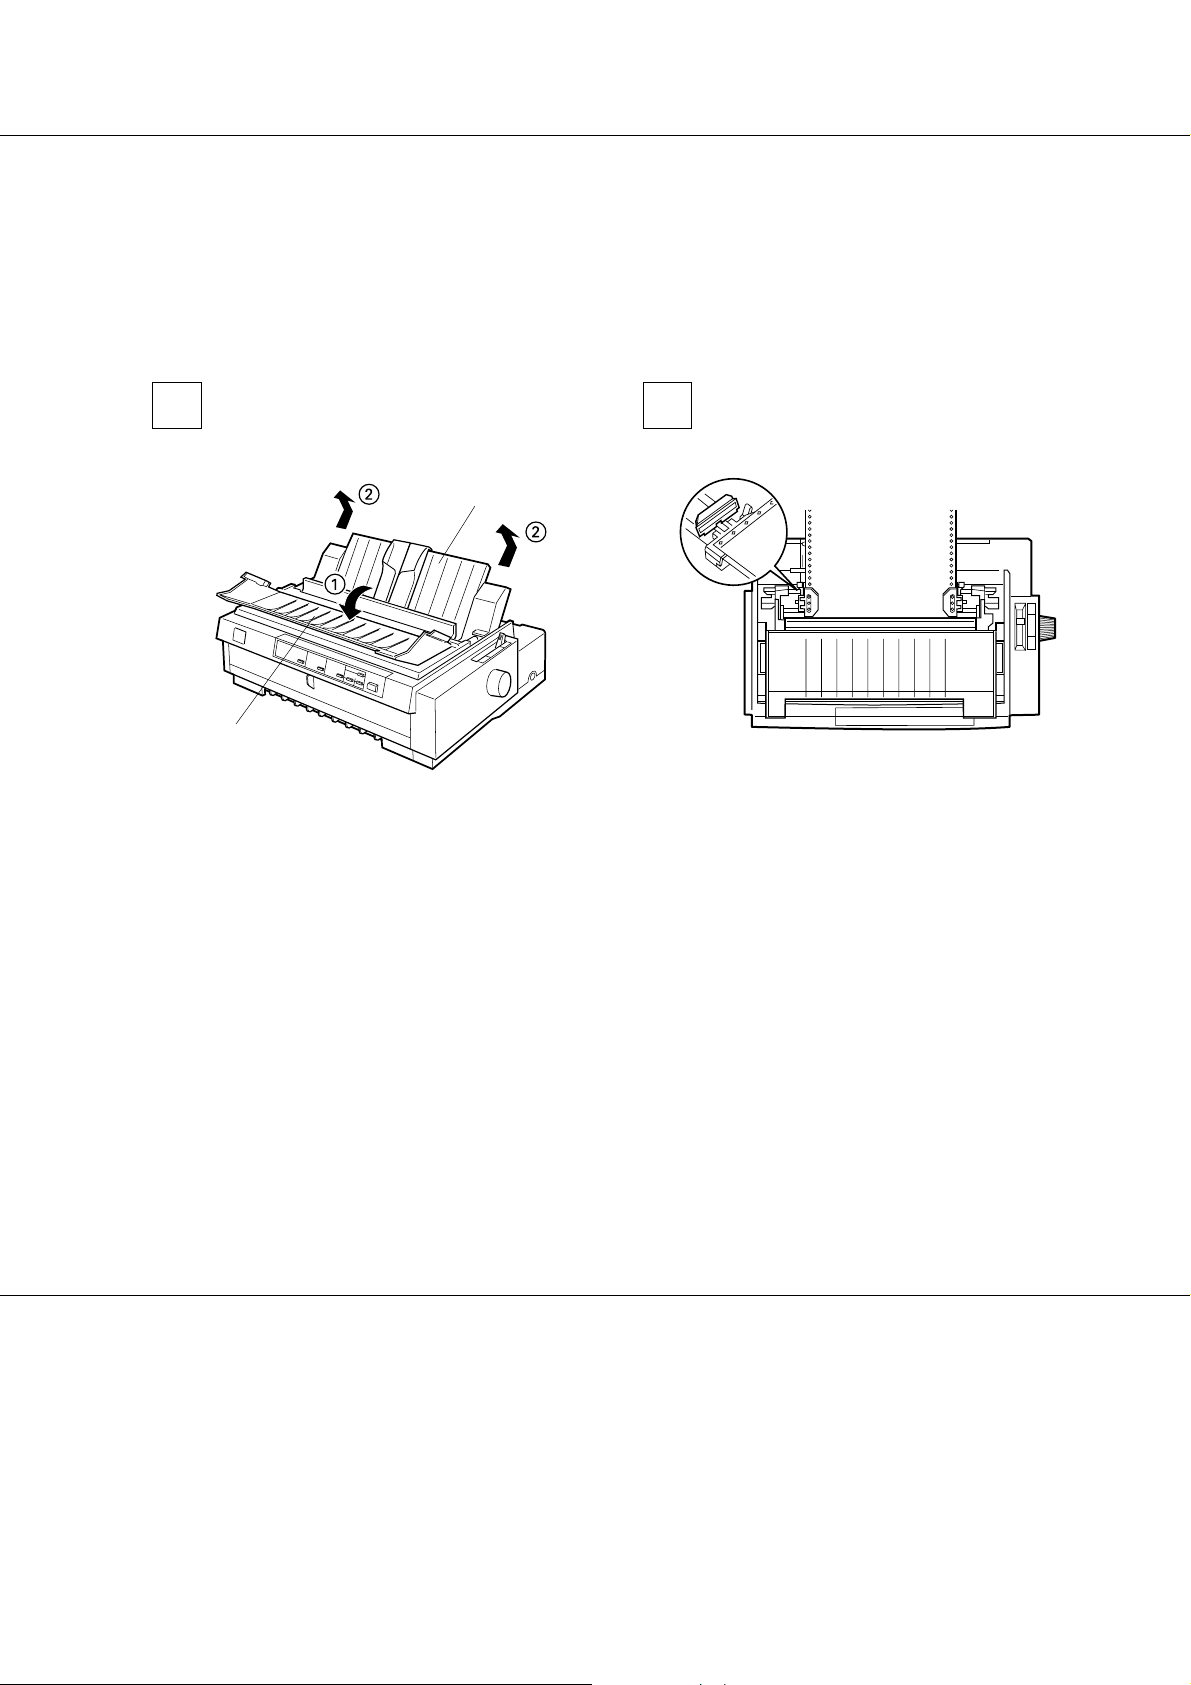
Loading Continuous Paper Onto the Rear Push Tractor
To load continuous paper onto the rear push tractor, follow these steps:
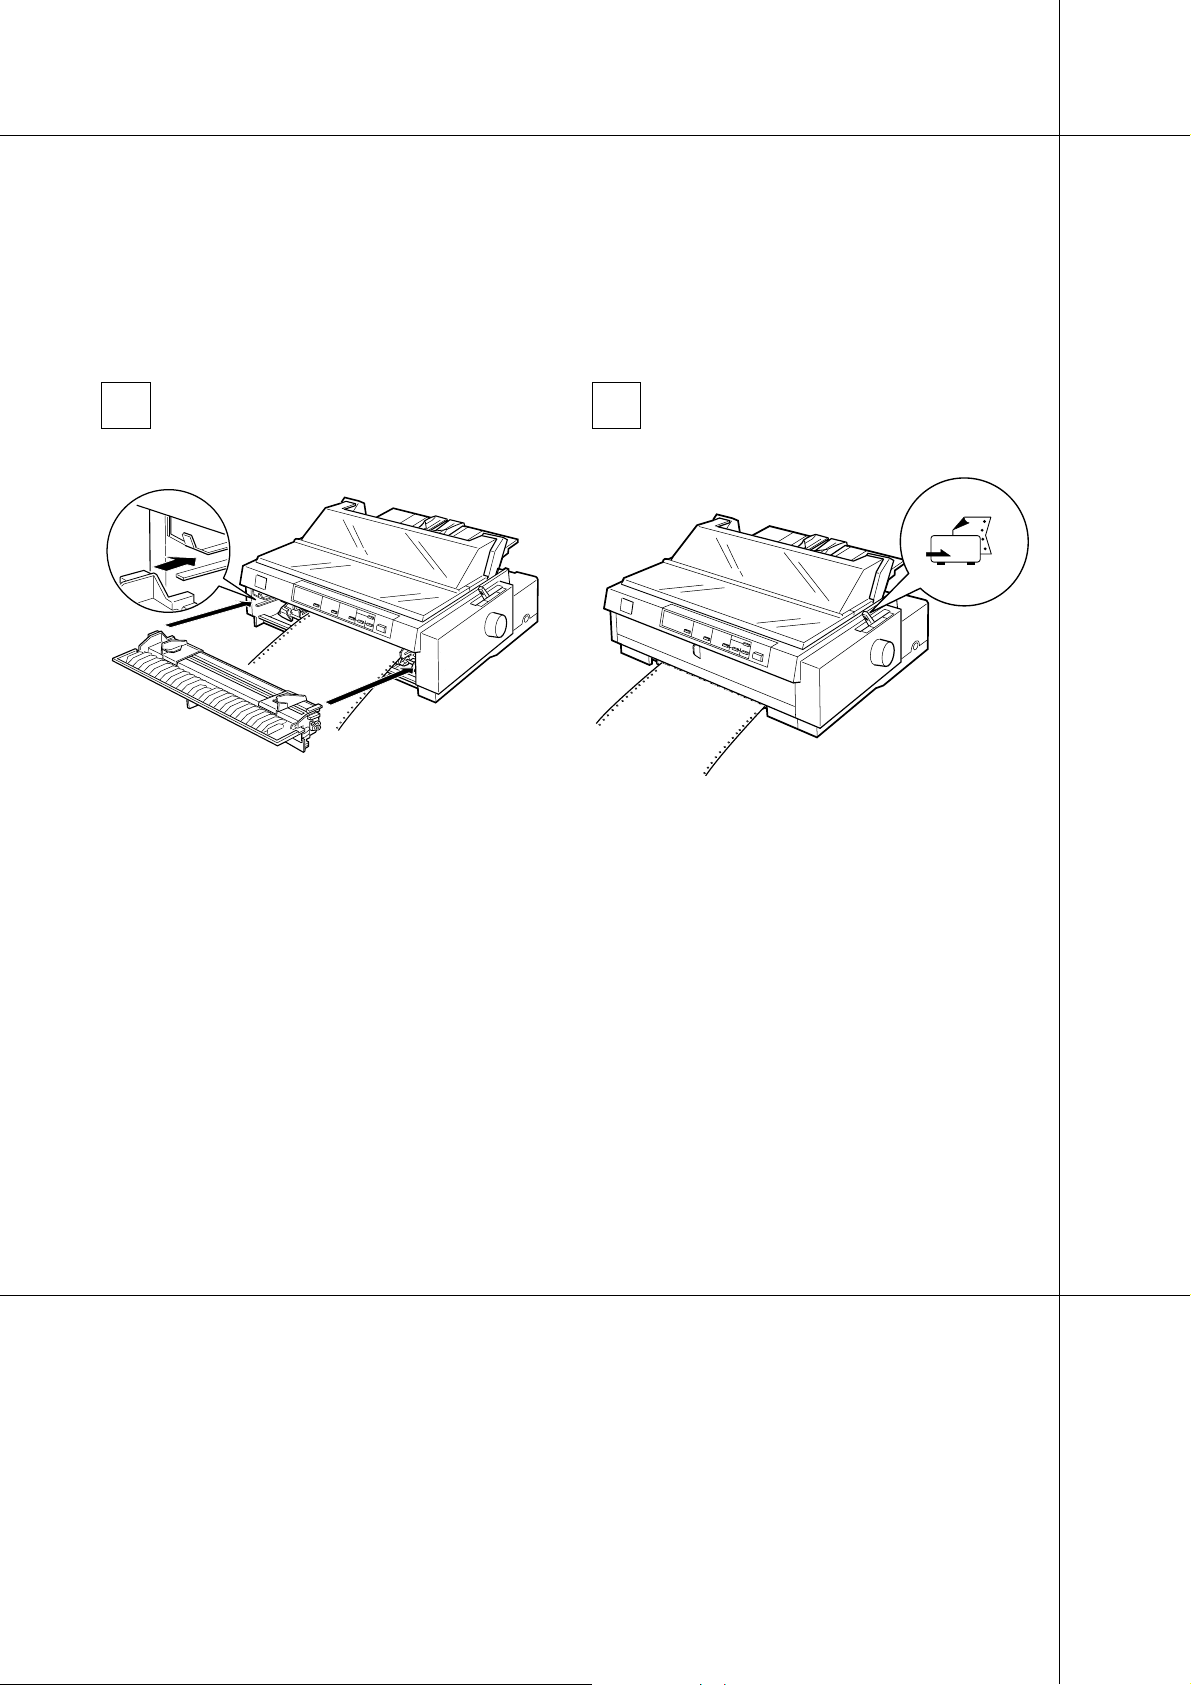
1
paper guide cover
Open the paper guide cover and
remove t he paper guide ba se .
2
paper guide base
Open both sprocket covers, and fit the
first three holes of the p aper, p r intab le
side down, over the tractor pins. Then
close the sprocket covers.
Note:
Load continuous pa per that has a clea n, s traight
edge to avoid paper jams.
To feed continuous paper to the standby
Q
position where you can remove it easily,
press the Load/Eject button.
2
When you lo ad con t in uous paper of a
Q
different size or thickness, adjust the
position of the sprockets or change the
paper thickness lever setting. See
Chapter 2 of the User’s Guide for
instructions.
Page 3
3 4
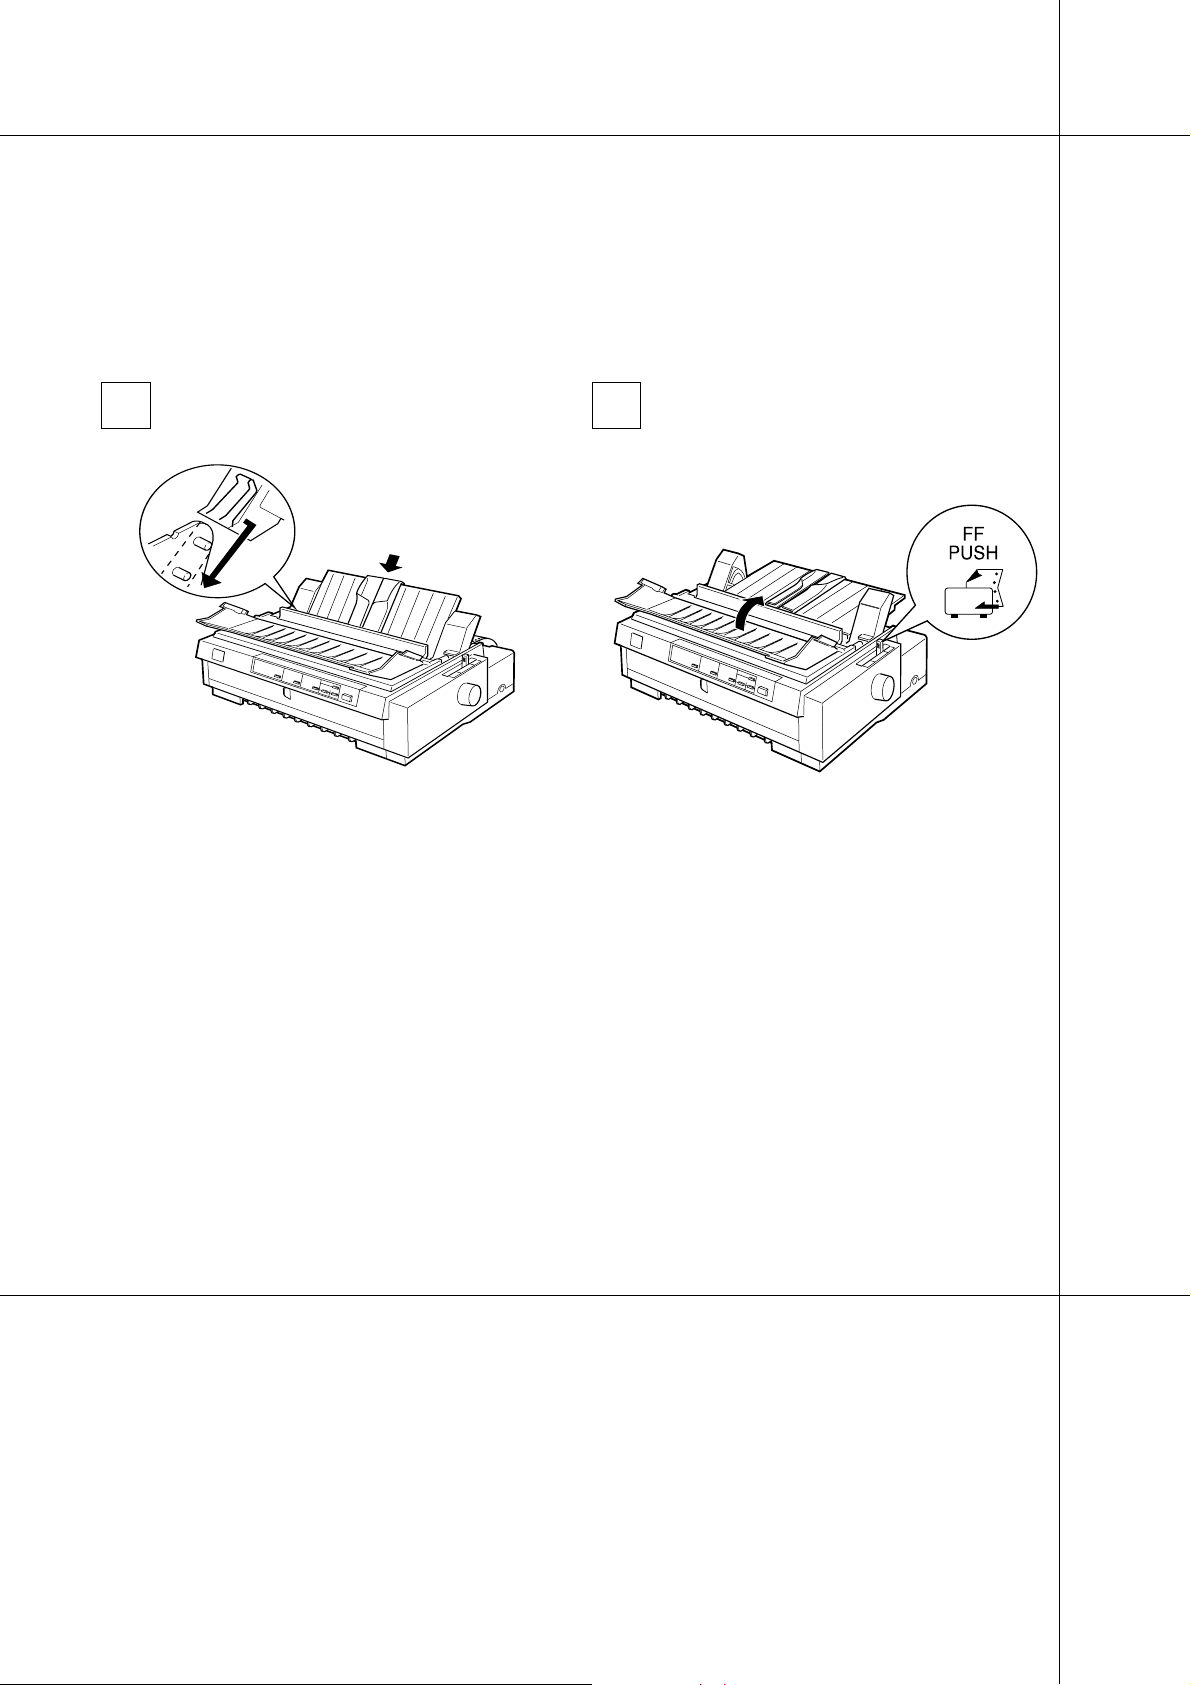
Loading Continuous Paper Onto the Rear Push Tractor
Attach the paper guide base, then lift
the center section of the paper guide up
and lay it flat.
Close the paper guide cover, and make
sure the paper release lever is set to the
rear push tractor position.
Note:
The printer canno t prin t when the pr inter cover
is open.
3
Page 4
Loading Continuous Paper Onto the Front Push Tractor
To load continuous paper onto the front push tractor, follow these steps:
Note:
To use the front push tractor, install the tractor unit in the front position and load continuous paper in
the front slot.
1 2
Open the front paper guide by pulling
the tab in the center. Remove the guide
by grasping both sides and pulling it
straight out of the printer.
To feed continuous paper to the standby
Q
position where you can remove it easily,
press the Load/Eject button.
Open both sprocket covers and fit the
first three holes of the p aper, p r intab le
side up, over the tractor pins. Then
close the sprocket covers.
Note:
Load continuous pa per that has a clea n, s traight
edge to avoid paper jams.
When you lo ad con t in uous paper of a
Q
different size or thickness, adjust the
position of the sprockets or change the
paper thickness lever setting. See
Chapter 2 of the User’s Guide for
instructions.
4
Page 5
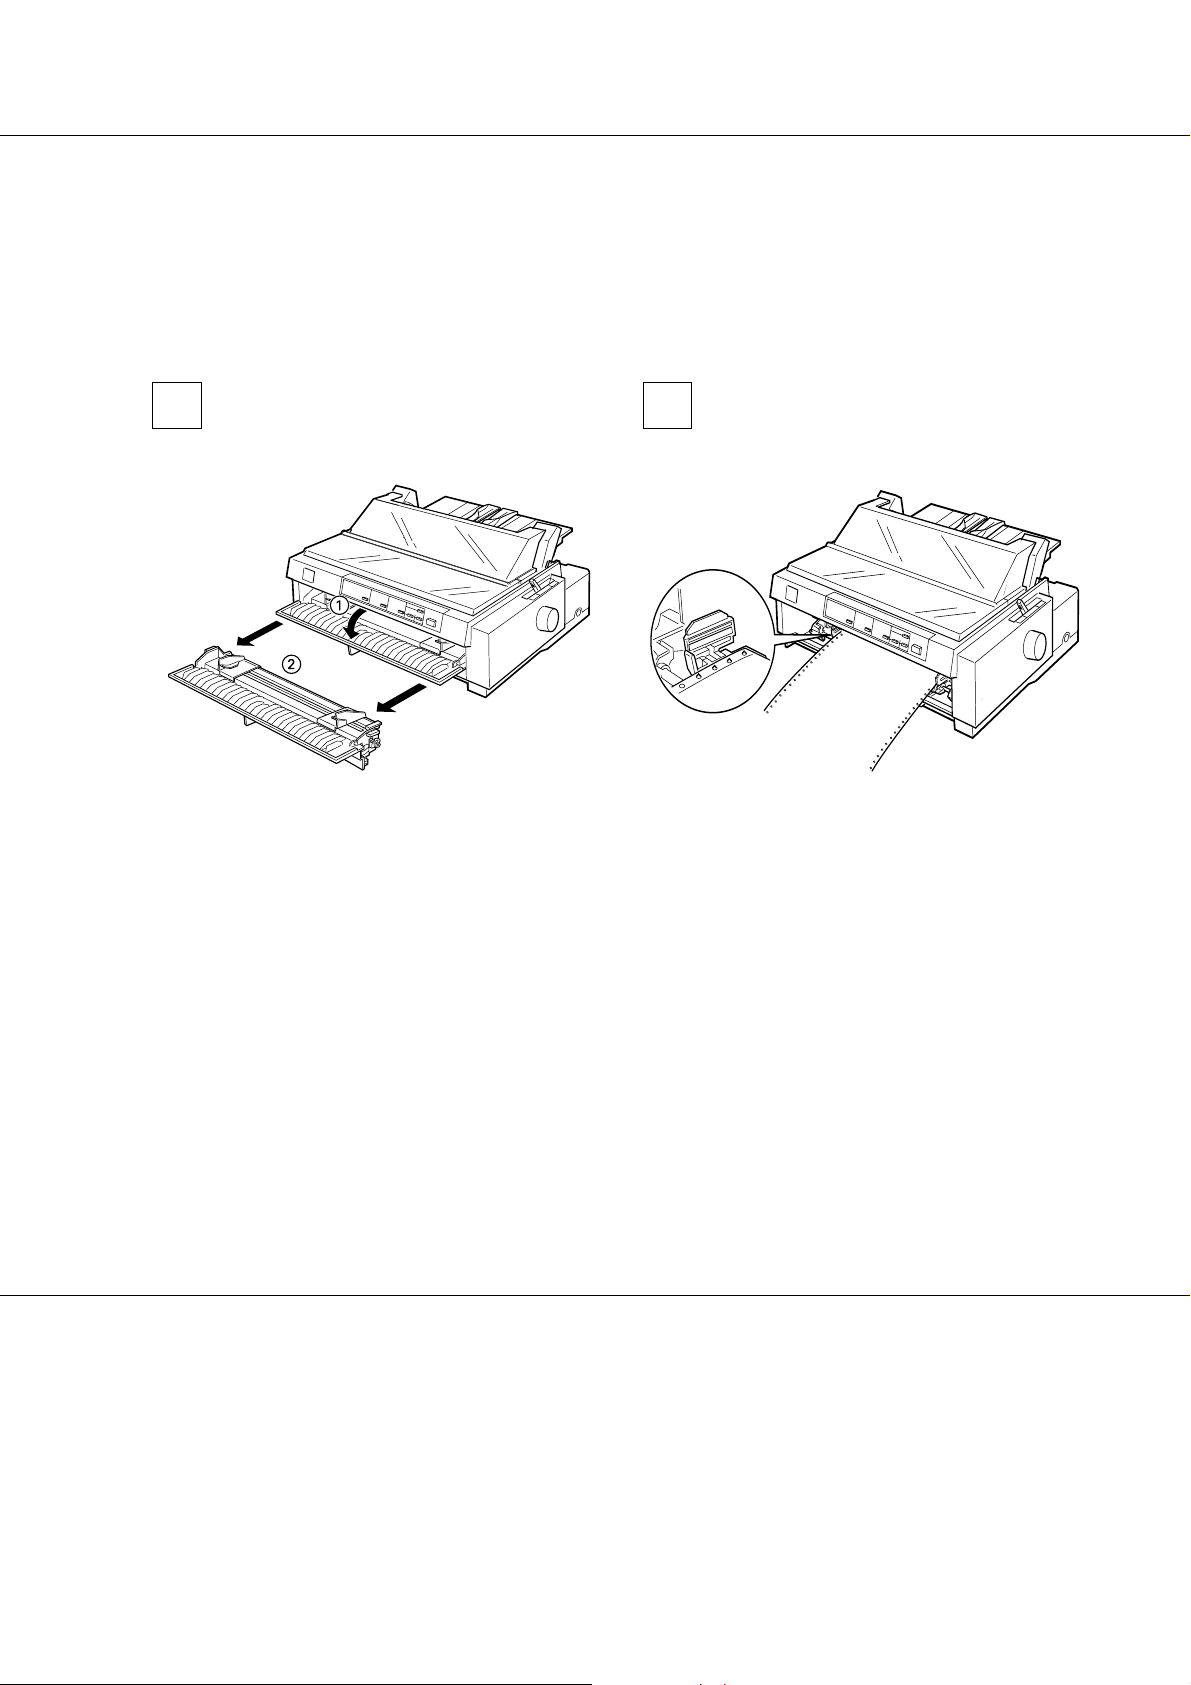
Loading Continuous Paper Onto the Front Push Tractor
3 4
Attach the front paper guide by
inserting it into the slots on each side of
the printer as shown.
When you lo ad con t in uous paper with
Q
labels, set the auto tear-off mode to Off
before you print. When fed backward,
the labels can easily come off the backing
sheet and jam the printer.
Close the front paper guide. Then set
the paper release lever to the front push
tractor position.
Note:
The printer canno t prin t when the pr inter cover
is open.
To turn off the auto tear-off mode, enter
Q
the printer’s default-setting mode. See
Chapter 5 of the User’s Guide for
instructions
5
Page 6
from the fron t push tra ct or
from the rear push tractor
Removing the Printed Document From the Push Tractor
To remove the printed document from the front and rear push tractor, follow the steps below. To
remove continuous paper from the optional pull tractor, see Chapter 2 of the User’s Guide.
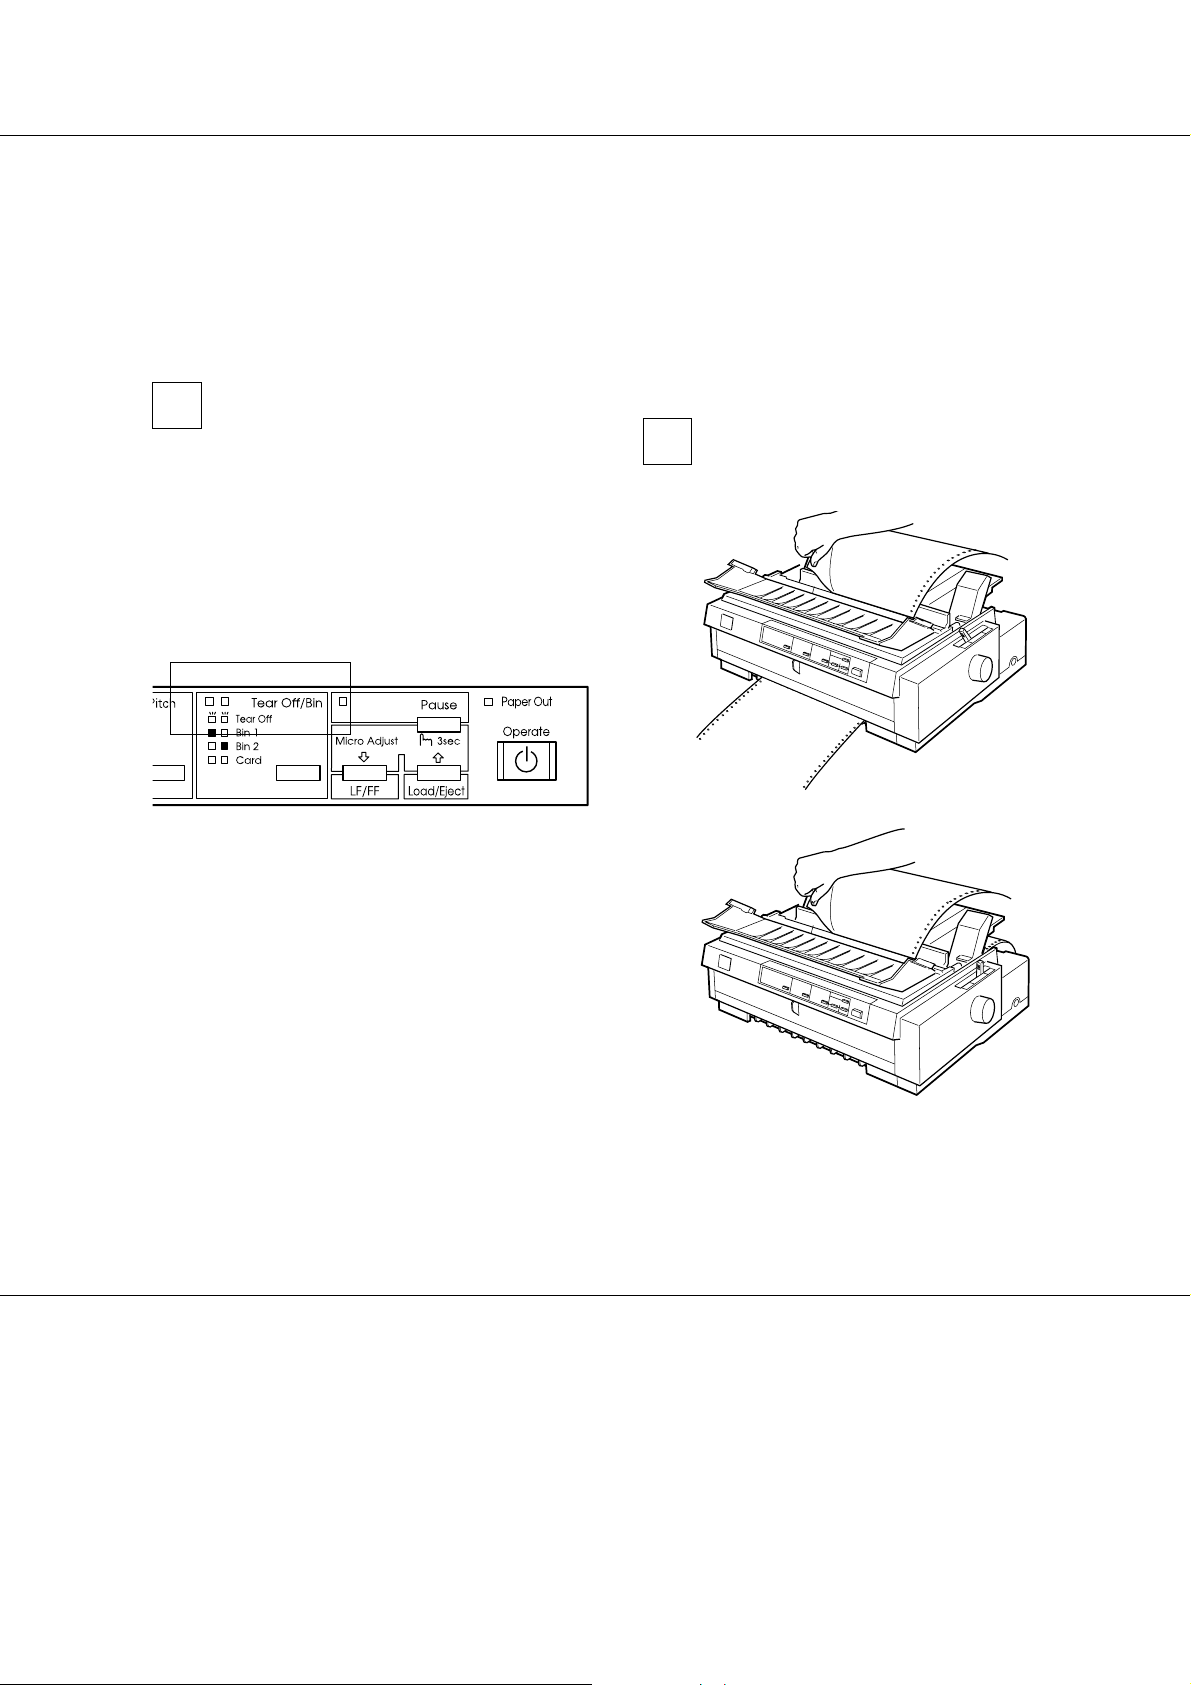
1
2
Make sure the Tear Off/Bin lights are
flashing. (You may need to press the
Tear Off/B in button.) This indicates
that your paper is at the current tear-off
positi on.
When you resume printing, the printer
Q
automatically feeds the paper backward
to the top-of-form position, and begins
printing.
6
Open the paper path guide cover, and
tear off the printed document us ing the
printer’s tear-off edge.
To feed continuous paper backward
Q
from the tear-off position into the
standby position, press the Load/Eject
button.
Page 7

Removing Continuous Paper With Labels
Removing the Printed Document From the Push Tractor
Removing Continuous Paper With Labels
To avoid peeling labels off the backing sheet and jamming the printer, follow the steps below when
you remove continuous paper with labels from the front push tractor.
1
Make sure that the printer is not
printing. You may need to press the
Pause button to pause the printer.
(When the printer is paused, the Pause
light is on.)
2
Tear off the supply of continuous labels
at the perforation nearest the paper
entry slot.
3
Hold down the LF/FF button to eject the
remainin g labels from the pr i nte r.
Caution:
Never feed labels backward usin g the
c
Load/Eject or Tear Off/Bin button.
When fed backward, labels can easily come
off the backing sheet and cause a paper
jam.
7
Page 8

Replacing the Ribbon Cartridge
Your printer uses an EPSON black ribbon cartridge S015091.
To replace the ribbon cartridge, follow the steps below.
1
Press the Operate button to turn off
the printer. The printer is off when the
surface of the Operate button is even
with the button protectors as shown.
Caution:
c
Moving the print head while the printer
is on may damage the printer.
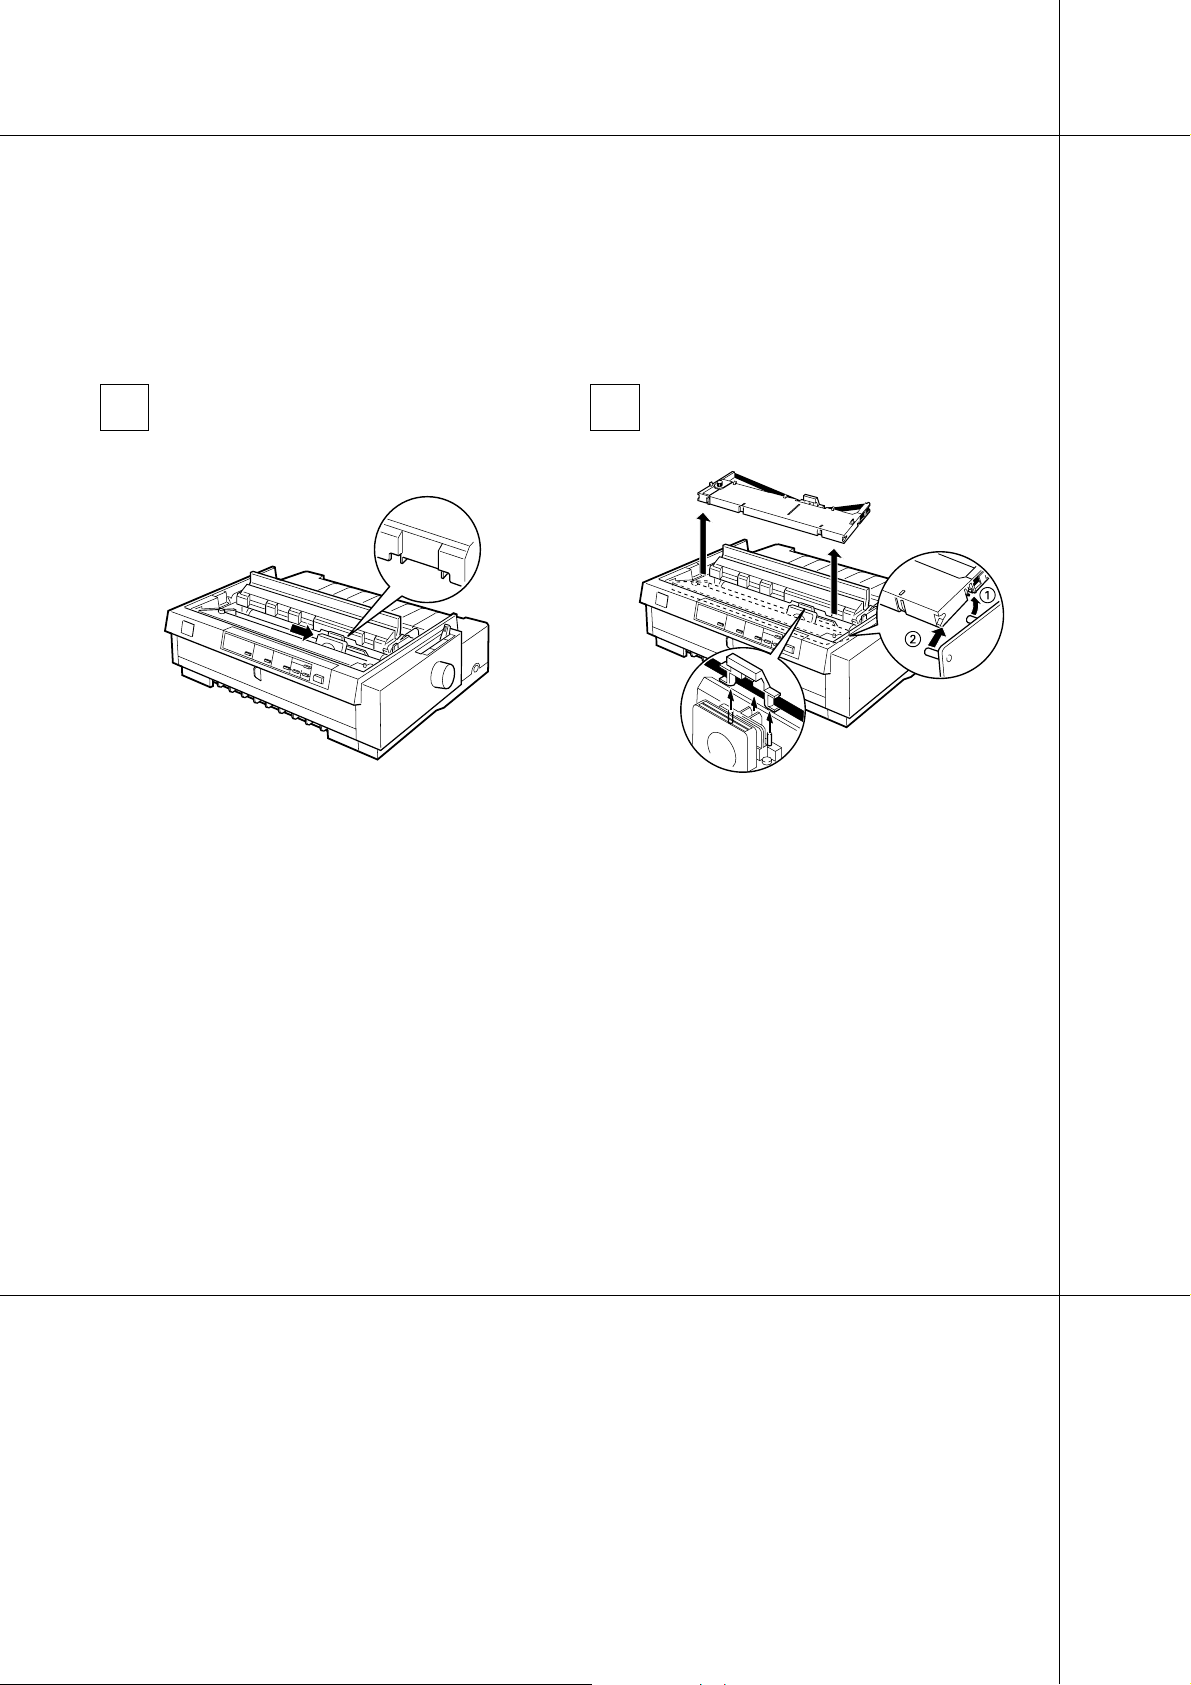
3
Open the paper guide cover. Then lift
the printer cover by its back edge and
pull it straight up and off.
2
Unplug the printer from the electrical
outlet.
8
Page 9
Replacing the Ribbon Cartridge
4 5
Make sur e the print he a d is not hot; if
it is, let it cool for a few minutes before
touching it. Then slide the print head to
the ribbon installation position (the
indented portion of the paper tension
unit) by hand.
If the pull tract or is installe d , you can
Q
replace the ribbon cartridge when the
print head is not in the ribbon
installati o n po sition.
Grasp the used ribbon cartridge and
pull it up and out of the printer.
9
Page 10

Replacing the Ribbon Cartridge
6
ribbon-tigh te ni ng kn ob
separator
Remove the separator from the new
ribbon cartridge and discard it. Then
turn the ribbon-tightening knob in the
direction of the arrow to remove any
slack in the ribbon.
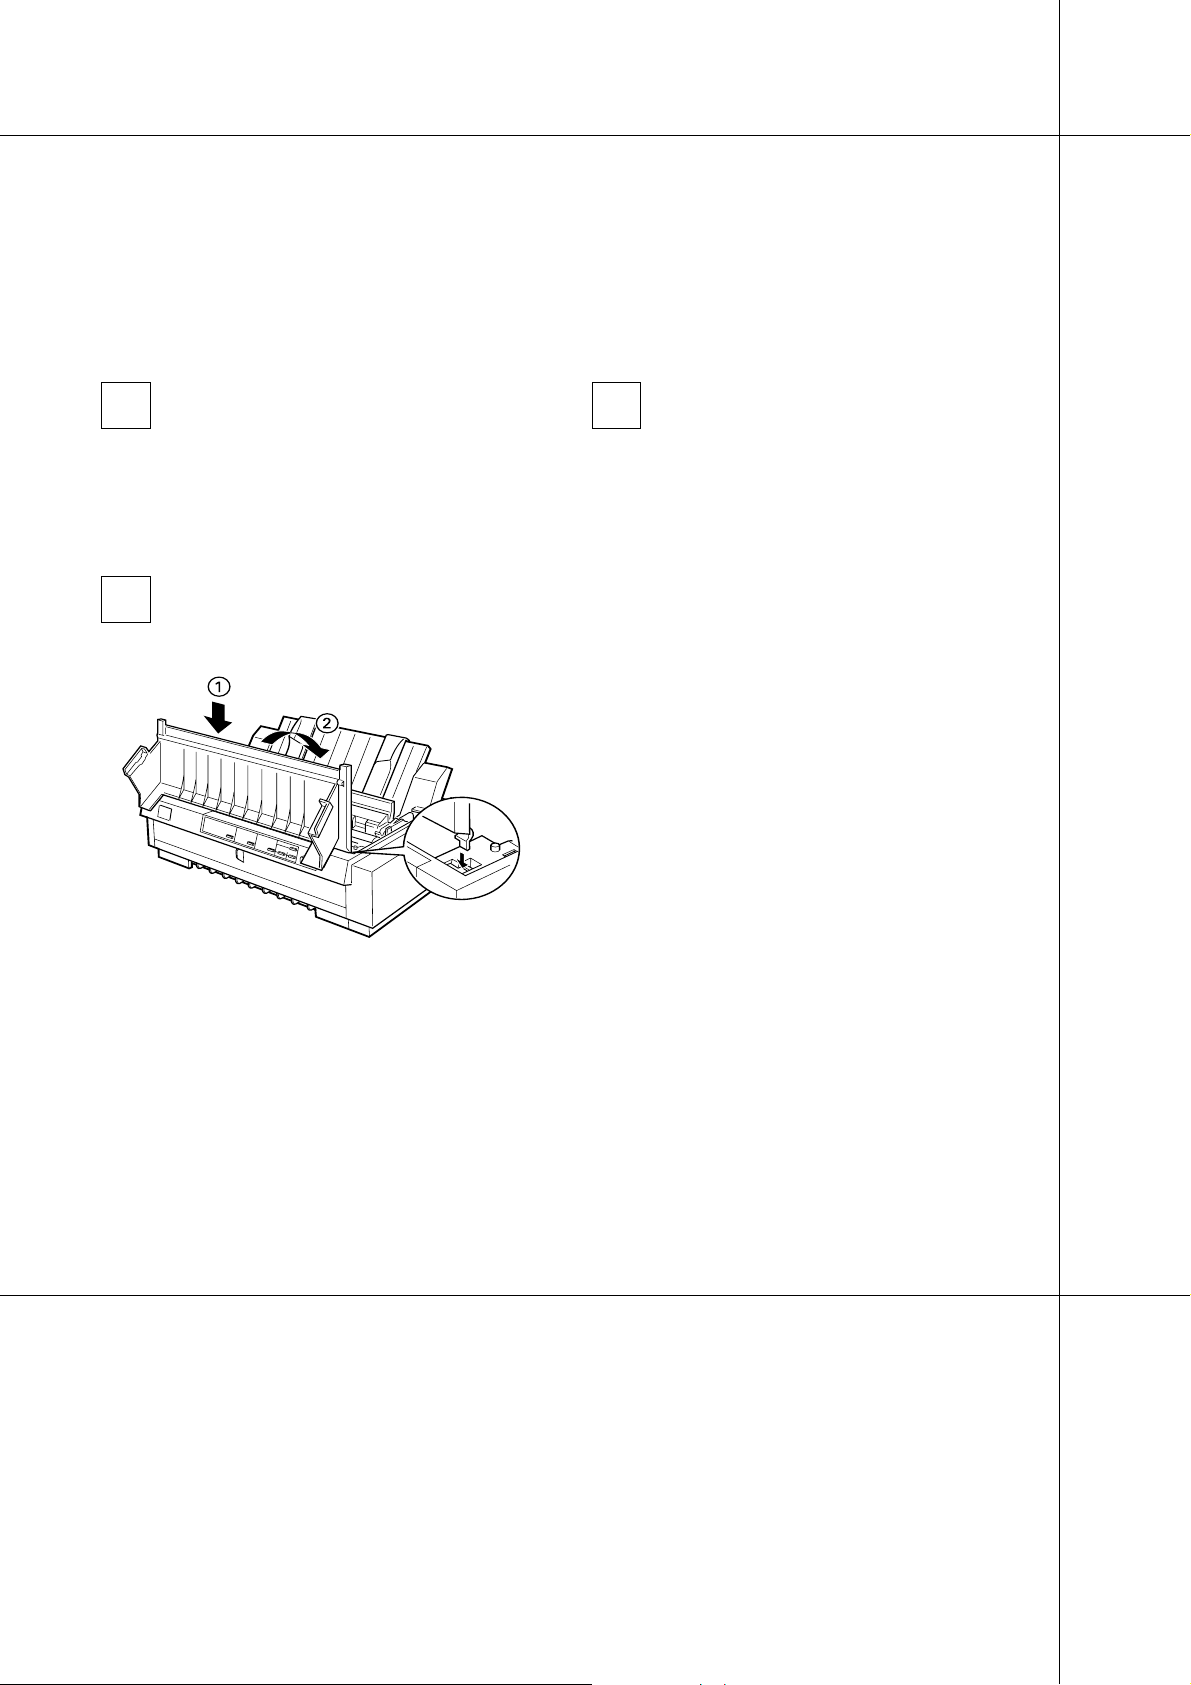
7
Hold the cartridge with the ribbontightening knob up. Fit the cartridge’s
two front notches (➀) over the small
pegs on each side of the printer as
shown. Then lay the cartridge flat so
that the rear notches (➁) fit over the
correspo n d in g pegs.
10
Page 11
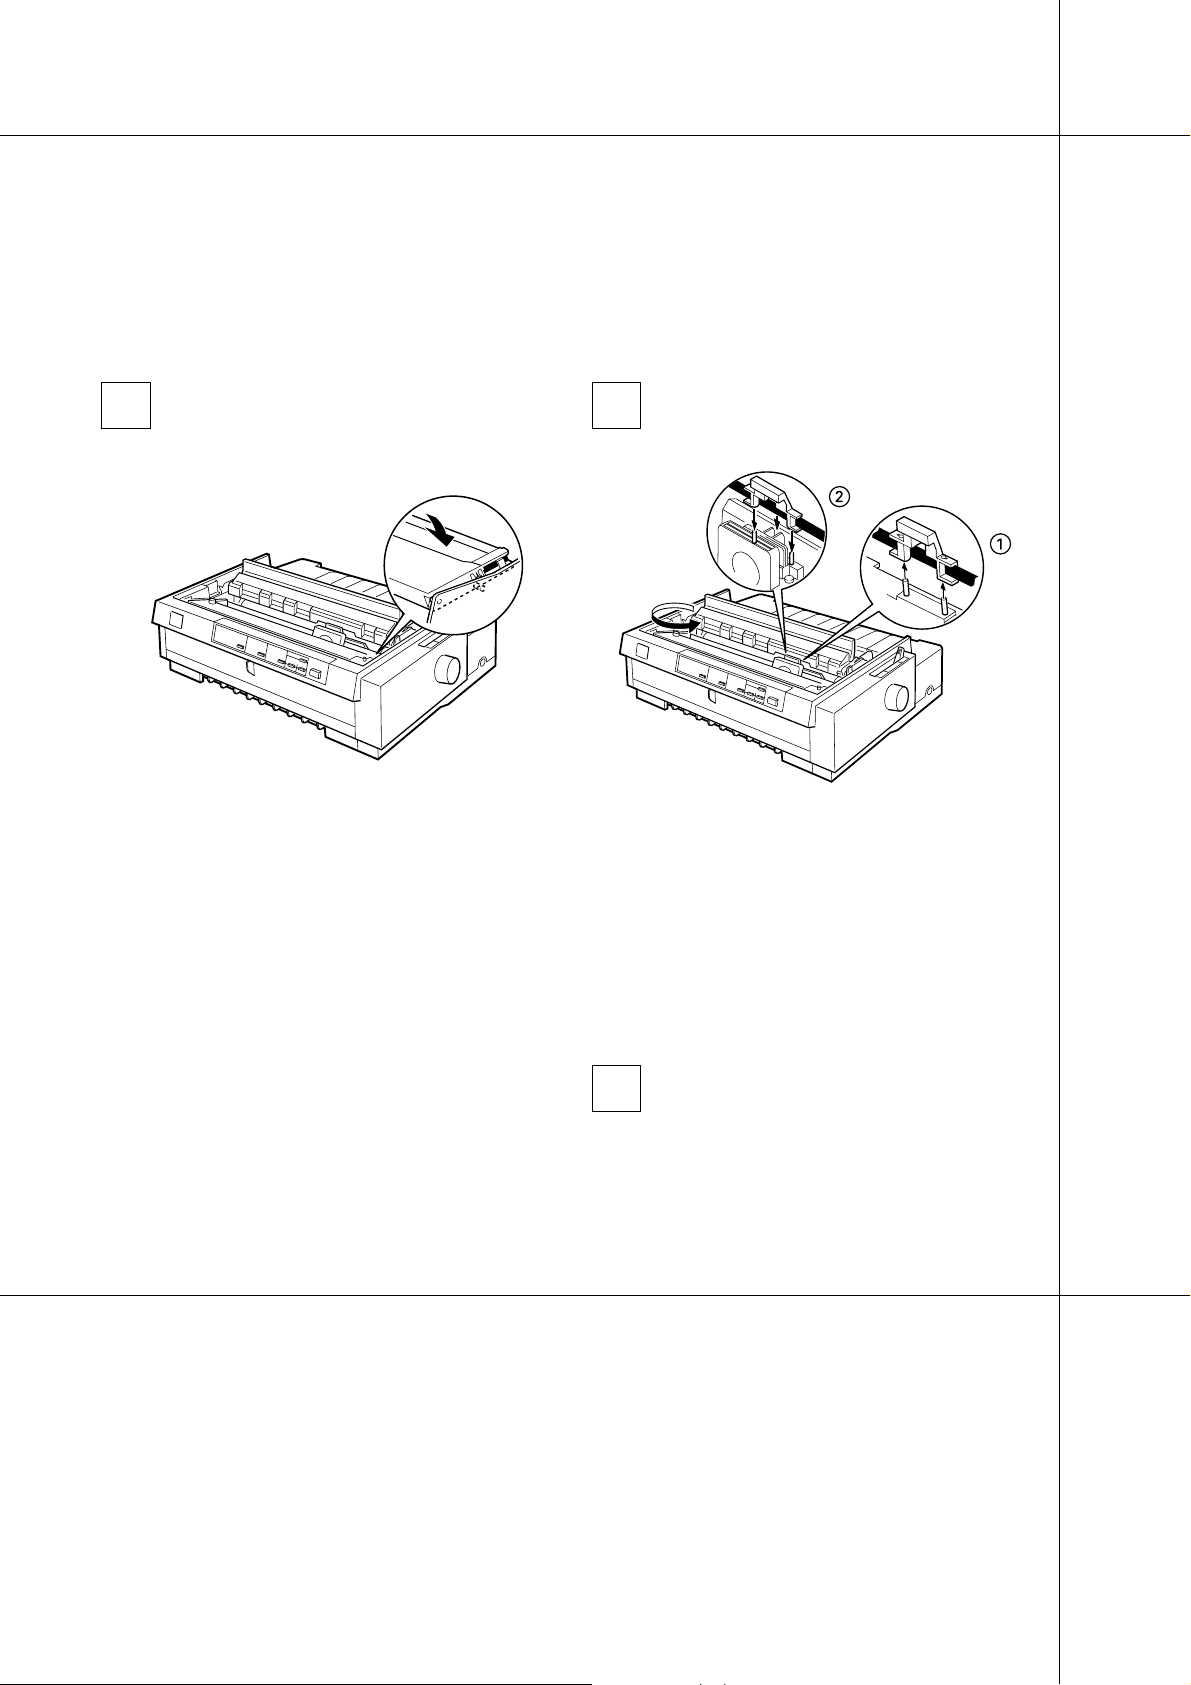
8 9
Replacing the Ribbon Cartridge
Gently press down on the cartridge
until both ends click into place.
Lift the cartridge’s ribbon guide (➀)
and insert it firmly over the metal pins
behind t he print head (➁). Make sure
the ribbon is not twist ed or creased and
that it is placed behind the print head.
Then press down on the ribbon guide
until it clicks into place.
10
Turn the ribbon-tightening knob in the
direction of the arrow to remove any
slack in the ribbon.
11
Page 12

Replacing the Ribbon Cartridge
11 12
Slide the print head from side to side to
make su r e it mo v es smoothl y.
Replace the printer cover and then
close the paper guide cover.
12
Page 13

Clearing Pa p er Jams
To clear a paper jam, follow these steps:
Clearing Pa p e r J a ms
1
Press the Operate button to turn off
the printer.
2
If an ejected sheet of paper is stuck on
the pape r guide, remove it.
3
Remove the printer cover. If
continuous paper is jammed in the rear
slot, also remove the paper guide base.
13
Page 14

Clearing Pa p er Jams
4 5
If continuous paper is jammed inside
the printer, tear off the supply at the
perforation nearest the paper entry
slot.
Turn the knob on the right side of the
printer away from you to eject the
paper in t he pr i nte r. Remove an y
remaining pieces of paper.
Caution:
c
Use the knob to clear paper jams only
when the printer is off. Otherwise, you
may damage the printer or lose the t op-ofform position or tear-off po sition.
14
Page 15
Clearing Pa p e r J a ms
6
Attach the paper guide base, if
necessary.
7
Replace the printer cover and then
close the paper guide cover.
8
Press the Operate button to turn on
the printer. Make sure the Paper Out
and Pause lights are off.
15
Page 16
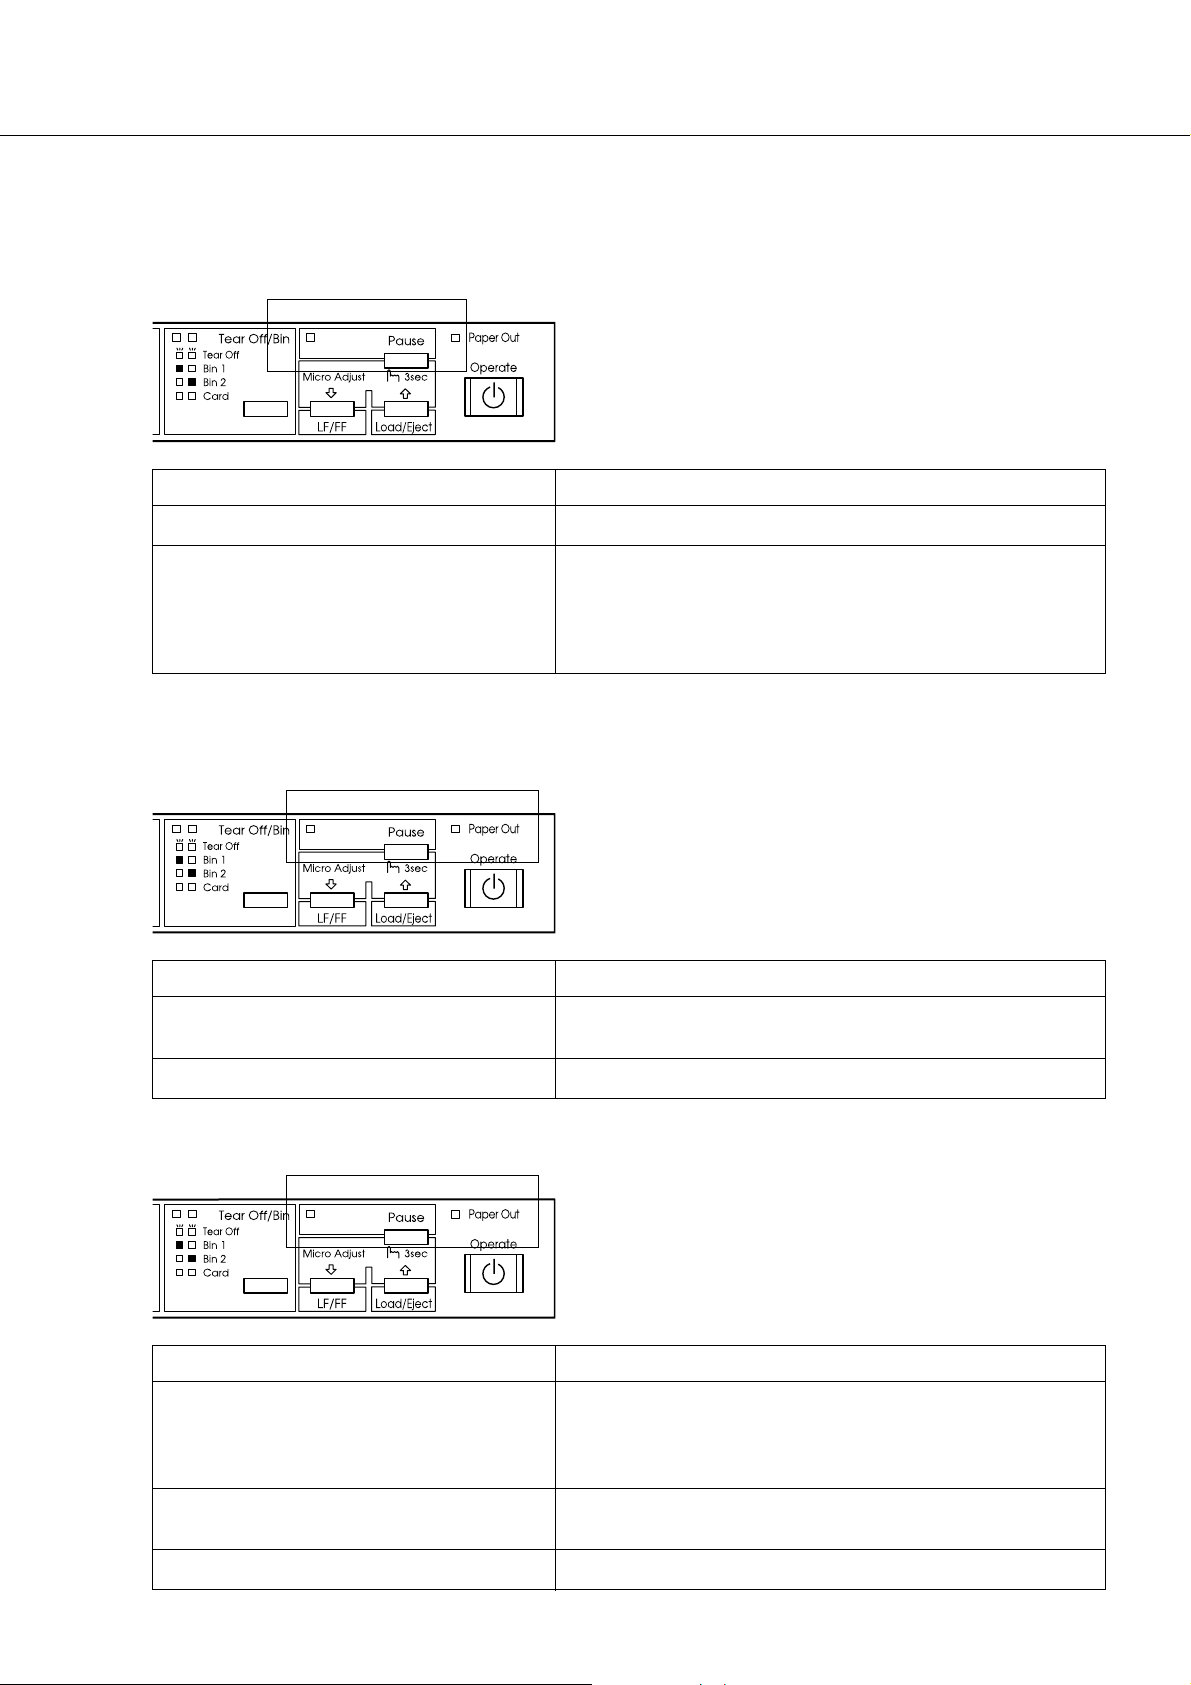
If Your Printer Stops Printing Unexpectedly...
Check the printer’s control panel lights and follow the appropriate instructions below. For more
information, see Chapter 7 of your User’s Gui de.
The printer stops printing and the Pause light is on.
Cause Solution
The printer is paused. Press the
You moved the paper release lever while
paper from another paper source was in
the paper path.
Move the paper release lever back to the appropriate
position an d press the
out of the pa per path . Th en set th e le ve r to t h e posi ti on y ou
want to use. Press the
Pause
button to resu me p rinting.
Load/ Eje ct
Pause
button to feed the paper
button to turn off the Pause
light, if necessary.*
*If you are using the pull tractor, see your
User’s Guide
The Paper Out and Pause lights are on.
Cause Solution
No paper is loaded in the selected paper
source or paper is not loaded correctly.
Load paper in the printer, then press the
turn off the Pause light, if necessary.
Paper is jammed in the printer. See ”Clearing Paper Jams” on page 10.
for instructions.
Pause
button to
The Paper Out light is flashin g and the Pause light is on.
Cause Solution
Continuous paper is not fed to the standby
position .
Tear off the printed document at t he perforation; then press
Load/Eject
the
standby position. Pres s the
button. The printer feeds the paper to the
Pause
button to turn off the
Pause light.
A single sheet of paper is not fully ejected. Press the
the
Load/Eject
Pause
button to turn off the Pause light, if nec essary.
button to eject the sheet. Then press
Paper is jammed in the printer. See ”Clearing Paper Jams” on page 10.
 Loading...