

Page 1
Page 2
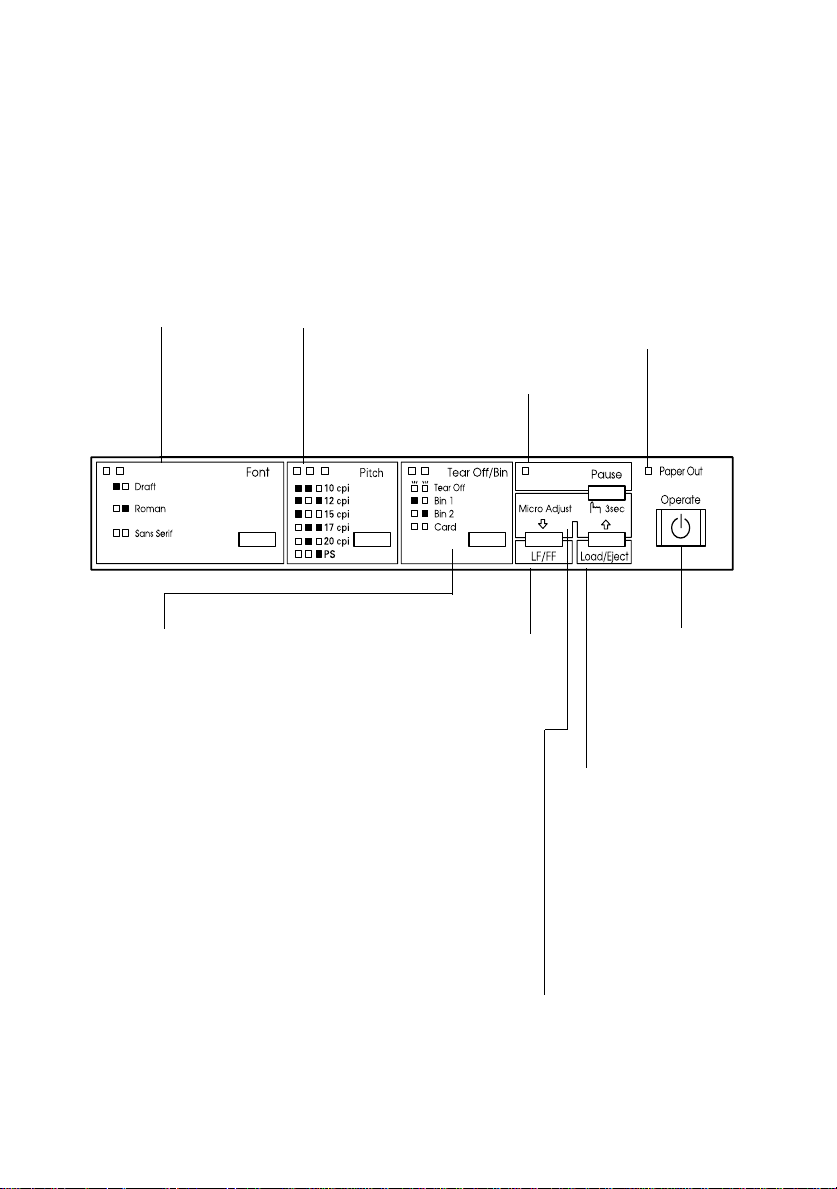
Control Panel Buttons and Lights
Font button
Selects the font.
See Chapter 5.
Font lights
Indicate which
font is selected.
Pitch button
Selects the font size.
See Chapter 5.
Pitch lights
Indicate what font
size is selected.
Tear Off/B in but ton
Advances continuous paper to the
●
tear-off position.
Feeds continuous paper backward
●
from the tear-off po sition to the top-ofform position.
Selects a cut-sheet feeder bin when the
●
cut-sheet feeder is installed.
Turns on the card mode to print on
●
postcards and envelopes. See
Chapt e r 3 .
Tear Off/Bin lights
when continuous paper is in the
●
f f
tear-off position.
when bin 1 of the optional cut-
●
o n
sheet feeder is selected.
when bin 2 of the optional cut-
●
n o
sheet feeder is selected.
when the printer is in the card
●
n n
mode.
n = On
f = Flashing
o = Off
Pause button
Stops printing
●
temporarily, and
resumes printing when
pressed again. When
pressed for 3 seconds,
turns on the *micro
adjust mode. To turn
off, press again.
Paper Out light
On when no paper is
●
loaded in the selected
paper source or pa per
is not loaded correctl y.
Flashes when paper
●
has not been fully
ejected or a paper jam
has occurred.
Pause light
On when the printer is
●
LF/FF button
Feeds paper line by
●
line when pressing
shortly.
Ejects a single sheet
●
or advances
continuous paper to
the next top-of-form
position when held
down.
Operate button
Turns the printer on
and off. The printer
is off when the top
of this button is
even with the
button protectors.
Load/Eject button
Loads a single sheet of
●
paper.
Ejects a single sheet of
●
paper if a sheet is
loaded.
Loads continuous paper
●
from the standby
position.
Feeds continuous paper
●
backward to the
standby position in
micro adjust mode.
*Micro Adjust m ode
When you hold down the Pause button for three
seconds, the printer enters the micro adjust m ode. In
this mode, you can pres s the LF/FF
buttons to adjust the top-of-form or tear-off position.
See Chapter 2.
and Load/EjectU
D
Page 3

®
9-Pin Dot Matrix Printer
All rights reserved. No part of this publication may be reproduced, stored in a retrieval
system, or transmitted in any form or by any means, electronic, mechanical, photocopying,
recording, or otherwise, without the prior written permission of SEIKO EPSON
CORPORATION. The information contained herein is designed only for use with this
EPSON printer. EPSON is not responsible for any use of this information as applied to other
printers.
Neither SEIKO EPSON CORPORATION nor its affiliates shall be liable to the purchaser of
this product or third parties for damages, losses, costs, or expenses incurred by the purchaser
or third parties as a result of: accident, misuse, or abuse of this product or unauthorized
modifications, repairs, or alterations to this product, or (excluding the U.S.) failure to strictly
comply with SEIKO EPS ON CO RPORA T ION ’s ope ra ting and mainte nanc e in stru ct ions.
SEIKO EPSON CORPORATION shall not be liable for any damages or problems arising
from the use of any options or any consumable products other than those designated as
Original EPSON Products or EPSON Approved Products by SEIKO EPSON
CORPORATION.
EPSON and EPSON ESC/P are registered trademarks of SEIKO EPSON CORPORATION.
Microsoft, Windows, and Windows NT are registered trademarks of Microsoft Corporation.
IBM is a registered trademark of International Business Machines Corporation.
General Notice:
may be trademarks of their respective owners. EPSON disclaims any and all rights in those
marks.
Copyright © 1998 by SEIK O EP SON CORPORATION, Nagano , J apan.
Other product names used herein are for identification purposes only and
User’s Guide
Page 4

FCC Compliance Statement
N
For United States Users
This equipment has been tested and found to
comply with the limits f or a Class B digital
device, pursuant to Part 15 of the FCC Rules.
These limits are designed to provide reasonable
protection against harmful interference in a
residential installation. This equip ment
generates, uses, and can radiate radio frequency
energy and, if not installed and used in
accordance with the instr u ctions, may cause
harmful interferenc e to radio or televi sion
reception. However, there is no guarantee that
interference will not occur in a particular
installation. If this equipment does cause
interference to radio and television reception,
which can be determined by turning the
equipment off and on, the user is encouraged to
try to correct the interference by one or more of
the following measures.
Reorient or relocate the receiving antenna
❑
Increase the separation between the
❑
equipment and receiver
Connect the equipment into an outlet on a
❑
circuit different from tha t to which the
receiver is connected
Consult the dealer or an experienced radio/
❑
TV technician for help.
WARNING
The connection of a non-shielded equipment
interface cable to this equipment will invalidat e
the FCC Ce rtification of this dev ice and may
cause interference levels which ex ceed the limits
established by the FCC for this equipment. It is
the responsibility of the user to obtain and use a
shielded equipment interface cable with this
device. If this equipment has more than one
interface connector, do not leave cables
connected to unused interfaces.
Changes or modifications not expressly
approved by the manufacturer could void the
user’s authority to operate the equipment.
For Canadian Users
This Cl ass B dig it a l ap p aratu s co mplies wi t h
Canadian ICES-003.
Cet appareil numérique de la classe B est conforme
à la norm e NM B-003 du Ca n a da.
Declaration of Conformity
According to I SO/IEC Guide 22 and EN 45014
Manufacturer:
Address: 3-5, Owa 3-cho me, Suwa-shi,
Representative: EPSON EUROPE B.V.
Address: Prof. J. H. B av inckl aan 5 1183
Declares that the Product :
Product Name: Dot Matrix Printer
Model: P922A
Conforms to the following Directive(s) and
Norm(s):
Direc t i ve 73/23/ EE C :
Directive 89/336/E EC:
March 1999
H. Horiuchi
President of EPSON EUROPE B.V.
SEIKO EPSON CORPORATIO
Nagano- ke n 392-8502 Japan
AT Amstelveen
The Netherlands
EN 60950
EN 55022 Class B
EN 61000-3-2
EN 61000-3-3
EN 50082-1
IEC 801-2
IEC 801-3
IEC 801-4
ii
Page 5

iii
Page 6

iv
Page 7

Contents
Getting to Know Your Printer
Easy-to-Use Features. . . . . . . . . . . . . . . . . . . . . . . . . . . . . . . . . . . . .2
Available Paper Paths. . . . . . . . . . . . . . . . . . . . . . . . . . . . . . . . . . . .3
Printing on continuous pape r. . . . . . . . . . . . . . . . . . . . . . . . .4
Printing on single sheets . . . . . . . . . . . . . . . . . . . . . . . . . . . . .8
Options . . . . . . . . . . . . . . . . . . . . . . . . . . . . . . . . . . . . . . . . . . . . . . . .9
Ribbon Cartridge . . . . . . . . . . . . . . . . . . . . . . . . . . . . . . . . . . . . . . . . 10
Important Safety Instructions . . . . . . . . . . . . . . . . . . . . . . . . . . . . .10
Print Head Caution Symbol. . . . . . . . . . . . . . . . . . . . . . . . . . . . . . .12
ENERGY STAR C om pliance . . . . . . . . . . . . . . . . . . . . . . . . . . . . . .12
For United Kingdom Us ers . . . . . . . . . . . . . . . . . . . . . . . . . . . . . . .12
Use of options . . . . . . . . . . . . . . . . . . . . . . . . . . . . . . . . . . . . . .12
Safety information . . . . . . . . . . . . . . . . . . . . . . . . . . . . . . . . . .13
How To Use Your Ma nuals . . . . . . . . . . . . . . . . . . . . . . . . . . . . . . .14
Warnings, Cautions, and N o tes. . . . . . . . . . . . . . . . . . . . . . . . . . . .14
Chapter 1 Setting Up the Printer
Unpacking the Printer. . . . . . . . . . . . . . . . . . . . . . . . . . . . . . . . . . . .1-2
Choosing a Place for the Printer . . . . . . . . . . . . . . . . . . . . . . . . . . .1-4
Positioning the continuous paper s upply. . . . . . . . . . . . . . .1-5
Installing or Replacing the Ribbon Cartridge . . . . . . . . . . . . . . . .1-6
Attaching the Paper Guide Base . . . . . . . . . . . . . . . . . . . . . . . . . . .1 - 12
Plugging in the Printer . . . . . . . . . . . . . . . . . . . . . . . . . . . . . . . . . . .1-13
Connecting the Printer to Your C o mputer . . . . . . . . . . . . . . . . . .1-14
Installing the Printer Software. . . . . . . . . . . . . . . . . . . . . . . . . . . . .1-17
Installing the printer software in Windows 98, 95,
or NT 4.0 . . . . . . . . . . . . . . . . . . . . . . . . . . . . . . . . . . . . . . . .1-18
Installing the printer software in Windows 3.1
or NT 3.5x. . . . . . . . . . . . . . . . . . . . . . . . . . . . . . . . . . . . . . .1-19
For DOS programs . . . . . . . . . . . . . . . . . . . . . . . . . . . . . . . . . .1-21
iii
Page 8

Chapter 2 Printing on Continuous Paper
Setting the Paper Release Lever . . . . . . . . . . . . . . . . . . . . . . . . . . . 2-2
Setting the Paper Thickness Lever . . . . . . . . . . . . . . . . . . . . . . . . . 2-4
Using the Rear Push Tractor . . . . . . . . . . . . . . . . . . . . . . . . . . . . . . 2-6
Loading paper onto the rear pus h tra ctor . . . . . . . . . . . . . . 2-6
Removing a printed document from the rear push
tractor . . . . . . . . . . . . . . . . . . . . . . . . . . . . . . . . . . . . . . . . . . 2-10
Using the Front Push Tr actor . . . . . . . . . . . . . . . . . . . . . . . . . . . . . 2 -12
Loading paper onto the front push tr a ctor . . . . . . . . . . . . . 2 -12
Removing a printed docume nt from t he front push
tractor . . . . . . . . . . . . . . . . . . . . . . . . . . . . . . . . . . . . . . . . . . 2-17
Removing the front push tractor. . . . . . . . . . . . . . . . . . . . . . 2 -18
Reinstalling the tractor in the front push position . . . . . . . 2-19
Using the Tractor in the Pull Position . . . . . . . . . . . . . . . . . . . . . . 2-21
Installing the tractor in the pull position . . . . . . . . . . . . . . . 2-21
Loading paper onto the pull tractor . . . . . . . . . . . . . . . . . . . 2 -23
Removing the paper from the pu ll tractor. . . . . . . . . . . . . . 2-28
Using two tractors in a push/pull co mbination. . . . . . . . . 2-29
Removing the pull tractor . . . . . . . . . . . . . . . . . . . . . . . . . . . 2-31
Loading Multi-Part Forms . . . . . . . . . . . . . . . . . . . . . . . . . . . . . . . 2-33
Loading Continuous Paper With Labels. . . . . . . . . . . . . . . . . . . . 2-34
Removing continuous paper with labels. . . . . . . . . . . . . . . 2-36
Switching Between Printing on Continuous Paper
and Printing on Single Sheets . . . . . . . . . . . . . . . . . . . . . . . . . . 2-37
Switching to printing on single sheets . . . . . . . . . . . . . . . . . 2-37
Switching to printing on continuous pa per. . . . . . . . . . . . . 2-38
Adjusting the Top-of-Form Position . . . . . . . . . . . . . . . . . . . . . . . 2-39
Advancing the Paper to the Tear-Off Edge . . . . . . . . . . . . . . . . . 2 -42
Using the Tear Off/Bin button . . . . . . . . . . . . . . . . . . . . . . . 2-42
Advanci ng the paper to the tear-off position
automatically . . . . . . . . . . . . . . . . . . . . . . . . . . . . . . . . . . . . 2-43
Adjusting the tear-off position . . . . . . . . . . . . . . . . . . . . . . . 2-43
iv
Page 9

Chapter 3 Printing on Single Sheets
Using Single Sheets . . . . . . . . . . . . . . . . . . . . . . . . . . . . . . . . . . . . . .3-2
Available paper types and paper slo ts . . . . . . . . . . . . . . . . .3-2
Loading single-sheet multi-part forms . . . . . . . . . . . . . . . . .3-4
Loading envelopes . . . . . . . . . . . . . . . . . . . . . . . . . . . . . . . . . .3-6
Loading postcards . . . . . . . . . . . . . . . . . . . . . . . . . . . . . . . . . .3-7
Loading Single Sheets in the Top Paper Slot. . . . . . . . . . . . . . . . .3-8
Loading Single Sheets in the Front Paper Slot . . . . . . . . . . . . . . .3-11
Chapter 4 Using the Printer Software
About Your Printer Software. . . . . . . . . . . . . . . . . . . . . . . . . . . . . .4- 2
Using the Printer Driver With W indows 95 or 98 . . . . . . . . . . . .4-3
Accessing the printer driver from Windows applications.4-3
Accessing the printer driver from the Start menu. . . . . . . .4-5
Printer driver settings overview. . . . . . . . . . . . . . . . . . . . . . . 4-5
Using the Printer Driver With W indows 3.1. . . . . . . . . . . . . . . . .4-9
Accessing the printer driver from Windows applications.4-9
Accessing the printer driver from the Control Panel . . . . .4-11
Printer driver settings overview. . . . . . . . . . . . . . . . . . . . . . . 4-11
Using the Printer Driver With W indows NT 4.0 . . . . . . . . . . . . .4-13
Accessing the printer driver from Windows applications.4-13
Accessing the printer driver from the Start menu. . . . . . . .4-15
Printer driver settings overview. . . . . . . . . . . . . . . . . . . . . . . 4-15
Using the Printer Driver With W indows NT 3.5x . . . . . . . . . . . .4-18
Accessing the printer driver from Windows applications.4-18
Accessing the printer driver from the Control Panel . . . . .4-20
Printer driver settings overview. . . . . . . . . . . . . . . . . . . . . . . 4-21
Using the EPSON Remo te! Utility . . . . . . . . . . . . . . . . . . . . . . . . .4- 23
Installing EPSON Remot e ! . . . . . . . . . . . . . . . . . . . . . . . . . . .4-23
Accessing EPSON Remote! . . . . . . . . . . . . . . . . . . . . . . . . . . .4-23
v
Page 10

Chapter 5 Changing Printer Settings From the Printer’s Control
Panel
Selecting a Built-In Font . . . . . . . . . . . . . . . . . . . . . . . . . . . . . . . . . 5-2
About Your Printer’s Default Settings . . . . . . . . . . . . . . . . . . . . . . 5-3
Changing default settings . . . . . . . . . . . . . . . . . . . . . . . . . . . 5-9
Chapter 6 Using EPSON Status Monitor 2
About the EPSON Status Monitor 2 Utility . . . . . . . . . . . . . . . . . 6-2
Installing EPSON Status Monitor 2 . . . . . . . . . . . . . . . . . . . . . . . . 6-3
Accessing EPSON Status M o nitor 2 . . . . . . . . . . . . . . . . . . . . . . . 6-5
Checking Printer Status Information. . . . . . . . . . . . . . . . . . . . . . . 6-5
Using the EPSON Status Monitor 2 window . . . . . . . . . . . 6-5
Using the Printer Status window . . . . . . . . . . . . . . . . . . . . . 6-11
Making Monitoring Preference Settings . . . . . . . . . . . . . . . . . . . . 6-12
Turning on background mo nitoring . . . . . . . . . . . . . . . . . . 6-13
Background monitoring icon. . . . . . . . . . . . . . . . . . . . . . . . . 6-14
Chapter 7 Troubleshooting
Using the Error Indicators. . . . . . . . . . . . . . . . . . . . . . . . . . . . . . . . 7-2
Problems and Solutions. . . . . . . . . . . . . . . . . . . . . . . . . . . . . . . . . . 7-4
Power supply problems . . . . . . . . . . . . . . . . . . . . . . . . . . . . . 7-5
Single-sheet paper loading or feeding problems . . . . . . . . 7-6
Continuous paper loading or feedin g problems . . . . . . . . 7-8
Wrong top-of-form pos ition . . . . . . . . . . . . . . . . . . . . . . . . . 7 -9
Wrong tear-off position . . . . . . . . . . . . . . . . . . . . . . . . . . . . . 7-10
Printing or printout quality problem s . . . . . . . . . . . . . . . . . 7-11
Clearing Paper Jams. . . . . . . . . . . . . . . . . . . . . . . . . . . . . . . . . . . . . 7-16
Aligning Vertical Lines in Your Print o ut . . . . . . . . . . . . . . . . . . . 7-17
Printing a Self Test . . . . . . . . . . . . . . . . . . . . . . . . . . . . . . . . . . . . . . 7-18
Printing a Hex Dump. . . . . . . . . . . . . . . . . . . . . . . . . . . . . . . . . . . . 7-19
vi
Page 11

Appendix A Enhancing Your Printer With Options
Options . . . . . . . . . . . . . . . . . . . . . . . . . . . . . . . . . . . . . . . . . . . . . . . .A-2
Paper handling options . . . . . . . . . . . . . . . . . . . . . . . . . . . . . .A-2
Optional interface cards. . . . . . . . . . . . . . . . . . . . . . . . . . . . . .A-3
Using the Optional Cut-Sheet Feed ers . . . . . . . . . . . . . . . . . . . . . .A - 4
Installing the high-capacity or double-bin cut-sheet
feeder . . . . . . . . . . . . . . . . . . . . . . . . . . . . . . . . . . . . . . . . . . .A-4
Loading paper in the high-capacity cut-sheet feeder . . . . .A-6
Selecting the paper source (bin 1 or bin 2) . . . . . . . . . . . . . .A-10
Switching between continuous paper and single-sheet
paper in the cut-sheet feeder . . . . . . . . . . . . . . . . . . . . . . .A-11
Using the Roll Paper Holder . . . . . . . . . . . . . . . . . . . . . . . . . . . . . .A-12
Assembling the roll paper holder . . . . . . . . . . . . . . . . . . . . .A- 12
Installing the roll paper holder. . . . . . . . . . . . . . . . . . . . . . . .A- 13
Loading roll paper . . . . . . . . . . . . . . . . . . . . . . . . . . . . . . . . . .A-14
Removing roll paper . . . . . . . . . . . . . . . . . . . . . . . . . . . . . . . .A-16
Installing an Interface Card . . . . . . . . . . . . . . . . . . . . . . . . . . . . . . .A-17
Appendix B Cleaning and Transporting the Printer
Cleaning the Printer . . . . . . . . . . . . . . . . . . . . . . . . . . . . . . . . . . . . .B-2
Transporting the Printer. . . . . . . . . . . . . . . . . . . . . . . . . . . . . . . . . .B-3
Appendix C Specifications
Printer Specifications . . . . . . . . . . . . . . . . . . . . . . . . . . . . . . . . . . . .C-2
Mechanical. . . . . . . . . . . . . . . . . . . . . . . . . . . . . . . . . . . . . . . . .C-2
Electrical. . . . . . . . . . . . . . . . . . . . . . . . . . . . . . . . . . . . . . . . . . .C-4
Environmental . . . . . . . . . . . . . . . . . . . . . . . . . . . . . . . . . . . . .C-4
Paper. . . . . . . . . . . . . . . . . . . . . . . . . . . . . . . . . . . . . . . . . . . . . .C- 5
Paper alignment . . . . . . . . . . . . . . . . . . . . . . . . . . . . . . . . . . . .C-8
Printable area . . . . . . . . . . . . . . . . . . . . . . . . . . . . . . . . . . . . . .C-9
Safety approvals . . . . . . . . . . . . . . . . . . . . . . . . . . . . . . . . . . . .C-11
CE marking . . . . . . . . . . . . . . . . . . . . . . . . . . . . . . . . . . . . . . . .C-11
vii
Page 12

Command Lists. . . . . . . . . . . . . . . . . . . . . . . . . . . . . . . . . . . . . . . . . C-12
EPSON ESC/P contr ol codes. . . . . . . . . . . . . . . . . . . . . . . . . C-12
IBM 2380 Plus emulation control codes . . . . . . . . . . . . . . . . C -16
Character Tables . . . . . . . . . . . . . . . . . . . . . . . . . . . . . . . . . . . . . . . . C-17
International character sets for the Italic table . . . . . . . . . . C-28
Appendix D Customer Support Information
Contacting Customer Support . . . . . . . . . . . . . . . . . . . . . . . . . . . . D-2
For North American Users . . . . . . . . . . . . . . . . . . . . . . . . . . . . . . . D-2
Electronic support services . . . . . . . . . . . . . . . . . . . . . . . . . . D-2
Automated telephone services . . . . . . . . . . . . . . . . . . . . . . . D-3
For United Kingdom and the Republic of Ireland Users . . . . . . D -4
Enquiry Desk . . . . . . . . . . . . . . . . . . . . . . . . . . . . . . . . . . . . . . D-4
Customer Support. . . . . . . . . . . . . . . . . . . . . . . . . . . . . . . . . . D-4
Faxon EPSON. . . . . . . . . . . . . . . . . . . . . . . . . . . . . . . . . . . . . . D -5
EPtec - Bulletin Board Service for latest drivers and
utilities . . . . . . . . . . . . . . . . . . . . . . . . . . . . . . . . . . . . . . . . . D-5
World Wide Web. . . . . . . . . . . . . . . . . . . . . . . . . . . . . . . . . . . D-5
For Australian Users . . . . . . . . . . . . . . . . . . . . . . . . . . . . . . . . . . . . D-6
EPSON FAXBACK . . . . . . . . . . . . . . . . . . . . . . . . . . . . . . . . . D-6
EPSON Bulletin Board System . . . . . . . . . . . . . . . . . . . . . . . D -6
Internet URL http://www.epson.com.au. . . . . . . . . . . . . . D-6
Your dealer. . . . . . . . . . . . . . . . . . . . . . . . . . . . . . . . . . . . . . . . D-6
EPSON Helpdesk . . . . . . . . . . . . . . . . . . . . . . . . . . . . . . . . . . D-7
For Singapore Users. . . . . . . . . . . . . . . . . . . . . . . . . . . . . . . . . . . . . D-7
For Hong Kong Users . . . . . . . . . . . . . . . . . . . . . . . . . . . . . . . . . . . D-8
Internet home page . . . . . . . . . . . . . . . . . . . . . . . . . . . . . . . . . D-8
Electronic bulletin board system. . . . . . . . . . . . . . . . . . . . . . D-8
Technical support hotline. . . . . . . . . . . . . . . . . . . . . . . . . . . . D-8
For Philippines Users. . . . . . . . . . . . . . . . . . . . . . . . . . . . . . . . . . . . D-9
Glossary
Index
viii
Page 13

Getting to Know Your Printer
Your EPSON® FX-980 9-pi n dot matrix prin ter provides
high-quality print ing and great performance in a compact design.
Features in clude:
❏ a variety of paper paths to suit your prin ting needs
❏ the ability to handle a wide range of paper types, including
continuous paper, multi-part forms with one original and
up to six copies, labels, single sheets, envelopes, and
postcards
❏ high-speed printing of up to 569 characters per second at
12 characters per inch
❏ equipped with built-in parallel and serial interface board
Your printer also com e s with printer driver software, the
EPSON Status Monitor 2 utility for Microsoft
98 that lets you check the status of your print er quickly and easily,
and other softw are. In addition, many options are available to suit
your individual needs.
Getting to Know Your Printer
®
Window s® 95 or
1
Page 14
Easy-to-Use Features
This section highlights some easy-to-use features that you’ ll
find helpful.
❏ Use the tear-off feature
If you load paper in th e rear or front push tractor , you can use
the tear-off fe ature to advance your continuous paper to the
printer’s t ear-off edg e when you finis h printing. Then you can
easily tear off printed sheets and save paper normally lost
between d ocuments. For more info rmation, see C hapter 2.
❏ Use the paper release lever to change the paper path
without r e moving continuous paper from the tractors.
to save paper
.
Using the paper release lever, you can easily switch to
printing on single sheets without r emoving the co ntinuous
paper loaded in the rear or front push tractor. You can also
easily switch to printing on continuous paper on a different
tractor. For more information, see Chapter 2.
2
Getting to Know Your Printer
Page 15
paper rel ease
lever
❏ Use the micro adjust feature to adjust the top-of-form and
tear-off positions. (See the Glossary for explanations of the
top-of-form and tear-off positions.)
The micro adjust feature allows you to move the paper forward
or backward in 1/216 inch increments so that you can make
precis e a dju stme nt s to t he t op-o f-f or m a nd te a r-o ff p osi ti ons . Fo r
more information, see Chapter 2.
Available Paper Paths
Your print er provides a variety of paper paths for prin ti ng on
continuous and single-sheet paper. As described below, paper
can be fed into the printer from the top, front, bottom, or rear. You
can select the paper path that best suits your current printing
needs.
Getting to Know Your Printer
3
Page 16

Printing on continuous paper
You can choose from t hree tractor p ositions (front push, rear
push, an d pull) and three paper entry slots (front, rear, and
bottom) for continuous pa per printing. Th is section help s you
determin e which paper paths and tractor positi ons are best fo r
your continuous paper printing needs . S ee the appropriate
sections in Chapter 2 for tractor installation and paper loading
instructions.
Using a push tractor
If you often need to tear off sheets of continuous paper (for
example, if you are printing purchase orders or sales slips), it is
best to use a push tractor. This allows you to use the printer’s tear-
off edge to easily tear off printed sheets of continuous paper at
the perforation. Also, when continuous paper is loaded on a push
tractor, you can load single sheets of paper from the paper guide
without removing the continuous pa per from the tractor.
There are two push tractor positions: front and rear. The tractor
is installed in the front push and rear push positions when the
printer is shipped. See the table below for details about the push
positions and the corresponding paper-feeding paths.
Note:
❏
Always load multi-part forms with seven parts (one original plus
six copies) from the front or bottom slot onto the pull tractor.
❏
The rear push tractor cannot be removed.
4
Getting to Know Your Printer
Page 17
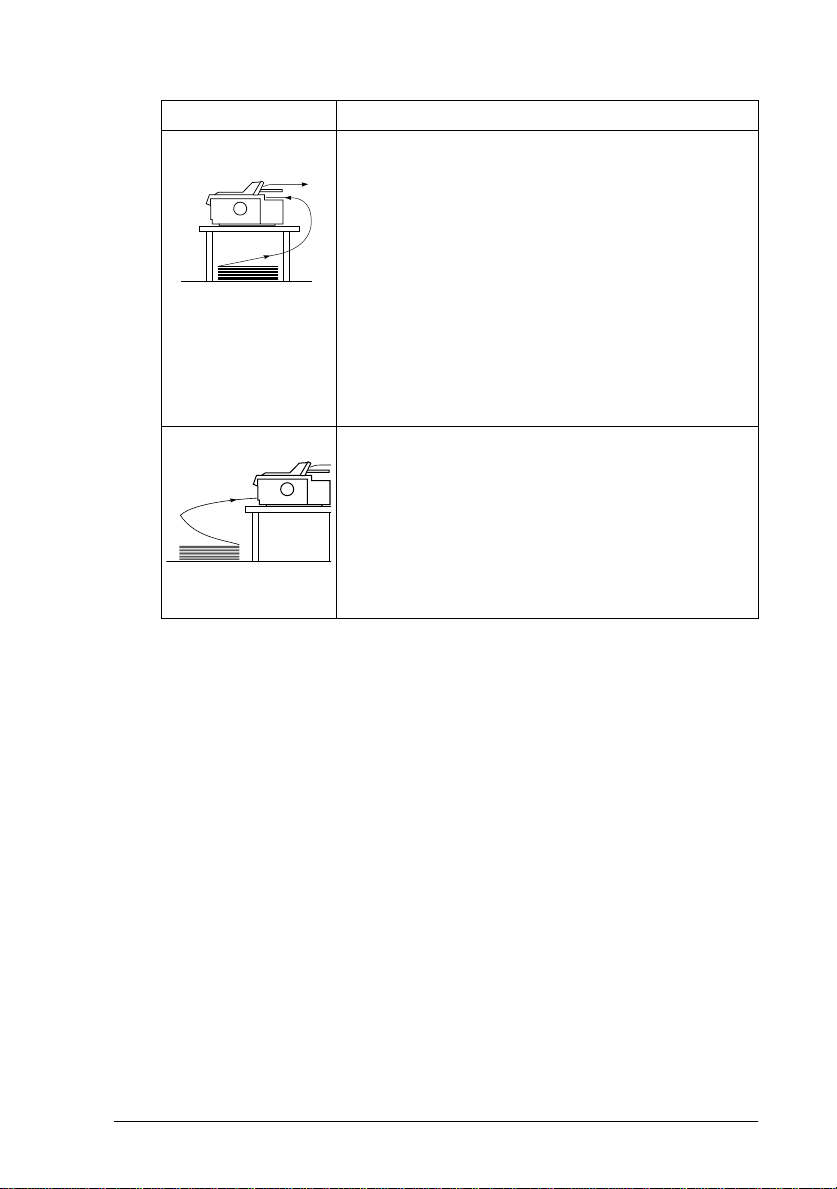
Tractor position Description
rear push
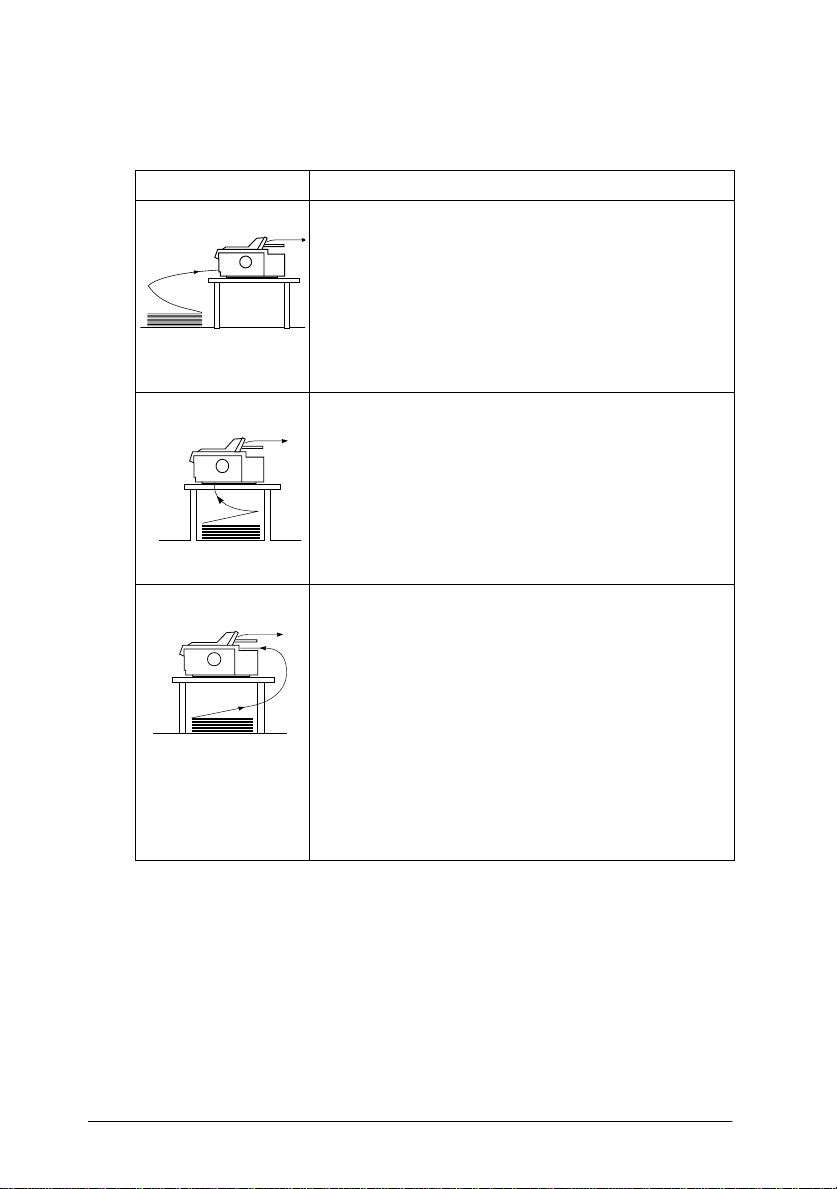
front push
Using a pull tractor
To use this t ractor, l oad paper in t he rear slot . When
you print on multi-part forms that are bound on
only one side by point gluing, load them i n the r ear
paper slot; the front push tractor cannot feed this
type of form.
Note:
Because thick multi part forms require a straight
paper path, load them in the front slot.
Caution:
Do not load continuous paper with labels in the
rear slot; the labels may come off th eir backing
sheet inside the printer and cause a paper jam.
To use this tractor, load paper in the front slot. If you
print on thick paper such as multi- part forms or
continuous paper with labels, use the f ront paper
slot because t his pa per path fro m this slot is alm ost
straight. This reduces the chan ce of paper jams.
If you often print on thick or heavy continuous paper, such as
multi-part forms or continuous paper with labels, use a tractor in
the pull position. The pul l tractor provides you with the best
paper jam prevention, and allows you to load continuous paper
from the front, rear, or bottom of the printer. However, you cannot
use the tear-off feature with the pull tra ctor.
Note:
If you plan to use a tractor in the pull position, you can remove the tractor
from the rear push positi on a nd reinstall it in the pull position, or you
can purchase an op tional addition al tracto r unit (C80033✽) and install
it in the pull positio n. See Ch apter 2 for instructions.
Getting to Know Your Printer
5
Page 18
You can us e the front, bottom, or rear pape r slot with the pul l
tractor.
Paper sl o t De sc r i p t io n
If you print on thic k pape r such as mult i-pa rt for ms
or continuous paper with labels, use the front
paper slot because this paper path is almost
straight. This reduces the chance of paper jams.
front
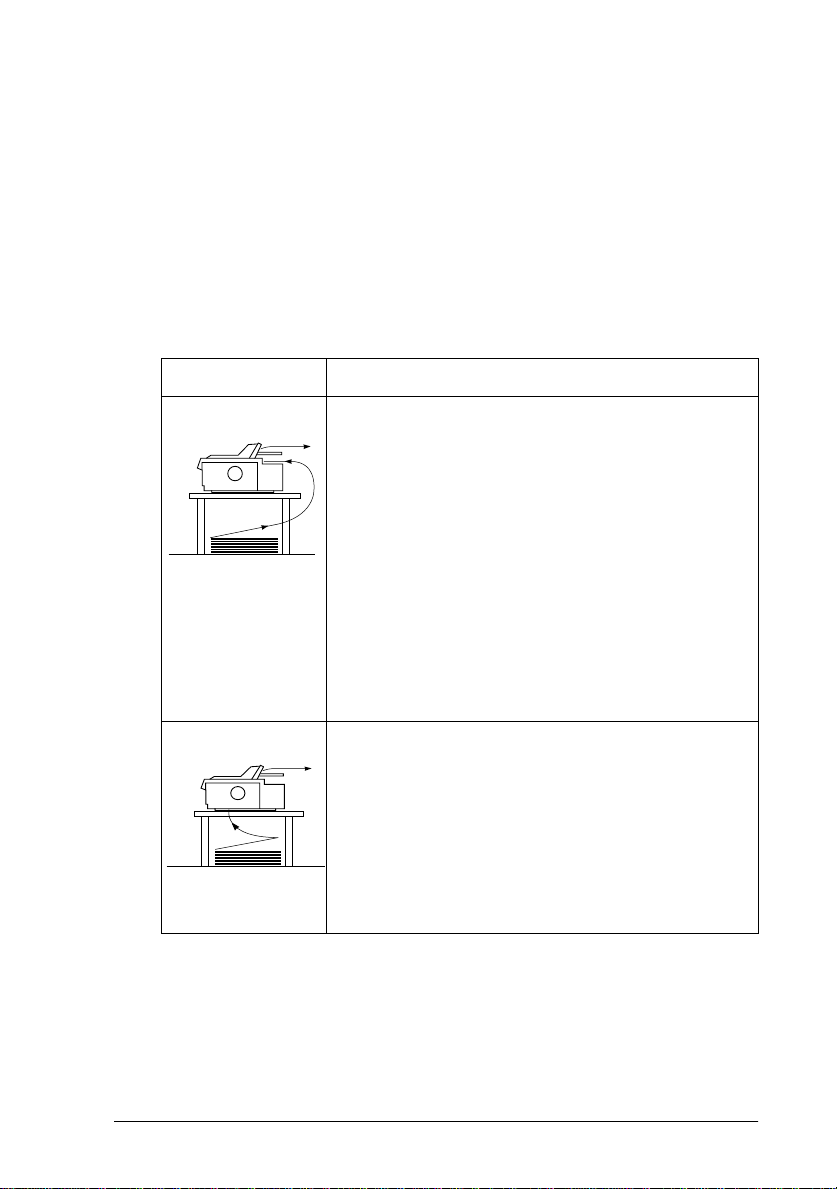
The bottom paper slot has the straightest paper
path, so it is the best slot to use when printing on
thick pape r, such as mu lti-par t forms or con tinuous
paper wit h labels.
Note:
When loadin g pape r in th e bot tom slot, be su re to
use a printer stand with an opening large enough
bottom
rear
for the paper to feed through it without obstruction
You can also load continuous paper from the rear
pull tractor position.
Note:
Paper loaded from the rear s lot r esult s in a curved
paper path, which may affect loading
performance, so use the front or bottom slot
whenever poss i bl e .
Caution:
Do not load con tinuous paper with labels in the
rear slot; the labels may come off their backing
sheet inside the printer and cause a paper jam.
.
6
Getting to Know Your Printer
Page 19
Using the push and pu ll tractors in combination
You can improve paper feeding and reduce paper jams by using
two tractors at the same time. This is especially helpfu l for
printing on continuous pre-printed for ms, multi-part forms, or
labels, and for printing high-quality graphics. When using two
tractors in combination, you can load paper eith er in the front
paper slo t bo th the front pus h tractor and the pull tractor, or in
the rear pape r slot with both the rear pus h tractor and the pull
tractor.
Combination Description
To use the rear push tractor with the pull tractor, you
need to remove the standard tractor that comes in
the front push pos ition and install it in the pull
position.
Note:
Because thick multi-part forms require a straight
paper path, load them in the front slot.
rear push
and pul l
Caution:
Do not load continuous paper with labels onto
the rear push tractor even when it is used in
combination with the pull tractor. If you load
continuou s paper with labels onto t he rear push/pull
tractor, the labels may come off their backing sheet
inside the printer and cause a paper jam.
To use the front push tractor with the pull tractor, you
need to purchase the optional pull tractor
(C80033✻) and install it in the pull posit ion.
front push
and pul l
Note:
For more informatio n on how to use two tractors in a push and pull
combination, see “Using t wo tractors in a push/pull combination” on
page 2-29.
Getting to Know Your Printer
7
Page 20
Printing on single sheets
As shown below, you can load single sheets from the top or the
front of the printer. You can load ordinary single sheets from
either position, even with continuous paper already loaded in the
front or rear push tractor.
This section helps you determine which paper slot best suits your
single-sheet printing needs. See Chapter 3 for paper loading
instructions.
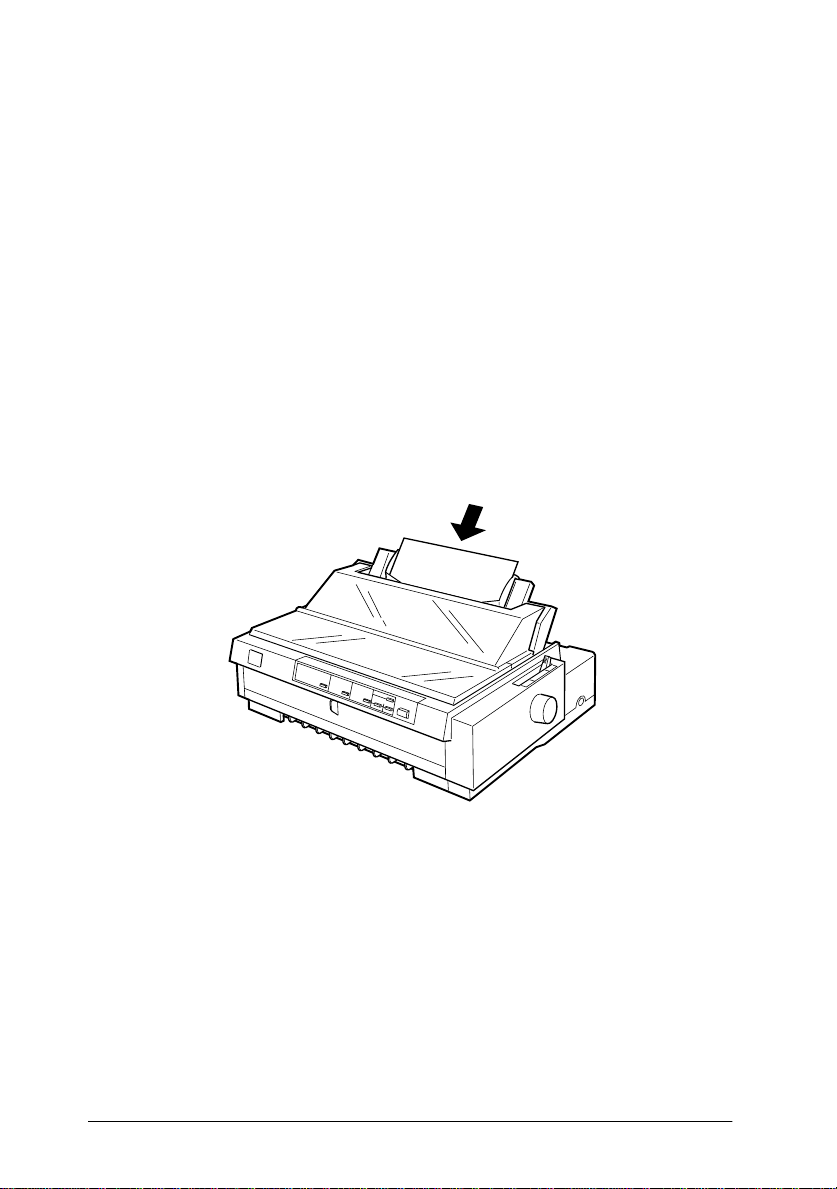
Loading paper in t he top slot
You can load ordinary single sheets, single-sheet multi-part
forms, envelopes, or postcards in the top slot.
Note:
Load envelopes in t he top slot only.
8
Getting to Know Your Printer
Page 21
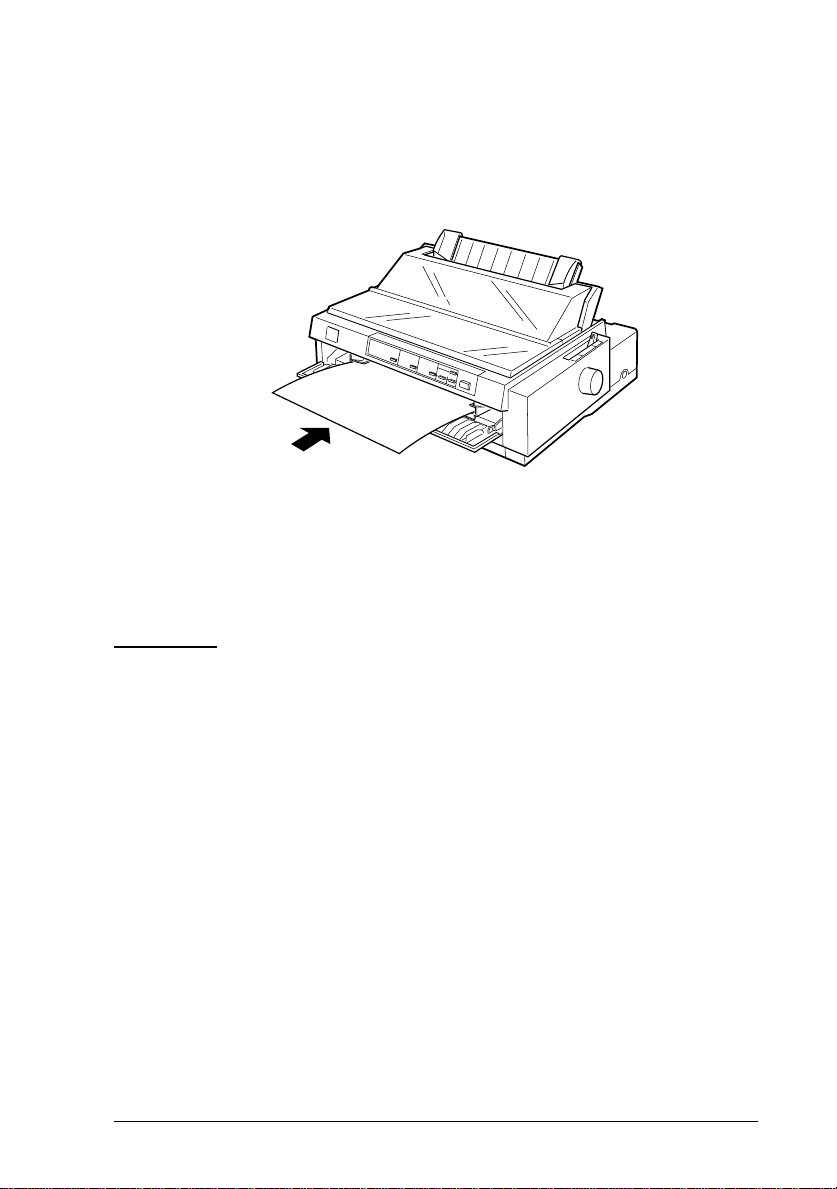
Loading paper in t he front slot
You can load ordinary single sheets, single-sheet multi-part
forms, or postcards in the front slot.
Note:
Always use the front paper slot to load glue-fastened single-sheet multipart forms bound at the side of th e form.
Options
Your printer comes with everything necessar y to print on
continuous paper and single sheets using a variety of paper paths.
By adding opt ions, su ch as a cut-sheet f eeder, pu ll t ractor unit, or
roll paper holder, you can further expan d y ou r printer’s
versatility. Optional interface cards are also available to
supplement your printer’s built-in parall el inter face and built-i n
serial interface. For more information on options for your printer,
see Appendix A, “Enha ncing Your Printer With Opti ons”.
Getting to Know Your Printer
9
Page 22

Ribbon Cartridge
Your print er uses the follo wing ribbon car tridge:
EPSON black ribbon cartridge S015091
When printi ng becomes f aint, you need to replace the ribbo n
cartridge . Ge nuine EPSON ribbon cartrid ges are designed and
manufactured to work properly with your EPSON printer. They
ensure proper operation and long l ife of the pr int head and ot her
printer parts.
To replace a used ribbo n ca rtridge, follow the inst ructions in
“Installing or Replacing the Ribbon Cartridge” on page 1-6.
Important Safety Instructions
Read all of these instructions and save them for later reference.
Follow all warnings and instructions marked on the printer.
❏ Do not place the printer on an unstable surface or near a
radiator or heat source.
❏ Place the printer on a f lat surface. The printer w ill not operate
properly if it is tilted or at an angle.
❏ Do not block or cover the openings in the pri nter’s cabinet.
Do not insert objects through the slots.
❏ Use only th e ty pe of power source indicated on the printer’s
label.
❏ Connect all equipment to properly grounded power outlets.
Avoid using outlets on the same circuit as photocopie rs or air
control systems that regularly switch on and off.
❏ Do not use a damaged or frayed power cord.
10
Getting to Know Your Printer
Page 23

❏ If you use an e xtension cord with the printer, make sure t he
total ampere rating of all d evices plugged into the extensi on
cord does not exceed the cord’s ampere rating. Also, make
sure the total of all devices plugged into the wall outlet does
not exceed the wall outlet’s ampere rating.
❏ Unplug the printer before cleaning, and clean it with a damp
cloth only.
❏ Do not spill liquid on the printer.
❏ Except as specifica lly expl ained i n this gui de, do n ot at tempt
to service the printer yourself.
❏ Unplug th e pri nter and refe r servicing to qualified
personnel under the following conditions:
If t he po wer cord or plug i s d amage d; i f l iquid has en tered the
printer; if t he printer has bee n dropped or the cabinet
damaged; or if the printer does not operate normally or
exhibits a distinct change in performance. Adjust only those
controls that are covered by the operating instructions.
❏ Printer parts marked with this symbol may be hot.
K
Turn of f the printer and let it cool for a few minutes
before y ou touch any printer part marked with this
symbol.
❏ If you plan to use the printer in Germany, observe the
following:
To provide adequate short-circuit protection and overcurrent protection for this printer, the building instal lati on
must be protected by a 16 Amp circuit breaker.
Note for Germ an-speaking users:
Bei Anschluß des Druc kers a n d ie St romv ersorgung muß
sichergestellt werden, daß d ie Gebäudeinstallation mit einem 1 6
A-Überstromschalter abgesichert ist.
Getting to Know Your Printer
11
Page 24

Print Head Caution Symbol
The sym b ol on the print head indicate s that this
part may be hot. Never touch the print hea d just
K
after the printer has been used. Let the print head
cool for a f ew minutes before touching it.
ENERGY STAR Compliance
E
As an
determined that this product meets the
S
TAR guidelines for energy efficiency.
NERGY STAR Partner, EPSON has
E
NERGY
The International
is a volun t ary partnership with the comput er and offic e
equipment industry to promote the introduction of
energy-efficient personal computers, monitors, printers, fax
machines, copiers, and scanners, in an effort to reduce air pollution
caused b y power genera t ion.
E
NERGY STAR Office Equipment program
For United Kingdom Users
Use of options
Epson (UK) Limited shall not be liable against any damages
or problems arising from the use of any options or consumable
products other than those designated as Original EPSON
Products or EPSO N Appr oved P rod uct s b y Eps on (UK ) Lim it ed.
12
Getting to Know Your Printer
Page 25

Safety information
Warning:
w
If you have to fit a plug:
As the colours of the mains lead of this appliance may not match
coloured markings used to identify the terminals in a plug, please
proceed as follows:
The gree n a nd yellow wire must be connected to the term inal in
the plug which is marked with the letter E or the Earth symbol (
The blue wire must be connected to the terminal in the plug
marked wi th the letter N.
The brown wire must be connected to the termi na l in the plug
marked wi th the letter L.
This appliance must be earth e d . Re fer to the rating plate
for voltage and check that the appliance voltage corresponds to
the supply voltage.
Important: The wires in t h e mains lead fitted to this applia nc e
are coloured in accorda nc e with the following code:
Green and yellow — Earth
Blue — Neutral
Brown — Live
G
).
If damage occurs to the plug, replace the cord set or consult a
qualified electrician.
Replac e f uses only with a fuse of the correct s iz e and rating.
Getting to Know Your Printer
13
Page 26

How To Use Your Manuals
This
User’s Guide
and using you r printer. The
comes with the printer summarizes basic information on how
to use the p rinter.
provides detailed information on setting up
Quick Reference Gui de
that also
Warnings , Cautions, and Notes
This guide uses the following conventions:
Warnings
must be followe d to avoid bodily injury.
w
Cautions
must be observed to avoid damage to your equipment
c
Notes
contain importan t information and useful tips on the operation
of your printer.
.
14
Getting to Know Your Printer
Page 27

Chapter 1
Setting Up the Printer
Unpacking the Printer. . . . . . . . . . . . . . . . . . . . . . . . . . . . . . . . . . . . . 1-2
Choosing a Place for the Printer . . . . . . . . . . . . . . . . . . . . . . . . . . . . 1-4
Positioning the continuous paper s upply. . . . . . . . . . . . . . . .1-5
Installing or Replacing the Ribbon Cartridge . . . . . . . . . . . . . . . . . 1-6
Attaching the Paper Guide Base . . . . . . . . . . . . . . . . . . . . . . . . . . . . 1-12
Plugging in the Printer . . . . . . . . . . . . . . . . . . . . . . . . . . . . . . . . . . . . 1-13
Connecting the Printer to Your C o mputer . . . . . . . . . . . . . . . . . . . 1-14
Installing the Printer Software. . . . . . . . . . . . . . . . . . . . . . . . . . . . . . 1 -17
Installing the printer software in Windows 98, 95, or NT 4.01-18
Installing the printer software in Windows 3.1 or NT 3.5x . 1-19
For DOS programs . . . . . . . . . . . . . . . . . . . . . . . . . . . . . . . . . . .1-21
1
Setting Up the Printer
1-1
Page 28
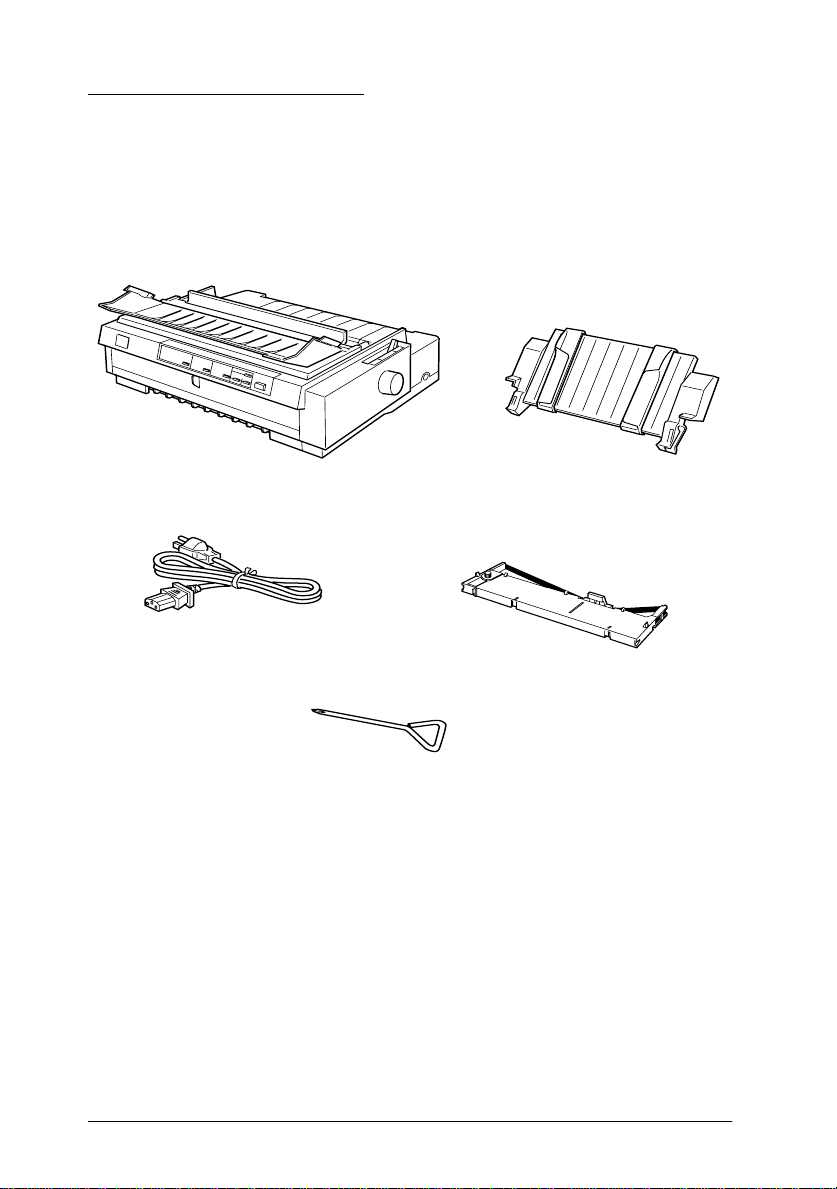
Unpacking the Printer
Besid es this gu ide, your p r inter box should include an EPSON
printer software disk, a Notice Sheet, and the fol lowing items:
printer
power cord
screwdriver
paper guide base
ribbon cartridge
Note:
Depending on your printer model, the power cord may be permanently
attached to the printer. Also, the shape of the power cord plug v ari es
depending on the country of purcha se; be sure the plug y ou have is the
right one for your locati on.
1-2
Setting U p the Pr inter
Page 29

Caution:
c
You must remove all protective materials packed around and
inside your printer before you set it up and turn on the power.
Follow the directions on the Notice Sheet (packed with the
printer) to remove the se materials. A screwdrive r has been
provided for removing the transportation screw.
Save all pack ing an d protective materials , incl uding the
transportation screw and the protective locking clips on the paper
tension unit, in case you need to ship the printer in the future. It
should always be transported in its original packaging or
equivalent materials.
There are several models of the print er d esig ned for different
voltages, and it is not possible to adjust the printer for use with
another voltage. If the lab el on the back of the printer does not
show the correct voltage for your country, contact your dealer.
1
Setting Up the Printer
1-3
Page 30

Choosing a Place for the Printer
Follow the guidelines below when selecting a location for your
printer.
❏ Place the printer on a flat, stable surface. T he prin ter w ill not
operate properly if it is tilted or at an angle.
❏ Place the prin ter where y ou can eas ily connect i t to a network
interface cable, if necessary.
❏ Leave adequate room around the printer for easy operation
and maintenance.
❏ Avoid using or storing the printer in places subject to rapid
changes in temperature and humidity. Keep it away from
direct sunlight, strong light, heat sour ces , or excessive
moist ure or dust.
❏ Avoid places subject to shocks and vibrations.
❏ Place the printer near a wall outlet where you can easily
unplug the power cord.
Note for French-s peaking us ers:
Placez l'imprimante près d'une prise de contact où la fiche peut être
débranchée facile ment.
❏ Avoid electrical outlets controlled by wall switches or
automatic timers. An interruption in power can erase
informat ion in the mem or y of your printer o r computer.
Also av oid outlets o n the same circuit as large motors or
other appliances that can cause voltage fluctuations.
❏ Keep the entire computer system away from potential sources
of electromagnetic interference, such as loudspeakers or the
base units of cordless telephones.
1-4
Setting U p the Pr inter
Page 31

❏ Use a grounded power outlet; do not use an adapter plug.
❏ Make sure the paper path is clear and uno bstructed before
you print on continuous paper. (See the next section.)
If you plan to use a printer stand, follow these guidelines:
❏ Use a stand that supports at least 22 kg (48.5 lb).
❏ Never use a stand that tilts the printer . The printer sho u ld
always be kept leve l .
❏ Position your printer’s power cord and interface cable so they
do not interfere with paper feeding . If possible, secure the
cables to a leg of the printer stand.
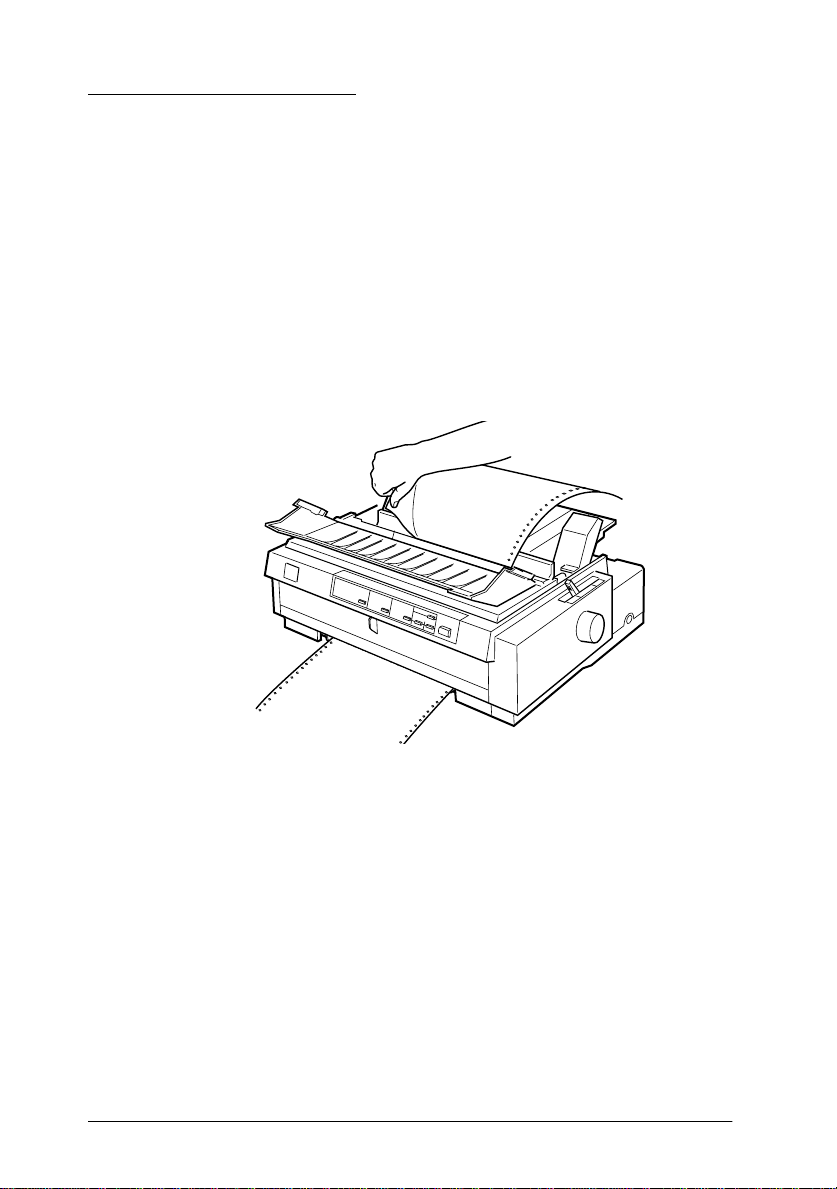
Positioning the continuous paper supply
Before using continuous paper, make sure you line up your paper
supply with the tractor feeder so the paper feeds smoothly into
the printer, a s shown below.
1
Setting Up the Printer
1-5
Page 32

Installing or Replacing the Ribbon Cartridge
EPSON recommends the use of genuine EPSON ribbon cartridges
(S015091). Products not manufactured by EPSON may cause
damage to your printer n ot covered by warranties.
Warning:
w
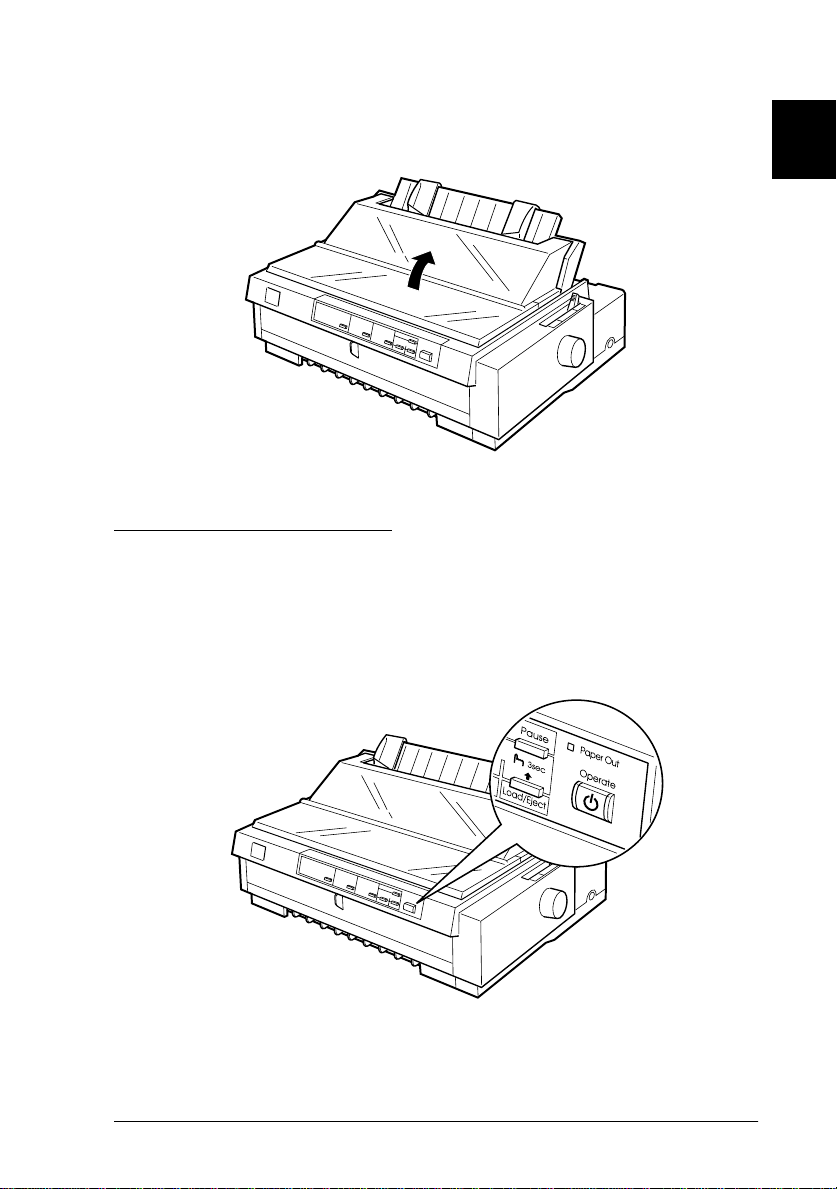
1. Make sure the printer is turned off. The printer is off when
You will need to move the print head by hand to install or replace
the ribbon cartridge. If you have just used the printer, the print
head may be hot; let it cool for a few minutes before touching it.
the surface of the
protectors as shown.
Operate
button is e ven with the button
Caution:
c
2. If the printer is connected to an elect rical outlet, unplug it from
the outle t.
1-6
Setting U p the Pr inter
Moving the print head wh ile the pr inter is on may damage
the printer.
Page 33

3. Lift the pri nter cover by its back edge and then pull it
straight up and off.
4. Make sure that the print head is not hot; if it is, let it cool for
a few minutes before touching it. Then slide the print head to
the ribbon installation position (the indented portion of the
paper tension unit) by hand.
Note:
When the pull tractor is installed, you can replace the ribbon
cartridge when the print head is not in the ribbon installation
position.
1
Setting Up the Printer
1-7
Page 34

5. If a used ribbon cartridge is installed, grasp it the cartridge
and pull it slightly forward and up; the ribbon guide snaps
away from the metal pins behind the print head. Properly
dispose of the used ribbon cartridge.
ribbon guide
6. Remove the new ribbon cartridge from the package. Then
remove the separator from the middle of the ribbon cartridge
and disca rd the sep arator. Turn the ribbon- tightening knob
in the direction of the arrow to remove any slack in the ribbon.
1-8
separator
ribbon-tigh te ni ng kn ob
Setting U p the Pr inter
Page 35

7. Hold the cartridge with the ribbon-tightening knob up. Fit the
two front notches of the ribbon cartridge over the small pegs
on each side of the printer as shown below. Then lay the
cartrid g e fl at.
8. Make sure that the two rear notches of the cartridge fit over
the small pegs on each side of the printer. Then gently press
down the cartridge unti l both ends click i nto place.
1
Setting Up the Printer
1-9
Page 36

9. Lift the cartridge’s ribbon guide (①) and insert it firmly over
the metal pins behind the print head (②). Make sure the ribbon
is not twisted or creased and that it is in place behind the print
head. Then press down the guide until it clicks into place.
ribbon guide
ribbon-tightening
knob
10. Turn the ribbon-tightening knob in the direction of the arrow
to remove any slack in the ribbon as shown in step 9. Then
slide the print head from side to side to make sure it moves
smoothly.
1-10
Setting Up the Printer
Page 37

11. Replace the printer cover by first inserting the front tabs into
the slots on the printer and then lowering the cover into place.
Push it down until it clicks.
1
Setting Up the Printer
1-11
Page 38

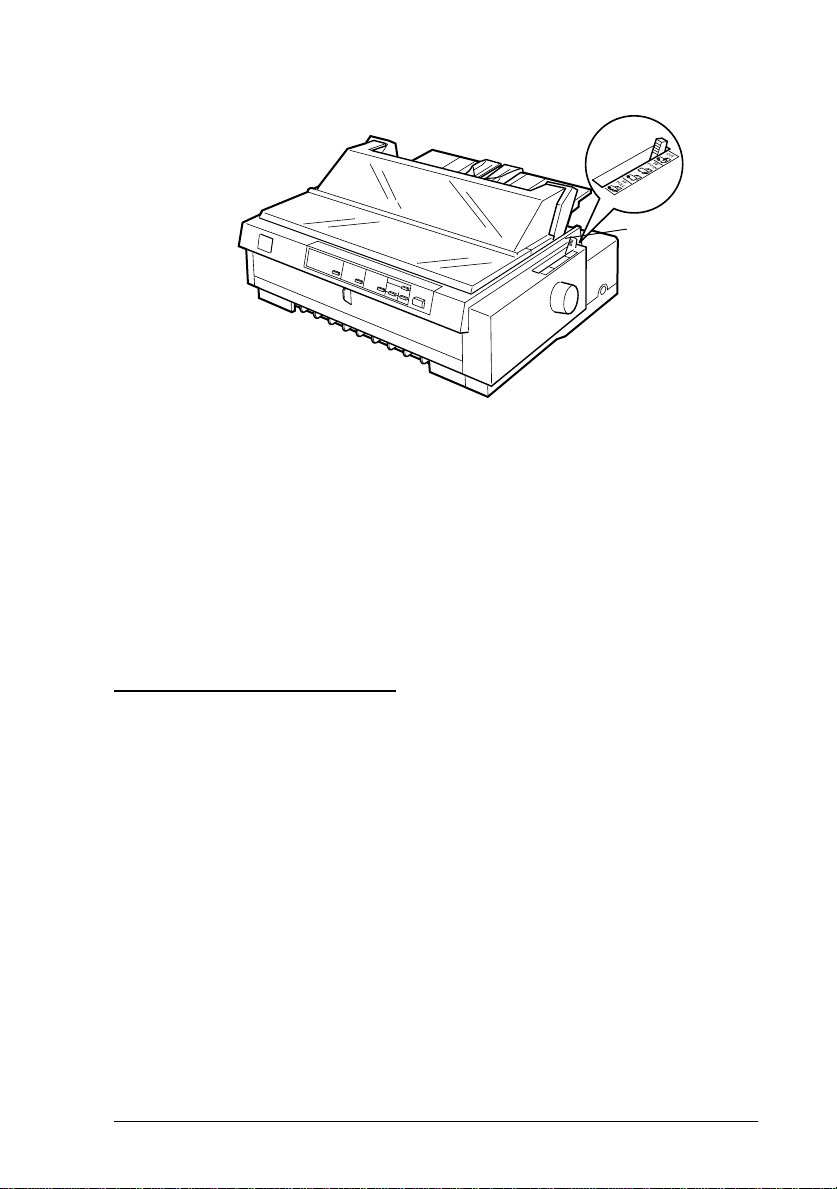
Attaching the Paper Guide Base
To install the paper gu id e base follow these steps:
1. Make sure the paper guide cover is open as shown below.
Attach the paper guide base by sliding the slots on the bottom
over the pegs located behind the paper tension unit, then tilt
the guide back until it stops.
paper guide cover
paper tension
unit
c
1-12
Caution:
Make sure to slide the slots on the bottom of the paper guide over
the pegs locate d behind the paper te nsion uni t on each si de of the
printer.
Setting Up the Printer
Page 39
2. Close the paper guide cover.
Plugging in the Printer
1. Make sure the printer i s turned off. The printer is off when
the surfa ce of the
protectors as shown below.
Operate
button is even with the butto n
1
Setting Up the Printer
1-13
Page 40

2. Check the label on the back of the printer to make sure its
voltage matches that of your electrical outlet. Also make sure
the plug on your printer’s power cord matches your electrical
outlet.
Warni ng:
w
3. If the power cord is not at tached to the printer, plug th e
4. Plug the power cord into a properly grounded electrical
It is not possible to change the p rinter’s voltage. If the rated
voltage an d your outle t voltage do not mat ch, contact your deale r
for assistance. Do not plug in t h e p ower cord.
appropria te end into the AC inlet on the back of the printer.
outlet.
Connecting the Printer to Your Computer
Your printer has three s e parate interface connect ions: an IEEE1284 compatible parallel interface, an EIA-232D serial interface
and Type B option al interfac e. See page A-3 fo r more informat ion.
If your computer requires a different type of printer interface, you
should be able to use one of the optional interfaces described on
page A-3.
Follow th e steps below to connect the printer to your computer
using a parallel or serial interface connector, or a ground wire
connector.
1. Make sure both the printer and computer are turned off. The
Operate
button is even
1-14
printer is off when the surface of the
with the b utton protectors.
Setting Up the Printer
Page 41

2. Plug the cable connector secure l y into the printe r’s interface
connec tor as shown.
Parallel interface
Plug the cable connector securely i nto the parall e l interface
connec tor.
.
parallel interface
connector
Squeeze the wire clips together until they lock in place on both
sides of the connector.
1
Setting Up the Printer
1-15
Page 42

Serial interface
Plug the c able connector securely into the serial i nte rface
connec tor.
serial interface
connector
Tighten the screws on the both sides of the connector.
1-16
Setting Up the Printer
Page 43

3. If your cable has a ground wire, c onnect it to the printer’s
ground connector as shown below.
4. Plug th e other end of the cable into the computer.
After you conne ct th e pr inte r to your compu ter, inst all the print er
softwa re as describe d in the next section.
Installing the Printer Software
1
After you connect the printer to your computer, you need to
install the software included on the EPSON printer software CDROM shipped wi th your printer.
Your printer softwa re includes:
❏ Printer driver
The printer driver is the software that runs, or "drives," your
printer. With it, you ca n make printer settings such as print
quality, resolution, and paper size.
❏ EPSON Status Monitor 2 (Windows 95 or 98 only)
The EPSON Status Monitor 2 notifies you of printer errors and
displays printer status information.
Setting Up the Printer
1-17
Page 44

❏ EPSON Remo te! (a DOS-based printer se tup utility)
The EPSON Remote! utility allows you to easily change the
printer’s default settings from the computer screen. To use the
EPSON Remote! utility with DOS, see page 4-23.
To install the printer software, see "Installing the printer software
in Windows 98, 95, or NT 4.0" or "Installing the printer software
in Windows 3.1 or NT 3 . 5x" i n th is sec tion. If y ou are u si ng DOS,
see “For DOS programs” on page 1-21.
Installing the printer software in Windows 98, 95, or NT 4.0
Follow the steps below t o install the printer software in Windows
98, 95, or NT 4.0:
Note:
❏
Installing the printer software for Windows NT 4.0 may require
network administration privileges. Ask your network administrator
for more information.
❏
If you wish to make a diskette version of the printer software on your
CD-ROM, insert the CD and run the EPSETUP program . In the
dialog box that appears, click the
button and follow the on-screen instructions.
Driver disk creation utility
❏
If you are using the diskette version of the EPSON software, make
a backup copy of the EPSON printer software disk or disks before
you begin installation.
1. Make sure Windows 98, 95, or NT 4.0 is running and the
printer is of f.
2. Insert the printer sof tware CD-ROM in the CD-ROM driv e.
The Install dialog box appears. (If you are using diskettes,
insert the diskette in a disk drive, then double-click the
Setup.exe
icon.)
3. Click
1-18
icon and double-click the
Install
to start the printer software installation, a nd
follow the instructions.
Setting Up the Printer
drive
Page 45

Note:
❏
If the New Hardware Found sc reen or any other wizard appears
when you turn on your computer, click
above.
❏
Installation time varies de p ending on your computer.
For information on opening and using the software, see "Using
the Printe r Software" in Chapter 4. After you install the printer
driver for Windows 98, 95, or NT 4.0, y ou can inst all the EPSON
Status Monitor 2 utili ty program. S ee Chapter 6 for information
on installing and using the Status Monitor.
Cancel
and follow the steps
Installing the printer software in Windows 3.1 or NT 3.5x
Follow the steps below to install the printer softwar e on Windows
3.1 or NT 3.5x systems.
Note:
Installing the pr inter software on Windo ws N T 3.5x may require
network administration privileges. Ask your network administrator for
more information.
1
1. Make sure Windows is running and the Program Manager
window is open.
2. Insert th e printer software CD-ROM shipped with your
printer in t he CD-ROM drive. (If you are us i ng diskettes,
insert Disk1 of your printer software in a disk drive.)
Setting Up the Printer
1-19
Page 46

3. Choose
In the Command Line box, type
drive has a drive letter other than "D", or if you are using a
diskette , substitute th e appropriate drive letter.) T hen click
OK
❏ If you wish to make a diskette version of the printer software
on your CD-ROM, type
dialog box that appe ars, cl ic k the
button and follow the on-screen instructions.
4. The installation program begins copying the printer software
files.
5. When the installation is complete, click OK to exit the
installation program.
Run
from the File menu. T he Run dialog box ap pears.
D:SETUP
.
EPSETUP
instead o f
Driver disk creation utility
, (If your CD-ROM
SETUP
. In the
The installation program automatically selects the FX-980 as the
default printer for Windows applications.
For information on opening and usi ng the softwa re, see "Using
the Printe r S oftware" in Chapter 4.
1-20
Setting Up the Printer
Page 47

For DOS programs
To cont rol the prin ter fr om DOS a ppli cati on prog rams, you mus t
select the printer you are using or another available printer from
the printer list of your application.
Choose the EPSON FX-980 printer at the appropriate step in the
setup or instal lation procedure. I f the list in your applicati on does
not includ e the FX-980 prin ter, choose the first available pri nter
from this list:
FX-880
FX-870
FX-850
FX-800
FX-85
FX-80+
FX-80
If none of these printers is listed, choose the first one available
from the following:
FX
LX
RX
MX
EPSON pri nter
Standard printer
Draft Pr inter
ASCII printer
1
Note:
If your application does not list a suitable alternative, co nta c t the
software manufactu rer to se e if an up date i s available.
Setting Up the Printer
1-21
Page 48

1-22
Setting Up the Printer
Page 49

Chapter 2
Printing on Continuous Paper
Setting the Paper Release Lever . . . . . . . . . . . . . . . . . . . . . . . . . . . .2-2
Setting the Paper Thickness Lever . . . . . . . . . . . . . . . . . . . . . . . . . . 2-4
Using the Rear Push Tractor . . . . . . . . . . . . . . . . . . . . . . . . . . . . . . .2-6
Loading paper onto the rear pus h t ractor. . . . . . . . . . . . . . . . 2-6
Removing a printed document from the rear push tractor . 2-10
Using the Front Push Tra ctor. . . . . . . . . . . . . . . . . . . . . . . . . . . . . . . 2-12
Loading paper onto the front pus h t ractor . . . . . . . . . . . . . . . 2 -12
Removing a printed document from the front push tractor 2-17
Removing the front push tract or . . . . . . . . . . . . . . . . . . . . . . . 2-18
Reinstalling the tractor in the front push position. . . . . . . . . 2-19
Using the Tractor in the Pull Position . . . . . . . . . . . . . . . . . . . . . . . 2-21
Installing the tractor in the pull position . . . . . . . . . . . . . . . .2-21
Loading paper onto the pull tractor . . . . . . . . . . . . . . . . . . . . 2-23
Removing the paper from the pull tractor . . . . . . . . . . . . . . .2-28
Using two tractors in a push/p ull combination . . . . . . . . . . 2-29
Removing the pull tractor . . . . . . . . . . . . . . . . . . . . . . . . . . . . . 2 - 3 1
Loading Multi-Part Forms . . . . . . . . . . . . . . . . . . . . . . . . . . . . . . . . . 2-33
Loading Continuous Paper With Labels . . . . . . . . . . . . . . . . . . . . . 2-34
Removing continuous p ape r with lab els . . . . . . . . . . . . . . . . 2-36
Switching Between Printing on Continuous Paper
and Printing on Single Sheets. . . . . . . . . . . . . . . . . . . . . . . . . . . . . 2-37
Switching to printing on single sheets . . . . . . . . . . . . . . . . . .2-37
Switching to printing on continuous pa per . . . . . . . . . . . . . . 2-3 8
2
Adjusting the Top-of-Form Position. . . . . . . . . . . . . . . . . . . . . . . . .2-39
Advancing the Paper to the Tear-O ff Edge . . . . . . . . . . . . . . . . . . . 2 - 4 2
Using the Tear Off/Bin butt on . . . . . . . . . . . . . . . . . . . . . . . . . 2-42
Advanci ng the paper to the tear-off position automatically 2- 43
Adjusting the tear-off position . . . . . . . . . . . . . . . . . . . . . . . . .2-43
Printing on Continuous Paper
2-1
Page 50

Setting the Paper Release Lever
You can load continuous paper in the printer from several paper
sources, including the rear push tractor or the front push tractor.
Use the paper release lever to indicate the paper source you want
to use, as de scribed in the table below.
Note:
To decide which paper source and paper path best suits your printing
needs, see “Available Paper Pat hs ” on page 3.
paper release
lever
The table bel ow describes each paper release lever positio n.
2-2
Paper release
lever position
Printing on Continuous Paper
Description
Single-sheet position
For loading single-sheet paper from the top or front
slot. For information on loading single sheets, see
Chapter 3.
Page 51

Paper release
lever position
Description
Rear push tractor position
For loading co ntinuous paper from t he tractor installed
in the rear push position. Also set the lever to this
position when using the rear push and pull tractors in
combination .
Front push tractor position
For loading co ntinuous paper from t he tractor installed
in the front push position. Also set the lever to this
position when using the front pus h and pull tractors in
combination .
Pull tractor position
For loading co ntinuous paper from t he tractor installed
on top of the printer in the pull position. When the
tractor i s in the pu ll posit ion, y ou can l oad pape r in t he
front, rear, or bottom slot.
Note:
You can load two different types of continuous paper onto the front and
rear push tractors, and easily switch between them using the paper
release lever. Before moving the paper release lever, alw ays press the
Load/Eject
button to feed the paper in the paper path backward to the
standby position.
2
Printing on Continuous Paper
2-3
Page 52

Setting the Paper Thickness Lever
Setting the paper thickn e ss lever allows t he printer to
accommodate various thicknesses of paper. The paper thi ckness
lever is located under the printer cover. You can select one of nine
positions identified by the scale next to the lever.
paper thickness
lever
-
Use the fol l owing table to set the paper thickness lever to match
the thick ne ss of your paper.
Paper type* Lever position
Ordinary (single sheets or continuous paper) 0
Thin paper -1 or 0
Carbonless multipart forms with:**
2 parts (original + 1 copy)
3 parts (original + 2 copies)
4 parts (original + 3 copies)
5 parts (original + 4 copies)
6 parts (original + 5 copies)
7 parts (original + 6 copies)****
Continuo us paper with labels*** 2
Postcard 3
Envelopes 4 or 5
2-4
Printing on Continuous Paper
1
3
4
5
6
6
Page 53

* See Appendix C for complete paper specifications.
** It is recommended that multi-part forms be used in the front push
or pull position.
*** Continuous paper with labels cannot be used with the rear push
tractor. To use them, install the optional tractor unit in the front push
or pull position.
**** Always load multi-part forms wi th 7 parts (one original plus 6
copies) from the front or bottom slot onto the pull tractor.
Note:
❏
If the printed image is smeared , y ou may need to set the paper
thickness lever one positio n h ig h er to im p r ove p r int quality.
❏
If the printed image is faint or has many gaps, you may need to set
the paper thickness lever one position lower to improve print quality.
2
Printing on Continuous Paper
2-5
Page 54

Using the Rear Push Tractor
To use the re ar push tractor, load continuous pa pe r in the rear
slot. For information on when to use the rear push tractor, see
“Available Paper Paths” on page 3.
Note:
The tractors are installed in the front push and rear push positions when
the printer is shipped. The rear push tra c to r cannot be removed.
Loading paper onto the rear push tractor
If a tractor is in stall ed in the p ull pos ition , you need t o remove it
and install the pa per tension unit as described on p age 2-32 before
using the re ar push trac tor.
Note:
To avoid paper jams, it is best to load thick multi-part forms using the
front or bottom slot an d the p ull or front push tractor.
Caution:
c
Do not load continuous pap er with labels in the rear paper slot;
the labels may come off their backing sheet inside the printer and
cause a paper jam.
To load pa per onto the r e ar push tractor, follow thes e steps:
1. Make sure the printer is turned off.
2-6
Printing on Continuous Paper
Page 55

2. Open the paper guide cover and remove the paper guide base
by holding the both edges and lifting it up.
3. Set the pa per release leve r to the rear push tractor posit ion.
Set the paper thickness lever (located under the printer cover)
to the proper position fo r your paper’s thickness.
2
Printing on Continuous Paper
2-7
Page 56

4. Release the left and righ t sprockets by pulling the sprocket
lock levers forward.
front of the pr inter
5. Slide the left sprocket to the left margin of the paper using the
scale on the printer. (Printing starts at the “0” mark.) Then
push the lever back to lock it in place.
front of the printer
Note:
See “Paper alignment ” and “ Printable area” in Appen dix C for
more information on the left margin position.
6. Slide the right sprocket to match the width of your paper, but
do not lock it. Move the paper support midway between the
two sprockets as shown above.
2-8
Printing on Continuous Paper
Page 57

7. Make sure your paper has a clea n, straight edg e . Then open
both sprocket covers and fit the first three holes of the paper,
printable side down, over the tractor pins. Then close the
sprocket covers.
front of the printer
8. Slide the right sprocket to remove any slack in the paper; then
lock it in place by pushing the sprocket lock down.
9. Attach the paper g uide bas e as des cr ibed on page 1-12. After
installing the paper guide, grab the center section of the paper
guide, lift it up and lay it flat.
10. Slide the edge guides to the middle of the paper guide base.
Then close the paper guide cover.
2
Note:
The printer cannot print w h en the cover is open.
Printing on Continuous Paper
2-9
Page 58

11. Turn on the printer. Yo u may need to check and cha nge the
printer driver settings as described in Chapter 4. When the
printer receives data, it automatically loads the paper and
starts printing. The printed pages are fed over the paper guide
toward the back of the printer.
12. After you finish printing, follow the steps in the next section
to tear off your printed document. If the first pri nted line on
your page appears too hig h or low, you can change its position
by using the micro adjust feat ure. See “Adj ust ing th e Top-of Form Position” on page 2-39.
Caution:
c
Never use the knob to adjust the top-of-form position; this may
damage the printer or cause it to lo se the t op-of-form position.
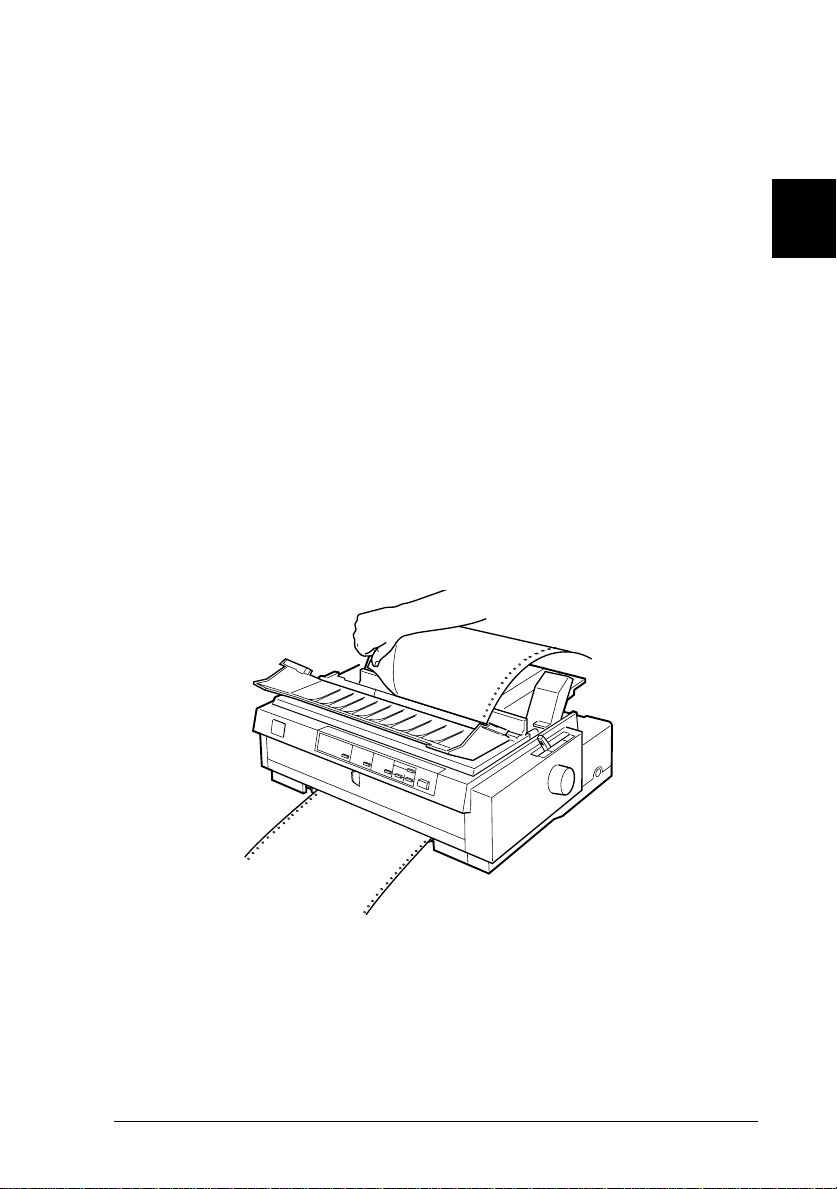
Removing a printed document from the rear push tractor
To remove the printed document, follow these steps:
1. Make sure the Tear Off /Bin lights are flas hing. (This indicat es
your paper is at the current tear-off position.) You may need
Tear Off/Bin
button.
2-10
to press the
Printing on Continuous Paper
Page 59

2. Open the paper guide cover, and tear off the printed
document using the tea r-off edge of th e p ri nte r.
Note:
If your paper’s perforation is not properly aligned with the tear-off
edge, you can adjust t he tear- off position using the micro adjust
feature. See “Adjusting the tear-off position” on page 2-43.
Caution:
c
Never use the knob to adjust th e tea r-o ff p osition; this may
damage the printer or cause it to lose the tear-off position.
2
3. Close the paper guide cover.
When you re sume printi ng, the printer auto matically feeds
the paper back to the top-of-form position and starts printing.
To feed continuous paper to the standby position where you can
remove the paper, press the
for an explanation of the standby position.) Then open the
sprocke t covers of the tractor and remove the pape r.
Caution:
c
Always tear off yo ur p rinted document before you press t he
Load/Eject
cause a paper jam.
button. Reverse feeding several pages at a time may
Load/Eject
Printing on Continuous Paper
button. (See the Glossary
2-11
Page 60

Using the Front Push Tractor
To use the front push tractor, load continuous paper in the fro nt
slot. For more information on when to use the front push tractor,
see “Available Paper Paths” on page -3.
Note:
The tractors are installed in the front push and rear push positions when
the printer is shipped. The rear tracto r cannot be removed.
If a tractor is not installed in the front push position, go to
“Reinstalling th e t ract or in t he front p ush posi ti on” on page 2-19.
Loading paper onto the front push tractor
To load pa per onto the fro nt push tractor, follow these steps:
1. Make sure the printer is turned off.
2. Open the front paper guide by pulling the tab at the center
of the guide. Then remove the guide by grasping both sides
and pulling it straight out of the printer. Check that the tractor
is installed i n the front push position.
2-12
Printing on Continuous Paper
Page 61

3. Set the paper release lever to the front push tractor position.
Also set the paper thi ckness lever (l ocated under the printer
cover) to the proper position for your pa per’s thickness.
4. Release the left and right sprockets by pushing the sprocket
lock leve rs backward .
2
Printing on Continuous Paper
2-13
Page 62

5. Slide the left sprocket to the left margin o f your paper us i ng
the arrow mark inside the printer. (Printing starts at the arrow
mark.) Then pull th e leve r forward to lock it in plac e.
Note:
See “Paper alignment ” and “ Printable area” in Appen dix C for
more information on the left margin position.
6. Slide the right sprocket to match the width of your paper, but
do not lock it. Move the paper support midway between the
two sprockets as shown above.
2-14
Printing on Continuous Paper
Page 63

7. Make sure your paper has a clea n, straight edg e . Then open
both sprocket covers and fit the first three holes on each side
of the paper, printable side up, over the tractor pins. Then
close the sprocket co vers.
8. Slide the right sprocket to remove any slack in the paper; then
lock it in place by pushing the sprocket lock down.
9. Attach the front paper guid e by sliding it along the p ri nte r’s
mounting slots as shown below. Then close the front paper
guide.
2
Printing on Continuous Paper
2-15
Page 64

10. Slide the edge guides to the middle of the top paper guide
base. Lift the center section of the paper guide base up and
lay it flat. Make sure that the printer cover and the paper guide
cover are closed.
Note:
The printer cannot print w hen the printer cover is open.
11. Turn on the printer. Yo u may need to check and cha nge the
printer driver settings as described in Chapter 4. When the
printer receives data, it automatically loads the paper and
starts printing. The printed pages are fed over the paper guide
toward the back of the printer.
12. After you finish printing, follow the steps in the next section
to tear off your printed document.
2-16
Printing on Continuous Paper
Page 65
If the first lin e on your pa ge appears too hi gh or low, you can
change its position by using the micro adjust feature. See
“Adjusting the Top-of-Form Position” on page 2-39.
Caution:
c
Removing a printed document from the front push tractor
To remove the printed document, follow these steps:
1. Make sure the Tear/Off Bin lights are flash ing. (This indicates
2. Open the paper guide cover, and tear off the printed
Never use the knob to adjust th e to p-of -form p osit ion ; this m ay
damage the printer or cause it to lose the top-of-form position.
your paper is at the current tear-off position.) You may need
to press the
document using the tea r-off edge of th e p ri nte r.
Tear Off/Bin
button.
2
Printing on Continuous Paper
2-17
Page 66

Note:
If your paper’s perforation is not properly aligned wit h the tear-off
edge, you can adjust the te ar- off position using the micro adjust
feature. See “Adjust ing the tear-off position” on page 2-43.
Caution:
c
3. Close the paper guide cover.
When yo u resume printing, the printer automati cally feeds the
paper back to the top- o f-form position and sta rts printing.
Never use the knob to adjust the tear-of f p osition; this may
damage the printer or cause it to lose the tear-off position.
To remove the remaining paper from the printer, press the
Eject
button to feed the paper backward to the standby position.
(See the Glossary for an explanation of the standby position.) Th en
open the sprocket cov e rs of the tract or and remove the paper.
Caution:
c
Always tear off you r p r inted document before you press t he
Load/Eject
cause a paper jam.
button. Reverse feeding several pages at a time may
Removing the front push tractor
To remov e the tractor from the front push po sition, follow these
steps:
1. Remove any paper from the tractor as described in the
previous section.
2. Turn o ff the printer.
3. Open the front paper guide by pulling the tab at the center of
the guide. Then remove the guide by grasping both sides and
pulling it straight out of the printer.
Load/
2-18
Printing on Continuous Paper
Page 67

4. Press the tractor’s lock tabs, tilt the tractor up , and lift it out
of the printer.
5. Replace the fr ont paper gui de by slid ing it alon g the printer’s
mounting slots until it locks in place. Then close the front
paper guide .
2
Reinstalling the tractor in the front push position
If a tractor is inst all ed in the pull pos ition , you n eed t o remove it
and install the paper tension unit as described on pa ge 2-32 before
using the f ront push tracto r.
To reinstall the tracto r in the front push position, follow thes e
steps:
1. Make sure the printe r is turned off.
Printing on Continuous Paper
2-19
Page 68

2. Open the front paper guide by pulling the tab at the center
of the guide. Then remove the guide by grasping both sides
and pulling it straight out of the printer.
tab
3. Insert the tractor into the printer’s mounting slots and press
down bot h ends of the tra ctor to make sure that it is fi rmly
seated.
You are now ready to load continuous paper onto the front push
tractor as described in the next section. To remov e the tracto r,
see“Removing the front push tractor” on page 2-18.
2-20
Printing on Continuous Paper
Page 69

Using the Tractor in the Pull Position
Using the tractor in the pull position is ideal for printing on thick
and heavy continuous paper, such as multi-part forms or
continuous paper with labels. However, you cannot use the tearoff feature with the pull tra ctor.
Because thick paper requires a straight paper path to avoid paper
jams, you should load paper in the front or bottom slot when
using the pull tractor.
Caution:
c
To further reduce the chance of paper jams and improve the
performance of continuou s paper, you can us e two tractors in
combination. When using this printing method, load the paper
onto both the front push tractor and the pull tractor, or both the
rear push tractor and the pull tractor. See “Using two tractors in
a push/pull combination” on page 2-29.
Do not load continuous paper with labels in the rear paper slot;
the labels may come off their backing sheet inside the printer and
cause a paper jam.
2
Installing the tractor in the pull position
To install a tractor in the pull position, you must either remove
the front push tractor or purchase the optional pull tractor
(C80033✽
front push tractor” on page 2-18.
Note:
The tractor in the rear push position cannot be removed.
To install a tractor in the pull position, follow these steps:
1. Make sure the printer is turned off. Then lift the printer cover
up and o ff the printer.
To remove the front push tractor, see “Removing the
).
Printing on Continuous Paper
2-21
Page 70

2. Push up the tabs on each side of the paper tension unit and
lift the unit up and off the printer. Store the paper tension unit
in a safe place.
3. Lower the tractor into the printer’s mounting slots and press
down bot h ends of the tra ctor to make sure that it is fi rmly
seated.
2-22
Printing on Continuous Paper
Page 71

You are now ready to load continuous paper onto the pull tractor
as describe d in the nex t se ction. To remove the pull tractor, see
“Removing the pull tractor” on page 2-31.
Loading paper onto the pull tractor
When using the pull tractor, load continuous p aper in the front
or bottom slot, if possible; loading paper in the rear slot may
increase the chance of a paper jam.
Caution:
c
To load pape r onto the pul l tractor, follow these steps:
1. Make sure the printe r is turned off, and the prin te r cover is
2. Slide the edge guides to the middle of the paper guide. Lift
3. Set the paper release lever to the pull tractor position. Set the
Do not load continuous paper with labels in the rear paper slot;
the labels may come off their backing sheet inside the printer and
cause a paper jam.
remov ed. Also check that the tr actor is installed in the pull
position.
the center section of the paper guide up and lay it flat.
paper thickness lever to the proper position for your paper’s
thickness.
2
-
Printing on Continuous Paper
2-23
Page 72

4. Release the left and righ t sprockets by pulling the sprocket
lock levers forward.
5. Slide the left sprocket to the left margin of the paper using the
scale on the paper guide as a guide. (Printing starts at the
arrow mark.) Then push the lever back to lock it in place.
Note:
See Appendix C, “Paper alignment” and “Printable area” for more
information on the left margin position.
6. Slide the right sprocket to match the width of your paper, but
do not lock it. Move the paper support midway between the
two sprockets as shown above.
2-24
Printing on Continuous Paper
Page 73

7. Make sure your paper has a clea n, straight edg e . Then open
both sp rocket covers.
8. Insert th e paper into the front, bottom, or rear paper slo t as
described below until it emerges between the platen and the
ribbon guide. Then pull up th e paper until the perforation
between the first and second pages is even with the top of the
printer’s ribbon.
Before you load paper in the
front slot, remove the front
paper gui de. Then load
paper printable side up.
Load paper in the bottom slot
printable side up (forward).
2
Before you load paper in the
rear slot, remove the paper
guide base. Th en lo ad paper
in the rear slot, printable side
down and attach the paper
guide base.
Printing on Continuous Paper
2-25
Page 74

9. Fit three holes on eac h side of the p aper ove r the trac to r pins
on both sprockets. Then close the sprocket covers.
10. Slide the right sprocket to remove any slack in the paper, then
lock it in place by pushing the sprocket lock down.
11. If you use the front slot, attac h the front paper guide with the
continuous paper positioned as shown below. Then close it.
12. If you use th e rear slot, replace the paper guid e base and make
sure the edge guides are together in the middle of the paper
guide base and lift the center section of the paper guide base
up and lay it fl at.
13. Turn on th e printer.
14. Remove any slack in the paper and adjust the top-of-form
position (the position where the printer will start printing) by
LF/FF
button or using the micro adjust feature.
2-26
pressing the
(To use the micro adjust feature, see Appendix 2, “ Adj usti ng
the Top-of-Form Position”.) The printer will start printing at
the curre nt position without adva ncing the paper.
Printing on Continuous Paper
Page 75

Caution:
❏
c
15. Attach the printer cover and close the p aper guide cover.
Note:
The printer cannot print when the printer cover is open.
16. You may need to check and change the printer driver settings
as described in Chapter 4. Then send a print job to the printer.
The printer starts printing from the current position without
advancing the paper. The printed pages are fed over the paper
guide toward the back of the printer.
Never use the knob to remove sla c k in the paper or to
adjust the top-of-form positio n; this may damage the
printer or cause it to lose the top-of-fo rm position.
❏
Always remove any slack from the paper; otherwise print
quality may be red uc ed.
2
Printing on Continuous Paper
2-27
Page 76

17. After you finish printing, open th e paper guide cover; then
tear off th e printed docu ment at the perforation nearest the
paper exit slot.
Removing the paper from the pull tractor
1. After you finish printing, tear off the supply of paper at the
perforation nearest the paper entry slot.
2. To eject the paper, hold down the
2-28
Printing on Continuous Paper
LF/FF
button.
Page 77

Using two tractors in a push/pull combination
To improve continuous paper feeding and reduce paper jams, you
can use two tractors at the same time. When using two tractors in
combination, you can load paper in the front paper slot onto both
the front push tractor and the pull tractor, or in the rear paper slot
onto both the rear push tractor and the pull tractor.
To use the front push tra ctor with the pull tractor, you ne e d to
purchase the optional pull tractor (C80033✽). The tractor in the
rear push position cannot be removed. Install the optional pull
tractor as described in “Installing the tractor in the pull position”
on page 2-21.
To use the rear push tractor with the pull tractor, you can remove
the tractor fr om the front pu sh position as described o n page 2-18
and install it in the pull position as described on page 2-21.
Note:
The tractor in the rear push position cannot be removed.
To load paper onto two tractors, follow these steps:
1. Remove the printer cover and paper guide ba se.
2
2. Make sure one tractor is in t he front or rear push posi tion and
one tracto r is in the pull position as de scribed earli er in this
chapter.
3. Set the paper release lever to either the front push or rear push
tractor position, depe nding on which push tractor you are
using. Set the paper thickness lever to the proper position for
your paper’s thi ckness.
4. Load continuous paper onto t he fron t or re ar push tract or as
described earlier in this chapter.
Printing on Continuous Paper
2-29
Page 78

5. Turn on the printer. Press the
the paper to the top-of-form position. T he n press the
button until the perforation between the first and second page
is even with the top of the printe r’s ribbon.
Caution:
c
6. Load the paper onto the pull tractor’s sprockets as described
in “Loading paper onto the pull tractor” on page 2-23.
7. Set the pa per release leve r to the pull trac tor position. The n
remove any slack in the paper between the push and p ull
tractors using the micro adjust feature (described on
“Adjusting the Top-of-Form Position” on page 2-39.) if
necessary.
8. Move the paper release lever back to the push tractor position
you set in step 2.
9. When the printer receives data, it w ill start printi ng at the
current po sition without advancing the paper. If necessary,
follow the steps in “Adjusting the Top-of-Form Position” on
page 2-39 to adjust the current position of the paper.
Never use the knob to move the paper; this may damage the
printer or cause it to lose the top-of-form position.
Load/Eject
butto n to a dva nc e
LF/FF
Caution
❏
c
10. Attach the paper guide base. Then slide t he edge guides to the
middle of the paper guide. Li ft the c enter section of the paper
guide up and la y it flat.
2-30
Printing on Continuous Paper
Never use the knob to remove sla ck in t h e paper or to
adjust the top-of-form position ; this may damage the
printer or cause it to lose the top-of-form position.
❏
Always remove any slack from the paper; otherwise print
quality may be reduced.
Page 79

11. Attach the printer cover and close the p aper guide cover.
Note:
The printer cannot print when the printer cover is open.
12. You may need to check and change the printer driver settings
as described in Chapter 4. Then send a print job to the printer.
The printer starts printing from the current position without
advancing the paper. The printed pages are fed over the paper
guide toward the back of the printer.
13. After you finish printing , open the paper guide cover; the n
tear off the printed document at the perforation nearest the
paper exit slot.
To remov e the paper from the tractors , fo llow the steps under
“Removing the paper from the pull tractor” on page 2-28.
Removing the pull tractor
To remove the tract or from the pul l position, fo llow these steps:
2
1. Remove any paper loaded on the pull tractor as described on
page 2-28.
2. Turn off the printer. Then remove the printer cover and lift
the paper g uide up and off th e p ri nter.
Printing on Continuous Paper
2-31
Page 80

3. Press the tractor’s lock tabs, tilt the tractor towa rd you, and
lift it off the printer.
4. Store the tractor in a safe place, or install it in the front push
position as described on page 2-12.
5. To repla ce the paper tensio n unit, lower it onto the printer’s
mounting pegs . Then pres s do w n b o th e nds of the unit unti l
it clicks into place.
2-32
Printing on Continuous Paper
Page 81

6. Replace the paper guide base and the printer cover. Then close
the paper guide cover.
Loading Multi-Part Forms
You can use carbonless multi-part forms of up to seven parts (six
copies i n a ddition to the original). Make sure you se t the paper
thickness lever to the proper position based on the number of
layers in your form.
For best results with thick paper, such as multi-part forms, select
a straight or almost straight paper path. It is best to load multipart forms using:
❏ the front slot and the front push tr actor
❏ the front o r bottom slot an d the pull tractor
Except fo r se tting the paper thickness lever, you load multi- part
forms th e same way you loa d ordinary continuous paper. For
details, see the sections on loading continuous paper earlier in this
chapter.
Note:
❏
Be sure your multi-pa rt forms do not exceed 0.46 mm (0.018 i nches)
in thickness for the printable area and 0.9 mm (0.035 inches) for the
perforated edges.
2
❏
Use multi-part forms only under normal temperature and humidity
conditions, as follows:
Temperature 15 to 25 °C (59 to 77 °F)
Humidity 30 to 60% RH
❏
Do not load paper that is dama ged, curled, or wrinkled.
Printing on Continuous Paper
2-33
Page 82

Loading Continuous Paper With Labels
When printing on labels, use only the type of labels that are
mounted on continuous ba cking sheets with sprocket holes for
use with a tractor feeder. Do not try to print on single sheets with
labels because the printer may not feed labels on a shiny backing
sheet properly.
Thick paper, such as continuous paper with labels, requires a
straight or almost straight paper path. You can load labels in the
front (push tractor or pull tr actor) or bottom (pull tractor) paper
slot; however, for best results, use the tractor in the pull position
and load paper in the front or bottom paper slot.
You load labels the same way you load ordinary continuous
paper, except you must s e t the paper thickness lever to 2 before
printing on labels. See “Loading paper onto the pull tractor” on
page 2-23 for more information.
2-34
Printing on Continuous Paper
Page 83

c
Caution:
❏
Do not load continuo us p aper with labels in the rear paper
slot because the paper path from the rear slot is curved; labels
may come off their backing sheet inside the printer and cause
a paper jam.
❏
Never use the tear-off feature (by pressing the
button or turning o n t he auto tear-off mode as described in
“About Your Printer’s Default Settings” in Chapter 5) to
feed continuous paper with labels backward; they may come
off their backing sheet an d jam the printer.
❏
Because labels are sensitive to temperature and humidity, use
them only under normal operating conditions, as fol lows:
Temperature 15 to 25 °C (59 to 77 °F)
Humidity 30 to 60% RH
❏
Do not load co ntinuous paper with labels that is damaged,
curled, or wrinkled.
❏
Do not leave labels lo aded in the printer between jobs; they
may curl around the platen and jam when you resume
printing.
Tear Off/Bin
2
Printing on Continuous Paper
2-35
Page 84

Removing continuous paper with labels
To avoid peeling labels off the backing sheet and jamming the
printer, f oll ow the steps below when you remove continuous
paper with la be ls from the printe r.
1. Tear off the supply of continuous labels at the perforation
nearest the paper entry slot.
2. Hold down the
the printer .
Caution:
c
2-36
Never press the
backward, labels can easily come off the backing sheet and cause
a paper jam.
Printing on Continuous Paper
LF/F F
button to eject the remaining labels from
Load/Eject
Tear Off/Bi n
or
button. When fed
Page 85

Switching Between Printing on Continuous Paper
and Printing on Single Sheets
You can easily switch back and forth between printing on
continuous paper with a push tractor an d printing on single
sheets without having to remove or reload the continuous paper.
Switching to printing on single sheets
To switch from printing on cont inuo us paper with the rear or
front push tractor to printing on single sheets, follow these steps:
Note:
❏
If continuous paper with labels is loaded in the prin ter, remove it
before switching to sin gl e-sheet printing. See “Removing
continuous paper with labels” on page 2-36.
❏
If a tractor is in the pull position, remove any continuous paper from
it before switching to single-sheet printing. See “Removing th e
paper from the pull tractor” on page 2-28.
2
1. If any printed pages remain in the printer, press the
Bin
button to advance the paper to the tear-off position. Then
tear off the printed pages.
Caution:
❏
c
Tear off your printed d ocument before you press the
Load/Eject
several pages at a time may cause a p aper jam.
❏
Never use the knob to eject paper while the printer is on;
this may damage the printer or cause it to lose the tearoff positi on.
button in the next step. Reverse feeding
Printing on Continuous Paper
Tear Off/
2-37
Page 86

2. Press the
backward to the standby position. The paper is still attached
to the push tractor but is n o longer in the pape r path.
3. Load single sheet s in the top or front paper guide as described
in Chapte r 3.
Load/Eject
button to feed the continuous paper
Switching to printing on continuous paper
To switch from printing on single sheets to printing on continuous
paper with the front or rear push tractor, follow these steps:
1. If a single sheet remains in the pr inter, press th e
button to eject it.
Caution:
c
2. Make sure that the tractor is installed in the front or rear push
position. To install the tractor in the front position, see
“Reinstalling the tractor in the front push position” on page
2-19 .
3. Load continuous pape r onto the front or rear push trac tor as
describe d earlier in thi s chapter.
The printer loads your continuous paper automatically when you
begi n pr i n ting.
Never use the knob to eject paper while the printer is on; this
may damage the printer or ca use it to lose the top-of-form
position.
Load/Eject
2-38
Printing on Continuous Paper
Page 87

Adjusting the Top-of-For m Position
The top-of-form position is the position on the page where the
printer sta rts printing. If your printing appears too high or low
on the page, you can use the mi cro adjust feature to adjust t he topof-form position. Follow these steps:
Caution:
c
Note:
❏
❏
1. Make sure the printer is turned on .
2. If necessary, load paper as described earlier in this chapter. If
Never use the knob to adjust th e to p-of -form p osit ion ; this m ay
damage the printer or cause it to lose the top-of-form position.
Your top-of-form position setting remains in effect until you change
it, even if you turn off the p r inter.
The top margin setting made in some application software overrides
the top-of-form position setting you make with the micro adjust
feature. If necessary, adjust the top- of-form p osition in your
software.
you load paper onto a pus h tractor, press the
button to ad vance the pap er to the current top-of-form
position.
Load/Eject
2
3. Lift the printer cover up and off the printer.
4. Hold down the
Pause lig ht starts flas hing and the printer enter s the micro
adjust mode.
Pause
button for about three se conds. The
Printing on Continuous Paper
2-39
Page 88

D
5. Press the
on the page, or press the
top-of-form position down on the page.
LF/FF
button to move the top-of-form position up
Load/Eject
U
button to move the
Caution
c
Note:
❏
Never use the knob to adjust the top-of-form position; this
may damage the printer or ca use it to lose the top-of-form
position.
plastic ribbon
cover
The printer has a minimum and a maximum top-of-form
position. If you try to adjust it beyond these limits, the printer
beeps and stops moving the pa p er.
:
2-40
❏
When the paper reaches the default to p -o f-form position, the
printer also beeps and stops moving the paper briefly. You can
use the default setting as a referenc e point when adjusting the
top-of-form positio n .
Printing on Continuous Paper
Page 89

To adjust the top-of-form position for continuous paper
loaded on the pull tractor, see the following example:
First mark a point 6.5 mm ( 0.26 inches) above the paper’s
perforation; then position the paper so that the mark is even
with the top edge of the plastic ribbon co ver. This gives you
an 8.5 mm (0.33 inches) m argin on the next page, meaning the
printer sta rts printing 8.5 mm (0.33 inches) below the
perforation. If you mark a point 5.5 mm (0.22 inches) above
the perforation, you get a 9.5 mm (0.37i nches) margin on the
next page.
2
6. After you set the top-of-form position, press the
to exit micro adjust mode.
Printing on Continuous Paper
Pause
button
2-41
Page 90

Advancing the Paper to the Tear-Off Edge
If you use the front or rear push tractor, you can use the tear-off
feature to advance your continuous paper to the printer’s tear-off
edge when you finish printing. You can then easily tear off the
printed document. When you resume pri nting, the printer
automatically feeds the paper back to the top-of-form position so
that you c an save the pa per normally lost between documents.
As described below, you can use the tear-off feature in two ways:
manually by pressing the printer’s
automati cally by turning on the auto tear-off mode.
If the perforation betwe en pages is not aligned with the tear-off
edge, you can adjust the position of the perforation using the
micro adjust featu re. See “Adjusting the tear-off position” on page
2-43.
Cauti on:
c
Never use the tear-off feature (by pressing the
button or turning on th e auto tea r-o ff m od e as described below)
to feed continuous paper with labels backward; they may come off
their backing sheet and jam the printer.
Tear Off/Bin
button, or
Tear Off/Bin
Using the Tear Off/Bin button
After the printer finishes printing your document, check that the
Tear Off/Bin lights are not flashing. Then press the
button. The printer advances the paper to the tear-off edge.
Note:
If the Tear Off/Bin lights are flashing, the paper is in the tear-off position.
If you press the
to the next top-of-form position.
2-42
Printing on Continuous Paper
Tear Off/B in
button again, the printer feeds your paper
Tear Off/Bin
Page 91

Advancing the paper to the tear-off position
automatically
To automatically advance your printed documents to the tear-off
position, you need to turn on the auto tear-off mode and select
the appropriate page length for continuo us paper in th e de faultsetting mode. For instructions, see “Changing de fault settings”
on page 5-9.
When au to tear-off is on, the printer au tomatically advances the
paper to the tear-off position whenever it receives a full page of
data or a form feed command fo llowed by no more data .
Adjusting the tear-off position
If your paper’s perfor ation is not ali gned with the tear-off edg e ,
you can use the micro adjust feature to move the perforation to
the tear- of f position. F ollow these step s:
Caution:
c
Never use the knob to adjust th e tea r-o ff p osition; this may
damage the printer or cause it to lose the tear-off position.
2
Note:
Your tear-off position setting remains in effect until you change it, even
if you turn off the pr inter.
1. Make sure the
the current tear-off position). You may need to press the
Off/Bin
2. Open the paper guide cover.
3. Hold down the
Pause light begins flashi ng and the printer enters the micro
adjust mode.
button to advance the paper to the te ar-off position.
Tear Off/Bin
Pause
button for about three se conds. The
light s are fl ash ing (t he pap er is a t
Tear
Printing on Continuous Paper
2-43
Page 92

D
4. Press the
the
LF/FF
Load/Eject
button to feed the paper backward, or press
U
button to feed the paper forward, until the
paper perf or ation is aligned with the tear-off edge.
tear-off edge
Note:
The printe r has a mi nimum and a maximum tea r-off po sition. If you
try to adjust the tear-off position beyond these limits, the pri nter
beeps and stops moving the pa p er.
5. After you set the tear-off position, press the
Pause
turn off the micro adjust mode.
6. Tear off the printed pages.
When yo u resume printing, the printer automati cally feeds the
paper back to the top- o f-form position and begins printing.
2-44
Printing on Continuous Paper
button to
Page 93

Chapter 3
Printing on S ing le S heets
Using Single Sheets . . . . . . . . . . . . . . . . . . . . . . . . . . . . . . . . . . . . . . . 3-2
Available paper types and paper slo ts . . . . . . . . . . . . . . . . . . 3-2
Loading single-sheet multi-part forms . . . . . . . . . . . . . . . . . . 3-4
Loading envelopes . . . . . . . . . . . . . . . . . . . . . . . . . . . . . . . . . . . 3 -6
Loading postcards . . . . . . . . . . . . . . . . . . . . . . . . . . . . . . . . . . . 3-7
Loading Single Sheets in the Top Paper Slot. . . . . . . . . . . . . . . . . . 3-8
Loading Single Sheets in the Front Paper Slot . . . . . . . . . . . . . . . .3-11
3
Printing on Single Sheets
3-1
Page 94

Using Sin gle Sheets
Available paper types and paper slots
As shown below, you can load single-sheet paper one sheet at
a time using the paper guide on top of th e printer or the front
paper guide. You can print on ordinary single s heets, single-sheet
multi-part forms, postcards, and envelopes. Your single-sheet
paper may be from 100 to 257 mm (3.9 to 10.1 in.) wide.
Note:
❏
To load a stack of single-sheet pa p er, use the o ptio nal cut-sheet
feeder. See Appendix A, “Enhancing Your Printer With Options”.
❏
For detailed specifications on the types of single-sheet paper you can
use, see Appendix C.
top paper slot
3-2
front paper slot
Printing on Single Sheets
Page 95

The table below shows the types of paper you can load in the top
and front paper slots and the paper thickness lever setting for each
paper type. For more info rmation on the pa per thickness lever,
see “Setting the Paper Thickness Lever” on page 2-4.
Paper type Available
Ordinary single-sheet paper Top and front -1 or 0
Multi-part forms (carbonless)
2 parts (original + 1 copy)
3 parts (original + 2 copies)
4 parts (original + 3 copies)
5 parts (original + 4 copies)
6 parts (original + 5 copies)
Postcards Top and front 3
Envelopes Top 4 or 5
paper slots
Top and front
Paper thickness
lever position
1
3
4
5
6
Note:
❏
If the printed image is smeared , y ou may need to set the paper
thickness lever one positio n h ig h er to im p r ove p r int quality.
❏
If the printed image is faint or has many gaps, you may need to set
the paper thickness lever one position lower to improve print quality.
❏
Do not load paper that is dama ged, curled, or has been folded.
3
Printing on Single Sheets
3-3
Page 96

Loading single-sheet multi-part forms
You can load single -sheet multi-part fo rms one at a time in the
top or front paper slot as described in “Loading Single Sheets in
the Top Paper Slot” on page 3-8 or “L oadin g Single Sh eet s in t he
Front Paper Slot” on page 3-11. Be sure to follow these guidel ines:
❏ Use only carbonless multi-par t forms bound as shown below.
fastened only at the
top by line gluin g
fastened only at the
side by line gluing
❏ You can use the top or front paper slot to load single-sheet
multi-part forms that are fastened at the top.
Insert the of form in the top slot, bound ed ge first and the
printable side down, as shown below.
printable side down
3-4
Printing on Single Sheets
Page 97

Insert the of form in the front slot, bound edge first and
printable side up, as shown below.
printable side up
❏ You can load s in gle-s heet multi-part forms b ound at t h e s ide
only in the front slot. Insert the of form in the front slot, top
edge first and printable side up, as shown below.
3
printable side up
❏ Before printing, set the paper thickness lev e r (l ocated under
the printe r cover) to the proper positio n for your paper. S e e
the table on page 3-3, for deta i ls.
❏ Be sure your multi-part forms do not exceed 0.46 mm (0.018
inches) in thickness.
❏ Use mult i- part forms only under normal temperature and
humidity cond itions , as follows:
Temperature 15 to 25 °C (59 to 77 °F)
Humidity 30 to 60% RH
Printing on Single Sheets
3-5
Page 98

Loading envelopes
You can load envelopes in the top paper slot only, as described in
“Loading Single Sheets in the Top Paper Slot” on page 3-8. Also
follow these guidelines:
❏ Load envelopes one at a time in the top slot, with the fla p fold
first and th e fl a p side up.
flap side up, printable
side down
❏ Set the paper thickness lever (located under the printer cover)
to position 4 or 5 to match the thickness of the envelope.
❏ Before pr i nting, turn on the card mo de by pressing the
Tear Off/Bin
button until both
Tear Off/Bin
lights are on.
After you fi nish pri nting on envelo pes, pr ess the
button once to exit the card mode. (Bin 1of the optional cutsheet feeder is selected.)
❏ Do not use envelopes that are curled or folded. Also avoid
using envel o pes that are to o thin; they may curl during
printing and b ecome jammed.
❏ If you are using No. 6 envelopes, align the left edge of the
envelope wi th the arrow mark on the prin ter.
3-6
Printing on Single Sheets
Tear Off/Bin
Page 99

❏ Use envelopes on ly under normal temperat ure and humidity
con ditio ns, as follows:
Temperature 15 to 25 °C (59 to 77 °F)
Humidity 30 to 60% RH
Caution:
c
Because pri nting on the edge of an envelope may da mage the prin t
head, make sure the printing stays entirely within the printable
area of your envelopes. See Appendix C for details on the printable
area of envelopes.
Loading postcards
You can load postcards one at a time in the top or front paper
slot as described in “Loading Single Sheets i n the Top Paper Slot”
on page 3-8 or “Load ing Single Sh eets in the F ront Paper Slot” on
page 3-11. Also follow these guidelines:
❏ When yo u ar e loa di ng po st car ds long edge fi rst , alw ay s lo ad
them in the top slot.
3
❏ Set the paper thickness lever (located under the printer cover)
to position 3.
Printing on Single Sheets
3-7
Page 100

❏ Before printing, turn on the card mode by pressing the
Tear Off/Bin
After you finish printing on postcards, press the
button once to exit the card mode. (Bin 1 of the optional cutsheet feeder is selected.)
❏ Use postcards on ly under normal t emperature and h umidity
conditions, as follows:
button until both
Temperature 15 to 25°C (59 to 77°F)
Humidity 30 to 60% RH
Tear Off/Bin
lights are on.
Tear Off/Bi n
Loading Single Sheets in the Top Paper Slot
To load paper in the top slot, follow these steps:
1. Make sure the paper guide base is installed properly. If not,
attach it as described on page 1-12.
2. Open the paper guide cover. Slide the left ed ge guide unti l it
locks in place next to the arrow on the paper guide. Next
adjust the right edge guide to match the width of your paper.
3-8
Printing on Single Sheets
 Loading...